How to Slip Stitch Crochet?
The humble crochet slip stitch is the unsung hero of any project. Not only does it serve as the foundation for joining disparate parts together, but it’s also a versatile tool for adding decorative flourishes to your creations. To master this fundamental stitch, begin by inserting your hook into the fabric and wrapping the yarn around it. Next, pull up a small loop and bring it through the worked loop on your hook, effectively completing the stitch. Whether you’re binding off a quilt or connecting separate pieces of a larger work, slip stitching is an indispensable skill to have in your crochet toolkit. As you embark on your next creative journey, don’t overlook the crucial role that slip stitches play in helping you bring your designs to life with precision and flair.
What is slip stitch?
The humble slip stitch is a fundamental building block in crochet, utilized in a wide range of projects. Its unique characteristic is its ability to produce a neat and compact seam that can be worked either flat or in the round. To execute this stitch, simply insert your hook into the loop on the row below, yarn over, and then draw the working yarn through both loops on the hook simultaneously. This versatile stitch not only serves as a means of joining rounds in a project, typically at the end of each round, but also finds application in edging and decorative work alike.
Why do you slip a crochet stitch?
When it comes to crochet, slipping stitches is a crucial technique that allows you to seamlessly transition between rows or patterns. By sliding a stitch instead of working it into the fabric, you can achieve a smooth edge, reduce the overall number of stitches, or add decorative elements like scalloped edges and textured designs. This subtle yet effective maneuver enables you to maintain consistency and create a polished finish in your projects. Mastering this technique is essential for producing high-quality crochet pieces that showcase your skills.
What is a slipknot in crochet?
Mastering the art of creating slip knots is a crucial step in every crocheter’s journey. This fundamental technique allows you to begin your project, attach yarn to your hook, and even join pieces together seamlessly. Whether you’re binding off stitches, changing colors, or working with multiple pieces, the humble slip knot proves its versatility time and again. It’s an essential skill that every crochet enthusiast should have in their repertoire.
Is slip stitch the same as single crochet?
While slip stitch and single crochet may share some similarities, they are distinct crochet stitches with unique functions. The slip stitch is the shortest of all crochet stitches, typically employed to join pieces together or conclude a round. In contrast, the single crochet is one of the most widely used stitches in crochet, yielding a tight, dense fabric suitable for a range of projects. Both stitches play crucial roles in crochet, but they are not interchangeable terms. Rather, each has its own specific purpose and application.
How do you work a slip stitch?
In the world of crochet, a slip stitch is a fundamental technique that’s easy to master. To execute it, insert your hook into the next stitch, then yarn over and draw the loop back through both loops on your hook. This versatile stitch can be used to seamlessly join two pieces of crochet fabric together, or to navigate up or down within a single piece without adding height. Slip stitches are also excellent for creating clean edges on crochet projects or incorporating textured details, making them an essential tool in any crocheter’s toolkit.
How to continue a row of slip stitches?
To continue a row of slip stitches, start by inserting your hook into the next stitch. Next, yarn over and draw the yarn through both loops on the hook. This process should be repeated until you’ve reached the desired number of stitches in the row. It’s essential to maintain consistent tension as you work from left to right. The result is a fabric that provides elasticity, making it perfect for many projects. With this technique, you’re free to get creative and enjoy the process!
How to join a chain ring with a slip stitch?
To seamlessly unite two chain rings with a slip stitch, initiate the process by inserting your hook into the first ring and pulling up a loop. Next, thread your hook through both loops of the second chain ring, securing another loop. Yarn over and draw through both loops to create a secure slip stitch. Continue this sequence until the joined connection is sturdy and reliable, then finalize the join by fastening off. This versatile technique enables you to securely connect any two chain rings for a range of creative projects.
How to start a slip stitch?
To initiate the slip stitch, begin by forming a chain of stitches before inserting your hook into the second chain from the hook. Next, wrap the yarn over the hook and pull it through both loops on the hook. This marks the completion of your initial slip stitch. To continue, simply repeat this process for each subsequent stitch, ensuring that you always enter the second chain from the hook to maintain uniformity in your stitches. The slip stitch is a versatile technique that can be used not only to join rounds but also as a decorative edge, adding visual interest to your project.
Why do you use slip stitch?
Slip stitches are a fundamental technique in crochet that offers a range of creative possibilities. Their versatility is showcased by their use in joining pieces together, creating a clean edge on a finished piece, and subtly increasing or decreasing the number of stitches. Moreover, slip stitches can be employed to add visual interest and texture to projects, making them an essential tool for any crocheter. What’s more, this technique allows for the creation of delicate and lightweight items, such as lacy doilies, perfect for showcasing intricate designs. With ease of mastery and efficiency in their application, slip stitches are a valuable asset for any crochet enthusiast.
How to make a ring with a slip stitch?
Crafting a slip stitch ring is a breeze. Begin by creating a foundation chain of 4 stitches. Next, join the chain with a slip stitch to form a loop. From there, work 8 additional single crochet stitches into the loop and secure them with another slip stitch, connecting it back to the starting point. Once you’ve completed the ring, bind off your stitches and tidy up any stray ends by weaving them in.
What stitch to use to join a round?
In crochet, the choice of stitch used to join rounds depends on the specific project being worked on. For most projects, a slip stitch is a popular and practical option as it provides an easy and invisible way to transition from one round to the next. However, for certain types of projects such as amigurumi toys or small stuffed animals, an invisible decrease stitch may be preferred in order to create a cleaner finish. If you’re unsure which stitch to use, consulting a pattern or tutorial specific to your project can provide valuable guidance and help ensure a professional-looking result.
How to mark a pattern with yarn?
To ensure consistency and accuracy in your knitting or crochet project, it’s essential to mark patterns effectively. One method is to tie a length of yarn in a visible color around the needle, making it easy to identify the spot as you work through the pattern. Alternatively, you can place a stitch marker on the needle for added clarity. By doing so, you’ll be able to maintain the integrity of your design with each stitch. Another approach is to jot down the number of stitches at the marked point, providing a written reference to double-check against as needed. Regardless of the method you choose, marking your pattern will guarantee that every stitch is accounted for and your final product turns out as intended.
Do you need to slip stitch a pattern?
Slip stitching is a fundamental technique in many sewing patterns, serving two primary purposes: finishing off edges and joining separate fabric pieces together. To execute this method, you’ll thread the yarn through both the front and back loops of each stitch, then gently pull it tight to secure the stitches. This versatile technique can also be employed for decorative elements like lacing or creating a chain stitch. With some practice, mastering slip stitching becomes an achievable goal.
When to use slip stitch?
The humble slip stitch is a crochet staple that offers an impressive range of applications. Its simplicity belies its versatility, making it an essential tool for joining rounds, finishing edges and seams, and even adding decorative textures to projects. This basic stitch is also a great way to introduce subtle changes in color or texture without significantly altering the overall design. Whether you’re working with granny squares, edging blankets and scarves, or attaching appliques, slip stitches provide the perfect solution for these tasks. Its ease of use and adaptability make it an indispensable resource for crocheters looking to tackle a wide range of projects.
What is the skill of slip stitch?
Slip stitch is a fundamental hand-sewing technique that serves as the building block for various fabric manipulation techniques, including joining two pieces of fabric together, creating hems, or adding decorative embellishments. This straightforward and efficient stitch demands precision and patience as you insert the threaded needle between the two fabrics, allowing it to slide up through the loop of thread before pulling it taut. While not particularly challenging, slip stitching requires a steady hand and keen eye for detail. The end result is often stunningly beautiful, making it a popular choice in quilting, home decor, and other sewing projects. As an essential stitch for any novice sewist, mastering the slip stitch can elevate your skills and open up new possibilities in the world of sewing.
How to slip stitch with a needle?
To begin, thread your needle and pass it through the fabric, creating a small loop. Then, insert the needle back into the same place, but this time pull it out slightly further away from the starting point. Continue repeating this process until you’ve achieved the desired length of stitches. It’s essential to maintain a consistent tension while stitching to avoid puckering the fabric. As you become more comfortable with the technique, you can use slip stitching to join seams or add decorative details to your garments.
What is the stitch that goes back and forth between the folds?
In the world of sewing, there’s a stitch that plays a crucial role in creating seamless joins – the slip stitch. Also known as a backstitch, this technique involves alternating between the folds to create a secure and invisible bond. Slip stitches are particularly useful when working with hems, cuffs, and small seams, allowing for a neat and tidy finish. Moreover, they can be employed to reinforce edges or join two fabric pieces together without visible signs of stitching. The beauty of slip stitches lies in their simplicity – requiring only a few looped stitches, making them an excellent choice for novice sewers looking to hone their skills.
How to Crochet the Purl Slip Stitch
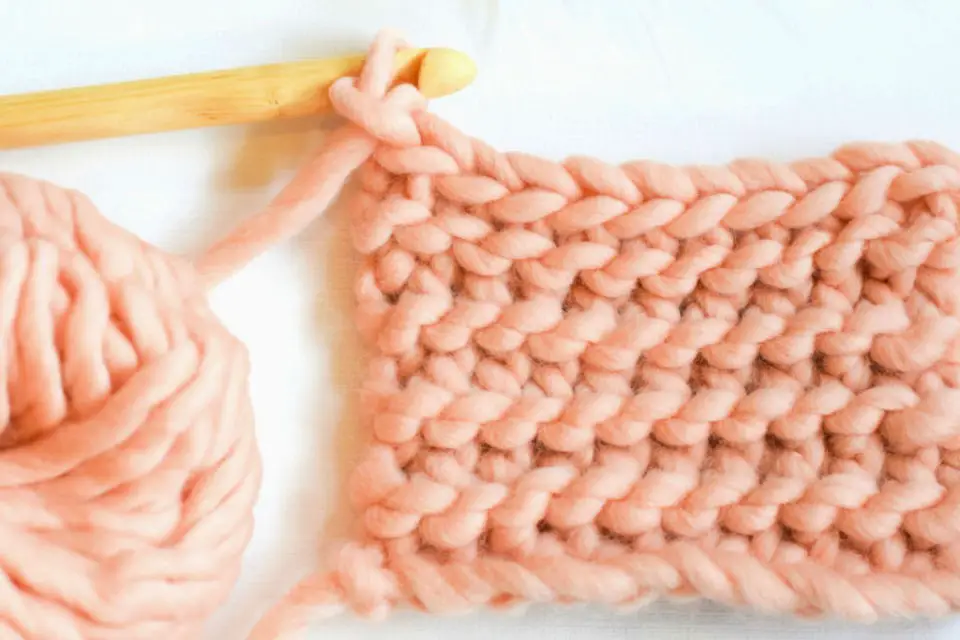
The humble slip stitch is a fundamental component in many crochet projects, requiring minimal effort yet producing impressive results. This straightforward stitch can be used to create a fabric that serves as a foundation for various crochet pieces. With your favorite yarn and a large hook at the ready, you can work up loose stitches with ease, achieving the perfect texture for your next project. For a comprehensive guide on how to achieve this look, visit mamainastitch.
Slip Stitch Crochet Fabric Pattern
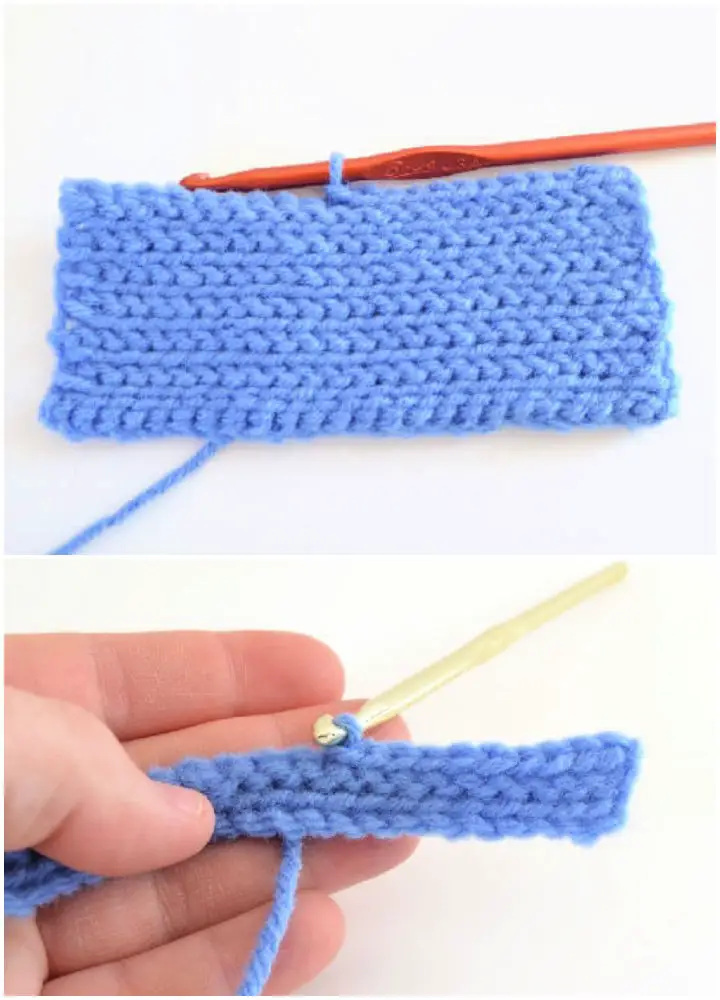
Crocheting offers a delightful experience as it allows you to craft a wide range of cozy winter essentials on your own. One such project is creating a plush crochet fabric using the slip stitch technique, which can be accomplished with ease and enjoyment at home. By repeating the slip stitch pattern and building up rows, you can create a thick, layered fabric that lends itself perfectly to crafting items like scarves, hats, and more. For further details on this engaging project, please visit dreamalittlebigger.
Crochet Slip Stitch Baby Booties Pattern
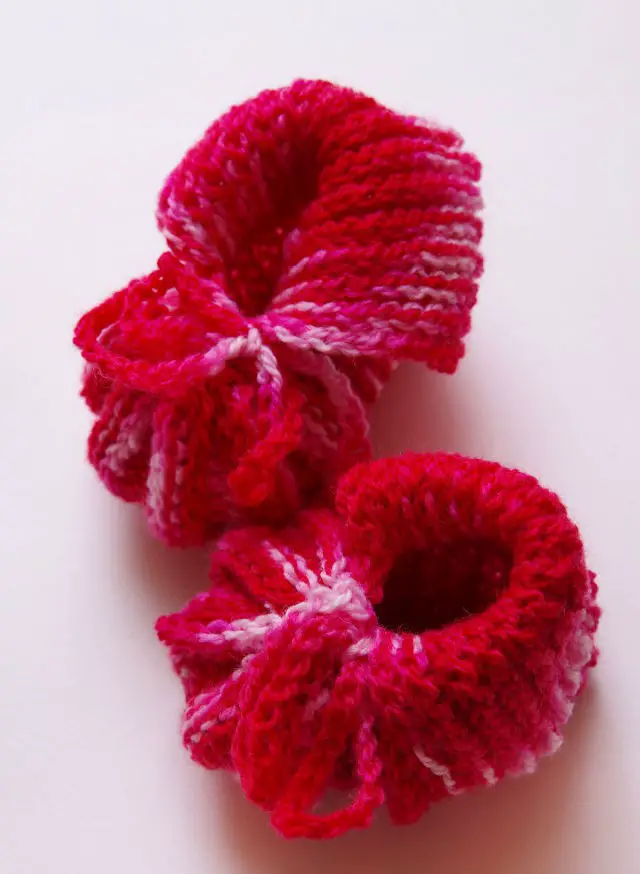
The slip stitch is a versatile technique that can be used to create a wide range of crochet projects, from adorable baby booties to cozy accessories for yourself and your loved ones. In fact, the slip stitch plays a crucial role in the creation of these charming baby booties, which feature a shaded yarn color palette and a seamless, effortless execution. For those interested in mastering this stitch pattern, I recommend exploring its intricacies on Ravelry or a similar online resource to gain a deeper understanding of how to incorporate it into your crochet repertoire.
Free Crochet Classic Hat Pattern
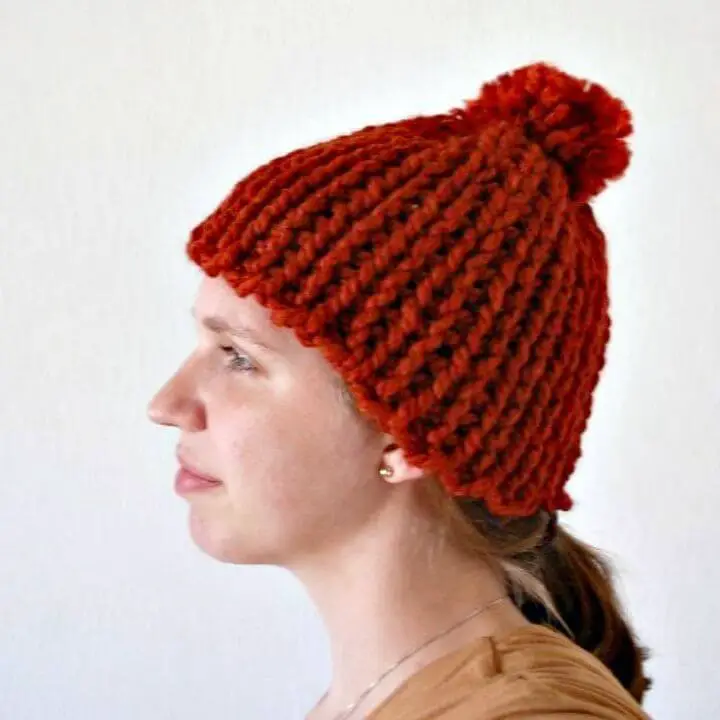
With minimal effort, you can create this adorable hat’s fabric at home using the slip stitch technique. To achieve the desired outcome, you’ll need a few larger crochet hooks and a repeating pattern of stitches after each row. The result will be a simple yet charming hat that’s sure to turn heads, complete with a playful pom-pom adding a touch of whimsy.
Crochet Slip Stitch Beanie Pattern
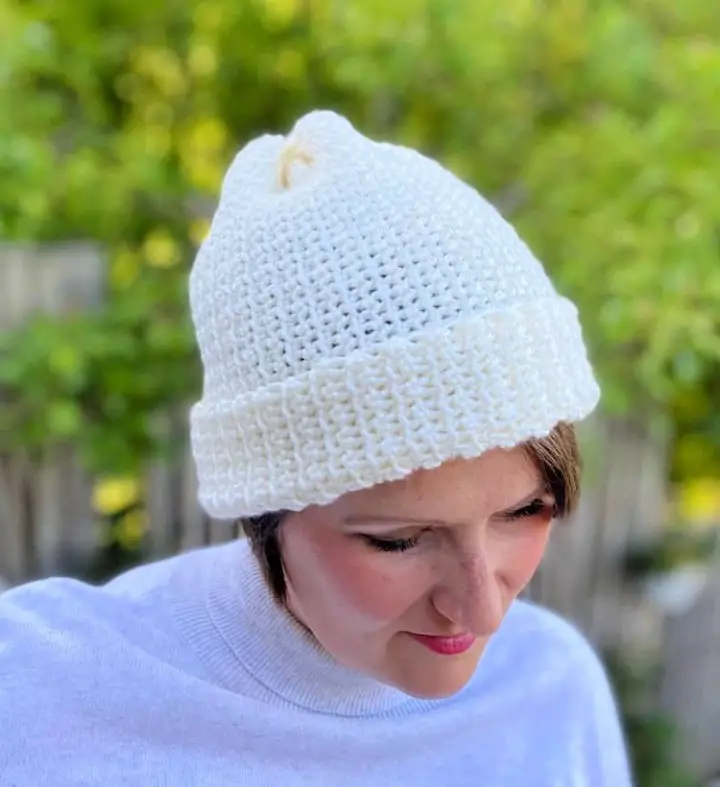
Winter has arrived, and what better way to stay warm and cozy than with a functional crochet slip stitch beanie? To create this stylish and practical hat, you’ll need some basic crochet supplies – specifically, yarn and a big-sized hook. The beauty of the slip stitch technique lies in its simplicity and fun factor. With easy-to-follow instructions and detailed guidance from Hanjan Crochet, you can master this versatile skill and craft your very own winter beanie.
Crochet Wrist Socks Bracelet
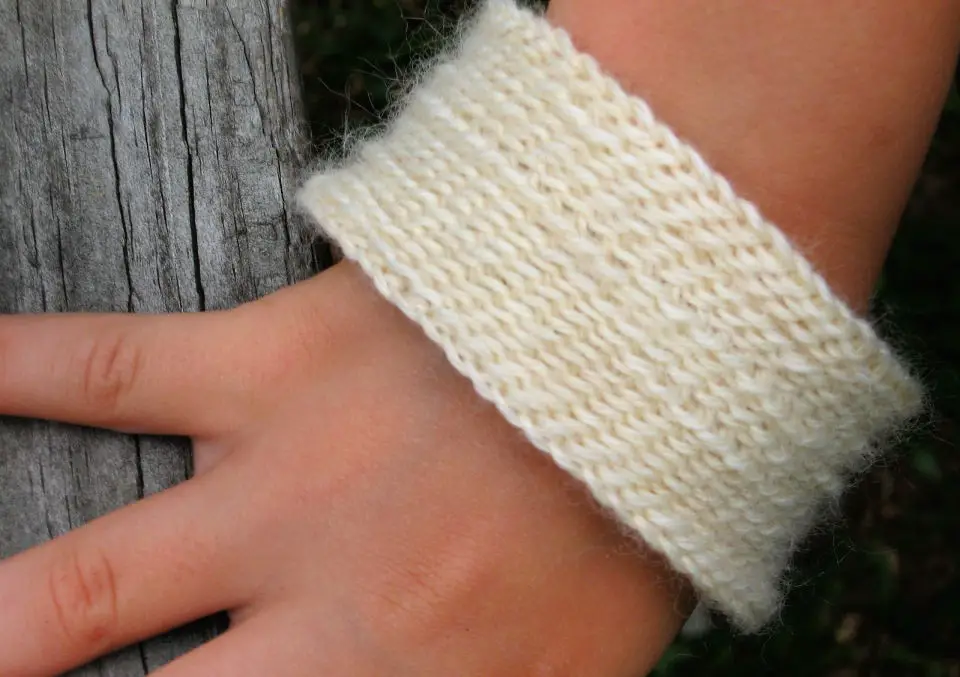
When your stash basket is overflowing with colorful yarn, it’s a great opportunity to repurpose those scraps into something functional and stylish. One idea is to use them to crochet wrist socks that can add a pop of color and warmth to your winter wardrobe. To create these cozy accessories, you’ll need to master the slip stitch pattern, which will allow you to customize the size and texture of your finished project. For step-by-step instructions on how to bring this project to life, check out the detailed pattern on Ravelry.
Crocheted Ribbed Hat Pattern
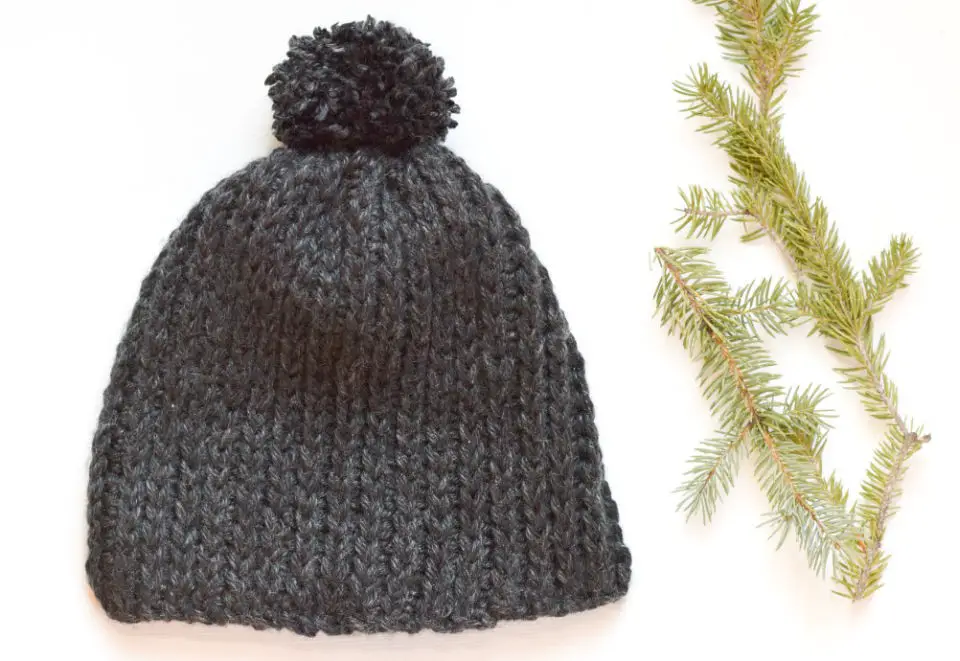
With a completed crochet fabric in hand, you can transform it into a plethora of cozy creations – think scarves, hats, or shrugs. One such project involves crafting a thick and warm hat using the slip stitch technique. To achieve this, you’ll need your preferred yarn and a large-sized hook to work the stitches. The result will be a flexible fabric with a knit-ribbed texture that’s perfect for keeping you warm during the cold winter months.
Crochet Looks Like Knit Ribbed Sandal Socklet
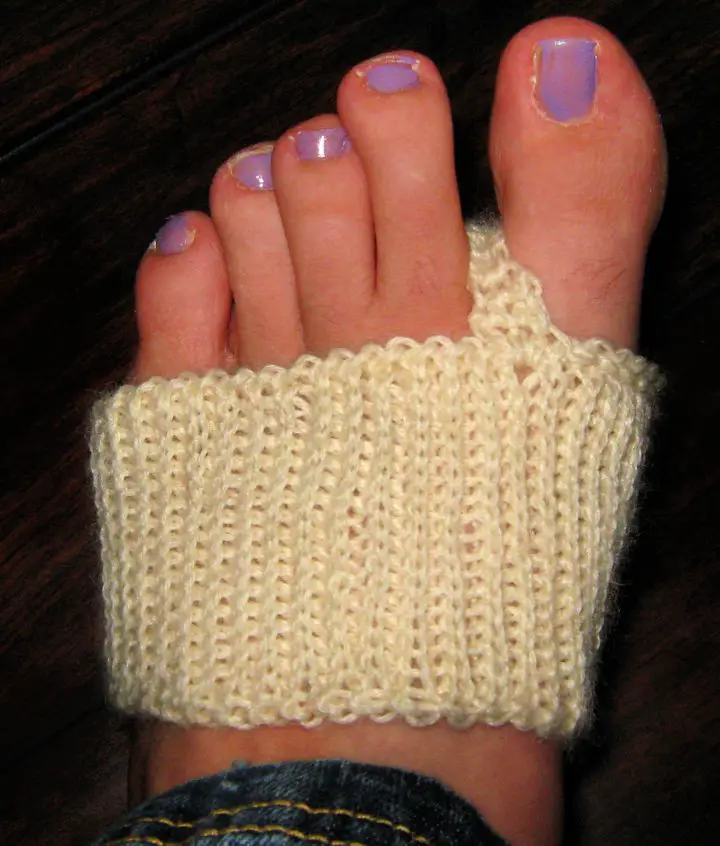
The adorable crochet socklets are an excellent way to add a touch of whimsy to your summer footwear. Not only can they be paired with sandals or flip-flops, but they’re also perfect for lounging around the house, keeping toes cozy and warm. To bring this charming project to life, we’ll rely on the slip stitch technique to achieve the ideal fabric. For those interested in learning more about the process, a detailed guide is available on Ravelry.
Slip Stitch Crochet Ribby Slouch Pattern

When it comes to creating a crochet fabric, the slip stitch is a fundamental technique that produces a knit-ribbed pattern. To take it to the next level, you can double up on the slip stitches to create an even more textured and visually appealing design. By working multiple rows of double slip stitches, you’ll be able to achieve a fabric with pronounced ribs that adds depth and interest to your finished project. This technique is particularly well-suited for creating unique and eye-catching accessories, such as hats. By mastering the double slip stitch, you can create a one-of-a-kind hat that’s sure to turn heads.
Slip Stitch Preemie Beanie Crochet Pattern

With a few simple tools and some colorful yarn, you can create an adorable hat for your little ones that’s not only fun to crochet but also has the potential to spread joy to others. By making this easy-to-craft hat at home, you can not only gift it to your own children but also consider donating some to hospitals or other organizations where a small act of kindness can bring big smiles. All you’ll need is some bright and cheerful yarn, sturdy crochet hooks, a basic slip stitch pattern, and a bit of stretchy fabric to complete the look. Once you have these essentials in hand, you can grab the free pattern and get started on making your custom-sized hat today.
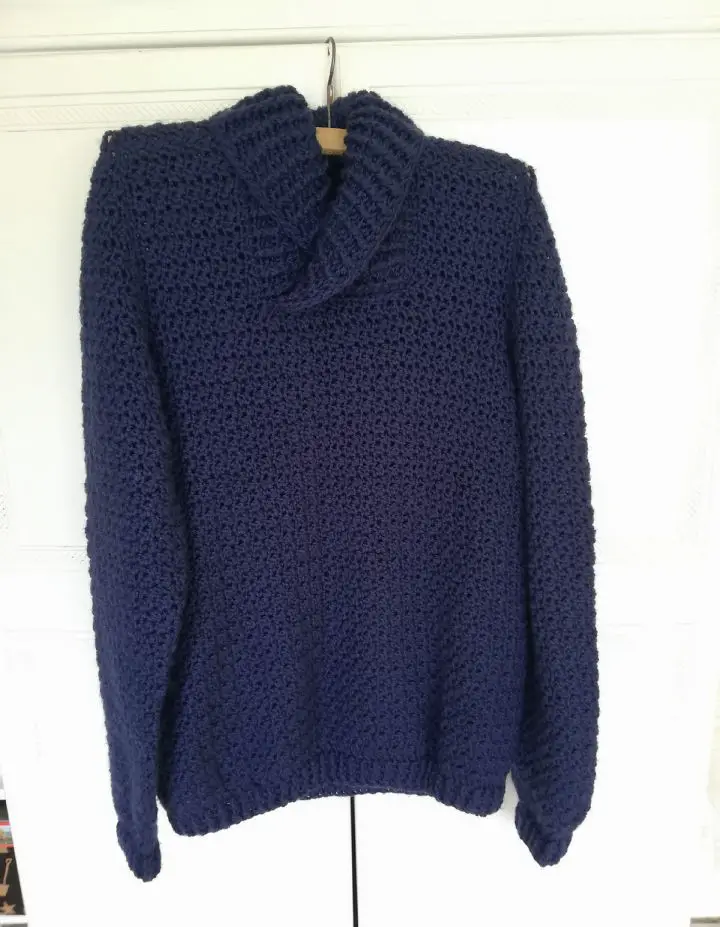
Crochet Cowl Neck Top – Free Pattern
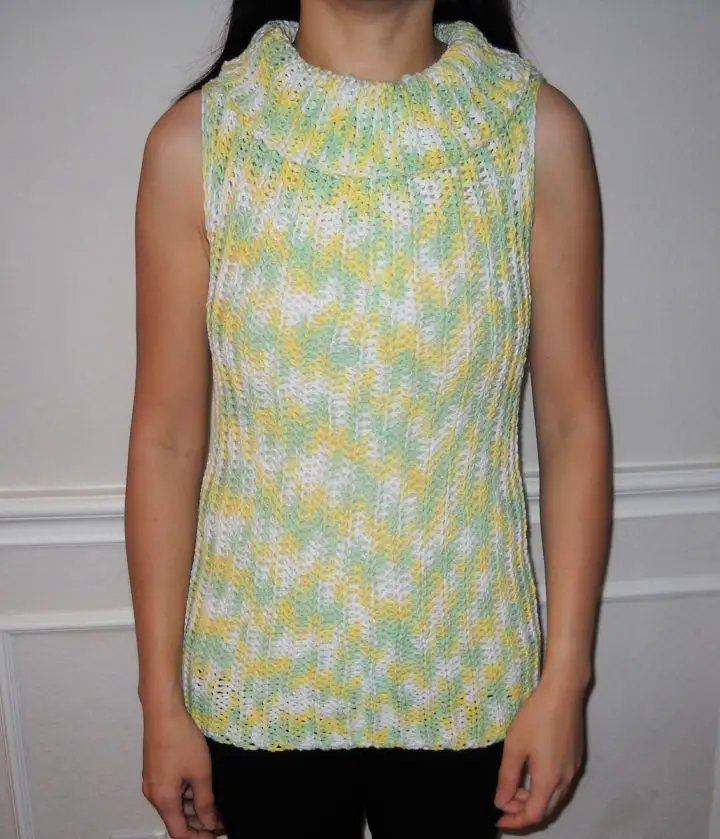
The crochet sweater, a delightful and straightforward creation, employs a slip stitch pattern that yields a charming, striped design reminiscent of ribbing. For those new to the slip stitch technique, this is an excellent opportunity to learn and practice, perfecting your skills for either personal wear or gifting someone special in your life. The instructions can be found on Ravelry.
Slip Stitch Joins Crochet Pattern
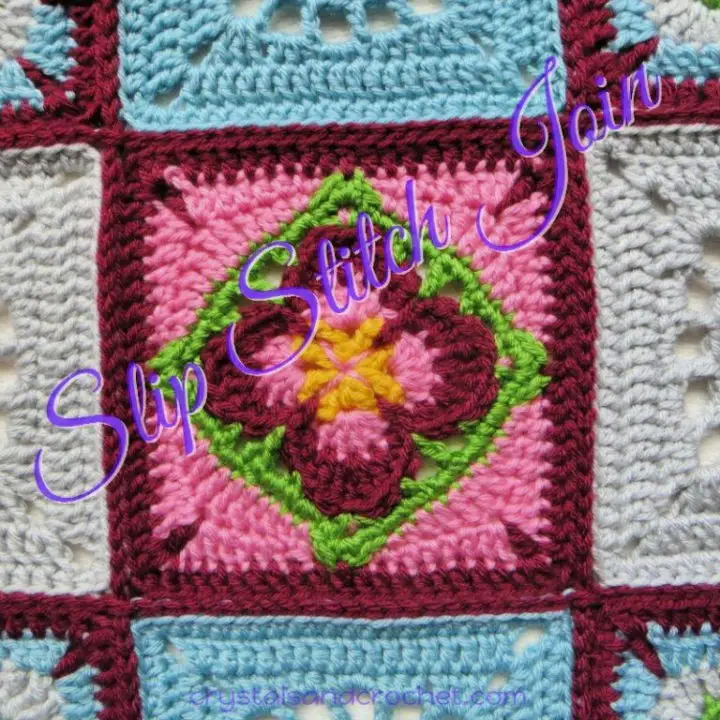
The slip stitch not only yields a thick and plush crochet fabric, but also plays a crucial role in joining various crochet patterns together to form a cohesive whole. One such example is the granny square, where the slip stitch is used to seamlessly connect multiple squares, resulting in a beautiful and intricate pattern. The process of joining these squares is surprisingly simple and straightforward, making it an ideal technique for home-based crochet projects. By learning the fundamental details and instructions, you can easily incorporate this technique into your next crochet endeavour.
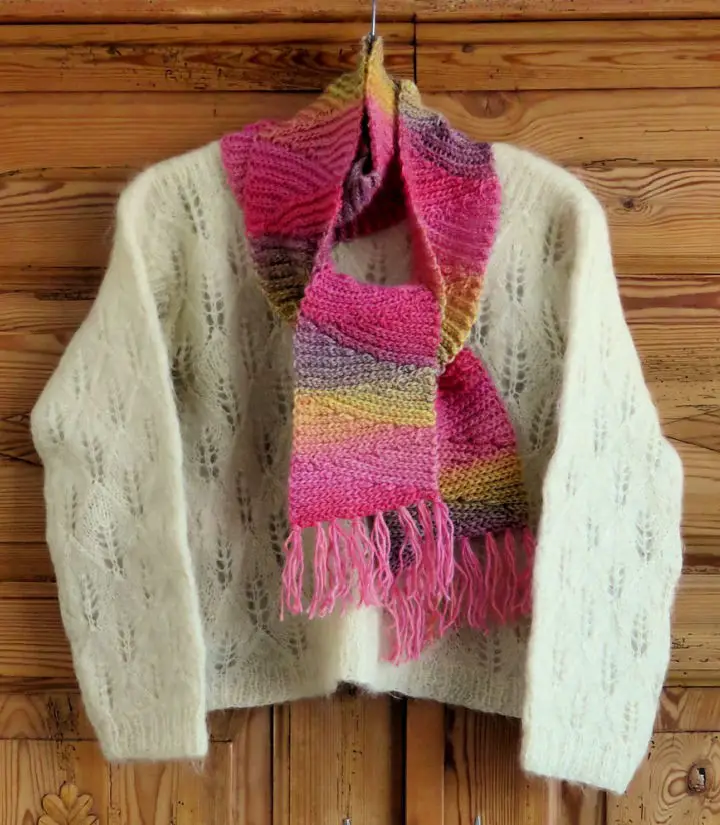
Crochet Slip Stitch Eco Duo Scarf
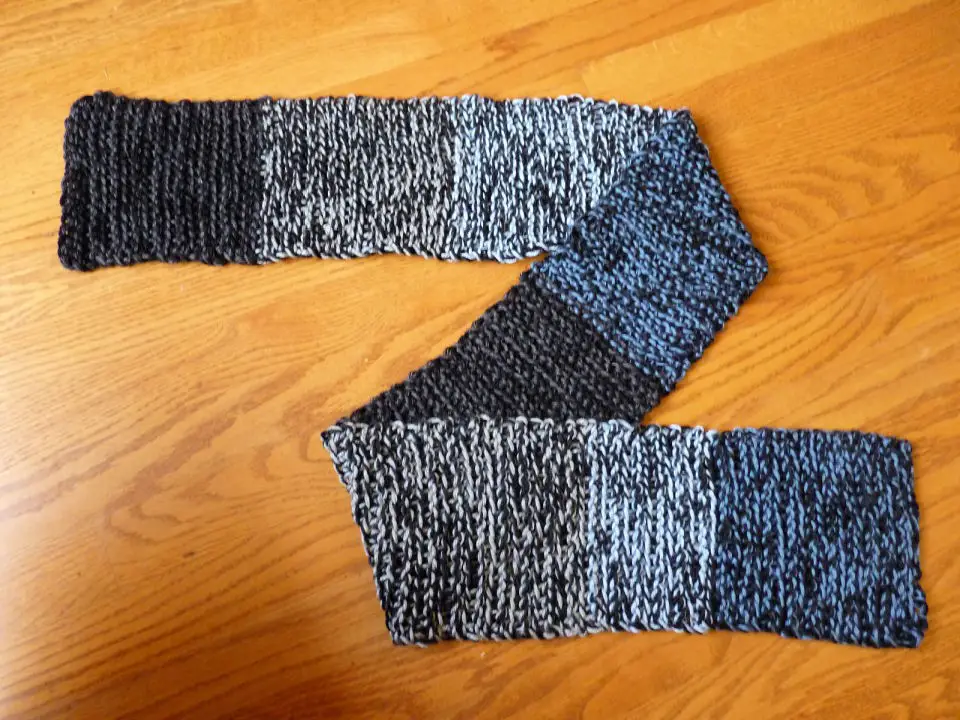
As the winter season approaches, a thick and cozy scarf is all you need to elevate your style without breaking the bank. To create this warm and inviting accessory, simply work up the slip stitch pattern and crochet it into a beautiful piece that will keep you comfortable and stylish throughout the cold months. Not only is this scarf a great way to add some flair to your winter wardrobe, but it also makes for a thoughtful and budget-friendly gift option.
How to Crochet Elephant Lovie
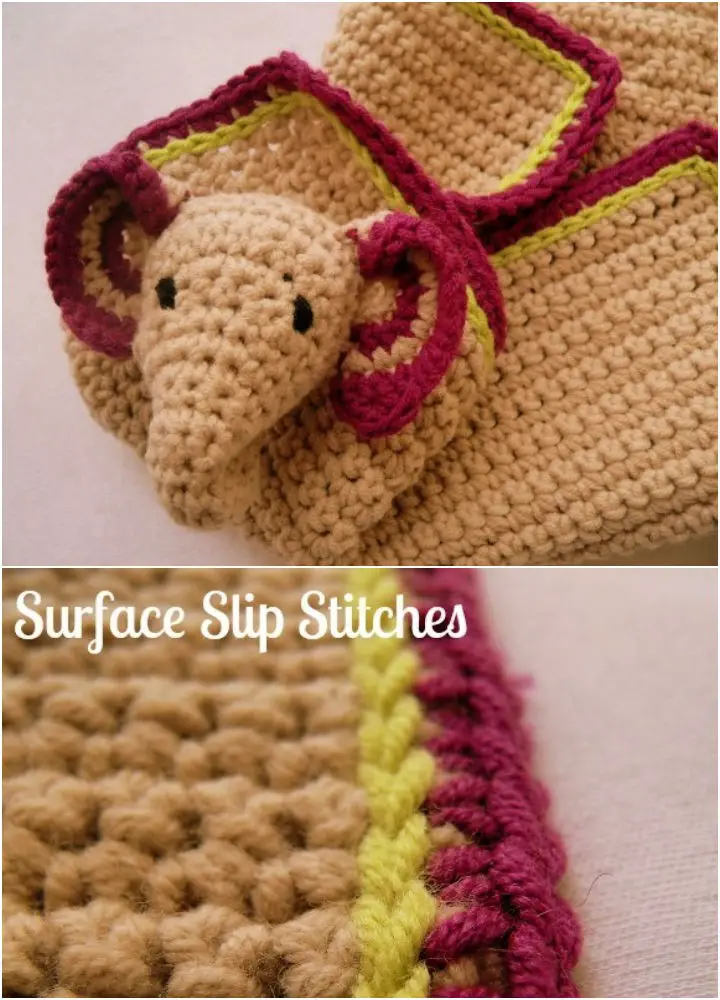
The humble slip stitch is a game-changer for crocheters, allowing us to create intricate patterns, textured possessions, and visually appealing designs that rival those we see online. Take, for example, this adorable lamb pattern. With its colorful crochet edges and charming design, it’s the perfect addition to any room. And with our step-by-step guide, you’ll be able to recreate this whimsical piece in no time.
Crochet Slip Slope Scarf Pattern
Learning to create crochet fabric has opened up a world of possibilities, allowing you to bring your favorite designs to life with ease and fun. The slip stitch pattern is an excellent starting point, as it enables you to quickly produce a thick and sturdy fabric that can be transformed into any number of crochet items. If you’re looking for a step-by-step guide to mastering this fundamental technique, I recommend checking out the easy-to-follow instructions on Ravelry, where you’ll find detailed details and tutorials to ensure your project turns out exactly as envisioned.
Crochet Slip Slope Square Pattern
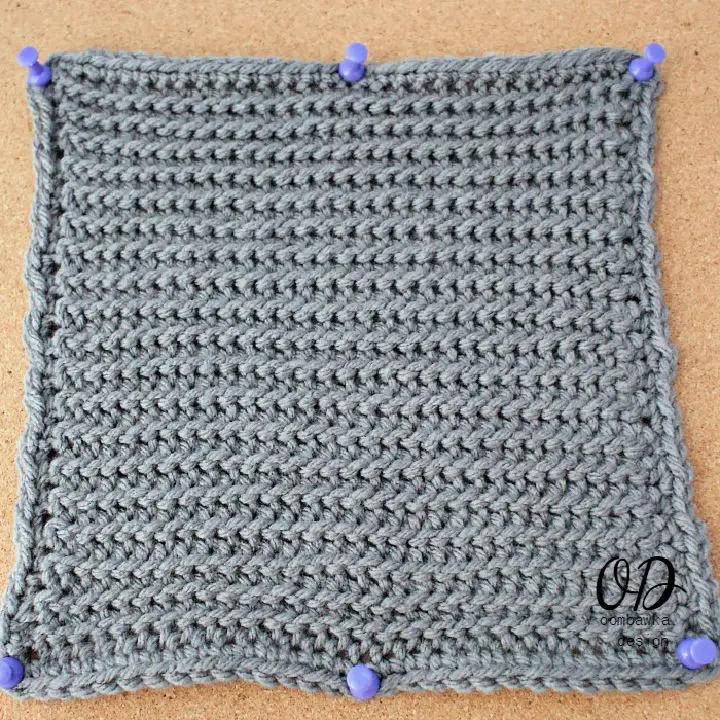
This versatile crochet slip-stitched square offers endless possibilities for adding a touch of handmade charm to your home decor. Its versatility knows no bounds – use it as a dishwasher mat, an appliqué to adorn a piece of furniture or clothing, or get creative and turn it into something entirely new. For more information on the pattern and step-by-step instructions, visit the link provided: oombawkadesigncrochet.
Crochet Scrap Yarn Slip Stitch Bracelet
This winter, elevate your wrist fashion with vibrant crochet bracelets that exude style and charm. With a kaleidoscope of yarn colors at your disposal, create the perfect fabric using the slip stitch pattern and your trusty crochet hook. Once you’ve crafted the desired piece, customize it to fit your unique taste by adjusting the size and shape. Before diving in, explore the idea further on jessieathome.
How To Crochet Surface Slip Stitch
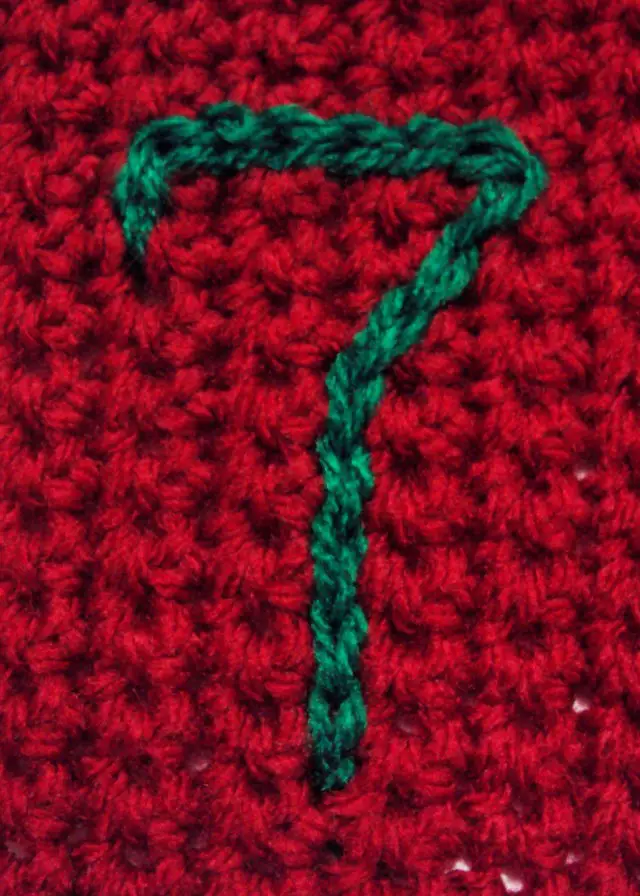
To add an extra layer of creativity to an existing crochet piece, the surface stitch technique is particularly useful. A vibrant green surface stitch has been applied to a red crochet fabric, resulting in a visually striking and engaging design that’s sure to catch the eye. The good news is that you can easily master this method with our comprehensive guide and pattern details available at crochetspot.
Slip Stitch and Single Crochet Seaming – Free Pattern
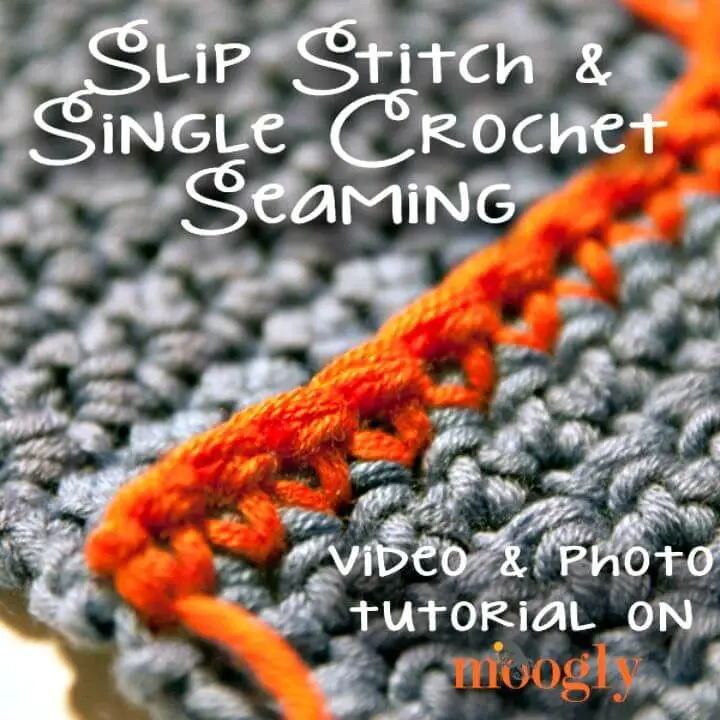
Transforming any crochet creation with a pop of color and whimsy can elevate its charm. The slip stitch method offers an effortless way to add a delightful trimming or edging to your crochet pieces, resulting in a collection of adorable winter accessories that will bring joy and warmth. To master this technique, visit the Moogly link for a comprehensive guide.
Crochet Slip Stitch Saugatuck Winter
Transforming menswear into a stylish and cozy winter wonderland is achievable with the efficient slip stitch method. By following the straightforward step-by-step pattern instructions, you can create versatile saugatucks suitable for daily wear in chilly climates. This engaging project allows you to get creative while keeping warm temperatures at bay, making it an excellent choice for those living in cold regions.
Conclusion:

Now that you’ve mastered the art of slip stitch crochet and have 20 free patterns to guide you, it’s time to put your new skills into practice. The 20 patterns we provided earlier offer a range of difficulties, allowing you to gradually refine your technique as you work through each one. As you become more confident in your abilities, consider taking on the challenge of designing something entirely original. With slip stitch crochet, the creative possibilities are truly limitless.
