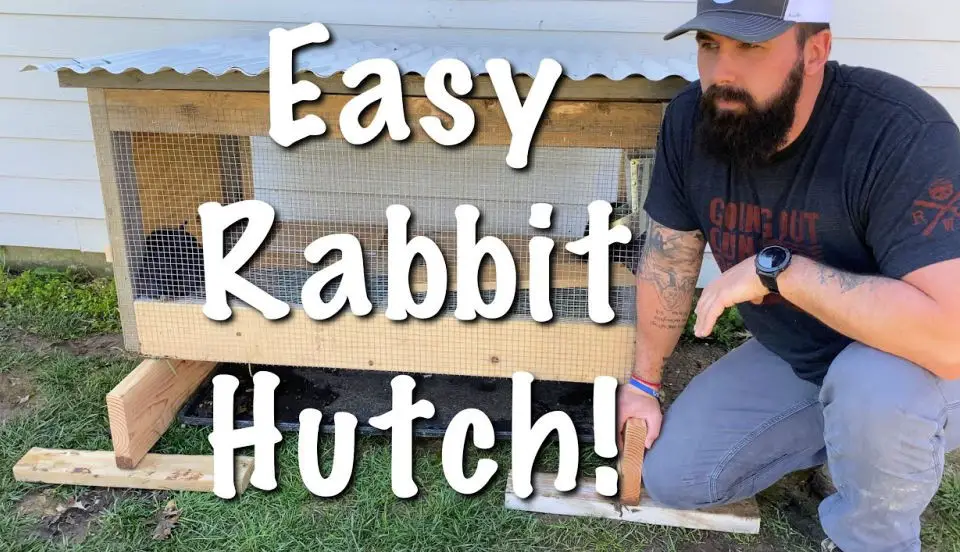
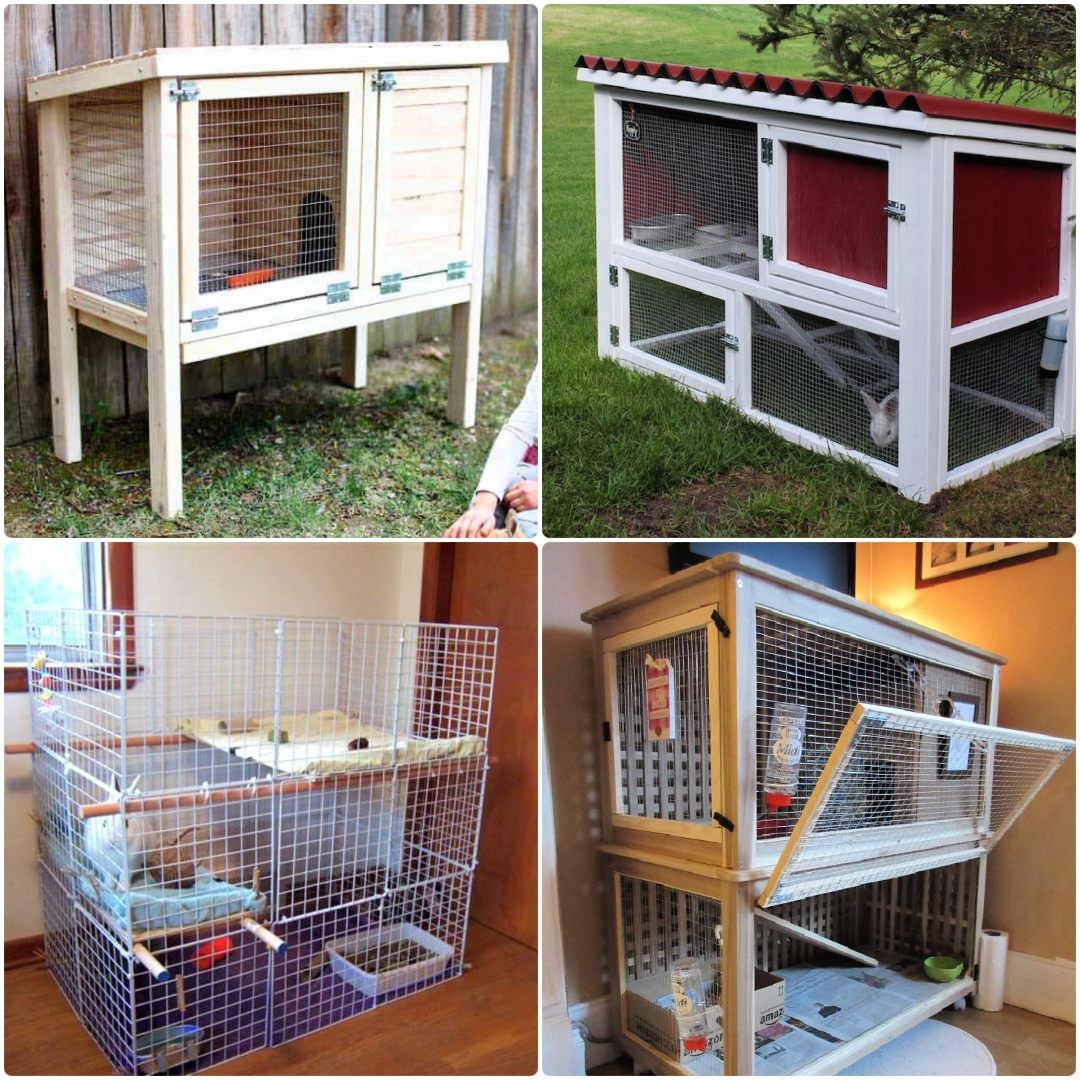
How to Build a Wooden Rabbit Hutch
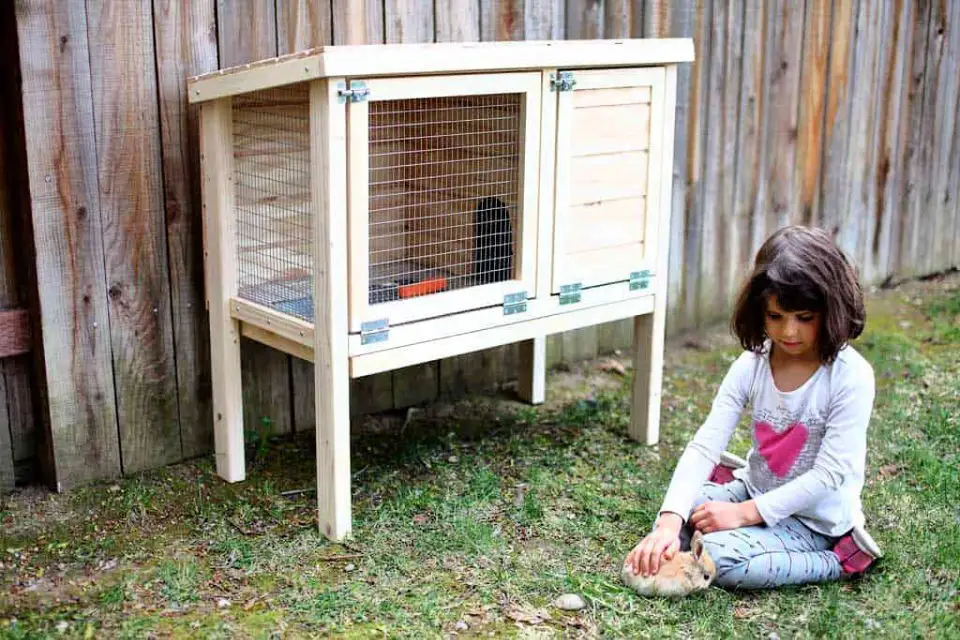
Creating a wooden rabbit hutch is a relatively straightforward DIY endeavor that can provide your cherished pet with a secure and cozy abode. To embark on this project, you’ll need to assemble the necessary tools, including a tape measure, drill, miter saw, table saw, nail gun, Kreg jig, and other essentials. Once you’ve gathered all these components, begin by cutting out the required pieces using your miter saw or jig saw; utilize clamps to keep everything in place as you drill holes for screws and nails. Next, use an orbital sander or snips to smoothen any rough edges before attaching a fabric lining with your staple gun and securing it firmly with a rivet gun. Finally, add handles for effortless transportation, and your rabbit hutch will be complete.
Building a Wooden Rabbit Hutch
To construct a wooden rabbit hutch, start by gathering the necessary tools: a pocket hole jig, drill, miter saw, circular saw or table saw, jig saw, tape measure, pencils, and safety glasses. You’ll also need specific materials, including 4′ x 8′ textured wood composite panel, four 2x4s that are 8 feet long, twelve 2x2s that are also 8 feet long, two-and-a-half inch blue-kote pocket screws, one-and-one-quarter inch exterior wood screws, two-and-a-half inch exterior wood screws, and wood glue. With these tools and materials at the ready, you can follow the step-by-step instructions to create a custom-built rabbit hutch that suits your needs.
Free Rabbit Hutch Woodworking Plan
To create a cozy outdoor haven for your rabbit, follow this comprehensive woodworking plan to build a sturdy and inviting hutch. Begin by constructing the framework using 2×4 and 2×2 lumber for each side, then move on to crafting a solid floor from 3/4″ plywood. Next, attach 1/2″ plywood siding to the back and sides of the hutch using 6d nails to provide a snug and weather-resistant enclosure. Once complete, your furry friend will have a warm and welcoming space to call their own.
Turn a China Cabinet Into Rabbit Hutch
Transform a vintage China cabinet into a cozy rabbit hutch with a dash of DIY creativity and some essential tools. Begin by gathering a drill and saw, and consider adding precision tools like a miter saw, jig saw, or skill saw for enhanced accuracy. Next, carefully measure and create an entrance to the den area, or secure wire mesh to the back of the cabinet door for improved ventilation. As you complete this upcycling project, not only will your rabbit enjoy its new spacious quarters, but your living space will also benefit from the charming addition.
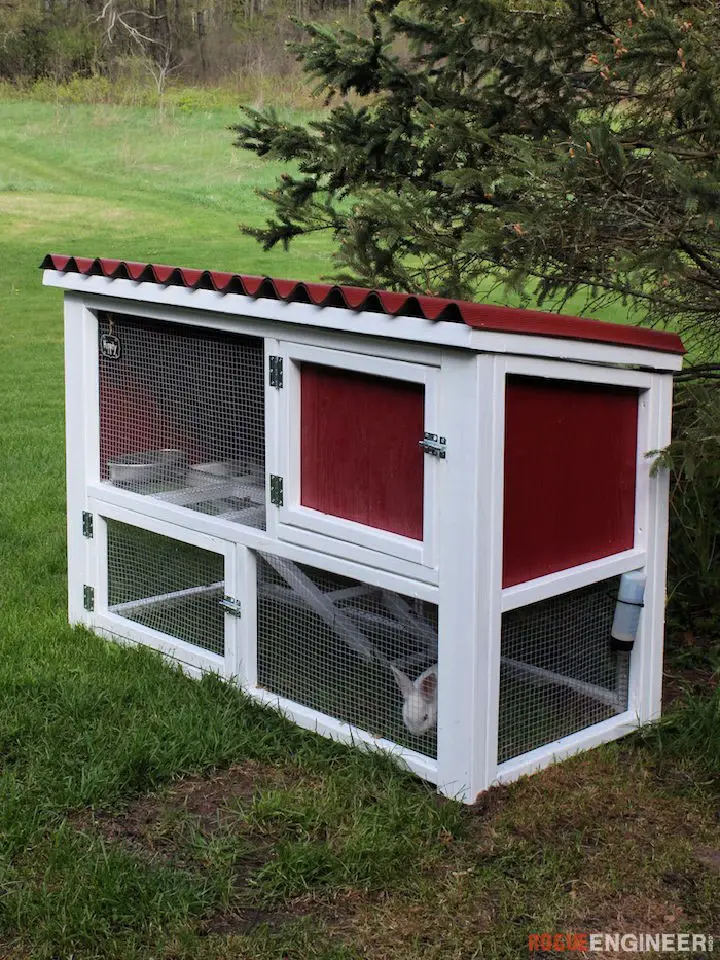
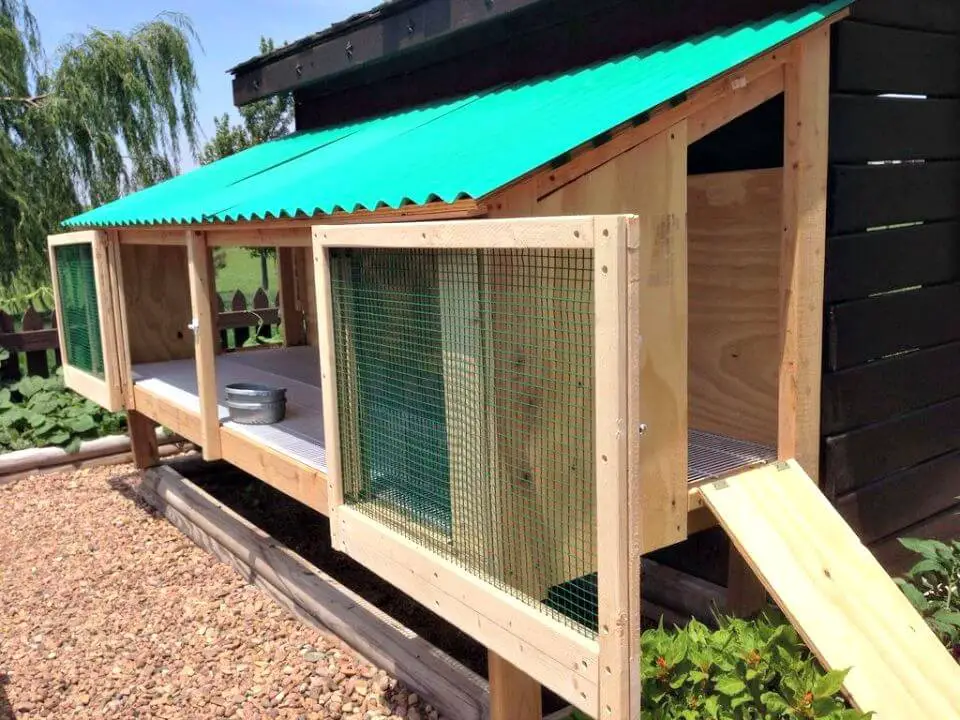
Handmade Outdoor Rabbit Hutch

When searching for an exceptional outdoor rabbit hutch, you’ve come to the right place. This meticulously crafted structure is held together by 2 1/2-inch galvanized screws and 1 1/4-inch finishing nails, providing a sturdy foundation for the wooden components. The floor has been reinforced with plywood sheets before being topped with 1×4 slats at the rear of the hutch. The roof serves as the crowning touch, completing this outstanding project. By bringing home this premium outdoor rabbit hutch, you’ll be able to provide your pets with a secure and comfortable environment that meets their needs.
Easy DIY Sectional Rabbit Hutch
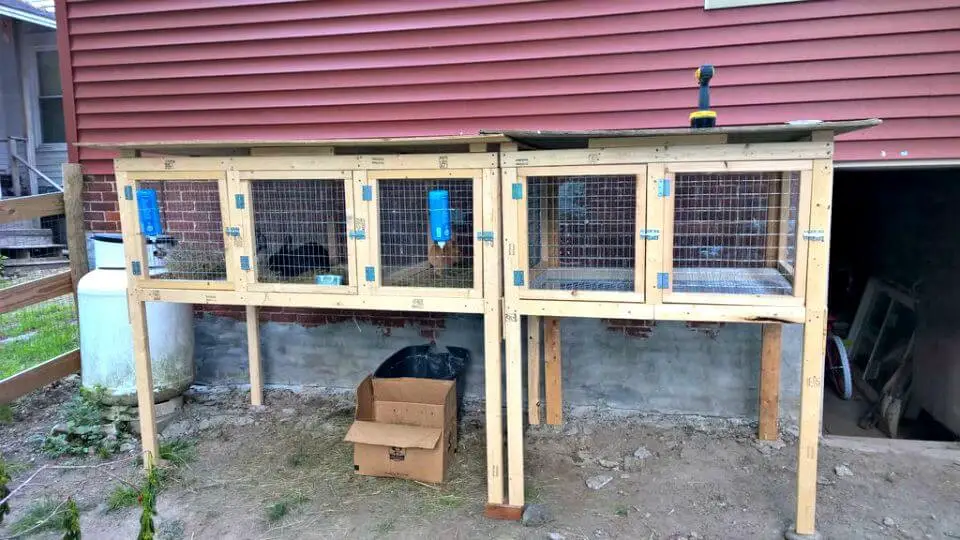
Create a cozy DIY sectional rabbit hutch without breaking a sweat! Start by conceptualizing your design, then gather or acquire the necessary materials. Follow this comprehensive guide to construct the base, build compartments and boundaries, attach them to your frame, complete the backs and fronts of the hutches, and assemble and install doors. With these steps, you’ll be rewarded with a functional yet charming abode for your beloved bunnies that will stand the test of time.
How to Make an Outdoor Rabbit Hutch
Unleash your creativity by crafting an outdoor rabbit hutch that not only provides a cozy retreat for your furry friends but also serves as a testament to your DIY prowess. Our comprehensive collection of plans offers innovative designs, clever weatherproofing solutions, and practical cleaning features that will make you proud of your handiwork. As you embark on this project, remember that it’s essential to prioritize safety above all else. With the right tools and protective gear at your disposal, you’ll be well-equipped to tackle the construction process with confidence. The necessary items include a hammer, tape measure, carpentry square, miter saw, drill machinery, screwdriver, sander, and router, while protective gear such as safety gloves, glasses, and a respiratory mask for sawdust protection will ensure your physical and respiratory health remain uncompromised. With these essentials in hand, you’ll be ready to begin constructing an outdoor rabbit hutch that’s both safe and secure for your pet rabbits.
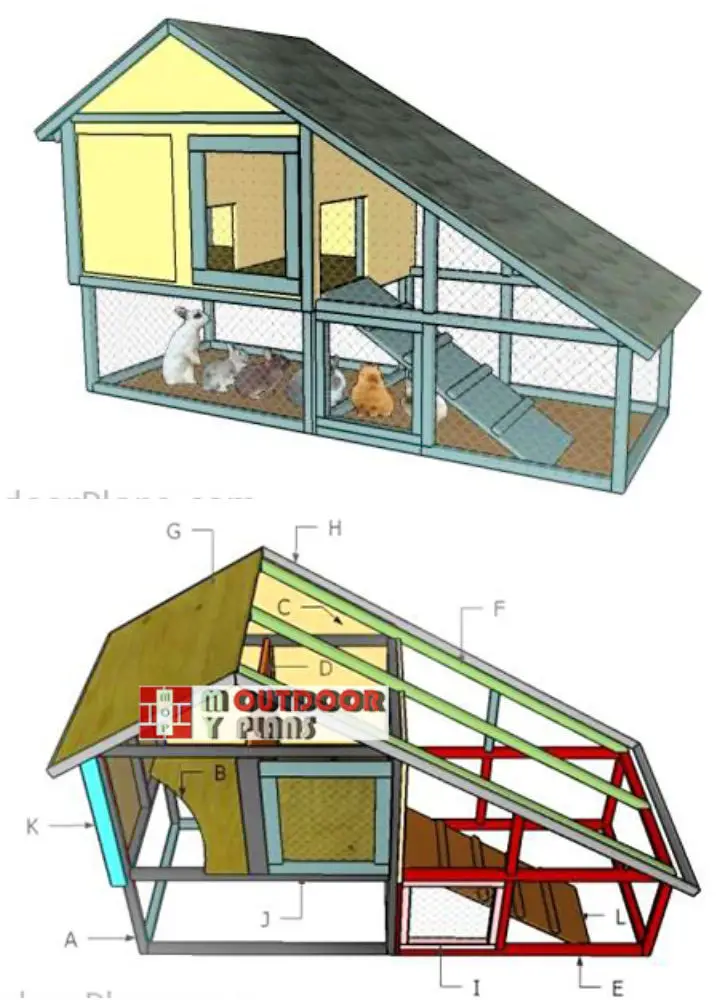
Making a Kid-friendly Rabbit Hotel
To ensure the well-being of your rabbits, consider crafting a DIY rabbit hutch that prioritizes security, spaciousness, and weather resistance. Begin by constructing the base framework, followed by installation of the floor material, top framing, and incorporating ramps for effortless movement between levels. For protection against harsh environmental conditions, cover the roof with a durable material that allows natural light to filter through. Next, build the front panels, securing them with clamps, hinges, latches, and knobs for maximum stability. This innovative rabbit hotel design not only provides a safe haven for your pets but also keeps their waste in check, making it an ideal solution for rabbit enthusiasts.
Build Your Own Rabbit Hutch
To construct the ultimate rabbit hutch, start by assembling the back wall using sturdy 2×2 lumber. Next, replicate this process to create the front wall. Secure the side components and install floor supports to ensure a rigid structure. Once you’ve got your frame in place, slot in the floor, ensuring there are no gaps. Finally, add a touch of finesse with 1×2 trims secured by 1 5/8-inch screws. By following these straightforward guidelines, you’ll be well on your way to providing a cozy and secure abode for your furry friend.
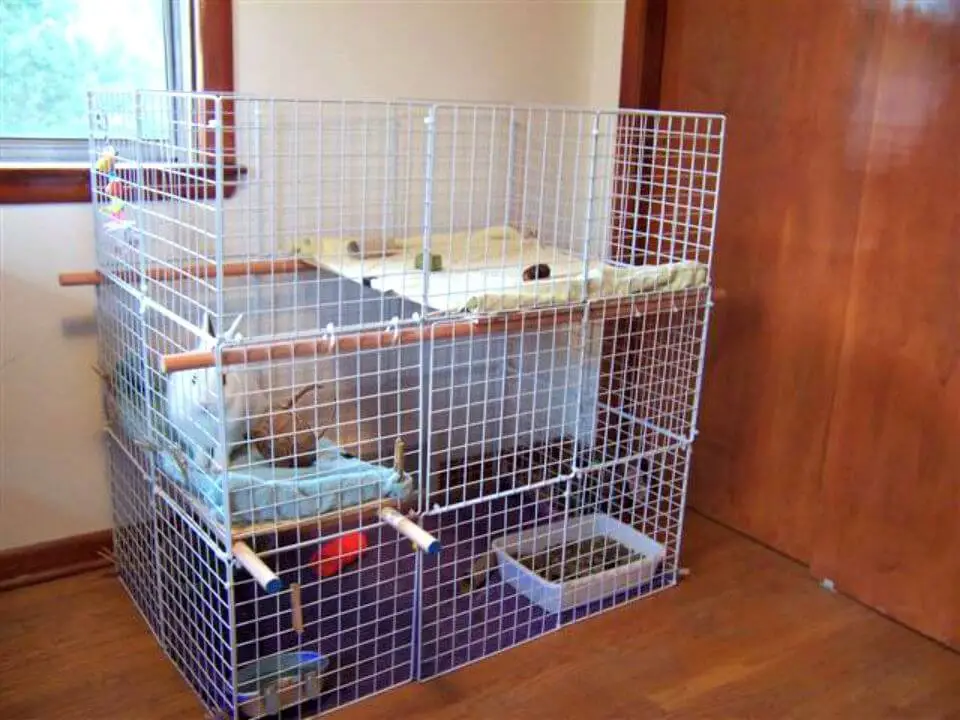
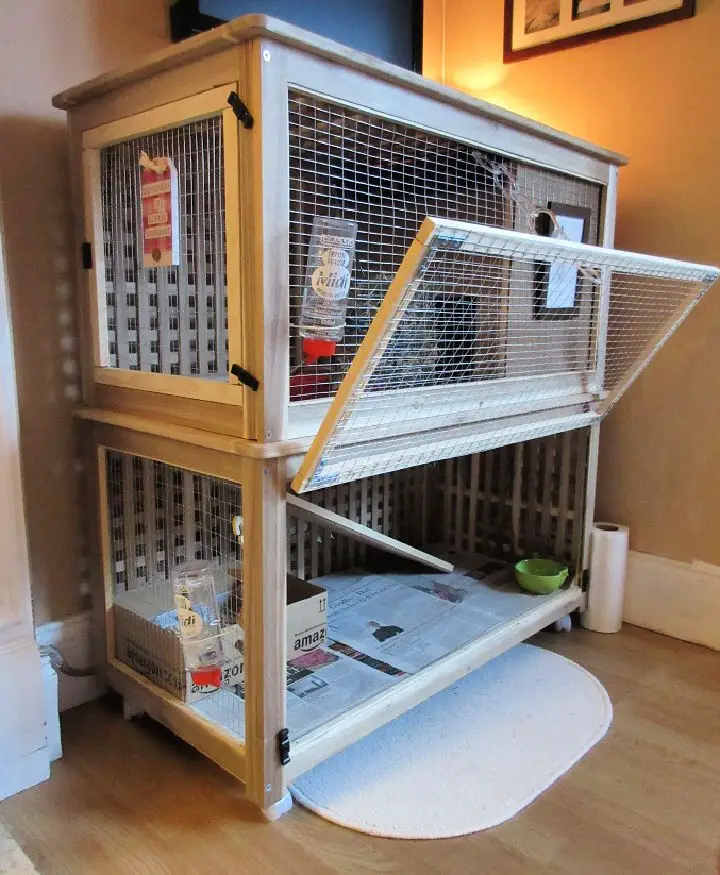
How to Build an Indoor Rabbit Cage
When it comes to building an indoor rabbit cage, many owners are intimidated by the process. However, with a step-by-step guide, you can create a safe and comfortable home for your pet in no time. The journey begins with the foundation – a sturdy base that provides ample space for all necessary supplies. Next, construct the middle section, which will serve as a hub for food, dishes, toys, and other essentials. The sides of the cage should be robust enough to support bedding and offer your rabbit plenty of room to roam freely. To prevent bedding from spilling out, attach kick plates, followed by easy-access doors that allow you to tend to your pet’s needs. Finally, add a secure ramp-up top with fencing to ensure your rabbit can climb up or down safely as desired. With these simple steps, you’ll have successfully built an indoor rabbit cage that will keep your furry friend happy and safe.
Awesome DIY Rabbit Cage for Under $80
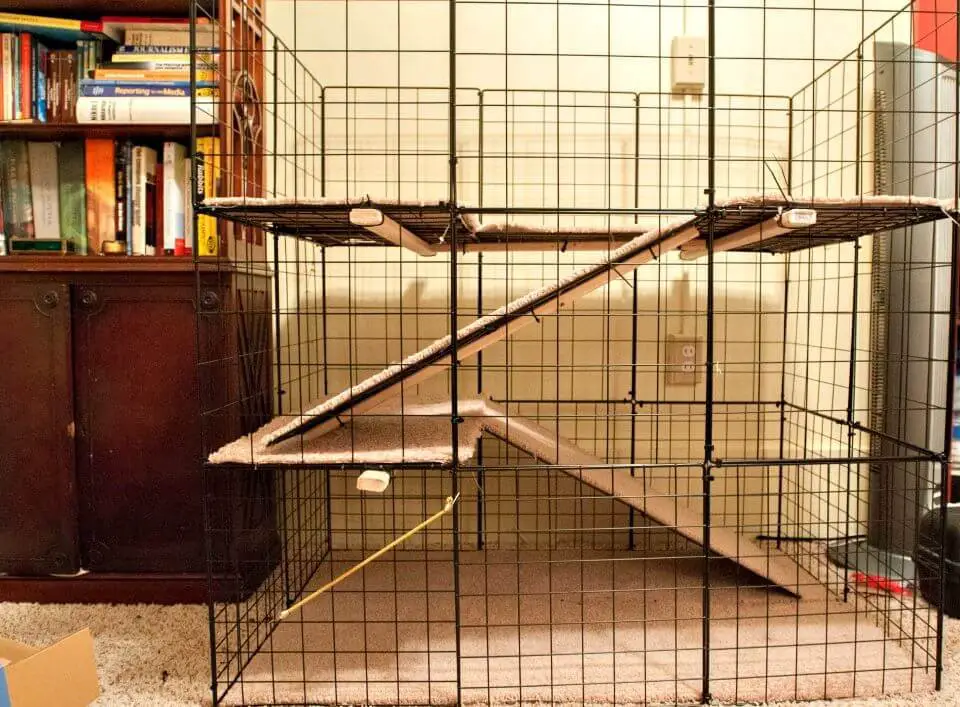
Transform your rabbit’s living space without breaking the bank. With just $80 worth of materials from Target and Home Depot, you can create a spacious and cozy habitat for your furry friend. Begin by connecting two wire cube packs to form each wall, securing them with four zip ties at the corners and one at the top and bottom seam. Once complete, you’ll have a comfortable and secure enclosure that won’t dent your wallet.
DIY Comfortable and Roomy Bunny Condo
Transform your pet bunny’s living space with a DIY two-sided cage that embodies comfort and spaciousness. By combining four walls connected via dowels, a plywood shelf, and cable tie strands, you’ll create a secure and safe haven for your small pet to stretch out or lounge in style. With minimal supplies required, this easy-to-make design is perfect for providing ample room for your little friend’s daily activities.
Build a Small Rabbit Hutch at Home
Transform your space into a cozy retreat for your rabbits by constructing a small hutch at home. Begin by dismantling pallets to obtain four 150cm and one-meter sections from their structural parts. Utilize the bottom section as a template to craft the top portion, subsequently securing it with wire mesh for the sides and panels on the roof using a staple gun. With minimal effort, you’ll have a sturdy hutch ready in no time, providing your furry friends with the comfort and shelter they deserve.
Make a Rabbit Hutch With Step by Step Instructions

To create a robust rabbit hutch, follow this step-by-step guide on DIY rabbit hutch ideas. The comprehensive tutorial will take you through the entire process of building the project from start to finish. Begin by constructing the base frame and attach 1×3 slats to its exterior for added structural integrity. Next, cut and fit 3/4″ plywood panels to cover the top portion of the enclosure. Finally, secure tar paper over the roof area to provide additional protection against rain and snow. Ensure you use high-quality materials throughout to ensure your hutch stands the test of time. Follow our detailed plans carefully and you’ll be enjoying your own rabbit hutch in no time.
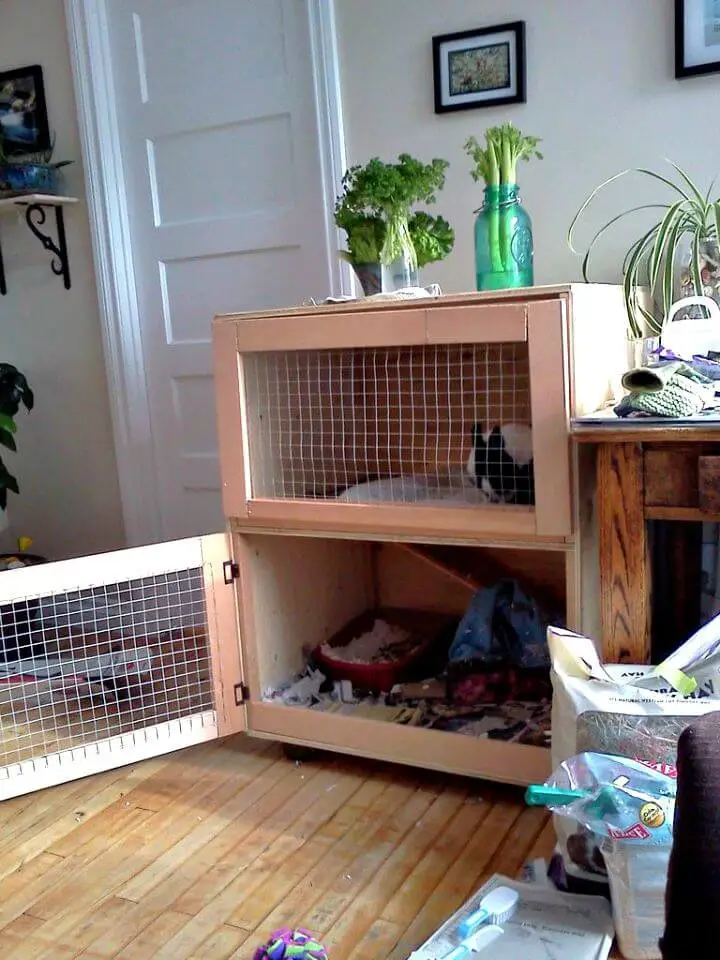
How To Convert End Table Into Rabbit Hutch
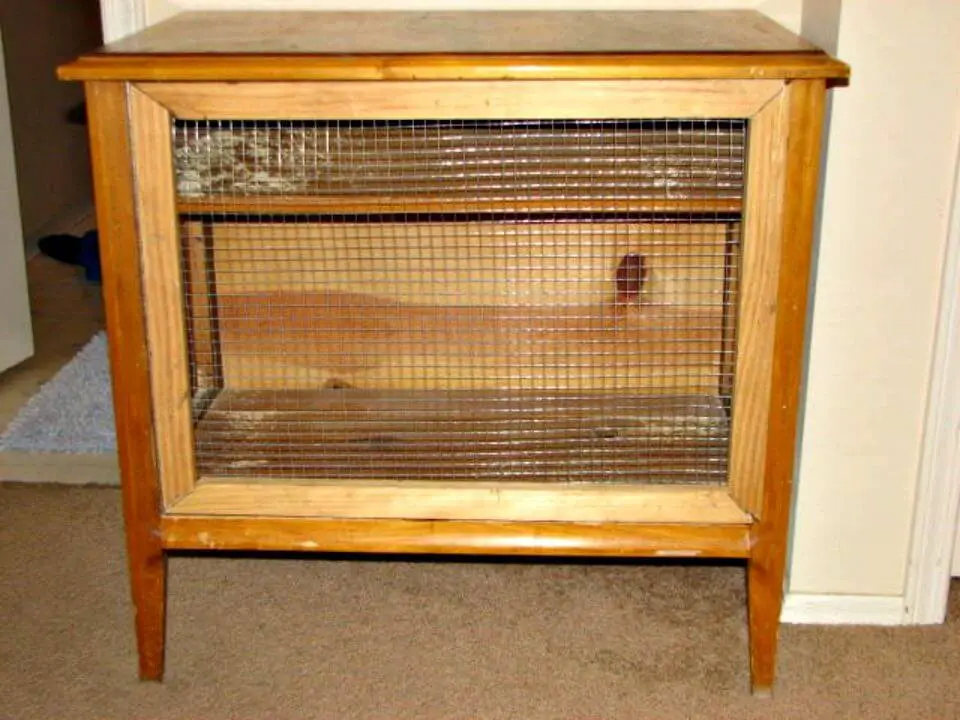
Give your pet rabbit a cozy new home by transforming an old end table, cabinet, or dresser into a bunny hutch. Start by scouring thrift stores and markets for the perfect piece of furniture. Once you’ve found it, remove any extra drawers or shelves to create a blank canvas. Measure the front frame size to determine the dimensions needed for your mesh door, then cut four wooden strips to fit the frame – each one should be 1 inch wide and half an inch thick. Use 45-degree angles at each end of the strips and attach them using piano hinges. Next, staple half-inch mesh onto the inside of the wood strip frame, and you’ll have a functional and adorable bunny hutch. With this easy DIY project, you can give your pet rabbit its own unique home and create a fun and cozy space for it to thrive in.
IKEA Large Rabbit Hutch Hacks
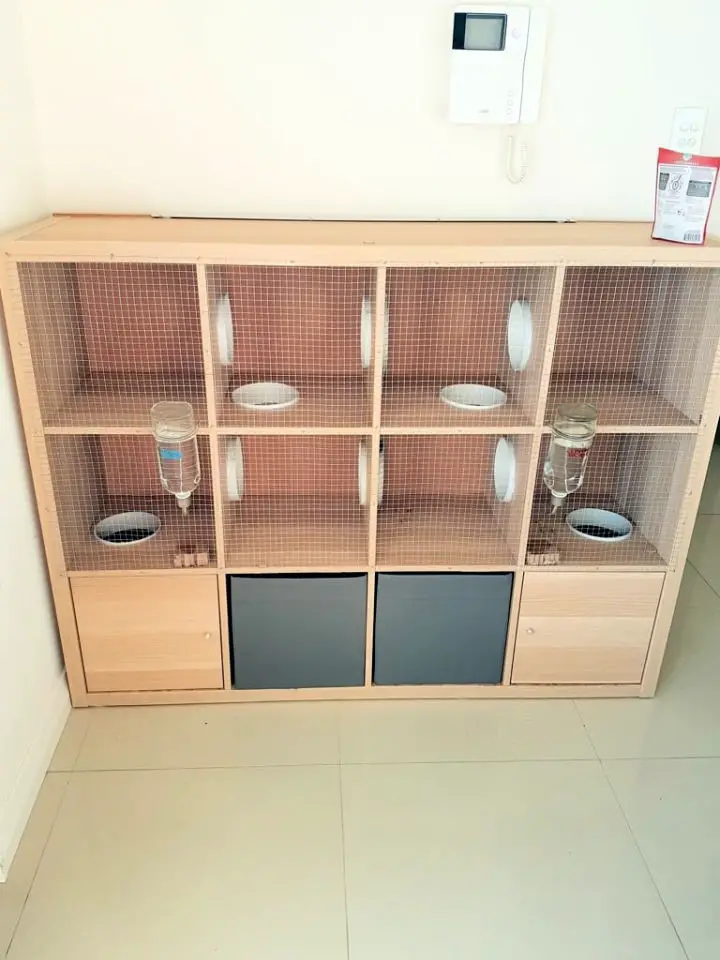
Transforming an IKEA KALLAX shelving unit into a one-of-a-kind rabbit hutch is a simple yet creative solution for housing large rabbits. By combining the shelving unit with PVC pipe, wire netting, nails, angle brackets, and wood board, you can create a custom-built home for your pet that’s both functional and visually appealing. To secure everything in place, apply glue and silicone sealant as needed. This innovative hack is perfect for rabbit enthusiasts who want to provide their pets with a unique and comfortable living space.
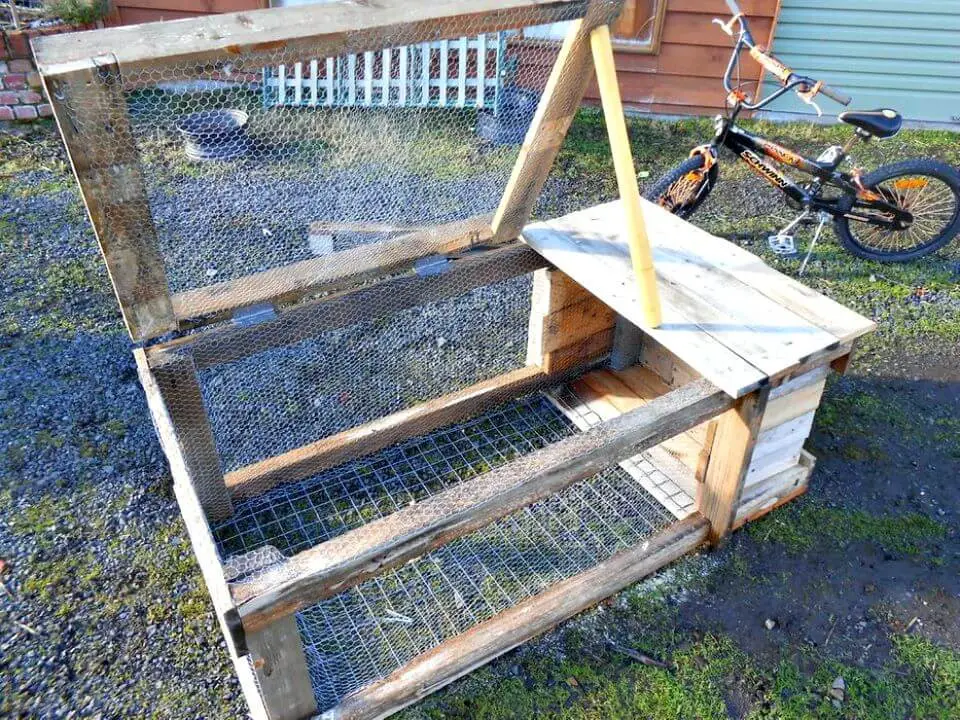
Cheap Knockdown Outdoor Rabbit Tractor
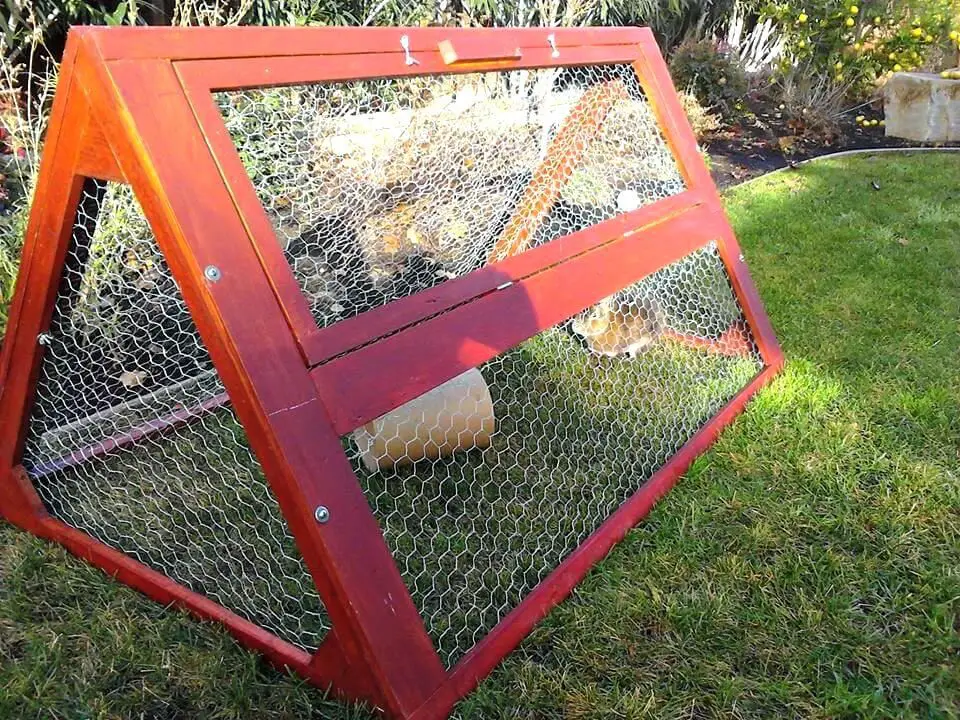
Create a haven for your furry companion by building a customizable DIY rabbit hutch, tailored to fit your available space and budget. Inspired by Romeo’s cage, this affordable outdoor tractor is the perfect solution for rabbits. Constructed from 1x2s with precision cuts and reinforced with triangular pieces of 1x4s for added stability. Design it as two interconnected rectangles with a hinged top and a hatch for effortless access. Order yours today and watch your rabbit roam freely in their new sanctuary!
Cool IKEA Bunny Hutch Hack
Transform an ordinary storage table into a cozy abode for your furry friend by upcycling it with a few simple materials and tools. Start by gathering the essentials: two Ikea HOL tables, four casters, wire mesh, staples, hardboard, panel pins, a jigsaw, goggles, a hacksaw, a Stanley knife, screwdrivers, a hammer, and a staple gun. With these tools in hand, cut the wood for your hutch using the jigsaw and protective goggles to ensure precision and safety. Next, use the hacksaw and Stanley knife to make any necessary adjustments. Once you’ve prepared the materials, it’s time to assemble the structure. Use screwdrivers, a hammer, and staple gun to secure the pine strips (14mm x 25mm) and lino. To add an extra layer of stability, apply no more nails adhesive. With these steps completed, your pet will have a comfortable and stylish home that’s sure to delight.
Adorable DIY Frame Rabbit Hutch
Bring joy to your pet bunny by crafting a charming DIY frame rabbit hutch. This adorable abode features doors and window walls, making it an excellent addition to any backyard. To add a personal touch, consider painting or adding decals for a unique flair. Best of all, the instructions are beginner-friendly, ensuring that anyone can build this delightful hutch with ease. For step-by-step guidance on how to bring this project to life, visit the provided link and get started today!
DIY Wooden Rabbit Hutch Tutorial
Whether you’re a seasoned woodworker or a complete beginner, building a rabbit hutch can be a fun and rewarding DIY project. To help you get started, we’ve put together a comprehensive tutorial that walks you through every step of the process, from selecting the right materials to assembling the final product. With our step-by-step guide, you’ll have all the tools and expertise you need to create a cozy and comfortable home for your rabbits.
Simple Minimalist Rabbit Hutch Using Recycled Material

Reusing recycled materials has never been more appealing than with this simple minimalist rabbit hutch. Not only does it provide a safe and cozy abode for your rabbits, but it also allows you to get creative while being eco-friendly. The best part is that the hutch can be easily assembled using an existing frame, which can then be disassembled to refinish or repurpose the wooden components into something new. This innovative approach not only saves resources but also ensures a unique and stylish habitat for your pets without compromising on convenience.
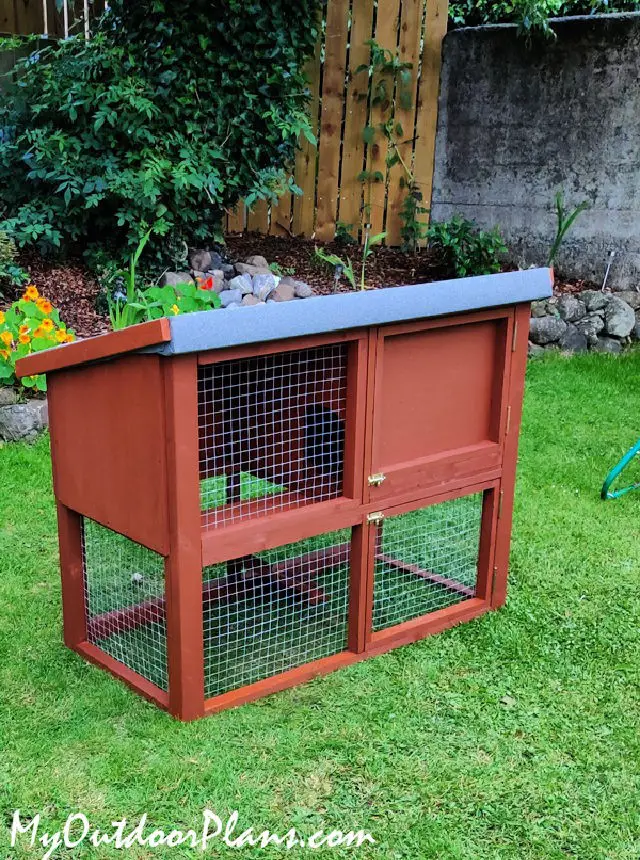
Homemade Wooden Rabbit Hutch
Are you an animal lover who wants to provide a cozy abode for their furry friend? Look no further than constructing a custom wooden rabbit hutch. With basic tools and materials, including a pocket hole jig, strategically placed staples, and the clever use of ceramic tiles, you can create a stunning enclosure that your pet will adore. Not only is building this DIY project an enjoyable experience, but it also allows you to save money by avoiding costly store-bought options. As you get creative and put in the effort, the possibilities are endless! With some patience and imagination, you’ll be able to craft a long-lasting haven for your beloved pet rabbit that will keep them happy and healthy for years to come.
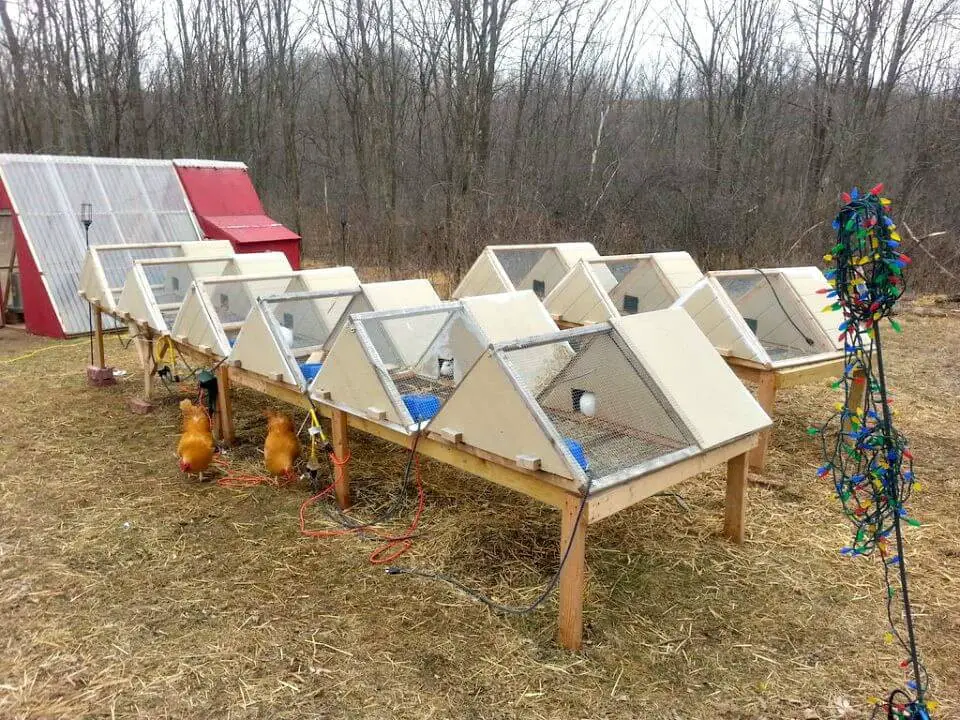
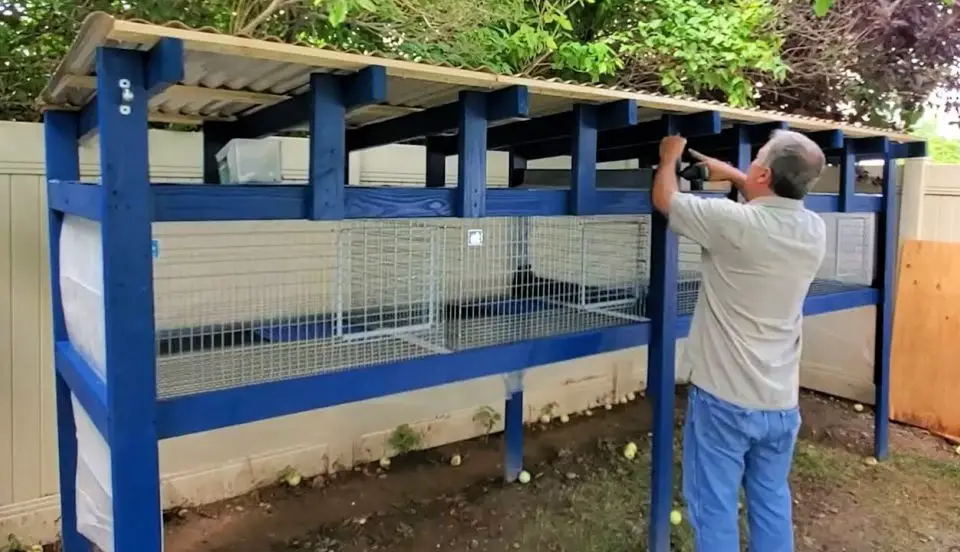
Making a Large Rabbit Hutch
Transforming a large rabbit hutch into a reality is now within reach by breaking down the process into manageable steps. Start by gathering the necessary materials, including lumber and paint. Assemble the legs, front, and back of the hutch first, ensuring a sturdy foundation. Next, add supports to elevate the structure, followed by attachment of roof pieces and completion of the painting process. Don’t forget to install LED lights and KW Cages for enhanced safety features before topping it all off with the roof. To complete the look, don’t overlook the importance of poop slides! Once the hutch is fully assembled, be sure to leave some intentional gaps to accommodate box fans, providing essential ventilation. With these steps in place, you’ll be proud to show off your newly crafted large rabbit hutch.
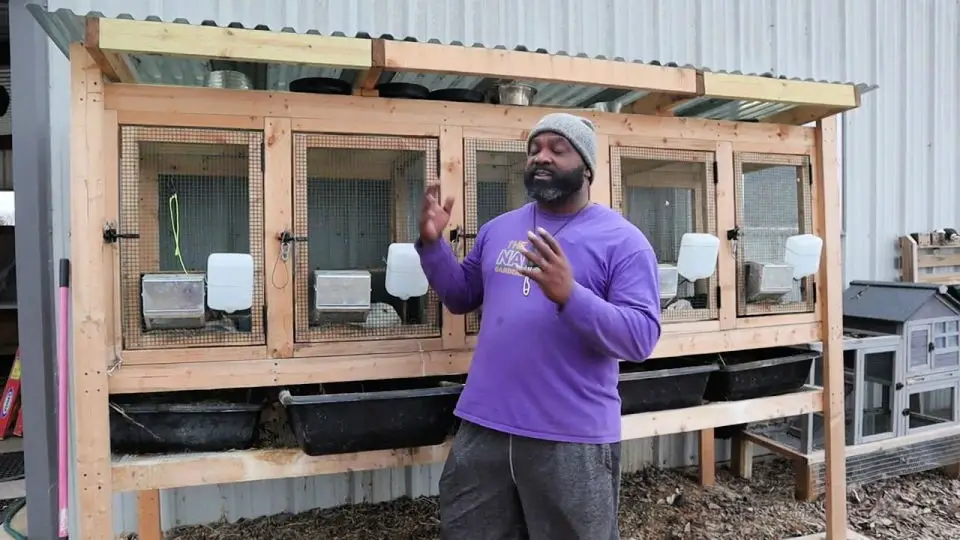
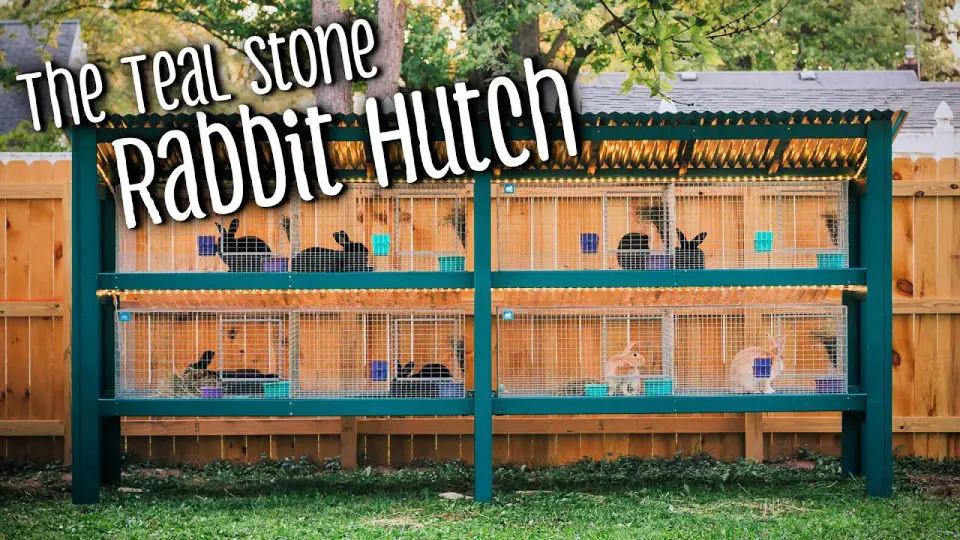
Building a Rabbit Hutch With KW Cages
When it comes to DIY rabbit hutch projects, having the right building materials is crucial. To help you get started, we’ve put together a comprehensive guide that covers everything from legs and dimensions to support systems and feeders. With these high-quality components, you can rest assured that your pet bunny will have a safe, secure, and comfortable home to call its own. At KW Cages, we’re dedicated to providing the best materials for DIY enthusiasts like yourself, giving you the confidence to create an adorable retreat for your furry friend.
How to Build a Rabbits House on Wheels
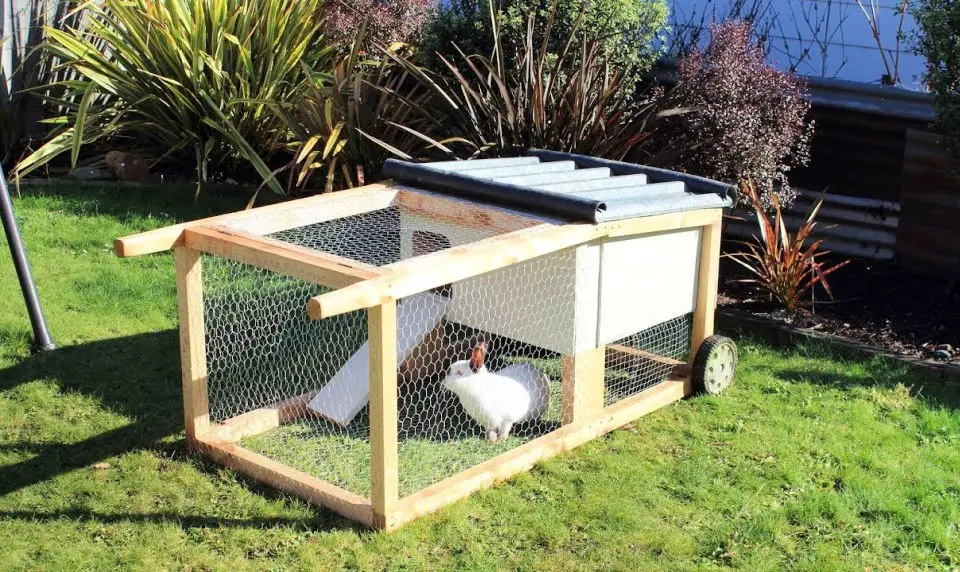
Building a rabbit house on wheels requires some creativity and practical skills. To help you get started, this guide will walk you through the process of constructing your own rabbit abode. By following these step-by-step instructions, you’ll learn how to expertly attach the front crossbar square with the rails using precision tools like straight edges and adjustable squares for maximum accuracy. Next, secure the bottom edges with screws or nails to ensure stability and prevent any potential damage. The process of lining up walls requires attention to detail, but with patience and practice, you’ll be able to assemble your rabbit house quickly and efficiently using drywall screws. Finally, we’ll cover the importance of painting or sealing the finished product to provide a safe and comfortable environment for your furry companion. With these steps in mind, you can create an amazing rabbit house on wheels that will keep your pet happy and healthy.
Conclusion:
As you wrap up this comprehensive selection of 25 free DIY rabbit hutch plans, it’s clear that each design offers a unique opportunity to create the ultimate retreat for your beloved rabbits. With options ranging from straightforward constructions to intricate rabbit hotels, there’s a plan tailored to every skill level and budget. Whether you’re drawn to classic wooden hutches, cozy indoor enclosures, or even clever IKEA repurposing, these blueprints cater to a wide range of tastes and abilities. By taking the DIY approach and building your own rabbit hutch, you’ll not only be providing a secure and comfortable space for your pets to flourish but also adding a personal touch to their habitat. So why delay? Take the first step towards crafting the perfect abode for your rabbits today.
