Build Your Own Wooden Toy Bins
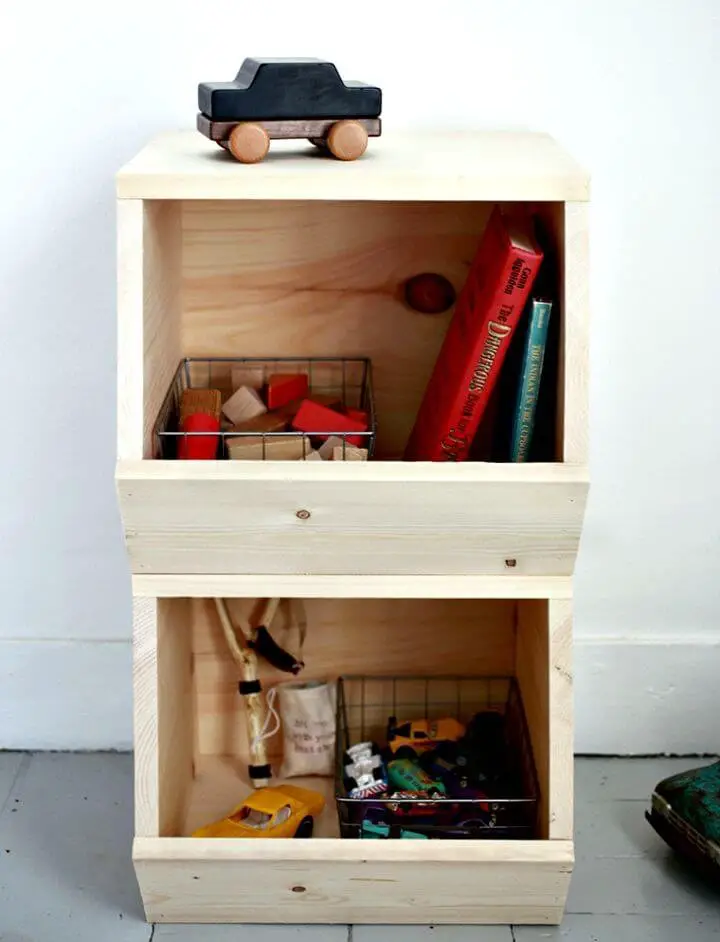
Transform your living space into a haven of organization and tranquility by crafting your own customizable wooden storage bins. This innovative DIY solution is particularly ideal for parents seeking to tame the toy chaos that can quickly overwhelm their homes. The rustic charm infused in each bin’s design allows it to seamlessly integrate with your existing decor, providing both form and function. By adjusting the dimensions of the bins to suit your needs, you can accommodate an assortment of toy sizes or even utilize them as mini-baskets for storing delicate items. Take your organizational skills to the next level by strategically stacking or arranging these bins to optimize their functionality in your space. Not only do they declutter and beautify your surroundings, but they also serve as a versatile bedside stand when needed. Embark on your journey to a clutter-free abode with these DIY wooden storage bins.
Colourful Crate Shelves for Toys Storage

Transform your storage space into a vibrant and functional haven with DIY crate shelves, a creative children’s toy organization solution that combines functionality with aesthetics. To get started, gather four wooden crates, Woodoc Water-Borne Clear and White, Woodoc Colours (in shades like Mulberry and Aquamarine), sandpaper, a sanding block, paintbrushes, and paint stirring sticks. Begin by thoroughly sanding each crate to smooth out any rough edges. Next, use the Woodoc sealant mixed with your chosen colors to create unique shades. Apply three coats, allowing each layer to dry before moving on to the next. Once complete, arrange your painted crates in a creative composition, secure them, and voila! You’ll have an affordable, attractive toy storage system in playful colors that will make organizing fun for kids.
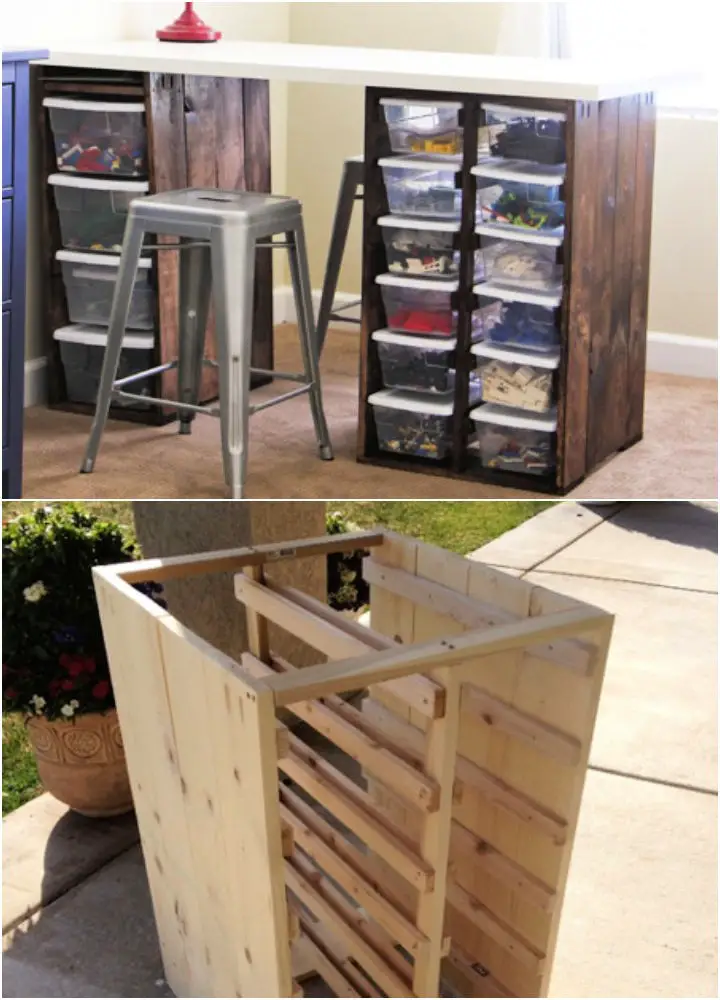
Handmade Hidden Toy Storage Table
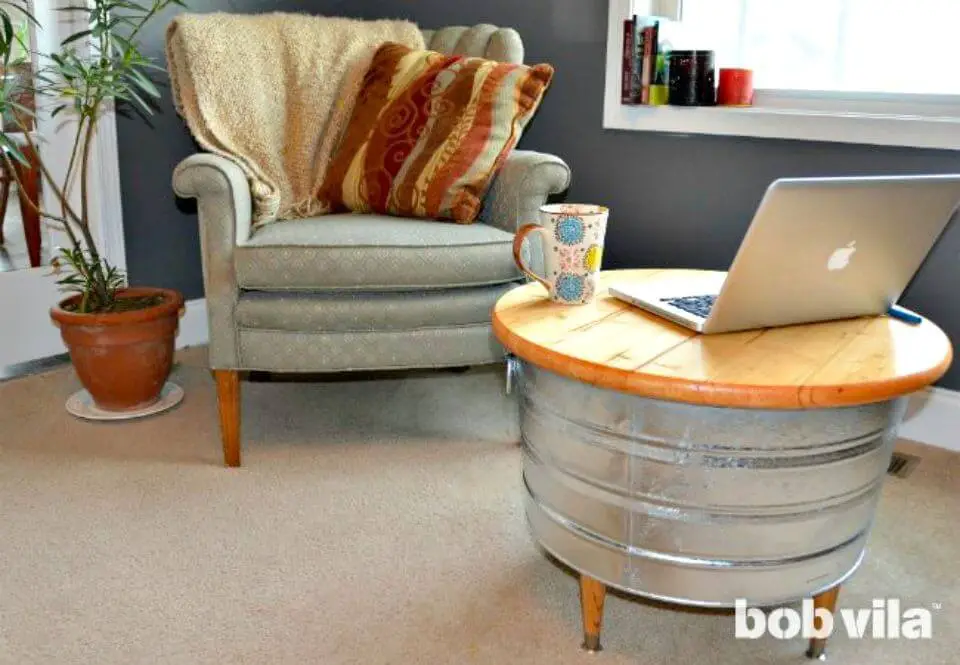
Transform your home into a serene sanctuary by leveraging a dozen ingenious DIY toy storage solutions that won’t break the bank. Bid farewell to the chaos of scattered stuffed animals, action figures, and building blocks with creative ideas that will make you wonder how you ever managed without them. By repurposing materials like plywood, wood planks, and caster wheels, create under-bed rolling bins with rope pulls and chalkboard labels for seamless organization. Alternatively, craft a one-of-a-kind three-tier hammock using precut hobby wood, lath, and rope to provide a cozy haven for your little ones’ stuffed friends or utilize a magnetic kitchen knife rack to keep metal toys out of the way. For a more versatile storage solution, build a seat-storage combo or an enchanting toy chest from cardboard boxes, perfect for corralling all manner of playthings. By embracing these clever DIY ideas, you’ll be well on your way to reclaiming your space and restoring your sanity.
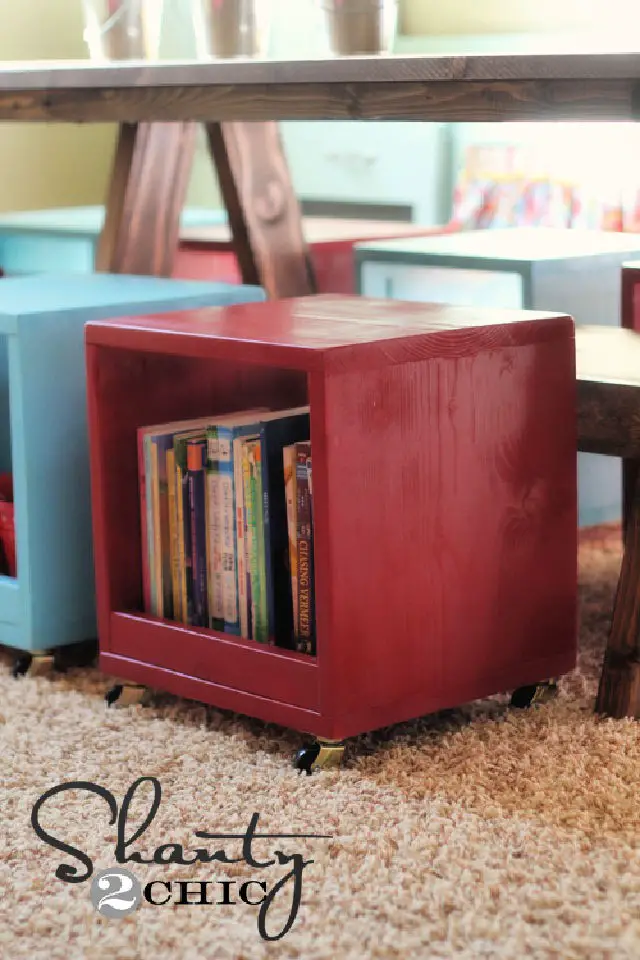
DIY Rolling Crate for Book Storage
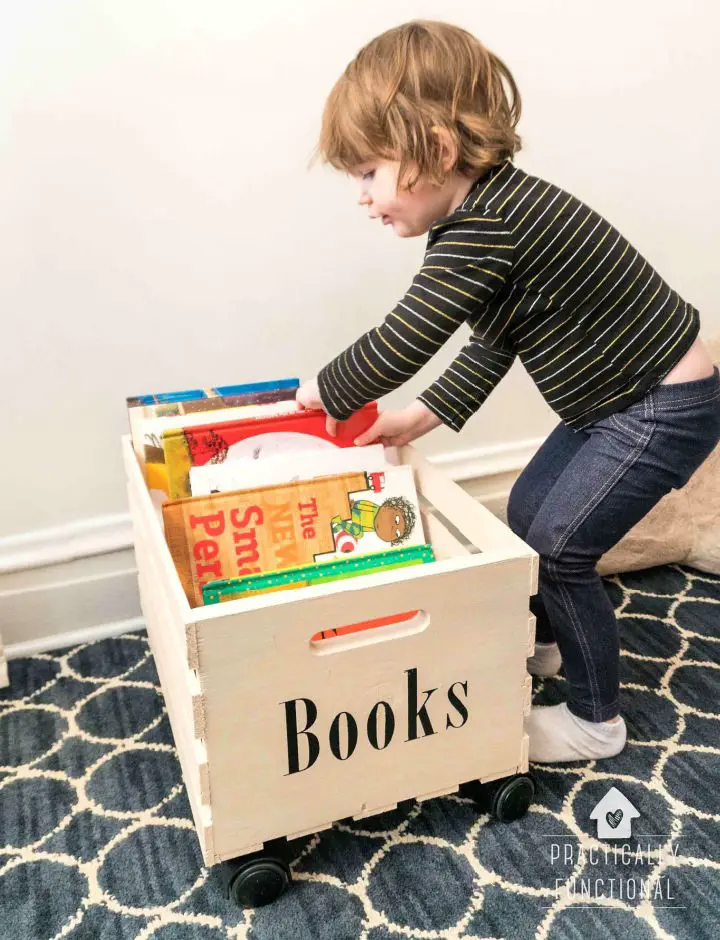
If you’re tired of tripping over scattered books around the house, consider whipping up a simple DIY rolling book storage unit. This clever creation can be built in under an hour with basic tools and materials. The end result is a sturdy, stylish, and mobile solution that makes organizing and transporting your favorite reads a breeze.
All you need to get started are a wooden crate, caster wheels, and some paint. Feel free to let your creative juices flow by making a vinyl stencil to add personalized labels to your crate. This space-saving storage solution is perfect for keeping your books within easy reach, whether you’re an avid reader or a parent looking for a fun way to encourage kids to carry their own books around.
When not in use, the rolling book crate can be neatly tucked under a coffee table or beside a couch, making it a practical addition to any room. With this DIY project, you can give your books a neat and accessible home that’s both functional and fun.
How to Build a Dog Toy Storage Box
Transforming a plain crate into a charming DIY dog toy box that harmonizes with your home decor is a fun and creative project. By utilizing common craft store materials such as a crate, paint, sandpaper, and plastic cups, you can elevate the storage of your furry friend’s toys to a whole new level. This step-by-step guide will guide you through the process, from setting up your workspace to preparing the crate, adding coats of paint, attaching personalized details, and finishing with a stylish fabric bow. Not only does this DIY project keep your pet’s playthings organized, but it also adds a unique touch to your space. So why not get creative and start crafting your one-of-a-kind dog toy box today?
Quick and Easy DIY Wooden Toy Box
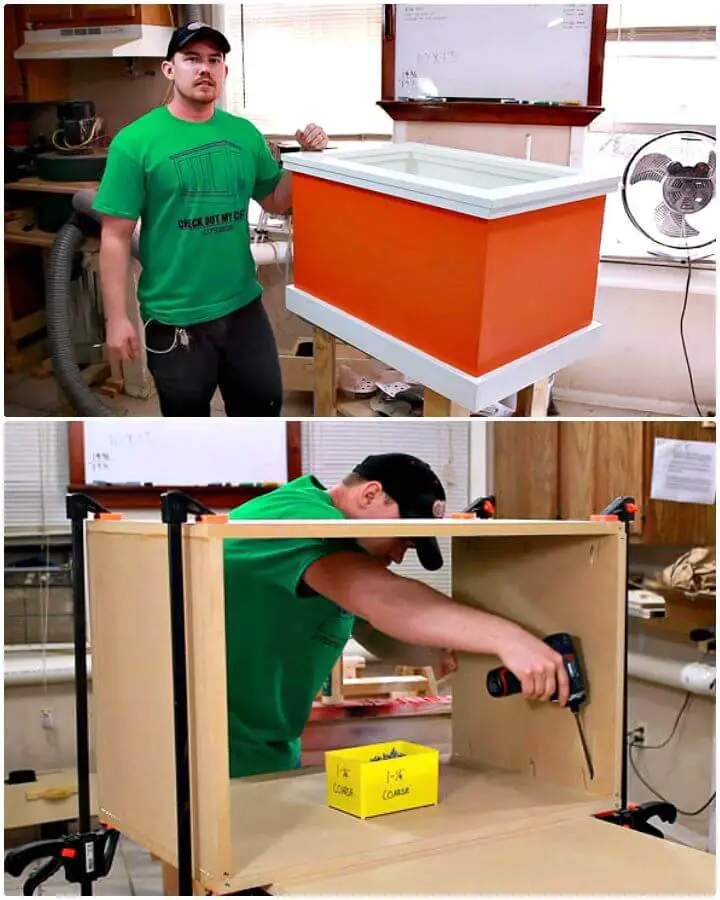
Transform a humble sheet of 3/4″ MDF into a sturdy and stylish toy box using basic tools and materials, as outlined in this step-by-step DIY guide. With the help of a circular saw, miter saw, Kreg Jig, brad nailer, and some patience, you’ll be able to create a functional storage solution for children’s playthings that’s equal parts practical and visually appealing. By implementing an innovative dust control system when cutting the MDF, this project prioritizes both safety and efficiency, ensuring a clean and safe working environment throughout. The incorporation of pocket holes adds strength and speed to the joints, resulting in a long-lasting and robust box that can withstand the rigors of daily use. To finish it off, a bright coat of paint and protective layer of lacquer add a vibrant sheen, making this toy box an eye-catching addition to any room. Today, showcase your crafting skills by constructing this simple yet highly effective MDF toy box!
Make Your Own Toy Storage Rolling Crate
Transform underutilized space into a stunning and functional storage solution perfect for managing large toy collections. Crafted from readily available materials like wood, casters, and handles, each unit costs approximately $30 – significantly more affordable than expensive commercial alternatives. This DIY project offers a fun and budget-friendly way to tackle toy clutter, infusing your child’s playroom with a unique touch. The resulting rolling storage crates are robust, visually appealing, and serve a practical purpose, elevating the room’s aesthetic appeal. By combining functionality and style, this inventive solution adds an element of creativity to your home decor, providing a cost-effective alternative to pricey storage options.
Underbed Toy Storage Rolling Cart
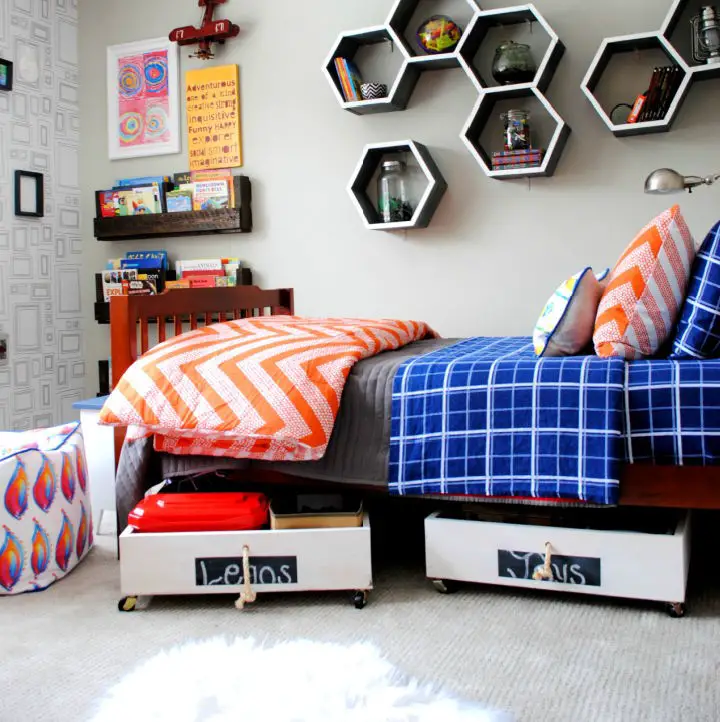
Transform your child’s room into a tidy haven with a unique DIY project that harmoniously blends style and functionality. By creating under-bed wood storage carts on wheels, you’ll be able to corral pesky toys that often find themselves at the bottom of the bed, making it an ideal repository for toys, books, or any other items that tend to get lost in the shuffle. Crafted from basic woodworking materials like plywood, wood nails, and rolling wheels, these carts are not only budget-friendly, with each one costing approximately $10, but also remarkably durable. Beyond the confines of a children’s room, these versatile carts can be easily customized for various uses and spaces, such as a living room, garage, or craft room, storing everything from blankets and DVDs to tools and art supplies. To add an extra touch of whimsy, you can personalize the carts with paint, chalk paint, or even a rope pull. Not only do these storage solutions offer a cost-effective and visually appealing way to stay organized, but they also make for an enjoyable project for home improvement enthusiasts.
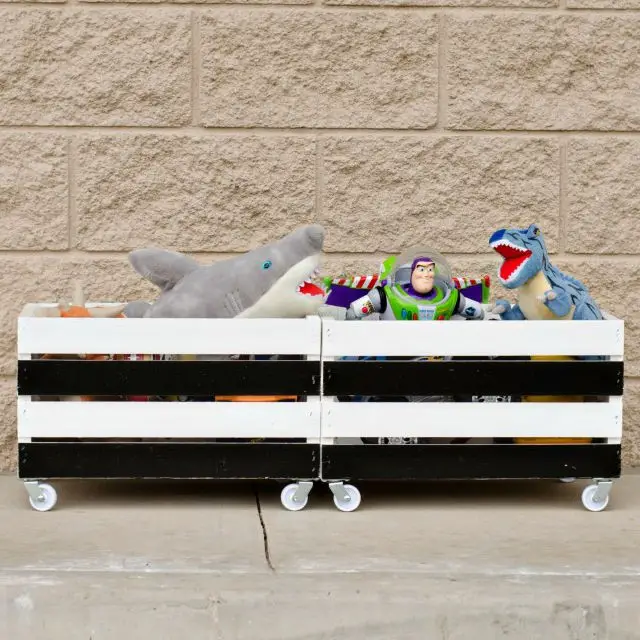
Cheap DIY Wooden Toy Storage Crate
Inject new energy into your kids’ play spaces by crafting DIY toy crates with casters, providing a much-needed storage solution for their ever-growing toy collections! By repurposing wooden pallets, you’ll create versatile containers that can be easily moved around to accommodate their playstyle. The construction process is straightforward, involving the assembly of a simple box structure using a nail gun and additional bottom planks for added support.
A gentle whitewash treatment gives the crates a softer aesthetic, allowing the natural charm of the pallet wood to shine through while blending seamlessly with your child’s room decor. Once complete, the crates are equipped with 2-inch casters for effortless mobility.
Filled with play kitchen toys or stuffed animals, these crates offer a convenient storage solution, making tidy-up times a breeze. By creating these toy crates, you’ll not only keep your home organized but also demonstrate the value of practicality and sustainability in reusing pallet wood.
How to Make a Toy Storage Using Wood Crates
Transform playtime for your little ones by building a DIY wooden crate toy box that’s both functional and fun. This clever storage solution not only keeps toys organized but also serves as a portable play station, encouraging imagination and creativity. To get started, gather a large wooden crate and two white swivel plate casters. Give the crate a fresh coat of Premium Decor High Gloss Enamel in white and black, adding stripes for visual appeal before allowing it to dry completely. Next, secure the casters to the crate using a power drill and number 8 wood screws, ensuring they’re aligned with the edges for seamless mobility. With that, your mobile toy box is ready to be filled with your child’s favorite playthings, making clean-up times a breeze. By incorporating this project into your home, you’ll bring in a touch of creativity, functionality, and modern design, leaving both kids and adults delighted.
How to Build a Toy Storage Chest
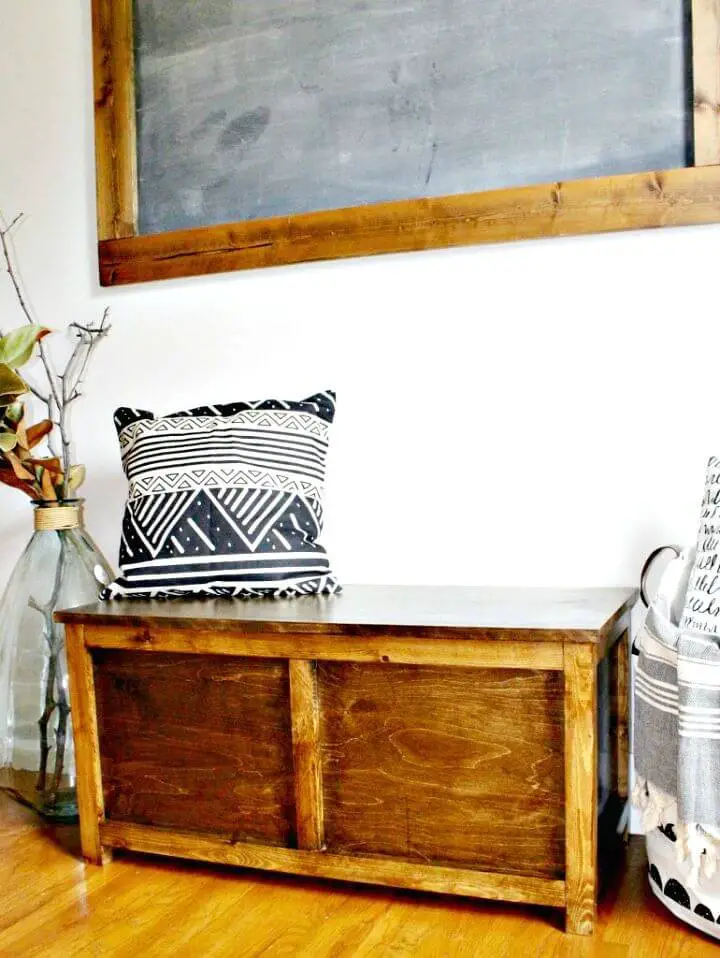
Transform your storage game with a DIY storage chest that seamlessly blends functionality with visual appeal. This versatile piece of furniture, crafted using a circular saw, drill, Kreg Jig, miter saw, plywood, 2x2x8s, edge banding, and screws, can be repurposed as a coffee table, entryway bench, or keepsake box. The step-by-step process involves constructing a frame, adding divider pieces, right side panels, installing a bottom panel, and finally, attaching the top. With its clean, elegant design, this storage chest is adaptable to any interior decor, allowing for a personalized touch. Start building this practical yet stylish storage solution to tidy up those pesky items while elevating your living space.
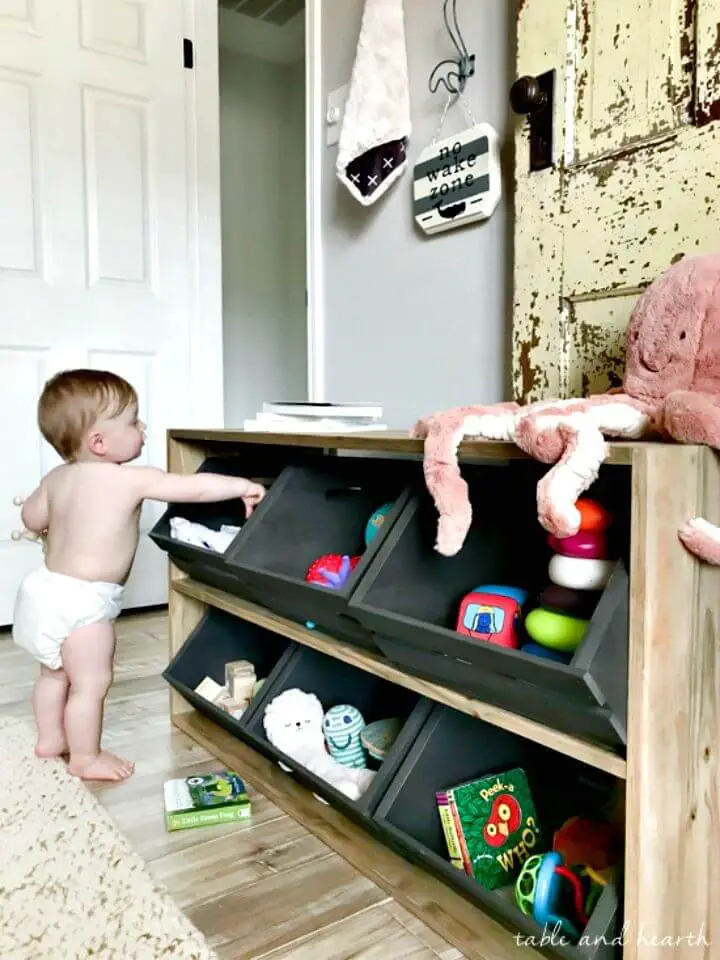
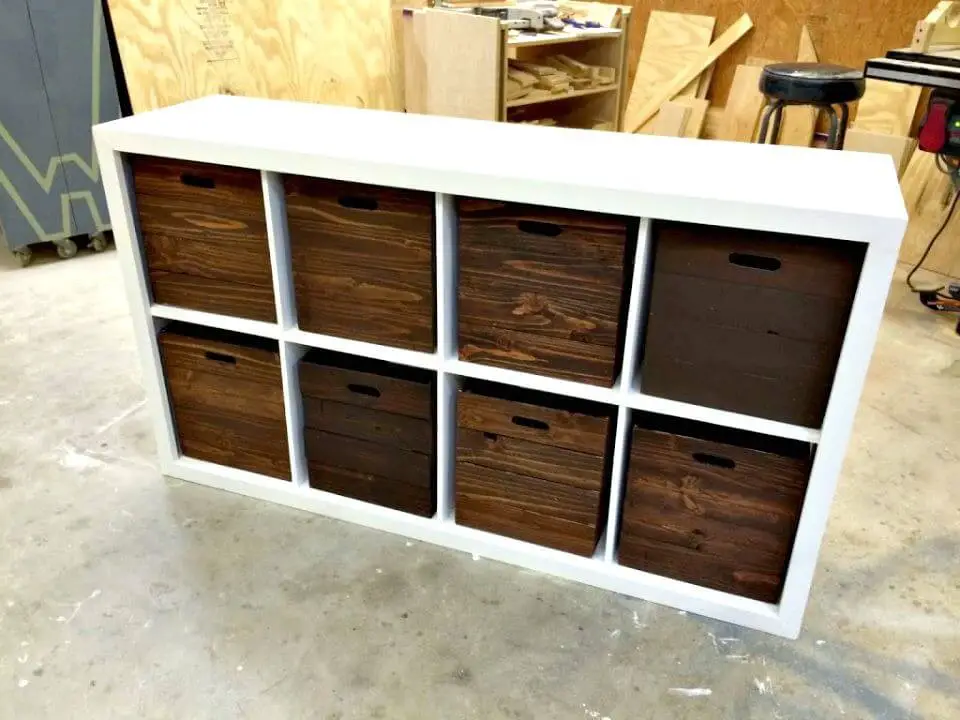
Toy Storage Bin Box With Cubby Shelves
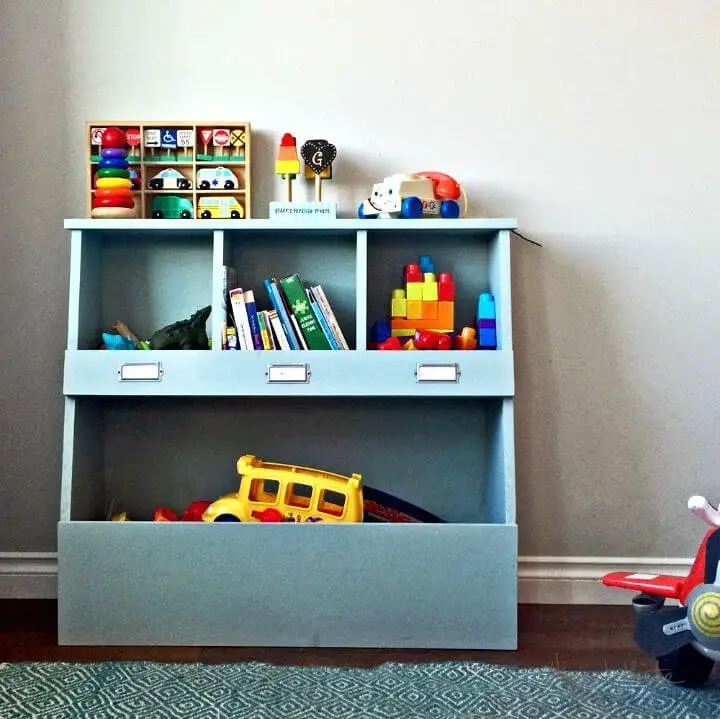
Transform your child’s playroom with a stunning DIY pine board vertical toy box that combines functionality with elegance. This intermediate-level project requires minimal materials, including 1×12, 1×10, 1×8, and 1×4 boards, as well as 1/4″ thick plywood or hardboard for the back and 3/4 inch finish nails. By following simple and detailed instructions, you’ll create a large toy box with smaller storage cubbies perfect for organizing tiny toys, books, or decorative items. The end result is a practical yet aesthetically pleasing storage solution that keeps your child’s play area tidy and uncluttered. With this project, you’ll unlock a fun experience for both kids and adults, as the unique toy box becomes a perfect addition to your home.
Easy DIY Rustic Crate Toy Storage
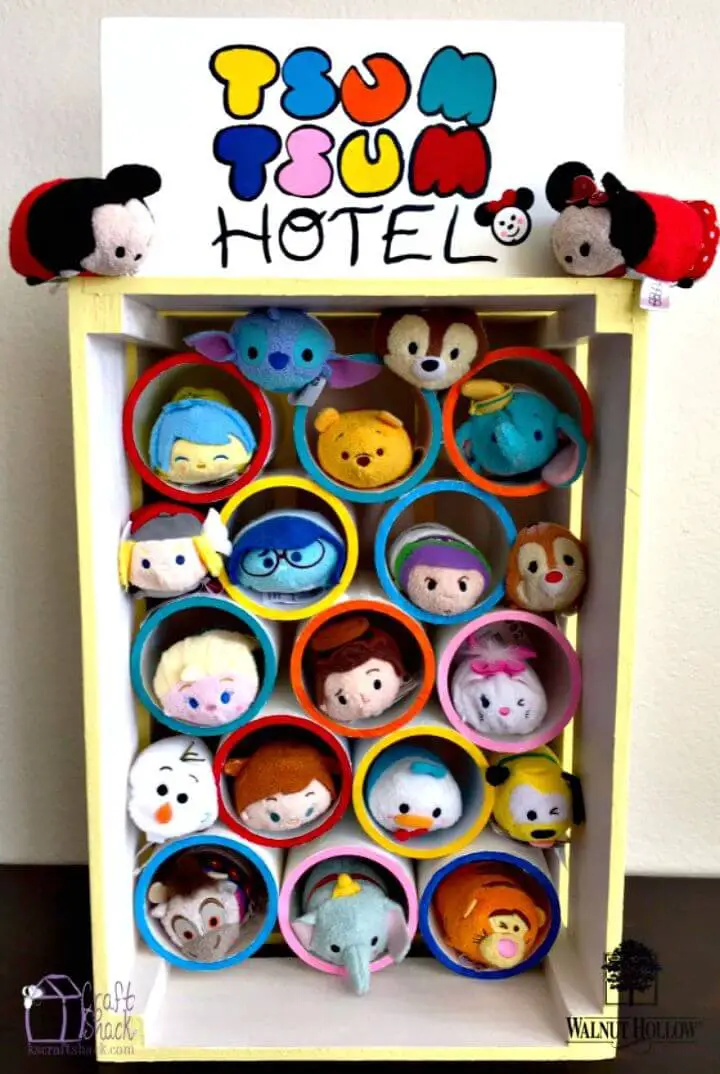
Imagine a whimsical haven for your tiny treasures – a rustic crate hotel that effortlessly organizes the playful chaos of your home. This charming DIY solution is crafted from a sturdy walnut hollow crate and topped with a vibrant, hand-painted sign. The pièce de résistance? A custom-made structure fashioned from PVC pipes, specifically designed to cradle your cherished Tsum Tsum toys or other miniature friends. With a straightforward construction process involving sanding, painting, cutting, and gluing, you’ll be delighted by the ease with which this storage solution takes shape. As the crowning glory of your space, it not only keeps your floor tidy but also adds a touch of rustic charm to your décor.
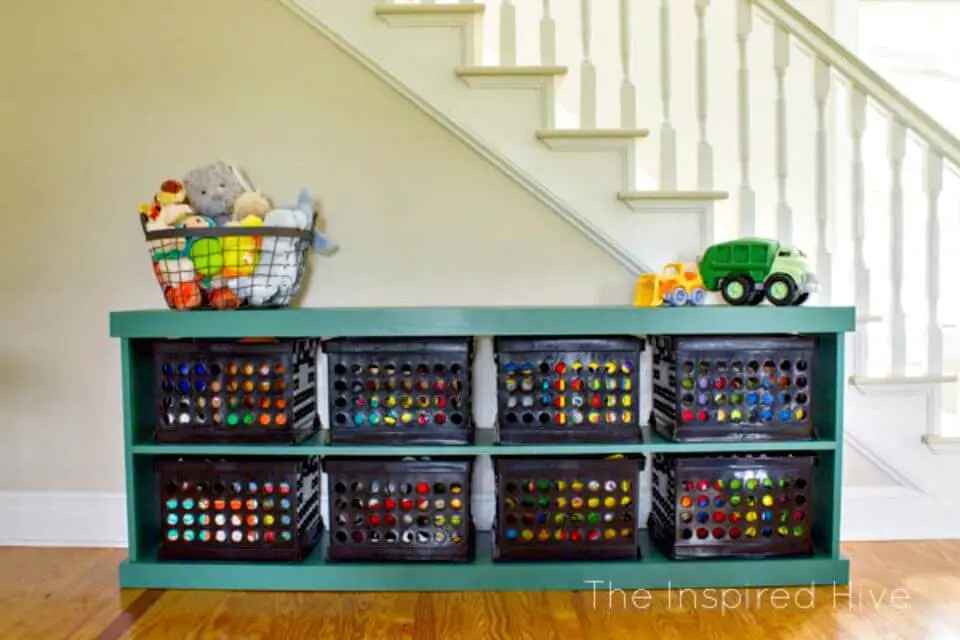
Toy Storage Console With Rolling Bins
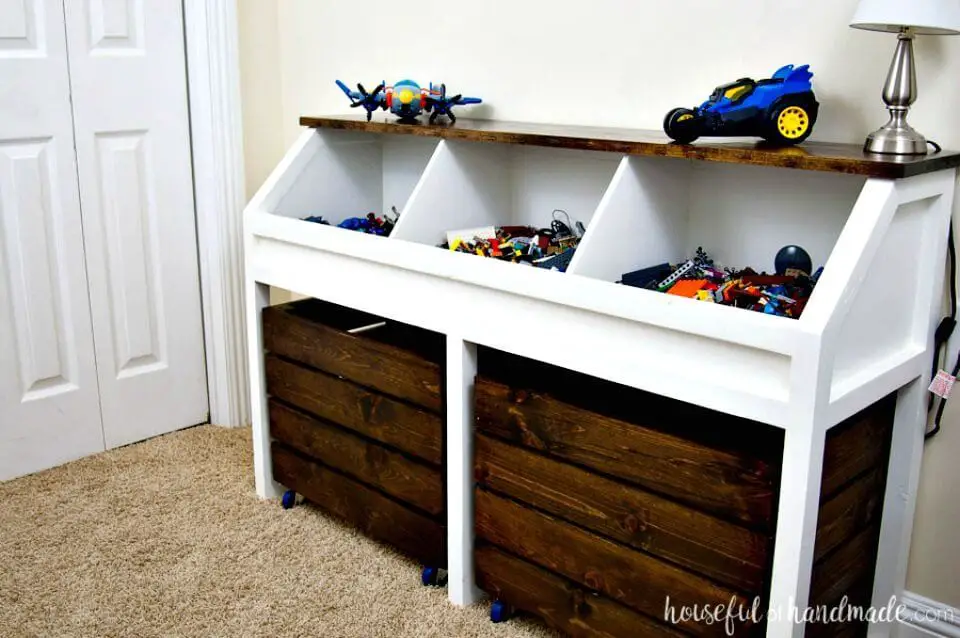
Transform your playroom into a haven of order with this DIY toy storage console and rolling bins, perfect for keeping your little ones’ toys in check. This moderate-level project takes basic wood products and turns them into a stylish, rustic console featuring three open bins for smaller items and two larger rolling bins for bulkier toys. Crafted from sturdy 2×2, 1×3, 1×4, and 1×10 boards, along with half-inch-thick plywood, the console’s practical design allows it to adapt as your child grows. The assembly, reinforced by pocket hole screws, promises a durable and long-lasting solution. This unique storage solution effectively organizes toys while adding a touch of rustic charm to your interior decor. Take on this satisfying project and experience the joy of creating a functional, one-of-a-kind storage solution for your home.
Make Your Own Toy Storage Shelf
Transform a closet or play area into an imaginative and functional toy storage solution by incorporating shelves and bins that maximize space for various items. This comprehensive guide shares expert insights on how to build a DIY crate toy storage shelf, providing a unique and fun answer to every parent’s toy storage conundrum. The innovative storage shelf seamlessly blends aesthetic appeal with practical design, crafted using sturdy boards and storage crates cut to size to fit your child’s play space. The step-by-step instructions also detail the process of assembling, painting, and sealing your toy storage, ensuring a clutter-free playroom that sparks creativity and joy. With this easily accessible and child-friendly storage solution, tidying up becomes an enjoyable game for kids. Not only is the storage shelf practical, but it also adds a touch of style to your child’s nursery, making it an ideal addition to any play area.
Build a Pottery Barn Media Center With Toy Storage
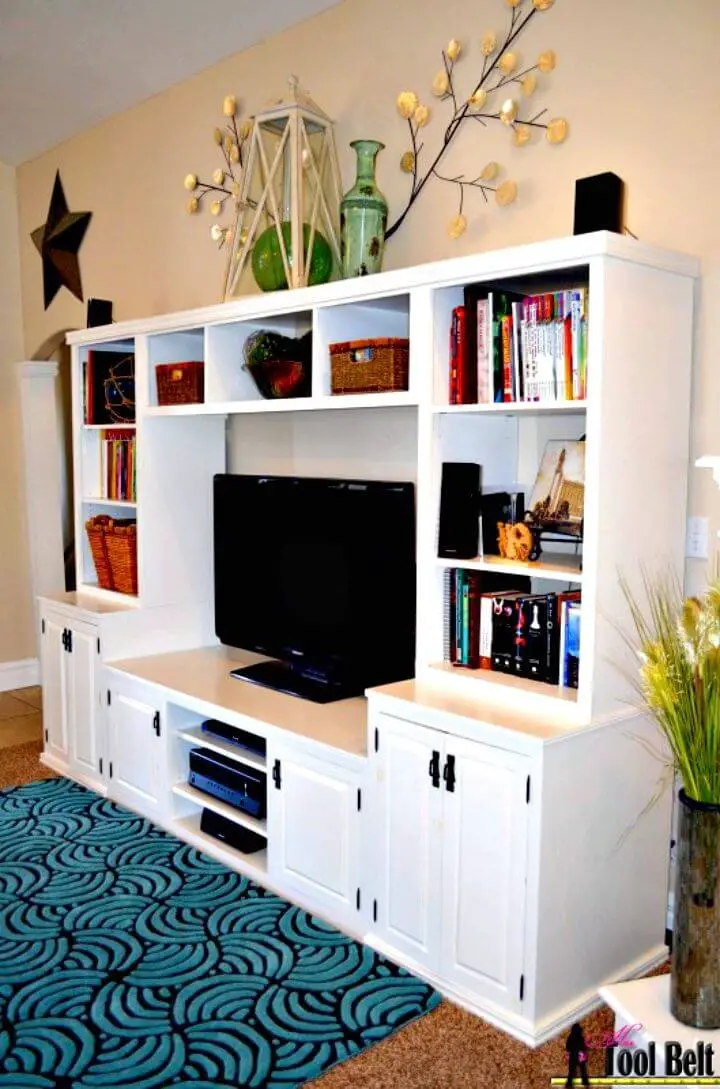
Transform your living space into a cozy haven by crafting a DIY media center inspired by Pottery Barn’s elegance. This woodworking project requires some manual labor but yields a functional and stylish storage solution for concealing clutter. The finished piece measures approximately 111 inches wide and 76 inches tall, accommodating a 70-inch TV. Its modular design comprises six separate components, allowing for effortless rearrangement.To bring this vision to life, you’ll need materials such as pine wood and birch veneer plywood, totaling around $300. Consider substituting poplar boards to prevent the inevitable yellowing that can occur over time, as suggested by Amy. The step-by-step instructions guide you through the process, including cutting solid wood pieces and assembling the frame using biscuits or dowels.The beauty of this DIY project lies in its customizability, allowing you to select materials that align with your personal design style and budget. By building your own media center, you’ll not only achieve a sense of accomplishment but also enjoy the satisfaction of having a space that perfectly reflects your aesthetic.
How to DIY Dress-Up Toy Storage
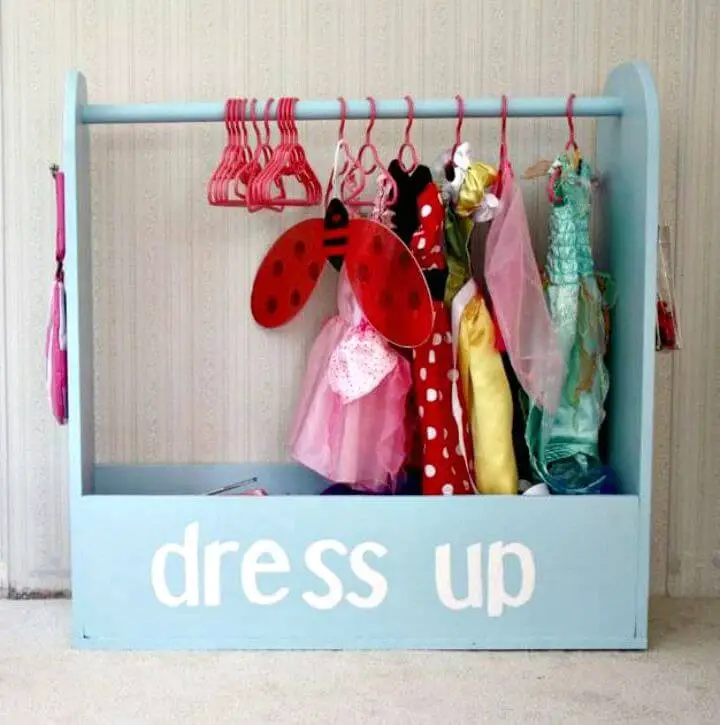
Transform your closet into a whimsical dress-up haven by crafting these DIY storage solutions! This multi-functional creation boasts a three-foot hanging rod for outfits, an open base for fluffy tutus and capes, and ample space to store costumes, shoes, and accessories. Constructed from wooden boards, dowels, and self-tapping wood screws, you can customize it with caster wheels for effortless mobility and a paint finish that harmonizes with your room’s decor. With dimensions of 36 inches by 36 inches by 12 inches, this charming storage box will bring joy and organization to your child’s space.
Crate on Wheels Toy Storage Idea
Transform your child’s playroom into a vibrant space by upcycling wooden crates into mobile toy storage units. This DIY project is a game-changer, converting ordinary boxes into dynamic and practical solutions for storing toys. The process begins with painting and adding a chalkboard rectangle for labeling, followed by the creation of a whimsical frame that adds a touch of personality to the design. The pièce de résistance is the incorporation of swivel plate wheels, allowing your child to easily move their toys around without damaging the floor. What was once a plain wooden box has now become an attractive and kid-friendly storage solution. This tutorial proves that organization can be both fun and accessible, making it easy for kids to keep their toys tidy and within reach. Ditch traditional toy boxes and inject some creativity into your child’s world with this easy yet impactful project.
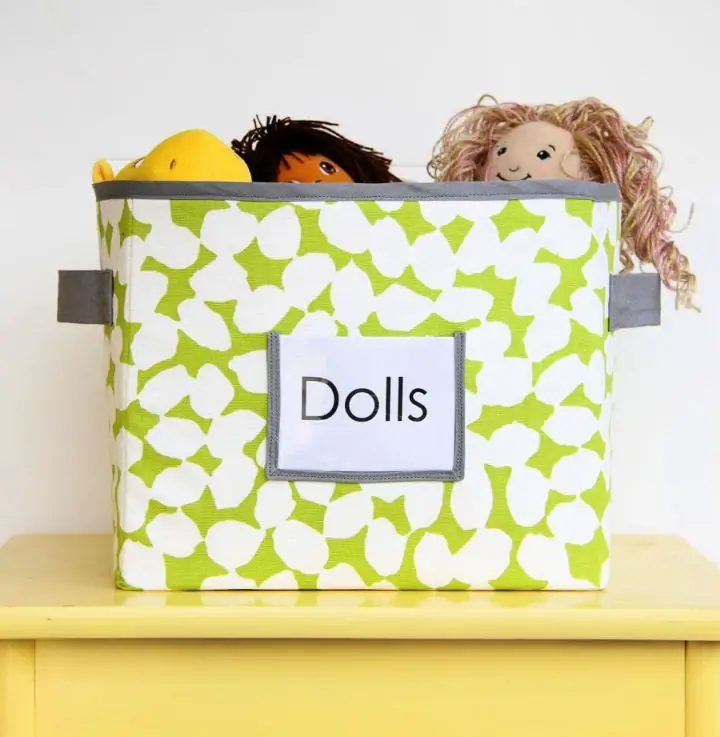
DIY Fabric Toys Storage Bucket
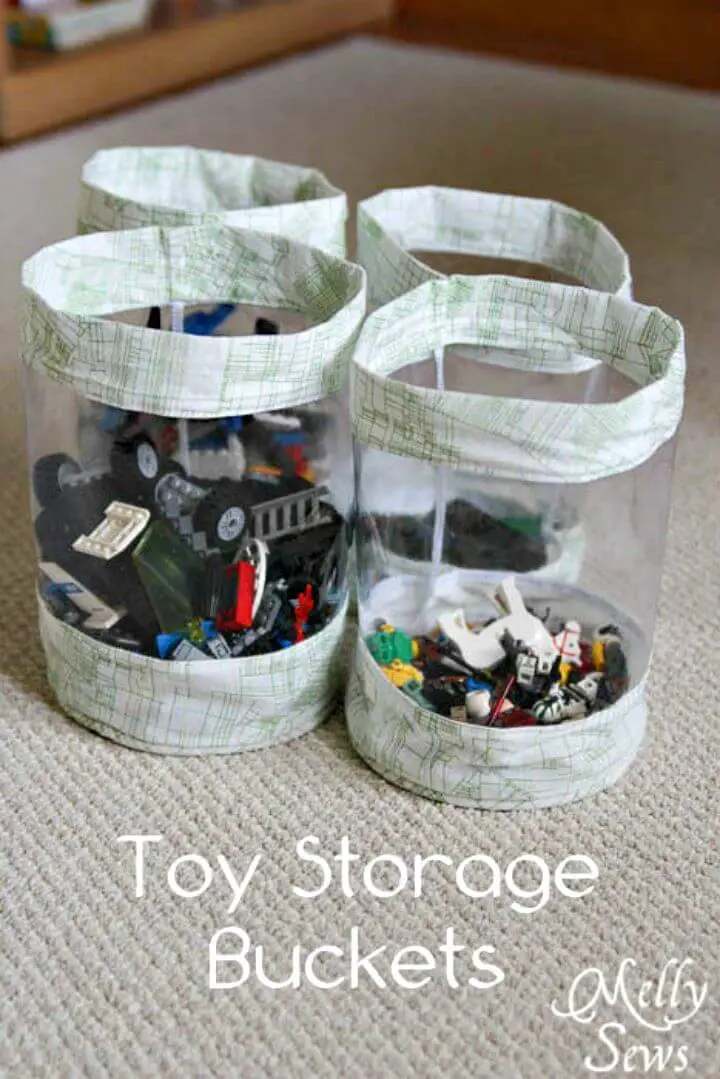
Transform your living space by embracing the practicality and charm of DIY fabric storage buckets. Perfect for decluttering and organizing spaces, these delightful containers will keep messy tabletops at bay and turn painful Lego encounters into a thing of the past. To create these stylish storage solutions, gather essential supplies like fabric, clear vinyl, heavy-duty fusible interfacing, sew-on velcro, tissue paper, and hot glue. With these easy-to-assemble buckets, you’ll be able to add a personal touch to your home while effortlessly solving storage woes.
Build Your Own Wooden Toy Storage
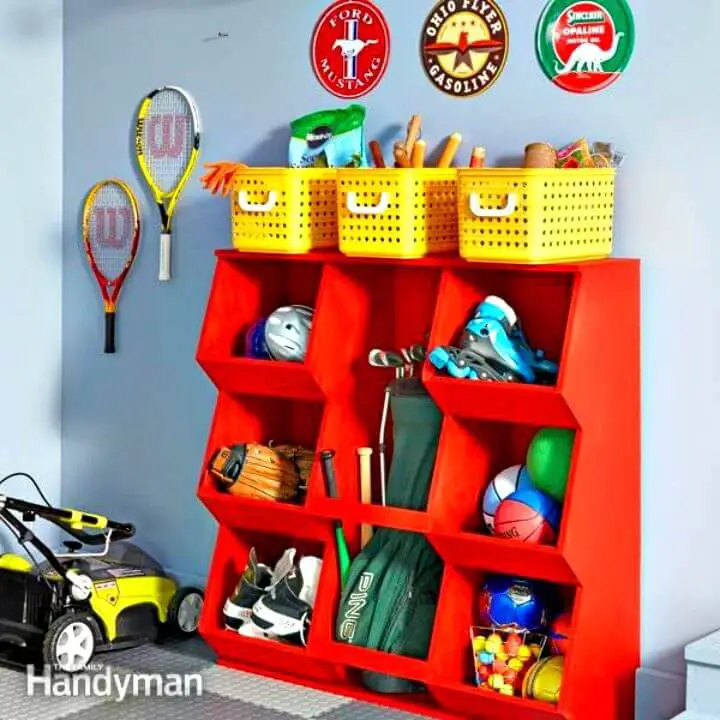
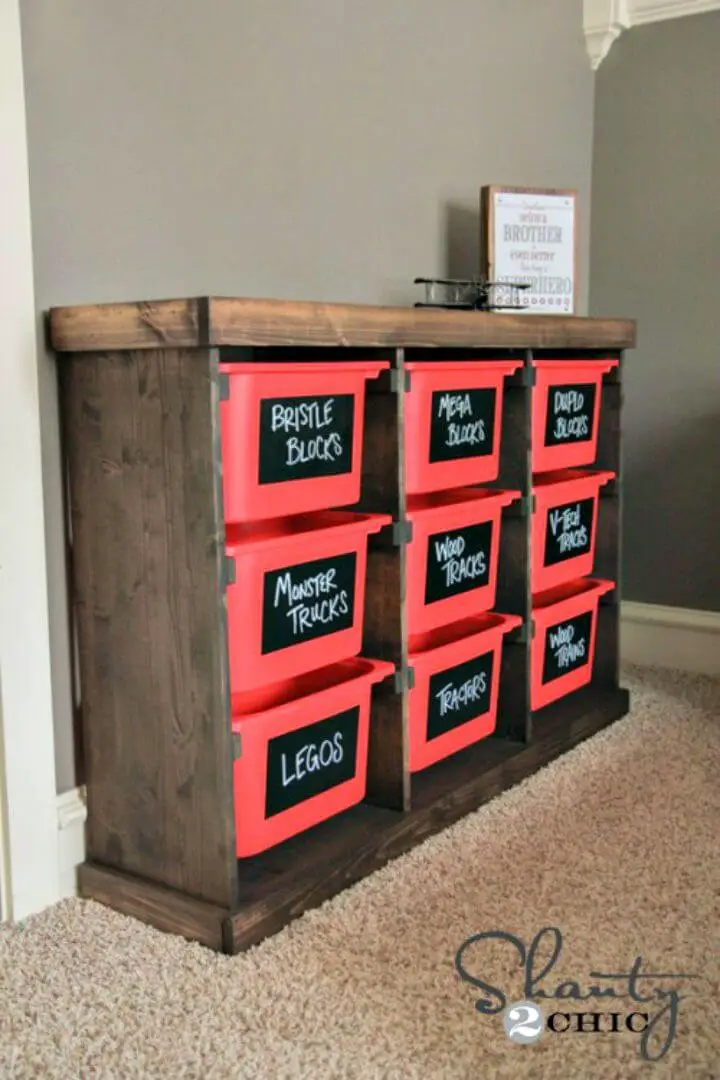
Transform your garage into a haven of organization with creative DIY toy bins! Designed to withstand the hustle and bustle of family life, these versatile storage solutions can accommodate everything from sports equipment to gardening supplies. The sturdy construction, combining plywood and solid pine board, ensures durability and reliability in daily use.
Inspired by old country store bins, this project injects a touch of nostalgia into practicality. With just a table or circular saw, screw gun, straightedge, tape measure, and wood glue required, you can easily bring these efficient storage solutions to life.
From cutting and sanding to assembling and finishing, the process is straightforward and rewarding. Enjoy the satisfaction of having a clutter-free garage with an estimated cost of $101-$250 – an affordable solution for busy families.
Awesome DIY Toy Storage Cubbies
Transform your chaotic playroom into an oasis of tidiness with this DIY toy storage project that’s sure to stand the test of time. By repurposing an old bookcase, you’ll be providing ample space for organizing toys and books while instilling valuable lessons in kids about the importance of keeping a tidy space. This post-holiday organization solution is designed to simplify clutter, making it easier to maintain a well-organized playroom that will continue to serve your family’s needs long after the holiday season has passed.
This project requires some effort upfront, but the end result is well worth it – a clean and organized space where every toy has its own designated home. The cubby itself serves as both a storage solution and a unique decor piece that will add a touch of personality to your playroom. So why not give it a try?
Make an Underbed Toy Storage Box
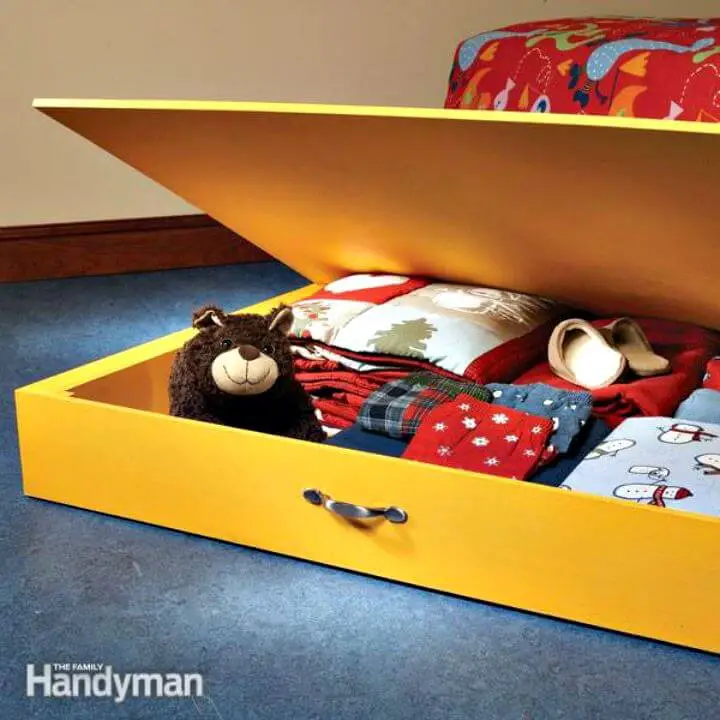
Transform your bedroom’s hidden space into a tidy haven by crafting an under-bed storage box. This DIY project requires just $60 and a single sheet of 1/2-inch plywood, offering a cost-effective way to boost your bedroom’s functionality and aesthetic appeal. Unlike plastic alternatives, this wooden storage solution promises longevity, customizable sizing, and a touch of natural charm. With only a few hours of your time on the weekend or whenever you prefer, you can create a space-saving storage box that keeps clutter at bay, leaving your bedroom looking serene and organized.
Covered Kiddie Car Parking Toy Storage Garage for Kids

Creating a covered parking garage for kids’ outdoor toys, such as ride-on cars, can be a game-changer in climates where harsh weather conditions quickly damage or fade them. By protecting these toys from the elements and keeping your yard tidy, you’ll not only extend their lifespan but also promote organized playtime. The good news is that this DIY project requires minimal materials, including PVC pipe, elbow and T-joints, corrugated plastic roof panels, drop cloth, clip rings, screws, and wire stakes. To build this outdoor toy garage, start by constructing a sturdy PVC frame, then attach the roof panel and drop cloth walls to create a covered space that’s both functional and visually appealing.
Make Pallet Wood Carts for Toy Storage
Transform your organization game with these adaptable and easily movable DIY wood crates on wheels. Boasting durability, sturdiness, and convenience, they’re perfect for tidying up a child’s room, enhancing mudroom storage, or adding rustic charm to your living space. With the ability to be quickly assembled using readily available materials like 1×12, 1×6, and 1×4 wooden boards, self-tapping screws, and caster wheels, you can create these crates in no time. Don’t worry about customization – use reclaimed wood, resize it to your liking, or add handles for a comfortable grip. Start now and gain the extra storage you’ve always needed while keeping it stylish and unique with these versatile wooden crates on wheels.
Clear Toy Storage Bags With Drawstring Closure
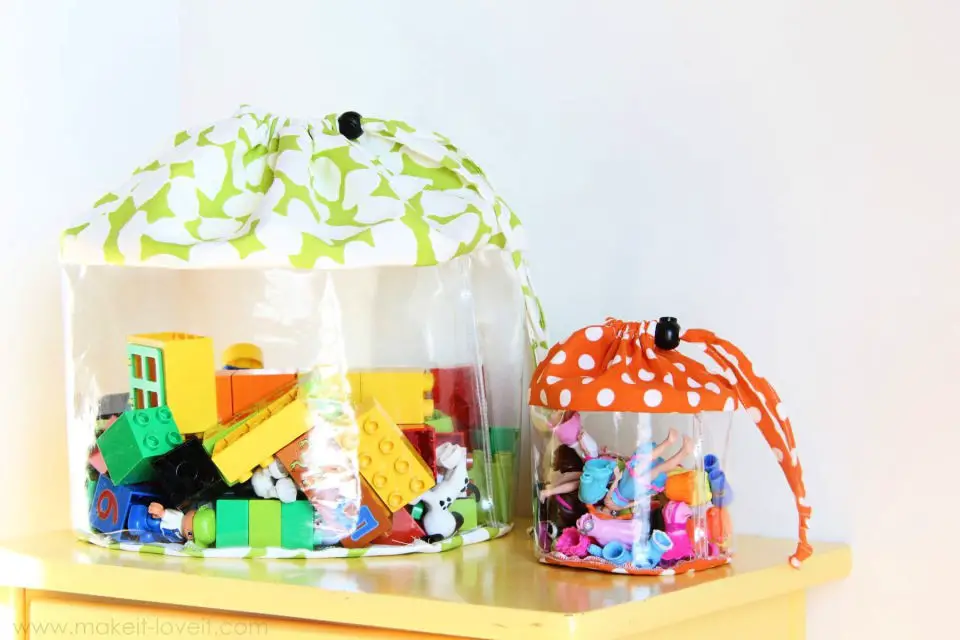
Want to tame the chaos of your kids’ toys? One simple solution is to create a clear vinyl pouch that keeps small play items neatly stowed away. These versatile bags are perfect for containing Polly Pocket dolls, miniature cars, or even blocks that have a knack for disappearing underfoot.
With basic supplies like fabric, clear vinyl, fusible interfacing, and a cord pull, you can whip up these pouches in no time, tailoring them to your size preferences. And the best part? They’re not just limited to toy storage – they’re also great for keeping bathroom essentials, makeup, markers, and craft supplies organized.
The clear design of these bags is a game-changer, allowing you to quickly identify what’s inside without having to rummage through a messy pile. So why not give it a try and minimize the mess with these adorable clear storage bags?
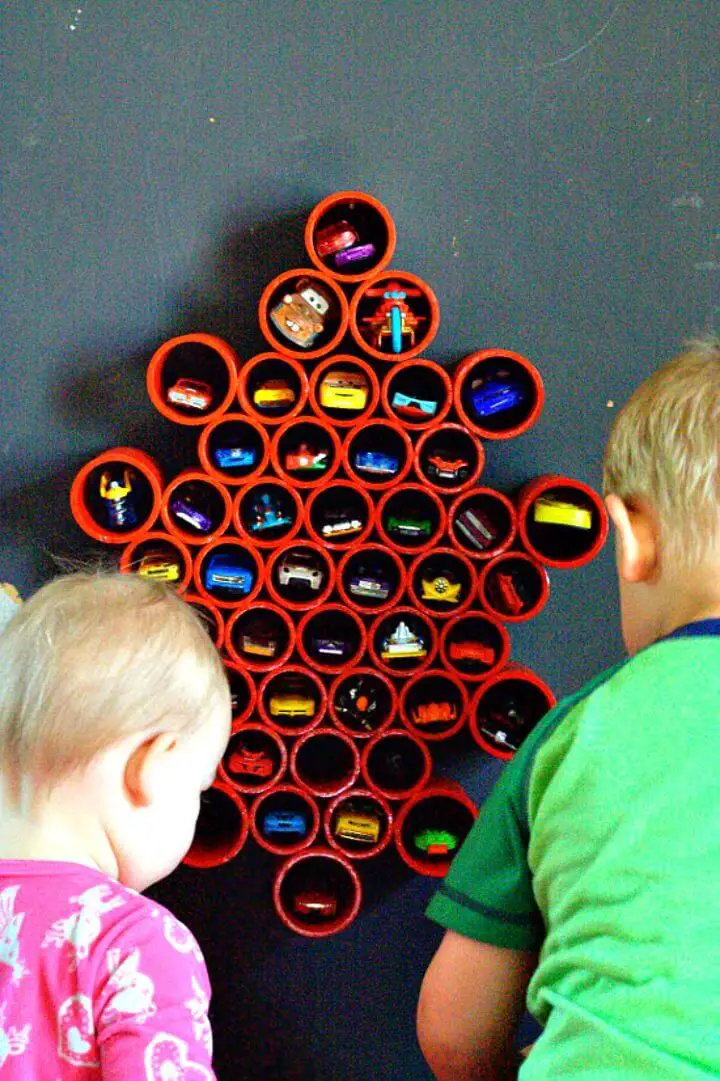
Making Wooden Crates for Toy Storage
Transform your wheeled toy storage with rustic charm using wooden crates! Begin by acquiring a sturdy crate from a craft store, then sand it down to eliminate rough spots. For the next step, opt for sturdy mailing tubes instead of flimsy paper rolls. Cut them to size, smoothen the edges, and prepare them for installation. To prevent cars from falling out the back, add a poster board support row by row. Secure the tubes using a hot glue gun for a neat finish. Finally, create a customized signboard with a pine strip, paint it your desired color, add sticker letters, and attach it securely. This playful parking garage not only stores favorite toys safely but also encourages creativity and organization during playtime.
Apothecary Style Coffee Table With Hidden Lego and Train Play Areas
Step into a world of creativity and functionality with this innovative DIY coffee table project that effortlessly blends style and play. By incorporating an apothecary-inspired design, this versatile piece transforms from a stunning centerpiece to a dynamic activity hub. With a simple lift of the tabletop, you’ll uncover a spacious train table and ample storage space, while flipping the inset reveals a delightful LEGO play area. The clever use of 1x2s and cabinet pulls creates an alluring illusion that draws you in, making this coffee table a must-have for any home. A beautiful white and stain finish adds a touch of sophistication, complemented by understated knobs that exude elegance. With an estimated cost of around $70, this project is both budget-friendly and rewarding. So why not take the leap and craft your own furniture today?
Easy DIY Animal Mason Jar Toy Storage
Transform the ordinary into a whimsical menagerie of storage with DIY mason jars featuring adorable plastic animals. This versatile and easy-to-create craft doubles as a stunning party centerpiece and nursery decor, making it an ideal addition to any room. To get started, gather common materials like glass bottles with lids, spray paint primer, a strong adhesive such as Liquid Nails, and your favorite animal figurines.
Begin by thoroughly cleaning the bottles and removing labels, then prime and paint the lids and animals for a personalized touch. Finally, attach the animal figures to the lids using the adhesive, allowing them to dry completely before use.
These charming jars not only showcase resourcefulness by repurposing everyday household items but also offer an unparalleled opportunity to personalize your space. Turn your storage solutions into a delightful menagerie of storage units that will add a touch of personality to any nursery, craft room, office, or bathroom.
How to Make Hoopla Toys Storage
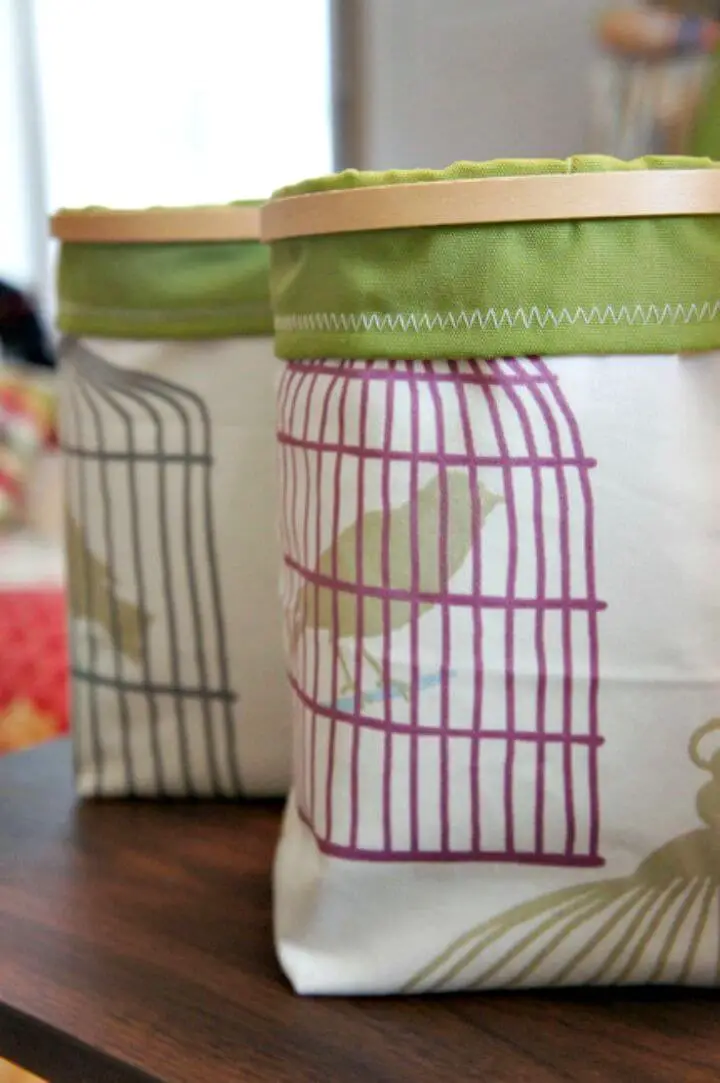
Step into the realm of creativity with a DIY storage solution that combines artistry with functionality. This ingenious project repurposes embroidery hoops to organize small items, such as sewing notions or other knick-knacks, in a visually appealing and efficient manner. The result is a charming, structured bag that not only declutters your space but also adds a touch of whimsy. By combining fabric scraps, a 6-inch embroidery hoop, and basic sewing skills, you can create a one-of-a-kind storage solution that’s as delightful to behold as it is practical to use.
The Ultimate Toy Organizer – Free Plan
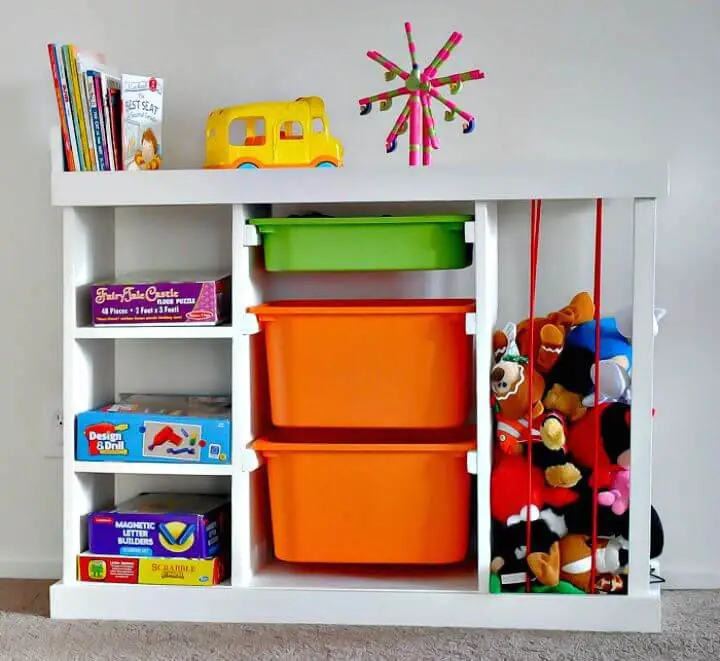
Transform your home into a clutter-free oasis by implementing top-notch toy organization ideas. This free, DIY-friendly plan makes organizing kid’s toys a breeze, providing a versatile storage solution that can accommodate everything from stuffed animals and books to board games and playthings of all shapes and sizes. With detailed instructions and building plans included, this beginner-friendly project is perfect for anyone looking to tackle the task. The best part? It’s ideal for small spaces, consolidating toys into one convenient location and reducing the risk of scattered chaos underfoot.
But this toy organizer is more than just a storage facility – it’s a creative way to keep your child’s play area neat and organized. By implementing this innovative solution, you’ll be saying goodbye to toy chaos and hello to a peaceful, clutter-free living space.
Building a Playroom Seating With Toys Storage
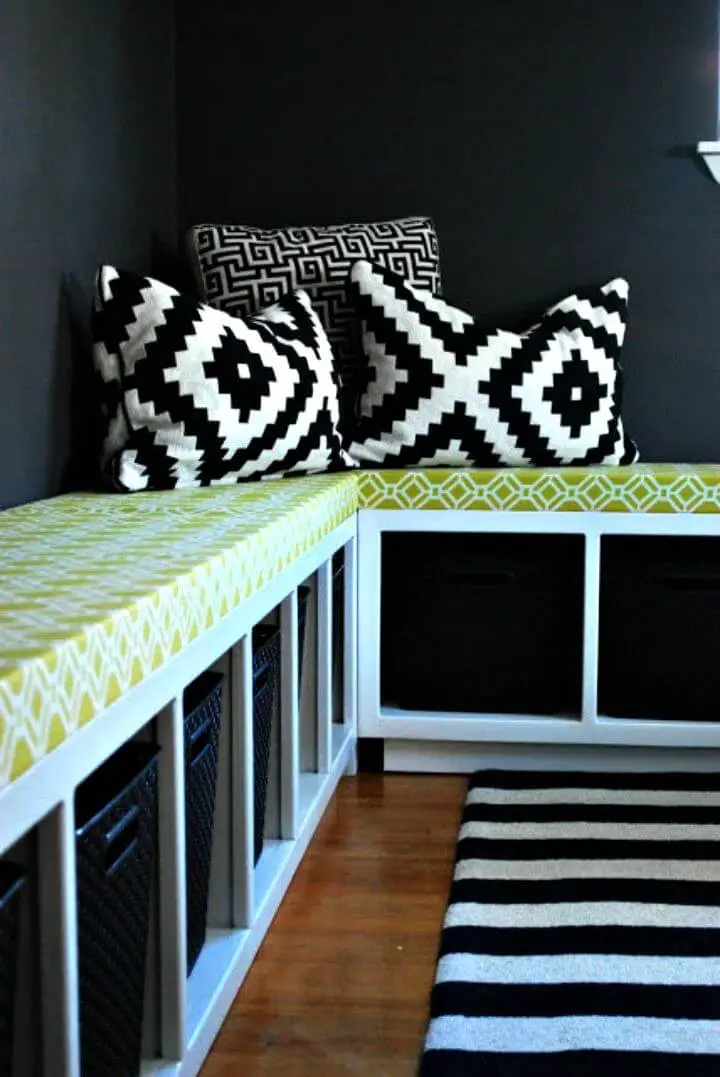
Transform your child’s playroom into a vibrant haven with this innovative DIY project. Create a cozy space that inspires creativity and imagination by repurposing IKEA-style benches with built-in storage. Even without access to IKEA, you can still achieve a customized fit for your room by enlisting the help of a skilled handyman or family member. With their expertise, you’ll have custom-made, upholstered benches ready to use in just a few weeks. To add a pop of color and brightness to darker spaces, choose vibrant fabrics and utilize tools like an air compressor staple gun to achieve a professional finish. While the transformation may require some effort, the end result will be well worth it. Turn your former office into a magical playroom today!
Build Rolling Storage Cube Stools for Toy
With their charming combination of functionality and whimsy, DIY cubby stools can bring a delightful touch to any children’s playroom. By leveraging basic materials like whitewood boards and casters, you can create these multifaceted seating and storage solutions for under $14. The construction process is surprisingly straightforward, thanks to the simplicity of the required tools and materials. A key feature is the protective front barrier, which can be crafted from a single 1×2 whitewood board to keep treasures safely tucked away. Once complete, you can add a pop of color with Rust-Oleum Painter’s Touch in Aqua and Colonial Red, or choose your own hues to match your interior design. After a quick dry, attach the casters and get ready to enjoy your new playroom addition. With these versatile and appealing cubby stools, you can unleash your creativity and create something truly special.
Handmade Fabric Toy Storage Boxes
Transform your home’s organization with these DIY fabric storage boxes that offer a unique blend of functionality and personal style. By upcycling ultra-stiff plastic canvas instead of cardboard, these containers retain their shape over time, making them perfect for storing items in a craft room, kid’s room, or even the car. The best part? You can customize each box to fit your distinct taste and needs.One of the most innovative features of these storage boxes is the interchangeable label window, allowing you to easily identify what’s stored inside. Whether it’s toys, sewing supplies, cords, or diapers, these boxes are versatile enough to accommodate a wide range of items. And with a few simple stitches, you can create a storage solution that reflects your personality and adds a touch of elegance to any room.
How to Sew a Collapsible Toy Storage Box

Discover the joy of decluttering with a creative DIY project – making collapsible storage boxes! These versatile containers are designed to keep your living or working space organized, while also adding a touch of style. By sewing together Moda Denim and Riley Blake Andrea Victoria fabric, you’ll create a chic way to hide away clutter and keep your belongings neatly stored. To get started, gather the following materials: fabric, dowel rods, binding tape, and a trusty sewing machine. The dowel rods will shape the box, while the binding adds both aesthetic appeal and functional benefits. Whether you’re storing yarn, patterns, or other craft supplies, these collapsible boxes are perfect for keeping your creative space organized and clutter-free. And when not in use, they collapse flat for easy storage – making them a must-have accessory for any crafter! With this simple sewing project, you’ll be on your way to boosting your organization and styling skills in no time.
How to Make the Matchbox Organizer
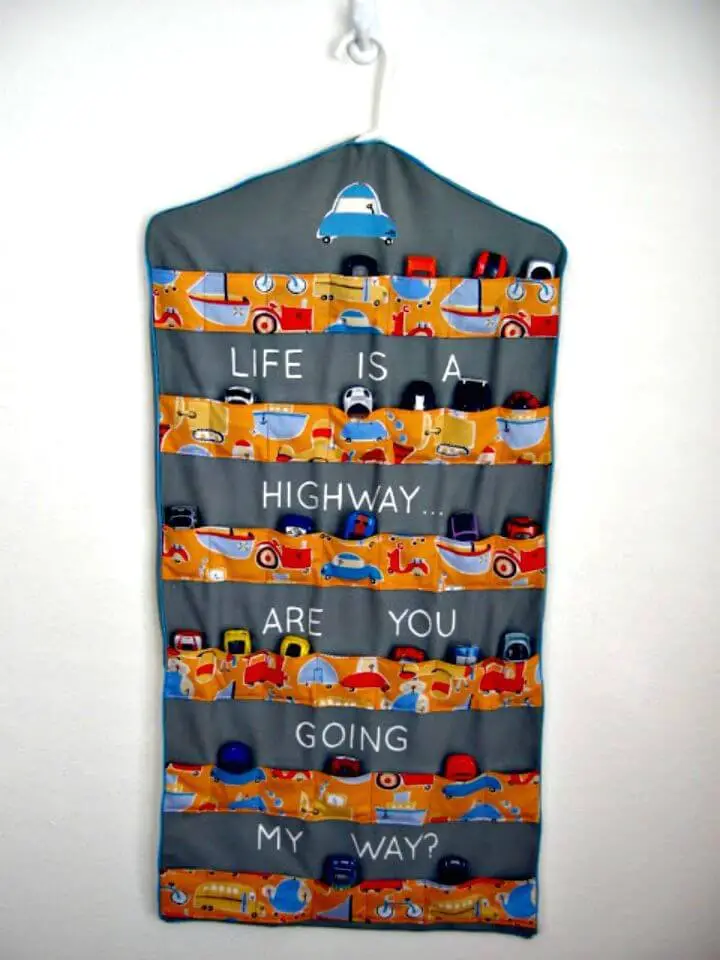
Transform your living space into a vibrant playground for toy cars by crafting a DIY matchbox organizer from basic materials. This ingenious project can store multiple vehicles in a compact, visually appealing way. Begin with a fabric strip of suitable length to accommodate the number of cars you wish to display, measuring and shaping it according to your preferred hanger design.Elevate this project by creating individual pockets for each car, incorporating whimsical word stencils that add a touch of personality. Use freezer paper stencils and fabric paint to bring these words to life, then enhance the overall look with a cute car appliqué. Once you’ve sewn together the front and back pieces, a quick iron press and addition of the hanger will complete this engaging organizational tool.
Repurposed Train Table Underbed
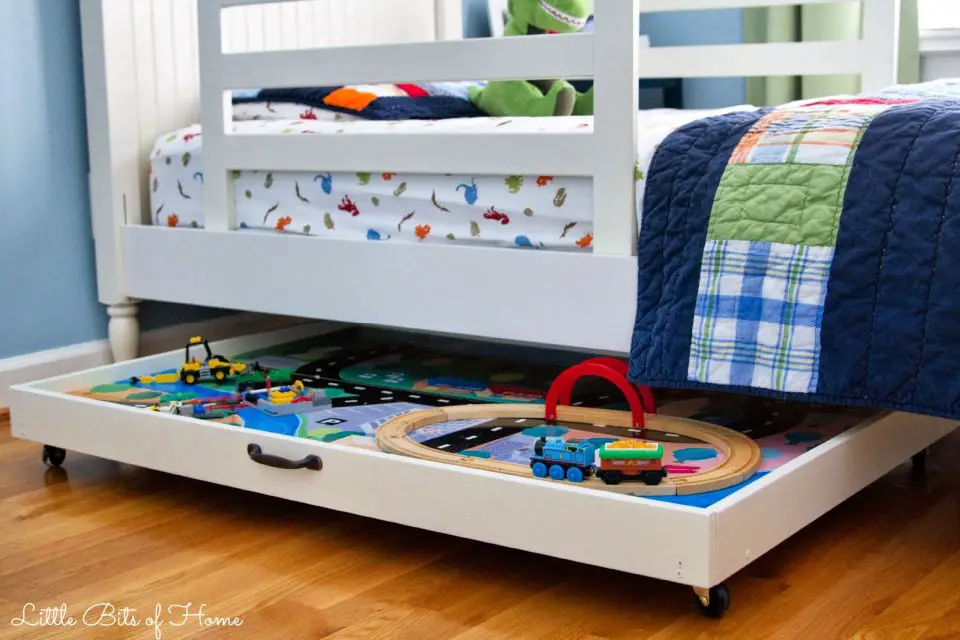
Reimagine a humble train table as a dynamic play space that sparks creativity and fuels imagination in your young one. This creative reconfiguration not only declutters the playroom but also fosters endless entertainment opportunities. With minimal carpentry skills and basic tools like screws, wood blocks, and casters, you can give your table a fresh new look by removing and reassembling its top boards, center supports, and legs. The possibilities are endless as you repurpose and rearrange these components to suit your needs, transforming the space into a hub for various activities – from puzzles to cars. This multifaceted play area promises to become your child’s next go-to toy, making it an ideal birthday surprise.
Easy DIY Matchbox Car Storage
Maximize floor space and keep children’s rooms tidy with creative toy storage ideas, like using hanging baskets on walls to corral clutter. Take it to the next level by crafting a DIY matchbox car storage system that doubles as an engaging display. By repurposing PVC pipe into a grid-like structure, you’ll create a functional and fun way for kids to store their favorite mini vehicles. Simply cut the pipe into 3-inch pieces, glue them together, and paint to match your desired color scheme. Once dry, mount it on the wall and enjoy the fruits of your labor. This clever car storage solution not only provides practical storage but also serves as a visually appealing display that’s sure to delight kids and parents alike.
Building Stacking Toy Storage Cubbies
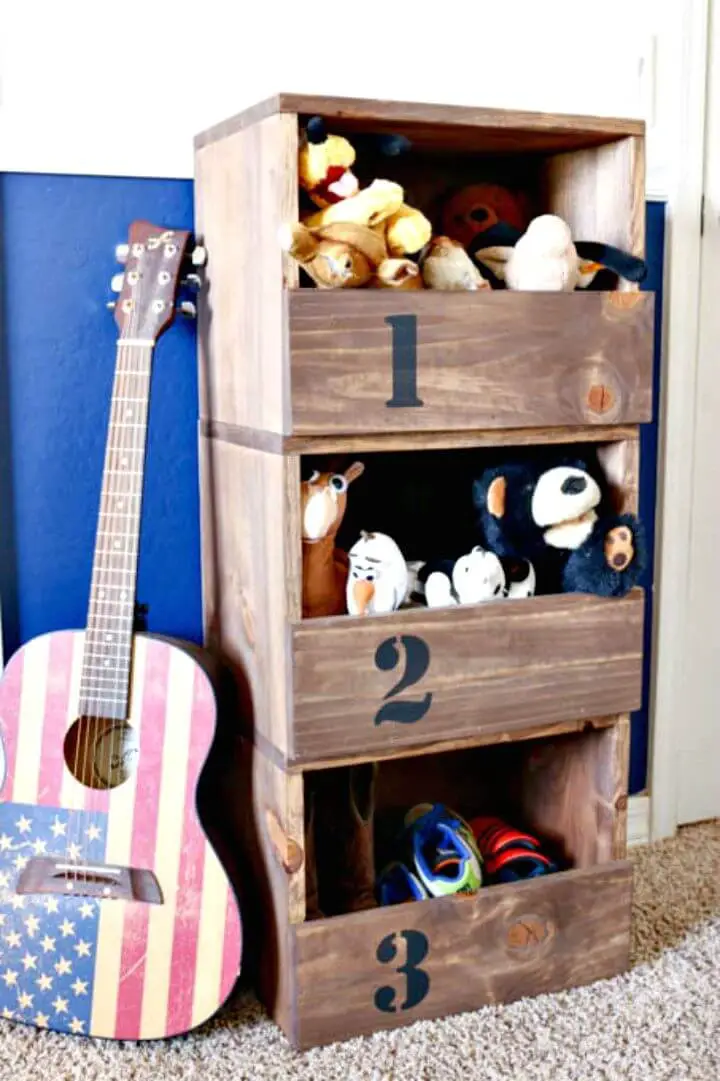
Transform your home with the excitement of building stacking storage cubbies, a perfect solution for managing collections of stuffed animals, shoes, toys, books, or any other items that clutter your space. Not only is this DIY project effortlessly easy to build, but it’s also easily customizable to suit your unique needs.
With just a few simple materials like 1″ x 12″ wood planks, 1″ x 6″ wood planks, 1/4″ plywood, wood glue, pocket screws, and brad nails, you can create your storage system. Follow the detailed step-by-step instructions to cut, assemble, and paint or stain the cubbies according to your color preference; if you want to add a creative touch, stencil numbers on the front using chalky black paint.
The cubbies can be stacked in various ways, offering an adaptable and stylish storage solution. This project is not just a clutter management hack but a fun and practical addition to your space that you’ll enjoy building and using.
Cool DIY Little Pieces Toy Sack
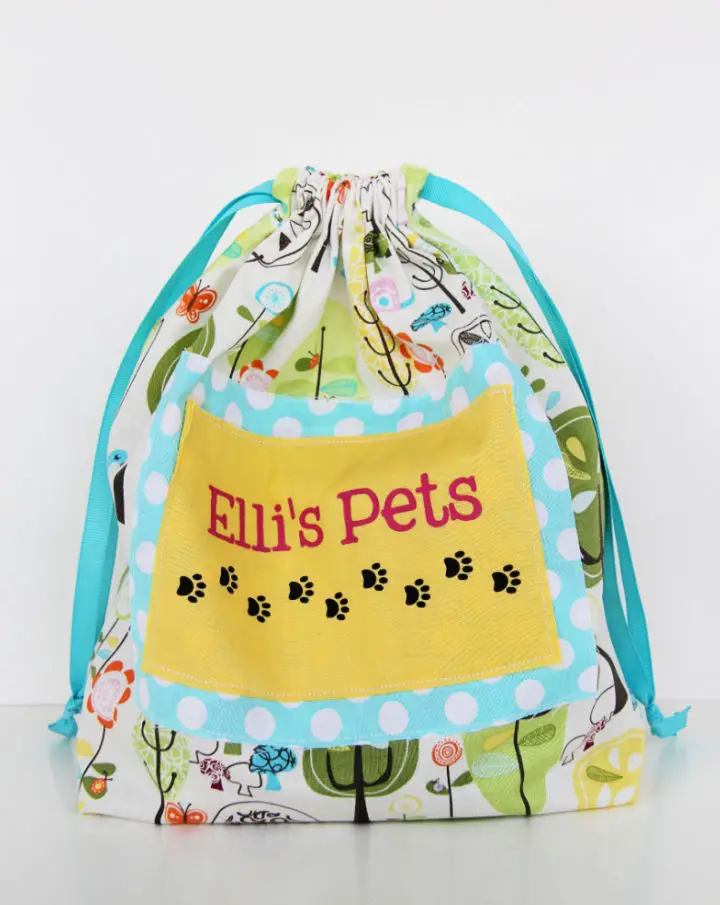
Bring delight to your child’s world by creating a one-of-a-kind DIY toy bag that perfectly stores their treasured trinkets and keepsakes. This vibrant, 11×11-inch cinch sack is designed for little hands to grasp, making it an ideal home for small toys like tiny figurines, LEGO pieces, or Barbie accessories.
With its eclectic mix of four distinct fabrics and a touch of personalization, this charming bag exudes a playful essence that kids adore. Plus, the effortless drawstring closure ensures easy access to their treasures.
This versatile sack’s practicality extends beyond toys, making it an excellent organizer for household items as well. By crafting this unique toy bag, you’ll elevate your child’s playtime and create lasting memories.
Makeshift Toy Storage Containers
Transform your child’s room with a creative DIY toy storage container project that repurposes plastic or glass containers to store toys like cars, planes, dinosaurs, blocks, and more. This innovative solution involves spray painting and E6000 glue to secure plastic animals onto the lids, adding a playful touch. With this smart storage system, you can customize the color and topper to fit any bedroom or playroom style. Not only is it practical for keeping toys organized, but it also serves as an appealing room decor that encourages children to keep their space tidy. This fun and simple project is perfect for parents seeking a stylish and efficient way to organize their child’s toys.
How to Build a Bookcase With Toy Storage

Transform your children’s play area into a clutter-free haven by building a DIY bookcase with integrated toy storage. This clever solution combines ample storage for toys with a cozy bookshelf perfect for bedtime reading sessions. With just two plywood boards and some trim, you can create a functional and attractive space that encourages a love of reading in kids while keeping the rest of the room tidy.
Creative Animal Zoo Toy Storage
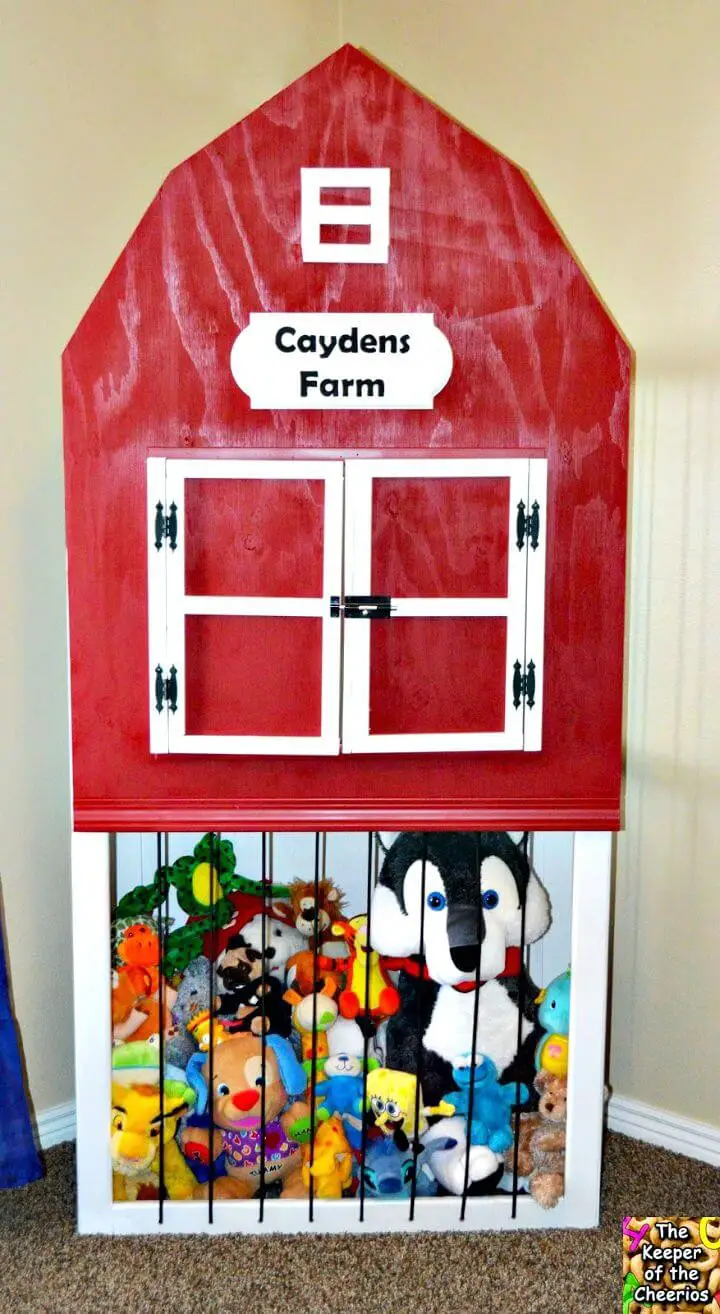
This rustic DIY zoo project brings a playful touch to your child’s bedroom, merging fun and functionality in a customized storage solution for their plush toy collection. The design takes inspiration from a classic barn, adding a boyish charm that sets it apart from more traditional options. Measuring 3′ x 5′, this construction requires attention to detail as you build the frame, add a plywood panel for the front, cut doors, install hinges, and arrange the bungee cord. As with any DIY project involving children’s items, safety precautions are crucial to mitigate risks, especially considering kids’ natural inclination to climb on structures. The end result is an innovative storage solution that not only keeps beloved stuffed animals organized but also adds a joyful element to the room, making it a treasured addition for any child.
DIY Labels for Toy Storage Bins
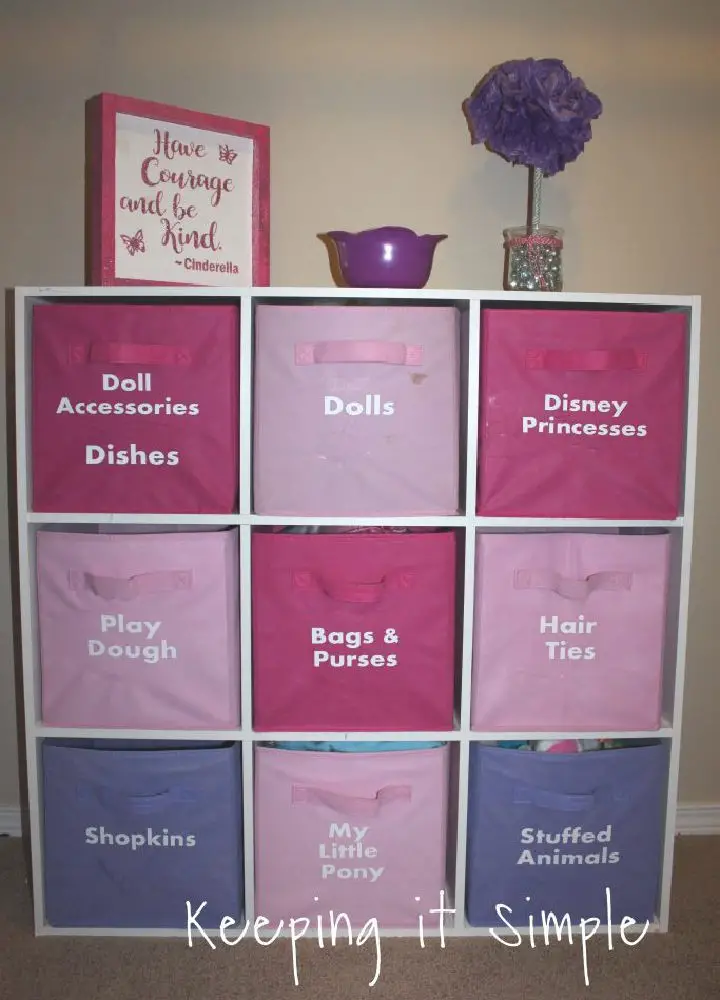
Kickstart the New Year with a fresh approach to toy organization by implementing clever and efficient ideas in your playroom. Start by transforming cube organizers and fabric storage bins into tidy havens using DIY labels. This process involves creating custom labels for each bin using white smooth heat transfer vinyl and a Silhouette CAMEO. To ensure precision, place the shiny vinyl on the mat and mirror the words before cutting. For added protection, use multi-use paper to iron on the labels, safeguarding the bin fabric from damage. This clever method of organizing toys not only makes cleanup easier for your children but also adds an appealing aesthetic to the room. Try this easy and cute project to transform your kids’ play space into a well-organized haven.
IKEA Toy Storage and Train Table Hack
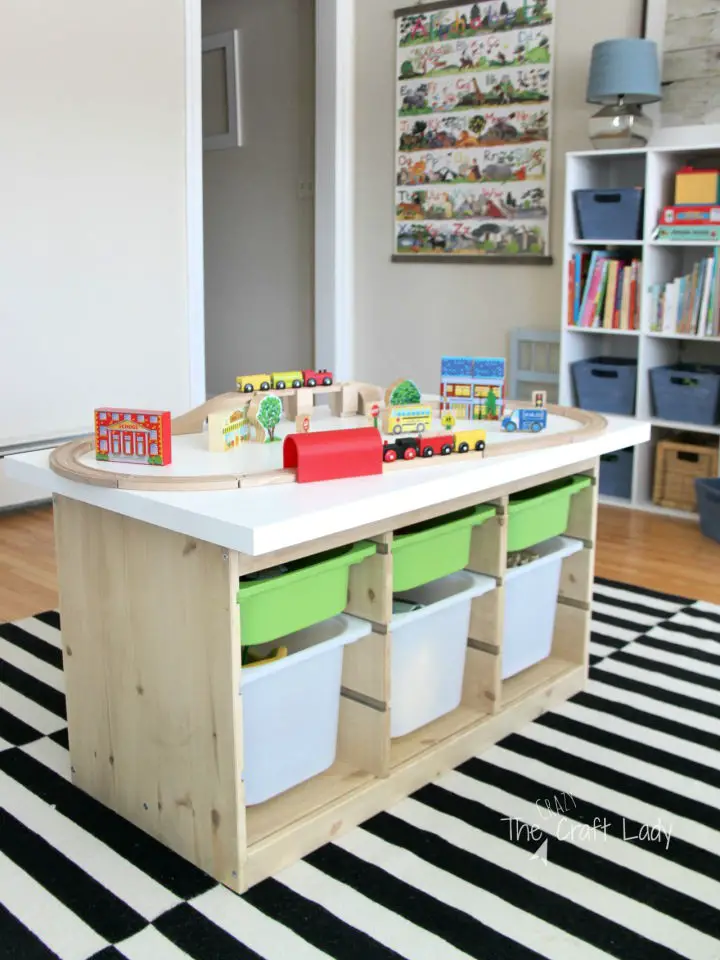
Transforming a simple Ikea Trofast frame and tabletop into a vibrant entertainment hub is a brilliant way to add organization and fun to your child’s play area. The resulting DIY hack boasts plenty of storage, courtesy of clear plastic bins with labels that make it easy for kids to locate their favorite toys and maintain order. This space-saving solution is perfect for families looking to declutter and organize their play areas, allowing each slide-out tub to effortlessly tidy away toys during playtime. What’s more, this cost-effective project doesn’t require extensive DIY skills, promising a neat and child-friendly finish that fits seamlessly into any room. By embracing this Ikea hack train and activity table, you’ll be boosting the fun factor in your living space in no time!
IKEA Frame Lego Minifigure Display and Storage Hack
Transform your living space into a vibrant and fun decor piece by creating a one-of-a-kind display for your Lego minifigures using an Ikea frame, white mat board, and Lego bricks. This DIY project offers a clever solution to organize up to 56 figures with ease. By following the step-by-step instructions, you’ll learn how to measure, cut, and assemble the frame, allowing you to effortlessly switch out your minifigures as desired. Not only will this unique display keep your collection tidy, but it also adds an innovative touch to any room, making it a perfect addition to your home or office.
Awesome DIY Freaking Lego Table
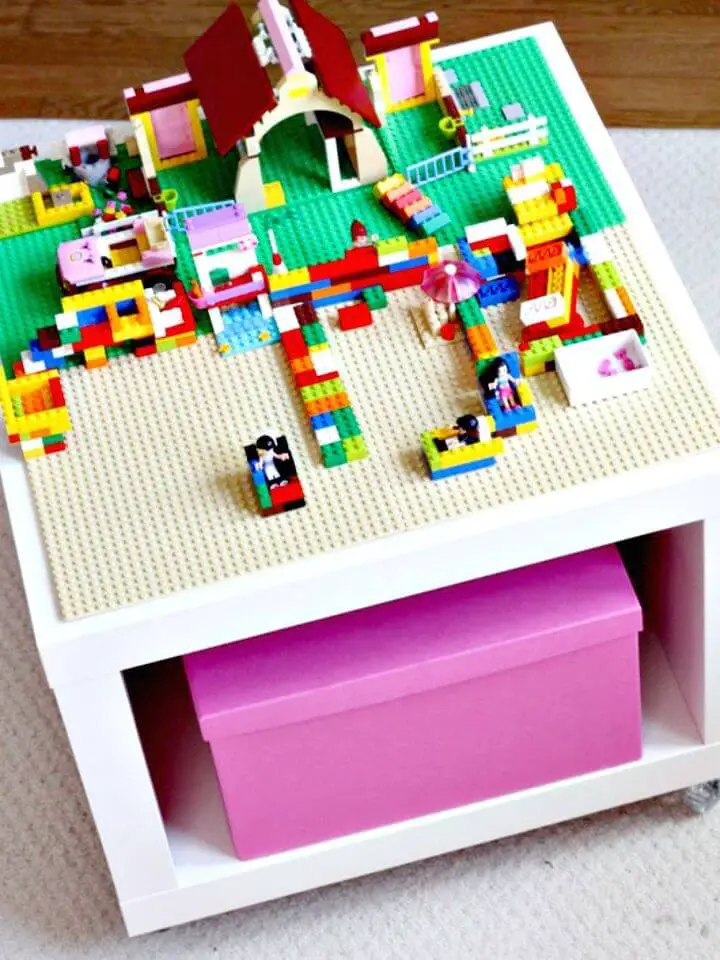
Transforming playtime just got a whole lot easier with this ingenious DIY IKEA hack: a movable LEGO table that serves as both a creative space and a storage unit. The foundation of this project is the IKEA Lack side table on casters, which provides unparalleled flexibility. By attaching LEGO plates to the top using sticky-back Velcro pieces, you’ll create a seamless building surface for your little ones to unleash their imagination. The real game-changer, however, is the mobility of the table – simply wheel it around the living room or stash it away with other toys when playtime is over. And if you want to take it up a notch, you can even attach IKEA’s casters to other side tables for added versatility. With this hack, your child’s LEGO adventures are sure to reach new heights.
Build Your Own Wooden Toy Storage
Elevate the aesthetic of your child’s playroom with a creative DIY storage solution that won’t break the bank. By leveraging Ikea’s Trofast baskets and some basic woodworking materials, you can create a functional and visually appealing space that keeps toys organized and tidy. With just a few simple tools like a drill, brad nailer, wood glue, and wood stain, you’ll be able to craft a custom storage system that adapts to your child’s ever-changing needs. The unique design allows each bin to slide into place, making it easy for little ones to access their favorite toys. This budget-friendly solution is both practical and customizable, ensuring your child’s room remains charmingly organized despite the chaos of playtime. And with a modest budget and clear instructions, you can tackle this project with confidence.
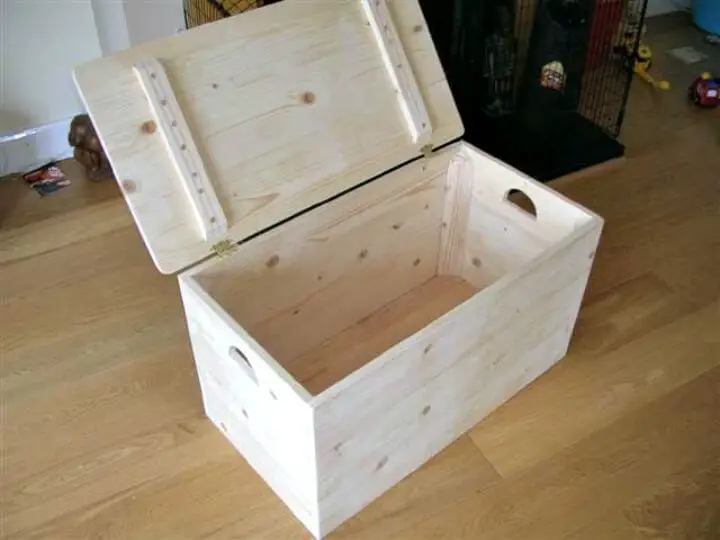
Simple DIY Toy Box With Lid
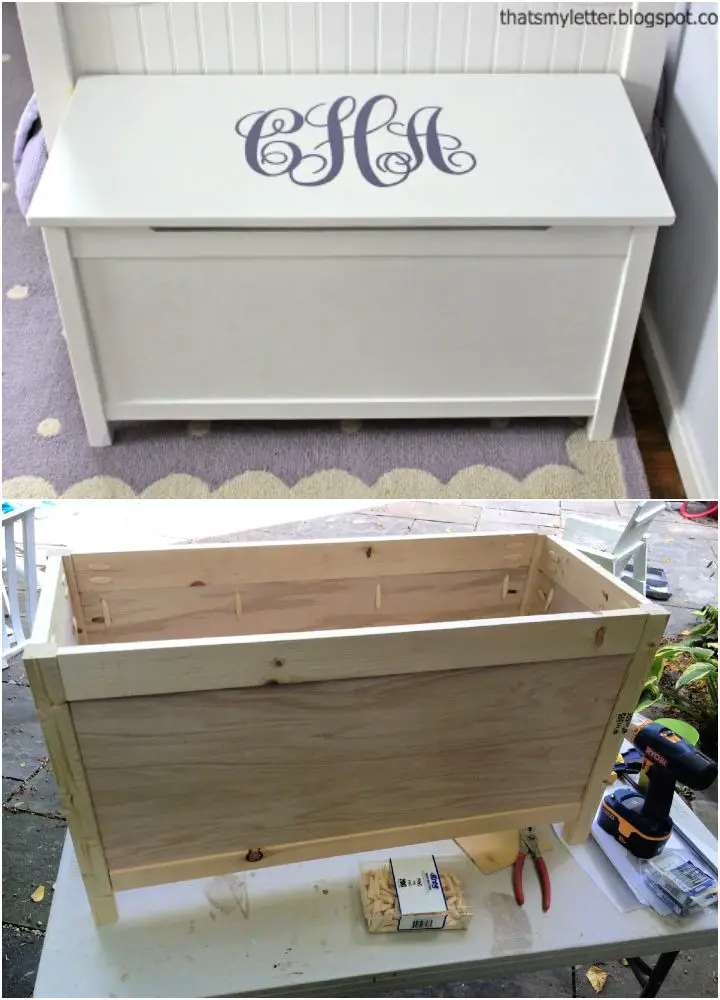
Transform your child’s playroom into a haven of creativity and organization by crafting a customized, self-made toy box with a secure, non-pinch lid. This DIY project seamlessly blends functionality with simplicity, allowing you to create a box that harmonizes perfectly with your home’s decor and adds a personal touch to your child’s space.Built using affordable lumber and sturdy hinges, this budget-friendly project costs approximately $110. Its unique feature is the torsion hinge lid, reminiscent of a laptop hinge, ensuring that tiny hands are protected from any potential harm. The construction process involves straightforward steps such as cutting, pre-drilling, assembling, and painting.The best part? It culminates in a fun monogramming activity where you can imprint your child’s initials, elevating the box’s charm and making it an exclusive addition to their play area. By building this toy box yourself, you’ll not only be providing your child with a stylish yet practical solution for toy storage but also fostering a sense of pride and accomplishment in your own DIY endeavors.
Making a Toy Storage With Wooden Crates
Bring warmth and personality to your home by combining adorable DIY toy storage with rustic wooden crates. This innovative project offers a unique, functional, and visually appealing way to organize small items like toys, books, or decorative trinkets. With basic woodworking skills and a few essential tools like a table saw, drill, miter saw, and clamps, you can create this practical piece of furniture. The sturdy frame is constructed from 3/4-inch plywood, while dividers are crafted from 1/2-inch plywood. Its design ensures ample storage space, making it perfect for keeping clutter at bay. A comprehensive guide provides step-by-step instructions for cutting plywood pieces, assembling the frame, and creating dividers, as well as building the wooden crates. To add a personal touch, consider staining or painting the finished piece to match your home’s unique aesthetic. This charming storage solution will keep your home tidy and cozy.
How to Build a Toy Storage Shed
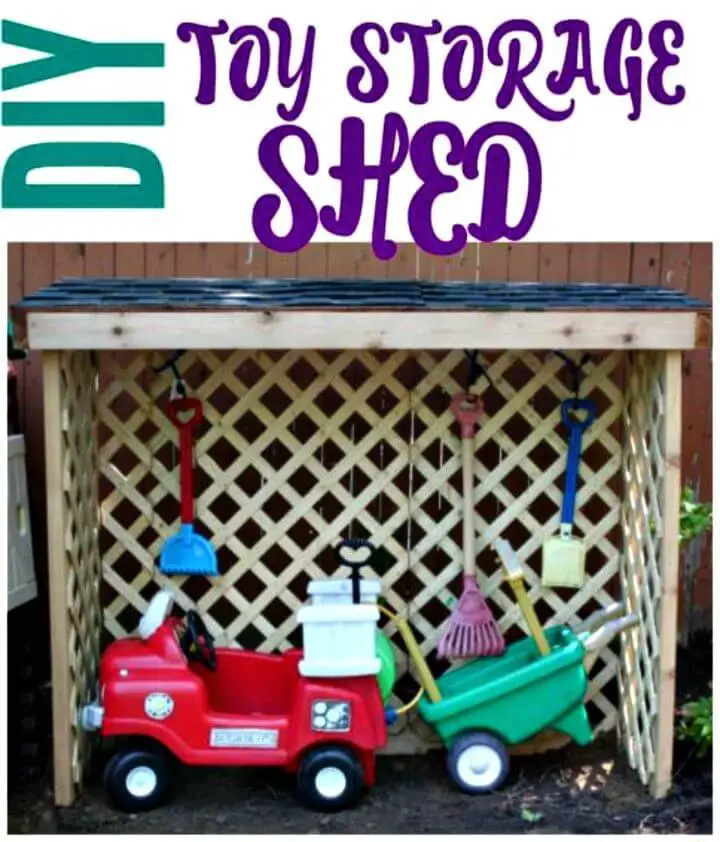
Transform your backyard into a more organized and functional space by creating a practical DIY toy storage shed. With kids’ toys scattered around, a durable storage unit is essential to maintain a tidy outdoor play area. This comprehensive guide will walk you through the process of constructing a sturdy toy storage shed that can withstand various weather conditions. To achieve this, you’ll need plywood, 2x4s, shingles, and a lattice panel. The steps involved include assembling a waterproof roof, building the sides and back of the shed, and installing a decorative lattice feature. What’s more, this storage shed serves as a reliable shelter for toys, while also providing ample space to store larger items or even doubling as a trash can storage area. This multipurpose project is well worth the time and effort invested, offering a practical solution for toy storage that will keep your backyard looking great and your kids happy.
Handmade Toy Storage Crates Nursery

Transform your nursery’s toy storage with a delightful DIY project that combines practicality and whimsy. Start by gathering an unfinished wooden crate, sandpaper, primer, white paint, and your preferred colored paints. The process begins with a gentle sanding to smooth the wood, followed by priming and painting to achieve the desired color. Next, add a playful touch by designing vibrant patterns on each face and side of the crate. To complete the project, attach colorful casters to the bottom for effortless mobility. This DIY solution not only keeps toys organized but also adds a splash of fun to your child’s nursery decor, creating a warm and inviting atmosphere.
DIY Wooden Toy Chest With Seating
Transform your child’s playroom into a harmonious space by incorporating multi-functional furniture pieces that serve both as storage and seating options. A storage ottoman or bench can effectively store toys while providing a cozy spot for kids to sit, relax, and engage in imaginative play. To take it up a notch, create a custom toy chest that not only stores toys but also offers a comfortable seating area. By following this DIY tutorial, you’ll be able to craft a sturdy, multipurpose storage solution using pine boards, furniture screws, and your imagination. Once complete, personalize the chest with paint or decals featuring your child’s name, and fill it with their favorite playthings. The added cushioned seat on top provides an inviting spot for kids to sit back, unwind, and enjoy quality time with friends and family.
Make a Lego and Toy Storage Unit
Transform your child’s play area into a tidy haven by crafting a one-of-a-kind Lego or toy storage unit, the perfect blend of functionality and DIY charm. This adaptable storage solution features interchangeable plastic tubs or bins of varying sizes, allowing you to tailor it to your needs. Constructed from sturdy PAR pine planks and secured with screws, this durable unit is designed to withstand the rigors of playtime, while its simple design belies a versatility that makes it easy to customize. By following our step-by-step guide, you’ll learn how to measure, cut, sand, assemble, and finish your project, adding a personalized touch with Plascon Woodcare varnish or Plascon Velvaglo. Not only will this DIY endeavor bring order to your child’s play space, but it also offers an opportunity to infuse your home with a touch of style. Get ready to revolutionize the way you store toys and take your DIY skills to the next level with this practical and stylish toy storage solution.
Hide Outdoor Toys Storage for Kids

As the warm weather of summer sets in, the outdoor spaces can quickly become overrun with toys, turning what was once a serene area into a cluttered mess. However, there is a simple solution to this problem: create a DIY storage solution for kids’ outdoor toys that not only keeps the yard tidy but also doubles as an entertainment space when needed.
This project requires just a few basic materials – 2x4s, L brackets, and some outdoor paint. The result is a functional and visually appealing structure that can be customized to fit your unique outdoor space. By transforming an awkward corner of the patio into a ‘Kids Garage,’ you’ll not only keep the toys organized but also create a dedicated area for kids to play.
The best part? This project is cost-effective, ensuring that it won’t break the bank. With this DIY storage solution, you can enjoy a relaxing summer and an inviting outdoor space, all thanks to a little creativity and some basic materials.
DIY Toy Storage With Crates
Transforming the way children engage with their toys and decluttering your home is easier than you think. With this clever DIY toy storage solution using crates, you can bring harmony to the chaos that often accompanies little ones’ playtime. By combining some simple sorting, old milk crates, and creative repurposing, you can achieve a tidy space in just a few hours. The result? An organized environment where toys have a designated home, encouraging more focused play and effortless cleanups. No longer will you be tripping over stray toys or longing for a clutter-free home. Instead, enjoy the serenity of a well-ordered space and give your kids a more engaging playtime experience.
How to Make a Toy Storage Shelf
Transform your playroom into a tidy haven with these ingenious ideas for cleverly storing toys! One such creative endeavor is crafting a custom toy storage shelf, a project that’s both fun and rewarding. By utilizing simple materials like pine boards, a carpenter’s square, a circular saw, and the R3 Kreg Jig, you’ll create a functional and visually appealing addition to your playroom. The Kreg Jig simplifies the process, making it accessible even for first-time furniture creators. With the detailed steps provided, you’ll be guided through the DIY process with ease. As a result, you’ll have a durable, functional, and aesthetically pleasing toy storage shelf that not only keeps toys organized but also adds a personal touch to your playroom. Embark on this creative journey and experience the satisfaction of building your own storage solution.
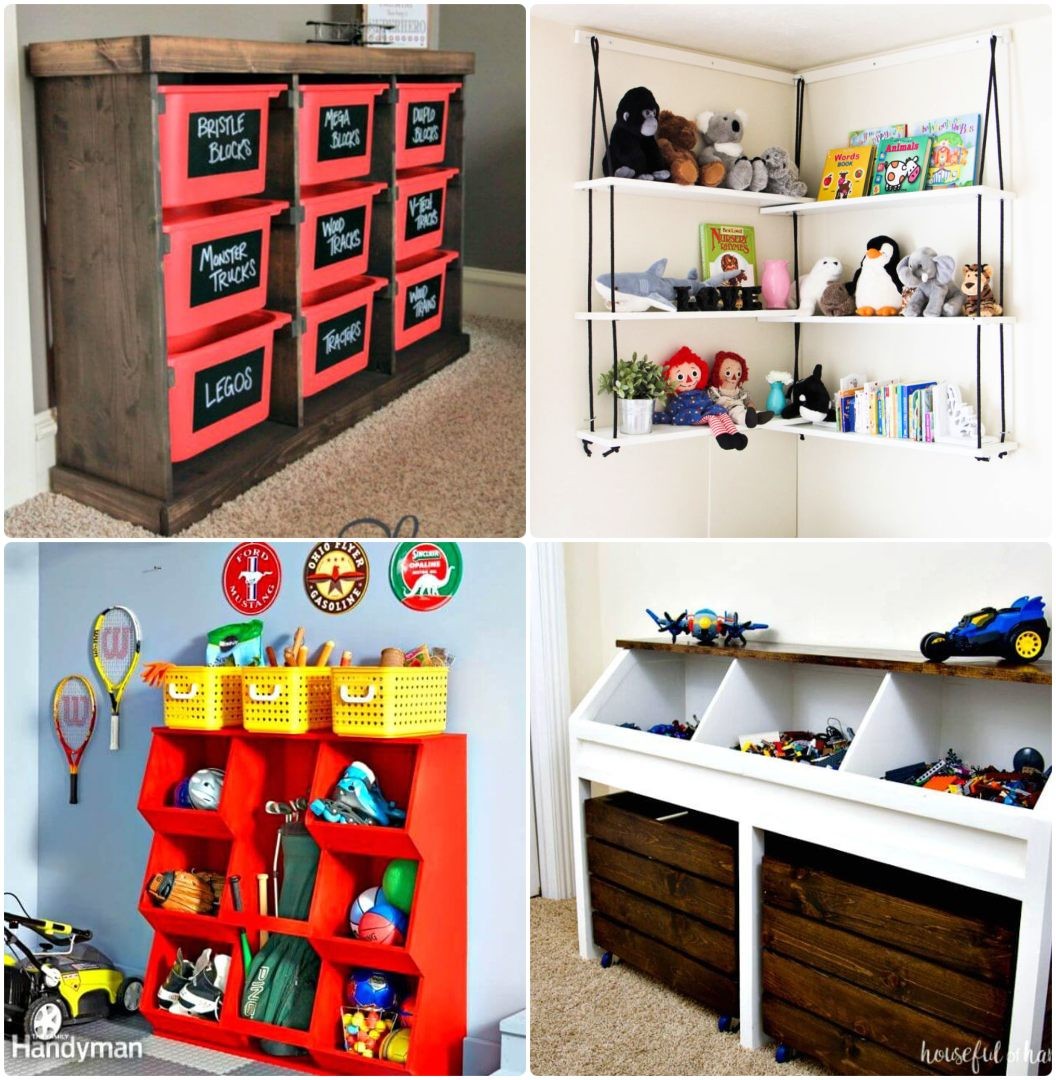
DIY Corner Rope Shelves for Toy Storage
Transform unused corners into functional and visually appealing spaces by crafting creative DIY corner rope shelves. Made from just six wooden planks and rope, these unique shelves elevate your room’s aesthetics while providing ample storage. With a simple yet effective approach, you can easily create this economical yet captivating addition to your decor. The process involves preparing the boards, drilling holes, and threading the rope. Having two people on hand makes hanging the shelves a breeze. While the procedure may seem daunting at first, the end result is well worth the effort. This project celebrates self-reliance and ingenuity, demonstrating how you can create beautiful room enhancements without breaking the bank.
Industrial Style Toy Storage Cubbies
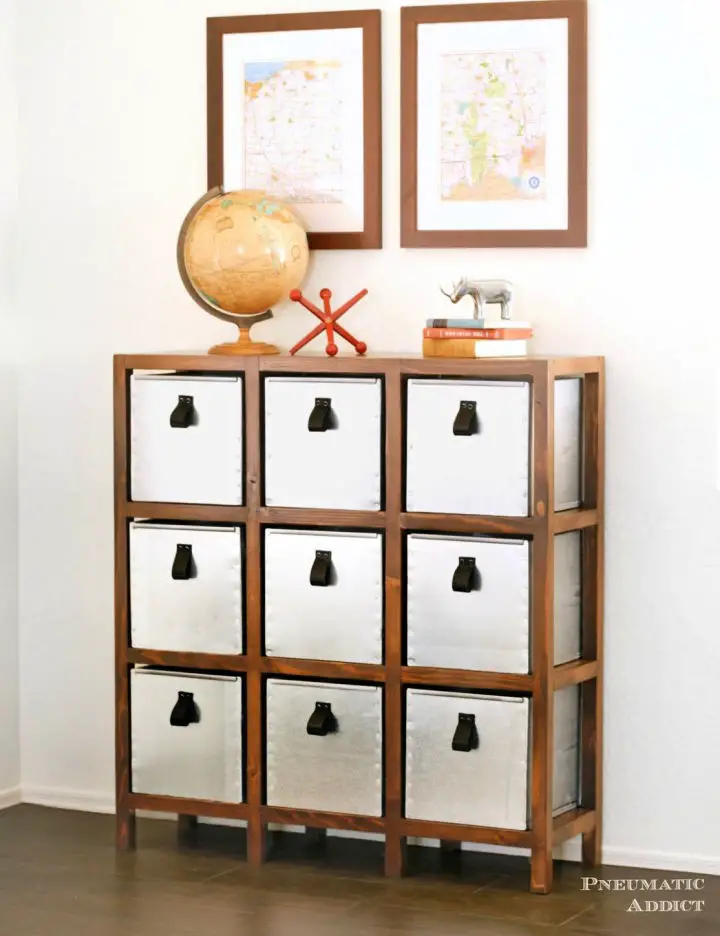
Transform your living space by embracing an organized lifestyle through the creation of a unique DIY cubby storage system. Drawing inspiration from vintage metal locker designs, this functional and stylish project presents a practical solution to home clutter. The nine standard 12″ x 12″ cubbies within its frame, constructed using accessible off-the-shelf lumber, offer a convenient way to contain scattered items.
This project combines affordability with functionality by utilizing materials like plywood, a 1×12 cut-to-size piece, and leather straps for added aesthetic appeal. Step-by-step instructions provide clear guidance throughout the building process.
Bid farewell to chaos and hello to structure by implementing this creative storage solution designed for everyday ease and efficiency. When faced with a home overflowing with scattered items, remember that there’s a cubby for every need.
Make a Toy Storage and Book Rolling Crate
Transform your child’s book collection into a whimsical and functional reading nook using just a few simple supplies. Start by gathering an unfinished wooden crate, some paint, and a set of swivel wheels. With these basics, you can create a mobile book storage solution that not only keeps books organized but also encourages kids to explore their favorite stories. The best part? This DIY project won’t break the bank, costing around $20 total. Plus, it’s adaptable for storing other treasures like toys or craft supplies. Give your little readers the gift of a fun and tidy reading experience with this clever mobile book crate.
Easy and Simple Storage Toy Box
Transform your child’s playtime space into a charming haven by crafting a functional storage box with ease. By leveraging everyday woodworking tools like miter saws, jigsaws, biscuit jointers, and hand sanders, you can turn basic materials like wood and No. 10 biscuits into a sturdy, customizable storage solution that blends seamlessly with your home’s decor. Assemble the box using PVA glue for a secure and long-lasting build. Consider adding personalized touches through designs, moldings, or a coat of paint to give it an extra layer of creativity. To ensure child-safe use, incorporate a lid stay into your design. This hands-on project offers a fun and engaging experience, resulting in a beautiful and practical toy box for home organization.
DIY Makedo Cardboard Treasure Chest
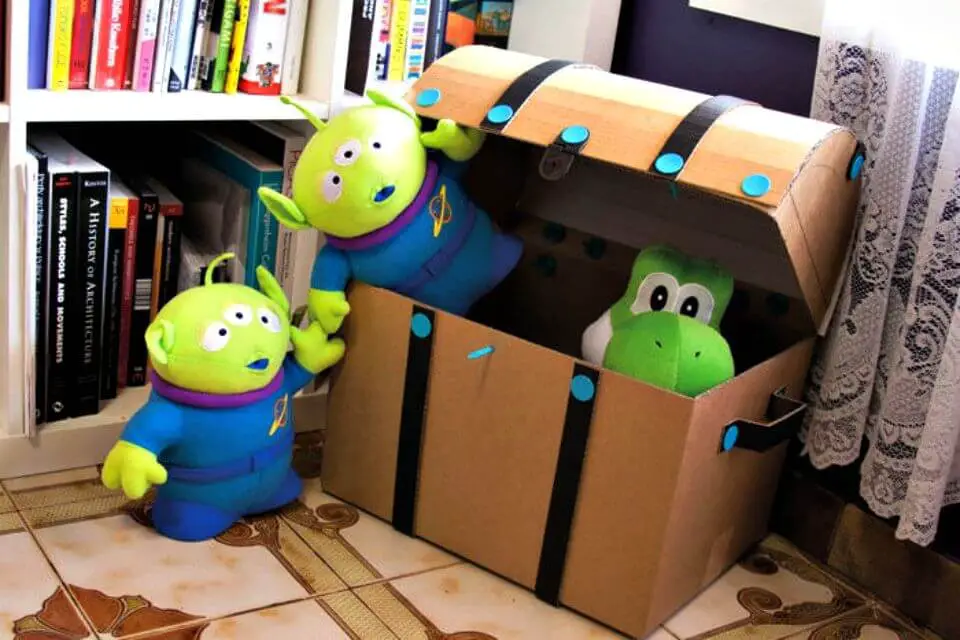
Transform an ordinary cardboard box into an extraordinary treasure chest with Makedo DIY! This imaginative project reinvigorates everyday materials, creating a charming storage solution for treasured toys.
To get started, carefully carve the outline of the chest on the small sides of the box. Once the top is removed and three sides are cut to form the lid, a rectangular cardboard sheet can be used to create a striking curve on the lid, secured with Makedo’s innovative Lock-hinges and Re-clip technology.
Bring your creation to life by adorning it with strips of cardboard and vibrant color accents using markers or crayons. Your one-of-a-kind treasure chest not only provides a fun storage solution but also sparks joy at every stage of the creative process. Fill it with your favorite treasures and bask in the thrill of having something truly unique!
Magnetic Toy Storage With Pizza Pans
Transform your child’s playtime into a visually pleasing experience with this creative DIY magnetic toy organizer project. Using everyday items like steel pizza pans, primer, acrylic paint, and basic tools, you can create a stylish and functional storage area that matches your kid’s room decor with custom color choices.
This hands-on project is not only an effective way to declutter your home but also a great opportunity to involve your child in the process, teaching them valuable lessons about organization and creativity. By affixing the completed pans to the wall, you’ll enjoy a tidy space that’s free from scattered toys.
Say goodbye to stepping on misplaced playthings or having your refrigerator become a magnet for various items. Instead, follow this cost-effective guide and discover a unique twist on toy storage that provides a fun, dedicated space for your child’s playthings.
Cute DIY Rolling Toy Storage
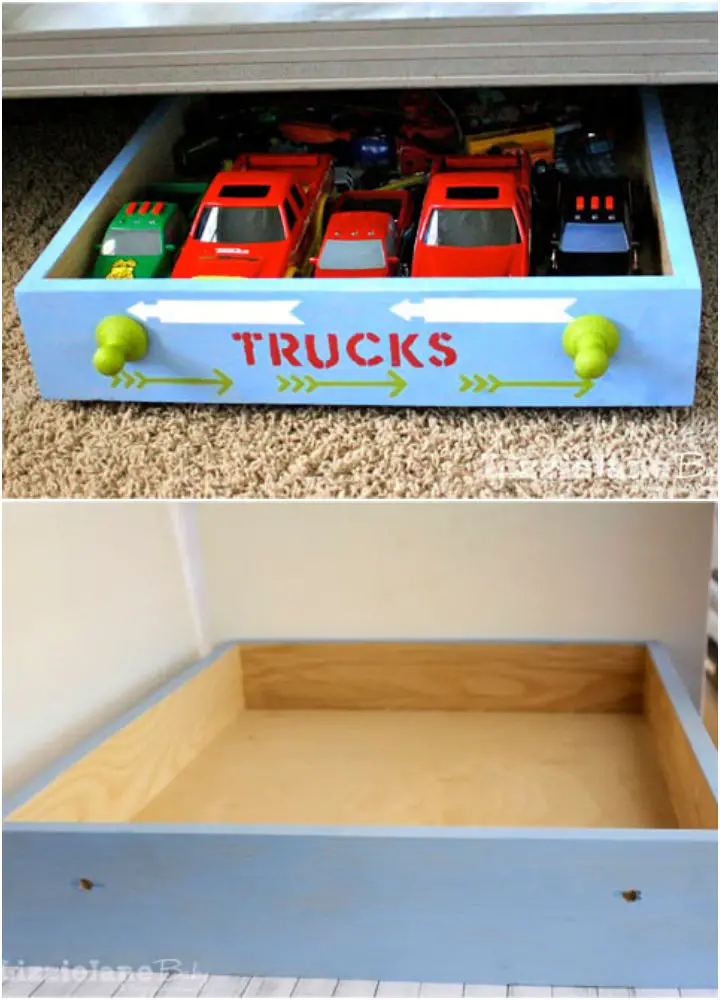
Transforming chaos into whimsy, one DIY rolling toy storage project at a time! Who says kids’ toys have to be drab and disorganized? With just a few simple materials and some creative flair, you can turn plain drawer boxes into vibrant, functional, and oh-so-cute storage solutions. Start by giving those boxes a fresh coat of French Blue paint – the perfect backdrop for your artistic masterpieces. Once dry, bust out those handmade Charlotte stencils and get ready to unleash your inner artist (or have fun with the kids)! Add some pops of color with Yellow Citron, White Wicker, and red paints to really make this storage box stand out. And because we know little hands can be a handful, mount it on swivel casters for easy mobility and add some painted wooden drawer pulls for an extra touch of whimsy. The result? A one-of-a-kind, rolling toy storage solution that’s as much fun to look at as it is functional. So why not bring a splash of color and organization into your child’s room – or heck, the whole house! – with this delightful DIY project?
Peek-a-boo Toy Storage Bags
Transform your playroom into a haven of organization and style with a simple DIY project: Peek-à-boo storage bags for small toys. As children grow, their toy collections tend to spread out, resulting in a scattered array of tiny objects. This innovative solution provides an effortless way to keep these items tidy and visually appealing. With just a half-yard of fabric, a 30-inch drawstring, clear vinyl, and coordinating bias tape, you can create storage bags that encourage kids to pick up after playtime. By investing minimal time and cost, you’ll be rewarded with a functional, creative, and aesthetically pleasing storage solution that will delight both children and adults.
Reclaimed Wood and Laminate Flooring Toy Storage Bench
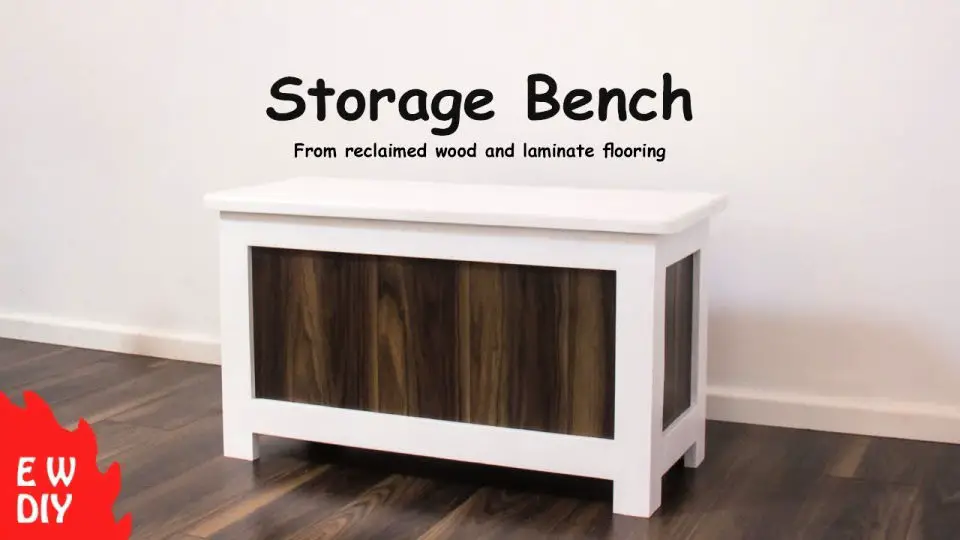
Revamp your living space by crafting a one-of-a-kind DIY storage bench from reclaimed wood and salvaged laminate flooring. This innovative project not only breathes new life into discarded materials but also enables you to harmonize the aesthetic of your furniture with that of your floors. By incorporating ample storage, this functional piece allows for effortless access to hidden treasures, while its sturdy construction accommodates two individuals in comfort.
Conclusion:
These 65 DIY toy storage ideas offer a diverse range of practical and fun solutions for organizing and storing toys effectively. By incorporating creative concepts such as building wooden bins, constructing colorful crate shelves, or even creating hidden storage tables and underbed rolling carts, the possibilities are truly endless. With such a variety of shelves, storage solutions, and organization ideas at your disposal, your living room will undoubtedly benefit from the best available toy storage options. As you enjoy a clutter-free environment and encourage creativity in your children’s play spaces with these useful ideas, it’s clear that it’s time to let the kids’ imagination run wild.
