DIY Rainbow Tie Dye Bag
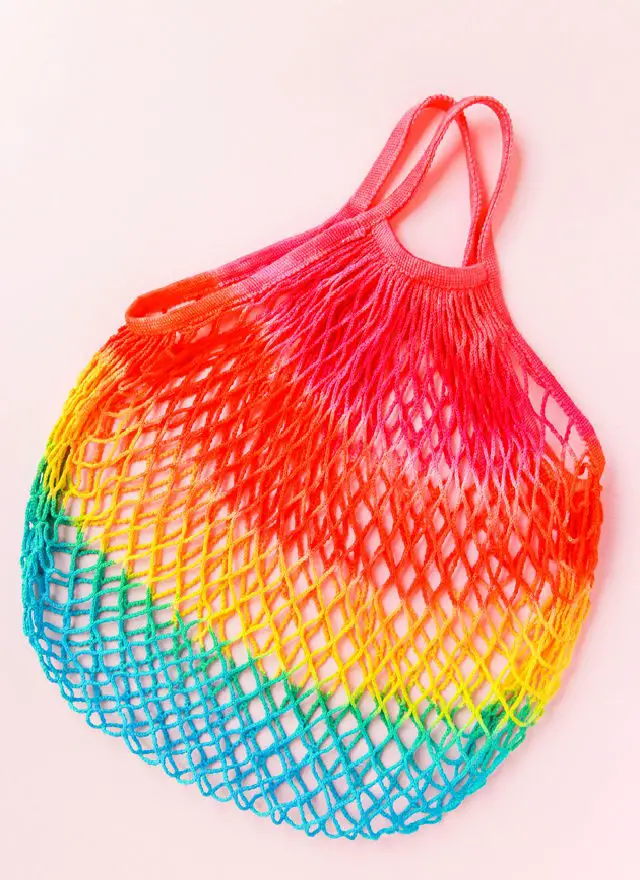
The tie-dye trend has taken the internet by storm, and with this fabulous market bag project, you can capitalize on its popularity while showcasing your creativity. This unique accessory is perfect for carrying essentials at the beach, paired with a matching tie-dye swimsuit for a stylish and functional combo.
To get started, you’ll need the following materials: cotton mesh bags, Rit dye, latex gloves, squeeze bottles, rubber bands, trays, and cooling racks.
One of the key benefits of this project is the level of control it affords over color placement. By experimenting with different techniques and colors, you can create a truly one-of-a-kind piece that’s sure to appeal to fans of the trend. To avoid any stains or residue, be sure to rinse your creation thoroughly until the water runs clear.
For an added touch of customization, consider incorporating white sections between the colored bands using additional rubber bands. This subtle detail can add a level of sophistication and visual interest to your finished piece.
Punch Needle Rug Hooking Pillow
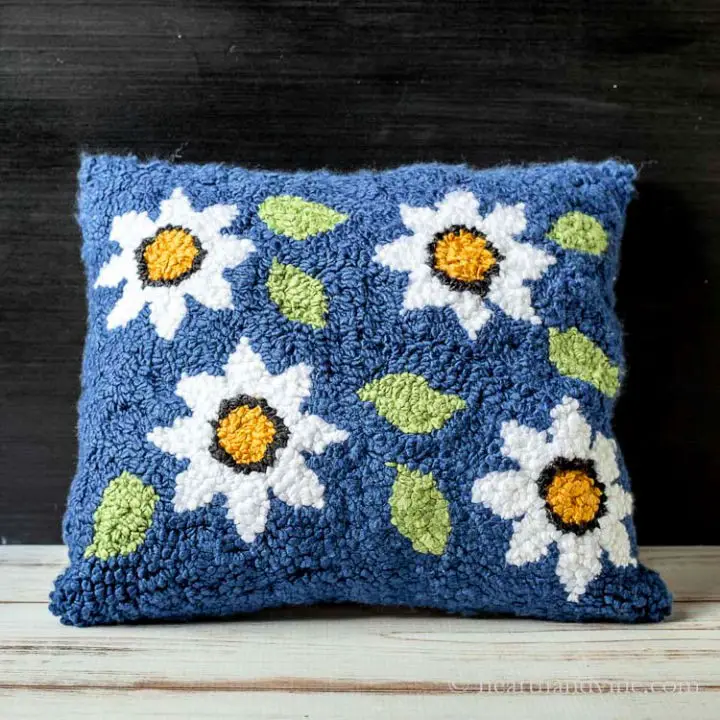
If you’re a hooked rug enthusiast, you’ll love this unique pillow pattern that combines yarn and punch needle techniques. The result is a stunning piece perfect for your couch or bed, or as a thoughtful gift for a loved one. Moreover, this craft has great potential to be sold at a high profit, making it an attractive option for those looking to monetize their creative skills.
To get started, you’ll need the following materials: canvas stretcher bars, carpet nail strips, small tack nails, old pieces of towel, monk’s cloth, pattern, carbon paper, chunky yarn, punch needle, and backing material. Fiberfill will also be required for filling the pillow.
As an added bonus, consider incorporating this vibrant and floral design into your spring decoration scheme. When attaching the nails to the canvas, ensure they face outwards for a secure and even finish. This pattern is ideal for beginners, making it a great starting point for those new to crafting.
Schedule Magnets With Cricut Joy
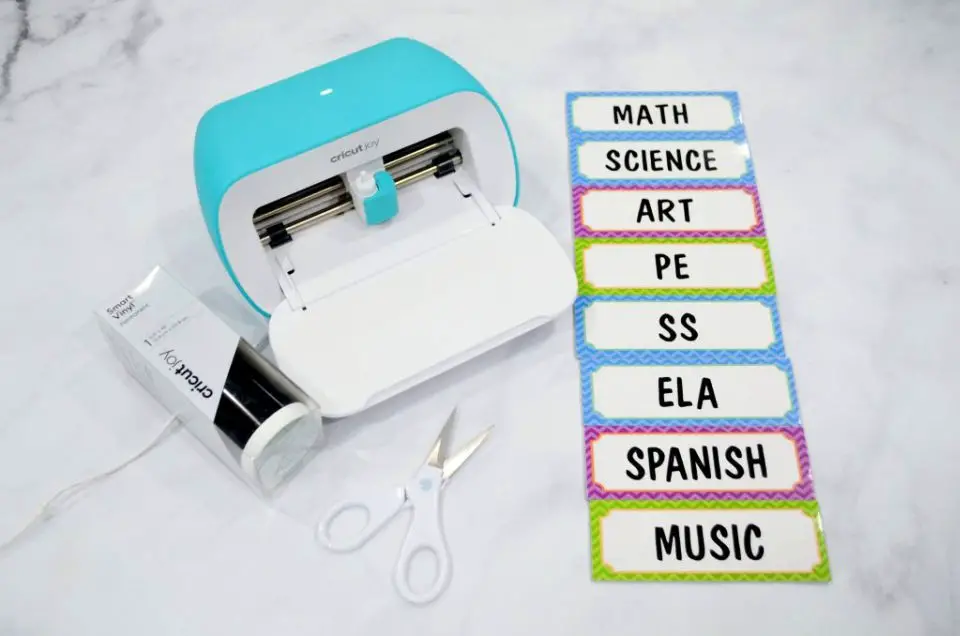
With Cricut, the possibilities for creating and selling are endless. One creative way to utilize your machine is by crafting a customized magnet schedule for kids. This project not only teaches children about organization but also discipline from an early age. Whether they’re homeschooling or following a hybrid schedule, this magnetic dry erase board is an engaging way for them to learn and stay on track.
To create this masterpiece, you’ll need the following materials:
– Cricut Joy machine
– Magnetic dry erase labels
– Cricut Smart Vinyl
– Scissors
– Burnishing tool
– Cricut Transfer Tape
For an added touch of personalization, ask your child to choose their favorite color scheme. This will make the project more enjoyable for them and give it a unique twist.
To ensure seamless integration into your child’s daily routine, simply re-order the magnets according to their assigned schedule from school. And as an added bonus, this interactive approach to scheduling can be a fun way for kids to learn and develop a sense of responsibility.
DIY Desk Organizer Caddy
How to Make a Hand Balm
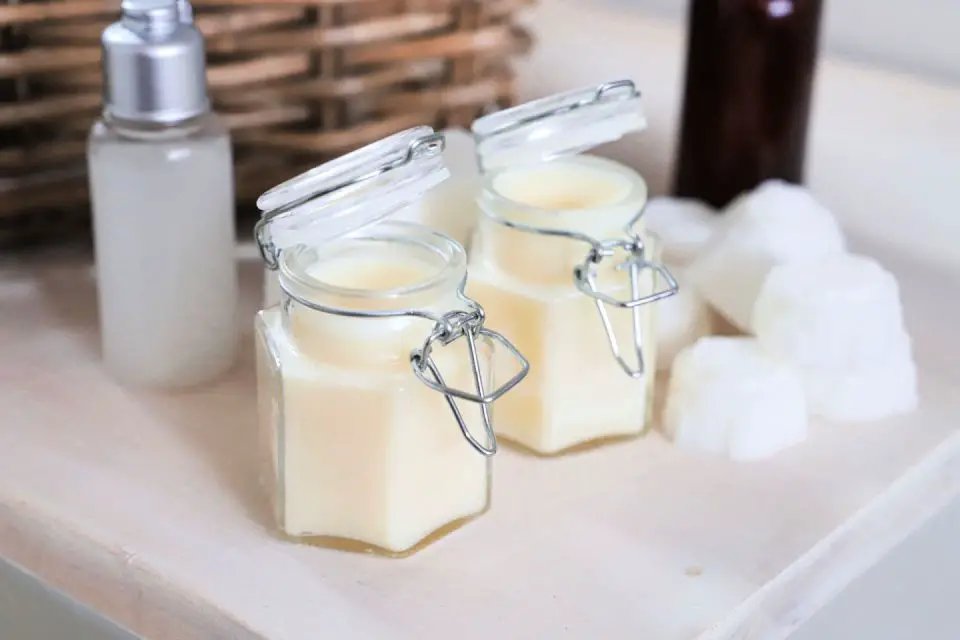
In contrast to other straightforward DIY crafts, this self-care package stands out with its unique blend of beauty projects. This collection includes a pillow spray, hand balm, and several more impressive DIY creations. As winter approaches, it’s crucial to prioritize self-care, especially when dry skin and hair are common concerns. With this gift set, you can effortlessly sell it on Etsy or Amazon for a significant profit.To create these DIY delights, you’ll need the following ingredients: beeswax, shea butter, coconut butter, almond oil, essential oils, tea tree oil, frankincense and cedarwood drops, distilled water, and rubbing alcohol. The best part? Many of these projects utilize natural ingredients like coconut butter and shea butter, while essential oils provide a pleasant aroma.Not only are these DIYs perfect for personal use, but they also make exceptional holiday gifts for loved ones. Just remember to highlight the natural ingredients and soothing properties when marketing your products.
Color Wheel Pegboard To Make And Sell
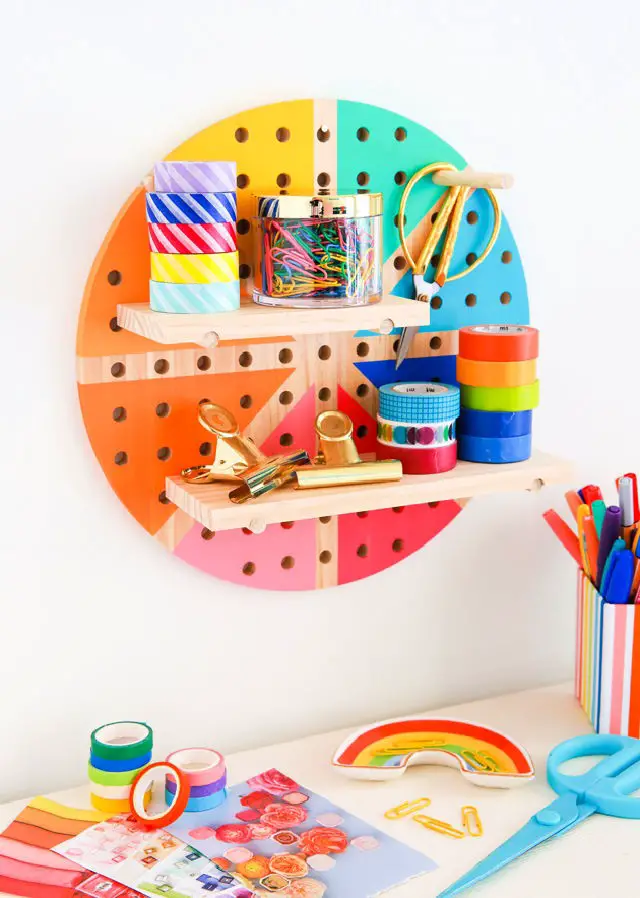
A DIY organizer doesn’t have to be plain and boring – it can be a stunning piece of art too! This unique plan uses a circular pegboard as its foundation, adding an extra layer of visual appeal. Imagine having it prominently displayed on your wall in front of your desk, effortlessly keeping you organized while also serving as a beautiful addition to your workspace.
To create this masterpiece, you’ll need the following materials:
– Round pegboard
– Washi tape
– Acrylic paint
– Paintbrushes
– Sealant
Some valuable tips to keep in mind:
– Feel free to add a personal touch by experimenting with different colors of paint.
– Ensure each section is symmetrical and evenly sized using a scale or measuring tape for precise measurements.
– To secure the washi tape firmly, press down on it gently with your fingers to create a strong bond.
DIY Vertical Garden From Scrap Wood
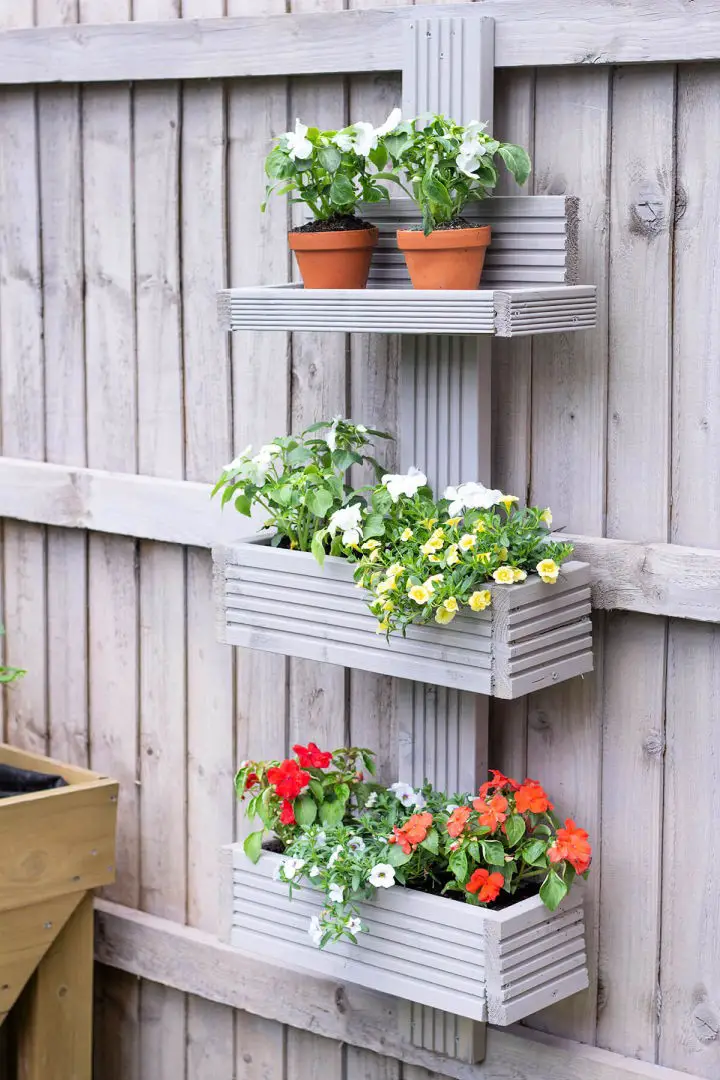
Immerse yourself in the innovative world of vertical gardening, where creativity meets functionality. This unique plan allows you to bring a touch of greenery into your home without sacrificing space. By using neutral grey planters as a backdrop, you can let vibrant flowers take center stage and add a pop of color to your living space. Our research also suggests that woodworking crafts are not only fulfilling but also profitable.To get started, you’ll need the following materials:* Decking board* Pencil/ruler* Cordless jigsaw* Cordless universal drill* Screws and drill bit* Sander* Wood paint and brushAs an added bonus, consider the following benefits:* Say goodbye to pests and insects with raised planters that keep them at bay.* Put your scrap wood to good use by repurposing it for this stunning planter project.* Measure out the space in your backyard before starting construction to ensure a seamless installation.
Homemade Disinfecting Wipes
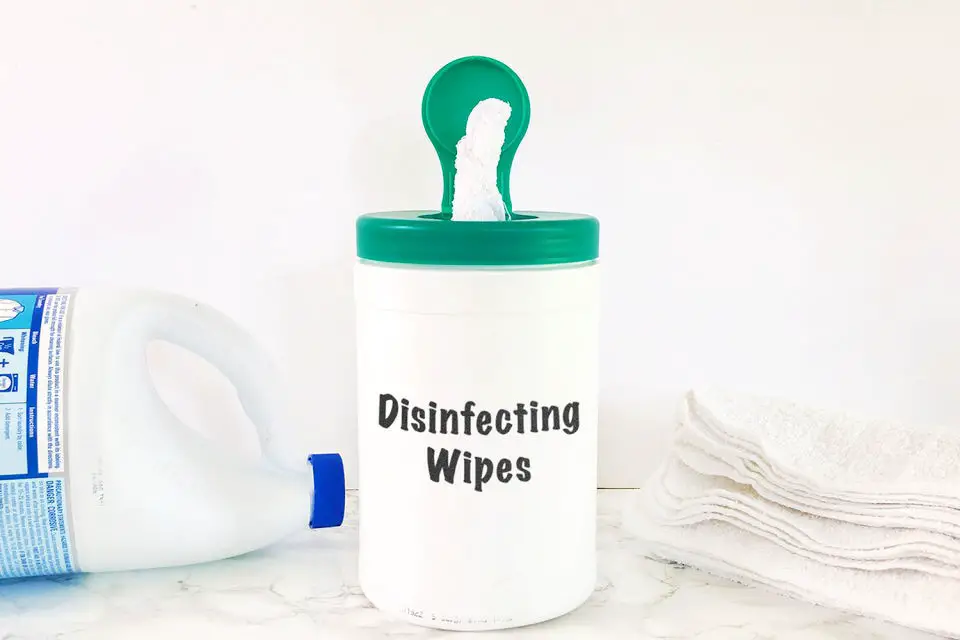
In today’s world where viruses and germs are a constant concern, disinfecting wipes have become an essential item for many households. By making these wipes yourself, you can not only save money but also contribute to a more sustainable environment by reusing them. The best part? They’re incredibly easy to create using just a few simple ingredients.
To get started, you’ll need the following materials:
– Dishcloths or washcloths
– A glass container (or alternative such as a large Mason jar or empty wipes canister)
– Scissors
– Laundry bleach
– Room temperature water
One of the benefits of making your own disinfecting wipes is that you can customize them to fit your needs. For example, you can roll the cloths in different ways before placing them in the container to suit your preference.
What’s more, these wipes are a product that almost everyone needs, making them a great opportunity for you to earn a good profit by selling them.
Personalize Your Back To School Supplies With Cricut
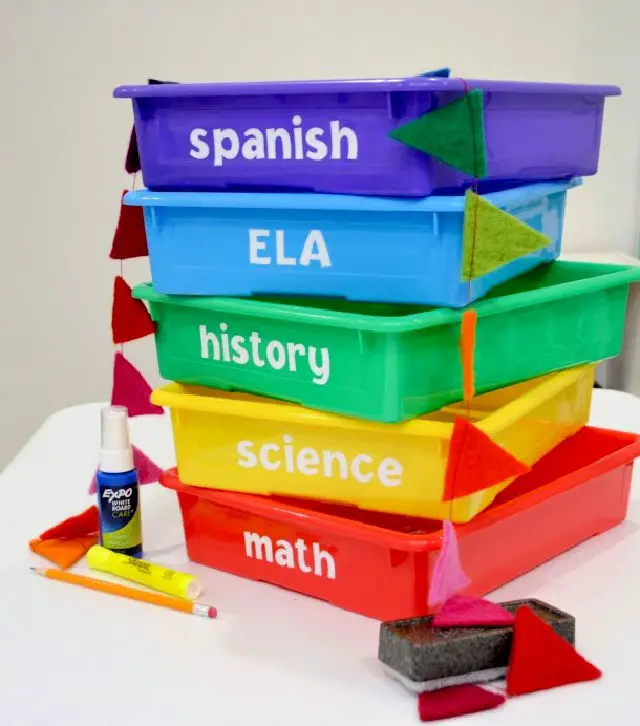
As students head back to school, you can make the transition smoother and more exciting by adding a personal touch to their supplies. One simple way to do so is with a Cricut machine, which allows for endless customization possibilities. With this guide, you’ll learn how to create a range of personalized items, from binders and paper bins to organizers and beyond.To get started, you’ll need a few basic tools: a Cricut Explore Air 2, the Design Space software that comes with it, solid color binders, Cricut premium vinyl, transfer tape, and the basic toolset. If you don’t want to invest in the full toolset, you can substitute with scissors, a scraper, and weeding tools from your local stationery shop.The best part? Your child will be thrilled to show off their unique supplies on the first day of school. You can even involve them in the design process, letting them pick out their favorite designs before printing them out.
Exploding Gift Box – Paper Craft Idea
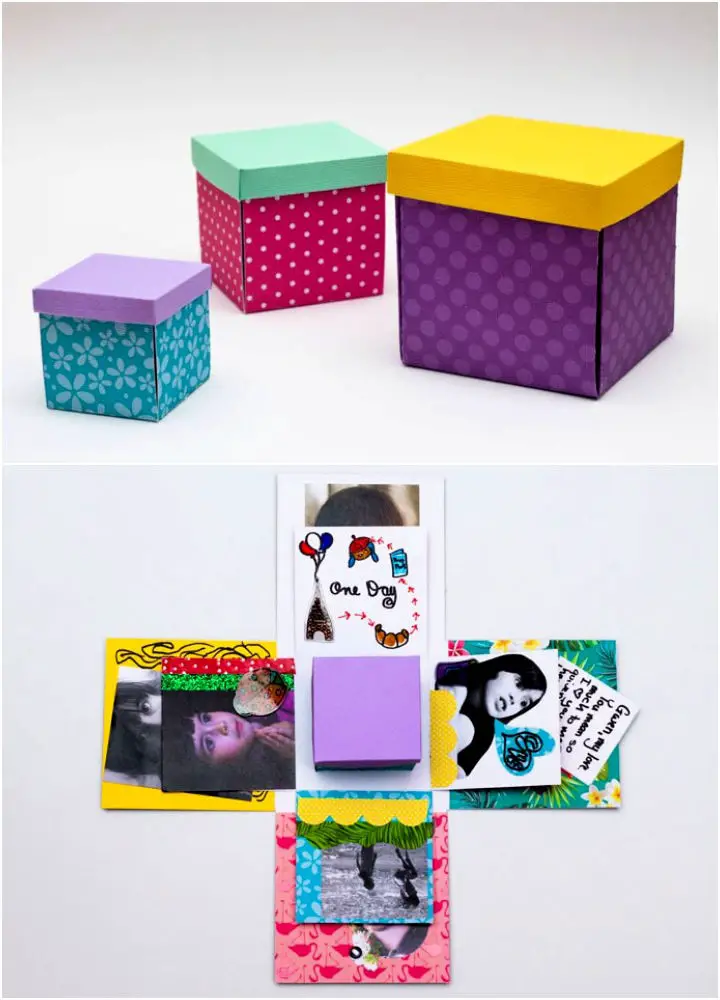
Looking for a unique and thoughtful gift idea for someone who loves taking pictures? You’re in luck! An exploding photo box is a creative and personalized present that’s sure to delight. This DIY masterpiece is filled with memories, making it an ideal choice for friends or family members who cherish the moments they’ve shared together.
To create this stunning gift, you’ll need:
– Colorful cardstock for the outer layers
– Scrapbooking paper for added texture and design
– A ruler to ensure precise cutting
– Pencil or pen for jotting down notes
– Scissors to cut out shapes and designs
– Double-sided paper for a pop of color
– Washi tape to hold everything together
– Stickers, scrapbooking decorations, or other embellishments to add visual interest
– Photos, of course, to fill the box with memories
– An art knife and cutting board for precision cuts (optional)
This gift has the added bonus of serving as a beautiful keepsake that can be revisited years down the line. Plus, you can customize it to fit your friend’s style or interests. To make it even more special, consider adding a small box with a heartfelt note or a meaningful memento.
As an added perk, we’ve included a free downloadable template to help guide your creative process.
Modern DIY Mini Air Dry Clay Pot
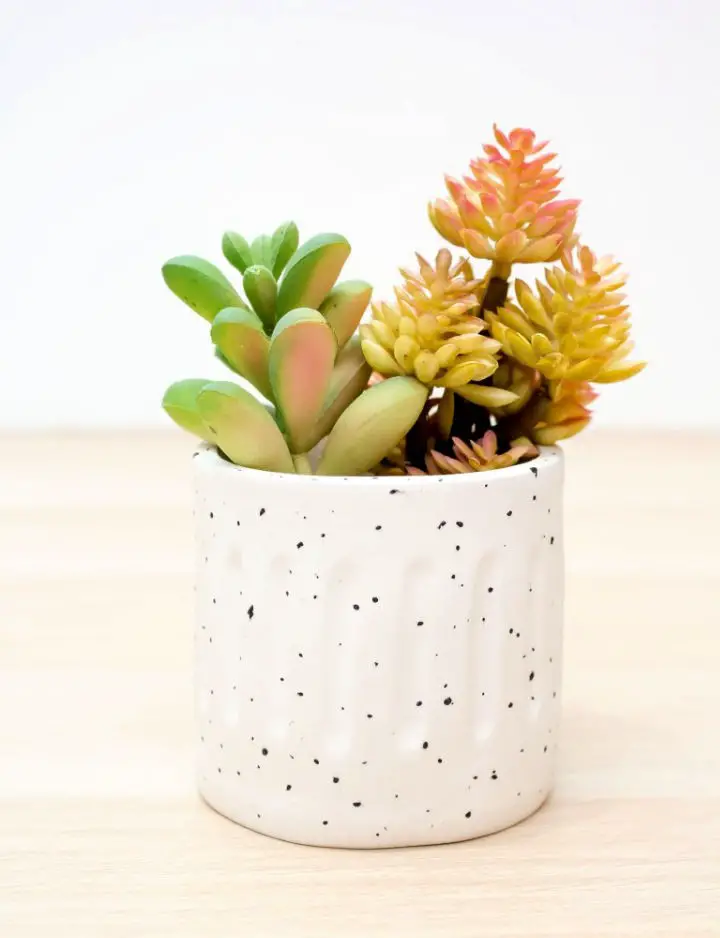
One of the greatest advantages of mini pots is their versatility – they can seamlessly blend in with any corner of your home. Whether you’re looking to add some life to a dull coffee table or inject some personality into a lackluster nightstand, these miniature vessels are guaranteed to make a statement. And it’s not just their visual appeal that sets them apart; the process of creating them is also incredibly rewarding. With minimal equipment and a bit of creativity, you can craft your own unique mini pots that will leave friends and family in awe.
To get started, you’ll need a few simple supplies: air-dry clay, a rolling pin, wax paper, a plastic knife, a pencil and ruler, a bottle or small vase, a bowl of water, acrylic paint, a needle or pushpin, varnish seal, sponge brush, and some dowels. Don’t worry if you’re new to working with clay – the process is surprisingly easy to pick up. And once you’ve mastered the basics, you can experiment with different designs and patterns to create truly one-of-a-kind mini pots.
As an added bonus, consider selling your creations online or at local craft fairs. With a little marketing know-how and some high-quality photos, you could be earning a decent income from your hobby in no time.
DIY Planter Out of an Upcycled Can
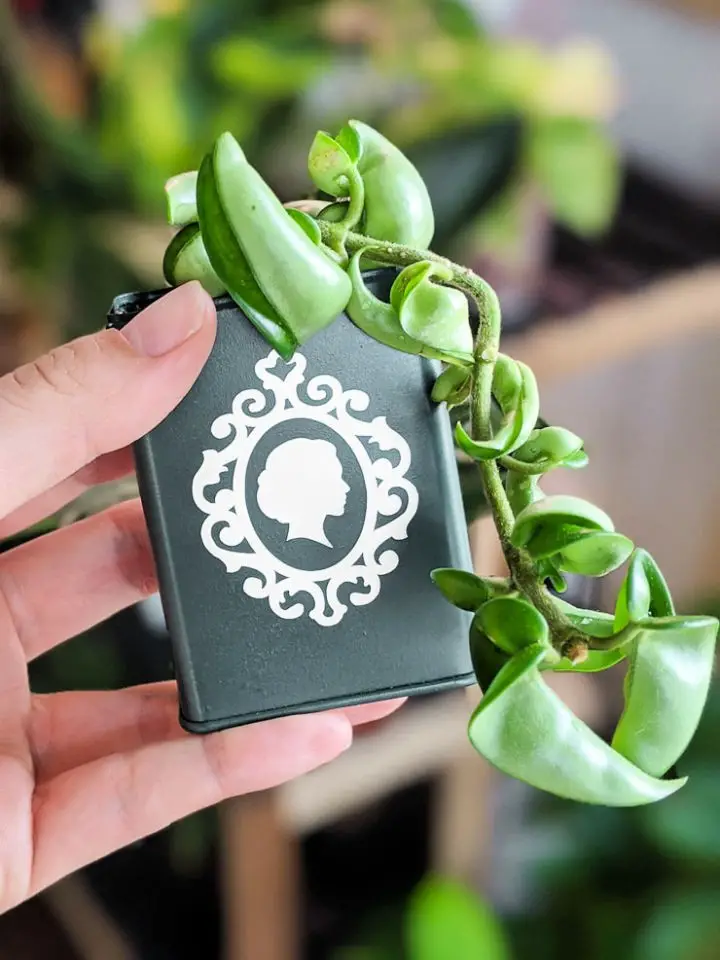
When exploring eco-friendly crafts, this project stands out for its unique blend of creativity and sustainability. By upcycling empty cans from around the house, you’ll not only reduce waste but also create a beautiful planter for your small plant of choice. To get started, don’t forget to wear protective gear – a mask and eye protection are essential when cutting wood. A drill will be necessary, so some woodworking experience is required.
To begin, gather the following materials:
– An empty old bay can
– Drill and regular drill bit
– Spray paint
– Cricut Explore Air 2
– White adhesive vinyl
– Weeding tool
– Transfer tape
As an added bonus, this project will help declutter your home by utilizing cans that would otherwise go to waste. Plus, you’ll save money by using old supplies instead of buying new ones. With a little creativity and some basic crafting tools, you can create a lovely planter that’s not only good for the environment but also adds a touch of greenery to your space.
Harlequin Crochet Slippers Free Pattern
As the fall and winter seasons approach, it’s the ideal time to indulge in the warmth and comfort of harlequin-inspired crochet slippers. The use of crochet instead of knitting or seaming is deliberate, as it yields a thicker and more durable finished product. The distinctive pointy diamond edge adds an extra layer of visual appeal. For those looking to turn their hobby into a profitable venture on Etsy, finding free crochet slippers patterns is the perfect place to start. To get started, you’ll need Fair Isle Liberty Craft Colors Yarn, a 6.0mm crochet hook, yarn needle, scissors, and color planner. With these basic materials in hand, you can create a pair of cozy slippers that will keep your feet warm and toasty all day long. The versatility of the design also allows for easy customization with various color schemes. Perhaps best of all, this pattern is accessible even to beginners, as it eliminates the need for sewing. With these features combined, you’ll be well on your way to crafting a unique and functional item that’s sure to please.
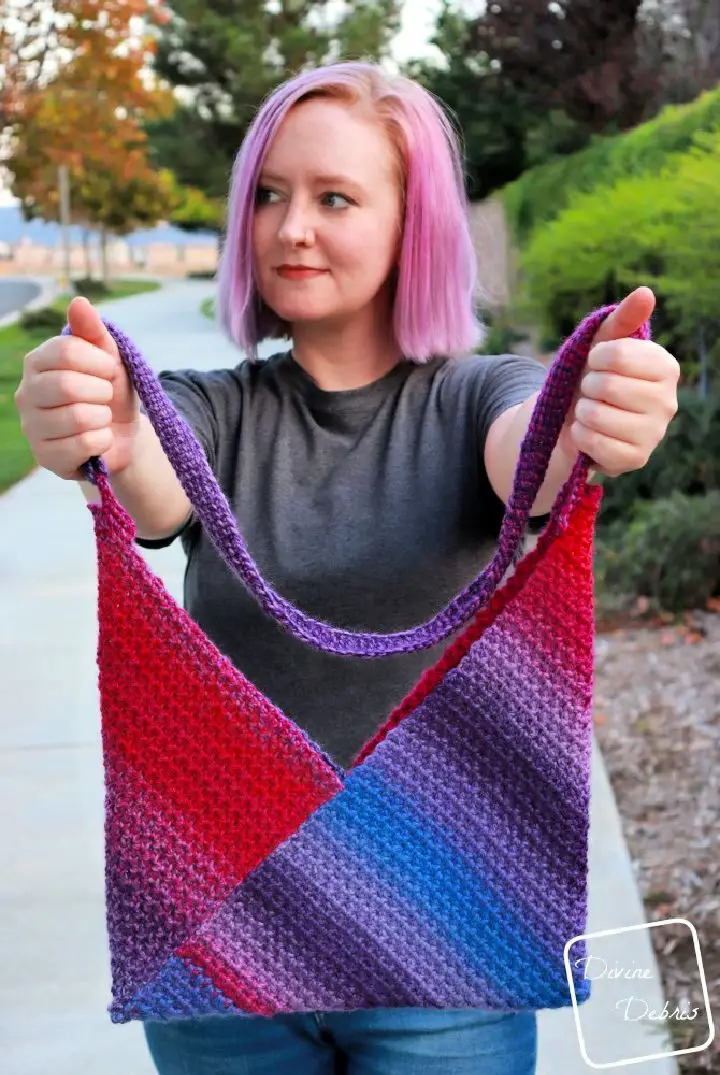
Free Crochet Diamond Tote Pattern
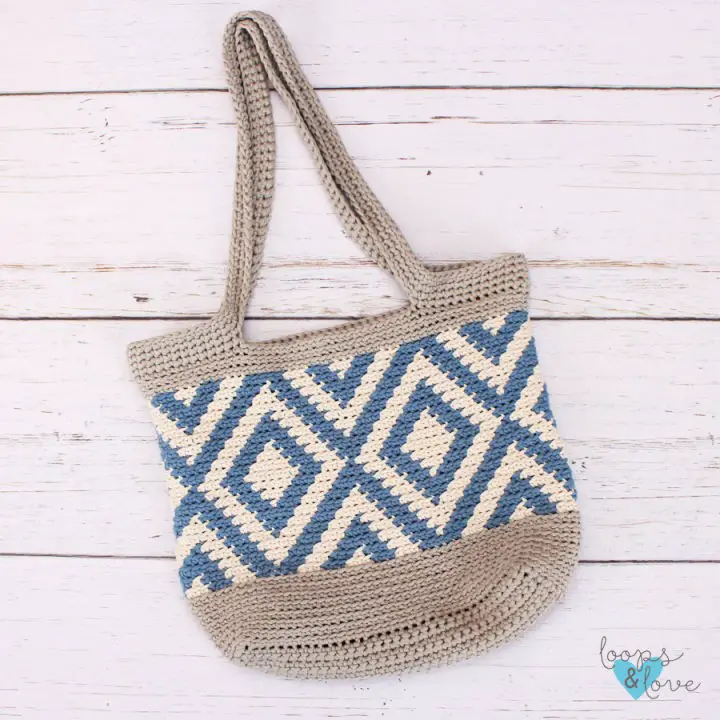
These stunning tote bags owe their charm to the striking diamond pattern stitches used in their creation. While it may seem intricate at first glance, the process is surprisingly straightforward. The use of joined rounds brings the bag’s handle to life, while the color-changing technique adds an extra layer of visual interest. With a little practice and patience, you’ll be well on your way to creating these adorable bags. To get started, gather your supplies: Bernat Maker Home Decor Yarn, a 6.0mm crochet hook, yarn needle, and a dash of creativity. As a bonus, this pattern is perfect for beginners, utilizing only basic stitches like chaining, skip stitching, and single crochet. Two distinct bag options are available, offering even more variety and flexibility. And the best part? You won’t need to worry about measuring gauge, allowing you to dive straight into the project and start creating.
DIY Origami Decorations

As the holiday season approaches, many of us look forward to transforming our homes into winter wonderlands. One simple yet creative way to add some festive flair is by crafting your own ornaments using basic paper and origami techniques. These adorable decorations can be easily integrated into your fairy lights, hung on your Christmas tree, or gifted to loved ones. With a little creativity, the possibilities are endless.
To get started, you’ll need just a few basic supplies: a printer, ruler, rounded knife or craft knife, white pencil, dry glue, and some cord. Once you have these materials, you can begin crafting your own unique ornaments.
A couple of bonus tips to keep in mind:
Firstly, it’s a good idea to print out the template on rough paper before moving on to the final product. This will give you an accurate sense of the finished size and help you make any necessary adjustments.
Secondly, when working with origami, precision is key. Use your ruler to draw accurate diagonal and horizontal lines, as these details can make all the difference in the final appearance of your ornaments.
Finally, consider attaching your creations to the small bulbs on your fairy lights for a truly show-stopping display.
Wooden Spindle Ornaments
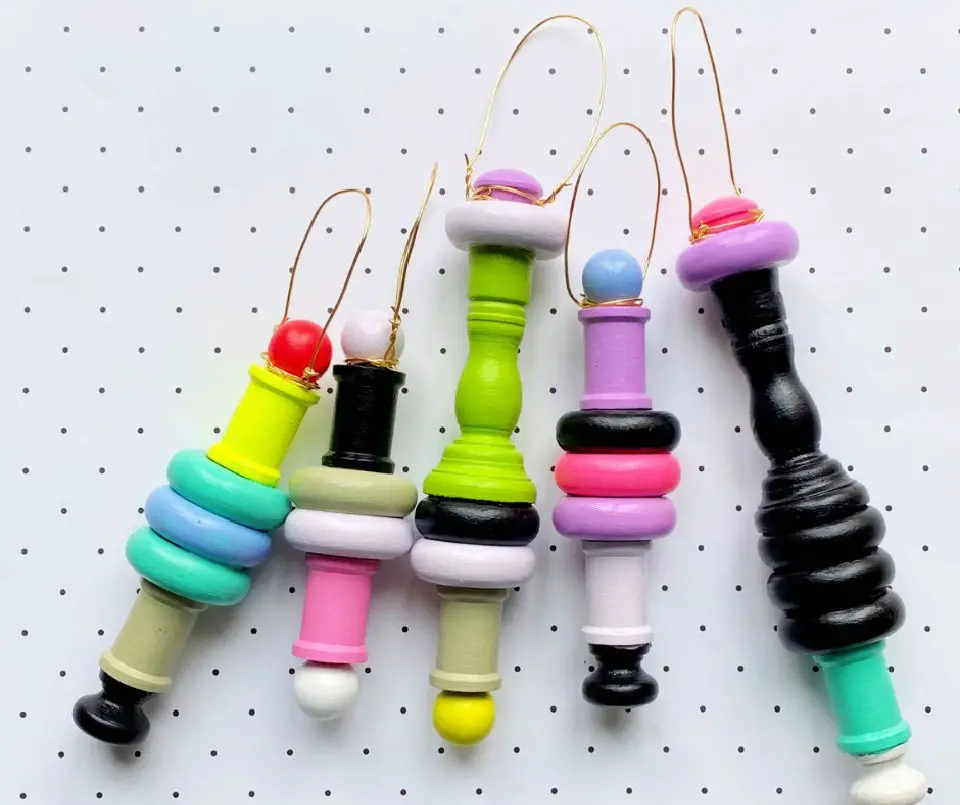
If you’re someone who enjoys experimenting with unique Christmas ornament ideas every year, you’ll love this one-of-a-kind project that stands out from the crowd of traditional decorations. Unlike common market finds, this creative endeavor will showcase your personal touch and artistic flair.
To bring this innovative design to life, gather the following materials:
– Assorted wood shapes with varying textures and designs
– Wood spindles for added dimension and interest
– Wood glue to secure each piece together seamlessly
– Christmas wire to create a sturdy base for your ornament
– Craft paint in a range of colors to match your personal style
– Paintbrushes of various sizes to achieve desired effects
– Mod podge to add a glossy finish and protect your masterpiece.
Additional tips to enhance the final result:
* Allow the wood glue to dry completely before applying paint to ensure a smooth, even coat.
* Use two colors of paint to touch up any imperfections or add an extra layer of depth to your design.
* Finish off with mod podge to add a glossy sheen and preserve your handiwork.
Rainbow Friendship Bracelets
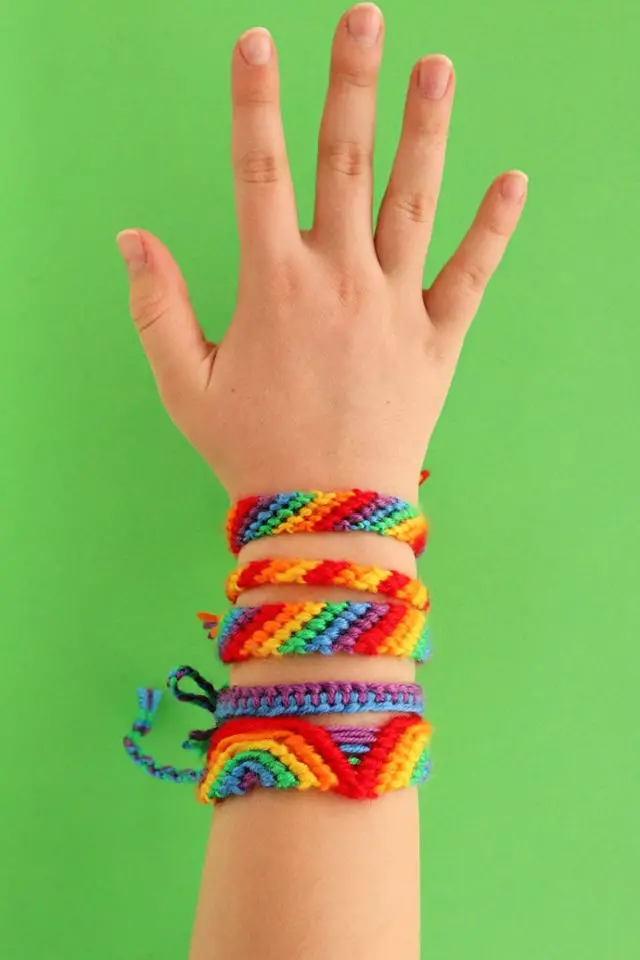
To show your appreciation for your friends, consider gifting them a beautiful, handmade rainbow-colored bracelet. You can use any colorful yarn from your stash, as long as the coloring is vibrant and pleasing to the eye. With various size options available, you’re sure to find the perfect fit. Take the time to thoughtfully combine colors and create a unique piece that showcases your crafting skills. To make this project even more special, consider incorporating yarn scraps into your design – not only will it add visual interest, but it’s also a great way to declutter your yarn collection! This craft is remarkably quick to complete, requiring only around ten minutes of your time. For an extra touch of whimsy, feel free to embellish your bracelet with pom-poms, tassels, or other decorative elements. Whatever you choose, the end result is sure to be a treasured gift for your friends.
Kelsey Cowl Crochet Pattern
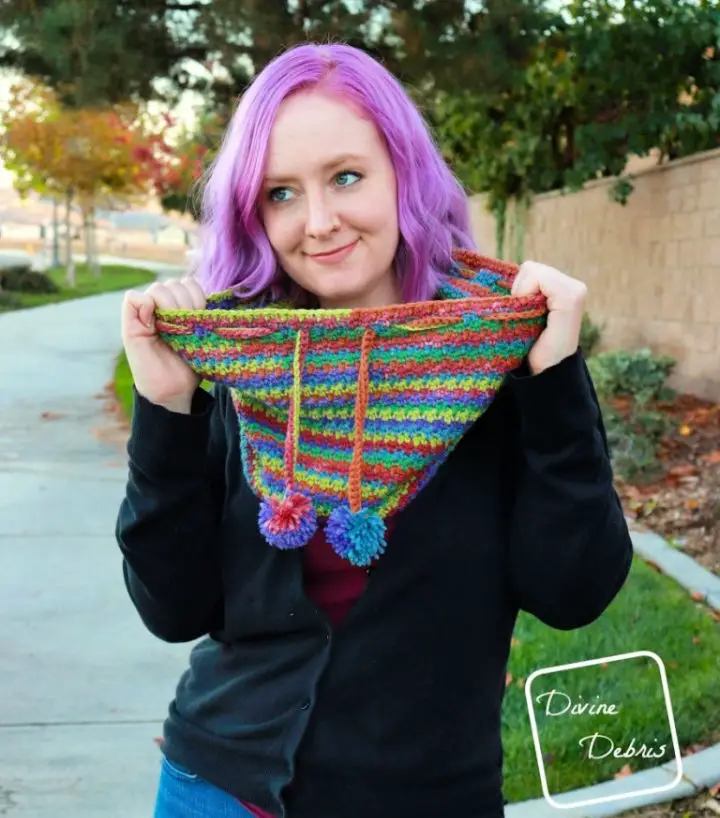
There’s something undeniably charming about this cowl pattern, don’t you agree? Not only does it provide excellent coverage for your neck, shoulders, and ears, but the addition of pom-poms at the end adds a touch of whimsy and playfulness. The combination of chaining, single crochet, double crochet, and other stitches makes for a unique and engaging crochet experience. To get started, you’ll need Worsted Weighted Yarn, a 5.0mm hook, scissors, a measuring tape, yarn needle, and a pom-pom maker. As with any crochet project, it’s essential to take the time to create a gauge swatch to ensure your finished product turns out as desired. And the best part? This pattern is perfect for beginners, requiring no special stitches or expertise.
How to Make Origami Kusudama Flowers
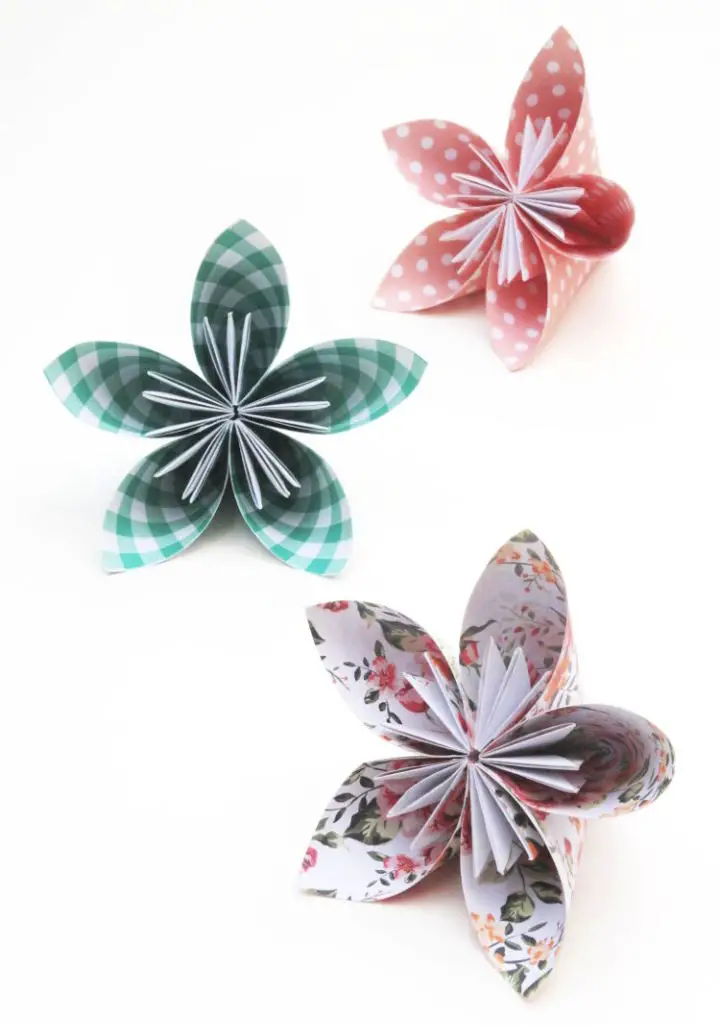
Bring the beauty of Origami Kusudama flowers into your home by creating your own stunning arrangements using just 5 simple pieces of paper! These delicate blooms are surprisingly easy to craft, requiring no prior experience or specialized skills. With a few basic materials and some patience, you can fill vases, decorate spaces, or even create unique gifts that will impress friends and family. And the best part? This creative endeavor won’t break the bank – it’s an affordable way to express yourself and add a touch of elegance to any setting.
To get started, gather these essential materials:
– Origami paper (choose from a variety of colors and patterns)
– Glue (for securing those delicate petals)
– A paintbrush (optional, for adding subtle shading or texture)
– Regular printer paper, magazines, maps, old books, or newspaper (for creating unique and textured backgrounds or bases)
Want to take your Origami Kusudama game to the next level? Try these bonus tips:
1. Elevate the design by using floral paper for intricate-looking flowers.
2. Combine 12 of these gorgeous blooms to create a show-stopping Kusudama ball that will be the centerpiece of any gathering.
3. Add an extra layer of whimsy by threading ribbons through these delicate flowers, perfect for Christmas tree decorations or other special occasions.
4. Make them pop with vibrant colors and watch as they become the focal point of any room!
How To Knit A Cardigan And Sell

Discover the ultimate cozy knitting experience with this delightful cardigan pattern! This stunningly long and plush design is perfect for any weather, boasting both lightness and a beautiful drape. Its ease of construction is unmatched, as it’s a simple knit-flat project that requires only basic decrease and purl stitches. To create this masterpiece, you’ll need the following essential tools: 8.0 mm knitting needles, Lion Brand Yarn Jeans, a measuring tape, and a trusty tapestry needle. For an added bonus, consider these tips: The Jeans yarn offers unparalleled affordability and washability, while using large needles will yield an incredible drape and a soft-on-skin texture. Opt for solid colors to achieve a charming vintage look. With this project, you’ll be surprised at how quickly and effortlessly you can earn good money.
DIY Wooden Playhouse For Kids
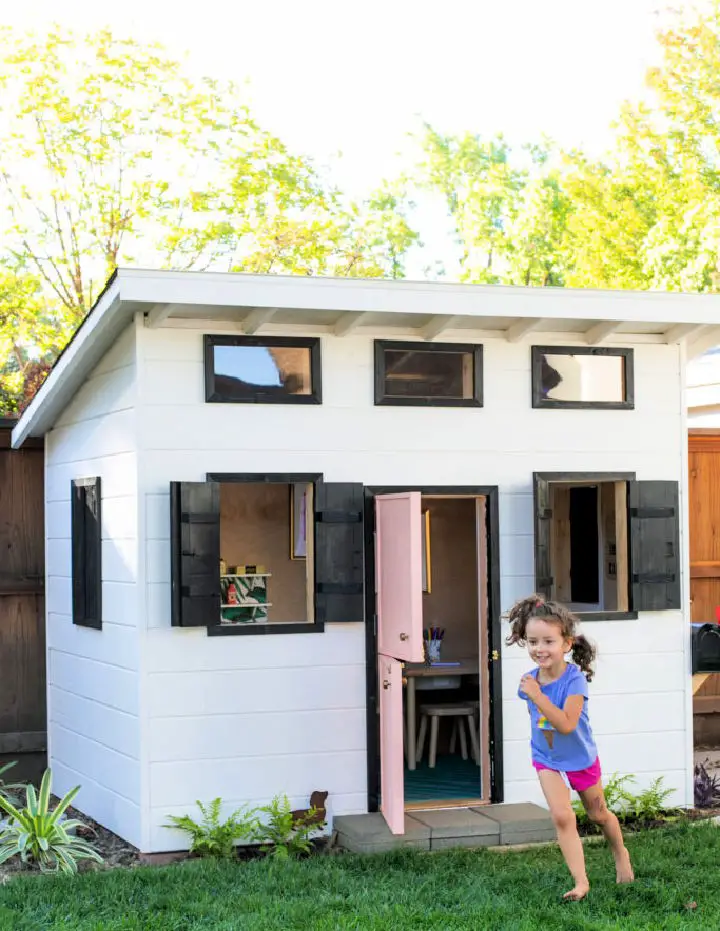
Make your children’s happiness shine brighter than the brightest swing with this DIY wooden playhouse! A modern plan that sparks creativity, fosters bonding, and provides endless joy. The best part? You can turn a creative outlet into a profitable venture by creating hundreds of dollars’ worth of wooden projects.
To get started, gather these essentials:
wood for walls, doors, and more
shutters to add a touch of whimsy to your windows
little stools for cozy snuggles
floor pillows for ultimate comfort
As an added bonus, consider these expert tips:
It’s a brilliant way to nurture your kids’ growth and learning through play
Bring serenity to the space by incorporating light colors and calming elements
Teach your little ones the importance of cleanliness and maintenance to instill a sense of responsibility within them. This DIY wooden playhouse is sure to become their happy haven!
Easy Pumpkin Tea Towel – Gift Idea
Elevate your kitchen’s fall ambiance with this charming pumpkin tea towel, a timeless design that won’t go out of style anytime soon. Its simplicity is part of its charm, making it an accessible DIY project for crafters of all levels. With basic hand-sewing skills and some scrap fabric, you can whip up this adorable appliqué in no time.To get started, gather your materials: a tea towel or large napkin, embroidery hoop, floss, needle, and that trusty scrap fabric. As an added bonus, this project makes for a thoughtful and unique gift for friends and family. Plus, the stitches are refreshingly easy to master, even without the aid of a sewing machine. For an extra pop of color, consider using linen fabric to bring out the pumpkin’s vibrant hues.
Single Upcycled Patchwork Denim Star
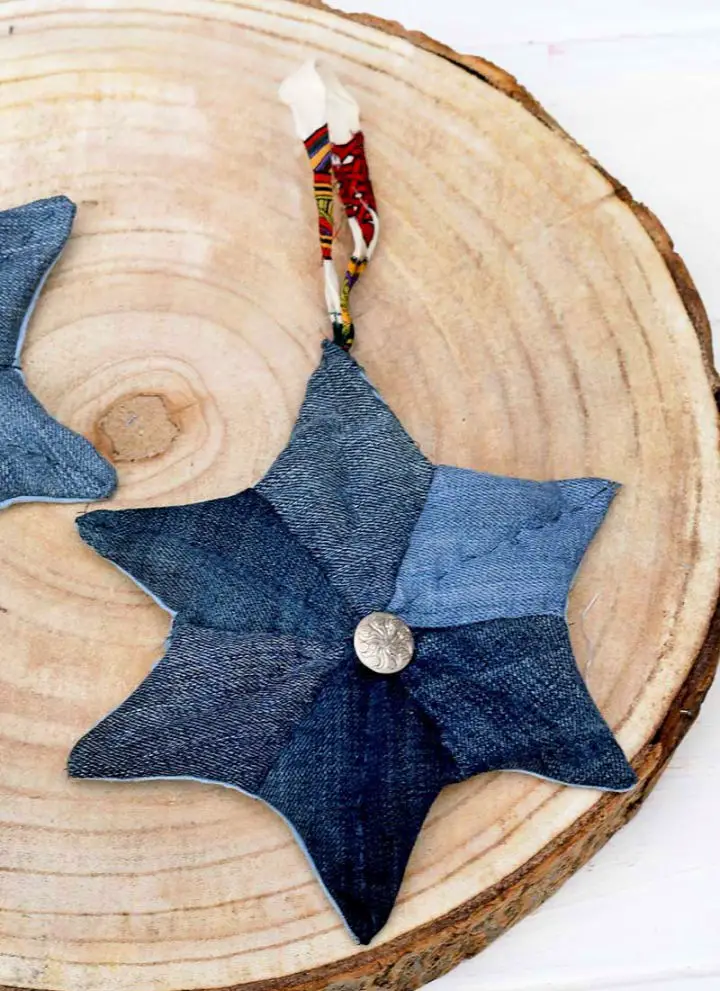
Upcycle Your Way to a Starry Night with This Easy DIY Project! This charming patchwork denim star is the perfect way to breathe new life into old scraps of denim. And the best part? It’s ridiculously easy to make! Whether you’re looking for a fun decoration for your kid’s room, a unique table mat, or just a quirky addition to your home decor, this little star is sure to bring some sparkle to your space. To get started, gather up some scraps of denim, a metal button, needle and thread, fiberfill, and a bit of ribbon. And don’t forget to get creative with those denim scraps – think old jeans, ripped knees, or faded hems – they’ll add character to your star. Plus, this project is perfect for last-minute Christmas decor, or as a fun way to use up your stash of fabric scraps. So why not give it a try? With its easy instructions and endless possibilities, this DIY project is sure to be a hit!
Cozy Dana Scarf Crochet Pattern

Wrap yourself in the warmth of this cozy Dana scarf, the perfect accessory for your fall ensembles. This free crochet pattern not only promises a fun and effortless creation process, but also delivers stunning color options. The addition of tassels at both ends lends a sophisticated yet trendy touch to the plush scarf. To bring this project to life, you’ll need:size #3 DK weight yarn5 mm crochet hookscissorsmeasuring tapeyarn needleFor an added bonus, consider these tips:Utilize your stash yarn from previous projects to reduce waste and save funds.This design is quick and easy to complete, making it a great option for those looking for a fast finish.Don’t be afraid to get creative with vibrant colors – the result will be a truly eye-catching scarf!
Pumpkin Lanterns Crafts to Make and Sell
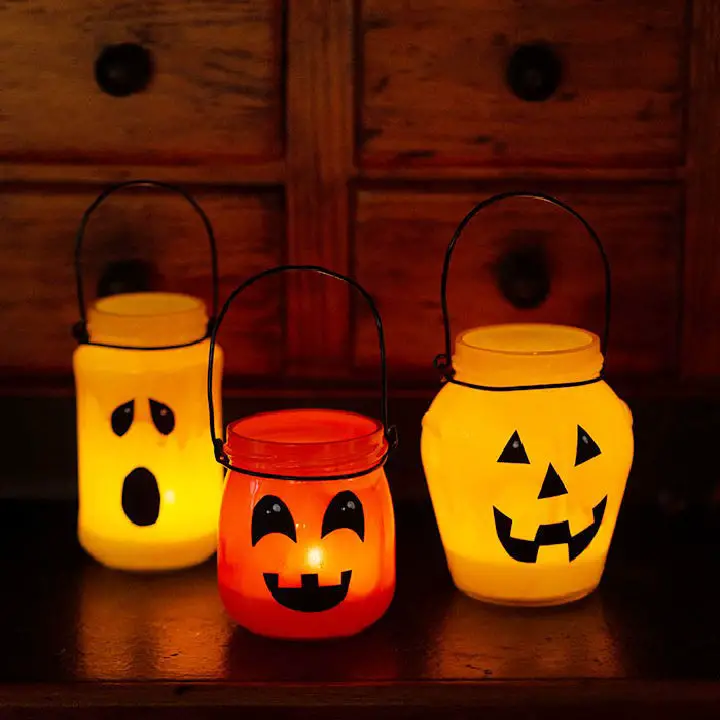
Transform ordinary pumpkin lanterns into extraordinary, spooky masterpieces this Halloween with an innovative DIY project that’s both easy and impressive. These lanterns are the perfect way to add a touch of darkness to your holiday decorations, and they’re surprisingly simple to create. Start by collecting empty jam jars and giving them a colorful makeover using yellow and orange spray paints. Add some eerie flair with black panel foil or an acrylic marker, and then finish off the look with white acrylic markers. To take it to the next level, you’ll also need scissors, black aluminum wire, and pliers. With these basic materials, you can create lanterns that are sure to cast a spell on your friends and family. And as an added bonus, these DIY lanterns make for a great way to monetize your creativity – just sell them and enjoy the profit! This project is perfect for anyone looking to add some Halloween magic to their home decor without breaking the bank.
Front Door Wreath For Fall
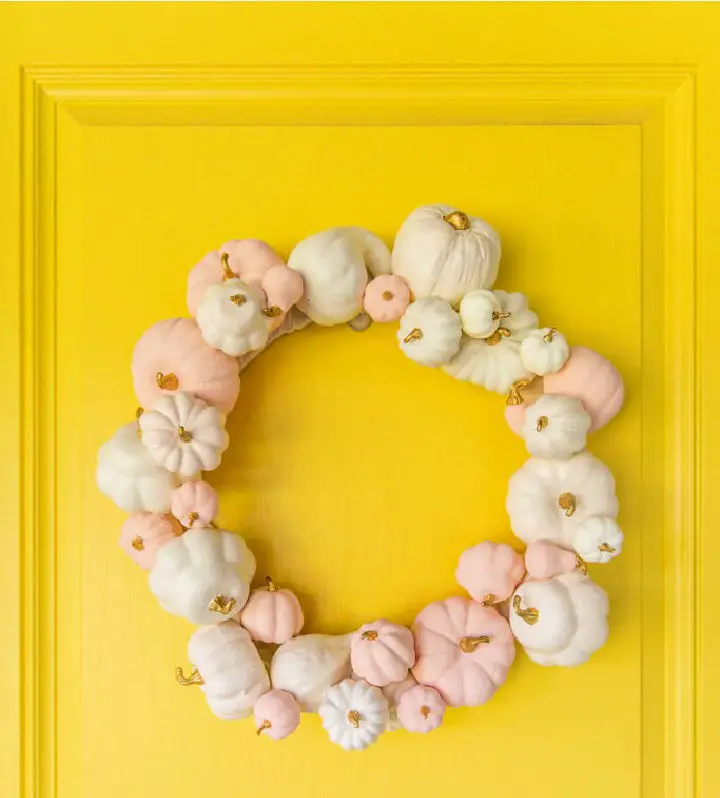
Imagine the inviting charm of a warm welcome at your front doorstep, courtesy of this vibrant fall wreath. This colorful creation is an effortless way to add a personal touch to your home’s exterior. Its bold design will undoubtedly catch the eye of anyone passing by, making it a perfect conversation starter. Plus, its versatility allows for endless color options that can seamlessly blend with your home’s aesthetic.To create this stunning piece, you’ll need:* Artificial mini pumpkins and gourds* Spray paint or craft paint* Gold craft paint* Paintbrush* Wreath form* Felt* Scissors* Glue gun and glue sticksAnd for added flair, consider the following bonus tips:* Opt for soft, smooth hues to create a striking contrast on your door* This DIY project is quick, easy, and requires minimal effort* Secure your masterpiece with glue for long-term durability
Basic Knitted Adult Hat

This vintage-inspired knitting hat is a perfect pick for the current season’s breezy weather. The simplicity of this mustard-colored, basic knitted adult hat makes it an excellent choice for beginners or those seeking a quick project. The free pattern involves alternating knit and purl stitches, allowing you to create a unique piece that can be customized to any size and color preference.
What’s needed:
* 9- & 10-mm knitting needles
* Wool-Ease Thick & Quick Yarn
* Stitch marker
* Faux fur pom poms
* Ultraleather garment tags
Bonus tips:
* Utilize stitch markers to keep track of the beginning and end of rounds for a seamless finish.
* Opt for soft, light colors to achieve a beautiful texture.
* This project is not only easy but also quick, making it an excellent choice for those looking to monetize their crafting skills, such as selling patterns on Etsy.
Cinnamon Stick Wreath To Make And Sell
Indulge your senses with this enchanting cinnamon stick wreath, a simple yet stunning addition to your fall decor. The warm aroma of cinnamon will fill the air as you welcome guests into your home. This easy DIY project requires minimal effort but yields maximum impact.
To create this delightful wreath, gather the following materials:
* 10-12 inch round wire wreath frame
* 38-40 six-inch cinnamon sticks
* A dozen three-inch cinnamon sticks
* Hot glue gun and glue sticks
* Burlap ribbon, 2.5 inches wide, approximately four feet long
* Red paint
* Wooden tack nails
Pro tips to elevate your craft:
* Ensure the cinnamon sticks are uniform in size for a harmonious pattern.
* Apply hot glue with precision and care for a seamless finish.
* Not only is this wreath a beautiful addition to your home, but it’s also a lucrative opportunity to create and sell, making it a worthwhile investment.
Colorful Dip-Dye Candles
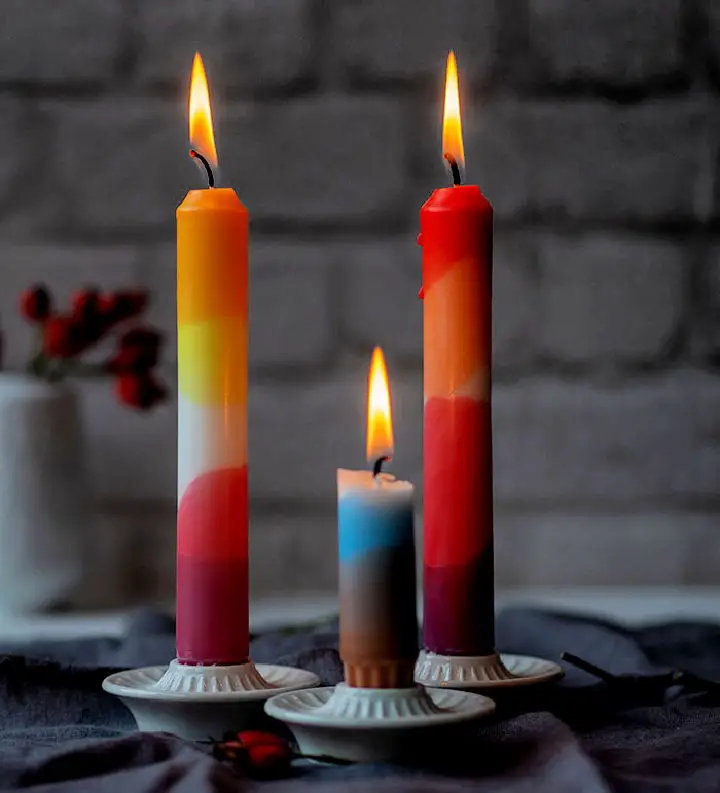
Who can resist the allure of handmade candles? With just a few simple materials, you can create your own vibrant dip-dye candles that make for an unforgettable birthday gift or a thoughtful gesture. This DIY project is not only easy on the wallet but also a fun and creative outlet.To get started, you’ll need:* White bar candles made from paraffin or stearin* White paraffin wax for melting* Dye lenses in various colors to achieve the desired hue* Empty, clean tin cans to serve as molds* An old pot with a sturdy handle to melt the wax* Wooden sticks to stir and shape the molten waxAs you embark on this DIY adventure, consider these bonus tips to elevate your candle-making experience:* Experiment with different dye lenses to create a stunning array of colors* Infuse your candles with a subtle scent by adding essential oils to the melted wax* Prepare sets in varying sizes to craft unique gifts for friends and loved ones
Colorful DIY Felt Wreath

Creating a DIY felt wreath is an ideal project for anyone looking to add a touch of modern elegance to their home’s entrance. This vibrant and colorful piece can be whipped up in just under an hour, making it perfect for those with a busy schedule. The best part? It’s incredibly easy to make, requiring minimal materials and no prior crafting experience.To get started, you’ll need the following essentials:* Various colors of felt* A wreath form* Scissors* Hot glue gun and glue sticksFor an extra pop of color and visual interest, consider using multiple hues to create a unique and eye-catching design. And don’t forget to utilize hot glue for a quick and secure application process.One final trick to take your DIY felt wreath to the next level is to shape the leaves into three-dimensional forms, giving your finished piece a textured and dynamic appearance.
Cuddle Shawl Cardigan Crochet Pattern
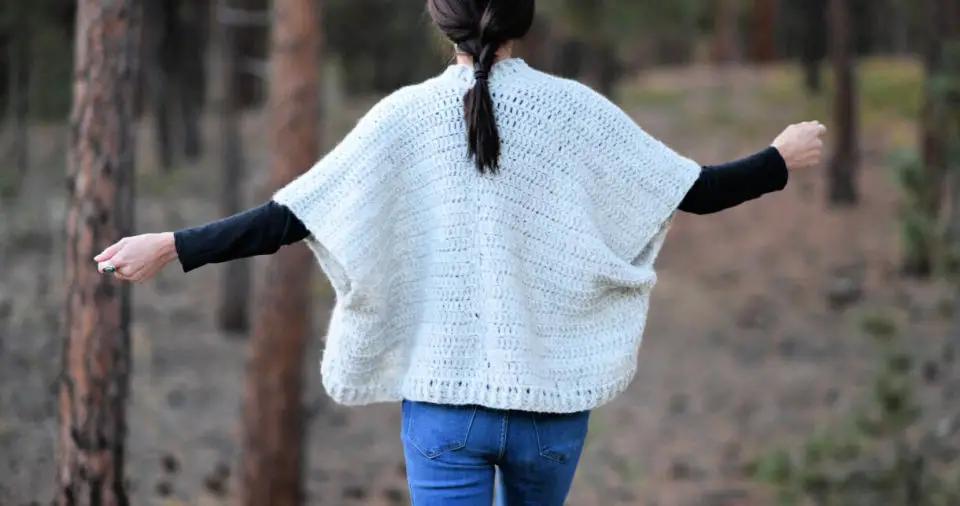
Get cozy this winter with our free crochet pattern for a cuddle shawl cardigan! This versatile project is perfect for beginners or anyone looking to create a unique, handmade accessory. The beauty of this design lies in its adjustability – simply add or remove rows to achieve the desired size.To get started, you’ll need:* We Crochet Wonder fluff yarn* 5mm crochet hook* Tapestry needle* Measuring tapeAnd here’s a little extra advice to take your cardigan from good to great:* The simple construction and easy stitches make this project a breeze to complete.* Consider using a light color to add visual interest and make the piece pop with any outfit.* Choose wonderful yarn for a luxurious finish that’s as soft as it is stylish.
Hurdle Stitch Hat Knitting Pattern

Indulge in the cozy charm of this hurdle stitch hat, an effortless accessory perfect for any occasion. The knitting pattern boasts a straightforward design, requiring only knit stitches in the round with alternating knit and purl rows. You’ll be delighted to discover that it can be completed within just a few hours. Why not kick-start your crafting journey by creating and selling these delightful hats from home? All you need is Rowan Big Wool Silk yarn, a crochet hook, tapestry needle, yarn needle, scissors, and of course, some playful pom poms for added flair. For an extra touch of drama, consider using bulky yarn and large needles to create a fuller silhouette or opt for a bold solid color for a statement piece. This quick and simple DIY project also makes for a thoughtful gift idea.
Make Your Own Mosaic Pot
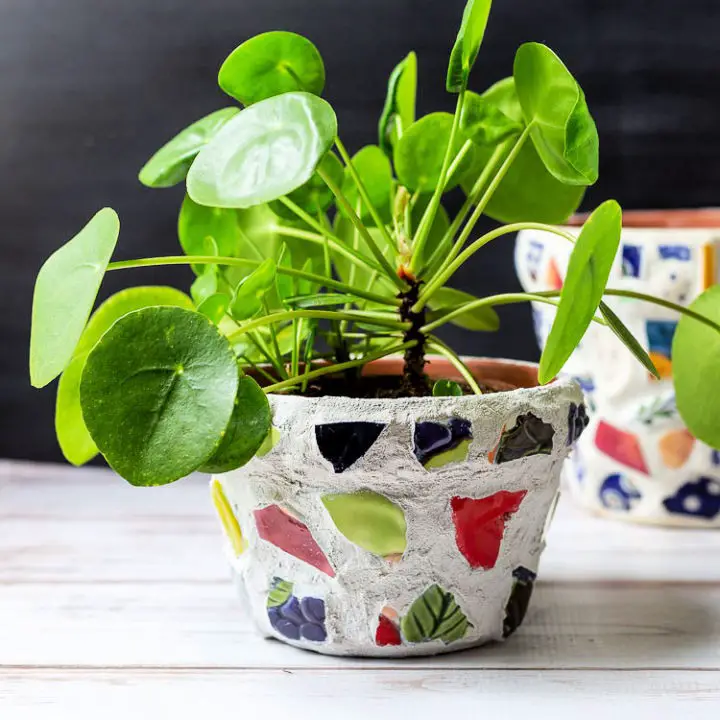
Transform your garden with stunning mosaic pots that add an extra layer of beauty to your indoor and outdoor greens. This DIY project is perfect for upcycling old ceramic dishes from thrift shops into unique, eye-catching planters. To get started, gather the following materials: a clay pot, diverse colorful ceramic dishes, heavy-duty glue, premixed white grout, and disposable gloves.
In addition to these essential items, consider using ceramic pottery from your home to save money and give your project an even more personal touch. When assembling the mosaic design, make sure to smooth out the areas between ceramic pieces for a seamless finish. Finally, allow the pot to dry for approximately 24 hours before use to ensure it’s ready for its new life as a beautiful planter.
Azuma Bukuro Bag Crochet Pattern
Looking for a versatile bag that’s perfect for daily outings? Look no further than this stunning Azuma Bukuro-inspired crochet market bag! Its innovative folding design sets it apart from other bags, making it a must-have accessory once you’ve finished creating it. The subtle ombre color effect adds an extra layer of sophistication to its overall charm.To get started, you’ll need the following materials:* Light worsted weight yarn* 5 mm crochet hook* Scissors* Measuring tape* Yarn needleAnd here are some valuable bonus tips to help you bring your bag-making skills to the next level:* Consider adding additional front pockets for increased storage space.* Use a larger needle to achieve a fuller, more defined shape.* Work in rows to ensure tight and neat stitches that will withstand regular use.
Free Crochet Dahlia Pattern
Easy Colour Block Face Mask Pattern
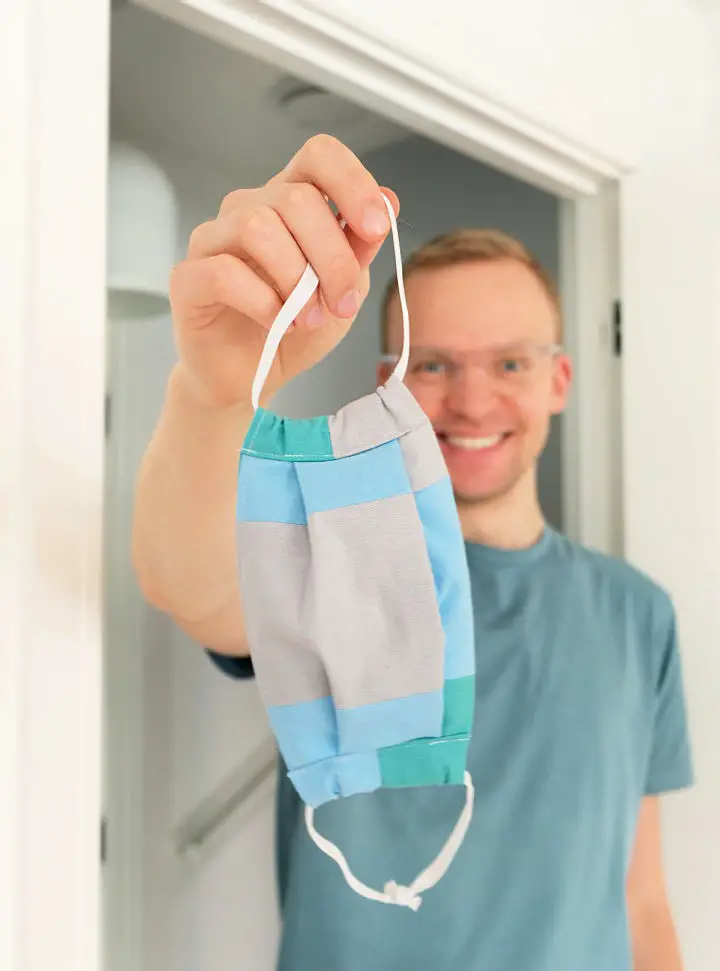
If you’re looking for a trendy accessory to make and sell, consider this easy color block face mask free pattern! The face mask trend shows no signs of slowing down in 2020, making it a great project to invest your time and money in. Plus, the design includes a pocket space for adding filters, providing an added layer of protection. Start creating your own colorful face masks at home that can be easily sold for a high profit.
Homemade Disinfectant Cleaning Spray

Make a homemade disinfectant cleaning spray that’s easy to prepare, cost-effective, and effective at cleaning surfaces. This DIY solution requires just a few simple ingredients, including rubbing alcohol, distilled water, hydrogen peroxide, and lemon essential oil. Simply combine the ingredients in an empty spray bottle and you’re ready to go! Use this homemade disinfectant to clean your kitchen appliances and windows for a long-lasting shine. For best results, use newspaper as a cleaning aid when applying the spray. To take it a step further, consider making fresh batches daily instead of relying on store-bought sanitizers and cleaners.
Macrame Camera Strap To Make And Sell
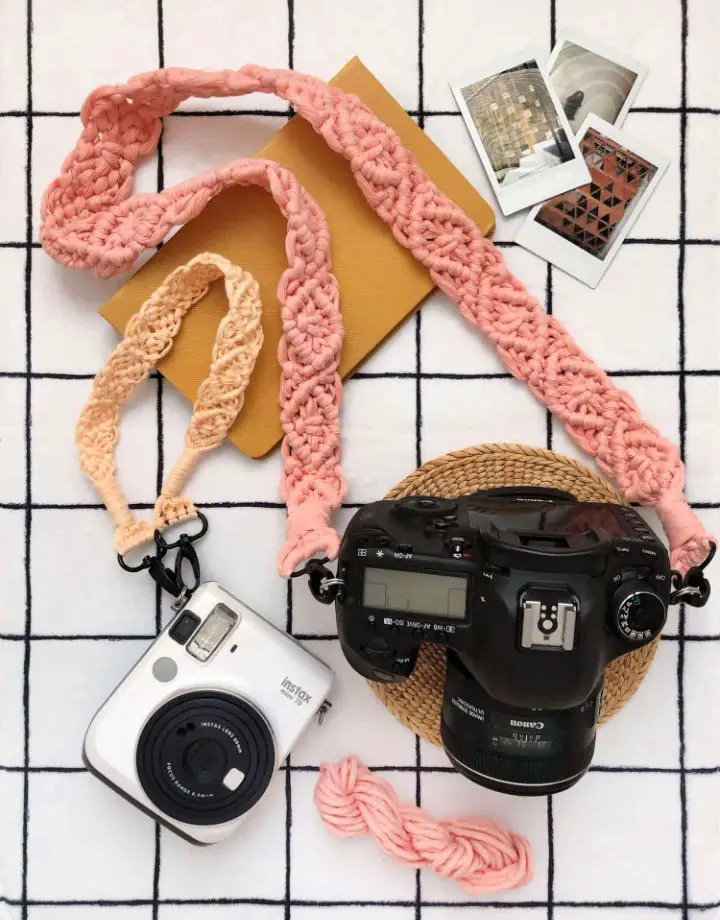
The Macrame camera strap is an ideal DIY project for beginners, allowing you to create a safe and stylish accessory for your DSLR or instant cameras. With the ability to customize the color and size of your strap, you can choose a combination that suits your unique style. This handy accessory not only keeps your hands free while traveling, but also makes for a great selling opportunity on platforms like Etsy, eBay, or Amazon. To get started, you’ll need just a few simple materials: two black claw clasps and some soft cotton. A pair of scissors will also come in handy as you work through the project. Additionally, consider the following bonus tips to maximize your earnings and create a truly timeless design: focus on darker colors to give your strap a classic look that never goes out of style.
DIY Swan Succulent Planters
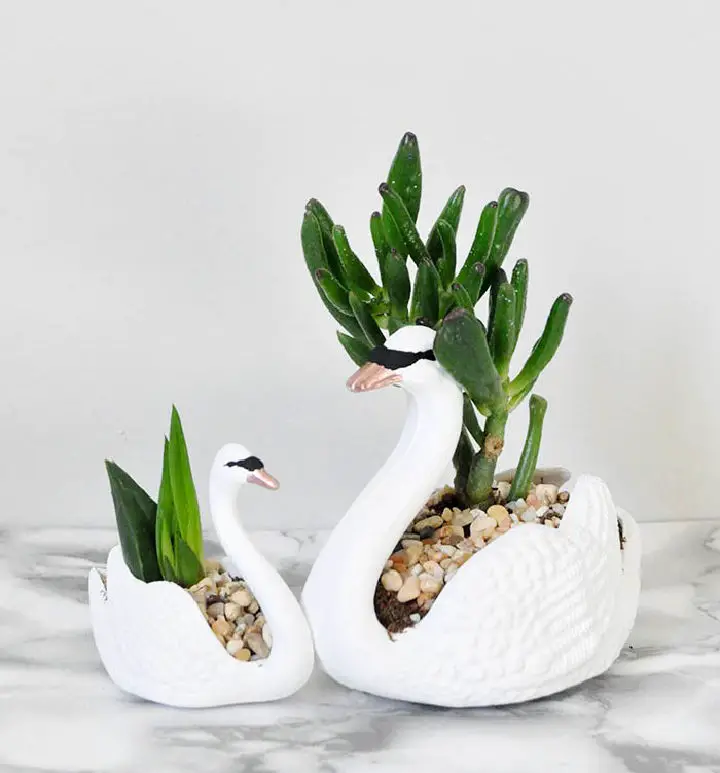
Elevate the ambiance of your modern living space with these easy-to-make DIY Swan succulent planters. By arranging them thoughtfully along your windowsill, you can create a visually appealing display that brings in a touch of nature and freshness. The versatility of this project lies in its ability to be customized to fit your unique style, whether you prefer bold colors or more subdued tones.
To get started, you’ll need the following materials:
– Plastic swan wedding favors (available at most craft stores)
– Gesso primer
– Paints and paintbrushes of your choice
As a bonus, consider these additional tips to take your project to the next level:
– Create a unique visual interest by varying the sizes of your planters.
– Add a unifying element by using same-colored pebbles or decorative accents throughout the display.
– This makes for an excellent and thoughtful gift for friends, making it a perfect addition to your wedding shower or registry.
Easy Rose Gold Foiled Pencil Cup
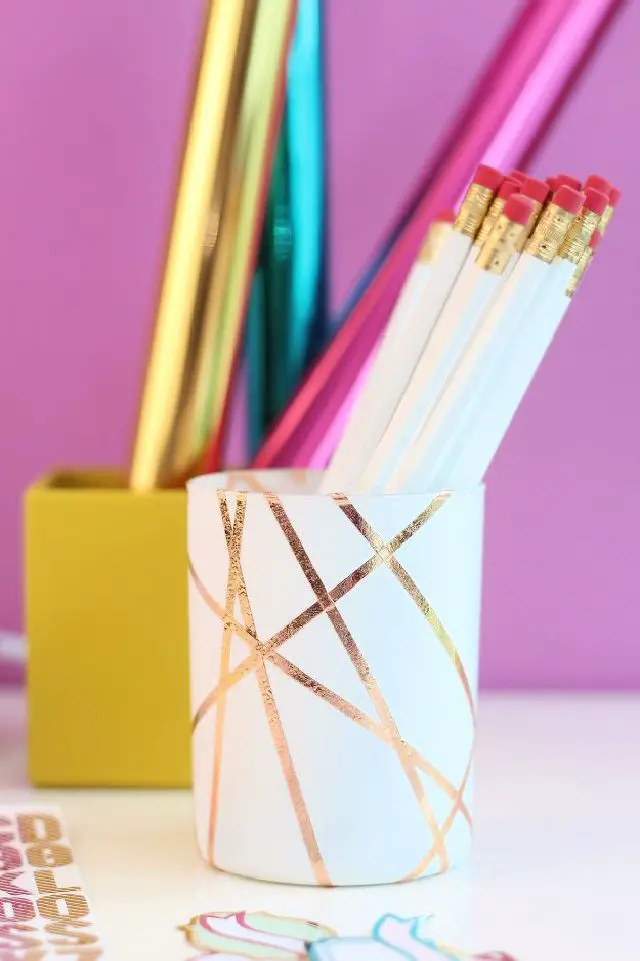
Create a stunning rose gold foiled pencil cup that adds a touch of elegance to your study table. This DIY project is surprisingly easy to make and can be a lucrative venture if you decide to sell it. Plus, you can customize it with your favorite designs and colors for a unique look.
To get started, you’ll need a few simple materials: white spray paint, double-sided tape, rose gold foil, and a glass jar. With these supplies, you can create a beautiful and functional pencil cup that’s sure to impress.
As an added bonus, this project is incredibly versatile. For instance, you can use lightweight jars or even plastic containers, which are durable and easy to clean. You could also consider gifting these adorable pencil cups on birthdays or using them as decorative flower holders.
Conclusion about Crafts that Make Money:
If you’re ready to turn a profit with your crafting skills, now’s the perfect time to give it a try. With technology at your fingertips, setting up an online presence and sharing your wares with friends and followers has never been easier. You can start selling right from the comfort of your own home, or even stock shelves at local stores for a decent income. Our list of high-profit crafts is specifically designed to coincide with peak shopping seasons, ensuring you’re targeting the most profitable opportunities. And as an added bonus, many of these DIY projects make great last-minute holiday gifts for loved ones.
