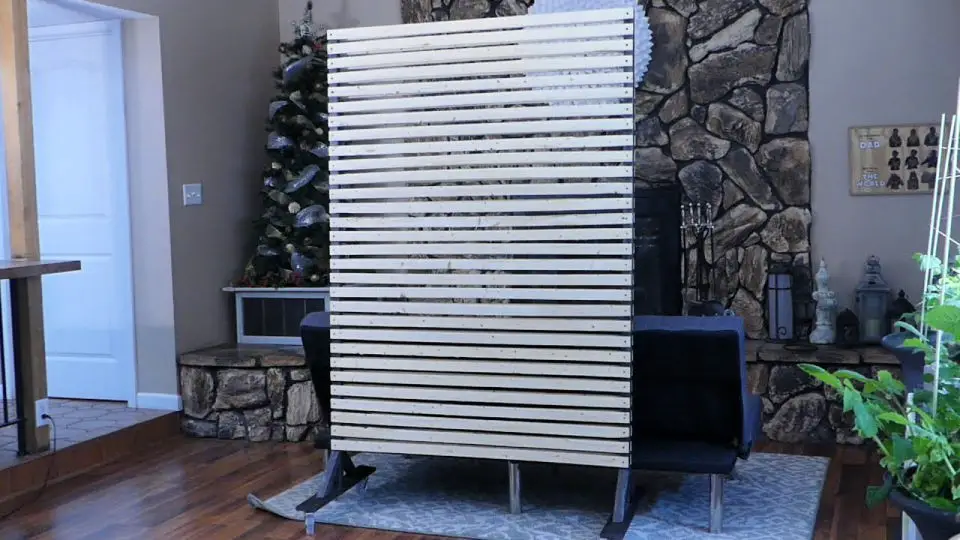
Modern DIY Wooden Room Divider
Transform your living space with a stylish DIY room divider, breathing new life into any unclear area in your home. By introducing structure while maintaining an airy atmosphere, this innovative solution cleverly tackles the challenges of open floor plans. To create this modern masterpiece, you’ll need a saw, pocket hole jig, drill, and sander. For an extra level of polish, consider adding a thickness planer and table saw to fine-tune the slats. This uncomplicated project is accessible with minimal tools, offering a creative interior design approach that can be completed with ease.
How to Make Room Dividers
Unleash your creativity and transform your living space with a one-of-a-kind DIY room divider inspired by the Hallmark Channel movie ‘Hearts of Winter’. This innovative project requires minimal materials, including a 24-inch wide hollow closet door, self-adhesive wallpaper, paint, masking tape, hinges, lock casters, and basic tools like a power drill and screws. Designed for fashion-conscious individuals, this room divider injects your space with a fresh and stylish vibe, making it an eye-catching centerpiece.
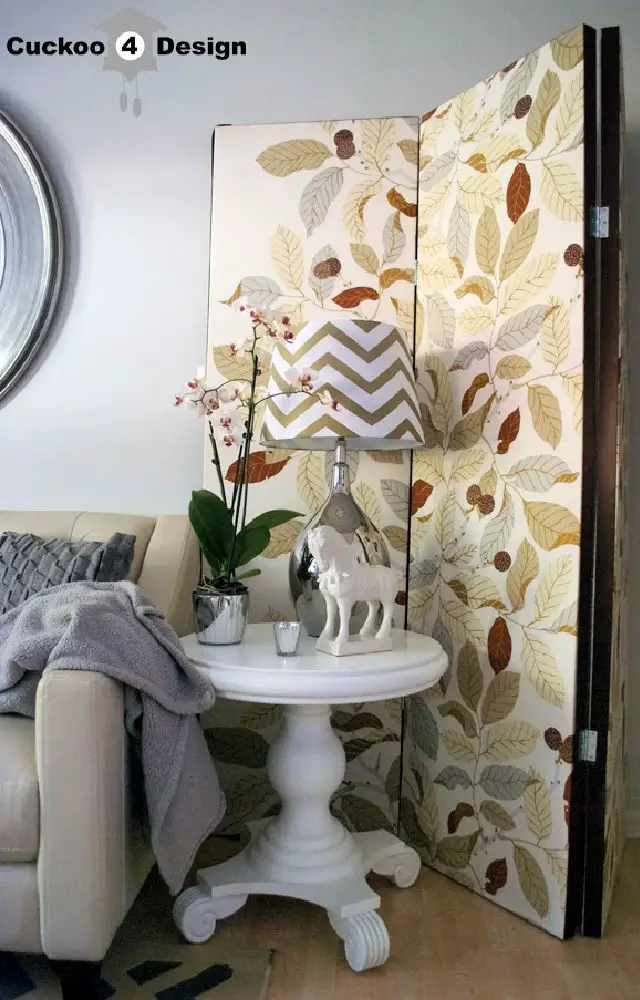
How to Build Room Divider Using Bifold Doors
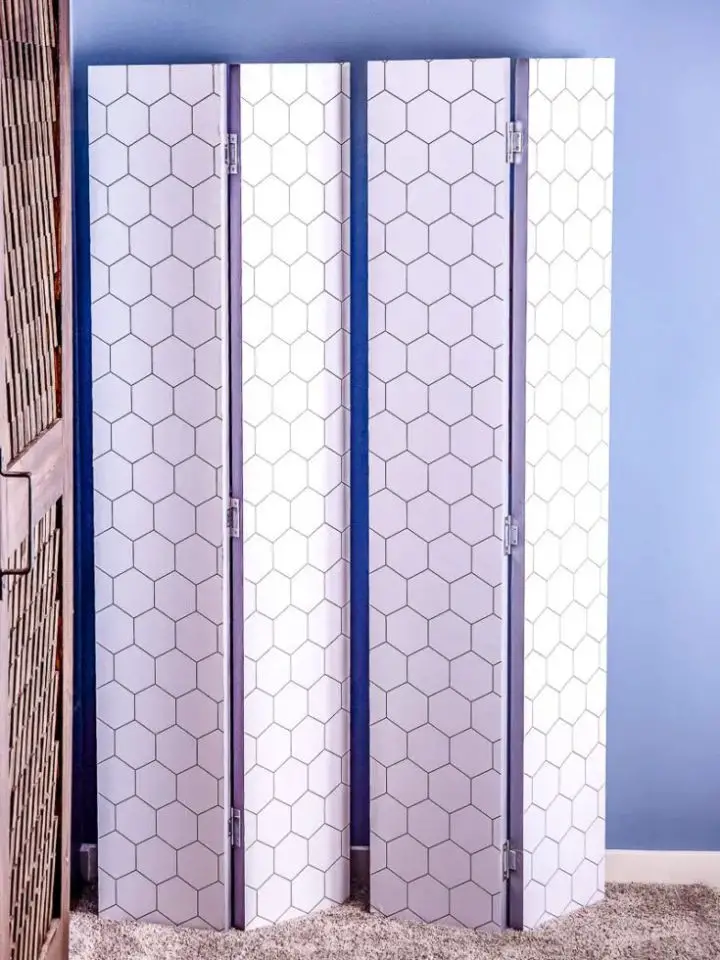
Transform the ambiance of your home with this creative DIY folding screen room divider. This ingenious project takes unsightly corners and turns them into a stunning focal point. By repurposing hollow core bifold doors, you can create a lightweight and portable screen that adds an artistic touch to any room.
To take it to the next level, decorate the doors with contact paper of your choice. The best part? You can easily switch up patterns and colors to match your unique style.
But this project isn’t just about aesthetics – it’s also a practical solution for hiding less-than-appealing features like exposed valves or electrical panels. With just a few basic tools, including a razor blade knife, screwdriver, and smoothing tool, you can give any room a fresh new look without breaking the bank.
DIY Room Divider Closet
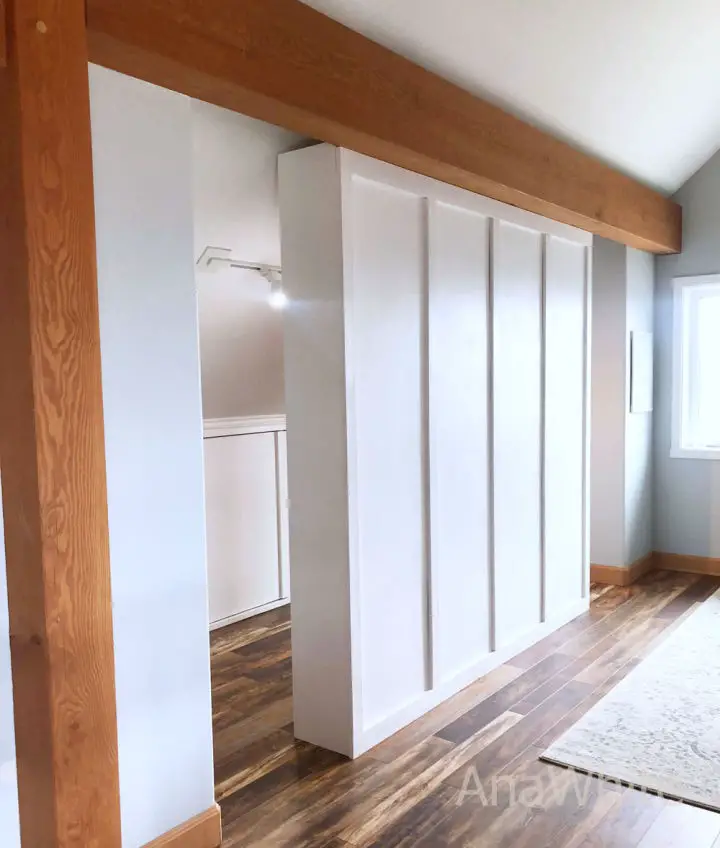
Transform your large bedroom into a stylish sanctuary by crafting a one-of-a-kind DIY room divider closet using readily available materials like plywood, paneling, and trim. This ingenious solution seamlessly blends aesthetics and functionality, offering a concealed storage space while showcasing a sleek facade. With an investment of approximately $150 and following this comprehensive guide, you can create two closet towers that are easily connected with 2x4s. Add a layer of paneling and trim to produce an eye-catching accent wall that doubles as a furniture backdrop. The best part? This closet design offers effortless accessibility and concealment, making it perfect for those who appreciate a more relaxed approach to wardrobe organization. Its versatility also makes it an ideal addition to rooms with unique spaces or slanted ceilings. Follow this free plan and accompanying video tutorial for step-by-step instructions.
Make Your Own Woven Room Divider
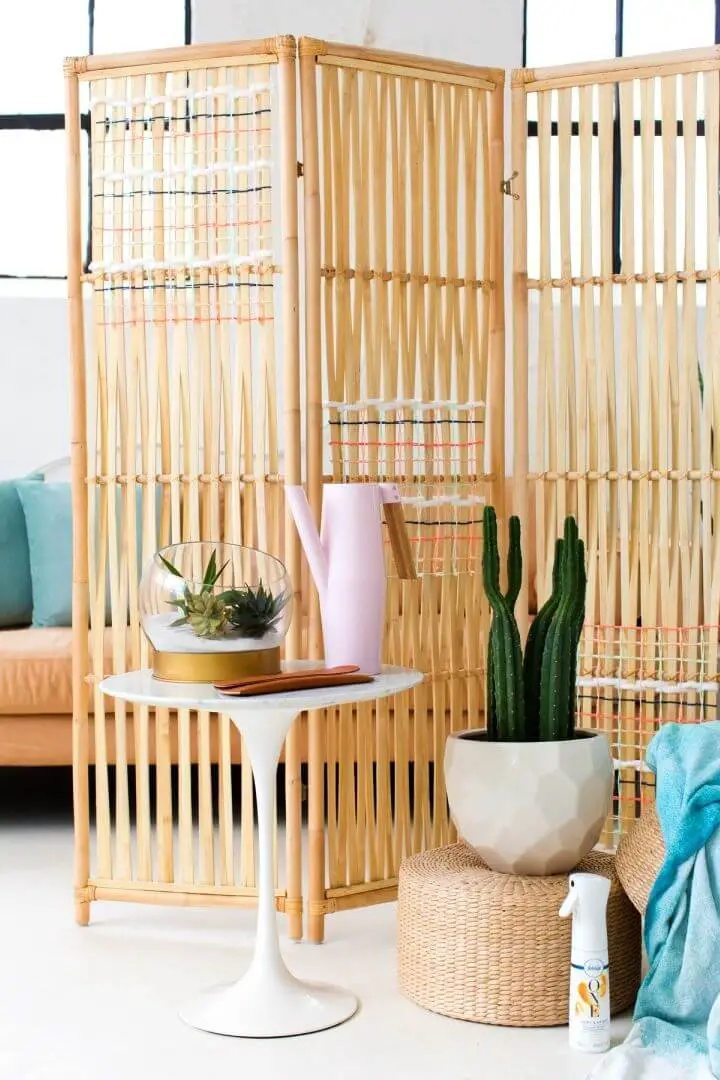
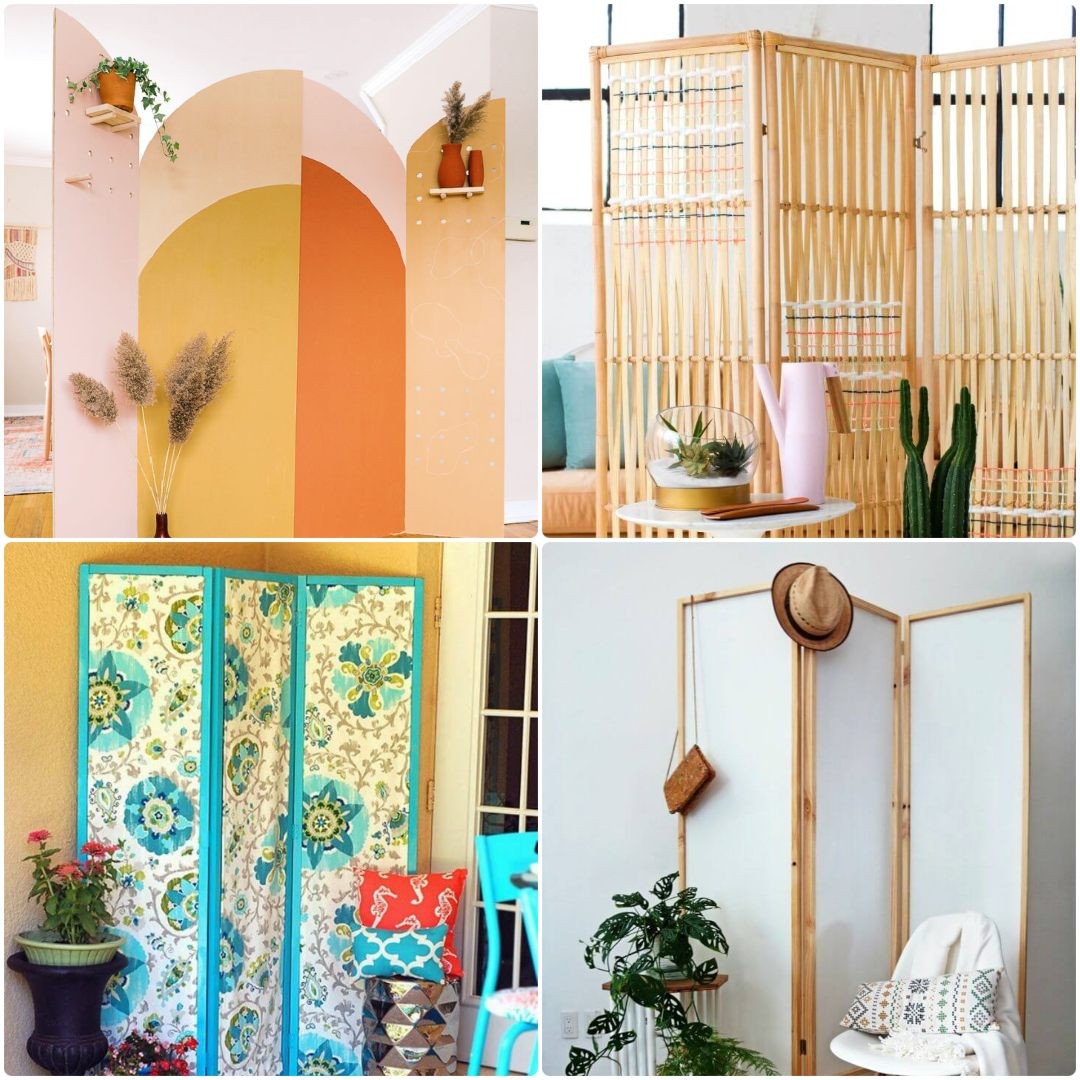
Transform your interior decor with this enchanting woven DIY room divider! This ingenious creation not only adds a unique touch to any room but also serves as an efficient space partition. The rattan divider is paired with yarn in a variety of colors, allowing you to unleash your creativity and craft a one-of-a-kind masterpiece. You can further customize the piece by incorporating textured yarn for added depth and visual interest.This DIY project offers endless possibilities for design experimentation, from shapes and patterns to color combinations that reflect your personal style. Whether you’re looking for an innovative way to define separate areas within a room or seeking a creative solution to conceal clutter during entertaining sessions, this woven room divider is the perfect solution. By embracing your creativity and making this piece, you’ll not only be creating a beautiful addition to your home but also experiencing the satisfaction of bringing a unique design concept to life.
Handmade Wooden Pegboard Room Divider
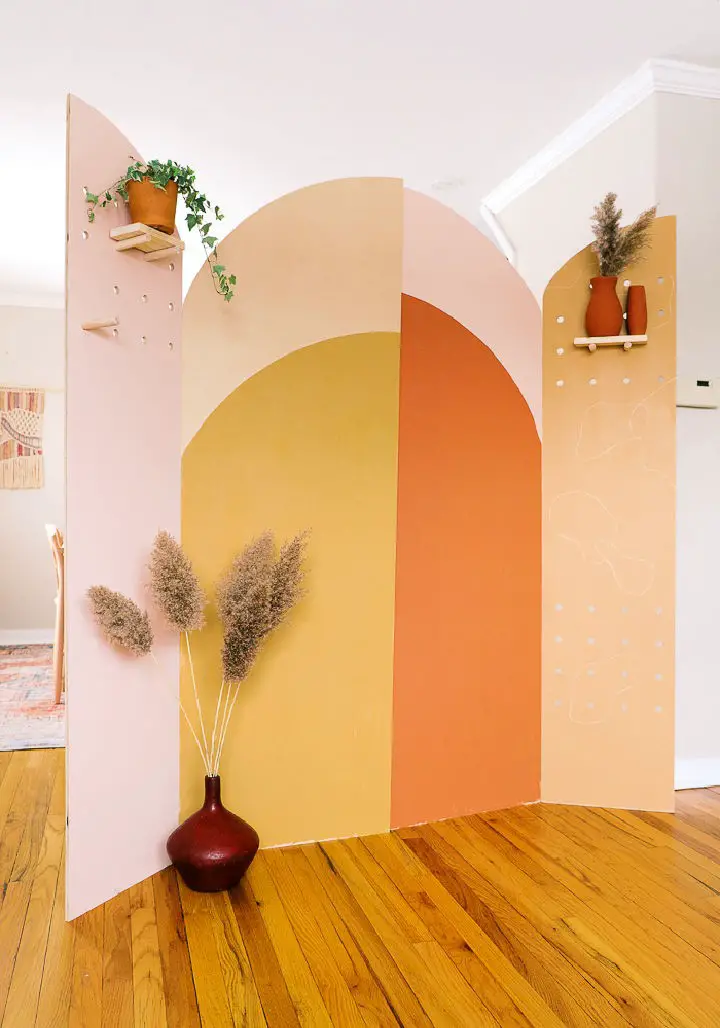
Transform your space with creative and budget-friendly DIY room divider ideas! One innovative solution is to craft a versatile wooden pegboard room divider that doubles as a multi-purpose backdrop. Perfect for filming YouTube videos, hosting Zoom meetings, or even adding a unique touch to a wedding setup. This customizable divider features arched design elements and pegs for hanging items, making it easy to adapt to any season or occasion by simply repainting.
With basic tools and materials like plywood, dowels, paint, pegboard, and hinges, you can bring this project to life in the comfort of your own home. Start by planning the design, determining the size, and sketching out arches, then drill holes for assembly. Next, construct panels using dowels and a 1×4″ board, followed by the finishing touch – painting with your preferred colors. This DIY endeavor not only yields a stylish backdrop but also fosters creativity, serving as a testament to the power of innovation. Begin today and enjoy a beautiful, multi-purpose wooden pegboard room divider in your space.
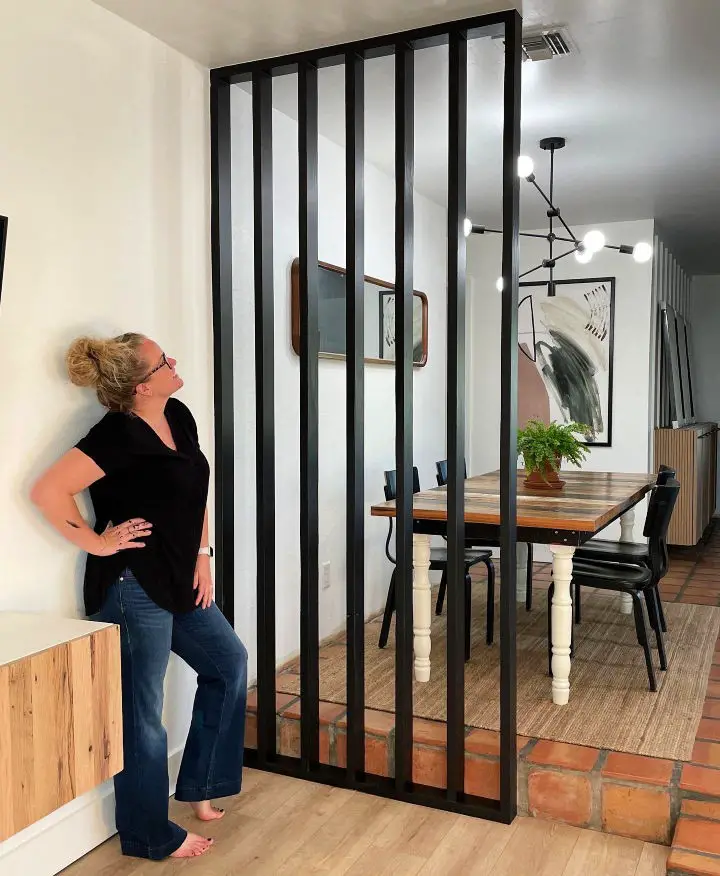
DIY Kitchen Wall Divider
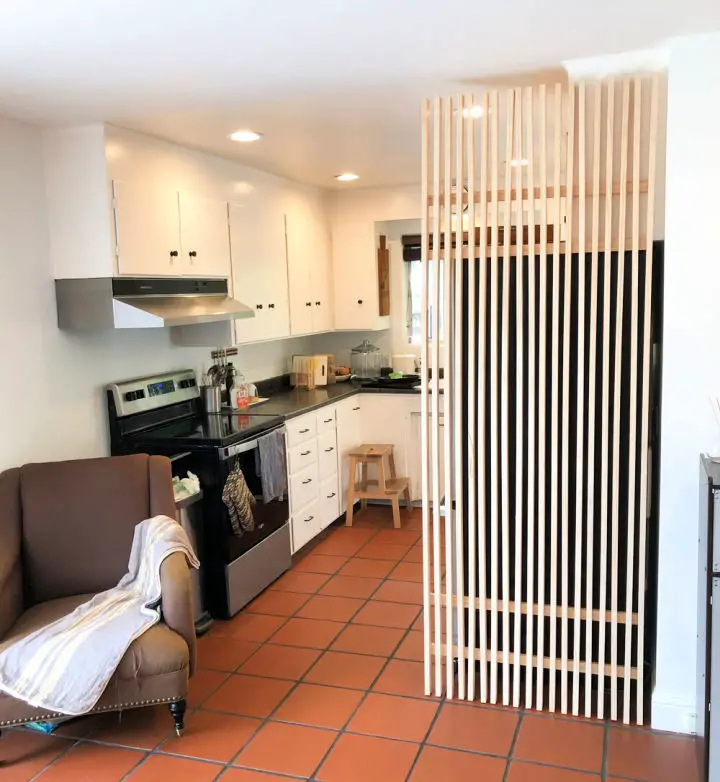
Transform your kitchen’s ambiance with a bespoke room divider, drawing inspiration from mid-century architecture while navigating the constraints of rental properties. The beauty of this project lies in its simplicity, utilizing 2x1s assembled with liquid nails, spaced approximately 1″ apart to create a stylish and functional barrier that conceals appliances and adds a touch of sophistication to your kitchen. While this DIY endeavor may require patience and precision, the end result is well worth the effort – a budget-friendly, minimalist divider that invites warmth and welcomes your guests into a more inviting space.
How to Build a Room Divider
Kickstart your office renovation by crafting a DIY room divider that seamlessly blends functionality and style. This clever solution not only creates distinct boundaries between work and play areas but also adds a touch of personality to your workspace. To get started, gather easily accessible supplies like plywood, wood lumber, hinges, and paint. With just a little glue, some nails, and basic tools like a drill and screwdriver, you’ll quickly assemble this versatile room divider. Feel free to personalize it with your favorite color or pattern – the possibilities are endless! This foldable and removable design allows for effortless space management in your office, ensuring that your work stays separate from the kids’ play area. It’s an ingenious solution that keeps toys from creeping into your workspace, resulting in a stylishly upgraded office environment.
DIY Wall Divider for Studio
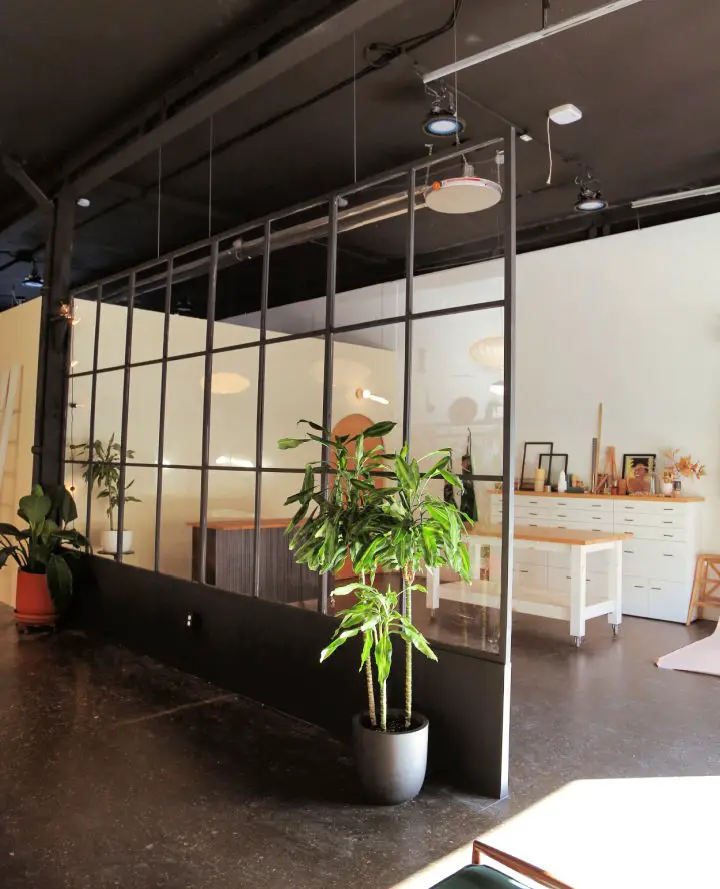
Transform your studio space into a creative haven by crafting a striking DIY wall divider that exudes industrial chic. The key to achieving this unique piece lies in combining a large plexiglass sheet with wood, yielding a substantial barrier that not only defines separate areas but also harmonizes with the space’s aesthetic. To bring the concept to life, secure the plexiglass with wooden beams and plywood, then suspend it from the ceiling using taut wires. For an added touch of industrial flair, paint the wooden components black, seamlessly blending the divider into your studio’s design. This functional masterpiece not only reduces noise and contains sawdust during filming but also serves as a versatile backdrop for creative pursuits and an innovative storage solution. By incorporating this game-changing makeover, you’ll breathe new life into your studio, turning it into a stimulating environment that fosters inspiration and creativity.
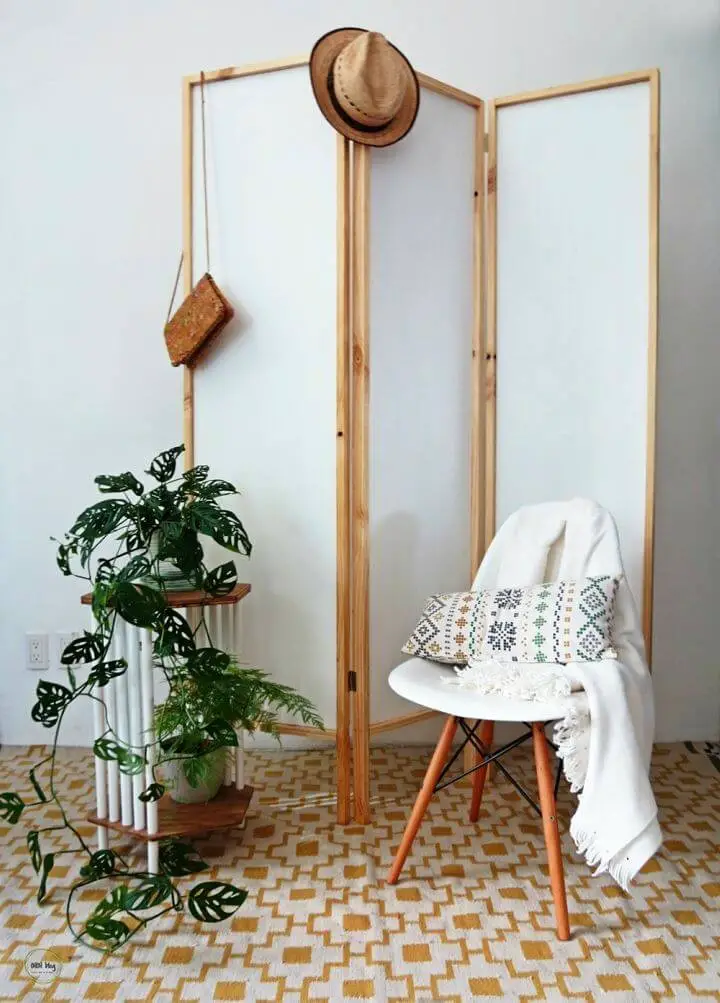
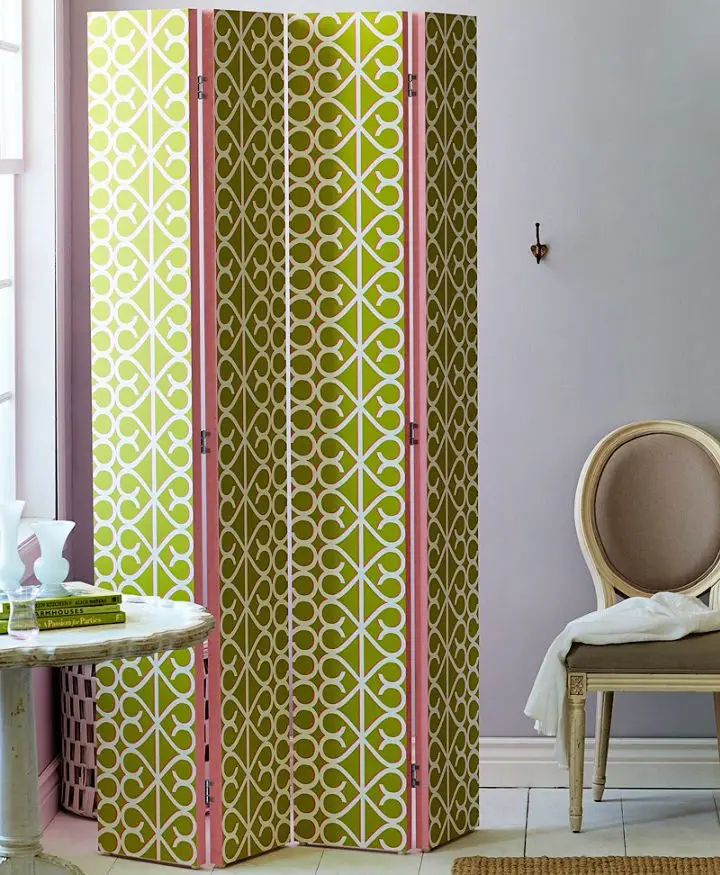
Folding Three-panel Room Divider Design
Transform any room with a stylish and functional DIY room divider. Whether you’re looking to carve out a home office from your bedroom or add a creative touch to your space, this project is perfect for you. To get started, gather the necessary materials, including wooden panels, paint, fabric, a saw, and a sewing machine. With just a few hours of effort, you can construct a sturdy frame, select a fabric that suits your style, and attach it seamlessly. By incorporating a room divider into your space, you’ll not only enhance the energy flow but also reap the benefits of a well-designed area. So why wait? Start creating your unique room divider project today! As you bring this DIY project to life, you’ll discover how easy it is to add a personal touch to your home with minimal investment of time and resources.
DIY Mid-Century Walnut Room Divider Ideas
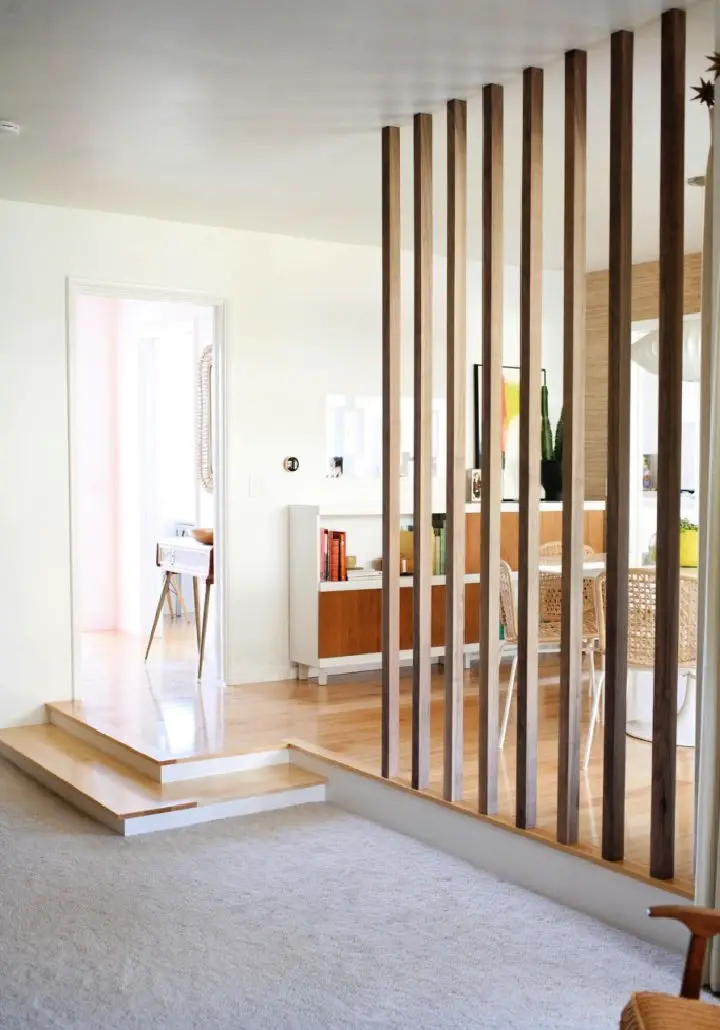
Transform the functionality and style of your room with our innovative DIY room divider ideas. Take inspiration from a stunning walnut partition that replaces an outdated iron rail in a family and dining area, bringing a touch of elegance to the space. By adding a new step, you’ll create a seamless transition into your sunken family room, perfect for casual gatherings or intimate conversations. The hand-milled walnut posts are both durable and stylish, capable of withstanding lively household moments. The natural color of the divider harmonizes beautifully with your existing decor, making it a delightful addition to your space.
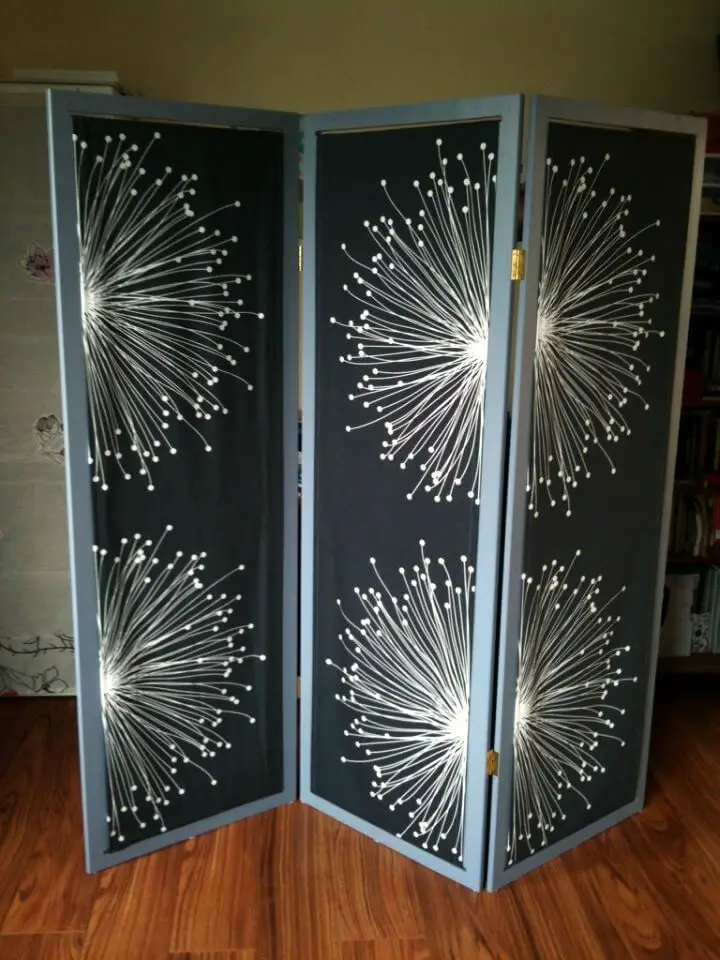
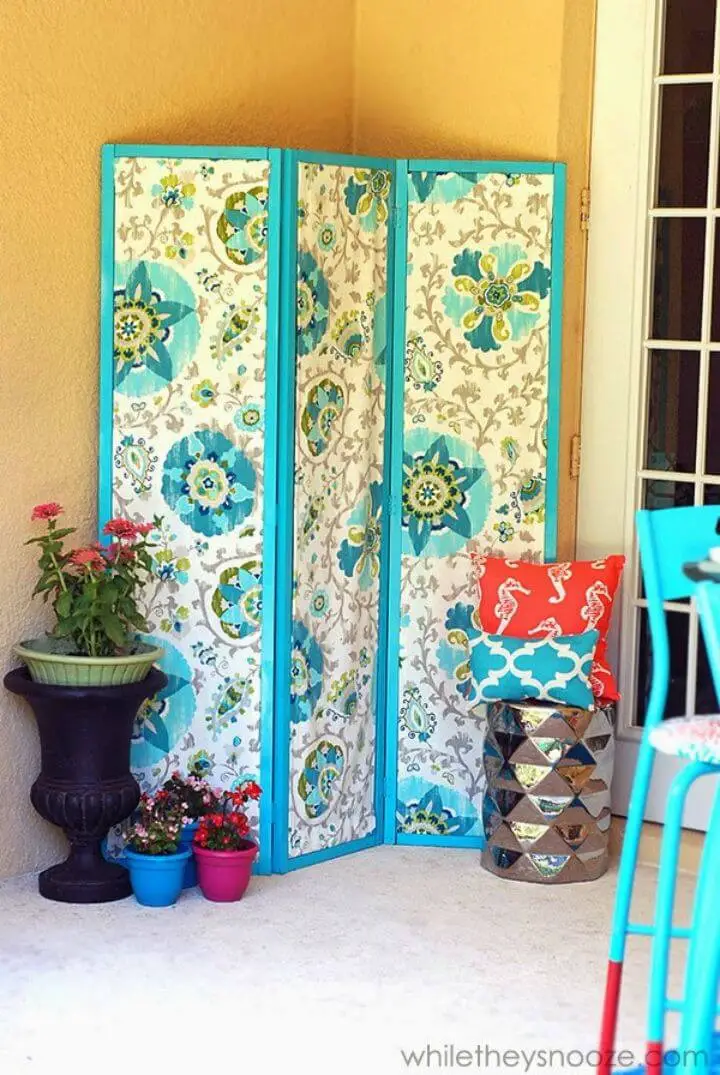
Fabric Screen Divider Makeover
Transform a mundane space with a one-of-a-kind DIY fabric screen divider that seamlessly blends functionality and artistry. By leveraging basic materials like white fabric, acrylic paint, brushes, and a staple gun or hot glue, you can reinvent this room separator to suit your unique style.
To create this masterpiece, start by sketching the design onto the fabric with a pencil, then bring it to life with a range of paint shades in an Impressionist-inspired style that mimics the beauty of cherry blossoms. This stunning screen divider will inject a personal touch into your living space, making it a true conversation starter.
What’s more, this project is an exercise in creativity and a great way to breathe new life into an ordinary room divider without breaking the bank. With imagination and patience as your only prerequisites, you’ll be rewarded with a truly unique piece that will leave a lasting impression on friends and family.
Hanging Room Divider Plan
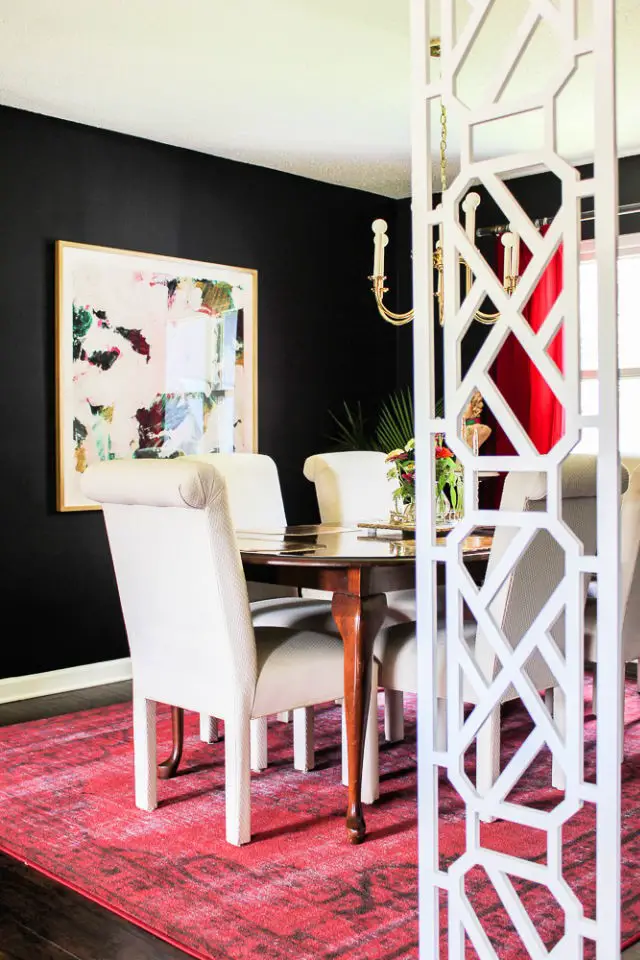
Transform your open-plan living space into distinct zones without sacrificing its airy feel by creating a DIY room divider screen. This innovative solution leverages creativity and readily available materials to deliver a stylish and flexible way to separate areas, while maintaining the overall sense of openness that defines this type of layout. At the heart of this project lies the use of prefab decorative panels, which serve as a visual anchor when hung. These partitions not only add architectural flair but also provide an easy-to-assemble and removable solution, allowing you to effortlessly adapt your space as needed. For those seeking a low-maintenance yet high-impact DIY endeavor, this room divider screen project is sure to impress.
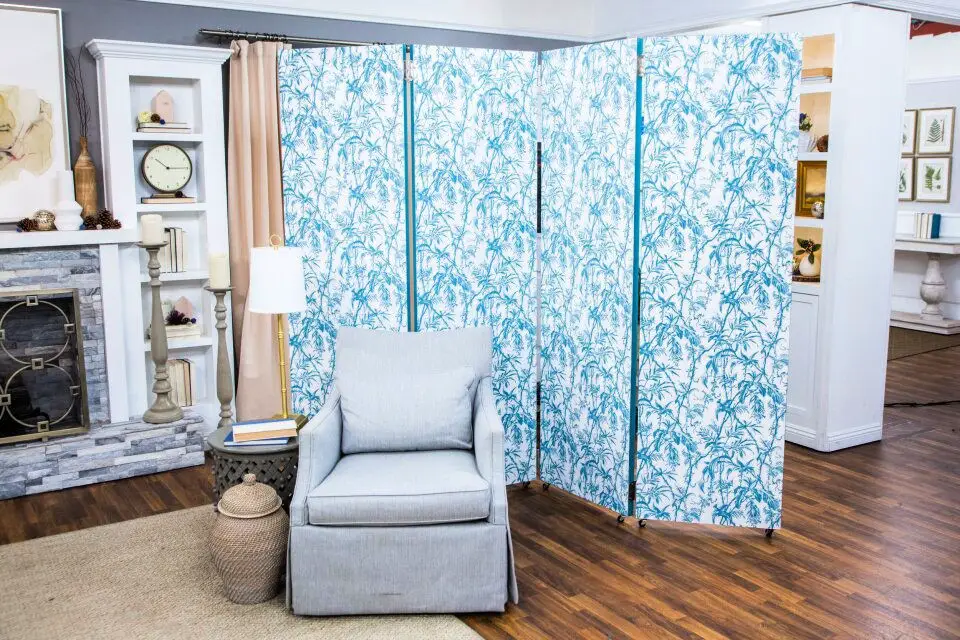
Make Your Own Folding Screen
Transform any space into an inviting oasis by creating a stunning DIY folding screen. This versatile piece serves as a stylish room divider, privacy shield, or decorative cover for storage areas, all without breaking the bank or requiring extensive renovations. The project is surprisingly simple, involving basic bi-fold doors, unique patterned wallpaper, and a range of tools – think screwdriver, foam brush, utility knife, and more.
Once you’ve applied your signature touch with paint to the doors, carefully apply your chosen wallpaper design, precision being key. Adjustable leveling feet ensure the screen stands sturdy and evenly, safeguarding your floors from scratches or scuffs. With this handcrafted folding screen, you can add a pop of personality and color to your space without committing to a full room makeover – perfect for renters, homeowners, or anyone seeking a quick update.
How to Make a Geometric Room Divider

Looking to add some visual interest to your living area? Consider creating a one-of-a-kind DIY room divider that combines form and function. This unique geometric wood art project is a perfect addition to any home office or guest room, offering a personalized touch that reflects your style. By working with premium wood and utilizing tools like orbital sanders, miter saws, corner clamps, and painter’s tape, you can craft a stunning piece that seamlessly integrates into your space. The step-by-step tutorial makes it easy to transform simple 1×2 wood boards into an impressive work of art that not only serves as a room divider but also adds character to the room. With this project, you’ll have the freedom to experiment with angles and measurements, pushing beyond the ordinary to create a masterpiece that is truly yours.
DIY Compression Shelf Room Divider
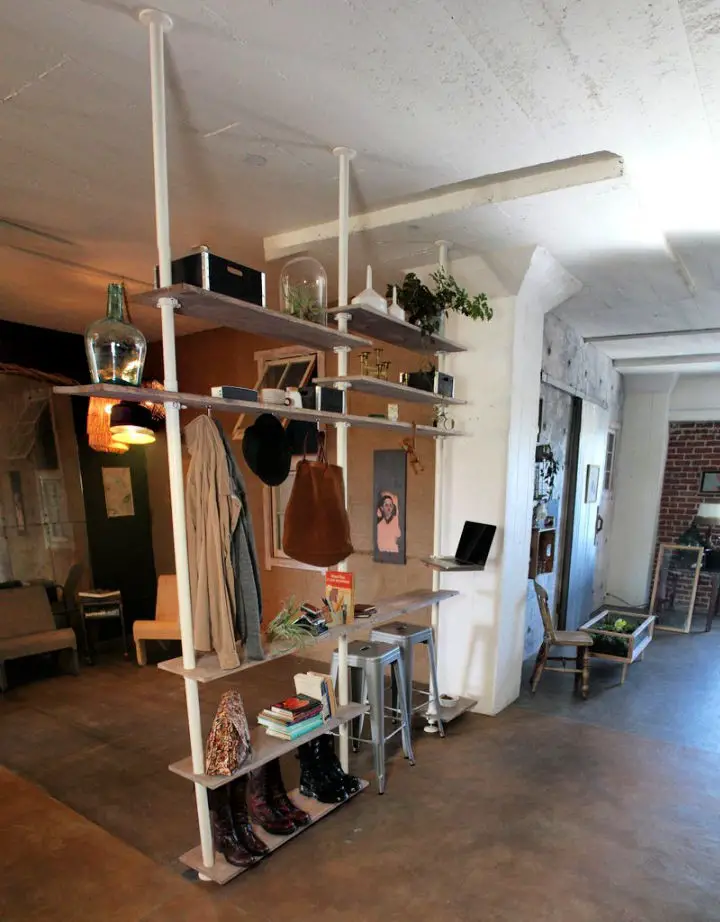
Transform your living area into a harmonious blend of form and function with a DIY compression shelf room divider that effortlessly merges storage and aesthetics. The structural backbone of this innovative piece consists of compression poles, while rustic shelves provide ample space for storing and showcasing personal treasures – from vintage collectibles to lush greenery. One of the most appealing aspects is the ability to position shelves at any height, ensuring a customized fit that caters to your unique needs and preferences. Crafted from cost-effective pine wood and featuring multi-layer staining, this piece exudes a warm, rustic charm that seamlessly integrates with a wide range of home decor styles. Not only does it efficiently partition your space, but it also doubles as a workstation or eating bar, further amplifying its versatility. Whether you’re seeking to organize, divide, or add an artistic touch to your living space, this compression shelf room divider is an ideal solution that will meet all your requirements and exceed your expectations.
DIY Privacy Screen With Salvaged Closet Doors
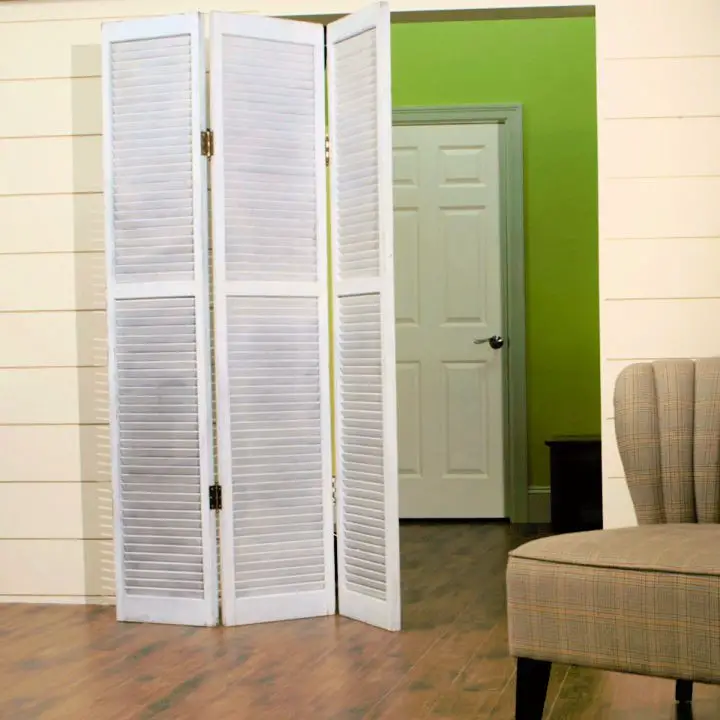
Transform an old living space into a charming retreat by upcycling salvaged closet doors into a one-of-a-kind vintage-style privacy screen. This creative project breathes new life into three discarded closet doors and four vintage hinges, transforming them into an eye-catching room divider that seamlessly blends form and function.
To get started, meticulously clean the doors and mark the precise hinge placement using a pencil. Next, predrill holes for the screws and attach the hinges to the central door. Place the middle door upright, align the outer doors, and mark the screw placements before repeating the drilling process.
The end result is a unique, bespoke privacy screen that not only provides practical functionality but also serves as a striking focal point, elevating the overall aesthetic appeal of your interior.
Build Your Own Room Divider
Transform your living space into a haven of comfort and style by crafting a unique DIY room divider that seamlessly blends functionality with elegance. To create this masterpiece, start by cutting 2×2 lumber to the desired size – in this case, each panel measures 21 1/4 inches by 75 1/4 inches. Secure the frames together using screws and angles for maximum durability. Next, add a plush touch by covering the frames with quilt batting and draping Ikea Stockholm Blad curtains over them. Finally, give your room divider a finishing flourish by adding a brown satin ribbon edging, secured in place with fabric glue or iron-on seam tape. Despite its simplicity, this handcrafted masterpiece exudes sophistication, effortlessly transforming any room into a cozy retreat.
Free Macrame Room Divider Pattern
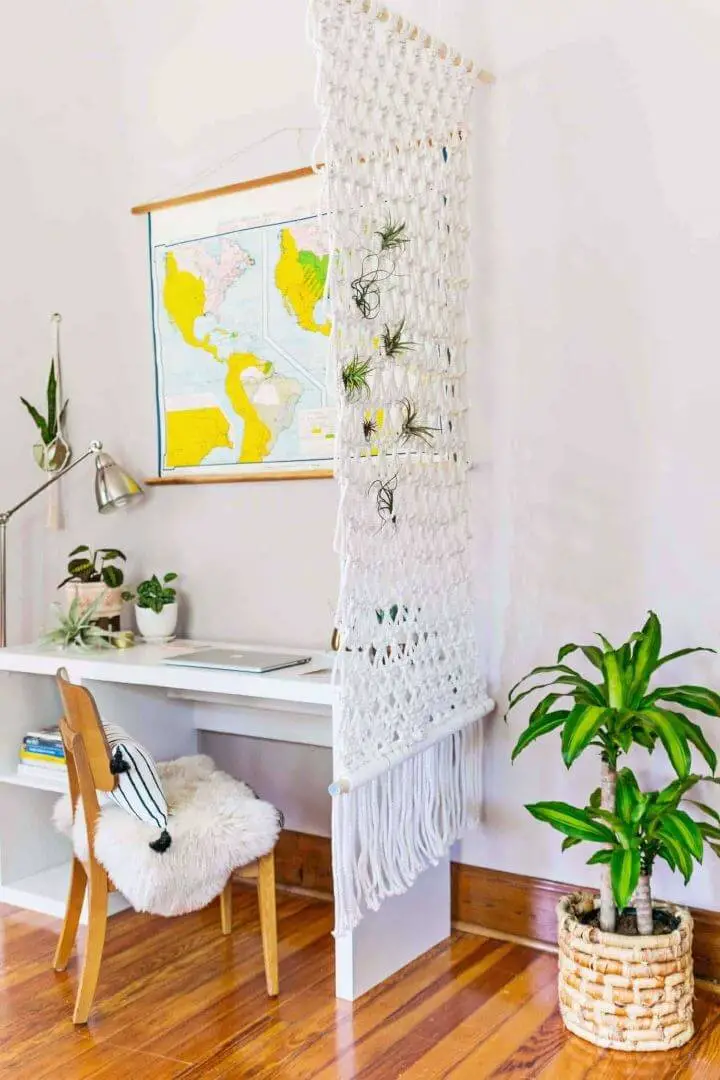
Transform your interior decor with a stunning DIY macrame room divider that not only cleverly separates spaces but also allows a soft, filtered glow to enter. This project requires just basic materials – good-quality cotton rope and a wooden dowel – making the art of macrame surprisingly accessible. By incorporating this unique piece into your studio, office, or large living area, you’ll effortlessly conjure a relaxed, welcoming ambiance that’s perfect for unwinding or boosting productivity. The subtle bohemian charm it exudes will also provide a lovely backdrop for showcasing air plants or other decorative greenery, adding an extra layer of personality to the space.
DIY Multipurpose Wooden Partition
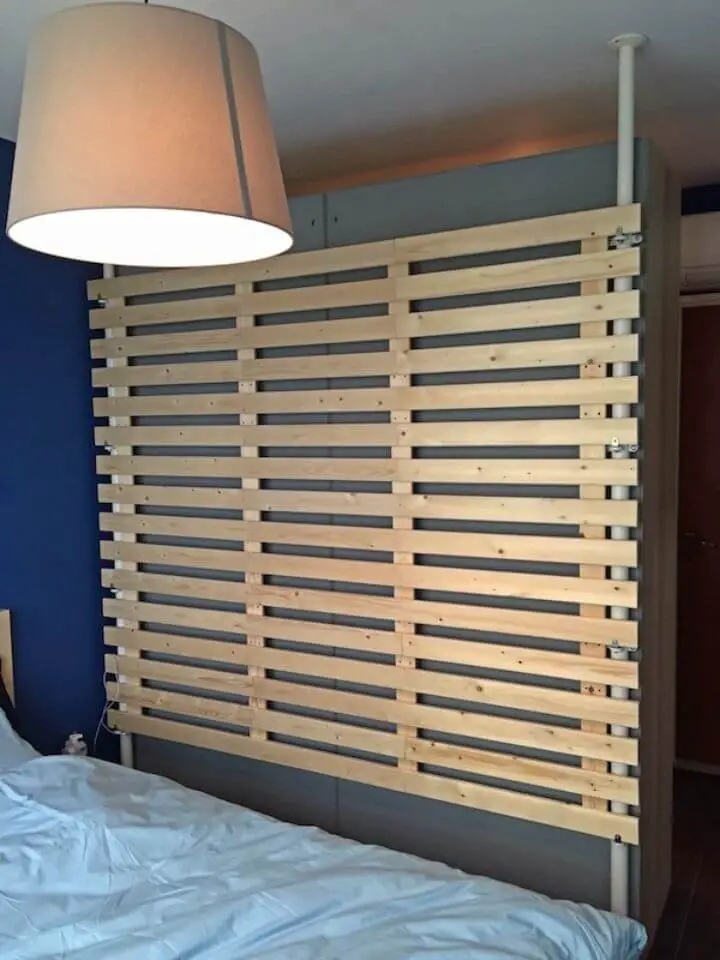
Transforming your wardrobe’s backside into a stylish and sturdy focal point is achievable through a DIY approach. If you’re dissatisfied with the ordinary appearance of your IKEA wardrobe’s rear panel, this comprehensive guide provides an affordable alternative ($249) to the discontinued IKEA Mandal headboard. To recreate this aesthetic masterpiece, you’ll need a detailed scale sketch, Stolmen posts and brackets from IKEA, Sultan Lade, wood, L-brackets, screws, bolts, nuts, and common tools. Follow our step-by-step instructions to assemble the frame, conceal screws for a sleek appearance, and attach the panel to your wardrobe, thereby creating a visually appealing and secure structure. The customization options allow you to tailor it to your personal style.
How to Make Folding Room Screen
Transform your space’s visual appeal and practicality by crafting a one-of-a-kind DIY privacy screen. This multi-faceted masterpiece seamlessly integrates into outdoor areas, softens harsh sunlight, defines indoor spaces, conceals clutter, and even serves as an artistic statement piece. By combining materials such as removable wallpaper, hollow-core doors, and slender brass hinges, we can efficiently bring your custom design to life. The process involves adhering the wallpaper to wooden panels before attaching them using hinges to create a stylish accordion-fold effect.
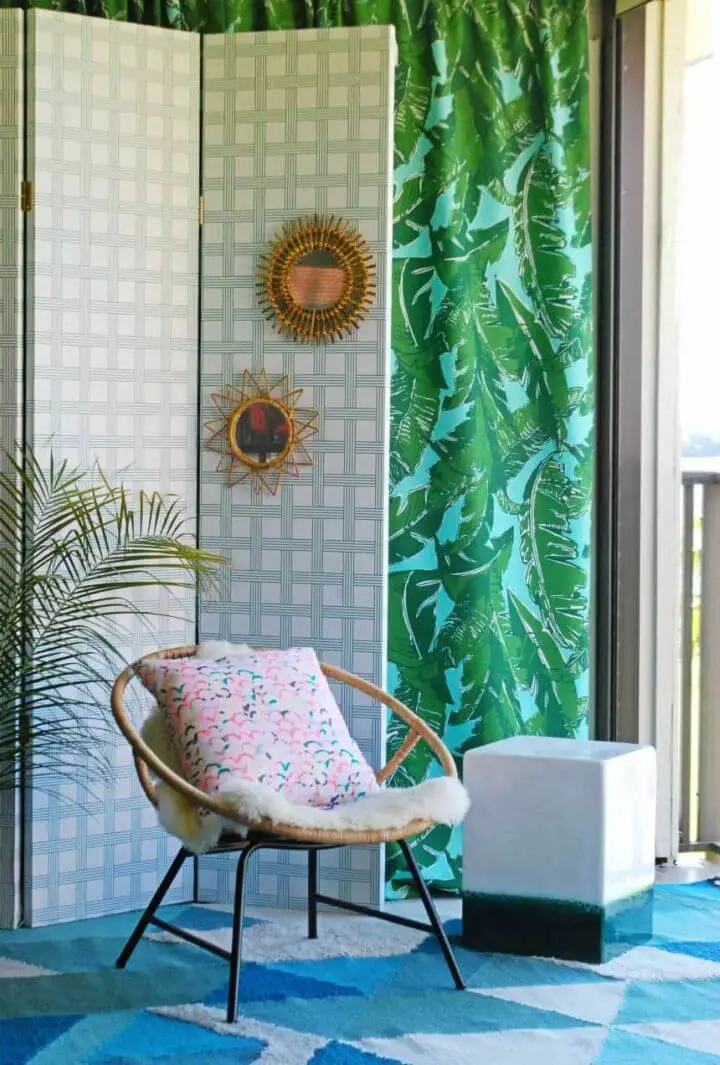
Decorative Folding Screen With Bifold Door
Transform your interior space with a dynamic DIY decorative folding screen, offering a versatile solution for adding flair and functionality to any room. This innovative piece can seamlessly replace a headboard, fill empty corners, divide rooms, or provide privacy – all while reflecting your personal style.
By combining three bi-fold doors, hinges, paint, and a dash of creativity, you can craft a reversible screen that effortlessly adapts to your decor and mood of the season. One side can radiate serenity with a soothing white hue, while the other injects a burst of energy with a vibrant pink tone.
This accessible, portable, and budget-friendly project promises instant impact and a splash of creativity to any room, making it an ideal way to revitalize your living space.
How to Build a Room Divider
Transform the ambiance of your living space by creating a bespoke DIY upholstered room divider using readily available materials like bifold doors, polyester batting, fabric, and ribbon. This ingenious project enables you to craft an sophisticated piece that not only enhances the aesthetic appeal of your room but also provides privacy.To bring this concept to life, begin by cutting and attaching your preferred fabric and batting to the door, employing a staple gun to ensure secure, seamless edges. Add a touch of creativity by covering the staples with a stylish ribbon trim or an adhesive of your choice. If you’re working with multiple doors, remember to join them together using metal hinges.With these simple steps, you’ll have crafted a chic and functional room divider that will breathe new life into your home decor. Make this elegant addition a reality in your space today.
DIY Hanging Divider for Front Porch
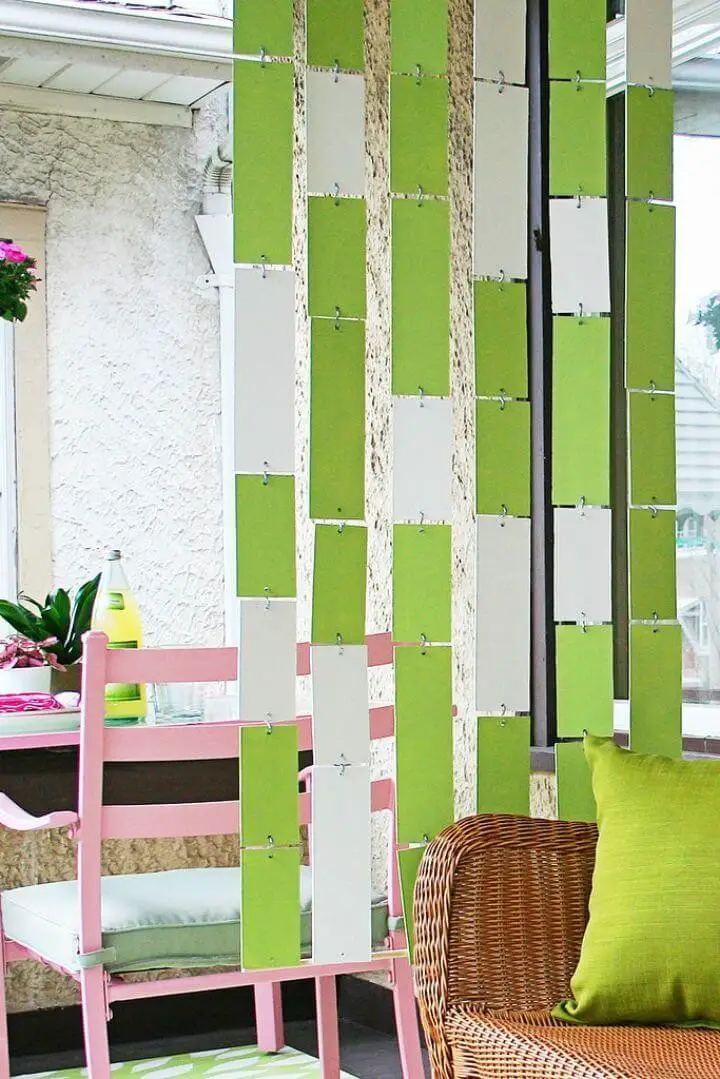
Inject some personality into your living space with these budget-friendly DIY room divider ideas that will have you feeling inspired. One of the most creative and easy-to-make options is a handmade hanging divider, which not only adds character to a room but also provides a sense of separation without breaking the bank.
To create this unique piece, you’ll need just a few simple tools like a table saw, drill, and paintbrush. Combine these with some basic materials such as s-hooks and chains, and the possibilities for customization are endless. You can make a statement pattern using different shapes and colors or mix and match materials for a truly one-of-a-kind result.
This hanging divider is incredibly versatile – use it outdoors with added reinforcement for a rustic touch or bring it indoors to add some decorative flair without any extra embellishments. Whatever your style, this DIY project is sure to elevate your home decor and leave you feeling proud of your handiwork.
Making a Cardboard Shoji Screen
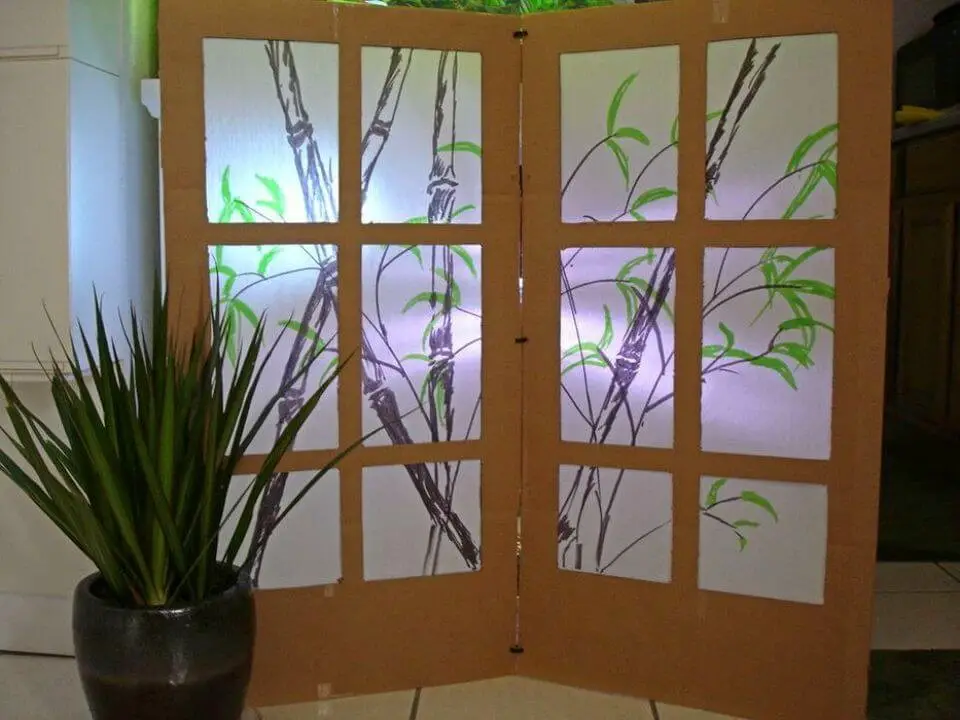
Transform your living or study space with an innovative DIY cardboard Shoji screen room partition that’s both budget-friendly and visually appealing. This creative solution is perfect for college students or anyone looking to revamp their space without breaking the bank. By repurposing readily available materials like cardboard, onion-skin paper, and cable ties, you can craft a stunning two-panel, 36″x18″ screen that serves as an effective room divider. The semi-transparent quality of the onion-skin paper softly diffuses light, casting a warm, inviting glow that adds depth and character to your space. With a few simple tools like a ruler, markers, pen, clear tape, and a box cutter, you can breathe new life into discarded materials and create something truly unique and purposeful.
Tropical Style Room Divider Tutorial
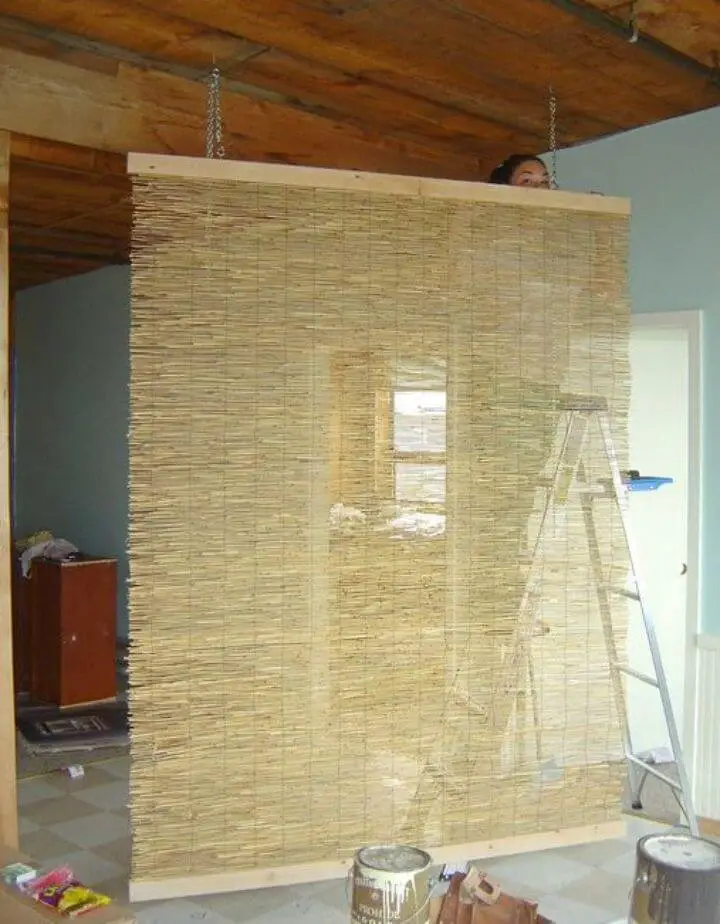
Transform your living space with a one-of-a-kind tropical-inspired room divider, crafted using air plants and natural decor. This budget-friendly project is surprisingly simple, requiring just a few basic supplies: reed fencing, craft scissors, four 1×4 boards, a staple gun and staples, Gorilla glue, a chain, ceiling hooks, eye screws, U-links, wood screws, and a drill. Measure and cut the reed fencing and boards to create an 8-foot divider, ideal for adding a touch of privacy or decor to your space. The combination of Gorilla glue and staples ensures a sturdy construction, while the chain and hooks make installation effortless. As you embark on this creative journey, you’ll be inspired to tackle even more DIY projects.
Moveable Room Divider Tutorial
Transform your open concept space into a tailored sanctuary with a DIY movable room divider. This versatile solution not only provides visual appeal but also offers practical benefits, allowing you to create distinct zones, ensure privacy during online meetings, and effortlessly reconfigure your layout. To bring this innovative project to life, gather essential tools such as a drill, screws, paint, and wooden panels. With careful planning and precise instructions, assemble the divider quickly and efficiently. The result is not only a unique decorative element that harmonizes with your home’s aesthetic but also a functional space manager that enables easy repositioning and optimal use of your living area.
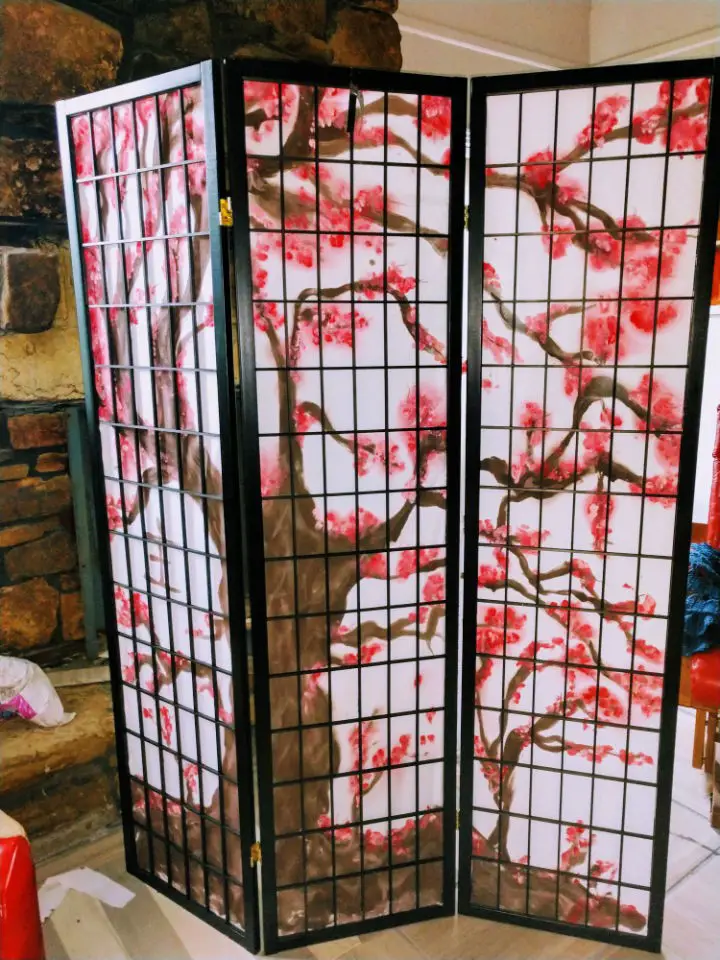
DIY Foldable Japanese Divider
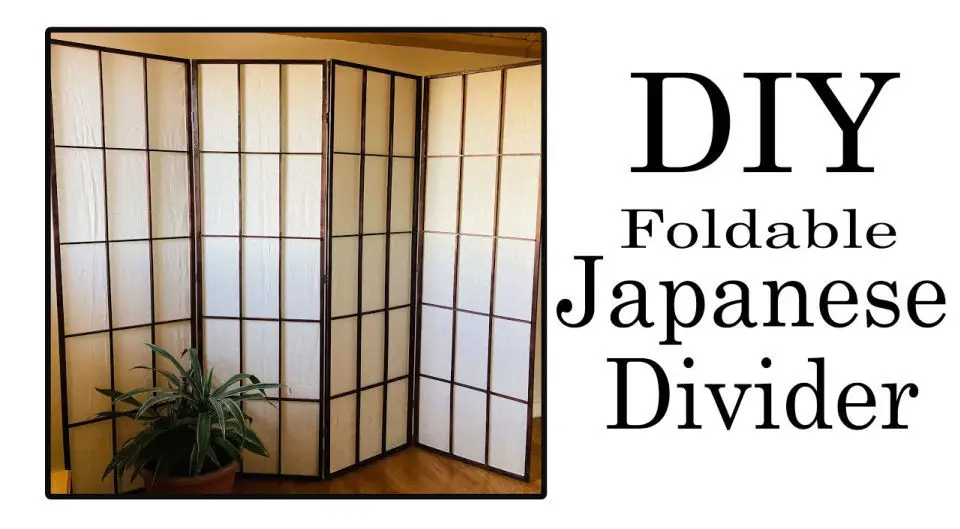
Transform your living space with a unique DIY Japanese foldable divider, a harmonious blend of form and function that doubles as a one-of-a-kind Zoom background. By combining wooden sticks, rice paper, and hinges in a creative way, you can craft a multifunctional partition that not only enhances the aesthetic appeal of your room but also provides privacy and defines different areas. This handcrafted folding divider brings an authentic touch of Japanese-inspired interior design to your space, while its versatility allows it to serve as a personalized backdrop for online meetings, elevating the professional and visual appeal of your Zoom sessions. Embark on this creative project and infuse your living space with artistic flair today.
IKEA Room Divider Hack
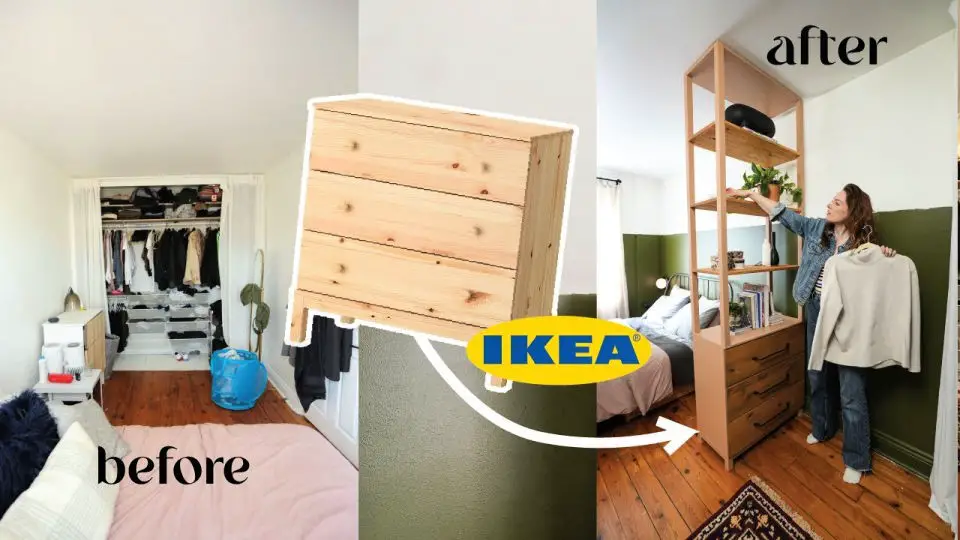
Transform an outdated dresser into a one-of-a-kind room divider that cleverly separates bedroom closet space. This DIY project requires disassembling the dresser and reassembling it as a unique shelving unit, showcasing impressive carpentry skills. To get started, you’ll need the dresser itself and a visit to your local hardware store for necessary tools and supplies.
While some carpentry expertise is essential, including building, staining, and painting shelves, the end result is a functional piece that not only adds visual appeal but also breathes new life into an old furniture. This project offers a prime opportunity to infuse your personal style into your living space while promoting sustainability.
So, grab your tools and let’s embark on this creative journey, where you’ll upcycle old furniture and turn it into a stunning room divider that will undoubtedly elevate your bedroom decor.
DIY Bling Wrap Room Divider
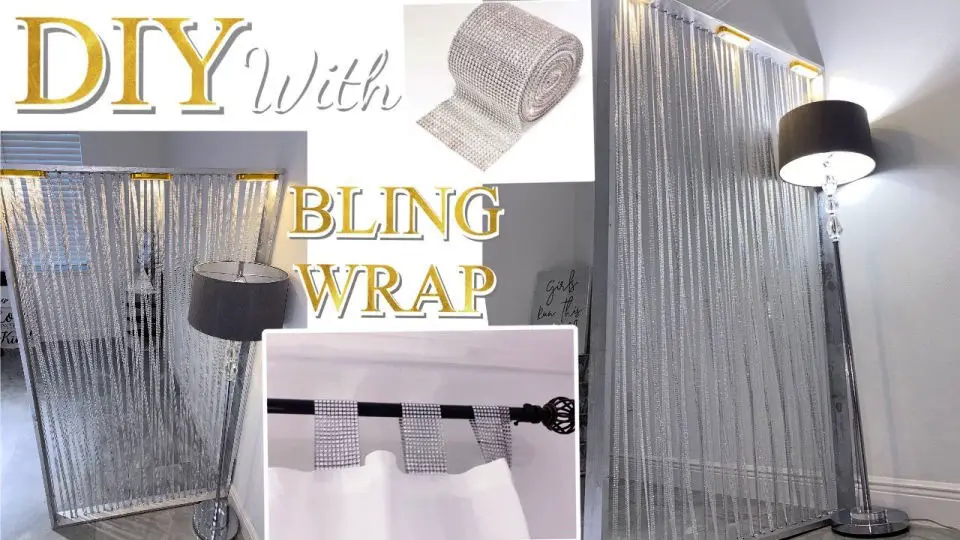
Elevate your space with these imaginative DIY room divider ideas. Let’s infuse your home with flair by transforming ordinary materials into a show-stopping conversation piece. By combining Bling Wrap, wood, and silver spray paint, you can create a one-of-a-kind room divider that not only divides the space but also adds charm to its ambiance. This creative project is not just limited to dividing rooms; you can repurpose the remaining Bling Wrap to decorate your curtains, injecting an air of glamour into your home decor. What’s more, this budget-friendly idea will help you express your personal style without sacrificing your wallet. Ready to make a lasting impression in your home? Start crafting today and turn your space into a masterpiece!
How to Divide a Room With Floor Mats

Transform your living space into a cozy retreat with a one-of-a-kind DIY room divider crafted from floor mats. This innovative project empowers you to reclaim control over your rental home’s layout, injecting personality and style into every corner. By repurposing readily available materials like IKEA floor covers for decking, silver spray paint, PVC lattice, and mirror reflective paper, you’ll create a showstopping decor piece that sets the tone for intimate gatherings or solo moments of relaxation.
With minimal tools – including an angle cutter – and a dash of creativity, you can craft a bespoke divider that not only adds visual appeal but also provides a sense of separation from the rest of your home. This project’s versatility allows you to redefine your living space according to your unique needs and preferences, making it easy to create a haven that reflects your personality without putting a dent in your budget.
Budget-Friendly DIY Room Divider Ideas for Your Home
When it comes to dividing a space without sacrificing its aesthetic appeal, DIY room dividers offer an ingenious solution. And the best part? You don’t need advanced carpentry skills to create one. In fact, you can repurpose existing materials or use recycled goods to save time and money. Here are some creative ways to make a room divider in just a day: One innovative approach is to transform a bookcase into a stunning room divider by attaching fabric panels to the back of each shelf. Simply combine a bookcase with fabric panels, cotton batting, spray adhesive, and a staple gun, and you’ll have a unique and stylish space separator. Add some decorative flair by arranging books and knick-knacks on either side of the bookcase.Alternatively, you could create a room divider that doubles as a piece of art. Hang a beaded curtain from a curtain rod or ceiling-mounted track to add visual interest to your space. With just beads, string, a curtain rod or track, and hooks, you can bring some natural light into your room by choosing beads that match its color palette.If you’re looking for a more tactile approach, consider creating a macrame room divider using natural rope or recycled T-shirt yarn. This project requires only rope or yarn, a dowel rod, scissors, and a tape measure. Macrame adds a lovely texture to your space, making it perfect for those who want to add some visual interest without sacrificing functionality.For a more rustic look, repurpose wooden pallets into a room divider that’s both functional and stylish. To do this, you’ll need wooden pallets, a saw, sandpaper, screws, and a drill. Simply assemble the pallets, paint or stain them to match your room’s color scheme, and you’ve got yourself a unique space separator.Last but not least, consider creating a folding screen room divider using old shutters or bi-fold doors. This project requires only shutters or bi-fold doors, hinges, screws, and a drill. You can customize the look by painting or staining the shutters or doors to match your room’s color palette.
How to Save Money on Divider Wall Ideas
To create a DIY room divider that meets your spatial needs and adds a touch of style, simply follow these straightforward steps. Using the right tools and materials, you can craft a one-of-a-kind partition that not only achieves its functional purpose but also becomes a defining feature in your room. These budget-friendly ideas are ideal for those seeking to make the most of their space while keeping costs low.
Conclusion:
By embracing these DIY room divider ideas, you can turn your living space into a functional and stylish sanctuary without breaking the bank. The versatility of these affordable solutions is undeniable, catering to different skill levels and design preferences. From wooden masterpieces to repurposed doors and intricately woven screens, there’s a wealth of creative possibilities waiting to be explored. By delving deeper into the realm of DIY room dividers, you’ll discover an array of fabric-based screens, intricate macrame patterns, and multipurpose wooden partitions that can be tailored to suit your unique tastes. With these ideas as your guide, you’re encouraged to take on the challenge and craft a one-of-a-kind DIY room divider that reflects your personality.
