DIY Multi Leveled Jewelry Box
Transform a space with an eye-catching DIY multi-level jewelry box crafted from unique woods like Wenge and Maple. This intermediate woodworking endeavor yields a captivating storage solution for treasured trinkets, perfect for any tiny home enthusiast. To bring your vision to life, combine wood glue, toothpicks, Starbond Medium-Thickness Adhesive, and Accelerator with precision and patience. Don’t overlook the importance of measurement accuracy – a 3/32” drill bit will ensure seamless pre-drilling. Feel free to personalize the wood types or storage levels to suit your style and needs, elevating your tiny home’s aesthetic appeal. Safety should always be top priority; take your time, stay comfortable, and let your woodworking expertise shine with this engaging jewelry box project.
Handmade Wooden Jewelry Box
This Valentine’s Day, seize the opportunity to create a one-of-a-kind jewelry box that exudes love and personalization. With its intermediate-level DIY instructions, you can complete the project within a half-day, exercising your creative skills while crafting a meaningful gift.
The box’s core materials comprise hardwood or plywood, Baltic Birch Plywood, sandpaper, wipe-on polyurethane, and wood glue. Guided by an 11-step process, you’ll cut, groove, dry-fit, glue, and sand the wood to fashion a box featuring a signature tray and cleats for added aesthetic appeal.
At a budget-friendly $20-$50, this handcrafted piece serves as a testament to your love and artistry, making it an ideal Valentine’s Day gift. By infusing your celebrations with this unique project, you’ll create a tangible symbol of your emotions that will be cherished for years to come.
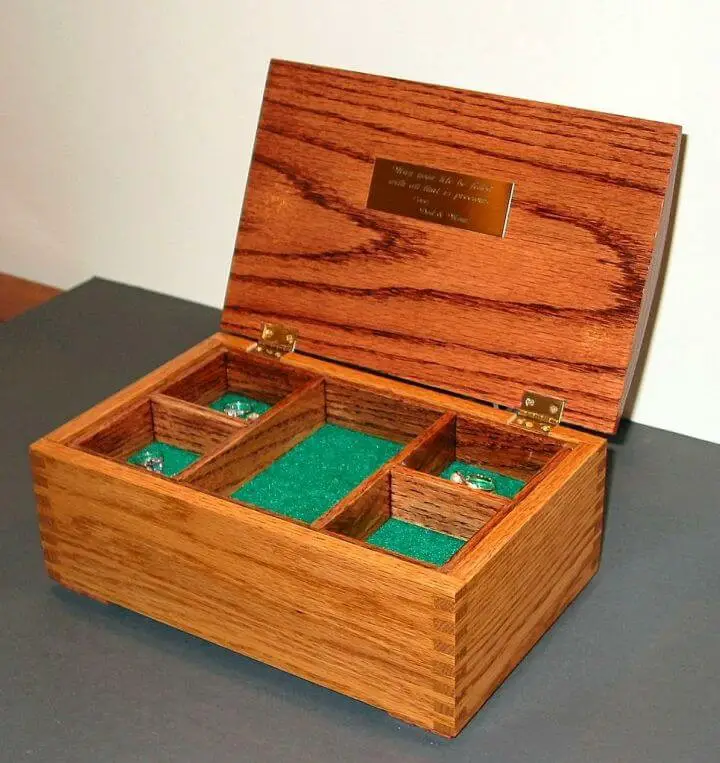
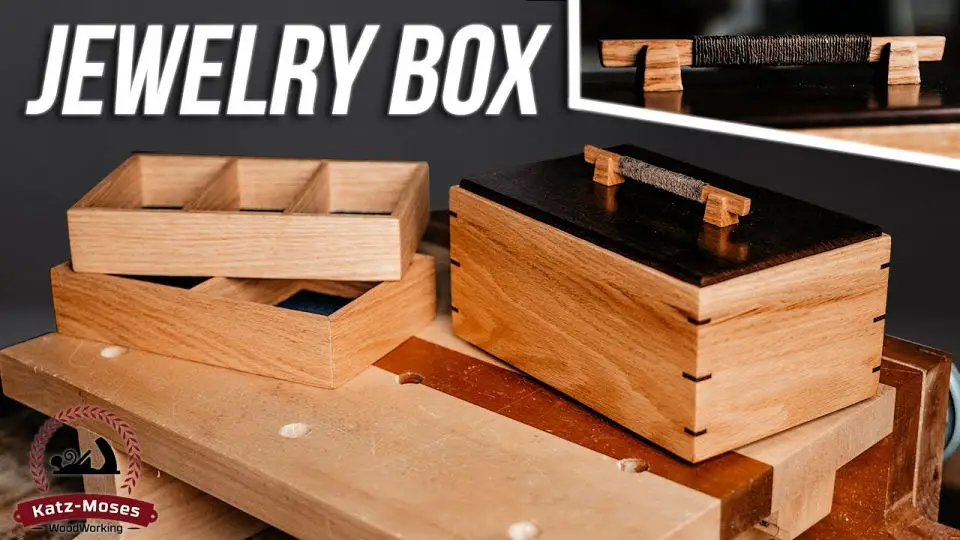
How to Build a Walnut Jewelry Box
Improve your woodworking skills by crafting a stunning walnut jewelry box featuring hand-cut dovetails, stopped dados, hardwood drawer runners, and distinctive hardware. This exquisite piece serves as both an elegant storage solution for treasured items and a testament to your mastery of woodworking techniques.
As you build this intricate box, you’ll gain hands-on experience with various components, expanding your knowledge and expertise in the process. The result is a premium-quality Walnut Jewelry Box that exudes elegance, functionality, and the pride of creating something with your own hands.
Homemade Jewelry Box
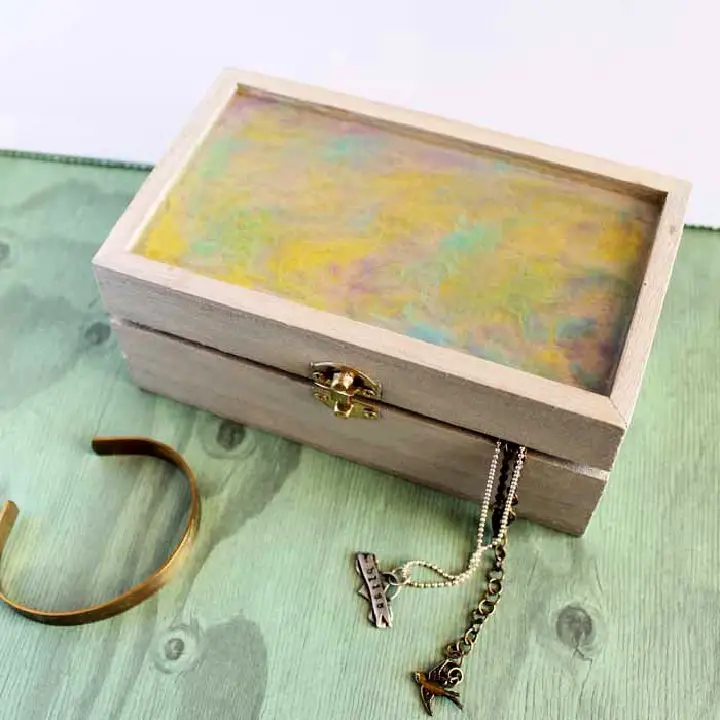
Craft a unique and personalized haven for your treasured jewels with a handmade jewelry box featuring a mesmerizing, marbled finish. This DIY endeavor is perfect for adding a touch of elegance to your home or as a thoughtful gift for a loved one. The process itself is a delight, requiring only an unfinished wood jewelry box, Craft paint, Vintage Wash, and EnviroTex Lite Pour-On High Gloss Finish. Begin by transforming the wooden base with vibrant hues before moving on to the pièce de résistance – creating a stunning, swirling effect using resin and craft paint. The end result is not just a functional storage container but a masterpiece that showcases your artistic flair and personal style.
Free Wooden Jewelry Box Plan
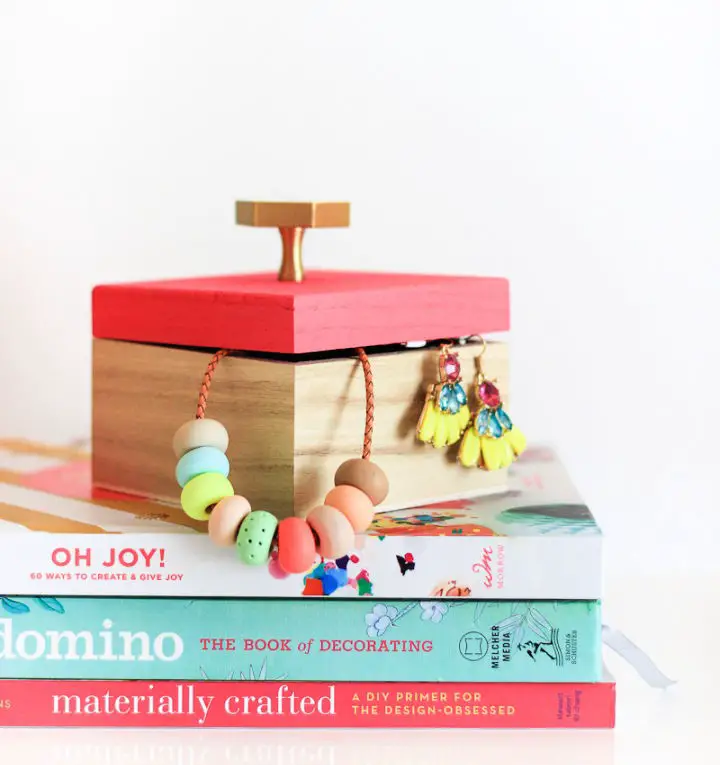
Transforming a small wooden box into a customized DIY jewelry box is an effortless and rewarding process. With just a few basic tools, acrylic paint, and a stylish knob, you can create a one-of-a-kind container that not only keeps your favorite trinkets organized but also serves as elegant home decor. The steps are straightforward: drilling a hole for the hardware, painting the box to your preferred color palette, and securing the chosen knob. For an added touch of whimsy, consider adding a vibrant ‘hidden’ color inside the box, which will reveal itself when the lid is opened. This project requires no more than 10 minutes of hands-on time, plus drying time, and can be sealed with polyurethane for long-lasting use. Moreover, this DIY jewelry box makes an excellent gift idea for thoughtful holiday presents. By choosing to store your jewelry in a beautiful and organized space, you’ll break the habit of leaving it scattered around and appreciate the aesthetic appeal of your handcrafted container.
DIY Oak Jewelry Box Featuring Box
Craft a lasting impression with this DIY wooden oak jewelry box, designed to safeguard your most treasured pieces! The box’s unique feature is the box joint construction, which elevates the humble box into an exquisite piece of art. This intricate craftsmanship, achievable with basic tools and a few simple steps, transforms the project from ordinary to extraordinary.
nThe secret to this box’s durability lies in its box joint, also known as finger joint, which not only adds visual appeal but also provides remarkable strength. By following a detailed guide that walks you through shaping the box, lid, and trays, you’ll be able to master this project with ease.
nThe finished product is not only a beautiful keepsake but also a testament to your craftsmanship. This stunning oak jewelry box will undoubtedly delight your loved ones and become a treasured family heirloom.
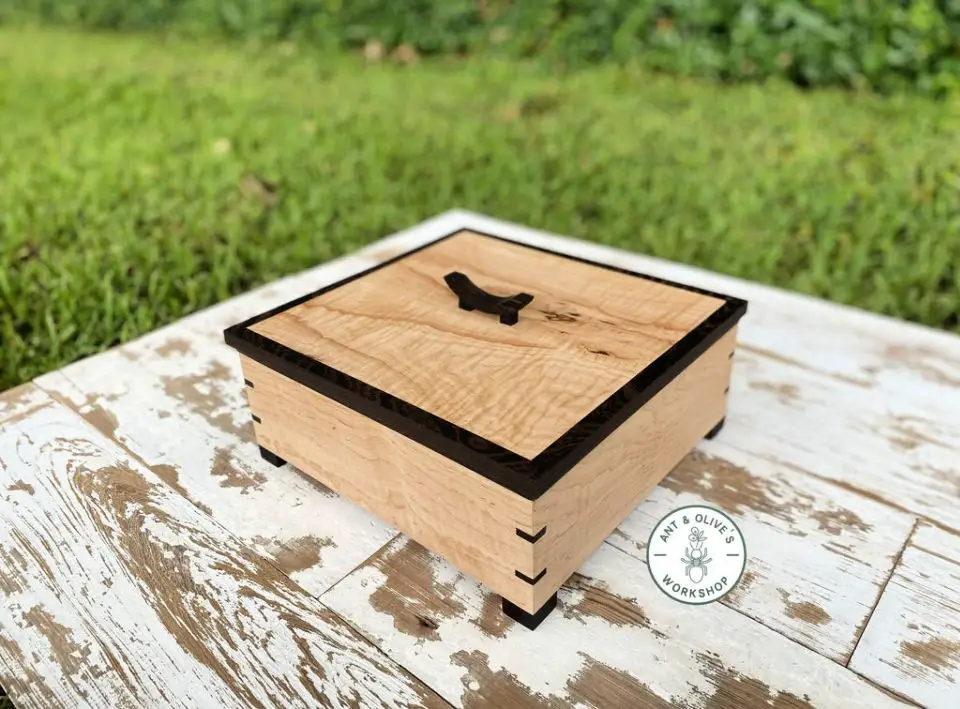
How to Make a Wooden Jewelry Box
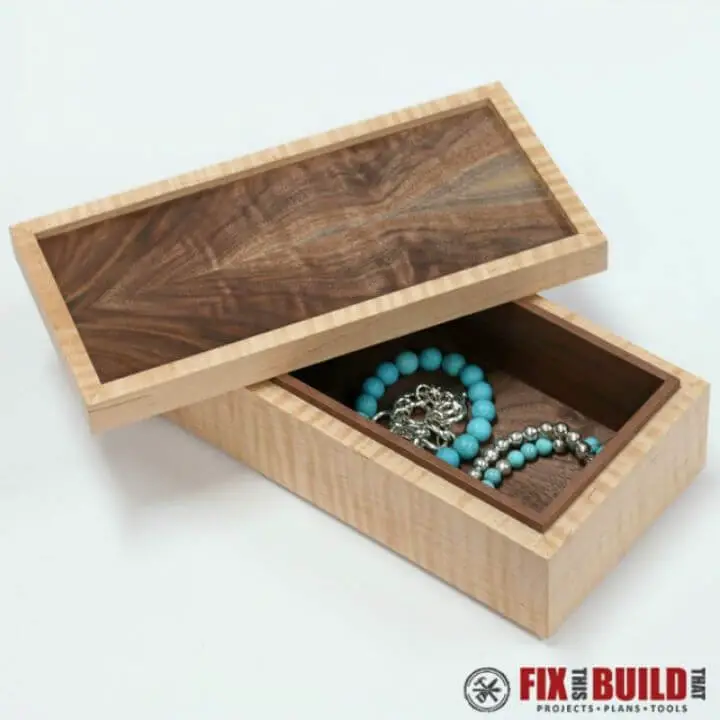
Get started with DIY box making by crafting a charming wooden jewelry box that’s perfect for storing small treasures. This beginner-friendly guide walks you through the process of building a functional keepsake box using humble materials and simple tools.The project combines curly maple and walnut, creating a visually striking combination that’s sure to impress. The box dimensions are adjustable, but this tutorial focuses on building a 10-inch by 5-inch box that stands 3 inches tall.Best of all, this DIY jewelry box is budget-friendly and requires minimal wood and basic tools like a bandsaw and drum sander. Once you’ve built the box, you can add an extra layer of elegance with lining and finish it off with a glossy shellac coating.The result is a sturdy, beautiful box that’s perfect for storing jewelry or other small items. Step into the satisfying world of DIY crafting and build your own jewelry box today!
Easy to Make a Jewelry Box
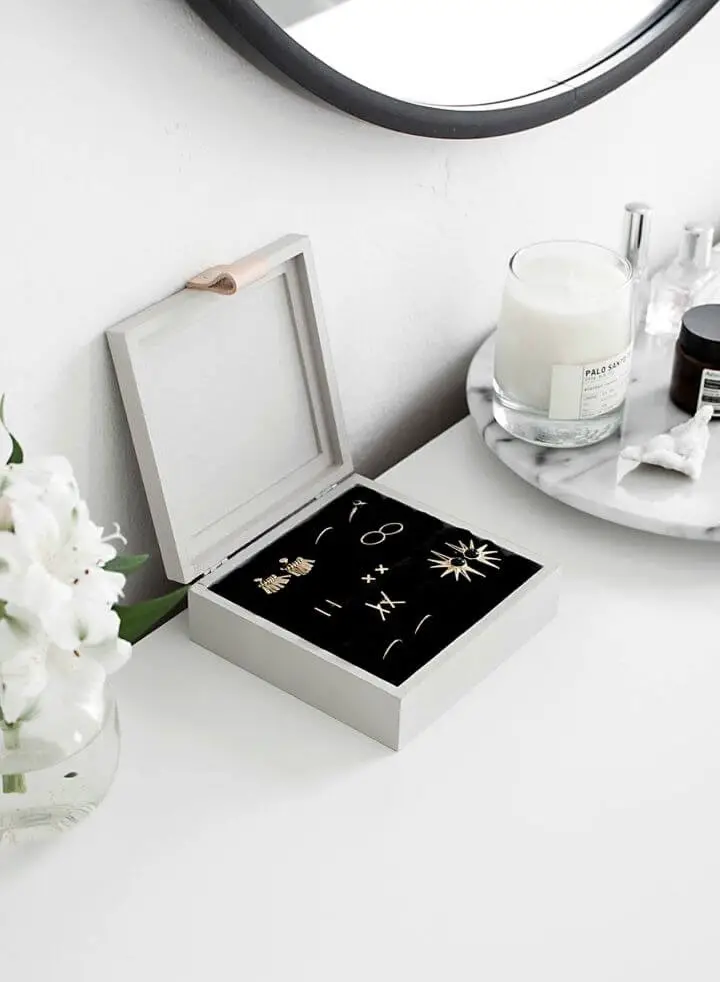
Create a bespoke jewelry box that harmonizes with your personal style by combining grey and leather in a unique DIY project. Ditch the hassle of searching for the perfect box and craft one that reflects your aesthetic. To get started, gather materials including a wooden box, screwdriver, wood filler, paint, foam brush, batting, velvet, glue gun, natural tooling leather, leather awl, thumb tack, and hammer. This thoughtful storage solution not only keeps your rings and earrings organized but also adds a touch of sophistication to your room’s decor. The grey paint infuses a modern and minimalist flair into the box, making it a perfect addition to any space. So why settle for an ordinary jewelry box when you can create one that’s tailored to your taste and needs?
Adorable DIY Jewelry Box – Step by Step
Transform your treasure trove of trinkets into a stunning work of art with this meticulous DIY wooden jewelry box. As you craft each component, from the silky-smooth drawers to removable dividers for statement pieces, precision and patience are rewarded with a masterpiece that’s as functional as it is beautiful.
The carefully curated exterior wood ensures a symphony of grain patterns, while optional figured wood tops add an air of sophistication. The finishing touch? Hand-carved handles that elevate this piece to new heights. Each step is meticulously guided, leading you from novice woodworker to accomplished craftsman as you create a keepsake that will be treasured for generations.
This project demands dedication, but the end result – a resplendent jewelry box with an interior that’s as impressive as its exterior – makes every moment worthwhile. With this instructable, you’ll discover the joy of woodworking and the satisfaction of creating something truly exceptional.
How to Stencil a Wooden Jewelry Box

Elevate the humble storage box into a stunning treasure chest with our vast array of DIY jewelry box plans. By combining captivating mini craft stencil patterns with wooden boxes, Nagoya card stencils, and Martha Stewart craft paint in hues like rose gold, blush pink, and white, you can create a chic piece that perfectly organizes your jewelry collection. The process begins by painting the box in crisp white and soft pink shades, then carefully positioning the stencil to add visual interest. Next, apply Rose Gold paint using a dense foam roller to create a mesmerizing geometric design that wraps around the box’s lid, adding depth and dimension. This unique project not only provides an eye-catching home for your trinkets but also adds a personal touch to your vanity or desk. Take it to the next level by customizing your jewelry box with your favorite card stencil design, letting your creativity shine through.
Simple Shabby Chic Jewelry Box Plan
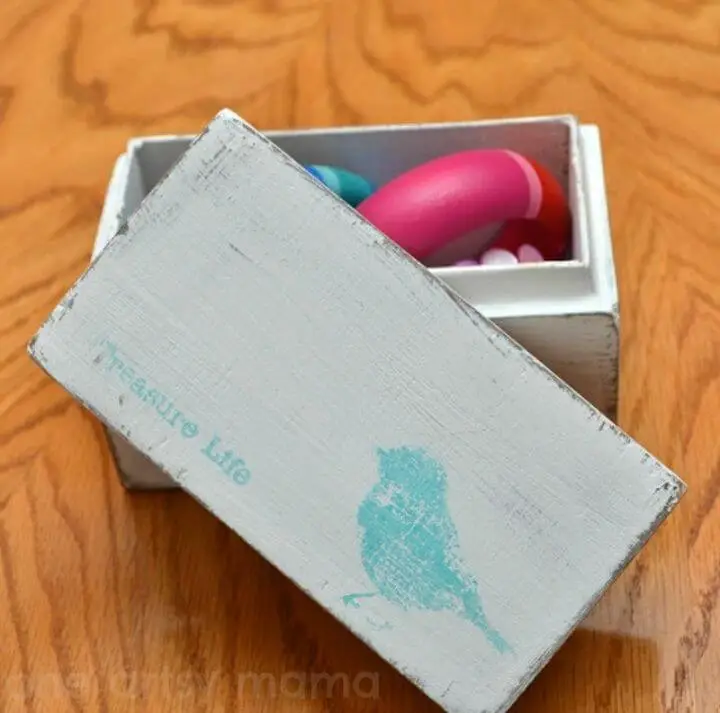
Transform your living space with this charming DIY wooden box project that combines the rustic charm of shabby chic with a delightful storage solution. By upcycling a simple wooden box using easily accessible materials, you can create a unique trinket holder that adds a touch of whimsy to any room. Simply apply acrylic paint in soothing shades of brown, white, and turquoise, then add intricate design elements using stamps and a sponge brush. The lightly inked bird and word stamps on the box top create a captivating focal point that will draw attention. This versatile project is not only budget-friendly but also easy to complete, making it perfect for those who want to add a personal touch to their décor without breaking the bank.
DIY Vintage Rose Jewelry Box
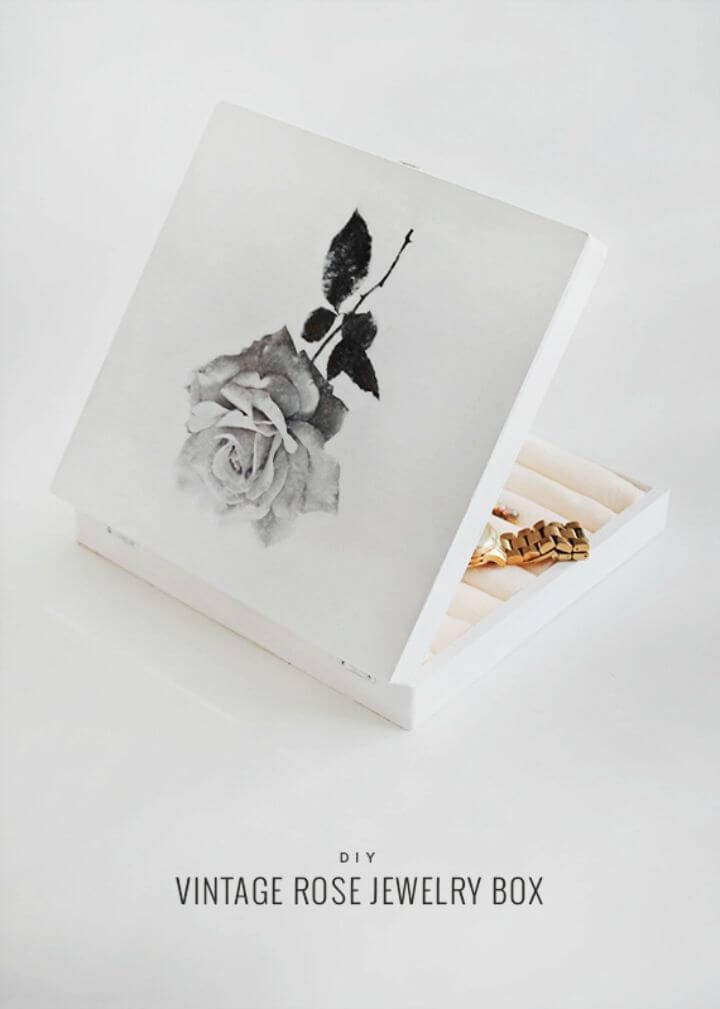
Transform Valentine’s Day gift-giving by crafting a unique, handmade feminine jewelry box that will delight the women in your life – whether it’s your mom, sister, niece, or friend. Begin by thoroughly sanding and painting the craft box, then select an image to print and cut out. Remember to reverse any text, as it will be mirrored once adhered to the box.Next, apply gel medium liberally to the image, place it atop the box, ensuring all corners are snugly aligned. Use a brayer tool, book, or credit card to burnish the image for several minutes. Allow it to dry for approximately three hours, then carefully wet and remove the paper backing using a sponge. Gently rub off any remaining paper until you’re satisfied with the final result.After an hour of drying time, move on to the final stage. Cut felt to fit the box’s width, roll it up tightly, and glue it into place within the box. Present this bespoke jewelry box, infused with your love and creativity, and watch as it brings a smile to their faces.
Make a Wooden Jewelry Box
Discover the art of woodworking by embarking on a DIY jewelry box project that’s perfect for beginners. With this step-by-step guide, you’ll be able to create a stunning wooden jewelry box that will become a treasured family heirloom. The instructions are designed to help you build a beautiful storage space for your favorite accessories, using affordable materials like whitewood boards, craft boards, and hardwood plywood, with an estimated cost of around $50.The design features ample interior space for necklaces to hang freely without tangling, making it perfect for storing delicate pieces. The use of scrap 1×2, 1×3, and 1×8 pieces adds a touch of sustainability to the project. Additional materials like paint or stain, wood glue, and nails allow you to customize the finish to your taste.The clever design incorporates 1×3 boards for the doors and shallow door bottoms, giving the box a timeless aesthetic that complements any home decor. Follow the provided cutting instructions for precise results, and take it to the next level by adding a coat of stain or paint. This delightful DIY project is perfect as a gift for loved ones or a charming addition to your own vanity.
DIY Jewelry Box Tutorial

Transform your space into a haven of elegance with this DIY wooden jewelry box tutorial. By merging simple woodworking techniques with your personal touch, you can craft a one-of-a-kind storage solution that not only keeps your jewelry organized but also becomes a stunning decorative piece. This accessible project offers a budget-friendly way to elevate the aesthetic of your vanity or dresser, adding a unique, personalized flair that reflects your creative side.
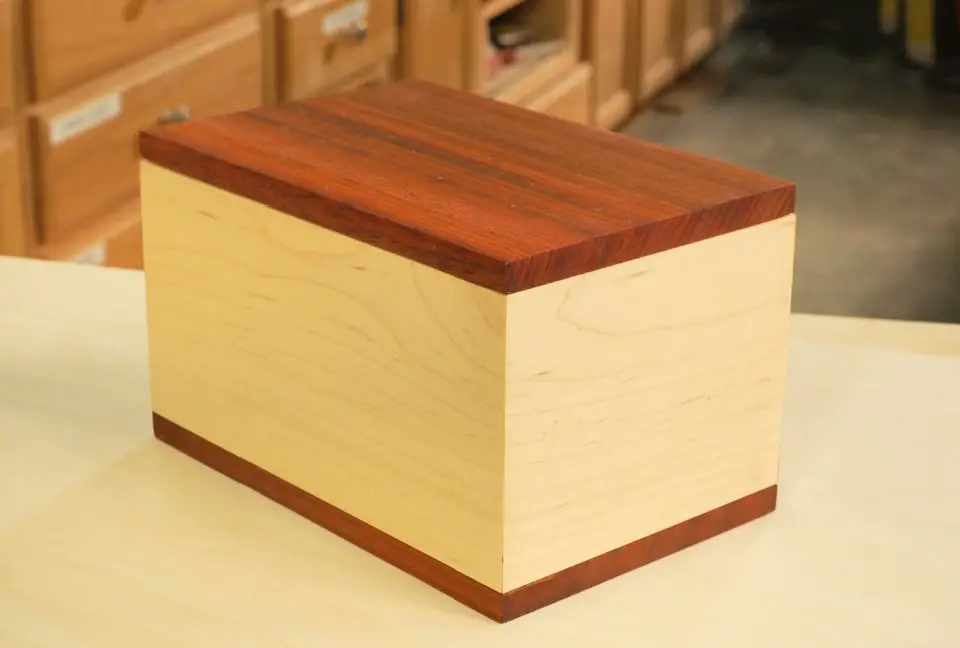
Maple and Walnut Wood Jewelry Box
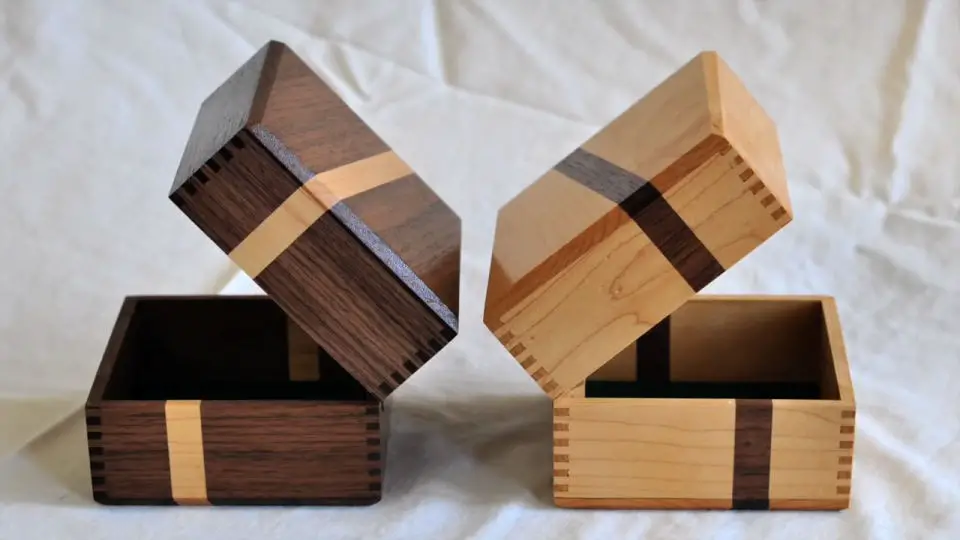
Celebrate Mother’s Day in style by presenting your loved one with handcrafted walnut and maple boxes that serve as a heartfelt token of love and appreciation. These small yet exquisite boxes feature an asymmetrical wooden stripe, adding an air of sophistication to their design. The perfectly joined sides, crafted using finger joints and a box joint jig, showcase fine craftsmanship and attention to detail. For a more polished finish, the interior is lined with soft felt, while simple hinges at the back secure the lid. This thoughtful gift carries an endearing charm and personal touch, making it a perfect keepsake for your mom or mother-in-law.
How to Make a Scrapwood Jewelry Box
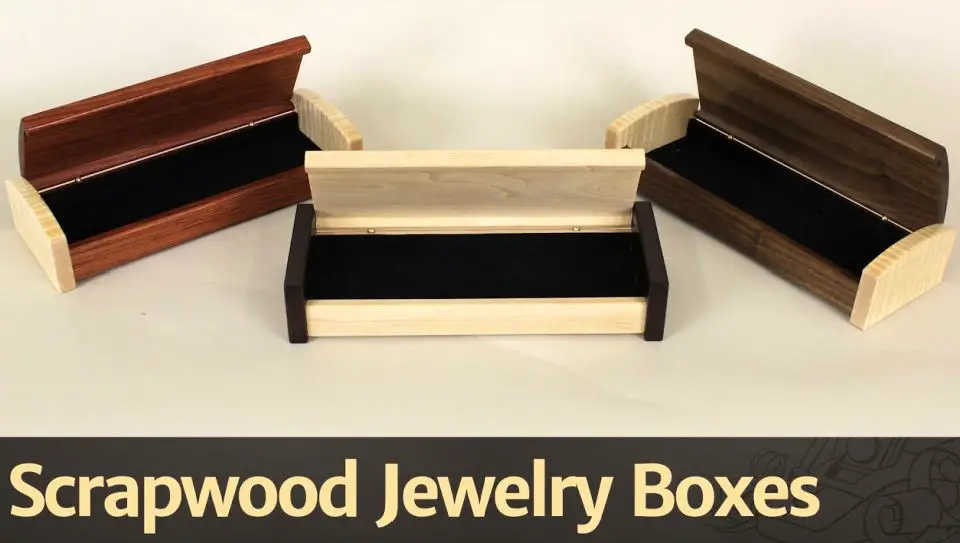
Discover the untapped potential of scrap wood in woodworking by embracing creative repurposing. This DIY guide will show you how to transform discarded pieces into practical and artistic creations, unlocking their unique textures and grains. With standard tools and equipment, you can breathe new life into these often-overlooked remnants, testing your creativity while adopting a sustainable approach to woodworking. By redefining your relationship with scrap wood, you’ll uncover its hidden beauty and purpose.
Make Your Own Jewelry Box
Enter the realm of woodworking with this comprehensive guide on crafting a stunning wooden jewelry box. Observe how raw materials are skillfully transformed into a piece that seamlessly blends form and function. This accessible process requires only basic woodworking tools, high-quality wood, and hinges. With meticulous measurements ensuring a precise fit for all components, preparation is effortless.
nThe accompanying instructional video provides a clear, step-by-step guide, making it easy for any novice woodworker to follow along. The outcome? A one-of-a-kind, handcrafted wooden jewelry box that not only serves its purpose but also adds a touch of sophistication to any room.
nThe enduring allure of wood and the satisfaction of creating something with your own hands combine for an unparalleled experience. This is your opportunity to build a masterpiece that reflects your unique style and craftsmanship, all with simplicity.
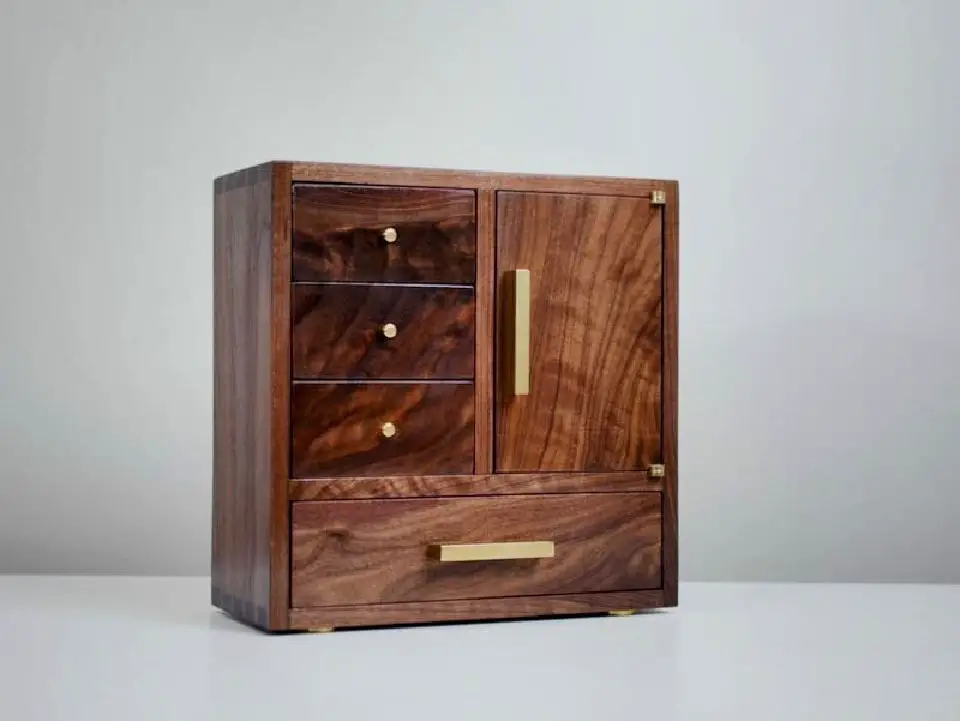
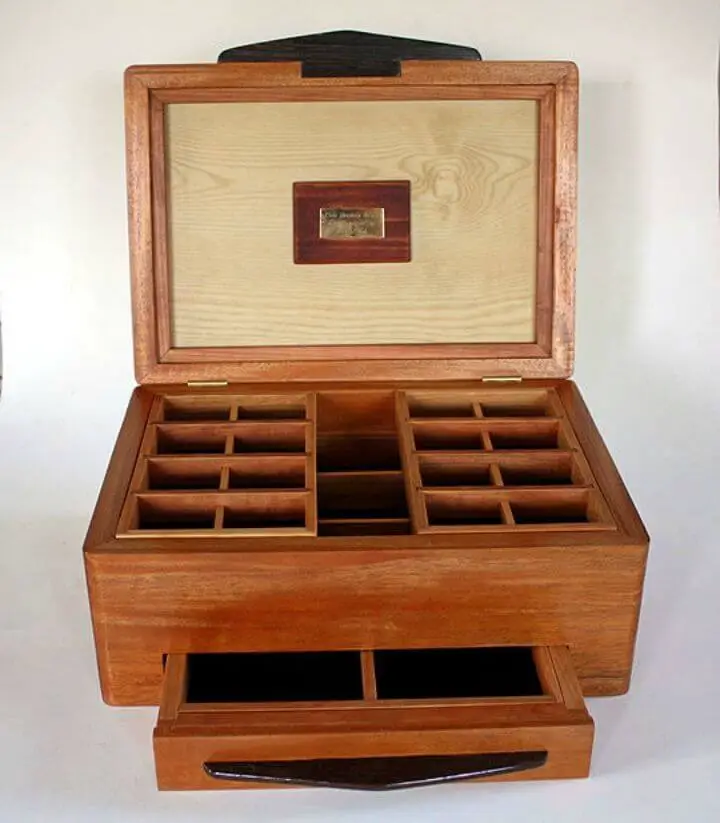
Building a Wooden Jewellery Box
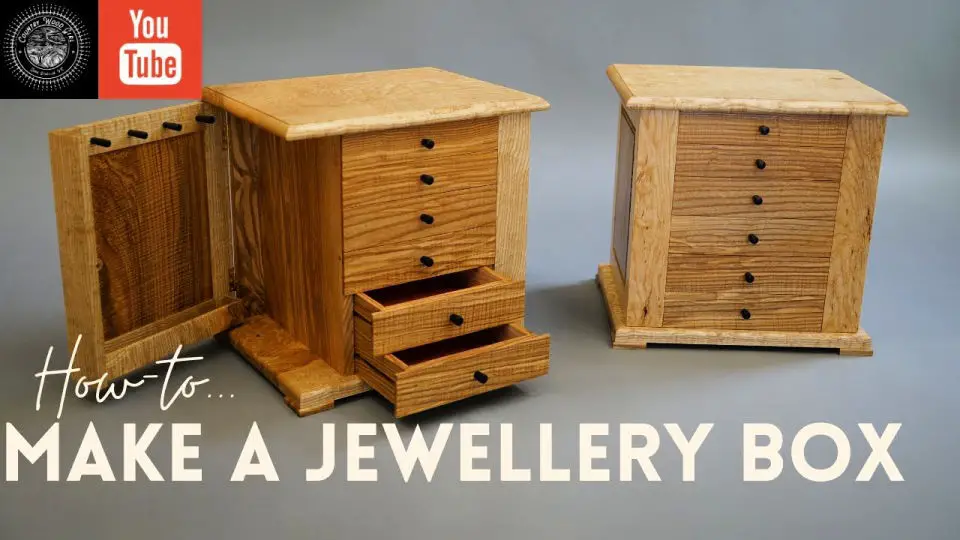
Unlock the secrets to crafting stunning DIY jewelry box plans that bring personalized storage to your treasured accessories and keepsakes. Embark on a unique woodworking adventure as you construct twin ash DIY jewelry boxes featuring intricate dovetailed drawers and dual-door designs. The pièce de résistance is the addition of expertly turned ebony handles, infusing each box with a touch of luxury.Using standard woodworking tools and high-quality ash timber, this comprehensive tutorial will guide you through every step of the process, ensuring that your ash jewelry boxes turn out nothing short of breathtaking. These beautiful creations not only provide an elegant storage solution for your most precious belongings but also serve as a testament to the artistry of skilled craftsmanship.As you bring raw materials to life, witness the harmonious blend of ash wood and ebony come together in a work of art that is sure to impress. Dive into this engaging woodworking tutorial and discover the thrill of creating your own ash jewelry boxes – a true masterpiece that will be cherished for years to come.
Make a Jewelry Box With Step by Step Instructions
Transform your DIY skills into a masterpiece by crafting an elegant white oak and wenge jewelry box. This project serves as an ideal canvas for honing high-end techniques and creating a unique, personalized gift. The process involves intricate grain wrapping, precise tray fitting, and adding a luxurious finish using grain filler, shellac, lacquer, and wax. Drawing inspiration from renowned craftsman Matt Kenney, the lid design adds an extra layer of sophistication to this stunning piece. In the world of woodworking, crafting boxes is a hallmark of excellence, and with a relatively modest investment in materials, you can embark on this creative adventure.
Free Jewellery Box Building Plan
Transform ordinary materials into an extraordinary piece of craftsmanship with this stunning DIY jewelry box made from purpleheart and ash wood. Perfect as a personalized Christmas gift, this project showcases the beauty and durability that can be achieved when combining quality materials with skillful hands. The finished box is not only a functional keepsake for storing precious trinkets but also a testament to the maker’s creativity and artistic vision. With comprehensive instructions guiding you through the process, you’ll be inspired to unleash your woodworking passion and create something truly unique.
Conclusion:
These DIY jewelry box plans offer an impressive range of possibilities for creating personalized, stylish, and functional homemade containers for your treasured accessories. Whether you’re drawn to simple yet elegant designs or intricate, multi-layered creations, there’s something on this list for every taste and skill level. By combining various woodworking techniques, materials, and design elements, you can craft a truly one-of-a-kind keepsake that not only showcases your jewelry but also reflects your personality. With these plans as your guide, you’ll be able to create a beautiful homemade jewelry box that serves as a testament to your craftsmanship and creativity.
