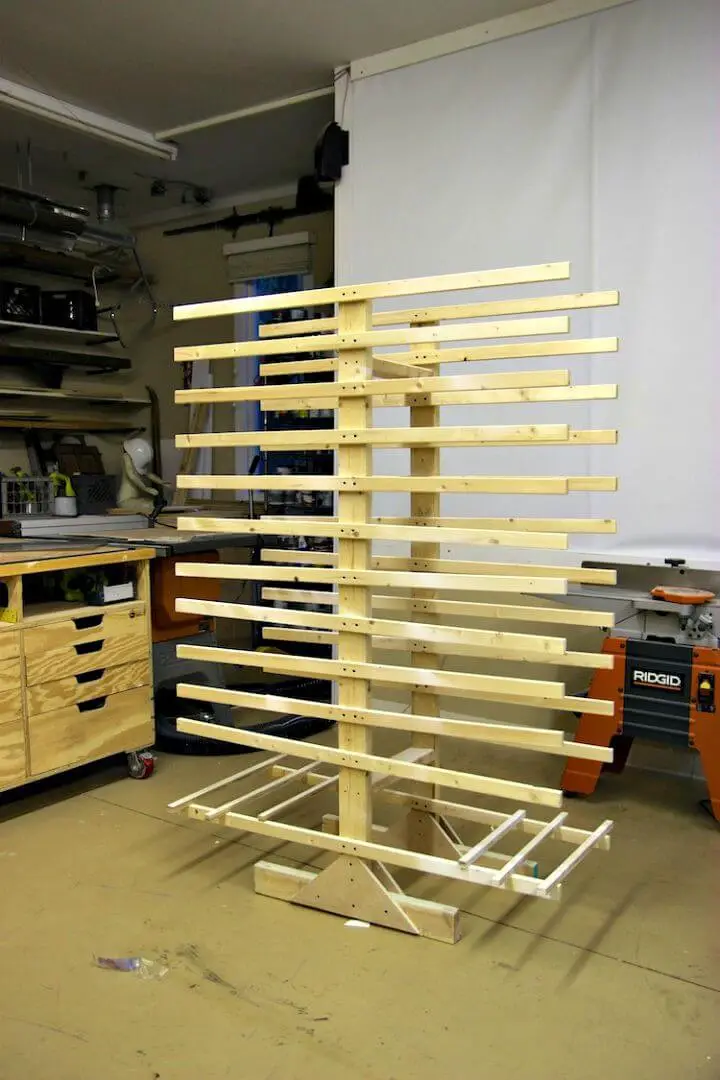
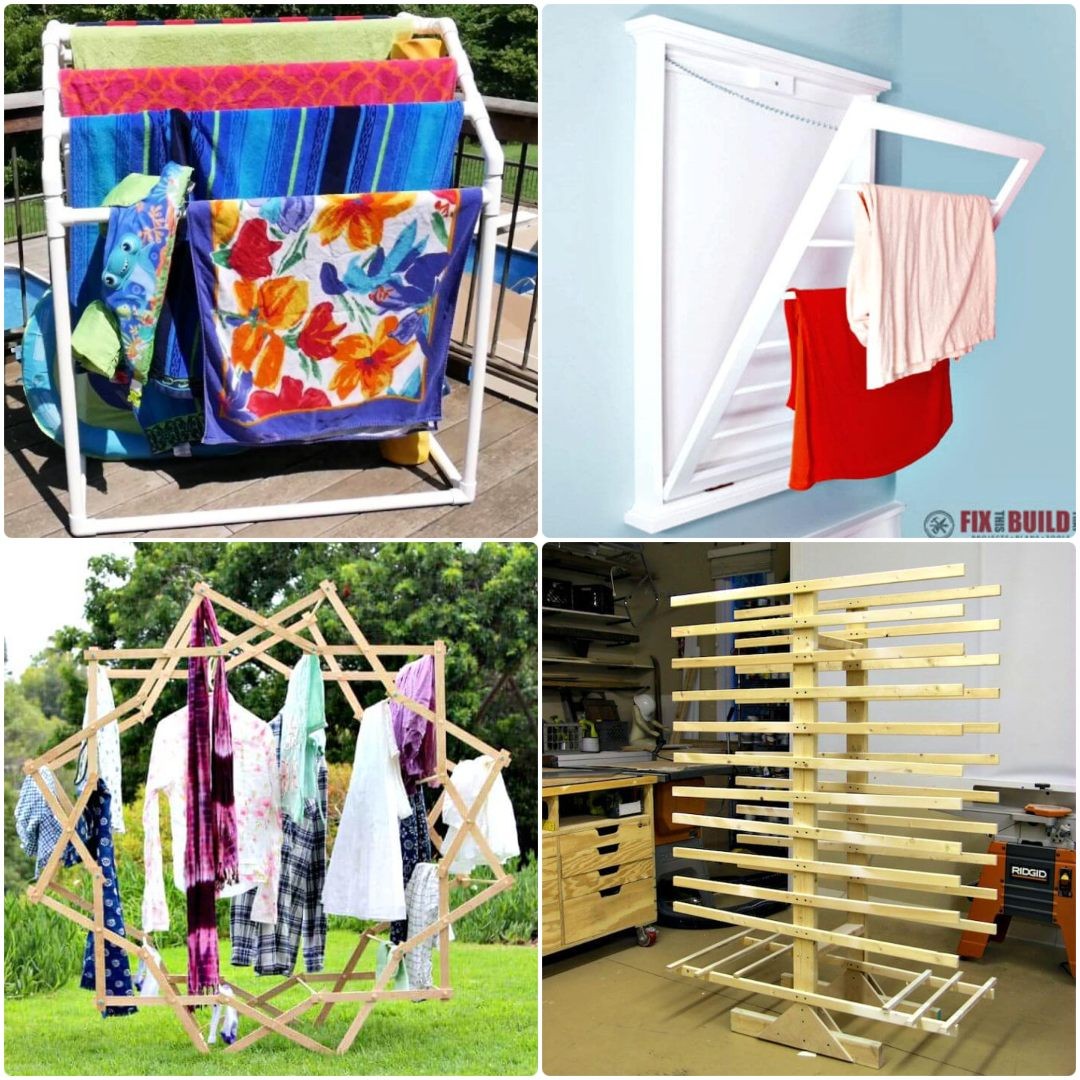
DIY Laundry Drying Rack
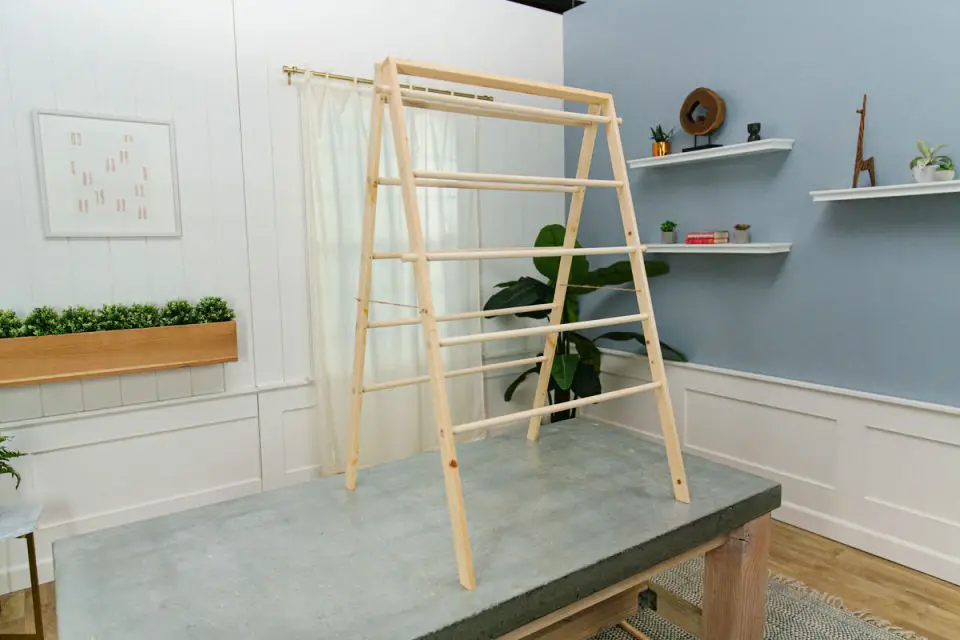
Transform your laundry experience by creating a sturdy DIY clothes-drying rack, expertly crafted from high-quality softwood and robust dowels. This budget-friendly alternative to flimsy mass-produced racks eliminates common issues like thin rods that can ruin delicate fabrics, providing a superior drying solution tailored to your space. The comprehensive guide covers measuring, cutting, sanding, and assembly, ensuring your rack is not only functional but also visually appealing. By following this easy-to-execute project, you’ll enjoy a seamless laundry experience with a durable and attractive addition to your daily routine.
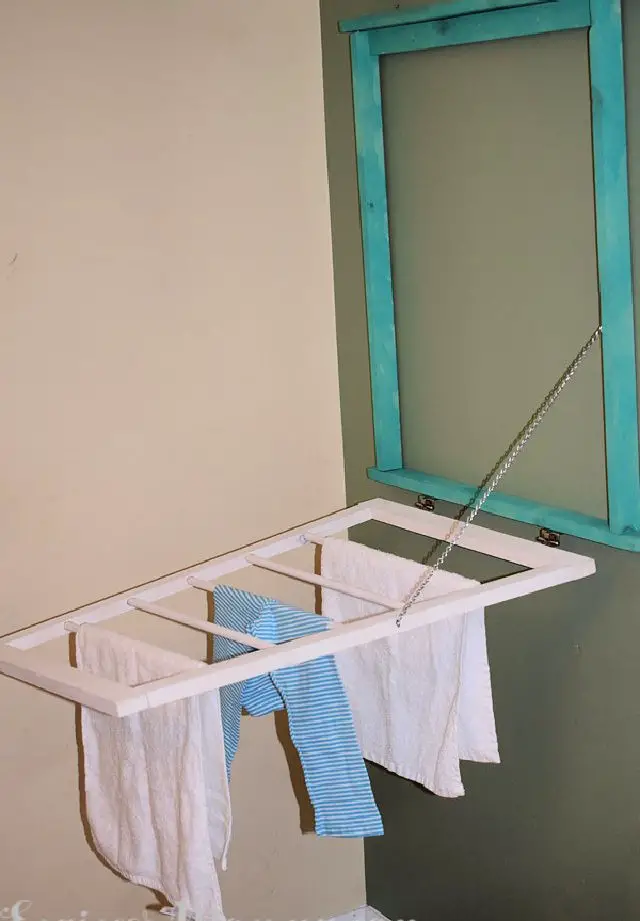
Make a Pulldown Hanging Drying Rack
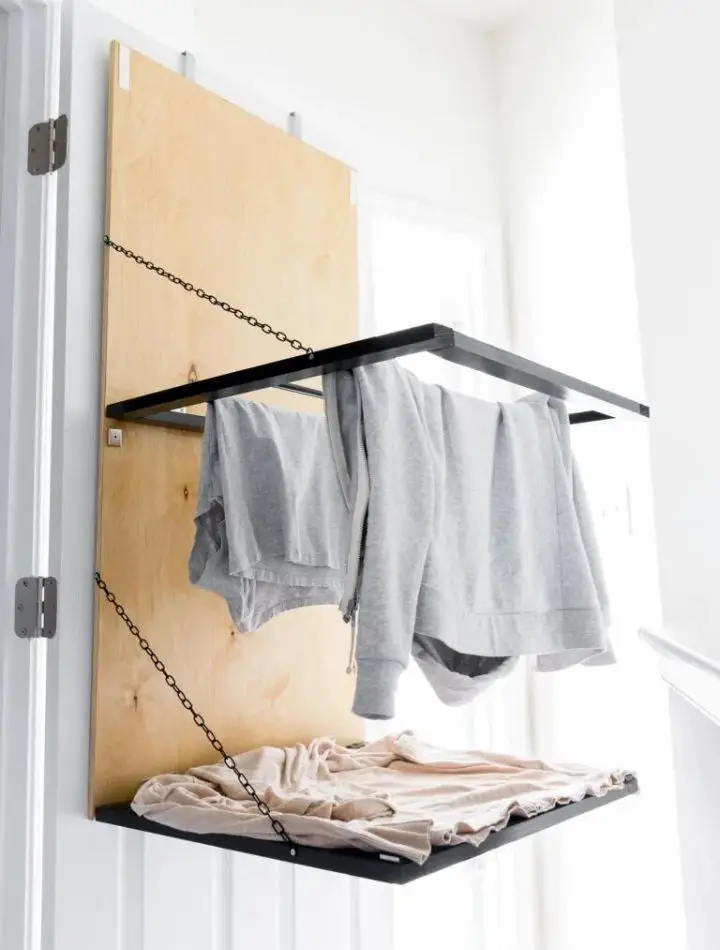
Transform your laundry space into a functional haven by crafting a bespoke wall-mounted clothes-drying rack! Combining the natural charm of birch plywood, pine, and wooden dowels, this project redefines the humble plastic drying rack, offering a sturdy and sophisticated alternative that effortlessly blends with any décor. The innovative design incorporates a pulldown function and a dedicated sweater station, providing ample room for delicate garments.Assembling this masterpiece requires a mix of manual and power tools, including a drill, miter saw, and orbital sander – making the process both engaging and practical. A finishing touch is added with Minwax wood stain and Valspar black spray paint, imbuing the final product with a professional sheen.The pièce de résistance lies in its foldable feature, allowing for effortless storage when not in use. With our comprehensive guide, you’ll be empowered to create a unique wall-mounted clothes drying rack that revolutionizes your laundry experience.
Make Your Own Drying Rack
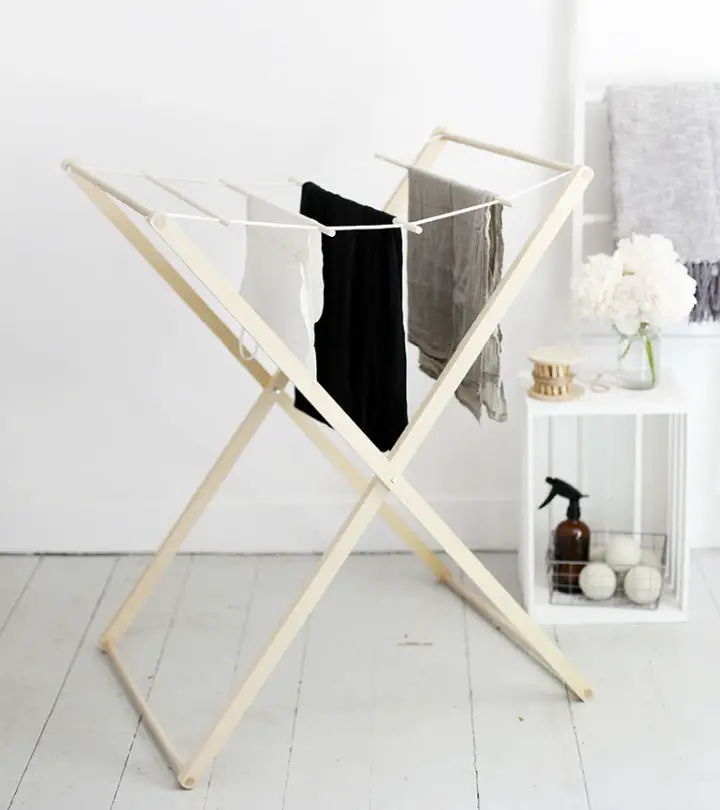
Transform your laundry routine with our top DIY drying rack solutions, designed specifically for small apartments and compact spaces. This innovative, adjustable design boasts built-in flexibility, allowing you to accommodate bulkier items with ease. Crafted from sturdy millwork, the frame features movable dowels that can be adjusted to suit your specific needs. Perfect for those seeking a more eco-friendly approach to drying laundry, this space-saving solution offers ample room for hanging clothes, mobility to capture natural indoor light, and a convenient foldable design for effortless storage when not in use. Whether you’re looking for a winter wonderland solution or simply prefer the cozy comfort of indoor drying, our DIY drying rack tutorial will guide you every step of the way.
DIY Crib Spring Drying Rack
Elevate your indoor drying system with a creative repurposing of an old crib spring. This DIY project transforms the sturdy structure into a functional and charming indoor drying rack, perfect for efficiently hanging clothes, diapers, rags, or towels. The navy blue finish not only adds a touch of personality to your laundry area but also protects the spring from rust. Installation is straightforward, requiring only a drill and screw hooks to secure the crib spring to the ceiling. With this versatile drying rack, you’ll enjoy perfectly dried laundry all year round, while adding a unique touch to your space.
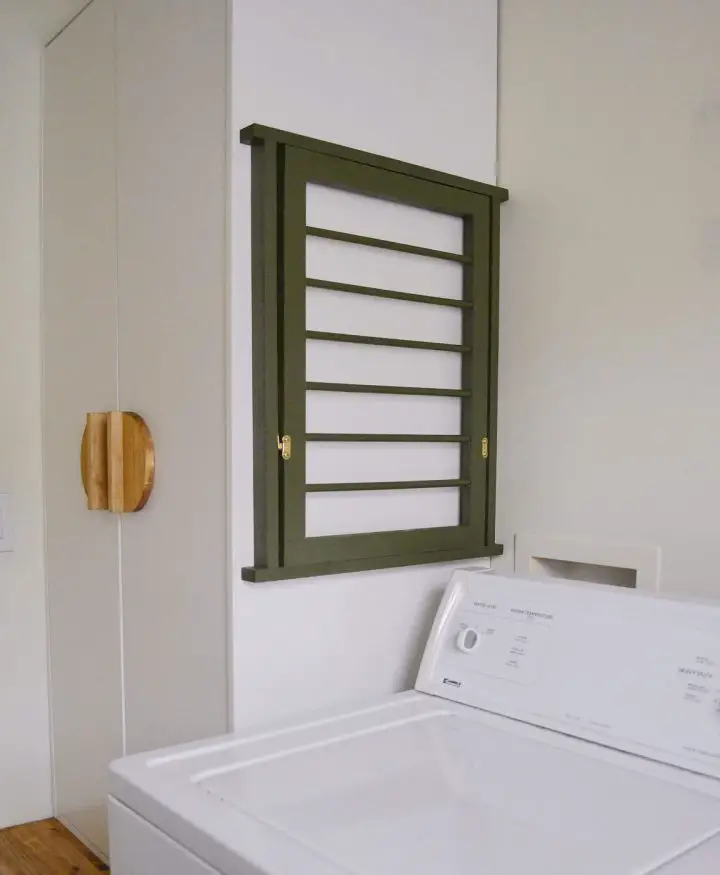
Wall Mounted Laundry Drying Rack

Discover a streamlined laundry experience by crafting a space-saving, wall-mounted drying rack using basic materials like wooden dowels, frames, hinges, and eye hooks. This eco-friendly solution minimizes wastage from small dryer loads, aligning with sustainable living principles.
When not in use, the rack folds neatly into itself, occupying minimal space and keeping your laundry area organized. The DIY guide takes you through a step-by-step process: cutting frames and dowels, assembling the rack, drilling holes for dowels, attaching hinges and crossbars, and finally securing it to the wall.
To ensure the wood’s longevity against damp clothes, apply a layer of waterproofing. With this innovative drying rack, you’ll free up your guest room from clutter and make laundry day a stress-free experience.
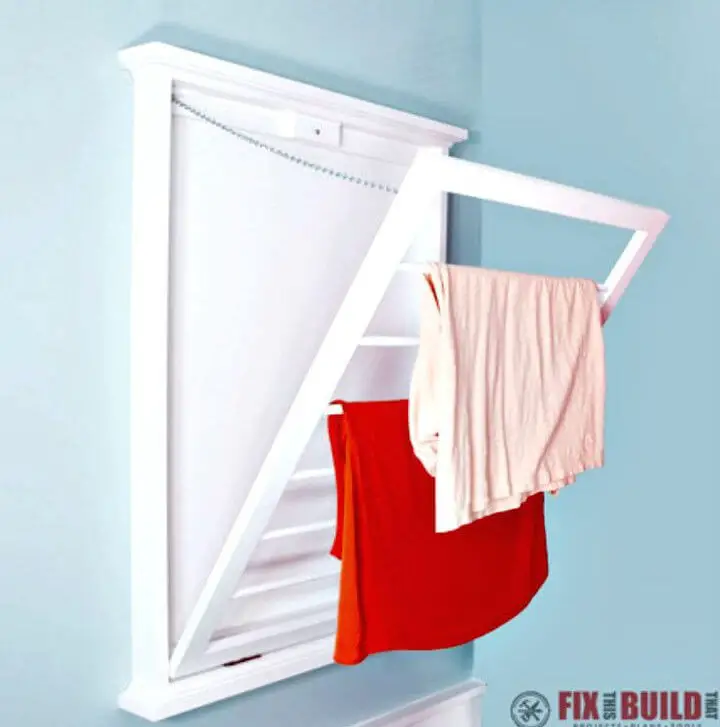
Fold-Down Drying Rack With Building Plans
Say goodbye to cluttered spaces with a DIY fold-down drying rack that’s as functional as it is space-saving! This clever solution can be built using just three common boards, dowels, and screws, making it an accessible project for anyone. The comprehensive guide provides step-by-step instructions for drilling and cutting, ensuring a seamless construction process. Once assembled, the drying rack is secured with wood glue and screws, capable of supporting even the heaviest loads. For added versatility, the hinge placements allow you to customize the design to your liking – whether that’s a flat surface or a 45-degree angle. This fold-down drying rack is built to last, constructed from durable materials that will withstand the test of time. With this easy-to-build solution, laundry day just got a whole lot more efficient and stress-free!
Homemade Boot Drying Rack
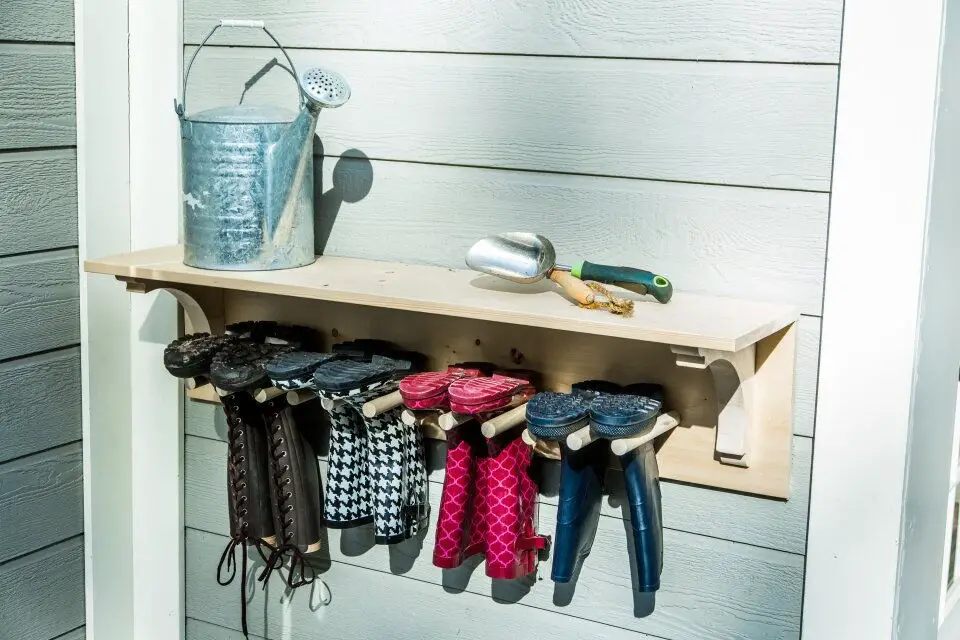
Crafting a DIY boot drying rack is a practical and easy solution to manage soggy footwear on rainy days. Ken Wingard’s unique project offers a functional approach to keeping boots dry and extending their lifespan. To create this useful storage solution, you’ll need materials such as a 4-foot long wood board, an 8-foot closet rod, screws, a drill, two mount brackets, glue, and paint. The process is straightforward: start by marking and drilling the board, then insert dowels and secure them with screws. Next, attach the brackets and finish with a coat of paint for aesthetics. This affordable DIY project provides a practical way to manage wet boots and adds an organized touch to your home’s storage space. With its efficient design and creative approach, this boot drying rack ensures that your boots are always dry and ready to wear, even on the rainiest days.
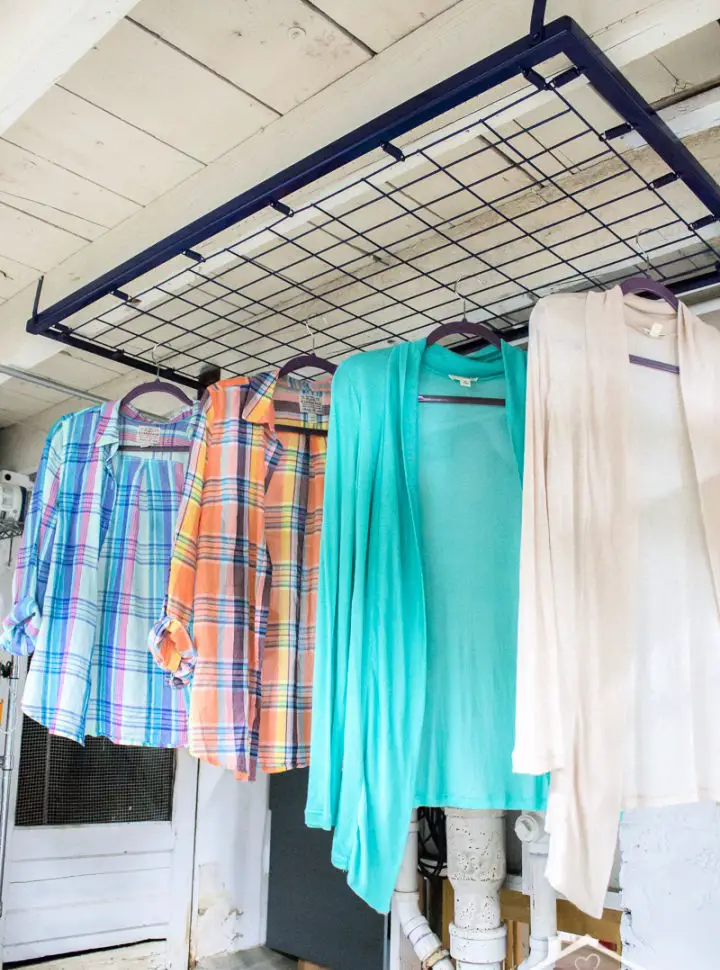
Hockey Drying Rack
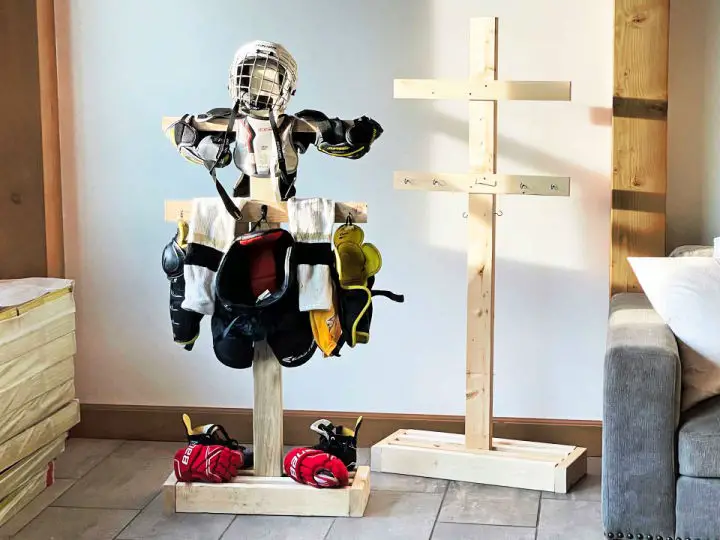
For hockey enthusiasts seeking an affordable and practical solution to dry their equipment, consider building a DIY drying rack using simple materials. Two 2x4s, some leftover hockey sticks or 1x3s, and a few screws are all you need to create this functional piece of furniture. The customizable design allows you to adjust the height to suit your preferences, ensuring that your gear is always dry and organized. This project eliminates the hassle of dealing with wet equipment, providing a convenient and space-efficient solution for storing and drying your hockey gear.
Handmade Star Shaped Clothes Drying Rack
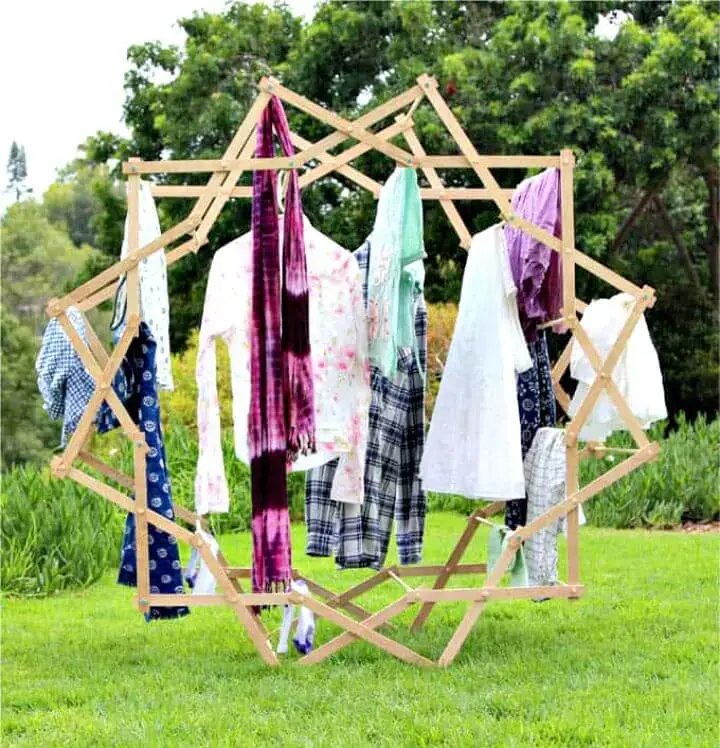
Transforming your laundry routine just got a whole lot more exciting with the creation of a functional and stylish DIY drying rack. This innovative project combines form and function, providing a beautiful and space-saving solution for all your drying needs. The star-shaped design adds a touch of elegance to any room, while the use of plywood and dowels makes it an affordable and eco-friendly option. With a budget-friendly price tag of just $18, you can create this expandable rack that maximizes drying space and extends its longevity with a non-toxic sealant. Plus, its compact design makes it easy to store when not in use, making it the perfect addition to any home. Detailed instructions are provided to ensure a seamless construction process, resulting in a rewarding experience and a unique piece of functional art.
DIY Laundry Drying Rack Makeover
Transforming a mundane laundry drying rack into a stunning home decor piece is easier than you think! With just a few simple materials and some creative flair, you can turn your standard drying rack into a chic display for freshly washed clothes. The key to this DIY makeover is high gloss spray paint in bold colors like black, gold, and white. Simply follow the straightforward instructions to give your rack a sleek new look that will elevate your laundry room’s style game.
How to Make Cabinet Door Drying Rack
Transform your home with a versatile and budget-friendly DIY drying rack, perfect for managing multiple cabinet doors and drawer fronts during a kitchen remodel. This innovative solution is designed to ensure a smooth, flawless finish while keeping costs under $40. Crafted from easily accessible materials like 1x2s and plywood, the drying rack is simple to assemble following a step-by-step guide that takes you through the process of cutting wood, laying out arms, and final assembly. This game-changing design is perfect for those embarking on similar renovation projects, simplifying their DIY journey and achieving impeccable results.
Creative Fold-Flat Drying Rack
Bring a touch of ingenuity to your home with this DIY fold-flat drying rack! By repurposing 1×2 boards, dowel rods, a short metal chain, and full-overlay hinges, you’ll create a space-saving solution for drying clothes or other items. To get started, construct the inner frame using precisely cut wood pieces, then modify the dowel rods and place them accordingly. This clever hack will result in a functional piece that enhances your living space while showcasing your creative skills.
Easy to Make Ladder Laundry Drying Rack
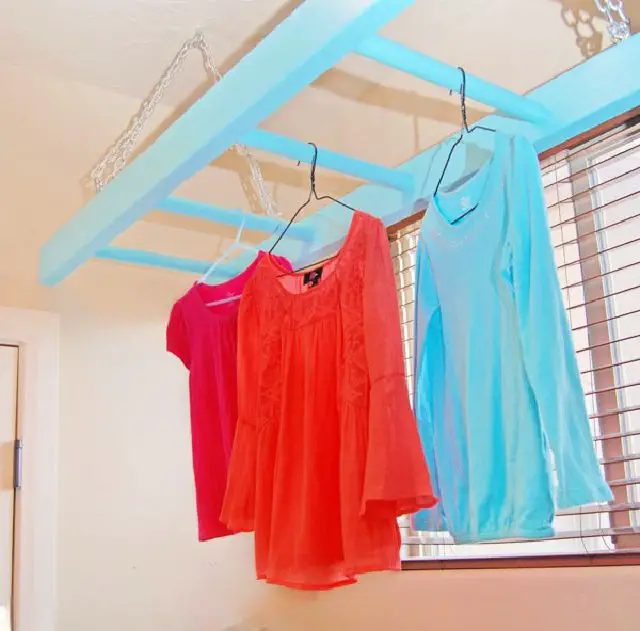
Transform the chaos of wet laundry around your home into a thing of beauty with a DIY hanging ladder laundry drying rack that’s as functional as it is visually appealing. This rustic, wooden masterpiece can add a charming touch to any room, thanks to its sturdy dowels and chains. With step-by-step instructions guiding you through the process, from drilling holes to assembling the ladder, you’ll be amazed at how effortlessly this project comes together. And when you’re done, get creative by adding a pop of color with your choice of paint, ensuring the rack blends seamlessly into your home’s decor. This innovative solution not only saves you money in the long run but also prevents shrinkage and keeps your space tidy, turning laundry day into a breeze.
Simple DIY Hanging Drying Rack
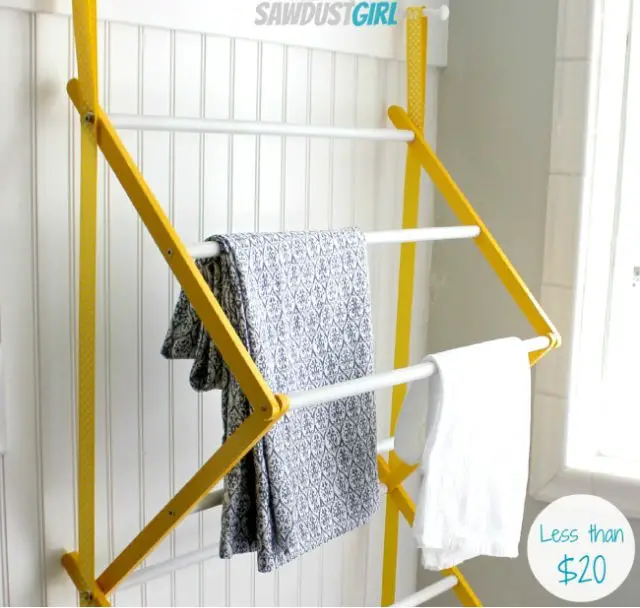
Transform your laundry experience by creating a DIY hanging drying rack that’s both stylish and budget-friendly. Say goodbye to cluttered spaces and hello to a more organized system. This innovative project uses affordable materials like plywood, dowels, twill tape, and paint to recreate a Pottery Barn-inspired design for under $20. With a few simple steps, you can customize the materials to your liking, attach the parts, and enjoy your new drying rack in no time. Perfect for maximizing space in small laundry rooms or homes, this collapsible rack is not only functional but also easy to store when not in use. By tackling this project, you’ll not only add a touch of elegance to your home but also make your laundry chores more enjoyable.
Build a Beadboard Laundry Drying Rack

Elevate your laundry room with a budget-friendly DIY project that adds functionality and charm. Inspired by designer versions, this custom beadboard drying rack is perfect for air-drying delicate items in a narrow space. Crafted from repurposed materials like tongue and groove boards, hinges, and a French cleat, the cost-effective solution comes in at around $30. Simple to build with straightforward instructions, the drying rack features a soothing Serenity Blue hue that won’t compromise on aesthetics. When not in use, it folds neatly, maintaining the streamlined look of your laundry space. This versatile laundry rack seamlessly blends form and function, transforming your daily laundry experience.
How to Make Clothes Drying Rack at Home
To maximize space and optimize efficiency in the laundry room, we’ll be building a DIY wall-mounted clothes drying rack that’s both functional and visually appealing. This project combines dimensional lumber, dowels, and a plywood back to create a collapsible, convenient solution for drying clothes. With step-by-step instructions, you’ll learn how to construct a drying rack ladder and a wall mount frame, as well as install the necessary hardware. The easy joinery involved makes this project accessible to DIY enthusiasts of all skill levels, and the rustic charm it adds to the laundry room is an added bonus. By taking on this DIY endeavor, you’ll experience the satisfaction that comes with creating something practical and useful with your own hands.
DIY Fresh Herb Drying Rack From Picture Frame
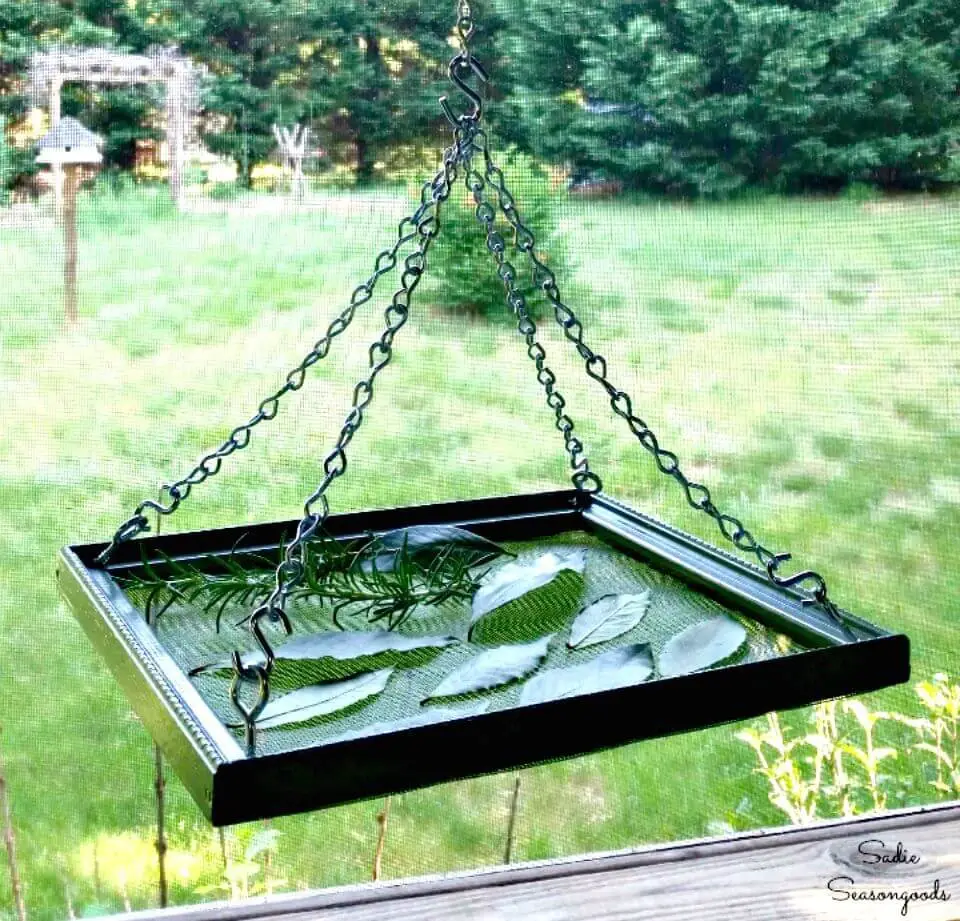
Transform a thrift store wooden picture frame into a practical and innovative DIY herb drying rack, reducing waste and creating a unique piece for your home. The process is straightforward: first, prepare the frame by applying some paint for durability. Next, fit a window screen to create a mesh surface perfect for drying herbs. Finally, add any necessary hardware to complete the project. With this upcycled drying rack, you’ll be able to dry your fresh garden herbs to perfection, ensuring they’re always ready for culinary use. The size of the frame doesn’t matter; it’s all about repurposing and creating something new with sustainability in mind. Start your upcycling journey today by giving this project a try!
Ballard Design Inspired Drying Rack
Transform your laundry routine with a clever DIY drying rack inspired by Ballard Design’s aesthetic. By repurposing crib parts, you can create a functional and stylish drying solution that adds a touch of sophistication to any room. The core design features a modified box shape with a beadboard backing, cleverly incorporating a half-cut crib rail for added stability. A coat of Rustoleum Heirloom White paint gives the rack a refined finish, complete with a ribbon separator maintaining the perfect gap between rails and super-strong magnets providing a secure fastening system. This innovative project boasts ample space for drying clothes, even when closed, making it an ideal solution for maximizing laundry room space or keeping delicates fresh in any area of your home. By embracing creativity and recycling, you can turn a mundane task like drying clothes into a delightful experience that’s as much about the process as the end result.
DIY Laundry Drying Rack – Step-by-Step Instructions
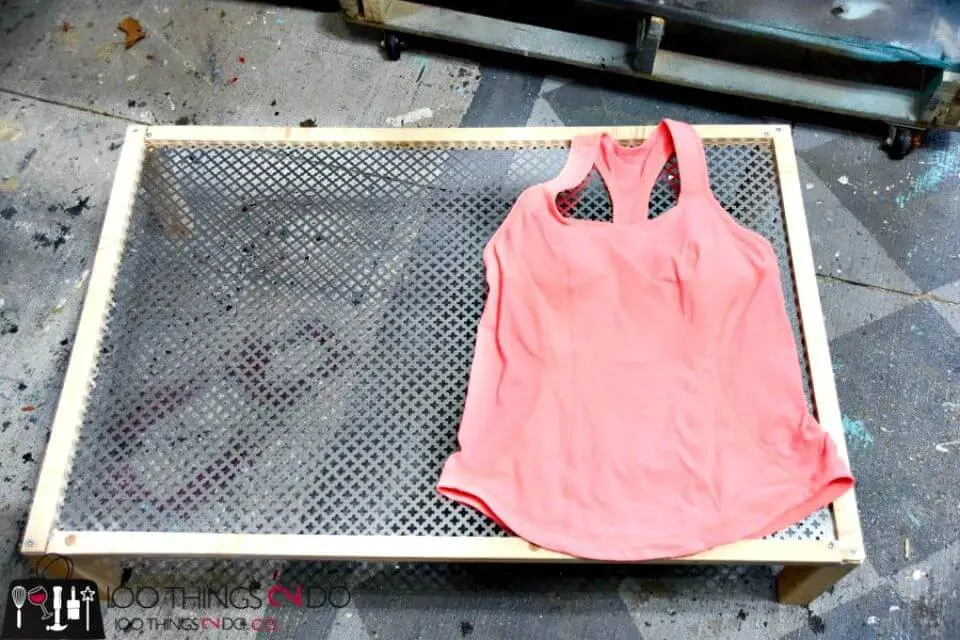
Give your laundry routine a boost by building a custom DIY drying rack for delicate garments that require flat drying. This clever creation uses rust-resistant aluminum sheets to facilitate airflow, ensuring quick and efficient drying times. The best part? It’s surprisingly easy to construct using plywood, glue, and finishing nails. Plus, the design is versatile – you can wall-mount it or add makeshift legs to adapt it to your space and needs. Not only does this project declutter your home and speed up drying times, but it’s also a cost-effective solution that brings convenience to your daily routine. Start building today!
Homemade Laundry Room Drying Rack

Craft a functional and budget-friendly solution for laundry with this DIY wall-mounted drying rack. Constructed from wooden dowels, pine, and beadboard, this adaptable design can be tailored to your laundry room’s unique space and style. By leveraging basic tools like drills and saws, you’ll save on the cost of commercial alternatives. The simplicity of this project belies its effectiveness, making it an ideal DIY endeavor for those new to woodworking.
Assembling the rack involves a straightforward process, including drilling holes for the dowels – a task that’s more manageable than it seems at first glance. To complete the piece, simply spray paint the assembled rack for added protection against damp clothing. With this guide, you’ll be able to create a practical and visually appealing drying rack in no time, streamlining your laundry routine and elevating the ambiance of your laundry room.
Clothes Drying Rack Using PVC Pipe
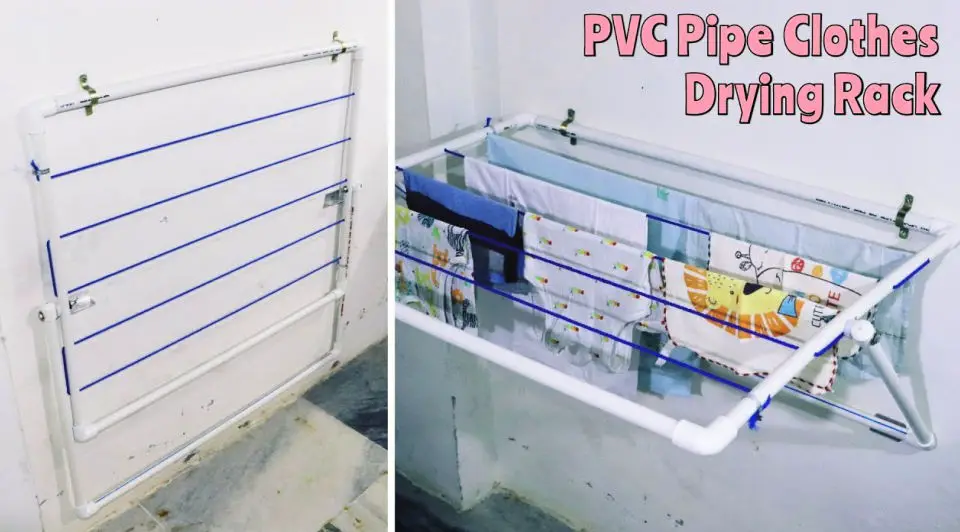
Transform your laundry experience without breaking the bank by crafting a foldable clothes drying rack using PVC pipes. This budget-friendly solution provides ample space for your garments to dry while keeping your living area clutter-free. The essential materials needed are PVC pipes, pipe cutters, and glue – a simple yet effective combination that’s easy to work with.
nThe process is straightforward and engaging, allowing you to develop your DIY skills as you construct this practical household item. You’ll appreciate the portability of this homemade drying rack, which can be folded away when not in use, freeing up valuable space in your home.
nAt the heart of this project lies the PVC pipe, the foundation upon which your new drying rack is built. Start your DIY journey with this cost-efficient, functional, and practical piece that offers a multitude of benefits. Your laundry routine is poised to become significantly more streamlined!
DIY Foldable Clothes Drying Rack
Transforming your laundry experience has never been easier or more cost-effective. By embracing creative DIY drying rack ideas, you can turn any household into a haven for efficient and eco-friendly clothes drying. One such innovative solution is the foldable clothes drying rack, constructed from three cedar 1x4s and wooden dowels. This clever design not only saves space but also prevents your shirts from shrinking – a major concern for those who value preserving their wardrobe’s integrity. The simplicity of this project makes it accessible to anyone looking to upgrade their laundry routine, bringing a touch of modern craftsmanship to their home. With just a few basic materials and tools, you can create a functional and stylish addition to your laundry room that will revolutionize the way you dry your clothes.
Handmade Clothes Drying Rack
A DIY clothes drying rack is an innovative way to bring the sunshine indoors and make laundry days more manageable. By creating a compact and practical solution for lack of drying space in laundry rooms, you’ll not only solve a common problem but also add a touch of minimalist charm to your room. The setup requires minimal tools and materials, making it accessible to anyone who wants to try their hand at DIY crafting.
The building process is straightforward and easy to follow, with simple steps that guide you through the creation of a functional drying rack. Not only will this project serve its core purpose, but it’ll also provide a sense of accomplishment and satisfaction from creating something useful for your home. The wooden texture of the drying rack adds a warm and rustic touch to your room’s aesthetics, making it a great addition to any laundry space.
By embracing your creativity and optimizing your laundry room space, you’ll be able to enjoy a more streamlined and efficient laundry experience. Plus, the cost-effectiveness of this project makes it an attractive option for anyone looking to create something new and useful without breaking the bank.
DIY Wooden Clothes Drying Rack
Transform your laundry routine with a DIY clothes drying rack that brings warmth and efficiency indoors. Using readily available materials, such as 4.5×4.5 cm lumber, this wooden rack is an economical and space-saving solution for small laundry areas. By following these step-by-step instructions, you can create a sturdy, stylish, and eco-friendly drying rack that doubles as a towel rack stand, reducing your energy consumption and adding a touch of rustic charm to your home.
How to Build a Towel Drying Rack
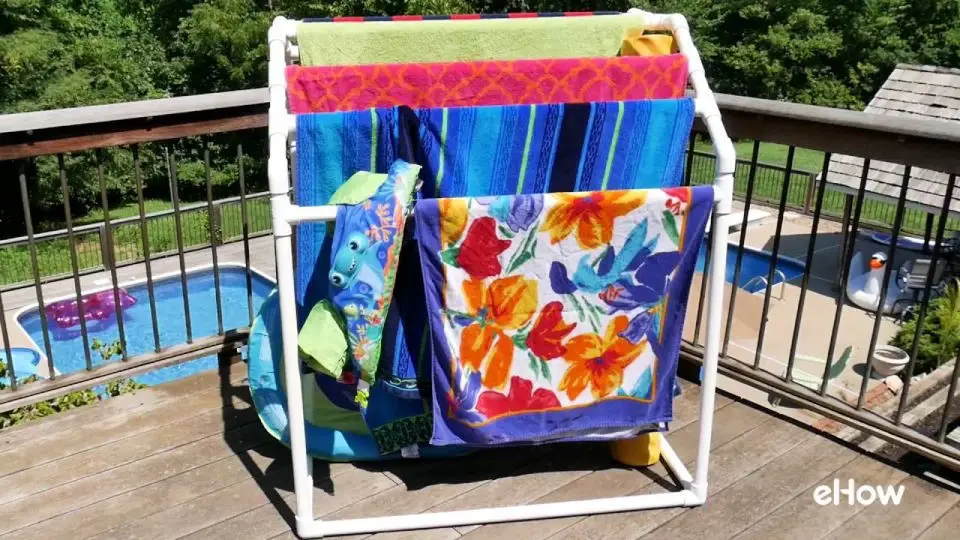
Transform your poolside experience with a functional DIY PVC towel rack that effortlessly holds up to eight full-size beach towels, pool noodles, and floaties. Constructed from a sturdy 1-inch schedule 40 PVC pipe, this clever creation requires minimal assembly using T-connectors, 3-way connectors, and 45-degree connectors. To ensure a seamless build process, follow the detailed instructions for cutting and sanding to achieve a polished finish. As you work, remember to prioritize your safety by working in a well-ventilated area, applying PVC primer and cement, and wearing protective gear like a mask and gloves.
Conclusion:
Discover the art of transforming your laundry room with DIY drying rack ideas that blend form and function. By exploring creative solutions for drying clothes, you can find a perfect fit for your space, whether it’s a wall-mounted design or a foldable option that adapts to your needs. Take inspiration from 25 innovative DIY projects, including unique creations made from crib springs, ladders, and PVC pipes. Not only will these DIY drying racks elevate the functionality of your laundry room, but they’ll also add a personal touch that’s both practical and stylish.
