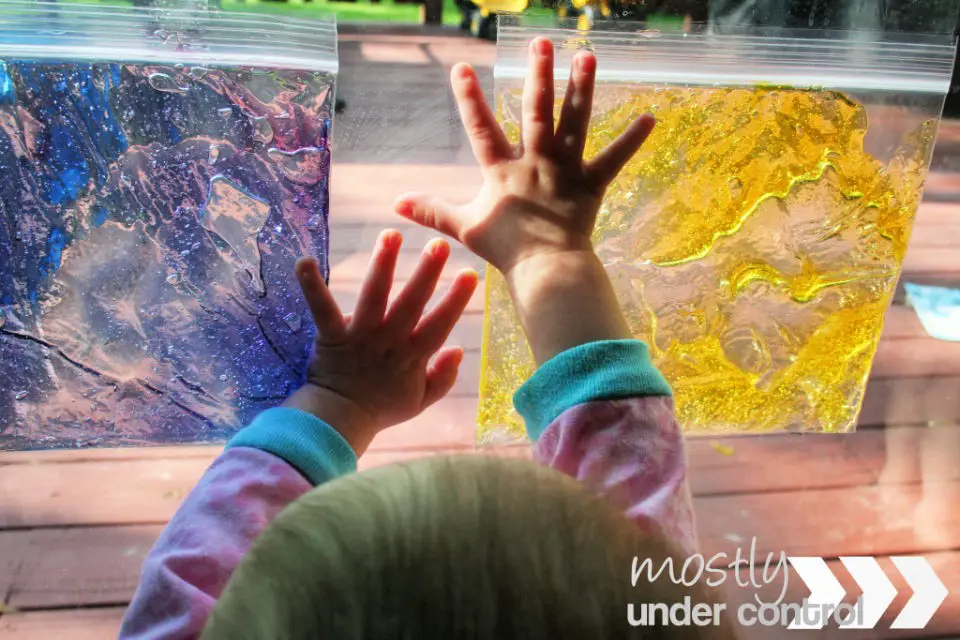
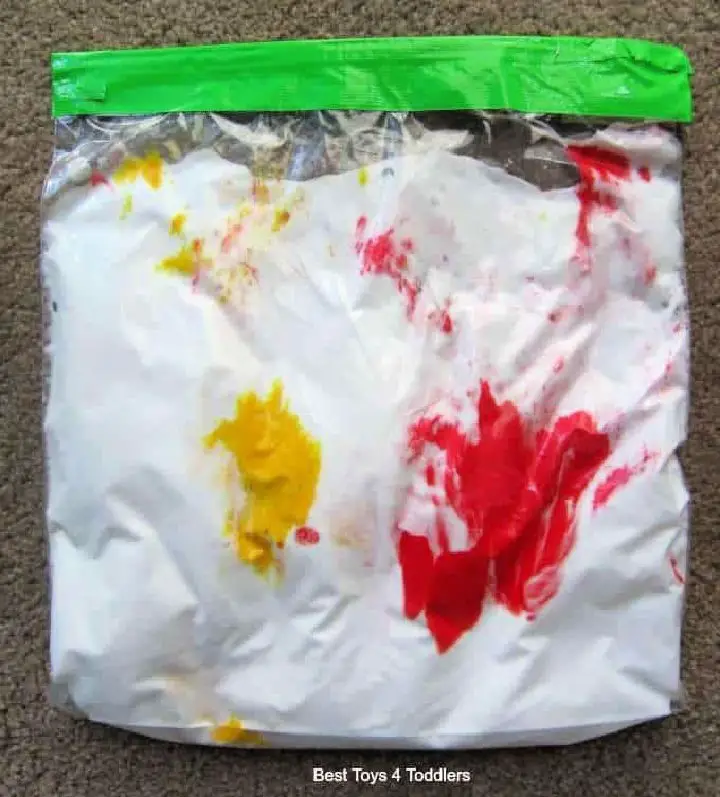
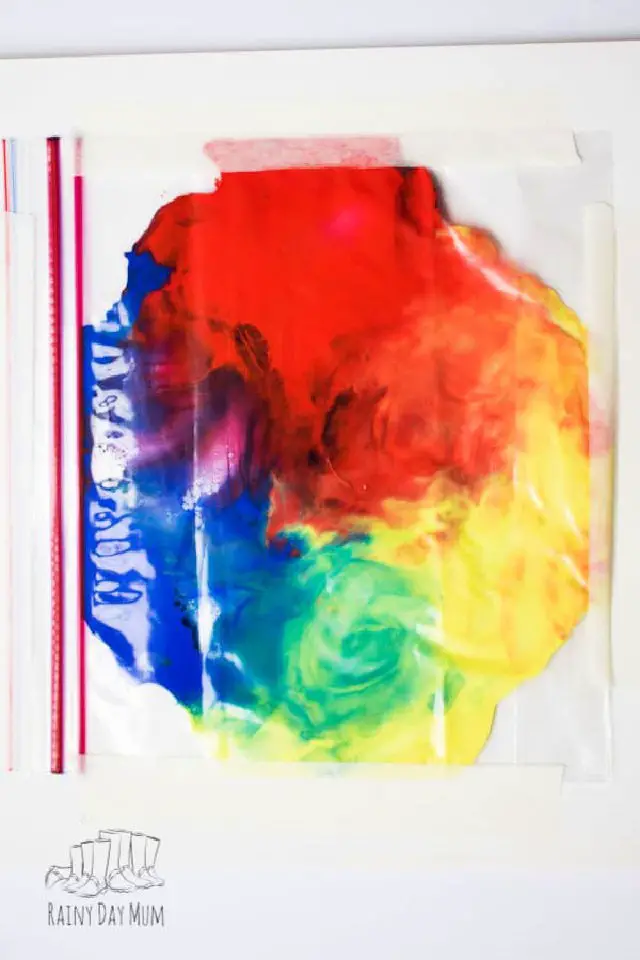
DIY Valentines Color Mixing Sensory Bags
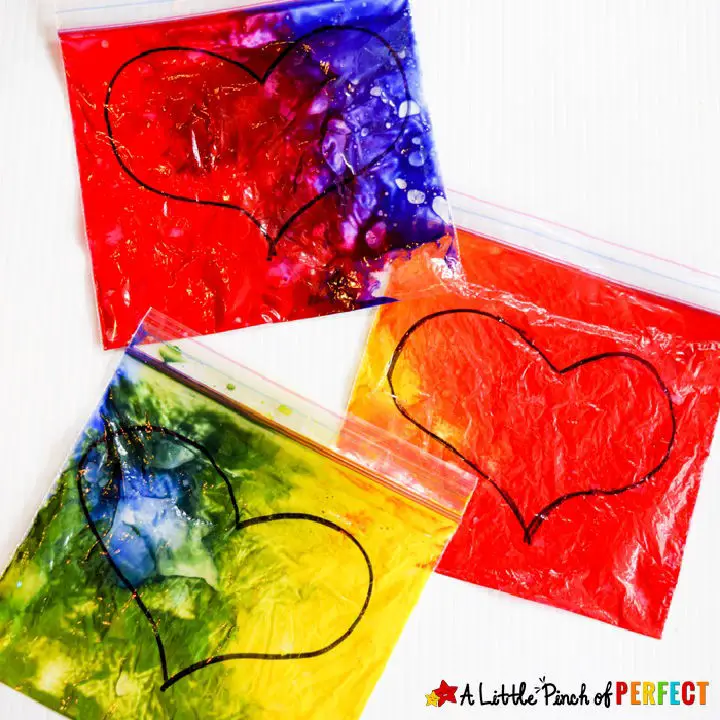
Unleash the magic of color mixing this Valentine’s Day by creating DIY heart sensory bags with your little ones! This engaging and mess-free activity will spark their creativity as they combine paint inside plastic zip-lock bags. With just a few simple supplies like primary-colored craft paint, plastic bags, and a permanent black pen, you can create heart-shaped sensory bags that will mesmerize kids as the colors blend together. By squeezing out the air and sealing the bags, children can safely experiment with different color combinations, developing their artistic skills and learning concepts in a fun and interactive way.
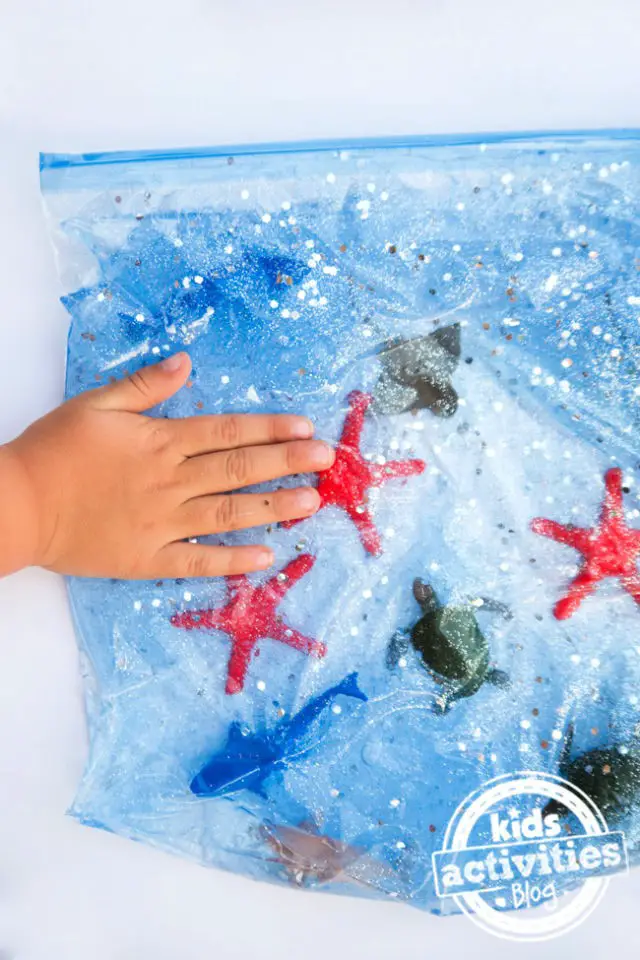
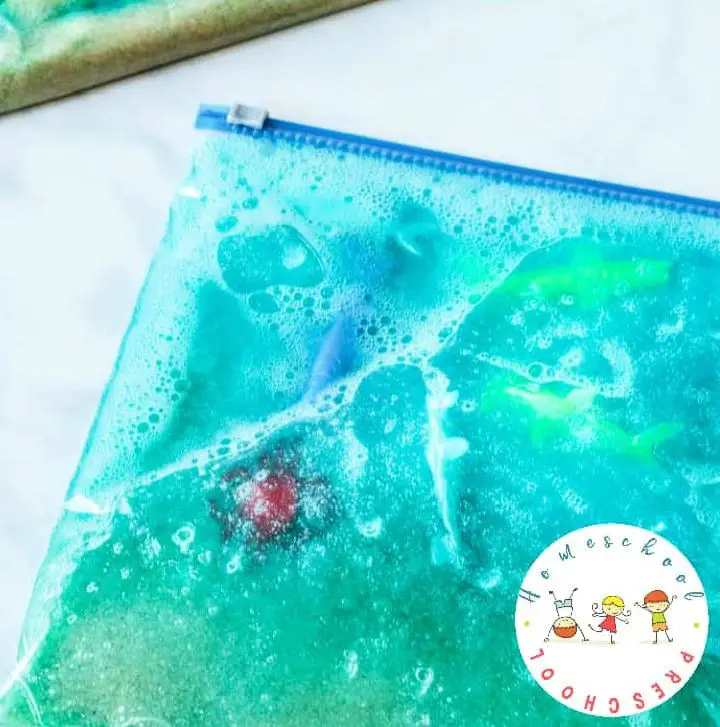
Ocean Life Sensory Bag for Toddlers
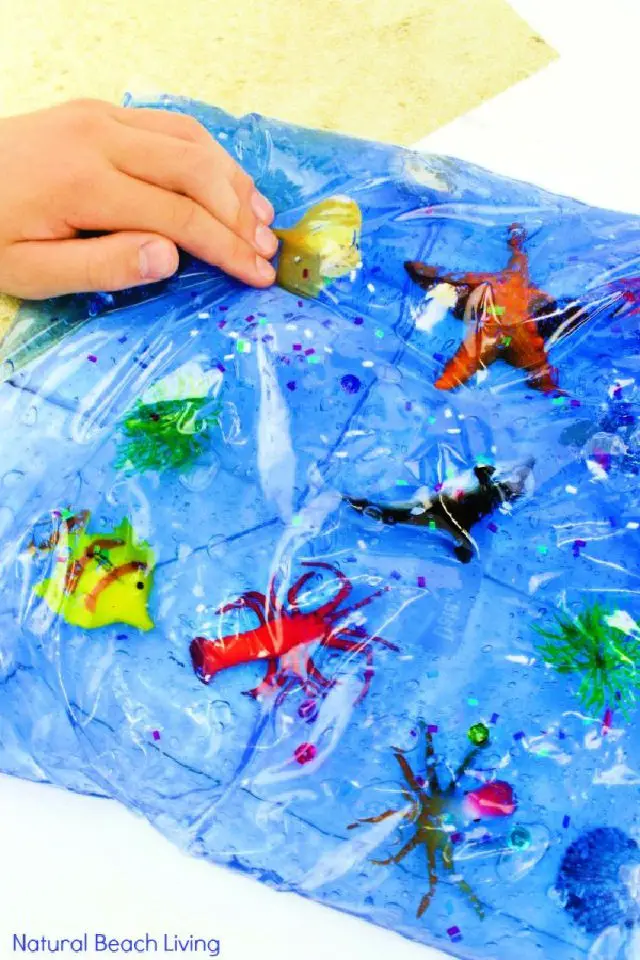
Embark on an unforgettable underwater journey with a simple DIY ocean life sensory bag that’s sure to captivate your little ones. This interactive sensory experience is designed for kids of all ages and provides endless hours of fun. Whether you’re looking for a summer activity for toddlers or preschoolers, or seeking to add some excitement to a science table, this mess-free sensory play idea is the perfect solution.
As your children explore the ocean-themed sensory bag filled with blue hair gel, sea creatures, shells, and glitter or confetti, they’ll be immersed in the wonders of the deep blue sea. With each press, squish, and discovery, their imagination and learning will flourish.
With these easy-to-follow instructions, you can create your own ocean- themed sensory bag at home. Say goodbye to tedious preparation and hello to hours of fun and creative play. Let the wonders of the ocean come alive for your little ones today!
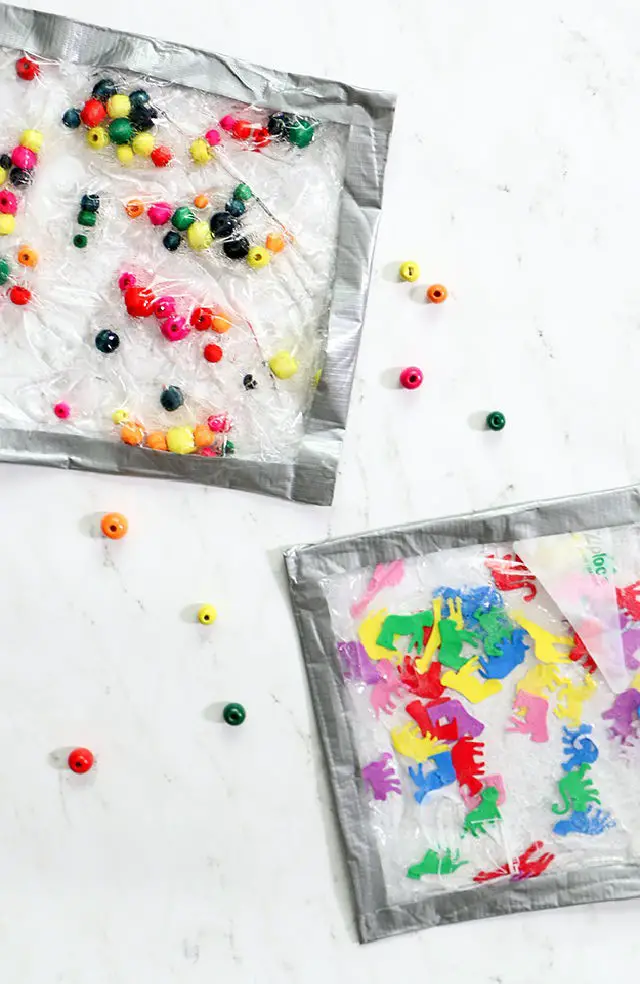
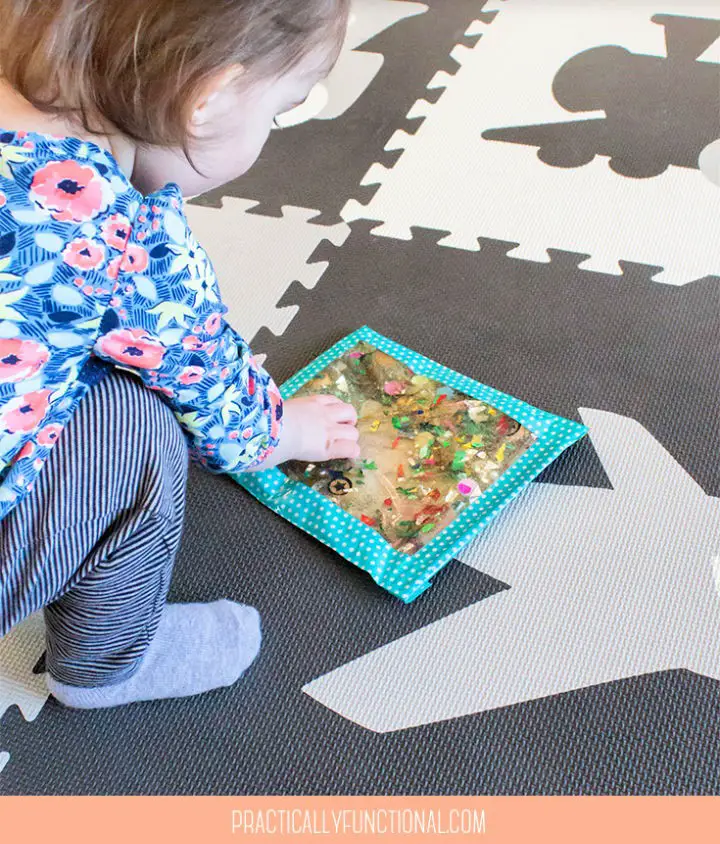
Cheap DIY Baby Toys Sensory Pat Bags
Create a treasure trove of tactile experiences for your little one with these ingenious DIY sensory bags! Made from humble laminating pouches, these easy-to-assemble bags are filled with an array of materials that spark curiosity and delight. Sequins, pompoms, pipe cleaners, and more – the possibilities are endless.
Add a dash of water or other liquids like hair gel or bath oil to create a mesmerizing sensory experience that will captivate your baby’s attention. The bags are securely sealed with an iron, ensuring durability and safety.
Customize the contents and sizes to suit your baby’s unique preferences and developmental needs. These sensory bags provide hours of entertainment and exploration, promoting fine motor skills and sensory development in the process.
Follow this step-by-step guide and witness your baby’s joy as they discover the wonders of these homemade toys – a true testament to the power of play!
How to Make a Spy Sensory Bag
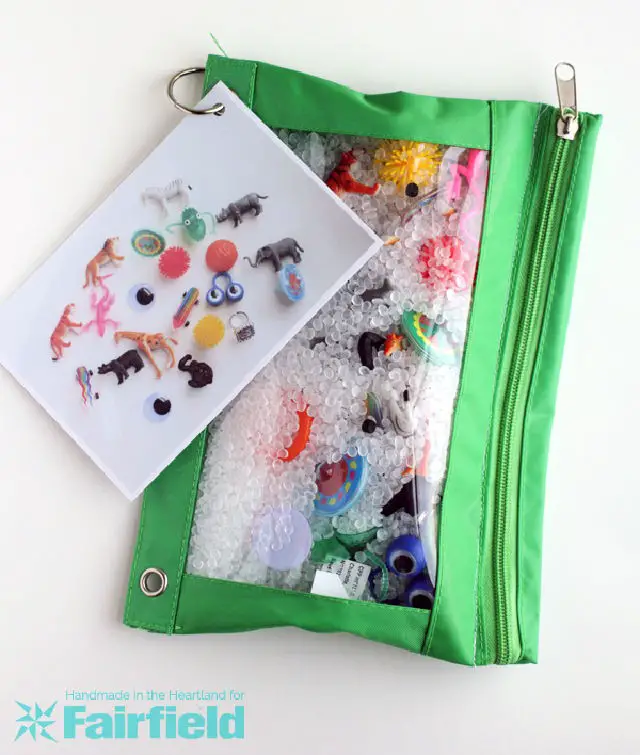
Transform your little ones’ playtime into a thrilling adventure with this DIY spy bag. Start by upcycling a clear pencil case and filling it with poly pellets to create a tactile treasure hunt. To add an extra layer of excitement, prepare a visual guide by photographing 1-2 dozen small items and printing them on paper. Laminate the pages for durability, then attach them to the pencil case using a book ring. Once assembled, this spy bag is ready to provide hours of quiet entertainment as your kids search for hidden treasures. It’s an excellent gift idea for birthdays or any special occasion, guaranteed to spark their sense of discovery and curiosity.
Alphabet Sensory Bag – Step-by-Step Instructions
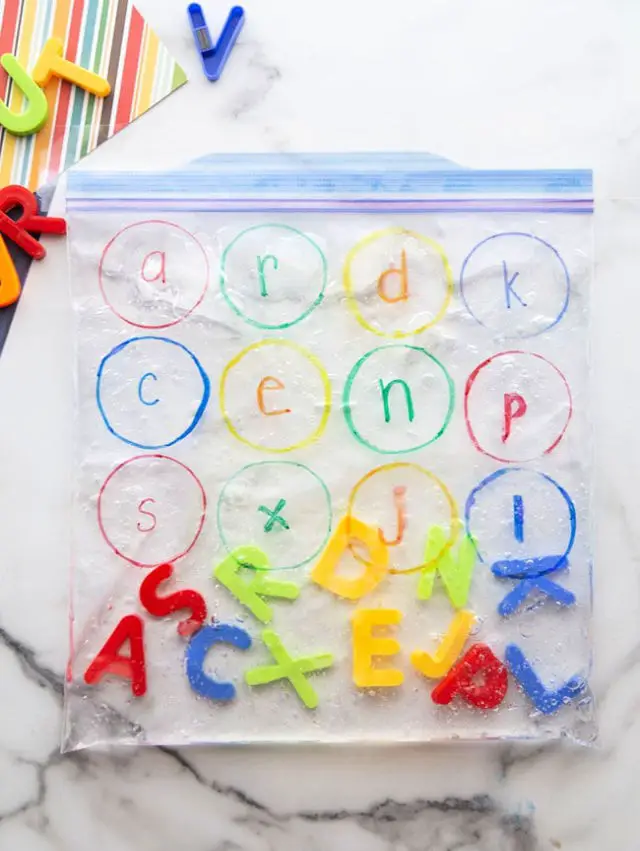
Transform your little learners’ understanding of uppercase and lowercase letters with an interactive and immersive DIY alphabet sensory bag experience. Geared towards pre-k and kindergarten students, this engaging activity combines a sealed bag, hair gel, Sharpies, and plastic letters to create a multisensory adventure that fosters letter recognition skills. By tracing circles on the bag and filling it with vibrant hair gel, children can manipulate the letters to match the corresponding lowercase and uppercase pairs, honing their literacy skills in a fun and supervised indoor setting.
How to Make a Winter Wonderland Sensory Bag
Transform your living space into an enchanting winter haven by creating a magical sensory bag filled with the essence of snowflakes, pine cones, and twinkling stars. This delightful craft is perfect for keeping little ones captivated and engaged for hours on end.
To create this wintery wonderland, fill a Ziploc bag with blue-tinged shaving cream, adding a dash of whimsy with glittery snowflakes, confetti-style decorations, and silver, white, and blue foam balls. Seal the bag with packing tape to prevent any leaks, then invite your child to embark on an immersive experience by exploring the contents using the I Spy Winter Wonderland worksheet.
This sensory bag is an ideal way to encourage creativity while providing a fun and interactive outlet for your little ones. Get ready to embark on a winter adventure from the comfort of your own home!
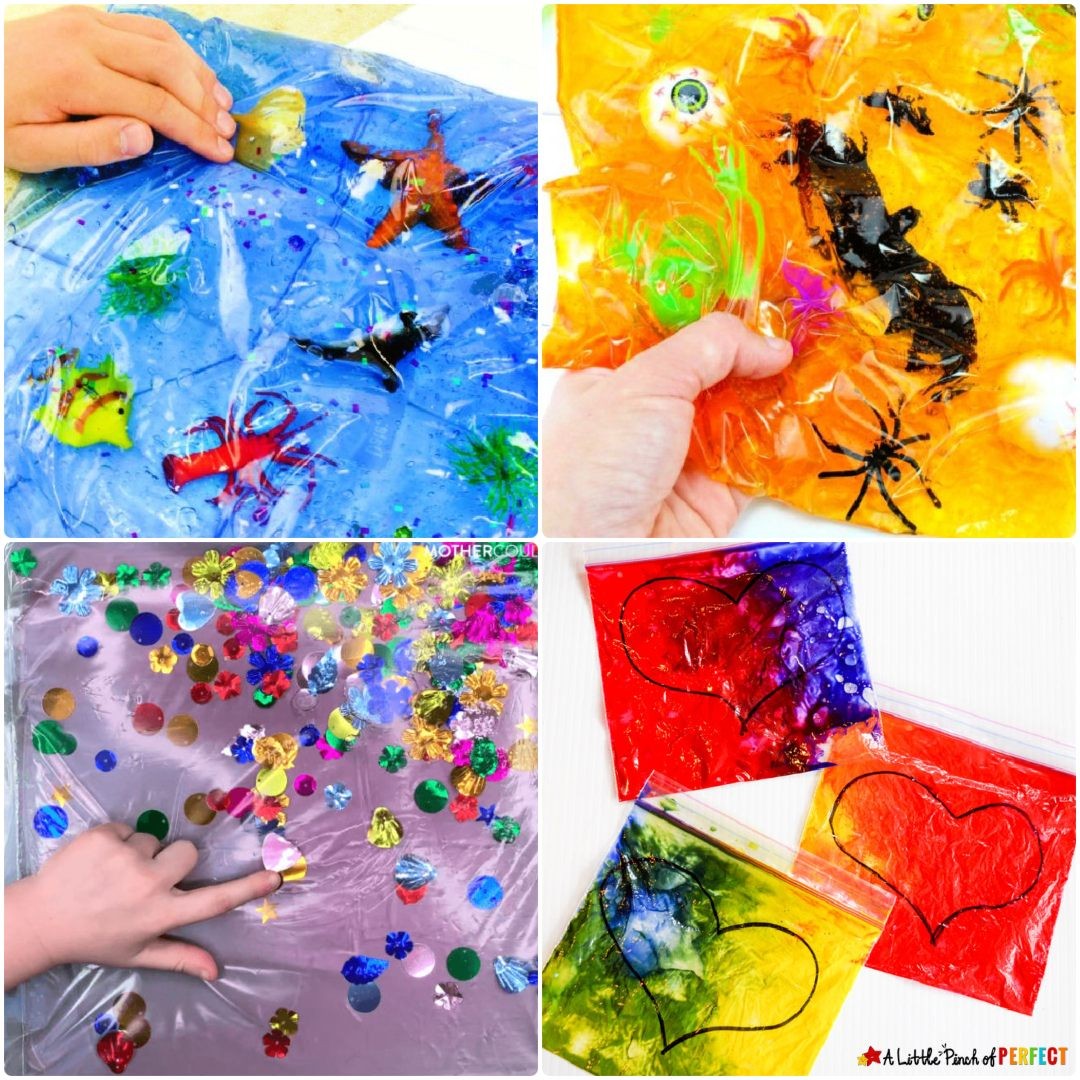
Halloween Sensory Bag Activity for Kids
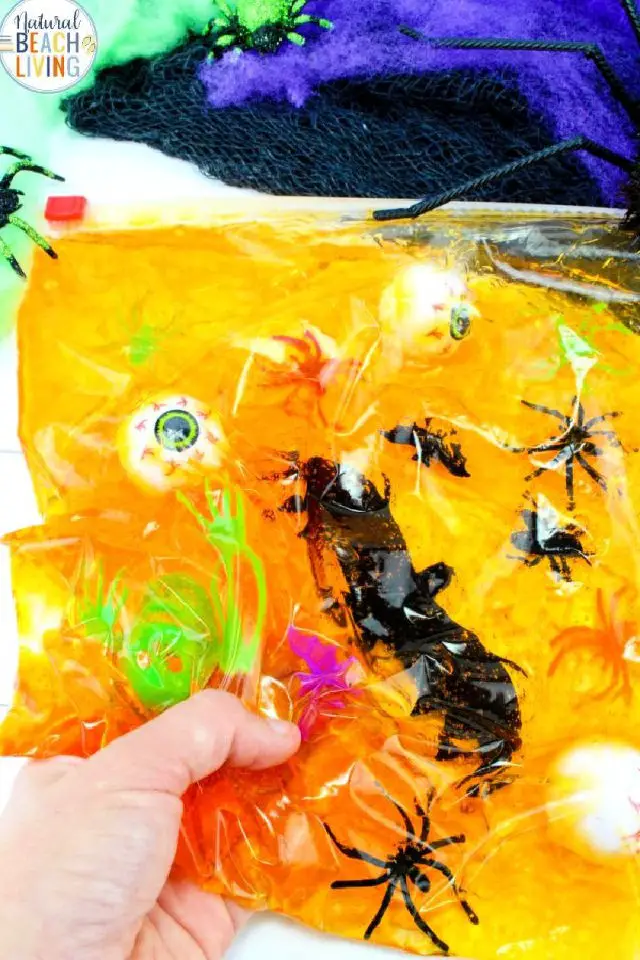
Transform your Halloween celebrations with this captivating DIY sensory bag activity! This mess-free, engaging experience is suitable for babies, toddlers, and partygoers alike. To create these delightful bags, combine 1-2 tablespoons of clear hair gel in a large Ziploc baggie with 10 drops of vibrant orange food coloring. Seal the bag and mix the ingredients together until well combined.
Next, add your favorite Halloween toys to the bag, then seal it shut for optimal exploration. For extra security, you can secure the top of the bag with tape. Little ones will delight in squeezing, squishing, patting, and sliding their hands over the tactile experience provided by the gel-filled bag.
These sensory bags offer a safe and stimulating activity perfect for Halloween parties or playdates. To elevate your holiday spirit, consider incorporating other spooky sensory ideas like slime and sensory bins to create an unforgettable experience.
Making Your Own Dollar Store Sensory Bags
Transform ordinary ziplock bags into extraordinary tools for engaging your twin toddlers in sensory play. By filling these simple containers with hair gel and adding an assortment of objects like beads, foam pieces, and small action figures, you can create a world of stimulation for their developing senses. Secure the bags with duct tape to withstand the rigors of rough play, then watch as they eagerly explore the tactile textures and sensations within. As you expand your collection of sensory bags, endless possibilities for creative play unfold, ensuring hours of entertainment and engagement for your tiny tots.
DIY Sensory Bag for Infant
Create an immersive sensory experience for your little ones with this DIY project that can be whipped up in under two minutes using everyday household items. Ditch the traditional clear hair gel approach and opt instead for water-based bags that are both cost-effective and easy to clean up if things get messy.
Start by gathering waterproof goodies like pom poms, glitter or confetti, and stash them inside a gallon-sized freezer ziplock bag. Fill it halfway with water, making sure to remove all the air before sealing it tight.
To add an extra layer of protection against sharp objects, apply a second layer of clear tape for added durability. Then, let your child’s imagination run wild as they search for and identify hidden colors or shapes inside the bag, honing their fine motor skills in the process.
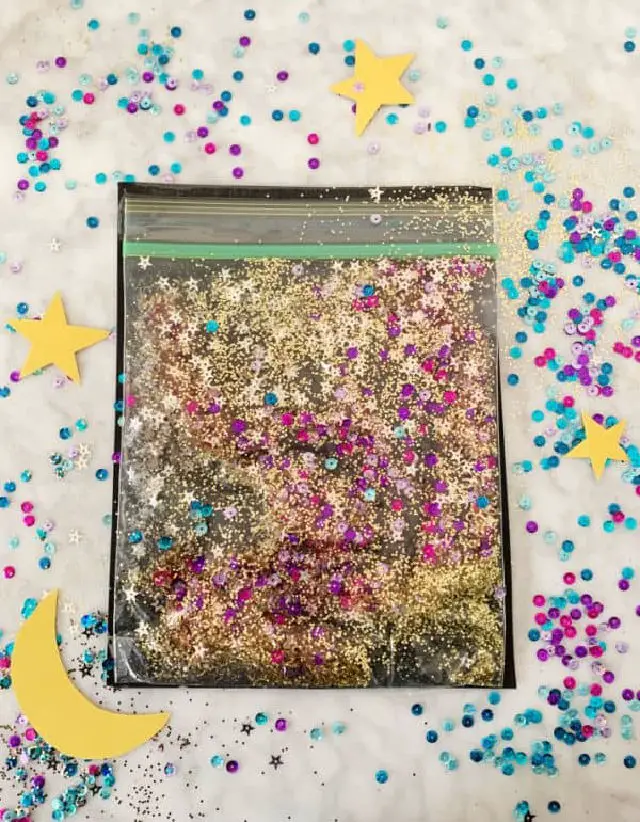
Best DIY Starry Night Sensory Bag
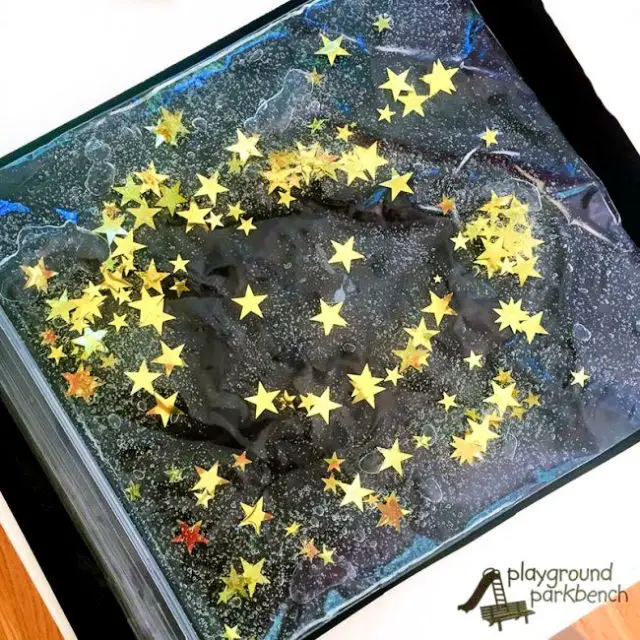
Transform your child’s learning experience into a star-studded adventure by crafting a DIY constellation sensory play activity. This hands-on exercise is perfect for toddlers and preschoolers, as it provides a safe and stimulating way to explore the world around them.
To create this sensory bag, gather inexpensive materials such as gallon storage bags, clear hair gel, star-shaped confetti, black poster board, and glow-in-the-dark constellation cards. Simply combine the gel with confetti, remove any excess air, and secure the bag to a black poster board for optimal visual impact. This activity offers endless entertainment opportunities and challenges young minds’ fine motor skills, making it appealing to kids of all ages and even adults.
As you explore the wonders of the stars through this project, be sure to check out the Studying the Stars series and related activities to expand your knowledge. By embracing sensory play and STEM learning, you’ll unlock a world of creative possibilities and affordable fun.
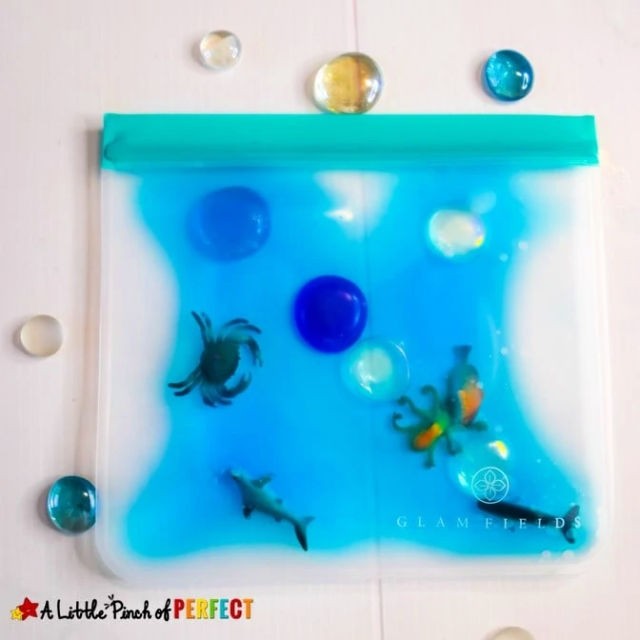
Easy DIY Sensory Bag With Ocean
Bring the thrill of the ocean to your little one’s fingertips with this easy DIY sensory bag project! By combining squishy sea creatures, sparkly gel, and a cool-to-the-touch feel, you’ll create an immersive experience that captivates babies and toddlers alike. Say goodbye to messy playtime with this contained and mess-free alternative to sensory bins.
To make it, simply fill a gallon-sized ziplock bag with the ocean’s treasures: clear or blue hair gel, blue food coloring (optional), glitter, sea animal toys, and secure it all with packing tape. Then, let your child explore the wonders of the blue sea in a fun and tactile way. With this sensory bag, you’ll be creating memories that will last a lifetime!
How to Make Lava Lamp Sensory Bags at Home
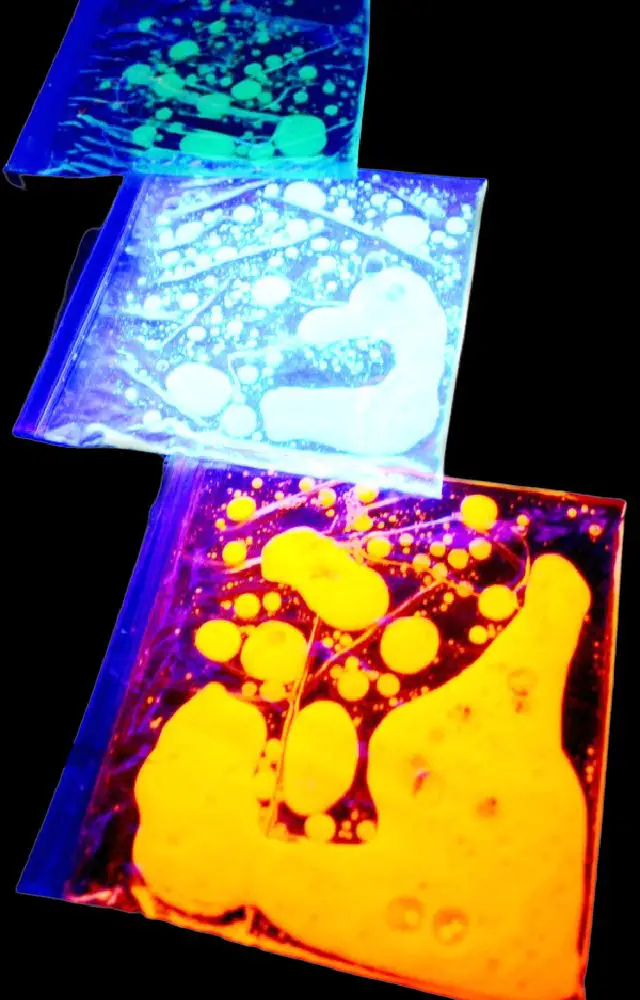
Ignite curiosity and creativity in your home by crafting homemade lava lamp sensory bags that are perfect for babies and toddlers. This engaging activity not only provides a safe way for little ones to explore different materials but also encourages learning and color recognition. To create these mesmerizing bags, start by filling a zip-seal bag one-third of the way with baby or cooking oil. Next, add 2-3 tablespoons of neon watercolor paint, then seal the bag tightly before securing the opening with clear packaging tape. The result is a sensory-rich experience that mimics the effects of a lava lamp, complete with mesmerizing swirls and color changes. For added fun, try incorporating other experiments like oil and water or glowing oil and water, using a blacklight for optimal effect. Remember to dispose of the bags responsibly once you’re done to prevent any potential messes.
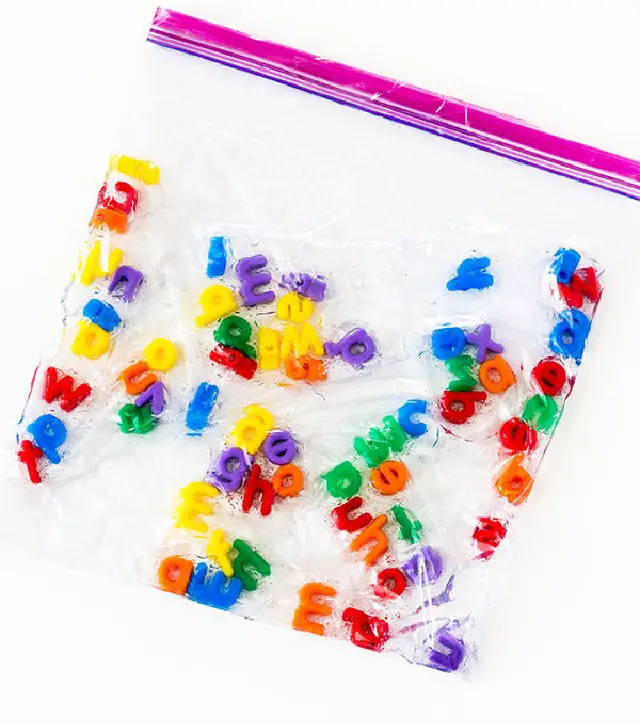
Letter Hunt Alphabet Sensory Bag

Transform your child’s sensory exploration into an engaging experience with this delightful DIY alphabet bag! Ditch the messy rice coloring and opt for a tidy plastic bag instead. Simply fill it with colorful rice and alphabet beads, seal it tightly, and spread it out flat.
Your little learner can then indulge in various letter-based games like searching for specific letters, identifying them based on their sounds, or even crafting simple words. This activity makes learning the alphabet an interactive and enjoyable experience for students of all ages. Whether you’re a teacher or parent, this sensory bag will help your child develop familiarity with letters while having a blast.
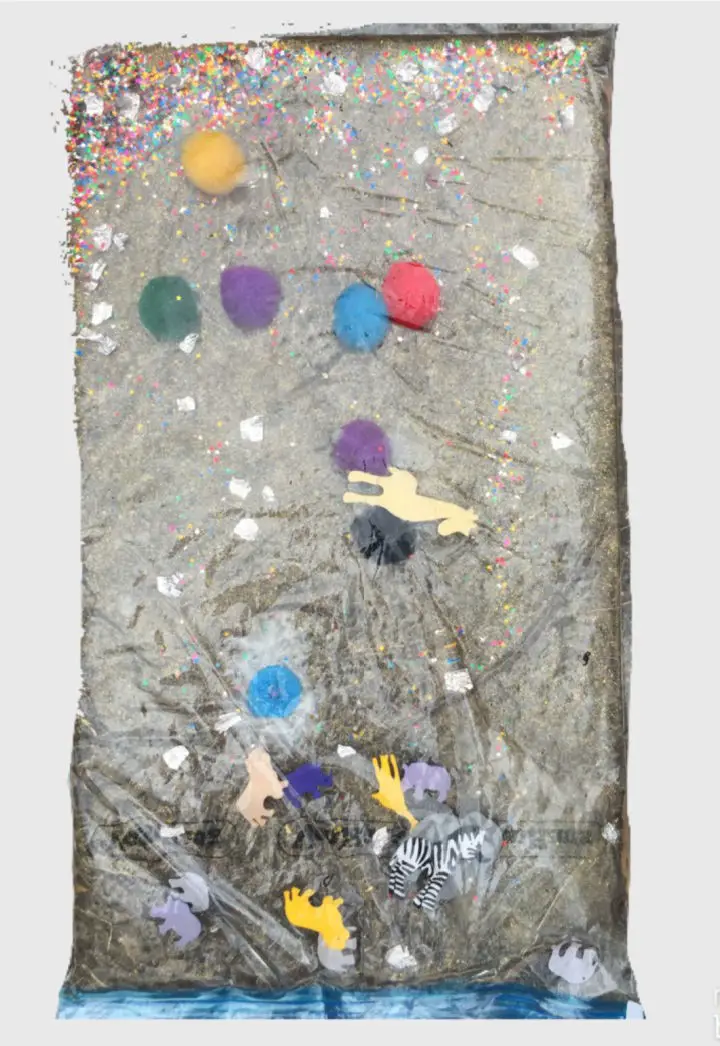
Handmade Feed the Shark Sensory Bag for Toddler
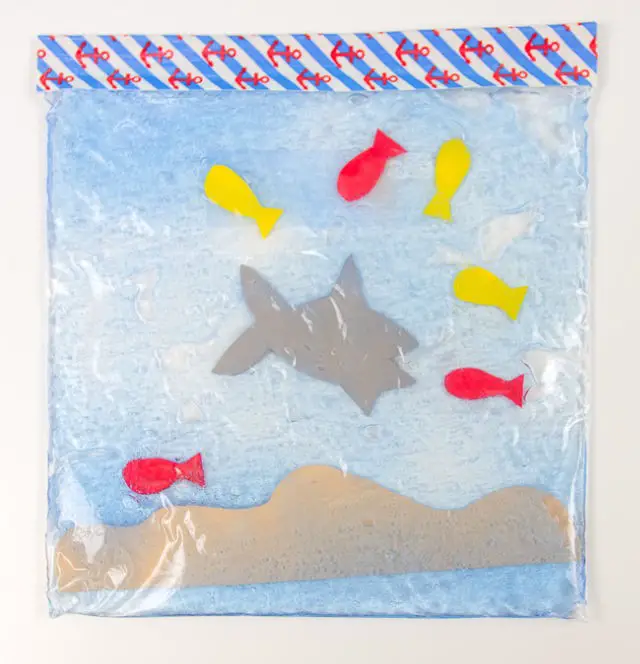
Immerse your little ones in an underwater adventure with a DIY ‘feed the shark’ sensory bag activity tailored for younger kids. This engaging and mess-free experience lets them explore different senses while having a whale of a time. The customizable shark-themed sensory bag features a playful feeding game where kids can feed fish to the shark, encouraging imaginative play and cognitive development. Designed with safety in mind, this sensory bag is perfect for babies and toddlers, with secure containment of loose pieces. By following simple instructions using materials like blue hair gel, foam paper in various colors, a gallon-sized zipper bag, duct tape, and scissors, you can create an activity that fosters language, fine motor, social, and cognitive skills through squishing fish around to feed the shark or making imaginative play scenarios.
Make Your Own Sensory Bags for Babies
Create an immersive experience for your baby or toddler by crafting sensory bags that stimulate their senses when you’re stuck indoors. With just a few simple ingredients like hair gel, glitter, beads, pompoms, and more, you can make customized DIY sensory bags that will keep your little ones engaged for hours.
To get started, simply load a Ziploc bag with hair gel and your chosen items. Then, seal the bag with duct or packing tape to prevent any accidental spills. These sensory bags are not only fun but also safe for your child to explore. Plus, you can even attach them to a wall or window for an added level of excitement.
With these easy and inexpensive sensory play ideas, you’ll be able to keep your child entertained and stimulated without breaking the bank.
Magnetic Polka Dot Sensory Bag Ideas
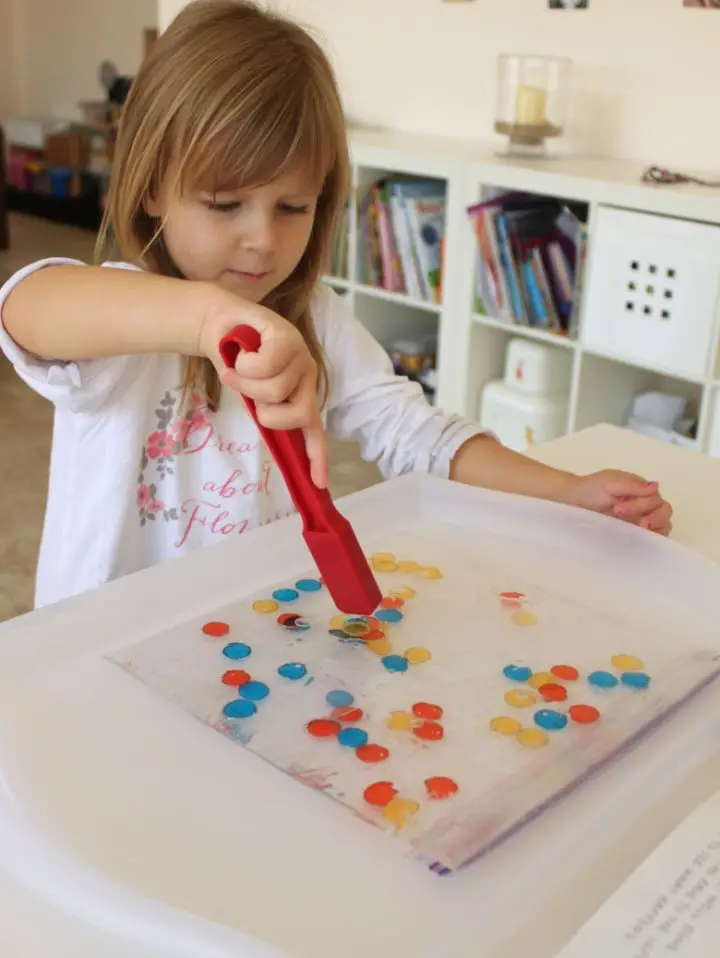
Imagine immersing yourself in a world of tactile exploration as you craft a DIY magnetic polka dot sensory bag, an activity that seamlessly blends science, sensory play, and color mixing. This engaging project is specifically designed for young learners to foster curiosity and creativity. By following the instructions, children can conduct experiments with magnetic counting chips, observing the mesmerizing effects of color mixing and manipulation. The sensory experience takes center stage as you fill a sturdy zip-close bag with water and magnetic chips, creating a unique canvas for crafting intricate polka dot formations using a magnetic wand. To further elevate the play, consider placing the bag on a homemade light box, adding an extra layer of depth and visual appeal. As you embark on this creative journey, get ready to captivate your child’s senses and ignite their imagination with this innovative and educational activity.
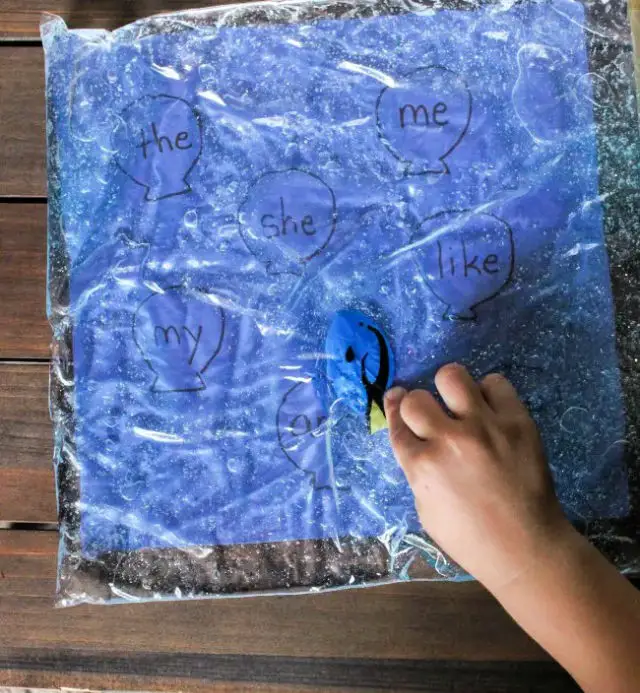
Make a Color Sorting Sensory Bag
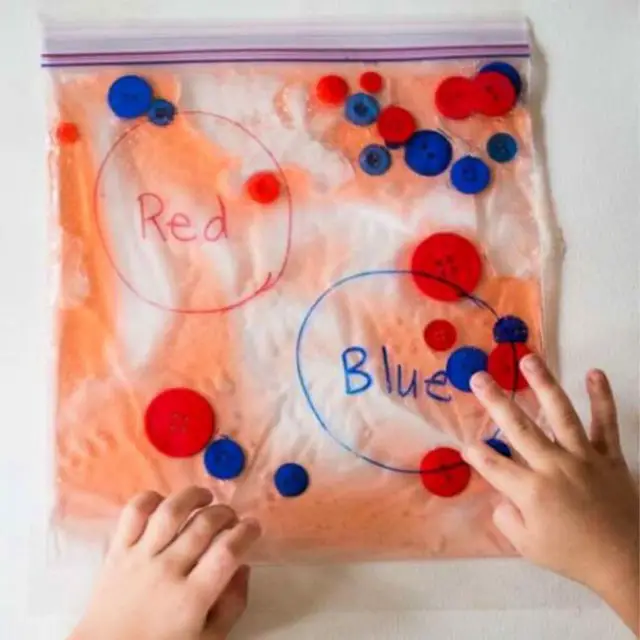
Transform your preschoolers’ and toddlers’ sensory playtime into a fun and educational adventure with this easy-to-make color-sorting sensory bag. By combining simple materials like freezer bags, hair gel, buttons or pompoms, markers, and tape, you can create a delightful squishy bag that fosters creative exploration and skill-building. Simply fill the bag with the gel, ensuring thorough coverage, and secure it tightly. Then, add buttons of varying colors and attach the bag to a stable surface. Your little ones will revel in the tactile experience as they move the buttons around, developing their fine motor skills in the process.
To incorporate color recognition practice, draw circles on the bag corresponding to each color and label them. As children sort the buttons into their respective circles, they’ll enjoy a engaging and repetitive learning experience that reinforces their understanding of colors.
How to Make Nature Sensory Ziploc Bags
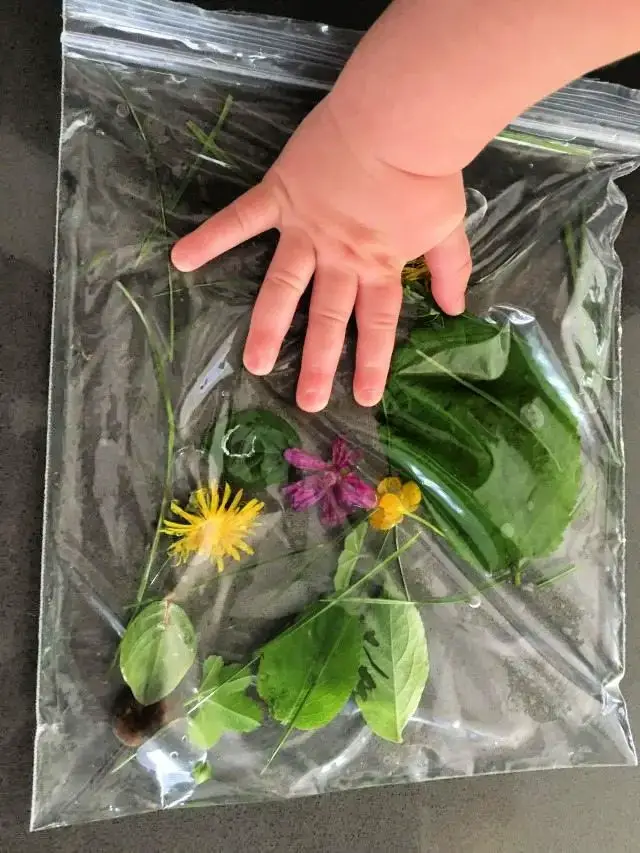
Transform your child’s nature exploration into a captivating sensory experience with DIY nature sensory bags! Not only do these mess-free creations provide endless entertainment, but they also foster essential skills like hand-eye coordination and fine motor control. To create these treasures, simply gather a medley of natural materials such as grass, flowers, stones, and leaves, then place them in a zip-lock bag filled with water. Seal the bag tightly, secure it with tape, and attach it to a table for effortless play. Dive into the world of sensory play with this innovative project!
Making Hair Gel Sensory Bags
Transform everyday moments into engaging sensory experiences for your older babies, toddlers, and preschoolers using a simple DIY project – hair gel sensory bags. This budget-friendly activity requires minimal supplies like sandwich bags, clear hair gel, food coloring, and packing tape. To get started, fill the bags with gel, add a splash of color, remove excess air, and seal them tight. Secure the bags to a window or door, and watch as your little ones indulge in tactile exploration and tracing activities while you enjoy some much-needed personal time. This activity not only fosters independent play but also enhances your daily self-care routine, making it a win-win for everyone.
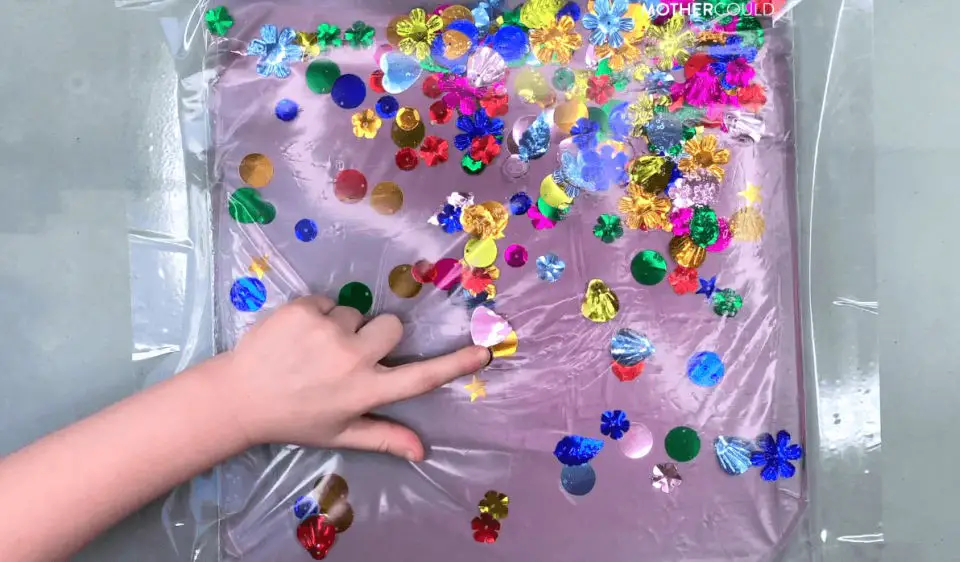
DIY Galaxy Sensory Bag
Transform ordinary playtime into an extraordinary adventure for your little ones with DIY squishy galaxy bags. These sensory-rich creations combine tactile exploration, creativity, and imagination to foster a deeper connection between your child’s senses and the world around them.
By filling Ziplock bags with gel, glitter, and other captivating objects, you’ll create a mess-free play experience that will captivate your child’s attention and encourage their natural curiosity. With these easy-to-make sensory bags, children can refine their language skills, develop fine motor control, and enhance social interactions.
Take the learning to the next level by incorporating numbers, letters, or shapes into the design. Alternatively, explore the color wheel with food coloring for a mesmerizing experience. Follow our simple step-by-step guide to create your own galaxy sensory bags and unlock the door to limitless imagination and creativity in your child.
Make Ocean Sensory Bag for Kids
Imagine immersing yourself in an underwater adventure without leaving the comfort of your own home! This DIY alphabet sensory bag is a fun and interactive way to engage young minds in an ocean-themed sensory experience. As kids squeeze and squish the bag, they’ll discover that the ocean animals inside seem to move and sway like waves, transporting them to an imaginary beachside paradise. This activity is suitable for babies, toddlers, preschoolers, kindergarteners, and even older kids who will be captivated by its allure.
To create this sensory experience, you can use a disposable ziplock bag or a reusable FDA food-grade storage bag for durability. Add some plastic ocean animals and glass gems to give it an extra boost of visual appeal and tactile stimulation. Fill the bag with water and a few drops of blue food coloring, remove the air, and seal it. You’ll also have enough materials left over to create a mini aquarium sensory bottle for added fun.
As your child explores this ocean-themed sensory experience, their imagination will come alive, and they’ll be delighted by the sense of discovery and adventure that comes with each squeeze and squish.
Homemade Alphabet Sensory Bag
Transform ordinary moments into an extraordinary sensory experience with an alphabet sensory bag. This adaptable activity is perfect for kids of all ages and abilities, requiring just a few simple supplies: alphabet beads, clear hair gel, and a freezer bag. By combining these elements, you can create a hands-on learning experience that’s both engaging and educational.
Pour the hair gel into the bag, adding alphabet beads featuring letters from their names and sight words. Seal the bag securely and let your child explore, manipulating the letters to develop their fine motor skills while you discuss letter names and sounds. For older kids, this sensory bag can be used to spell out simple sight and CVC words.
This activity is a fantastic way to cultivate letter recognition, fine motor development, and language skills. It’s just one of many ways to make learning fun and interactive for your little ones.
Shaving Cream Color Mixing Sensory Bag
Imagine unleashing a world of creative possibilities with a DIY shaving cream color-mixing sensory bag, specifically designed for babies and toddlers to explore colors in a mess-free environment. This engaging activity not only enhances fine motor skills through tactile manipulation but also develops visual skills as young minds observe how different hues blend together. Simply fill ziplock bags with tempera paint and shaving cream, seal them with duct tape, and let the little ones discover the joy of color mixing. The best part? No cleanup required! To further extend this learning experience, why not complement it with a reading session about color mixing or try some other sensory bag activities? Get ready to unlock a world of fun and educational sensory exploration!
Cool DIY Ocean Sensory Bag
Creating a DIY ocean sensory bag is an excellent way to delve into the wonders of the ocean while having fun and learning. This activity is suitable for young children, even when sealed properly, making it a great addition to your summer plans. Whether you’re planning a beach trip or exploring the ocean’s depths from home, this sensory experience is an engaging way to learn about marine life. For preschoolers, it complements various educational units such as ocean and beach themes, animal studies, and habitats. To assemble the bag, gather materials like a freezer bag, ocean animals, sand, blue body wash or hand soap, sea shells, and optional blue Orbeez. Follow simple instructions to encourage pouring skills, discuss animal characteristics, and incorporate literacy activities. For an added layer of engagement, utilize printable flashcards and crafts to further enhance your preschoolers’ understanding of the ocean.
How to Make a Nature Sensory Bag
Transform a DIY nature sensory bag into an immersive experience that sparks curiosity and fuels language development in children. To create this engaging activity, gather materials like hair gel, leaves, flowers, grass, a large ziplock bag, and duct tape.
As children explore the textures and colors within the bag’s confines, they’ll develop a deeper understanding of sensory stimulation while exercising their tactile skills under adult supervision.
To ensure safety, thoroughly inspect the bag for any tears or leaks before allowing children to interact with it. By doing so, educators can capitalize on observational opportunities to gauge children’s reactions to novel stimuli, thereby fostering language acquisition and cognitive growth through this enjoyable sensory play experience.
Decorating Robots Sensory Bags
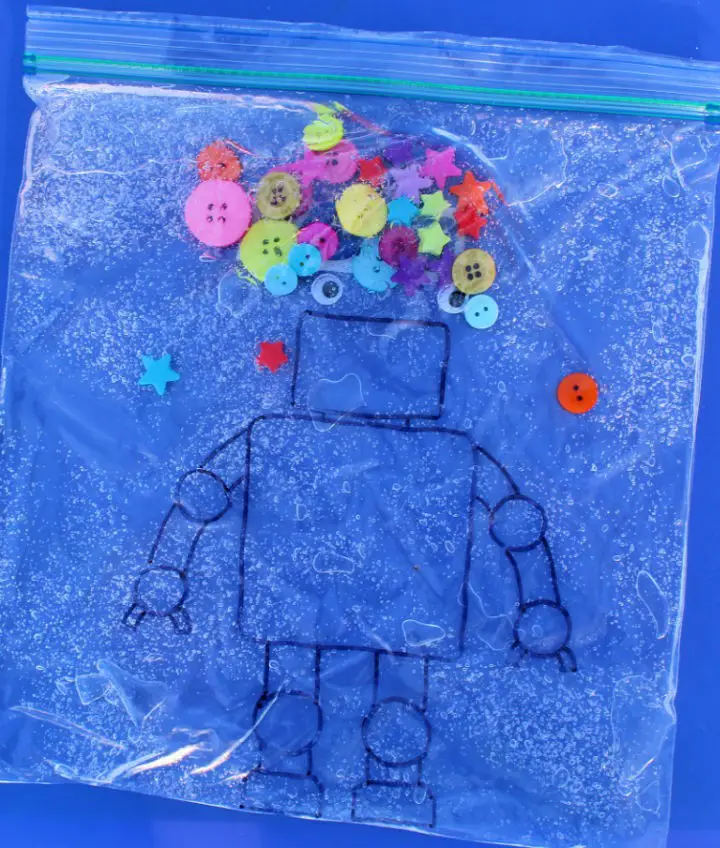
Unleash the imagination of kids by creating DIY sensory bags that can be used to decorate robots. This fun activity allows children to add details to robot outlines by manipulating objects inside the bags. With just seven simple supplies, including clear hair gel, wiggly eyes, buttons, and star pony beads, making the bags is a straightforward process. Simply trace the robot outline on a gallon-sized zipper bag, fill it with hair gel, and then add the eyes, buttons, and beads. These sensory bags offer various exploration options, such as creating facial expressions, arranging buttons and beads on the robot’s chest, or counting stars as they are added. Let your child’s creativity shine by providing these delightful sensory bags!
DIY Swimming Letters Dory Sensory Bag
Dive into the world of literacy with this engaging DIY sensory bag activity! By combining Disney’s beloved character Dory with hands-on manipulation of capital letters, children can develop a deeper understanding of letter recognition and sound association. This interactive exercise involves multiple sensory experiences, including:Hearing the letter’s name and soundObserving its unique shape and designFeeling the movement of a fish-shaped manipulative as it glides through the letterTo get started, guide your child in selecting a letter, saying its name and sound, and then navigating the fish-shaped manipulative through it. Repeat this process with different letters, gradually introducing new ones as your child becomes more confident. You can also expand the learning experience by incorporating numbers, simple words, or sight words into the activity.This swimmingly fun sensory bag activity makes learning enjoyable and effective, perfect for educators looking to bring a splash of creativity to their literacy lessons.
Paint Rainbow Sensory Bag for Toddlers
Indulge your toddlers or preschoolers in a delightful DIY sensory experience without the worry of mess, thanks to this vibrant rainbow sensory bag. This innovative approach to sensory play offers a perfect solution for those gloomy days when you’re cooped up indoors. By simply filling a ziplock bag with a medley of colorful paints and sealing it securely, you’ll create an engaging activity that not only develops fine motor skills but also fosters color recognition and a deeper appreciation for the sensory world. And what’s more? You can even draw parallels between the colors they mix to a majestic real-life rainbow! Get ready to be mesmerized by hours of creative exploration with this effortless and mess-free rainbow sensory bag activity.
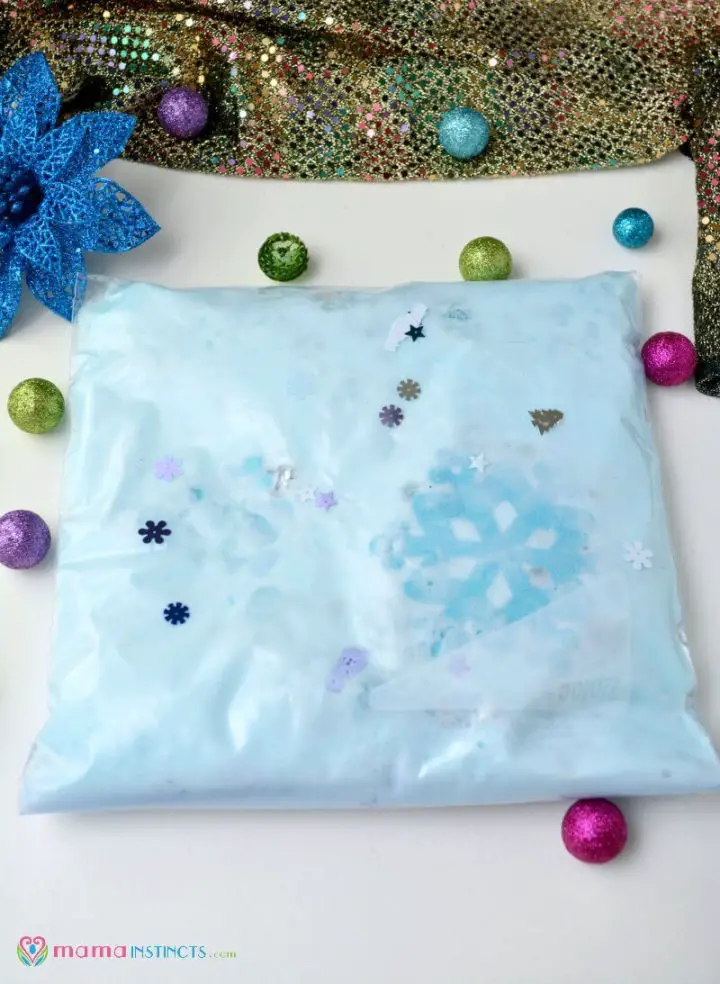
How To Make a Water Snowflake Sensory Bag

Transform your home into a winter wonderland with a DIY water snowflake sensory bag that’s perfect for indoor play. This mess-free activity simulates the experience of playing in the snow without leaving a single footprint behind. To create this magical experience, gather a zip-top bag, blue food coloring, hair gel, snowflake buttons, sequins, and optional duct tape.
In just five minutes, you can assemble the sensory bag by combining the gel and food coloring to create a mesmerizing ‘snowy’ effect, adding the buttons and sequins for an extra touch of winter magic, and sealing the bag to keep everything contained. Once assembled, let your child delve into the sensory experience, exploring the tactile sensation of squishing and playing with the ‘snowflakes’ inside.
This activity is not only a fun way to spend quality time together but also an opportunity to develop essential skills like counting, comparing sizes, and introducing new vocabulary. So why not grab some warm hot chocolate, get cozy, and enjoy the winter-tinged playtime with your little one?
Squishy Sparkly Sensory Bag Instructions

Unleash your creativity and introduce tactile sensory play to your little ones with our DIY squishy sensory bag! This innovative project requires just a few simple ingredients, including water, glitter, and an unexpected twist: an unused diaper. The absorbent polymer inside the diaper magically transforms the water into a delightful gel, providing a unique texture for tiny hands to explore. To prevent any leaks, simply seal the bag with duct tape and let your child’s imagination run wild as they squeeze, squish, and create their own sensory adventure. Whether you’re looking for a mess-free alternative or want to encourage creativity in children who are hesitant about messy textures, this DIY project is sure to spark joy and excitement. With endless possibilities for customization – including adding colors and sparkles with glitter or tinsel – the only limit is your child’s imagination!
Simple DIY Giant Sensory Bag
Create an immersive sensory adventure for your little one with this easy-to-make giant sensory bag. Simply combine a vacuum storage bag with everyday items like water, glitter, pompoms, foam animals, and more to craft a tactile wonderland that will captivate your baby or toddler’s attention. For an added pop of color, consider adding a few drops of food coloring to the mix. Seal the bag securely to prevent any leaks, then let your child indulge in hours of tactile exploration and discovery. This budget-friendly project is not only entertaining but also educational, providing a rich sensory playtime experience that will delight and engage your little one.
Conclusion:
By combining creativity and imagination, DIY sensory bags provide a wealth of opportunities to stimulate your child’s senses and support their cognitive growth. From innovative color mixing projects to interactive feed-the-shark pouches, these 30 easy-to-create sensory bag ideas offer engaging and educational activities suitable for children across various age ranges and interests. Feel free to experiment with diverse materials and themes to craft one-of-a-kind sensory experiences that captivate your little ones. With a dash of creativity and resourcefulness, you can transform ordinary items into captivating and beneficial sensory toys for toddlers, babies, and preschoolers alike.
