Materials:
To construct a sturdy and functional gazebo, you’ll need to gather a range of materials. Start with the foundation: pallet wood can be sourced at little to no cost, while plywood sheets will provide the base and roof overlay. Cross-beams made from wooden slats will add structural integrity. For insulation, consider using fiberglass – though it’s optional – to keep your gazebo cozy on chilly days. Seal any gaps with caulk to prevent water ingress. Additional blankets can be used for extra insulation, while stain or paint will allow you to add a pop of color and weatherproof the structure. Fasten everything together with nails or screws. If you’re building a template, cardboard is a useful tool. Finally, wooden slats can be used for veranda and roof shingles, while hinges and latches can be added to create a functional door – though this is an optional feature.
Tools:
When embarking on a DIY project, it’s essential to have the right tools for the job. A saw – whether it’s a circular saw or hand saw – is a must-have for making precise cuts. In addition to cutting tools, having a measuring tape and angled rule on hand can help you ensure accurate measurements and angles. For assembling and fastening pieces, a hammer or screwdriver is crucial. When working with materials that require smoothing out, such as wood or drywall, a paintbrush or roller can be used to get the job done. Protecting yourself from potential hazards is also vital, which is why safety goggles and gloves are essential for any DIY project. Planning ahead is key, so having a pencil and paper on hand can help you visualize your project before diving in. Additionally, sandpaper can come in handy for smoothing out surfaces, while an insulation cutter (if using fiberglass insulation) ensures precise cuts without compromising the material’s integrity. Finally, clamps are indispensable for securing pieces during assembly, ensuring that everything fits together smoothly and securely.
Approximate Size:
When it comes to designing a pallet dog house, the size of the structure largely depends on the breed and size of your canine companion, as well as your personal preference. While there’s no one-size-fits-all solution, a standard medium-sized dog house might measure around 36 inches in width, 42 inches in length, and 36 inches in height, providing ample space for your furry friend to stretch out and get cozy.
Cost:
Building a pallet dog house can be an affordable DIY project, with costs varying depending on the quality of materials and whether you can source pallet wood for free or at a low cost. To give you a better idea, here’s a rough breakdown of estimated costs:You can often find pallet wood at little to no cost, which is a significant saving. For the remaining components, you’ll need:* Plywood sheet: $10-$20* Wooden cross beams: $5-$10* Fiberglass insulation (optional): $10-$20* Caulk: $5-$10* Stain or paint: $10-$20* Nails or screws: $5-$10* Hinges and latch (if desired): $5-$10* Other miscellaneous supplies: $10-$20This adds up to a total estimated cost of $55-$115, although this can vary depending on your location, the quality of materials, and any additional features you choose to include. Keep in mind that these costs are only estimates, and the actual cost may differ based on your specific circumstances.One of the best things about building a pallet dog house is how quickly it comes together once you have all your supplies. By constructing an outdoor pallet dog house, you’ll be providing your pet with a safe and sheltered space that protects them from the elements and potential predators. So why not get started today? With minimal time and effort required, you can build a unique and functional pallet dog house for your furry friend.
Pallet Wood Dog House Plan Guide
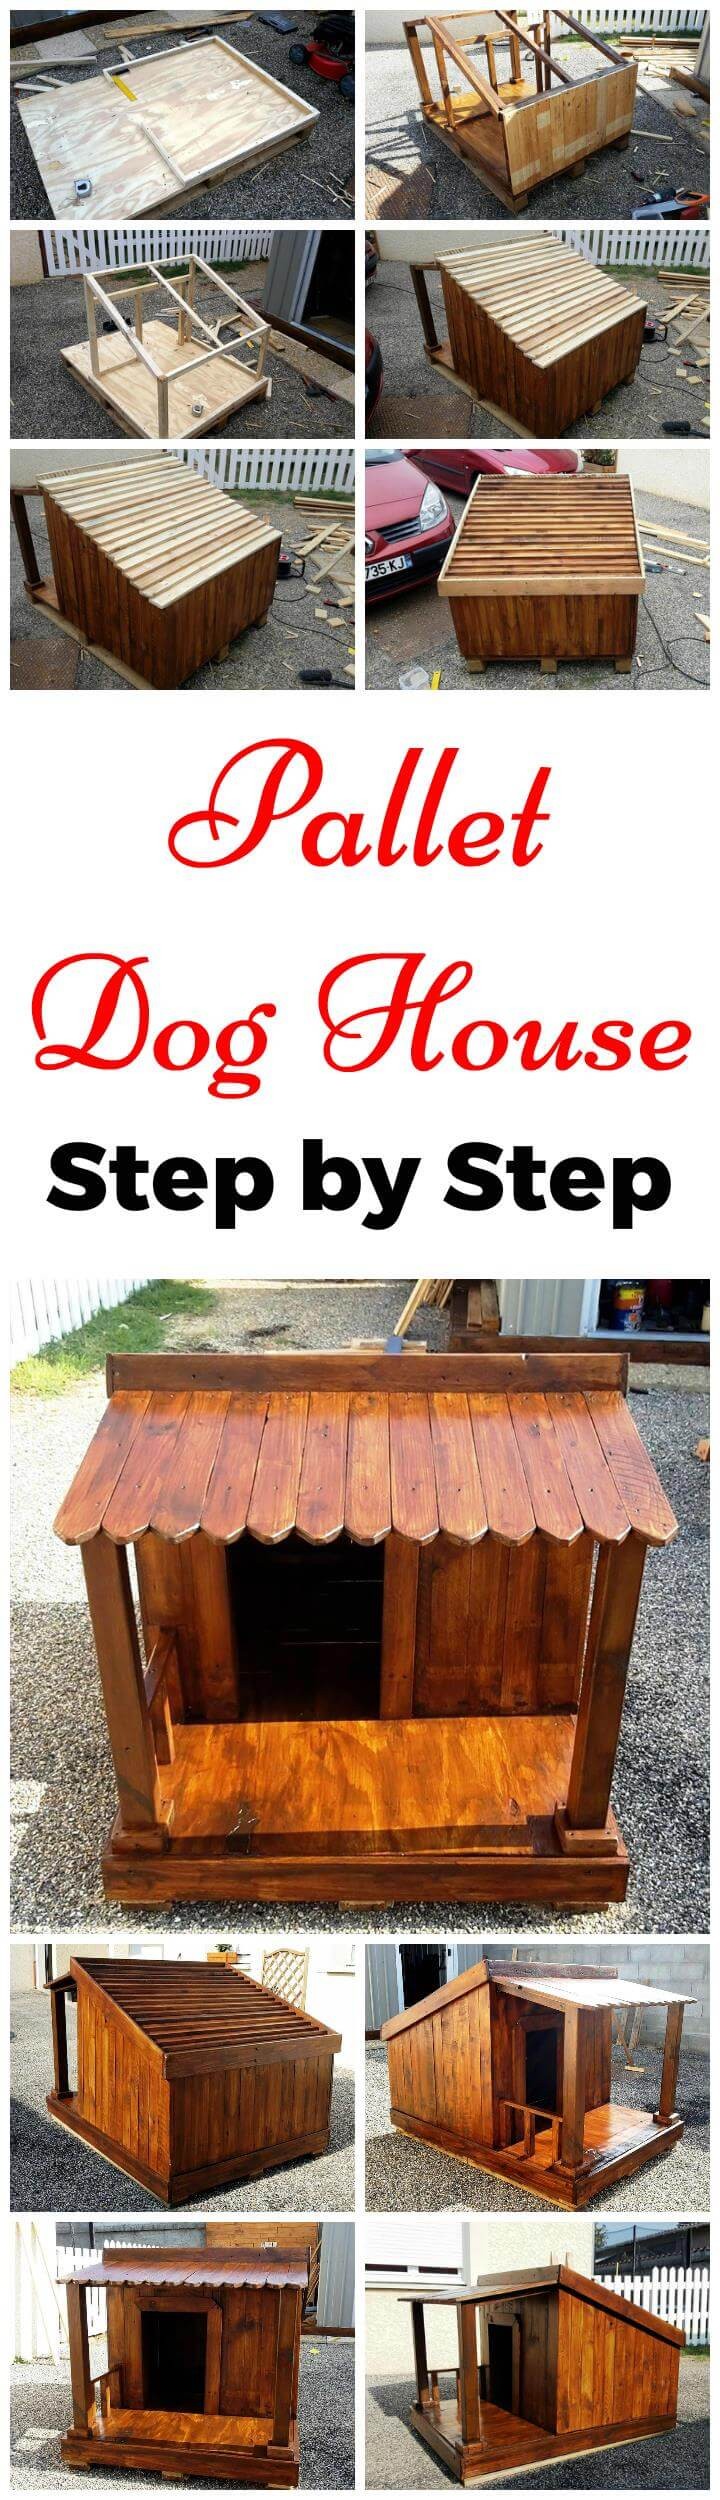
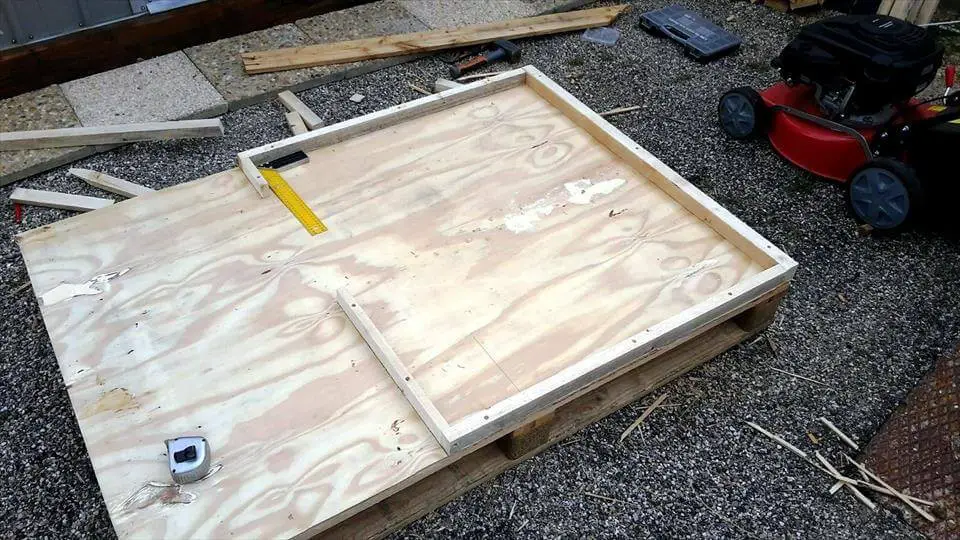
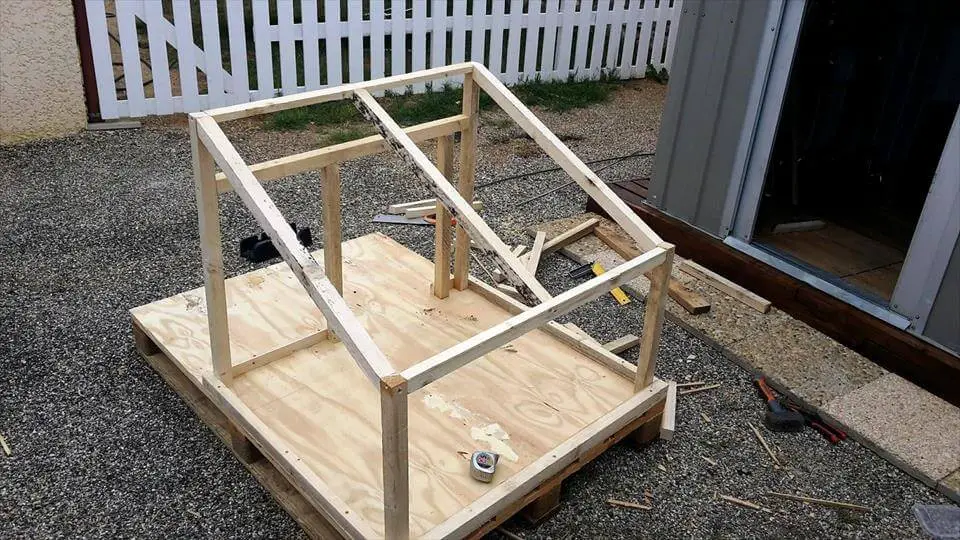
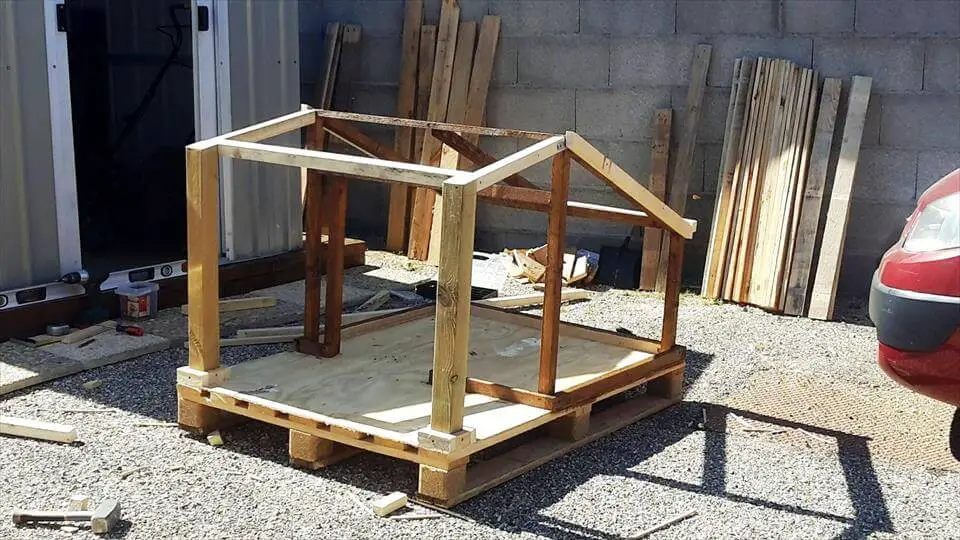
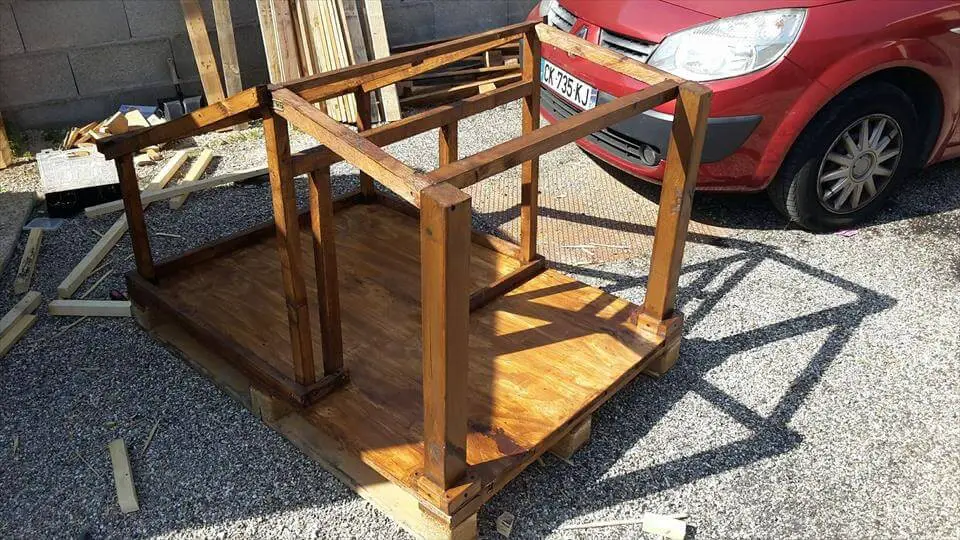
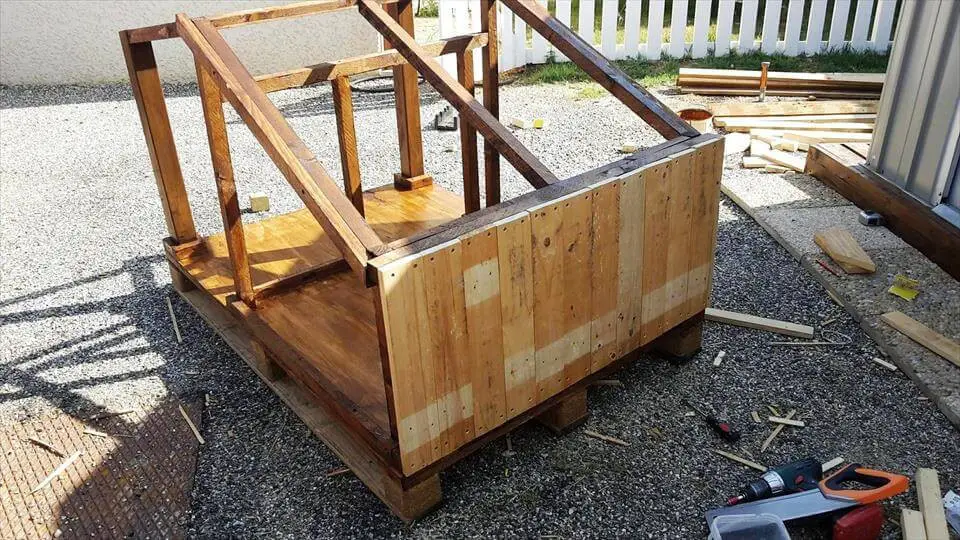
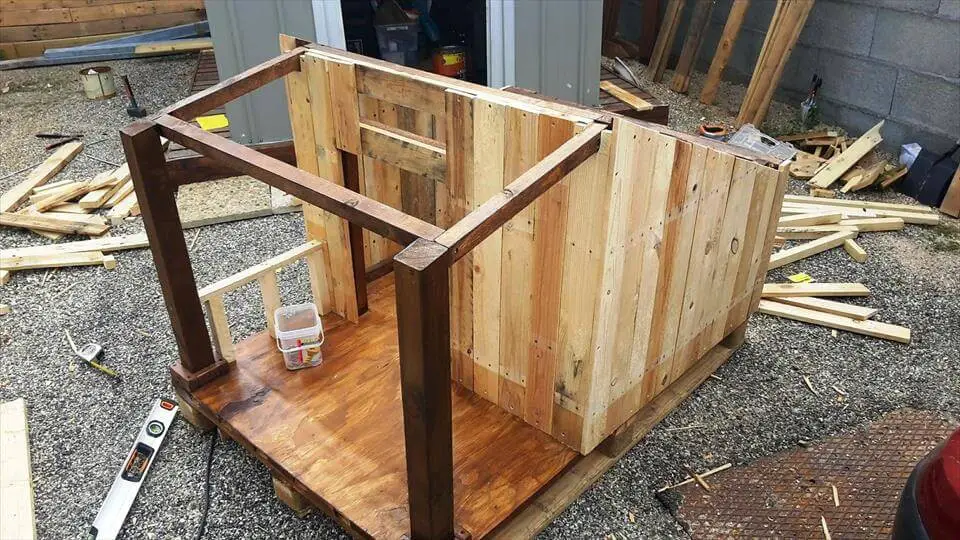
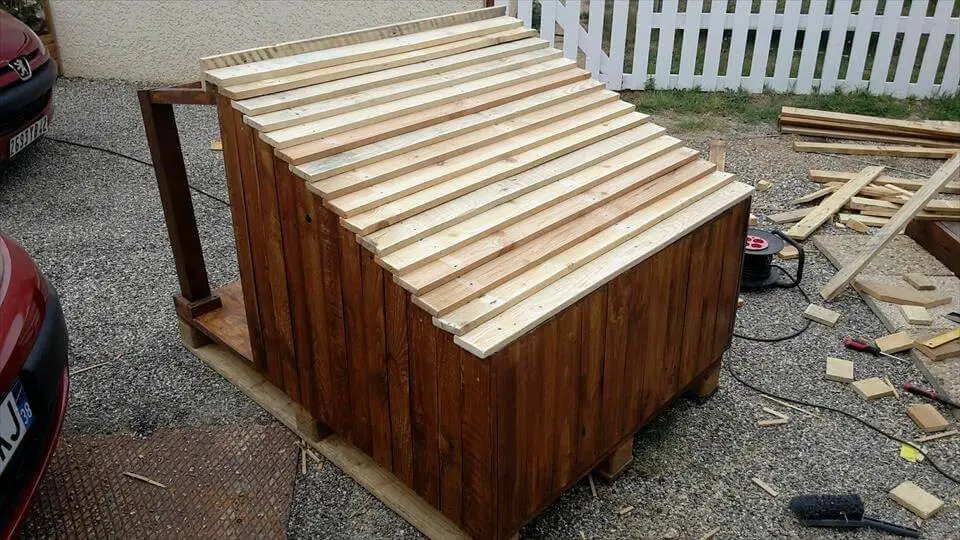
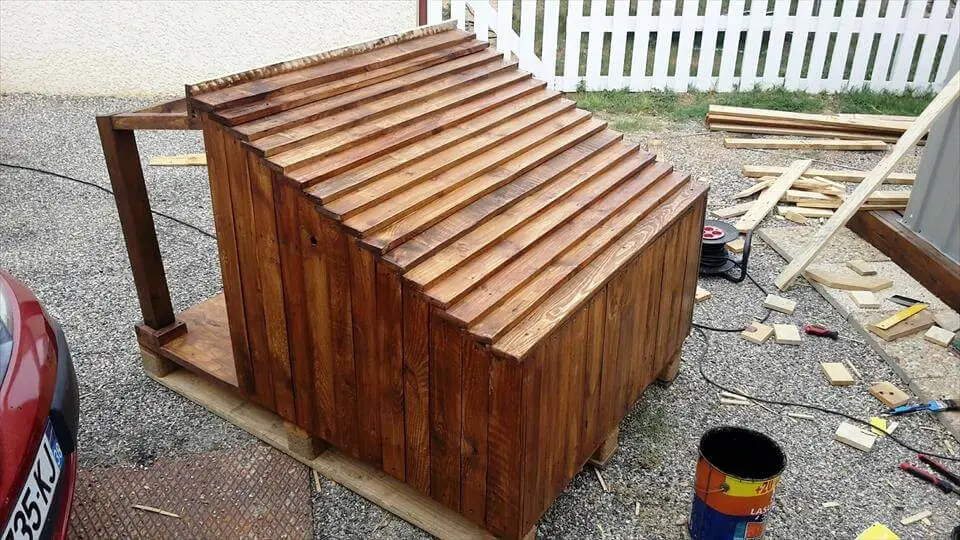

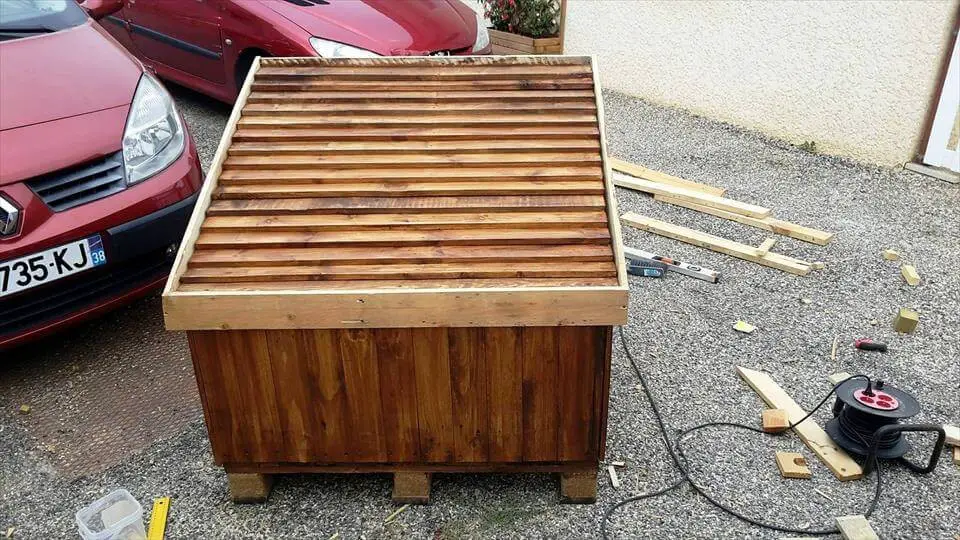
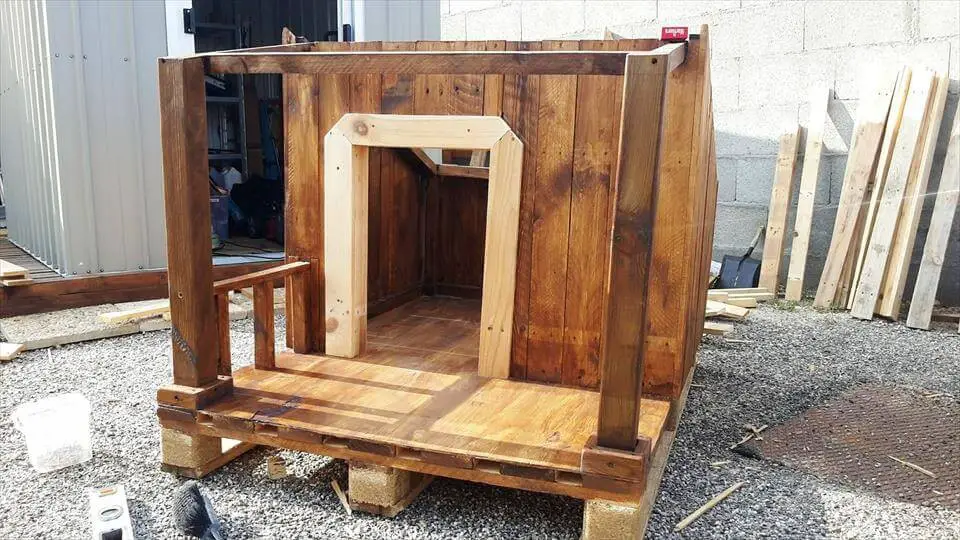
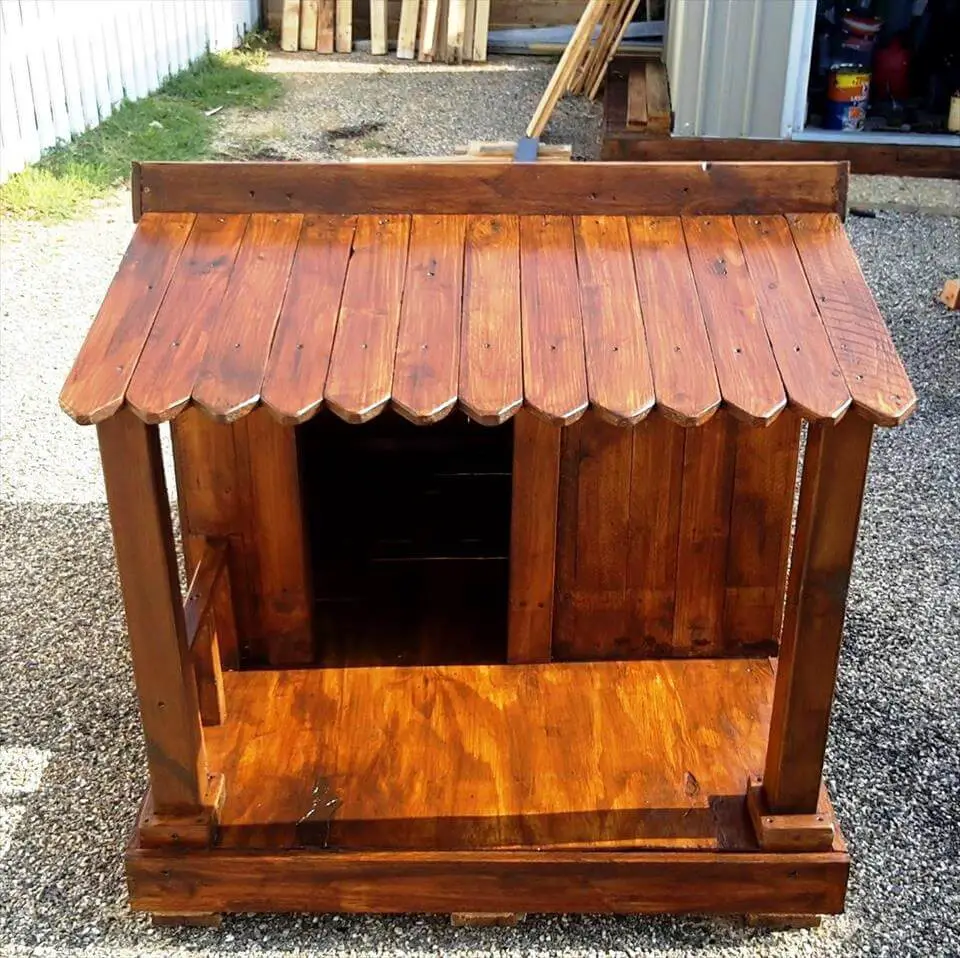
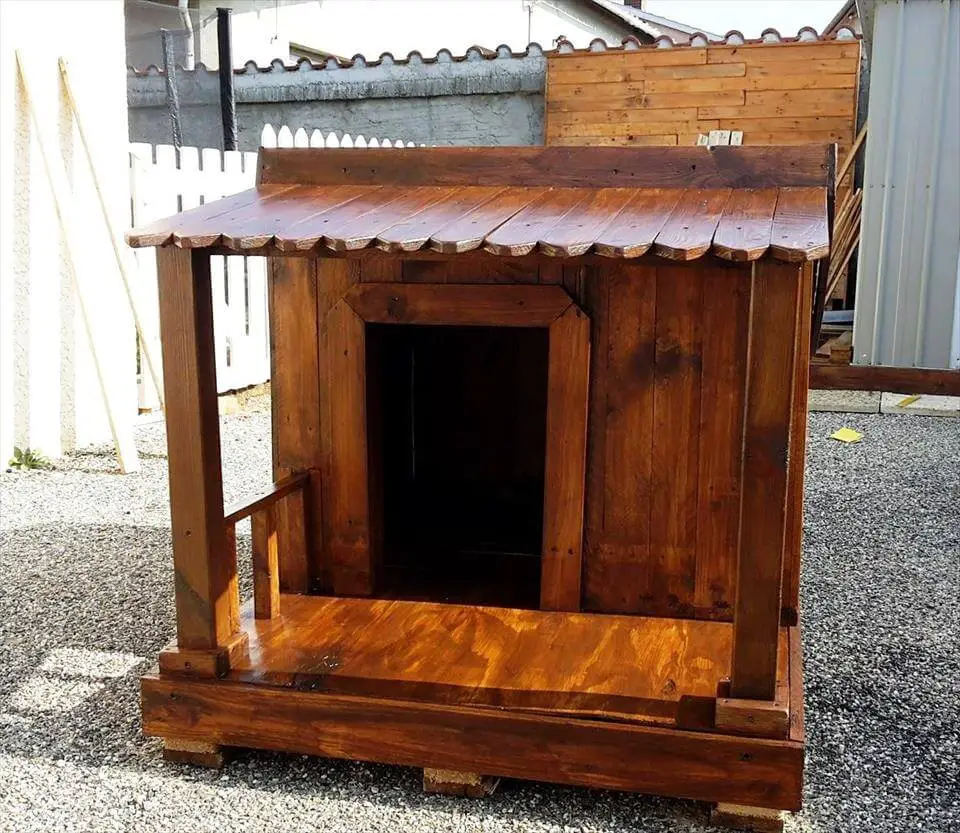
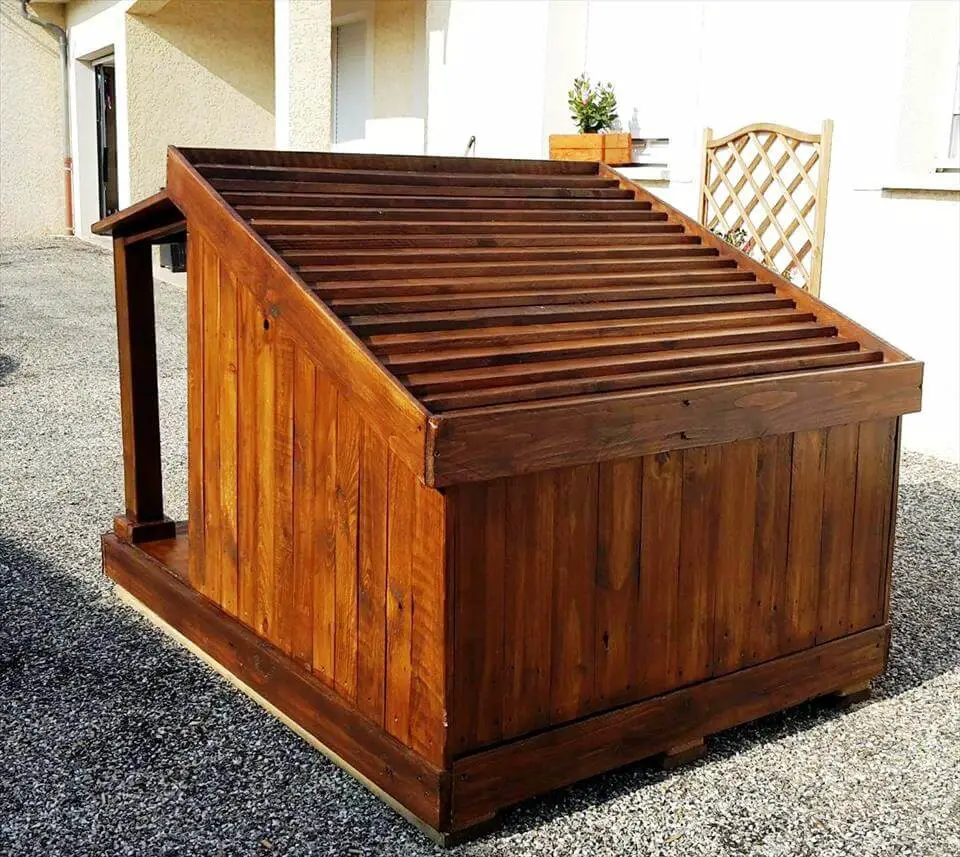
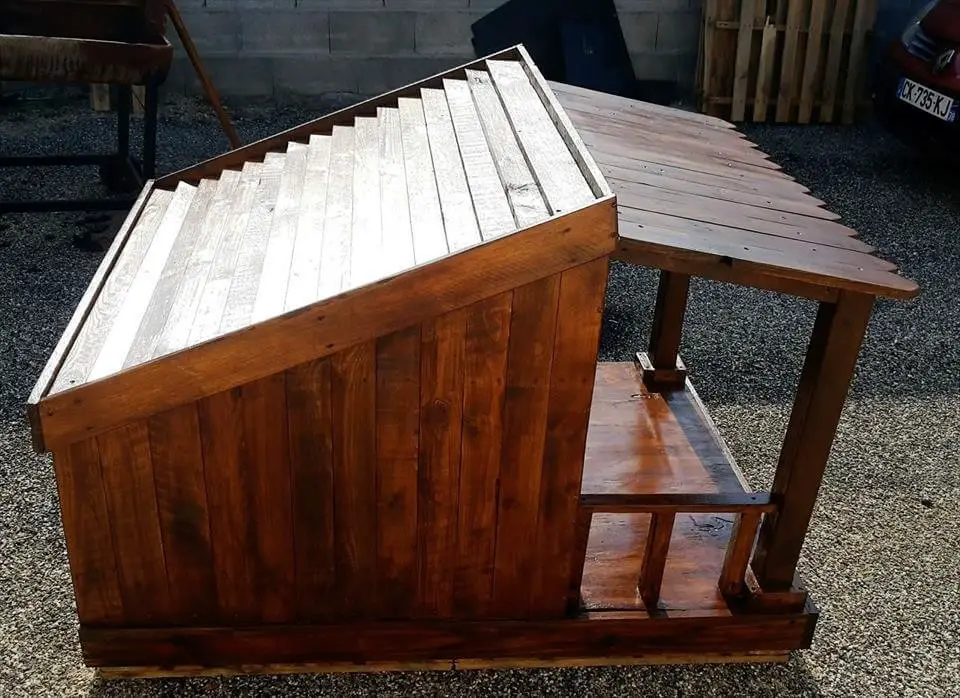
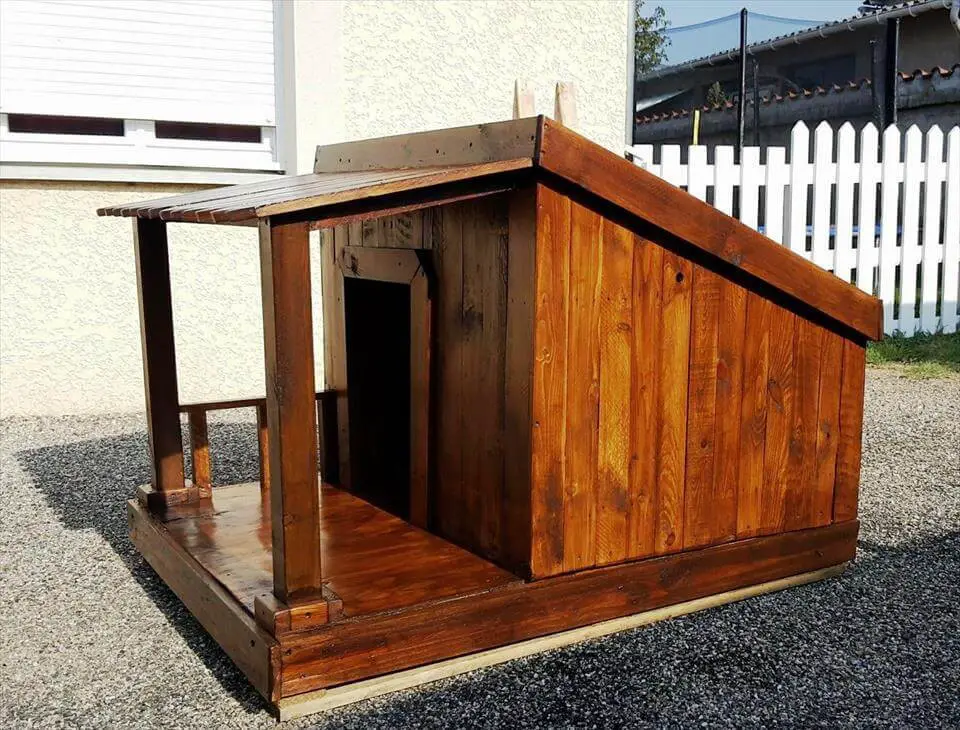
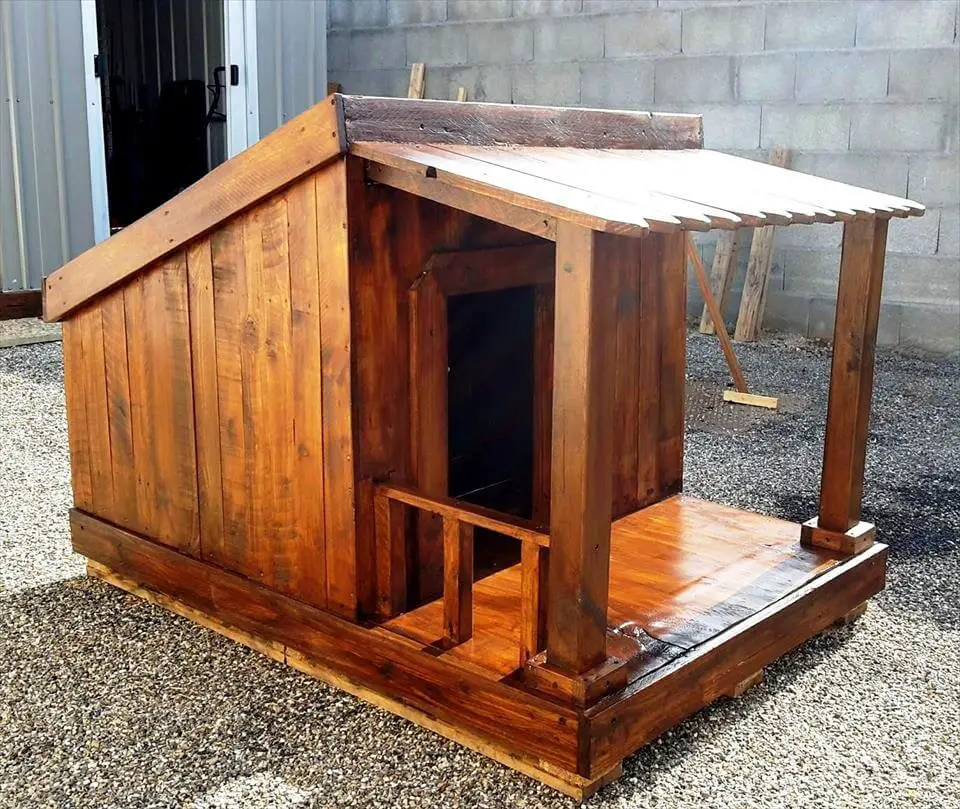
To build a sturdy base for your dog house, start by selecting an uncut solid pallet. Cover any rough edges with a plywood overlay to create a smooth surface. Consider the overall size of your dog house as you construct the basic skeleton using slats from pallets, complete with solid pillars and cross beams.Once you’ve built the frame, fill in any gaps with more pallet wood and apply stain coats for added visual appeal and weather protection. For step-by-step instructions and guides on building a dog house, check out our free plans and PDF templates.Next, combine a full pallet board with a plywood sheet overlay to create a seamless base. Ensure the plywood sheet is equal in size to the pallet board. Leave space at the front for a veranda and add raised wooden boundaries around the rest of the base. Keep your measuring tape and angled rule handy to ensure precision in your work.When it comes to designing the roof, you have two options: a tilted or balanced design. For a tilted roof, shorten the back pillars to your desired length, while a balanced flat roof requires equal-length back and front pillars. The tilted roof has an added benefit of preventing rainwater accumulation.Once you’ve decided on your roof design, connect the back pillars to the front ones using durable wooden cross beams, with an additional beam in the middle for extra stability. Next, install veranda pillars and join them to roof pillars using more wooden cross beams.Pay attention to the details that make a difference. Add small square-shaped supports underneath the pillars for a stylish touch. Inspect your joints to ensure they’re secure before moving on to staining the dog house frame.To add extra stability to the sides and back, layer additional wooden lengths over the existing cross beams. These extra supports should have a slightly larger size to cover the corners perfectly.After adding these extra braces, fill in the sides and overall frame with straight removed pallet planks, leaving a measured space at the front for the veranda. Start from the lower backside and work your way up, filling the entire frame solid except for the front entrance.Next, it’s time to add the shingled roof! Begin by arranging pallet slats flat like stair steps, starting from the low backside and working your way up to the peak. Once you’ve completed the roof, apply stain coats equal to the number of coats you’ve applied already to the rest of the design.For side trimming of the shingled roof, use more pallet slats and resize them to fit snugly along each side of the tilted roof. Trim down any excess edges for a neat finish.Finally, install the entrance frame and one-side fence wall of the veranda using dismantled pallet slats. The veranda roof or shelter can be built by placing flat pallet slats one by one, with the front edges forming a V-shape like a wooden fence. This adds an artistic touch to your dog house design.Stain the veranda roof and voila! You’ve got a perfect dog kennel or pet house that you can build yourself, all at zero cost. Just remember to seal the wooden surfaces after staining for added shine, clarity, and weather protection.
Customizing Your Pallet Dog House
Once you’ve built the foundation of your pallet dog house, you can elevate its comfort and functionality by adding some thoughtful touches. To begin with, consider insulating the walls and roof to keep your furry friend cozy during chilly months. This involves measuring and cutting fiberglass insulation to fit between the pallet slats, then covering it with a thin plywood layer or breathable barrier to protect your dog from direct contact. Don’t forget to seal any gaps or cracks with caulk to prevent drafts.Next, focus on creating a comfortable interior that extends beyond mere shelter. Start by laying down a thick, water-resistant pad or cushion that fits snugly inside the dog house. Add removable and washable bedding like blankets or towels for added warmth, and consider installing a raised floor to keep your dog off the cold ground.To protect your dog from the elements, install a door flap that allows them to come and go while keeping the weather at bay. Measure the entrance of the dog house, cut a piece of heavy-duty vinyl or rubber matting to fit the doorway, leaving a few inches extra on each side, then attach it above the doorway using staples or screws.Good air circulation is crucial to avoid condensation and keep the dog house comfortable in warmer weather. Drill several small holes near the roofline of the back wall for ventilation, and consider adding a small battery-operated fan to one of the walls to help circulate air.Finally, give your dog house some personality with a coat of pet-safe paint and add some decorative touches like your dog’s name or paw prints. And don’t forget about regular maintenance – inspect the dog house regularly for signs of wear or damage, tighten any loose screws, replace damaged parts promptly, clean the interior regularly, and wash the bedding to keep it hygienic.
Additional Considerations
When it comes to building a dog house, there are several factors to consider. First, choose an elevated spot in your yard that will avoid water pooling and provide some shade during the hottest part of the day. This will ensure your pet stays comfortable and healthy. Additionally, make sure the dog house is the right size for your pet – big enough for them to stand up, turn around, and lay down comfortably without being so large that it loses heat too quickly. A well-sized dog house will provide a sense of security and relaxation for your furry friend. Furthermore, consider weatherproofing the wood with a sealant to extend its lifespan and prevent water accumulation. You can also add a slanted roof design to help water run off. By taking these factors into account and having fun with the process, you’ll create a functional shelter that reflects your dog’s personality and craftsmanship.
Frequently Asked Questions:
How many pallets does it take to build a dog house?
When planning a dog house project, it’s essential to consider the number of pallets required based on the desired size and style. On average, you’ll need six to eight standard pallets to construct an ordinary-sized doghouse. However, custom-designed doghouses may require more or fewer pallets, depending on their unique features. Before commencing your project, take a moment to assess the dimensions and type of wood needed, as these factors can significantly impact the overall outcome.
What type of pallet wood should I use for a dog house?
When it comes to building a dog house using pallet wood, treated timber and cedar are two top-notch options. Treated timber boasts impressive durability and resistance to rot, making it an ideal choice for areas prone to moisture. Cedar, on the other hand, offers natural insect-repelling properties, ensuring your furry friend’s abode remains pest-free. Ultimately, the best pallet wood type for a dog house depends on your location, budget, and personal preferences. To ensure you’re getting the best value, thoroughly inspect the quality of the pallets before making a purchase or accepting a free offer.
How do you insulate a pallet dog house?
To ensure your pallet dog house remains cozy throughout the year, follow these straightforward steps. First, fill the gaps between the walls and floor with fiberglass insulation, which will help retain the warm air. Next, seal any openings or cracks around the edges using caulk to prevent chilly drafts from entering. Finally, line the interior of the house with thick blankets, providing an extra layer of warmth for your furry friend.
What is the cheapest way to insulate a dog house?
Insulating a doghouse is a cost-effective and straightforward process that can make a significant difference in your pet’s comfort. A simple yet effective approach involves using materials like foam boards, bubble wrap or old blankets to line the interior walls and floor of the structure. For added insulation, consider incorporating natural options such as straw or hay, ensuring they remain dry. Furthermore, wrapping a thick blanket around the door can be a game-changer in colder temperatures, providing your furry friend with an extra layer of warmth.
Do insulated dog houses keep dogs warm?
In cold climates, insulated dog houses are a game-changer for keeping dogs cozy. Made from waterproof materials and featuring a layer of insulation to retain heat, these houses come equipped with draft-proof doors that prevent wind from entering and stripping the warmth away. By ensuring the right size and ventilation, you can guarantee your furry friend stays comfortable all year round.
How to find free pallets?
When it comes to sourcing free pallets, a combination of research, networking, and persistence is key. Start by exploring local hardware stores, big-box retailers, lumber yards, and warehouses, as these establishments often have surplus pallets they’re willing to give away or sell at a discounted rate. Don’t be afraid to ask around your neighborhood, as you may strike gold with a neighbor who’s got some unwanted pallets lying around. Online forums and social media groups dedicated to DIY enthusiasts, sustainability advocates, or even local buy/sell/trade communities can also prove to be valuable resources in your search for free pallets. Before accepting any pallets, make sure to inspect them thoroughly to ensure they’re sturdy and suitable for your intended use.
Conclusion:
Looking to keep your furry companion entertained and happy this weekend? Consider building a pallet dog house as a fun DIY project. This comprehensive guide provides a step-by-step approach, covering essential tools and supplies needed, along with detailed instructions accompanied by illustrations. By following these straightforward steps, you’ll be able to craft a charming pallet wood dog house that’s sure to impress your neighbors’ pets. So why wait? Begin your creative journey today!
