Cute DIY Summer Snow Globes:
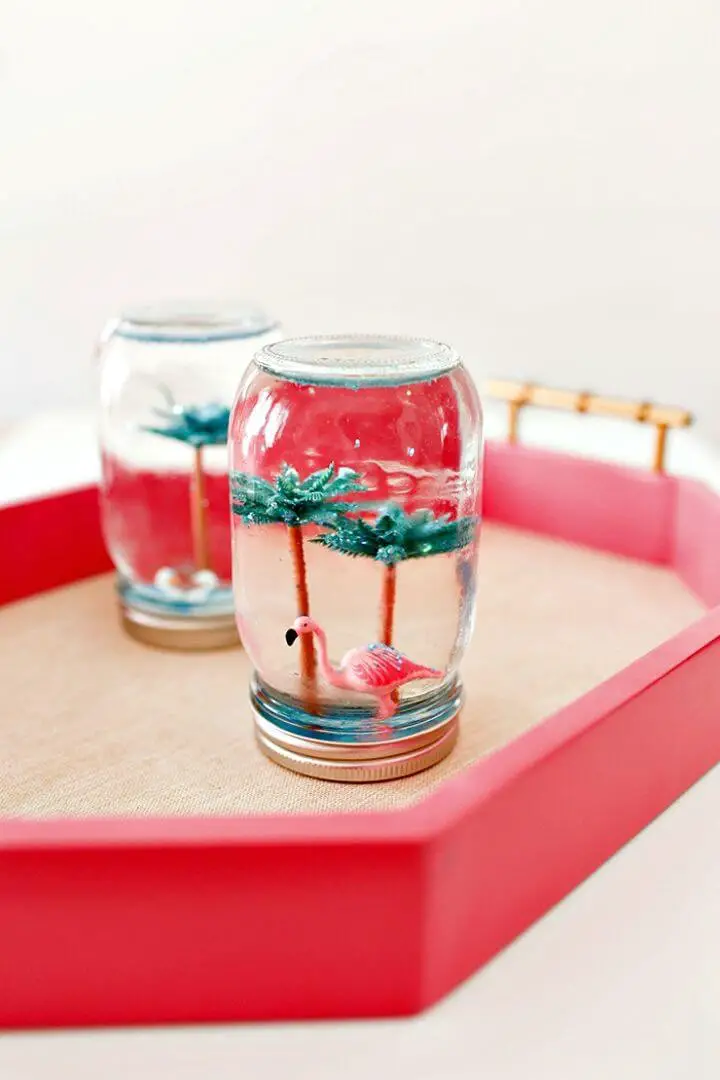
Transform ordinary glass containers and vintage kids’ toys into breathtaking snow globes that serve as both a thoughtful gift and an eye-catching home décor centerpiece. This DIY project is surprisingly easy to execute, requiring only basic materials like glue, plastic figurines, water, glitter, and glycerin. Simply attach the custom summery plastic figurines to the jar lids, fill the jars with water, add a dash of glitter and glycerin, and voilà! You’ll have a unique creation that’s sure to spark conversation. Want to replicate these charming snow globes? Head over to graymalin for the comprehensive guide and step-by-step visuals.
Easy DIY Dream Catchers:
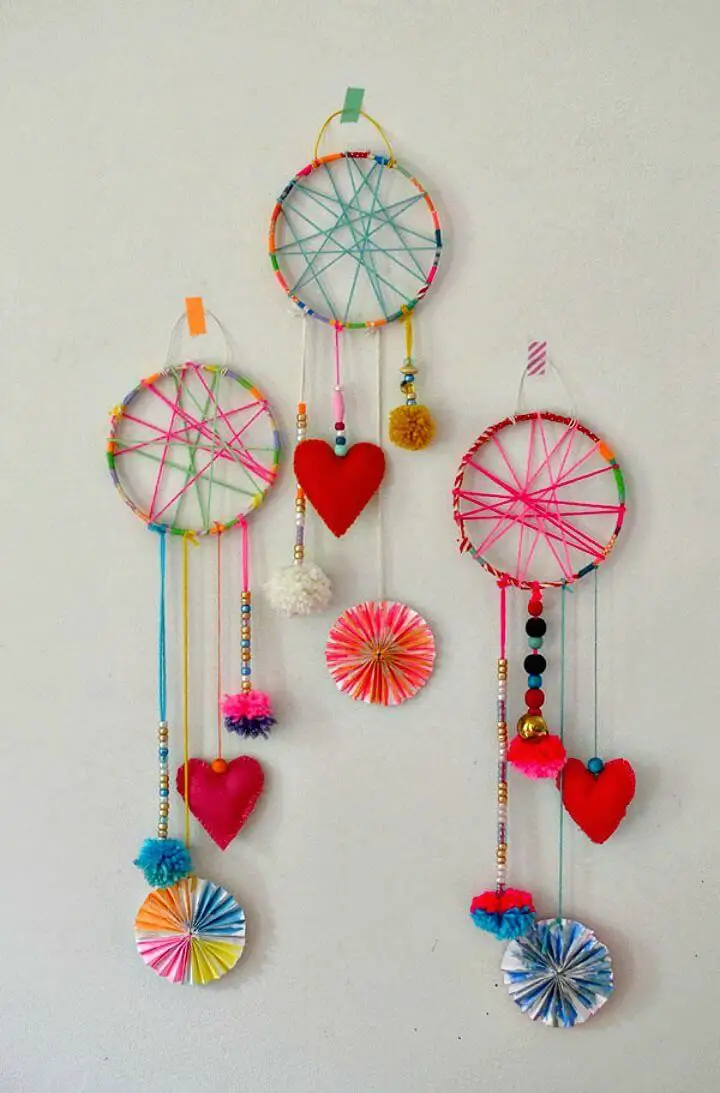
Transform your home into a haven of creativity by crafting stunning dream catchers this summer. If you’re inspired by this project, take a look at these breathtaking examples for motivation. These intricate dream catchers are crafted using embroidery hoops covered in vibrant twine and embellished with washi tape. The yarn is then randomly wrapped around the hoop, while custom bead strands featuring unique charms like stuffed felt hearts add an extra layer of charm. Get the complete tutorial and instructions on how to create your own masterpiece at artbarblog.
Adorable DIY Gemstone Bobby Pins:
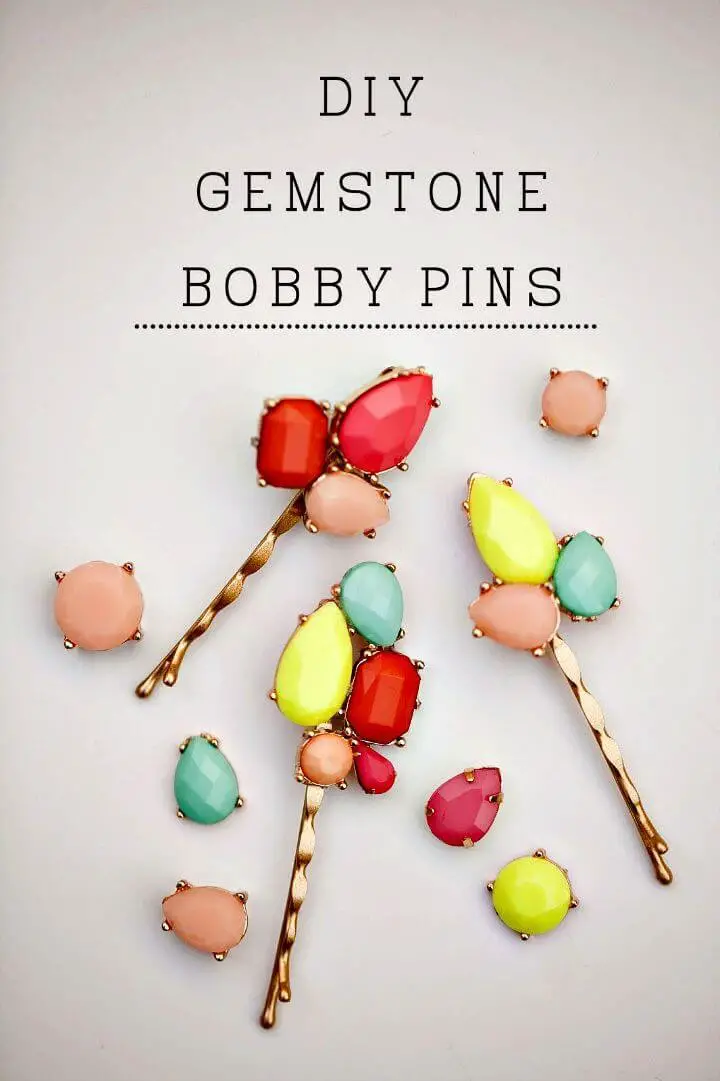
This summer, why not add some sparkle to your hair with a simple yet stunning DIY project? With just a few basic materials, you can create gorgeous gemstone bobby pins that are sure to turn heads. The idea is to upcycle old jewelry or beads and glue them onto regular bobby pins. Not only will this tutorial inspire you to get creative, but it’s also the perfect summer gift for friends and family. Simply cut the gemstones from an old necklace or earring, apply a small amount of adhesive, and voila! Your very own elegant gemstone bobby pins are ready to adorn your locks.
DIY Melted Bead Suncatchers:
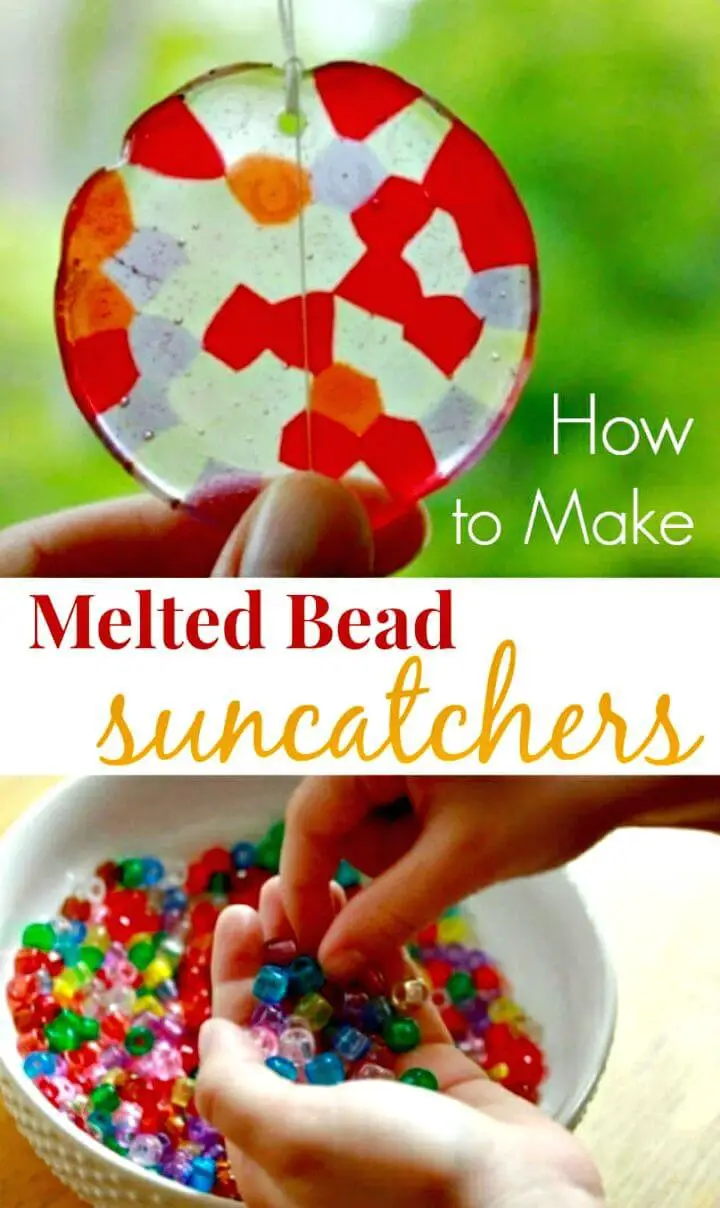
A creative twist on the classic handmade sun catcher is here, showcasing a one-of-a-kind design! To create this masterpiece, simply pour beads of various colors into a custom mold and watch them melt together. In this instance, the beads have been dropped into a round dish, resulting in a perfectly spherical and eye-catching sun catcher that’s now suspended in mid-air. Taking it to the next level, mini melted bead circles have also been added to a piece of string and artfully paired with the main suncatcher. Want to recreate this unique design? Head over to Artful Parent for the complete project tutorial and step-by-step instructions.
How To Make Beachy Shell Planter:
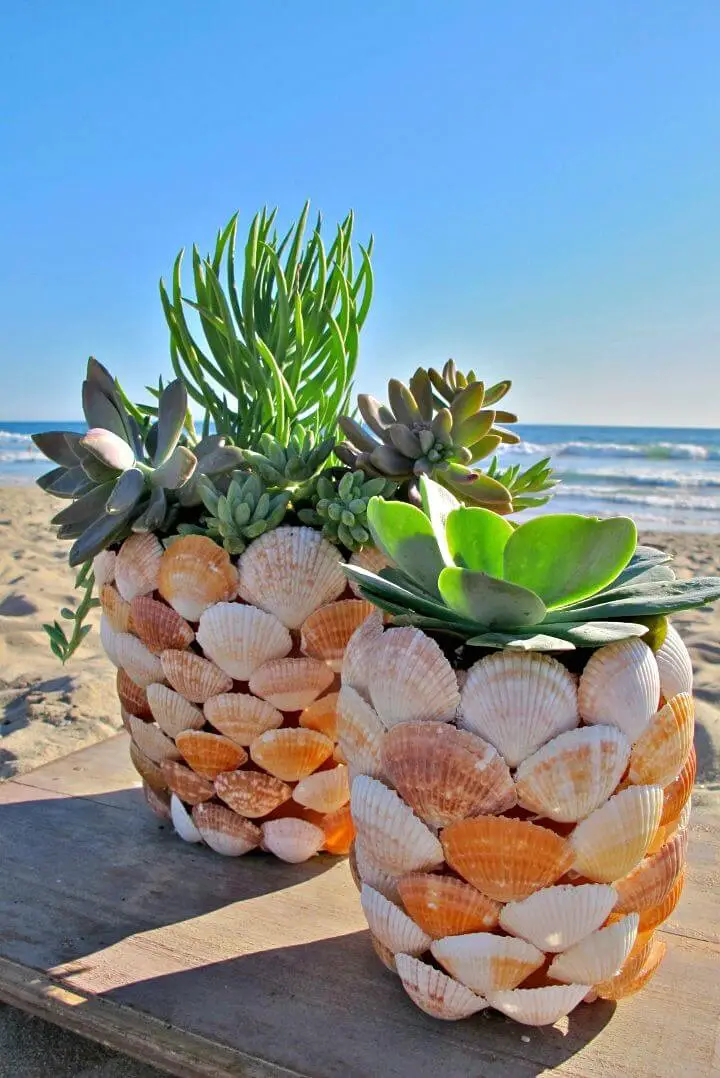
Transform your outdoor spaces into a beach-inspired oasis with this creative summer project. The goal is to upcycle plain garden or porch pots by gluing seashells around them in a scalloped pattern, resulting in unique beachy shell planters that will become the perfect decor for any indoor or outdoor area. For inspiration, take a look at these sample beachy shell planters and get ready to have fun making your own at home. Follow this link to access the full tutorial and get started!
Adorable DIY Summer Beaded Barefoot Sandals:

Transform your beach attire with ease this summer by crafting stunning barefoot sandals. This project requires minimal effort, as all it takes is threading glass beads onto a jewelry cord, followed by the addition of custom flower embellishments to bead strands. For an extra touch of glamour, adorn your finished sandals with plastic rhinestones and gems. Click the link for a step-by-step tutorial and detailed instructions: runningwithsisters
DIY Summer Fruit Trays:

Transform your summer gatherings by crafting a fruit-inspired tray at home. This charming serving solution will add a touch of elegance to your refreshment offerings. To get started, gather some custom wooden rounds and give them a colorful makeover by painting them to resemble fruit slices. Next, attach custom handles to each tray using thin spoons screwed into the sides. The result is a one-of-a-kind serving piece that’s sure to impress your loved ones. Take inspiration from our sample trays, which take their cue from a watermelon and orange theme, and get creative with your own design! Mark Montano
Make Mosquito Bracelets With Essential Oils:
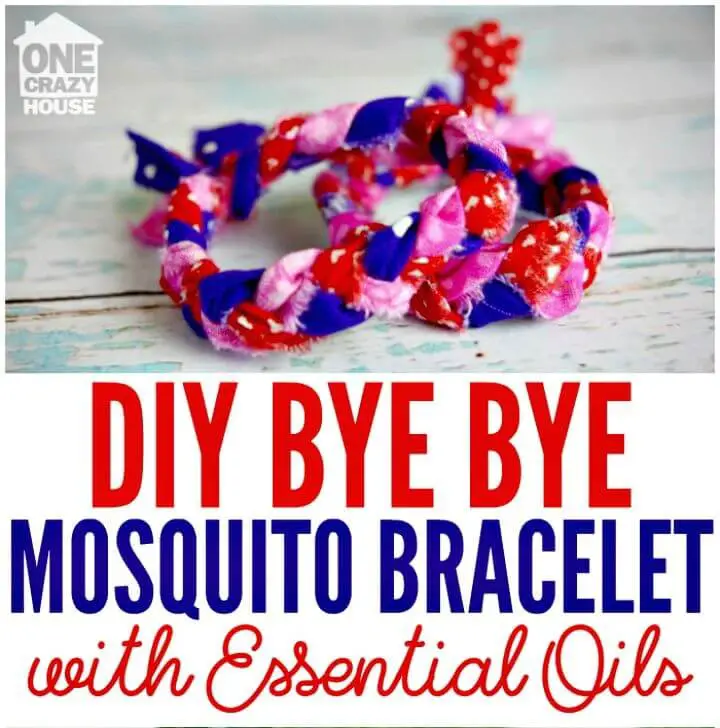
If you’re anxious about mosquito bites and the diseases they transmit, consider this creative solution to deter them: crafting your own custom mosquito-repellent bracelets. The concept is simple yet effective – intertwine colorful fabric strips to create a beautiful accessory that can be infused with essential oils, bug juices, or custom sprays designed to repel mosquitoes. This DIY project not only keeps those pesky insects at bay but also showcases your creative flair.
Easy DIY Summer Painted Planters:
If you’re planning a porch or patio makeover this summer, consider elevating your planters and pots with unique and visually appealing designs. To add some extra flair, try painting them in custom patterns, such as polka dots, or inspired by summer fruits like strawberries or lemons. This simple DIY project can completely transform the look of your outdoor space, making it perfect for warm-weather gatherings and BBQs. For a comprehensive guide on how to get started, head over to The Crafted Sparrow.
Colorful DIY Marbled Hanging Planter:
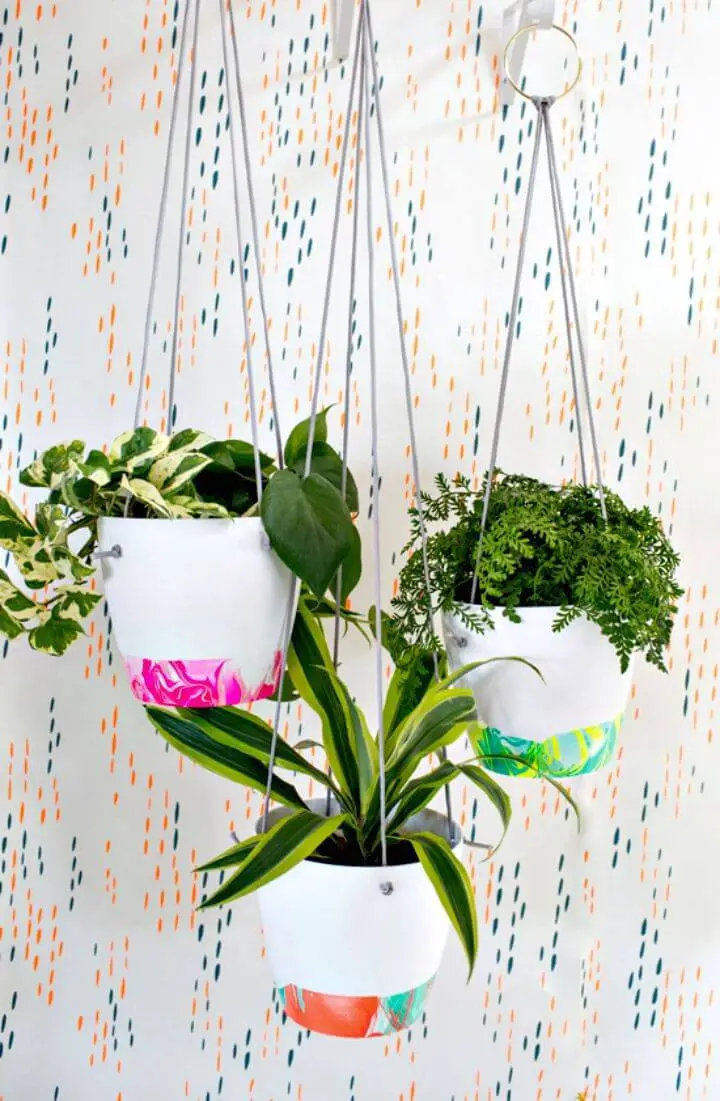
As summer approaches, incorporating a natural décor touch into your indoor spaces can be as easy as bringing in some planters or pots. For a unique and visually appealing approach, consider using hanging planters. If you already have some lovely ones, elevating their aesthetic appeal is just a matter of adding an extra layer of flair. One simple yet effective way to do so is by giving them a marble-like finish. This can be achieved by dipping your ceramic pots into a mixture of hot water and custom nail polish in your preferred colors. With a few quick strokes, you’ll be able to create a stunning marble effect that will instantly enhance the beauty of your planters. For a step-by-step guide on how to accomplish this look, check out the tutorial and instructions available here.
Make Your Own Light Up Mason Jar Aquariums:
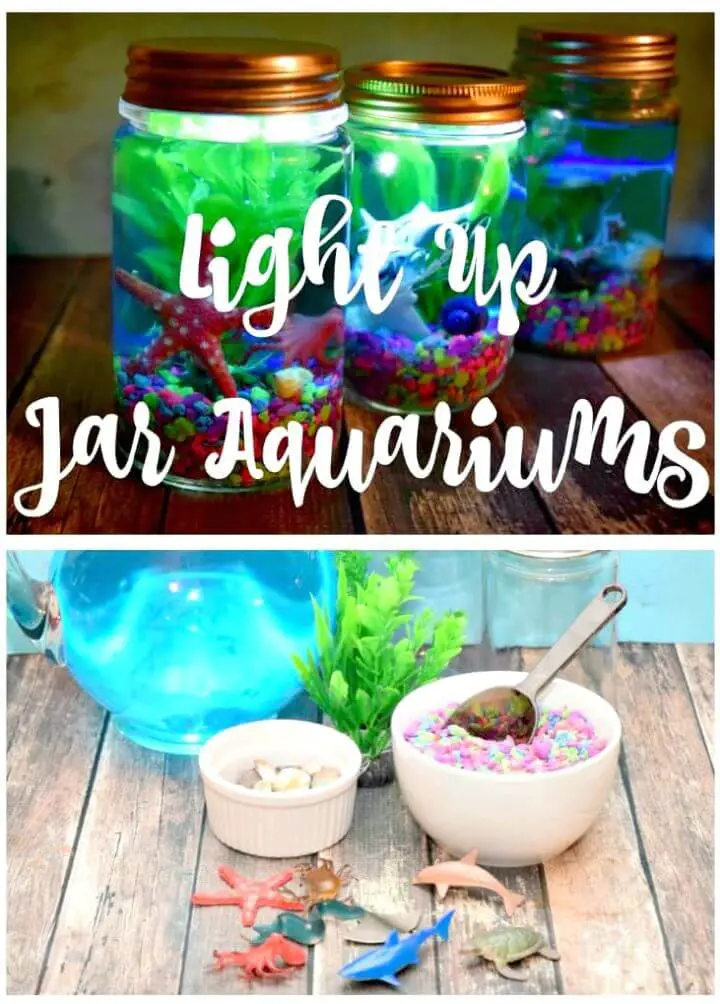
Transforming your modern indoor spaces into miniature aquatic masterpieces can be achieved without breaking the bank. By repurposing Mason jars, you can create adorable mini-aquariums that double as unique gifts this summer. Simply fill the jars with a mix of inexpensive sea plants, seashells, and aquarium gravel, then add some artificial sea creatures to bring it all to life. The final touch is adding water with a hint of blue food coloring to give your creation a realistic seawater hue. Take a look at the sample mini-aquariums below for inspiration. For a complete tutorial on how to create these charming mini-terrariums, visit thetiptoefairy.
DIY Embellished Glasses for Summer:
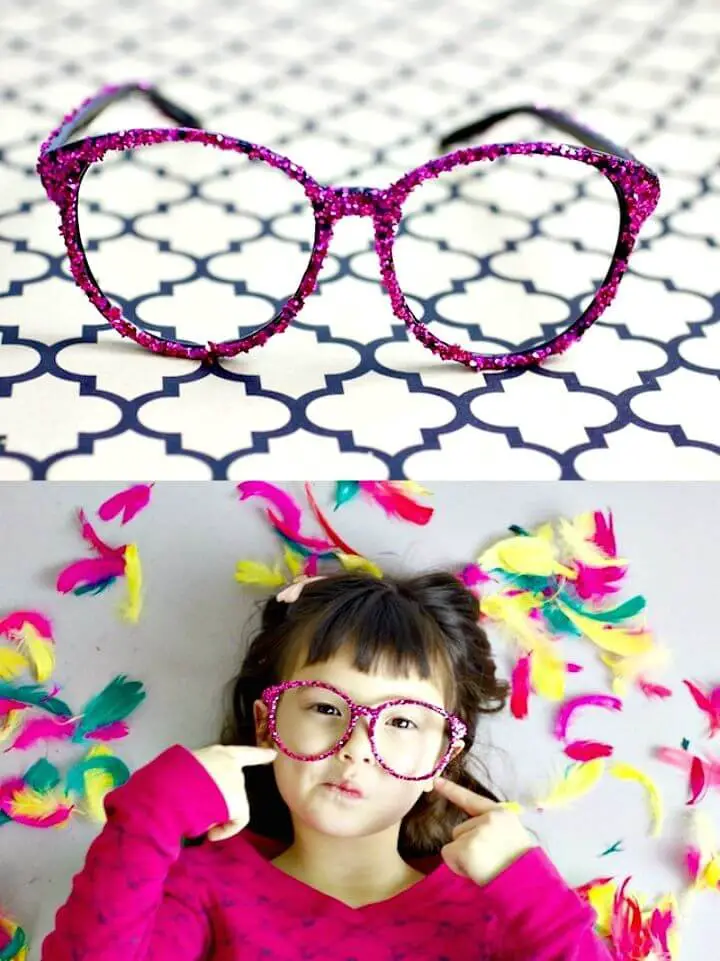
Are you feeling stuck this summer? Need a creative outlet to shake off boredom? Look no further! You can transform plain sunglasses into stunning pieces of art by adding custom décors. Just take a look at these beautifully embellished glasses, complete with sequins, glitter, and feathers on the frame’s top edge. Not only are they eye-catching, but they also make for an awesome gift idea for a fun-loving kid in your household. To learn more about this project and get the tutorial, head over to rufflesandstuff.
Make Glow in the Dark Jellyfish Craft:
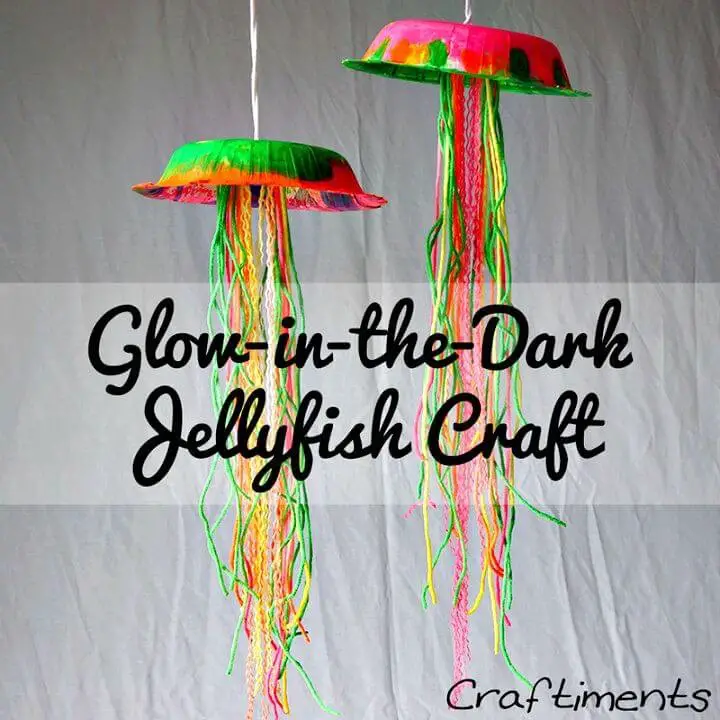
Transform your indoor or outdoor spaces with a unique and innovative DIY project this summer. Create a stunning beachy décor statement by crafting glowing jellyfish lanterns at home. Start by painting paper bowls to create the upper body of the jellyfish, then use colorful twine to craft the tentacles. To add an extra touch of magic, fill plastic bags with yarn strands, glow paint, and zip them shut. Squeeze out any excess air and your jellyfish will be ready to glow in the darkness. For a step-by-step guide on how to bring this project to life, visit Craftiments for a comprehensive tutorial.
How To Make Firework Painting:

This summer, take your home décor to the next level by creating unique and eye-catching paintings and wall art pieces. One fun project that’s perfect for kids is making firework-inspired masterpieces using everyday materials like pipe cleaners, paint, glue, paper, and glitter. Simply create a flower-shaped template or stamp by twisting together lengths of pipe cleaner, then dip it in paint to stamp out fireworks patterns that resemble the real thing. Add some spark with glitter for an authentic touch. Check out the full, free guide and visual instructions on jugglingwithkids for more inspiration.
Cool DIY Hanging Bird Feeder:
Enhance your garden’s ambiance with a delightful DIY project – hanging bird feeders that are not only easy to create but also attract those cheerful chirping creatures. A simple yet effective way to bring some excitement to your outdoor space is by crafting a charming bird feeder using Cheerio hearts and a decorative black polka dot ribbon. To make this adorable feeder, start by twisting a piece of wire into a heart shape and slip in the desired number of Cheerio hearts. The full tutorial can be found at bystephanielynn for a step-by-step guide on how to create your own hanging bird feeder.
How To Decorate A Wooden Yoyo:
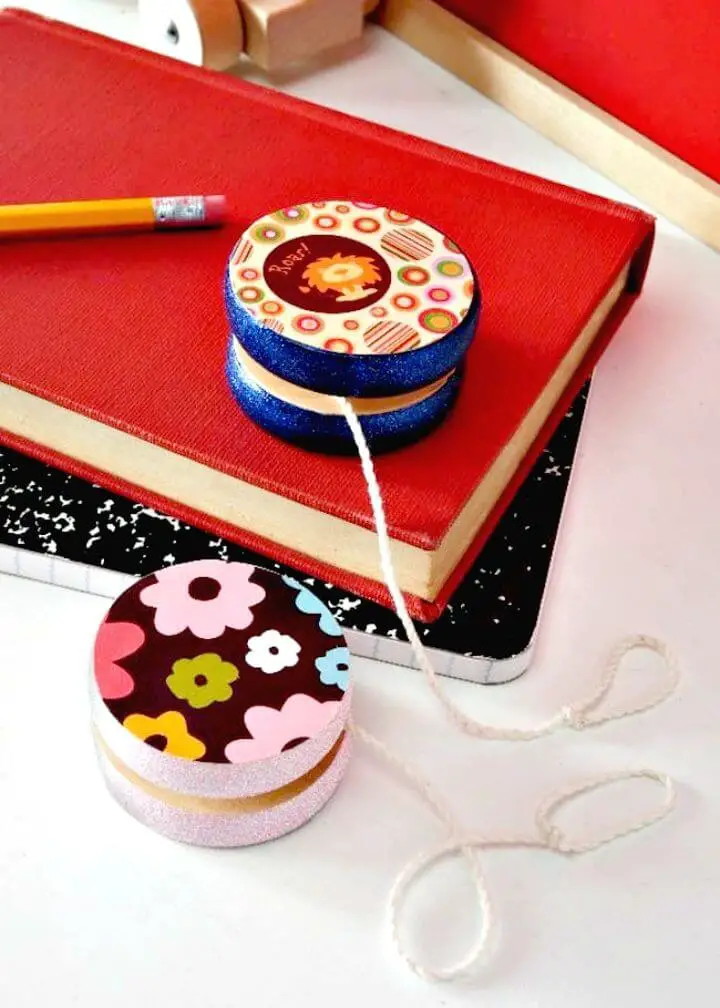
As summer approaches, kids can’t help but gather around the yo-yo, laughing with friends and siblings. This fun outdoor activity is a staple of warm weather playtime. But why not take it to the next level? With a little creativity and some basic crafting supplies, you can transform your yo-yos into one-of-a-kind summer treasures that kids and adults alike will adore. Imagine customizing your yoyos with colorful embellishments, stencils, and paints – the possibilities are endless! To get started, take inspiration from these stunning wooden yo-yos, decked out in scrapbook paper, glitter, and acrylic paint. With a few simple steps and some imagination, you can create your own unique masterpieces. And if you’re looking for more guidance, be sure to check out the project details and instructions over at modpodgerocksblog.
Make Your Own Little Sailboat:
Discover a delightful DIY project that’s easy to recreate at home with your kids! This charming sailboard, crafted from recycled materials, is sure to inspire creativity. Moms and kids alike can get crafting together and try their hand at making one of these adorable sailboats. To create this treasure, you’ll need the following materials: cardboard, chopsticks, plastic water bottles, fabric, kitchen twine, and duct tape. Follow along as we explore the simple steps to build this charming little vessel.
Easy DIY Egg Carton Mini ‘Copters:
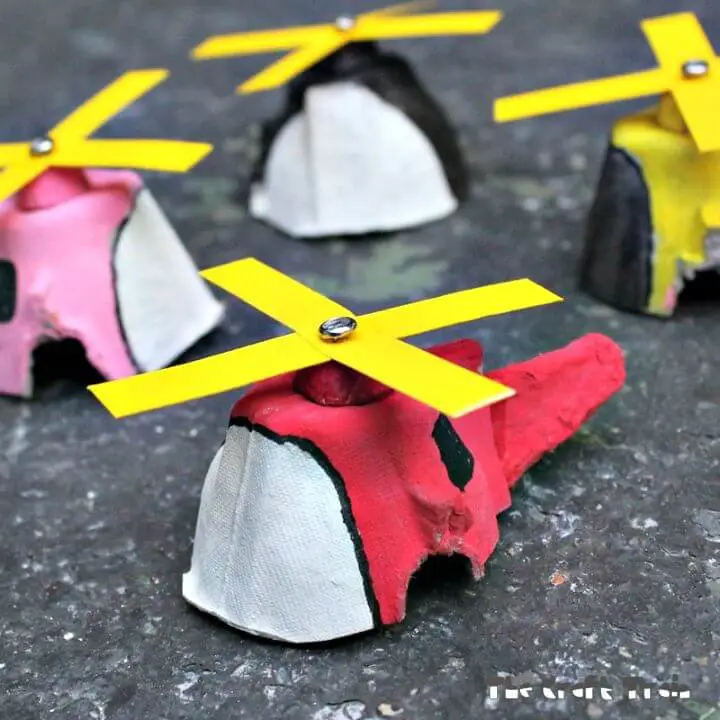
This summer, surprise your kids with these adorable mini helicopters. What’s amazing is that they’re not only handcrafted but also extremely affordable. The helicopter design is actually created by cutting out custom sections from an egg carton and painting them to resemble a chopper. Then, simply assemble the paper strips in an X-shape and secure the fan using a brad clip. To complete the copter toy, use an egg carton cone and cut out the cup to create the helicopter’s body. For a step-by-step guide on how to make these mini copters, check out The Craft Train for the full project details.
Adorable DIY Tins Can Bird Feeders:
Transform your outdoor space with a creative twist on traditional birdfeeding. By upcycling tin cans into unique birdfeeders, you can add a personal touch to your summer decor. Simply paint the cans in different colors and hang them in your garden using colorful ribbons tied to the center of each can. Fill the containers with custom bird food, such as finch food, bird seeds, or hummingbird food, and watch as the birds flock to your new feeder. This DIY project is a great way to get creative while also providing a fun and functional addition to your outdoor space. For the full tutorial and instructions, head to momendeavors.
DIY Camera Strap Tutorial:

As you prepare for a summer adventure, why not combine your love of nature photography with a creative DIY project? Crafting custom camera straps at home can elevate your outdoor escapades in two ways: it keeps your camera securely around your neck and adds a stylish touch to your overall aesthetic. The example strap featured is made from an old scarf repurposed with leather ends, split rings, and chain closures for easy and durable fastening to the camera’s sides. For a step-by-step guide on how to create this unique accessory, visit thehousethatlarsbuilt.
Easy DIY Painted Beach Ball Makeover:

Summer is synonymous with beach visits, tours, and picnics, making them a fashionable and enjoyable way to spend time outdoors. If you’re looking to elevate your summer experience, consider bringing along some special items to enhance the fun. One unique idea is to paint custom beach balls that can be used by both kids and adults. This DIY project allows individuals to add their personal touch with shapes, dots, or patterns using paintbrushes, masking tape, and favorite colors. For a comprehensive guide on how to get started, check out StudioDiy’s tutorial.
DIY Denim Cut-offs Wine Bag:
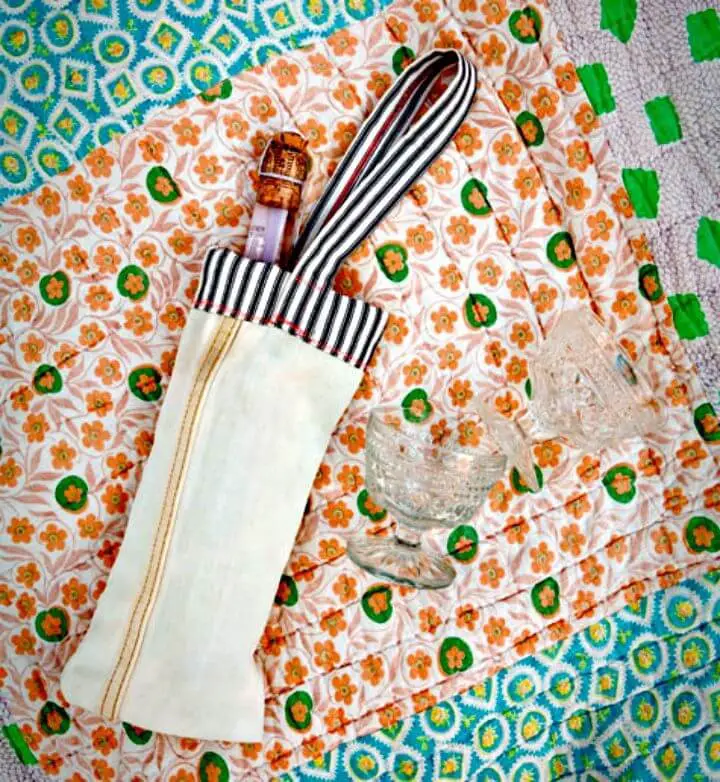
Summer nights are the perfect excuse to let loose and have fun with friends. When it comes to night out parties, having the right gear can make all the difference. One essential item is a reliable bag that can keep your beverages and drinks fresh throughout the evening. A great option is this durable tote made from repurposed denim cut-offs. Not only does it feature sturdy straps for comfortable carrying, but its unique design also sets it apart from more conventional bags. To create this one-of-a-kind accessory, you’ll need some old denim leg bottoms, as well as a bit of fabric to replicate the look. If you’re looking for step-by-step instructions on how to bring this project to life, check out Design Sponge for a comprehensive guide.
DIY Recycled Egg Carton Caterpillars:
Elevate your gift-giving game by crafting exceptional summer presents for your kids. While store-bought items are always appreciated, handmade gifts hold a special place in their hearts. Moreover, repurposing discarded materials can lead to the creation of unique and engaging toys that foster even more love and admiration from your little ones. To get started, let’s begin with this adorable caterpillar craft, which is not only easy to make but also exudes innocence and charm. The caterpillar’s body is crafted using painted and assembled egg carton cups, while pink pipe cleaners serve as its antennae. Add some googly eyes for the finishing touch, and top it off with colorful pom-pom balls to give your creation a lively, eye-catching appeal. For a step-by-step guide on how to bring this delightful caterpillar to life, visit creativegreenliving.
Simple DIY Paper Spinner for Endless Fun:
Add some whimsy to your kids’ playtime with this delightful DIY project that’s incredibly simple to create at home. One such treat is the charming paper spinner, sure to captivate their imagination! To craft these spinners, start by cutting out cardboard circles and embellishing them with scrapbook paper or your own custom designs. Next, punch two holes in the center of each circle and thread twine through them to complete the project. For a comprehensive guide, including step-by-step instructions, check out the full tutorial available here: makeandtakes.
Make Your Own Magnetic Bug Jars:
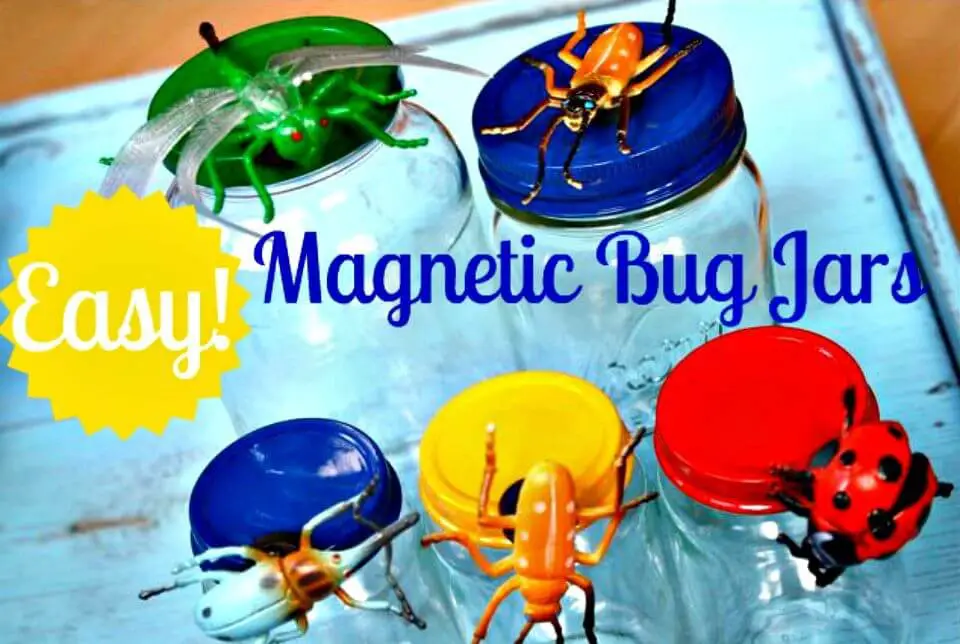
Get ready to be captivated by yet another exciting summer craft project! This time, we’re going to create unique magnetic bug jars that not only serve as a fun storage solution for kids’ toys and game items but also add a touch of whimsy to any room. To make these one-of-a-kind containers, start by decorating Mason jar lids with enamel paint in your favorite colors. Next, grab some plastic bugs and attach round magnets to the bottoms using glue. Finally, arrange the bugs on the painted jar lid for an eye-catching magnetic bug jar that’s sure to delight both kids and adults alike. Want to give these jars a try? Look no further than our comprehensive project guide and visual tutorial available here.
DIY Patriotic Paper Windsock – Summer Activities for Kids:
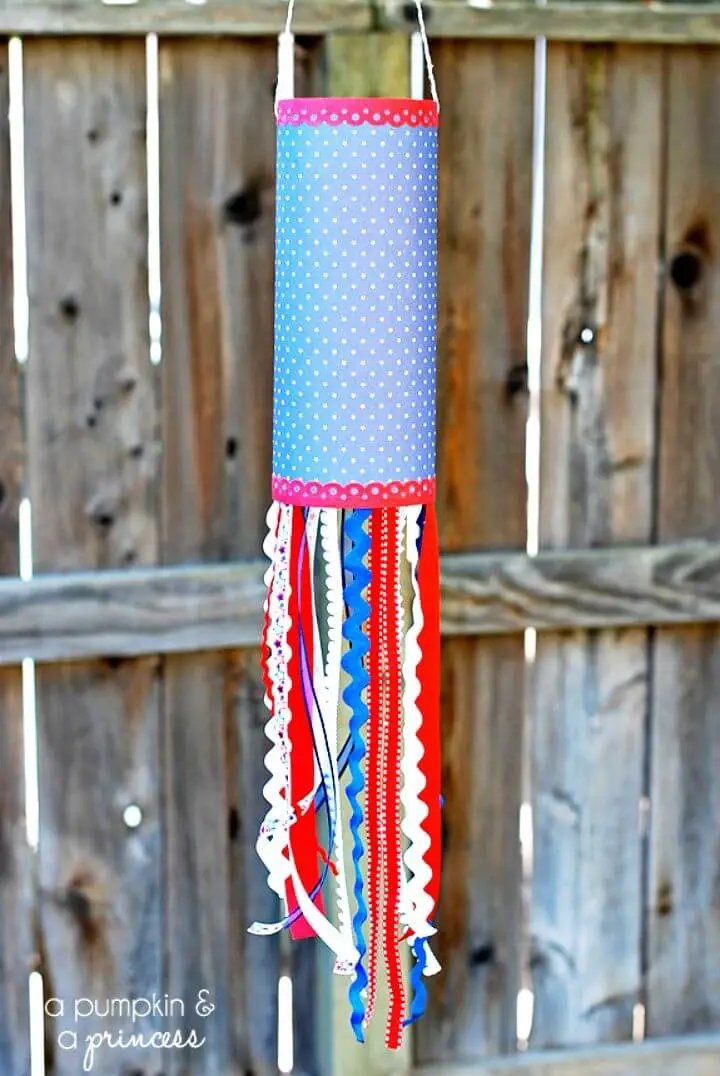
Transform your kids’ downtime into a creative outlet with this engaging DIY project. Combine chipboard sheets, scrapbook paper, and ribbons to craft a unique windsock that doubles as an outdoor decoration. Start by layering the chipboard sheet and paper together, then add a decorative punch along the bottom and top edges. Next, fold the chipboard into a cylindrical shape and create holes for hanging strings at the top. Finally, insert colorful ribbons inside the windsock to give it a pop of color. This simple yet satisfying project is perfect for a summer afternoon at home. For step-by-step guidance and visual instructions, visit apumpkinandaprincess.
Awesome DIY Flamingo Ring Toss Yard Game:
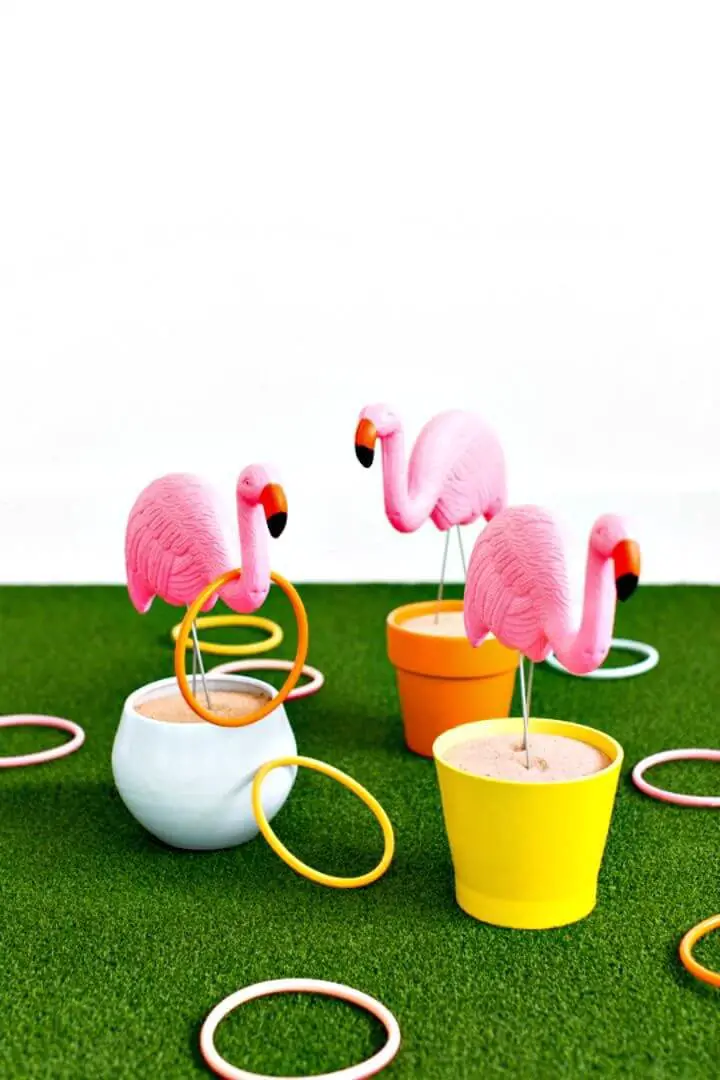
Transform your outdoor space into a summer playground by incorporating engaging activities. One innovative idea is to set up custom ring toss games in your yard or garden. This fun and easy-to-create setup will not only provide endless entertainment but also enhance the overall aesthetic appeal of your outdoor area. A unique example is the flamingo ring toss yarn game, which can be created by placing flamingos with stakes in mini pots filled with soil or sand or attaching them directly to the ground. Simply grab some rings and start playing! For a comprehensive tutorial and instructions on how to set up this delightful game, head over to sugarandcloth for a step-by-step guide.
How To Sew A Towel Beach Bag:

This summer, take your beach visits to the next level by creating a functional yet stylish beach bag from a towel. Not only will you be able to carry all your essentials in one place, but you’ll also be making a thoughtful and eco-friendly choice. To add some extra flair, attach coordinating ribbon straps and embellish with ribbon bows for a sweet and summery touch. The possibilities are endless, and with this simple yet effective DIY project, you can enjoy the sunshine without sacrificing style.
DIY Homemade Butterfly Feeder:
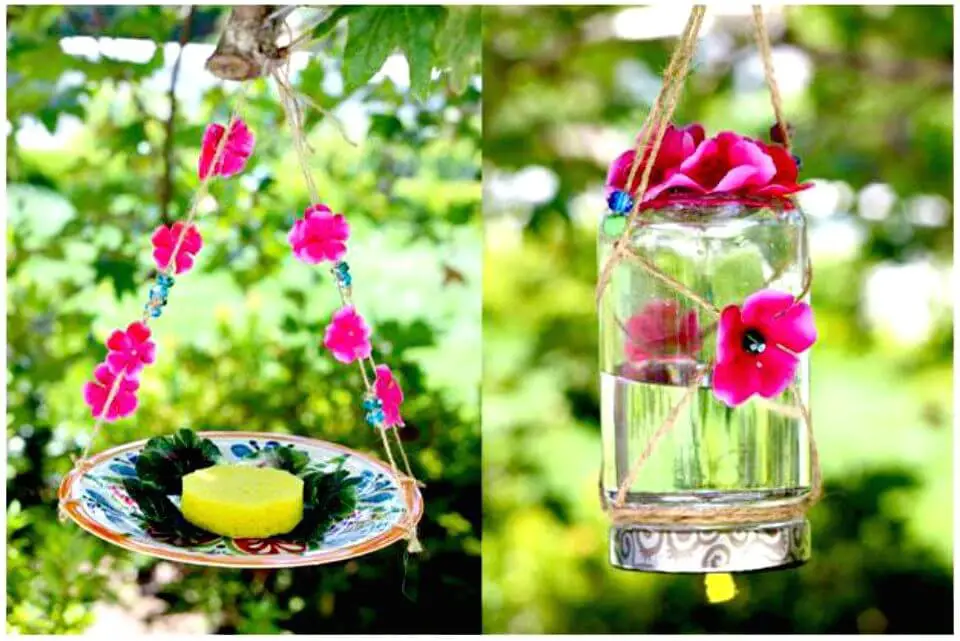
As summer’s warmth arrives, our gardens become a kaleidoscope of color as butterflies flit about, adding to the joyful atmosphere. If your outdoor space lacks these delicate creatures, consider creating a welcoming environment by crafting simple butterfly feeders using everyday materials. With just a few basic supplies, you can create not one, but two unique and effective feeding stations. For instance, you can transform a plate into a beautiful feeder by filling it with sugar water and adorning it with custom bead and flower strands that also serve as hanging hooks. Alternatively, use a glass jar and repeat the same process for a charming and functional feeder. Complete instructions can be found at ehow.
Easy DIY Mason Jar Pineapple and Tags:
Transform your home décor and create unique gifts by upcycling Mason jars and other glass containers. This versatile craft can be used to make beautiful summer decor, centerpieces, and even Thanksgiving presents. One creative project is a duplicated Mason jar pineapple centerpiece that doubles as a thoughtful gift. To get started, grab a Mason jar and paint it your desired color. Before applying paint, use vinyl stickers to cover areas you don’t want to paint. For this example, the jar has been painted yellow and adorned with black Sharpie triangles. Finally, fill the jar with candies and succulents for a visually appealing display. Full instructions can be found here.
How To Create An Element Jar Necklace:
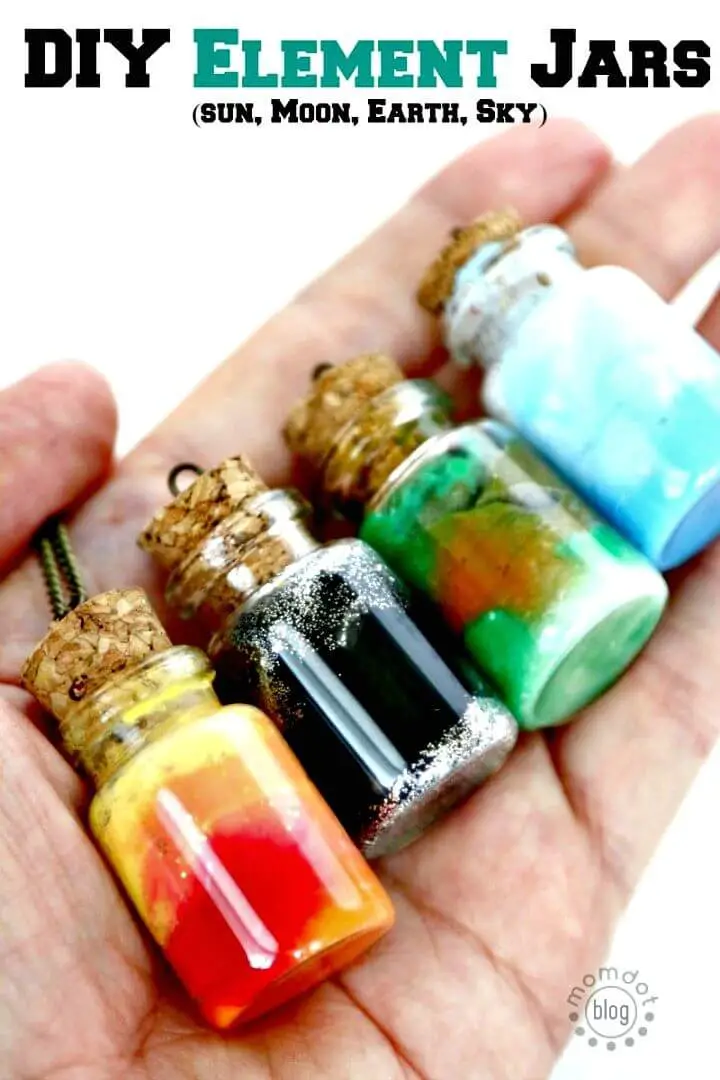
If you’re looking to elevate your style this summer, DIY projects can be a fantastic way to do so without breaking the bank. One great example is creating unique jewelry pieces at home. For instance, an element jar necklace is surprisingly easy to make and looks stunning! To create one, start by collecting jar lids with corks that you can paint in any color or design you like. Next, attach eye-on-screw hooks to each lid to transform them into charming pendants. Once you have your pendants ready, you can assemble the necklace and add a personal touch. For a complete visual tutorial and instructions on how to make this project, check out momdot.
Make a LOVE Yarn Fonts:
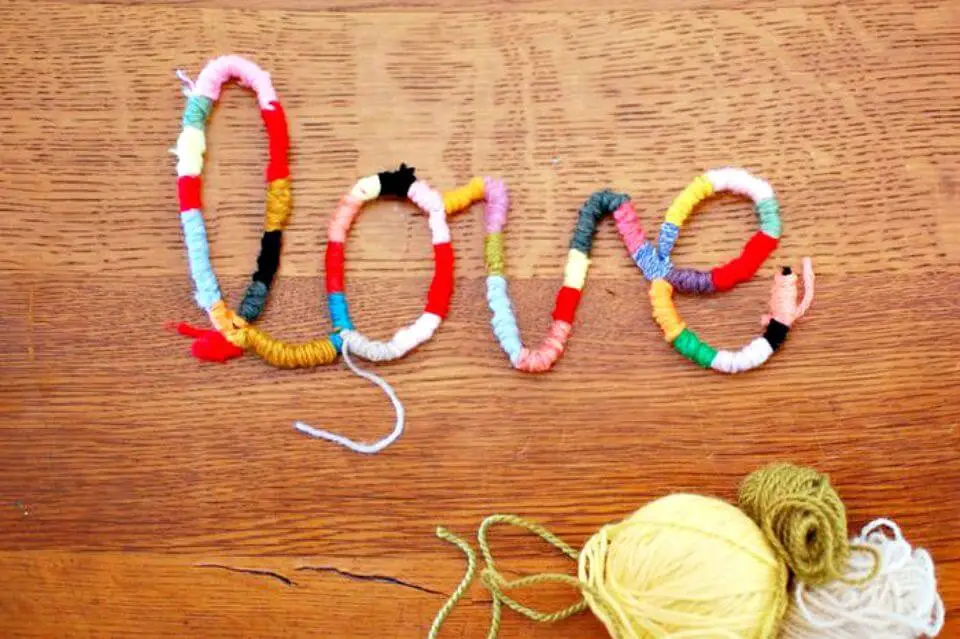
Get ready to fall head over heels in love with this ingenious summer project that will not only delight you but also open up a world of creative possibilities for future home décor endeavors. The concept is simple yet ingenious: create custom fonts, letters, and symbols using pipe cleaners and scrap yarn. Simply twist the pipe cleaners into the desired shape – whether it’s an alphabet, letter, or symbol – and then wrap colorful yarn around it to bring out its full visual potential. With this unique art piece, you can instantly add a decorative touch to any interior wall or custom item, making it the perfect statement piece for your home.
How To Create Rain Stick:
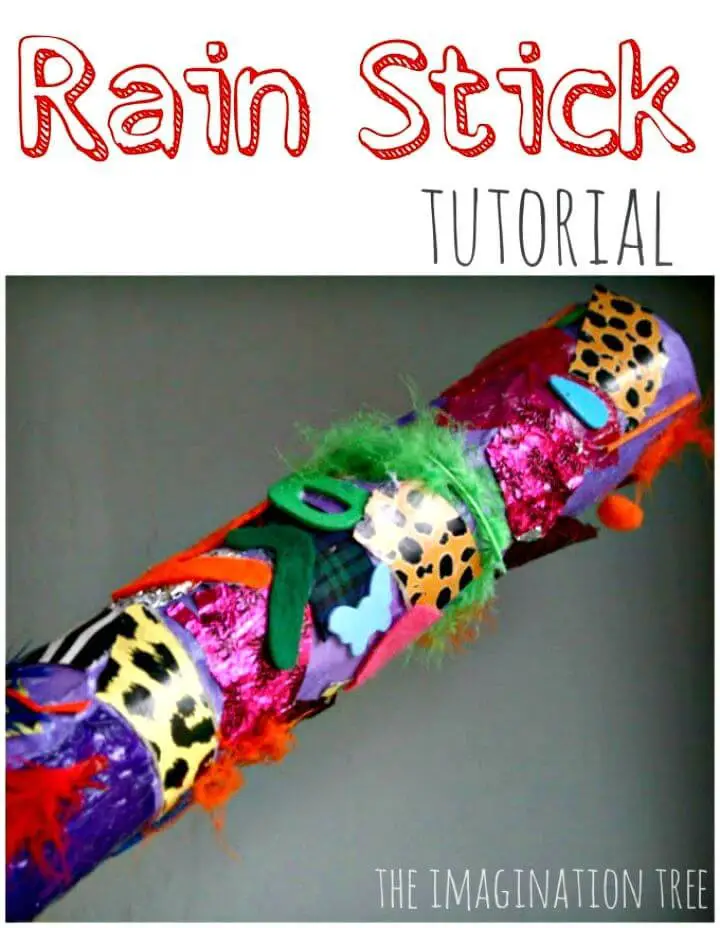
When discussing summer fun activities and kids’ toys, it’s easy to overlook the simple yet creative joy of making rain sticks at home. One way to get started is by taking inspiration from a colorful and visually appealing example. To create your own rain stick, begin by gathering a cardboard tube, some nails, and a variety of materials such as rice, couscous, or beads. Once you’ve filled the tube with your chosen material, wrap it in a colorful paper sheet to give it a beautiful finish. For an added touch, consider embellishing your tube with custom designs or patterns, like animal prints. The tutorial for this project can be found on The Imagination Tree website.
How To Make Spray Chalk – Kids Summer Activity:
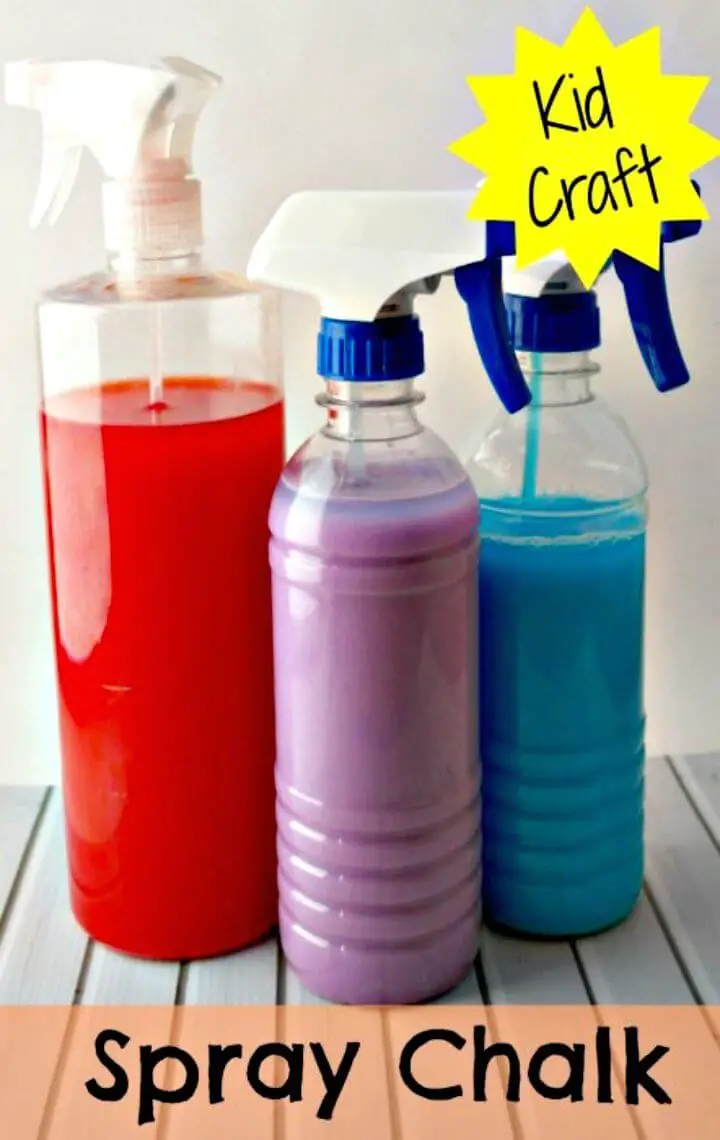
Bring excitement to your kids’ summer with engaging activities that’ll make them laugh and play all day long. Why not consider adding a unique twist to their fun by introducing spray chalks? Not only are they easy to make, but the process itself can be a fun bonding experience for you and your little ones. To create these colorful masterpieces, simply combine cornstarch, water, and food coloring to form a mixture that’s then transferred into spray bottles. For a step-by-step guide on how to get started, head over to cleverpinkpirate for the full tutorial.
Build A Water Wall – Backyard Water Feature:
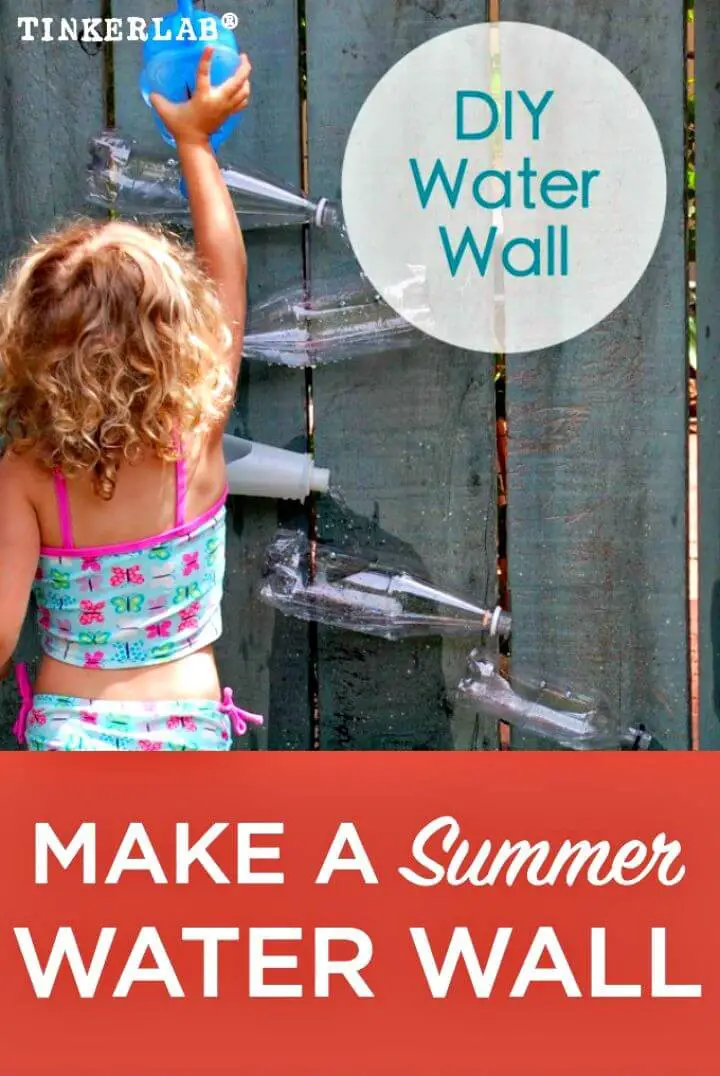
As summer approaches, incorporating water-based activities can elevate your enjoyment of the season and provide a refreshing escape from the heat. To take it to the next level, consider installing water features in your outdoor space that will not only beat the heat but also add a touch of whimsy and visual interest. One creative idea is to build a water wall using plastic water bottles, which can be cut to size and arranged on a surface or hung from a wall. The upper bottle’s water flow can create a mesmerizing trickle effect into the lower one, creating a unique and captivating display. For a step-by-step guide on how to construct this DIY water feature, visit tinkerlab for the full tutorial and instructions.
DIY Rainbow Bubble Snakes:
Make this summer a splashy one by creating a fun and unique gift for kids who love bubbles. Introduce them to the magical world of rainbow bubble snakes that can be easily made at home using plastic water bottles, socks, food coloring, and duct tape. To start, cut off the bottom of the bottle and slide a sock over it, securing it with some duct tape. Next, fill the bottle with bubble solution and add a pop of color to the end of the sock using food coloring. The result is a whimsical and delightful gift that’s sure to bring joy to any child who loves playing with bubbles. For a step-by-step guide on how to create these rainbow bubble snakes, check out housingaforest for the complete project tutorial.
Build Your Own Sprinkler – Summer Craft:
This summer, why not create some DIY water fun with your family? With a few simple materials, you can craft beautiful water sprinklers from plastic bottles and add a unique touch to your garden’s landscape. For instance, take a look at this easy-to-make sprinkler project where custom holes are created in the bottle and then attached to a hose pipe, allowing for a delightful display of running water. With just a few drops of creativity, you can create multiple versions of these sprinklers at home, bringing joy and excitement to your outdoor space.
How To Make Lava Lamps:
Transforming ordinary bottles into mesmerizing lava lamps is a surefire way to captivate your kids’ imagination and create a delightful summer decoration. To get started, fill the bottle about halfway with vegetable oil, leaving just enough room for water at the top. Add a few drops of food coloring to give it an extra pop of color. But here’s where things get really exciting – add a quarter tablet of Alka-Seltzer to create a chemical reaction that will make the ‘lava’ swirl and bubble! This DIY project is not only a blast for kids, but also makes for a thoughtful gift. For a complete guide on how to make these lava lamps at home, check out our tutorial here.
How To DIY Homemade Chalk:
Create a DIY twist on traditional chalks by making colorful ones at home for your kids. Not only will this activity add an extra layer of fun to their summer days, but it’s also surprisingly easy to do. Simply follow the simple recipe below, which requires just a few basic materials: plaster of Paris, silicone molds, plastic containers, measuring cups, and tempera paint. To take it to the next level, use custom molds to shape your homemade chalks into any design or character you like. Just head to yesterdayontuesday for the full tutorial.
How to Make Your Own Coasters:
Summer is the perfect time to bring people together, whether it’s a backyard BBQ or a picnic in the park. To add a personal touch to your outdoor gatherings, why not create some unique coasters that reflect your personality? You can achieve this by transforming plain white bathroom tiles into custom masterpieces. Start by applying custom vinyl stencils, then paint them with your chosen design – think chevron stripes or dotted lines. The result is a beautiful and functional coaster that’s sure to impress your friends and family. To give it an extra-special touch, add a mini felt circle to the bottom for added grip and stability. For a complete tutorial on how to make these stunning coasters, head over to iheartnaptime.
DIY Sea Creature Sand Castle Cans:
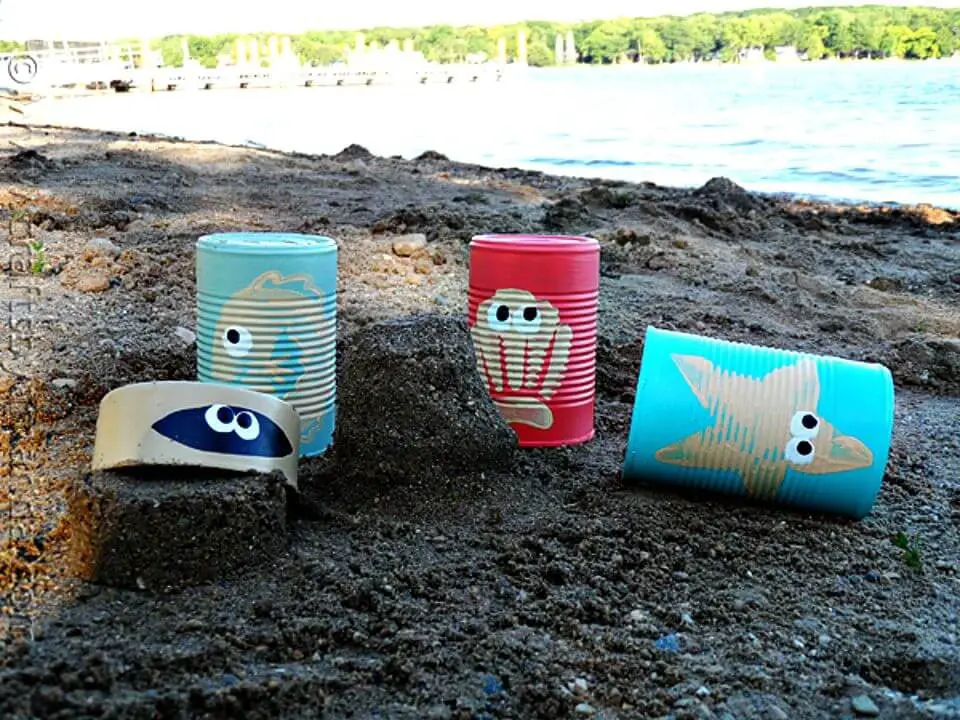
Transform ordinary tin cans into enchanting summer crafts in just a few easy steps. For instance, paint the cans and then add some sea creature foam stamps for a delightful beachy touch, creating perfect miniature sand castle containers! These castle-inspired tin cans are sure to captivate kids’ imaginations, keeping them busy for hours as they build and recreate their own sand masterpieces. Moreover, these creative vessels can also be repurposed as charming organizers or pencil holders on your study table or desk.
Simple DIY Sunglasses Case Tutorial:

For those who adore the warm summer days, there’s another creative DIY project to indulge in – crafting custom cases for your sunglasses at home. By combining fabric, lining, and interfacing, you can create a unique cover or case with an elastic opening and add a touch of elegance with an accent bow tie. This no-sew project is perfect for the summer season, allowing you to create not only a functional item but also a thoughtful gift for friends and family. Simply follow the tutorial provided to bring your sunglasses sleeves to life.
Make a Coconut Sunscreen With Shea Butter:
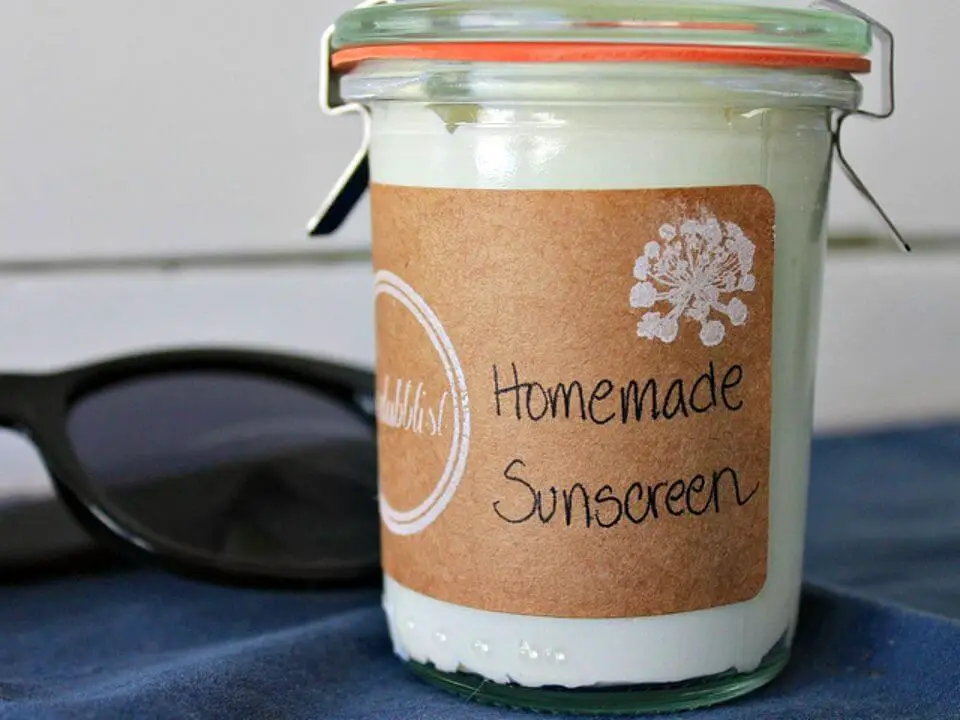
For those who dread getting their skin exposed to the harsh summer sun, there’s an alternative to achieving sun-kissed perfection without the risk of burning. Consider treating your skin to custom-made treatments that prioritize sun protection, rather than seeking a tan. One innovative approach is to create your own brilliant sunscreen at home using common household ingredients like butter and coconut oil. Not only will this DIY project save you money, but it’ll also give you the satisfaction of crafting something unique and personalized. Take inspiration from our recipe and tutorial for a shea butter-based coconut sunscreen that’s perfect for gifting or personal use. Check out the full instructions here: [link].
Quick DIY Summer Fort Tutorial:
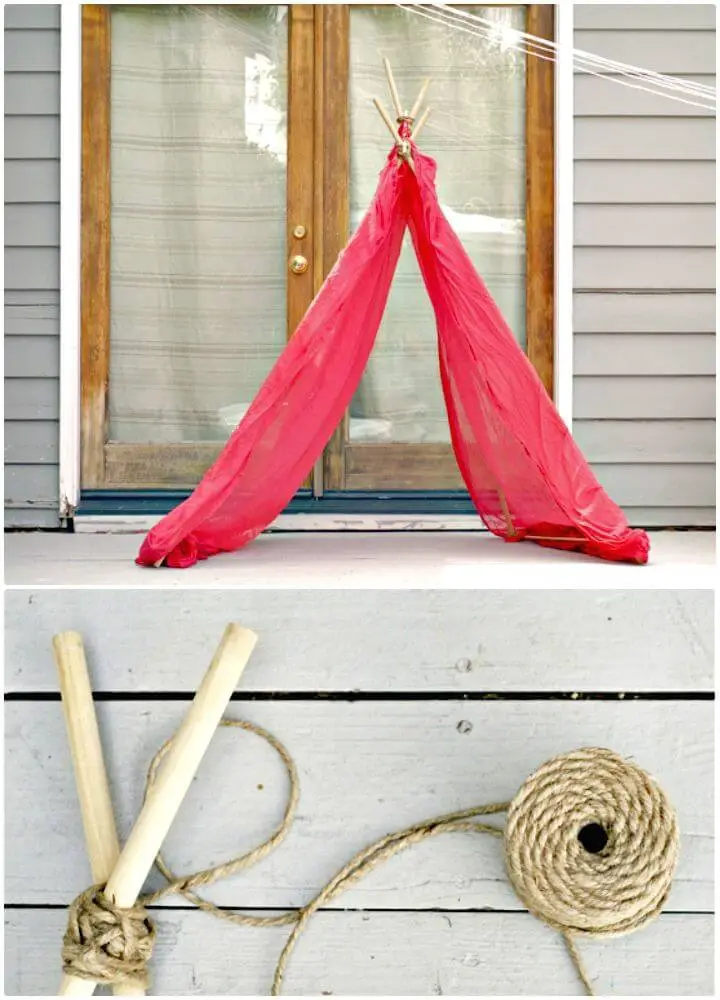
As summer approaches, many of us look forward to spending quality time outdoors with family and friends. Camping trips and tenting excursions are a great way to enjoy nature’s beauty. However, setting up an outdoor campsite can be costly and logistically challenging. A creative solution is to build a fort at home that provides a fun and engaging space for kids to play. This DIY project uses thick wooden dowels to construct a tee-pee style frame, which is then covered with sheer tabbed curtains featuring straps that slip onto cross dowel braces. The result is a cozy and inviting fort that’s perfect for indoor or outdoor use. For a step-by-step guide on how to build this summer fort, check out the complete tutorial.
How To Create News Paper Forts:
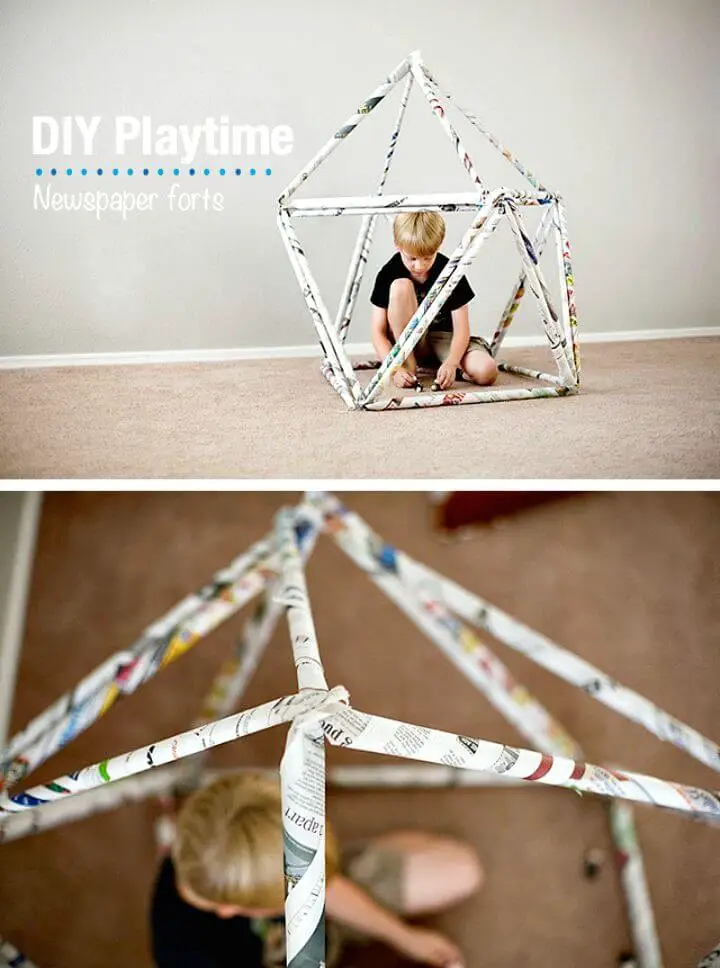
Create lasting summer memories with your kids by setting up a DIY summer fort at home using everyday materials. Old newspapers, for instance, can be transformed into a unique and cozy play area. Simply roll two layers of newspaper together to create a sturdy ‘newspaper stick’, then use three sticks to form triangles which can be combined to build a geometrically-inspired fort. The best part is that your kids can help with the construction process, making it a fun and collaborative activity. Once you’ve built the frame, let your little ones’ imaginations run wild and play in their new summer hideout. And if you want more inspiration or step-by-step guides, head to modernparentsmessykids for the full instructions.
Quick DIY Lego Key Holder:
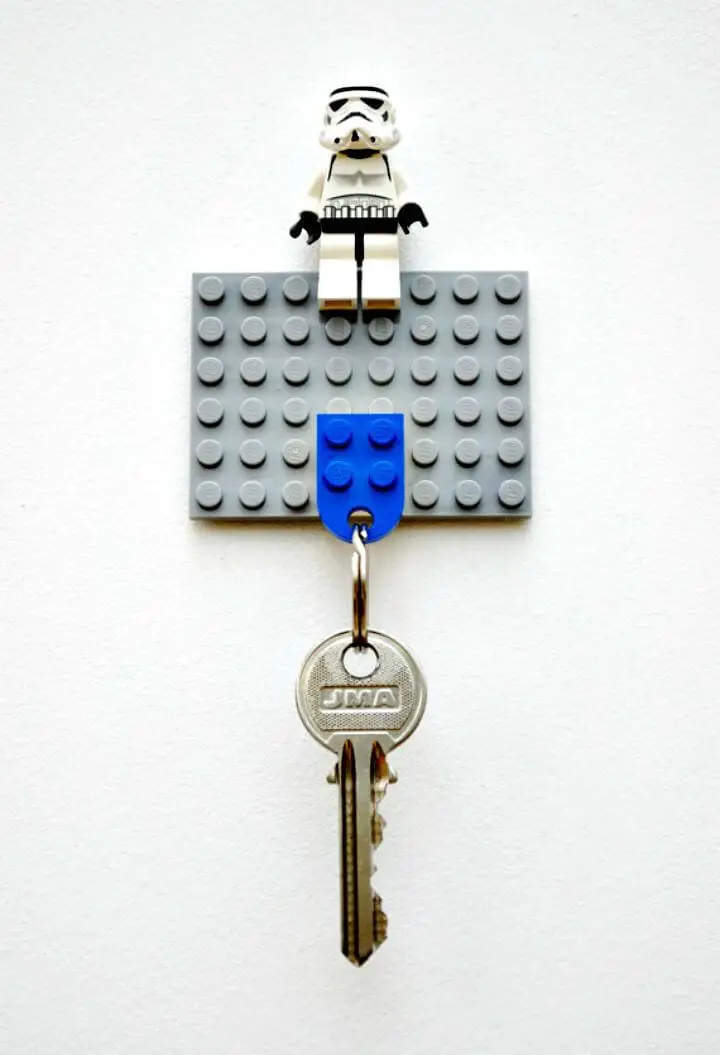
If you’re looking for a quick and easy summer project, look no further than this stunning LEGO key holder. Not only will it keep your keys organized, but it’ll also make a unique addition to your entryway décor. The pièce de résistance is the stormtrooper minifig perched on top, acting as the guardian of your keys and adding an extra layer of whimsy to this already- impressive piece. And if you’re looking for a thoughtful gift for a new homeowner, this LEGO key holder would be a fantastic choice. Plus, it’s incredibly easy to make – just follow along with our free tutorial and instructions to get started! The perfect combination of function and fun, this project is sure to delight.
Cute DIY Superhero Terrarium:
Creating breathtaking terrariums is an excellent way to spend summer days. With a few simple materials, you can craft stunning miniatures without breaking the bank. Take inspiration from this Captain America-themed mini terrarium: fill a glass vase halfway with sand and add custom decorations like semi-precious stones, succulent plants, and of course, a superhero figurine. Feel free to substitute your favorite hero for Captain America! For a comprehensive tutorial and step-by-step instructions, visit sweethappylife.
Simple DIY Traditional Kite Craft:
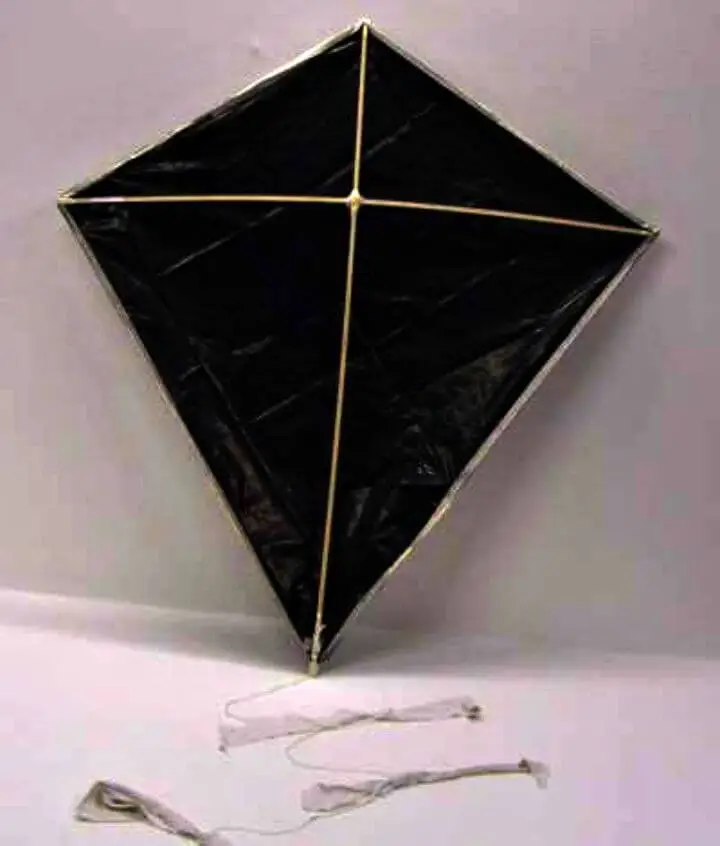
Summer’s warm breeze is perfect for flying kites, as vibrant colors dance across the blue sky. If you’re planning a colorful celebration this season, why not create your own stunning kites at home without breaking the bank? A simple DIY project can yield impressive results, like this traditional kite that can be crafted in no time. All you need is a plastic bag or kite paper, two sticks, some fabric strips for the tail, and masking tape to bring your creation to life. With a little creativity and some basic materials, you can create a beautiful-looking kite that will leave you feeling proud of your handmade design.
DIY Coffee Filter Butterflies:
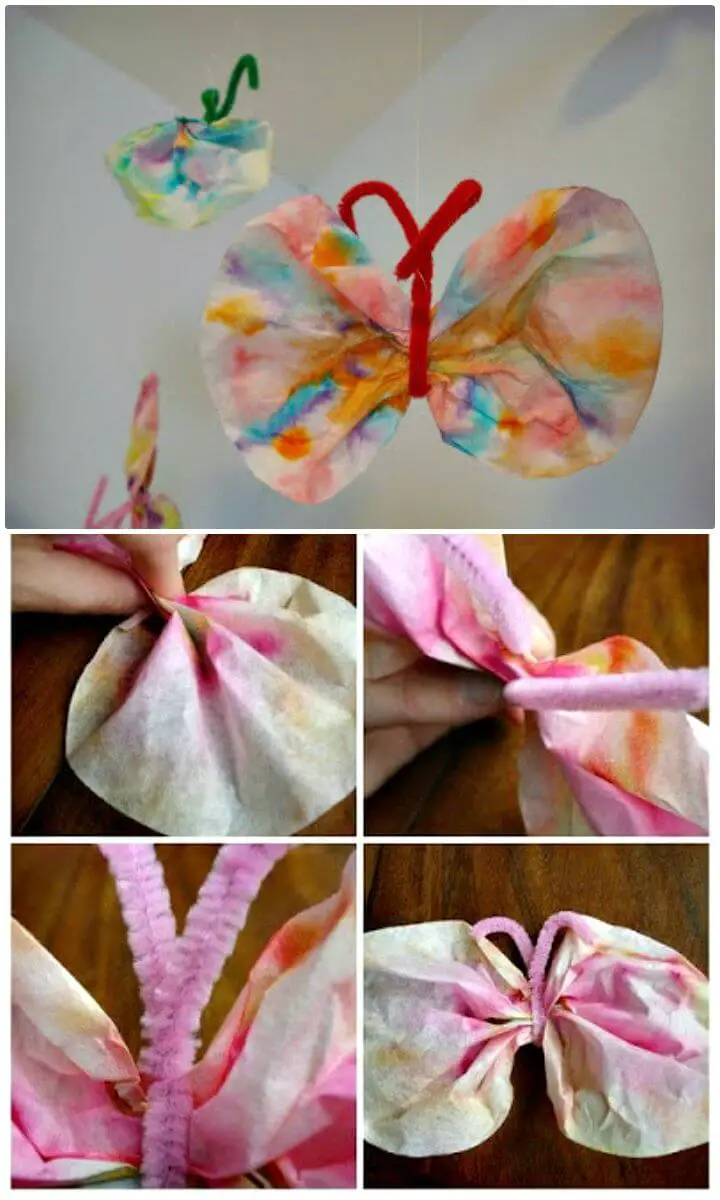
Transform your summer decor with the whimsical charm of handmade coffee filter butterflies. To create these delightful creatures, start by selecting coffee filters that will provide the perfect canvas for your artistic expression. For added visual interest, consider custom painting certain colors to bring out their unique characteristics. Using a basket-weave pattern, cut and shape the coffee filters into butterfly forms. Add antennae by attaching pipe cleaners to the center of each creation, allowing them to protrude from the body. Finally, suspend these aerial wonders from above using string or twine, and marvel at your handiwork. For a comprehensive guide on how to bring this project to life, visit Sycamore Stirrings.
How to Make Toilet Paper Roll Bird Feeder Craft:
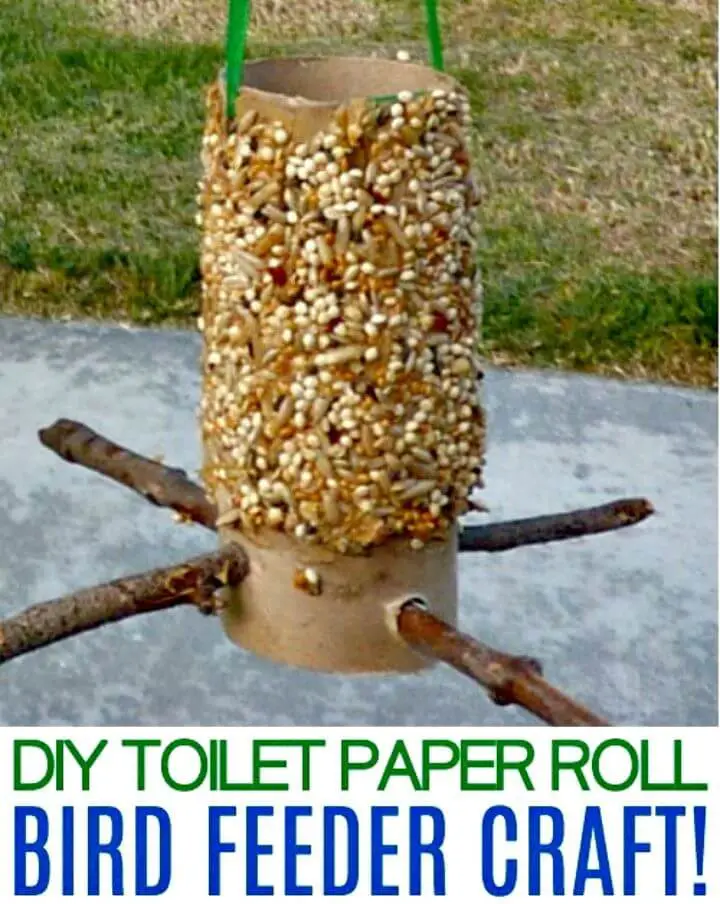
Transform your outdoor space with a creative birdfeeder project that’s budget-friendly and easy to execute. By repurposing cardboard tubs and twigs, you can create a unique and functional feeder that will attract birds to your garden without breaking the bank. The X-shaped twig arrangement provides the perfect perches for our feathered friends to feast and socialize. This DIY project is an excellent way to add some personality to your garden decor this summer, and with our step-by-step tutorial, you’ll be well on your way to creating a stunning birdfeeder that’s sure to delight both you and your garden visitors.
