Why Make Sharpie Art?
Sharpies offer a unique creative outlet that’s accessible, easy to use, and versatile. One of the primary reasons people enjoy making art with Sharpies is because they’re readily available and affordable – you might already have them at home. The fine points on Sharpies make it simple to create detailed work without needing any special setup or cleanup. You can use Sharpies on a variety of surfaces, including ceramics, fabric, and glass, which opens up endless possibilities for creative projects. Additionally, the permanent and water-resistant ink ensures that your creations will last for a long time. Making art with Sharpies is also a fun and relaxing experience that can help you unwind and express yourself creatively. With Sharpie art, you can easily customize gifts, personalize belongings, or add a personal touch to your home decor. For children, working with Sharpies can be an educational experience that helps develop fine motor skills, color theory understanding, and artistic expression. Whether you’re looking to create something for your home, as a gift, or simply for the joy of creating, Sharpie art projects are a reliable and enjoyable choice. With minimal investment and a bit of creativity, you can produce beautiful, lasting artwork.
How to Get Started with Sharpie Artwork
Artistic expression is within reach when working with Sharpies, offering a world of creative possibilities for artists of all levels. The process of creating with Sharpies is not only inclusive but also enjoyable, making it an excellent starting point for those looking to explore their artistic side or build upon existing skills. To help you begin your Sharpie art adventure, we’ve outlined a straightforward and structured approach that’s sure to inspire and delight.
Choosing Your Materials
When it comes to selecting the right Sharpies for your creative endeavors, it’s essential to consider the type of tip and the surface you’ll be working on. The iconic fine, ultra-fine, and chisel tips offer varying levels of precision, making them suitable for a range of projects. For beginners, starting with basic black Sharpies in fine and ultra-fine tips is a great way to develop your skills before expanding your collection to include vibrant colors. As you become more comfortable with the tools, you can experiment with different colors and techniques.Sharpies are incredibly versatile, allowing artists to express themselves on a variety of surfaces. Paper is an excellent starting point for practicing your skills, but don’t be afraid to venture beyond – try using Sharpies on ceramics, fabric, glass, or even wood. The key is to find what works best for you and your unique style.
Finding Inspiration
When searching for inspiration for Sharpie art, there’s no shortage of sources to draw from. Online galleries, social media platforms such as Pinterest, and the natural world all offer a wealth of ideas. Take a moment to explore these realms and see what sparks your creativity. Next, define your project by choosing an activity that aligns with your interests and skill level. For beginners, simple yet engaging projects like creating intricate mandala patterns, designing personalized mugs or customized t-shirts can serve as excellent starting points.
Planning Your Artwork
Before diving into the creative process, take a moment to lay the groundwork by lightly sketching out your design. This preliminary step enables you to visualize and refine your artwork before committing to ink. Additionally, be prepared to adapt as needed.To ensure a smooth and controlled environment, prepare your workspace by covering it with newspapers or a craft mat. This is particularly crucial when working on delicate surfaces such as fabrics or ceramics. To have peace of mind in case of any mishaps, keep rubbing alcohol and cotton swabs nearby for quick cleanups.
Making Your Artwork
To kickstart your journey with Sharpies, start by creating small, uncomplicated designs on various surfaces. This will help you understand how the markers perform and develop basic skills. Practice different strokes, lines, and fill techniques on scrap materials to get a feel for the tools.
Sealing and Preserving Your Art
When working on ceramics or glass projects, it’s essential to seal your work to safeguard against damage or wear. To achieve the best results, always adhere to the product instructions for the sealer you’re using. Additionally, consider implementing a clear coat to shield your designs from potential harm.
To ensure the longevity of Sharpie-decorated items, it’s crucial to hand wash them with gentle care. This will help preserve the artwork and prevent any damage. For fabric projects, a cold water wash followed by air drying is recommended.
Sharing Your Art
Whether you’re looking to showcase your creative work or share it with others, displaying or gifting your Sharpie artwork can be a fulfilling experience. Not only do you get to bask in the pride of having brought something new into existence, but you also have the opportunity to inspire and connect with like-minded individuals. This is precisely why joining online communities dedicated to Sharpie artists is so valuable – it provides a platform for sharing tips, ideas, and support, as well as receiving constructive feedback and discovering fresh sources of inspiration. The beauty of starting with Sharpie artwork lies in its ability to free you from the pressure of perfectionism, allowing you instead to focus on the joy of creation and the satisfaction that comes with taking risks and pushing your boundaries. So go ahead, get creative, and enjoy the process!
FAQs on Sharpie Artwork Ideas
Unleash your artistic side and discover a world of creative possibilities with Sharpie. Whether you’re just starting out or looking to take your skills to the next level, we’ve got you covered with expert advice and project ideas that will inspire you to new heights.
What surfaces can I use Sharpies on for art projects?
Sharpies are incredibly versatile markers that can be used on an array of surfaces including paper, ceramics, fabric, glass, and even wood. While the surface may affect the permanence and appearance of the ink, it’s essential to test a small area initially to ensure optimal results.
Are Sharpie artworks durable?
Sharpie’s permanent and water-resistant properties ensure that your designs remain intact for the long haul, even when applied to most surfaces. Nevertheless, for added longevity, particularly when working with delicate materials like ceramics or glassware, it may be prudent to topcoat your artwork with a clear sealant, thereby further safeguarding your creations.
How can I prevent Sharpies from bleeding on fabric?
When it comes to using Sharpies on fabric, preventing bleeding is crucial. To achieve this, consider inserting a layer of cardboard or wax paper between the garment and the marker’s tip. This simple trick helps contain the ink, reducing the risk of unwanted stains on the opposite side. For added peace of mind, look for Sharpie markers that are specifically designed for use on fabric. These products are formulated to minimize bleeding and ensure your designs remain vibrant and intact.
Can Sharpie art be washed?
When it comes to delicate decorative pieces like Sharpie-adorned ceramics or glassware, a gentle hand wash is usually the best approach to preserve the artwork’s integrity. For fabric-based items with applied designs, a cold water wash followed by air drying can help ensure the design remains intact. However, for truly washable fabrics, using fabric markers is often the more practical and effective option.
How can I remove Sharpie ink from surfaces?
When dealing with Sharpie ink on non-porous surfaces like glass or ceramics, rubbing alcohol or acetone (nail polish remover) can be used to effectively remove it. However, when tackling Sharpie stains on fabrics, pre-treating the affected area with a stain remover before washing may prove helpful in lifting the pigment. As with any cleaning method, it’s crucial to first conduct a small-scale test to ensure the chosen approach won’t cause any unintended damage or discoloration.
Can children participate in Sharpie art projects?
Sharpie art projects offer a unique opportunity for kids to hone their fine motor skills while fostering creativity. With proper supervision, this activity can be both enjoyable and educational. In fact, it’s crucial to keep a close eye on children when using permanent markers, as accidental marks on unintended surfaces can quickly become a problem.
How can I make my Sharpie art on ceramics or glassware more permanent?
To enhance the longevity of your Sharpie art on ceramics or glassware, you have two primary options: baking or sealing. Baking can be an effective method to make your design more permanent, but it’s essential to note that not all projects recommend this approach as it may alter the ink’s appearance. On the other hand, applying a clear sealer specifically designed for the surface can provide a long-lasting protection without compromising the art’s appearance. Ultimately, the choice between baking and sealing depends on your project’s specific requirements and the desired outcome.
25 Easy Sharpie Artwork Ideas (Things to Draw with Sharpie)
Unleash your creativity by exploring 25 effortless Sharpie artwork ideas. This comprehensive guide will show you the limitless possibilities of drawing with Sharpie markers, inspiring you to create breathtaking masterpieces.
Easy DIY No Bake Sharpie Art Bowl
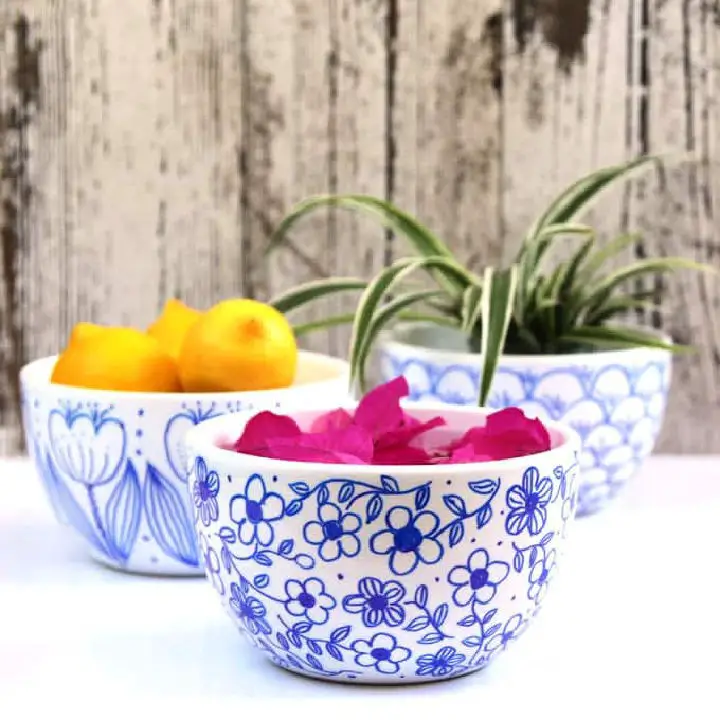
Unleash your creativity without the need for a kiln or ceramic glazes! With A Piece Of Rainbow’s easy, no-bake approach to Sharpie art bowls, you can transform plain ceramic bowls into stunning decorative pieces that reflect your unique style. Through three engaging video tutorials, you’ll learn how to create mesmerizing fish-scale patterns, charming tulip flowers, and a naturally beautiful toss pattern. Each project is designed to be manageable and enjoyable, allowing you to add a personal touch to your home decor. But don’t worry about longevity – we’ll also cover why baking Sharpie creations isn’t recommended and provide tips on how to seal your artwork for years to come.
Peony Line Drawing With Sharpie
Transform any space into a serene oasis with a charming DIY peony line drawing project. Using nothing more than a fine-tip Sharpie and some white cardstock or plain paper, you can create an ethereal masterpiece that exudes elegance and simplicity. As we guide you through the step-by-step process, allow yourself to become fully immersed in the creative journey, embracing the unique beauty of your final piece. This delightful craft is perfect for infusing a touch of springtime charm into your mantel or any room in need of a calming ambiance.
DIY Paint Pen Kitchen Organization
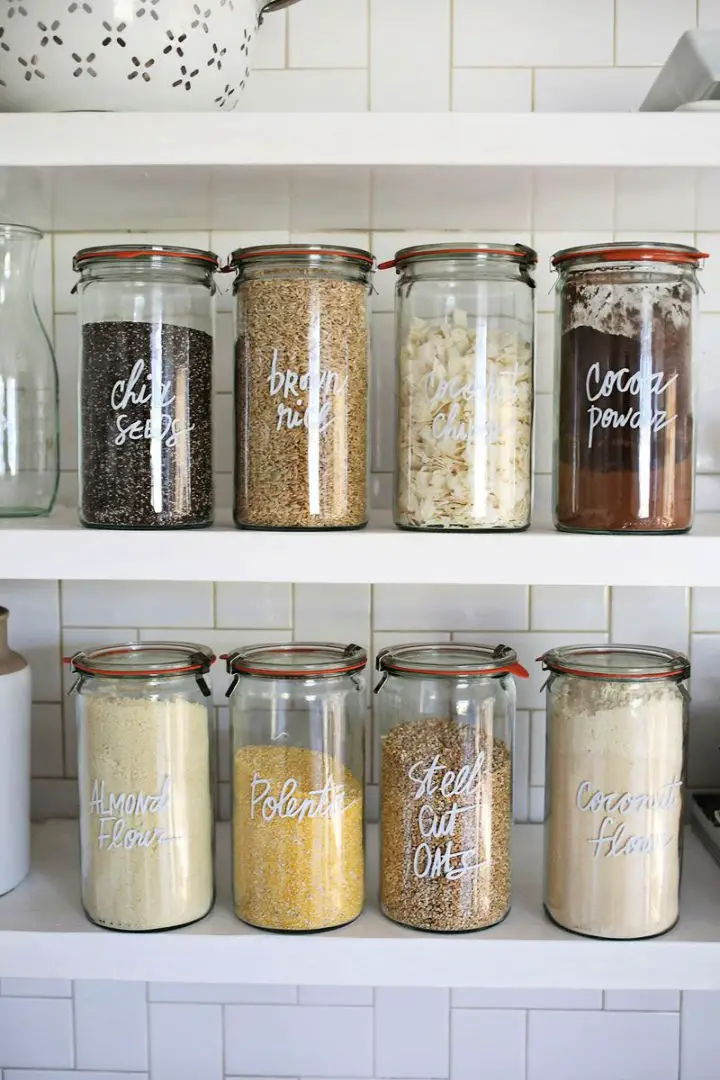
Transform your kitchen storage with a clever technique from A Beautiful Mess. Uncover the secret to using paint pens to label clear glass jars, making it effortless to identify and stylishly display your pantry items. This approach is not only straightforward but also permits easy updates or removals, allowing you to effortlessly maintain an organized kitchen that seamlessly blends functionality with beauty. Whether you’re looking to streamline your kitchen setup or add a personal touch, this method is perfect for anyone seeking to elevate their culinary space.
Make a Custom Sharpie Tray
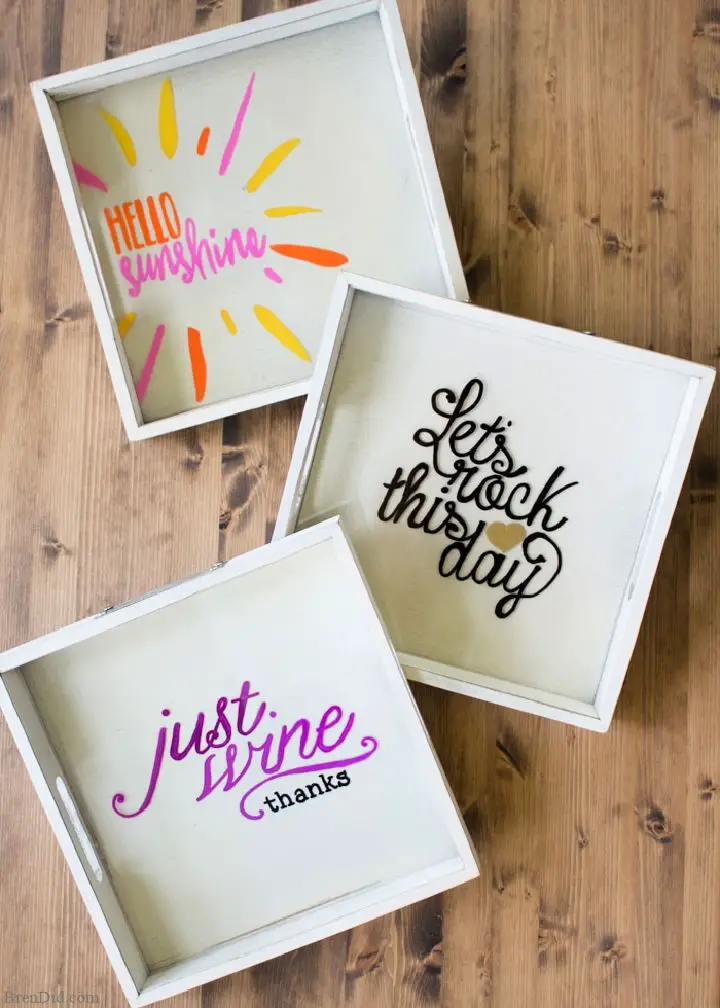
Transform your crafting skills with a unique yet effortless Sharpie project: a bespoke wine tray and glasses set. Whether you’re hosting an intimate gathering or simply want to elevate your wine night experience, this straightforward tutorial from BrenDid is the perfect fit. By leveraging just a few budget-friendly materials and dedicating about 30 minutes of time, you’ll create something truly extraordinary. Perfect for those seeking a fun, engaging, and stress-free crafting experience, follow these easy-to-follow steps to personalize your wine night essentials.
Watercolor Flower Sharpie Mug
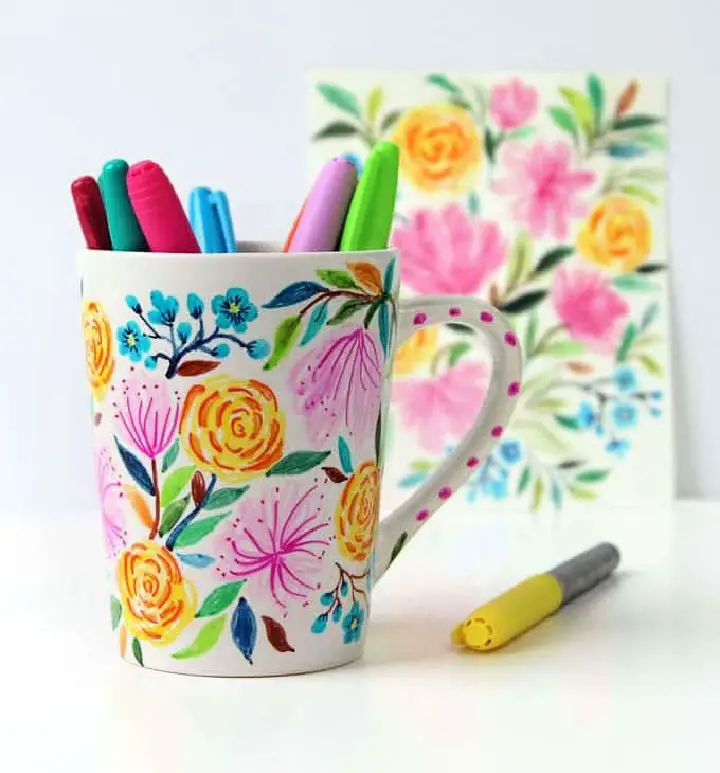
Unleash your creativity by transforming everyday objects into unique masterpieces with Sharpie art on canvases. From abstract patterns to intricate mandalas, explore endless possibilities. For those inspired by Anthropologie’s distinctive ceramic designs, our Watercolor Flower DIY Sharpie Mug tutorial is a must-try. This project requires no baking and offers boundless creativity. Discover how to create durable, beautiful Sharpie art on ceramics that can withstand daily use. Perfect for gifting or personal enjoyment, our step-by-step guide and video tutorial will empower you to craft a stunning, hand-painted mug using just Sharpies and your imagination. Visit A Piece Of Rainbow to explore the full tutorial and start crafting today.
DIY Sharpie Art Birdies for Wall
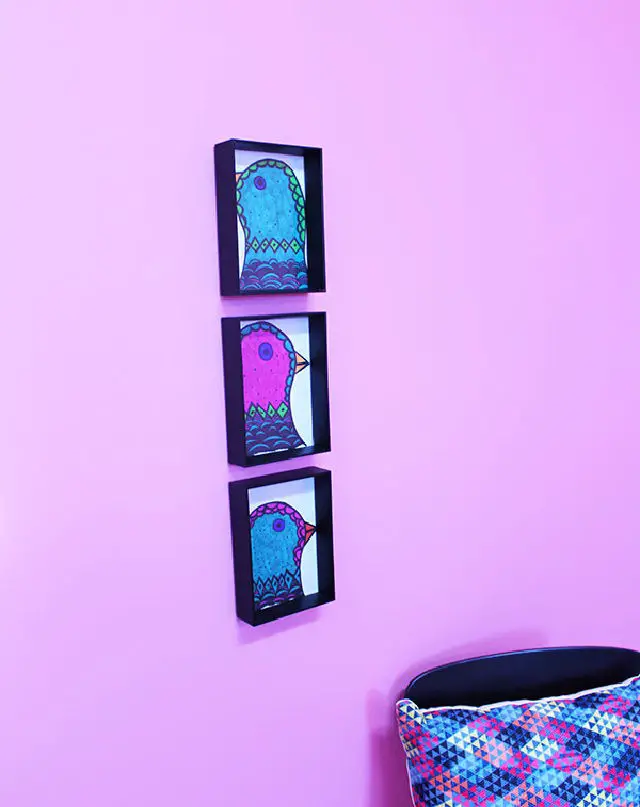
Transform any space with whimsical Sharpie art featuring birdies, a collaborative DIY project that celebrates creativity and sibling bonding. With just a few simple supplies – A5 paper, Sharpies, scissors, and frames – you can unleash your inner artist and craft a unique trio of wall accents. Begin by sketching out a bird shape; if it has a beak, you’re off to a great start! Vary the orientation and height of each bird to add personality and dimension to your design. Use a fine-point black Sharpie to outline your birdies, then bring them to life with vibrant color. This charming project not only adds a decorative touch but also serves as a heartwarming tribute to the special bonds that make us who we are. For step-by-step guidance on creating these delightful wall decorations, visit ErynWithAY.
Black Glue and Sharpies Butterfly Suncatcher

Unleash the creativity of kids by crafting a stunning Black Glue & Sharpies Butterfly Suncatcher. This engaging project requires just a few common household items: black glue, Sharpies, and recyclable clear plastic. By combining these elements, you’ll create a vibrant suncatcher that mimics the beauty of stained glass. Not only does this craft foster creativity, but it also provides an excellent opportunity for kids to practice their fine motor skills.
The process is simple yet effective: start by drawing outlines on clear plastic using black glue, then bring the designs to life with bright Sharpies. This project is perfect for a fun family activity that combines art, science, and recycling in one. For more inspiration and to grab your free butterfly template, visit Adventure in a Box.
How to Make a Sharpie T Shirt
Unlock the world of wearable art with a fun and easy DIY Sharpie t-shirt project perfect for kids! With just a few simple materials like white t-shirts, Sharpie fabric markers, cardboard, and an image to trace, you can unleash creativity and imagination. This mess-free alternative to tie-dye is an excellent activity for children of all ages and skill levels. Let your child’s inner artist shine by tracing their favorite silhouettes or embracing their imagination to create one-of-a-kind, personal pieces. It’s the perfect way to spend quality time with family while creating adorable results. Learn more about this delightful project at Living Well Spending Less.
Handmade Sharpie Canvas Art
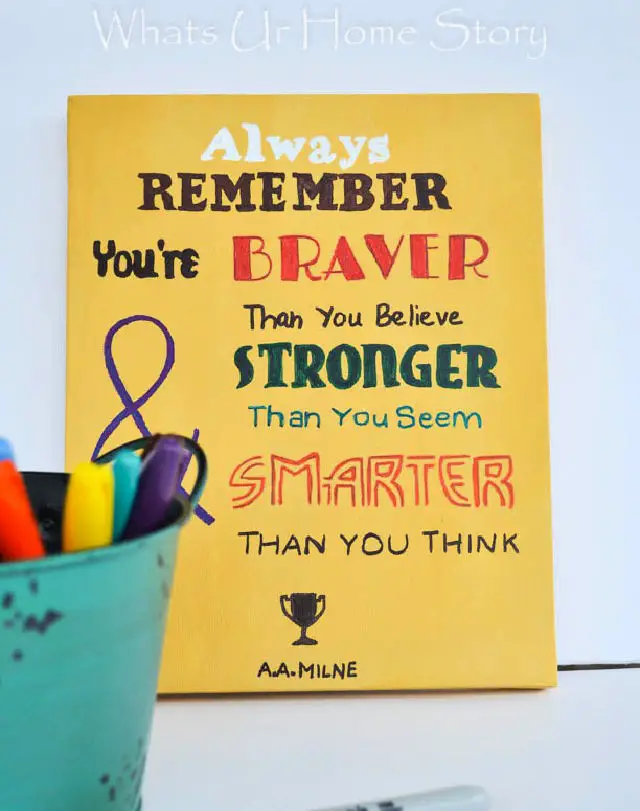
Unlock the artist within by transforming a blank canvas into a stunning masterpiece using nothing but Sharpie markers and a pinch of creativity. This straightforward DIY project is perfect for personalizing spaces, crafting heartfelt gifts, or simply expressing oneself. The beauty of this art form lies in its simplicity, making it accessible to anyone looking to add a unique touch to their surroundings. Whether used to decorate lockers, homes, or given as an inspiring gift, Sharpie canvas art is the perfect way to bring your ideas to life.
How to Make a Sharpie Art Gift
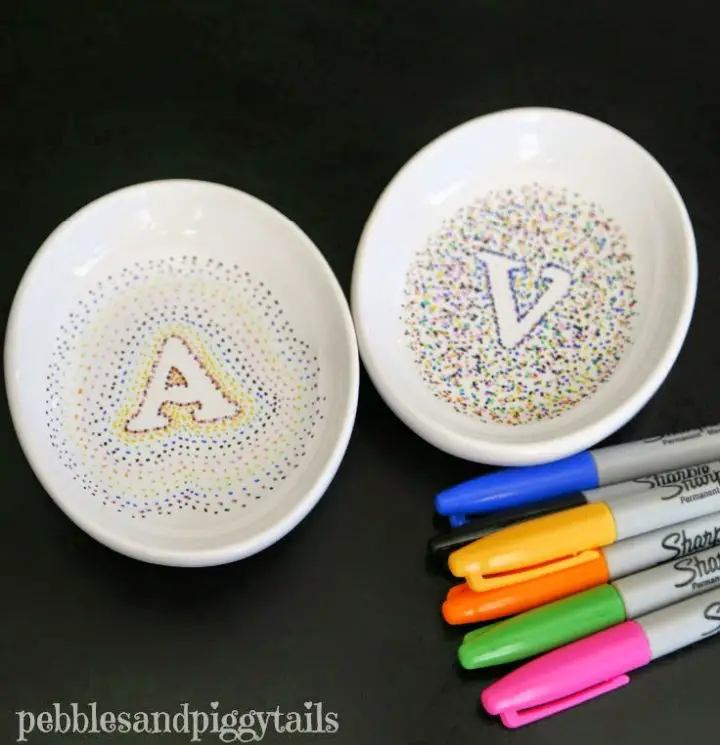
Unleash your creative genius by transforming Sharpie art into heartfelt DIY gifts that truly reflect your personality. Inspired by Making Life Blissful, this innovative project allows you to craft personalized presents using nothing but Sharpies, ceramic soap dishes, and a dash of imagination. Perfect for gifting teachers, parents, or grandparents, these unique keepsakes are ideal for Mother’s Day, Father’s Day, or any special occasion. What’s more, this DIY endeavor is an excellent opportunity for kids to express themselves, making it a fun activity the whole family can enjoy together. As you create these charming gifts, you’ll not only be crafting something practical but also capturing memories and smiles that will last a lifetime.
DIY Tie Dye With Sharpies on Shells
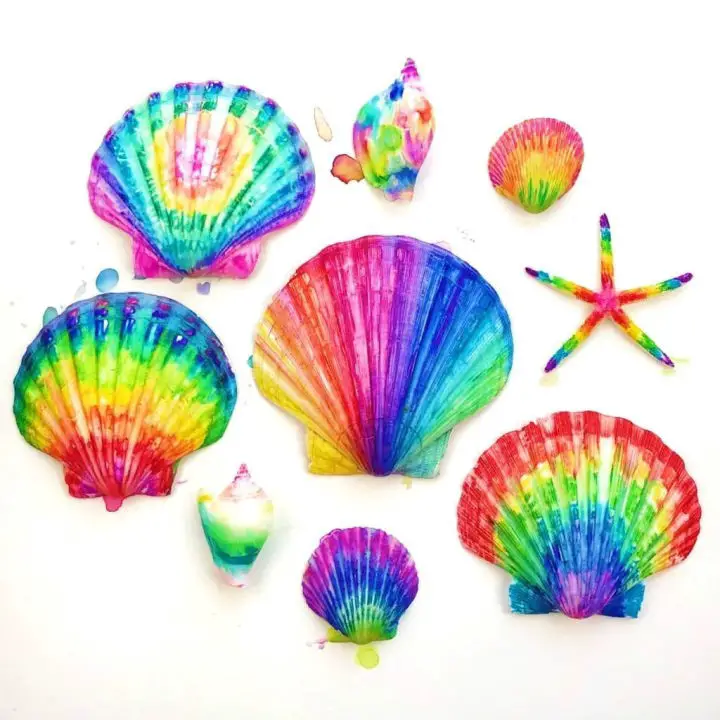
Unleash your artistic side by transforming ordinary seashells into stunning works of art using a simple Sharpie tie-dye technique! This captivating project is ideal for crafters of all skill levels. To begin, collect white or light-colored shells, fine-tip Sharpie markers, and isopropyl alcohol. Then, follow the easy steps outlined on Color Made Happy and witness the magic unfold. Let your imagination run wild and showcase your finished tie-dye creations in unique and eye-catching ways. Get ready to craft a nautical masterpiece that will leave you feeling inspired and eager for more!
Simple Custom Sharpie Glass
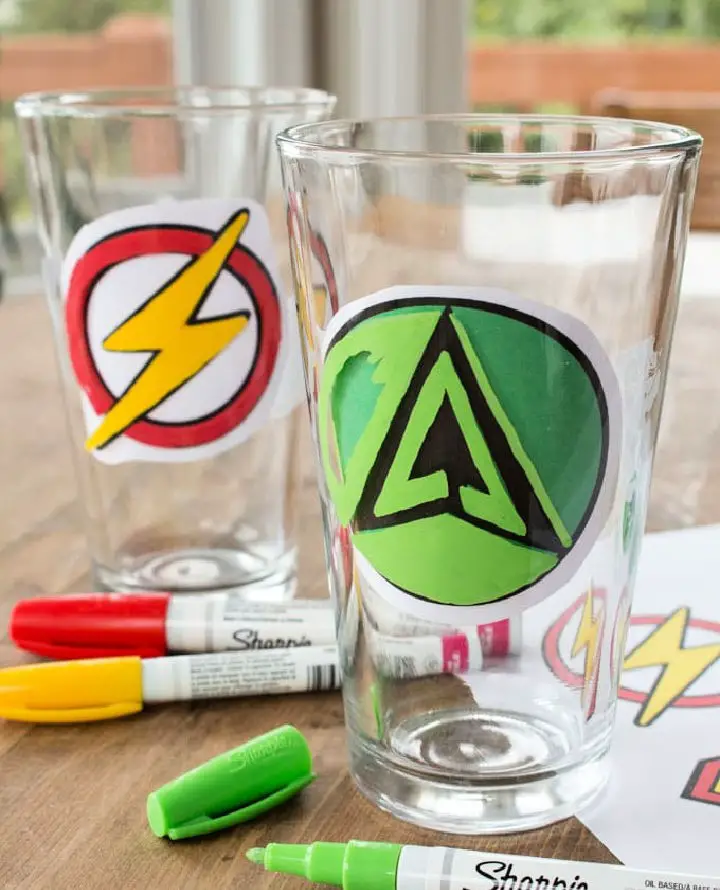
Transform plain glasses into one-of-a-kind superhero-themed drinks vessels by unleashing your creativity and crafting custom DIY Sharpie glasses. This project is accessible to crafters of all skill levels, as it only requires oil-based Sharpie paint markers, a printed pattern, and some patience. Simply trace the desired superhero logo onto the glasses, let the design dry, and you’ll have a unique piece of drinkware that’s sure to impress your friends. Just remember to hand wash these artistic creations to preserve their vibrant colors.
Make Your Own Sharpie Word Balloon
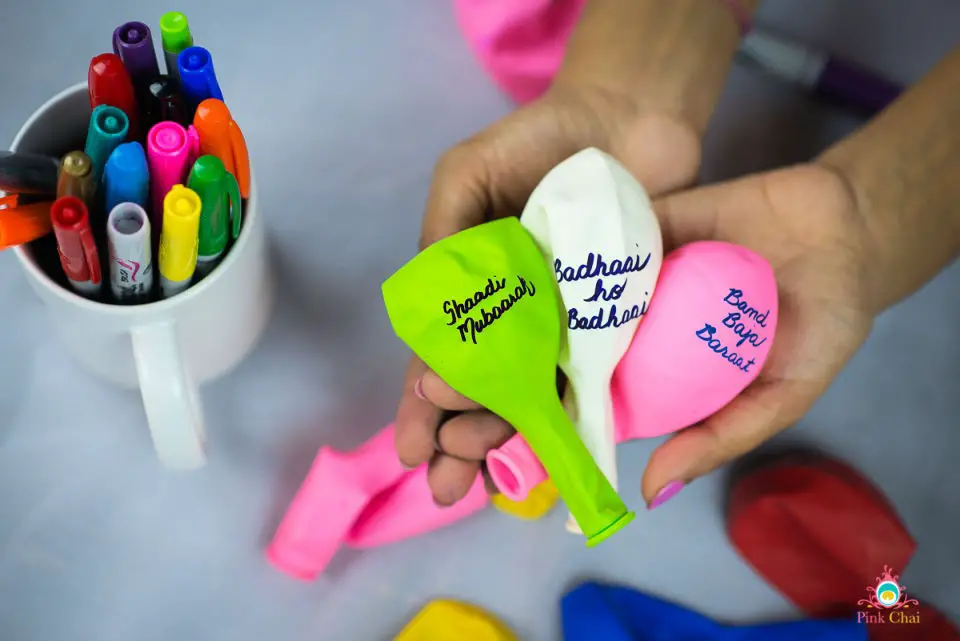
Transform your Indian celebrations into truly special occasions by infusing them with personalized charm through DIY Handwritten Balloons. These one-of-a-kind decorations are perfect for events like Diwali, Eid, and Vaisakhi, where you can express your creativity and add a unique touch to the festivities. All it takes is a few simple supplies – balloons and a permanent marker – to create customized décor that will make your celebration stand out from the rest. For those looking for an easy yet impactful way to elevate their party decorations, this DIY project is an ideal choice. To learn how to craft these special balloons, visit Pink Chai Living for a step-by-step guide.
DIY Sharpie Photo Mat – Step by Step Instructions
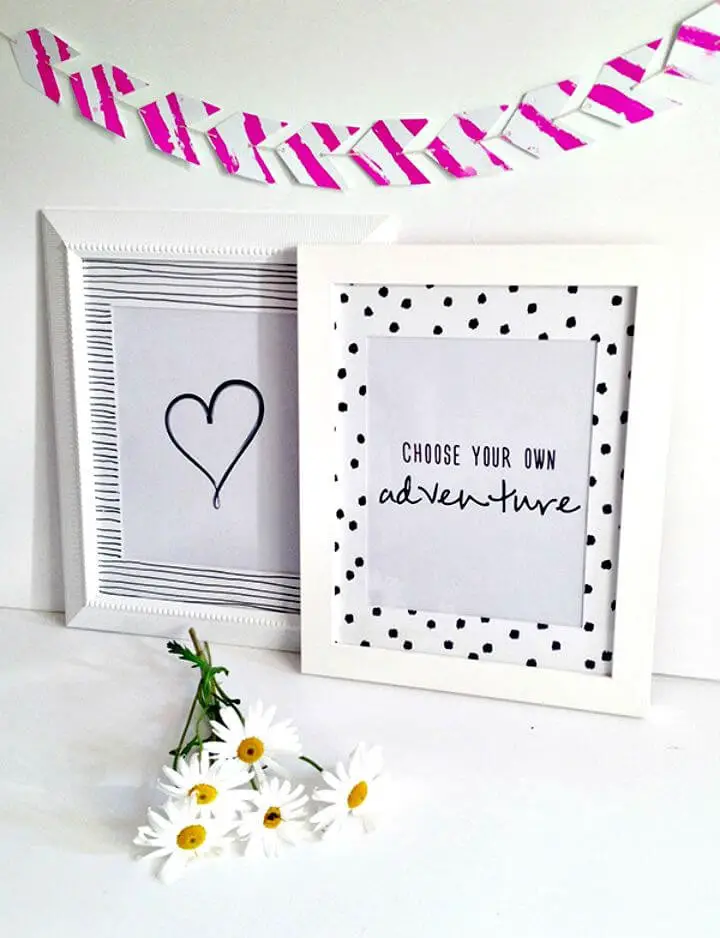
Unleash your artistic side by experimenting with unconventional Sharpie drawing techniques that bring whimsy to life in modern landscapes and captivating portraits. Add a dash of personality to your home decor without breaking the bank by incorporating hand-drawn designs into photo frames. Take it up a notch by transforming standard photo mats into one-of-a-kind masterpieces with simple yet effective patterns like dots and stripes. The beauty lies in the imperfections, making this DIY project perfect for pairing with thought-provoking quotes or prints. With minimal effort, you can transform your space into a reflection of your unique style. For step-by-step guidance, visit Make and Tell.
Easy DIY Gentleman IPhone Case

Transform your iPhone’s plain style into a unique work of art with a bespoke DIY case that exudes elegance and sophistication. In just under 15 minutes, you can take a basic clear case and turn it into a statement piece perfect for showcasing on your white iPhone. To achieve this stunning effect, all you need is a clear iPhone case, some tracing paper, a pencil, an extra fine tip black Sharpie, and optional clear nail polish to add an extra layer of protection. Follow the step-by-step instructions outlined on whiskandmaps to unleash your creativity and craft a custom accessory that reflects your personal style.
Burlap Monogram Letter With Wedding Year
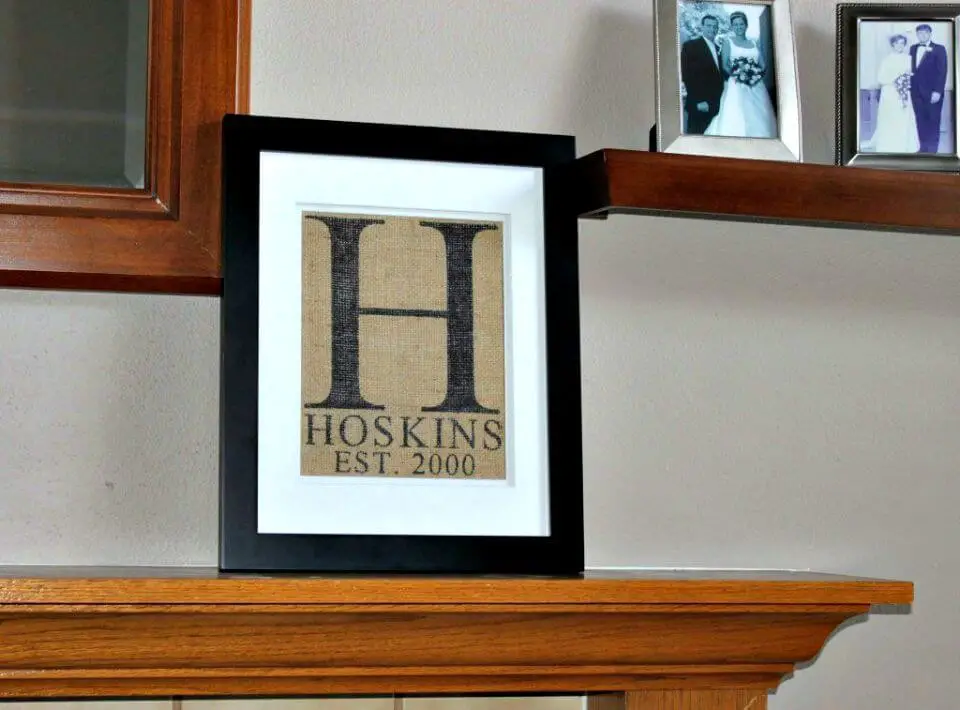
Create a heartfelt tribute to a special bond by crafting a one-of-a-kind Burlap Monogram Letter featuring your wedding year. This DIY project is ideal for wedding, anniversary, or housewarming celebrations. With just a few simple supplies, including burlap, a frame, stencil, and Sharpie marker, you can produce a personalized keepsake that will stand the test of time. The straightforward steps ensure a beautiful outcome, making it a treasured addition to any home’s décor.
Best DIY Handwritten Slogan Bag
Turn any ordinary tote into an eye-catching statement piece with a DIY slogan bag, inspired by The Things She Makes. Start by selecting or printing a custom slogan template that reflects your personality. Place the design inside your bag, using a window to illuminate the area. To prevent ink smudges, place a thick card on the back of the bag. Next, use a fabric pen or Sharpie to carefully trace over your sketch, ensuring a clean and precise finish. With your personalized bag complete, you can now store your essentials or give it as a thoughtful gift to someone special. This DIY project is not only quick but also meaningful, making it a great way to add a personal touch to any tote.
Homemade Makeup Storage Jar
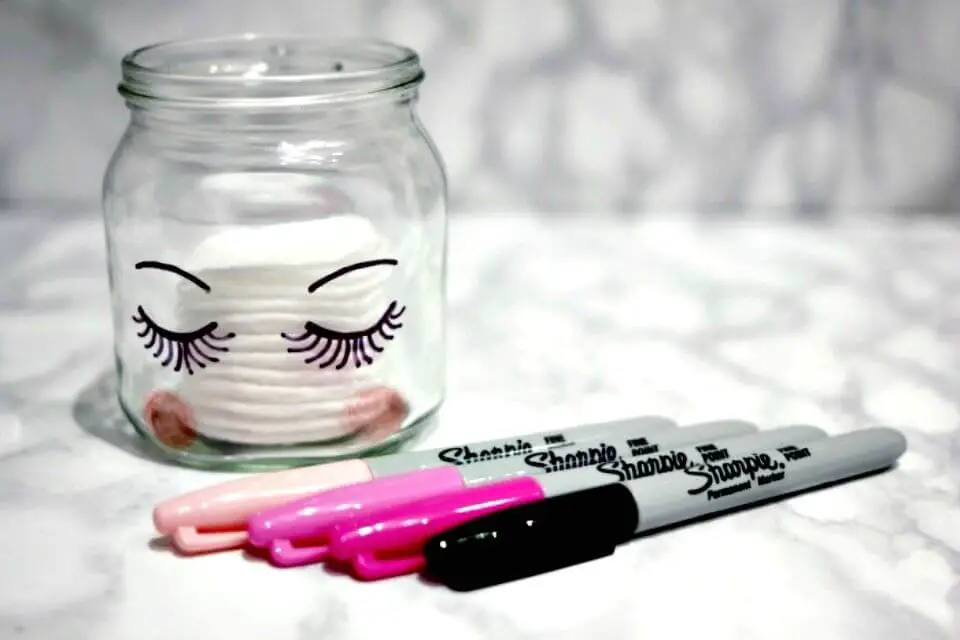
Give your makeup storage a creative makeover with a simple yet innovative DIY project! Draw inspiration from the charming Miss Etoile chinaware and create your own Sharpie Make Up Storage Jars with Ling Yeung B’s easy-to-follow guide. Perfect for those who adore unique, handcrafted items, this project adds a personalized touch to your beauty space. With its versatility and charm, this DIY endeavor is ideal for makeup enthusiasts seeking to organize their collection in style.
DIY Sharpie Quote Pillow at Home
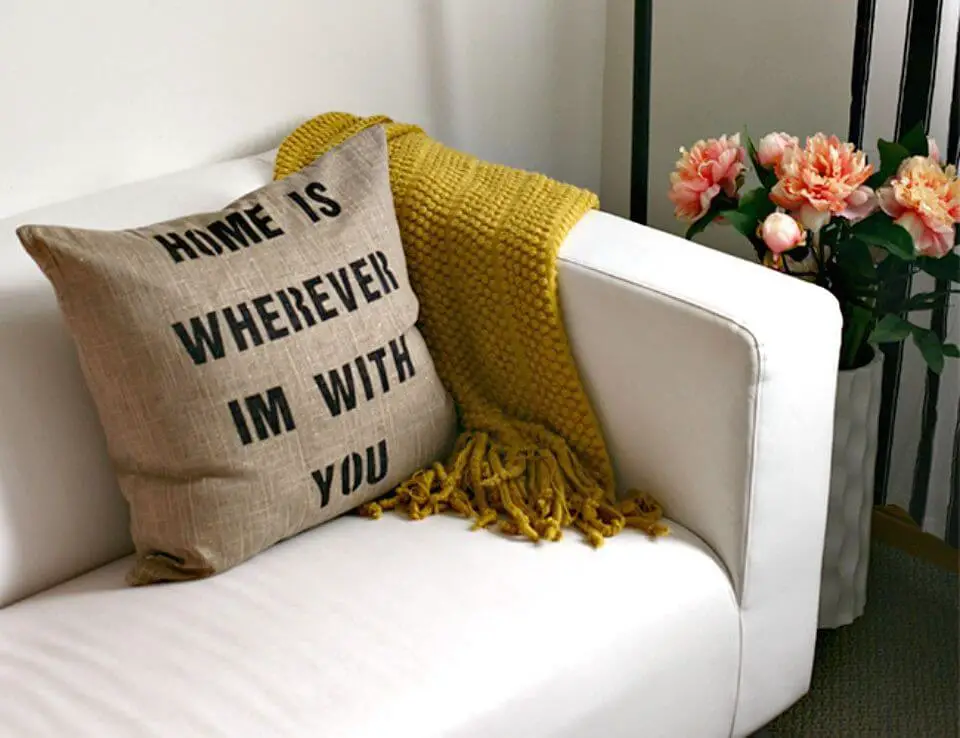
Transform any room with a personalized DIY quote pillow that reflects your unique style and sentiments. With just basic supplies like stencils and a fabric marker, you can turn a humble linen pillow into a statement piece for under $15. Whether you’re looking to add a warm welcome message or a cherished quote, this fun and engaging project allows you to make it uniquely yours. Visit Inspired by This Lifestyle Blog for the full step-by-step guide and get crafting!
How to Make Your Own Sharpie Shoes
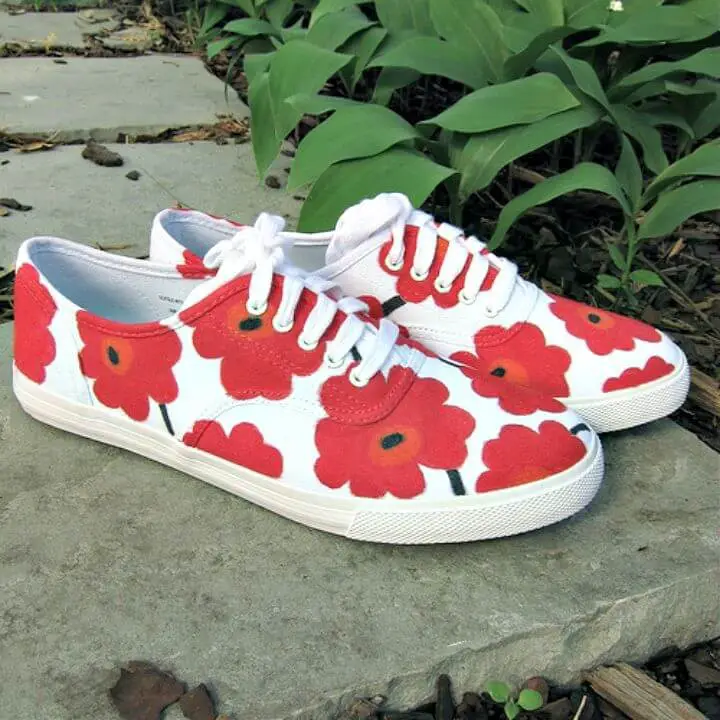
Elevate your sneaker collection with a dash of Finnish flair courtesy of Marimekko’s bold patterns. If you’re ready to shake things up, discover how to revamp plain kicks into vibrant works of art using Sharpies as your creative canvas. Perfect for making a statement at special events or simply adding a pop of personality to your everyday look, these DIY sneakers invite you to express yourself through color. And the best part? You can get started with our step-by-step guide and supply list on Just Crafty Enough. So go ahead, unleash your inner artist and turn heads with every step!
DIY Flower Jewelry Dish Tutorial

Transforming a plain white soap dish into a personalized jewelry keeper is easier than you think. With just Sharpies as the creative catalyst, you can turn this ordinary item into an extraordinary piece of home decor inspired by the elegant floral designs of Rifle Paper Co. This simple yet striking tutorial requires no artistic skills, just your imagination and a few basic steps. By applying the same Sharpie ink technique used in baking, you’ll be able to create a beautiful spot for your rings that’s uniquely yours. For a complete guide on how to make this charming piece of handmade decor, visit Pitter and Glink.
Making a Gold Embellished Mug
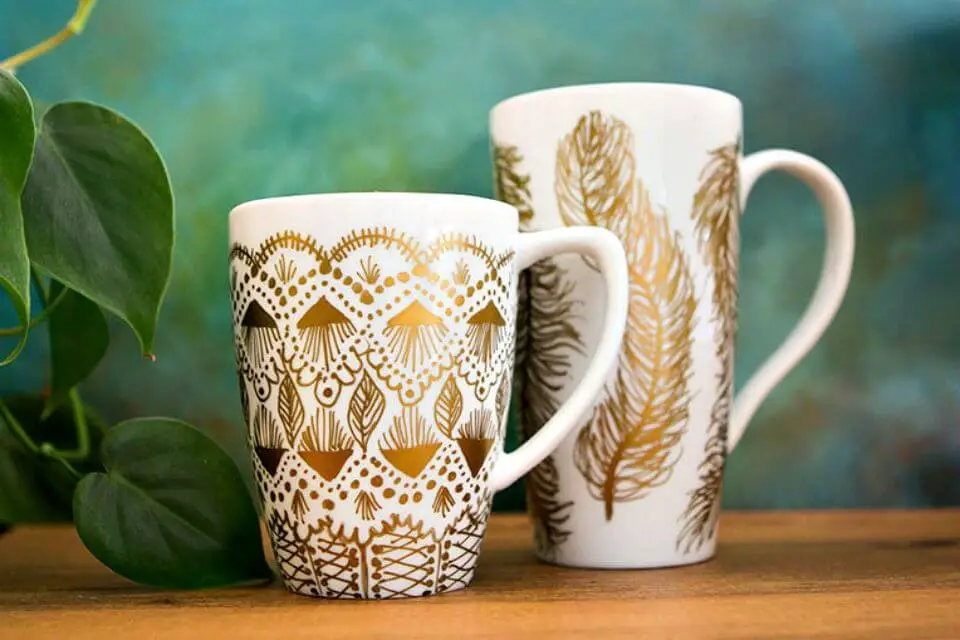
Immerse yourself in the realm of Sharpie artistry, where vibrant galaxy prints and intricate animal sketches come to life. Unleash your creativity by transforming plain ceramic mugs into stunning works of art with a simple DIY Gold Paint Mug Makeover. Whether for personal enjoyment or as a one-of-a-kind gift, this easy-to-follow tutorial will take your coffee experience to the next level.
To get started, you’ll need just three essential items: a plain ceramic mug, a metallic gold paint pen, and an oven. Begin by shaking the paint pen well and testing its flow before bringing your design to life. Allow the paint to dry completely, then bake it in the oven at 350 degrees Fahrenheit for a mere 30 minutes. And that’s it! For best results, hand wash only. For a more detailed guide and additional inspiration, visit Sisoo.com.
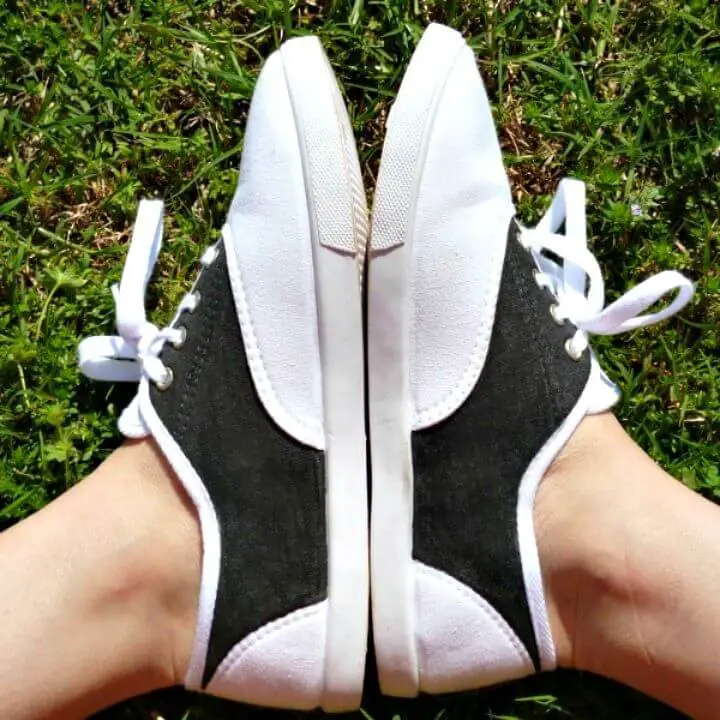
DIY Painted Faux Saddle Shoes
Elevate a pair of plain sneakers into striking faux saddle shoes with this step-by-step guide. Whether you’re looking for a creative Halloween costume or want to add some flair to your everyday style, these shoes are sure to turn heads. By combining fabric paint and imagination, you’ll breathe new life into a humble pair of tennis shoes, transforming them into a durable and charming accessory that pairs perfectly with a poodle skirt. Are you ready to unleash your creativity and craft one-of-a-kind footwear? Let’s embark on this project together and create something truly special.
How to Do You Make a Sharpie Dinnerware
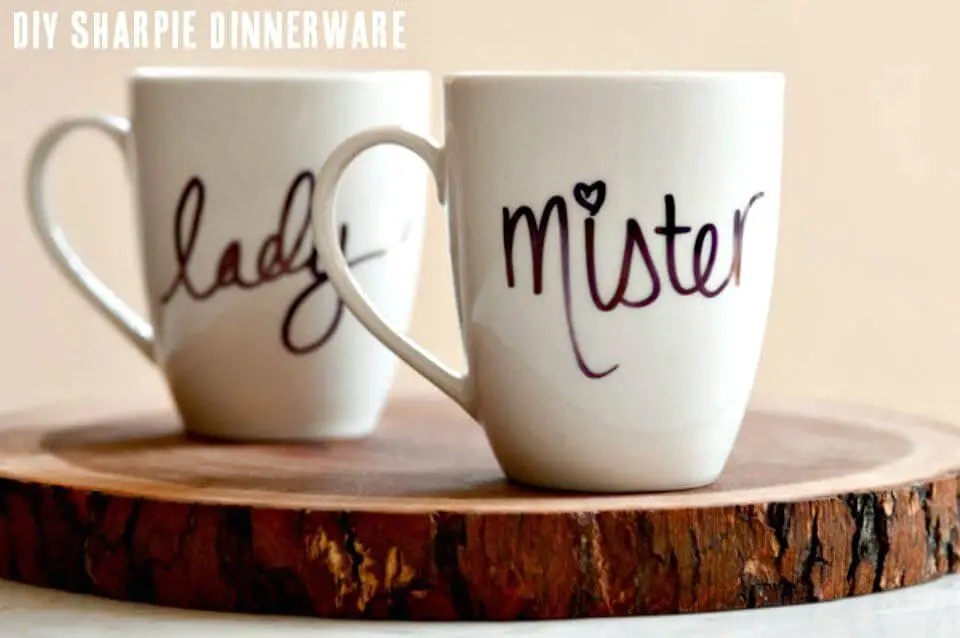
Elevate your kitchenware and unleash your creativity with this easy and engaging DIY Sharpie Dinnerware project. Perfect for personalizing gifts or adding a touch of whimsy to your dining table, this tutorial takes you step-by-step through creating beautiful, custom pieces that are sure to impress. All you’ll need is a set of white dinnerware, Sharpie markers, glass cleaner, and an oven. From playful polka-dot bowls to heartfelt personalized mugs, the possibilities are endless for making unique and meaningful ceramics. Just be aware that they may require hand washing to preserve the integrity of your designs. For the full guide, visit The Sweetest Occasion.
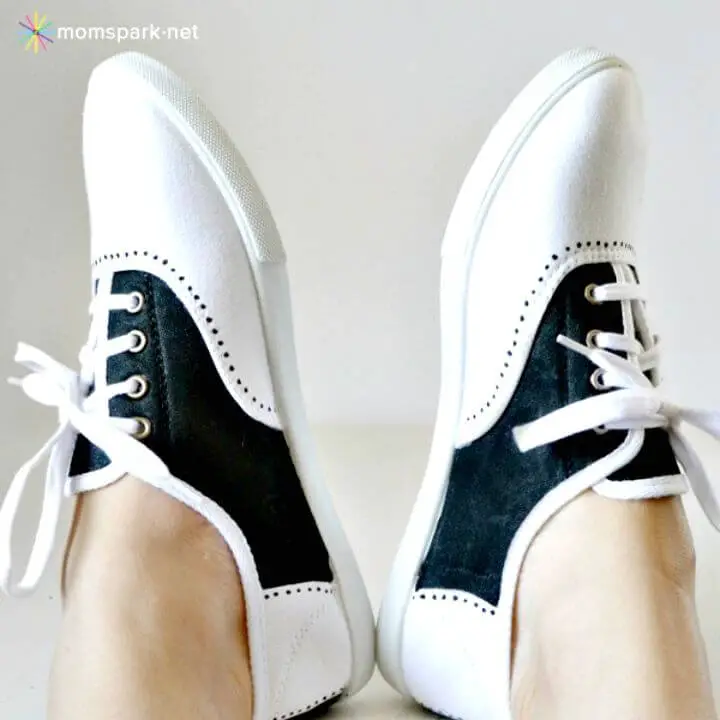
How to Make a Faux Saddle Shoes
Unleash your creativity with bold and vibrant Sharpie art, transforming ordinary objects into extraordinary pieces of art. Take plain white sneakers, for instance, and turn them into one-of-a-kind DIY Saddle Shoes. All it takes is a few simple materials – sneakers, paint, a stiff brush, and a dash of imagination! This easy tutorial ensures the vibrant color lasts long after you’ve rocked your new kicks. Head to Dream a Little Bigger for the step-by-step guide and get ready to craft your personalized pair today. With endless possibilities at your fingertips, choose your favorite colors and make DIY Saddle Shoes that truly reflect your unique style.
Conclusion:
The world of Sharpie artwork offers a refreshing escape into creativity, where 25 easy ideas serve as a starting point for artistic expression on various mediums like paper, ceramics, or fabric. The beauty lies in its accessibility – no extensive supplies or skills are required, making it an ideal project for people of all ages. As you begin your journey with Sharpie art, the right materials, inspiration, and some simple steps to protect and share your creations become crucial. This opens up a vast playground for personal expression and thoughtful gifts. Remember, the secrets to success lie in embracing creativity, practicing with different surfaces and techniques, and allowing experimentation to be the driving force behind crafting stunning Sharpie artwork masterpieces.
