DIY Color Blocked Disk Beaded Necklaces
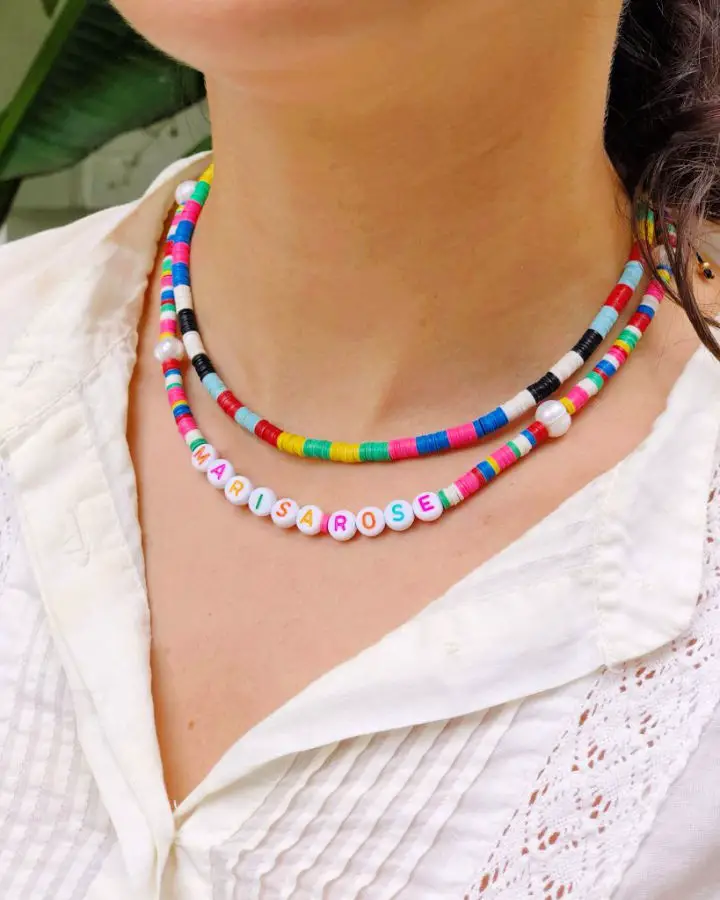
Craft a striking color-block necklace with ease by following this DIY tutorial. This stylish piece features African vinyl disk beads, knotting cords, gold spacer beads, and other materials. The vibrant color blocks add a distinct flair to the design, allowing you to personalize it by adjusting the block widths. By stringing the beads, securing them with knots, and adding an adjustable square knot closure at the back, you’ll create a bold and captivating accessory that’s perfect for everyday wear. With these simple steps, unleash your creativity and craft a one-of-a-kind piece that reflects your personal style.
Handmade Beaded Statement Necklace
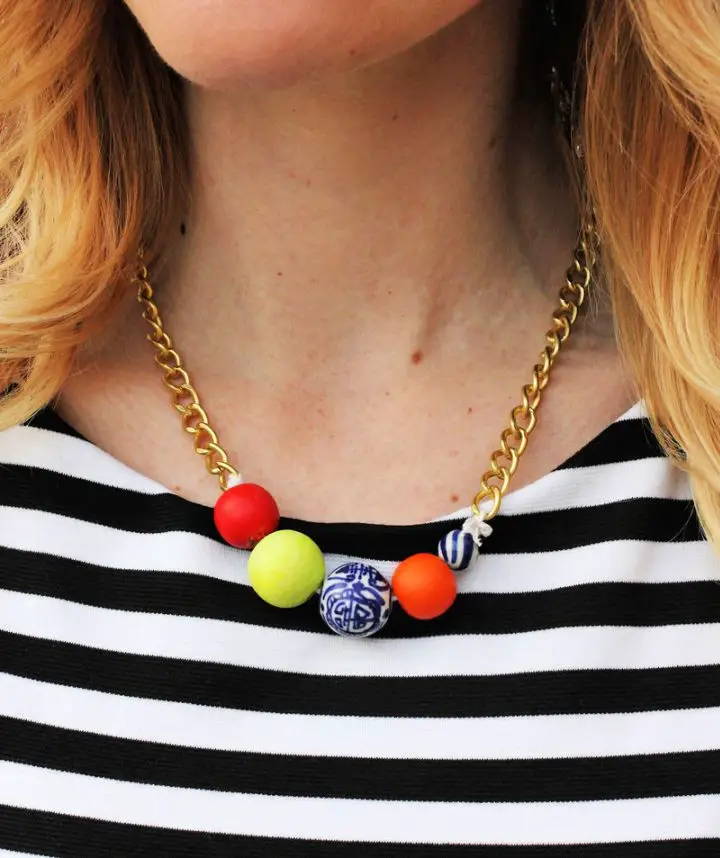
Step outside your comfort zone and unleash your creativity by crafting unique and fashionable DIY necklaces. Start with a rustic yet vibrant design featuring painted wood beads paired with colorful craft store beads, carefully strung together with twine to create an eye-catching look. Take it up a notch by experimenting with more polished designs that combine chains, beads, head pins, and jewelry pliers. Simply add beads to the head pins, attach them to the chain, trim any excess wire, and secure the loops with pliers for a refined finish. Feel free to get creative and indulge your newfound passion for jewelry making by experimenting with different color schemes and designs to create personalized pieces that reflect your unique style.
Marbled Clay Pendant Necklace Design
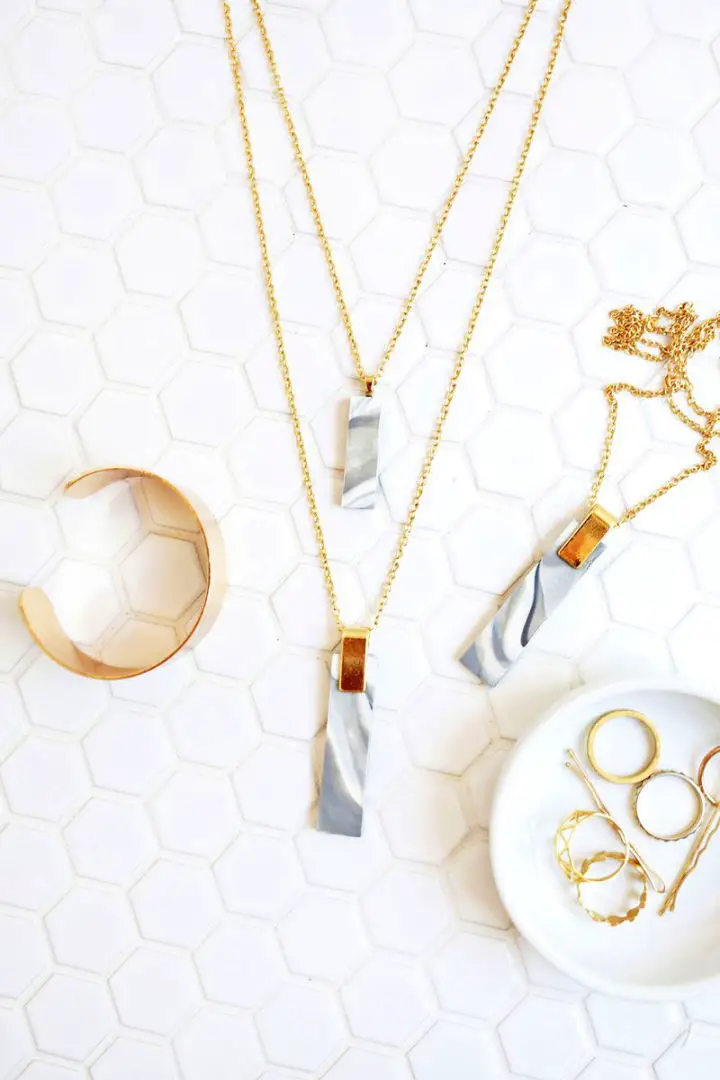
Transform your style with a DIY marbled clay pendant necklace that’s as versatile as it is stunning. This unique accessory can elevate both casual and formal outfits, its longer chain creating the illusion of height. Drawing inspiration from the marbling technique used in making clay ring dishes, this tutorial will guide you through crafting a show-stopping pendant necklace. To get started, gather your supplies: oven-baked clay, a rolling pin, an X-Acto knife, parchment paper, super glue, a necklace chain, jump rings, and a necklace closure. Don’t be afraid to experiment with colors and sizes to make the piece truly yours. Whether you’re crafting for yourself or creating a thoughtful gift, this project is quick, easy, and sure to impress. Unleash your creativity and make a fashion statement with your marbled clay pendant necklace today!
Making a Wire Hand Necklace
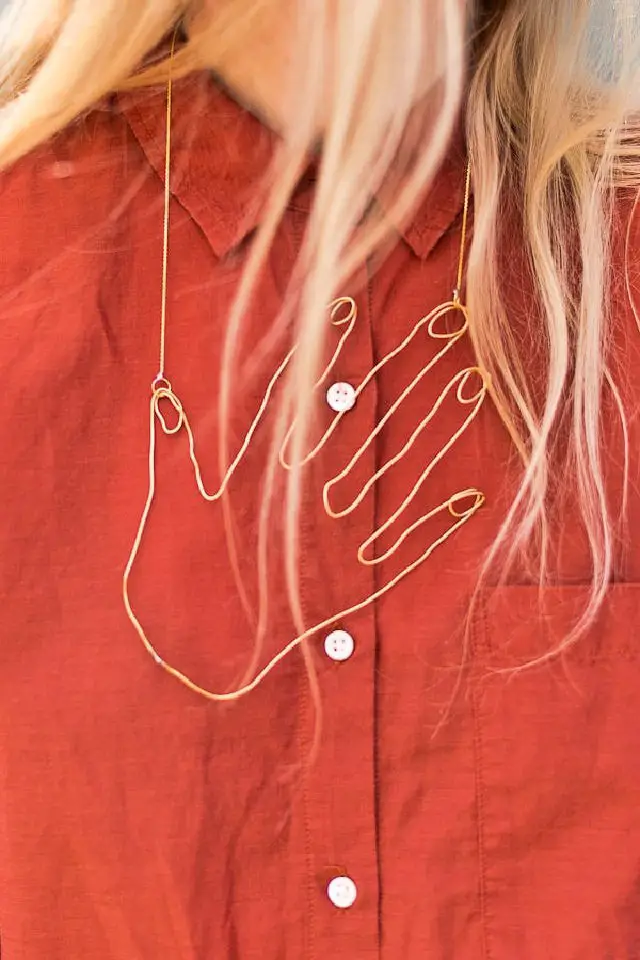
Transform your style with this innovative DIY hand necklace tutorial, perfect for beginners looking to explore soldering. By following our step-by-step guide, you’ll learn how to shape and mold brass wire into a stunning pendant using a soldering iron set, flux soldering paste, and other essential supplies. The comprehensive instructions will walk you through the soldering process, ensuring a seamless connection of the wire pieces. Elevate your creation by attaching a gold-plated chain and jump rings to each finger of the hand-shaped pendant, creating a truly one-of-a-kind accessory that’s sure to make a fashion statement.
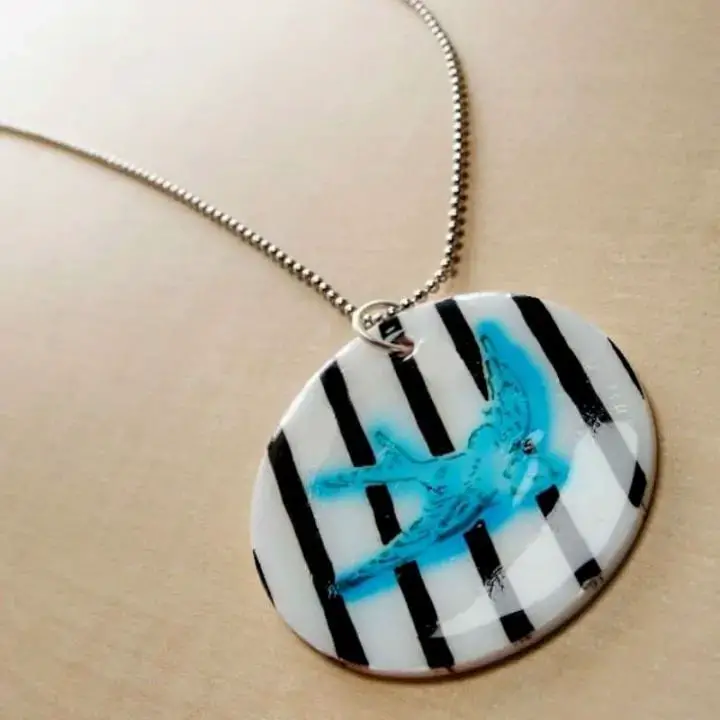
How to Make Your Own Polymer Clay Necklace
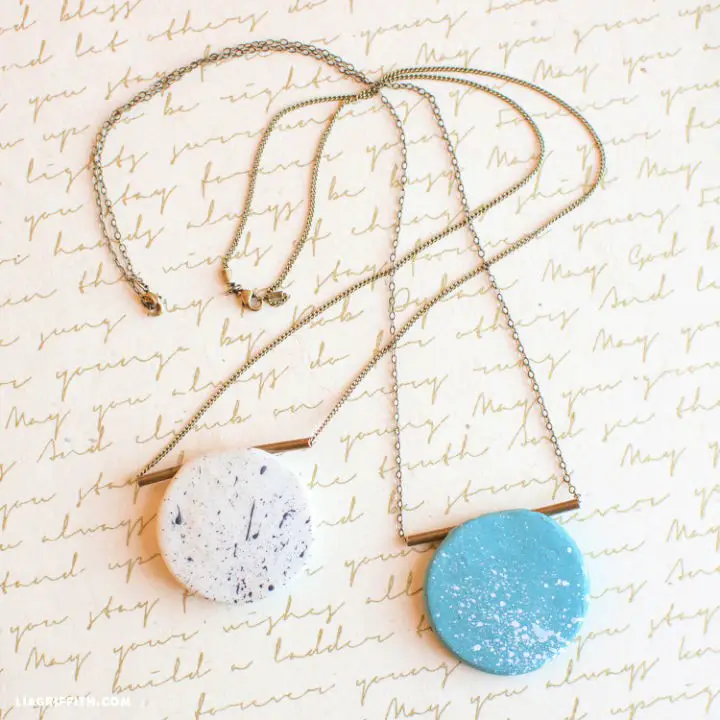
Craft a show-stopping DIY polymer clay necklace with this step-by-step guide. This versatile and budget-friendly modeling clay offers endless opportunities to create stunning jewelry pieces. With its vibrant color palette, your creativity can run wild.To get started, roll out the clay into a 1/8-inch thick circle and insert a copper noodle along its length. Smooth out any imperfections, then bake the necklace until it’s set. Next, add some personality to your design by splattering acrylic paint onto the surface in unique patterns.Once your piece is complete, thread the chain through the copper noodle, attach the clasp and jump rings, and get ready to wear your one-of-a-kind statement necklace. Feel free to experiment with different chain lengths and color combinations to create a truly personalized look.
DIY Scandinavian Hoop Necklaces
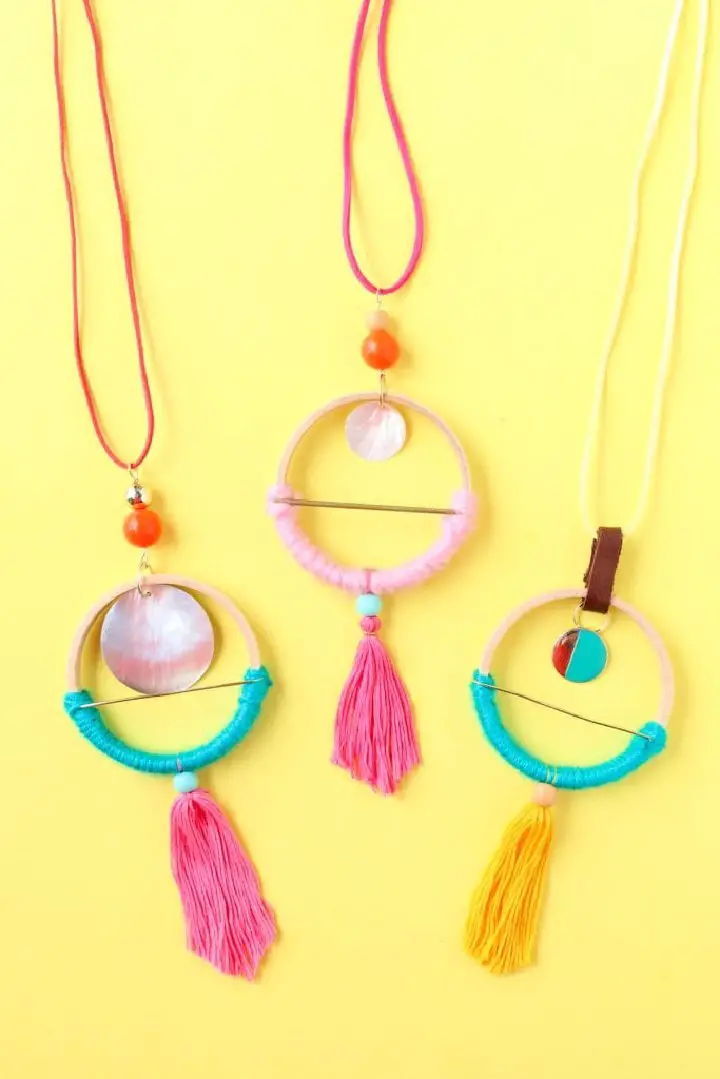
Create a stunning DIY Scandinavian hoop necklace that makes a fashion statement! Drawing inspiration from popular hoop mobiles, these necklaces beautifully combine the charm of woven wall hangings with the mobility of a necklace. To craft your unique piece, gather materials like a 3-inch wood embroidery hoop, yarn, embroidery floss, brass jewelry wire, colorful beads, and faux suede cording. Follow the step-by-step guide to wrap the wire around the hoop, add embroidery floss and beads, then wrap the hoop with yarn. Customize your design by attaching a pendant piece and adding more beads. Finish the look by looping the suede cord through the hoop and securing it at your desired length. With its vibrant colors and blend of wood, metal, and fibers, this necklace is perfect for adding a stylish touch to your summer outfits!
Homemade Chain and Pearl Necklace
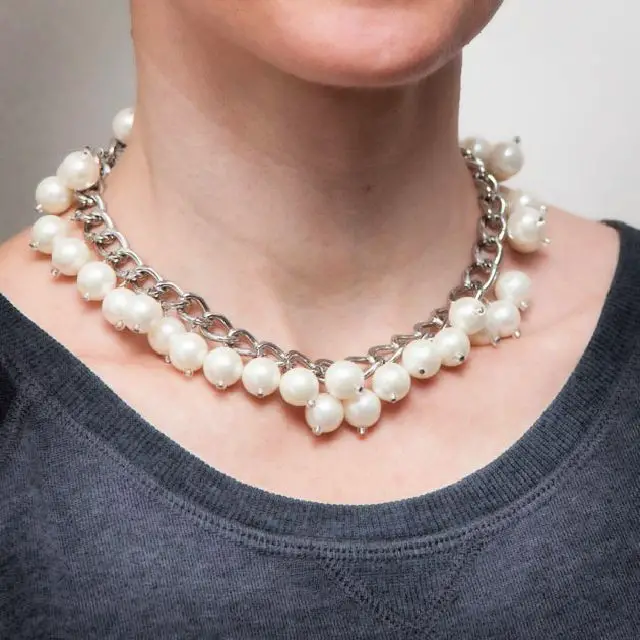
Elevate the classic pearl necklace by infusing it with an edgy twist. This DIY project combines the timelessness of pearls with the modernity of heavy chain, resulting in a versatile piece that effortlessly complements any outfit. To create this statement-making accessory, gather your materials: a large chain, large pearls, small beads, jump rings, a closure, pliers, and bead pins.
Begin by measuring out the desired length of your chain and securing the closure using jump rings. Then, craft bead pins by attaching a small and large bead to each pin and linking them to the chain’s metal links. The subtle movement created by these beads adds an intriguing touch to the overall design.
To put your personal stamp on this piece, experiment with gold or silver chains. This necklace effortlessly straddles elegance and edge, whether paired with a casual ensemble or a little black dress. Let your creativity shine and make a statement with your one-of-a-kind pearl necklace.
DIY Wood and Copper Necklaces
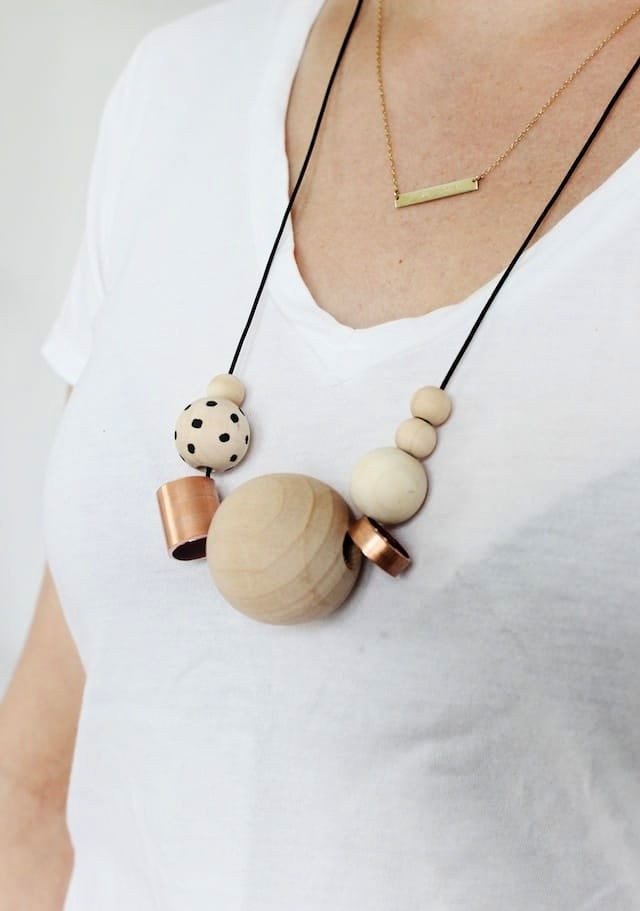
Immerse yourself in the world of DIY craftsmanship by exploring the unique fusion of natural woods and copper in creating statement necklaces. This modern project combines raw, uncomplicated materials like wooden beads and copper tubing to produce a truly personalized piece of jewelry. The versatility of this design lies in its ability to be tailored to suit any outfit or personal style.
To take your creativity to the next level, begin by crafting copper tube beads using a tube cutter, following a series of step-by-step instructions. Add a touch of whimsy and visual interest with polka dots painted onto some wooden beads. The possibilities are endless as you experiment with different combinations of beads and tubing on a leather cord, allowing for variations in length and style.
Complete each necklace with a small bead and knot, culminating in a stunning piece of handmade jewelry that reflects your individual creativity and flair.
Modern DIY Tassel Necklace
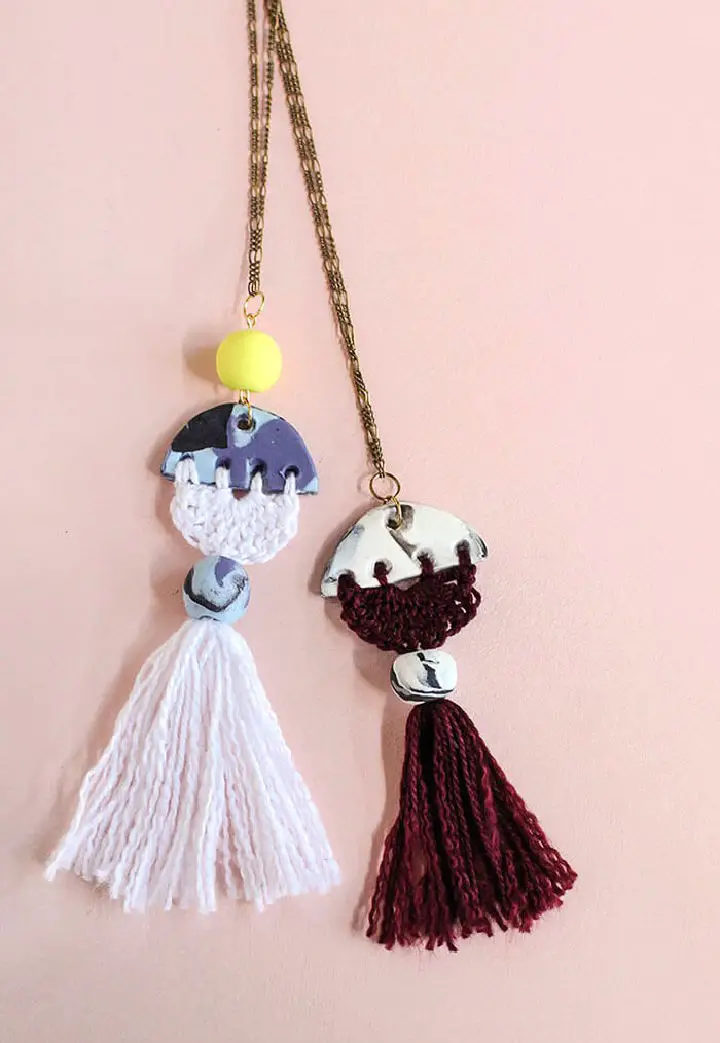
Create a one-of-a-kind statement piece by crafting your own DIY necklace with this unique modern tassel tutorial. By combining marbled clay and crochet, you can customize the design to reflect your personal style. With simple steps and minimal supplies like oven-bake clay, a craft knife, embroidery floss, and crochet hooks, you’ll be able to make multiple necklaces in no time. The process begins with marbling the clay, cutting out circles, creating beads, and baking them to perfection. Next, learn how to crochet a semicircle and add a tassel for an added touch of elegance. Finally, attach the chain and jump rings to complete the necklace and proudly showcase your creativity.
Painted Wooden Bead Necklace Ideas
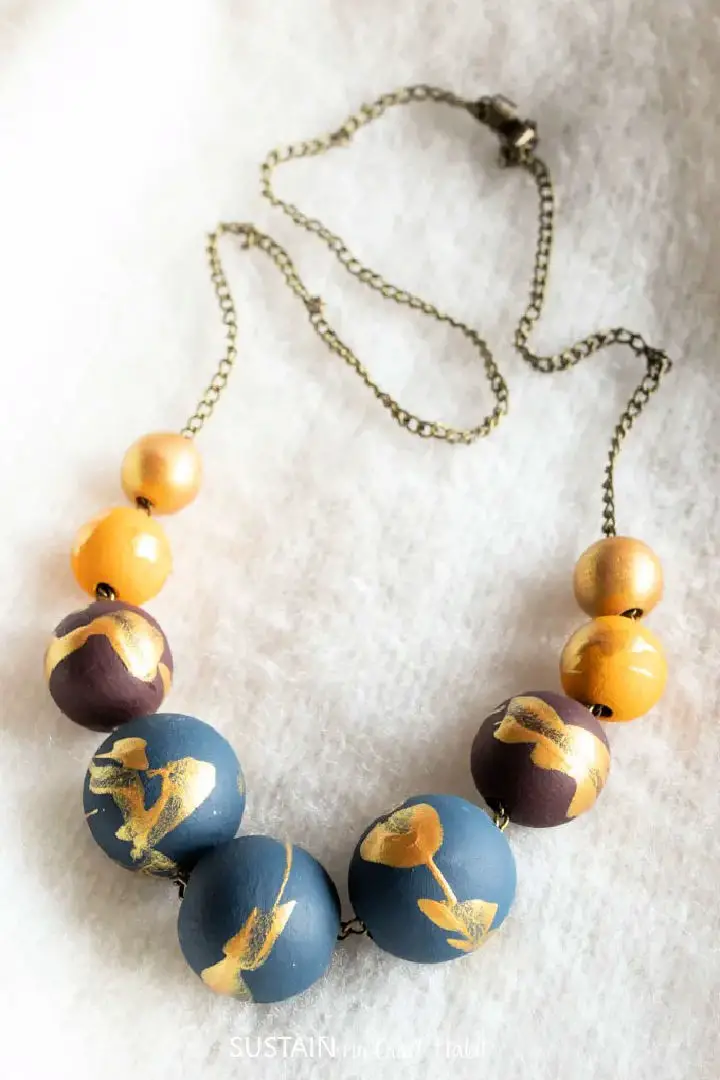
Transform any outfit into a stunning work of art with this step-by-step guide on creating a one-of-a-kind, hand-painted wooden bead necklace featuring jewel-toned hues and gold accents. This DIY jewelry project is perfect for gifting or selling as a unique handmade craft. To create this masterpiece, you’ll need natural round wood beads in various sizes, antique gold jewelry chains, jump rings, and magnetic clasps. Paint the wood beads with bold colors like midnight blue, black plum, saffron yellow, and extreme sheen 24K gold for a modern and sophisticated look. With simple instructions and expert tips, you can assemble the necklace and attach the magnetic fasteners to complete the piece. This handmade jewelry is sure to turn heads and garner compliments whenever you wear it. Consider adding a lobster clasp for an extra secure closure. Let your creativity shine as you bring this painted wood bead necklace to life.
Easy Hand-stamped Necklace
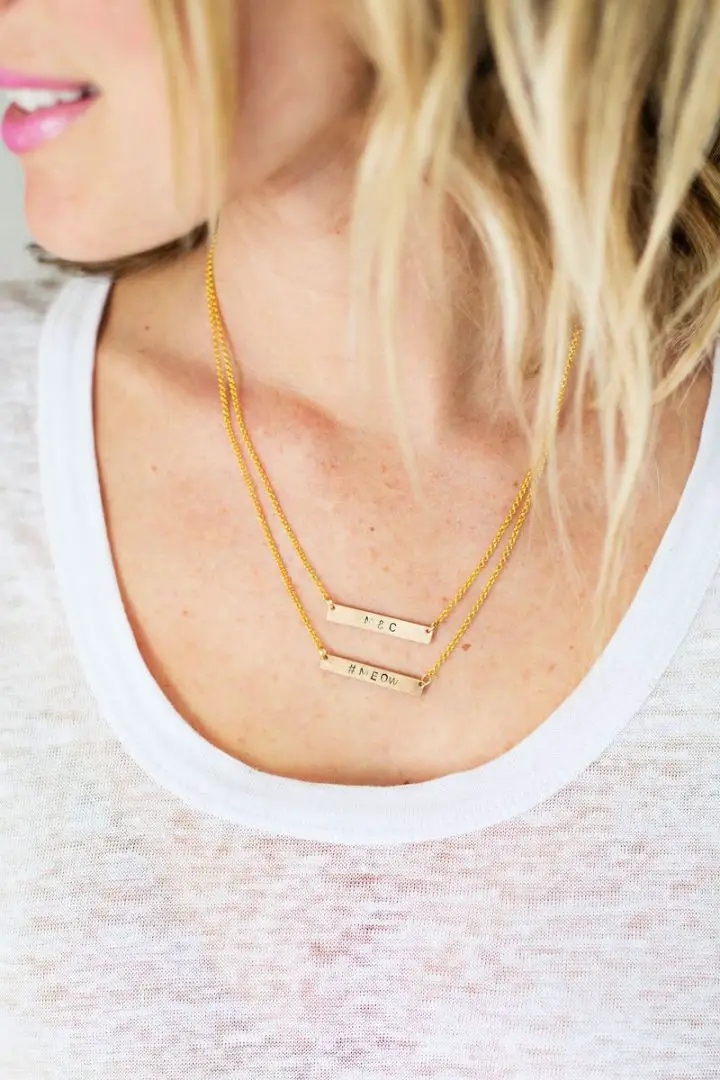
Transform your style with customized DIY stamped metal jewelry using this simple yet effective technique. Create one-of-a-kind necklaces with special meaning, such as a loved one’s name, initials, or a meaningful phrase. The process involves utilizing letter and number punch stamps, a jeweler’s bench block, and a hammer to create clean and defined impressions on metal blanks. To add depth and dimension, darken the stamped letters with a black marker and then wipe off any excess. Once you’ve mastered the basics, take your creations to the next level by attaching stamped blanks to gold necklace chains using jump rings, crafting beautiful double pendant necklaces. The possibilities are endless, from commemorating special anniversaries to incorporating playful hashtags. Let your creativity shine and craft thoughtful gifts or stylish accessories for yourself or loved ones.
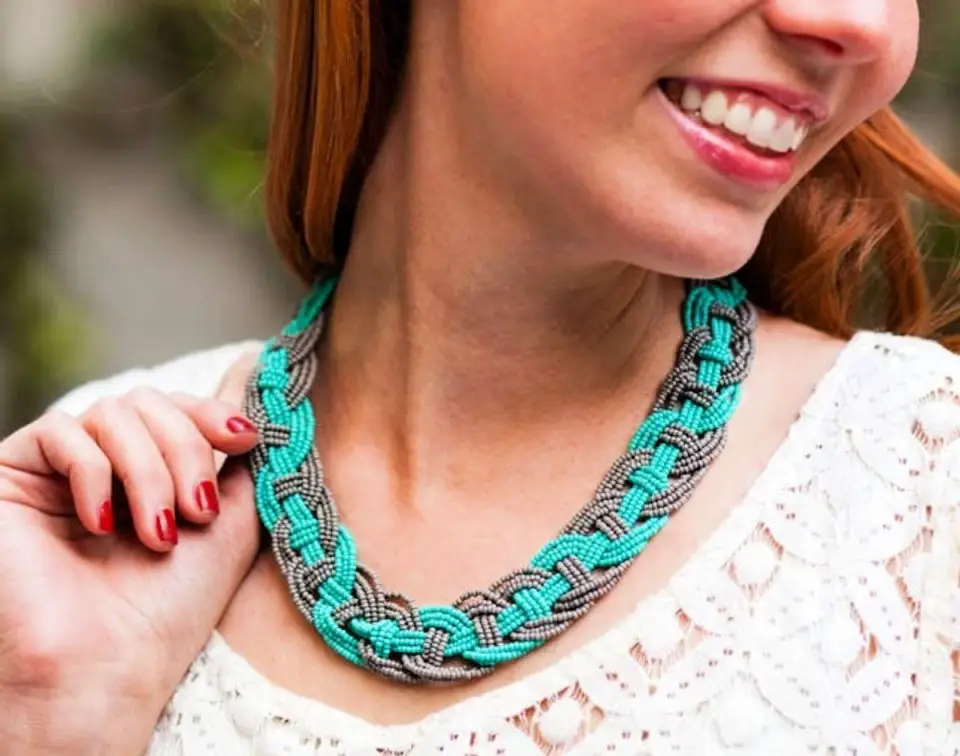
How to Make a Knot Necklace
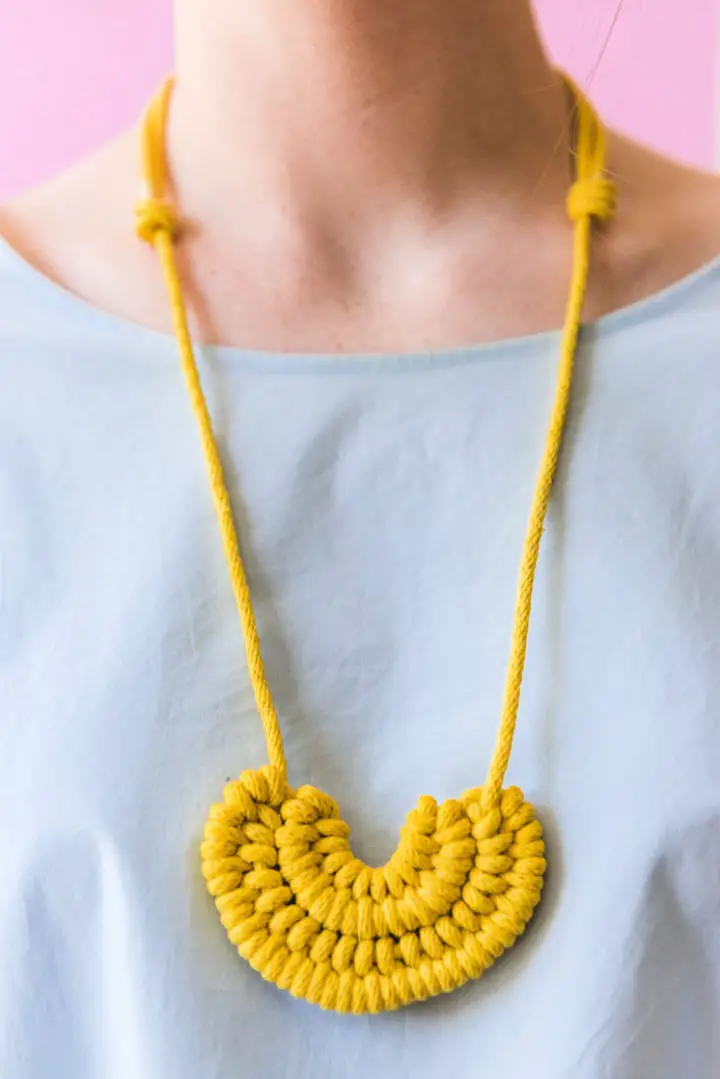
Immerse yourself in the mesmerizing realm of knot artistry with this comprehensive guide to creating a stunning knot necklace. As a masterclass in DIY crafting, this tutorial collection spans from home decor to fashion-forward shoe embellishments, showcasing versatility and creativity. The pièce de résistance is the intricate yet accessible knot necklace pattern, which can be transformed into a show-stopping accessory for any outfit using a mere handful of materials: rope, thread, needle, hot glue gun, and Rit Dye. This guide meticulously walks you through crafting the inner and outer semicircles, attaching them, and creating sliding knots for closure. Moreover, it provides invaluable advice on dyeing your necklace to achieve the perfect hue, liberating your creativity and elevating your personal style with this one-of-a-kind, stylish knot necklace.
Pretty DIY Tassel Necklace
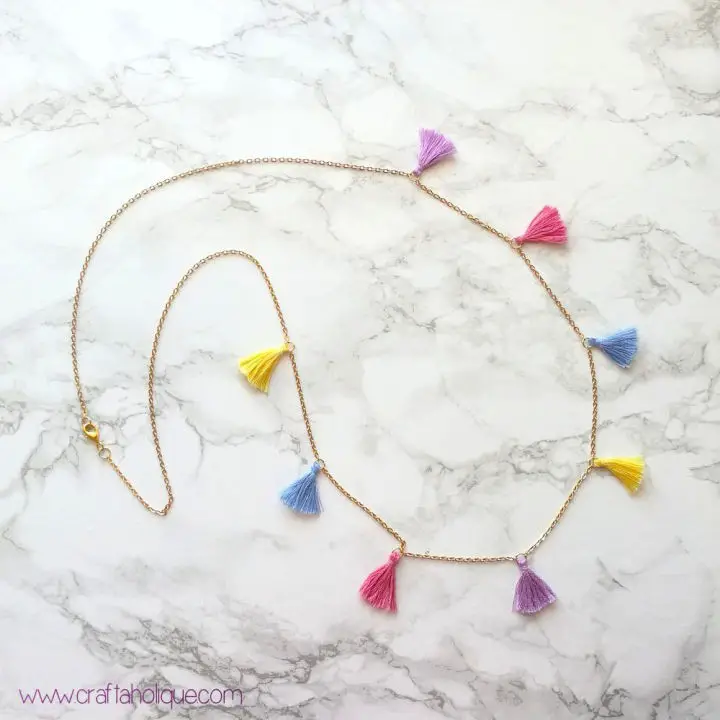
To create a statement piece for your summer wardrobe, follow this comprehensive DIY guide to crafting a stunning tassel necklace. This eye-catching accessory combines vibrant colors with the perfect blend of elegance and whimsy. To get started, gather your materials, including gold-toned chains, jump rings, embroidery thread, and jewelry-making tools. Once you have all the necessary components, proceed to create the tassels according to the step-by-step instructions provided. Ensure a secure attachment by wrapping the tassels carefully and trimming them to your desired length. Next, measure and mark the chain to fit comfortably around your neck, taking into account the placement of the tassels. Finally, attach the tassels to the chain using jump rings and complete the necklace by adding a lobster clasp. This beautiful piece is sure to elevate any casual summer outfit and add a touch of creativity to your jewelry collection.
DIY Statement Necklace for Beginners
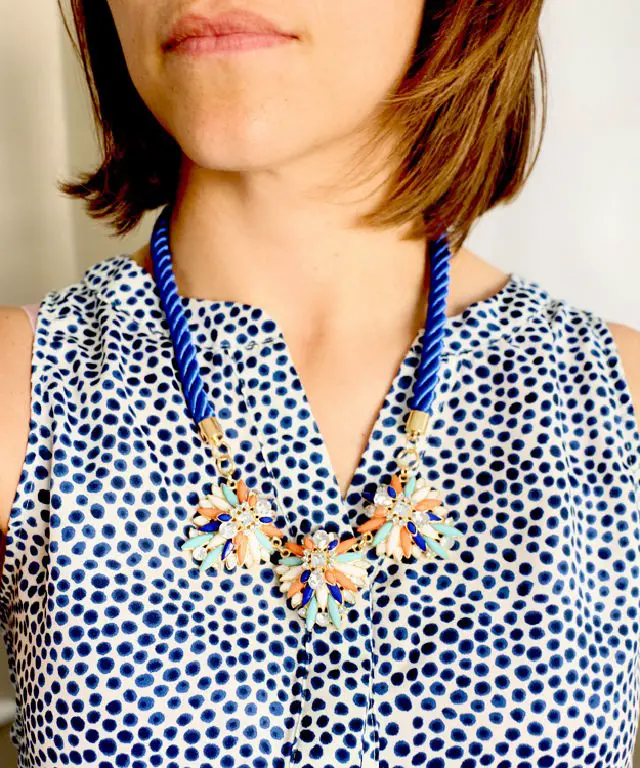
Transform an ordinary day into an extraordinary one by crafting a show-stopping statement necklace in mere minutes with this simple DIY guide. By combining Darice Statement Looks components, you can effortlessly create a necklace that rivals high-end designer pieces without breaking the bank.
With just a few essential supplies, including Darice Statement Looks Chain, Darice Statement Looks Statement Piece, and jewelry pliers, follow these three straightforward steps to bring your design vision to life. Begin by opening a jump ring, adding the statement piece, and closing the jump ring. Then, repeat the process on the other side of the chain.
Voilà! You now possess a stunning necklace that will garner attention at a fraction of the cost of a J.Crew-inspired design. Unleash your creativity and enjoy the therapeutic benefits of crafting this effortless jewelry piece today.
Make Your Own Boho Fringe Necklace
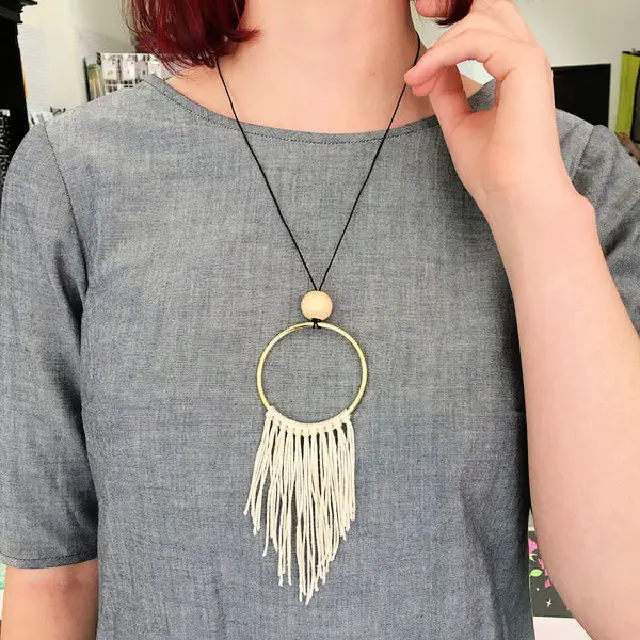
Transform a trendy boho fringe necklace into reality with this straightforward DIY tutorial. In under 30 minutes, you can craft this stylish accessory using accessible materials like brass rings, wooden beads, and cotton cords. Follow the step-by-step guide to effortlessly cut the fringe, tie knots, trim the ends, and add a statement-making large bead and leather cord to complete the necklace. Whether you’re a novice or an experienced crafter, this project presents an exciting opportunity to showcase your macrame prowess. Get ready to flaunt your handmade jewelry skills and rock this fashionable piece with confidence.
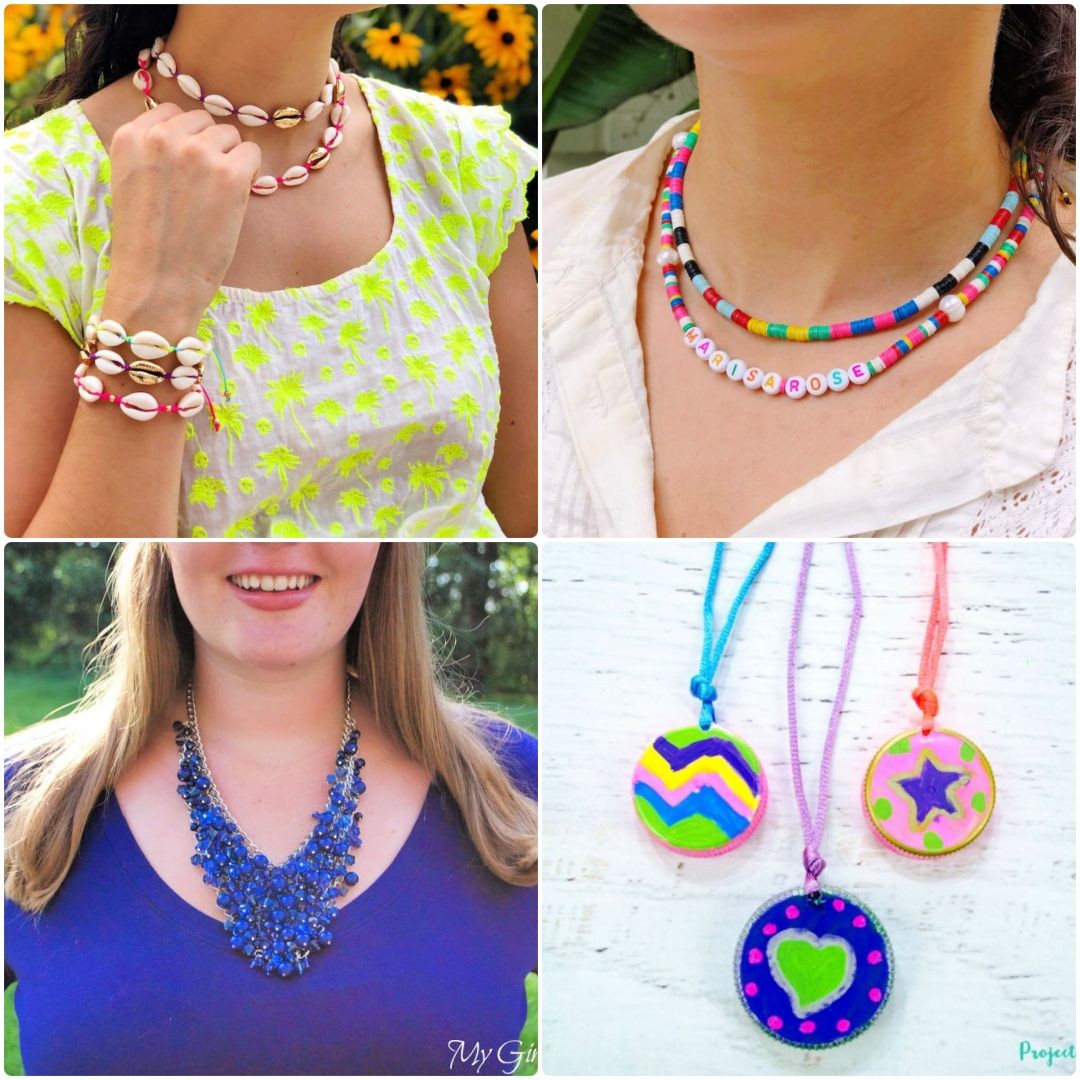
Plastic Lids Necklace Craft
Unleash your creativity and create stunning DIY necklaces without breaking the bank! This fun and easy upcycled craft is perfect for a fun family activity or as a thoughtful gift. Simply gather clean plastic lids, paint pens, and satin jewelry cord, then let your imagination run wild with designs and embellishments. If you’re looking for a unique way to celebrate Earth Day, Mother’s Day, or a special birthday, this project is an eco-friendly and budget-friendly solution. With adult supervision, poke holes in the lids, thread the cord through, and secure it with a knot. The result? A colorful and elegant necklace that’s sure to impress. This DIY craft is also a great way to spend quality time with your kids, teaching them about creativity, sustainability, and resourcefulness. And who knows, you might just discover some hidden artistic talents!
Making a Beaded Pendant Necklace
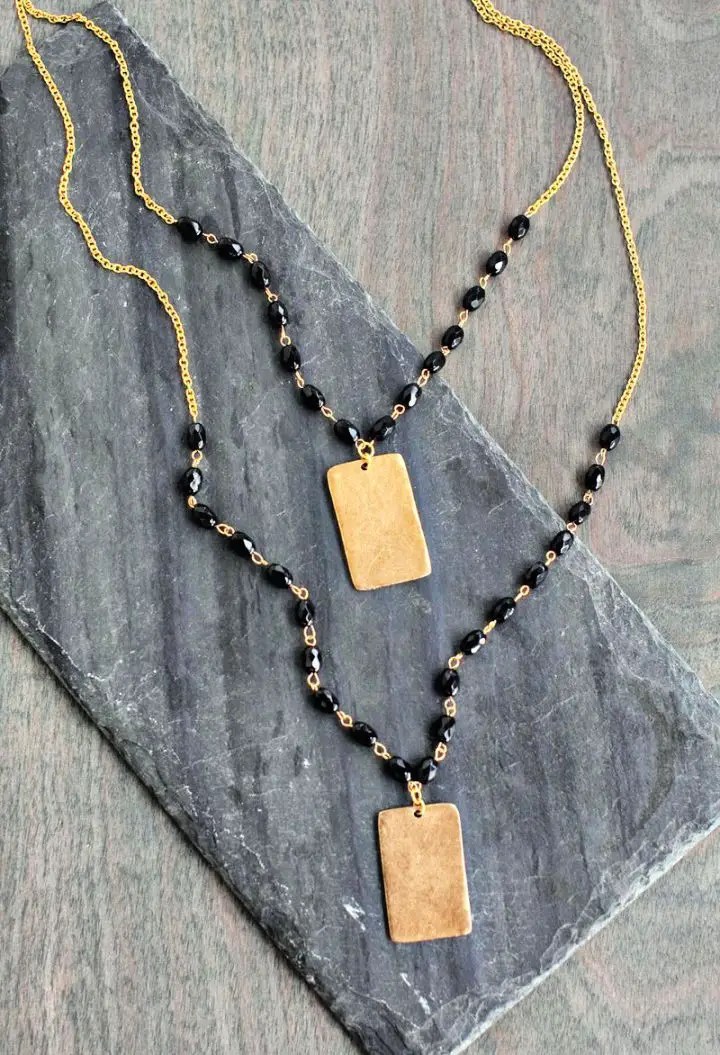
Craft a show-stopping DIY pendant necklace that’s reminiscent of the sold-out Anthropologie design, without breaking the bank! With just a handful of supplies – think gold eye pins, faceted black onyx oval beads, gold cable chain, gold hammered rectangle blanks, jump rings, and a lobster claw closure – you can create your own one-of-a-kind masterpiece. Simply weave together the beaded sections using pliers and wire cutters, then secure them with jump rings. Add the finishing touches by attaching the chains to the hammered rectangle blanks, and voila! Your unique necklace is complete. The best part? This budget-friendly version comes in at around $40 – a fraction of the original’s $240 price tag. Feel free to customize the length and bead count to fit your personal style, and bask in the joy of creating something truly special for yourself.
Beautiful Pearl and Gold Chain Necklace

Transform your style with these trendy DIY necklace ideas that add a personalized touch to any outfit. One such creation is inspired by LOFT’s designs, where you can craft a stunning piece featuring gold chains and pearls. This step-by-step guide will walk you through the process of making your own using simple jewelry-making techniques. To get started, gather essential supplies including needle nose pliers, round nose pliers, wire cutters, an assortment of pearl sizes, eye pins, head pins, chunky gold chains, crystal charms, jump rings, and beading wire. By following the instructions, you’ll learn to create chains featuring pearls, add charms and string pearls onto the beading wire, and attach crystal charms to the longest chain. Once you’ve crafted each strand, use multi-strand connectors and jump rings to assemble the final piece. The end result is a dazzling necklace that exudes elegance, sure to garner compliments wherever you wear it.
Cowrie Shell Macrame Jewelry Ideas
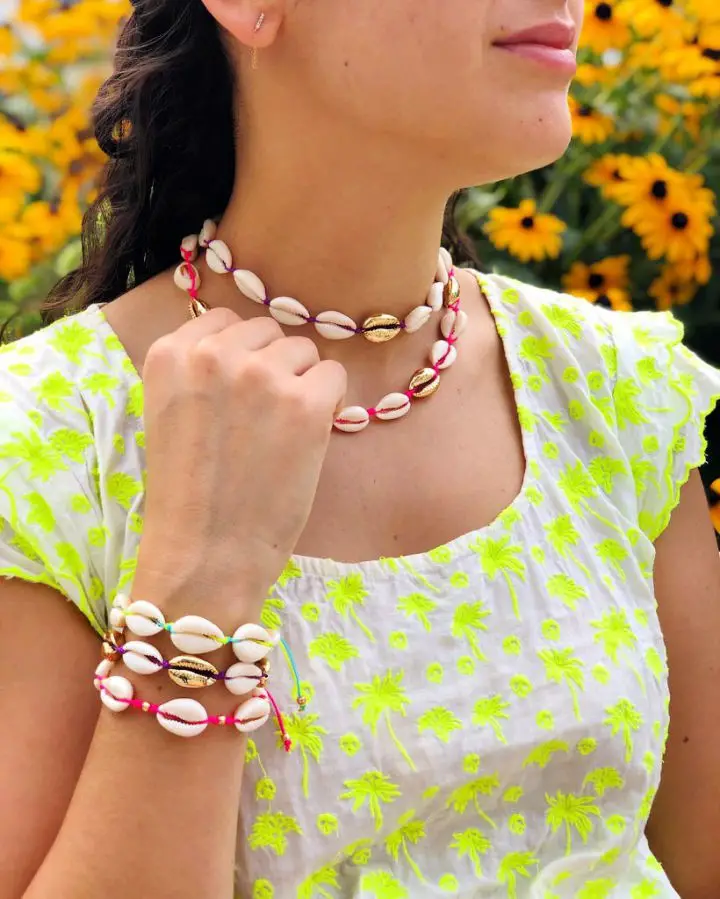
Transform old materials into unique statement pieces with eco-friendly DIY necklace ideas. Want to create one-of-a-kind cowrie shell jewelry? This simple tutorial will guide you in turning macrame cord, shells, and beads into a stylish choker or bracelet. With just a few basic materials, you can customize your design by experimenting with colors, adding embellishments, or trying out different techniques. Let your creativity shine and showcase your trendy handmade accessories!
DIY Triple Strand Crystal and Pewter Necklace
Elevate any outfit with a stunning triple-strand necklace crafted through this effortless DIY jewelry project. This adaptable design seamlessly blends crystal and pewter elements, effortlessly complementing both casual and dressy styles. The bib-style coverage adds an air of sophistication without sacrificing comfort. Personalize the necklace by incorporating your favorite hues to make it one-of-a-kind.
To create this masterpiece, you’ll require basic wire wrapping skills and a few essential supplies like pewter connectors, crystal beads, spacer beads, silver-plated wire, chains, jump rings, and pliers. The project is generously sponsored by Happy Mango Beads, a fair-trade and eco-conscious bead retailer offering an impressive array of natural and ethnic beads.
Follow the step-by-step guide to craft beaded connectors and assemble the necklace. In under an hour, you’ll be flaunting your handiwork – a breathtaking piece of jewelry that proudly showcases your creativity. Indulge in the art of beading and revel in the joy of creating your own unique masterpiece.
Easy DIY Lava Stone Necklace
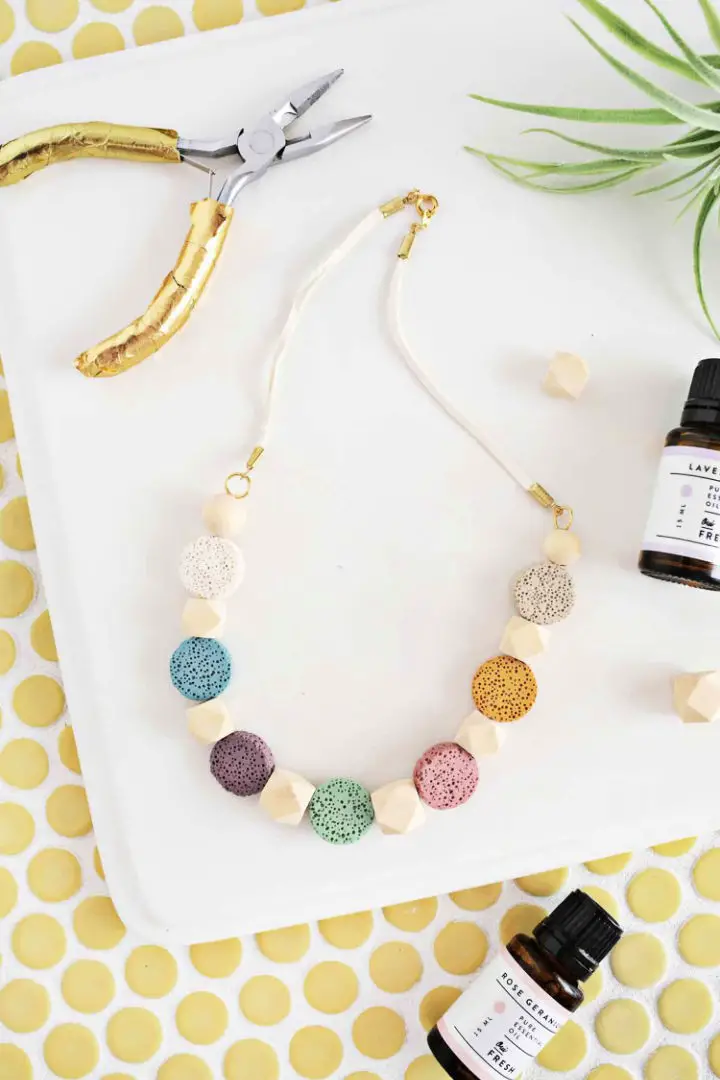
Elevate your sense of style and overall well-being by crafting a DIY essential oil lava stone necklace that’s as unique as you are. The porous nature of lava stone beads makes them the perfect vessel for infusing your favorite fragrances, allowing you to enjoy the scent on-the-go.To get started, gather the necessary materials, including lava stone beads, flat cords, fold-over cord ends, wooden beads, jump rings, and a selection of essential oils. Once you have all your pieces, thread the beads onto the wire in a pattern that reflects your personal style, securing them with jump rings as you go.Next, attach the flat cord using cord ends and add a jewelry clasp for easy wearability. To apply the essential oil, mix a few drops of your chosen fragrance with a carrier oil and gently drop it onto the stones. Allow the oil to absorb before putting on your new accessory.This stylish and aromatic piece is more than just a fashion statement – it’s a way to connect with nature and promote relaxation wherever you are. With endless possibilities for scent combinations, you can create a truly personalized experience that reflects your mood, environment, or desired outcome.
How to Make Macrame Necklace
Transform your style and unlock the therapeutic advantages of essential oils with this easy-to-make DIY macrame necklace. The popularity of macrame lies in its organic, artistic appeal, allowing you to craft one-of-a-kind pieces that reflect your personal touch.
This versatile necklace utilizes the square knot, a fundamental macrame technique, making it an excellent accessory for your summer wardrobe. To get started, gather your materials: a chain, jewelry findings, beads, cotton twine, and hemp cord. Then, follow our step-by-step photo tutorial to create your very own macrame masterpiece. With this project, you’ll be ready to unleash your creativity and showcase your unique handiwork.
Making Your Own Vintage Button Necklace
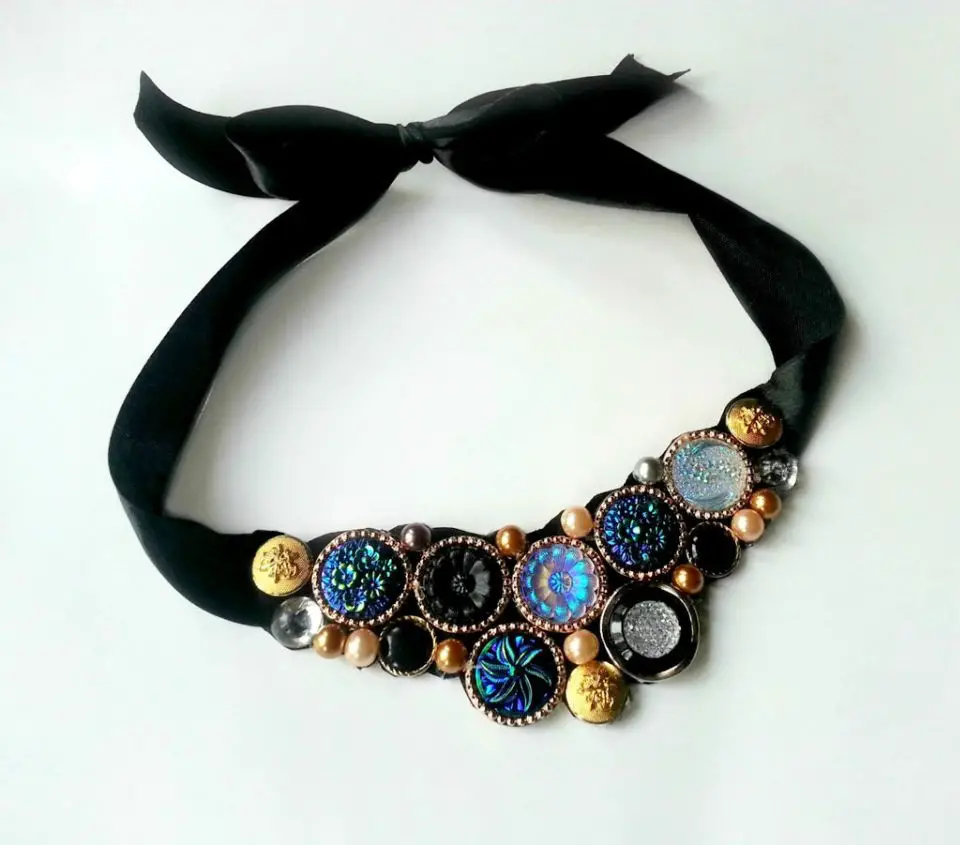
As you explore our diverse DIY necklace ideas, you’ll discover a world of creative possibilities. From understated designs to bold statements, there’s something for every fashion enthusiast. This particular tutorial focuses on crafting a unique vintage button necklace that embodies the charm of handmade accessories. To get started, embark on a treasure hunt to collect vintage buttons by asking friends and family or repurposing old sweaters. This project not only yields a stunning piece of jewelry but also allows you to express your artistic side. Gather your materials, including cutting pliers, rexine or faux leather, satin ribbon, sewing scissors, hot glue, and faux pearl beads. By following this step-by-step guide, you’ll be able to create a one-of-a-kind necklace that seamlessly blends nostalgia with modern style.
DIY Reversible Valentine’s Heart Necklace
Create a unique and sentimental token of love with this DIY reversible Valentine’s heart necklace guide. In just a few minutes, you can craft a beautiful piece that can be worn in two ways, reminiscent of the romantic charm of vintage heart lockets. This thoughtful gift is perfect for Valentine’s Day celebrations, adding a touch of nostalgia to your loved ones. With simple materials like wooden beads, jewelry-making nylon cord, and foam hearts, follow the easy instructions to thread the beads, attach the foam hearts, secure the loose ends, and add a necklace lock. Whether it’s a classroom gift or a special present for best friends, this necklace pairs wonderfully with a cute Tic Tac Toe Valentine Card, making it a heartfelt and thoughtful gesture that will be treasured.
How to Make Resin Feather Pendants Necklace
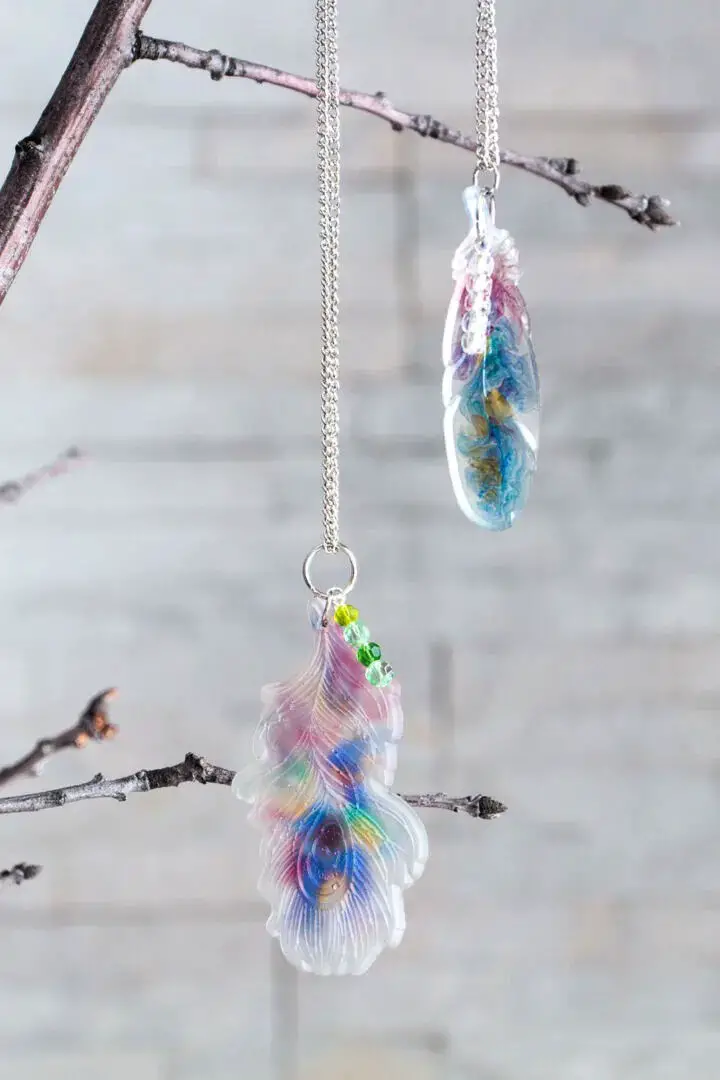
Transform your creativity into stunning DIY necklaces with these limitless possibilities for crafting unique, handcrafted jewelry at home. Take inspiration from the natural world and create breathtaking resin feather pendants with a watercolor twist! This simple guide will walk you through the process of using a silicone mold, resin, and transparent dyes to achieve a beautiful, ombre-like effect.
Combine equal parts of resin and hardener, pour into the mold, and then add droplets of distinct colored dyes. Use a toothpick to delicately blend the colors, creating an enchanting watercolor design.
Allow the resin to cure, drill a hole at the feather’s stem, and attach jump rings for effortless hanging. These bohemian-inspired pendants are perfect for adding a touch of whimsy and nature to your jewelry collection.
How to Make a Crescent Moon Necklace
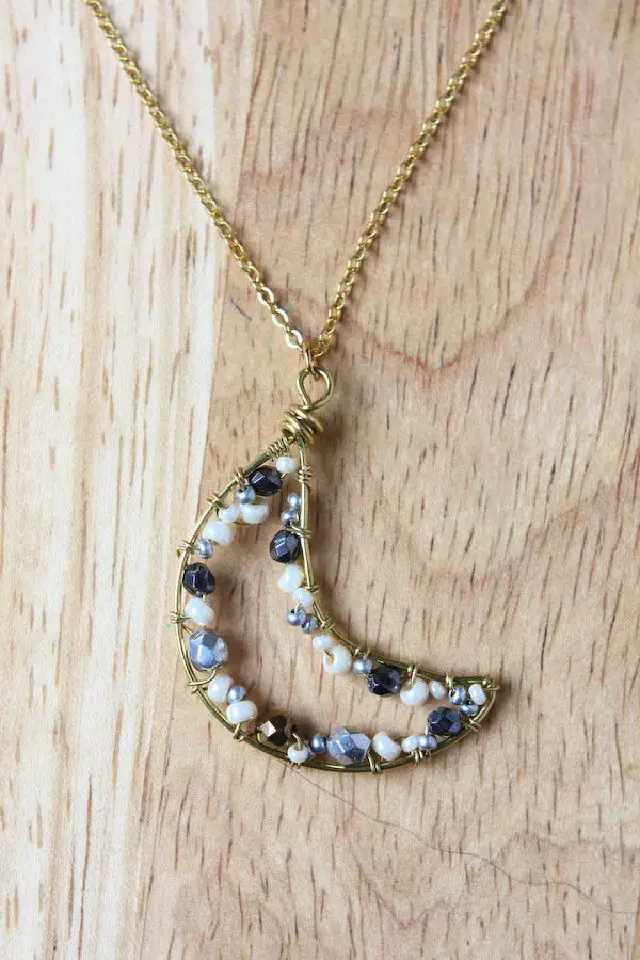
Imagine crafting a one-of-a-kind DIY crescent moon necklace using nothing but wire and beads! This project is perfect for anyone looking to unleash their creative side, as it’s easy and customizable to suit your personal style. By combining the timeless appeal of the crescent moon symbol with the versatility of beads, you’ll create a unique accessory that shines bright like its celestial inspiration. Let creativity guide your hands as we embark on this fun crafting adventure! To start, shape a teardrop frame using wire, then form a wrapped loop to serve as the foundation for your design. Next, transform the wire into a crescent moon silhouette by manipulating it into a curved shape. Now, add some sparkle and personality to your creation by tightly wrapping wire around the framework and threading beads onto the wire. Continue building up layers of beads until you’ve completed the entire circle within the crescent moon shape. Finally, attach the pendant to a necklace using a jump ring, and bask in the satisfaction of having crafted something truly special.
Cute DIY Saint Patrick’s Day Necklace
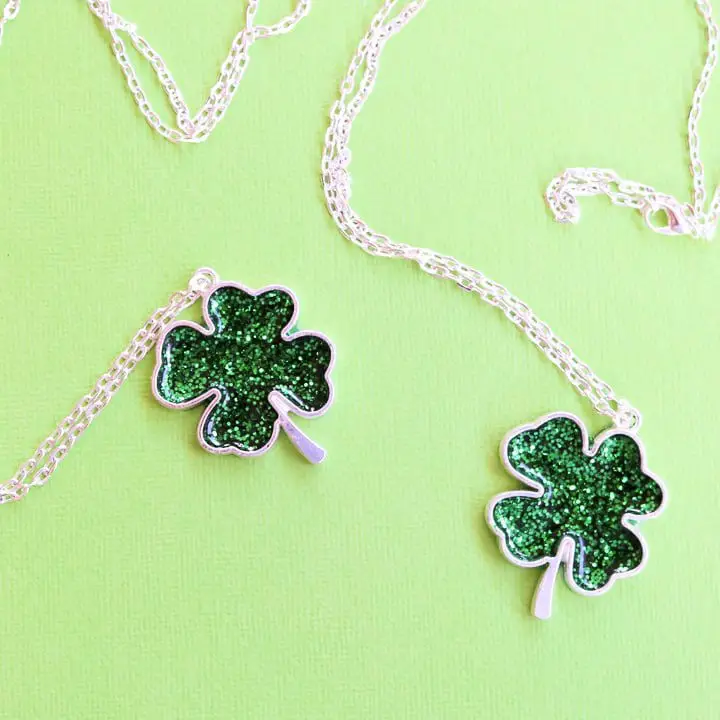
Unlock your creative potential with these DIY necklace ideas that will make you shine! Get ready to craft a charming St. Patrick’s Day-inspired accessory that exudes confidence and charm. This beginner-friendly project combines the magic of resin, shamrock-shaped bezels, and a pinch of sparkle to create a show-stopping piece. Whether you’re new to working with resin or a seasoned pro, this tutorial will guide you through every step, from preparing the bezels to pouring in the mixture. Simply secure the bezels with masking tape and hot glue, mix the resin according to instructions, add a dash of green dye and glitter, then carefully pour it into the bezels. Allow the necklace pieces to cure for 24 hours, periodically checking for any signs of seepage. Once cured, attach your preferred necklace chain, and voila! You’ll be rocking a dazzling piece of green jewelry that will complement any outfit and make you feel like a million bucks.
How to Make a Stone Necklace at Home
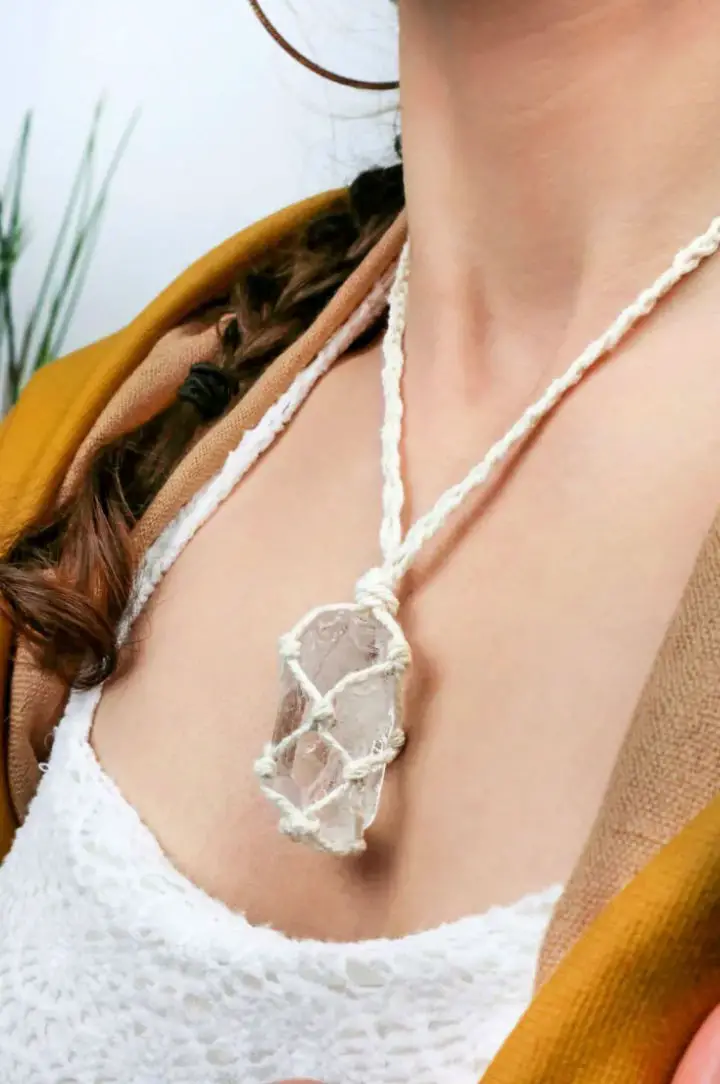
Embark on a creative journey and learn how to craft a stunning macrame necklace featuring an earthy crystal. This easy-to-follow guide will walk you through the process of creating this unique piece. To get started, gather your materials: a rock or crystal, 1mm cotton twine, and scissors. Cut the twine to approximately 32 inches, depending on your desired necklace length and stone size.
Begin by folding the twine in half and creating a loop at one end with loose ends at the other. Secure the crystal in place by knotting the twine around its base. Next, craft a triangular foundation for the crystal by making a series of knots. Continue to knot the twine around the crystal, gradually forming a net-like pattern.
To complete the necklace, braid the cords together and secure them with a final knot. Feel free to customize your design by adding beads or using different colored cords. This macrame project is perfect for crafty teens and adults alike, making it an excellent option for selling or gifting.
Make Your Own Bead Cluster Web Necklace
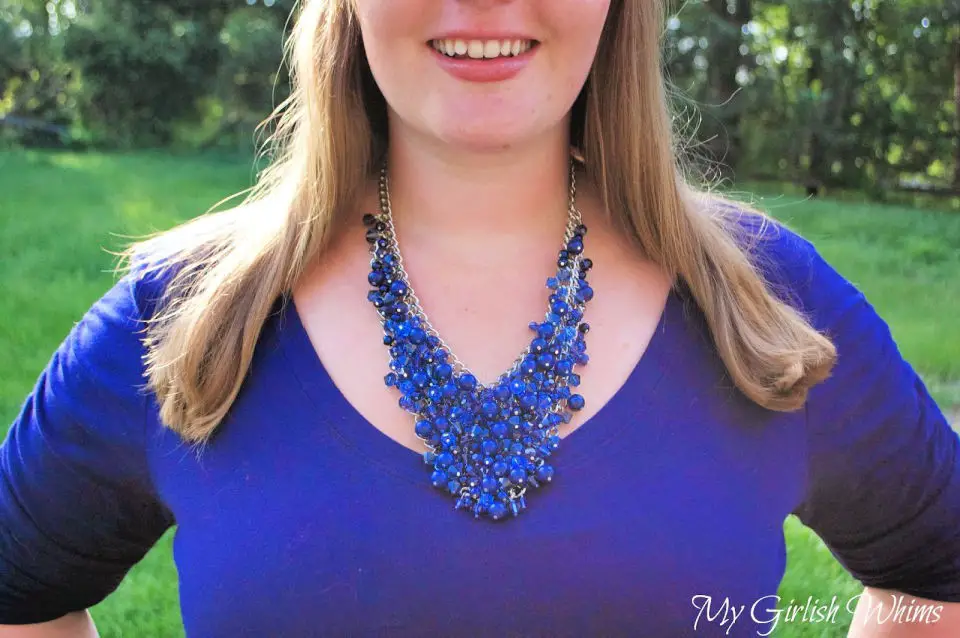
Transform your outfit with a show-stopping DIY bead cluster web necklace, a masterpiece of creativity and elegance. This labor-intensive project yields stunning results, making it perfect for adding a touch of sophistication to any ensemble. Start by gathering your materials: chains, jump rings, head pins, crystals, and an assortment of blue beads. With these components in hand, follow a step-by-step guide to craft the necklace base using chain and jump rings, gradually decreasing in length to create visual interest. Next, attach various beads to the foundation, alternating sizes and colors for a harmonious design. Finally, secure the necklace with a split ring and add a clasp, revealing a breathtaking cluster piece that exudes charm and refinement. Feel free to experiment with different color schemes to match your wardrobe and express your unique personal style.
DIY Woven Bead Statement Necklace for Under $15
Transform a thoughtful gift into a one-of-a-kind masterpiece by crafting a custom DIY necklace together with your loved ones. This innovative weaving pattern allows for endless color combination possibilities, ensuring the final product perfectly reflects their personal style. Begin by following the semi-intricate instructions to weave the jewelry thread and seed beads into a stunning design. Once complete, assemble the ends using silver cones, jump rings, and a secure lobster clasp. To finish, apply a small amount of E6000 glue to hold everything in place, allowing it to dry before presenting your handmade treasure. This unique accessory is sure to be a springtime staple, showcasing your creativity and thoughtfulness in every detail.
DIY Tassel Statement Necklace
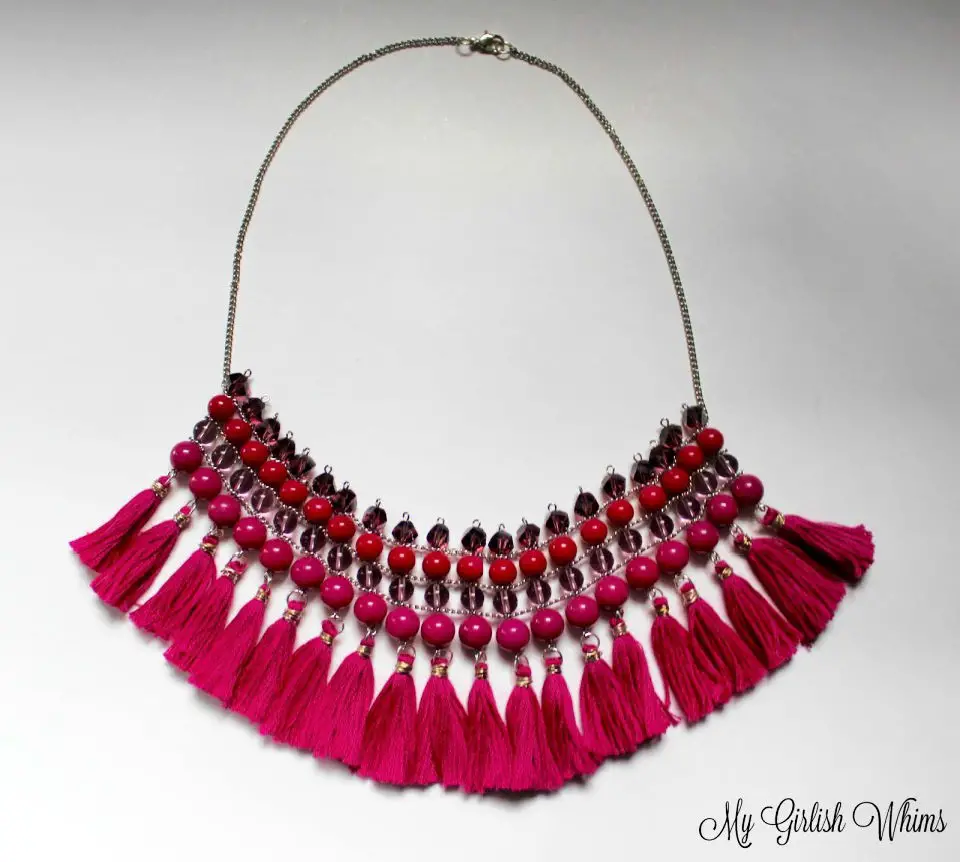
Transform treasured memories into wearable masterpieces by crafting sentimental DIY necklaces that commemorate life’s most precious moments. Embrace the whimsical charm of tassels and express your creativity through this visually stunning accessory. This comprehensive guide will walk you through the process of creating a breathtaking collar adorned with vibrant stone beads and playful tassels, sans the need for a specialized tassel maker. With basic jewelry-making skills and a few essential supplies like needle-nose pliers, wire cutters, and embroidery thread, you’ll be able to craft your own unique version of this trendy piece. Step-by-step instructions ensure that even the most novice crafter will achieve a polished finish. Pair this one-of-a-kind necklace with a simple outfit to instantly elevate your style and make a bold statement with this tassel-adorned masterpiece.
Shrinky Dink Jewelry Making Ideas
Transform your jewelry box with a one-of-a-kind DIY shrinky dink necklace! By combining the versatility of Shrinky Dinks, the precision of Sharpies, and the creativity of stencils, you can craft a personalized accessory that’s both lightweight and on-trend. When heat-set, these versatile materials shrink to a smaller size while becoming thicker, making them an ideal choice for jewelry-making. To create this unique piece, simply cut a circular shape from the Shrinky Dink material, unleash your artistic side with Sharpies, and then bake it in the oven. For an added touch of sophistication, apply Dimensional Magic for a glossy finish. The result is a creative, fun, and functional accessory that you can proudly wear or gift to friends.
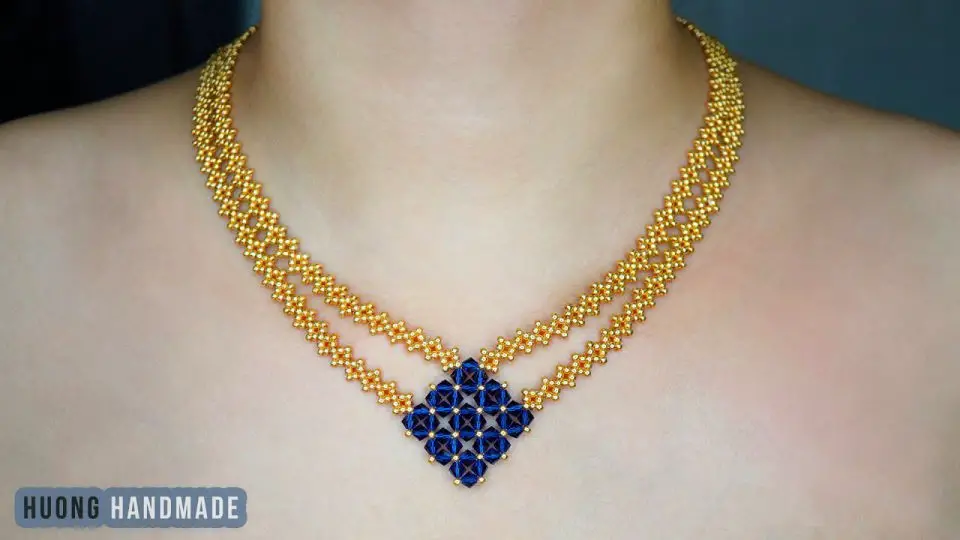
Beaded Statement Collar Necklace
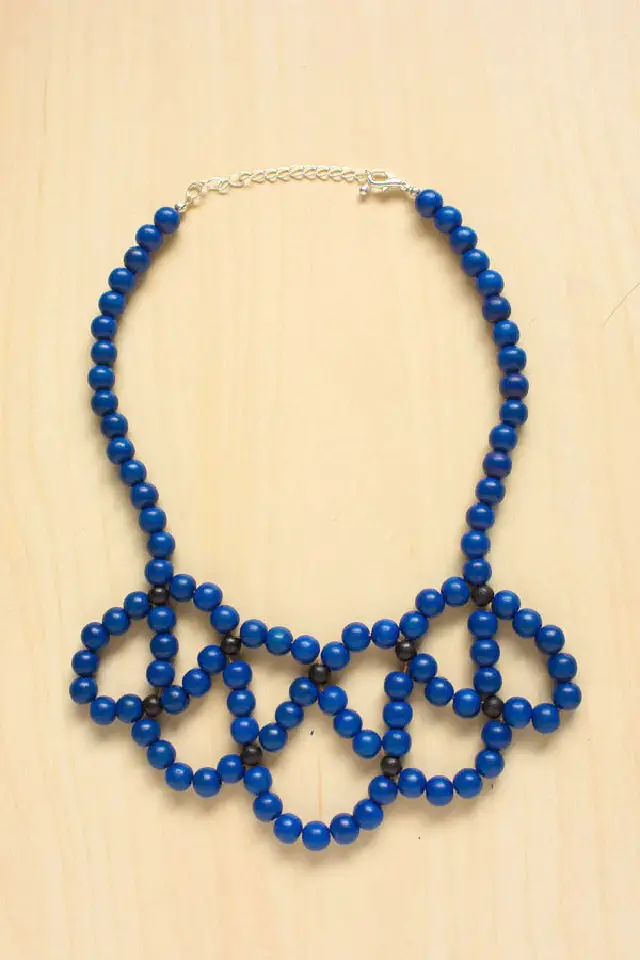
This stylish DIY beaded statement collar necklace injects a burst of color and individuality into any outfit. By combining wooden beads with thread, you can create a lightweight accessory that’s both unique and effortlessly chic.
Taking inspiration from ancient netting techniques, this modern take on beadwork is surprisingly easy to master. The necklace features an intricate pattern crafted from 8mm and 6mm wooden beads, accompanied by step-by-step instructions to guide your creative process.
The addition of a clasp and extension chain allows for effortless length adjustment, ensuring the perfect fit for any occasion. Try making one yourself and showcase your personal flair with this show-stopping statement piece!
DIY Beaded Necklace for Beginners
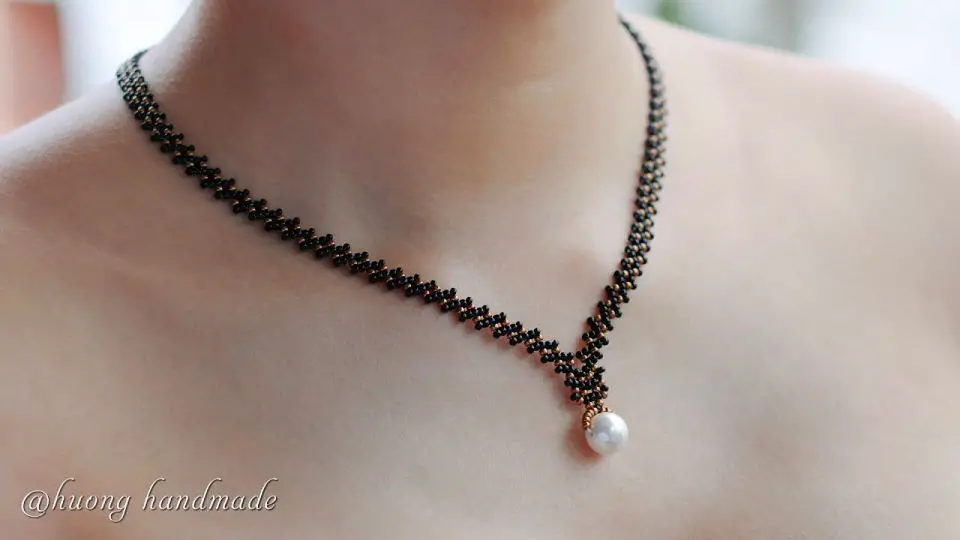
Want to create a stunning piece that’ll make your friends green with envy? Look no further! With our easy-to-follow DIY beaded necklace guide, you can craft a beautiful accessory that’s sure to impress. The key to success lies in the carefully curated materials, including seed beads in two striking colors, a luminous 10mm pearl, a secure lobster clasp, an extension tail chain, jump rings, a precision-crafted beading needle #11, and high-quality beading thread. This comprehensive guide takes you by the hand, providing step-by-step instructions that’ll have you creating your very own masterpiece in no time.
Quick and Easy Beaded Necklace Tutorial
Transform your style with a statement-making DIY necklace that’s as elegant as it is effortless. This comprehensive guide takes you by the hand, leading you through a simple yet effective process for crafting a stunning piece featuring white pearls and rondelle beads. Whether you’re just starting out or already an experienced jewelry maker, this tutorial is designed to help you build on your skills and create a truly one-of-a-kind accessory that complements any outfit.
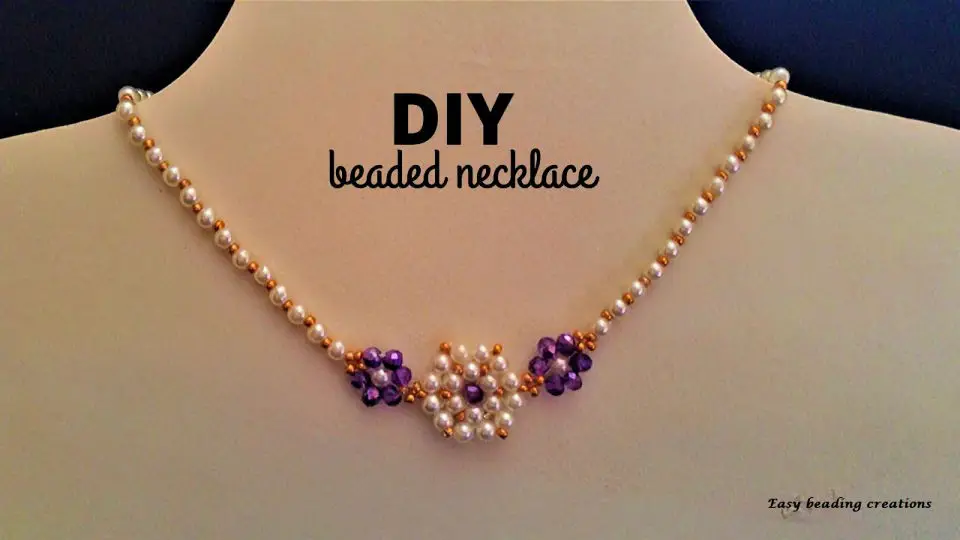
How to Make Beaded Necklace
Embrace your free-spirited side by infusing your wardrobe with bohemian charm through these DIY necklace ideas that require minimal effort and maximum creativity. Perfect for beginners, this step-by-step guide demystifies the process of crafting a stunning beaded accessory using seed and bicone beads. With just a few simple materials like 11/0 seed beads, 4mm bicone beads, a lobster clasp, extension tail chain, jump rings, beading needle #11, and thread, you’ll be creating your own unique piece in no time. Whether looking to enhance your jewelry-making skills or craft a thoughtful gift, this tutorial provides the perfect foundation for your next DIY project.
Make a Beautiful Necklace at Home
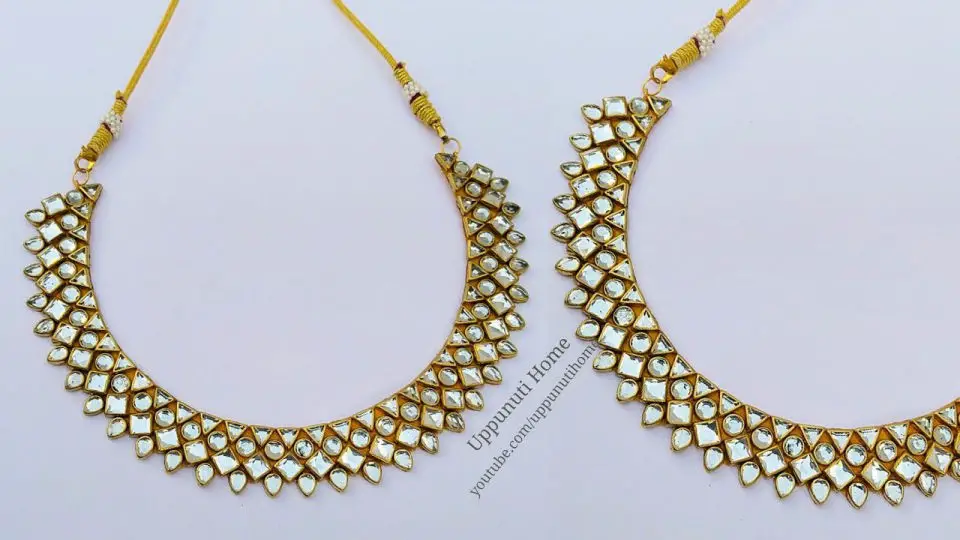
Unleash your inner creativity and craft a show-stopping choker-style necklace that exudes elegance and sophistication. This DIY guide is designed to empower you, regardless of your level of experience, to create a one-of-a-kind piece that perfectly complements your personal style. With readily available materials and easy-to-follow steps, you’ll be able to transform simple components into a breathtaking accessory that’s sure to turn heads. Whether you’re looking for a statement piece for a special occasion or simply want to elevate your everyday look, this unique project is the perfect way to express yourself through jewelry-making.
Conclusion:
Crafting a DIY necklace offers a thrilling opportunity to unleash your creativity and bring a personalized touch to your jewelry collection. With 35 diverse and easy-to-follow ideas covering a range of materials, techniques, and styles, you’ll be spoiled for choice when it comes to finding inspiration. From vibrant color-blocked designs featuring disk beads to statement pieces crafted by hand and eye-catching resin feather pendants, the possibilities are truly endless. By embracing your inner artist and learning new skills in jewelry making, you can create unique accessories that perfectly reflect your individual style. So why not give it a try? Craft your own stunning DIY necklaces today and discover the joy of creating something entirely yours.
