Repurposing old picture frames is an innovative way to breathe new life into discarded items, while also showcasing your creativity and personal style. By transforming outdated or unused frames into unique pieces, you can add a touch of elegance and character to your home decor. This guide offers a comprehensive approach to revitalizing old frames, ensuring each project is both achievable and satisfying. To get started, let’s tap into our imagination and gather the necessary materials. Whether you’re crafting a jewelry organizer, chalkboard, or even a work of art, the possibilities are vast. We’ll walk you through finding suitable frames, collecting essential supplies, and bringing your vision to life step by step. Prepare to transform those forgotten frames into stunning and functional pieces that reflect your personality.
Why Repurpose Old Picture Frames?
When it comes to enhancing your home decor, repurposing old picture frames is a creative solution that not only saves you money but also contributes to a more sustainable environment. This eco-friendly approach has several compelling reasons why it’s worth considering. Firstly, by giving old frames a new lease on life, you’re reducing waste and making a positive impact on the planet. Secondly, repurposing frames allows for personalized customization, which can be far more meaningful and tailored to your space than buying new decor items. Additionally, when you breathe new life into an old frame, you create a one-of-a-kind piece that adds character and uniqueness to your home. It’s a way to make your decor stand out and reflect your personal style. Furthermore, transforming frames that hold sentimental value can be a meaningful way to keep memories alive. Finally, taking on DIY projects like these can be incredibly satisfying, allowing you to learn new skills, experiment with creativity, and have fun in the process. The sense of accomplishment when you see your finished product is unbeatable. In essence, old picture frames are blank canvases for your creativity, waiting for imagination and effort to transform them into extraordinary home enhancements that bring joy.
Sustainability Tips: The Environmental Benefits of Repurposing Frames
In today’s world, repurposing old picture frames is not just a creative outlet, but also a crucial step towards fostering environmental sustainability. By breathing new life into an old frame, you’re playing a vital role in reducing waste and conserving precious resources. The process of reviving an existing frame has far-reaching benefits that positively impact our planet.
One significant advantage is the reduction of waste. The fashion and decor industries are significant contributors to global waste, with millions of items ending up in landfills each year. By choosing to repurpose a frame, you’re preventing it from joining this staggering statistic, thereby minimizing the environmental burden.
Another key benefit is the conservation of resources. Manufacturing new frames requires the extraction and processing of raw materials, as well as significant amounts of energy. By opting for repurposing, you’re not only reducing your carbon footprint but also preserving these valuable resources for future generations.
Lastly, by extending the life of an item, we promote a circular economy where products are used for their intended purpose, reducing the demand for new resources and minimizing waste. In essence, every repurposed frame is a testament to our commitment to sustainability and our willingness to think creatively about reducing our environmental footprint.
Design Ideas: Elevating Your Home Decor
Revamping old picture frames into unique home decor not only minimizes waste but also infuses your space with personality. Here are some creative approaches to give your repurposed frames a stylish makeover:
Ethereal Arrangements: Curate a visually striking gallery wall by combining mismatched frames, imbuing the space with eclectic charm.
Thematic Harmony: Harmonize your decor by pairing frames with the aesthetic of your room—rustic, modern, or vintage—resulting in a cohesive and inviting atmosphere.
Seasonal Refreshments: Update your artwork to match the changing seasons, ensuring your decor remains fresh, timely, and reflective of your personal style.
Maintenance Advice: Caring for Repurposed Frames
To extend the lifespan of your repurposed frames, it’s essential to adopt a regular maintenance routine. This involves not only ensuring they look their best but also safeguarding them from damage and wear. Here are some practical tips to help you achieve this:
Firstly, commit to a cleaning schedule that includes dusting the frames regularly. This simple task can make a significant difference in preserving their appearance.
Next, consider applying a protective coating such as a sealant or varnish. These products will help shield your frames from humidity and general wear and tear.
Finally, when moving or rearranging your frames, handle them with care to prevent accidental chips or cracks. By adopting these habits, you’ll be able to enjoy your repurposed frames for years to come while simultaneously contributing to a more sustainable future.
How to Get Started with Repurposing Old Picture Frames
Transforming vintage picture frames into functional and eco-friendly home decor is an innovative way to infuse personality into your space while reducing waste. From crafting one-of-a-kind wall art, clever jewelry organizers, or distinctive trays, the possibilities are endless. With a few simple steps, you can unlock your creative potential and give old frames new life.
Finding the Right Frames
When on the hunt for vintage frames, start by exploring your own home’s hidden spaces like attics, basements, or closets. You’d be amazed at the treasures that can be found collecting dust in these areas. Additionally, thrift stores and yard sales are excellent places to discover one-of-a-kind frames at affordable prices. Be sure to keep an eye out for unique shapes, sizes, and styles that can add character to your space. Furthermore, don’t underestimate the power of asking friends and family if they have any old frames lying around that they no longer need or want. A simple inquiry might just lead you to some truly special pieces.
Gathering Your Materials
Now that you’ve chosen the frames for your project, it’s time to gather all the necessary materials. This will likely include a combination of painting supplies and adhesives. For instance, you may need paint and brushes to give your frames a new coat or touch up any blemishes. Additionally, you’ll want to have a selection of adhesives on hand, such as glue, staple guns, or nails, depending on the type of project you’re working on. It’s also important to consider the decorative elements that will bring your frames to life. This might involve fabric, chicken wire, or even chalkboard paint, among other options. Finally, having a few essential tools like screwdrivers, pliers, and scissors can be helpful in case you need to make any adjustments or repairs.
Planning Your Project
Before embarking on your creative project, it’s essential to define its purpose. This fundamental question will shape the direction of your repurposing journey. What is the intended use of your upcycled frame? Will it be a decorative piece, a functional item, or a gift for someone special? Clarifying this intention will help you stay focused and make informed decisions throughout the process.
To further clarify your vision, take some time to sketch out your ideas. A simple drawing can help you visualize the end result and identify the steps necessary to get there. This exercise will also allow you to experiment with different designs and layouts, giving you a better sense of what will work best for your project.
Finally, prepare your workspace for creativity by ensuring it’s clear, clean, and well-organized. Cover any surfaces that may be affected by paint, glue, or other materials to protect them from damage. By setting up your environment in this way, you’ll be able to work efficiently and effectively, without worrying about making a mess.
Getting to Work
Before giving your frames a makeover, it’s essential to start with a clean slate. Begin by wiping down each frame to remove any dust, dirt, or grime that may be accumulated on the surface. This step is crucial in ensuring a smooth and even finish for your transformation.Next, carefully disassemble your frames to access any glass covers or backings. It’s vital to handle these delicate components with care to avoid damage or breakage. Take your time and work methodically to ensure everything is removed safely.With the groundwork laid, you can now begin modifying your frame. This may involve applying multiple coats of paint, so be prepared to exercise patience during this process. The end result will be well worth the effort, as a beautifully transformed frame can add a touch of elegance to any room.Finally, once the base is complete, it’s time to add the finishing touches. This might entail attaching hooks for a jewelry organizer or securing fabric for a bulletin board. Whatever your vision may be, this is the perfect opportunity to bring it to life and give your frames a unique personality.
Finishing Up
Before reassembling or hanging up your frame, make sure it’s completely dry. This crucial step ensures a sturdy and long-lasting finished product. Once complete, take pride in displaying your masterpiece in a spot that showcases its beauty. Your repurposed frame is more than just a decorative item – it’s a testament to your creativity and effort, reflecting your unique style and personality. As you admire your handiwork, don’t forget to share it with friends and family. Sharing your project might inspire others to explore their own creative potential, giving them the confidence to repurpose and upcycle in their own homes. By doing so, you’ll not only have created something beautiful, but also foster a sense of community and shared creativity.
FAQS on Repurposing Old Picture Frames
Embarking on a creative adventure, repurposing old picture frames offers endless possibilities. To spark your imagination and guide you through the process, I’ve compiled answers to common questions that will get you started.
What materials do I need to start repurposing old picture frames?
To embark on this creative journey, gather the following essential materials: a collection of old picture frames that are ripe for revitalization, an artistic arsenal comprising paint and brushes, as well as various adhesives such as glue, staple guns, and nails. Additionally, consider incorporating decorative elements like fabric, chicken wire, or even chalkboard paint to add texture and visual interest. Finally, ensure you have a set of basic tools at your disposal, including screwdrivers, pliers, and scissors, to help shape and assemble your masterpieces.
Can I turn an old picture frame into a jewelry organizer?
Transforming an outdated frame into a functional jewelry organizer has become a beloved DIY endeavor. To achieve this, you’ll require several essential components: sturdy hooks, versatile wire mesh, or a stylish fabric to serve as the backdrop. By incorporating these elements, a once-neglected frame can be seamlessly transformed into a sophisticated display for your treasured jewelry pieces.
How can I make a chalkboard from an old picture frame?
Creating a chalkboard requires some preparation, which can be broken down into three key steps: selecting a frame, applying chalkboard paint, and finishing the surface. First, you’ll need to choose a frame that suits your desired style and size. Next, apply the chalkboard paint to the glass or backing material, ensuring an even coat. Once the paint is dry, condition the surface by rubbing chalk over it and erasing any marks. This process will leave you with a functional and visually appealing chalkboard that can be used for brainstorming, note-taking, or simply adding a touch of whimsy to your home’s decor.
What’s a unique way to use repurposed frames for home decor?
To create a visually striking focal point, consider constructing an open-frame gallery wall with multiple layers. Begin by selecting frames of different sizes and hues, then map out their placement on the wall. To further customize the design, feel free to paint or stain the frames to complement your existing decor. By layering the frames in a thoughtful manner, you can add depth, visual interest, and even create the illusion of dimensionality.
How can I make a tray out of an old picture frame?
Crafting a Tray from Scratch:
To create a functional and visually appealing tray, begin by selecting a robust frame that can support the weight of any items you plan to display or store. Once you’ve chosen your frame, bring it to life with a coat of paint or a refinishing treatment in a color that suits your personal style.
Next, attach sturdy handles to either side of the frame to provide easy access and portability. For the base of your tray, opt for glass or a durable material that can withstand daily use. Finally, seal the back of the frame to ensure everything stays securely in place, preventing any items from slipping off or falling out.
Can old frames be turned into shelves?
To create a seamless visual effect, consider integrating small wooden shelves within the frame’s architecture or utilizing the frame itself as the focal point of a shadow box shelf. By matching the paint color of the frame and shelf, you can achieve a harmonious aesthetic that ties the entire design together.
Is it expensive to repurpose old picture frames?
Transforming old frames into new pieces of art is a creative and budget-friendly solution. By utilizing frames you already possess or sourcing them at second-hand stores, you can significantly reduce costs. It’s the materials and embellishments you add that ultimately determine your expenses.
How do I prepare an old picture frame for repurposing?
To prepare a picture frame for restoration, the process begins with thorough cleaning to remove any dust, dirt, or grime that may have accumulated over time. This is crucial in ensuring a smooth and even surface for subsequent steps. Once clean, the frame is carefully disassembled, allowing access to the glass or backing material. Any damage or rough areas are then identified and addressed through repair or sanding techniques. Finally, if you’re planning to alter the frame’s color, a primer or paint application can be performed, setting the stage for further refinishing efforts.
Can I make a message board from an old frame?
To breathe new life into an old picture frame, consider adding a functional message board by attaching chicken wire or corkboard to its back. This versatile feature can be used to display notes, photos, and even jewelry, offering endless creative possibilities.
By addressing common questions and providing inspiration, we aim to empower you to repurpose your old frames with confidence, whether you’re a casual crafter or seeking to add a unique touch to your home.
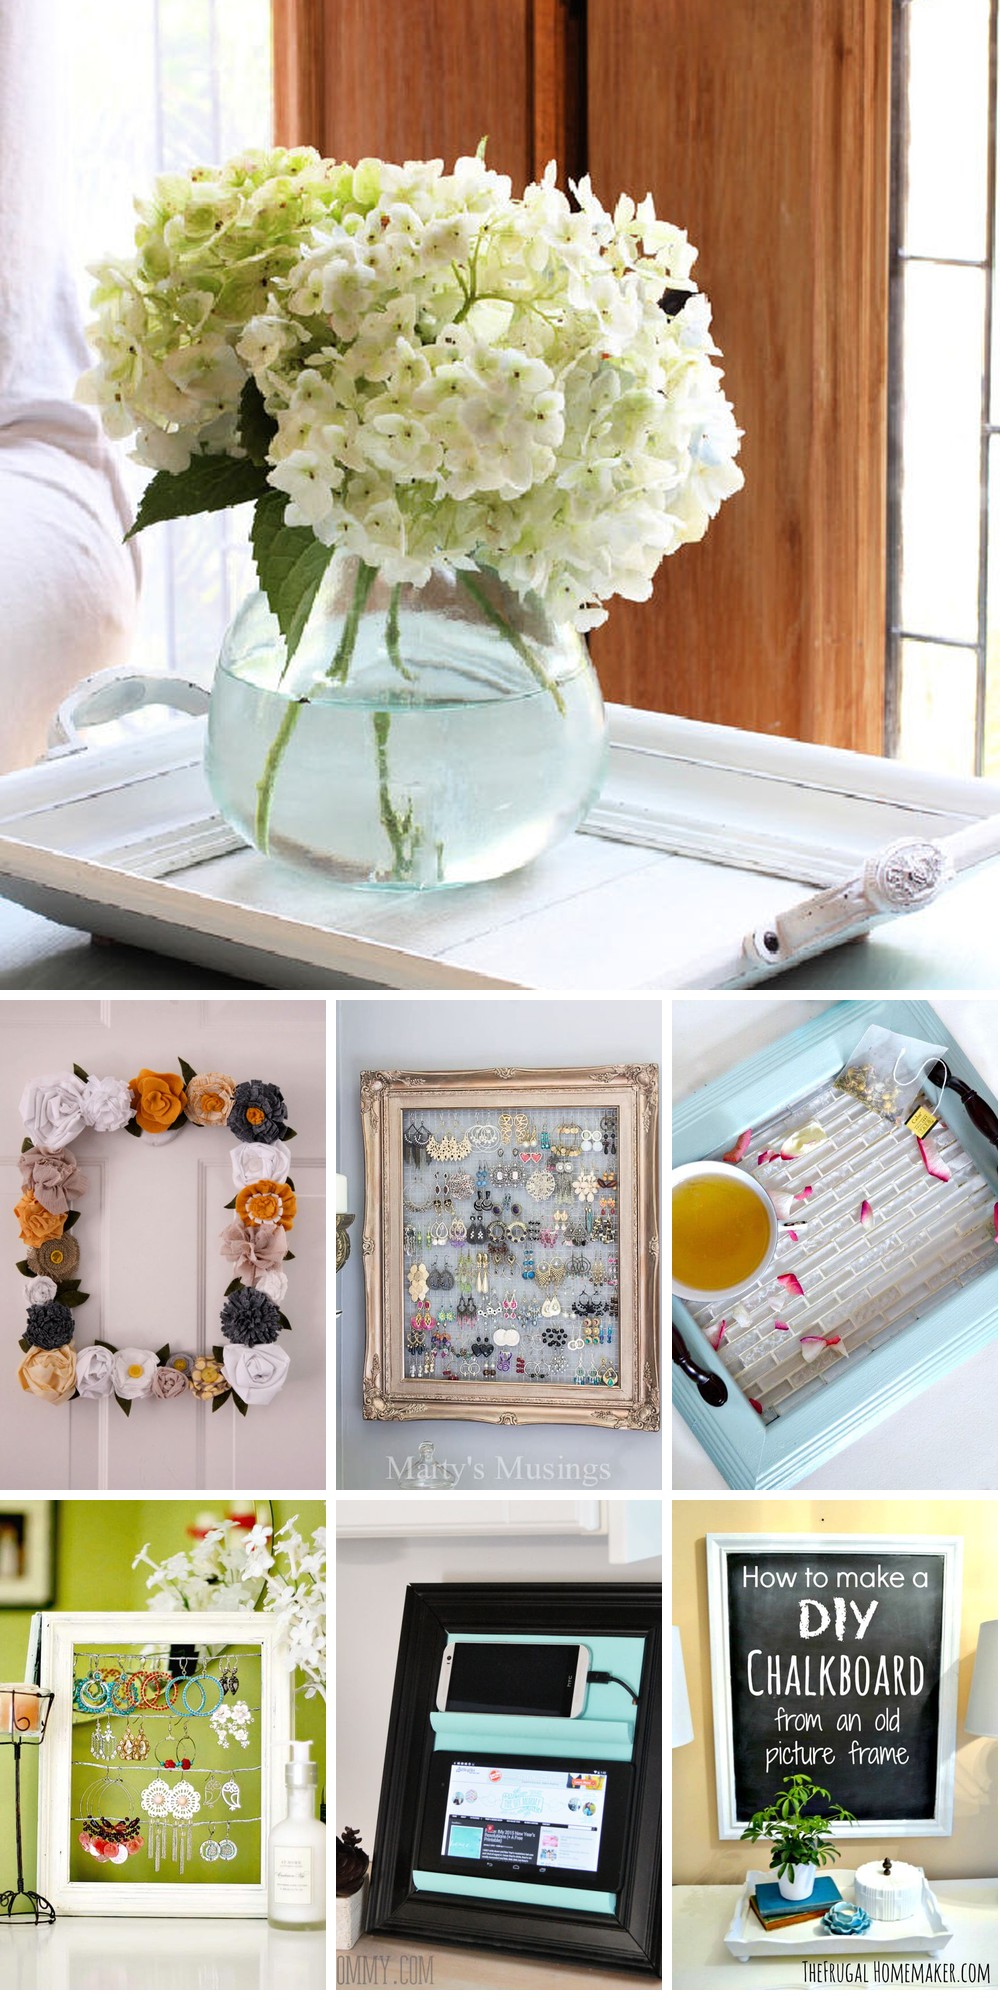
25 Ideas to Repurpose Old Picture Frames
Transforming vintage picture frames into modern masterpieces is a simple yet effective way to add personality and character to your living space. By giving new life to old frames, you can create one-of-a-kind decorative elements that tell a story and spark conversation. In this article, we’ll explore 25 innovative ways to repurpose old picture frames, showcasing their potential as stylish decor pieces for your home.
Beautiful DIY Old Frames Wall Art
Give new life to old picture frames by revamping them into stunning works of art with the help of Salvaged Living’s expert tips. To modernize vintage finds, apply a coat of chalk paint for a fresh look that complements contemporary decor. For added texture and depth, create 3D artwork by wrapping cardboard in felt that matches your wall color, providing a cozy background that invites conversation. Alternatively, enhance your own photography using PicMonkey’s editing tools to produce vibrant, high-contrast images that harmonize with your home’s color scheme. By crafting unique pieces from budget-friendly supplies like Plaster of Paris, paint pyramids, and faux flowers, you can elevate your decor without breaking the bank. These simple and cost-effective DIY projects allow you to showcase your personal style and creativity in your living space, effortlessly transforming it into a reflection of your unique aesthetic.
Make a Chalkboard From an Old Picture Frame
Transform an old picture frame into a charming DIY chalkboard with this easy-to-follow guide. Begin by choosing a large thrift store frame, ideally 16×20 or 18×24 in size, to create a statement piece that’s sure to impress. To prepare the frame for painting, apply a coat of white primer to prevent any wood grain from showing through. Since the glass will be painted over, there’s no need to worry about meticulously taping off areas. Instead, opt for affordable chalkboard paint, such as the kind available at Michael’s, and apply two light coats directly onto the glass. Allow the paint to dry overnight before curing the chalkboard surface by rubbing chalk all over it and then erasing any excess. With your new chalkboard ready to use, feel free to get creative with artful messages and designs that can be easily changed up to suit your mood or season. This simple project adds a functional and stylish element to any space, from an entryway to a kitchen, making it both engaging and useful.
Handmade Old Frame Table Organizer
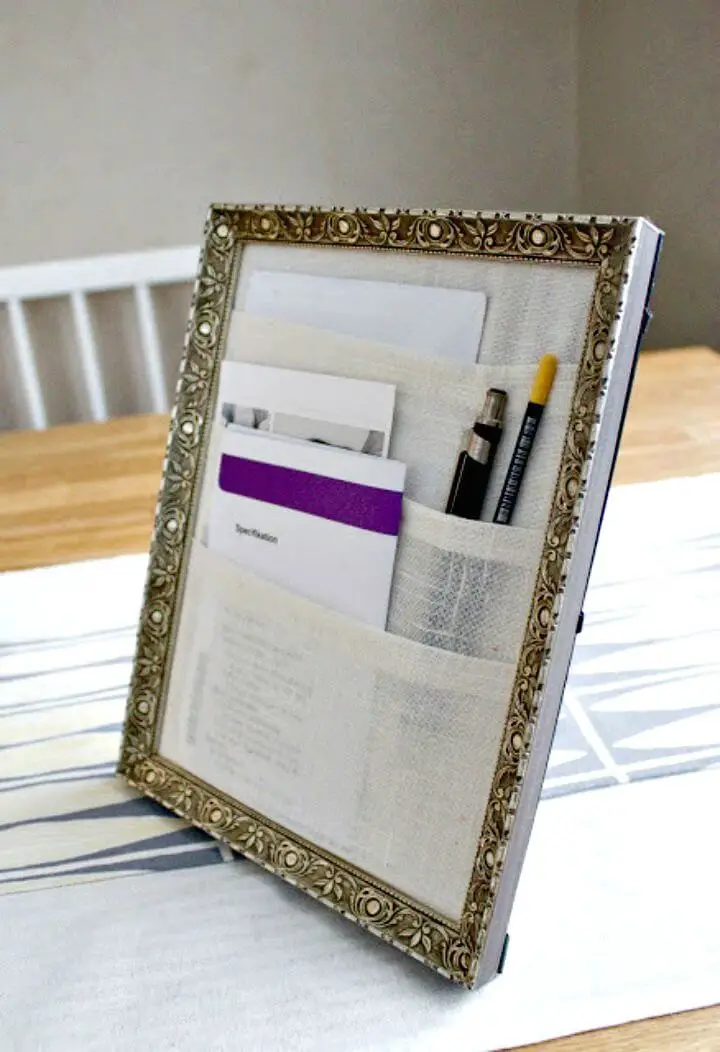
Transform your table into a tidy oasis with the creative Wishful Tinker’s table organizer. Inspired by wall organizers, this DIY masterpiece reimagines a thrift store frame and leftover fabric into a charming home accessory that will delight crafters and organizational enthusiasts alike. This ingenious solution provides a simple yet effective way to keep your essentials within reach, perfect for those who crave order in their daily lives. By employing basic materials like fabric, glue, and a sewing machine, you can craft a custom organizer that injects personality into your space. The Wishful Tinker’s step-by-step guide makes this project an enjoyable adventure for anyone eager to combine crafting and organization skills.
How to Make an Old Frame Tray
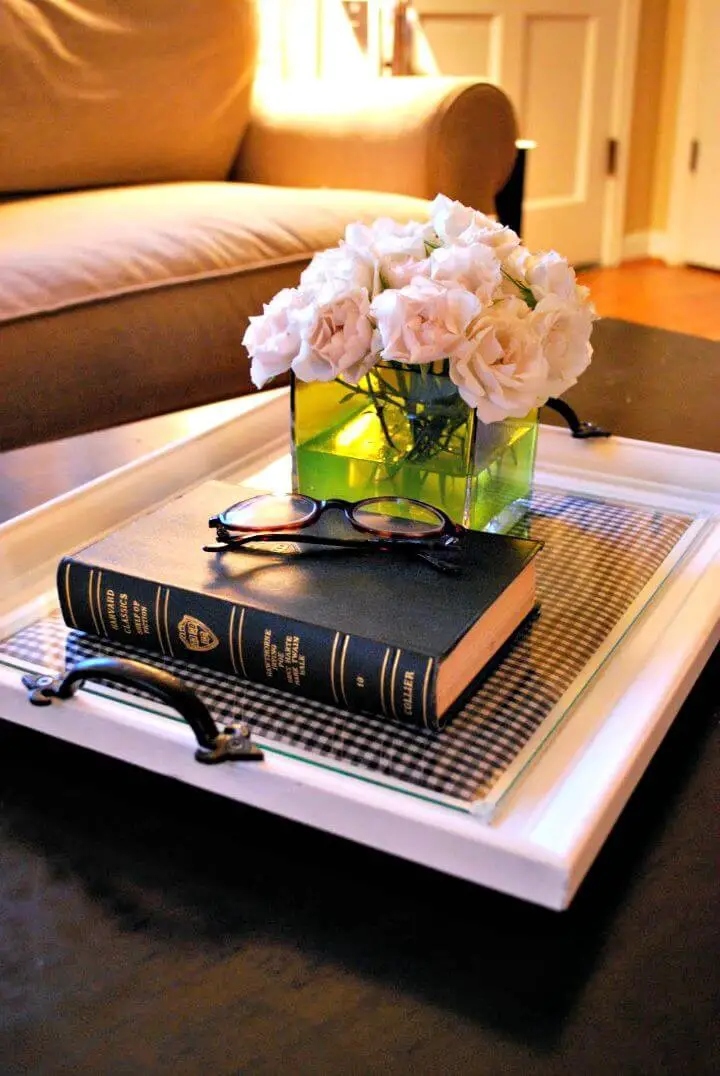
Transform an old picture frame into a stylish and functional frame tray by following our step-by-step guide. This creative project is not only budget-friendly but also adds a personal touch to your living space, serving as both a decorative piece and a practical surface for displaying or serving your favorite items. To achieve this unique creation, select the perfect frame, give it a fresh coat of paint, add stylish handles, and secure a glass top for durability and elegance. With these simple steps, you can elevate your coffee table display and create a stunning focal point that reflects your personal style.
Adorable DIY Old Frame Jewelry Organizer
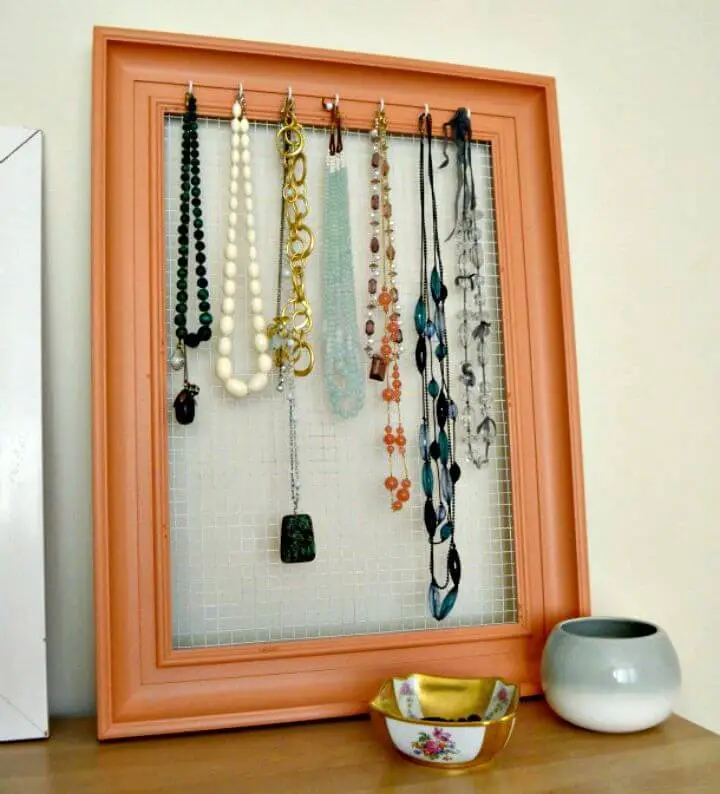
Transform your chaotic necklace conundrum into a visually appealing display with a homemade jewelry organizer, inspired by Emily from ‘From China Village.’ This DIY project revamps an old frame, transforming it into a functional and stylish haven for your accessories. By applying a few coats of paint, screw-in hooks, wire mesh, and a dash of glue, you can craft a customized showcase for your necklaces and earrings that reflects your personal style and storage needs. Not only does it keep your jewelry neatly organized, but it also adds a charming touch to your room. Unleash your creativity and follow these straightforward steps to create your own unique jewelry organizer.
Making a Chicken Wire Message Board With an Old Frame
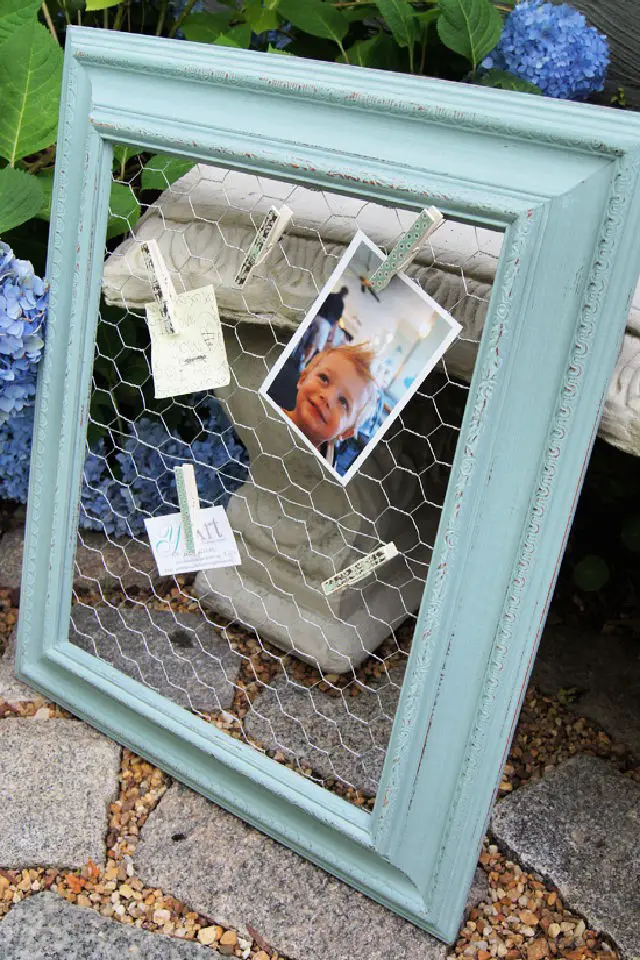
Transform a vintage painting into a whimsical chicken wire message board using the following creative guide. With just a staple gun, some paint, and resourcefully repurposed clothespins, breathe new life into a thrift store find and turn it into a stylish and practical piece for your home that effortlessly blends form and function. Perfect for showcasing cherished photos or keeping track of vital notes, this DIY project not only elevates your decor but also keeps you organized. Simply follow these straightforward steps to add a personal touch to your space with a message board that’s as one-of-a-kind as you are.
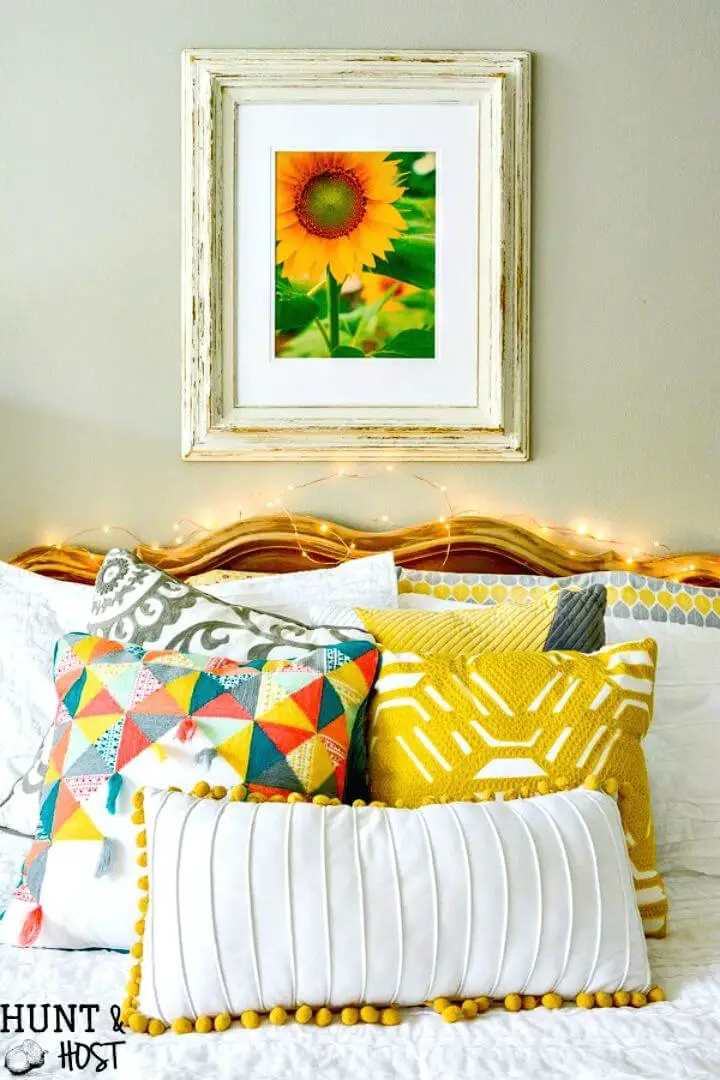
Homemade Hello Spring Fabric Art Using Old Frame
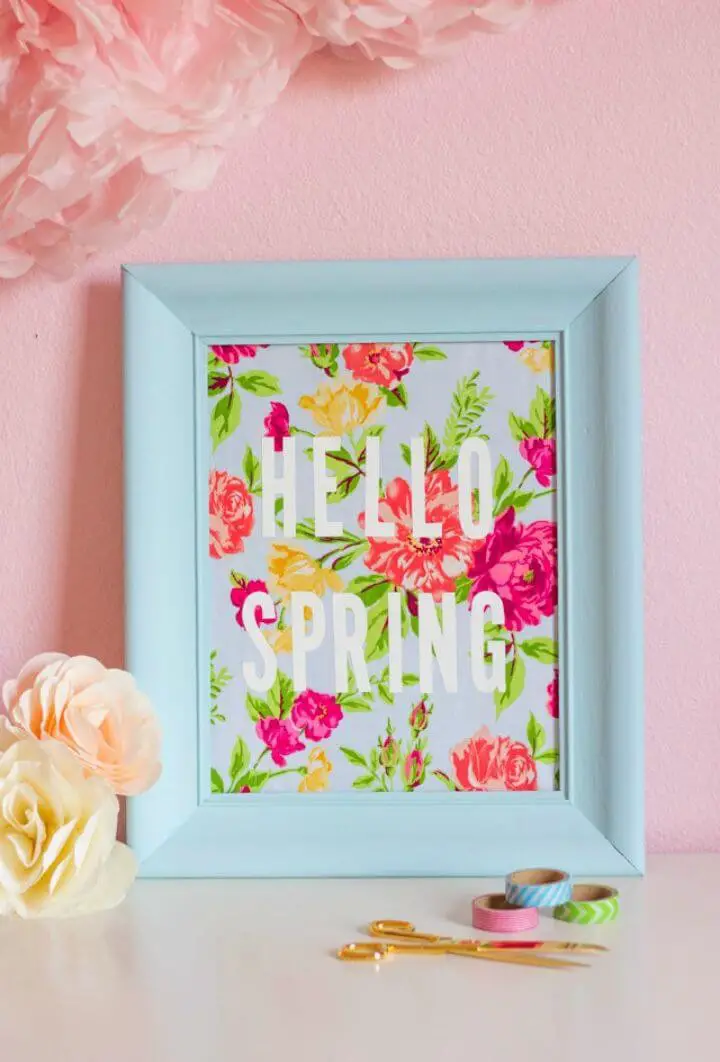
Transform your home’s ambiance by creating a charming DIY hello spring fabric sign. This project, inspired by Design Improvised, is an ideal way to add a pop of seasonal color and freshness to your space. To make it, you’ll need just a few simple materials: vibrant floral fabric, some paint, and a thrifted picture frame. With easy-to-follow steps, this craft is perfect for anyone looking to give their decor a spring makeover. Simply gather your supplies and let’s get started on this fun and rewarding project!
Pretty DIY Picture Frame Wreath
Transforming an ordinary picture frame into a charming wreath is a delightful DIY project that can add a personal touch to any room. With its engaging and helpful guide, Joy To My Heart shows you how to upcycle a thrifted picture frame into a stunning decorative piece. This tutorial is perfect for crafty individuals who enjoy giving old items a new lease on life and making their decor truly unique. All you need are some simple materials like paint, a brush, flowers, and a hot glue gun to bring your creative vision to life. The clear instructions make the process enjoyable and rewarding, allowing you to add a burst of color and character to your home with this one-of-a-kind craft.
Make Your Own Picture Frame Key Holder
Transform an old picture frame into a functional key holder with a touch of personal style using this straightforward DIY project. The result is a unique home accessory that not only keeps your keys organized but also adds a dash of charm to your decor.
To create this one-of-a-kind piece, start by wrapping fabric around the frame and securing it with glue. Next, attach hooks to hang your keys and add embellishments such as chipboard letters for a customized look. This easy-to-follow guide ensures that even the most novice DIY enthusiast can produce a practical and visually appealing addition to their wall.
Useful Shabby Chic Dangly Earring Display
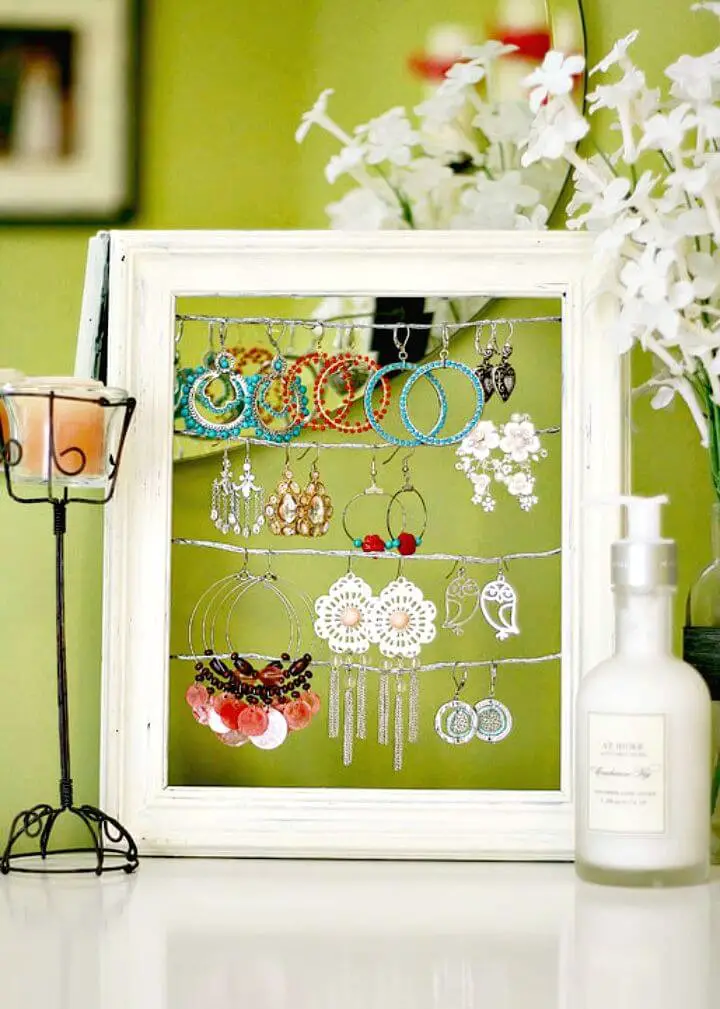
Transform an ordinary picture frame into a charming shabby chic earring display with this easy tutorial from Kevin & Amanda. To get started, grab an 8×10 frame, some picture wire, acrylic paint, and a staple gun. First, give the frame a vintage makeover by painting it with your chosen color, aiming for a distressed finish.
Next, measure and cut the wire into rows to hang your earrings. Secure the wires to the back of the frame using staples, making sure there are no sharp edges exposed. In just 30 minutes and for under $10, you’ll have a beautiful earring stand that not only enhances your decor but also keeps your accessories within easy reach.
Give this craft a try and add a personal touch to your space by upcycling an old picture frame into a functional piece of art.
Cheap DIY Framed Earring Organizer
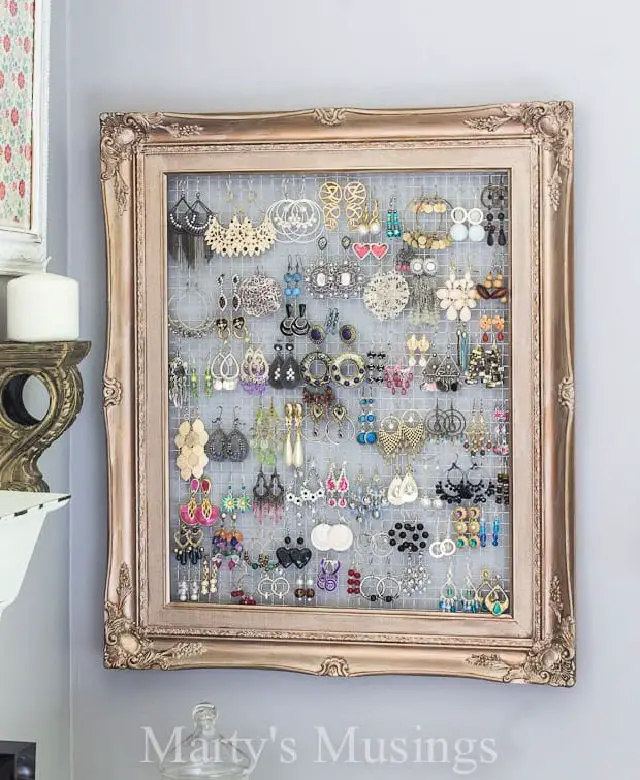
Transform a yard sale find into a unique and functional DIY earring and jewelry organizer with Marty’s Musings’ easy-to-follow guide. By upcycling a frame and chicken wire, you’ll create a vintage-inspired storage solution that adds a decorative touch to your space while keeping your accessories neatly displayed.
How to Make an Old Frame Inspiration Mood Board
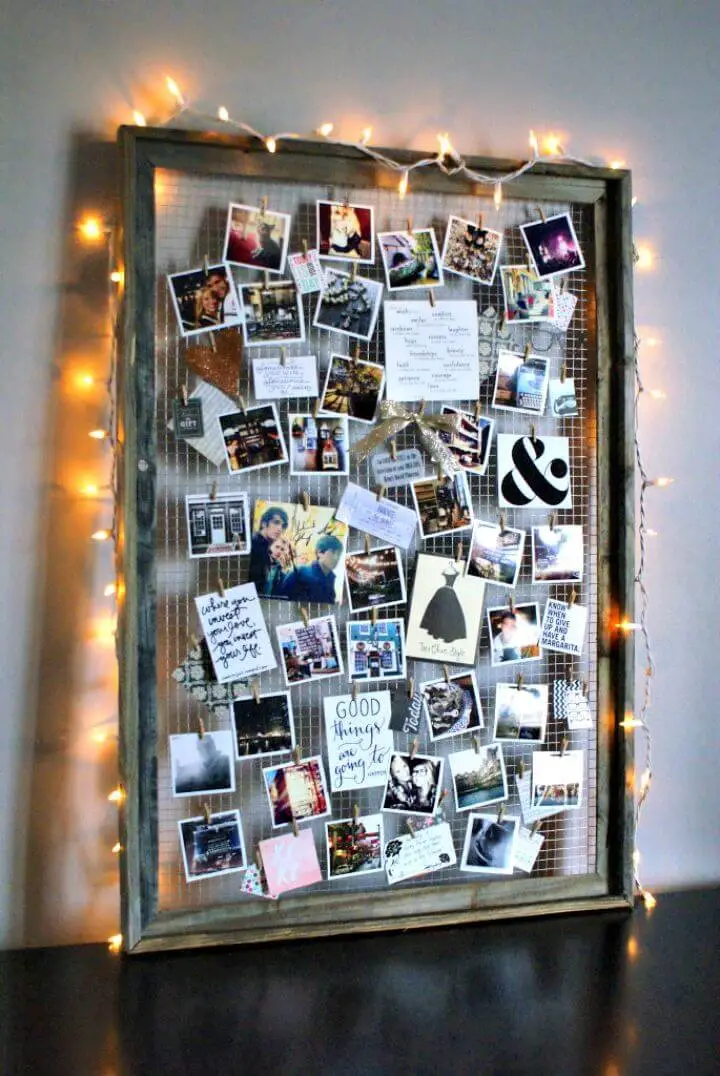
Transform any space into a personalized oasis with a DIY mood board from The Anastasia Co. This creative project enables you to curate your favorite memories, quotes, and images in a visually stunning collection that reflects your unique style and theme. By combining a few simple materials like a frame, wire roll, wire cutters, staple gun, staples, and mini clothespins, you can effortlessly assemble and customize your mood board. Whether you’re looking to showcase art prints, vacation mementos, or simply keep your jewelry organized in a chic way, this versatile frame is the perfect canvas for your creativity.
Build a Chalkboard With Old Picture Frame
Transforming an old picture frame into a functional chalkboard is a simple yet effective way to add a touch of rustic charm to any space. According to h3OBungalow, this DIY project is perfect for leaving notes, showcasing messages, or planning menus without breaking the bank. With no need for expensive paints and requiring just a few hours of your time, it’s an ideal activity for anyone looking to get creative with minimal fuss. The process starts by selecting a frame, preparing it with paint, and securing a pre-cut chalkboard sheet from a local home improvement store. Even those new to DIY crafts can follow these instructions with confidence and enjoy the satisfaction of creating their own homemade chalkboard.
Inexpensive DIY Old Frame Shelves
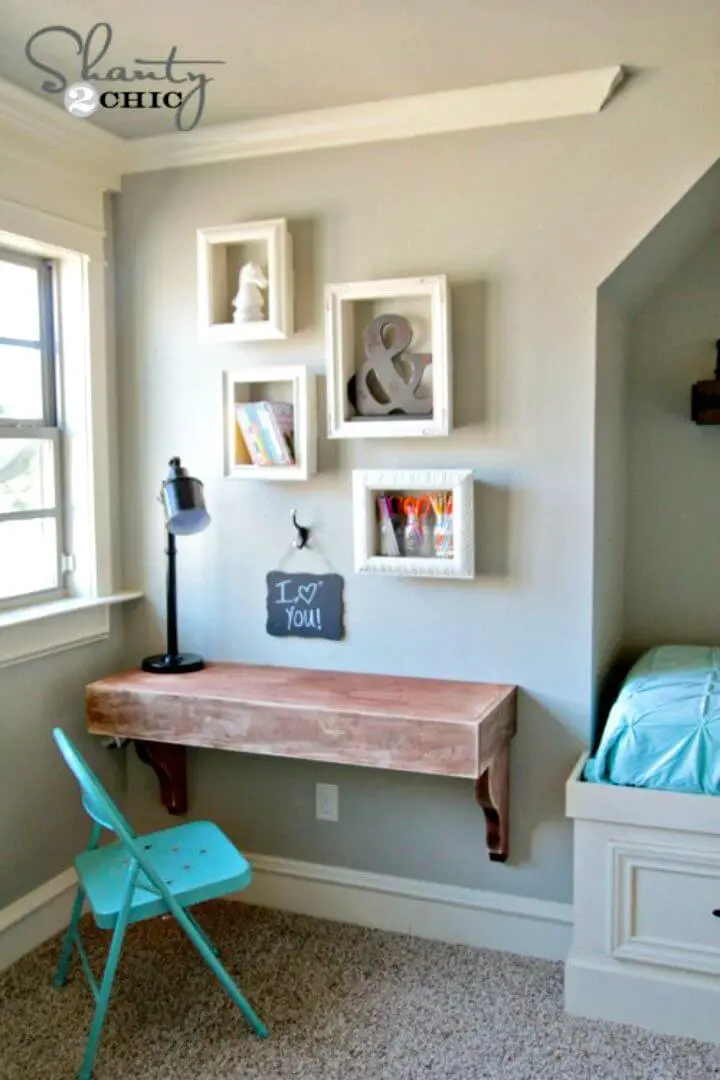
Elevate a blank wall into a visually appealing display with Shanty 2 Chic’s DIY frame shelf guide. This innovative project repurposes old picture frames, transforming them into functional shelving units that beautifully showcase art supplies, books, or decorative items. With just a few simple materials like 1×4 boards and a dash of paint, you can craft custom shelves that seamlessly integrate with your room’s decor. The step-by-step instructions ensure assembly is straightforward, while the clever use of command strips makes installation effortless – no drilling required! Embark on the creative journey and infuse your space with personality by building these one-of-a-kind frame shelves.
Turn an Old Picture Frame Into a Tiled Serving Tray
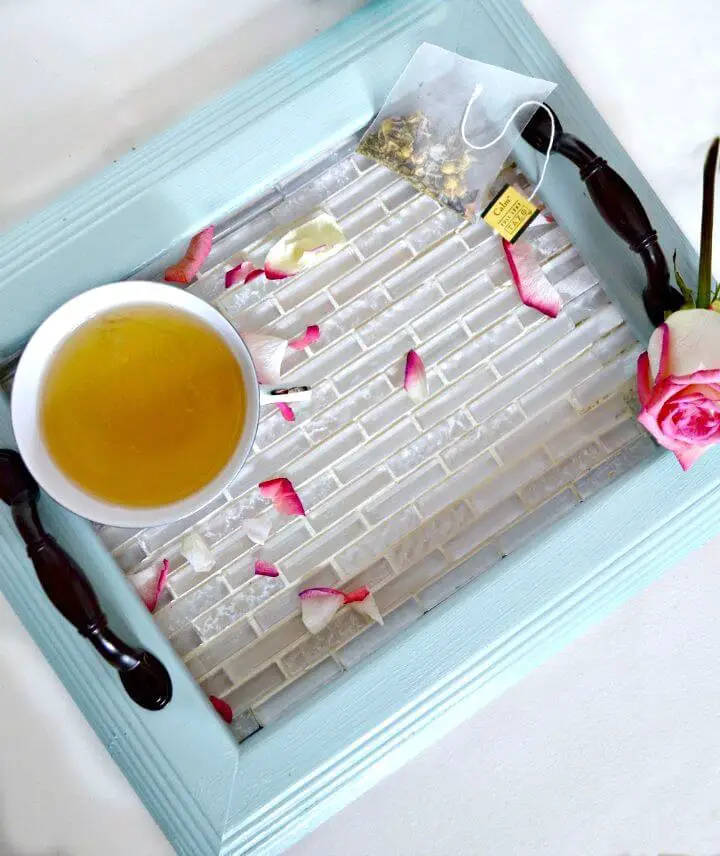
Transform an old picture frame into a stunning and functional tiled serving tray with this imaginative DIY project from my uncommon slice of suburbia. Perfect for those who delight in upcycling thrift store finds, this comprehensive guide will walk you through the process of selecting and painting the frame, cutting and placing tiles, and finishing with grout to achieve a professional-looking result. Add a personal touch to your home or create a one-of-a-kind gift with this engaging and easy-to-follow craft. Prepare to wow your guests with your handcrafted serving tray at your next gathering.
How Do You Make an Old Frame Wall Art
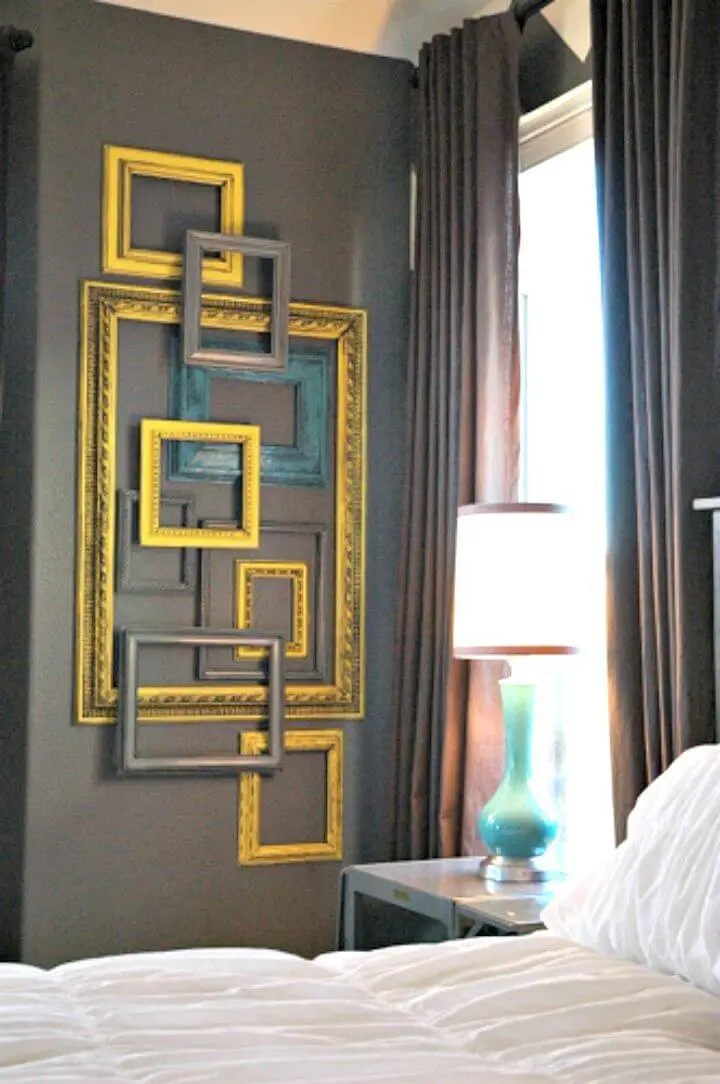
Transform a dull bedroom nook into a showstopping focal point by following Lindsay Ballard’s comprehensive guide to creating a layered, open frame gallery wall on Makely. Her easy-to-follow instructions will walk you through selecting frames, designing your layout on paper, and choosing custom paint colors to infuse your personal style. Discover the clever trick for securely attaching frames without visible adhesives, achieving a sleek, professional finish. This approachable and budget-friendly project is the perfect way to give your master bedroom a striking feature that will surely impress visitors. Prepare to take your space to new heights with this innovative wall art concept.
Outstanding DIY Old Frames Lantern

Transform old picture frames into enchanting lanterns with this meticulous guide from My Repurposed Life. This DIY project revitalizes forgotten frames, adding a warm ambiance to your home decor or serving as an exceptional centerpiece for weddings and other celebrations. With straightforward instructions and a dash of creativity, you’ll craft a stunning lantern that not only brightens up your space but also showcases your upcycling prowess. Collect your materials and join us on this creative journey as we breathe new life into those frames!
Make an Old Picture Frame Terrarium
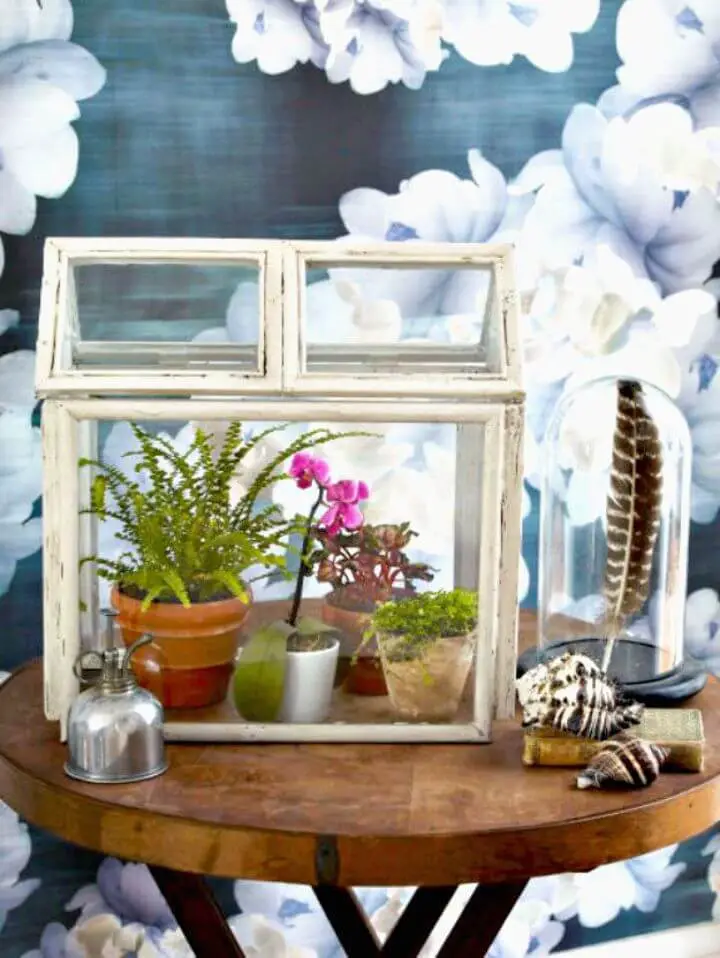
Revive old wooden picture frames by transforming them into charming DIY terrariums, perfect for plant enthusiasts. This eco-friendly and budget-conscious project breathes new life into unused frames, creating a Victorian-style mini-greenhouse for indoor plants like ferns, orchids, and warmth-loving flora. Follow our step-by-step guide to construct a unique habitat for your greenery, enhancing your home with vintage elegance. Get ready to roll up your sleeves and dedicate a few hours to crafting a beautiful, glass-encased sanctuary for your botanical companions.
Easy Way to Make a Scrappy Flower Spring Wreath
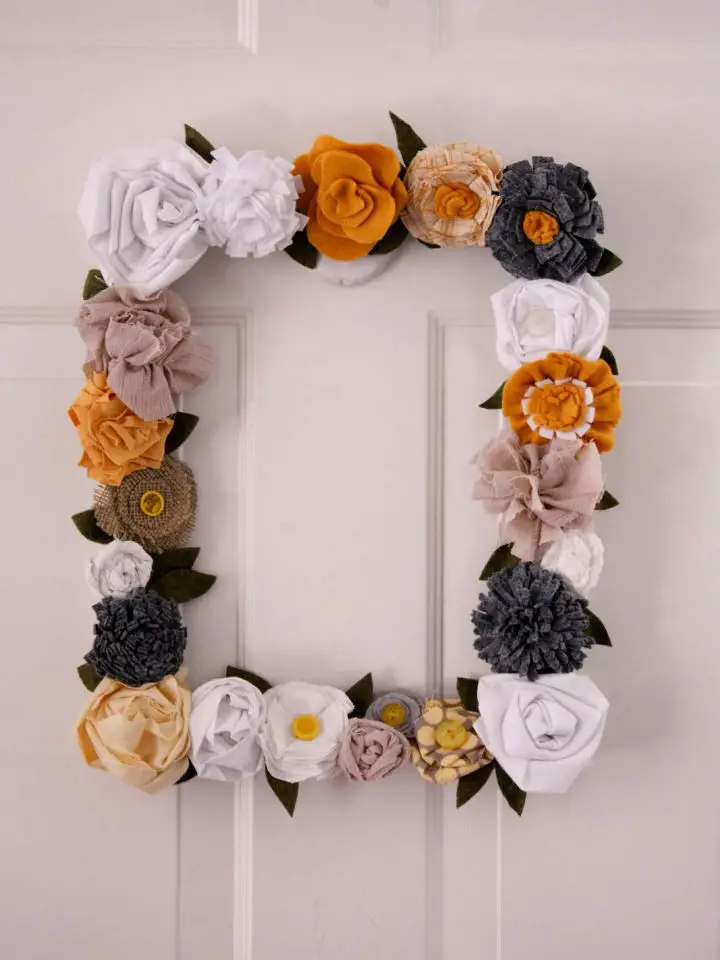
Spring’s vibrant energy can be infused into your space with our delightful flower spring wreath tutorial. This engaging craft project allows for creativity and uniqueness, as no two wreaths will ever look the same. With just a few fabric scraps and a trusty hot glue gun, you’ll create a colorful array of fabric flowers to adorn a simple white frame. Our step-by-step instructions make it easy to follow along, ensuring that your finished piece adds a cheerful touch to your home decor. As the seasons transition towards spring, this charming wreath will have you feeling like it’s just around the corner.
Simple DIY Old Picture Frame Tray
Transform an ordinary frame into an extraordinary DIY tray with a dash of creativity! Thrift store frames offer the perfect canvas for this project, boasting unique characteristics like chunky profiles and affordable prices. To create the base of your tray, repurpose old fence pickets, readily available and often thin. Measure and cut them to size, then smooth out any rough edges through sanding. Give them a fresh coat of whitewash for a coastal cottage-inspired look that’s sure to delight.Once you’ve prepped your frame and pickets, it’s time to bring everything together. Paint and seal the frame to protect it from wear and tear, before attaching the pickets with small nails at an angle. To add some extra flair, slap on protective felt discs on the bottom of your tray and stylish handles on top.The end result is a one-of-a-kind upcycled tray that not only serves its purpose but also injects a touch of handcrafted elegance into any space. With these easy steps, you can turn a basic frame into a functional and stylish home accessory.
Building an Old Picture Frame Coffee Table Tray
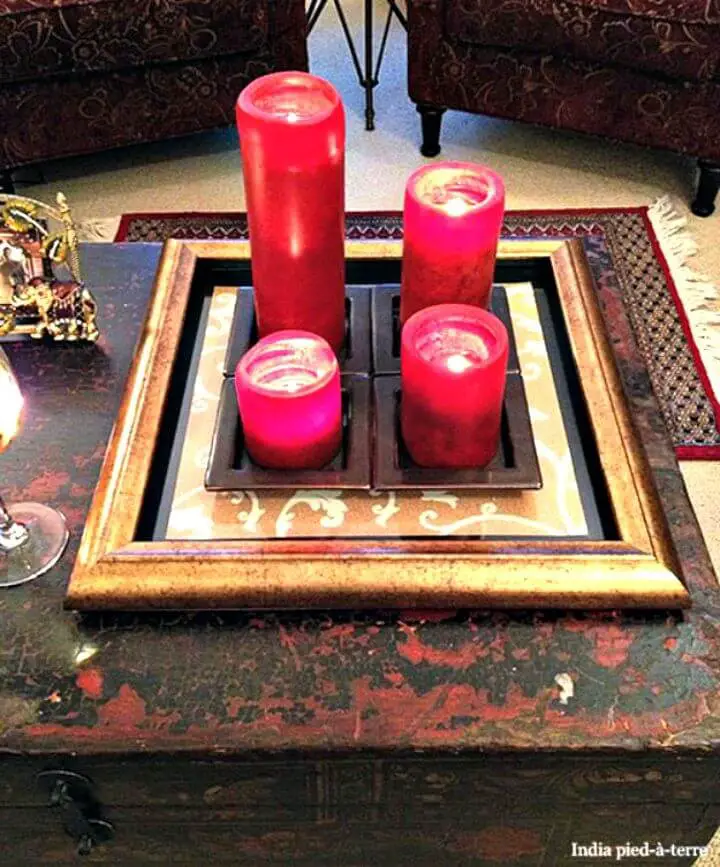
Transform an ordinary picture frame into an extraordinary coffee table tray with this clever DIY project inspired by Nomadic Decorator. This straightforward guide empowers you to create a functional and aesthetically pleasing tray using scrapbook paper and basic supplies, perfect for keeping clutter at bay and adding a touch of elegance to your living space. As a bonus, this craft allows you to upcycle an old frame into a beautiful holder for candles or decorative items, giving your coffee table a personalized and practical upgrade that perfectly reflects your distinct style.
DIY Old Picture Frame Phone Charging Station and Tablet Holder
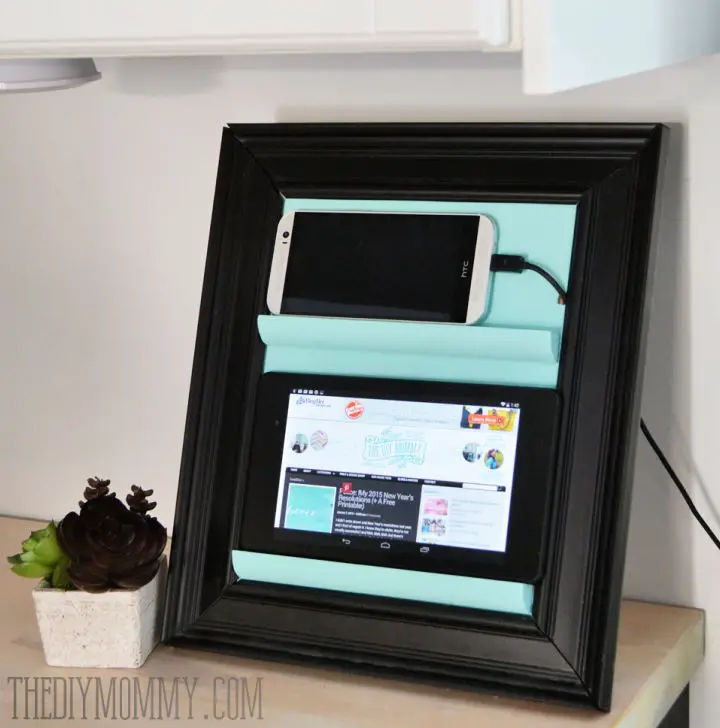
Give your kitchen counter a functional makeover with this clever DIY charging station, transforming an old picture frame into a stylish and organized hub for your phones and tablets. By following these simple steps, you can upcycle a sturdy 8×10″ photo frame, some trim scraps, cardboard, and basic tools to create a personalized holder that keeps your devices within easy reach while cooking or following recipes. With its practical and space-saving design, this homemade tablet and phone station is the perfect addition to any kitchen countertop.
How to Make a Picture Frames Cupcake Stand
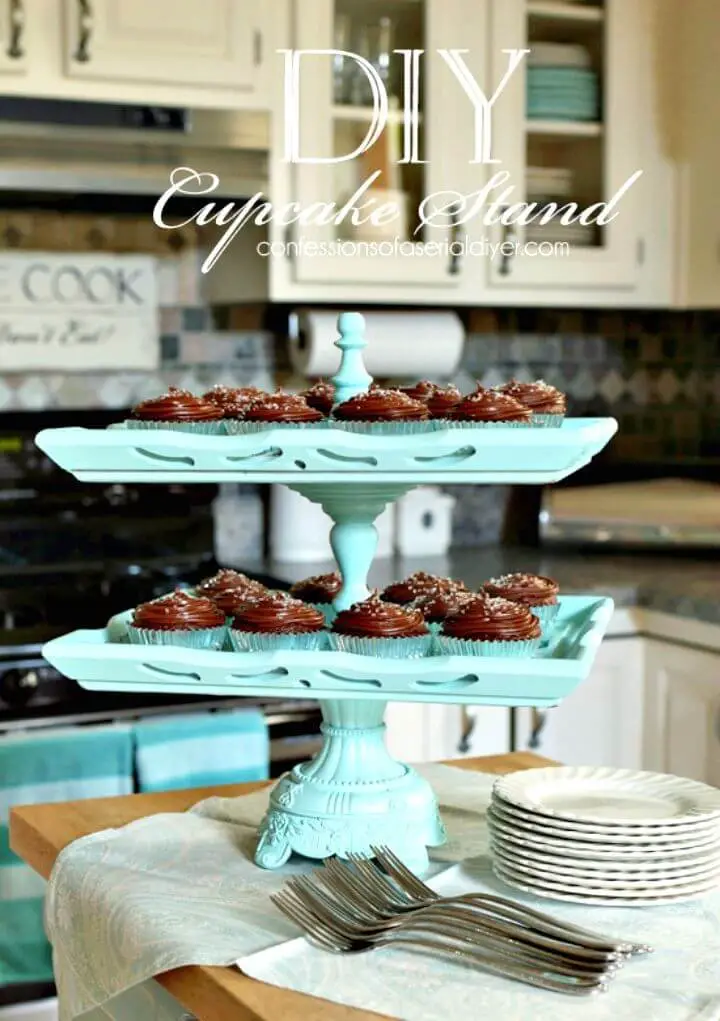
Transform old picture frames into stunning home decor by breathing new life into forgotten treasures with this innovative DIY guide from Confessions of a Serial Do-It-Yourselfer. Discover how to repurpose vintage frames into a mouthwatering cupcake stand that exudes charm and functionality. Through a straightforward, step-by-step process involving cleaning, painting, and assembly using basic tools and materials, you can effortlessly revive items on the verge of being discarded. This project is perfect for crafty individuals who delight in upcycling, as it adds a personal touch to any celebration or home setting. Get motivated and start creating your one-of-a-kind masterpiece today.
Making a Photo Frame Out of an Old Frame

To breathe new life into an old picture frame, start by giving it a fresh coat of paint. Once the paint is dry, use 28 gauge Darice brand silver wire to create delicate ‘clotheslines’ for your treasured photos. Next, attach two ring hooks at the back corners of the frame, allowing for effortless hanging. Select a series of uniform-sized photos that tell a story or showcase a special moment, and secure them to the frame using a combination of sturdy hooks and nails. As you hang your unique piece of home decor, take pride in knowing that you’ve not only given new purpose to an old frame but also kept cherished memories within easy view.
DIY Old Picture Frame Sunglasses Storage
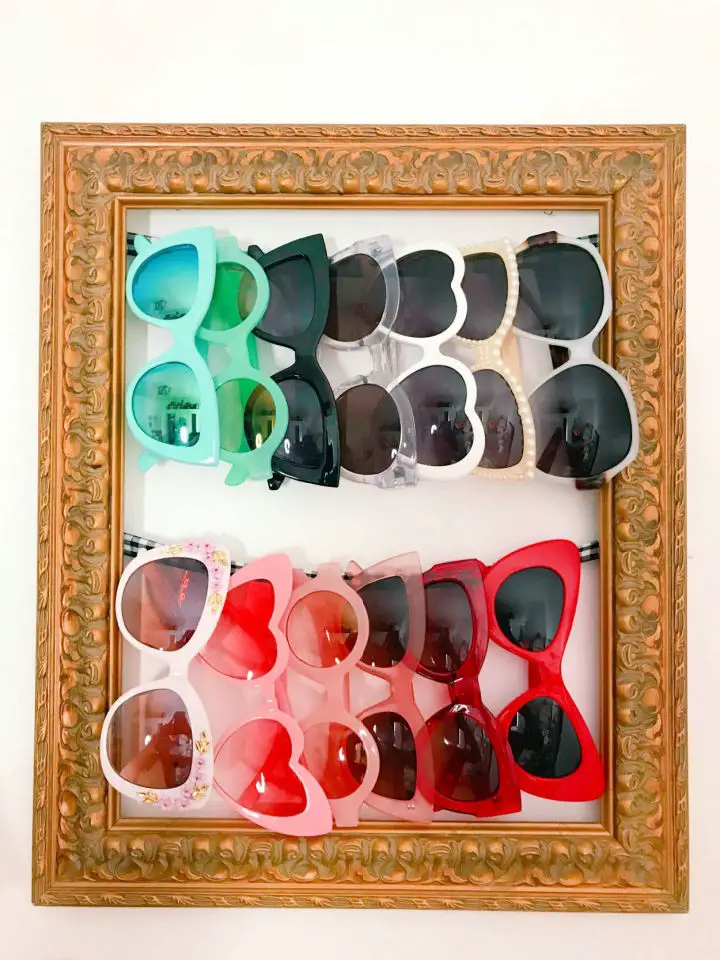
Transforming an ordinary frame into a unique sunglasses storage display is a brilliant DIY solution that adds a touch of style to any room. With a few simple steps, you can repurpose a frame and add ribbons to create a custom organizer that not only keeps your collection tidy but also serves as functional decor. This clever project makes it easy to find the perfect pair to match your outfit, elevating your accessory game in the process. For the full tutorial, visit KRYSTLE DESANTOS and get ready to elevate your fashion sense with this practical and chic DIY solution.
Conclusion
By transforming old picture frames into unique creations, you can breathe new life into your living space while also embracing sustainability. This guide has aimed to inspire and empower you to give those forgotten frames a fresh purpose. With endless possibilities ranging from crafting jewelry organizers to one-of-a-kind home decor elements, the potential for innovation is vast. As you embark on your projects, remember that each old picture frame holds the potential to become a masterpiece in its own right. Let’s bring our creative ideas to fruition and continue to explore the multitude of ways to revitalize old picture frames.
