Let’s embark on a creative journey together as we craft DIY dream catchers this weekend. These intricate pieces hold profound cultural significance, allowing us to infuse our personal style into any space. With 25 comprehensive DIY patterns accompanied by step-by-step instructions, you’ll uncover the ease and fulfillment that comes with mastering this beloved craft. Whether you’re seeking a unique decor piece or meaningful gift for loved ones, this guide is tailored to help you achieve your dream catcher goals.
As we delve into the world of dream catchers, we’ll explore not only their cultural significance but also provide essential guidance on selecting materials and personalizing your creation. This enables you to add your distinctive touch, making each piece a true reflection of your artistic vision.
By the end of this introduction, we hope you’re motivated to dive into the following sections with confidence and creativity, ready to begin your dream catcher crafting adventure.
Cultural Significance of Dream Catchers
The concept of dream catchers has its roots deeply embedded in the cultural heritage of Indigenous North America, with the Ojibwe people being a key part of this history. These ornate objects are often misunderstood as mere decorations, but they hold profound spiritual significance, serving as a powerful symbol of protection and solace.
The Origin and Meaning
According to traditional Ojibwe culture, the dream catcher is a handmade willow hoop adorned with a intricately woven net or web. This symbolic tool is believed to filter out both good and bad dreams that fill the night air. The good dreams are allowed to pass through the center hole, gently drifting down to the sleeping individual below, while the bad dreams become hopelessly entangled in the web, ultimately perishing with the dawn of a new day. By harnessing the power of these ancient traditions, dream catchers serve as a tangible representation of our ability to shape and control our own destinies.
The Story of Asibikaashi
As the Ojibwe nation expanded across North America, their revered Spider Woman, Asibikaashi, found it increasingly challenging to reach every child in need of her guidance. To address this issue, mothers and grandmothers took matters into their own hands, weaving intricate webs as a way to connect with newborns. These magical creations were crafted using willow hoops and sinew, or cordage derived from various plant sources, symbolizing the importance of nurturing and protection in Ojibwe culture.
The Legend of the Lakota
In Lakota legend, a spiritual leader received a profound vision on a mountain, courtesy of Iktomi, the revered trickster and teacher of wisdom. This enigmatic figure manifested as a spider, weaving a web around the elder’s willow hoop adorned with feathers, horsehair, beads, and sacred offerings. As the spider spun its intricate pattern, it imparted a profound lesson about the cycles of life, where we begin as innocent infants and grow into venerable age, requiring care and nurturing once more. According to Iktomi, the dream catcher serves as a guardian, capturing benevolent ideas while allowing malevolent ones to dissipate harmlessly through its central aperture.
Modern Day Significance
As the beauty and symbolic nature of dream catchers have captivated many, it is crucial to approach these items with sensitivity and respect for their cultural significance. The Native American community has long revered dream catchers as a symbol of identity and traditional value, making it essential to prioritize understanding and appreciation over mere aesthetic appeal. Misappropriation can be deeply offensive to the Indigenous communities who cherish these sacred items, making it vital to educate oneself on the purpose and cultural context behind each dream catcher. By doing so, we demonstrate a genuine commitment to respecting their origins.
How to Get Started with DIY Dream Catcher Crafting
Embarking on a DIY dream catcher project can be an incredibly fulfilling experience, regardless of whether you’re crafting for personal satisfaction, home decor, or as a thoughtful gift for someone special. With deep roots in Native American culture, dream catchers not only serve as stunning pieces of art but also as powerful symbols designed to safeguard sleepers from the negative energies that can manifest in their dreams. In this guide, we’ll provide you with a reliable and easy-to-follow roadmap to help you get started on your dream catcher crafting adventure.
Choosing Your Materials
To create a dream catcher, start by selecting the foundation: a hoop. This can be an embroidery hoop, metal ring, or repurposed material like willow or sturdy rings from old purses or curtains. The key is to choose a stable base that provides structure for your design.Next, consider the webbing material, which will form the net inside the hoop. Popular options include yarn, string, or thin leather strips. Feel free to get creative with color and texture choices.The addition of decorative elements adds both aesthetic appeal and symbolic significance. Beads, feathers, and charms can be woven into the web or attached as dangling accents, serving as a means of adding protective qualities believed to emanate from traditional dream catchers.Finally, prepare your toolkit: scissors for cutting materials, and potentially a needle for threading beads or a glue gun for securing decorations.
Crafting Your Dream Catcher
Transform your space into a whimsical sanctuary by creating your very own mesmerizing DIY dreamcatcher, courtesy of our comprehensive and user-friendly instructions.
Step 1: Prepare the Hoop
One of the simplest yet most effective ways to enhance the aesthetic and functionality of your hoop is to wrap it with yarn, fabric strips, or leather. This not only adds a pop of color but also provides a more secure grip for your webbing material. To ensure the wrapping stays in place, simply tie off the end with a knot or use a small amount of glue to keep everything tidy.
Step 2: Weave the Web
Begin by securing the webbing material to the hoop’s topmost point. Then, weave the material in and out of the hoop, creating a loop that you’ll secure with a knot. Repeat this process, moving around the perimeter of the hoop and working your way towards the center. For added visual interest, consider incorporating beads into your web design.
Step 3: Decorate with Feathers and Beads
Transform your webbing material by trimming it to the desired length, or opt for the elegance of ribbons to suspend decorations from your dream catcher. Embellish the ends with feathers and add a personal touch with strategically placed beads. This ancient tradition holds that these dangling elements play a crucial role in guiding good dreams towards the sleeper.
Step 4: Final Touches
Before displaying your dreamcatcher, take some time to ensure that all decorative elements are securely fastened and there are no loose threads. Additionally, consider adding a length of twine or cord to the top of the dreamcatcher, allowing you to easily hang it in your desired location.
Tips for Success
When approaching dream catcher crafting, it’s essential to strike a balance between simplicity and creativity. For beginners, starting with straightforward designs is crucial, allowing you to build confidence as you progress. Meanwhile, feel free to let your imagination run wild, experimenting with diverse colors, patterns, and materials to make each dream catcher uniquely yours. Additionally, taking the time to learn about the cultural significance behind this traditional craft can elevate the experience, fostering a deeper appreciation for its origins and the stories it represents. Moreover, consider adopting eco-friendly practices by incorporating natural or recycled materials into your design, giving your finished product an environmentally conscious touch.
Personalizing Your Dream Catcher
Embarking on the adventure of crafting a dream catcher is an invitation to explore the realms of creativity and self-expression. As you select each component, consider the significance or symbolism it holds for you, allowing your unique personality to shine through. This personal touch transforms your dream catcher into a one-of-a-kind reflection of your thoughts, emotions, and experiences.
Choosing Colors and Materials
When selecting colors and materials for your craft project, consider the symbolism they carry and how they can reflect aspects of your life or personality. The calming blue hue may evoke feelings of serenity, while the bold red tone could embody passion. Take a moment to ponder what each color means to you and choose those that resonate with your values.
In addition to colors, think about the materials you’ll use to bring your project to life. Traditional options like willow and sinew can lend a sense of nostalgia and heritage, while modern alternatives like metal hoops and yarn offer a sleeker, more contemporary look. Consider incorporating materials that hold special significance, such as fabric from a memorable event or beads passed down through family generations. By choosing materials with personal meaning, you’ll infuse your project with an extra layer of emotional depth and connection.
Adding Meaningful Symbols
When crafting your dream catcher, consider incorporating beads and feathers that hold personal significance. Beads, for instance, can serve as tangible representations of life’s milestones or cherished memories. Choose those that have a story to tell, allowing you to infuse your creation with emotional resonance. Similarly, feathers, a traditional element in dream catchers, can symbolize concepts like freedom or travel, which may align with your aspirations. Select feathers that resonate with your goals and values, imbuing your dream catcher with a deeper sense of purpose.
Incorporating Personal Touches
Incorporating personal touches is an excellent way to make your dream catcher truly special. One idea is to attach small photographs to the fabric, allowing you to keep cherished memories close at all times. Alternatively, you could embroider or paint a meaningful quote onto the fabric, serving as a daily reminder of your goals and aspirations. For a more organic look, consider incorporating natural elements like shells or stones into your dream catcher’s design. This not only adds visual interest but also brings the beauty of nature indoors.
Troubleshooting Common Issues in Making Dream Catchers
When embarking on the creative journey of crafting a dream catcher, it’s not uncommon to encounter a few obstacles along the way. However, with a little preparation and troubleshooting, these hurdles can be easily overcome. For instance, if you’re experiencing difficulties in weaving the yarn or finding the perfect shape for your dream catcher, there are several solutions at your disposal.
Hoop Wrapping Difficulties
To keep the suede lace or ribbon from sliding off the hoop, try applying a small amount of adhesive to the end of the lace or ribbon before wrapping it around the hoop. This will provide a secure hold. When wrapping, make sure to apply even pressure and avoid gaps in the fabric. By taking these precautions, you can ensure that your finished product remains in place.
Web Weaving Woes
When it comes to creating a visually appealing piece of webbing, a common issue is an uneven or loose appearance. To achieve a more harmonious design, it’s essential to maintain consistent tension on the strings as you weave. Should you encounter any mistakes along the way, don’t be afraid to undo and rework certain knots. With practice, you’ll find that your webs become increasingly symmetrical and visually appealing.
Decorative Dilemmas
To prevent feathers or beads from continually falling off your dream catcher, consider securing them with a small knot both before and after each bead or feather. This simple step can make all the difference in keeping your decorative piece intact. Additionally, if you’ve opted to use glue instead of knots, make sure it’s fully dry and cured before displaying your finished dream catcher. This will ensure that everything stays securely in place.
Problem: Size and Shape Struggles
When designing a dream catcher, it’s crucial to consider the scale and proportions of the piece to ensure it fits harmoniously in its intended space. One key consideration is the size of the hoop, which can greatly impact the overall appearance and functionality of the dream catcher. Larger hoops not only require more materials but also demand more time and effort to create, making them less suitable for smaller spaces or those with limited crafting resources. By choosing a hoop size that is proportional to its intended environment, crafters can achieve a visually appealing and effective dream catcher that brings balance and serenity to the space.
Material Missteps
When examining the construction of a dream catcher, it’s clear that the materials used can greatly impact its overall integrity. To ensure a sturdy and attractive final product, it’s essential to opt for high-quality materials from the outset. This is particularly important when working with yarn, where pre-winding it can help prevent tangles and make the crafting process much smoother. In the case of web construction, a flexible yet strong string is crucial for creating a dream catcher that will withstand the test of time. By thoughtfully addressing these potential issues upfront, you’ll be able to create a truly stunning dream catcher that showcases your skills and dedication.
Maintenance and Care for Dream Catchers
To preserve the aesthetic appeal and functional effectiveness of your dream catcher, it’s essential to perform routine upkeep tasks. A comprehensive guide is outlined below to ensure your dream catcher remains a stunning piece that continues to attract positive energies.
Regular Cleaning
When it comes to maintaining your dreamcatcher’s integrity, gentle care is key. To prevent damage to the delicate web and adornments, use a soft brush or duster to carefully sweep away any accumulated dust. This thoughtful approach will safeguard your dreamcatcher’s appearance while preserving its intricate details.
In terms of lighting, it’s essential to be mindful of your dreamcatcher’s exposure to direct sunlight. Prolonged periods of strong light can cause the colors to dull and fade, compromising the overall aesthetic. Instead, opt for a well-ventilated area that provides soft, diffused light. By doing so, you’ll ensure your dreamcatcher remains vibrant and captivating, free from the negative effects of harsh sunlight.
Handling Repairs
When it comes to reassembling loose elements in your handmade crafts, such as wayward beads or stray feathers, precision is key. To restore the original design’s cohesion, take a few minutes to carefully reattach these wayward items using a small needle and thread. Move deliberately to ensure each component is securely fastened, preserving the overall aesthetic.
Long-Term Preservation
To maintain the integrity of your dream catcher when it’s not being displayed, it’s essential to store it in an environment that minimizes exposure to moisture and light. A dry, dark location is ideal, as this helps prevent deterioration of its materials and preserves the craftsmanship. By doing so, you’ll ensure your dream catcher remains in great condition for many years.
FAQs About Dream Catchers
As curiosity about crafting and interpreting dream catchers grows, numerous individuals seek clarification on various aspects of this ancient tradition. To address the most pressing concerns, I’ve compiled a comprehensive FAQ section, offering straightforward and trustworthy responses to commonly asked questions.
What is the purpose of a dream catcher?
In the realm of Native American craftsmanship, dream catchers have long been revered as powerful talismans that safeguard sleepers from the dark forces of nightmares. The intricate design of these charms is rooted in ancient wisdom, where good dreams are allowed to flow freely through the central opening and gently drift down the soft feathers, imparting sweet slumber to the sleeper. Conversely, malevolent visions become entangled in the delicate web, dissipating with the dawn’s warm light as the day begins anew.
How do I choose the right hoop for my dream catcher?
When it comes to crafting your dreamcatcher, the first step is selecting a hoop that aligns with your vision. You’ll find metal and wooden hoops are popular options, offering a range of sizes from compact, handheld circles to larger decorative pieces. For those new to dreamcatcher-making, a hoop measuring between 5 to 8 inches in diameter is an ideal starting point.
What materials are used for the web?
When it comes to crafting your web, you have the flexibility to choose from a variety of materials that cater to different needs. You can opt for artificial sinew, hemp cord, waxed nylon string, or even silk thread. The key is to select a material that offers a balance between strength and flexibility. While traditional dream catchers often feature natural-colored strings, you’re free to explore a range of colors that hold personal significance for you.
Can I use different decorations?
Elevate the significance of your dream catcher by infusing it with symbolic elements that resonate with your personal experiences. Opt for adornments like feathers, beads, gemstones, and shells, which not only add a touch of elegance but also hold emotional value. Each decoration can be chosen to represent a specific aspect of your life, such as memories, values, or aspirations, allowing the dream catcher to become an intimate reflection of yourself.
Where should I hang my dream catcher?
Position your dream catcher strategically, ideally near your bedside or in an area that captures the gentle morning glow. This thoughtful placement serves a dual purpose: allowing the dream catcher to effectively capture and ward off negative energies, while also permitting the nourishing light to purify it of any lingering bad dreams from the previous night.
How do I maintain my dream catcher?
To maintain the integrity and visual appeal of your dream catcher, it’s essential to perform routine maintenance tasks. Start by gently dusting the entire piece using a soft-bristled brush to remove any debris or residue. When it comes to light exposure, be mindful not to leave your dream catcher in prolonged direct sunlight as this can cause fading over time. Additionally, if you notice any loose threads or beads becoming detached, take the necessary steps to reattach them using a needle and thread, ensuring that all components remain securely fastened.
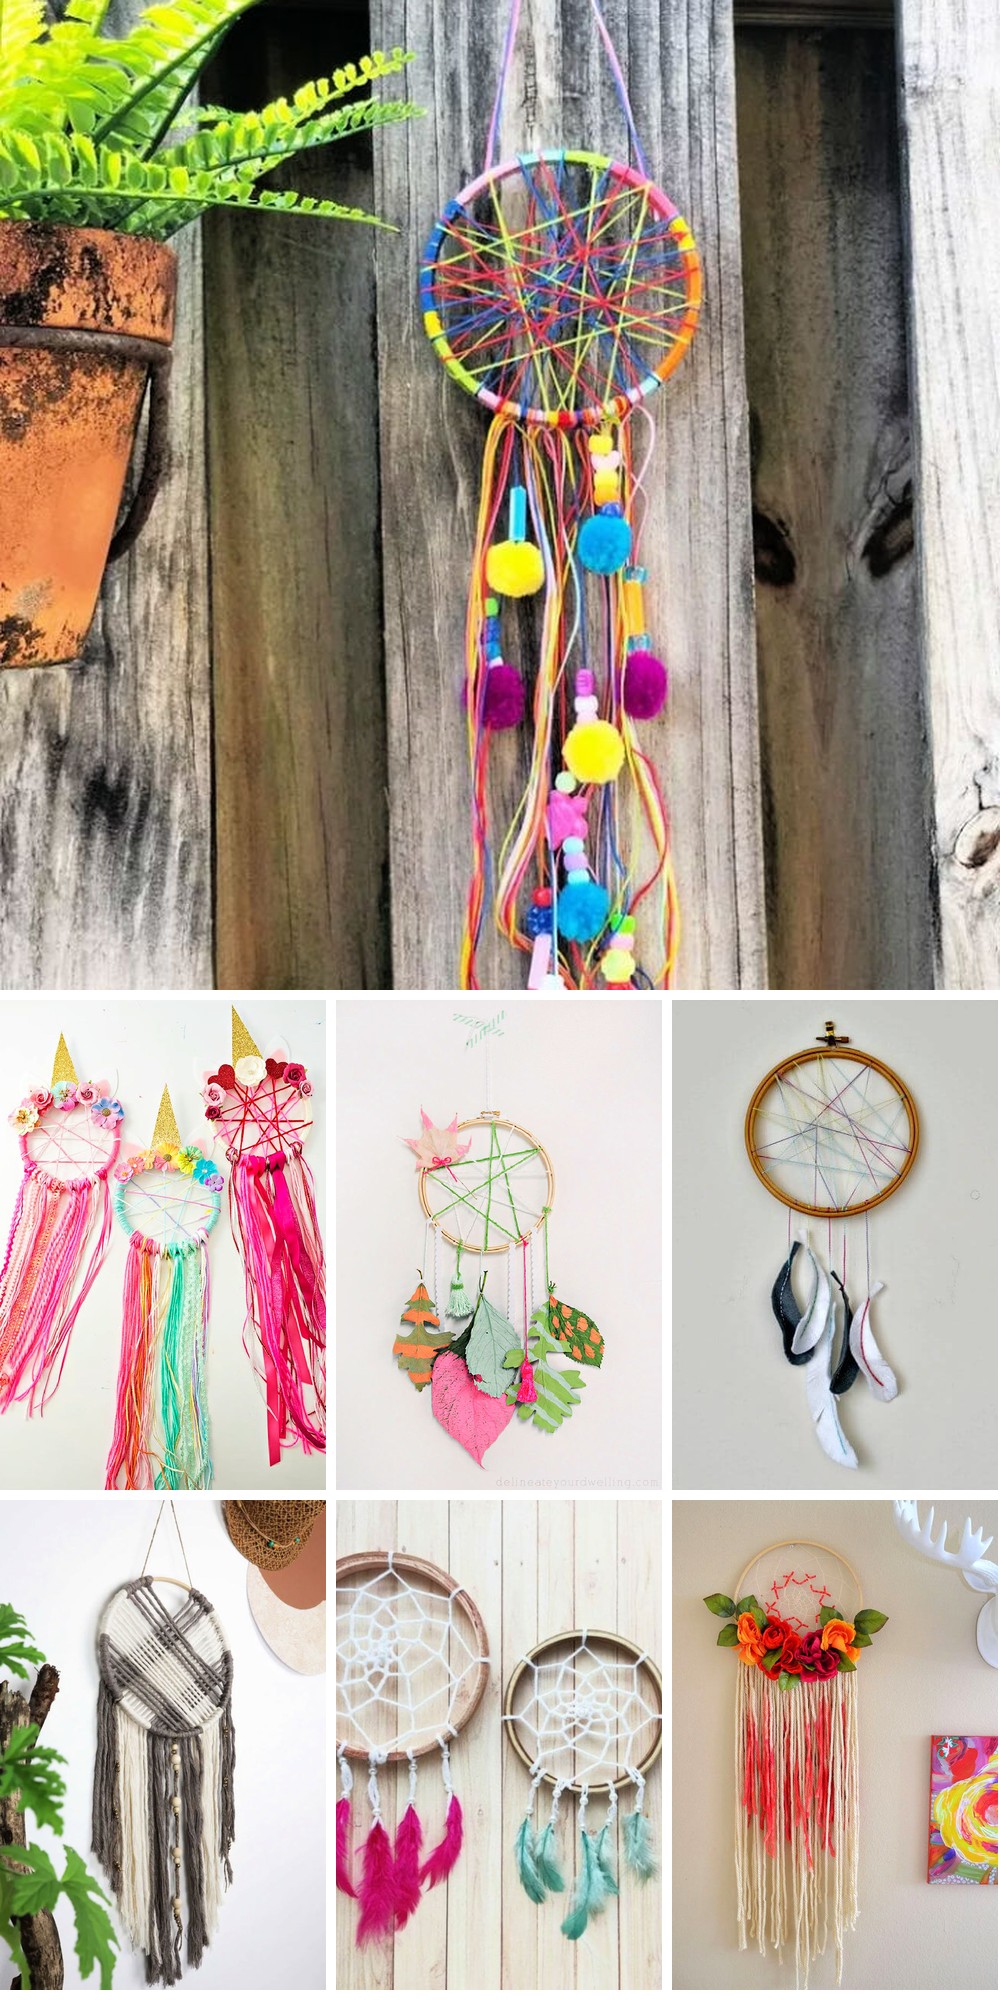
25 DIY Dream Catcher Patterns
Unleash your creative potential by crafting a one-of-a-kind dream catcher using 25 breathtaking DIY patterns. With simple, step-by-step tutorials, you’ll be guided through the process of transforming raw materials into a masterpiece that reflects your personal style.
Shabby Vintage Doily Dream Catcher
Transform the ordinary into an extraordinary keepsake by crafting a dream catcher infused with personal significance. Inspired by my own creative journey on My So Called Crafty Life, this DIY project harmoniously blends sentimental value with artistic expression. Start by upcycling a simple doily and embroidery hoop into a one-of-a-kind decorative piece that exudes bohemian charm. Embellish your dream catcher with a medley of materials – yarn, ribbon, trims, fabric scraps, leather lacing, and feathers – to imbue it with unique character. The process is straightforward yet deeply rewarding, making it an ideal activity for anyone seeking to add a touch of whimsy and meaning to their space.
DIY Farmhouse Style Dreamcatcher From a Vintage Doily
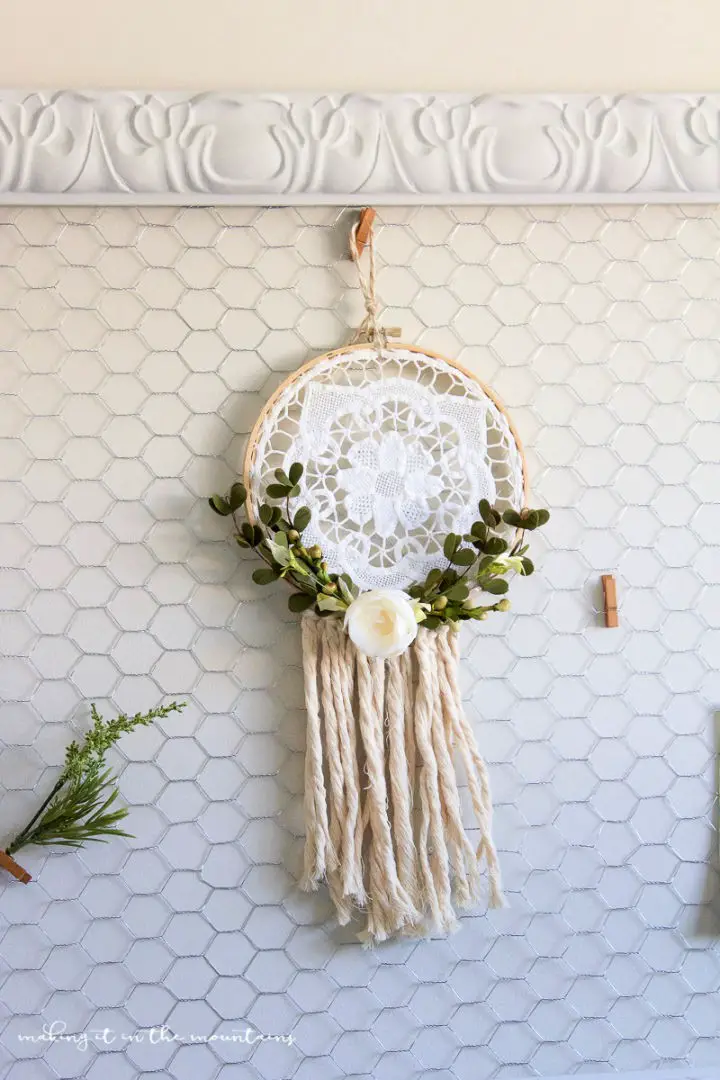
Transform a thrift store find into a charming rustic farmhouse style dreamcatcher by following the creative guidance of Kristi at Making it in the Mountains. With her simple yet effective tutorial, you can turn a vintage doily into a delightful piece of home decor that exudes warmth and nostalgia. Simply secure the doily into an embroidery hoop, add decorative strings for texture, and personalize with subtle pops of color from faux florals. The result is a unique dreamcatcher that brings a touch of femininity and whimsy to any room. With this enchanting farmhouse charm, you can infuse your living space or office with a sense of rustic elegance.
Make Your Own Dreamcatcher
At Craftsy Hacks, we’re fascinated by the mystique surrounding dreamcatchers – a harmonious blend of artistry and legend. Our step-by-step guide invites you to embark on a creative journey that not only celebrates Native American traditions but also adds a touch of warmth to your home decor. As you weave together cords and beads, you’ll discover the art of crafting a mesmerizing design capable of capturing bad dreams while nurturing peaceful slumber. This DIY project is ideal for craft enthusiasts seeking a unique outlet for self-expression. By putting your own creative spin on this handmade charm, you’ll infuse it with personal significance, creating a treasured piece that’s both protective and stylish. As you elevate your space with this story-rich creation, every thread will seem to whisper tales of protection and positivity.
Rustic DIY Driftwood Dreamcatcher
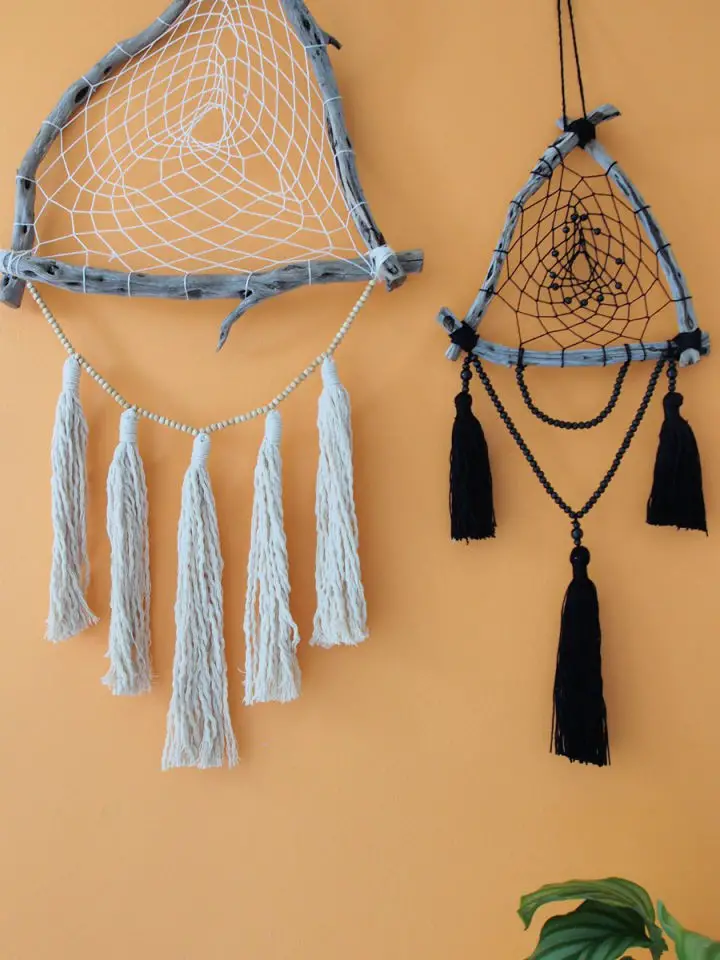
Give your home a free-spirited ambiance with a one-of-a-kind driftwood dreamcatcher. This captivating DIY endeavor takes you on a creative journey, transforming rustic driftwood into a unique decorative piece that reflects your personal style. For those who crave something unconventional, consider substituting traditional webbing with a vintage crochet doily – an unexpected yet charming twist. The process begins with crafting a sturdy triangular frame from driftwood, followed by weaving the webbing and adding embellishments like beads and tassels to infuse that distinctive bohemian flair. Step-by-step instructions make this craft accessible, ensuring a fun and rewarding experience as you bring whimsy to your décor.
How to Make a Paper Plate Dreamcatcher
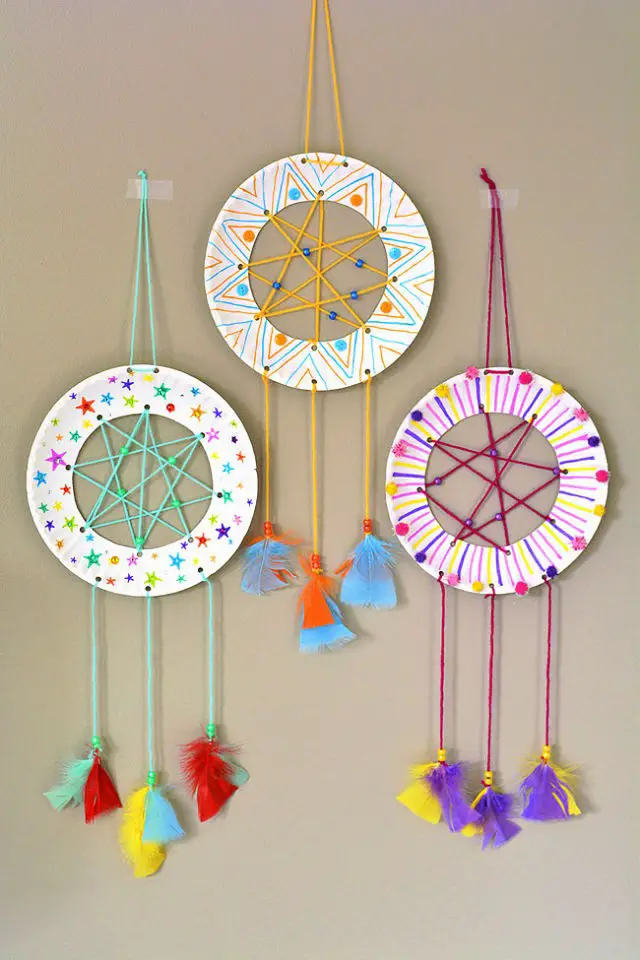
Create a whimsical dreamcatcher with just a paper plate and some basic crafting supplies, courtesy of One Little Project. This delightful project is not only engaging but also easy to follow, making it an excellent bonding experience for parents and children alike. By customizing the dreamcatcher with vibrant yarn, beads, and feathers, you can add a touch of magic to your bedroom decor.
Beyond being a fun way to spend quality time together, this project offers a creative outlet for personalizing a handmade decoration that’s said to keep bad dreams at bay. With simple instructions, you can transform ordinary materials into a beautiful piece of art, while also developing fine motor skills and encouraging creativity through hands-on activity.
How to Make a Dreamcatcher

Unleash the creative spirit with Happy Active Kids as we embark on a cultural adventure to craft a DIY Dreamcatcher. This project seamlessly blends enrichment and fun, making it an ideal family activity for springtime celebrations. By exploring the rich Native American heritage behind dreamcatchers and their symbolic significance, you’ll uncover the meaning behind this beloved decorative piece. Using readily available materials like sticks, twigs, yarn, and more, we’ll guide you through a step-by-step process to create your own unique Dreamcatcher. As you weave together artistry and learning, you’ll be left with a stunning and meaningful decoration to adorn your space for a restful night’s sleep.
Colorful DIY Leaf Dream Catcher
Step into the warm and cozy atmosphere of autumn by crafting a DIY Leaf Dream Catcher, a delightful project perfect for both kids and adults. Our easy-to-follow tutorial uses simple materials like acrylic paint, an embroidery hoop, yarn, and leaves to transform natural foliage into a stunning piece of decor. As you bring your creation to life, you’ll not only celebrate the vibrant hues of fall but also add a unique touch to any space. With its whimsical charm and colorful design, this dream catcher is sure to infuse your home with the spirit of the season, making it a memorable keepsake that captures the essence of autumn’s beauty.
Easy DIY Unicorn Dreamcatcher
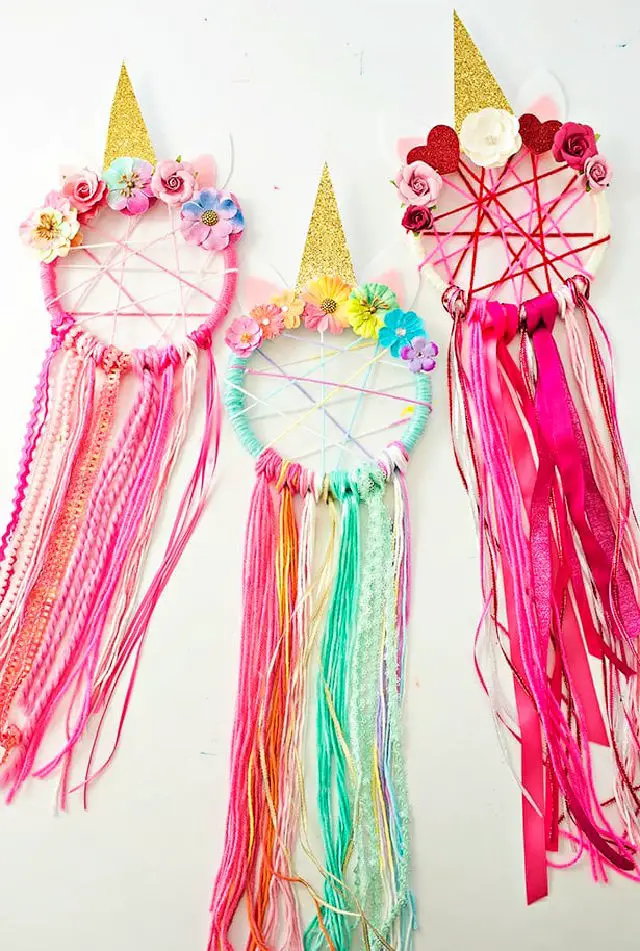
Transforming a DIY Unicorn Dreamcatcher is an enchanting experience for crafty individuals who relish infusing their creations with whimsical charm. This delightful project, expertly guided by hello, Wonderful, involves wrapping yarn around embroidery hoops, adding a sparkly horn, felt ears, and an array of decorative flowers. With this step-by-step process, you can create unique decorations that capture the essence of unicorns and are perfect for adding a touch of magic to any room or party. Whether you’re looking to customize with various colors and textures or simply want to unwind with a fun crafting experience, this tutorial is designed to help you achieve a stunning result.
DIY Lace Wedding Dreamcatcher
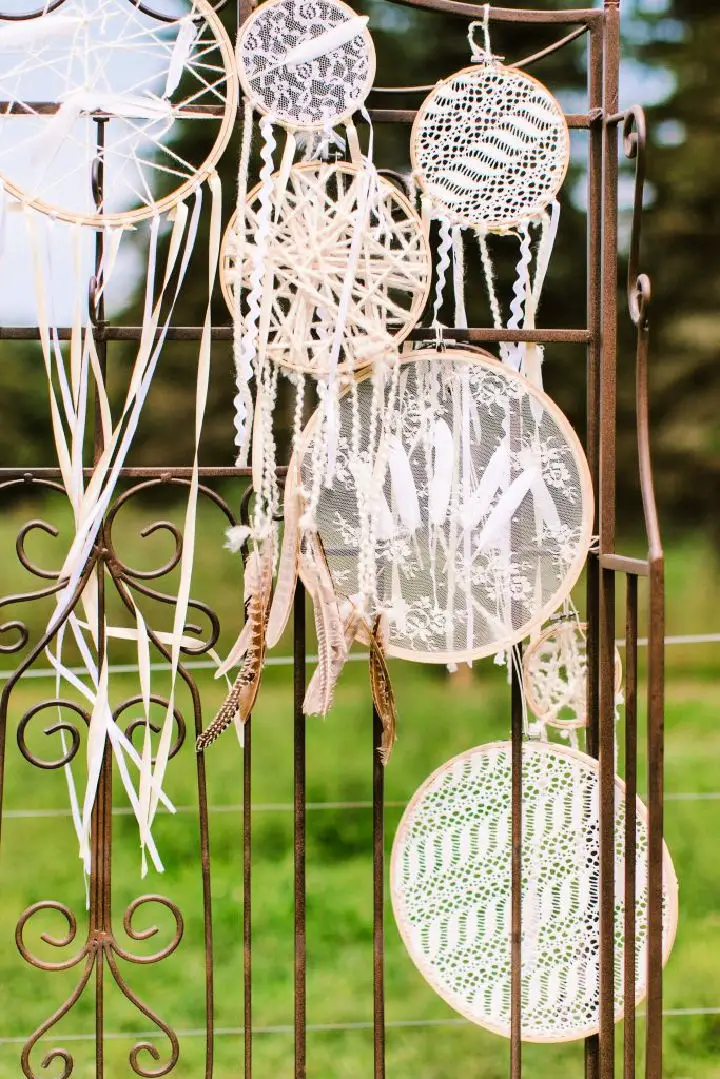
Elevate your wedding décor by infusing it with personal touches using The Neon Tea Party’s DIY Lace Wedding Dreamcatchers guide. These intricately crafted dreamcatchers, made from embroidery hoops, lace, ribbons, yarn, and feathers, double as unique decorations that can be tailored to harmonize with your wedding theme. By following the easy-to-understand instructions, you’ll unlock the creative freedom to experiment with different materials and create a set of dreamcatchers that, although distinct in their own right, coalesce into a breathtaking visual display. Whether used to adorn a bedeken chair or as part of a larger installation, these dreamcatchers bring an air of whimsy and charm to your special day, allowing you to make it truly unforgettable.
How to Make a Floral Dreamcatcher
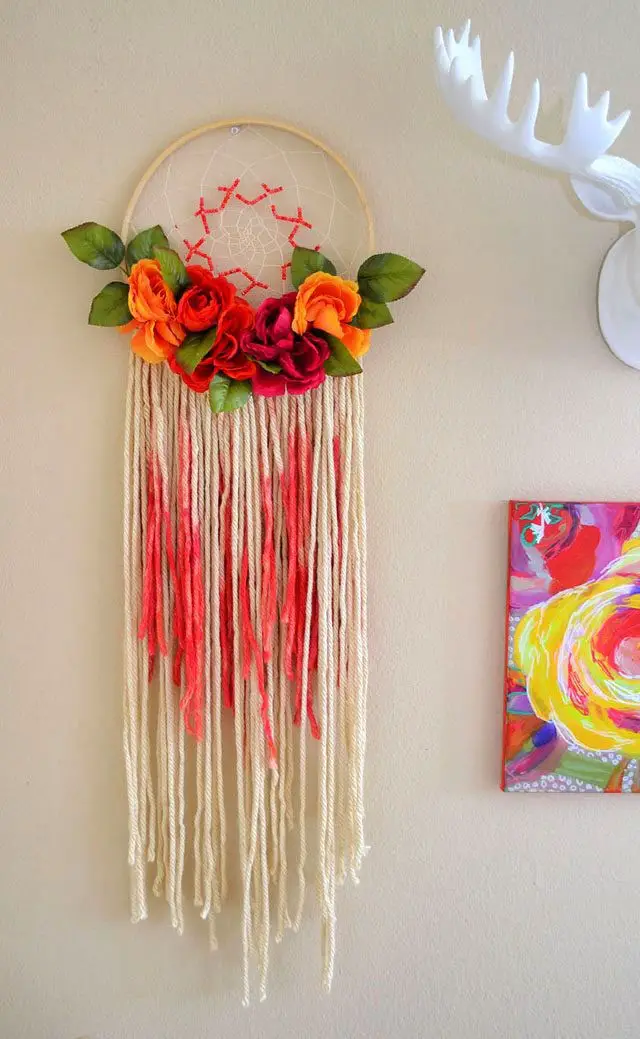
Transform any room with a whimsical floral dreamcatcher using this DIY tutorial from Mom Spark. This budget-friendly craft project adds a bohemian touch, combining fun with creative expression. Follow the step-by-step process to weave a delicate web within an embroidery hoop, attach soft yarn tassels, and enhance the design with vibrant flowers and leaves. With clear guidance, simple materials are transformed into a beautiful wall decoration that can be tailored to suit your decor. This project provides a sense of satisfaction as you handcraft a personalized piece, perfect for sprucing up your living space.
Doily and Grapevine Wreath Dream Catcher
Transform your creativity into a stunning doily and grapevine wreath dream catcher with The Hamby Home’s simplified guide. This DIY project combines colors and textures to produce a one-of-a-kind piece of art. To get started, gather the essential materials: a grapevine wreath, a doily, ribbons, hot glue, and scissors. Begin by creating knots on the wreath for about a quarter coverage, then secure the doily to the back for that classic dream catcher look. Don’t be afraid to experiment with fabric strips, beads, or feathers to add an extra layer of uniqueness. This tutorial is perfect for home décor or as a thoughtful handmade gift, yielding a piece that’s not only special but also stylish.
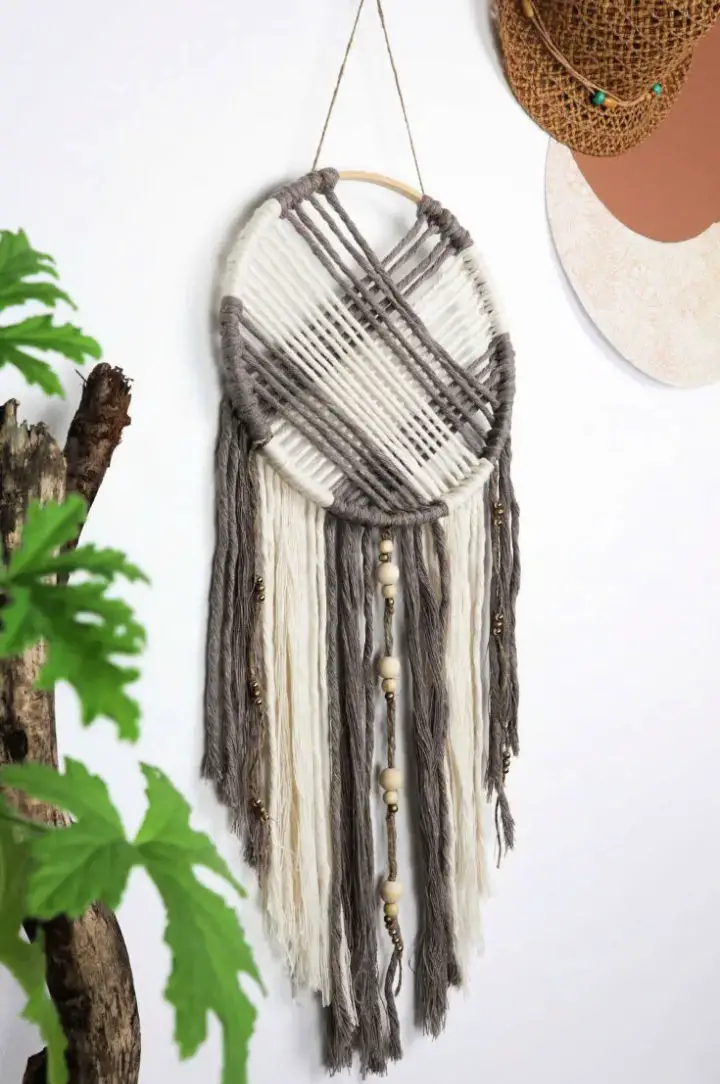
Making a Dream Catcher
Transform any bedroom into a cozy retreat with a one-of-a-kind boho-inspired dream catcher. Semigloss Design’s step-by-step guide simplifies the creative process, requiring just a few essential materials like a metal wreath hoop, yarn, embroidery floss, ribbons, and beads to bring your unique vision to life. For added flair, Emy Flint offers expert advice on pre-winding yarn for effortless loops and spacing them for an airy texture. Perfect for crafty individuals who crave personalized decor, this engaging tutorial promises a whimsical and distinctive final product that reflects your personal style.
Quick and Easy DIY Dream Catcher
Indulge in a creative summer activity with kids by crafting a vibrant DIY Dream Catcher, inspired by Creatively Beth’s guide. With just an embroidery hoop, Anchor Embroidery Floss Spools, beads, pom poms, and a few simple supplies, you’ll be guided through a fun and easy step-by-step process to create a colorful dream catcher that not only adds a personal touch to your home decor but also serves as a unique way to learn about Native American culture. The included instructions are crystal clear, making assembly a breeze, while the spool-based floss provides a tidy storage solution. Get ready to unleash your creativity and craft a one-of-a-kind dream catcher that’s as unique as it is visually stunning.
Dreamcatcher Step by Step Instructions
Embark on a creative journey by learning the art of crafting a dreamcatcher with The Craftaholic Witch’s comprehensive guide. A step-by-step approach, accompanied by a helpful video tutorial, empowers individuals of all skill levels to create this captivating home decor piece. Delve into the rich cultural heritage surrounding dreamcatchers and familiarize yourself with the necessary materials required for the crafting process. Whether seeking to infuse your personal space with tradition or present a thoughtful gift, our accessible tutorial guarantees a fulfilling and rewarding experience. Begin weaving your dreamcatcher today and bring a touch of elegance and symbolism to your surroundings.
How to Make a Fabric Scraps Dreamcatcher

If your workspace is overflowing with fabric scraps, you’re not alone. But instead of letting them pile up, why not transform those vibrant snippets into a charming Dream Catcher? This project isn’t just about decluttering – it’s an opportunity to infuse your craft with history and storytelling. Not only will you be creating something beautiful, but you’ll also be soothing little ones with bad dreams. By diving into your stash and selecting some treasured scraps, you can follow a series of easy steps to create not just a dream catcher, but a piece of art that holds a story. With a bit of fabric, a doily, and some decorative extras, you’ll craft something truly special – a way to honor the past while making something new and meaningful.
Super Easy DIY Dreamcatcher
Immerse yourself in the rich cultural heritage of dream catchers with Artbar’s comprehensive guide, designed for kids to unleash their creativity while learning about the Native American tradition behind this iconic craft. This hands-on activity not only fosters imagination but also provides a unique opportunity for children to develop fine motor skills and take pride in their handmade creations. As they wrap colorful yarn around hoops, add personalized touches with beads and pom-poms, kids will gain valuable insights into the cultural significance of dream catchers while crafting their own distinctive decorative pieces. Perfect for parents, educators, and anyone seeking to guide children through a fun and rewarding artistic experience that will leave them beaming with pride.
Colorful DIY Feather Dreamcatcher
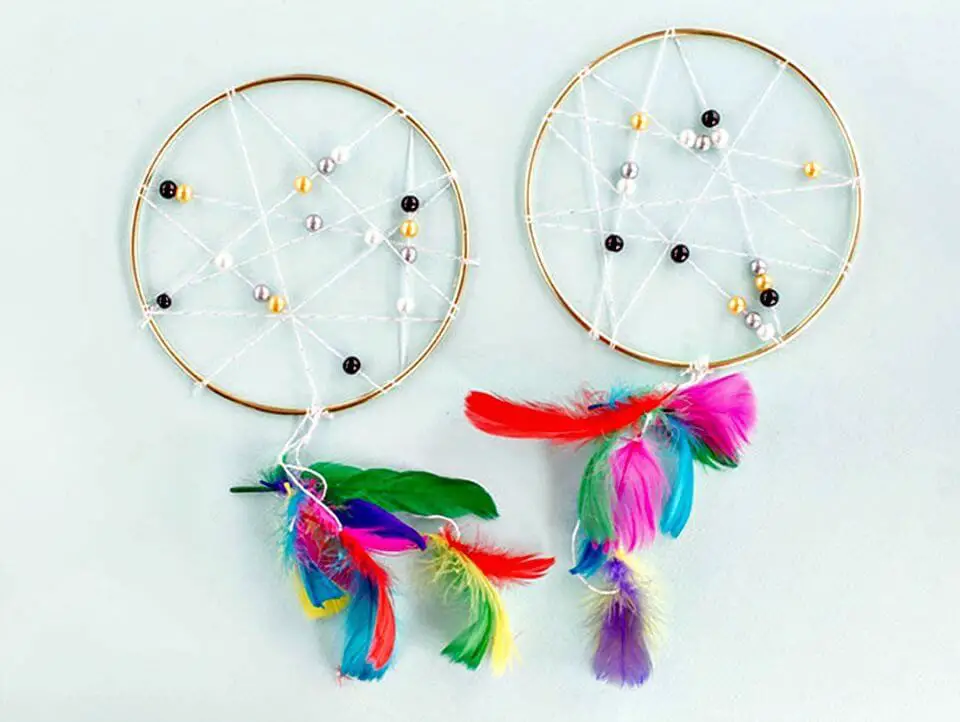
Transform your decor with a vibrant dream catcher, crafted using Silver Baker’s Twine, Gold Metal Ring, Celebration Pearl Beads, and colorful feathers. This engaging project involves weaving the twine through the ring, creating a beaded web that serves as the foundation for layers of randomly-wrapped twine, adding depth and dimension to the design. To complete the piece, simply tie an assortment of feathers to the ring’s edge, infusing the dream catcher with a playful touch. With step-by-step guidance and a dash of creativity, you’ll be able to create a one-of-a-kind piece that showcases your personal style and adds a touch of handmade charm to any room.
How to Make a Modern Dream Catcher
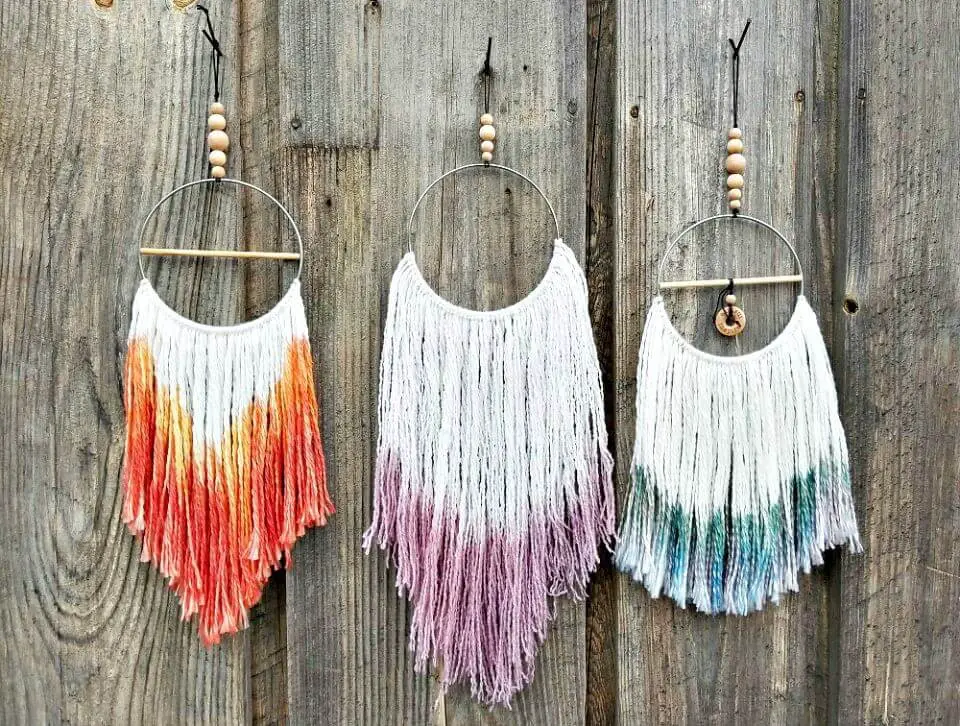
Unleash your creativity by crafting a one-of-a-kind DIY dream catcher that combines the charm of handmade decor with a modern twist. Our step-by-step guide will walk you through the process of creating this unique piece using materials like acrylic yarn, metal craft rings, and liquid watercolor. With its versatility in design, this project is perfect for adding a personal touch to your space or gifting it to someone special. By following our clear instructions and helpful tips, you’ll be able to customize your dream catcher to reflect your style, incorporating vibrant yarns, beads, and dowels to give it a distinct flair. Let your imagination run wild and start weaving a bit of magic today.
Cheap and Easy DIY Dreamcatcher

Get ready to unleash your creativity with Thalita Murray’s comprehensive guide on crafting a unique and stunning dreamcatcher! This step-by-step tutorial is designed to be both fun and easy to follow, requiring just a few simple materials like lace, an embroidery hoop, beads, ribbon, feathers, and glue. Whether you’re looking to add a whimsical touch to a nursery or create a charming new piece for your living room, this DIY dreamcatcher project allows you to put your personal artistic stamp on the final result. Join Thalita on a creative journey as she takes you through the process of mixing, matching, and tying together a truly one-of-a-kind masterpiece that reflects your unique style.
Simple DIY Fall Dreamcatcher
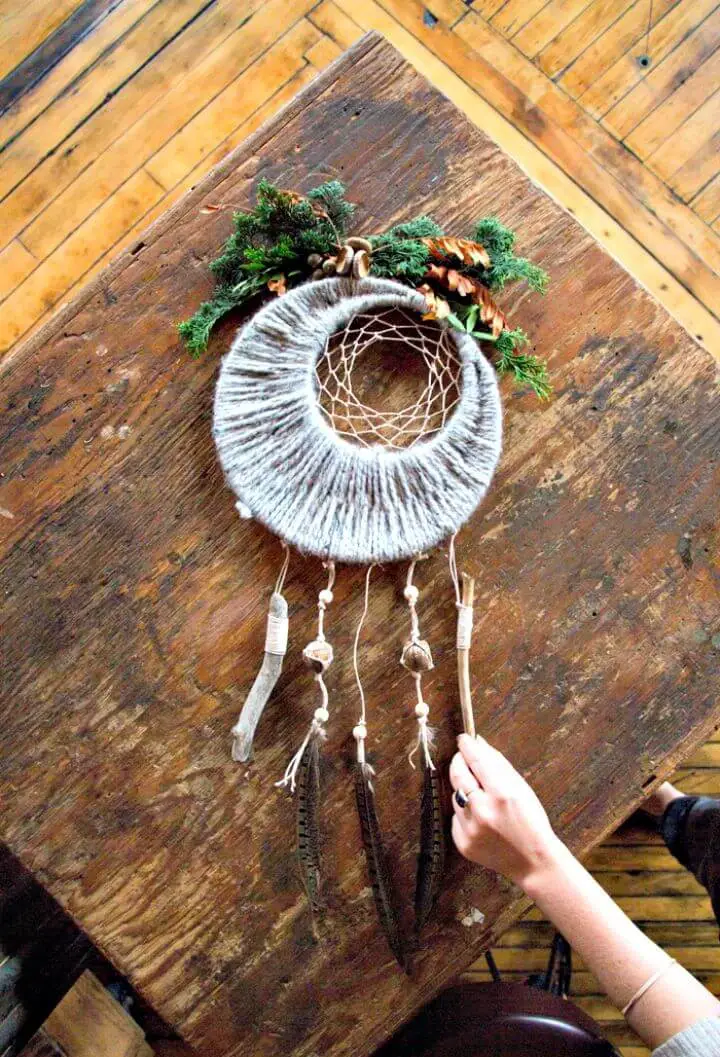
As autumn arrives, Maptote invites you to unwind with a charming DIY project that brings warmth and coziness to your home. Create a stunning fall dreamcatcher using readily available materials like embroidery hoops, yarn, hemp string, and natural elements such as feathers, acorns, and leaves. This delightful craft not only adds a touch of autumnal charm but also offers a calming and fulfilling experience.To begin, you’ll create a yarn moon by joining two embroidery hoops together and wrapping yarn in a figure-eight pattern. Next, prepare your hanging accents by twining hemp around a branch and attaching beads and feathers. Although the weaving process may initially seem intimidating, with time and practice, you’ll find yourself effortlessly mastering the same knot. As you work on this project, let go of any stress or anxiety and allow the soothing rhythms of yarn manipulation to guide you into a state of relaxation.
Modern Beaded Dreamcatcher Tutorial
Elevate the traditional dreamcatcher with a modern twist! By following Almost Makes Perfect’s straightforward tutorial, you’ll be creating a unique piece of home decor that exudes charm and sophistication. The process begins with a simple hoop and yarn, which are then carefully transformed into a one-of-a-kind masterpiece through a series of easy-to-follow steps. From securing the starting knot to adding decorative beads for a personalized touch, this guide is designed to help you achieve a beautifully balanced design. Tips on adjusting yarn placement and trimming to perfection ensure that your finished piece is not only visually stunning but also expertly crafted. Hang your creation in a place of pride as a testament to your creativity and crafting prowess.
DIY Embroidery Hoop Dream Catcher
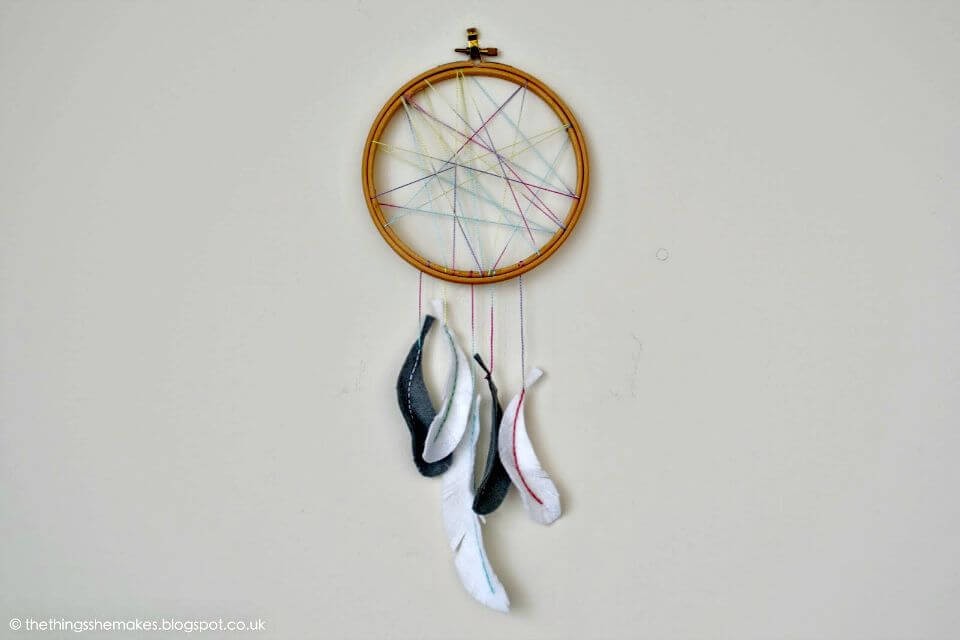
Create a one-of-a-kind dreamcatcher with an embroidery hoop, colorful thread, and felt feathers, thanks to the step-by-step guide on The Things She Makes blog. To get started, form a knot at the inner hoop’s center using your chosen thread, then experiment with various wrapping techniques to craft the desired pattern. Once you’ve achieved the look you want, secure the thread and add felt feathers for a charming finishing touch. This DIY project empowers your creativity by allowing you to incorporate different colors, beads, or fabric into your design. As a result, it’s an ideal way to bring a dash of whimsy to your space.
How to Make a Dream Catcher

Instructables provides a detailed guide for crafting enthusiasts looking to create their own dreamcatcher. This comprehensive tutorial is designed to make the process enjoyable and straightforward, featuring clear instructions and numerous visuals that walk you through each step. By using simple materials, you can craft your own unique dreamcatcher, adding a personal touch to your home decor or gifting it to someone special. The guide ensures that readers understand every stage of creation, from the intricate webbing to the final embellishments, leaving you with a sense of accomplishment upon completion. Join the DIY movement and give this project a try for a rewarding and creative experience.
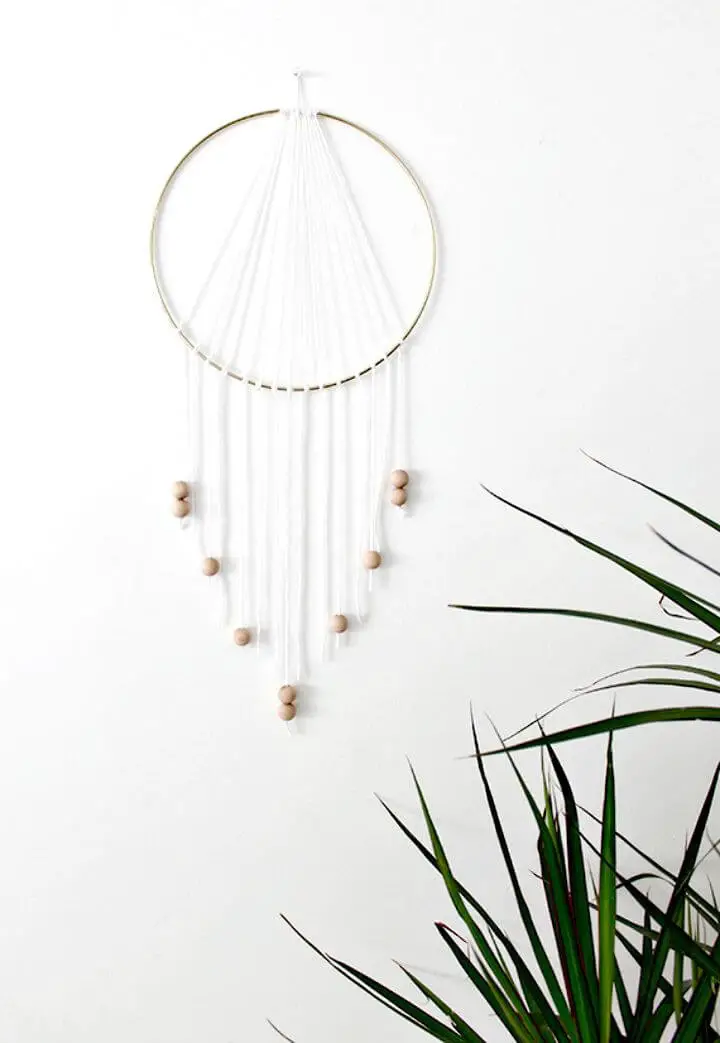
Make Your Own Dream Catcher
Are you looking to infuse your living space with a dash of modern whimsy? Look no further! With Envato Tuts’ comprehensive guide, you’ll have the skills to create a contemporary dreamcatcher that’s as stylish as it is unique. From choosing the ideal materials – think rattan hoops, artisanal feathers, wooden beads, and Perle 5 thread – to mastering techniques like hoop wrapping, fringe creation, and feather attachment, this step-by-step tutorial has got you covered. Designed with crafters in mind, this engaging project is perfect for those seeking a meaningful addition to their home décor. Let the process of creating something truly special unfold, and get ready to admire your beautifully crafted dreamcatcher.
Conclusion:
As we conclude our journey of exploring 25 DIY Dream Catcher Patterns with Step-by-Step Instructions, it’s evident that creating a handmade dream catcher not only adds a unique touch to your surroundings but also forges a meaningful connection to the rich cultural heritage behind this iconic symbol. Throughout this exploration, we’ve delved into the nitty-gritty of crafting a dream catcher, from choosing the perfect materials to troubleshooting common challenges, ensuring you’re equipped with the skills to create a masterpiece that truly reflects your personality. The beauty of DIY craft lies in its ability to allow personalization, making each creation one-of-a-kind as you infuse it with colors, materials, and symbols that hold special significance for you. As you embark on this creative journey, may your dream catcher become a beacon of serenity, guiding you towards peaceful slumber and pleasant dreams.
