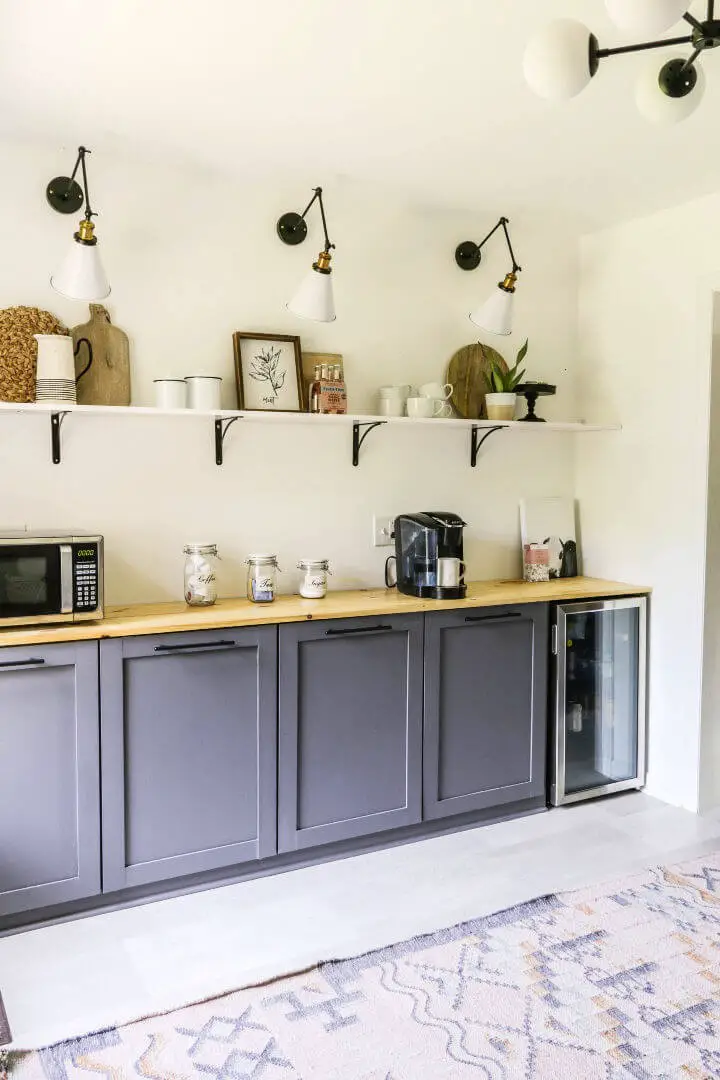
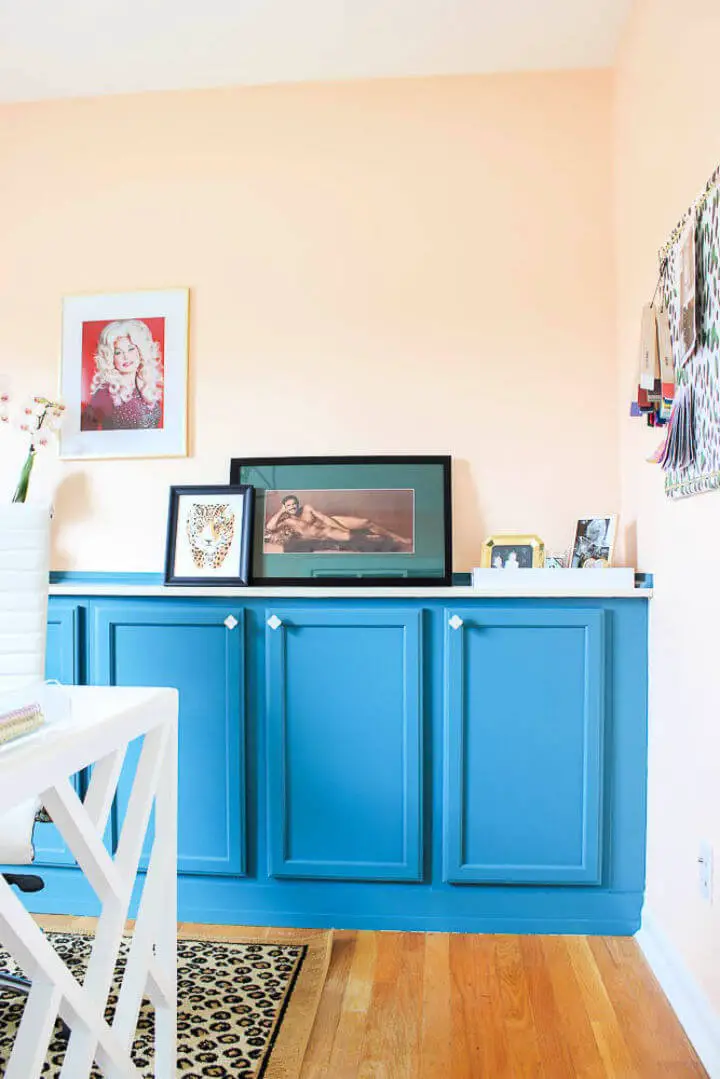
DIY Stock Cabinets for Living Room
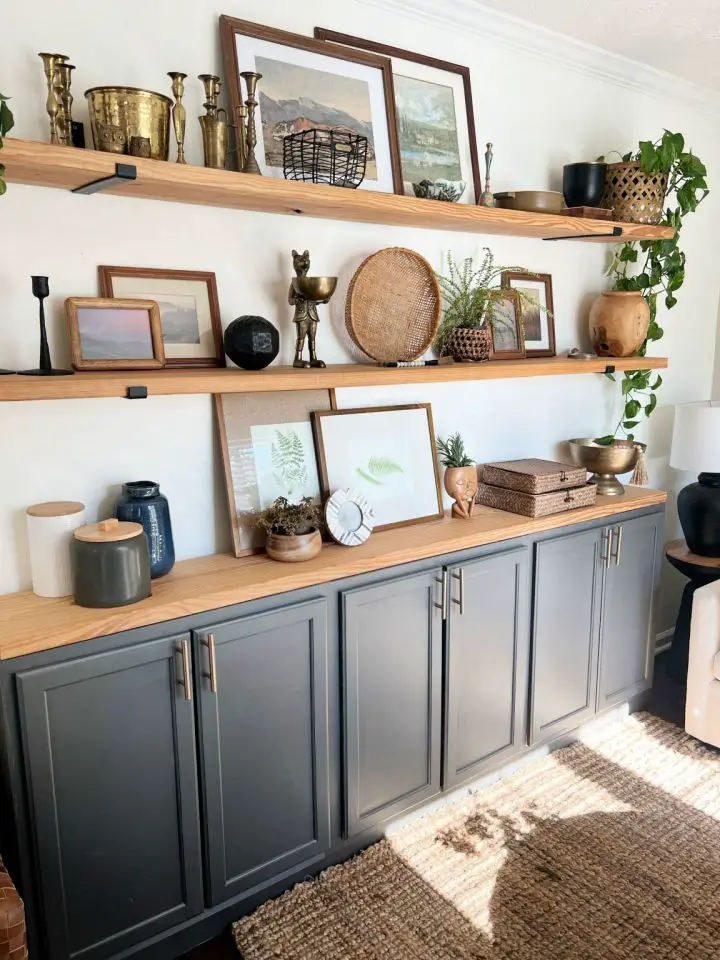
Transform your living room’s blank walls into a personalized sanctuary by crafting a unique sideboard using stock cabinets in a DIY project. This creative solution adds a touch of personality and distinct character to the space. With readily available materials like unfinished cabinets, black floating shelf brackets, gold handles for cabinets, and your preferred wood stain, this sideboard becomes a testament to your home styling expertise. To begin, construct a base using 2x4s, followed by placing your chosen cabinets on top. Add baseboards to conceal the raw wood, then coat with your favored paint color. Attach a cut 2×12 across the top and stain for a warm finish. Next, install brackets, position the shelves, and the structure is complete. The final touch is to adorn your sideboard with a range of decor items, from thrifted treasures to personal mementos. This sideboard transforms a wall and elevates the living room’s functionality and style.
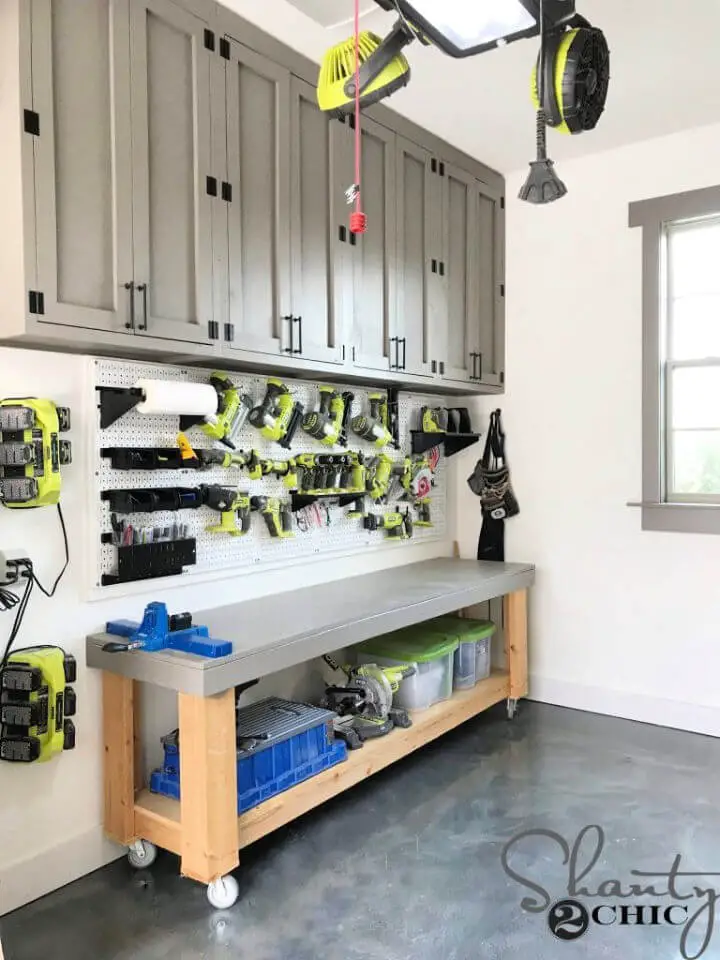
Handmade Garage Cabinets and Miter Saw Station
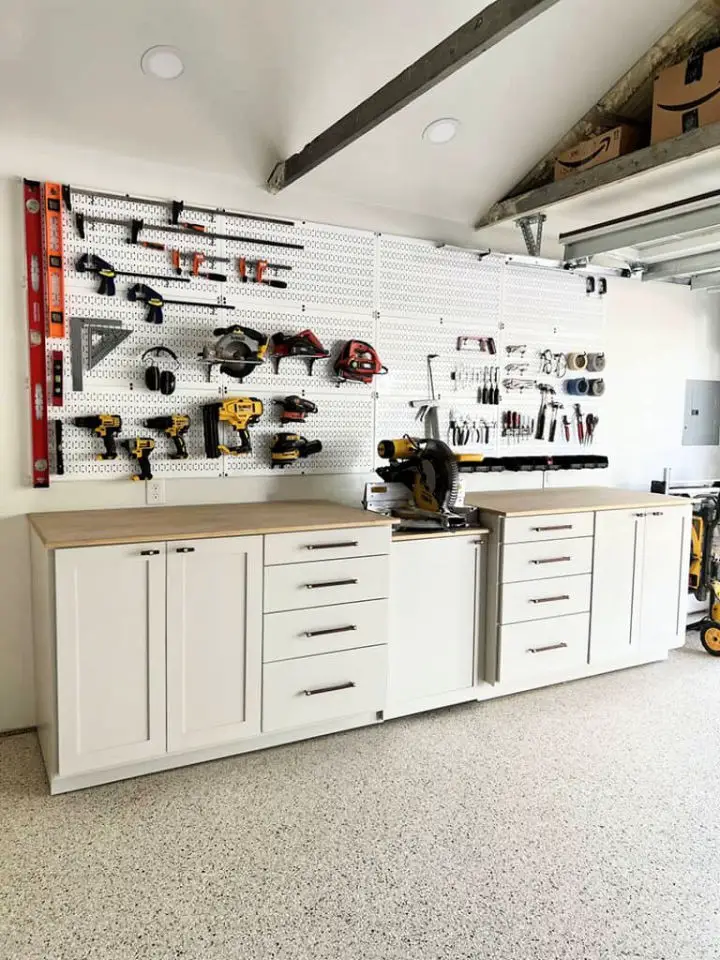
Transform your garage space into a haven for creativity by crafting your own DIY garage cabinets and miter saw station. With just a few simple tools and some sanded plywood, you can turn an empty wall into a storage powerhouse that keeps all your essentials within easy reach. The cabinets not only provide ample room for storing your tools of the trade, but they also create a dedicated space for your miter saw, streamlining your workflow and boosting your DIY project’s overall efficiency. Assembled with precision and care, the miter saw station aligns perfectly with the countertop, offering a versatile workspace that’s sure to elevate your woodworking game. By implementing these clever cabinets and miter saw stations, you’ll be able to tackle projects with renewed confidence and enthusiasm, making every moment in your garage a joy to spend.
DIY Kitchen Cabinets With Nieu Cabinet Doors
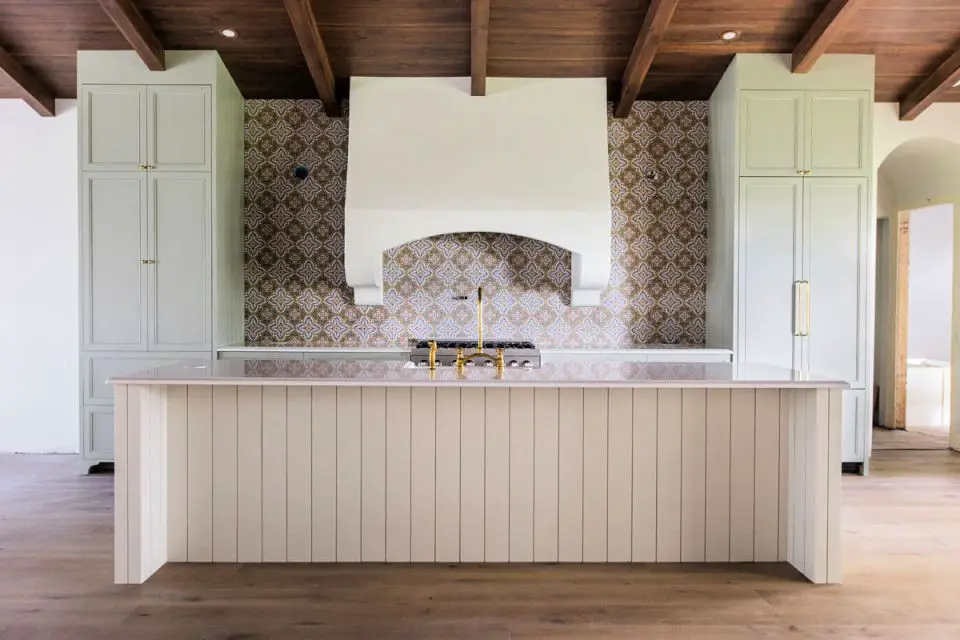
Transform your kitchen into a sleek and modern haven with a DIY project that combines Nieu cabinet doors with custom-built cabinet boxes. This comprehensive guide delves into the intricacies of birch plywood cabinet construction, showcasing professional edge banding techniques to achieve a flawless finish. By adopting frameless cabinet box construction with full overlay doors, you’ll create a sophisticated look that exudes refinement. To take your project to the next level, incorporate attention-grabbing details like custom toe kick valances and vertical shiplap cover panels. The key to a successful build lies in a sturdy base platform constructed from pressure-treated 2×4s, paired with precise cabinet installation techniques. Finally, complete your kitchen makeover by learning expert painting tips that ensure your cabinet doors boast a polished and lasting finish.
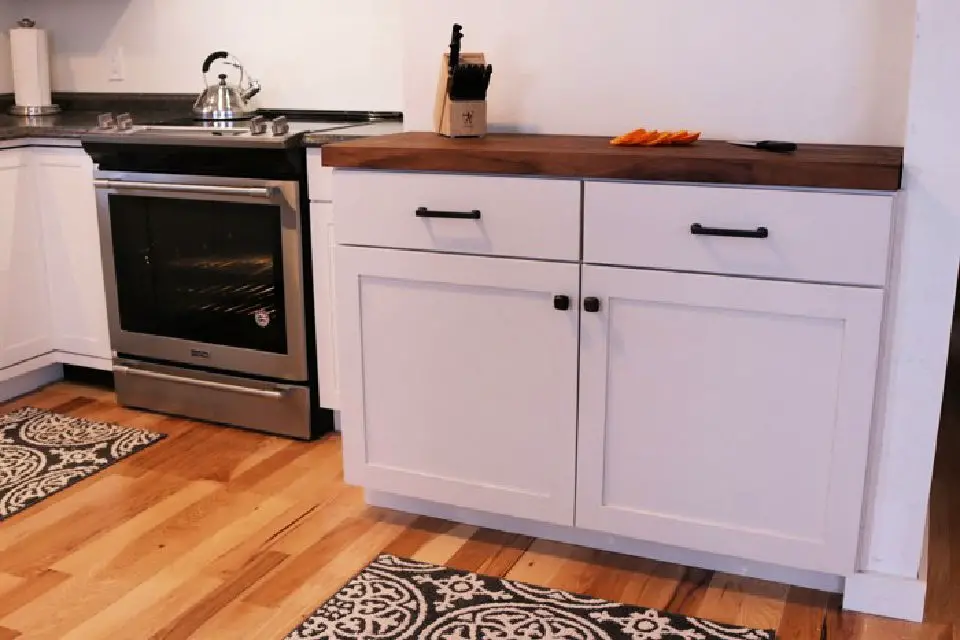
Building an Open Kitchen Cabinet
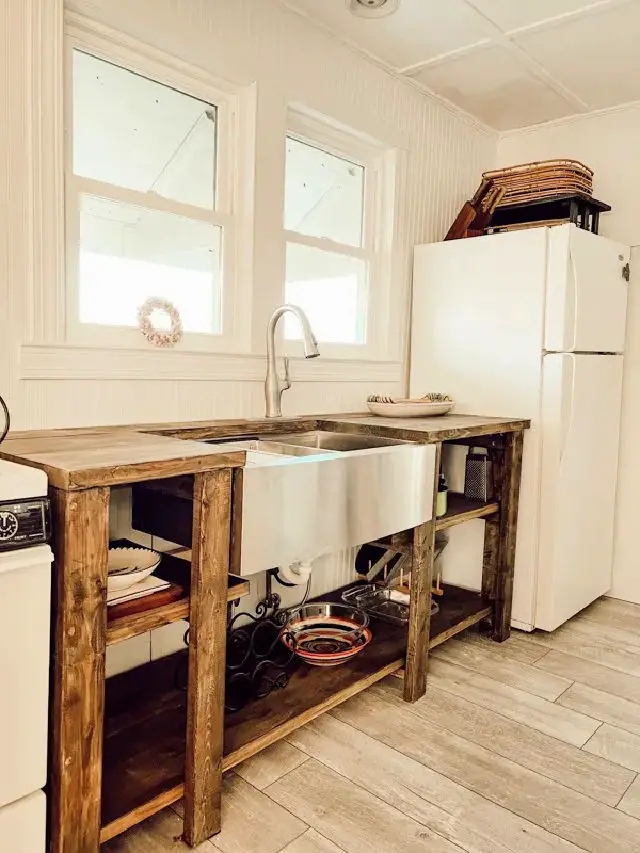
Transform your tiny beach cottage’s kitchen into a warm and inviting space without breaking the bank by embarking on a DIY open kitchen cabinet project. This creative renovation idea uses affordable pine boards to build a sturdy, open cabinet that creates a sense of airiness in small areas. By following detailed instructions that cover everything from assembling the cabinet off-site to installing it and finishing it with a food-grade sealer, you’ll be able to fit a stainless steel sink into your wooden countertop and secure the cabinet for a seamless finish. Perfect for those seeking a rustic beach cottage ambiance, this guide takes you through every step of transforming your kitchen space on a budget.
Built-in Wooden Cabinets and Bookcases
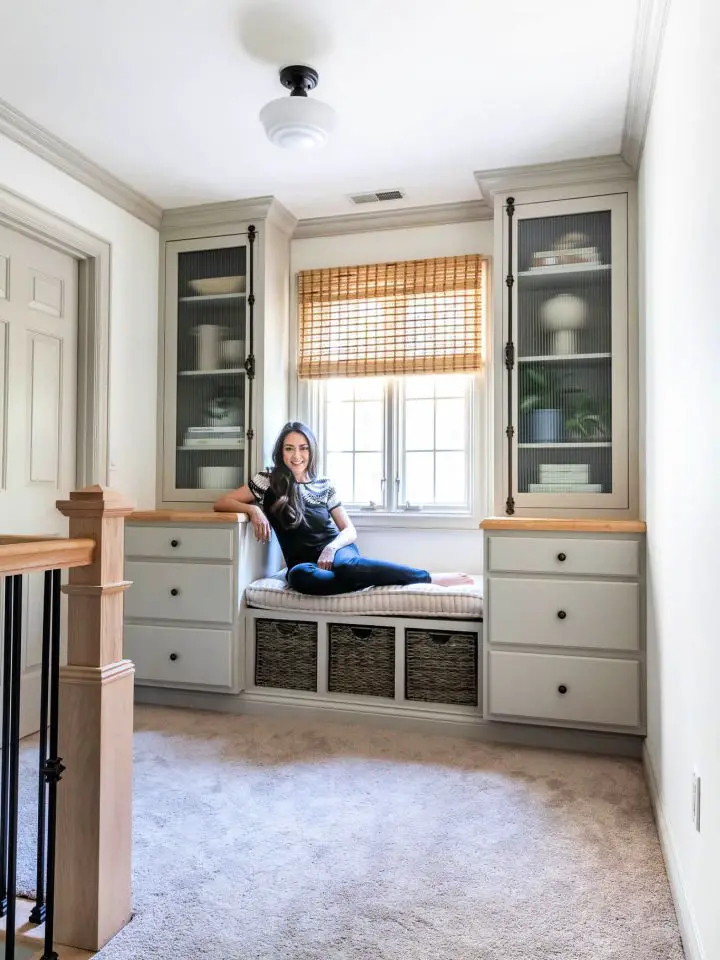
Transform underutilized areas into functional sanctuaries by crafting elegant DIY built-in bookcases and cabinets. This ingenious project not only boosts storage but also transforms spaces like alcoves or hallways, breathing new life into their design.
To achieve this impressive feat, gather a few simple yet versatile materials: unfinished base kitchen cabinets, butcher block countertops, and antique brass round beaded cabinet knobs. By leveraging these easily accessible components, you’ll not only save time but also money, while still crafting bespoke furniture pieces that reflect your unique aesthetic.
Take it to the next level by integrating a window bench alongside the storage cubbies, fashioned from plywood for added versatility. As the crowning touch, cap off with a solid wood butcher block countertop and create reeded glass doors for your built-in bookcases. The result is a harmonious blend of form and function that effortlessly solves all manner of home storage conundrums.
How to Make 2×4 Kitchen Cabinets

Transforming your kitchen space with DIY flair, consider crafting 2×4 cabinets as a budget-friendly solution for compact kitchens or tight areas. To overcome the obstacle of an uneven floor, a step-by-step approach was employed. A thoughtful selection of tools, including a miter saw, sander, and level, proved essential in building these bespoke cabinets.
The process began with identifying the highest point on the floor and leveling it to establish a solid foundation. Key materials used were 2x4s, MDF or plywood for shelving, and 2×2 wood screws, which played a crucial role in constructing a floating shelf and securing it to the studs via 2×2 shelf supports.
While specific circumstances may require adjustments, this guide aims to provide valuable insights into creating a similar setup. Following painting and caulking, custom-made doors were installed – a notable highlight of the renovation. The end result was a one-of-a-kind, cost-effective kitchen design tailored to your unique needs.
Build Your Own Wooden Pantry Cabinet
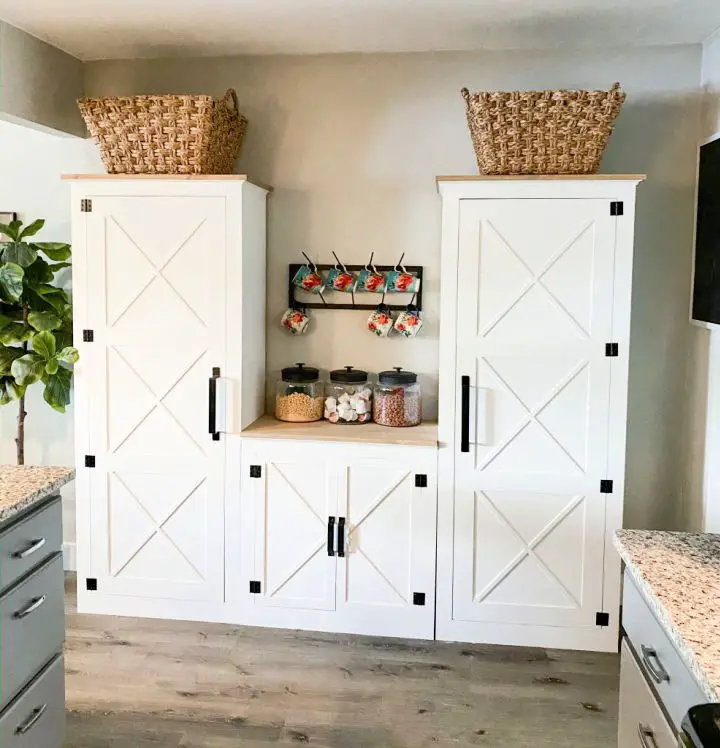
Discover the perfect blend of function and flair with a DIY table-height kitchen pantry system. This design seamlessly integrates practicality and style, serving as a standalone statement piece or a valuable addition to your existing cabinet setup. With access to free plans, you can customize this vision to suit your home’s unique aesthetic. By leveraging common tools, equipment, and creativity, construct a versatile storage console that transforms your kitchen into a well-organized haven. The assembly process is intentionally straightforward, eliminating the need for professional assistance. By opting for this innovative pantry system, you’ll be unlocking a chic cooking space that effortlessly balances form and function.
Homemade Wooden Cabinets for the Kitchen
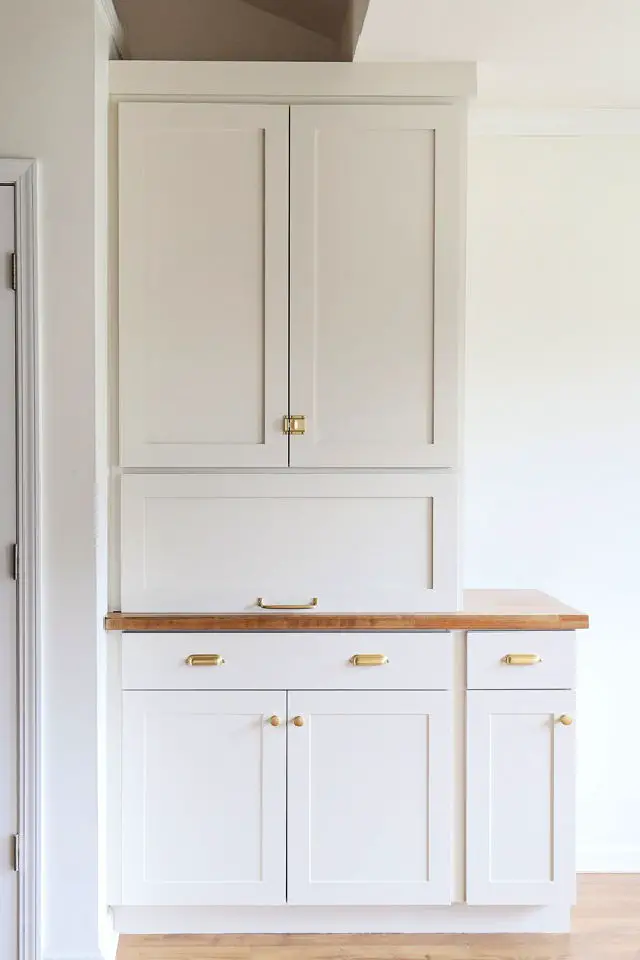
Transform your kitchen space with custom-built-in cabinets that seamlessly merge style and functionality. By utilizing the often-wasted nook between the pantry and dining room, these built-ins provide ample storage from floor to ceiling, effortlessly integrating form and function. The cabinet design features stock drawers at the base, a bespoke countertop cabinet, and a clever kitchen appliance garage, streamlining your cooking experience. This comprehensive tutorial will guide you through every step of the process, empowering you to create a stunning transformation without relying on professionals. Join this remarkable project and revel in the satisfaction of crafting and the beauty of optimized storage in your kitchen.
Simple DIY Cabinets for Your Garage
Elevate your garage workshop by crafting custom DIY cabinets that optimize storage and organization. These birch plywood cabinets are designed to reach ceiling height, providing ample space for tools and supplies while keeping them protected from debris. The sturdy design ensures a clutter-free environment, perfect for boosting efficiency and productivity.
With the included free printable plans and step-by-step guide, constructing these cabinets is surprisingly straightforward. You’ll need only a few basic materials – birch plywood, a miter or circular saw, a Kreg Shelf Pin Jig, and essential accessories.
Unleash your creativity while refining your workspace with these custom cabinets. A well-organized space has the power to fuel efficiency and productivity, so why wait? Start building your own set of these fantastic cabinets today.
Making Laundry Room Cabinets
Transform your laundry room into a haven of organization and functionality by building custom DIY cabinets that cater to your unique space requirements. This straightforward guide takes you through the process of crafting sturdy, tailor-made storage solutions using plywood, pocket hole screws, and wood glue. The journey begins with precise cuts on the plywood, followed by the assembly of the cabinet box and the creation of a face frame made from poplar board, which seamlessly attaches to the cabinet carcass. The cabinet doors, constructed from poplar boards, feature a groove that accommodates a 1/4-inch thick plywood panel. After a thorough sanding process and application of your preferred paint finish, these custom cabinets are ready for installation, offering a perfect blend of style and functionality. Add value to your home with this engaging DIY project today!
Building Functional Cabinets for Kitchen

Transform your kitchen space by building your own DIY cabinets! This hands-on project can yield significant cost savings, as evidenced by a couple who successfully constructed their cabinet boxes for just $500 – a fraction of their initial $10,000 quote. With this endeavor, you’ll not only gain practical storage solutions tailored to your needs but also increase the value of your home. The construction process involves assembling the cabinets with wood glue and a Kreg Jig, followed by caulking, priming, and painting for a flawless finish. To streamline the painting process, consider using a paint sprayer – it can save you considerable time. So why wait? Start designing your kitchen cabinets today and watch your vision come to life. You’ll be enjoying the benefits of your new storage solutions in no time.
DIY 42 Inch Base Blind Corner Cabinet
To eliminate kitchen clutter for good, you can create a DIY corner base kitchen cabinet that doubles your storage space while maintaining external symmetry with other units. Unlike traditional cabinets, this design provides ample room without sacrificing aesthetics. For the interior, use PureBond plywood to achieve a sleek finish without painting. This project requires intermediate-level skills, making it perfect for those who want both function and style in their kitchen. If your kitchen walls aren’t perfectly square, this cabinet can also serve as an adjustment tool. With the right materials and these insightful steps, you can create a storage solution that enhances your cooking space.
Organized Lower Cabinet for Kitchen Storage
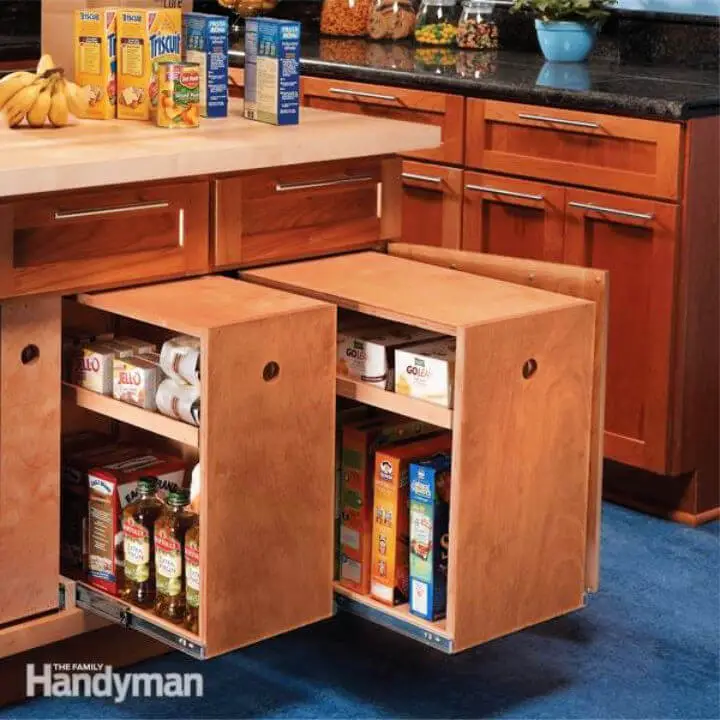
Elevate your kitchen’s storage game with custom-made DIY rollout bins crafted from plywood and adjustable shelves. These clever contraptions can significantly boost the storage capacity of your base cabinet, making it a breeze to find what you need and utilize every available inch of space. To bring these innovative organizers to life, gather the following materials: hardwood plywood, 1-1/2-in. Brad nails, Forstner drill, 220-grit sandpaper, drawer slide cleats, shelf standards, and 90-lb-rated full-extension side-mount drawer slides. The step-by-step process involves determining the bins’ sizes, selecting the perfect materials, cutting the parts to fit, assembling the box, drilling finger pulls for easy access, adding shelf standards for added stability, fastening the slides to cleats for smooth operation, and finally, installing the rollout bin for a seamless experience. With an investment of just $51 to $100, your kitchen will be transformed into a haven of organization and functionality.
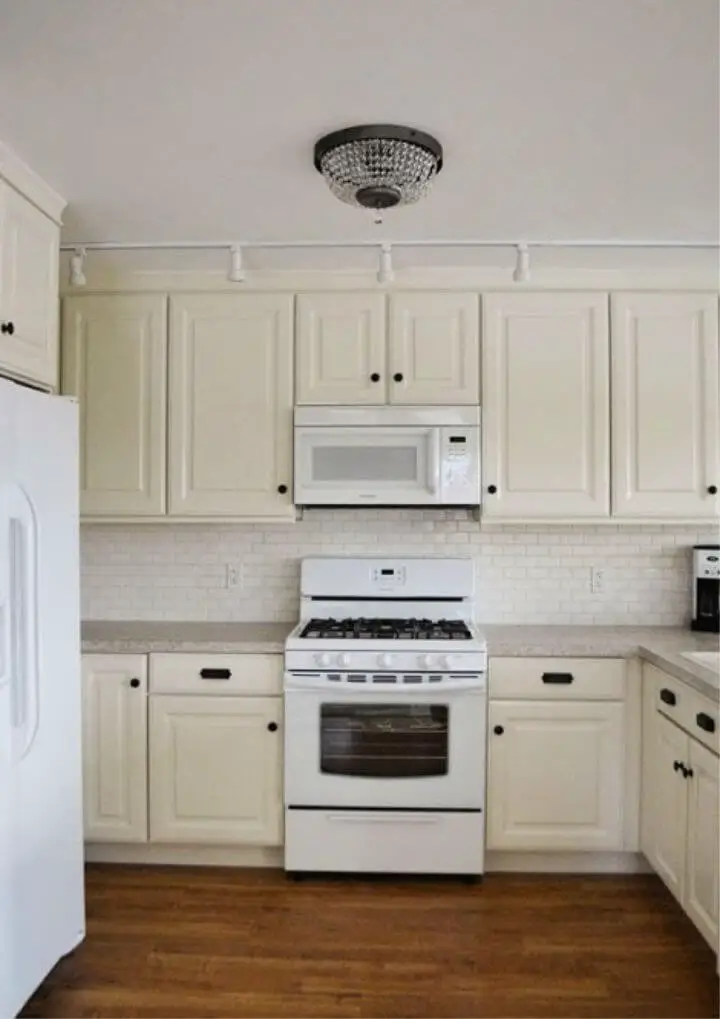
How to Make Shaker Style Cabinets
Transform your kitchen’s flat doors into sleek shaker-style cabinets with this budget-friendly DIY project. By adding tasteful trim to the existing doors, you can give your kitchen a modern makeover without breaking the bank. While the process may require some time and effort, it’s not overly complex, making it an ideal project for tackling at your own pace.
To get started, you’ll need a few key materials, including plywood, a miter saw, nail gun, sanders, and wood filler. This step-by-step guide will walk you through the process of refurbishing your cabinets, from cleaning and sanding to measuring, cutting, nailing, and painting.
As you work on your kitchen transformation, be prepared to unleash your creativity and add value to your home with a unique and beautiful result.
DIY Kitchen Cabinets Under $200
Transform your kitchen’s functionality without breaking the bank by creating a bespoke butler pantry using DIY skills. With a comprehensive guide, you can construct base cabinets that address your storage woes in no time. This budget-friendly project requires minimal tools and materials like 2x3s, construction screws, poplar wood, and basic power tools such as a circular saw and table saw. The step-by-step instructions will walk you through building the frame and doors for your cabinet with ease. The minimalist shaker style design adds a touch of modern farmhouse charm to your home’s interior. So, why delay? Dive into this affordable and efficient project today and watch your kitchen space transform into a haven of functionality and style.
Make Your Own Tool Storage Cabinets
Elevate your DIY workspace with custom-designed storage cabinets that seamlessly integrate into compact areas. The clever use of sliding Shaker-style doors and adjustable shelves maximizes storage potential, allowing for a clutter-free workshop environment. By embracing frame-and-panel construction, you can work with manageable 1x3s and 1x4s instead of cumbersome plywood sheets, resulting in sturdy cabinets that visually expand your workspace. For an added touch of sophistication, opt for solid wood panels crafted from affordable 2x4s. The innovative implementation of sliding doors eliminates potential hazards and frees up valuable floor space, while adjustable shelves provide unparalleled flexibility in tool organization. Join the DIY revolution by transforming your small workshop today.
Inexpensive Pallet Wood Kitchen Cabinet
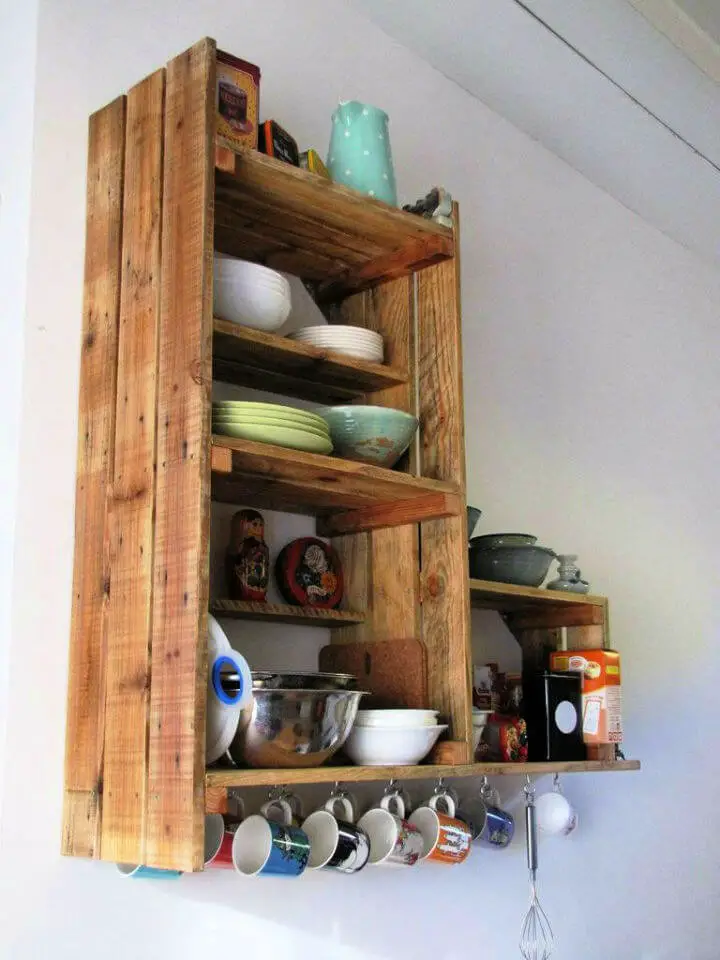
Discover the joy of upcycling and create a unique kitchen storage solution by crafting a DIY wooden cabinet from recycled pallets. This budget-friendly project not only solves storage dilemmas but also adds a touch of rustic charm to your kitchen. To get started, you’ll need salvaged pallets, basic tools, clear matte lacquer for finishing, and a dash of creativity.Before diving into the project, consider designing your cabinet using 3D software to ensure precision and avoid errors. Once you’re satisfied with your design, disassemble the pallets, measure and cut the wood to size, sand the surfaces to smooth out any rough edges, and then paint the entire piece with clear matte lacquer to bring out the natural grain of the wood.The final step is building and hanging your cabinet, complete with the option to add hooks for additional storage possibilities. With a little love and care, this wooden cabinet will provide practical storage solutions while also enhancing your kitchen’s aesthetic appeal.
How to Make Wooden Cabinets at Home
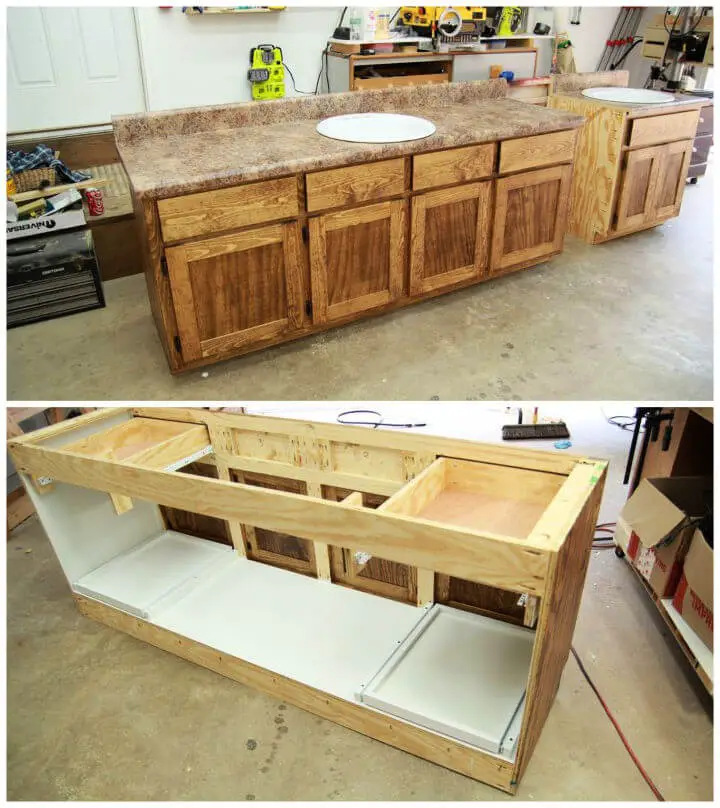
Mastering the art of building cabinets can be a thrilling DIY project, and this comprehensive guide is here to help you achieve success without frustration. Say goodbye to complicated furniture assemblies and hello to the satisfaction of creating your own bathroom vanities or kitchen cabinets.
To get started, you’ll learn how to craft simple yet functional pieces using fundamental construction methods and a straightforward design approach. The step-by-step process breaks down into four key areas:
1. Preparing case panels for a sturdy foundation.
2. Assembling face frame components with precision.
3. Building cabinet doors and drawers with ease.
4. Adding the finishing touches to complete your project.
Remember, safety always comes first – if you’re unsure about a particular step, it’s best to seek guidance or learn more before proceeding. With this guide, you’ll be well on your way to building furniture that reflects your personal style and meets your practical needs.
Vintage-Style Cabinets With Step-by-Step Instructions
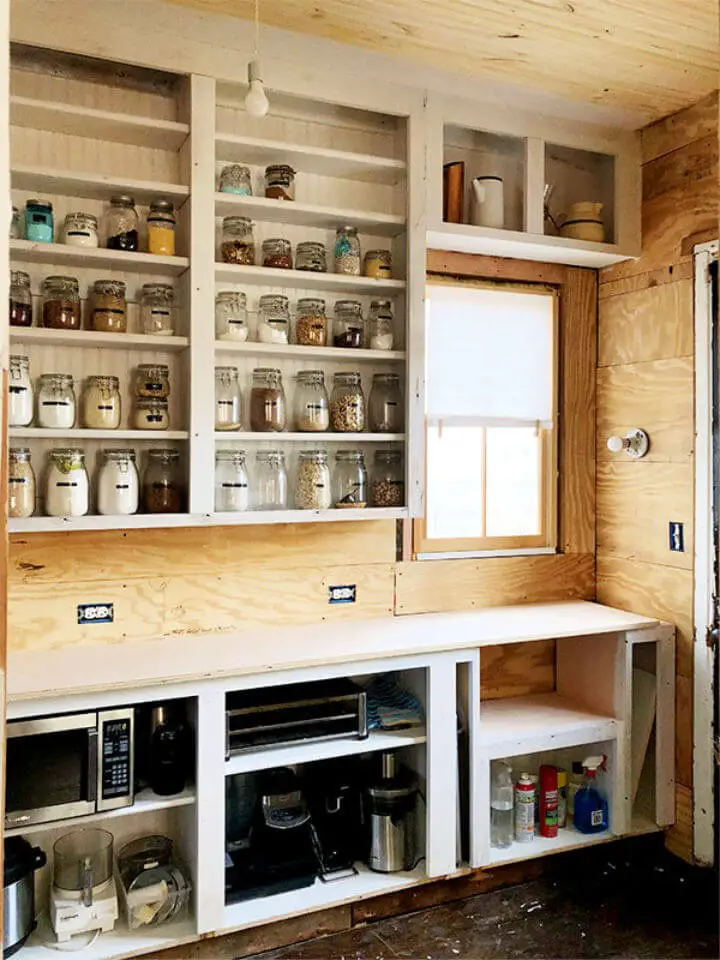
Transforming your pantry with vintage-style cabinets is an exciting DIY project that can be achieved with basic woodworking skills. This step-by-step guide will walk you through the process of selecting materials, cutting them to size, and assembling them into sturdy, elegant cabinets. You’ll learn how to create a cut list, drill shelf pin holes, assemble carcasses, dry fit, make bases, and install your cabinets. The guide also covers assembling face frames, building and installing shelves, and preparing cabinets for filler and caulk. Despite the project’s intricacies, its guidance makes it accessible even with limited space or a smaller tool selection. Start your vintage-style cabinet journey and add a beautiful, functional touch to your pantry.
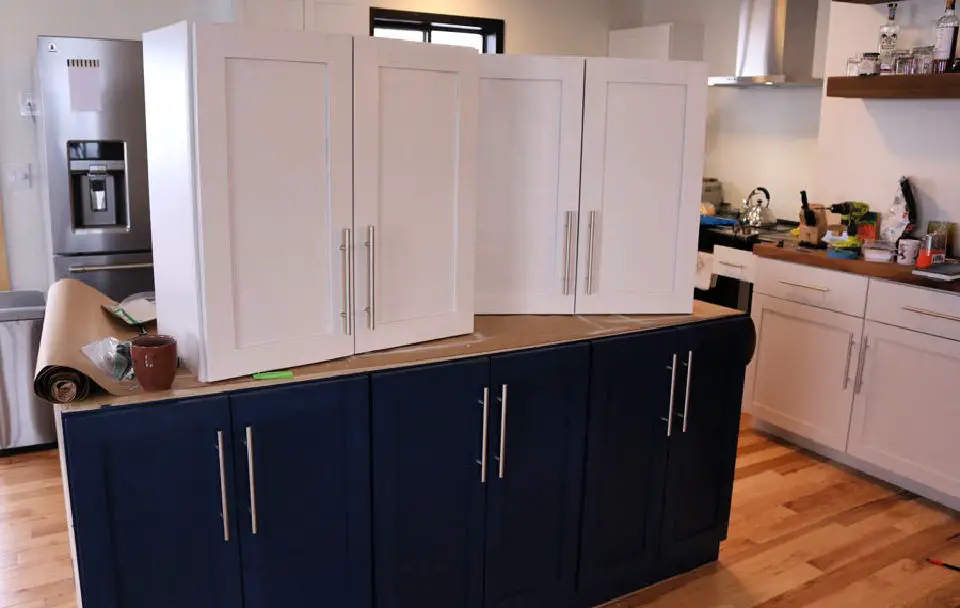
Built-in Cabinets Using Stock Wall Cabinets
Transform your home-based business’s workspace by repurposing stock wall cabinets into custom-built-in storage solutions. This clever idea not only adds a touch of style but also provides a practical solution for concealing paperwork or files, keeping your office organized and clutter-free.
By upcycling unfinished wall cabinets onto a built frame, you’ll create a seamless integration with your existing decor, giving the impression of a custom-made installation. The process is relatively straightforward, involving assembly, installation, and a final trim to complete the look.
The beauty of this project lies in its adaptability – regardless of the size of your space, these built-ins can be tailored to fit perfectly. Plus, it’s an economical way to boost your productivity by providing a dedicated area for storing and accessing important documents and supplies.
Take the first step towards creating a functional and beautiful workspace today by turning stock wall cabinets into base cabinets that will exceed your expectations.
How to Build a Hallway Cabinet
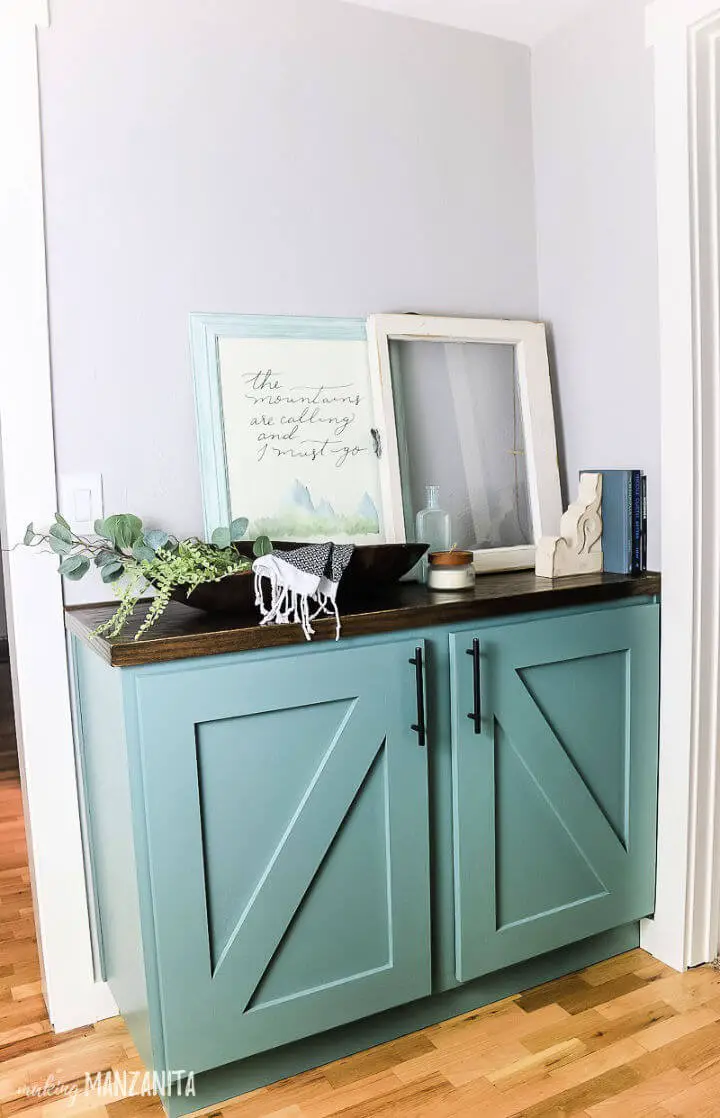
Transform your hallway into a haven of style and functionality with a DIY cabinet that’s surprisingly easy to build, even for beginners. The key to success lies in its straightforward construction method, free from complex joinery. Start your DIY adventure by envisioning the perfect finish and designing and cutting the wood with precision. With just basic woodworking tools and materials, you can create a stunning and practical storage solution that not only keeps your home organized but also adds a unique personal touch. As you embark on this rewarding project, you’ll be thrilled to see how it brings together form and function, resulting in a truly one-of-a-kind piece that’s both beautiful and functional.
Free Cane Cabinet Woodworking Plan
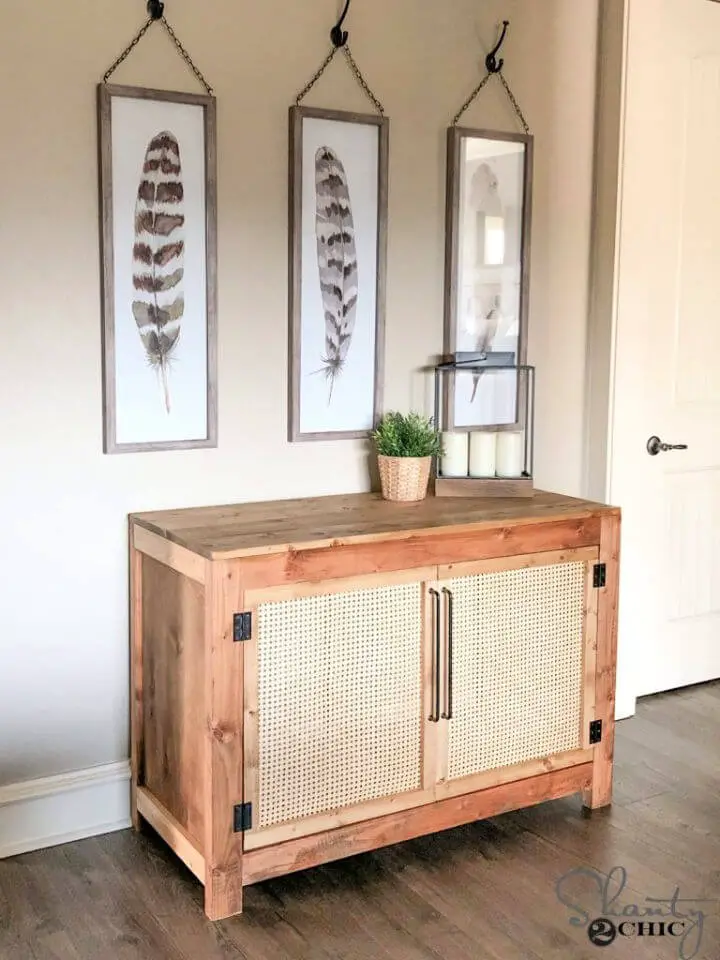
Elevate your home decor by breathing new life into an old cabinet. A DIY cane remake is a simple yet effective way to contemporize your space. By combining rustic charm with modern appeal, this project transforms an ordinary storage console into an extraordinary piece of furniture.
The pièce de résistance – the cane webbing on the doors – adds a touch of sophistication and glamour. With free plans and step-by-step instructions at your disposal, you can recreate this stunning cabinet using materials like plywood and 2x4s. This easy-to-follow guide takes you by the hand, guiding you through every stage of the process.
What’s more, building this cabinet is not just a project – it’s an opportunity to infuse your personal touch into your space, proving that style and functionality can harmoniously coexist. The versatility of its design ensures it seamlessly blends with various home decor styles, making it a testament to the adage ‘Handmade is better.’ Let your creativity take the reins, and start building this exceptional cane cabinet today!
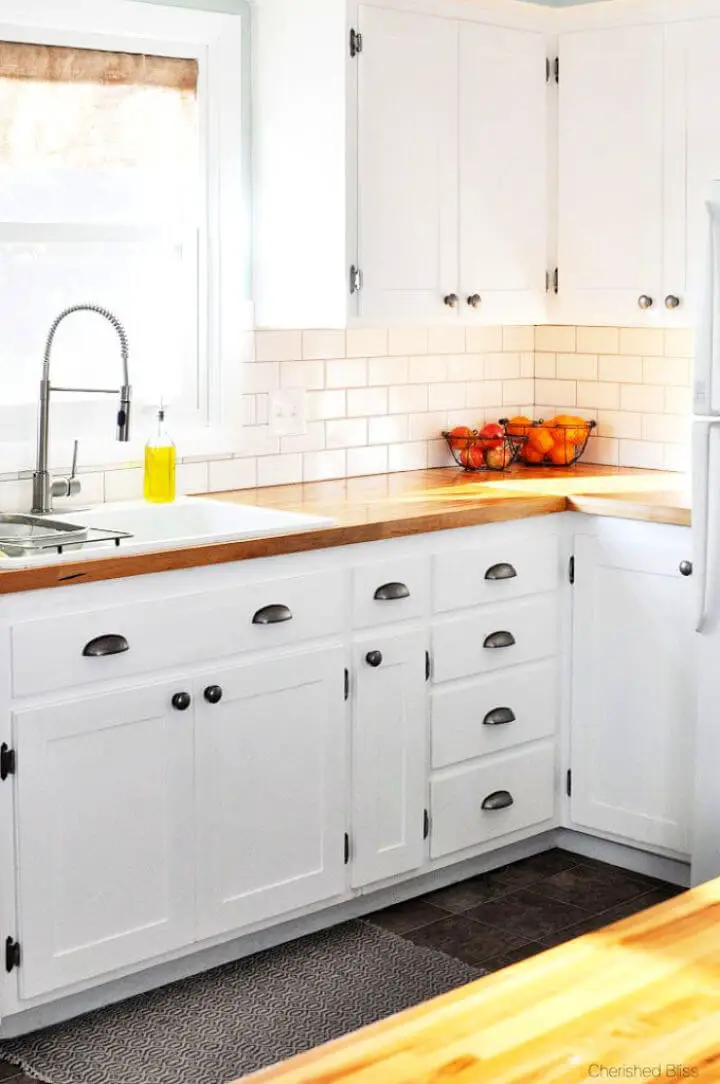
Quick and Easy DIY Kitchen Cabinets
Considering a kitchen renovation? Why not try building your own cabinets instead of simply revamping the look with new hardware or paint? This DIY project is an engaging way to express your creativity, personalize your space, and develop a sense of pride in your craftsmanship. As you construct the main cabinet structure, also known as the carcass, you’ll be able to assemble face frames, design doors, and complete your creation with a professional-quality paint job. To get started, you’ll need the following materials: pre-finished plywood sheets, poplar boards of various sizes, cabinet hardware, and a sturdy butcher blockboard. You’ll also require a range of tools, including a table saw, circular saw, router, and pocket hole jig. Beyond the aesthetic benefits, this project offers several practical advantages as well. By building your own cabinets, you can create custom-fit designs that perfectly suit your unique kitchen layout, which can be particularly valuable in spaces with unusual shapes or obstructions. Additionally, this DIY approach is often more cost-effective than hiring a professional to install your cabinets, and the sense of accomplishment you’ll feel when you step back and admire your finished project is priceless.
How to Build Wooden Kitchen Cabinets

Transform your kitchen with the ultimate DIY project: crafting professional-grade cabinets that reflect your unique style and needs. By embracing the DIY spirit, you can save thousands of dollars and create a personalized cooking space that perfectly balances form and function. With the Dowelmax Joinery System, table saw, clamps, and basic hand tools, you’ll be well-equipped to construct sturdy and visually stunning cabinets from scratch.
The comprehensive guide breaks down each step of the process, from building box units to installing drawers, ensuring a seamless and fulfilling construction experience. Safety guidelines for handling tools are also emphasized, as they’re essential for any DIY project. To support your journey, detailed instructions, video tutorials, and images come together to provide an unparalleled learning resource.
Get started today and revitalize your kitchen with a custom cabinet solution that’s both functional and beautiful.
Making a Fridge Cabinet On Top
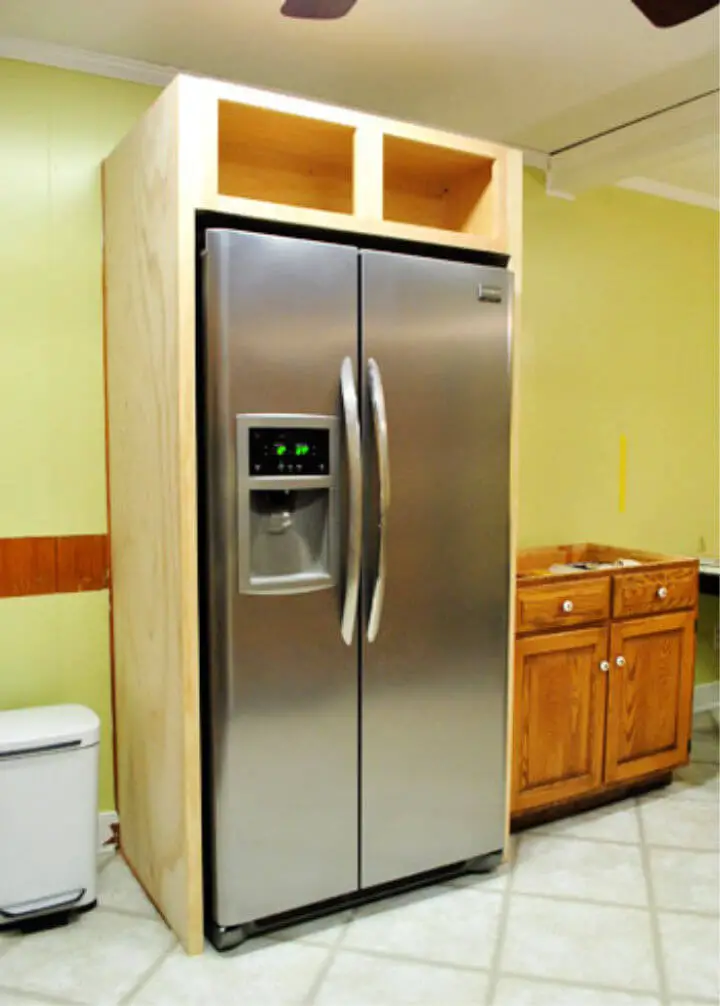
Transforming your kitchen’s style without breaking the bank is possible by cleverly integrating your refrigerator into custom cabinetry. By using an affordable cabinet, plywood, and pine trim, you can give your standalone fridge a bespoke look that blends seamlessly with the rest of your kitchen. To achieve this, start by placing the cabinet on top of the fridge, then modify it to match existing cupboards for a cohesive design. Next, use plywood panels to create the sides of the built-in look, and finish off the project with pine trim for a professional touch. With minimal materials and some patience, you can complete this DIY project for under $100. The result is a stylish and modern kitchen where your fridge becomes an integral part of the overall aesthetic, giving you a sleek and harmonious space that’s sure to impress.
Conclusion:
Ultimately, these DIY cabinet plans offer a flexible and budget-friendly way to revamp your living area. By leveraging the power of free tutorials, you can create bespoke kitchen cabinets, garage storage solutions, or eye-catching bookshelves that perfectly align with your design preferences. As you embark on this woodworking adventure, you’ll not only infuse your home with personal touches but also refine your crafting skills. With a range of simple to intricate designs at your disposal, the possibilities are endless. Simply select a project that resonates with you and start building functional, aesthetically pleasing DIY cabinets that reflect your unique style and meet your practical needs.
