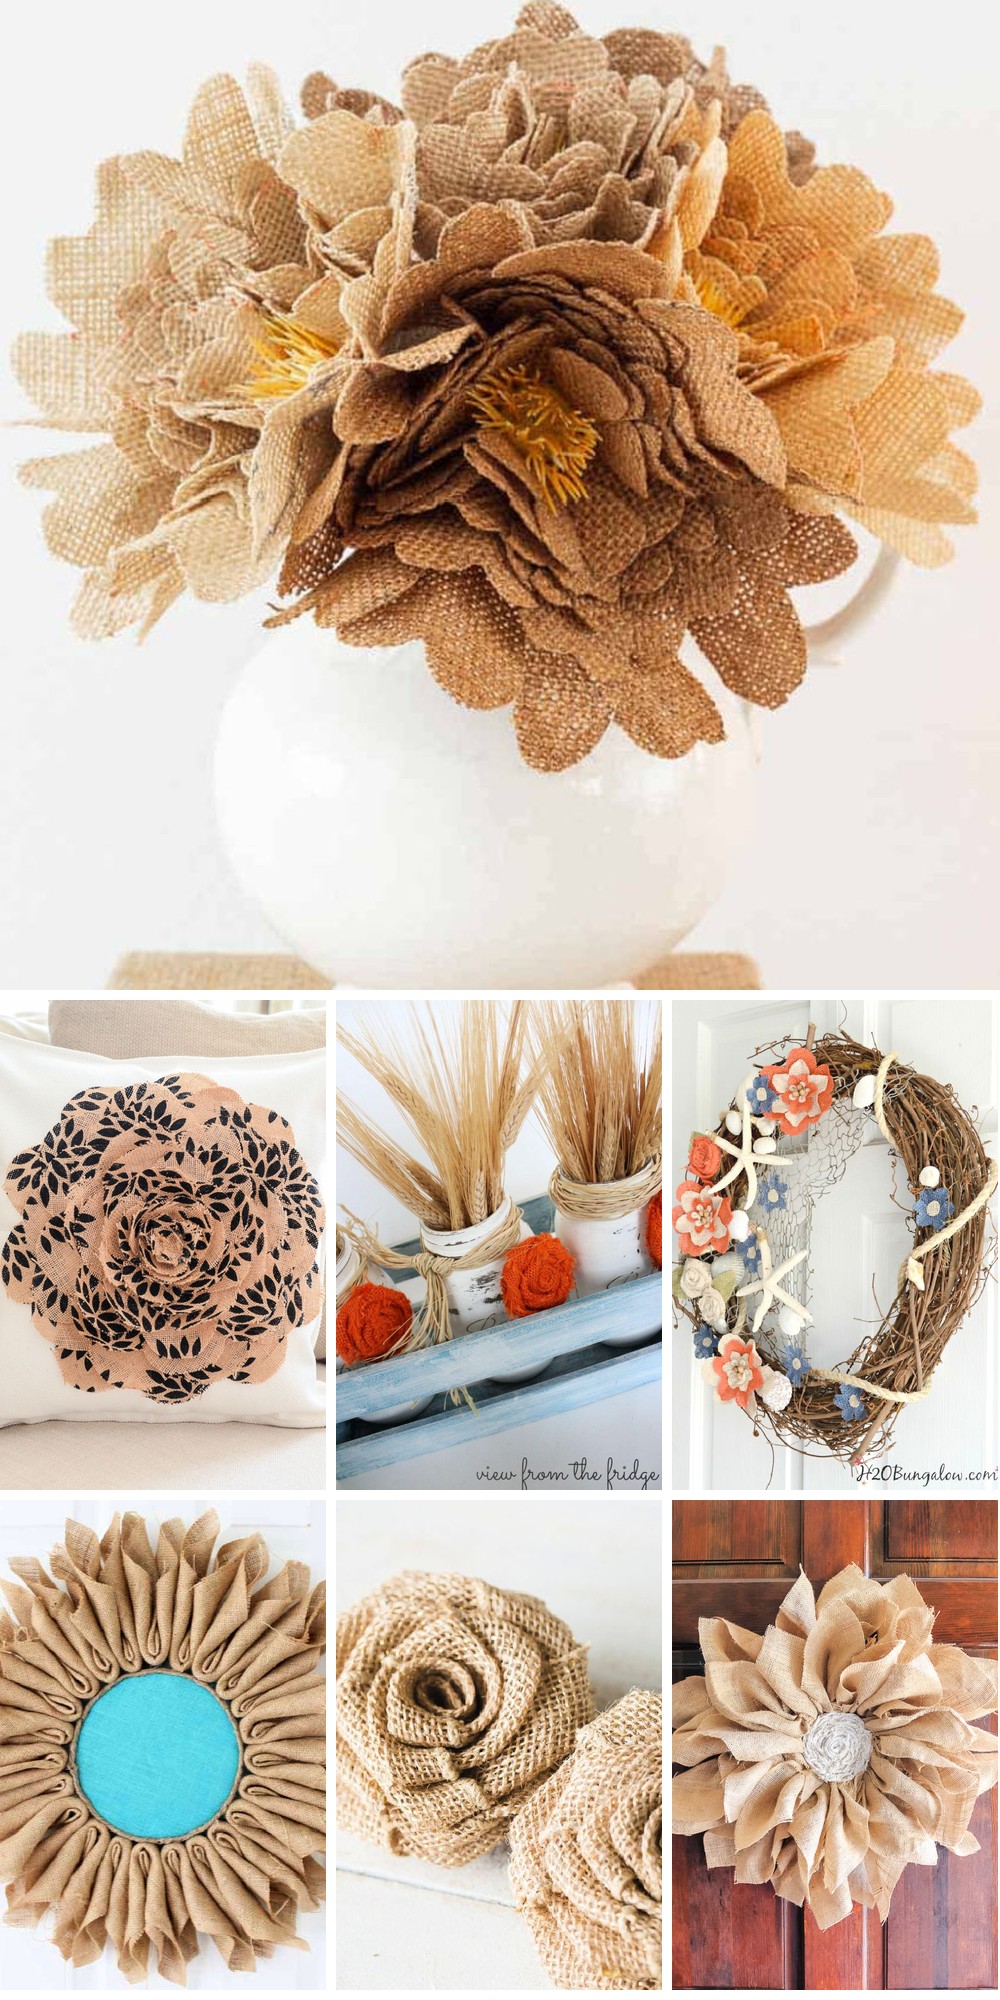
Transform any setting with the charm of DIY burlap flowers. These 15 creative and easy-to-create ideas for rustic decorations and gifts will delight anyone seeking to infuse their decor with a personalized touch. By exploring various styles and techniques, learning how to craft burlap flowers becomes an enjoyable and rewarding experience. We’ve got you covered from selecting materials to mastering the process, providing everything you need to get started.
The foundation of this creative journey is built upon two essential components: the necessary materials and tools, followed by a step-by-step guide on crafting your very own burlap flowers. Whether it’s enhancing home decor, adding a rustic touch to weddings, or personalizing gifts, these burlap creations offer endless possibilities.
Ready to unleash your creativity and add a blooming touch to your projects? Let’s dive into the specifics of crafting charming DIY burlap flowers.
Essential Materials and Tools for DIY Burlap Flowers
Crafting DIY burlap flowers can be an enchanting hobby that effortlessly adds a touch of rustic elegance to any space. To ensure a seamless creative process, it’s crucial to gather all the essential materials and tools before diving in. Below, we’ve outlined the necessary steps to get you started on your handmade burlap blooms.
Materials
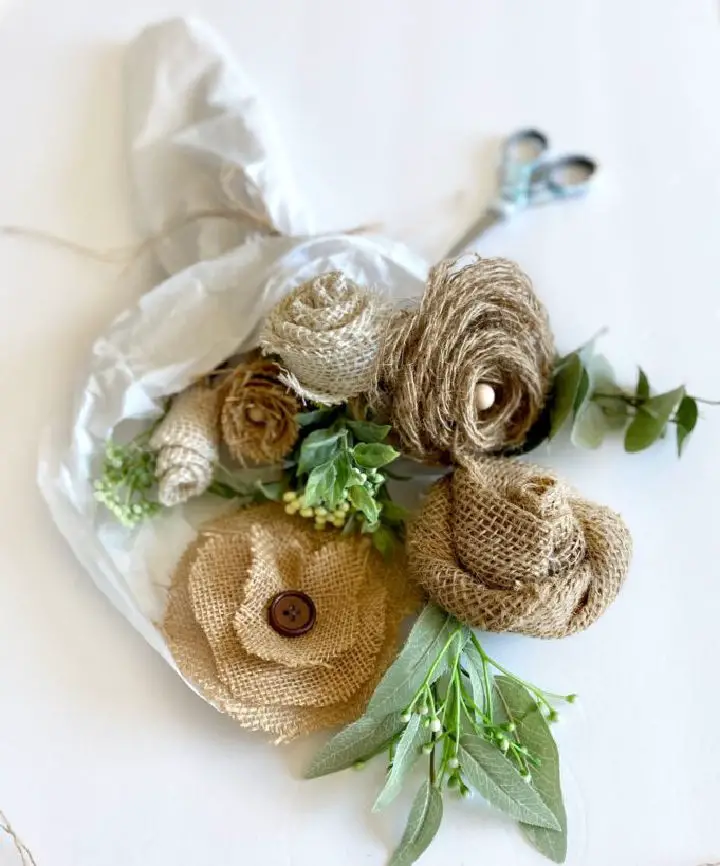
At the heart of any successful burlap craft project lies a trifecta of essential materials. First, there’s the star of the show itself – burlap, also known as hessian, which is woven from the skin of the jute plant or sisal fibers and comes in a range of colors, although its natural brown hue is often favored for rustic designs. To get started, you’ll need a sharp pair of scissors to cut your burlap into the desired shapes without fraying. Once you’ve got your fabric cut to size, you can use floral wire to help maintain the shape of your burlap flowers or other decorative elements. Of course, no burlap craft project would be complete without the use of hot glue guns and glue sticks to securely adhere your pieces together – this is especially true when working with a fabric that can be prone to fraying. Finally, wire cutters are an indispensable tool for trimming the floral wire to the precise length you need.
Tools
To ensure precise results, it’s essential to measure your burlap strips accurately, as uniform flowers are crucial. For marking cutting lines on the burlap, utilize either a pencil or fabric marker that won’t bleed and compromise the quality of your project. Additionally, stock up on floral tape for wrapping stems and achieving a clean finish. Some designs may also require basic sewing skills, so it’s wise to have a needle and thread at the ready. When crafting burlap flowers, work in a well-ventilated area with a hot glue gun, prioritizing safety above all else.
How to Make a Burlap Flower – Step by Step
With its charming, rustic charm, creating a burlap ribbon rose is an inviting DIY endeavor that can effortlessly elevate your home decor or special events. This concise guide will walk you through the simple steps to craft your own ribbon rose in approximately five minutes, making it accessible and enjoyable for both novice and experienced crafters alike.
Materials Needed:
When it comes to crafting the perfect wedding bouquet, having the right tools and materials can make all the difference. For a rustic or vintage-inspired look, consider using burlap ribbon with a wired edge to add texture and dimension. To shape your design, you’ll need a good pair of scissors to trim any excess material. A stick or dowel rod is also helpful for rolling and shaping the bouquet as needed. Of course, no bouquet would be complete without some hot glue to hold everything in place. If you want to add an extra touch of elegance, consider incorporating a veil into your design for a romantic and whimsical effect.
Step-by-Step Instructions:
Begin by preparing a 24-inch length of burlap ribbon with a wired edge, ideal for shaping the rose’s center. Roll the ribbon tightly around a stick, forming the core and twisting it about two to three times to create a solid foundation. Next, shape the petals by folding and twisting the ribbon as you wrap it around the center, manipulating the wired edges to achieve a natural look. Continue rolling until your desired size is reached, then cut the burlap leaving a small tail. Secure the end with hot glue, taking care as the gun can be hot. For an added touch, consider attaching a piece of veil at the back of the rose, giving it a sophisticated appearance perfect for weddings or elegant events. Finally, adjust the petals as needed by gently bending the wired edges to create a fuller, more natural-looking bloom.
Video Tutorial
To create a beautiful burlap ribbon rose, we recommend following along with the step-by-step video tutorial provided by Maison ZiZou on their YouTube channel. This comprehensive guide will walk you through each stage of the process, ensuring that your finished product turns out stunning and intricate.
Personalizing Your DIY Burlap Flowers
Transforming your DIY burlap flowers with a personal touch can elevate them from ordinary to extraordinary, reflecting your distinct style and creative flair. To infuse your creations with character, consider these customization ideas:
Dyeing Burlap
To give your burlap a pop of color, start by selecting a fabric dye that matches your favorite hue or complements your decor theme. Next, carefully follow the dye package instructions to prepare the bath in a large container capable of holding all the burlap you plan to dye. Once prepared, submerge the burlap into the dye bath and stir gently to ensure an even distribution of color. As the desired shade is achieved, rinse the burlap thoroughly until the water runs clear, then lay it flat to air dry.
Adding Embellishments
To elevate the look of your burlap flowers, consider adding some tactile interest through embellishments like buttons and beads, sewn or attached to the center of each bloom. Alternatively, you can wrap delicate lace or ribbons around the stems for a whimsical touch, or glue them along the petals’ edges for a more subtle flair. For a pop of color and added visual appeal, try using fabric paint to create unique patterns, such as stripes or polka dots, on your burlap petals.
Combining Fabrics
When working with burlap, don’t be afraid to get creative and mix it with other materials to create unique and interesting textures. Try pairing it with cotton, lace, or satin to add depth and visual interest to your flowers. To take it to the next level, experiment with layering different fabrics under or over the burlap petals, creating a multi-dimensional effect that adds volume and texture to your blooms.
Styling DIY Burlap Flowers
Burlap blooms offer a unique charm that can elevate the aesthetic appeal of various settings or occasions. To showcase their versatility, here’s a breakdown of creative ways to incorporate these natural wonders into your designs.
Home Decor
To add a touch of rustic charm to your decor, consider incorporating burlap flowers into your design. One idea is to fill a glass vase with these flowers and pair it with lace and twine for a shabby chic-inspired centerpiece that exudes warmth and coziness. Alternatively, you could create a welcoming wreath for your front door by combining the burlap blooms with greenery and a wooden sign. For a unique piece of wall art, attach the burlap flowers to a canvas or wood plank and arrange them in a heart shape or initial for a personalized touch that adds personality to any room.
Weddings and Events
When it comes to creating unique and long-lasting decorations, burlap flowers are an excellent choice. They can be used to craft bouquets that won’t wilt or fade over time, making them perfect for wedding decor. To add an extra touch of elegance, consider pairing the burlap flowers with pearls or brooches for a vintage-inspired look.In addition to their use as centerpieces, burlap flowers can also be used to add texture and interest to table settings. Use them as napkin rings or place setting accents to create a rustic yet sophisticated atmosphere. For a truly memorable experience, line the wedding aisle with burlap flower arrangements and pair them with candles or lanterns for a romantic ambiance that will leave your guests in awe.
Color Combinations
To create stunning burlap flower arrangements, consider pairing this earthy material with natural tones like creams, whites, and greens for a harmonious palette. For added visual interest, introduce bold colors through bright flowers or ribbons that can be adjusted according to the occasion’s mood. Additionally, incorporating seasonal themes by choosing colors that resonate with the current season, such as oranges and reds for fall or pastels for spring, can elevate your designs. Ultimately, the key to successful burlap arrangements lies in embracing your creativity and having fun with the design process.
Troubleshooting Common Issues with DIY Burlap Flowers
While creating intricate designs with burlap can be a delightful experience, it’s not uncommon to encounter some minor setbacks. To ensure that your DIY burlap flowers turn out flawlessly, it’s essential to address these common challenges head-on. For instance, if you find that the fibers are prone to fraying or unraveling, try using a hot glue gun to secure the edges and prevent further damage. Similarly, if the burlap is not lying flat due to wrinkles or creases, gently iron out the fabric before commencing your project. With these minor hurdles overcome, you’ll be well on your way to crafting stunning DIY burlap flowers that exude a rustic charm.
Preventing Fraying
When working with burlap, it’s common for the fabric to fray easily, which can be disappointing if you’re striving for crisp edges. One simple trick is to employ sharp scissors when cutting burlap, as this will help minimize the fraying issue. Additionally, applying a thin layer of clear adhesive or using a specialized fray check solution along the cut edges can effectively seal and protect them from further unraveling.
Shaping the Flowers
Mastering the art of shaping burlap can be a challenge, but there are ways to achieve the perfect form. One technique is to incorporate floral wire into the petals, providing a sturdy foundation that holds its shape. Another approach involves using fabric starch to give the burlap a temporary structure. Simply spray the material lightly with starch, then manipulate it into the desired shape as it dries.
Dealing with Burlap’s Rough Texture
While the coarse texture of burlap adds to its unique charm, it’s not always the most pleasant material to work with. One way to mitigate this is by softening the fabric through a simple soaking process: combine water and fabric softener, then rinse and dry. If your skin is sensitive to the roughness of burlap, consider donning gloves when handling it to prevent irritation. With practice and patience, these tips can help you overcome common challenges associated with working with burlap.
Maintenance and Care for Burlap Flowers
To preserve the beauty of your DIY burlap flowers, it’s essential to adopt a few straightforward yet impactful care strategies. By following these guidelines, you’ll be able to extend the life of your creative endeavors and enjoy their charm for a longer period. Start by dusting your burlap creations gently with a soft-bristled brush or a clean cloth to remove any dirt or debris that may have accumulated. This simple step will help prevent scratches and damage to the delicate fabric. Next, avoid exposing your flowers to direct sunlight, moisture, or extreme temperatures, as these factors can cause them to fade, wilt, or become brittle over time.
Cleaning Burlap Flowers
When it comes to maintaining your burlap flowers, gentle and deliberate is key. Start by using a soft brush or a feather duster to carefully sweep away any loose dust particles. For more stubborn stains, use a damp cloth to gently dab at the area, taking care not to apply too much moisture. Burlap can be prone to retaining water, so it’s essential to avoid over-saturating the material to prevent damage or discoloration.
Storing Burlap Flowers
To maintain the integrity of your burlap flowers, it’s essential to prioritize their storage conditions. Firstly, ensure they are kept in a dry environment to prevent the growth of mold and mildew, which can be detrimental to their overall appearance and longevity. When it comes to preserving the vibrant colors of dyed burlap, avoid exposing them directly to sunlight as this prolonged exposure can cause the hues to fade over time. For extended storage periods, consider wrapping the flowers in tissue paper and placing them within a cardboard box. This will provide a protective barrier against environmental factors, helping to keep your burlap blooms fresh and intact.
Refreshing Their Look
When it comes to maintaining the appearance of your burlap flowers, a few simple steps can go a long way in keeping them looking their best. To smooth out any wrinkles that may have developed, iron the flowers on a low heat setting, taking care to place a cloth between the iron and the burlap to prevent damage. Additionally, as time passes, the petals of your burlap flowers may begin to lose their natural shape. In this case, gently use your hands to reshape the petals back to their original form, ensuring that they continue to add a touch of rustic charm to your space.
FAQs About DIY Burlap Flowers
Unlock the secrets of creating stunning DIY burlap flowers with our comprehensive guide. Dive into the world of crafting and get ready to craft like a pro, tackling any questions or concerns you may have along the way.
What is burlap, and why is it used for making flowers?
Woven from the fibers of jute or sisal plants, burlap, also referred to as hessian, boasts a unique blend of rustic charm and remarkable durability. This versatile fabric has earned a reputation for crafting flowers that exude a homespun appeal, its textured surface adding an authentic touch to any arrangement.
How do I cut burlap without it fraying?
When trimming fabric, it’s essential to use sharp scissors that glide through the material with ease. To achieve a precise cut, move your scissors in a single, fluid motion, applying gentle pressure as you go. After cutting, apply a small amount of clear glue or a fray check solution along the edge to prevent fraying and ensure a professional-looking finish.
Can I dye burlap to make colored flowers?
Unlocking the full potential of burlap, a simple yet effective way to add color and personality is by dyeing it using fabric dye. To achieve the best results, follow the manufacturer’s guidelines and take heed of the instructions provided on the packaging.
What kind of glue should I use to assemble burlap flowers?
For crafting burlap flowers, a hot glue gun proves to be an indispensable asset. Its ability to create a robust bond between the various components enables you to construct sturdy and long-lasting creations.
How can I make my burlap flowers look more interesting?
Take your floral arrangements to the next level by incorporating thoughtful embellishments that reflect your personal style. Consider adding unique touches such as ornate buttons, delicate beads, intricate lace, or dainty ribbons to give your flowers a truly one-of-a-kind look.
Can I wash burlap flowers?
When it comes to maintaining burlap flowers, a gentle approach is often the most effective. In most cases, simply wiping them down with a soft, damp cloth should be sufficient to remove any dirt or debris. Avoid using harsh chemicals or excessive water, as these can damage the delicate material and shorten the life of your arrangement.
How do I store burlap flowers to keep them looking fresh?
When it comes to storing your delicate items, it’s essential to prioritize their protection. To ensure they remain in pristine condition, consider keeping them in a dry environment that is sheltered from direct sunlight. For extended storage periods, consider investing in tissue paper or other gentle wrapping materials to prevent scratches and damage.
Are burlap flowers suitable for outdoor use?
While burlap flowers can indeed be utilized outside, their aesthetic appeal may eventually wane as they succumb to the natural wear and tear of environmental factors such as sunlight, humidity, and wind. The outdoor environment’s harsh conditions can cause the once-vibrant blooms to gradually lose their texture, color, and overall appearance.
How do I keep burlap flowers from losing their shape?
To add stability and shape to your burlap arrangement, consider using floral wire as a structural foundation. Additionally, lightly spritzing the burlap with starch can enhance its stiffness, allowing it to hold its form better.
Can I use burlap flowers for my wedding?
For couples planning a rustic or vintage-inspired wedding, burlap flowers can be an ideal choice to incorporate into their big day’s décor. Their unique texture and earthy tones perfectly capture the charm of a whimsical and laid-back celebration.
Is burlap an eco-friendly material?
While burlap’s natural fibers make it a sustainable choice for crafting, its biodegradable properties truly set it apart as an eco-friendly option.
15 DIY Burlap Flower Ideas
Add a touch of rustic elegance to your next crafting project with these 15 innovative DIY burlap flower ideas. Transform plain wreaths and arrangements into stunning masterpieces by learning how to create your very own burlap blooms, perfect for everything from home decor to gift-giving.
Easy DIY Burlap Wedding Flower
Transform your home’s ambiance with the warmth of handmade burlap flowers, brought to life through the clear instructions and helpful tips of KariAnne Wood from Thistlewood Farm. With a minimalistic collection of supplies, including coat hanger wire, florist tape, scissors, and burlap, you’ll be well on your way to crafting charming rustic blooms. The process begins with creating the flower’s center, followed by cutting and ironing burlap squares for petals, which are then wrapped with florist tape to form a delicate blossom. As you work through KariAnne’s guide, even those new to DIY projects will find the experience enjoyable and rewarding. By adding these one-of-a-kind burlap flowers to your décor, you’ll infuse your space with a touch of springtime charm, while bypassing any potential burlap shortages and embracing the joy of creating something truly unique.
How to Make a Burlap Flower
With Canary Street Crafts’ straightforward DIY guide, creating charming burlap flowers is an effortless endeavor. Perfect for incorporating a rustic flair into your home decor or crafting one-of-a-kind accessories, these blossoms can be fashioned from burlap or any fabric of your preference. All you require are some burlap ribbon, felt, scissors, and a glue gun.
To start, fold your burlap in half and secure it with a knot at one end to form the bud. Next, twist and wrap the fabric around the bud, fastening it with hot glue to achieve the desired size. Finish by attaching felt to the back of the flower to maintain its shape. For added versatility, consider appending a string to the rear for effortless attachment to various projects.
This enjoyable and easy project yields beautiful results, making it an ideal activity for crafters of all skill levels.
Homemade Burlap Flower Centerpiece
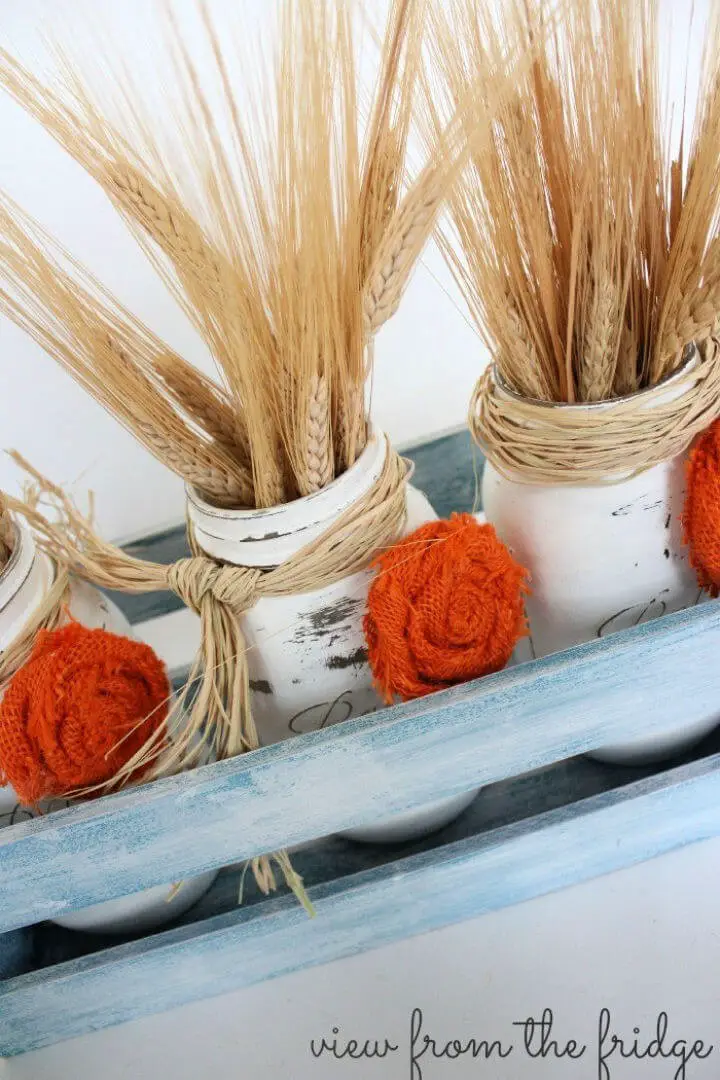
As the seasons change and autumn’s warmth settles in, why not get creative and add a dash of rustic charm to your home decor? Oh My Creative’s Fall Mason Jar Centerpieces tutorial is the perfect guide to help you transform ordinary mason jars into stunning centerpieces. With just a few simple materials like chalk paint and burlap rosettes, you can create beautiful pieces that will enhance any fall-themed setting. The step-by-step instructions are clear and easy to follow, making this a delightful crafting experience that’s sure to produce a lovely result. Whether you use them as table centerpieces or decorative accents, these mason jar creations will bring a cozy, festive atmosphere to your space. And the best part? You can add a personal touch to your autumn decor with this engaging and enjoyable project.
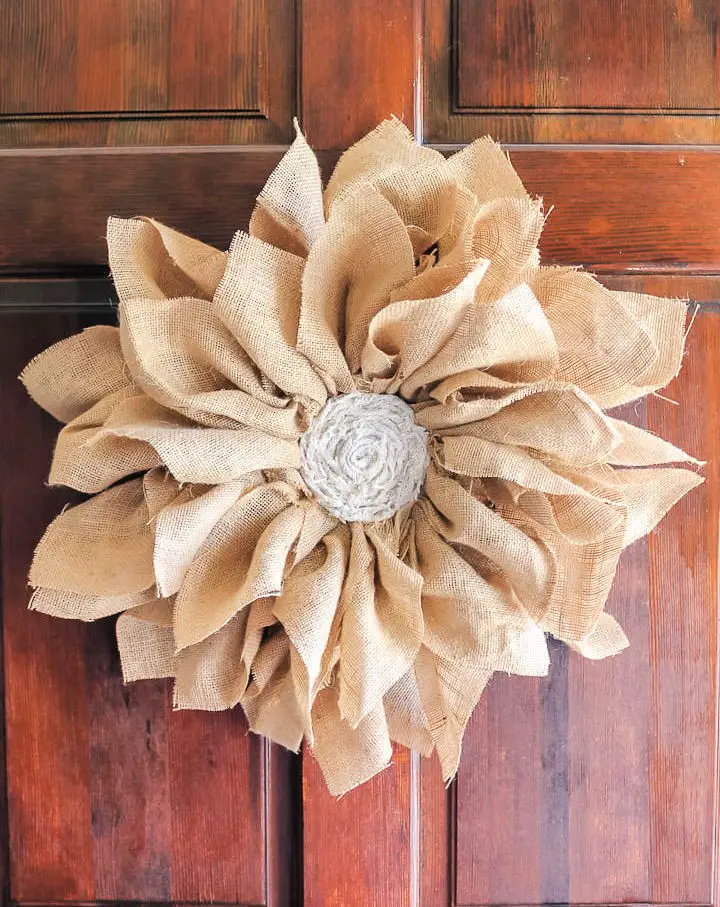
DIY Burlap Flowerpot at Home
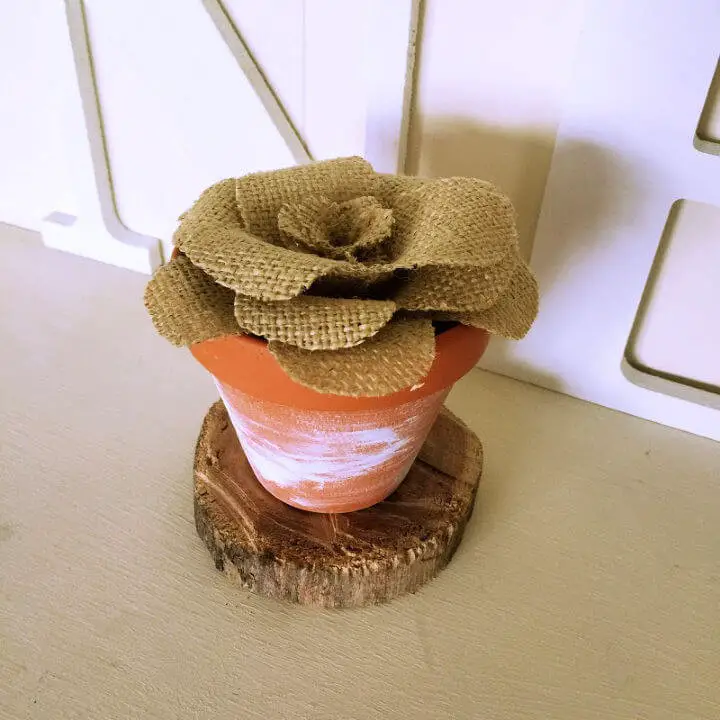
Embark on a charming DIY adventure by creating a stunning burlap flower with this step-by-step guide. Perfect for adding a rustic touch to your home decor or personalizing your space, this project begins by stiffening the burlap for easy cutting and shaping. You’ll then create a custom stencil before carefully cutting and gluing the layers of burlap into delicate petals that form a gorgeous bloom. Whether you’re looking to adorn wreaths, centerpieces, or use as a decorative accent, this burlap flower tutorial will walk you through the process while sharing in the joy of creativity. Get ready to elevate your crafting skills and add a touch of handmade charm to your decorations!
Burlap Flower Centerpiece for Wedding
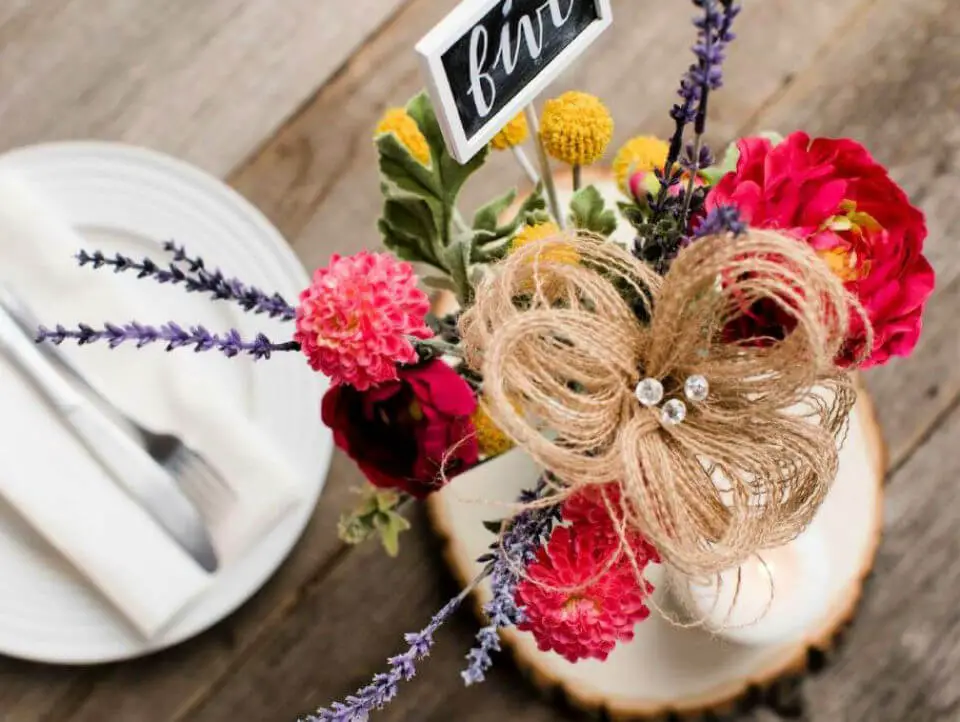
If you’re envisioning a rustic or vintage-inspired wedding, incorporating handmade elements can add a unique and intimate touch to your special day. To help you achieve this look, we’ve created an in-depth guide on how to create DIY burlap flowers that will elevate your wedding reception tables. The process is surprisingly straightforward, requiring only basic supplies and some creativity. By crafting these charming flowers, you’ll be able to incorporate them into your bridal or bridesmaid bouquets, imparting a whimsical, shabby-chic charm. To begin, simply cut the burlap fabric, secure it with glue, and wrap it around a straw or dowel, mimicking the natural beauty of a flower. With these simple steps, you’ll be able to create an array of these delightful flowers, adding a personal touch to your wedding celebration.
Making Your Own Burlap Flower
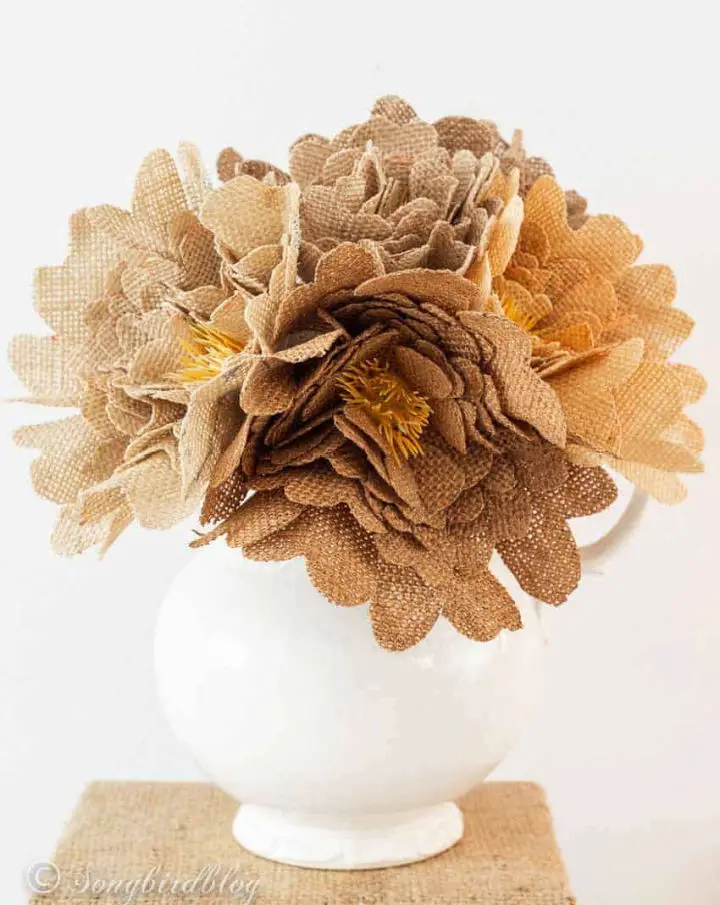
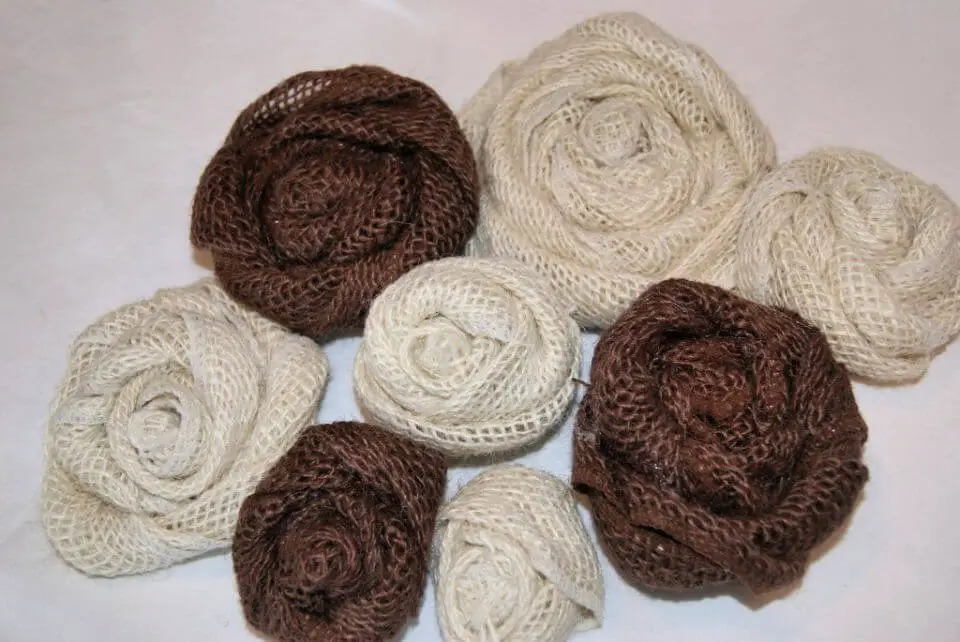
Add a touch of rustic charm to your home with this step-by-step tutorial on making handmade burlap flowers, courtesy of Songbird. By crafting roses from colored burlap fabric, you’ll create a romantic and earthy vibe that’s perfect for enhancing your fall decor or adding a personal touch to gifts and wreaths. Start by creating a rose pattern, then dye the burlap for a natural look. After stiffening the fabric with Mod Podge, cut and assemble the petals into beautiful blooms. This comprehensive guide is designed to make your crafting experience enjoyable and successful, allowing you to add a unique and delightfully imperfect flourish to your space.
DIY Coastal Burlap Flower for Wreath
Bring a touch of coastal charm to your front door with a stunning DIY burlap flower wreath. By following h3OBungalow’s comprehensive tutorial, you’ll learn how to craft rosettes and daisies from burlap, as well as assemble them into a beautiful wreath adorned with starfish and seashells. This easy-to-follow guide is perfect for a relaxing afternoon project, allowing you to upcycle shells collected during beach walks and personalize your entryway with a handmade, beachy vibe that echoes the serenity of the coast.
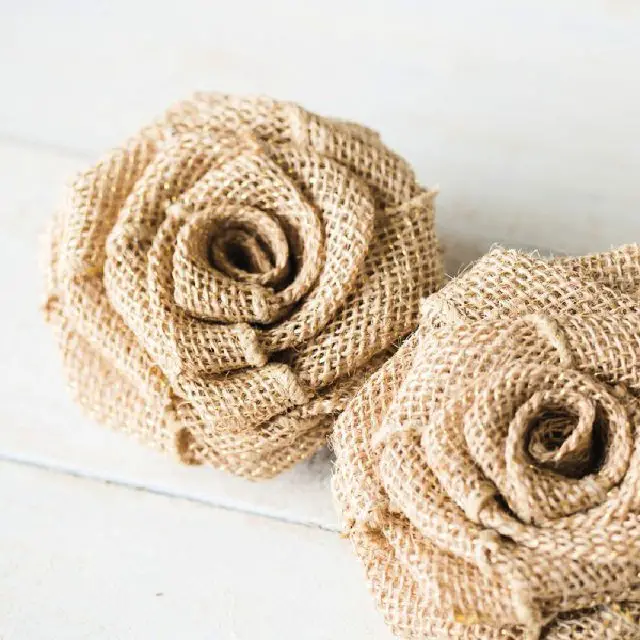
Handmade Rustic Burlap Flower
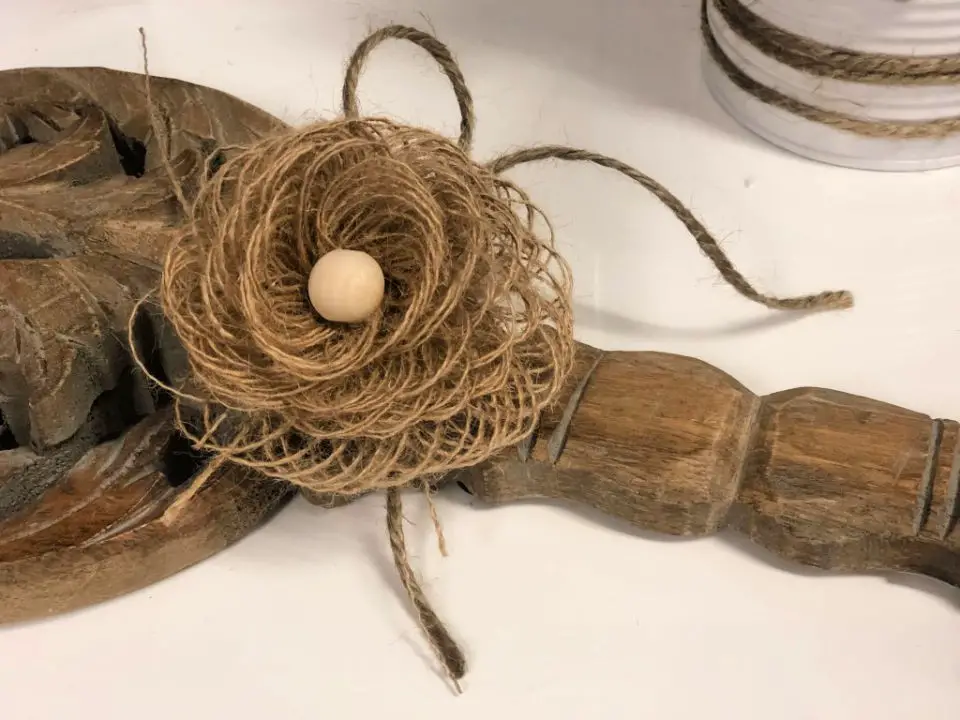
If you’re seeking to infuse a touch of rustic elegance into your home decor or gift-giving, Just That Perfect Piece has got you covered with an endearing DIY project that showcases the art of crafting burlap flowers. This straightforward tutorial masterfully guides you through transforming everyday materials like burlap, wooden beads or buttons, and a hot glue gun into visually stunning floral embellishments. Whether used to adorn wreaths or elevate your gift-wrapping game, these handmade blooms bring a warm, farmhouse-inspired charm to any object they’re paired with. Join us on this creative journey and revel in the sense of accomplishment that comes from crafting one-of-a-kind, handcrafted decorations.
How to Make Your Own Burlap Flower
Discover the art of creating charming burlap flowers with Hootshack’s easy-to-follow DIY tutorials. Our comprehensive guide takes you through a step-by-step process to craft a range of unique blooms, from loop flowers to roses, rosettes, and bouquets. These textured creations bring a touch of rustic elegance to any setting, making them perfect for adorning your home, personalizing events, or enhancing gifts. With a minimal set of materials, including burlap ribbon, hot glue, and scissors, you’ll be able to craft beautiful, long-lasting floral arrangements. To add an extra layer of customization, incorporate colorful buttons or beads to make each flower truly one-of-a-kind. By following our expert tips and avoiding common hot glue mistakes, you’ll be able to create stunning burlap flowers that are both decorative and delightful.
Make a Burlap Flower Napkin Ring
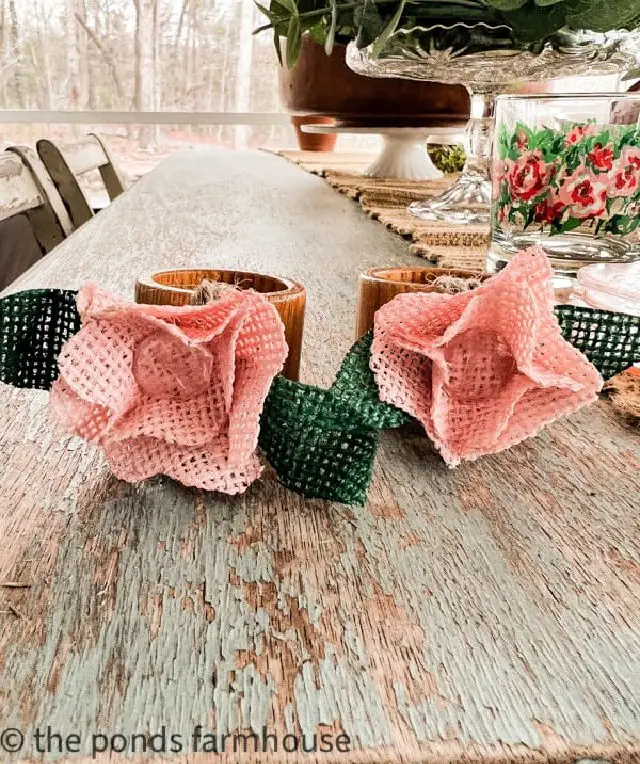
Discover the charm of DIY Burlap Napkin Rings as you transform scrap burlap, paint, and thrifted napkin rings into delightful flowers to adorn your table settings. This budget-friendly craft is perfect for sprucing up your spring and summer gatherings. By wrapping jute twine around each piece, you’ll not only add a rustic touch but also create a sturdy base for your handmade decorations. The best part? These customizable napkin rings can be tailored to match any party theme or color scheme, infusing your dining experience with a personal and creative touch that’s sure to impress your guests.
How to Make No-Sew Burlap Rose
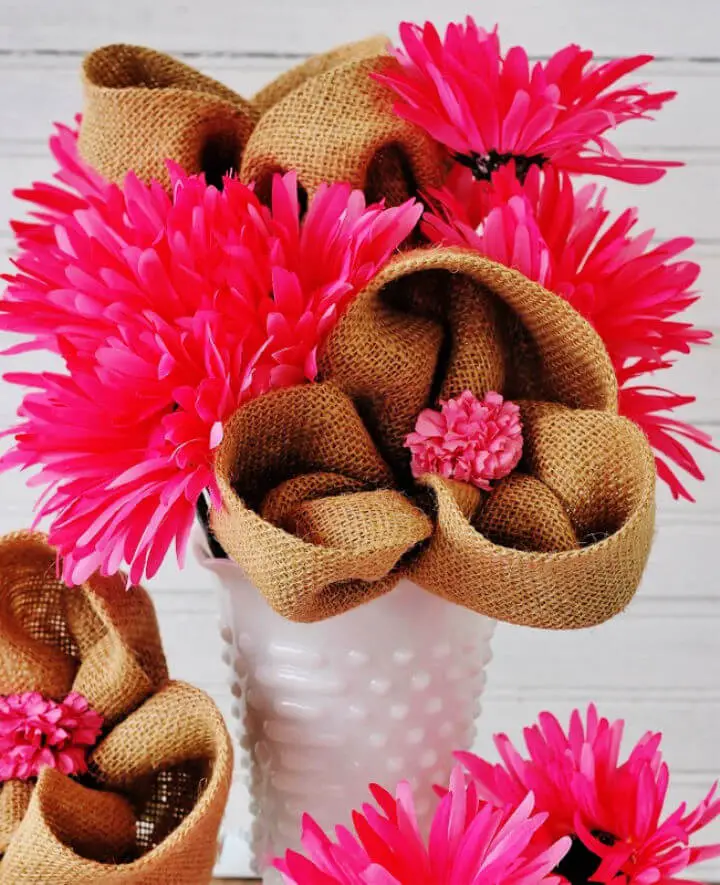
Transform your space with charming DIY burlap roses, crafted effortlessly without sewing. The versatile and timeless charm of these rustic blooms makes them perfect for adding a personal touch to your decor or creating thoughtful gifts. With just a few simple materials like burlap ribbon, bobby pins, and a hot glue gun at hand, you can create these lovely flowers in mere minutes. By rolling and folding the burlap, you’ll be able to customize the size and color to suit your project, incorporating them into wreaths, garlands, or mason jar arrangements for that cozy, homemade ambiance. Get ready to elevate your crafting skills with these delightful DIY creations.
Big Burlap Flower Without Sewing
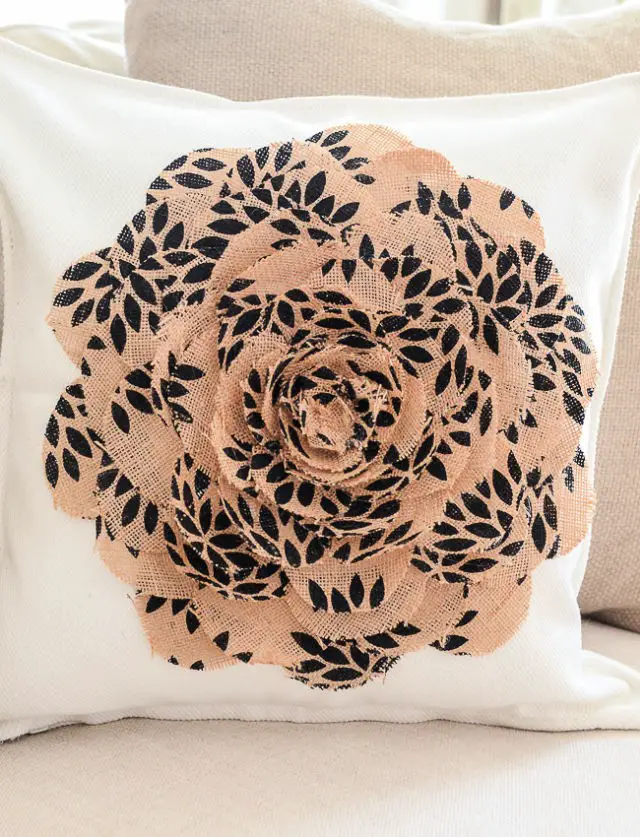
Transforming a living space with a charming no-sew burlap flower pillow is an effortless way to infuse elegance into your home decor. By following StoneGable’s comprehensive DIY guide, even those without sewing skills can create this beautiful piece of art. The materials required are straightforward: a pillow cover, approximately a yard of fabric, cardboard for template-making, and a hot glue gun. Begin by cutting out circles from the fabric to form the petals, then arrange them on the pillow cover in concentric circles using the adhesive. As you watch your design take shape, you’ll be delighted with the result – a stunning flower that appears professionally crafted. This DIY project is ideal for adding a personal touch to your living space.
Quick and Easy DIY Burlap Flower
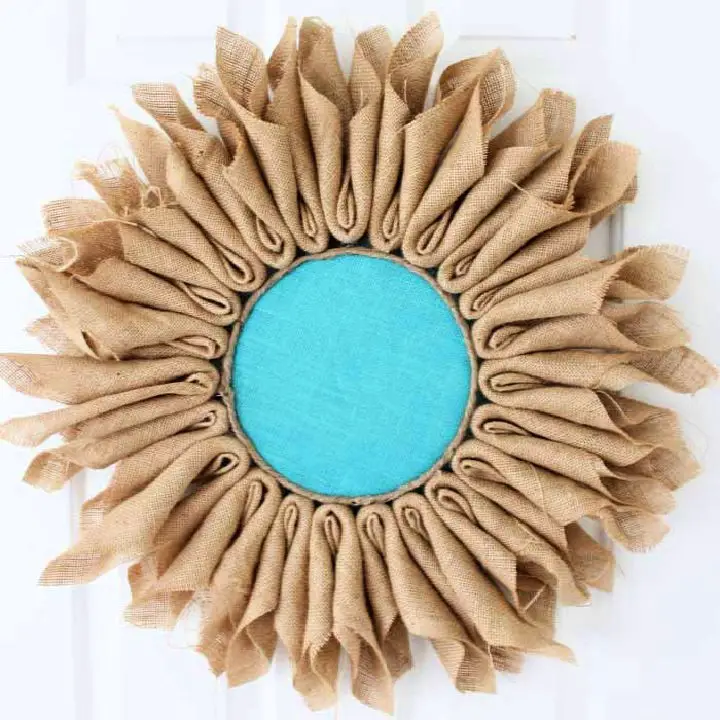
Handcrafting rustic charm with DIY burlap flowers is an excellent way to add a unique touch to your home décor. For those seeking inspiration and guidance, Angie Holden’s The Country Chic Cottage offers a comprehensive tutorial on creating large, striking burlap flowers that can elevate any room or serve as a beautiful wreath for your door. The step-by-step instructions are presented in a clear and engaging manner, ensuring an enjoyable crafting experience.To get started, you’ll need a few simple supplies such as an embroidery hoop, colored burlap, and a glue gun. The tutorial is further supported by a helpful video guide, making it easy to follow along and bring these lovely flowers to life. With your finished creations, you’ll have a unique collection of handmade decorations that can add warmth and personality to any space.
How to Do You Make Burlap Sunflower
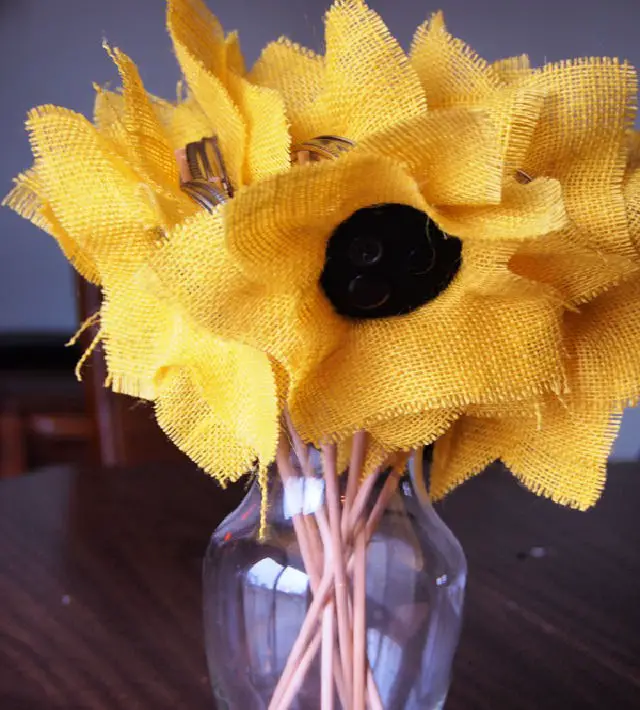
Learn the art of creating charming burlap sunflowers with Kelley Grant’s comprehensive tutorial on Clumsy Crafter. This engaging guide provides an effortless step-by-step process for crafting vibrant, long-lasting sunflowers using readily available materials such as colored burlap, dowel rods, felt, and buttons. The simplicity of the method ensures a fun and rewarding crafting experience that yields beautiful decorations suitable for any celebration, whether it’s a baby shower or wedding. With practical advice on cutting and assembling these cheerful flowers, even novice crafters can produce stunning results. By embracing the joy of making your own burlap sunflowers, you’ll add a touch of handmade charm to your decor.
DIY Burlap Flower Wreath Step by Step Instructions
Elevate your home’s aesthetic by creating a charming DIY flower wreath using burlap, following Angie Holden’s step-by-step guide at The Country Chic Cottage. This rustic-inspired craft project effortlessly adds a farmhouse flair to your decor and is surprisingly easy to execute, utilizing unconventional bases like wood plates and coasters. With only a handful of essential supplies – including burlap, white burlap, a hot glue gun, scissors, and a ruler – you can assemble a stunning wreath perfect for spring or any season. The tutorial is carefully crafted to ensure a seamless crafting experience, yielding a lovely piece that’s sure to garner admiration from visitors.
Conclusion:
As you wrap up the DIY burlap flower-making process, the possibilities are truly endless. You can tailor your creations to suit various occasions, from enhancing your home decor to making unique gifts or adding a personal touch to special events like weddings. With every step, from gathering materials to styling your final product, you have the opportunity to inject your personal style into each piece. While it’s natural to encounter minor setbacks along the way, having a few troubleshooting tips up your sleeve will ensure that your burlap flowers remain a beautiful reflection of your crafting skills. Whether you’re looking for a versatile decoration or a meaningful addition to a special gift, DIY burlap flowers offer a stylish and creative solution.
