Crafting a DIY lunch bag is an exciting project that combines creativity with sustainability. With 15 free patterns to choose from, you can pick the one that suits your style and needs. From simple to complex designs, these patterns offer endless possibilities for customization. The best part? You get to select materials that align with your lifestyle – whether you prioritize durability, insulation, or a pop of color.
What may seem daunting at first becomes an enjoyable journey when equipped with the right guidance. Our comprehensive guide takes you through every step, from gathering materials to following instructions and leveraging expert tips for success. We also provide valuable advice on customization and maintenance to ensure your lunch bag looks great and lasts long.
Get ready to dive into the world of DIY lunch bags, where creativity meets practicality. The next sections will reveal everything you need to know to create a uniquely yours lunch bag.
How to Make a Lunch Bag: A Step-by-Step Guide
Creating your own lunch bag offers a unique opportunity to merge sustainability with self-expression. By following this straightforward guide, you’ll be able to craft a sturdy and stylish bag that reflects your individuality. Prior to embarking on this creative journey, make sure you have all the required materials at the ready.
Materials Needed
When crafting your lunch bag, start by selecting a printed canvas outer fabric measuring 88 x 38 cm (34 5/8″ x 15″). This exterior layer will provide the foundation of your design. Next, choose a cotton lining fabric with matching dimensions to serve as the interior component. To create a functional closure system, you’ll need a drawstring made from cotton rope, measuring 4mm thick and 7 cm (2 3/4″) in length. Additionally, select a webbing strap that’s 3 cm (1 1/4”) wide and 22 cm (8 5/8″) long to serve as the handle. Finally, incorporate one button for securing the closure.
Step-by-Step Instructions
To begin crafting your custom-made lunch bag, start by laying both the outer and lining fabrics wrong side up on your work surface, ensuring they are precisely aligned over one another. Next, fold the fabric in half, securing the short ends together with a firm press. Mark the center point at both ends of the folded fabric to serve as a guide for subsequent steps.
Moving forward, sew along both open sides of the fabric, leaving a small gap at the marked center folds for the drawstring channel. Once complete, cut two small holes on either side of the bag within the seam allowance. Thread a cotton rope through these openings using a safety pin, circling around the top of the bag to create a secure closure.
To add additional functionality and style to your lunch bag, position a webbing strap on one side of the bag, ensuring it is centered and forming a loop. Secure the strap’s ends to the bag with multiple stitches for added durability.
Finally, place a button on the opposite side of the bag from the handle, situated just below the drawstring channel. Sew the button in place to complete its attachment. With these steps complete, turn your lunch bag inside out and gently push out the corners to achieve a professional finish. Your custom-made lunch bag with drawstring closure and sturdy handle is now ready for use.
Tips for Success
To maximize the lifespan of your homemade lunch bag, select fabrics that are not only aesthetically pleasing but also durable and easy to clean. Consider using identical materials for both the exterior and interior layers to simplify maintenance. For an added layer of customization, incorporate decorative elements such as embroidery, appliques, or fabric-based artistry to infuse your bag with a distinctive flair.
Video Tutorial
To enhance your understanding of crafting a lunch bag, I highly recommend watching our step-by-step video tutorial on YouTube – Fast & Easy! How to make a lunch bag. This visual guide seamlessly complements our written instructions, providing an immersive learning experience for those who prefer to learn through visuals. It’s an excellent resource that breaks down the process into clear and engaging steps, making it easy to grasp even for beginners. Moreover, this DIY project is not only practical but also eco-friendly, allowing you to create a personalized lunch bag with minimal materials and a dash of creativity.
Customization Ideas for Your DIY Lunch Bag
When it comes to creating a DIY lunch bag, the possibilities are endless and the opportunity to express personal style and creativity is limitless. To make your lunch bag truly one-of-a-kind, consider incorporating various design elements such as colorful fabrics, functional pockets, and unique embellishments. For instance, you can choose vibrant patterns or bold colors that reflect your personality, or opt for a more subtle approach with contrasting trims. Pockets and compartments can be added to create a functional yet stylish bag, complete with a mesh side pocket for a water bottle, a front pocket for utensils, or an interior compartment for an ice pack. Appliques, embroidery, and embellishments can also be used to add character to your lunch bag. Cut out shapes from fabric scraps, such as fruits, animals, or initials, and sew them onto your bag, or use iron-on patches for a simpler option. The type of handle or strap you choose can also impact the overall look and feel of your bag, with options ranging from braided rope to adjustable nylon straps. Additionally, the closure mechanism you select – such as velcro, snaps, buttons, or zippers – not only secures your lunch bag but also contributes to its design. The lining of your bag is equally important, providing an opportunity to add a contrasting fabric that adds a pop of color every time you open your bag. Waterproof linings are also practical for easy cleaning. Ultimately, your DIY lunch bag will be a reflection of your personal style and a testament to your crafting skills, making it a truly unique and special item.
Troubleshooting Common Issues in DIY Lunch Bag Making
As you embark on creating your DIY lunch bag, you may encounter a few obstacles along the way. But fear not! These common challenges can be easily overcome with some basic know-how. To help you navigate these hurdles, here’s a guide to walk you through some typical issues and their solutions:
One of the most common problems is when your fabric doesn’t hold its shape. The solution? Simply add an interfacing or fusible fleece layer to give your bag more structure. Iron it onto the wrong side of your fabric before sewing the pieces together.
When sewing through thick layers or heavier fabrics, you may find that it’s difficult to get a smooth stitch. To overcome this, switch to a heavier needle like a denim or leather needle and slow down your sewing machine’s speed for better control.
Zippers can be finicky, but with the right approach, they become much easier to install. Use a zipper foot attachment and baste the zipper in place before final sewing. And don’t forget to iron the fabric flat first to ensure everything lies smoothly.
Lining that keeps shifting around? No problem! To keep it in place, tack it to the outer bag at the corners or use a few hand stitches to secure it to the zipper tape.
If you’re looking for a waterproof lunch bag, there are a few tricks up your sleeve. Choose a waterproof fabric like PUL or oilcloth for the lining, and consider applying a waterproof spray to the finished bag.
Finally, if your handles aren’t quite sturdy enough, it’s easy to upgrade them. Use webbing or make your own by folding fabric strips and sewing them with multiple rows of stitching. Attach them securely to the bag with reinforced stitches.
By anticipating these issues and knowing how to address them, you’ll be well on your way to making a lunch bag that’s not only stylish but also durable and functional.
Embracing Sustainability with Your DIY Lunch Bag
When it comes to making environmentally conscious choices, every small step counts. One such step is creating a DIY lunch bag that not only reduces waste but also promotes sustainability. To ensure your project aligns with eco-friendly practices, consider the following guidelines:
Select materials that are biodegradable and have a lower environmental impact than synthetic alternatives. Organic cotton, hemp, or jute are great options. Additionally, upcycle old clothes or textiles to give them a new life, reducing waste and adding a unique story to your creation.
To minimize fabric waste, plan your cuts carefully and save scraps for future projects or use them as stuffing or quilt patches. When it comes to accessories like buttons and zippers, opt for natural or recycled materials that can be easily recycled or composted at the end of their life.
When using adhesives or dyes, choose products that are free from harmful chemicals. Water-based and plant-based options are safer for you and the planet. Design your lunch bag to be durable and easy to clean, encouraging long-term use and reducing the need for disposable alternatives.
Finally, share your sustainable DIY journey on social media or with friends to inspire others to make a difference. By focusing on sustainability, you’re not just crafting a lunch bag; you’re contributing to a healthier planet and inspiring others to do the same.
Maintenance and Care Tips for Your DIY Lunch Bag
To keep your DIY lunch bag in top condition, it’s crucial to develop a routine that includes regular cleaning, gentle washing, thorough drying, deodorizing, proper storage, and timely repairs. Here’s how you can do just that:
Firstly, clean your bag regularly to prevent stains and odors from building up. For fabric bags, turn them inside out and shake off any loose crumbs. For any stubborn stains, use a mild detergent and a soft-bristled brush to gently scrub the area. Make sure to rinse the area thoroughly to remove all soap residue.
If your bag is machine washable, use a gentle cycle with cold water. To protect the shape and print of your bag, place it in a pillowcase or laundry bag before washing. However, if your bag isn’t machine washable, hand wash it with warm soapy water using a soft sponge to gently scrub the inside and outside of the bag.
Once you’ve finished washing your bag, make sure to dry it completely before using it again. Avoid putting it in the dryer as high heat can damage the fabric or insulation. Instead, hang the bag upside down to allow any water to drain out and air to circulate inside.
To remove any lingering odors from your bag, sprinkle baking soda inside the bag and let it sit overnight. In the morning, shake out the baking soda and wipe the bag with a damp cloth.
When not in use, store your lunch bag in a cool, dry place. Keep it open or loosely folded to prevent mold and mildew from growing. Finally, check your bag periodically for any wear and tear and repair any loose threads or small tears promptly to prevent further damage.
FAQs About DIY Lunch Bag
Get the inside scoop on creating your very own fashionable and practical lunch bag with our thorough FAQ guide. Dive in to find out everything you need to know to craft a one-of-a-kind accessory that will elevate your daily lunches.
What is the best size for a DIY lunch bag?
When it comes to determining the perfect size for a bag, it ultimately depends on your unique requirements. As a general guideline, many people opt for bags that stand around 9 inches tall, span 7 inches wide, and have a depth of approximately 4 inches. However, feel free to adjust these dimensions based on the specific items you plan to carry within the bag, as this will greatly impact its overall functionality.
How can I make my lunch bag waterproof?
When it comes to creating a water-resistant lining, there are several options you can consider. One effective approach is to utilize waterproof fabrics such as PUL (polyurethane laminate) or oilcloth. These materials provide an added layer of protection against moisture and liquids. Additionally, you can line your bag with a plastic liner for extra insurance against the elements. Alternatively, you could apply a waterproof spray to the fabric itself, providing a quick and easy solution for adding water resistance.
Can I add insulation to my lunch bag?
When it comes to keeping your food at the ideal temperature, adding insulation is a clever trick. To achieve this, consider inserting materials like insulated batting or foam sheets between the outer fabric and the lining of your picnic bag. This simple yet effective hack can make all the difference in maintaining the perfect warmth or chill for your meals.
How do I adjust the pattern for different sizes?
Adjusting the size of your design can be achieved by scaling it up or down while preserving its original proportions. It’s essential to consider seam allowances as you make these adjustments to ensure a smooth and professional finish.
What type of closure is best for a lunch bag?
When it comes to fastening your bag, you have a range of options at your disposal. Velcro, snaps, buttons, and zippers are all viable choices, each with its own unique characteristics that make it suitable for different skill levels and bag styles.
How do I clean my fabric lunch bag?
When it comes to cleaning your item, start by checking if it’s machine washable. If it is, opt for a gentle cycle using cold water. Alternatively, if you prefer to hand wash the item, use warm water with soap and allow it to air dry completely.
Can I use recycled materials for my lunch bag?
Embracing upcycling by transforming old materials like jeans or curtains into new creations not only reduces waste but also infuses a personal touch into your handmade lunch bag. As you embark on this eco-friendly endeavor, these considerations will serve as a solid foundation for overcoming any obstacles that may arise.
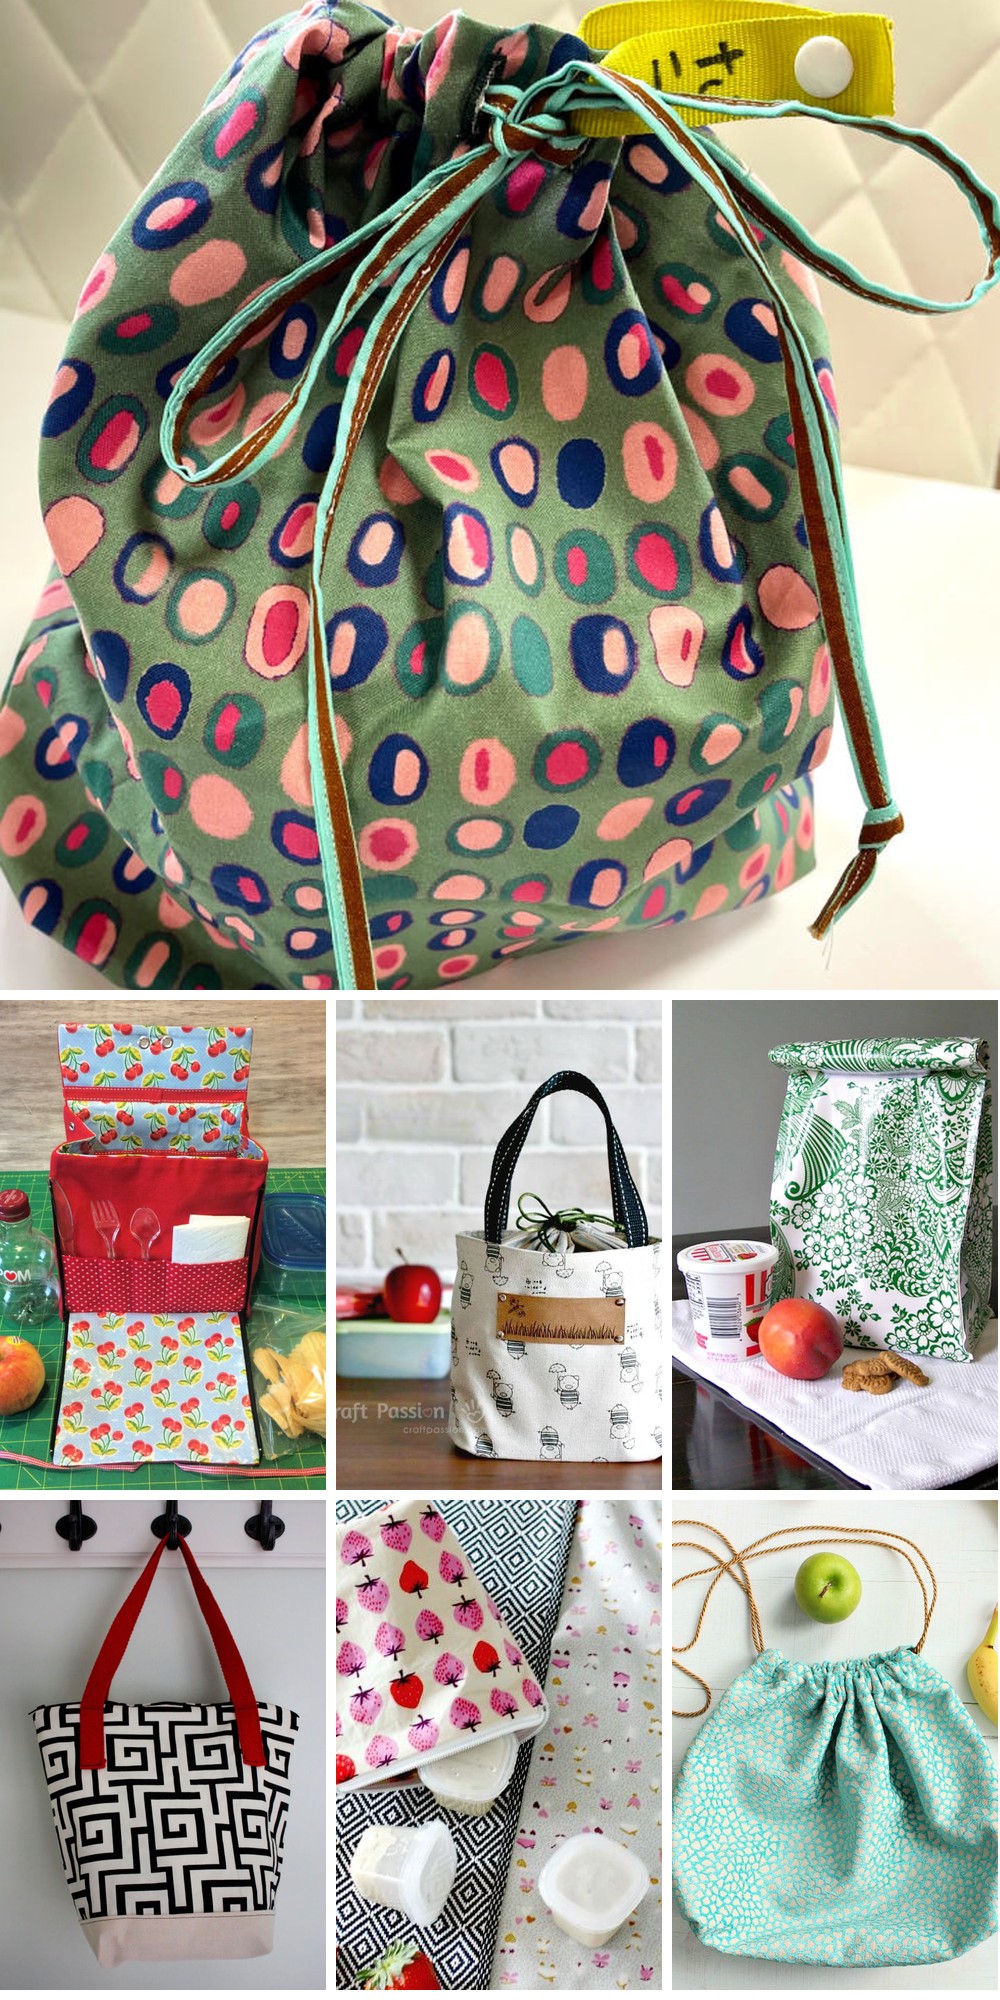
15 Free DIY Lunch Bag Patterns To Sew
In just a few hours, you can create 15 unique and functional lunch bags using simple DIY techniques. With these free sewing patterns, you’ll never have to settle for boring or flimsy bag lunches again. Start crafting now!
DIY Lunch Bag With Zip Down Placemat
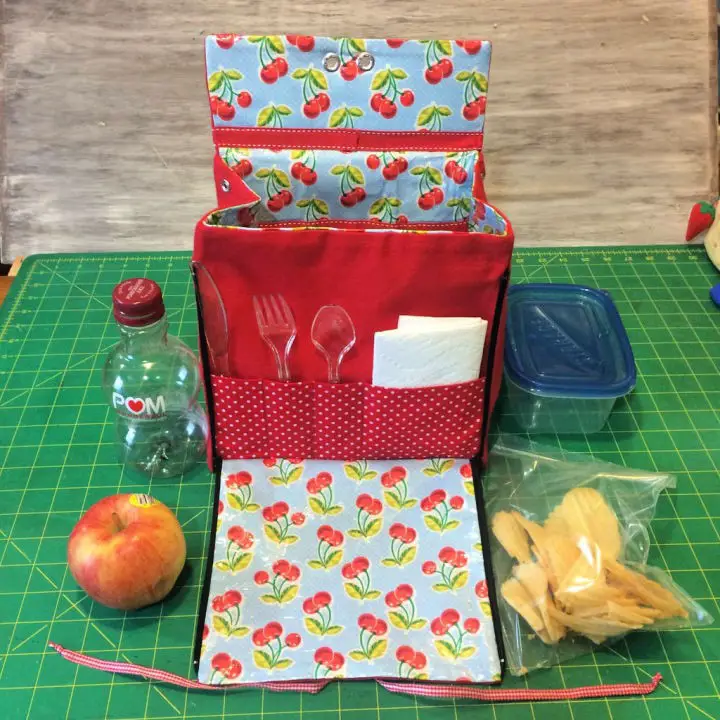
Transform your mealtime with a custom-made lunch bag that combines functionality and style. By following the step-by-step guide from Instructables, you can create a unique accessory that not only ensures cleanliness but also provides convenience during outdoor activities or work breaks. The innovative design features a vinyl-lined placemat and interior for effortless cleaning, accompanied by a built-in utensil pocket for organized storage of your essentials.
This DIY project is ideal for those who appreciate crafting their own accessories and offers a practical solution for carrying a satisfying lunch and snacks. With comprehensive instructions on materials and assembly, the bag can be easily collapsed for compact storage, making it an excellent choice for daily use or as a thoughtful gift.
Whether you’re sewing for personal use or looking to create a unique present, this tutorial provides a wealth of information to guide you in crafting a functional and stylish lunchtime companion.
How to Sew a Lunch Box Bag
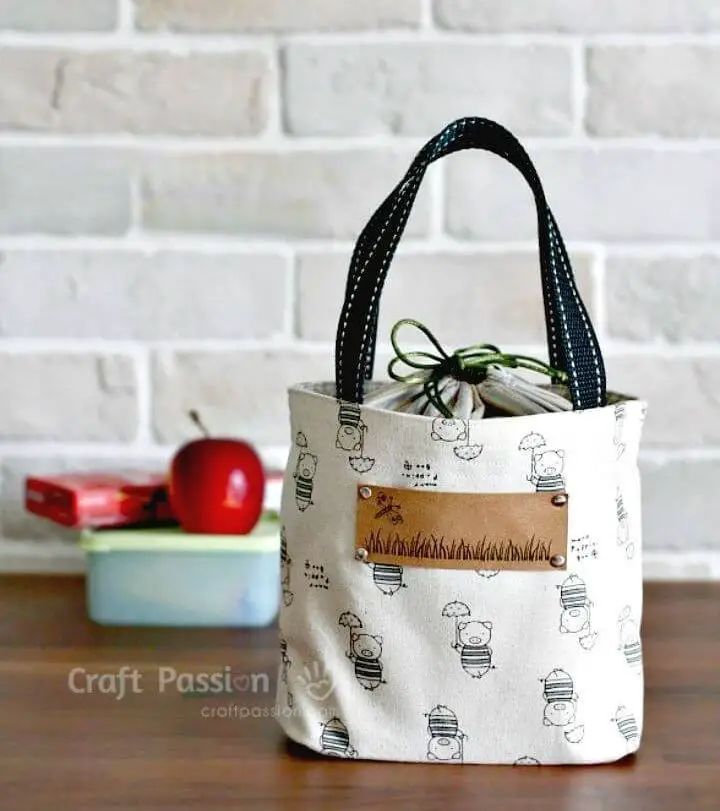
With Craft Passion’s step-by-step tutorial, creating a homemade lunch box bag has become an accessible DIY sewing project. The guide offers a free pattern and clear instructions for crafting a versatile bag with a unique drawstring cover, perfect for carrying lunches or small craft projects. This personal touch can be added to daily essentials without breaking the bank. Not only is the bag’s design practical, as it lays flat when not in use, saving storage space, but it also offers the option to add an insulated lining, transforming it into a thermal lunch carrier. By following this guide, you’ll gain the skills to sew a functional and stylish item that’s reusable, making it an ideal addition to your daily routine.
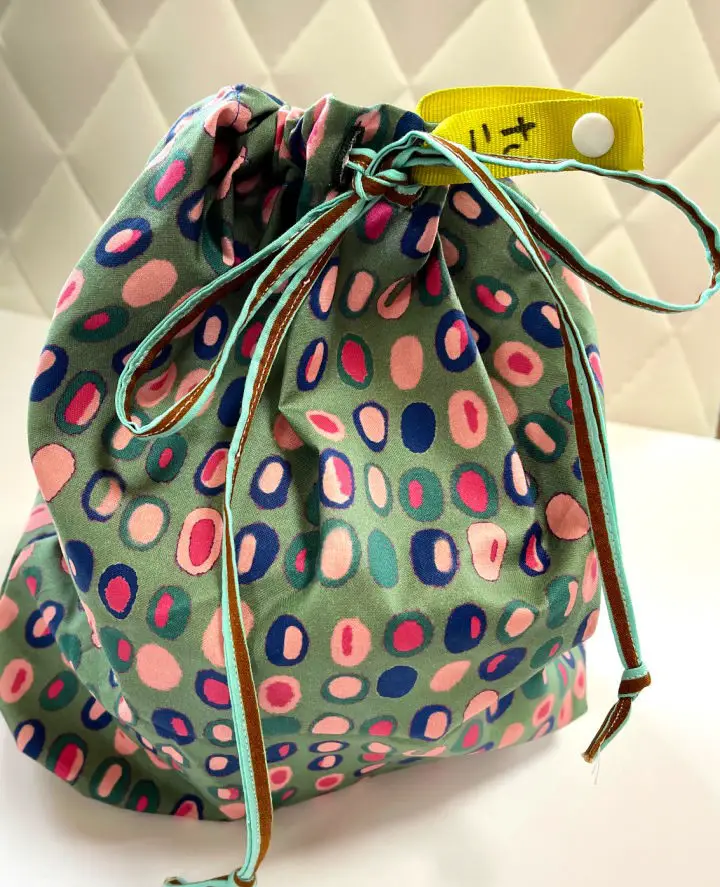
Drawstring Lunch Bag Sewing Pattern
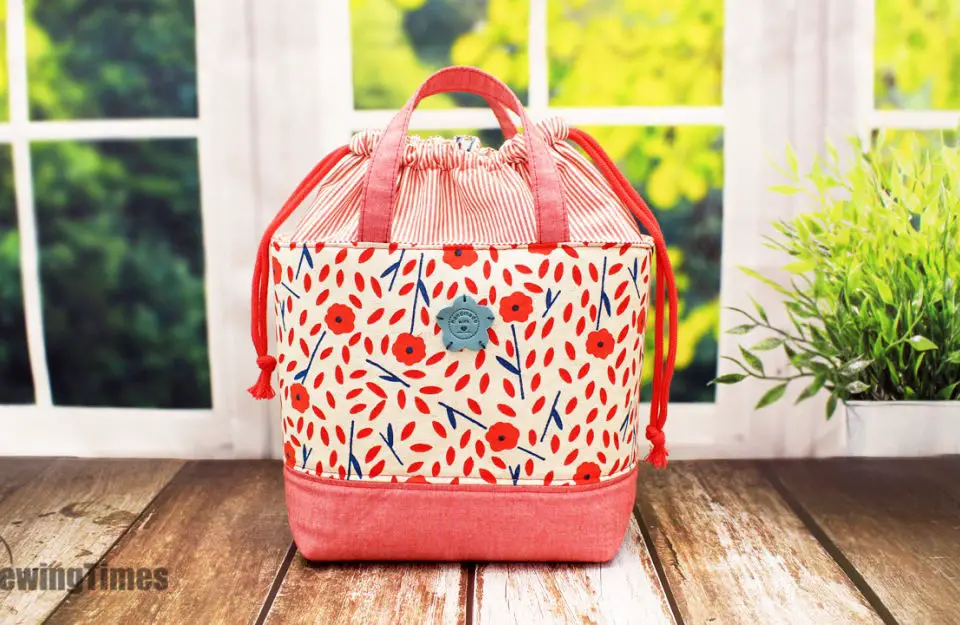
With Sewingtimesblog’s step-by-step guide, you can effortlessly create a charming DIY drawstring lunch bag perfect for daily use or as a unique project bag. This accessible tutorial breaks down the process into manageable steps, making it suitable for sewing enthusiasts of all levels. The clear and engaging instructions will guide you in crafting a practical accessory with approximate dimensions of 8⅜″ W × 8⅜″ H × 6″ D from the comfort of your own home. Whether you’re looking to add a handmade touch to your collection or showcase your skills and style, this DIY sewing project is an excellent choice. By following Sewingtimesblog’s tutorial, you’ll be able to create a custom lunch bag that reflects your personal touch.
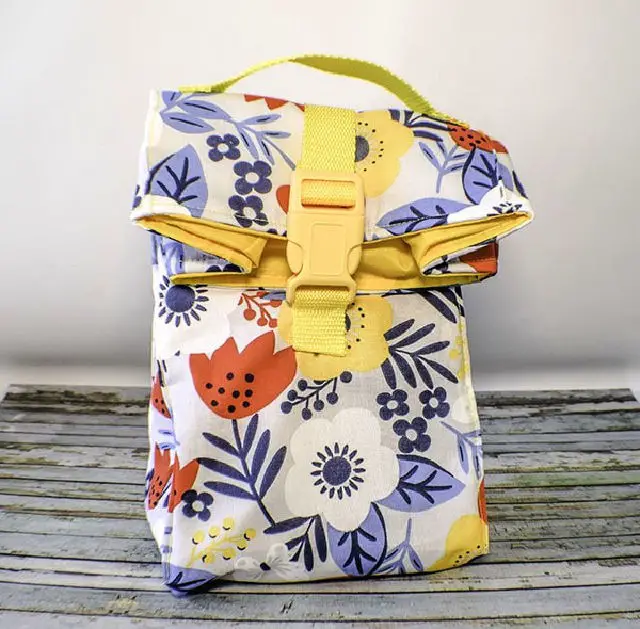
Sewing a Back to School Lunch Bag
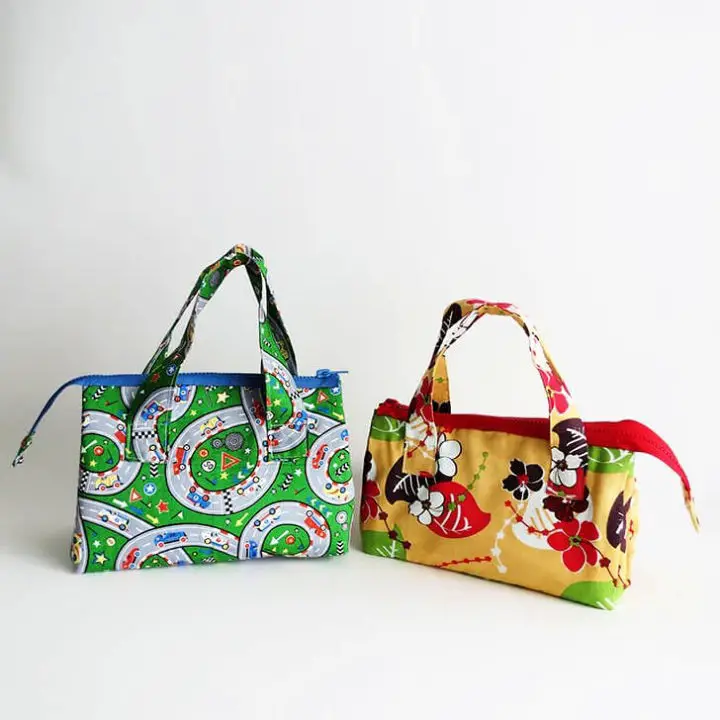
Create a delightful and functional lunch bag for your little ones with this step-by-step sewing guide from Dream a Little Bigger. Dive into crafting a one-of-a-kind masterpiece that will add a splash of personality to your child’s school day. You’ll require sturdy cotton fabric, interfacing for added strength if you choose a lighter material, a 12-inch zipper, and basic sewing essentials. The process involves constructing a simple bag shape from the fabric, adding a lining for extra durability, installing the zipper for smooth opening, and attaching handles for effortless carrying. With your imagination running wild, you can select vibrant patterns and colors to give the lunch bag a personalized touch. This project not only fosters creativity but also allows you to craft a special item for your kids that they’ll treasure during their lunchtime breaks.
Make Your Own Drawstring Lunch Bag
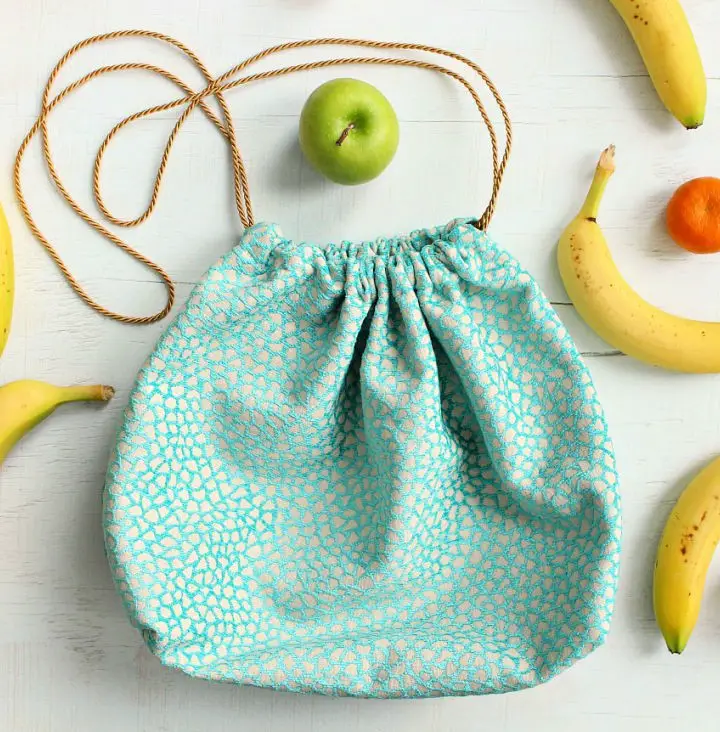
Dans le Lakehouse offers an inspiring DIY guide on crafting a one-of-a-kind drawstring lunch tote using materials you likely have on hand. By repurposing sturdy fabric, you can transform it into a spacious and collapsible lunch bag featuring a neat drawstring closure – perfect for carrying bulkier salad containers. The step-by-step instructions are designed to be easy to follow, complete with sewing tips and tricks to ensure a seamless crafting experience. With Tanya’s creative process as your guide, you can breathe new life into unused fabrics and create a personalized lunch bag that exudes handmade charm. This DIY project is perfect for elevating your lunchtime accessories and adding a touch of uniqueness to your daily routine.
DIY Reusable Lunch Bag at Home
Transform your road trips into a tidier experience by creating a versatile car trash bag that doubles as a reusable lunch bag or essential carrier. This straightforward DIY project requires minimal materials, including home decor weight fabric, medium-weigh fusible interfacing, and basic sewing tools. With clear instructions to guide you, you’ll be able to craft a durable and washable bag that keeps your vehicle clutter-free. Perfect for keeping wrappers, bottles, and other trash organized during long drives, this practical accessory also serves as a convenient companion for outdoor activities.
How to Make Your Own Lunch Bag
Gugu Guru’s DIY lunch bag tutorial is an exciting project for crafters looking to create a functional and stylish accessory that can be used by babies, toddlers, or even themselves. With a straightforward materials list and clear instructions, this zipper-enabled project is perfect for those with some sewing experience who want to take on a new challenge. The step-by-step guide ensures that anyone can confidently create a one-of-a-kind lunch bag using a combination of luxurious velvet and vibrant quilting cotton. Not only will it provide a cute container for food items, but it’ll also add a touch of elegance to your daily routine. Get ready to break out your sewing kit and head over to Gugu Guru for the full tutorial to elevate your crafting skills with this charming lunch bag.
Easy DIY Back to School Lunch Box

Starting the new school year is about more than just stocking up on supplies – it’s an opportunity to shake things up with fresh experiences and routines. One way to add some personality to your daily routine is by crafting a unique, insulated lunch box that not only looks great but also keeps your meals at the perfect temperature. At Dunn DIY, we’re here to guide you through the process of creating a stylish lunch tote that combines form and function. With step-by-step instructions and expert tips for working with various fabrics, our comprehensive guide is perfect for those with intermediate sewing skills looking for a challenging yet rewarding project. Whether you’re a crafty parent or student, this creative and practical endeavor promises to make lunchtime a more enjoyable experience.
Sewing Your Own Lunch Bag
Unleash your creativity and elevate your lunch game with Katie Kortman’s comprehensive guide on WeAllSew! This engaging tutorial takes you on a journey to craft a stunning Japanese-inspired bento lunch bag, complete with a drawstring closure and a practical napkin wrap. As you follow the step-by-step instructions, you’ll discover how to transform ordinary materials into extraordinary creations that will make your daily lunch routine a true delight. With its focus on clear explanations and valuable tips, this sewing project is designed to not only teach you new skills but also provide a unique and personalized touch to your homemade meals.
DIY Insulated Lunch Tote Bag

Embark on a creative journey with our comprehensive Insulated Lunch Tote Tutorial. This updated guide features enhanced clarity and additional insights, empowering you to craft a reliable and washable lunch tote from medium weight fabric, waterproof PUL, insulating Insul-Bright material, and a zipper. With meticulous instructions, learn to precision-cut, shape, and assemble your lunch tote, resulting in a functional yet stylish accessory for your daily meals. Whether used personally or gifted thoughtfully, this tutorial’s step-by-step process ensures the creation of a sturdy and visually appealing insulated lunch tote that will become an indispensable companion for years to come.
Sew a Reusable Insulated Lunch Bag
For eco-conscious individuals who value personal touches in their daily routine, crafting a reusable insulated lunch bag is an engaging DIY project. By following Sew Very Crafty’s step-by-step guide, you can create a stylish and functional lunch bag utilizing basic sewing techniques. This innovative design not only maintains the ideal temperature for your meals but also features a water-resistant construction thanks to the strategic use of ripstop nylon and Insul-Bright materials. Whether you’re headed to work or enjoying an outdoor picnic, this DIY insulated lunch bag serves as a practical accessory that’s sure to impress. As a perfect project for sewing enthusiasts who prioritize reducing their environmental impact, carefully follow the instructions, gather your materials, and relish the sense of accomplishment in crafting a one-of-a-kind lunch bag that reflects your unique style and commitment to sustainability.
How to Make Oilcloth Lunch Bag
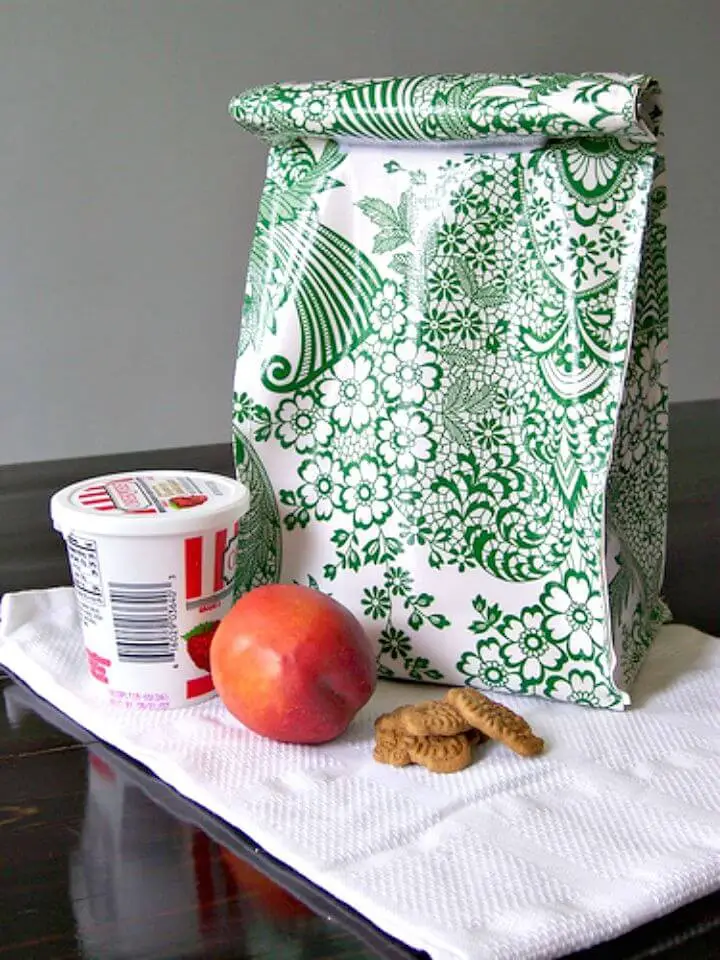
Crafting an oilcloth lunch bag is more than just a creative endeavor – it’s a sustainable way to make healthier, cost-effective meal choices. Say goodbye to pre-packaged cafeteria food and hello to homemade goodness! With our step-by-step guide, you’ll learn how to transform oilcloth into a durable and stylish lunch bag featuring a Velcro closure that keeps your snacks secure. Using simple sewing techniques and common household materials like thin batting and a shower curtain for lining, you’ll be able to create a custom lunch bag that’s as functional as it is chic. Whether you’re packing lunches for school or the office, this eco-friendly bag will keep your meals fresh and waste to a minimum. Join us as we show you how to make a lunch bag that’s both practical and stylish – a perfect addition to your environmentally friendly lifestyle.
Colorful DIY Decorated Lunch Bag

Transform your plain lunchtime style with Sarah Hearts’ innovative DIY guide on decorating a store-bought lunch bag. This easy-to-follow tutorial empowers you to turn an ordinary accessory into a show-stopping, personalized statement piece that showcases your unique flair. To get started, gather basic materials like metallic iron-on letters, vibrant heat transfer vinyl, and a compact iron. Cut the vinyl into geometric shapes or whimsical designs and apply them using the mini iron for a distinctive touch. Add a personal touch with the letter patches by inserting your name or a playful phrase – voilà! You’ll have created a truly one-of-a-kind lunch bag that will never get mistaken again. This engaging crafting project is perfect for anyone seeking to inject some personality into their daily routine.
Simple and Easy Button Lunch Bag
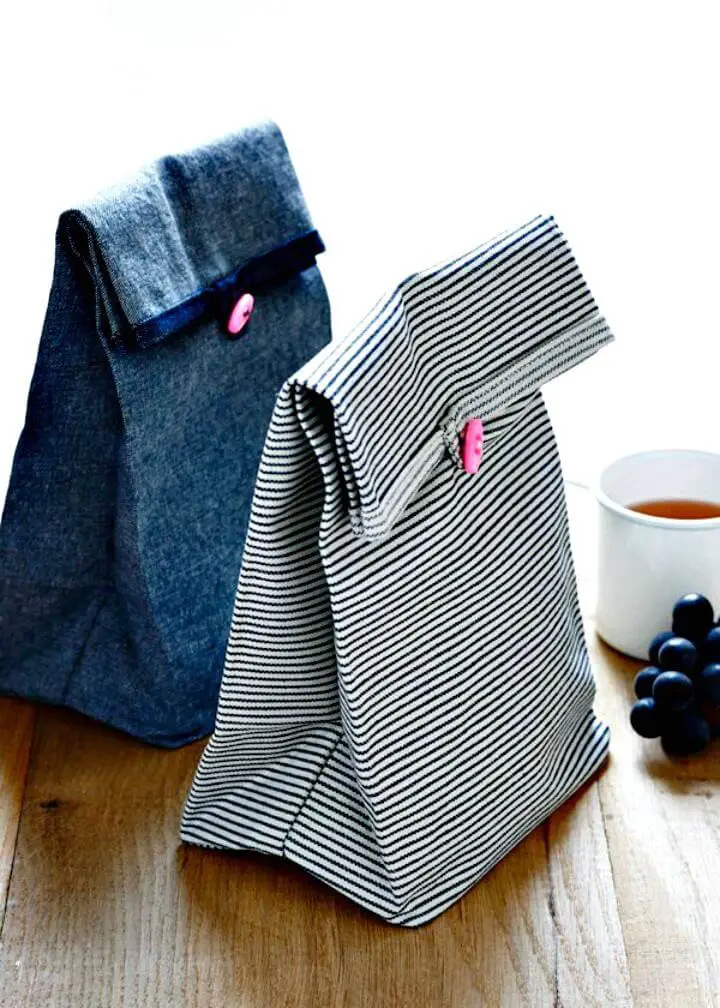
As the seasons transition to autumn’s crispness, Purl Soho invites you to craft a unique project that adds personal flair to daily routines. Their Button Lunch Bags offer a charming solution for anyone seeking to infuse their daily meals with warmth and style. Constructed from durable cotton and secured by a quaint button, these homemade bags are not only practical but also easy to clean. The pattern is meticulously detailed, guiding you through each step with clarity, making it accessible to sewers of all skill levels. To get started, gather your materials: fabric, matching bias tape, thread, and an oblong button. Let the joy of sewing guide you towards a sustainable and stylish lunchtime experience.
Homemade Quilted Lunch Bag
Embarking on a sewing project to create a quilted lunch bag for your kids is not only an engaging way to spend quality time together, but it also yields a practical and charming accessory for their daily routine. By following Sewing.com’s comprehensive guide, you’ll effortlessly navigate the process from selecting fabrics to attaching straps, resulting in a sturdy and stylish lunch bag that reflects your personal touch. The step-by-step instructions, coupled with valuable tips such as employing basting spray to secure layers and pressing seams for seamless assembly, will ensure a rewarding crafting experience. Your kids will be thrilled with their one-of-a-kind lunch bag, while you’ll also contribute to a more eco-friendly approach by reducing waste from disposable bags.
Conclusion:
As we conclude our in-depth exploration of 15 free DIY lunch bag patterns to sew, it’s clear that the comprehensive guide provided will empower you to craft a one-of-a-kind, sustainable lunch bag that perfectly balances functionality with style. From selecting the ideal materials to navigating the construction process, customization ideas and troubleshooting common issues, every aspect is meticulously covered to ensure your creation not only thrives but also reflects your unique personality and lifestyle. To further optimize its lifespan, don’t overlook the importance of proper maintenance and care. With these patterns and expert advice, you’re now equipped to produce a lunch bag that effortlessly blends form with function, while proudly showcasing your commitment to eco-friendliness. Happy sewing!
