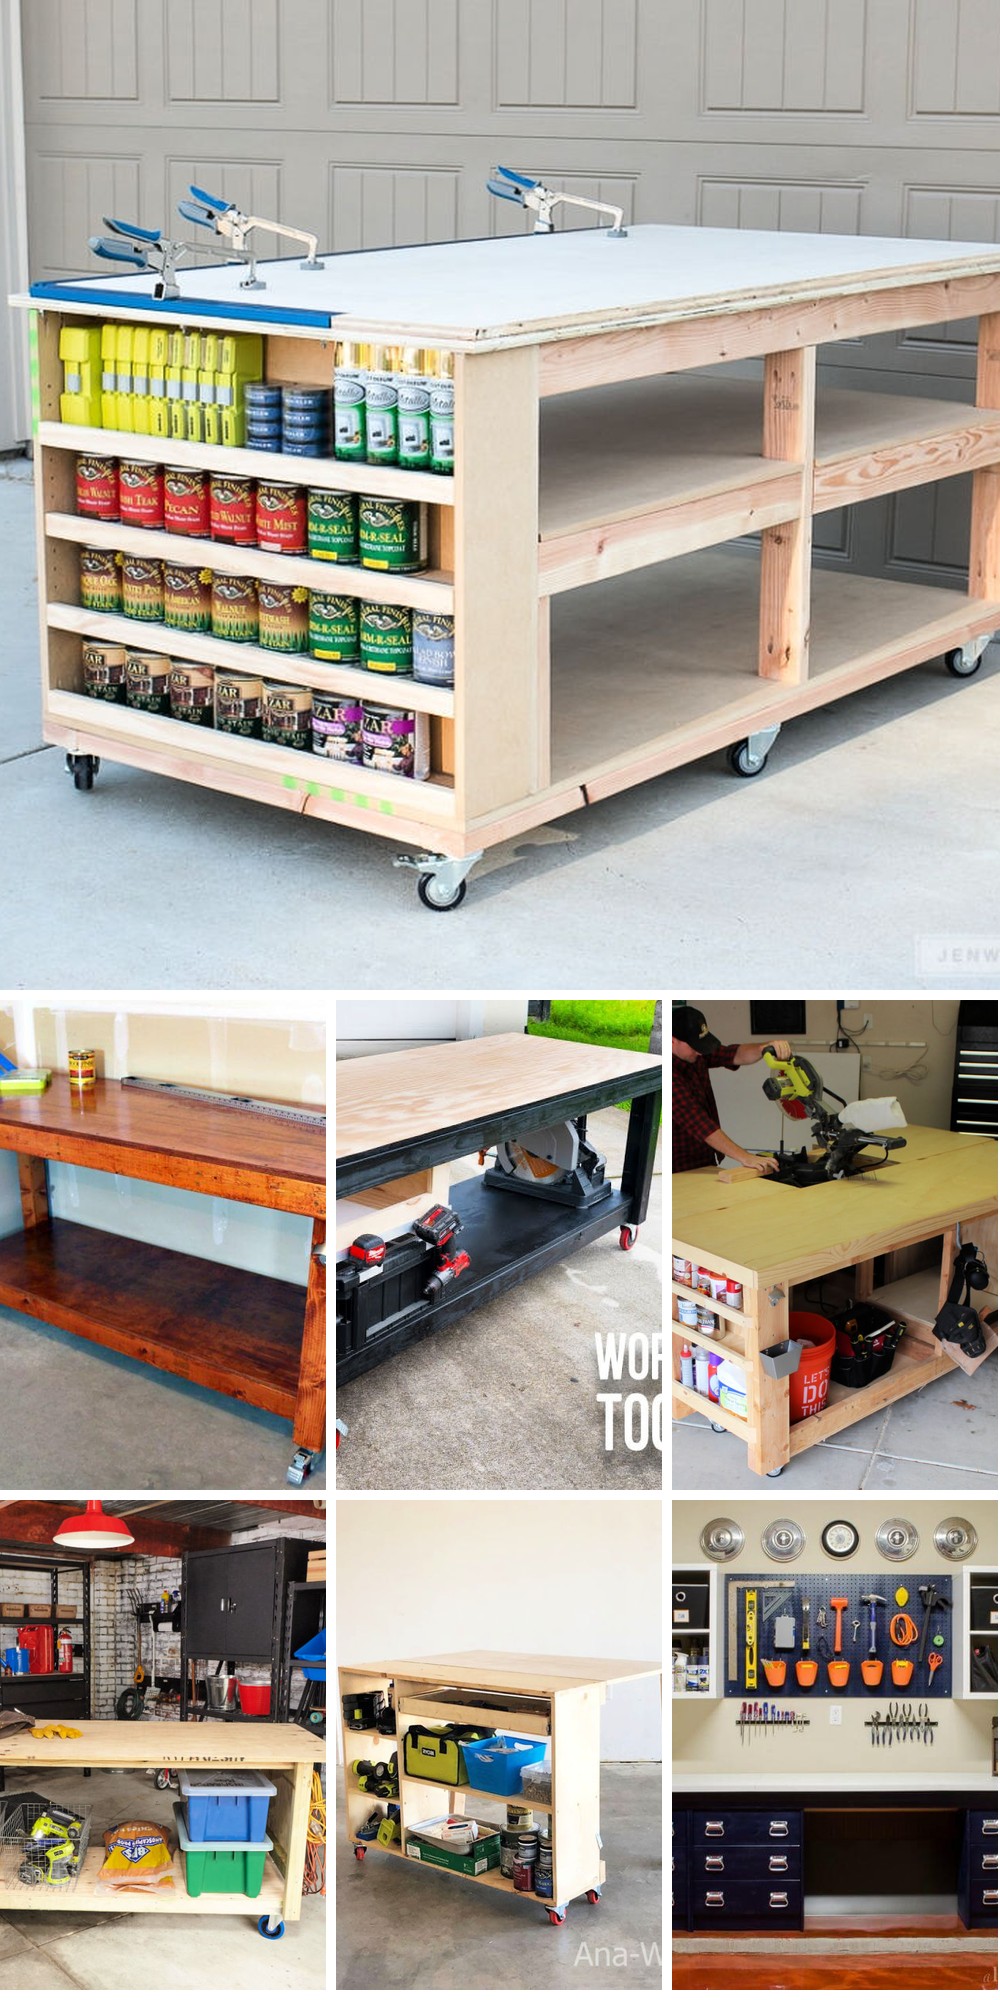
Crafting a DIY workbench is more than just a physical space; it’s about creating an environment that sparks creativity and maximizes efficiency. With our extensive collection of 40 free DIY workbench plans, we aim to empower you with the skills and expertise needed to build a workspace tailored to your unique needs and preferences. This curated selection caters to various skill levels and workshop areas, ensuring that every individual can find a plan that resonates with their vision and work style. As we delve into this comprehensive guide, you’ll discover the essential steps from materials selection to step-by-step instructions that bring your workbench to life. From lumber cutting to finishing touches, each phase is designed to simplify the process, making it accessible to DIY enthusiasts of all levels. Additionally, expert tips on incorporating storage, mobility, and customization will help enhance your workbench’s functionality, allowing you to maximize your productivity and stand out from the crowd. Join us as we lay the groundwork for a workspace that not only serves your needs but also amplifies your creative potential.
Why Build Your Own DIY Workbench?
When it comes to building a DIY workbench, many people are deterred by the perceived complexity of the project. However, the benefits of creating one far outweigh the initial uncertainty. In reality, constructing your own workbench offers numerous advantages that make it a worthwhile endeavor.One of the most significant perks is cost-effectiveness. By taking charge of materials and design, you can significantly reduce expenses compared to purchasing a pre-made workbench. This not only saves you money but also allows you to allocate funds towards other essential tools or projects.Customization is another major advantage. As every DIYer has unique requirements based on the projects they undertake, building your own workbench enables you to tailor it to fit your specific needs. You can adjust the size, height, and storage options to create a perfect match for your workspace.Moreover, embarking on this project allows you to develop valuable woodworking and construction skills. Whether you’re a beginner or an experienced DIYer, this project offers an excellent opportunity to learn new techniques and tackle new challenges.When you build your own workbench, you also gain quality control. With the ability to choose the materials and construction methods, you can ensure a more durable and reliable workbench than some mass-produced options.Perhaps most importantly, building a DIY workbench provides a unique sense of satisfaction and pride that comes with creating something with your own hands. Every time you use your workbench, you’ll be reminded of your hard work and creativity, making it a truly rewarding addition to your workshop.Finally, having a workbench you’ve built yourself makes it easier to modify or add features down the line, making it a highly adaptable piece in your workspace.
How to Make A Workbench
A custom-built workbench offers a satisfying experience, plus it provides a tailored space for all your DIY projects. This straightforward guide will walk you through the process of constructing a sturdy and practical workbench, allowing you to tackle woodworking or other DIY endeavors with greater ease and efficiency. By following these steps, you’ll be able to create a workspace that is uniquely suited to your needs and preferences.
What You’ll Need
To bring your DIY shelving project to life, you’ll need a solid foundation of essential tools and materials. Start by gathering the following essentials: high-quality 2×4 construction lumber for framing, plywood sheets for the top and lower shelf, and pocket hole jig and screws for secure joinery. Don’t forget wood glue to reinforce your joints, as well as a reliable drill and screwdriver for driving those screws home. A speed square will come in handy when ensuring accurate cuts, while a miter saw is perfect for making precise angled cuts. If you’re feeling ambitious, consider adding a router (optional) to create decorative edges or profiles. When it comes time to smooth out your work, sandpaper will be your trusted sidekick. Finally, don’t overlook the importance of casters and clamps – the former will keep your shelves mobile and easy to move, while the latter will help you secure your pieces in place as you work. And, of course, a measuring tape is always handy for double-checking your measurements.
Step 1: Cutting the Lumber
To get started, ensure precision in your initial steps by accurately cutting your 2×4 lumber into the required lengths for the legs and frame of your workbench. The quality of these cuts will have a direct impact on the overall structure and functionality of your final product.
Step 2: Assembling the Frame
To achieve a seamless joint, utilize a pocket hole jig to discreetly place screw holes in your project’s components. This technique effectively conceals fasteners, resulting in a visually appealing outcome. Assemble the frame by attaching the pieces with screws, prioritizing squareness throughout the process.
Step 3: The Legs
To ensure a stable and level foundation, start by preparing your legs by drilling precise pocket holes in the required components. Assemble these pieces with care, verifying that they are sturdy and evenly aligned to prevent any wobbling or instability.
Step 4: Attaching the Frame to the Legs
To construct a sturdy foundation, start by securing the legs to the frame using your designated workspace as a reference point for maintaining flatness. Ensure precision by employing a speed square to guarantee accurate alignment.
Step 5: Additional Framing for Storage
To enhance the functionality of your workbench, consider adding supplementary framing to the underside for a secondary shelving system. This newly created space can serve as an ideal location for storing tools and materials, thereby maintaining a clutter-free workspace.
Step 6: Strengthening the Legs
When it comes to adding casters to your furniture or equipment, you’ll want to make sure the legs are sturdy enough to support the added weight and movement. One simple solution is to attach a small piece of plywood at the base of each leg, creating a flat surface for mounting the casters. This will provide a stable foundation that can handle the stress and strain caused by the added mobility.
Step 7: Adding the Top
When preparing the workbench top, ensure you cut the plywood to a size slightly larger than the frame dimensions to accommodate any potential imperfections in the lumber. To maintain a clean and professional appearance, secure the top with brackets or screws from underneath, rather than visible screws on the surface.
Step 8: Tool Storage and Accessories
To enhance your workshop’s productivity and organization, consider incorporating a built-in tool holder beneath the workbench surface. This thoughtful addition enables seamless clearing of the workspace or secure storage of tools as you work, streamlining your workflow and minimizing clutter.
Step 9: Finishing Touches
When it comes to completing your workbench, safety and aesthetics are crucial considerations. To ensure a safe and smooth working surface, make sure to sand all edges thoroughly. Additionally, you may want to take your project to the next level by applying a coat of paint or sealant. This not only protects the wood from damage but also gives it a professional-looking finish.
Adding Mobility and Versatility
Transform your workbench into a versatile and portable workspace by attaching casters to the bottom of each leg. This simple modification grants you the freedom to effortlessly relocate your workbench within your workshop, garage, or even across different rooms, allowing for greater flexibility and convenience in your DIY projects.
Video Tutorial
The accompanying video tutorial on YouTube offers a step-by-step visual guide to building a DIY Workbench. This comprehensive resource seamlessly complements our written guide, enabling you to follow along as the techniques are demonstrated and providing a clear understanding of the entire process from initial setup to final assembly.
Conclusion
To elevate the efficiency and organization of your workspace, building a custom workbench is an excellent endeavor. By carefully following these guidelines, you can create a sturdy, functional, and tailored workbench that addresses your unique needs. Take a methodical approach, double-checking measurements before cutting, and soon you’ll possess a reliable workbench companion for all your DIY endeavors.
DIY Workbench Plans FAQs
Creating a DIY workbench offers a fulfilling experience, allowing you to design a personalized space that meets your unique requirements. As you embark on this project, it’s natural to have questions. To ease your journey, here are some of the most frequently asked queries related to building a DIY workbench:
What materials do I need to build a DIY workbench?
To build a sturdy and functional storage cabinet, you’ll need to gather the following essential materials: 2×4 construction lumber for the frame, plywood for the top and lower shelf, and pocket hole screws for secure assembly. Additionally, wood glue will be necessary for bonding joints together. You’ll also require a drill and screwdriver for driving screws, as well as a speed square to ensure accurate cuts with your miter saw or router (if you choose to add crown molding or other decorative elements). Sandpaper will come in handy for smoothing out any rough edges or splinters. Finally, casters (optional) and clamps will allow for easy mobility and precise adjustments during the building process. Don’t forget to have a measuring tape on hand to take accurate measurements and double-check your work as you go.
How do I choose the right size for my workbench?
When planning your workspace, consider the dimensions that will best accommodate your needs and projects. Leave sufficient clearance around the workbench to ensure comfortable movement. While a typical size might be approximately 60 inches in length by 30 inches in width, feel free to adjust this accordingly based on your unique requirements and preferences.
Can I add storage to my workbench?
One effective approach to maintaining tool and material organization is by incorporating additional storage solutions. This can be achieved by installing a lower shelf specifically designed for holding larger items, as well as incorporating drawers or a pegboard for storing smaller tools and accessories.
How do I make my workbench mobile?
Securely fasten casters to the legs of your workbench, ensuring they’re equipped with a locking mechanism that allows you to stabilize the workbench during usage. This simple step is crucial in maintaining the overall integrity and functionality of your workspace.
What is the best height for a workbench?
For optimal functionality, the ideal height of a workbench depends on individual factors such as personal stature and specific job requirements. As a rough guideline, it’s recommended that the work surface be positioned at wrist level when standing. This tends to fall within the range of 34 to 38 inches for most individuals, allowing for comfortable working conditions.
How can I make my workbench more durable?
When it comes to constructing your wooden surface, prioritizing high-quality, sturdy materials is essential. To further enhance its longevity, consider applying a protective finish that shields the wood from moisture and wear. Additionally, opting for thicker plywood for the top or incorporating a hardboard layer can significantly increase the durability of the material.
Is it possible to build a workbench if I’m a beginner?
Starting with a fundamental project like building a workbench is an excellent way to kick-start your woodworking journey. Not only do you get to hone your skills, but you’ll also create a functional piece of furniture that can elevate your workspace experience. With careful attention to detail and patience, even beginners can successfully complete this project.
How can I ensure my workbench is stable?
To guarantee stability, ensure that all joints on your workbench are securely fastened. Additionally, consider reinforcing the legs with diagonal braces for added support. Furthermore, if you’re working on an uneven floor, incorporate adjustable feet into your design to maintain a consistent and level surface.
Can I modify a workbench plan to fit my needs?
While traditional workbench plans can be modified to accommodate unique requirements, the true value lies in creating a custom-built space that reflects an individual’s distinct needs and abilities. This may involve scaling up or down, incorporating additional storage solutions, or integrating specialized features such as vises or power strips. Ultimately, building a DIY workbench is not merely about constructing a piece of furniture; it’s about crafting a workspace that fuels creativity, drives productivity, and serves as a reflection of one’s skills and expertise.
40 Free DIY Workbench Plans and Designs
Get ready to transform your workspace with a custom-built workbench, all thanks to our vast collection of 40 free DIY workbench plans and designs. This comprehensive guide is packed with step-by-step instructions that will walk you through the process of creating your dream workbench from scratch.
Make a Kids Workbench With Tool Storage
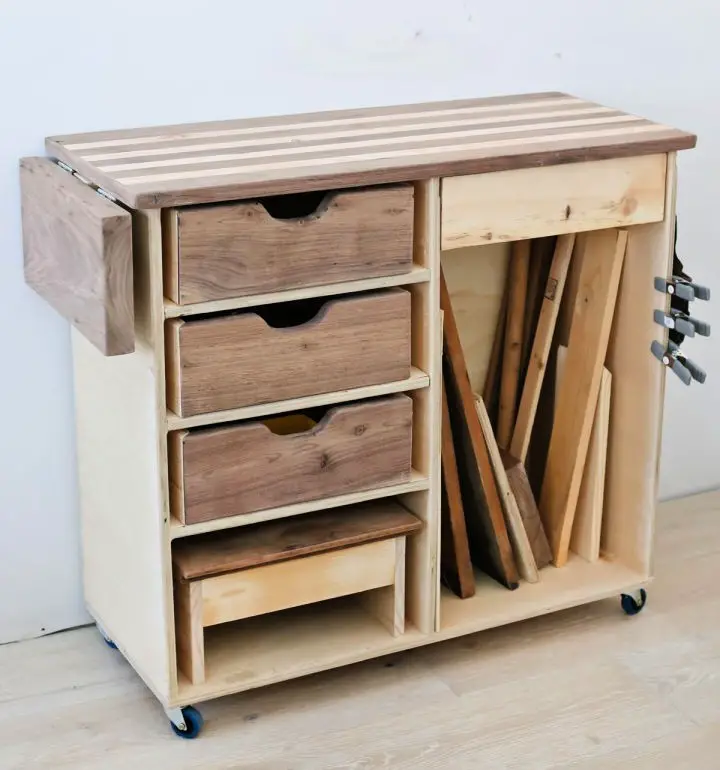
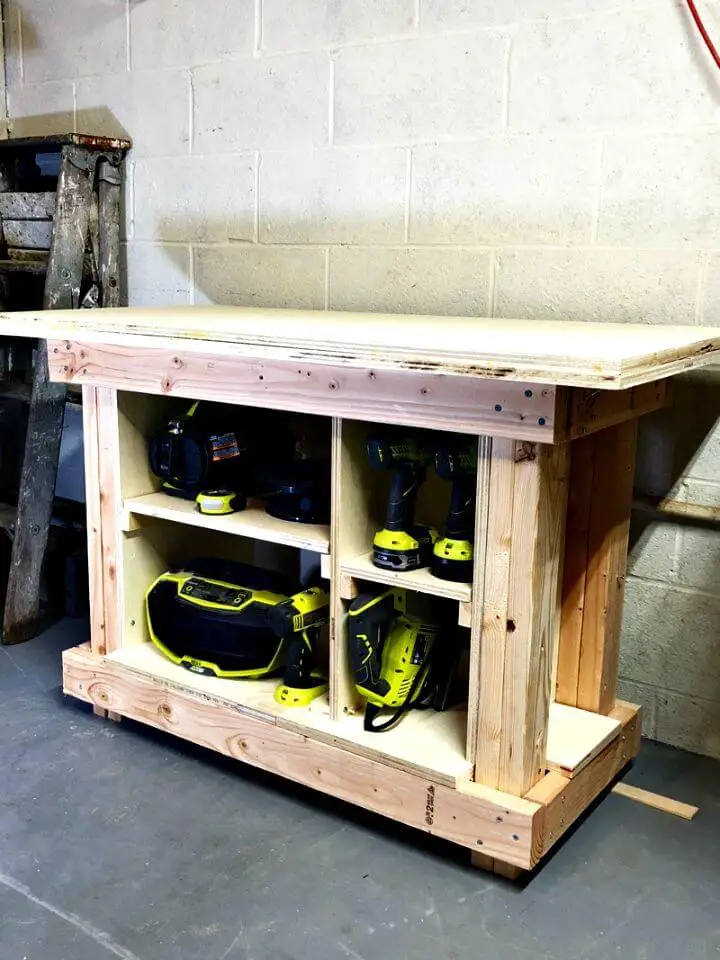
Unleash your child’s inner inventor by creating a bespoke Kids Workbench with built-in tool storage! This innovative DIY project from Tidbits offers a unique way to introduce young minds to the world of crafting and hands-on learning, while keeping adult tools out of reach.
By following simple, step-by-step instructions, you can provide your child with a dedicated workspace that fosters creativity and self-expression. Our comprehensive guide includes free building plans, expert tips on selecting age-appropriate tools, and essential safety guidelines.
As your child grows and becomes more skilled, their workbench will evolve alongside them, providing a constant source of inspiration and storage for all their creative endeavors.
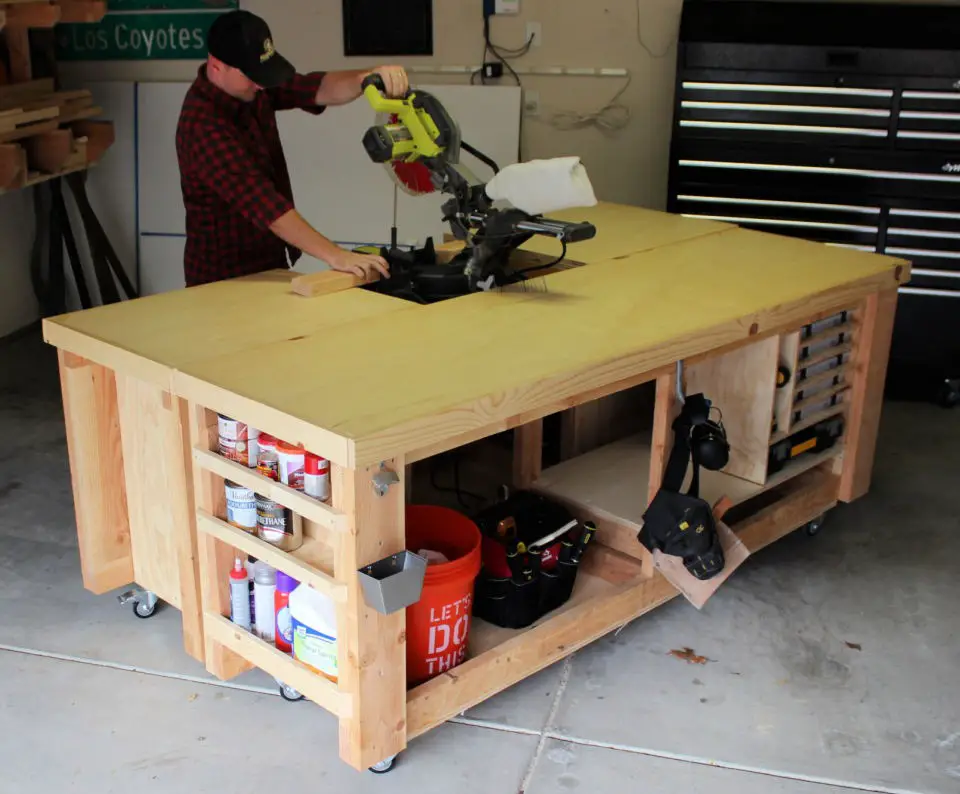
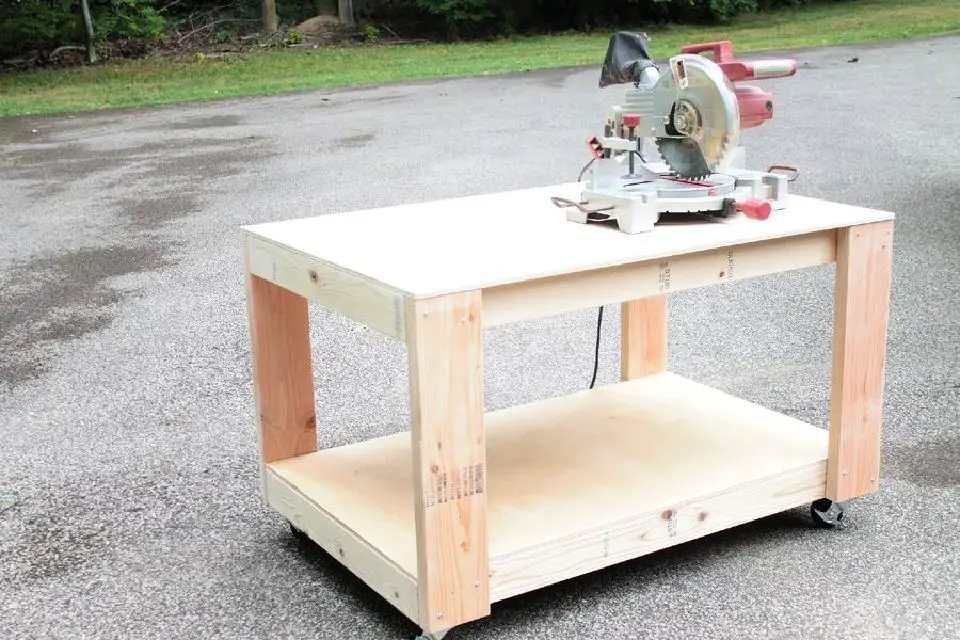
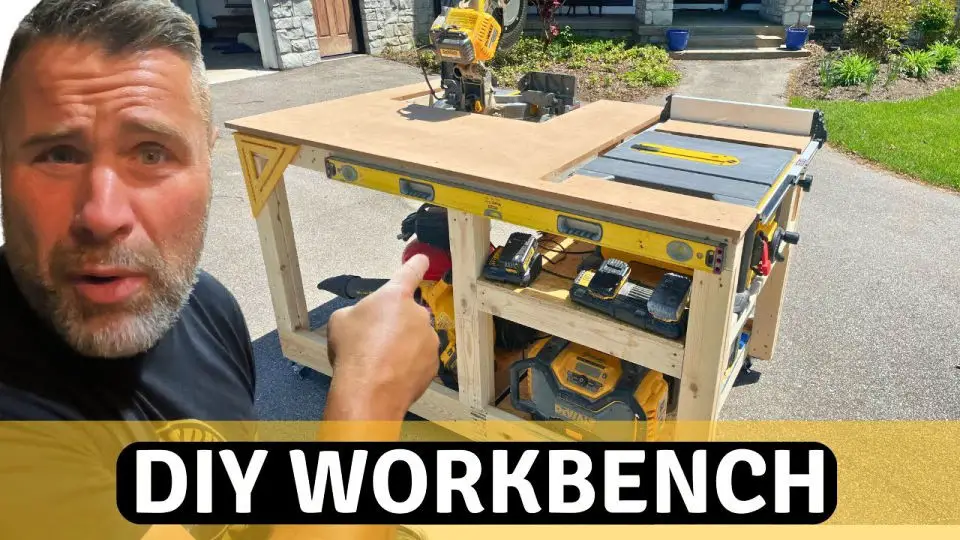
DIY Mobile Workbench With Table Saw
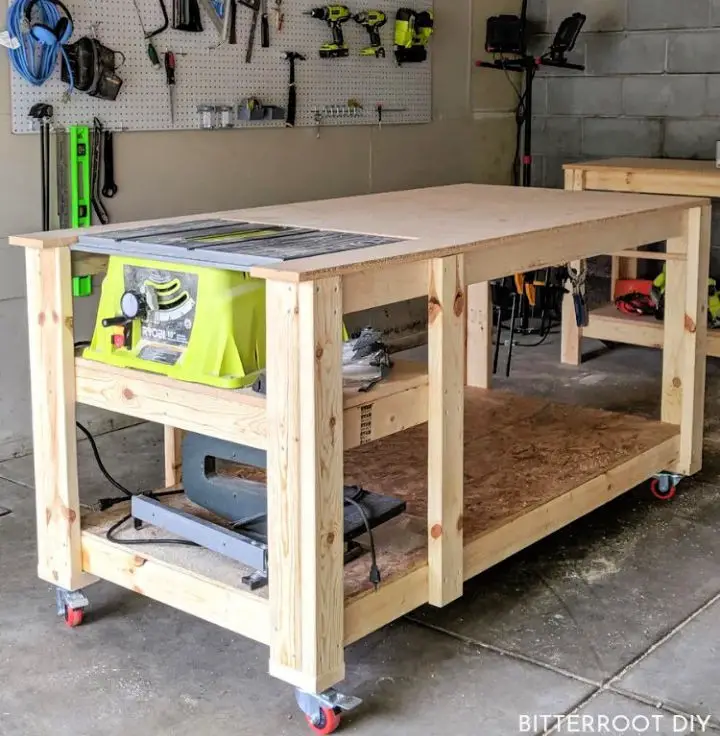
Transform your workspace with a custom DIY mobile workbench designed to optimize your shop area while maintaining functionality. This versatile workbench combines an out-feed table for your saw with a robust work surface, perfect for those aiming to streamline their workflow. To take it to the next level, incorporate innovative MicroJig dovetail clamps and follow step-by-step instructions from Tylynn M. to enhance your workbench’s capabilities.
Homemade Heavy Duty Workbench
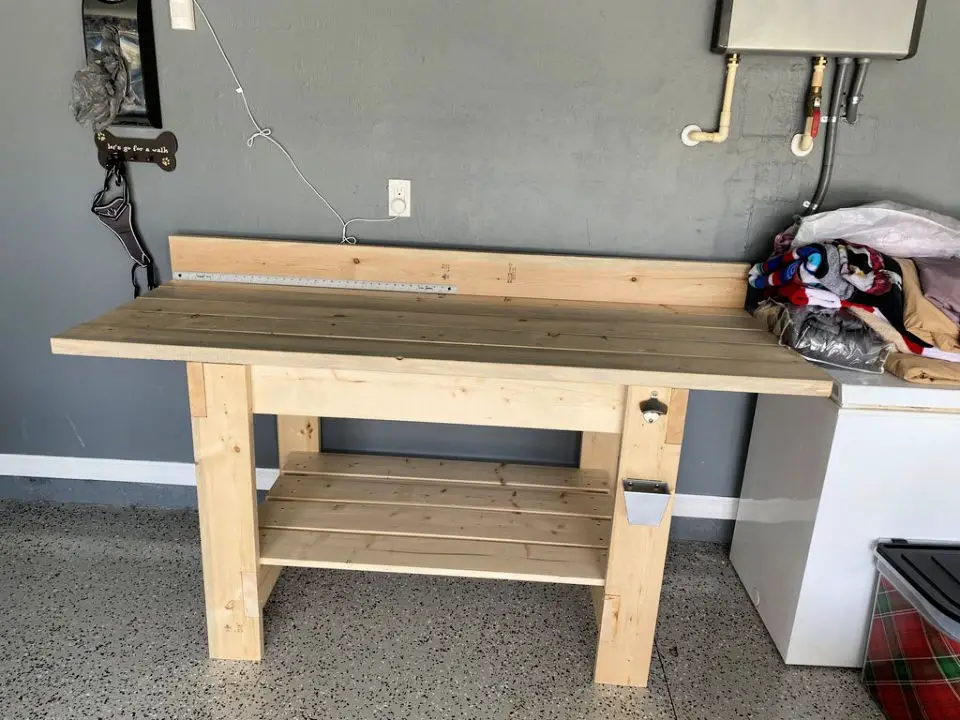
If you’re looking to create a robust workbench that can withstand the demands of heavy-duty projects and the test of time, we’ve discovered an outstanding guide for constructing a reliable and affordable bench. This comprehensive guide takes you through every stage, from cutting the initial pieces for the benchtop to assembling the sides and installing the finishing touches. You’ll gain access to a precise list of required tools and materials, including 2×6 and 1×6 boards, wood glue, and screws, ensuring that everything is within reach. For a step-by-step walkthrough on building your own heavy-duty workbench, follow this link. This afternoon project promises a lifetime of reliable use, so there’s no need to wait – start building and savor the satisfaction of crafting something both functional and impressive.
DIY Simpson Strong Tie Workbench
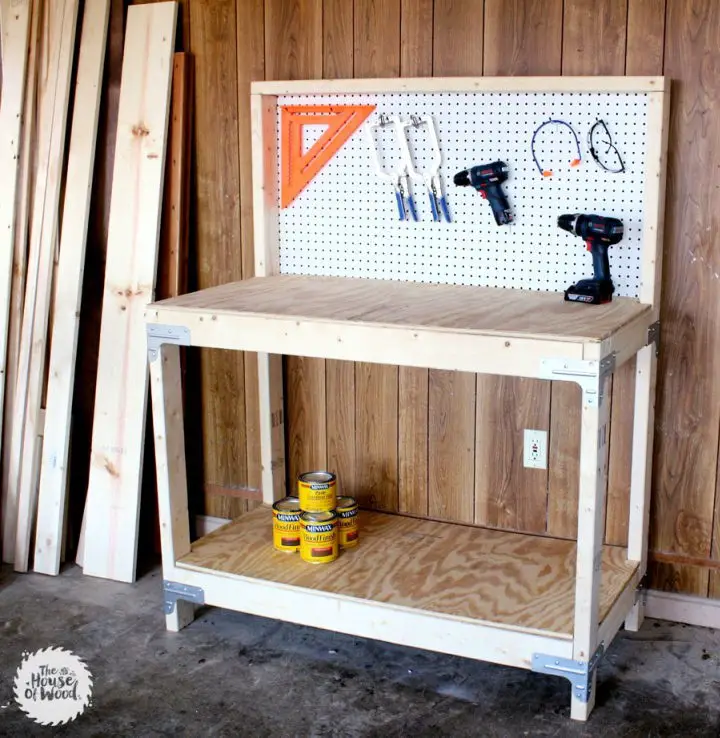
Reinvent your workspace with a DIY workbench that’s as unique as you are! The Simpson Strong-Tie Workbench Kit makes building a custom workstation easier than ever, freeing up your creative energy to focus on the fun stuff. With step-by-step guidance and innovative self-tapping screws that eliminate the need for pre-drilling, you’ll be whipping up projects in no time. Whether you’re a seasoned pro or just starting out, this kit’s adaptability and durability will keep you inspired and productive. Check it out and see how DIY Workbench mastermind Jen Woodhouse brings her vision to life!
How to Make a Folding Workbench
Experience the versatility of Ana White’s Folding Workbench, designed to accommodate even the most limited workspace needs. With a compact footprint of just 4 square feet, it effortlessly expands to provide a spacious 12 square foot working area. Its slender frame cleverly incorporates storage for essential tools, keeping them within easy reach and minimizing clutter. Perfect for occasional projects or those with space constraints, this innovative solution maximizes efficiency without sacrificing functionality. For a seamless transition into your work routine, follow Ana White’s comprehensive step-by-step plans to create this user-friendly project today, transforming your workspace into an organized haven that sparks creativity.
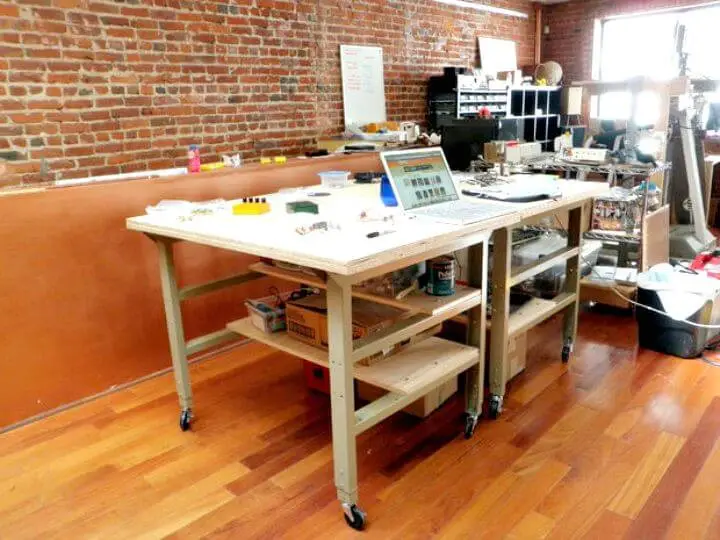
Mobile and Modular Workbench Ideas
Transform your workshop with a DIY mobile and modular workbench that adapts to any project’s unique demands. This innovative foundation offers unparalleled flexibility, size adjustability, and customizable tool integration, making it an indispensable asset for optimizing your workspace. Whether you’re working on large materials or requiring easy mobility, this versatile workbench has got you covered. By following the detailed plans, material lists, and step-by-step instructions available at Gadgets and Grain, you can turn your shop into a high-performance haven that streamlines setup, boosts storage capacity, and maintains exceptional quality.
DIY Portable Workbench at Home
Elevate your DIY projects with a custom-built portable workbench from Bunnings Australia, designed for unmatched strength and convenience. This comprehensive guide accompanies the workbench, providing step-by-step instructions to create a sturdy, mobile workspace with ample storage. Ideal for transforming your home workshop, it seamlessly integrates tools and equipment on a robust platform. By adding lockable wheels, this portable powerhouse ensures stability during use, allowing you to move your set-up effortlessly. Begin your next project with a solid foundation by investing in this game-changing workbench.
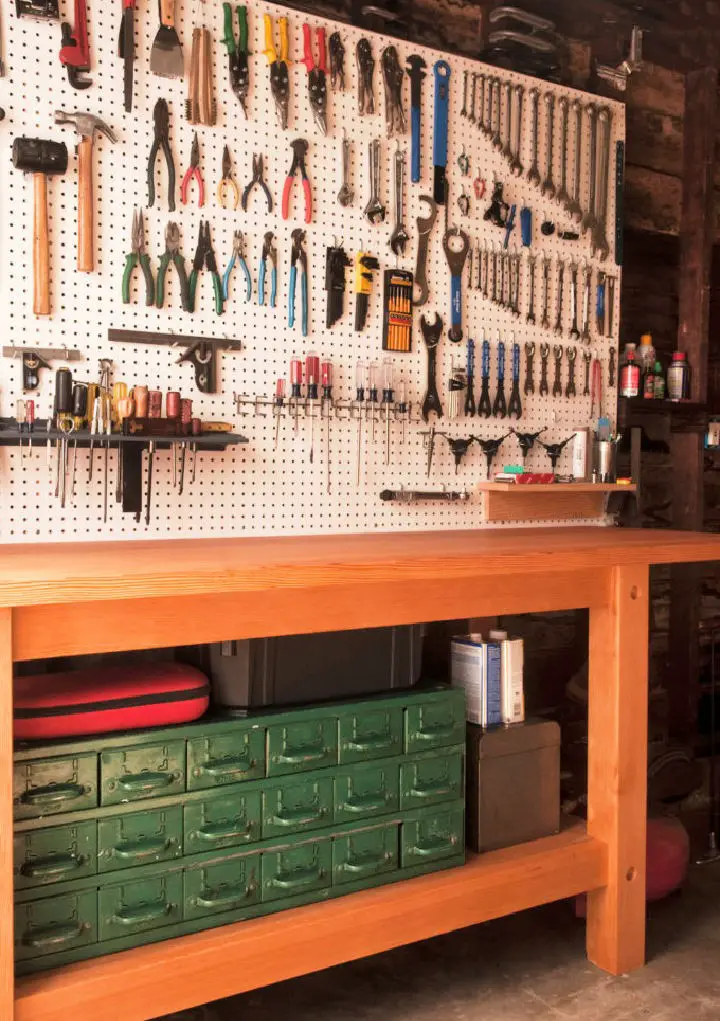
How to Make Your Own Sturdy Workbench

If you’re embarking on a DIY journey, having a reliable workbench is crucial for the success of your projects. The good news is that building one doesn’t have to break the bank or be overly complicated. Start with basic materials like house framing pine and construction ply to lay the foundation for all your future endeavors. While it may not be complete without upgrades like a pegboard or vise, start with the fundamentals to ensure a solid base for your DIY adventures. For a comprehensive guide on tools and materials required, visit DIY For Knuckleheads. Create this essential workbench this weekend – a simple, affordable, and efficient solution that will serve you well in the long run.
DIY Low Workbench – Step by Step Instructions
Transform your workspace into a productive hub with a custom-designed low workbench, perfect for cramped areas like sheds or basements. By following Jaime Costiglio’s free plans and step-by-step guide on his website, you can create a 30-inch high workbench that maximizes storage and stability. The sturdy 4×4 legs and spacious 36-inch by 72-inch top of this project make it an essential addition to any craftsperson’s workshop, allowing them to optimize their workspace and achieve greater efficiency.
Making a Workbench With Retractile Wheels
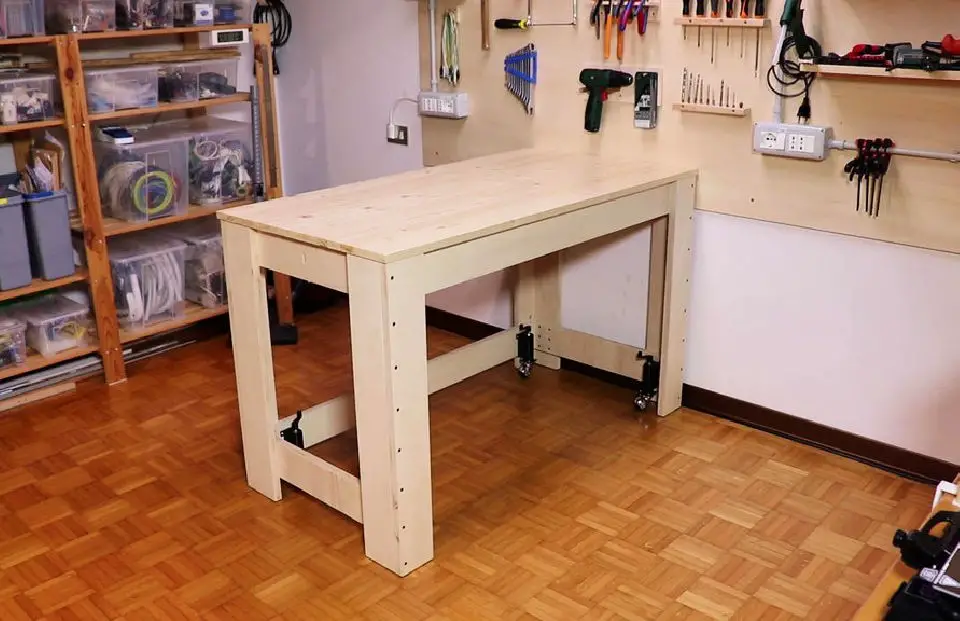
Elevate your workshop game with a DIY workbench boasting retractile wheels, engineered for unmatched stability and portability. This space-saving project requires minimal tools and expertise, making it perfect for cramped workshops or beginners. The clever wheel system allows effortless movement, transforming the bench into a solid working surface when needed. Constructed from durable plywood and glulam fir, this budget-friendly marvel offers a robust and adaptable workspace solution for creative enthusiasts seeking flexibility. Start building your dream workbench with ease by following the comprehensive step-by-step guide on Instructables.
Super Sturdy and Sleek Styled Basic Workbench
Get ready to elevate your DIY game with the Easy Build Workbench, a cutting-edge solution designed specifically for enthusiasts who demand a reliable and adaptable working station. Its streamlined design effortlessly balances durability and flexibility, allowing you to customize your setup according to your specific needs. The workbench’s modular nature makes it an ideal companion for any space, transforming it into a dynamic workshop that follows your creative journey wherever it may take you.
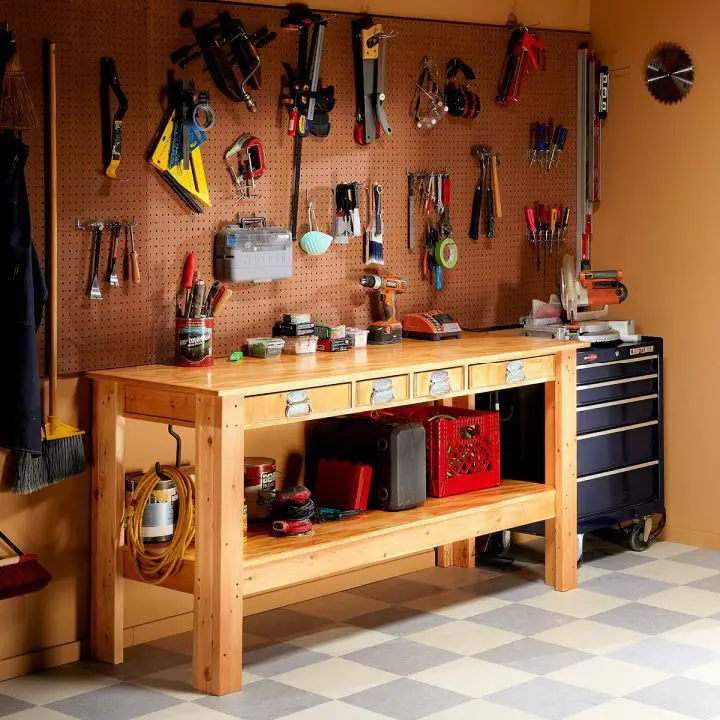
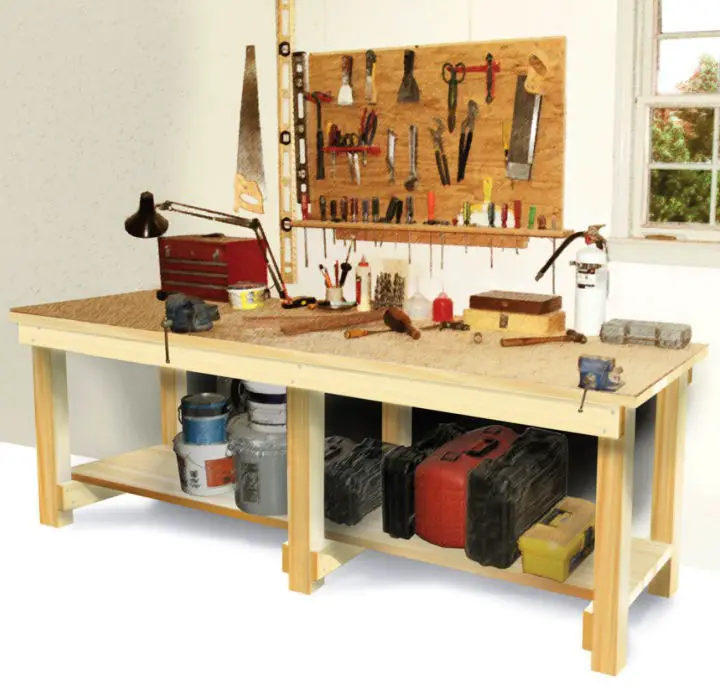
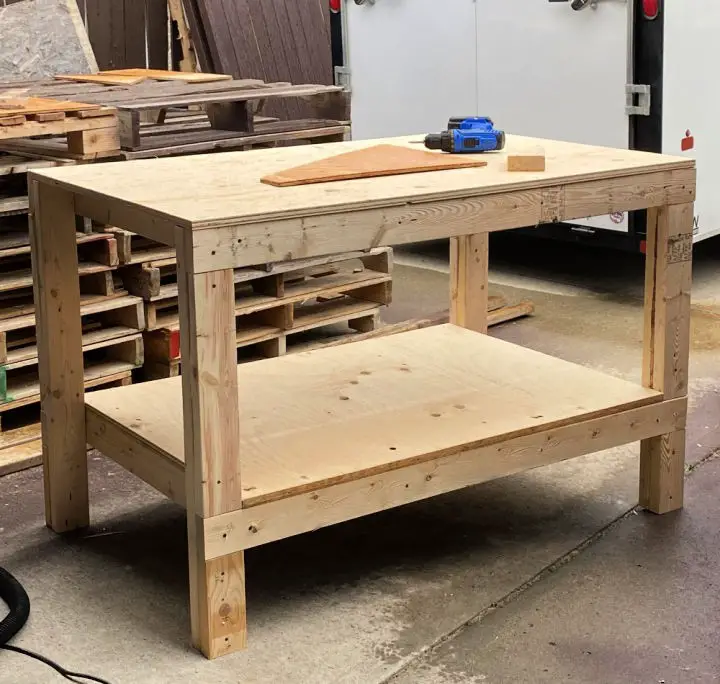
Ultimate DIY Garage Workbench
Transform your garage into a hub of productivity with our straightforward guide to creating an ultimate workbench. This versatile workspace is perfect for DIY enthusiasts and anyone seeking a robust area for projects big or small. Our plan features a detailed list of required tools and materials, as well as step-by-step instructions that make it easy to build a durable and beautiful workbench from readily available supplies. With this design, you’ll achieve strength, style, and the sense of accomplishment that comes with creating a space that supports all your endeavors.
Easy DIY Workbench for Beginners
Transform your DIY skills with these straightforward workbench plans, designed for ease of construction and durability. This comprehensive guide empowers anyone to build a sturdy workbench with ample storage space, featuring drawers and shelves for organizing tools. A one-day project that won’t break the bank, this design ensures your new workspace is not only easy to set up but also robust enough to withstand heavy use over the years. Bid farewell to makeshift arrangements and hello to your reliable, custom-built haven.
Make Your Own Kids Workbench
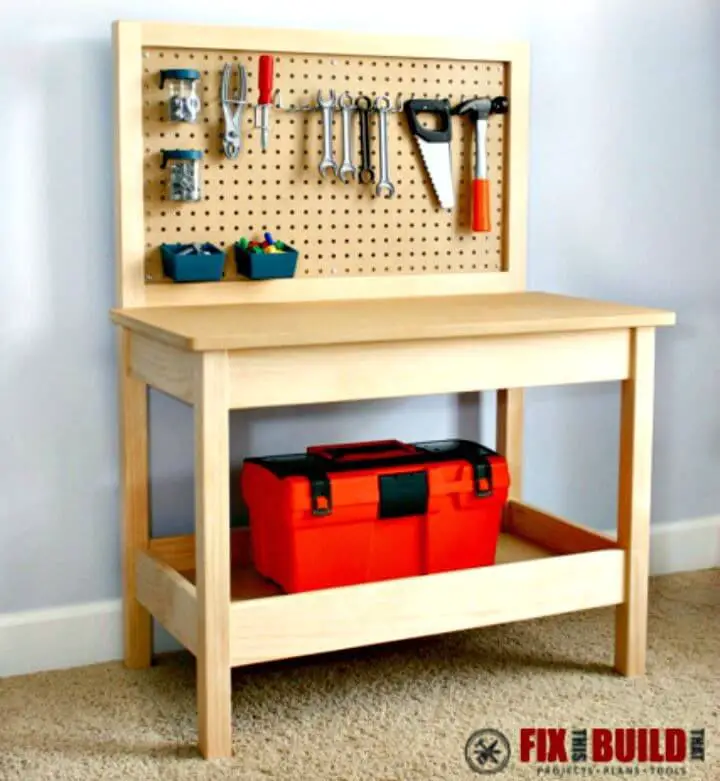
Crafting a DIY Kids Workbench is an exceptional way to foster creativity in children. This comprehensive guide walks you through the process of building a workbench tailored to kids of various ages, boasting a height of 24 inches and featuring an under-shelf storage area and pegboard for organized tool management. The workbench’s design ensures safe play with plastic tools or real woodworking projects, while its hidden pocket hole joinery provides a sleek appearance and effortless assembly. For a detailed, step-by-step guide on how to construct this engaging and educational workbench, head over to FixThisBuildThat – an ideal weekend project that guarantees hours of fun and learning for your young DIY enthusiast.
Simple DIY Sturdy Work Bench
Transform your DIY experience with Ana White’s sturdy work bench, designed to keep tools organized and workspace tidy. This dependable companion is a must-have for any craftsman, providing a solid foundation for creative endeavors. With easy-to-follow step-by-step instructions, you can confidently construct this reliable bench, perfect for indoor or garage use. Its combination of practicality and durability makes it an ideal addition to your crafting setup, allowing you to optimize your workflow and take your projects to the next level.
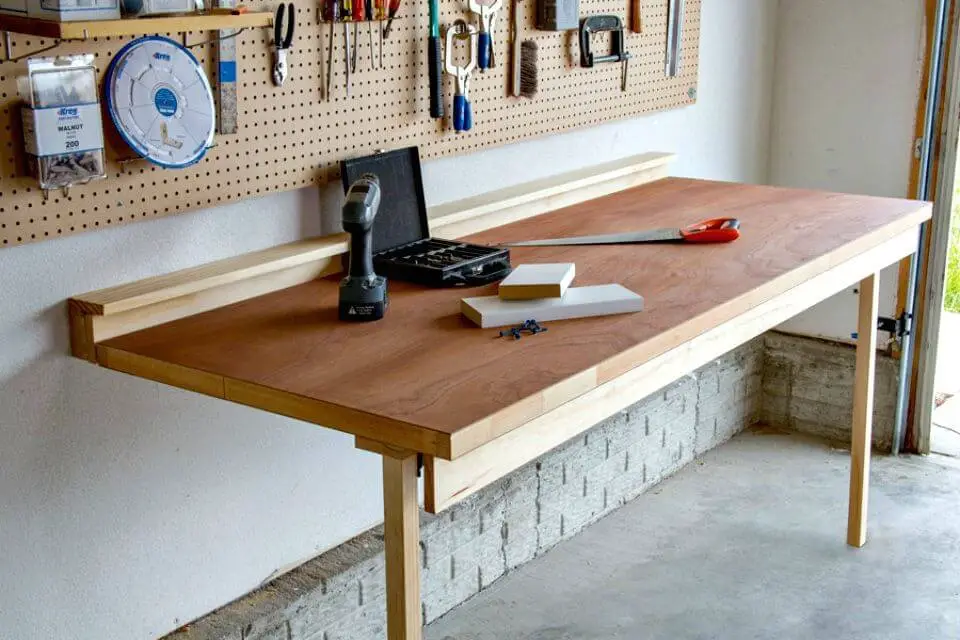
Building Your Own Garage Workbench

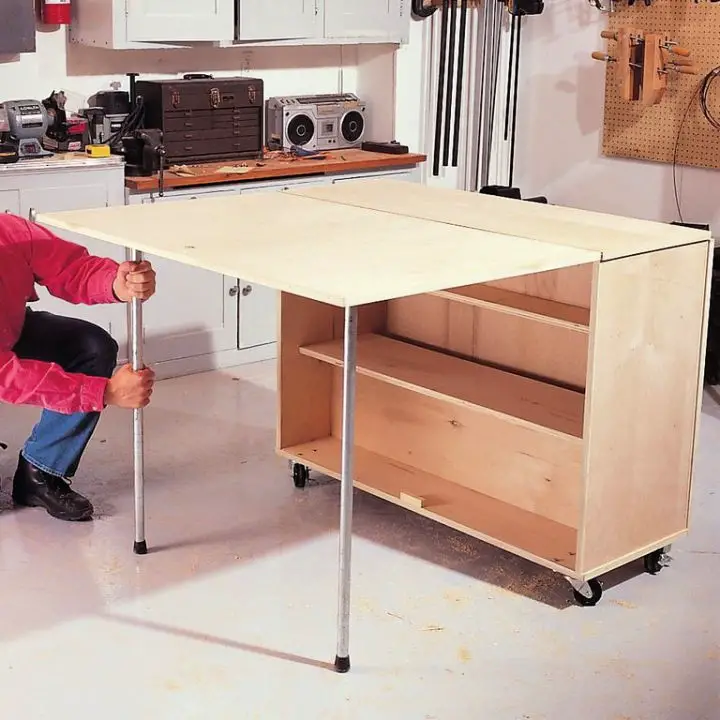
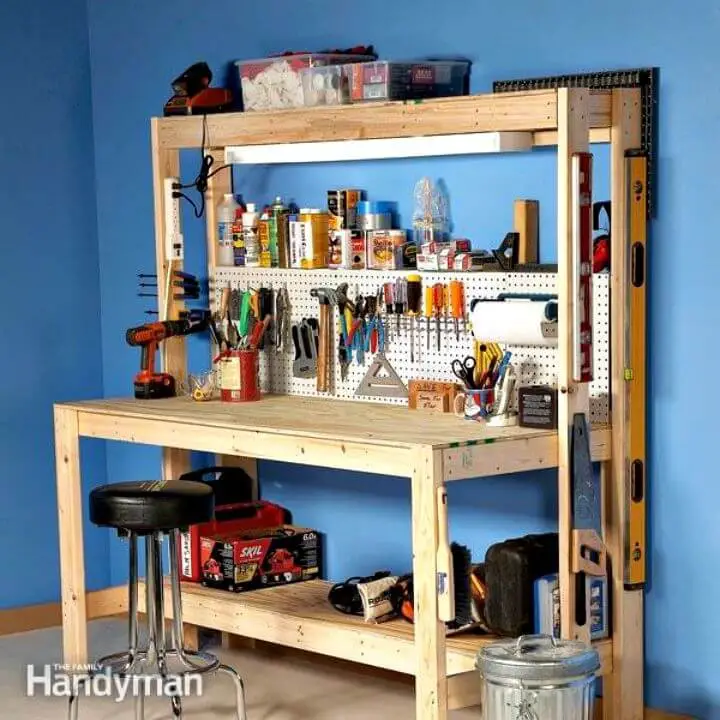
Elevate your small garage space with a versatile workbench that seamlessly adapts to your needs. This cleverly designed solution folds out to provide ample workspace for projects, while expertly tucking away when not in use, preserving valuable parking space. By incorporating drawers and a shelf for storage, this compact yet functional workbench efficiently utilizes every inch of your garage.
What’s more, the simplicity of its design makes it accessible to beginners, requiring only basic tools and materials to complete in a single day. For a step-by-step guide, head over to Family Handyman. With this project, you’ll be able to make the most of your garage space, streamlining your workflow and maximizing productivity.
How to Make Workbench in 10 Easy Steps
Maximizing the efficiency of your workshop is achievable with a multi-purpose workbench that doubles as an outfeed table for tablesaws. This straightforward yet incredibly valuable design allows for effortless support of extended workpieces post-cuts. The benefits of this versatile addition extend to artisans of all skill levels, effectively streamlining workflow and optimizing available space. A practical and space-saving solution ideal for enhancing any woodworking station, it’s a must-have for anyone seeking to elevate their workshop’s overall performance.
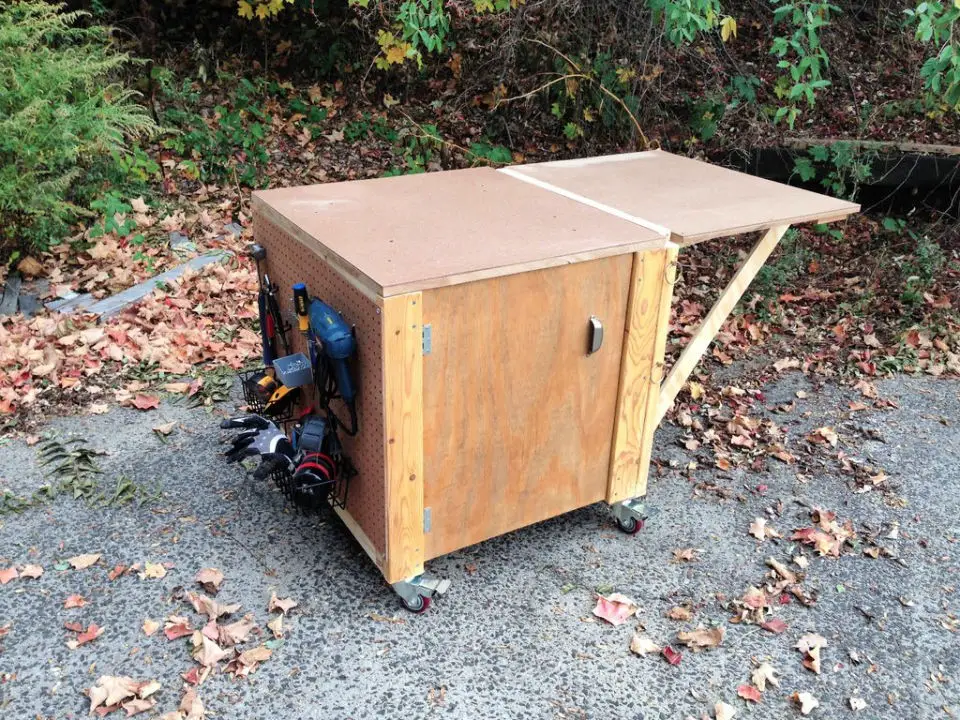
Compact Folding Workbench With Storage
Transform limited spaces into versatile work areas with a compact folding workbench, ideal for garages or basements. When unfolded, it provides an expansive surface area, yet can easily be tucked away when not in use. By following this DIY guide from Family Handyman, you can build a sturdy, roll-around bench using simple hardware and plywood. This fold-away bench is perfect for various projects, simplifying crafting, repairs, and more while maximizing your workspace efficiency.
DIY Workbench With Details Instructions
Transform your garage space into a haven for DIY creativity by crafting a functional yet simple workbench. This project is perfect for both newcomers and seasoned makers, offering a solid foundation for a wide range of projects. With step-by-step instructions and accessible materials, you can create a reliable and affordable workspace. For further guidance, including a downloadable woodworking plan, visit DIYPete’s website. Take the first step in bringing your creative visions to life with this sturdy workbench, designed to help you stay focused on your next big project.
How to Do You Make a Workbench
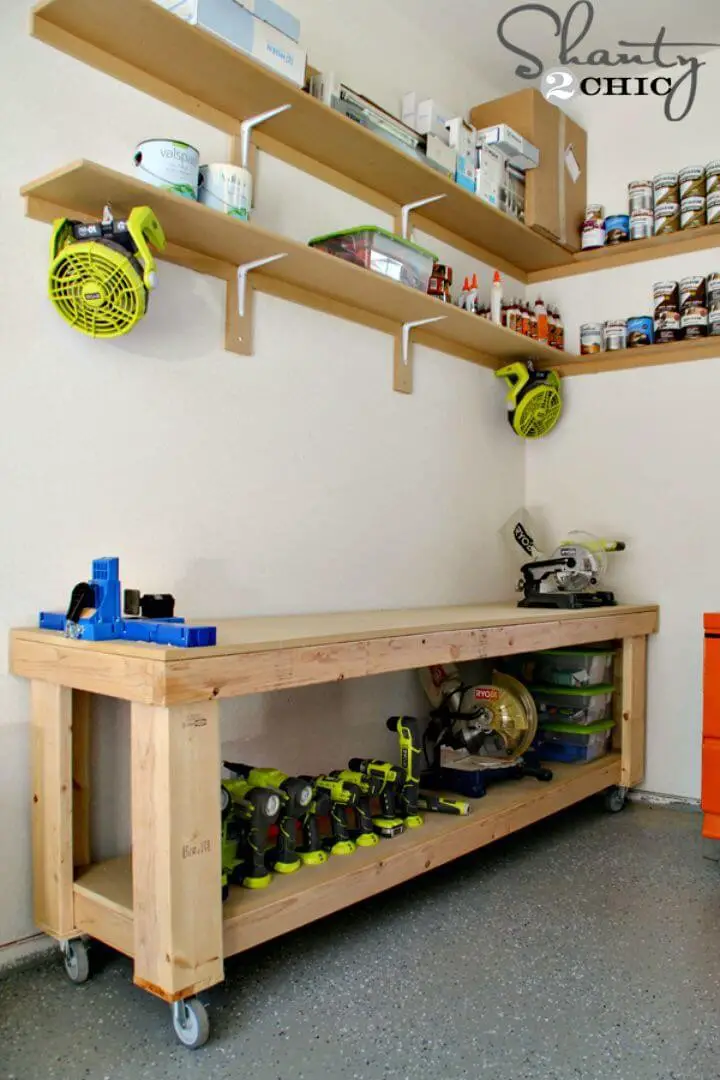
Transform your workspace with ease and efficiency by utilizing Shanty-2-Chic’s DIY Workbench Plans, specifically designed for compact spaces. This comprehensive guide is an ideal solution for those seeking to upgrade their shop without incurring significant expenses. With a budget-friendly expenditure of approximately $100, this project is accessible to both beginners and seasoned crafters alike. By following the straightforward, step-by-step instructions, you’ll be able to create a highly customizable workbench tailored to your unique needs. Perfect for small workshops or cramped crafting areas, this value-packed addition promises to enhance your overall work experience.
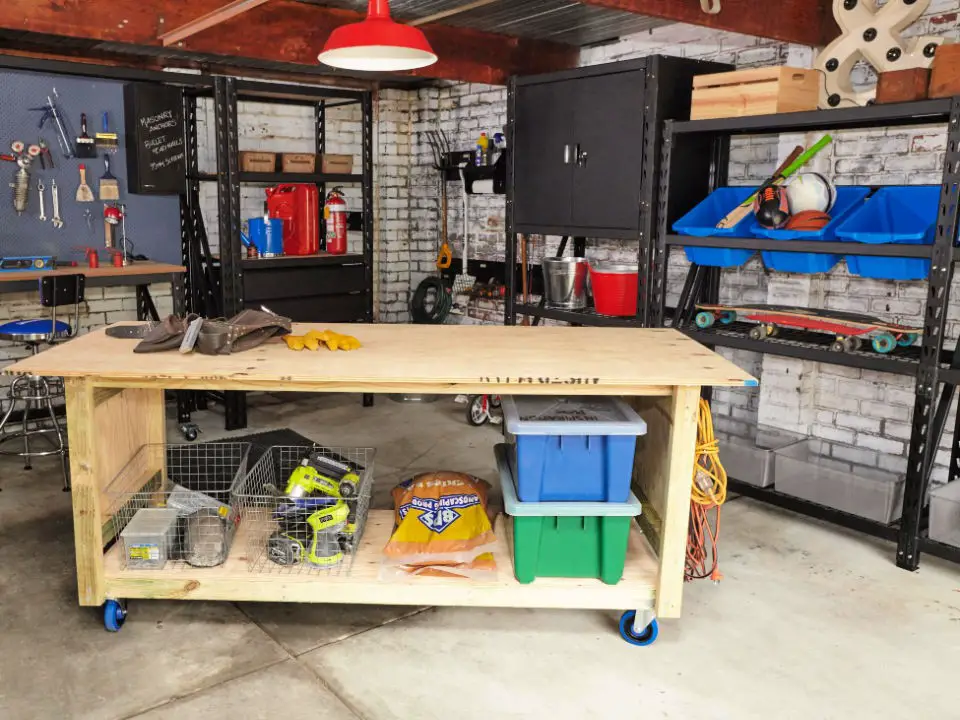
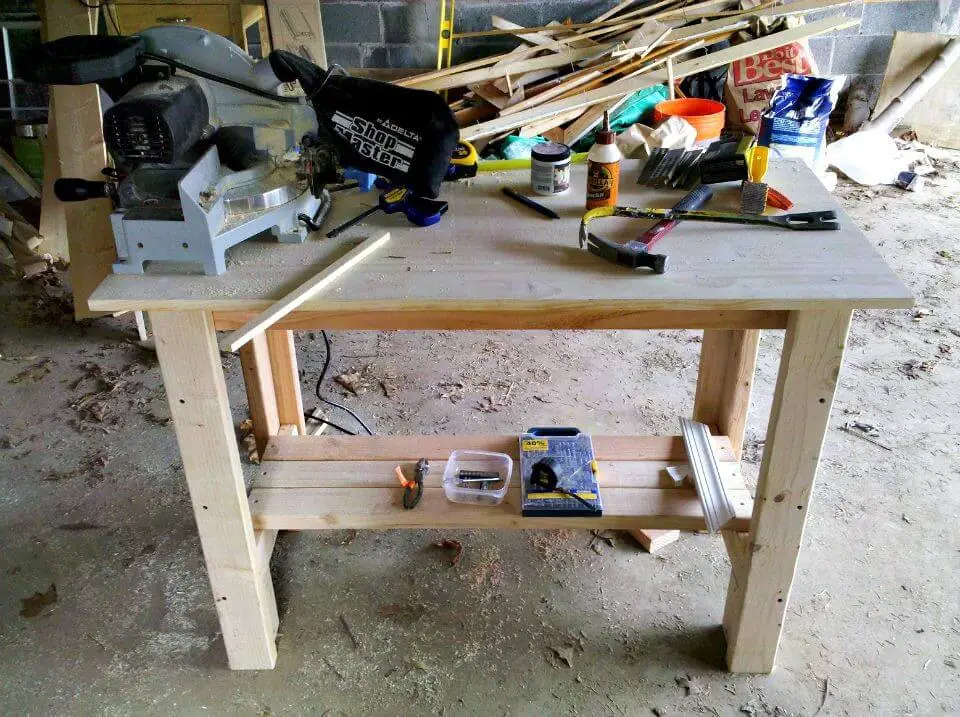
DIY Wood Workbench Bench for Under $50
Wanting to create a robust DIY woodworking bench without sacrificing time or funds? Look no further! I’m excited to share with you a straightforward workbench plan that can be built for around $50 and completed in just a few hours. This versatile bench is perfect for both woodworking enthusiasts and hobbyists, offering ample space for projects while also allowing easy customization with the addition of pegboard, a bench vise, and other accessories to establish a comprehensive work center. Constructed using fundamental materials like 2x4s and plywood, this sturdy bench measures in at a generous 30 inches wide by 6 feet long. For a step-by-step guide on bringing this project to life, simply click the link below.
4×8 Workbench and Outfeed Table
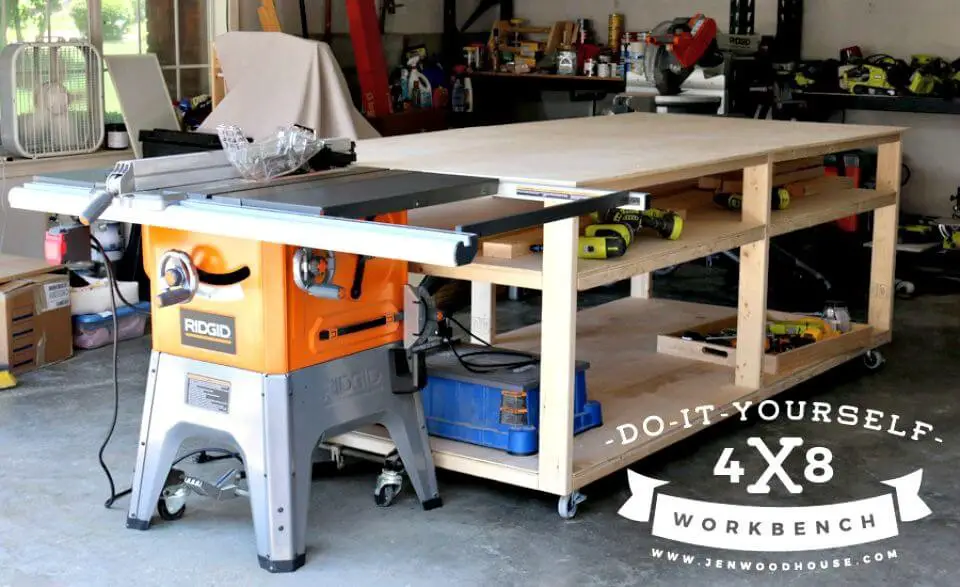
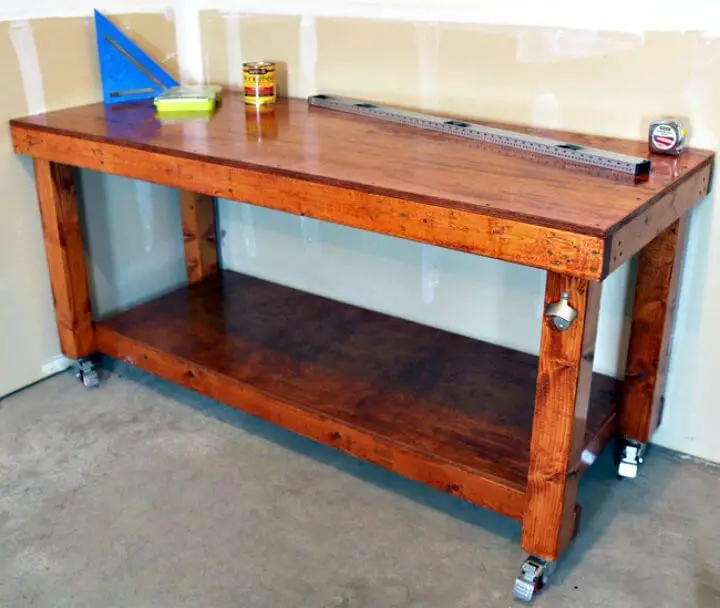
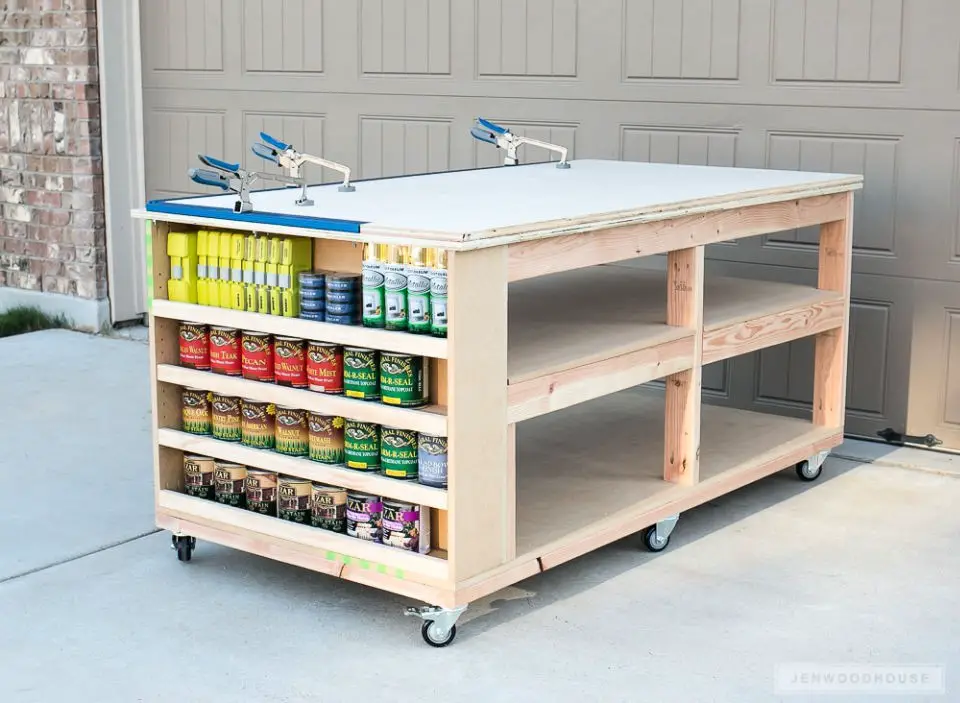
Transform your DIY experience with a sturdy and spacious workbench, inspired by Paulk’s ingenious design. This project boasts a clever shallow shelf, keeping tools within easy reach without cluttering the workspace. Magnetic strips for metal accessories ensure efficient storage, while matching the height of a table saw adds dual functionality. The locking swivel casters provide a perfect balance between mobility and stability, allowing you to tackle projects with ease. For crafters seeking a robust work area, follow Jen Woodhouse’s step-by-step guide and take your DIY journey to the next level.
How to Make a Timber Workbench

For those seeking a reliable and long-lasting timber workbench, Instructables provides a comprehensive guide to help you build a sturdy and efficient workspace. This user-friendly tutorial ensures that your newly constructed workbench is not only functional but also an attractive addition to your workshop. Whether you’re a crafty enthusiast or a seasoned repair expert, this guide will provide the necessary steps to create a durable platform perfect for any project. By following the easy-to-follow instructions, you’ll be well on your way to establishing a creative and practical space that will withstand the demands of frequent use.
Medium Sized Mobile Workbench Design
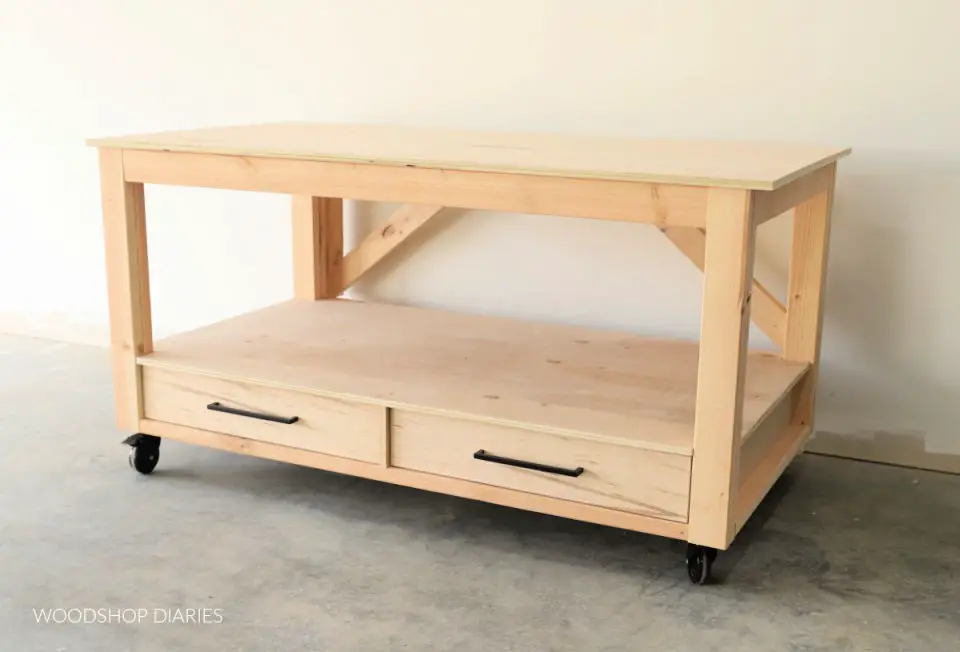
Transform your workspace with a practical and versatile DIY project! Woodshop Diaries brings you a straightforward guide to constructing a mobile workbench that seamlessly integrates ample storage and flexible functionality. This medium-sized workstation, ideal for garages or workshops, boasts an innovative flip-top design that effortlessly opens up additional space. Customize the build to suit your needs – omit the flip-top if not required, but appreciate the added storage and open shelf. Join us on this weekend adventure and create a functional space that’s both budget-friendly and tailored to your unique requirements.
Building Your Own Workbench
Transform your workspace into a haven for creativity with Mother Earth News’ comprehensive guide on building a durable DIY workbench. This resourceful guide provides expert advice and detailed plans to help you craft a sturdy table from rough-cut lumber or recycled materials, perfect for potting plants, working on crafts, or tackling any project that comes your way. By following these practical tips, you’ll be able to create a workbench that’s tailored to your specific needs and space constraints, providing a robust and versatile setup for all your endeavors.
Simple and Easy DIY Workbench
Embark on a journey of creating your own personalized workspace with our comprehensive Simple Workbench guide. Designed for the DIY enthusiast, this resource provides step-by-step instructions for constructing a sturdy and functional workbench tailored to any project’s specific needs. With its simplicity and versatility, this guide ensures that your next creative endeavor is grounded in a solid foundation, allowing you to bring your ideas to life in a space that reflects your unique vision.
Handmade 4hr $70 Workbench

If you’re looking to create a robust workbench without sacrificing time or budget, consider following the detailed guide at Instructables, which showcases how to build a sturdy workbench for just $70 in a mere 4 hours. This comprehensive guide is ideal for DIY enthusiasts seeking a reliable workspace that won’t break the bank or require an extensive construction process. By following our step-by-step instructions, you’ll be able to construct a functional and durable workbench, perfectly suited for tackling any project that comes your way.
Free Portable Workbench Plan
Transform your DIY endeavors with Rogue Engineer’s accessible portable workbench plans. In under 30 minutes and for approximately $75, you can create a sturdy workbench that also offers storage solutions – an ideal setup for any project. Designed to be beginner-friendly, these plans only require basic tools and materials to bring your vision to life. With thoughtful material selection, you can even construct a second workbench at minimal additional cost. Start building your own portable workbench and experience the benefits of optimized workspace efficiency today.
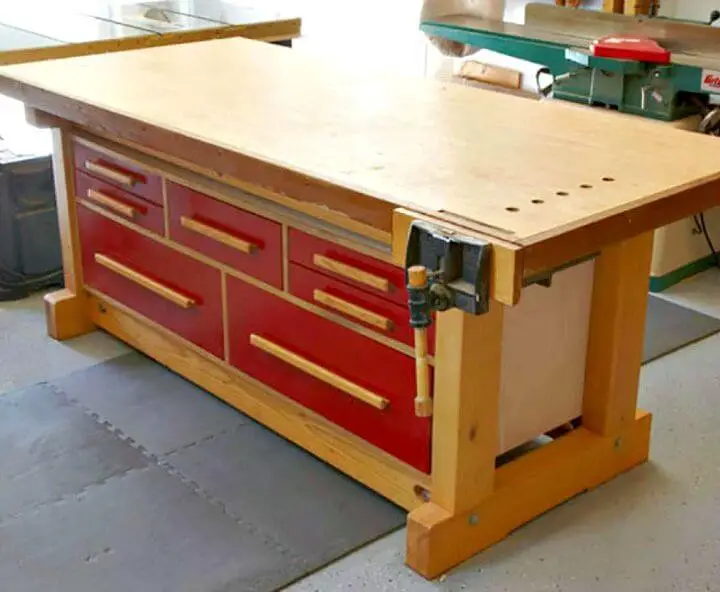
Building a Real Woodworker’s Workbench
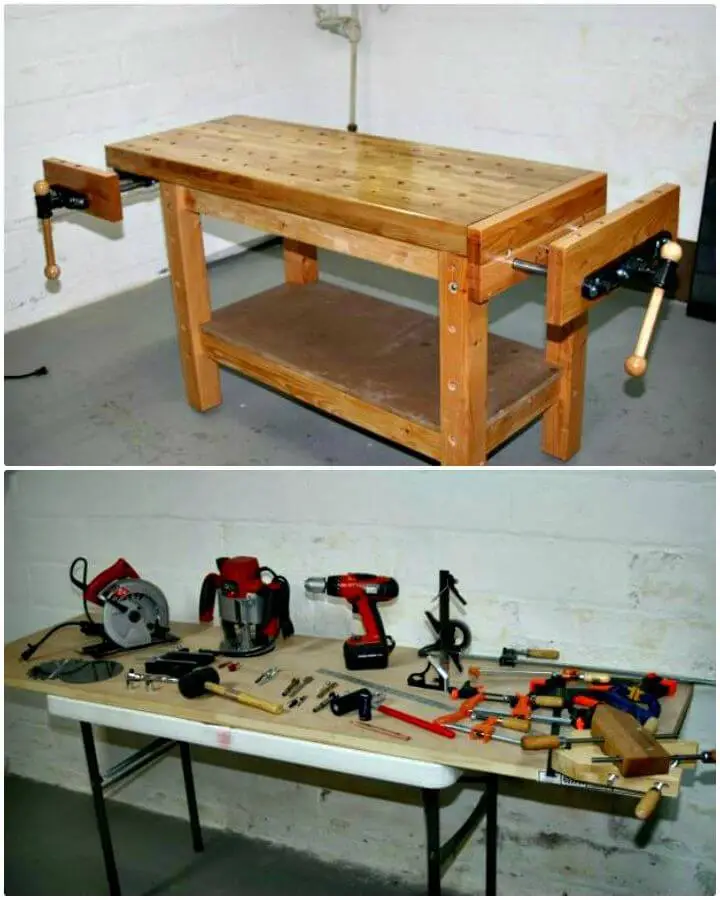
Transform your woodworking experience by building a robust and reliable workbench, tailored to meet the demands of a skilled woodworker. For a comprehensive guide on crafting a sturdy bench, look no further than Instructables’ step-by-step tutorial. With accessible tools and materials, you’ll create a functional workspace that can withstand the rigors of vigorous woodworking tasks without compromising on stability or durability. The tutorial also delves into incorporating various work-holding mechanisms to elevate your craftsmanship. Perfect for enthusiasts seeking to optimize their workspace with a bench that truly supports their creative endeavors.
DIY Portable Workbench With Storage
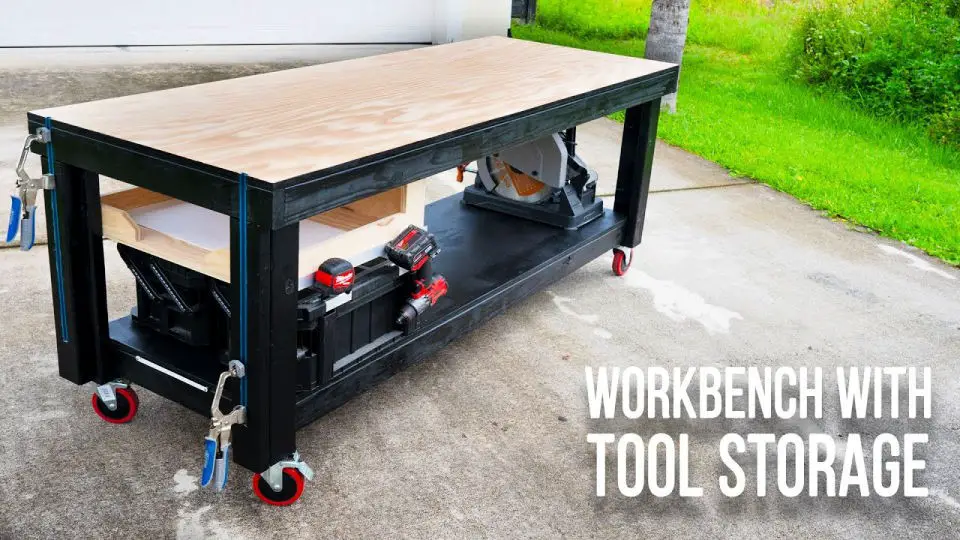
Unleash the potential of your garage by transforming it into an organized haven with this clever DIY Portable Workbench with Storage solution. Designed for those who’ve outgrown their tool collection and stain accumulation, this ingenious design enables you to declutter and maximize your space with ease.
Built from robust plywood, this workbench harmoniously integrates a solid work surface with ample storage capacity, fostering an efficient and productive working environment. For a step-by-step guide on how to create your own masterpiece, including complimentary plans and a list of essential materials and tools, head over to Rogue Engineer for the ultimate DIY experience.
How to Build Drop-Down Workbench
Elevate the functionality of your workshop with a ingenious Drop-Down Workbench design, expertly suited for compact spaces. This innovative workbench effortlessly folds down when needed, and neatly tucks away when not in use. Built upon a sturdy solid-core door, it features clear step-by-step instructions for assembling a shelf, mounting cleat, and installing a hinge plate. By incorporating this space-saving solution into your shop, you’ll be able to maximize your work area without sacrificing precious real estate. Perfect for every craftsman seeking to optimize their workspace, this clever design is ready to serve whenever inspiration strikes.
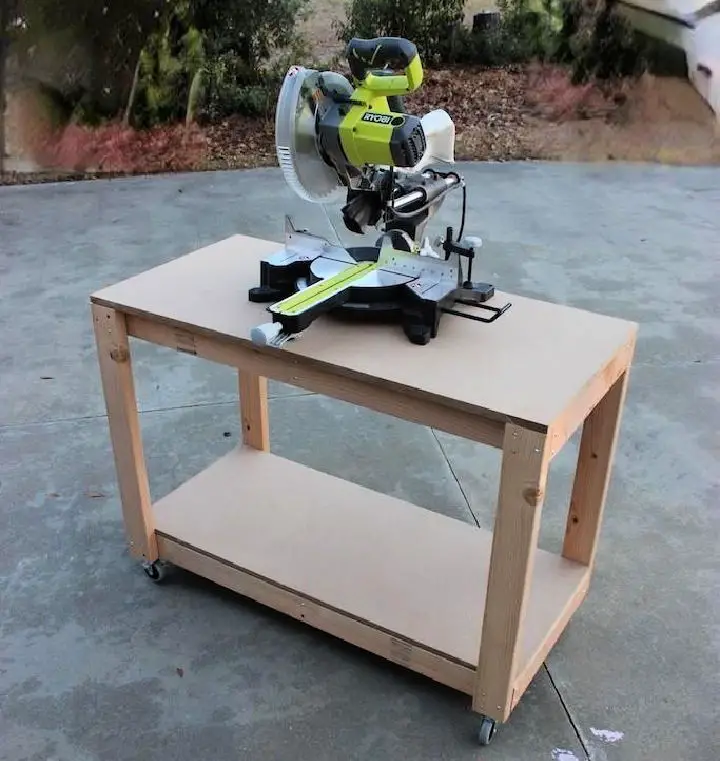
Flip Top Workbench Cart Building Plan
Elevate your small workshop with the creative DIY 2×4 Fliptop Workbench Cart, a clever solution that combines functionality and portability. This compact cart serves as both a sturdy work surface and tool stand, streamlining your workspace without the need for extensive plywood construction. By utilizing minimal wooden components and 2x4s, this project prioritizes ease of assembly and practicality. Ideal for those seeking a reliable, space-saving setup that maximizes efficiency. Embark on this project today and discover the value of a versatile work environment!
Ultimate DIY Mobile Workbench
Revamp your workspace with the Ultimate Mobile Workbench, a game-changer for those working in tight spaces. This innovative design expertly balances functionality and portability, featuring a vertically adjustable benchtop that can be tailored to your specific needs. The ample storage space is comprised of shelves, drawers, and a pegboard wall, providing an organized and clutter-free environment for any project. With the ability to roll around effortlessly, you’re free to work anywhere, from garage to workshop to job site. What’s more, this budget-friendly solution helps maximize your productivity by streamlining material storage and accessibility. Experience the difference it can make in your workflow with the Ultimate Mobile Workbench.
Build a Garage Workshop Workbench
Turn your garage into a functional workspace with ease! Drawing inspiration from Ana White’s DIY Garage Workshop Workbench guide, we’ll walk you through a simple and stress-free project that’s perfect for beginners. This straightforward guide provides step-by-step diagrams, a comprehensive shopping list, and a detailed cut list to ensure your DIY journey is smooth sailing. With a standard countertop height designed for comfort and featuring easy clamping capabilities, this project promises a sense of accomplishment and added functionality in your garage.
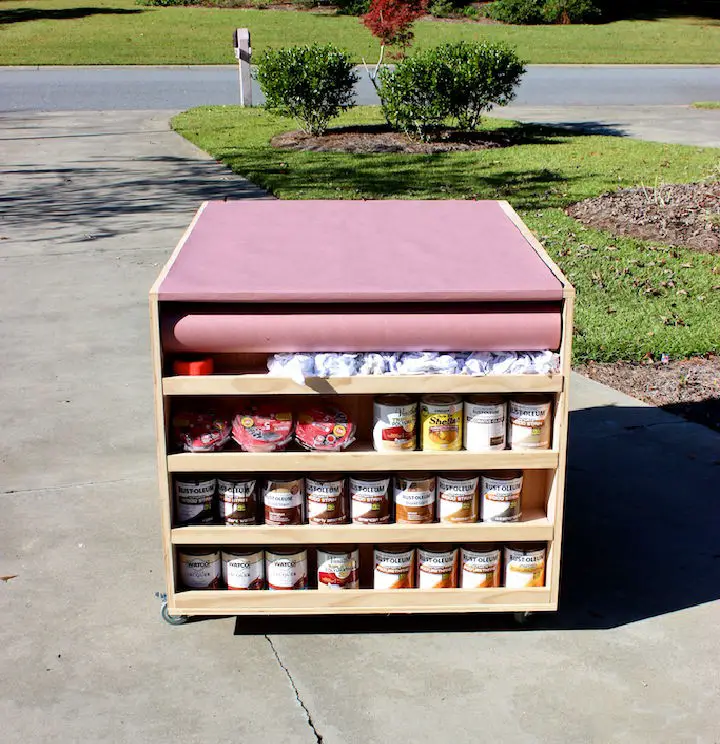
Best DIY Workbench With Shelves
Transform your workspace with a versatile and functional DIY mobile workbench, designed to adapt to your evolving workshop needs. This innovative project from JenWoodhouse.com offers robust storage solutions and efficient shelving, allowing you to boost productivity without sacrificing valuable floor space. The comprehensive guide takes you through each step, from installing heavy-duty casters for effortless mobility to incorporating adjustable shelves for organized tool storage. Perfect for hobbyists and craftspeople seeking a clutter-free environment, this DIY project is designed to make your workspace more efficient and enjoyable.
Simple Workbench Using Plywood
Discover the joy of working in an organized space with a simple yet effective DIY workbench. This compact, portable solution is perfect for crafty individuals who value order and efficiency. By utilizing basic tools and materials, you can create a sturdy workbench that provides ample storage and becomes a cornerstone of your creative area. Follow this easy-to-follow guide to transform your workshop from chaotic to calm, and unlock your full potential as a maker.
How to Build a Garage Workbench
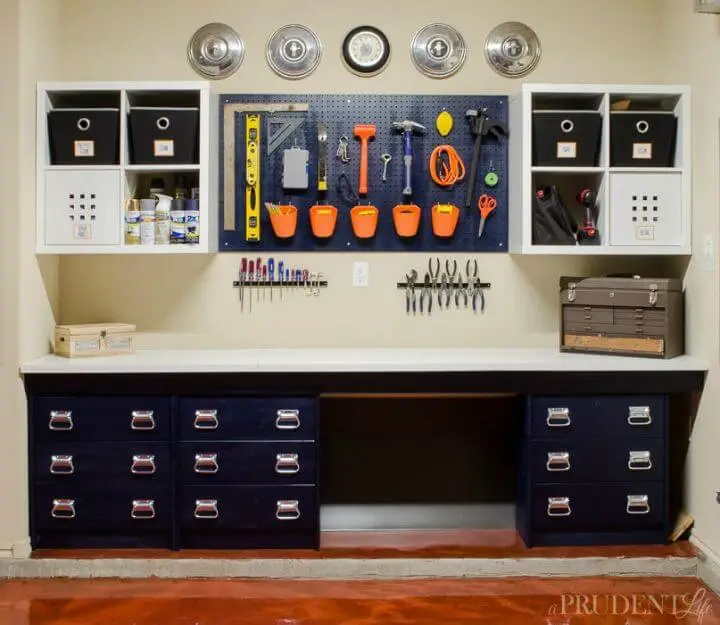
Transform your garage workspace without sacrificing functionality or your wallet with our DIY Garage Workbench guide. We’ll show you how to cleverly repurpose IKEA pieces into a custom, adaptable storage solution and work area that’s perfect for garages of any size. This hack is especially useful if you’re working within a tight timeframe or space. Our step-by-step process will walk you through building a sturdy workbench with ample storage and a tidy look, all while keeping costs remarkably low. Get ready to optimize your garage space!
Multipurpose Workbench With Tool Storage
Transform your workshop into a haven of creativity by constructing a custom-built workbench using straightforward materials. Follow the comprehensive instructions provided by DIY Creators to craft a sturdy and efficient workspace that showcases your woodworking skills. Master techniques such as pocket hole joinery, which enables the creation of strong yet visually appealing connections, and explore practical storage solutions to optimize your workflow. This immersive tutorial is designed to help you turn your crafting area into a well-organized and versatile space, perfect for honing your woodworking craft.
DIY Workbench for Under $200
Unleash the potential of your garage by transforming it into a functional workspace without putting a dent in your wallet! By following this step-by-step guide from HomeProHero, you can create a sturdy and mobile workbench using affordable materials like 2x4s, caster wheels, and construction screws. With a focus on practicality and reliability, this project is perfect for DIY enthusiasts looking to optimize their garage space with reliable solutions. Say goodbye to clutter and hello to a fully functional workbench tailored to your specific needs.
Making a Workbench Out of Plywood
Elevate your workspace productivity by effortlessly assembling a versatile workbench that packs a punch despite its simplicity. This DIY project requires just one plywood sheet and a few 2x4s, taking under an hour to complete. As you navigate various woodworking tasks, the option to bolster durability with glue provides added peace of mind. With precise measurements for the legs, top, and shelf meticulously detailed, crafting this functional and spacious workbench with storage becomes a straightforward endeavor. For a step-by-step guide on bringing your vision to life, explore the tutorial at the link provided.
Conclusion
As you complete the journey to build your own workbench using our 40 free DIY plans (PDF guide), you’re not just creating a functional space – you’re unlocking a world where creativity and productivity converge. Every step, from material selection to the finishing touches, is carefully designed to empower you with a workspace that not only meets your needs but elevates your workflow. Our comprehensive guide is tailored to inspire and support DIY enthusiasts of all skill levels, giving you the confidence to construct a sturdy and efficient workbench that will become the hub of all your future projects. Remember, the right workbench can revolutionize your workspace and the way you approach your projects – so dive in and start building the one that will be the cornerstone of it all.
