Transforming ordinary wooden crates into extraordinary DIY projects is a creative journey waiting to unfold! With an abundance of possibilities, the rustic charm of wooden crates can be harnessed to create functional storage solutions, decorative items that add a touch of personality to your home, and even statement pieces that reflect your unique style. From bookshelves to coffee tables and planters, the versatility of wooden crates presents endless opportunities for self-expression. As you begin this creative endeavor, anticipate bringing not only functionality but also a dash of rustic charm to your living space.Starting your DIY wooden crate project is simpler than you might envision. With some preparation, the right materials, and a well-prepared workspace, you’ll be ready to embark on this creative adventure. This section will guide you through selecting your project, gathering essential supplies, preparing your workspace for safety, and executing your design with precision. Let’s dive into the world of wooden crate crafting, where creativity knows no bounds!
Why Build DIY Wooden Crate Projects?
Imagination knows no bounds when it comes to DIY wooden crate projects. By embracing this creative outlet, you’re given the freedom to design and personalize items exactly how you envision them, unleashing your inner artist. This unique approach to crafting not only allows for endless possibilities but also fosters a sense of pride and satisfaction upon completion.In addition to sparking creativity, these projects offer an eco-friendly way to recycle and reduce waste. Many wooden crates can be repurposed into functional items for your home, giving new life to something that might otherwise end up in a landfill. This cost-effective approach to DIY crafting is not only budget-friendly but also environmentally responsible.One of the most significant advantages of DIY wooden crate projects is their customizability. Whether you need a small storage solution or a large piece of furniture, these projects allow for flexibility in terms of size, color, and function. You can tailor your creations to fit your space perfectly, adding a personal touch that store-bought items simply cannot match.As you delve into the world of DIY wooden crate projects, you’ll also discover opportunities to learn new skills or improve existing ones. From woodworking to painting and decorating, each project presents a chance to expand your DIY abilities and grow as a crafter.Finally, these projects offer an excellent way to bond with family members, including children. Simple enough for young ones to participate, these projects provide a fun and engaging way to spend quality time together while teaching practical skills and creativity.
Upcycling Tips for Wooden Crates
Transforming old wooden crates into unique and functional pieces isn’t just a creative outlet, but also a sustainable way to reduce waste and give new life to discarded materials. In this article, we’ll delve into the world of upcycling wooden crates, exploring various techniques and ideas to turn these humble containers into beautiful home decor items.
Choosing the Right Crates
When sourcing materials for your creative project, begin by identifying suitable crates that can be easily modified to fit your needs. Scour flea markets, thrift stores, and local shops for affordable options, and don’t be surprised if you stumble upon some crates being given away at no cost. With a little creativity and resourcefulness, these humble containers can be transformed into something truly unique.
Cleaning and Preparing
Prior to embarking on your project, dedicate time to meticulously cleaning the crates, ensuring they are free from any dirt, grime, or debris that may have accumulated. For those seeking to achieve a distressed, vintage aesthetic, consider employing light sanding techniques to subtly preserve the rustic charm of the wooden surfaces.
Simple Upcycling Ideas
Transform your storage spaces with creative repurposing! One way to do this is by stacking crates to create custom shelving units. These modular pieces can be mounted on walls or left freestanding, providing flexible storage solutions that adapt to your needs. But why stop at mere shelves? With some cushioning on top, these same crates can be transformed into cozy ottomans that double as storage containers. The possibilities are endless when you think outside the box – or crate, in this case!
Customization
Elevate the look of your crates by introducing personal touches through painting, staining, or swapping out traditional hardware for decorative alternatives. For those who prefer a more creative approach, stenciling and decoupage offer excellent opportunities to add a distinctive flair without requiring advanced DIY skills or specialized tools.
Advanced Projects
To maximize storage and visual appeal, consider building around focal points in the room, such as a bed or TV. A built-in shelving unit can not only provide ample space for storing items, but also serve as a design statement. For an added layer of sophistication, crate lockers with doors can be created, offering a stylish and discreet storage solution that keeps clutter out of sight.
Sustainability
Embracing the art of upcycling wooden crates offers a unique opportunity to promote a more eco-friendly lifestyle. By thoughtfully reusing materials, we can significantly reduce our environmental footprint by giving new life to items that would have otherwise ended up in landfills or incinerators. This approach not only preserves natural resources but also fosters creativity and encourages us to think outside the box – quite literally, as we breathe new life into discarded crates.
Safety First
When embarking on a DIY adventure, prioritizing safety above all else is crucial. Not only should you don the appropriate protective gear, but also ensure that you’re utilizing tools correctly to minimize the risk of accidents. By adopting this mindset, you’ll be well-equipped to tackle even the most ambitious projects.To create truly one-of-a-kind home items imbued with character, it’s essential to think creatively and be willing to experiment with different techniques. Remember, the key to successful upcycling lies in embracing innovation and being open to trying new things. So go ahead, get crafty, and have fun!
Customization Techniques for Wooden Crates
Transforming wooden crates into unique decorative pieces not only reduces waste but also injects personality into your living space. To help you achieve this, we’ll delve into the intricacies of personalizing wooden crates and provide you with a comprehensive guide on how to make them truly one-of-a-kind.
Painting Your Crates
To breathe new life into an aged crate, consider adding a splash of color through painting. Selecting a wood-friendly paint is crucial, and applying a primer beforehand can guarantee a smooth finish. For a charmingly distressed appearance, lightly sand the edges once the paint has dried, subtly revealing the original texture.
Staining for a Natural Finish
To amplify the inherent charm of wooden crates, consider adding a stain that harmonizes with your surrounding decor. This can be achieved by applying the stain using either a brush or cloth, while taking necessary precautions to protect your skin and breathing air freely. When working with stains, it is essential to don gloves and operate in an environment with sufficient ventilation.
Adding Fabric Liners
To give your crates an extra dose of personality, consider adding a fabric liner. This simple trick can add a splash of color and pattern to your storage containers. To get started, measure the interior dimensions of your crate to determine how much fabric you’ll need. Cut the material to size, leaving a little extra for trimming and fitting. Then, use a staple gun or fabric adhesive to secure the liner in place, ensuring a snug fit that won’t shift during use.
Decoupage for a Unique Look
Crafting with decoupage is a delightful process that brings artistry and whimsy to plain wooden crates. To create this unique piece, start by selecting the paper or fabric cutouts you’d like to adorn your crate. Then, apply a thin layer of decoupage glue or mod podge to the back of each cutout, ensuring it’s evenly coated. Next, gently press the cutout onto the crate, smoothing out any air pockets or wrinkles as you go. Allow the adhesive to dry completely before sealing with a clear varnish for added durability and protection from wear and tear.
Hardware Upgrades
Elevate the functionality and aesthetic appeal of your crates by incorporating hardware such as handles, clasps, or wheels. Ensure a secure attachment process and choose hardware that harmonizes with the prevailing style of your room, allowing for seamless integration.
Creative Uses
Embrace creative freedom by repurposing your customized crates in innovative ways. Beyond their original intended use, these versatile containers can be transformed into charming planters for your favorite flowers or greenery, clever storage solutions for books and decorative items, or even functional furniture pieces like a stylish coffee table or a unique nightstand.
Safety Considerations
To create custom wooden crates that are not only visually appealing but also safe to use, prioritize safety above all else. Opt for non-toxic materials and double-check that any added hardware is securely fastened to prevent accidents from occurring. By taking these precautions, you can craft unique, functional, and stylish wooden crates tailored to your specific needs.
Storage Solutions with Wooden Crates
Wooden crates offer more than just a place to store items – they’re a chic and functional way to keep your home organized. Whether you’re looking to corral clutter or add some rustic charm, these versatile containers can help you achieve both goals.
Versatile Crate Stacking
Building with crates offers a versatile and adaptable solution for storage. By arranging them in diverse configurations, you can effortlessly optimize the use of space in closets, living rooms, garages, or any other area that requires organization. The ability to easily relocate and rearrange the crates as needed is an added advantage, making it an ideal approach for individuals who require flexible storage solutions that can evolve with their changing needs.
Wall-Mounted Crate Shelves
Transforming your storage area into a visually appealing display is achievable by mounting crates on the walls of your home or office. This clever solution not only frees up valuable floor space but also allows you to showcase your favorite books, plants, collectibles, or other treasured items in an attractive and accessible manner. To ensure the safety and stability of your display, make sure that the crates are properly secured to the wall to prevent any accidents or damage.
Crate Storage Benches
Transforming a humble wooden crate into a multifunctional storage bench is a clever DIY project that offers a unique blend of form and function. By adding a cushion on top, you can create a comfortable seating area while also providing ample storage space – perfect for entryways or mudrooms where functionality meets aesthetics.
Rolling Crate Carts
When it comes to streamlining your workspace, few solutions are as effective as equipping crates with casters. By adding these simple yet ingenious devices to the base of a crate, you can create a rolling cart that’s perfect for navigating tight spaces in craft rooms, kitchens, or anywhere else you need flexible storage.
Under-Bed Crate Storage
Maximize your bedroom’s storage potential by utilizing the often-overlooked space under your bed. Slide in crates or containers to create a convenient repository for items like seasonal clothing, extra bedding, and even children’s toys, keeping them neatly hidden yet effortlessly retrievable.
Crate Desks and Tables
While traditional furniture options may not provide the flexibility you’re looking for, a little creativity can go a long way in transforming wooden crates into functional pieces like desks or coffee tables. By combining these crates in unique ways, you can create one-of-a-kind pieces that cater to your specific space and design requirements.
Organizing with Crate Dividers
To optimize the use of space within your crates, consider inserting dividers to separate and categorize smaller items. This practical approach is particularly effective when storing items like art supplies, kitchen utensils, or other miscellaneous goods that have a tendency to become disorganized and cluttered.
Labeling for Easy Identification
Adding labels to your wooden crates is a thoughtful touch that makes it easy to locate what you need. Consider using chalkboard paint, tags, or stickers to mark the contents of each crate. Not only do these labels enhance the charm of your storage solution, but they also help keep your home organized and tidy. The rustic aesthetic of wooden crates adds a unique touch to any room, making them a functional and stylish way to stay organized.
Maintenance and Care for Wooden Crates
To maximize the lifespan of your wooden crates and maintain their appealing appearance, it’s essential to adopt a consistent maintenance routine. By following these simple steps, you can ensure your wooden crates remain in excellent condition for an extended period.
Regular Cleaning
Regularly dusting and cleaning your wooden crates is crucial to prevent the accumulation of debris that can ultimately cause harm to the wood itself. To achieve this, use a gentle approach with a soft cloth or brush to effectively remove any surface dirt that may have accumulated.
Protective Coatings
To safeguard the longevity and aesthetic appeal of your crates, consider applying a protective layer like varnish or paint. This multi-faceted approach not only extends the lifespan of your crates but also imbues them with a refined look that can elevate the overall presentation.
Avoid Excessive Moisture
To ensure the longevity of your crates, it’s essential to store them in a location that provides optimal conditions. A dry, well-ventilated area is ideal for preventing warping and rot. In the event that your crates do become exposed to moisture, prompt drying is crucial to avoid long-term damage.
Inspect and Repair
To ensure the longevity of your crates, it’s crucial to conduct regular inspections and address any issues that arise. Be on the lookout for telltale signs of damage, including cracks, splinters, and other forms of wear and tear. By making prompt repairs, you’ll be able to halt the progression of deterioration and extend the life of your crates.
Gentle Handling
When utilizing wooden crates, it’s essential to handle them with care to prolong their lifespan. Refrain from dropping or stacking them excessively, as this can lead to damage and compromise the crate’s integrity.
By adhering to these straightforward maintenance guidelines, you’ll be able to maintain the durability and aesthetic appeal of your wooden crates, ultimately serving your storage needs while also adding a touch of rustic charm to your surroundings.
Safety Precautions for DIY Projects
As you dive into DIY ventures, safety considerations should take center stage. To ensure a successful and stress-free experience, it’s crucial to prioritize the following vital safety measures from the get-go:
Personal Protective Equipment (PPE)
When engaging in any activity that poses a risk to your well-being, make it a habit to don the necessary personal protective equipment (PPE). This includes essential items like safety glasses, gloves, and ear protection, all of which work together to shield you from potential dangers.
Proper Tool Use
When utilizing tools, it’s crucial to employ them for their designated functions and maintain them in a state of optimal functionality beforehand. Failing to do so can lead to not only diminished productivity but also compromised safety due to the potential risks associated with malfunctioning equipment. A well-maintained toolset is essential for achieving desired outcomes, whereas neglecting maintenance can result in subpar results or even accidents.
Fire Safety
When it comes to preventing fires, caution is key. To mitigate the risk of unexpected blazes, make sure you have a fire extinguisher readily available. Additionally, exercise vigilance when handling flammable materials, keeping them at arm’s length whenever possible. Moreover, oily rags are notorious for their potential to spontaneously combust, so store them in a metal container with a secure lid to prevent such incidents from occurring.
Clutter-Free Workspace
To mitigate the likelihood of accidents, it’s essential to maintain a well-organized workspace. This can be achieved by putting tools back in their designated places as soon as they’re no longer needed. Additionally, ensure that the floor remains clear of any clutter or debris, allowing for unobstructed movement and reducing the risk of tripping or other mishaps.
Adequate Lighting
In order to minimize the risk of errors and accidents, it’s crucial to create a well-lit workspace. Adequate lighting enables you to clearly visualize your tasks and detect any potential dangers, thereby reducing the likelihood of mistakes and injuries. This simple yet effective precaution can make a significant difference in ensuring a safe and productive working environment.
Avoid Fatigue
When tackling a DIY project, it’s essential to prioritize your physical and mental well-being by avoiding work when exhausted or under the influence of substances like alcohol or medication. Impaired reaction times and judgment can lead to accidents, compromising not only your own safety but also that of others around you.
By strictly adhering to these fundamental safety guidelines, you’ll be able to fully immerse yourself in your creative pursuits without worrying about potential risks. With a clear conscience and a sense of security, you can focus on crafting with joy, knowing you’re taking proactive measures to safeguard yourself and those nearby.
How to Get Started with DIY Wooden Crate Projects
Starting a DIY wooden crate project can be an exciting and fulfilling experience that allows you to put your personal touch on your space, develop new skills, and even forge memories with loved ones. Whether your goal is to craft functional storage solutions, one-of-a-kind furniture, or striking decorative pieces, the key to success lies in taking the first step. To help you navigate this process, here’s a comprehensive guide that will get you started on the right foot.
Choosing Your Project
When embarking on a DIY project, it’s essential to choose a venture that aligns with your skill level, personal interests, and the practical needs of your living space. For newcomers, starting with relatively simple projects such as building a crate bookshelf or crafting a storage box can be an excellent way to gain confidence and develop fundamental woodworking skills. Meanwhile, those with more experience may wish to challenge themselves by tackling more complex creations like a coffee table made from crates or a custom console table. Ultimately, the key is to select a project that sparks your enthusiasm and provides practical value in your home.
Gathering Materials
When embarking on a project that involves wooden crates, it’s crucial to gather the necessary materials before diving in. Typically, you’ll need to collect four primary components: wooden crates themselves, various tools, finishing supplies, and safety gear.
Wooden Crates: These can be sourced from craft stores, home improvement outlets, or even scoured for free from local businesses or online marketplaces.
Tools: A basic toolkit consisting of a screwdriver, hammer, nails, and sandpaper is essential. However, more complex projects may require the use of power tools such as saws or drills.
Finishing Supplies: To protect your crate and achieve the desired aesthetic, you’ll need to apply paint, stain, or sealant. Depending on your project’s requirements, you might also need additional hardware like hinges, casters, or brackets.
Safety Gear: Lastly, don’t forget to prioritize safety by wearing protective eyewear and gloves – especially when cutting wood or operating power tools.
Prepping Your Workspace
To embark on your project, it’s essential to create an ideal workspace environment. This involves setting up a dedicated area that fosters focus and efficiency. Start by selecting a flat, stable surface where you can comfortably work. Next, ensure all the necessary tools and materials are easily accessible and organized in a logical manner. If you’re working indoors, consider laying down a protective covering such as a drop cloth to safeguard against any accidental spills or debris. By taking these simple precautions, you’ll be well-prepared to tackle your project with confidence and minimize any potential disruptions.
Executing Your Project
To successfully execute most wooden crate projects, follow these general steps:
First, plan out your design or layout. While measurements don’t need to be precise at this stage, having a visual guide can help clarify your vision.
Next, prepare the crates themselves by sanding down any rough spots to prevent splinters. If you’re working with used crates, take the time to clean them thoroughly to remove any dirt or debris that might affect the final result.
As you begin assembly, pay close attention to your project guide and work at a comfortable pace. This may involve attaching crates together, adding shelves, or installing hardware – just be sure to follow the instructions carefully.
Once your main structure is complete, it’s time to add some finishing touches. Apply paint, stain, or sealant to protect the wood and enhance the overall appearance of your project.
Finally, once your main structure is dry, you can add any decorative elements or additional hardware that might be necessary – just remember to take your time and ensure everything is properly secured.
Safety First
When operating power tools, prioritizing safety is essential. Before commencing any project, thoroughly read and comprehend the instructions provided for each tool. This includes never compromising on wearing necessary personal protective equipment (PPE). Moreover, maintain a clean and organized workspace by removing any hazards that may pose a risk. If you’re unsure about a particular step or the correct usage of a tool, seek guidance from an experienced individual or consult reputable online tutorials.
Enjoying Your Creation
When it comes to DIY projects, the true value lies not just in the end result, but in the journey itself. The freedom to create something entirely yours, whether it’s an office cart, book nook, or TV stand, is what makes it truly special. And it’s okay if things don’t turn out exactly as planned – mistakes are simply opportunities for growth and learning. In fact, it’s often the imperfections that make a DIY project truly unique and reflective of your personal touch.
FAQs on DIY Wooden Crate Projects
To ensure a seamless experience for crafters tackling DIY wooden crate projects, we’ll address frequently asked questions that may arise during this process. By providing straightforward answers to these common queries, our goal is to simplify the creative journey and enhance overall satisfaction.
What materials do I need for a basic DIY wooden crate project?
To bring your basic project to life, you’ll need a solid foundation of materials and tools. These include wooden crates as the base structure, followed by sandpaper or a sanding block for smoothing out any rough edges. For added color or protection, consider incorporating paint or stain, along with a protective finish such as sealant or varnish to lock in your design. In addition to these essentials, you’ll also need basic tools like a hammer, nails or screws, and screwdriver to bring your vision to reality. Finally, prioritize safety with protective gear including gloves and safety glasses to safeguard yourself throughout the process.
Where can I find wooden crates for my projects?
You can obtain wooden crates from a variety of sources. For instance, you may find them at local craft stores and home improvement retailers that cater to DIY enthusiasts and professionals alike. Additionally, wine and liquor establishments might also carry these crates, often used for storing and displaying merchandise. Moreover, online marketplaces like Craigslist or Facebook Marketplace are viable options for sourcing wooden crates, potentially at a discounted rate. Furthermore, don’t be surprised if you stumble upon them being given away for free or at a low cost by local businesses looking to declutter their premises.
Can I do these projects with my kids?
While many wooden crate projects can be adapted for kids, it’s crucial to balance fun with safety. By involving your little ones in the process, you can create a unique bonding experience. However, remember to keep them at arm’s length when handling tools or executing steps that might not be suitable for their age and skill level.
How do I prepare my crates before starting a project?
To achieve a refined and splinter-free outcome, it’s essential to meticulously prepare your crates. The process involves several key steps. First, sand down the crate to eliminate any rough spots and remove potential hazards. Next, thoroughly clean the crates to eliminate dust, dirt, and other debris that may hinder the finishing process. If you plan to paint or stain the crates, consider applying a primer first, as this can significantly enhance the durability and longevity of the finish. Finally, apply your chosen paint, stain, or sealant, allowing sufficient time for each coat to dry before moving on to the next.
What kind of projects can I make with wooden crates?
When it comes to upcycling or repurposing old pallets, the creative possibilities are virtually limitless. To illustrate this point, let’s consider a few popular examples of how you can breathe new life into these rustic wooden planks. You might, for instance, transform them into clever storage solutions like bookshelves, toy boxes, or even shoe racks. Alternatively, you could repurpose pallets as functional furniture pieces, such as coffee tables, nightstands, or chairs. And then there are the decorative items you can create – think wall shelves, planters, or photo displays that add a touch of rustic charm to any room.
How can I ensure my DIY wooden crate project is eco-friendly?
When it comes to keeping your project environmentally friendly, consider the following strategies:
Firstly, opt for sources that are disposing of their materials responsibly, thereby minimizing waste.
Next, choose natural and non-toxic finishes and paints for a more eco-conscious approach.
Finally, think creatively about reusing or repurposing crates from previous projects to reduce the need for new materials altogether.
Is it necessary to finish my wooden crate project with paint or sealant?
Applying a finish to your project is not always a requirement, but it can significantly boost its longevity and aesthetic appeal. By shielding the wood from moisture and wear, a finish like paint, stain, or sealant safeguards your investment against damage, while also enabling you to tailor the look to harmonize with your interior design. This simple yet effective step can make all the difference in elevating the overall quality of your project.
What safety precautions should I take when working on a wooden crate project?
To ensure a safe and successful DIY project, prioritize precautions by: adopting protective attire such as gloves and safety glasses, working in a well-ventilated space, especially when dealing with materials like paints or stains that release fumes, thoroughly understanding and adhering to the instructions for power tools, and maintaining a tidy workspace devoid of clutter, thereby minimizing the risk of accidents.
Can I undertake a wooden crate project if I’m a complete beginner?
When venturing into the world of wooden crate projects, it’s essential to begin with a straightforward endeavor that fosters confidence and sets the stage for future creations. As you grow more acquainted with the necessary tools and techniques, you can progressively tackle increasingly intricate builds.
How can I customize my wooden crate project to match my home decor?
When it comes to personalizing your project, the possibilities are endless. To get started, consider pairing your chosen paint or stain colors with the existing decor in your space. This ensures a harmonious look that complements the surrounding environment. For an added touch of elegance, incorporate decorative elements such as custom knobs, casters, or fabric linings. Alternatively, experiment with different configurations or combine your crates with other materials like glass or metal to create a truly one-of-a-kind piece.
30 Unique DIY Wooden Crate Ideas and Decor Projects
Transform the humble wooden crate into a versatile design element by exploring 30 innovative DIY projects that infuse your living space with rustic charm. From clever upcycling ideas to decorative displays, uncover the limitless possibilities of turning wooden crates into unique home decor accents.
Make Your Own Wood Crate Rolling Cart
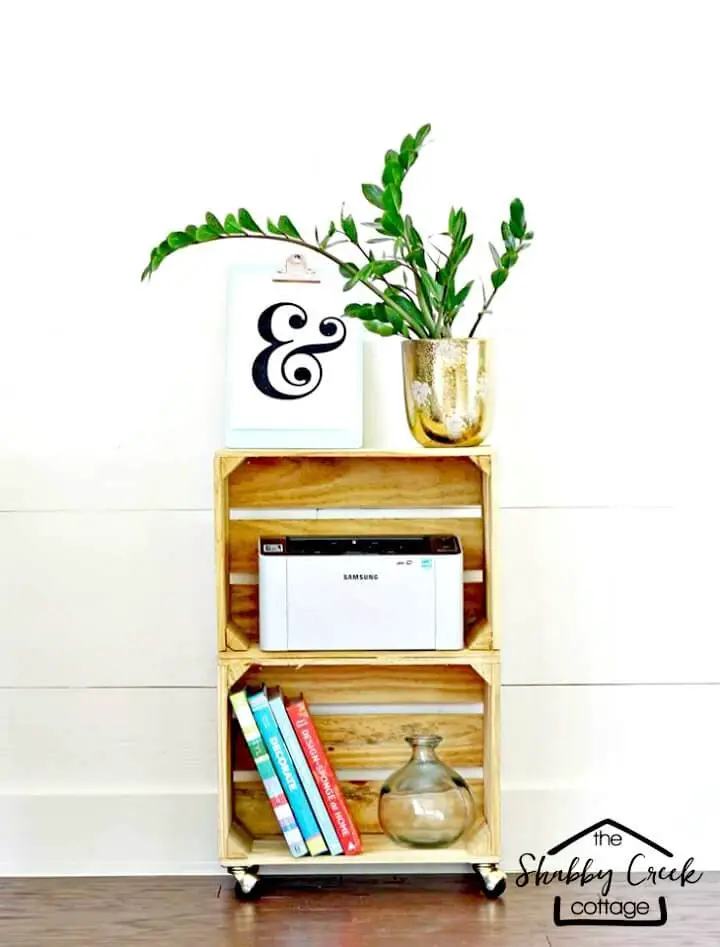
Transforming wooden crates into functional rolling carts is easier than you think! With Gina Luker’s step-by-step guidance from The Shabby Creek Cottage, you can repurpose two crates into a practical piece of furniture in under 30 minutes. Perfect for office spaces or supply organization, this DIY project requires minimal tools and materials – just wood crates, screws, casters, and basic tools. Follow the simple instructions to assemble and secure the crates, attach the casters, and enjoy your new, versatile rolling cart. Not only will it add a charming touch to your home, but it also offers a creative solution for storage and mobility.
How to DIY Wooden Crate Lockers
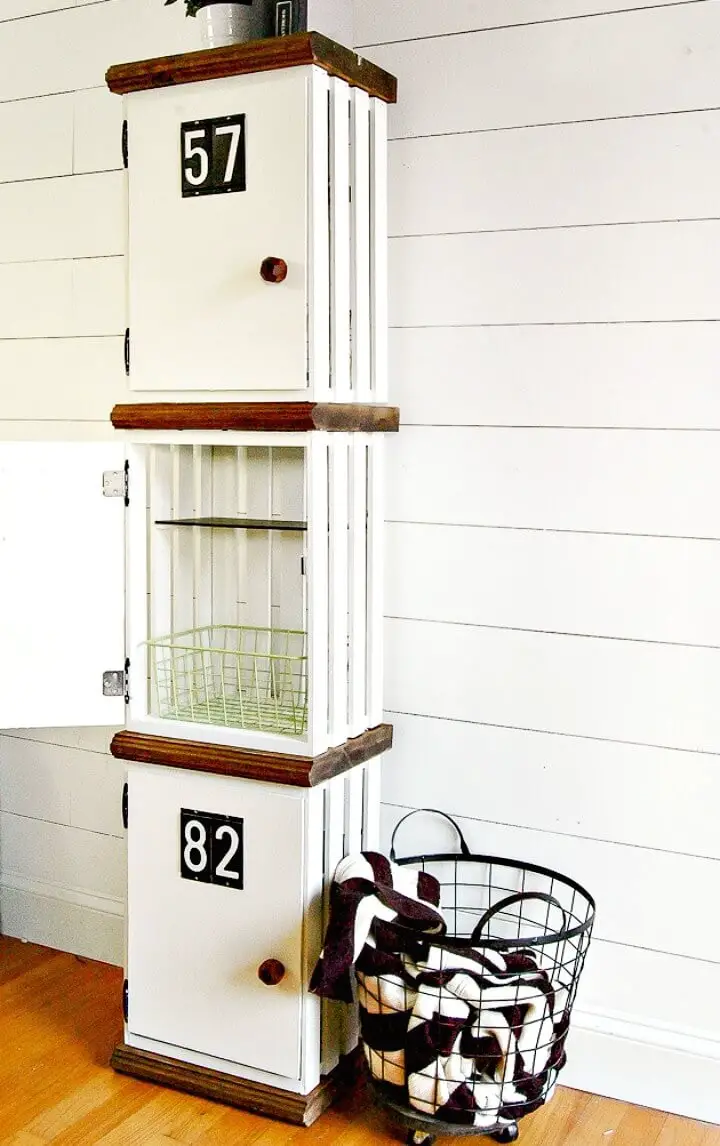
Transforming humble crates into bespoke storage solutions is an accessible and rewarding DIY project that can elevate the functionality of any space. At Little House of Four, we’ve distilled the process into a series of easy-to-follow steps, requiring only basic tools and materials. By following our comprehensive guide, you’ll be able to craft a custom locker set tailored to your unique needs. From measuring and cutting the crates to adding the finishing touches with paint, this project offers a fun and creative outlet for anyone looking to add a personal touch to their home furnishings. As always, remember to prioritize safety by securing your lockers with sturdy straps to prevent tipping and ensure a secure, practical addition to your space.
Wooden Crate Storage and Display for Hot Wheels Cars
Turn your playroom into a hot spot with a charming DIY wooden crate parking garage, perfect for Hot Wheels or Matchbox car enthusiasts! By following the easy-to-follow guide from Frugal Fun For Boys and Girls, you can create a stylish and practical storage solution that’s as functional as it is fun. Start by sanding the wooden crate to perfection, then cut sturdy mailing tubes to size and secure them with hot glue. Add a backing to prevent cars from slipping through, and finish things off with a custom sign for a personalized touch. This project isn’t just about organizing your collection – it’s also a great way to turn it into a display piece that’s both functional and fun. So get creative and give your favorite toy cars the special place they deserve in your home.
How to Build Crate Bookcase
Transforming a room into a cozy reading nook for kids can be achieved with a simple DIY crate bookcase. Maison de Pax’s effortless approach involves stacking raw wood crates to desired height and filling them with cherished items. The flexibility of this project lies in its ability to be personalized through painting or staining the crates, or embracing their natural charm. For added safety, securing the crates to the wall is a quick solution, especially for households with energetic little ones. This project is perfect for those seeking a straightforward and adaptable solution to storage and decor, offering a practical yet playful addition to any space.
How to Make a Crate TV Stand
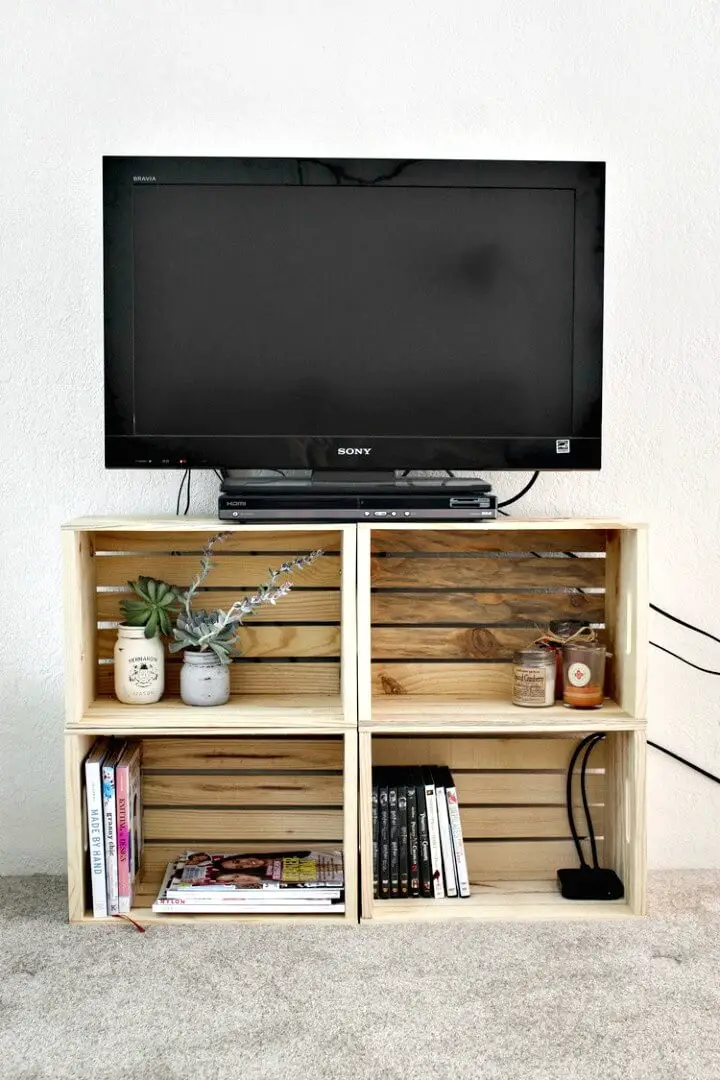
Transforming your living space doesn’t have to break the bank. With a little creativity and some crates of Cashmere & Plaid, you can build a budget-friendly and stylish TV stand that perfectly reflects your unique taste. Emily Johnson’s journey in creating her Victoria apartment’s cozy atmosphere is proof that with a DIY crate TV stand, anyone can add a personal touch to their home. This project involves assembling and securing crates to create a practical and decorative piece that’s perfect for students or anyone looking to make a statement. By following clear instructions and getting creative with the styling of each section, you’ll be able to craft an attractive and functional furniture item that will elevate your living area without putting a dent in your wallet. Get ready to give your space a makeover with this simple yet effective DIY project.
Build Your Own Crate Storage Coffee Table and Stools
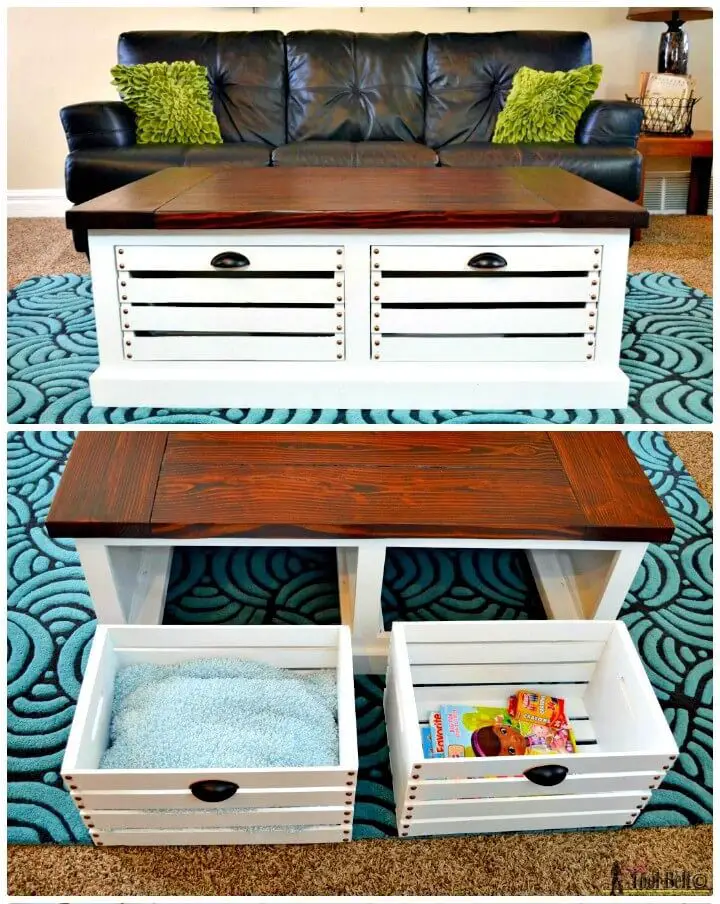
Transform your compact home into a warm and welcoming space with the multifunctional crate storage coffee table and stool set. This clever combination seamlessly integrates style and practicality, featuring a sturdy coffee table with discreet storage compartments that can stow away books, remotes, and plush throws. The matching stools not only provide additional seating but also double as space-saving under-table storage when not in use. With its rustic charm, this ensemble effortlessly adapts to any décor, creating a cozy gathering spot for friends and family alike. Whether you’re hosting a casual coffee morning or an evening of board games, this versatile set ensures your living area remains clutter-free and inviting, perfect for relaxed social gatherings.
DIY Crate Side Table Tutorial
Spring is the ideal season for embarking on home improvement projects, and By Hand London presents a comprehensive DIY guide that empowers you to craft a charming crate side table from scratch. This engaging tutorial takes you through a series of straightforward steps, guiding you in transforming bushel crates into a sturdy and functional piece of furniture. Begin by sanding the crates to eliminate imperfections, followed by screwing them together to form a double- layered tabletop. Next, infuse your creation with personality by painting the crates in your preferred hue. For added convenience, consider attaching wheel castors for effortless mobility. To put your unique stamp on the design, you can also incorporate decorative trim or other embellishments that align with your personal taste. By following these step-by-step instructions, you’ll be able to create a delightful new side table that adds warmth and character to your living space. Moreover, IKEA Billy Bookcase hacks offer an array of free plans and creative ways to transform your shelves into functional masterpieces.
Building a Wood Crate Bookshelf
Bring a touch of personalized style to your home with a custom DIY wood crate bookshelf. This engaging tutorial from Sew Much Ado provides a step-by-step guide on how to transform pre-finished wood crates into a functional and stylish storage solution, perfect for organizing books or showcasing collectibles. The addition of removable wallpaper adds an extra layer of sophistication, allowing you to customize the look to fit your unique aesthetic. With clear instructions on sanding, gluing, and wallpaper application, this project is designed to be approachable and easy to complete, even for those new to DIY crafting. As a bonus, stay tuned for an upcoming tutorial on creating a giant floor pillow, ideal for building a cozy reading nook that’s sure to become your favorite spot in the house.
Make a Bookshelf from Unfinished Wooden Crates
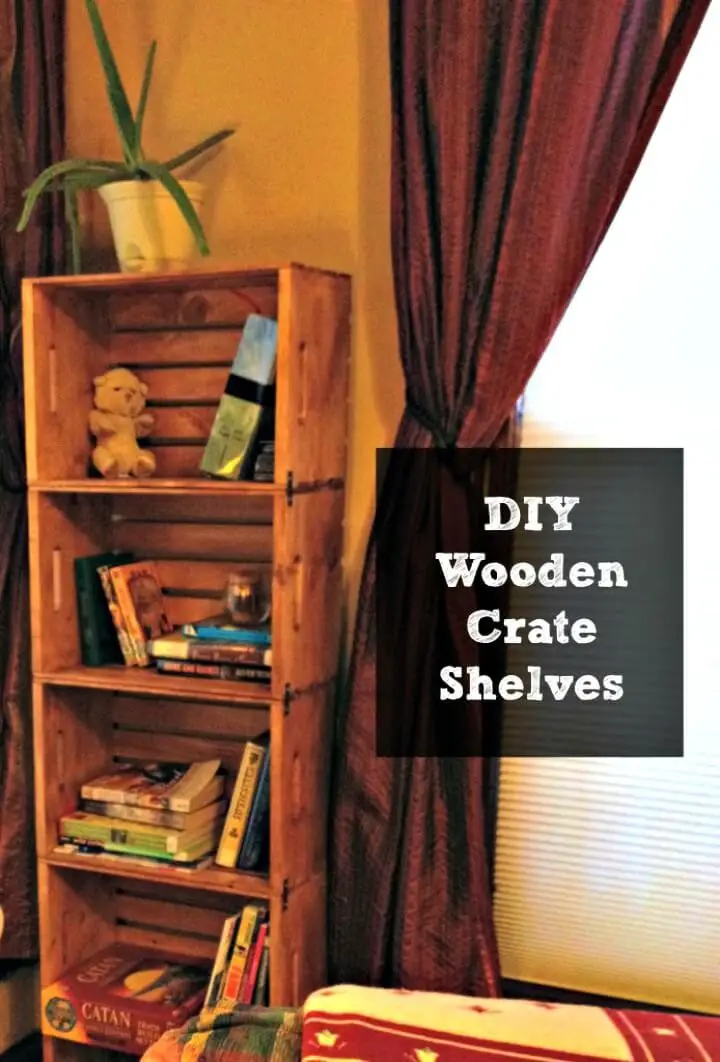
Transform your home with a rustic bookshelf crafted from unfinished wooden crates from Walmart, as cleverly described by Jenn at Frugal Upstate. This budget-friendly DIY project not only saves you money but also yields a unique decorative piece. By following straightforward steps, you’ll refinish the crates to create a personalized design that perfectly suits your taste. The incorporation of mending plates provides a solid foundation, while opportunities for customization arise through painting or varied arrangements. Perfect for keeping books and magazines organized, this handmade bookshelf embodies the perfect blend of practicality and style. To ensure safety, secure it with a tip-resistant strap and revel in the sense of accomplishment that comes from creating something functional and visually appealing entirely by yourself.
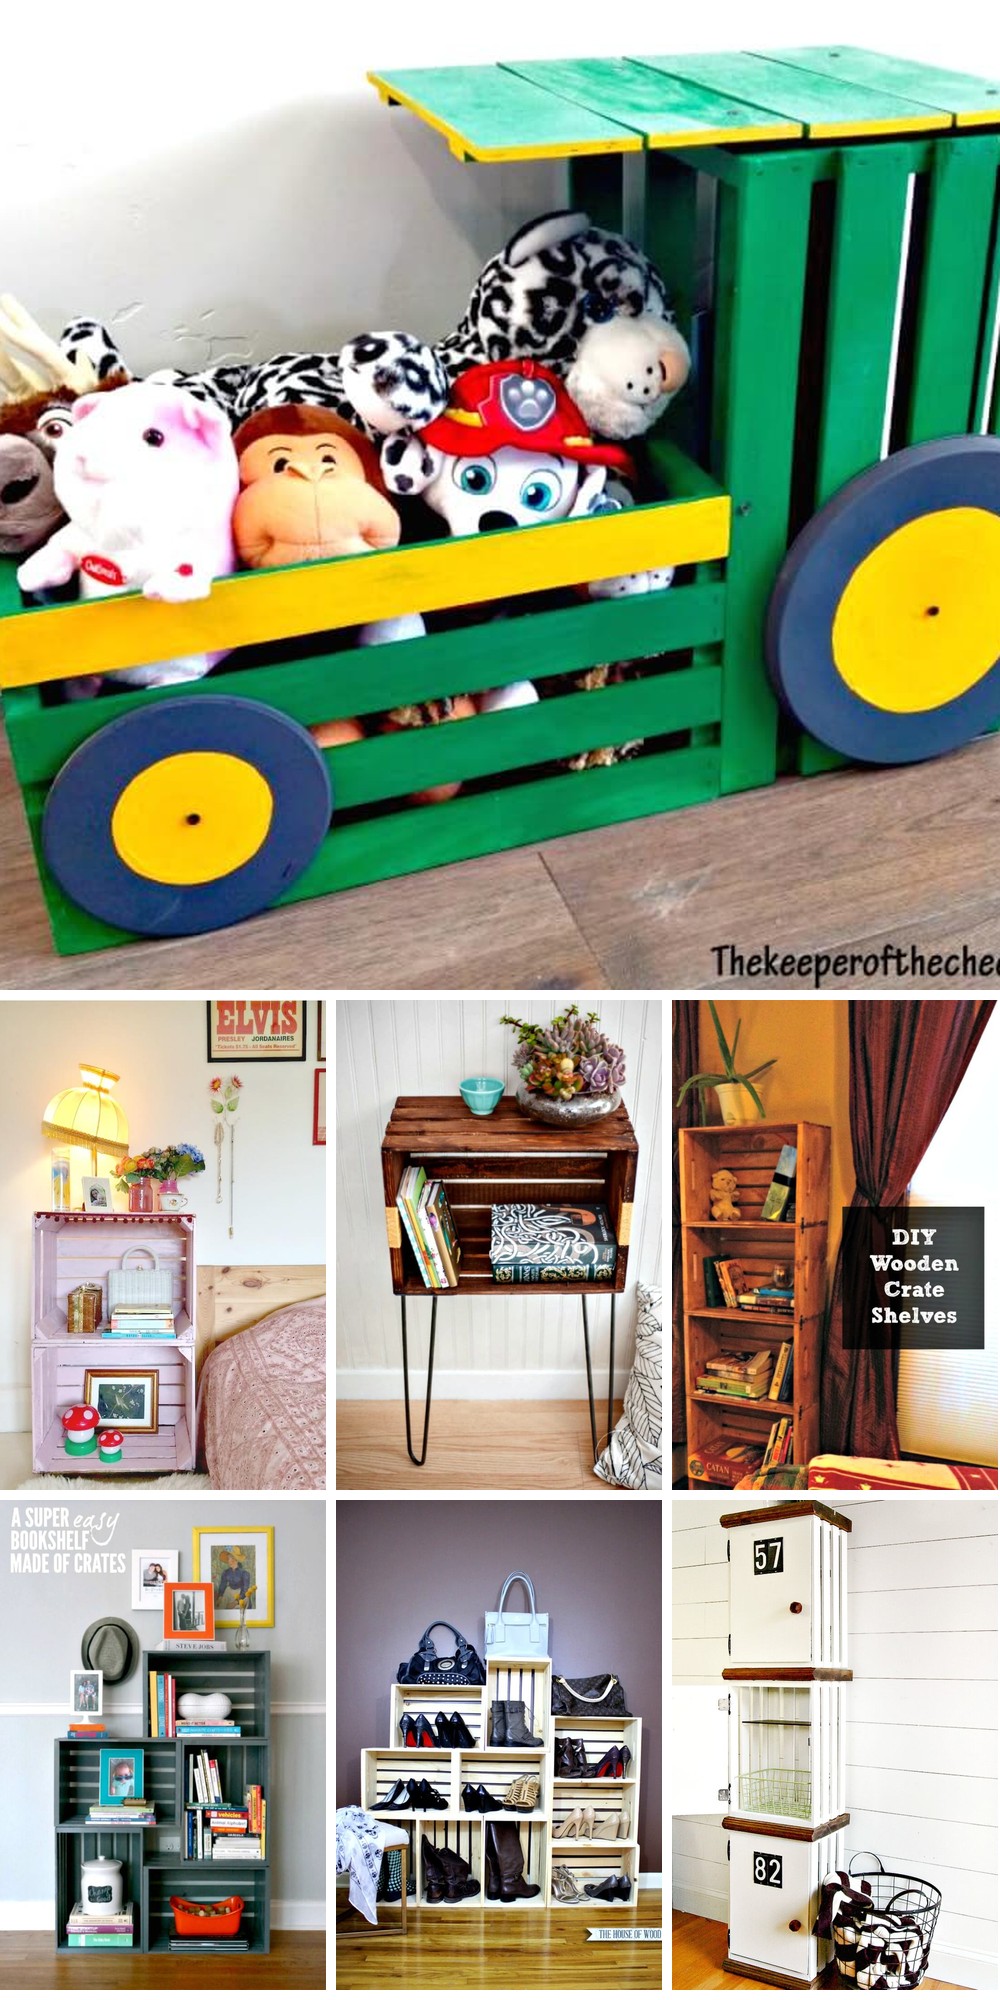
DIY Wood Crate Tractor Toy Box
Transforming a plain toy box into a playful tractor-themed storage solution is a straightforward process that requires minimal DIY expertise. By following The Keeper of the Cheerios’ step-by-step guide, you can easily turn simple wood crates and panels into a vibrant and organized space for your child’s toys. All it takes is some basic painting skills and a few screws to secure the wooden pieces together. With a well-ventilated workspace and attention to safety precautions like smoothing out sharp edges on the wood, you’ll be able to create a charming new home for your child’s toy collection in no time. This DIY project is perfect for organized playrooms, providing a fun and thematic way to store toys and keep them within easy reach.
Handmade Wooden Crate Outdoor Table
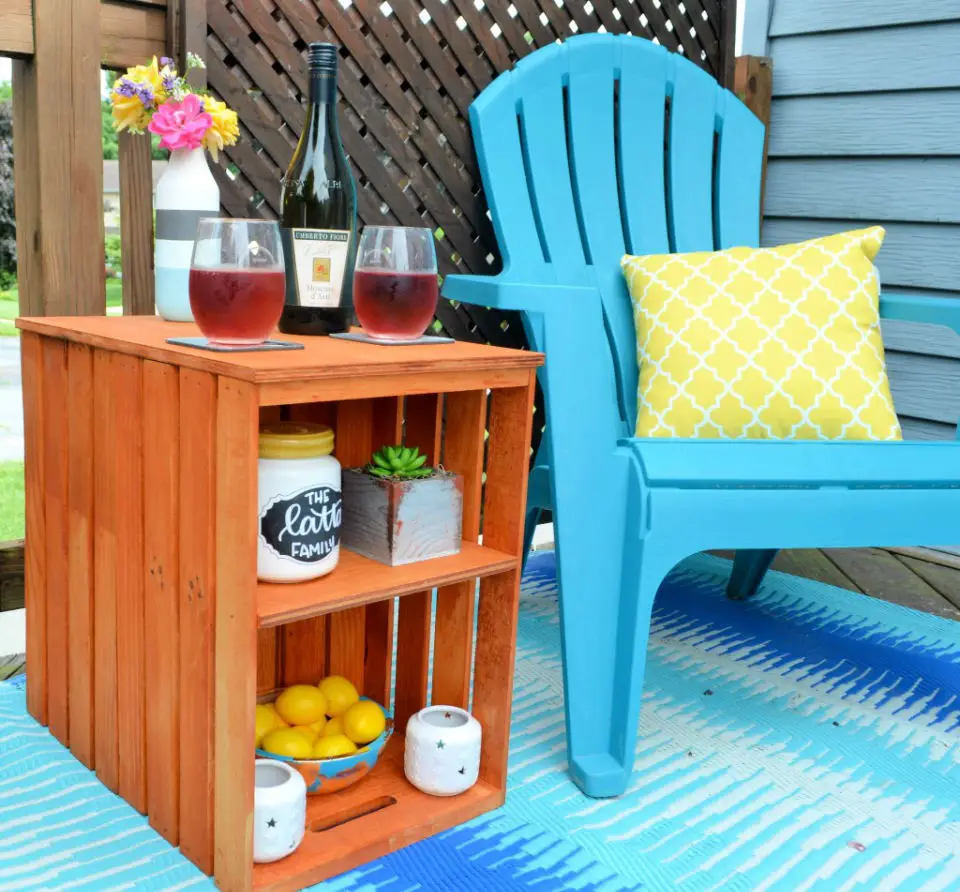
Ready to elevate your alfresco ambiance? Transform your deck or patio into a cozy gathering spot by crafting a rustic wooden crate outdoor table with Amy Latta Creations’ easy-to-follow instructions. All you need are two crates, some plywood, and fundamental tools to create a multi-functional masterpiece perfect for showcasing grilling essentials or hosting impromptu soirees.
Tailor it to your taste with a selection of stains or paints, and revel in the practicality and visual appeal this DIY endeavor brings. Kick-start your summer celebrations with a table that’s as versatile as it is charming.
Make Your Own Crate Lemonade Stand for Kids

Get ready to unleash your kids’ creativity and entrepreneurial spirit with an exciting outdoor activity! For a fun and educational experience, head over to See Vanessa Craft for a step-by-step tutorial on building a charming DIY crate lemonade stand that’s perfect for little entrepreneurs. This carefully crafted guide by Vanessa will walk you through each stage of the process, from gathering materials to adding the final touches.
This project is ideal for family bonding and is more than just a fun setting for pretend play – it also offers a fantastic opportunity for kids to learn valuable business skills while earning some money at community events. Give your children the joy of creating their own little stand, and watch their imagination and business acumen flourish!
Rustic DIY Wooden Crate

Discover the joy of DIY crafting with Clean and Scentsible’s comprehensive guide to building custom wooden crates. This step-by-step tutorial is designed to help you create unique storage solutions that not only keep your belongings organized but also add a personal touch to your home’s décor. With a clear list of materials and easy-to-follow directions, even those new to woodworking can feel confident in their ability to complete the project. The tutorial goes beyond just the basics, offering valuable tips on finishing touches like staining and hardware additions to ensure your handmade crates are both functional and stylish. As you work through this engaging and accessible wooden crate tutorial, you’ll be amazed at how easily you can transform your space into a reflection of your personal style.
Make Shelf Sconce Using Wooden Crates
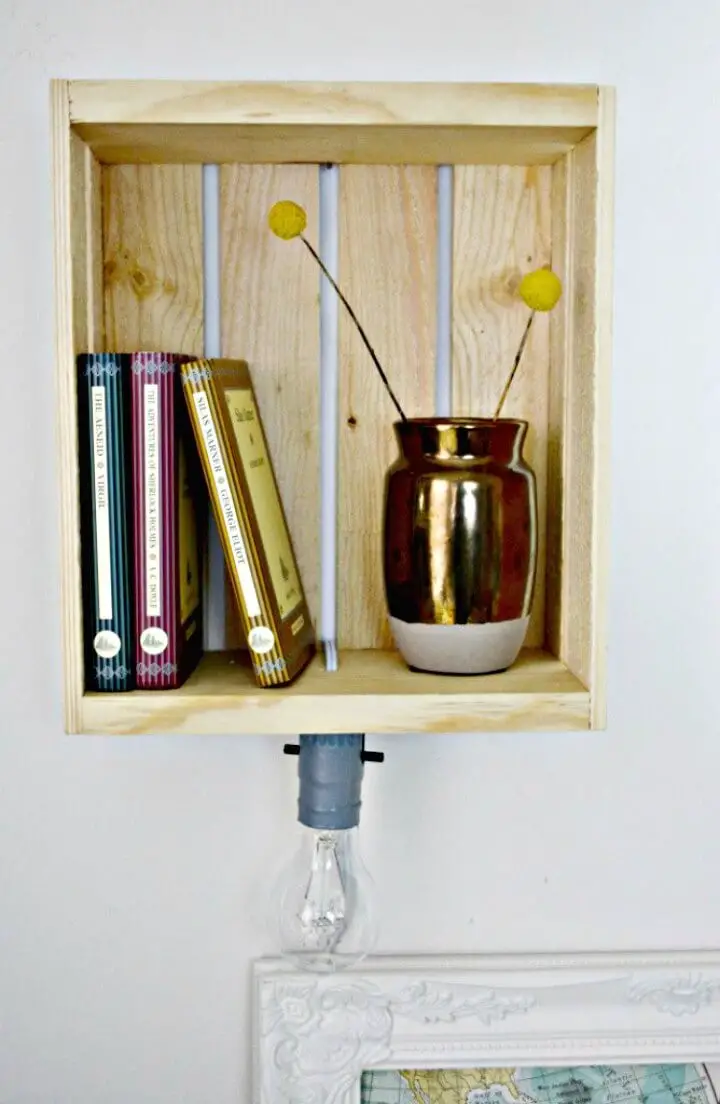
Transform your living space with an innovative and easy DIY shelf sconce project from joyful riot. This creative endeavor combines the benefits of additional shelving and enhanced lighting to elevate any room. By repurposing a small wooden crate and a lamp kit, you can create a functional and stylish sconce that’s both practical and chic. The step-by-step guide takes you through a simple process of drilling, wiring, and securing the light socket, allowing for easy customization to match your unique decor. Once complete, display your favorite trinkets or decorative items for a personalized touch. Perfect for craft rooms, offices, or any space that needs extra illumination and storage, this DIY sconce is a clever solution that’s sure to impress.
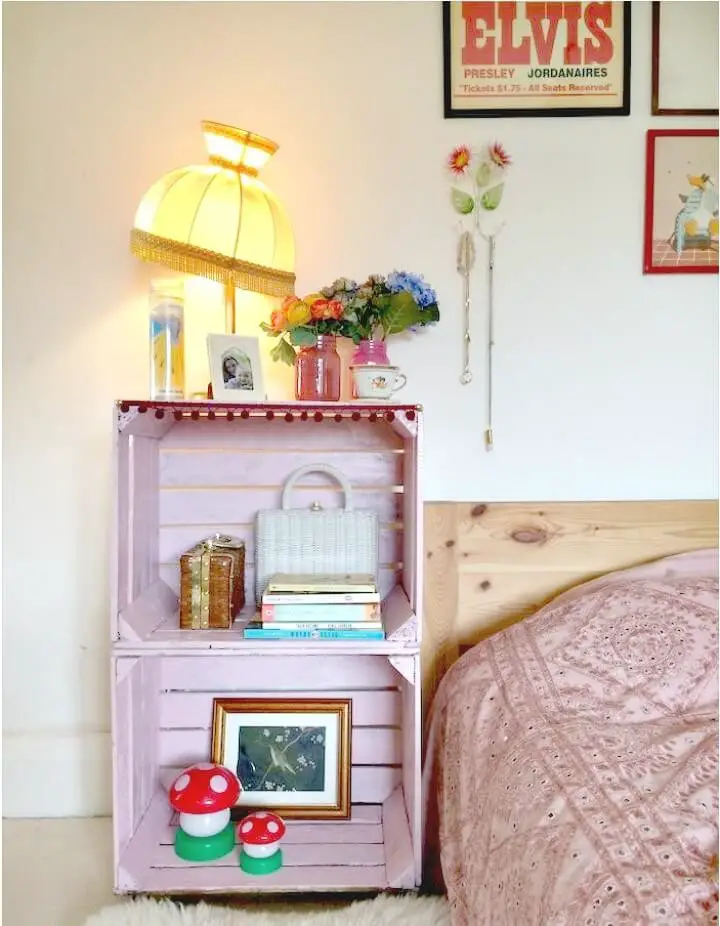
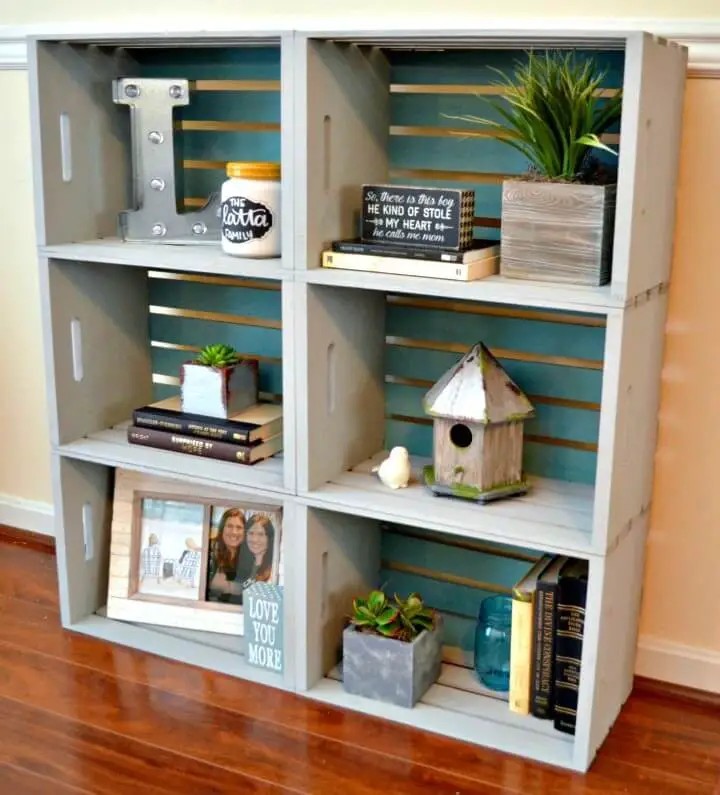
Adorable DIY Bookshelf Out Of Crates
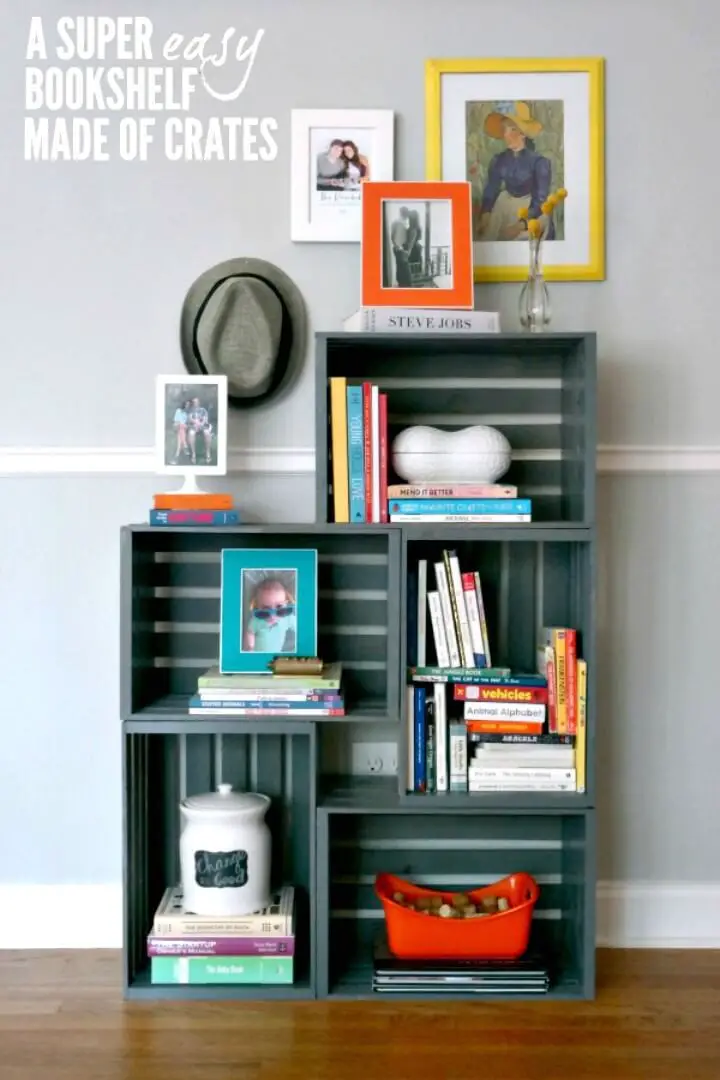
Crafting a customized bookshelf is an enjoyable and practical project that can bring a personalized touch to any room. By following the straightforward guide provided by C.R.A.F.T., you can transform wooden crates into a functional storage solution perfect for organizing books, shoes, or toys. With just a few large crates, some stain or paint, and a trusty paintbrush, you’ll be able to assemble a unique bookshelf that suits your space. The process involves staining the crates to your desired finish, stacking them in a configuration that meets your needs, and securing them together for stability if necessary. The guide offers various arrangement ideas catering to different storage requirements, making it easy to create a durable and stylish bookshelf that complements your home decor. By following these simple steps, you can craft a functional and visually appealing bookshelf that adds a touch of personality to any room.
Adorable and Easy DIY Crate Book Storage
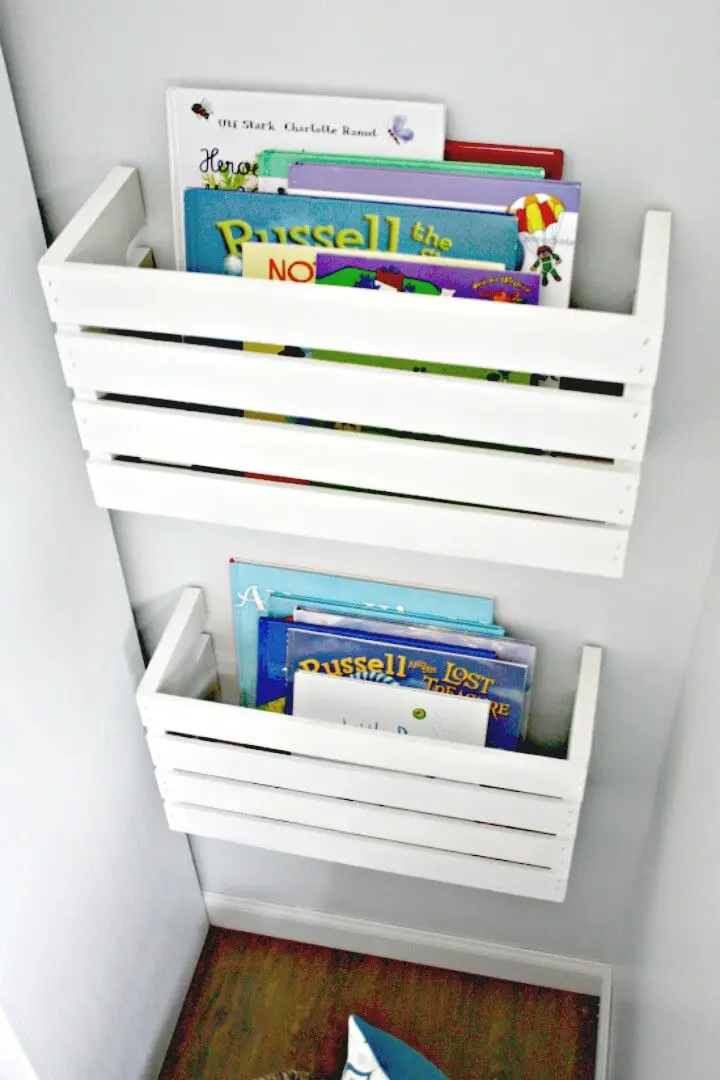
Transform your playroom’s literary landscape with creativity and resourcefulness! By upcycling simple wooden crates, you can craft charming book shelves that not only provide easy access to your little one’s favorite stories but also add a touch of whimsy to the space. Begin by giving the crates a fresh coat of white paint and then cleverly slice them in half to create a unique wall-mounted shelf. Secure these halves with basic wall brackets at a kid-friendly height, allowing for effortless book browsing and tidy organization. To complete this eco-friendly project, line the slatted crate bottoms with a spare school folder or poster board for a smooth finish. Finally, anchor your creative shelves to the wall using drywall anchors to ensure they’re sturdy and safe for your tiny bookworms. With this clever crate book storage idea, you’ll be well on your way to creating an inspired playroom that seamlessly blends form and function. As you bring this project to life, imagine the joyful hours of reading and exploration that await within its cozy confines.
How to Make a New Wood Crate Look Old
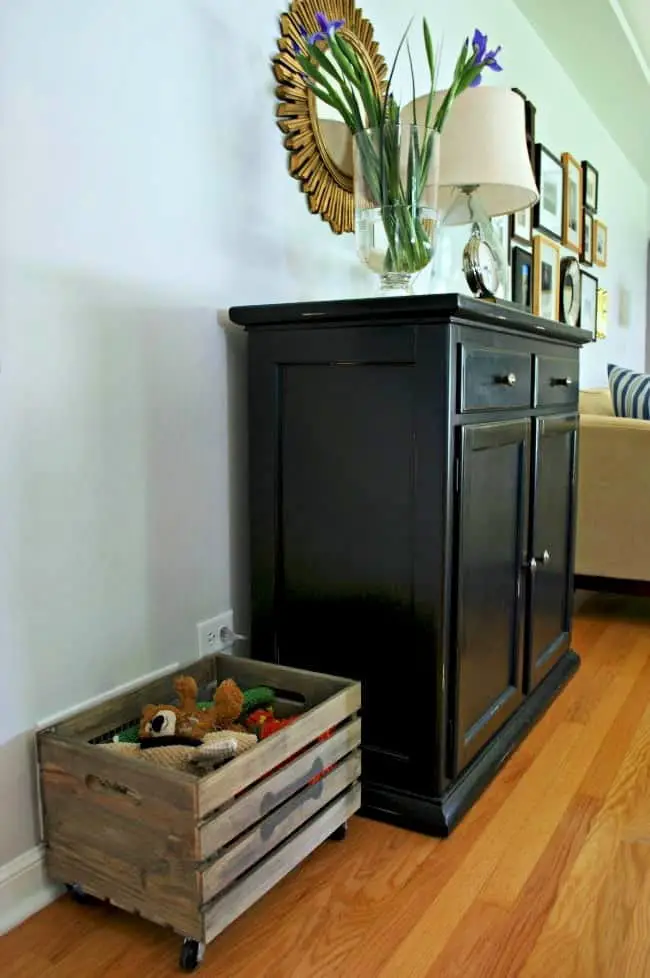
Kristi Haight from Chatfield Court shares a creative way to breathe new life into an ordinary $10 wooden crate from Target, turning it into a charming dog toy box with a vintage twist. With just water and leftover paint, this DIY project transforms the humble container into a one-of-a-kind storage solution that’s both stylish and practical. The addition of wheels for easy mobility and a customized dog bone stencil adds a personal touch, blending seamlessly into any home decor. This straightforward yet impactful project is perfect for those looking to try their hand at home crafting, and with Kristi’s expert guidance, you’ll learn how to create a functional and fetching dog toy box that looks like it’s been part of your family for years.
How to Build Crate & Pipe Industrial Table
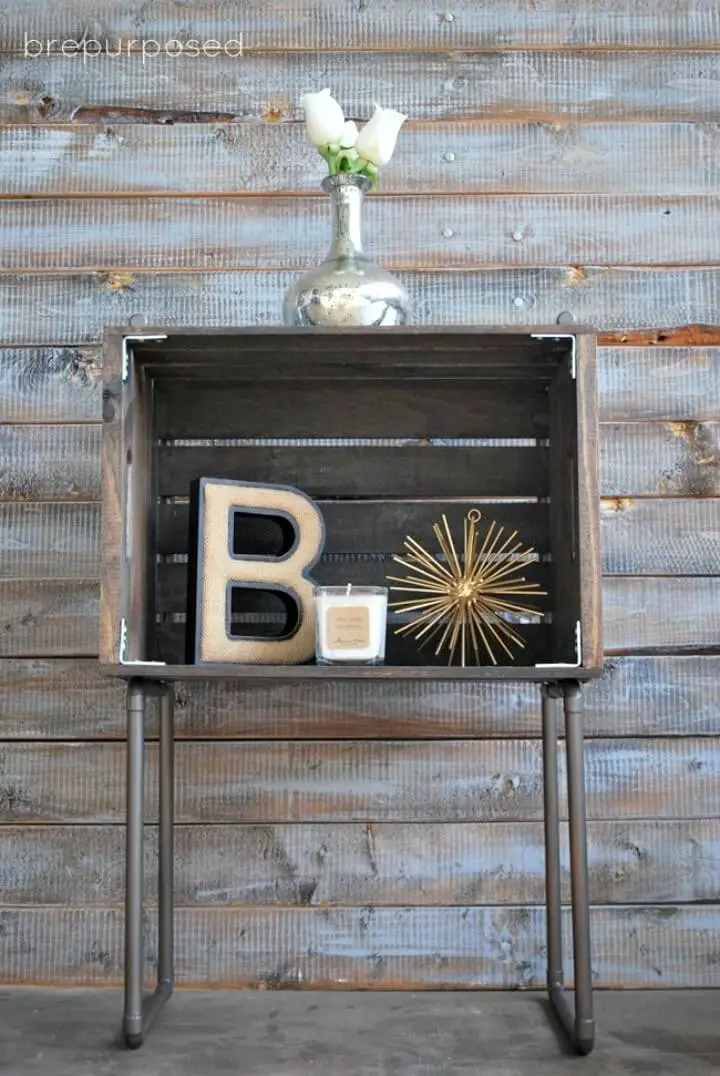
Crafting a DIY industrial table using crates and pipes is a great way to add a unique touch to your home decor. One excellent resource for learning how to create such a piece is Brepurposed’s step-by-step guide. With just a few simple materials, including wooden crates and plumbing pipe from your local hardware store, you can build a sturdy and stylish table that exudes an industrial flair. The tutorial provides detailed measurements and tips on achieving the perfect finish for your crate, ensuring your final product turns out strong and chic. Whether you’re looking to add some industrial charm to your living room or home office, this project is sure to impress.
Make Your Own Wood Crate Console Table

Imagine embarking on a creative odyssey alongside Dwell Beautiful as they join forces with nine visionary bloggers to take part in the Great Crate Challenge! Each participant transforms a plain Michael’s crate into a masterpiece, showcasing their unique flair for upcycling. Erica Soofer shares her enlightening journey of turning a humble wooden crate into a sophisticated console table and display shelf. With refreshing candor, she recounts her first-time experience with staining wood, adding a touch of luxury with gold string, and culminates the project with trendy hairpin legs. This instructive post is a treasure trove for DIY enthusiasts, not only inspiring but also imparting practical tips for their next home project. Step into Erica’s transformation journey and be inspired to elevate your decor with a dash of DIY magic! For those seeking a functional centerpiece, discover free DIY coffee table plans to get started on your next creative adventure.
DIY Crate Storage Seat

Transform a humble wood crate into a charming and multifaceted piece of furniture, perfect for a child’s room or craft corner. This step-by-step guide will walk you through the process of turning a simple crate into a cozy, cushioned seat that doubles as storage. From sanding and painting to upholstering and adding casters, this project is designed to be easy to follow and yields a unique, functional, and whimsical stool that’s just waiting to be filled with toys or craft supplies.
Easy DIY Crate Bookcase Tutorial
Add a touch of personality to your living space by crafting a one-of-a-kind bookcase using DIY crates. With Amy Latta Creations’ straightforward guide, you can create a charming and functional bookshelf that’s perfect for any room. Whether you’re new to DIY or a seasoned pro, this project is sure to be a satisfying addition to your home decor. To get started, gather some unfinished wood crates, a few basic tools, and a dash of paint. Then, follow Amy’s steps to sand, paint, and assemble the crates before nailing them together for a sturdy and stylish bookcase. To customize the final look, add your favorite accessories and balance each shelf with color-coordinated items for an engaging and cohesive appearance. With this project, you’ll create a unique piece that not only holds your treasured books but also becomes a focal point in your home.
How to Make Crate Locker Cubbies & Giveaway
Get ready to transform your home into a organized haven for the school year! By repurposing wooden crates, you can create a functional and stylish locker cubby system that keeps school supplies and homework essentials in check. The best part? This DIY tutorial requires no complex carpentry skills – just standard pine boards, screws, and wood glue. With detailed instructions and a materials list, you’ll be able to build a sturdy base, integrate shelves for extra storage, and finish your cubbies with paint or stain for a custom look. To ensure smooth drawer glides, the tutorial also provides valuable sanding tips. If you’re eager to tackle a project that will help maintain order and add a personal touch to your space, Jaime Costiglio’s engaging step-by-step guide has got you covered.
DIY Kitchen Island With Pantry Storage
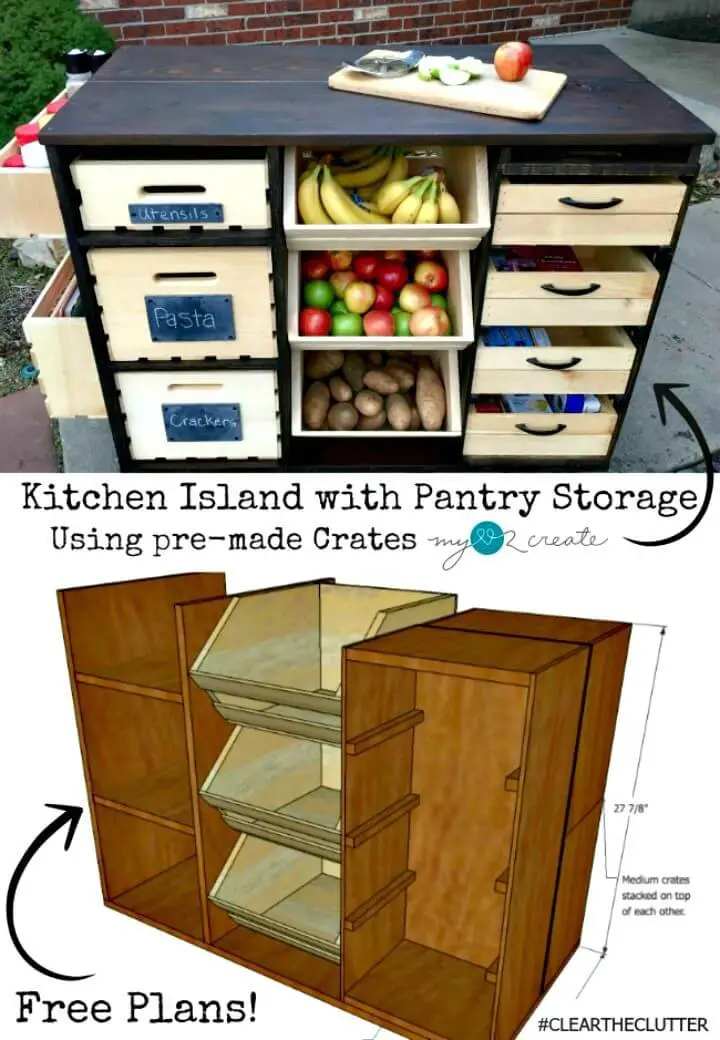
Transform your kitchen space with functionality and style using MyLove2Create’s DIY Kitchen Island with Pantry Storage guide. This innovative project takes ordinary crates and pallets and turns them into a versatile storage solution that’s perfect for organizing spices, utensils, or crafting supplies. With its mobile design, the island can be easily moved to accommodate different kitchen layouts, making it an ideal addition to any home. The comprehensive plans provide a clear and straightforward building process, allowing you to customize the project to fit your unique needs and kitchen size. A cutting board slot and space for hanging towels add practicality, while the island’s stylish design makes it a beautiful focal point in your kitchen. Whether you’re looking to upgrade your cooking experience or simply create more storage space, this DIY project is an exciting and rewarding way to do so.
How to Make Vintage Crate Boot Rack
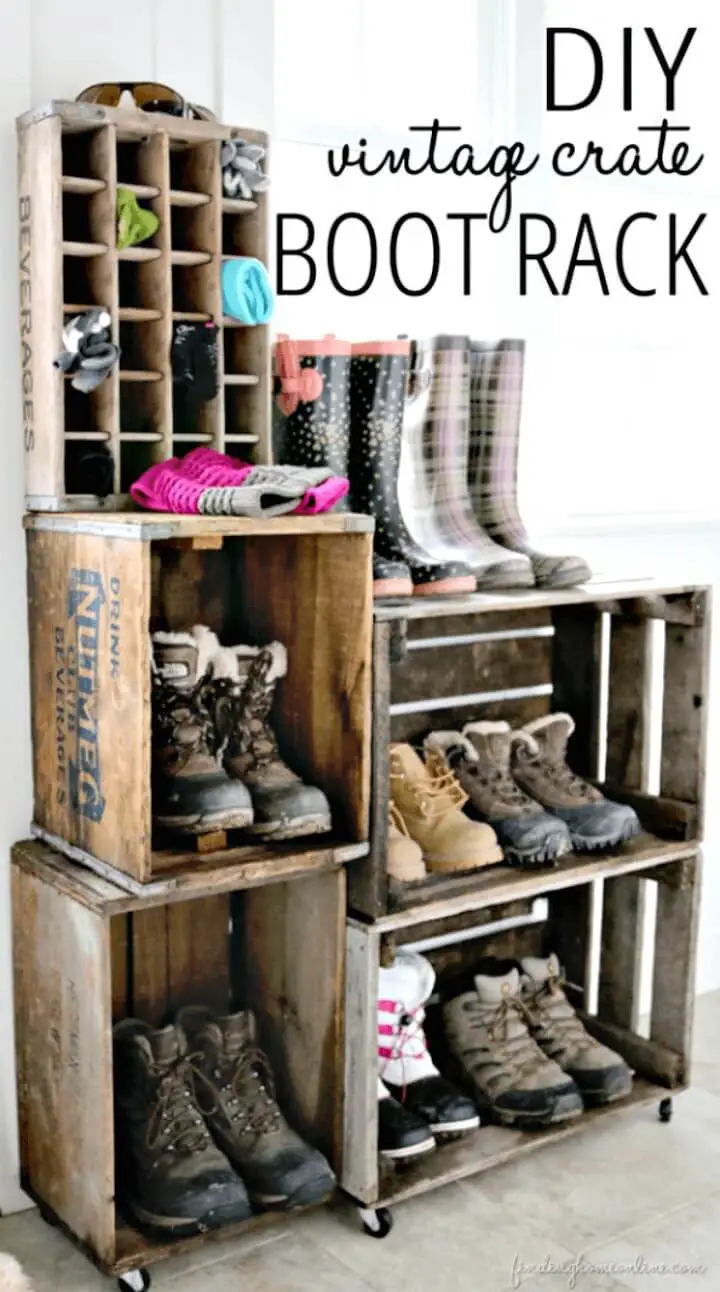
Transform your entrance or mudroom into a charming farmhouse-inspired haven by embracing the rustic elegance of Infarrantly Creative’s DIY vintage crate boot rack tutorial. Cluttered boots and shoes can be a thing of the past as you create an organized and stylish storage solution with this step-by-step guide. From expertly staining wooden crates to add a touch of authenticity, to attaching casters for effortless mobility, this tutorial is designed to educate and engage, making it easy to follow along. With insider tips on aging crates to perfection and adding personalized graphics, you’ll craft a practical and vintage-lookin boot rack that beautifully complements your home’s aesthetic. Get ready to roll up your sleeves and tackle a rewarding DIY project that promises to tidy up your living space with a touch of vintage charm.
How to Build Industrial Wood Crate Toy Box
Unleash your creativity and transform your child’s room with a unique, DIY industrial wood crate toy box that seamlessly blends functionality with a sports-inspired aesthetic. This comprehensive tutorial from Addicted 2 DIY will walk you through the process of crafting a sturdy and stylish storage solution that’s sure to delight your kids. You’ll discover how to source the perfect materials, precision-cut the wood, assemble the pieces, and add a personal touch through stenciling techniques. With crystal-clear instructions and valuable tips, you can create a one-of-a-kind toy box that stands out and keeps clutter at bay. Get ready to elevate your DIY skills and upgrade your child’s room decor with this innovative project.
How to Build Shoe Storage Display
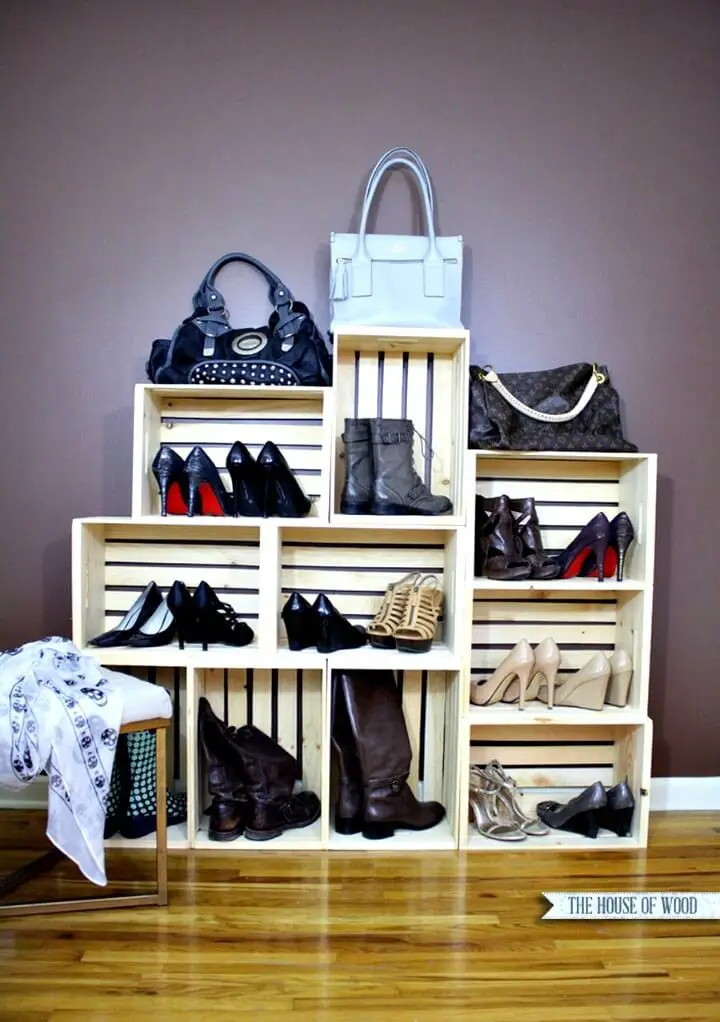
Kick off the new year with a sense of calm and control by transforming your shoe storage situation. By leveraging wooden crates, you can create a customized display that not only streamlines your footwear but also adds a touch of personality to your home decor. Follow Jen’s straightforward guide on The House of Wood to build a shoe storage solution that showcases your collection in an orderly manner while providing easy access. This DIY project is perfect for anyone looking to declutter their living space and cultivate a sense of satisfaction. Simply follow the tutorial to turn shoe chaos into a stylish and organized haven.
Easy DIY Ironing Board Station
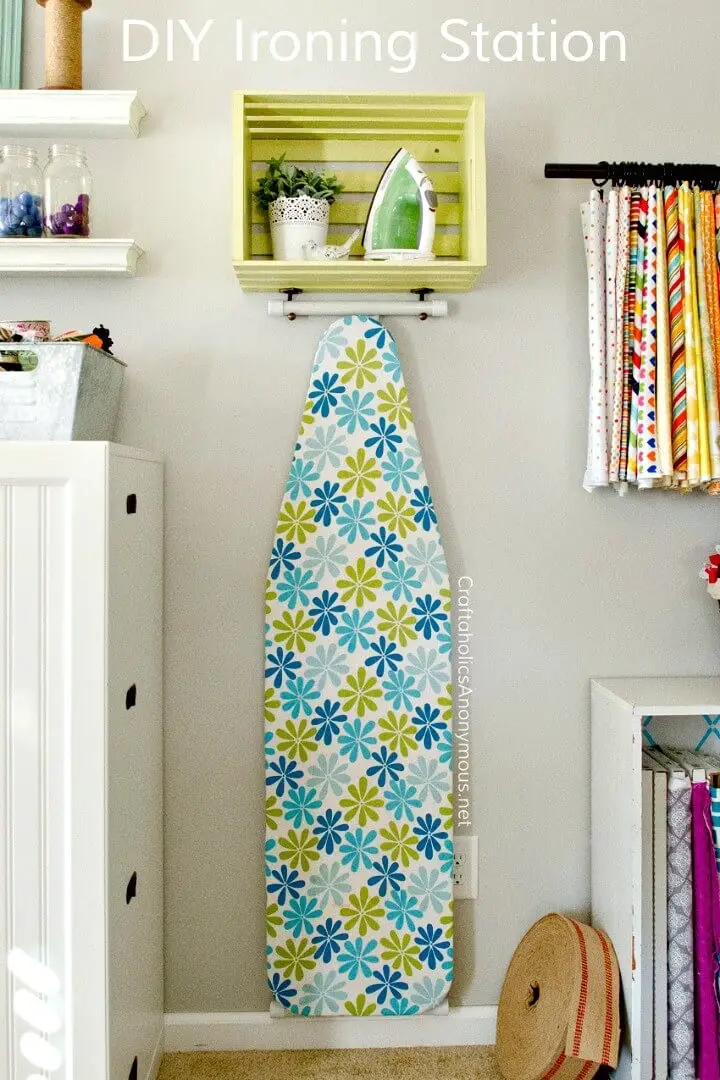
Transform your workspace into an organized oasis by repurposing a wood crate as a DIY ironing station. With just a few simple supplies, including metal hooks, you can create a functional and visually appealing space for storing your iron and ironing board. In this project, we’ll show you how to breathe new life into a plain crate by painting it with vibrant colors from BEHR. By following our step-by-step guide, even those without extensive crafting experience will be able to achieve professional-looking results. Say goodbye to cluttered spaces and hello to a tidy craft room or laundry area with this clever storage solution.
DIY Ottoman Using Jeans and a Wooden Crate
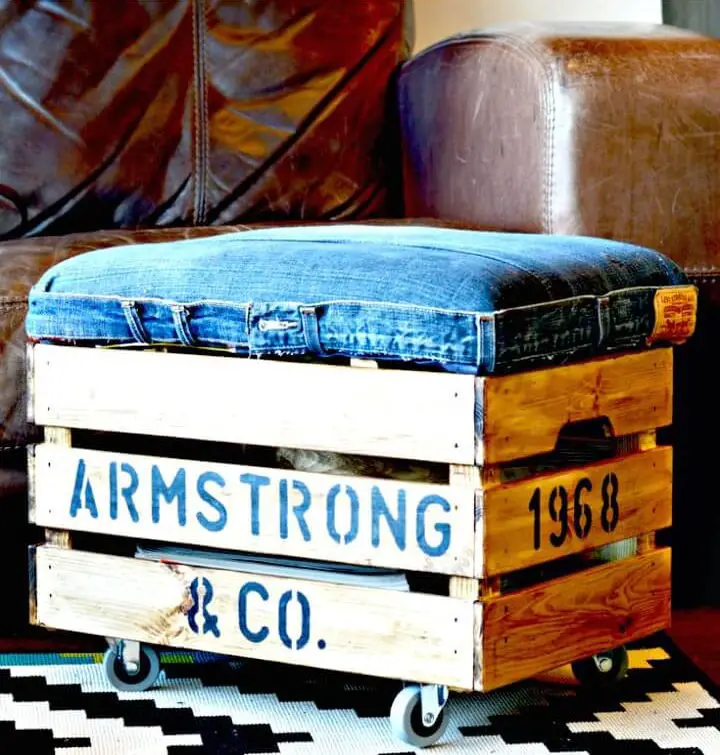
Transform your living space with a clever IKEA Knagglig hack from Pillar Box Blue. By turning a wooden crate into a stylish denim-upholstered ottoman on wheels, you’ll gain functional storage and a chic seating solution. This engaging DIY project balances style and practicality, providing an additional spot to relax while keeping your clutter at bay. To add a personal touch, learn how to stencil designs onto the wood, protect it with a layer of wax for a rustic finish, and bring your unique vision to life. Perfect for family rooms or casual living areas, this ottoman not only enhances your decor but also offers a clever way to stash away magazines, books, or knick-knacks. The comprehensive guide is designed to help anyone feel confident in tackling their first DIY home improvement project.
Simple DIY Crate Nightstand
Transforming wooden crates from Walmart into stylish DIY nightstands with an industrial flair is a simple yet impactful DIY project. According to Inspiration Made Simple, Kim Morgan’s tutorial guides you through building these unique pieces of furniture using inexpensive crates and copper piping. With some basic crafting skills and attention to detail, you can create nightstands that showcase your handmade style while adding character to your bedroom. The best part? This project is budget-friendly, with a cost that won’t break the bank. While cutting, staining, and assembling the nightstands requires some effort, the end result is well worth it – a pair of functional and stylish pieces that reflect your DIY skills and add a touch of industrial chic to your home decor.
Make Your Own Wooden Crate Picnic Basket
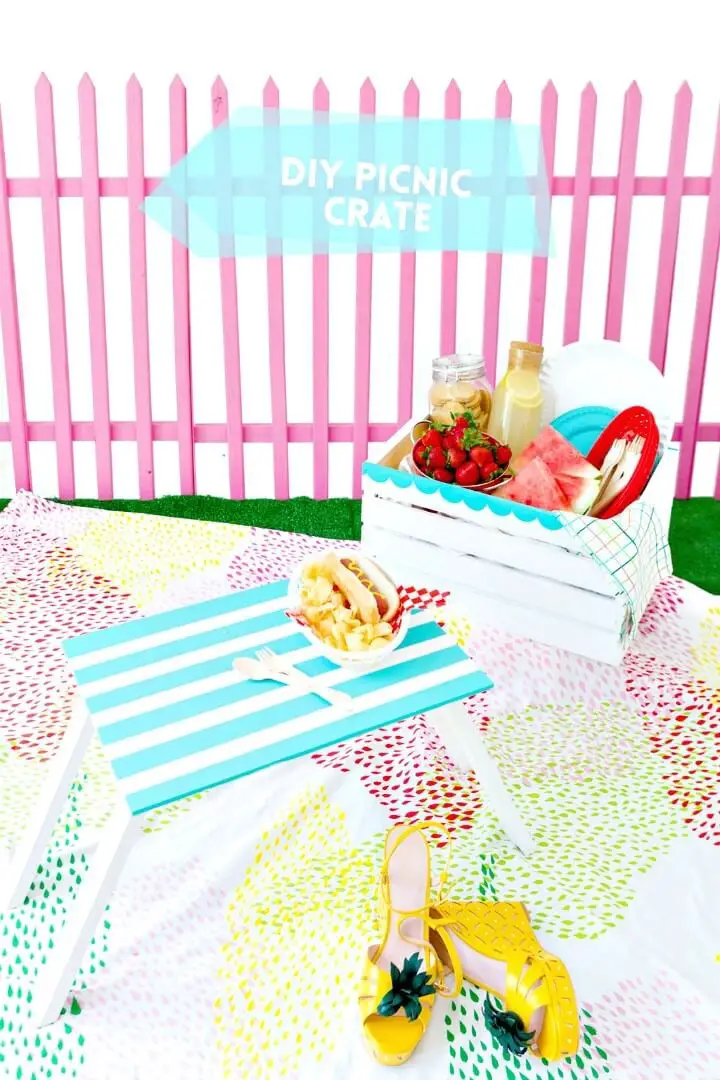
Transform a humble wooden crate into a unique and functional picnic basket with a DIY twist. With Damask Love’s straightforward guide, you’ll learn how to breathe new life into this simple crate, turning it into a modern and stylish picnic accessory that serves as both a storage container and a convenient tabletop. This adaptable project is perfect for outdoor enthusiasts and anyone looking to add a creative touch to their home storage solutions. As you prepare your paints and tools for this fun and rewarding crafting experience, get ready to elevate your outdoor dining essentials and create a one-of-a-kind picnic experience.
Conclusion
Transforming your home with a personal touch is just a DIY wooden crate project away. The vast array of 30 unique ideas and decor projects can elevate your space to a new level of functionality and style. With no barriers to entry, the possibilities are endless. As you embark on this creative journey, remember that each project not only enhances your environment but also provides an opportunity for self-expression and fulfillment. So, why hesitate? Dive in today and discover the joy of crafting something truly one-of-a-kind for your home.
