Embarking on a journey of creative expression through foam ball crafting is an exciting adventure awaiting discovery. By exploring this treasure trove of 20 easy-to-create styrofoam projects, you’ll unlock innovative ways to unleash your artistic flair and produce something truly unique. From the initial selection of project to the final touches, each step offers a chance to learn, grow, and refine your skills. These projects not only enhance your crafting repertoire but also grant you the opportunity to create stunning pieces for home decor or as thoughtful gifts.
The process of getting started with styrofoam crafts is more exhilarating than intimidating. Whether it’s choosing the next project or adding the finishing touches, each moment is filled with excitement and anticipation. This guide will walk you through the selection of suitable tools, the environmental impact of styrofoam, and the safe handling of this versatile material.
Join us as we delve into the realm of styrofoam crafting, where your imagination can soar to new heights. Ready to unleash your creativity with foam balls? The next section awaits, eager to inspire you.
How to Get Started with Styrofoam Crafts
Unleashing creativity through styrofoam crafting is an experience like no other. This versatile medium allows individuals to create anything from decorative masterpieces to playful toys, and even educational models that can be both engaging and informative. To get started on this creative journey, a simple guide is essential for mastering the art of styrofoam crafting.
Choosing Your Project
Starting your journey in styrofoam crafting begins with sparking inspiration. Dive into a sea of creative possibilities by exploring various projects online, from rustic pallet wood deer heads to whimsical owls crafted from everyday cups. As you peruse these ideas, identify the ones that resonate with your interests and available time. This will ensure you’re tackling a project that aligns with your enthusiasm level.When crafting with children, it’s essential to consider their age group when selecting projects. For younger crafters, simple yet engaging activities like building styrofoam snowmen or creating pretend play ice cream cones can be both entertaining and educational.
Gathering Materials
When preparing for a DIY project, it’s essential to consider the foundation – literally. The type of base material you choose can significantly impact the overall appearance and functionality of your creation. For many projects, styrofoam is an excellent option. Its versatility allows you to select from various shapes and sizes, whether it’s a ball, sheet, or custom design available at craft stores. This flexibility ensures that your project meets its unique demands.As you plan your masterpiece, don’t forget about the finishing touches. A range of decorative elements can elevate your creation, including paints, fabrics, glitters, or other materials. Create a comprehensive list of required items to guarantee you have everything needed for a seamless execution.Finally, no DIY project is complete without the right tools. The essential toolkit typically consists of a sharp knife for shaping and trimming, glue for assembling components, and paintbrushes for adding those finishing touches. However, some projects may require more specialized equipment, such as a styrofoam cutter or hot glue gun. By having these necessary tools at your disposal, you’ll be well-prepared to bring your vision to life.
Starting Your Craft
Before diving into a styrofoam crafting project, it’s essential to thoroughly understand the process by reading through any provided instructions or tutorials. This initial step will help you anticipate potential challenges and develop a clear understanding of the steps involved. By doing so, you’ll be better equipped to tackle each task with confidence and precision.
Timing is everything when working with styrofoam. Allow ample time for paint to dry thoroughly and ensure any adhesive has fully set before proceeding to the next step. Rushing through the process can lead to subpar results, whereas patience will yield a more polished and professional-looking final product.
Don’t be afraid to put your own personal stamp on the project. Experiment with different colors, textures, and additional elements to infuse your craft with unique character. By doing so, you’ll create something truly one-of-a-kind that reflects your personality.
Finishing Touches
When it comes to sealing and protecting your projects, consider applying a coat of sealant to ensure they remain in pristine condition. This is particularly important for pieces that will be handled frequently or displayed outside, as the elements can cause damage over time. Additionally, think about how you’ll display or use your finished project. If it’s intended to be decorative, you may need to incorporate a hook for hanging or a stand for support. By taking these factors into account, you can ensure that your creations are both functional and aesthetically pleasing.
Getting started with styrofoam crafts is an excellent way to tap into your creative side. With a little preparation and imagination, you can transform basic materials into something truly unique and extraordinary. Embrace the process, and don’t forget to share your accomplishments with others, as this will help you stay motivated and inspired to continue exploring your artistic abilities.
Sustainability and Recycling Tips for Styrofoam Crafts
Styrofoam, a ubiquitous material in packaging and crafting, presents a substantial environmental conundrum. Its non-biodegradable nature means it can linger in landfills for centuries, contributing to overcrowding and marine pollution. Yet, with innovative thinking and eco-awareness, we can effectively address these concerns by embracing recycling and creative repurposing techniques in our craft projects.
Understanding the Impact of Styrofoam
Styrofoam’s environmental impact is staggering, particularly in landfills where its unique properties make it a persistent presence. The material’s durability and volume mean that it can occupy significant space, remaining intact for centuries without degrading. This poses a significant challenge for waste management facilities. Furthermore, when exposed to sunlight, Styrofoam releases toxic air pollutants, which have detrimental effects on both the environment and human health. The consequences of this pollution are far-reaching, affecting not only the ecosystem but also the well-being of humans who come into contact with these pollutants. Additionally, Styrofoam’s presence in landfills has a profound impact on wildlife. Many animals mistakenly ingest Styrofoam, which can lead to harm and potentially even death. Moreover, the material contributes to marine pollution, contaminating aquatic ecosystems and posing a threat to the delicate balance of marine life.
How to Recycle Styrofoam for Crafts
Before diving into craft projects with Styrofoam, it’s essential to ensure the material is clean and dry to avoid contamination and preserve the quality of your final product. Once you’ve cleared this hurdle, the possibilities for creative reuse are vast.
Styrofoam can be used as a lightweight filler in potted plants, reducing soil usage and making pots more portable. For art enthusiasts, it’s an ideal material for creating custom stamps or molds for painting and printing projects. Alternatively, you can transform Styrofoam into decorative items like picture frames or holiday ornaments, adding a unique touch to your home decor.
Tips for Repurposing Styrofoam
When tackling DIY projects that involve Styrofoam, prioritize safety by working in a well-ventilated area and utilizing appropriate tools to minimize the risk of injury or damage. To elevate your creativity, seek opportunities to incorporate Styrofoam into your crafts in ways that not only add aesthetic appeal but also provide functional value, such as using it for insulation in homemade lunch bags or as padding for delicate items. By sharing your repurposed Styrofoam creations with the community, you can inspire others and help promote sustainable crafting practices that benefit the environment. As you strive to make a positive impact through your hobby, remember that every small effort counts, and collectively, we can contribute to a more sustainable future.
Safety Precautions in Styrofoam Crafting
While crafting with Styrofoam can be an engaging and creative endeavour, it’s crucial to adhere to specific safety guidelines to guarantee a risk-free experience. As a versatile material used in numerous projects, expanded polystyrene foam (EPS), also known as Styrofoam, requires careful handling to avoid potential hazards. When cutting or shaping this material, small particles and toxic fumes can be released, particularly when heated. To mitigate these risks, it’s essential to follow certain safety protocols.
Choose the Right Tools
When it comes to working with Styrofoam, having the right tools is essential for ensuring safety and achieving precise cuts. For straight cuts, opt for a sharp utility knife that will yield clean results. More intricate shapes require a hot wire cutter, which will allow you to precision-cut even the most complex designs. Electric knives and hand saws equipped with fine teeth are also suitable for cutting thicker sheets of Styrofoam, providing a strong foundation for your project. Once cut, it’s essential to smooth out the edges using a rasp or sandpaper, ensuring a seamless finish.
Cutting Techniques
To achieve a precise cut with your chosen cutting tool, adopt a measured approach when working with Styrofoam. When using a utility knife, execute multiple gentle strokes, gradually making your way through the material to avoid applying too much pressure. For hot wire cutters and electric knives, meticulously follow the manufacturer’s guidelines and maintain a slow, deliberate pace along the designated cutting line to ensure a seamless, accurate cut.
Essential Safety Measures
When engaging in Styrofoam crafting, it is essential to prioritize a safe and healthy environment by implementing several key measures. Firstly, ensure you are working in a well-ventilated area to prevent inhaling harmful fumes. Additionally, don the necessary protective gear, such as safety goggles and a dust mask, to shield your eyes and lungs from potential particles. A clean workspace is crucial for avoiding accidents caused by clutter, so maintain a tidy environment at all times. Adequate lighting is also vital, as it prevents eye strain and enables you to accurately visualize your craft. Furthermore, always carefully read and follow the guidelines provided with any tools or materials you use, taking regular breaks to avoid fatigue and maintain focus. It is also important to have a first aid kit readily available and possess basic first aid knowledge to address any unexpected accidents that may occur. By following these safety protocols, you can effectively minimize risks while enjoying the creative process of Styrofoam crafting.
Crafting with Styrofoam for All Skill Levels
Styrofoam crafts have a unique ability to bring people together, regardless of their experience with DIY projects. This versatile material, known for its lightweight and moldable properties, offers a wide range of creative possibilities. To make Styrofoam crafting accessible to everyone, it’s essential to consider the skill level of those involved. By offering projects that cater to various levels of expertise, you can ensure that both beginners and seasoned crafters have a blast exploring their creativity.
Beginner Projects: Easy and Enjoyable
When it comes to creating artistic expressions with kids, simplicity is key. Begin by introducing basic shapes like balls, cubes, and stars. These can be transformed through various mediums such as painting, glittering, or even building simple models. The process of creating and experimenting with these shapes will help young minds develop their problem-solving skills and encourage creativity. For added fun and functionality, consider using Styrofoam blocks to carve out simple patterns that can serve as stamps for card making or decorating fabric. This activity not only develops fine motor skills but also allows kids to express themselves through art.
Intermediate Projects: Building Your Skills
Imagine recreating the Earth’s layered structure using everyday materials. A foam ball serves as the foundation, with paint adding color and depth to represent each layer. The process of cutting, shaping, and painting requires precision and creativity, making it an engaging combination of crafting and learning. Alternatively, transform Styrofoam sheets into a realistic faux wood art piece by honing skills like cutting, shaping, and painting. This DIY project offers an interactive way to develop techniques while exploring artistic expression.
Advanced Projects: Challenging and Rewarding
For those looking to push their skills further, detailed sculptures or intricate models offer a thrilling challenge. To achieve precision, use tools like electric cutters to carefully shape and craft your creation. Alternatively, try your hand at building complex dioramas with multiple elements, such as a nature scene or historical setting. This requires careful planning, layering, and attention to detail to bring the scene to life. By offering projects that cater to various skill levels, everyone can experience the joy of creating something beautiful with Styrofoam. Remember, the key is to have fun and let your creativity flow!
FAQs About Styrofoam Crafts
As beginners and experienced crafters alike embark on the creative journey of Styrofoam crafting, it’s natural to encounter a range of inquiries. To streamline the process and alleviate any uncertainty, I’ve gathered some of the most commonly asked questions that arise when working with this versatile material.
What is Styrofoam?
Expanded polystyrene foam, better known by its trademarked name Styrofoam, boasts a unique combination of lightweight properties and exceptional insulation capabilities. As a popular choice among craft enthusiasts, it’s prized for its pliability and adaptability, allowing users to shape it with ease into a wide range of creative forms.
Can Styrofoam be painted?
While it is possible to paint Styrofoam, it’s crucial to select a suitable paint type to ensure a successful outcome. Unlike some other options, water-based paints are generally recommended for this purpose, as certain types of paint – such as spray paint – can potentially compromise the foam’s integrity by dissolving it.
How can I cut Styrofoam cleanly?
When it comes to achieving clean cuts, having the right tools at your disposal is crucial. For those seeking precision, a sharp craft knife is an excellent choice. By employing gentle, repeated strokes, you can achieve the desired shape with ease. Alternatively, hot wire cutters offer an added layer of accuracy, particularly when working with intricate or small shapes. This combination of techniques allows for seamless and precise cuts, resulting in a polished finish.
Is Styrofoam recyclable?
When it comes to recycling Styrofoam, the feasibility of this process largely hinges on the availability of local recycling programs. While some regions boast specialized facilities dedicated to processing Expanded Polystyrene (EPS), others may not have such infrastructure in place. As a result, it’s essential to verify with your local waste management services to determine whether and how Styrofoam can be recycled within your area.
What glue should I use for Styrofoam?
When it comes to bonding Styrofoam, special adhesives designed specifically for this purpose are available on the market. For a more precise approach, using low-temperature hot glue guns with caution is also an effective option. By employing these methods, you can ensure that your Styrofoam remains intact and undamaged.
Can Styrofoam be used for outdoor projects?
While styrofoam can be employed in outdoor settings, it’s crucial to seal and paint it to safeguard against environmental factors. As it’s not inherently waterproof, supplementary shielding measures are necessary to ensure its durability.
How can I smooth the surface of Styrofoam?
To achieve a seamless finish on your Styrofoam project, consider using a texture filler designed specifically for this purpose. Following application, gently sanding the surface will create a smooth canvas for painting or decorating. With these techniques in mind, you’ll be well-prepared to tackle any Styrofoam crafting endeavor with confidence and creativity.
20 Styrofoam Crafts – Fun Crafts with Foam Balls
Discover the versatility of Styrofoam foam balls by diving into a world of 20 innovative and entertaining DIY projects. From simple to complex, these creative endeavors await your imagination, beckoning you to unleash your inner crafter and start bringing your ideas to life.
DIY Layers of the Earth Foam Model
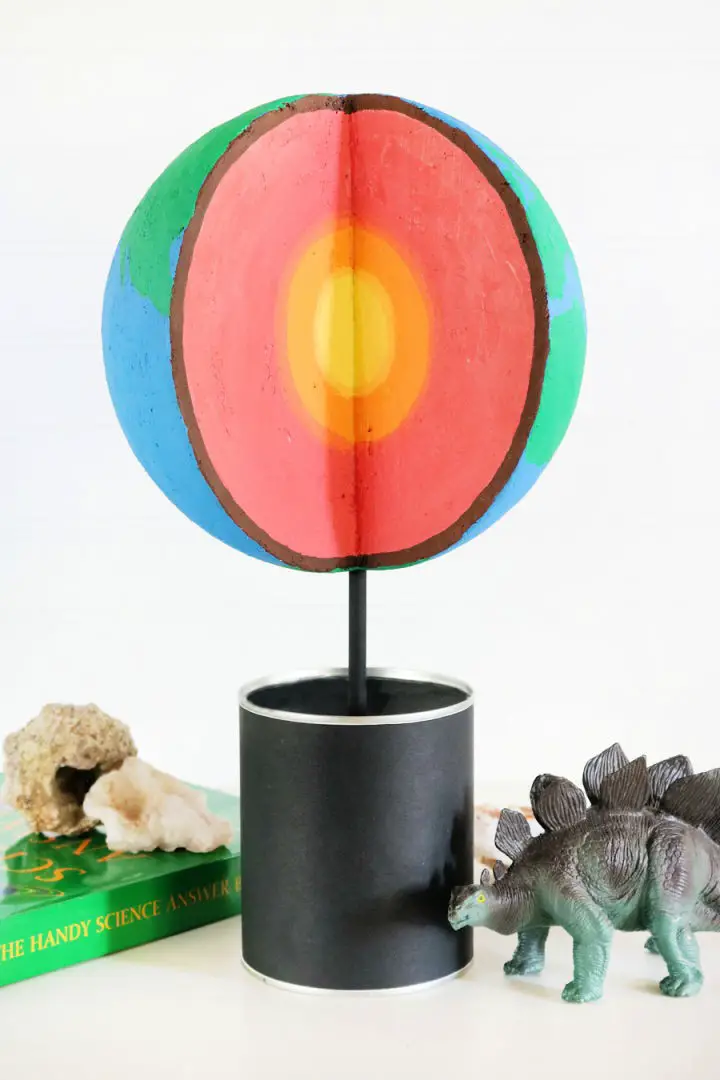
Styrofoam crafts offer an incredibly versatile material for artistic projects, with DIY ornaments and whimsical characters being just a few examples of the countless creative possibilities. One fascinating project that can spark children’s curiosity about geology is the DIY Earth layers foam model. This hands-on science project requires only a few simple supplies, including an 8-inch foam ball, acrylic paint, and either a foam saw or electric cutter. Begin by cutting a ‘slice’ from the foam ball, mimicking the cross-section of our planet. Apply a smooth finish to ensure easy painting, then depict each layer with different colors – brown for the crust, coral for the mantle, orange for the outer core, and yellow for the inner core. To add an interactive element, insert a painted wood dowel into the center of the model, allowing children to explore and learn from their very own homemade geology lesson.
Faux Pallet Wood Deer Head Art
Bring the rustic charm of autumn into your home with a one-of-a-kind DIY faux deer head pallet art. By substituting foam for wood, this creative project achieves an astonishingly realistic aged barnwood effect – despite being lightweight and manageable. The construction process relies on 1’x3′ foam sheets, a foam cutter, a smooth finish, foam connectors, eyelets, styrofoam glue, a putty knife, and three vibrant shades of acrylic paint. To amplify the festive atmosphere, consider crafting a fall-colored pompom bunting to complement your newly created faux deer head pallet art. This adaptable DIY project injects a touch of rustic sophistication into your space, allowing for effortless color swaps to suit various holidays and occasions. Embark on a refreshing fall-inspired makeover with this accessible craft.
Awesome Styrofoam Faux Gear Craft
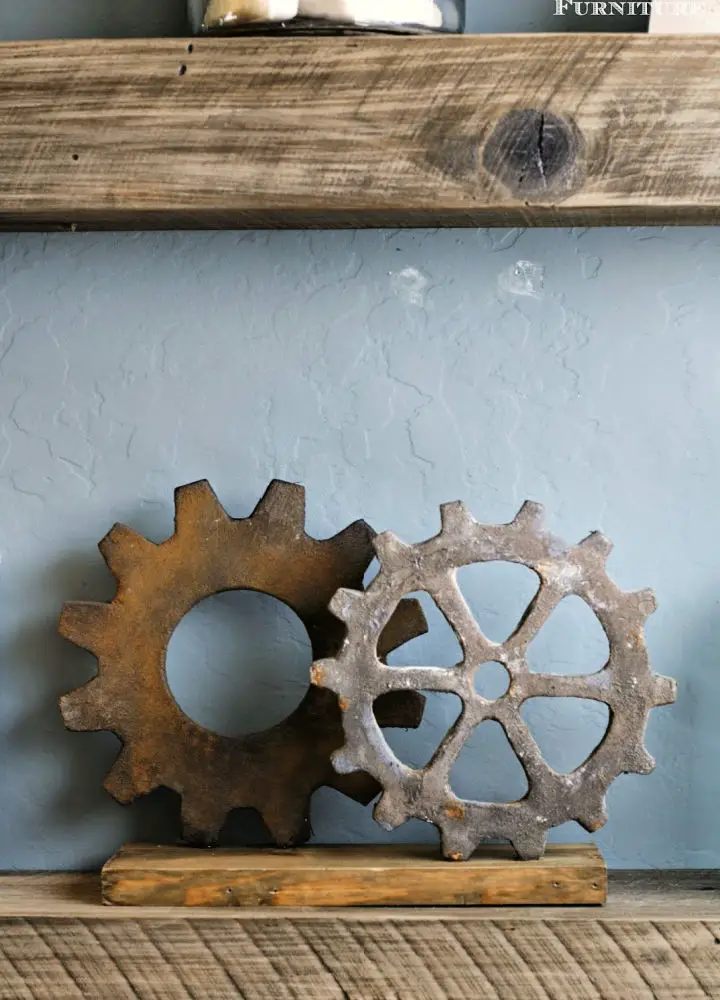
Transform your workspace into an industrial-chic haven with this unique DIY project. By leveraging readily available materials like 1/2-inch thick Styrofoam, a Styro Cutter, and Smooth Finish, you can create intricately designed gears that exude authenticity. Simply select the gear shape that resonates with your style, cut it out, and get creative.Despite its seemingly rough texture, Styrofoam becomes remarkably smooth after applying multiple coats of Smooth Coat and allowing it to dry. A quick sanding session further refines the surface, setting the stage for a striking finish. To achieve an aged look reminiscent of rusted iron or oxidized metal, add a dash of creativity with spray paint and household ingredients like cinnamon or cream of tartar.Mount your finished gears on a wooden base for a statement piece that embodies industrial flair, or repurpose them as bookends for a functional yet artistic touch. This innovative project is perfect for DIY enthusiasts seeking to inject their space with creativity or anyone looking to add an unexpected twist to their decor.
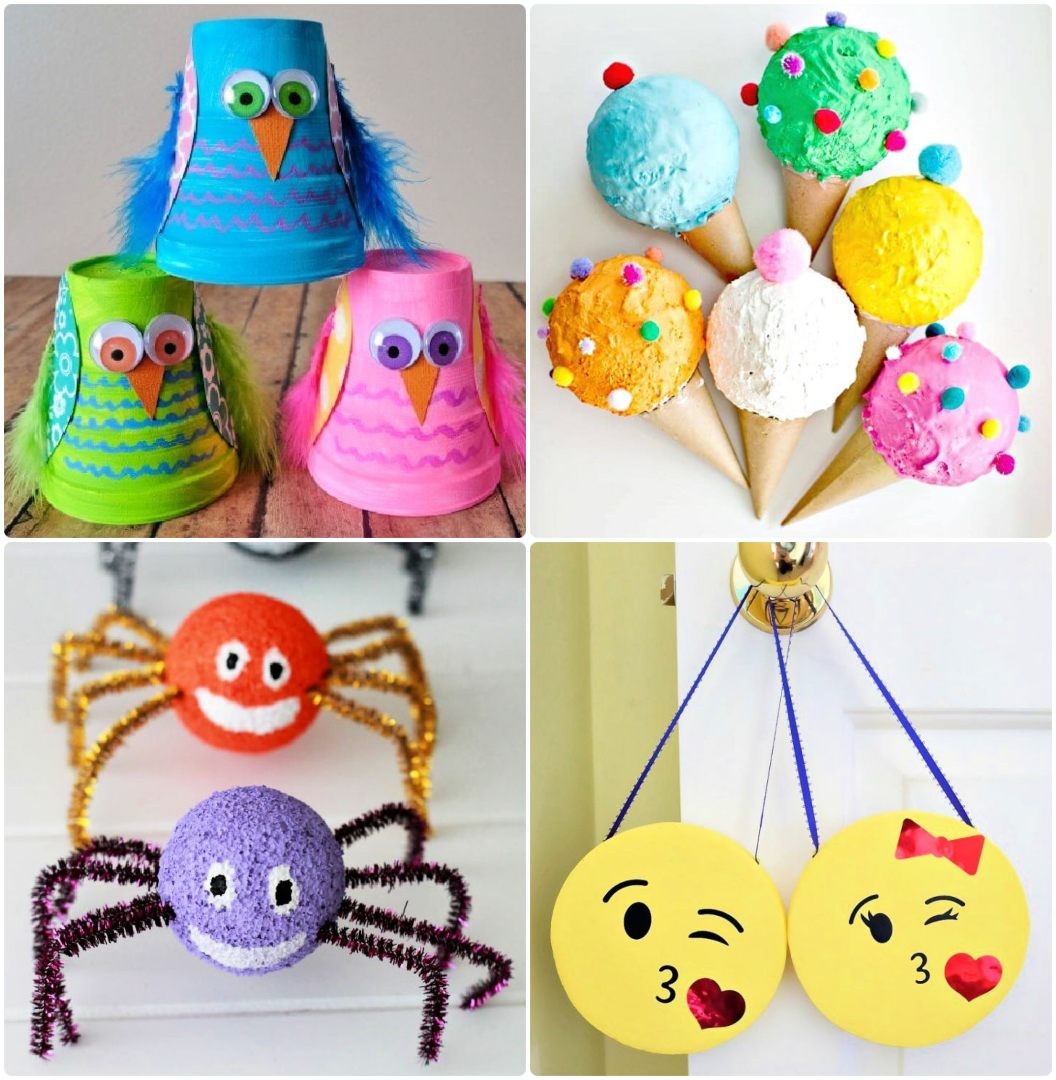
Cute and Colorful Styrofoam Cup Owl Craft
Transform ordinary foam balls into extraordinary owl crafts with your kids! This fun and engaging DIY project is perfect for developing fine motor skills, imagination, and creativity. By combining small styrofoam cups, acrylic paint, liquid chalk markers, scrapbook paper, colored feathers, googly eyes, orange cardstock paper, and glue, you’ll be creating adorable owls that will bring a smile to everyone’s face. The process begins by painting the cups and preparing your materials. Once dry, add scallop lines to resemble owl feathers and attach cut-out wings and beaks. Finally, add the eyes and feathers to bring your creation to life. This craft allows for endless color combinations and pattern variations, sparking imagination and creativity. Consider pairing this activity with owl-themed storybooks, fostering a love for reading and arts in your children. With just a few simple steps, you can create unique and colorful owls that will become treasured keepsakes.
Make Your Own Styrofoam Snowman
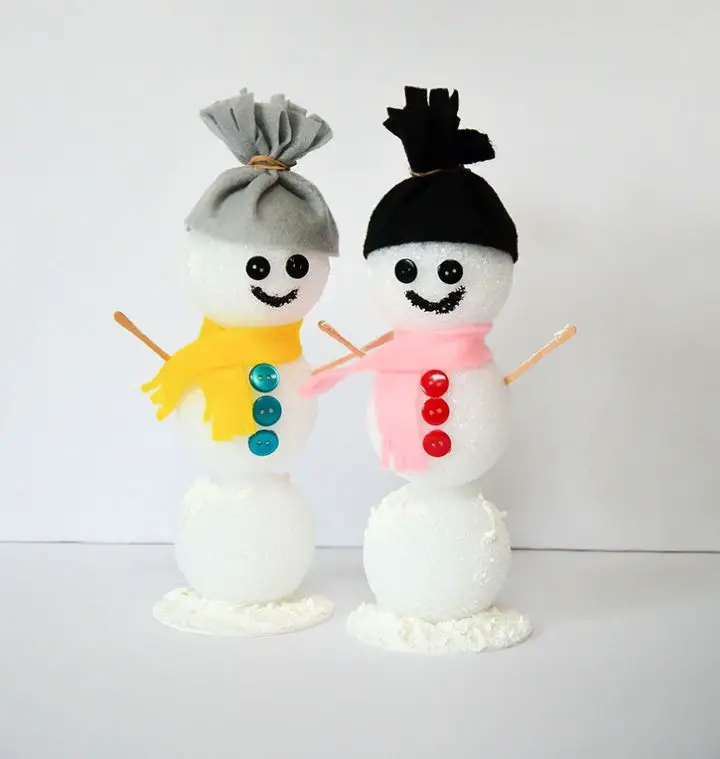
Unleash your creative side and bring a playful touch to your home decor with these whimsical DIY snowmen crafted using Styrofoam and Craft Dots. Embrace the holiday spirit by infusing your space with these charming creations, which blend artistry with minimal mess. To give your snowmen a personalized flair, choose from an array of colors for their hats, scarves, and buttons, ensuring they harmonize perfectly with your festive decor.The crafting process commences with painting wooden circles and stacking foam balls to form the snowman’s body. Next, design a felt hat and scarf, followed by adding button eyes and sandwich pick arms. The pièce de résistance is a painted smile and a layer of Snowtex paint for an authentic snowy texture.In approximately 45 minutes, you can create these delightful snowmen that captivate both kids and adults alike. Encourage imagination by allowing them to select colors that reflect their personality or decorating themes. Prepare to spread joy in your home this season with these adorable snowmen!
Making a Styrofoam Ball Hyacinth Flower
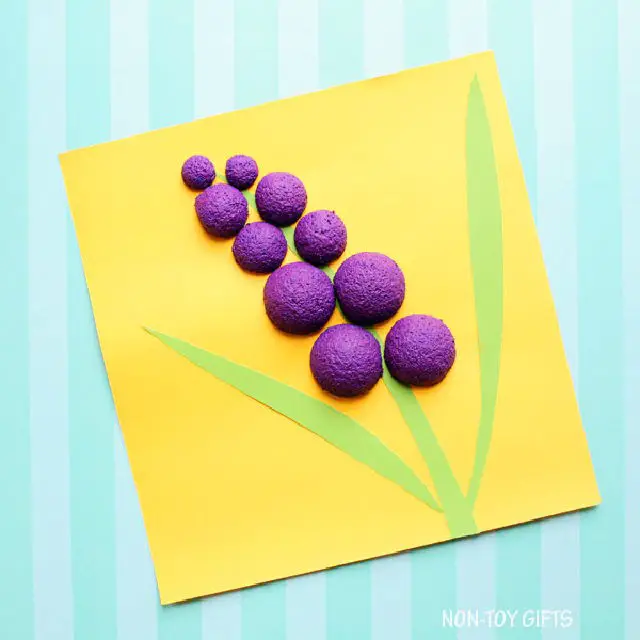
Imagine transforming ordinary Styrofoam balls into stunning Hyacinth flowers, perfect for creating unique homemade gifts or brightening up any room. This innovative DIY project is an excellent way to engage children’s creativity and imagination while producing a beautiful, long-lasting result. To craft these delightful flowers, you’ll need a selection of Styrofoam balls, a knife, purple paint, a paintbrush, colored cardstock paper, green construction paper, scissors, and glue. By following the step-by-step instructions, from carefully splitting the Styrofoam balls to attaching them onto a painted stem, you’ll be able to create a realistic Hyacinth flower. With this budget-friendly project, you can craft multiple flowers to assemble a vibrant bouquet that’s sure to bring joy and warmth to anyone who receives it.
Easy DIY Styrofoam Spiders for Kids
Embark on a creative journey with your kids by crafting Styrofoam spiders that are sure to delight. This fun and easy activity stimulates imagination while developing fine motor skills, making it an excellent way to bond with your children. To get started, gather 2″ foam balls, acrylic paints in four different shades, and some pipe cleaners. With these simple materials, you can create a mini spider army that’s sure to spark joy. Beyond the fun factor, this craft helps foster artistic growth and creativity, making it an excellent way to spend quality time with your little ones.
Adorable Styrofoam Ball Lollipop Turkey
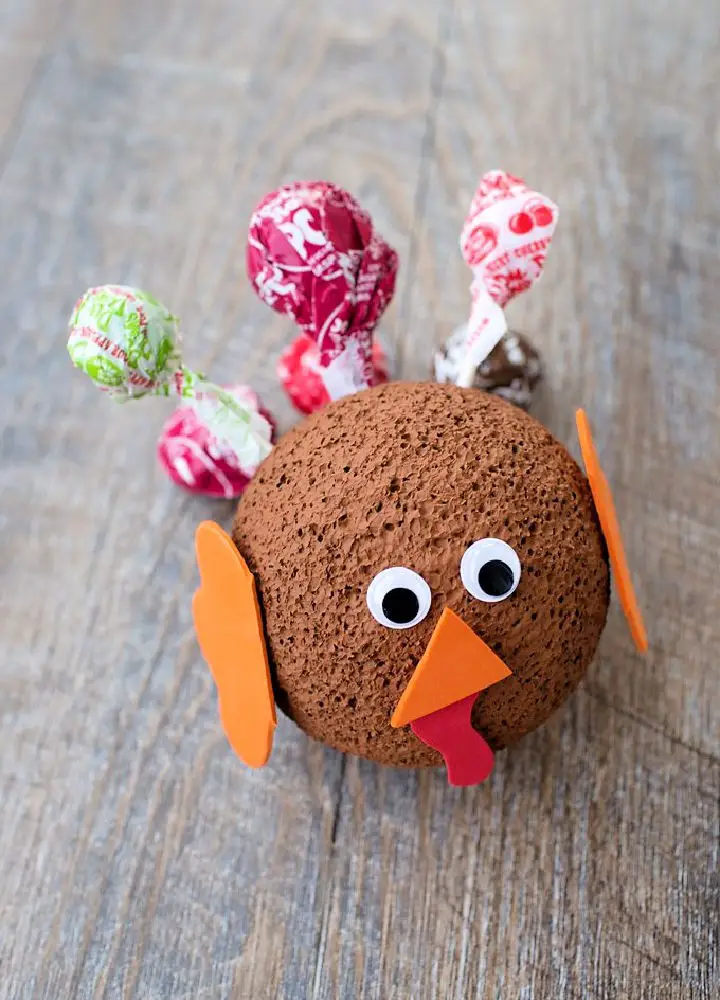
Immerse yourself in our extensive collection of Styrofoam crafts, where creativity meets practical guidance. This season, why not create a charming DIY styrofoam ball lollipop turkey to adorn your Thanksgiving table? With basic materials like a medium-sized styrofoam ball, brown acrylic paint, craft foam, wiggly eyes, and lollipops readily available, you’ll be well on your way to crafting a memorable centerpiece. Start by painting the Styrofoam brown, allowing it to dry before cutting out wings, a beak, and a gobbler from the craft foam. Once dry, secure these elements to the Styrofoam using craft glue. Finally, place the lollipops at the turkey’s rear, ensuring stability and preventing the piece from rolling away. This delightful project not only utilizes leftover candies but also transforms simple supplies into a festive holiday treasure. It’s an engaging crafting experience for kids that yields holiday treasures with ease!
How to Make a Styrofoam Pumpkin
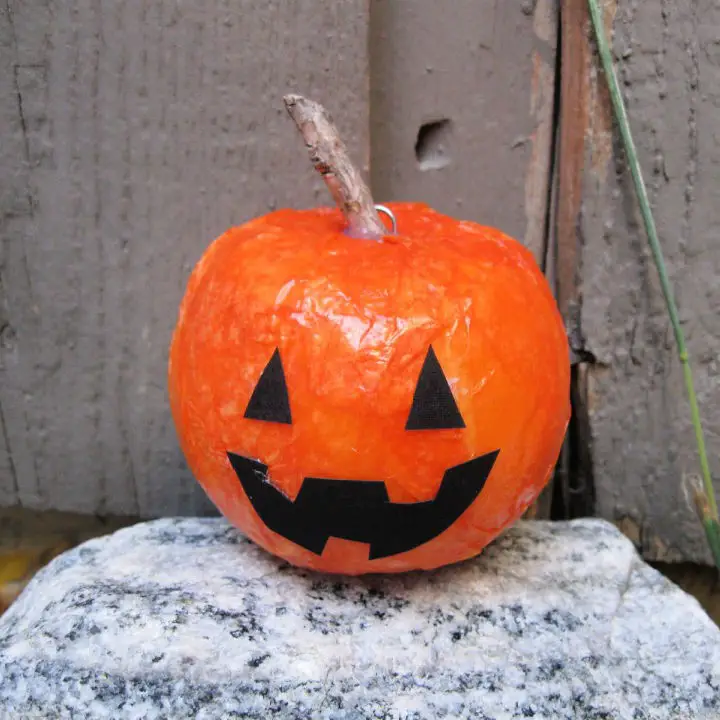
Transform your home decor with the warm, inviting essence of autumn using this delightful DIY pumpkin craft. With just a few simple materials like a Styrofoam ball, orange tissue paper, black paper, a stick, Mod Podge, hot glue, and a paper clip, you can recreate the cozy atmosphere of fall within your space.
The process begins by shaping the Styrofoam into a pumpkin, followed by covering it with layers of tissue paper to create a vibrant orange hue. Secure the paper in place using Mod Podge for a durable finish. Once dry, use hot glue to attach a stick stem and add a festive touch with black paper facial features.
This versatile project can serve as a charming place card holder or be hung as an ornament, adding a pop of seasonal color to your decor. Whether you’re celebrating the beauty of autumn or simply looking for a creative way to express yourself, this craft is sure to delight. With its ease and uniqueness, it’s the perfect addition to your home’s decor.
make Pretend Play Ice Cream Cones Using Styrofoam Balls

Unleash your inner child and join forces with your kids to create a whimsical world of DIY ice cream cones. This delightful craft project combines creativity, imagination, and playfulness, making it an ideal activity for children’s parties or everyday fun.
Using a combination of plaster of Paris, styrofoam balls, and paper mache cones as the base, you’ll bring these faux treats to life with vibrant paint and adorable mini pompoms that resemble sprinkles. The process itself is just as engaging as the final product, allowing kids to develop their creative skills through mixing, painting, and assembling.
These colorful ice cream cones not only make for a fantastic party hit but also serve as an entertaining craft activity that fosters children’s creativity and imagination. And let’s be honest – the real treat lies in the joy of creation, so get ready to have fun and ‘savor’ these sweet delights with your kids today!
His And Her Styrofoam Emoji Door Hangers
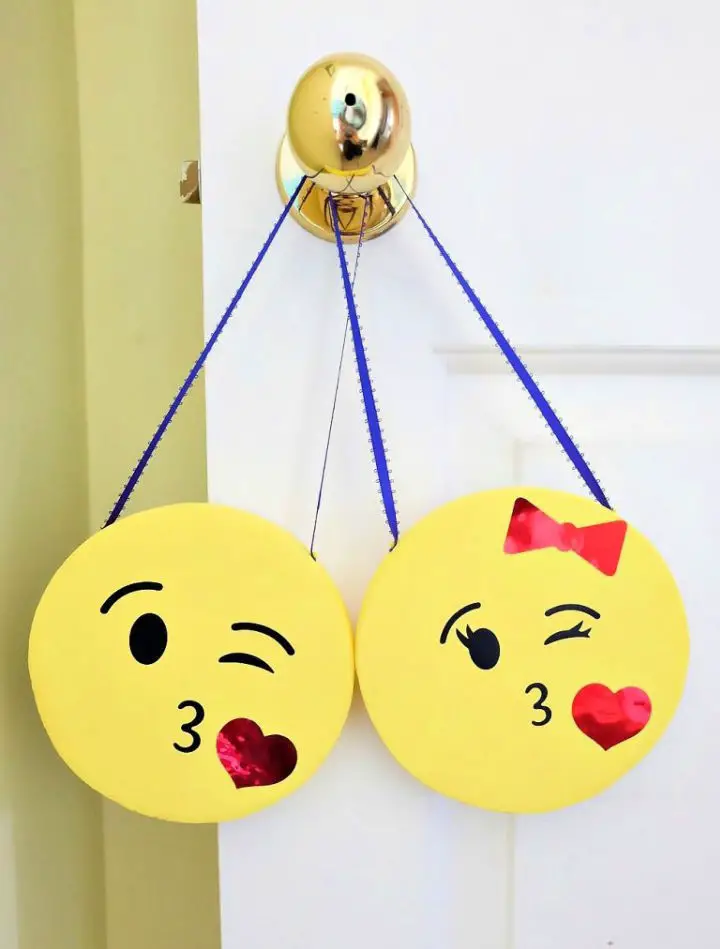
Transform plain Styrofoam disks into adorable emoji faces with this easy DIY project. Using yellow paint, a Cricut machine, and vinyl, you can create custom emojis that reflect your child’s personality, adding a personal touch to their space. This DIY door hanger is not only a fun way to express creativity but also an engaging craft session for kids. With the end result being a vibrant emoji door hanger, this project adds a trendy flair to any room and serves as a reminder of the creative journey. Try it today and put a smile (or any emoji) on that door!
How to Make a Styrofoam Pomander Flower Ball
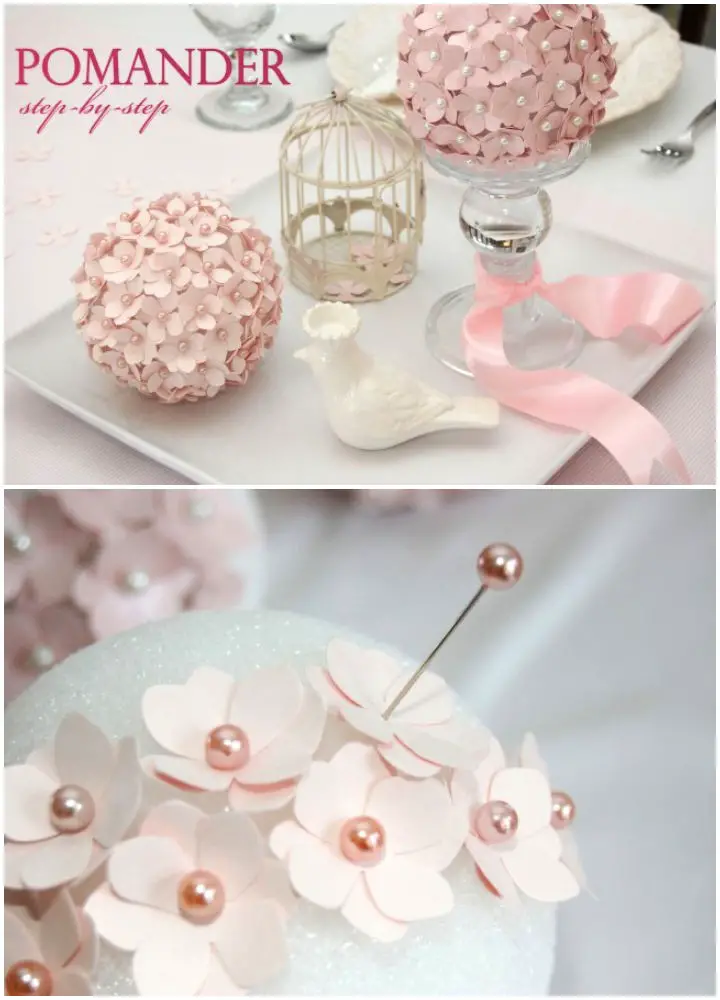
Transform plain foam balls into exquisite art pieces for special occasions. One such creative endeavor is the DIY Pomander or ‘flower kissing ball,’ which draws inspiration from the French tradition of pomme damage, where fragrant flowers were used to ward off disease. Today, these charming floral accessories are a symbol of sophistication and elegance at events like weddings and parties.
By following four straightforward steps, you can turn simple craft materials into a masterpiece that adds a personal touch to your celebration. The versatility of these pomanders allows them to serve as a stunning centerpiece, a unique hanging ornament, or an impressive display in a bowl. Unlock the creative potential of foam balls and elevate your event with artistry and flair.
Handmade Hemp Ball Accents Using Styrofoam
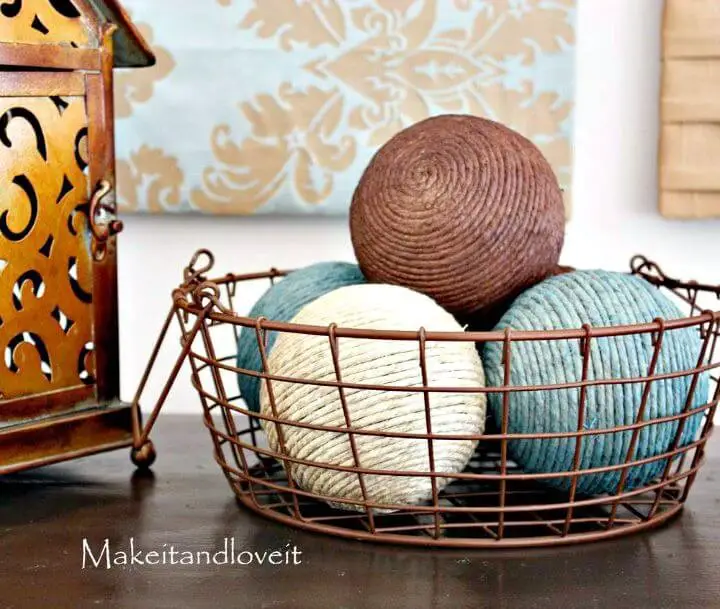
Elevate your home’s ambiance by crafting DIY hemp ball decorations, a budget-friendly and visually appealing project that requires just a few simple materials. Start by gathering styrofoam balls, hemp cord from a local craft store, and a hot glue gun. The process involves meticulously wrapping the hemp cord around the styrofoam balls, securing it with hot glue to preserve their spherical shape. For added color and personality, spray paint can be used on the finished hemp balls. These charming accents are perfect for filling empty baskets or shelves, bringing a touch of rustic charm to any room. With this easy DIY project, you can add a unique and eye-catching element to your living space.
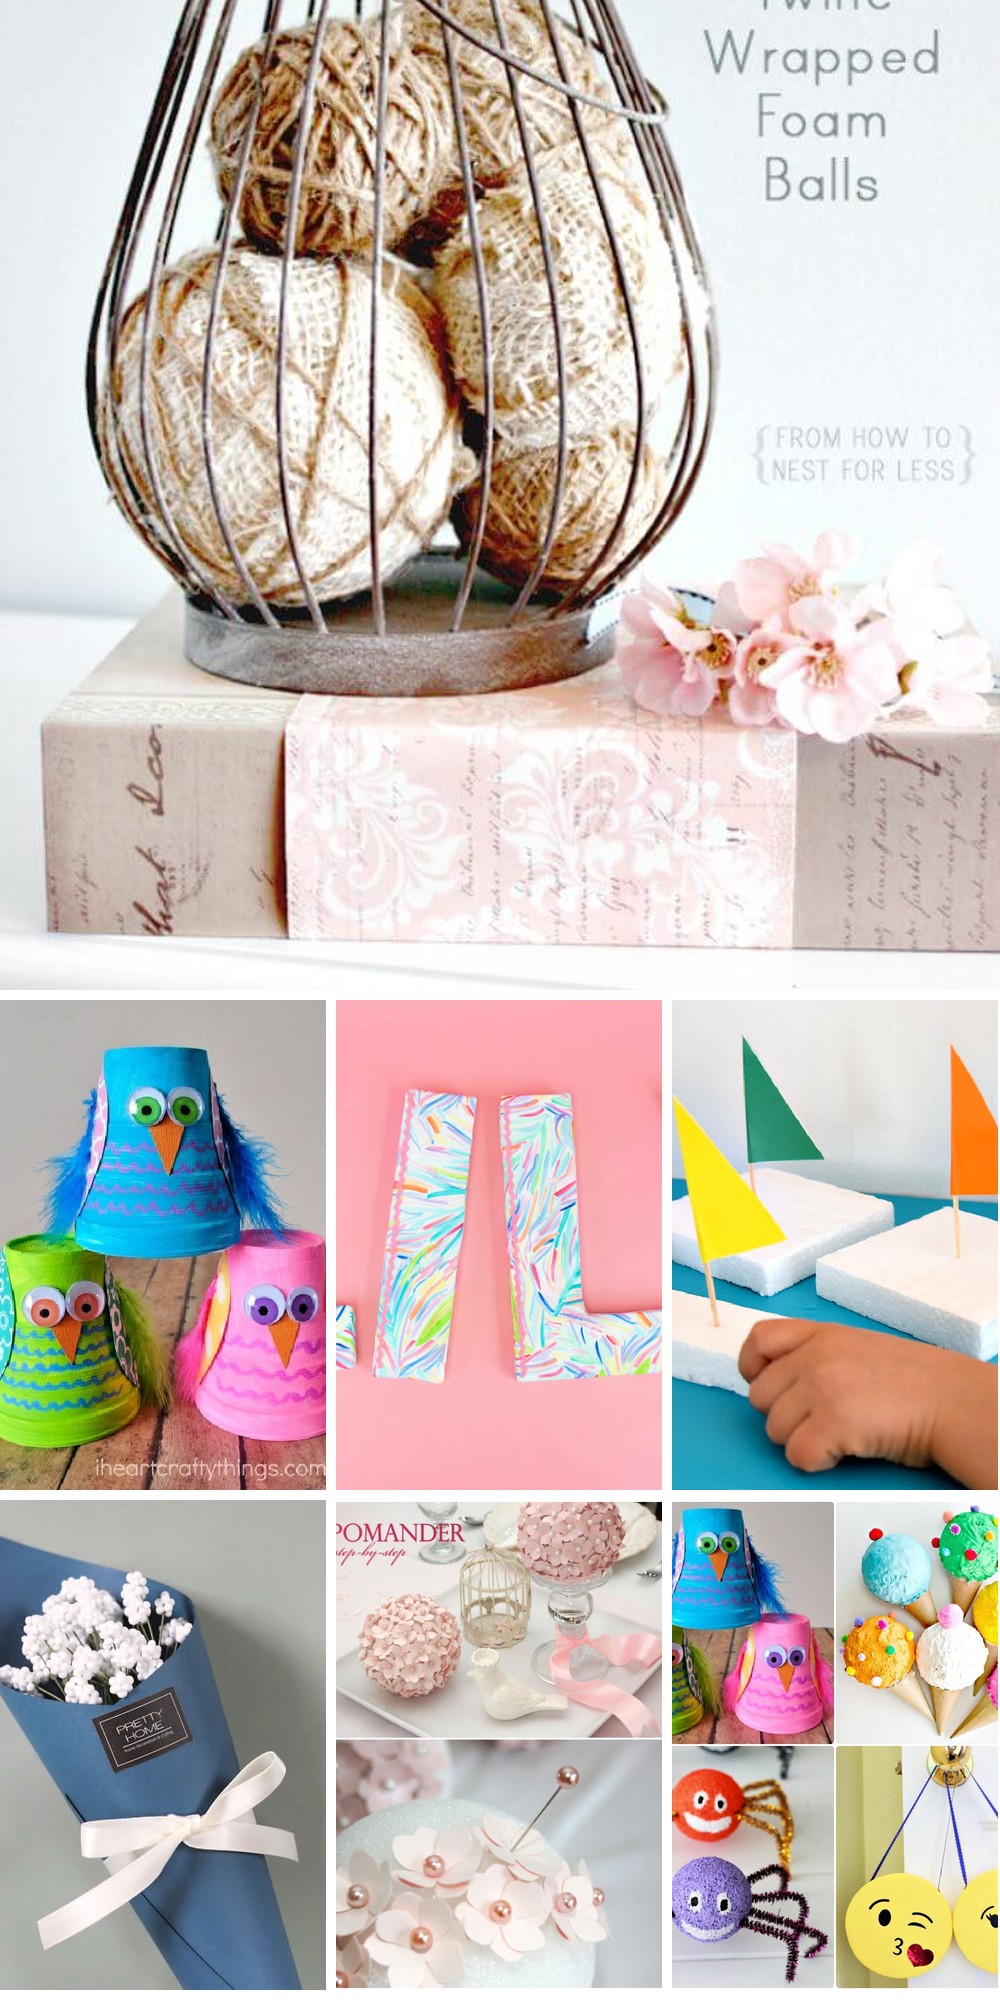
Burlap and Twine Wrapped Styrofoam Balls
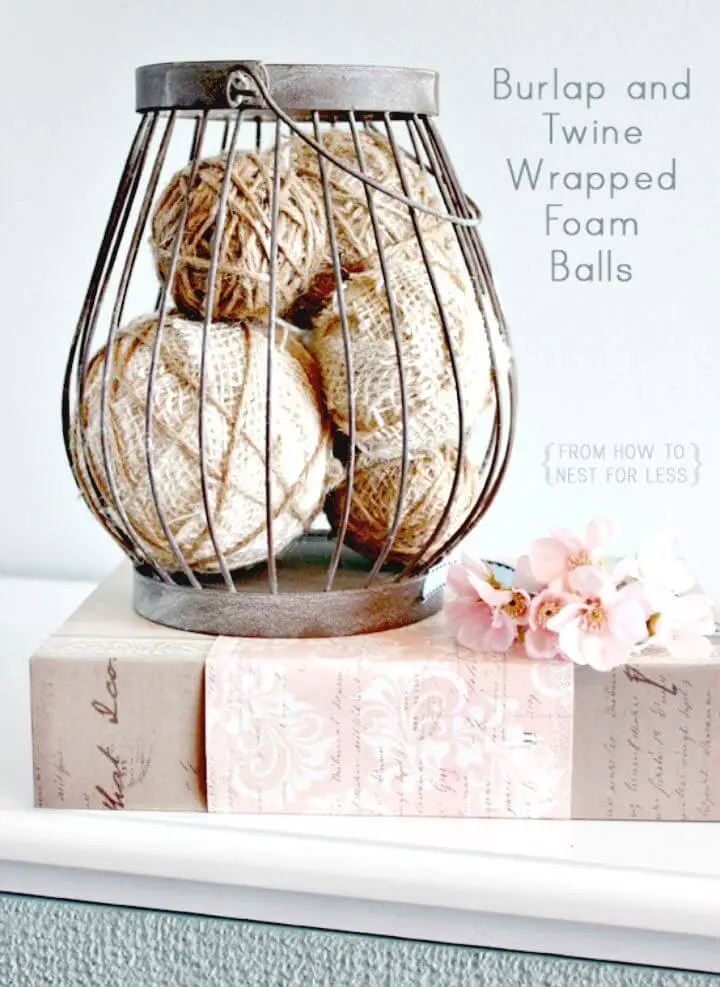
Transform the ambiance of your space with a captivating DIY project that combines rustic charm and effortless creativity. To create this stunning piece, you’ll need just a few simple materials: burlap, twine, foam balls, greenery pins, and scissors. The beauty of this craft lies in its adaptability – feel free to experiment with varying amounts of twine and different shades of burlap to make the design uniquely yours.
The process is delightfully straightforward: begin by trimming the burlap into manageable strips, then wrap them around the foam balls, securing each one with a pin. Add some textural interest by wrapping twine around the burlap, and voilà! Your creation is taking shape.
Display your handiwork in a beautiful wire basket for an eye-catching centerpiece that’s sure to draw attention. With minimal expense and easy-to-follow instructions, this project is the perfect way to add some rustic flair to your home decor – so why not give it a try and enjoy the therapeutic benefits of crafting? The end result is well worth the minimal time and effort required.
Cheap DIY Styrofoam Catamaran
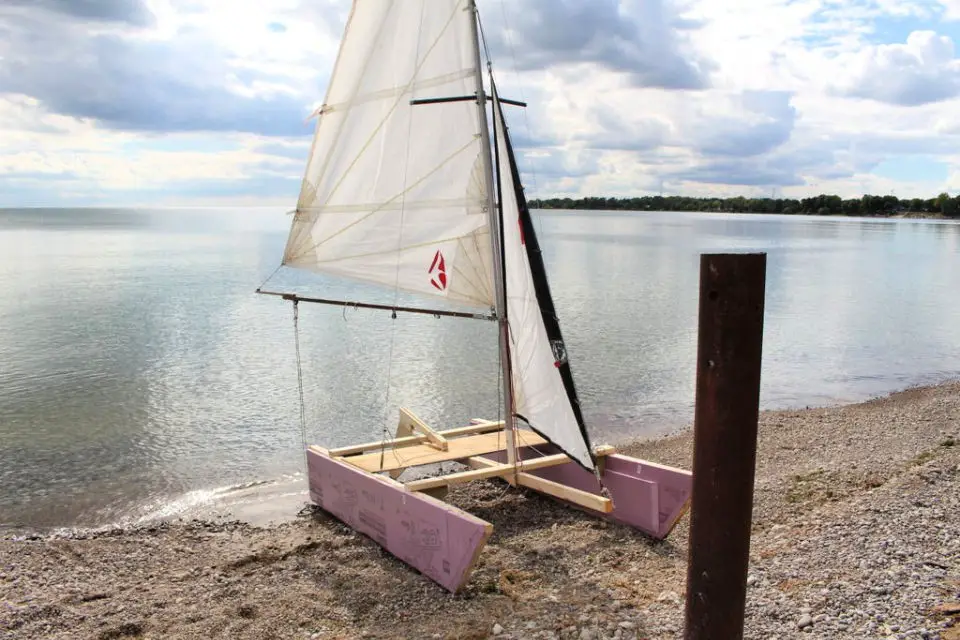
Embark on a thrilling summer project by constructing a DIY styrofoam catamaran with ease. This comprehensive guide takes you through the process of building a sturdy and affordable vessel over two days, with testing on the third. Unlike store-bought models that typically cost around $2000, this DIY project can be completed for just $200. The design features a pair of pontoons, a solid frame, a keel, a rudder, and a mast and sail, making it perfect for solo expeditions or small group outings. When fully submerged, the catamaran can hold up to 460 lbs, offering a sense of freedom and adventure on the water. The guide includes easy-to-follow instructions, detailed schematics, and practical tips on assembly, ensuring that even novice builders can create a sea-worthy vessel with confidence.
3D Love Letter Styrofoam Wall Art
Transform your home with the vibrant essence of spring by crafting stunning wall art that’s not only budget-friendly but also easy on the eyes. This ‘LOVE’ themed masterpiece is brought to life using styrofoam sheets, scrapbook paper, and ribbon, secured with a low-temperature hot glue gun. For an extra touch of personality, hand-design or stencil the letters before attaching them to a 12×12 styrofoam panel wrapped in scrapbook paper, creating a visually striking display.
The lightweight yet impressive wall art can be easily hung using Command velcro strips, making it perfect for any space. This DIY project takes approximately an hour to complete, resulting in a beautiful and uplifting addition that will brighten up your home.
Quick and Easy DIY Styrofoam Letters
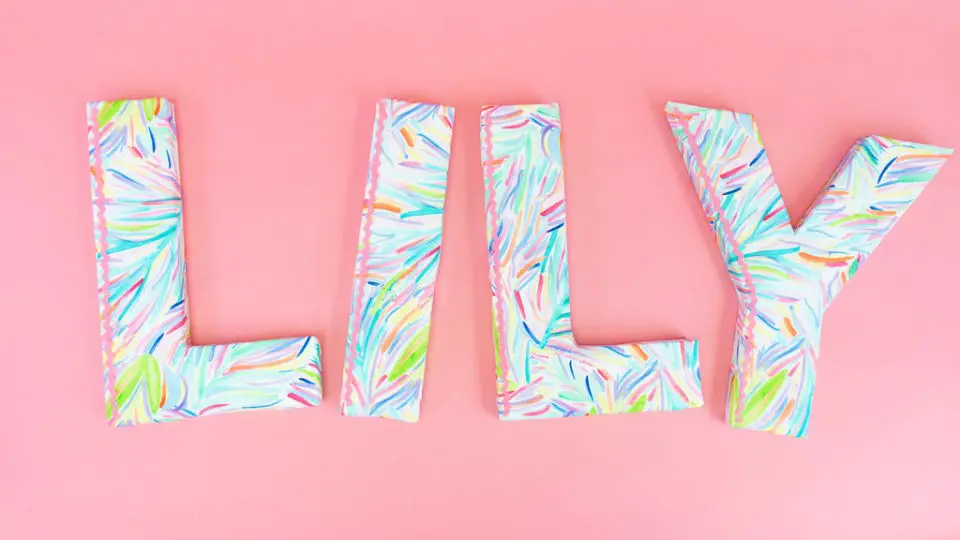
Give your child’s bedroom a personalized makeover by upcycling Styrofoam letters into one-of-a-kind decorations. This DIY project is an excellent opportunity to unleash your creativity while enhancing the charm of their room. Start by gathering the necessary materials: Styrofoam letters, fabric of your choice, E6000+ adhesive, scissors, and trim. The process is straightforward, allowing you to focus on the fun part – crafting! As you work on this project, remember that the fabric is the true star. Your selection will transform these letters into unique art pieces, adding a vibrant and creative touch to any room. This DIY endeavor not only results in personalized decor but also provides a fun and engaging experience for your child.
Styrofoam Sailboat Craft for Kids
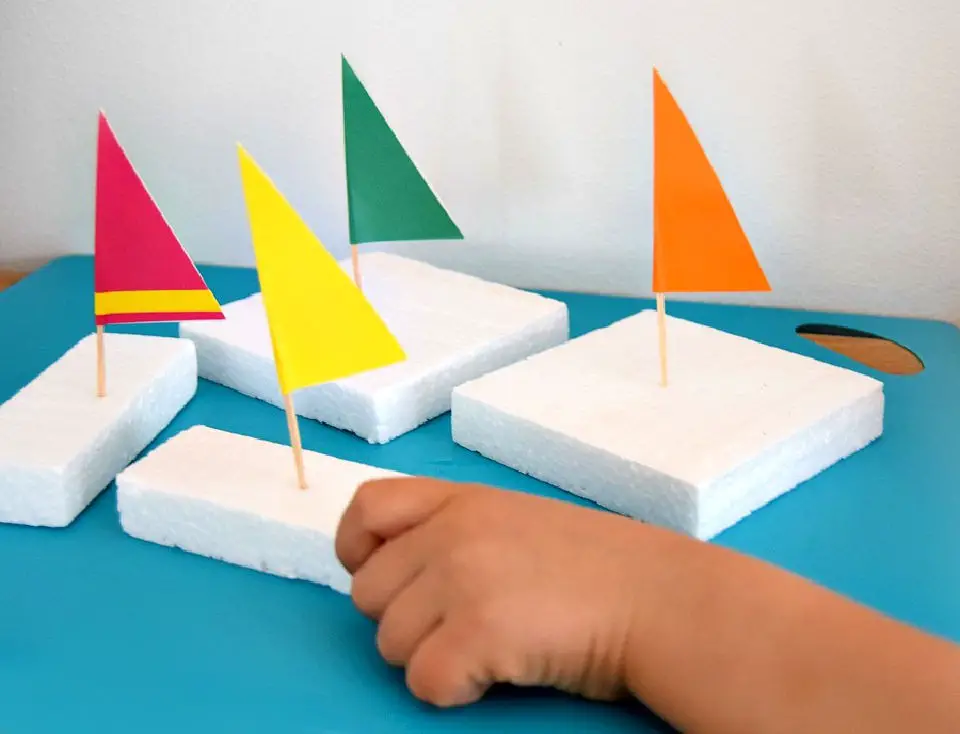
Summer is the perfect time to spark creativity and keep your kiddos entertained. One fun and easy way to do this is by making DIY styrofoam sailboats that can be enjoyed for hours of water play fun. The best part? It requires minimal supplies – simply gather some styrofoam packaging, vinyl- coated color paper, toothpicks, and scissors. This upcycling project not only teaches kids about sustainability but also helps develop their fine motor skills. Plus, the sailboats are versatile enough to be used in any body of water, from a giant bucket to your kitchen sink. With these self-made vessels, your little ones can enjoy delightful races and playtime, ensuring a summer filled with laughter, learning, and memories that will last a lifetime.
DIY Styrofoam Ball Baby Breath Flowers
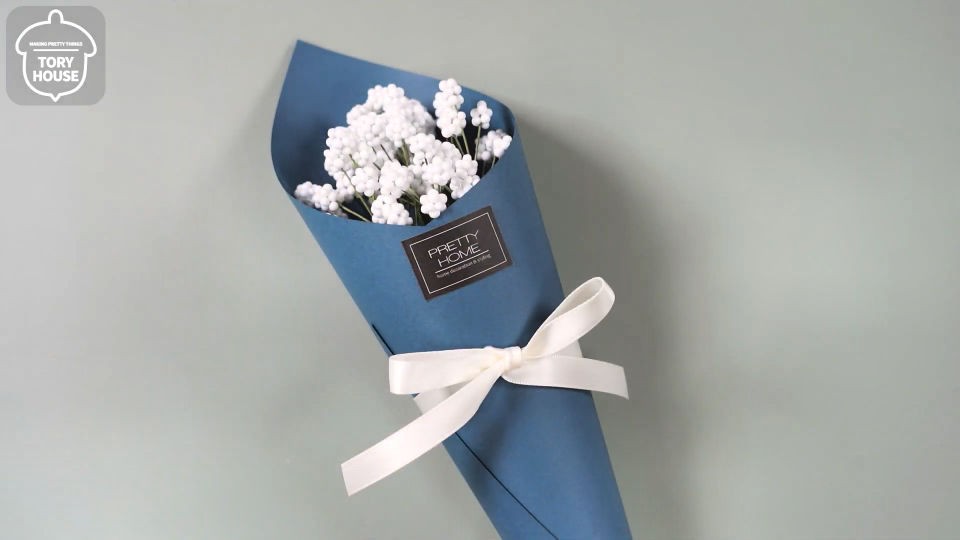
Elevate your crafting skills and inject a touch of whimsy into your decor with this effortless DIY project: Styrofoam ball baby breath flowers. By combining basic materials like Styrofoam spheres and wire, you can create a charming bouquet of faux blooms that’s as delightful as it is easy to make. With a straightforward preparation and assembly process, this craft is perfect for enthusiasts of all levels. The end result? A gorgeous arrangement of baby breath flowers that’s sure to add a warm, inviting touch to any room or special occasion. Not only does this project allow you to express your creativity, but it also provides an affordable alternative to store-bought decorative items. So why not gather your supplies and get crafting these adorable Styrofoam ball baby breath flowers today?
Mini Water Fountain Waterfall Using Styrofoam and Cement
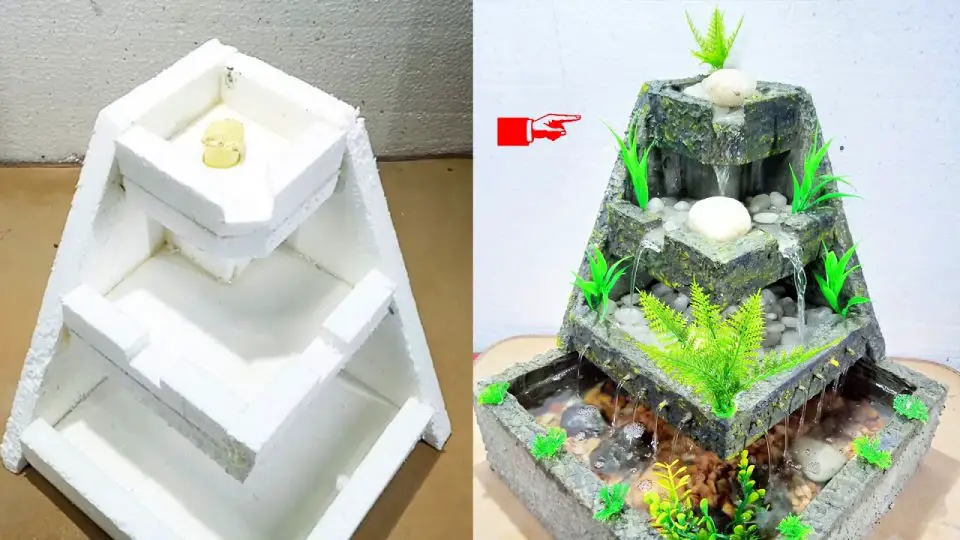
Transform white Styrofoam into a stunning centerpiece with this creative DIY project, perfect for all ages. This engaging DIY mini water fountain combines Styrofoam, cement, and water to create a unique tabletop waterfall aquarium that not only enhances your space’s aesthetic but also boosts air cooling. The construction process is surprisingly straightforward, resulting in an eye-catching feature that serves as both a creative decor piece and a source of soothing ambient sound, adding tranquility to your surroundings. Whether you’re looking for innovative decor or want to bring a touch of nature indoors, this miniature oasis on your tabletop is the perfect solution, inviting you to relax and unwind in its serene atmosphere.
Conclusion:
As you conclude this journey of 20 Styrofoam crafts, it’s undeniable that working with foam balls has been a creatively fulfilling experience. From selecting the perfect project to gathering materials, mastering finishing touches, and appreciating sustainability, each step has offered an abundance of opportunities for craft enthusiasts to grow. Furthermore, prioritizing safety precautions ensures not only an enjoyable but also secure crafting experience. With projects catering to various skill levels, everyone can discover their unique creative expression by transforming simple foam balls into stunning, personalized creations. As you prepare to unleash your imagination with Styrofoam crafts, get ready to revel in the boundless possibilities they bring to innovative self-expression!
