Ready to wrap yourself in warmth and comfort? Discover the joy of creating a puff quilt with our comprehensive guide featuring 15 free patterns, step-by-step instructions, and expert tips. This charming textile art form offers an extra layer of coziness, thanks to its textured design of puffs that provide a sense of indulgence. From tracing the rich history of puff quilts to exploring modern approaches in making them, we’ll walk you through everything you need to know to embark on this rewarding crafting journey. Start with the basics, and learn how to choose the perfect fabrics, gather essential supplies, and bring your puff quilt vision to life. Whether you’re aiming for a classic design or something more contemporary, our guidelines are designed to be informative, engaging, and easy to follow. As you explore the world of puff quilts, get ready to transform your crafting space into a cozy retreat and uncover the beauty and warmth that awaits.
The Rich Tapestry of Puff Quilt History
Puff quilts, also known as biscuit quilts, bring a unique charm and coziness to any home with their distinctive puffy sections that beg to be touched and felt. These quilts have a rich history that sets them apart from traditional quilts, offering a fascinating glimpse into the world of quilting. The story of puff quilts is one of evolution and innovation, shaped by the creative endeavors of skilled quilters throughout the ages.
Origins and Evolution
The history of quilts is deeply rooted in society’s fabric, with padded fabrics used globally for various purposes, dating back long before the term ‘quilting’ was coined. Puff quilts hold a special significance, originating as an innovative solution to utilize scraps of fabric and other materials, such as old pantyhose during the early years of the quilt revival. This resourceful approach not only gave birth to a new quilting technique but also showcased the ingenuity of quilters in repurposing materials, a testament to their creative problem-solving skills.
Cultural Significance
Quilting is an art form that transcends mere craftsmanship, serving as a vehicle for self-expression, storytelling, and community building. Puff quilts, in particular, are a testament to this notion, as they often bear the mark of their creators’ surroundings, resourcefulness, and individuality. The fabric choices, patterns, and colors used in these quilts offer a window into the life experiences and cultural influences that shape each quilter’s unique perspective.
Modern-Day Puff Quilts
Puff quilts have come a long way, with quilters constantly pushing the boundaries by incorporating diverse fabrics, innovative designs, and creative techniques. As a result, they’ve become a sought-after addition for those seeking to inject warmth, texture, and unique character into their homes. The modern puff quilt is not just a tribute to its predecessors but a vibrant representation of the craft’s resilience and capacity to evolve in harmony with contemporary trends.
How to Get Started with Puff Quilt Making
While creating a puff quilt may appear intimidating at first, it’s actually a manageable process that requires the right guidance and a moderate amount of patience. With these essential steps as your foundation, you’ll be well-equipped to craft a cozy and textured quilt that will become a treasured possession.
Choosing Your Fabric
When it comes to creating your puff quilt, the first crucial step is selecting the ideal fabric that reflects your personal style. To ensure your quilt exudes comfort and durability, opt for soft yet resilient materials that cater to your unique taste. Cotton remains a timeless favorite due to its ease of manipulation and luxurious feel. For an added touch of opulence, consider incorporating minky or fleece into your design. Ultimately, the choice of fabric is yours alone – after all, it’s your quilt, your way!
Gathering Supplies
Prior to embarking on your project, ensure you have all the required materials within arm’s reach. Specifically, you’ll need to gather: a suitable fabric for both the upper and lower layers; filling material such as polyester fiberfill to give shape to the puffs; a reliable sewing machine equipped with thread of matching color; sharp scissors for cutting through fabric; a fabric marker to mark your seams; a measuring tape to precision-cut your pieces; and sturdy pins to secure them in place. With these essential supplies at hand, you’ll be well-prepared to tackle your project head-on.
Cutting Your Squares
When it comes to creating the foundation of your quilt, precision is crucial. To achieve the desired dimensions, carefully cut fabric squares into uniform pieces, each destined to become the crown of a puff. Assemble an equal number for both the top and bottom layers, with square sizes typically ranging from 4 to 6 inches across. However, feel free to adapt this measurement according to your personal preference or the unique characteristics of your quilt design.
Sewing the Puffs
To begin the process, take two squares and position them so that their right sides are facing each other. Next, sew along the edges, leaving a small opening for turning the square right side out. Once you’ve completed the sewing, carefully turn the square right side out through the gap you left. Then, use a small amount of fiberfill to stuff the square, ensuring it’s evenly filled before finally closing the opening.
Assembling the Quilt
Assembling the quilt is a thrilling part of the process! Begin by laying out your prepared puffs in the desired pattern and secure them with pins, ensuring they’re aligned edge to edge. Next, sew the puffs together row by row, gradually building the quilt’s foundation. Finally, join the completed rows to reveal your finished quilt, a true testament to your skill and patience.
Finishing Touches
When the puffed sections are securely stitched, consider adding a finishing touch with a border or binding to create a polished appearance. Furthermore, attaching a backing fabric can enhance the overall warmth and longevity of your quilt, providing an added layer of protection and comfort.
Tips for Success
When embarking on the journey of making a puff quilt, it’s essential to adopt a measured approach. Rushing through the process can lead to errors and frustration. Instead, take your time to thoroughly enjoy each step, pausing when needed to recharge and refocus. One of the greatest advantages of working on a puff quilt is the freedom to experiment and express yourself creatively. Feel free to push boundaries by combining unexpected colors, patterns, and textures. If you find yourself stuck or struggling with a particular aspect, don’t hesitate to seek guidance from online communities, video tutorials, or even fellow crafty enthusiasts.
Design Variations for Puff Quilts
While puff quilts may seem straightforward at first glance, the versatility they offer is truly remarkable. From novice quilters to seasoned veterans, the array of design options can transform a humble project into a masterpiece. Here, we’ll venture into some unconventional puff quilt patterns that cater to diverse tastes and styles.
Traditional Patterns with a Twist
The classic square puff quilt is a tried-and-true design that never goes out of style. For added visual interest, consider mixing things up by varying the sizes of the squares or incorporating an ombre effect through a gradual color progression. This subtle nuance can add depth and sophistication to what’s already a timeless choice.On the other hand, pinwheel patterns bring a playful and dynamic energy to your quilt. By using bold, contrasting colors, you can make the pinwheels truly pop and give your quilt a lively personality that’s hard to ignore. Whether you opt for subtle variations or go all out with bright, eye-catching hues, the possibilities are endless and sure to result in a one-of-a-kind creation that reflects your unique style.
Modern Designs for Contemporary Spaces
A modern twist on the classic puff quilt is achieved by incorporating geometric shapes like triangles, hexagons, and diamonds. These shapes can be arranged in a repeating pattern or scattered randomly to create a contemporary aesthetic. For a more subdued approach, a minimalist puff quilt featuring large, solid-colored puffs offers a chic and understated design. A monochromatic palette or a limited selection of complementary colors adds an extra layer of sophistication to this simple yet elegant quilt.
Themed Puff Quilts for Personalization
Celebrate the changing seasons with a unique twist on traditional quilting. Imagine wrapping yourself in a spring-inspired quilt featuring soft pastel florals, or snuggling up with an autumnal quilt that exudes warmth and coziness through its earthy tones. But why stop there? Take your quilting to new heights by creating special occasion quilts that capture the essence of holidays like Christmas, Halloween, or Valentine’s Day. Simply choose holiday-themed fabrics and patterns that evoke the magic of each celebration, ensuring your quilt is a true reflection of the joy and wonder they bring.
Creative Approaches to Puff Quilt Making
Transforming old clothes or linens into a puff quilt not only showcases creativity but also embodies eco-friendliness. The possibilities are endless when combining different materials, such as cotton, velvet, and satin, to create a unique mixed media piece. Prints and solids can be blended to produce an extraordinary one-of-a-kind creation.
Skill Level Assessments for Quilters
When diving into a quilting project, it’s essential to have a clear understanding of your skill level. This awareness enables you to select patterns and techniques that will yield a satisfying outcome. To ensure a harmonious quilting experience, consider the following factors: your current expertise, the complexity of the design, and the time commitment required for each step. By taking this approach, you’ll be well-equipped to tackle projects that match your abilities, allowing you to build confidence and grow as a quilter.
Skilled Beginner
With the fundamentals mastered, you’ve reached a pivotal point in your sewing journey. Your technical prowess now allows you to operate your machine with ease, manage bobbins and rotary cutters with precision, and understand fundamental concepts like appliqué, basting, and seam allowance. As you continue to refine your skills, simple pieced designs and appliqué projects provide an ideal outlet for your creativity. Moreover, consider supplementing your learning experience with classes – they can prove invaluable in further developing your expertise.
Intermediate Quilter
As you progress to intermediate-level quilting, you’ve likely built a solid foundation of skills and techniques. With this increased proficiency comes the ability to tackle more intricate projects that challenge your creativity and push your abilities further. You’re now comfortable navigating your sewing machine and have a strong grasp of quilting terminology. Your piecing skills are becoming increasingly consistent, allowing you to experiment with more complex patterns and designs. This intermediate stage is also an ideal time to explore new techniques like free-motion quilting and refine your fabric selection skills, ultimately boosting your confidence as a quilter.
Advanced Quilter
With the fundamentals of quilting firmly under their belt, advanced quilters are free to explore new frontiers in creativity. They’re taking on more complex designs, experimenting with innovative fabrics, and refining their skills through trial and error. Their quilts exude precision and attention to detail, with crisp edges and precise seams. As they continue to push the boundaries of their craft, they may even be showcasing their work in exhibitions or competitions, earning recognition for their artistic endeavors.
Maintenance and Care Tips for Puff Quilts
While puff quilts are undoubtedly stunning and practical, they’re also treasured heirlooms that require gentle care to ensure their beauty endures. With these vital guidelines, you’ll be able to preserve the allure and integrity of your puff quilts for years to come, potentially even generations.
Proper Washing and Drying
When it comes to washing puff quilts, it’s essential to handle them with care. A gentle hand wash or a delicate machine cycle using mild detergent is recommended. It’s crucial to ensure the quilt is thoroughly rinsed to prevent any residue buildup. For drying, air-drying is the way to go. Lay the quilt flat on a clean surface or hang it evenly on a line to prevent creases and maintain its shape. To preserve the colors and prevent fading, avoid direct sunlight during the drying process.
Storage Solutions
When it comes to storing your quilt, it’s essential to provide a stable environment that prevents the growth of mold and mildew. This means avoiding areas prone to temperature and humidity fluctuations, such as basements and attics. A cool, dry space is ideal for long-term storage.For added protection, consider using acid-free tissue paper to wrap your quilt before placing it in a breathable cotton bag. This will not only shield the fabric from dust and pests but also safeguard against damage caused by acidic substances.
Regular Care
To maintain its shape and longevity, it’s essential to handle your quilt with care. One crucial step is to rotate and refold it periodically, as this prevents the formation of permanent creases and minimizes wear on the folds. Additionally, when handling your quilt, it’s vital to be gentle to avoid putting unnecessary strain on the seams and stitching. This means avoiding any pulling or tugging motions that could cause damage over time.
FAQs About Puff Quilts
The allure of puff quilts lies in their unique texture and coziness, prompting a flurry of questions from quilters seeking clarity on various aspects. To address these concerns, this section provides straightforward answers to frequently asked queries.
What is a Puff Quilt?
Puff quilts, also referred to as biscuit or bubble quilts, boast a unique characteristic – their blocks are filled with stuffing, resulting in a soft and three-dimensional appearance. In contrast to traditional quilts, which typically feature a middle wadding layer, puff quilts abandon this convention by filling each individual block with stuffing before sewing them together.
How Do I Choose the Right Fabric?
When it comes to selecting fabrics for your quilt, it’s essential to prioritize quality and practicality. For the visible top squares, opt for high-quality fabrics that will withstand scrutiny. Meanwhile, you can get creative with scrap fabric like muslin for the bottom squares that won’t be visible. Additionally, consider the quilt’s intended use and choose materials that are not only aesthetically pleasing but also durable and easy to care for, ensuring it remains a treasured possession for years to come.
What Are the Ideal Sizes for Puff Squares?
While there’s no one-size-fits-all approach to creating puff squares, personal preference plays a significant role in determining their size. Typically, top squares tend to measure around 6 inches by 6 inches, with bottom squares slightly smaller at 5 inches by 5 inches. However, feel free to adjust these sizes to achieve the desired level of puffiness and overall quilt dimensions.
Can I Machine Wash a Puff Quilt?
While it’s perfectly fine to machine wash your puff quilt, it’s crucial to follow certain guidelines to ensure its integrity remains intact. Begin by selecting a gentle cycle and using mild detergent that’s specifically designed for washing delicate fabrics. After the wash cycle is complete, make sure to rinse the quilt thoroughly to remove any remaining soap residue. To prevent distortion or creasing, air-dry the quilt flat or hang it evenly, allowing it to dry naturally.
How Do I Store My Puff Quilt?
When it comes to storing your puff quilt, keep it out of harm’s way by placing it in a cool, dry location that is shielded from direct sunlight. For long-term storage, consider enveloping the quilt in acid-free tissue paper and securing it within a breathable cotton bag. This will effectively safeguard the quilt from dust, pests, and other environmental factors that could cause damage over time.
How Many Squares Do I Need for My Quilt?
When it comes to crafting a quilt, one crucial consideration is the quantity of squares needed. The key factors influencing this calculation are the final dimensions of the quilt and the size of each individual puff. To ensure a precise estimate, start by envisioning your quilt’s desired size and then calculate the number of puffs required to achieve that dimension. This meticulous planning will set the stage for a beautifully proportioned quilt.
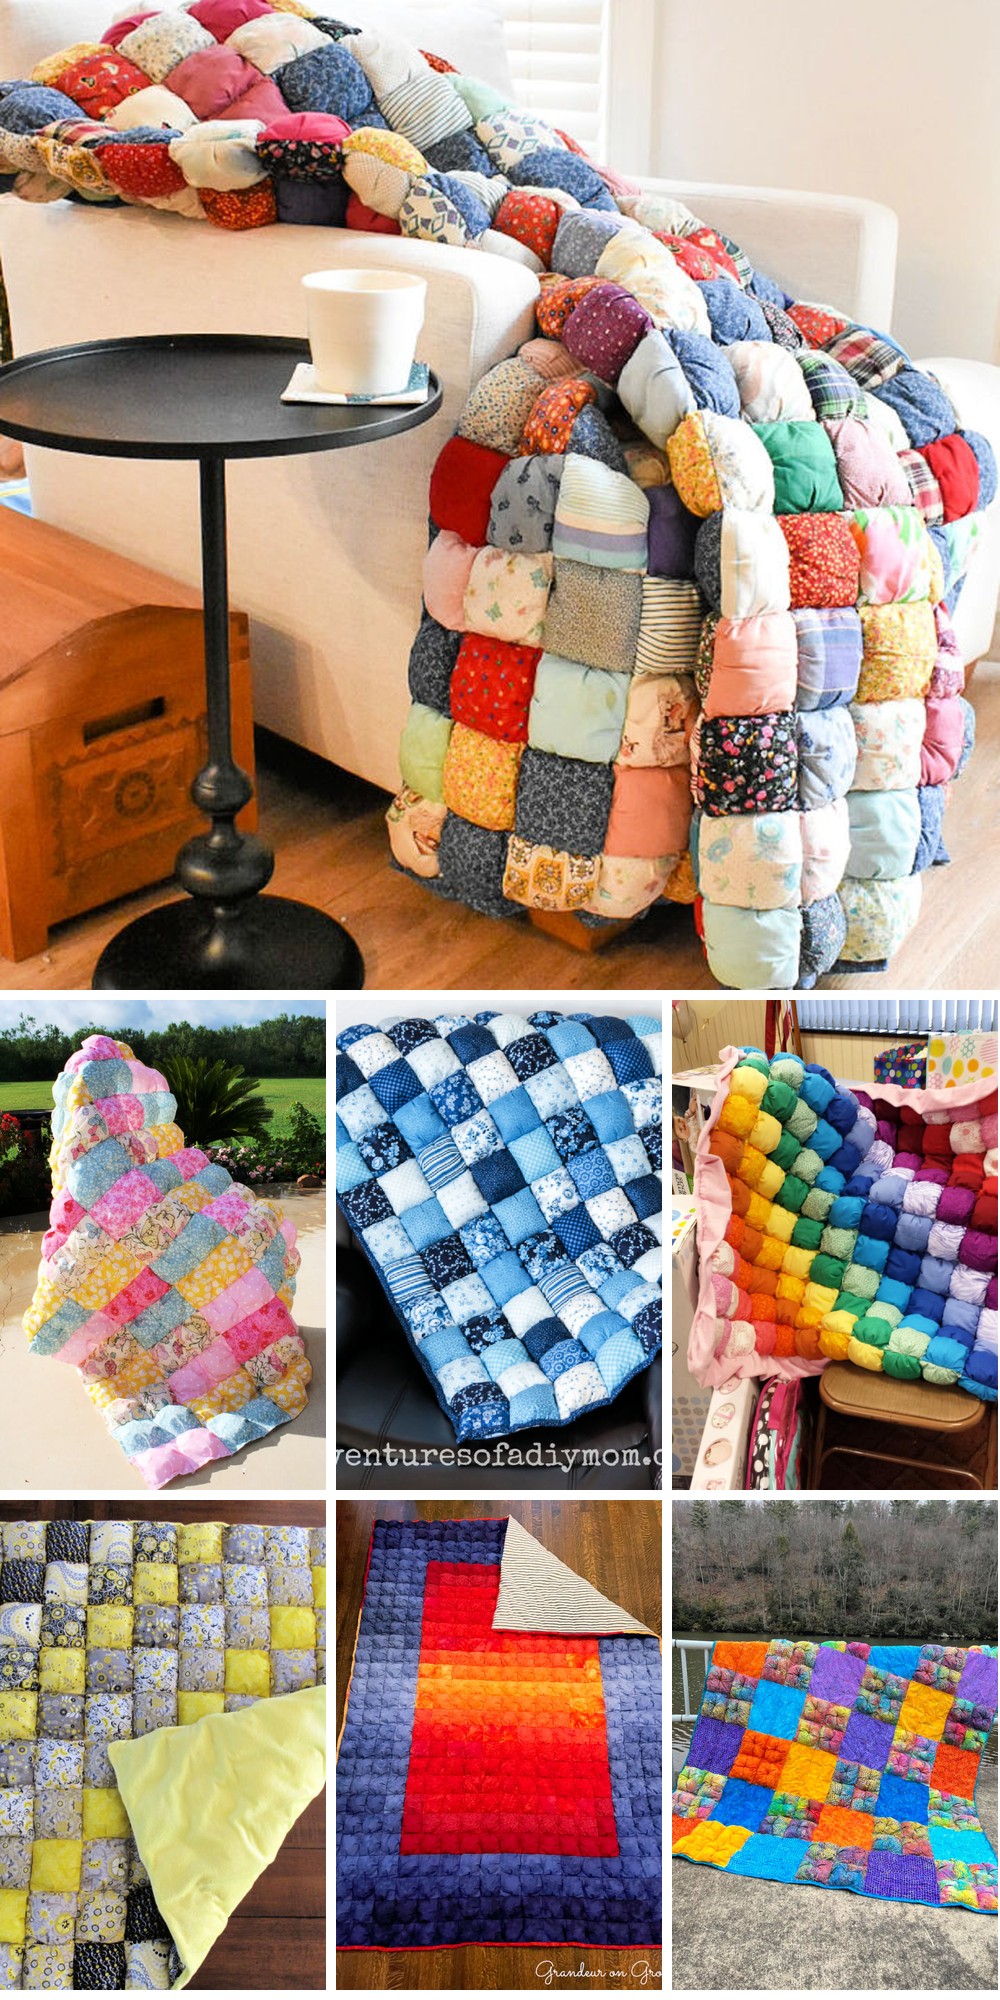
15 Free Puff Quilt Patterns To Keep You Warm
Embrace the warmth and coziness of winter by exploring 15 free puff quilt patterns. These innovative designs offer endless possibilities for your next quilting adventure, allowing you to express your creativity while staying snug as a bug in your very own handmade blanket.
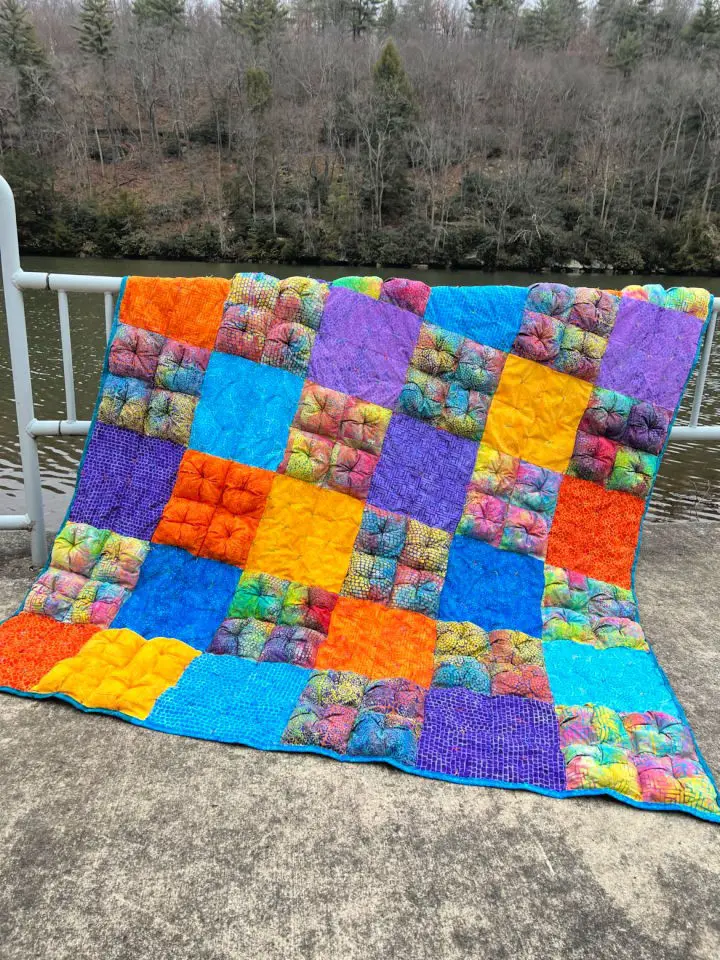
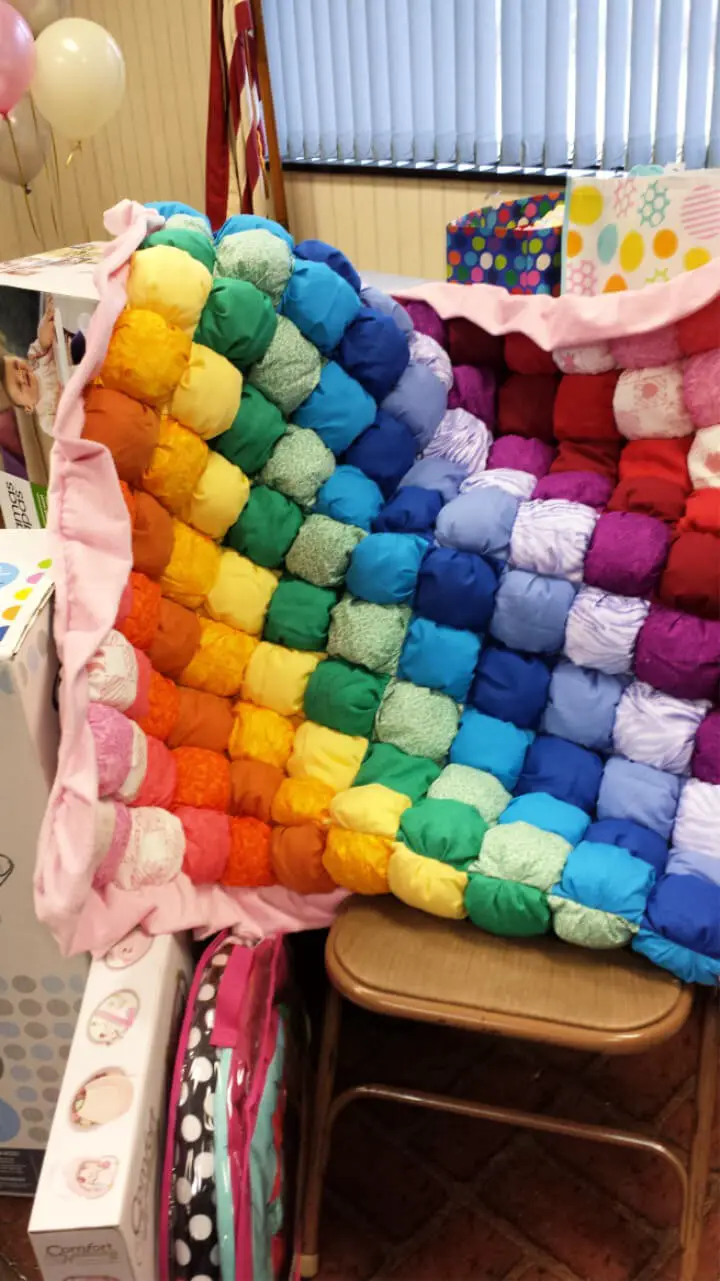
DIY Prima Blender Puff Quilt
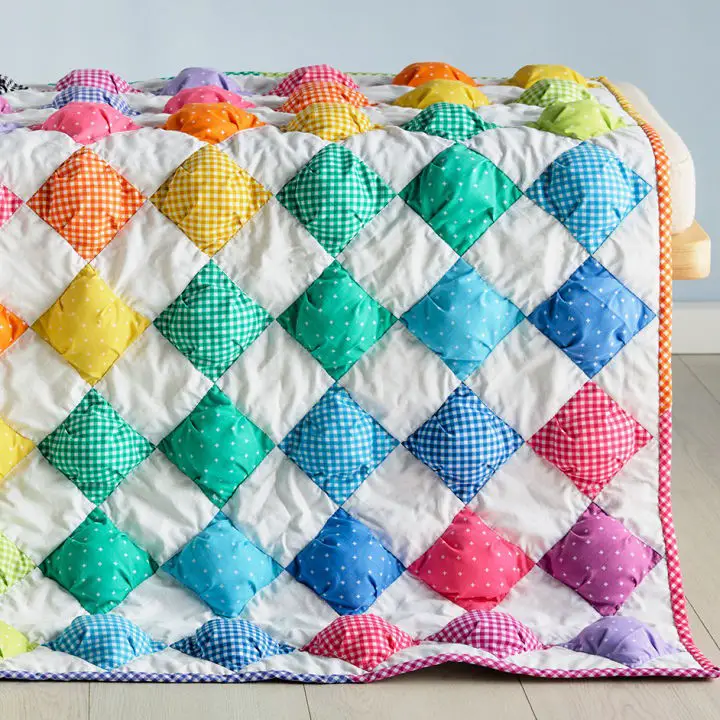
Spotlight Australia’s Prima Blender Puff Quilt guide is a must-have for quilters of all skill levels looking to create a vibrant and cozy quilt. The comprehensive tutorial provides step-by-step instructions for cutting and assembling the quilt, making it easy to follow along and achieve professional-looking results. By combining rainbow-colored squares with crisp white fabric, you’ll be able to create a stunning pattern and plush texture that’s sure to brighten up any room or make a thoughtful gift. Throughout the project, essential tips are shared to ensure a smooth quilting experience, from expertly stuffing squares to assembling the quilt top with precision. With the finished quilt measuring 39.5 inches by 29 inches, you’ll have the option to expand the dimensions to suit your preference. Get ready to sew and stuff your way to a beautiful handmade treasure!
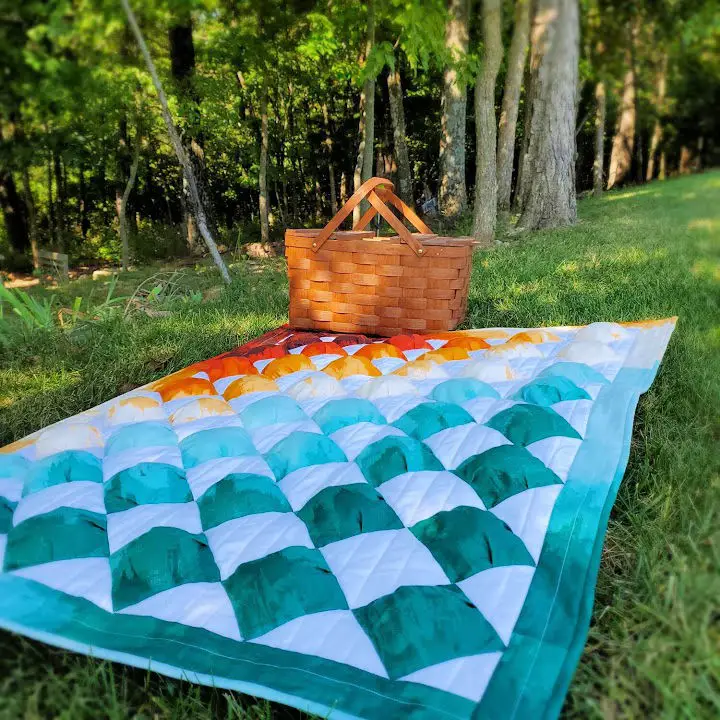
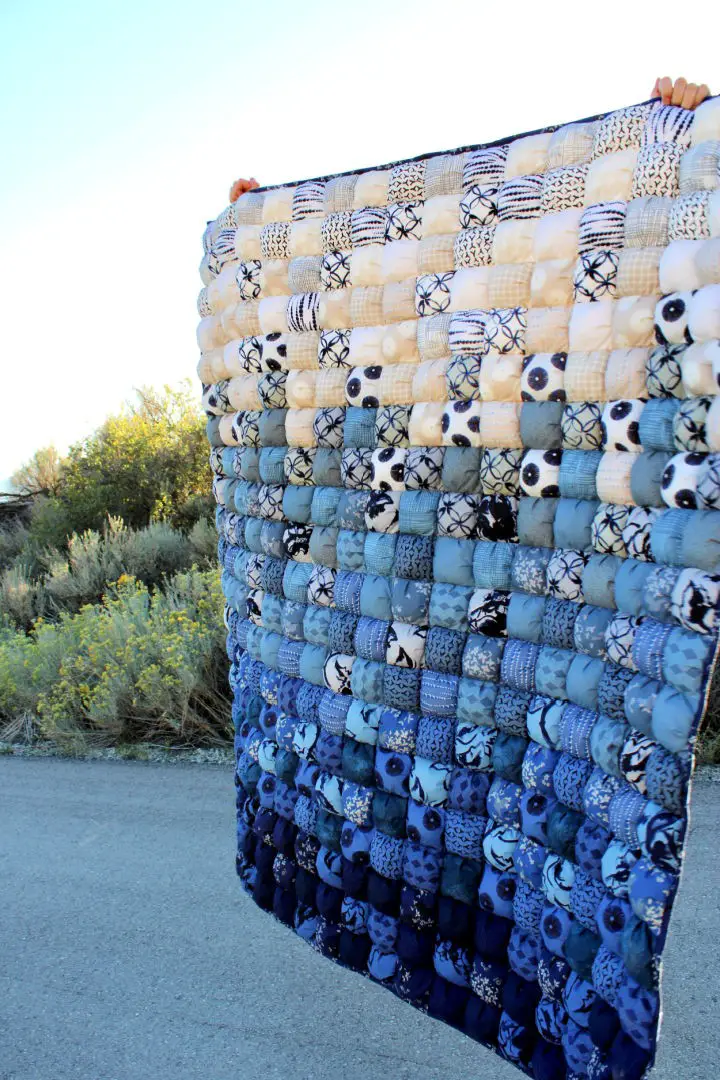
Easy DIY Ombre Puff Quilt
Discover the art of creating a one-of-a-kind Ombre Puff Quilt by following Brittany Lloyd’s step-by-step guide at Lo & Behold Stitchery. Her personal experience of making a second puff quilt, despite the time and effort required, provides valuable lessons on choosing fabrics, stuffing materials, and innovative quilting techniques. This comprehensive piece is ideal for those looking to add a personal touch to their home or gift a handmade treasure. With an emphasis on experimentation and practical tips such as machine tacking and creating an ombre binding, the write-up serves as a trusted resource for crafting a unique and stunning puff quilt. By incorporating various stitches and taking care to support the quilt during the sewing process, you’ll achieve the best results.
How to Sew a Puff Quilt
Embark on a delightful adventure in puff quilting with SewCanShe’s comprehensive guide to creating charming puffy quilts reminiscent of plush pillows. This beginner-friendly tutorial is perfect for sewing enthusiasts seeking to infuse their home decor with a personalized touch. By following the straightforward instructions, you’ll master the art of cutting, sewing, and stuffing your quilt, resulting in a unique piece that exudes coziness. Not only will this project yield a treasured keepsake, but it’s also an excellent opportunity to bond with family members by involving them in the fun process of stuffing the pillows. As you refine your crafting skills, you’ll be proud to display your creation for years to come.
Make a Puff Quilt
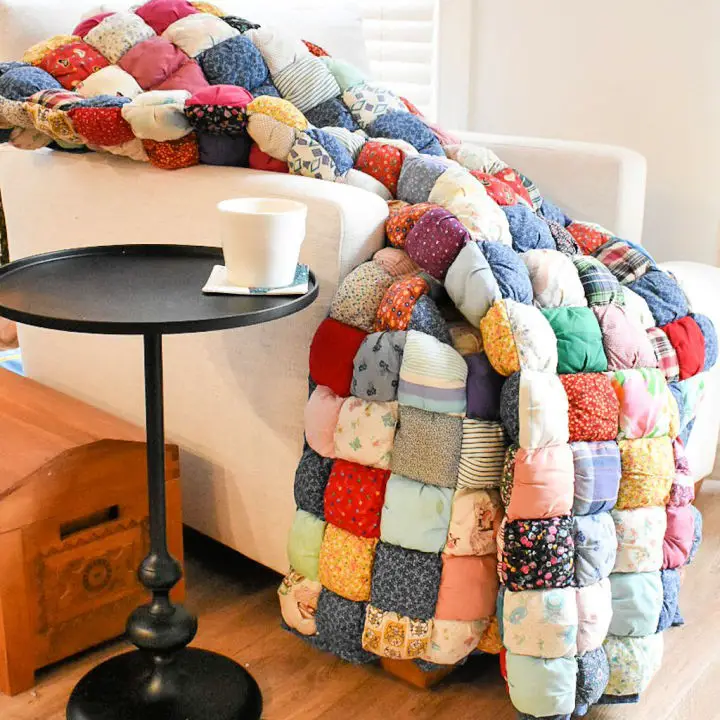
Get ready to wrap yourself in the softness of puff quilts! The DIY Puff Quilt blog on Cotton Cuts is the perfect destination for crafty folks who love upcycling scrap fabrics into something truly special. This charming quilt style boasts a unique texture and deceptively simple construction, making it an excellent choice for beginners and seasoned quilters alike. What sets puff quilts apart are their signature 4-inch squares that puff out when stuffed, giving them a delightfully airy appearance.
The blog provides step-by-step guidance on two primary construction methods, along with valuable tips and resources like the free Ombre Puff Quilt Pattern to get you started. With its focus on repurposing leftover materials, this tutorial also offers practical advice on organizing and assembling your quilt, ensuring a fulfilling crafting experience that yields a cozy and inviting final product.
Making a Puff Quilt Blog Hop
Join Claudia’s vibrant journey as she crafts a unique puff quilt with the stunning ‘Broken Glass’ fabric line from Island Batik. As a 2023 Island Batik Ambassador, Claudia shares her design choices and quilting process, offering valuable insights into combining textures and techniques. Her informative post provides detailed descriptions and helpful tips for quilters of all levels, inspiring readers to start their own projects. Plus, discover the charming bonus project that even the cats love!
Make an Ombre Puff Quilt
Immerse yourself in the captivating world of quilting with Lo & Behold Stitchery’s comprehensive Ombre Puff Quilt Tutorial. This meticulously guided process, coupled with an informative video, transforms the creation of a stunning gradient quilt into a seamless and satisfying experience. The step-by-step instructions carefully walk you through fabric selection, puff construction, and quilt top assembly, guaranteeing a unique and cozy final product. By incorporating traditional hand-tying techniques, you can seamlessly merge modern flair with timeless charm. Simply download the free pattern, gather your materials, and begin crafting a treasured keepsake that’s just as enjoyable to create as it is to snuggle up with.
Make a Puff Quilt
Crafting a puff quilt is an incredibly satisfying DIY project that can instantly add warmth and texture to any room. By following the comprehensive guide provided by Adventures of a DIY Mom, you’ll be able to create a charming lap-sized puff quilt – also known as a bubble or biscuit quilt – even if you’re new to quilting. The tutorial takes a straightforward approach, relying on precut fabric squares to simplify the process and make it accessible to all skill levels. Step-by-step instructions are provided for cutting fabrics, constructing puff blocks, and assembling the quilt with stuffing and binding. To further aid your progress, a video tutorial is included, visually guiding you through each step of the process. With this guide, you’ll have everything you need to complete this plush and eye-catching blanket – perfect for gifting or personal use.
Making a Puff Quilt for Beginners
Transforming your crafting experience into one of comfort and creativity, our guide to making a puff quilt takes you on a journey from beginner to accomplished crafter. With each row unfolding like a meditative exercise, the process becomes almost hypnotic as you stitch together squares, fold, sew, and stuff your way to a cozy, handcrafted quilt. Crucial tips on pin usage ensure that even those new to sewing can achieve a professional finish, leaving you with a sense of pride and accomplishment. Whether gifting or keeping for yourself, the satisfaction of creating something warm and inviting is just a few stitches away.
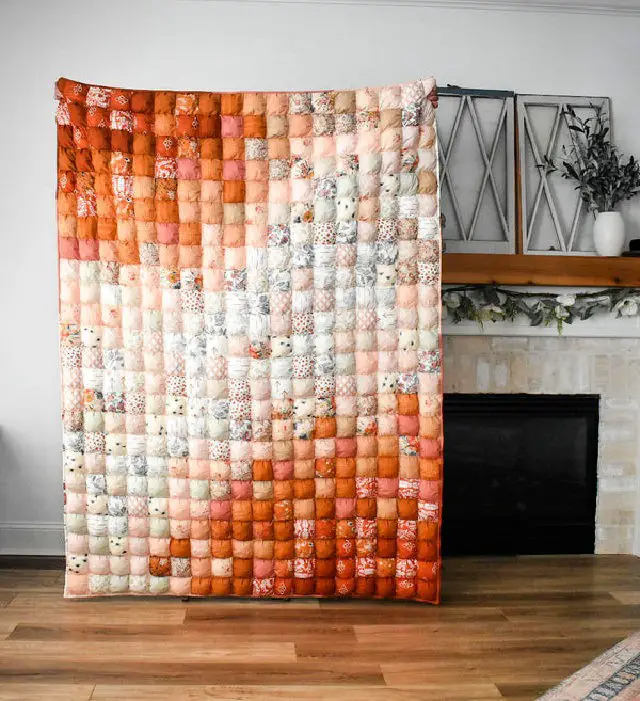
DIY Ombre Puff Quilt
Dive into the world of Ombre Puff Quilts with Bayhill Studio’s comprehensive guide, where Julia Frazier reveals her nostalgic inspiration behind crafting a cozy, weighted throw using the stunning Watermark fabric collection by Tammie Green. As you embark on this creative journey, learn the meticulous steps to pair fabric squares, create pleats, and piece together rows for a breathtaking gradient effect that will leave you mesmerized. The quilt’s soothing weight and comforting aesthetic make it an ideal home accessory or heartfelt gift. To get started, grab the free pattern from Lo & Behold Stitchery and transform fabric stacks into a textured, layered masterpiece that will delight the senses.
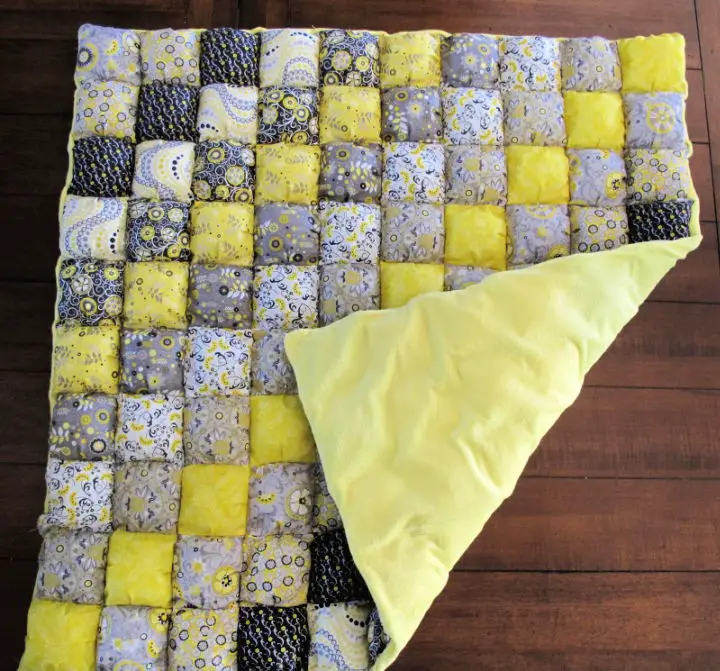
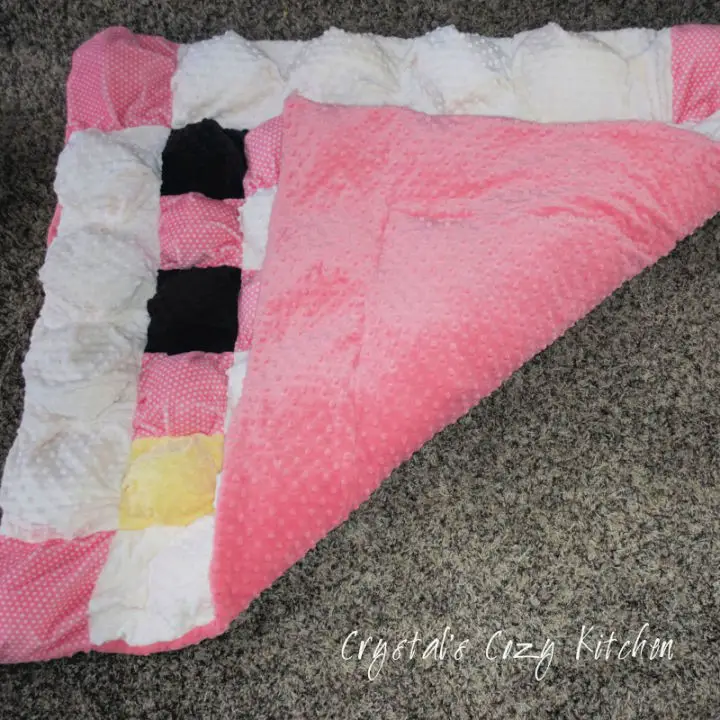
How to Make a Puff Quilt
Transform your home with the unique charm of a handmade Puff Quilt, crafted using Smiling Colors’ comprehensive guide. This delightful project features individual puffy squares, creating a captivating 3D effect that adds a touch of personality to any room. With step-by-step instructions for selecting fabrics, cutting precise pieces, and constructing each puff, the process is made accessible for those with some sewing experience. In addition to learning how to select and join blocks, you’ll also discover valuable tips for adding finishing touches without the need for batting. Embark on this engaging project and create a beautiful Puff Quilt that’s perfect for gifting or keeping as a treasured keepsake.
Make Your Own Puff Quilt
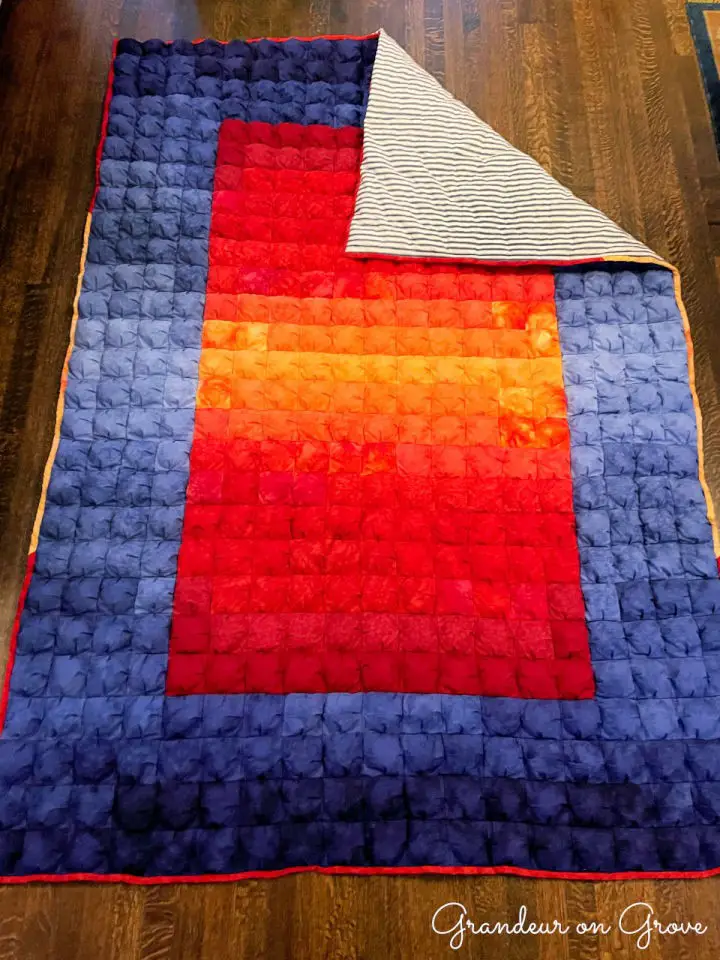
Indulge in the art of crafting a sumptuous puff quilt with Grandeur on Grove’s comprehensive guide. Our step-by-step tutorial demystifies the process for novice to intermediate sewists, empowering them to infuse their creations with texture and warmth. This versatile quilt, ideal for cozying up on chilly nights, can be tailored in size and hue to harmonize with any room’s décor.While the project does require precision and repetition, our expert tips will guide you through the process of sewing plush squares filled with soft Poly-fil. Master essential skills such as maintaining straight stitches and managing the bulkiness of the material. As a reward for your efforts, you’ll be left with a stunning and functional quilt that’s sure to become a treasured possession.
Puff or Biscuit Quilt Pattern
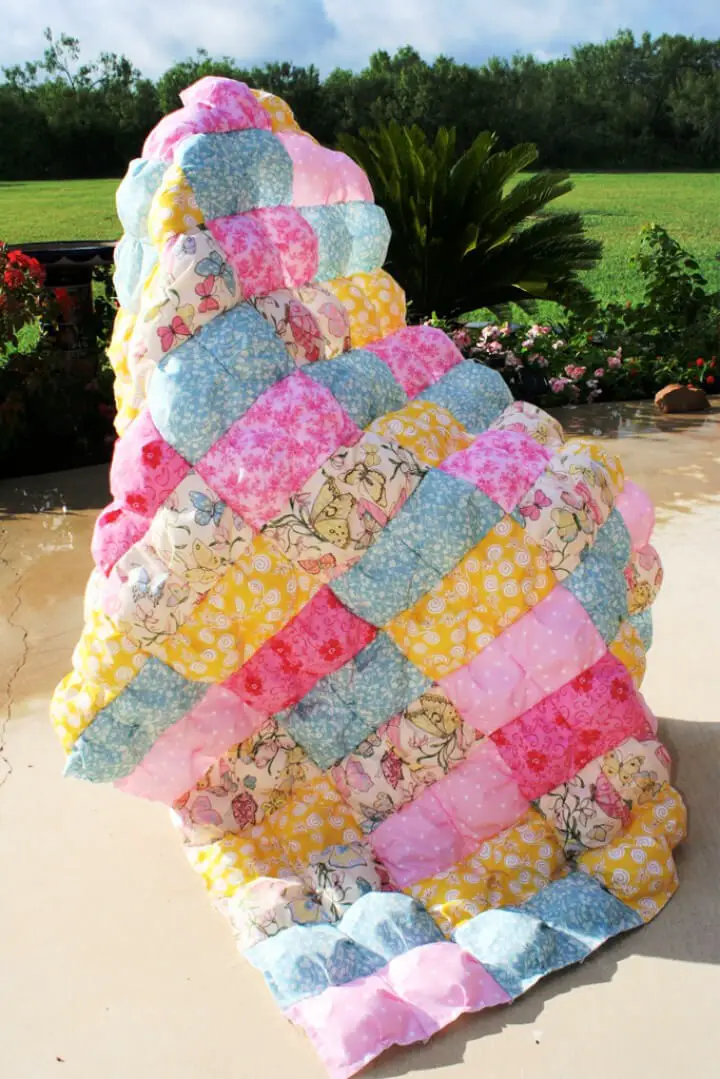
Embark on a creative journey to craft a captivating Puff or Biscuit Quilt with this step-by-step guide designed specifically for beginners in sewing. This comprehensive tutorial takes you through the fundamental process of creating a charming quilt that can be treasured as a thoughtful gift or added as an attractive feature to your home decor. By following the instructions, you’ll learn how to work with various fabric square sizes, sew them together with pleats to achieve the desired puffiness, and master the technique for stuffing and closing the blocks to give your quilt a cozy finish. To ensure a smooth sewing experience, tips are also provided to help you navigate any challenges that may arise. As you bring your project to life, you’ll discover the joy of creating a unique piece that reflects your personality and brings warmth to any space. The next installment will delve into how to add a backing and complete your quilt masterpiece.
Super Easy DIY Doll Puff Quilt
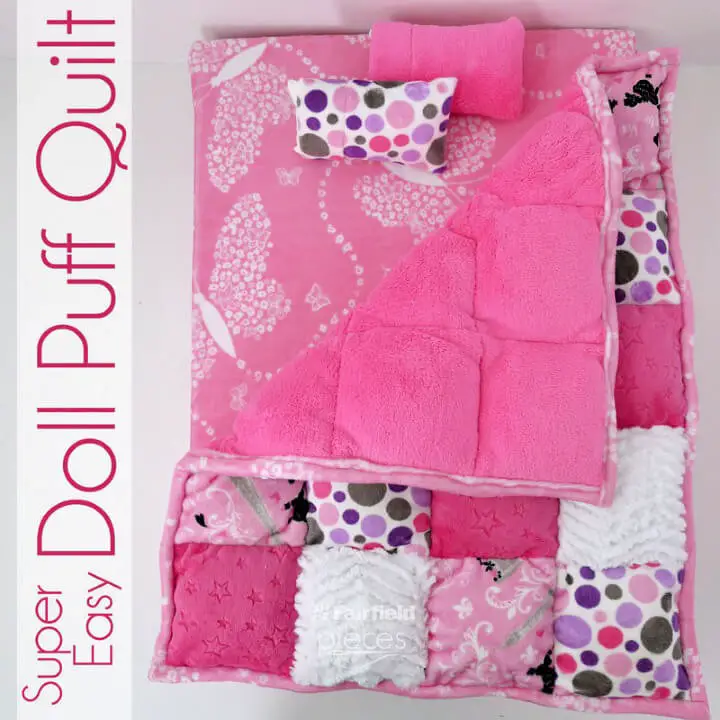
Transform your crafting experience with our step-by-step guide on creating Super Easy Doll Puff Quilts from Shannon Cuddle Scraps. This project is perfect for doll enthusiasts who want to add a touch of coziness to their accessories. By following our easy-to-follow instructions, you’ll be able to turn these scraps into adorable, puffy quilts that any doll would adore. From selecting the ideal materials to binding the final touches, every step is carefully presented to ensure an enjoyable and stress-free crafting experience. Not only will you have fun creating this miniature quilt, but you’ll also end up with a soft and luxurious piece that’s perfect for gifting or keeping as a treasured handmade keepsake.
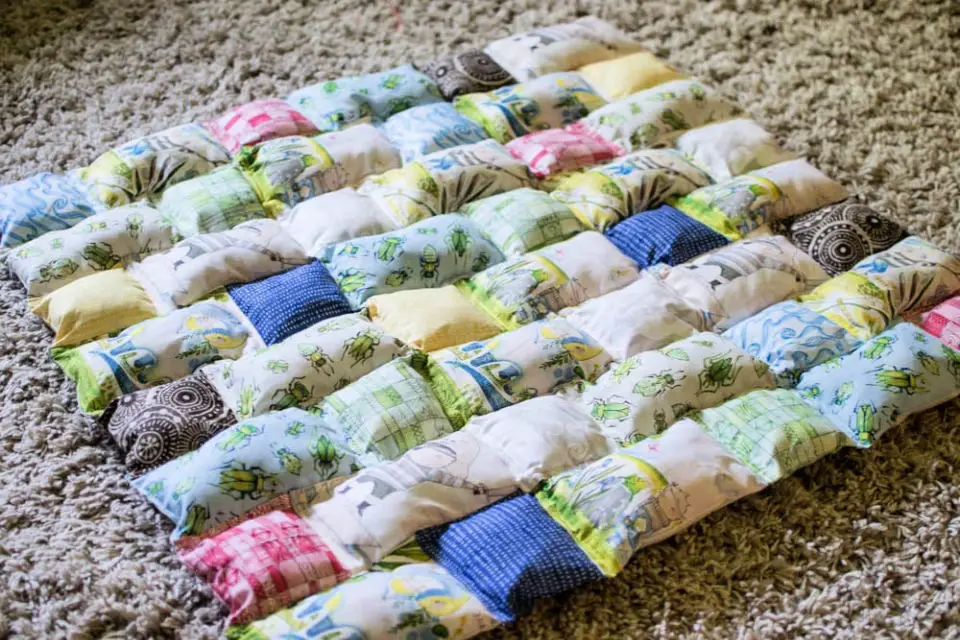
Sanity Saving Puff Quilt Pattern
For crafty enthusiasts seeking to create a charming puff quilt without the intricacies of constructing individual ‘pillows’, the Sanity Saving Puff Quilt Tutorial offers a refreshing approach. By sewing squares into rows and stuffing them before final assembly, this simplified method minimizes the bulk of seams, making the process more manageable. The tutorial utilizes fundamental materials like coordinating fabric, fiberfill, and basic sewing tools to guide you in crafting a delightful toddler-sized quilt, perfect for gifting or personal use. As you complete this creative sewing project, you’ll experience a sense of fulfillment and be left with a beautifully crafted puff quilt that showcases your skills. By embracing this hassle-free approach, you’ll preserve your sanity while delivering impressive results.
DIY Puff Quilt
Starting a puff quilt project is an artistic journey that demands creativity and patience. At Mage Menagerie, enthusiasts can dive into a comprehensive tutorial to create their own unique, cozy masterpiece. This three-dimensional design adds warmth and whimsy to any nursery or living area. To begin, gather vibrant fabrics, essential sewing tools, and fiberfill for the puffs. The process unfolds by cutting out squares, crafting individual puffs through precise stitching, and then arranging them into a delightful patchwork quilt. Adding a soft backing and a decorative ruffle edge gives the finished product a polished look. The step-by-step instructions are clear and concise, making each stage enjoyable from start to finish. Whether creating for oneself or gifting it to someone special, the sense of accomplishment that comes with crafting a puff quilt is incredibly fulfilling.
Conclusion:
In conclusion, delving into the 15 free puff quilt patterns is an immersive experience that transcends mere crafting; it’s a journey into the comforting realm of quilting. The historical significance of puff quilts serves as a backdrop for exploring various fabric options and honing one’s sewing skills. These patterns cater to quilters with diverse skill levels, inviting experimentation with design variations and care techniques. As the cold months draw near or whenever you crave a touch of warmth and creativity, recall that these puff quilt patterns are your entry point into crafting a masterpiece that harmoniously blends warmth, tradition, and artistic expression.
