Embarking on a creative journey can be an exhilarating experience, especially when starting with a craft as accessible and versatile as rock painting. For newcomers to the world of crafting, 30 easy rock painting ideas for beginners serve as the perfect introduction. This comprehensive guide aims to empower you with the knowledge and skills necessary to transform ordinary stones into stunning works of art, ensuring each step of the process is enjoyable, straightforward, and productive. By exploring the various aspects of rock painting, from selecting the right rocks to sealing your finished creations, you’ll be well-prepared to express your creativity and add a personal touch to your home décor or garden. Let’s dive into the vibrant world of rock painting and discover its endless possibilities!
Why Paint Rocks?
Rock painting is more than just an artistic pursuit; it’s a rich experience that offers a multitude of advantages for people of all ages and backgrounds. By embracing this hobby, you can expect to reap numerous benefits that extend far beyond the realm of creativity alone.
For one, rock painting provides a creative outlet that challenges your imagination while also promoting mindfulness. The deliberate strokes and careful consideration required to bring a design to life on a rock’s unique surface can be meditative, calming the mind and reducing stress. This therapeutic quality makes rock painting an excellent activity for those seeking relaxation and mental clarity.
Moreover, rock painting encourages outdoor exploration, as searching for the perfect rocks often involves venturing into nature. This connection with the environment can have a profound impact on individuals of all ages, fostering a sense of wonder and awe. For children, this hobby also provides an opportunity to develop fine motor skills and hand-eye coordination.
Beyond its individual benefits, rock painting can also bring people together. Participating in projects like The Kindness Rocks Project, where painted rocks are hidden for others to find, can create a sense of community and spread joy. This heartfelt connection with strangers can be incredibly uplifting and rewarding.
Finally, hand-painted rocks make thoughtful, personalized gifts that showcase creativity and care. Whether you’re looking for a unique way to express your appreciation or seeking a meaningful memento, rock painting is an excellent hobby to explore.
In summary, rock painting is a multifaceted activity that offers not only a creative outlet but also numerous psychological and social benefits. Whether you’re seeking relaxation, inspiration, or a way to connect with others, this accessible and affordable hobby has something to offer.
Finding the Right Rocks for Your Project
When embarking on a rock painting adventure, selecting the ideal starting material is crucial. Regardless of whether you’re a novice or an experienced artist, recognizing key characteristics in a rock can significantly impact the success of your project. To ensure a stunning finish, it’s essential to choose rocks that are suitable for painting and properly prepare them for your creative touch.
Ideal Rock Shapes and Smoothness
When selecting rocks for painting, two key factors come into play: smoothness and shape. A rock’s surface texture plays a significant role in the overall painting experience. Opt for rocks with a smooth surface to ensure your brush glides effortlessly, allowing you to fully express yourself through art. This not only makes the process more enjoyable but also allows your design to shine through clearly.The shape of the rock is another crucial consideration. A flat rock lends itself well to scenes or mandalas, while round, oval, or unique shapes can inspire creative and interesting artwork. As you conceptualize your final design, choose a rock that complements it. This harmony between rock shape and design will result in a visually appealing piece that showcases your artistic vision.
Where to Find Rocks
When searching for rocks, it’s crucial to consider local regulations regarding the collection of natural items. This is especially important when scouring public spaces like riverbeds and beaches, where permits may be required. However, there are also more accessible options. Landscaping stores often carry a variety of rocks in different sizes and shapes, making them a reliable source for your project. Additionally, you might be surprised at what you can find right in your own backyard. Take some time to explore your surroundings and you might just stumble upon the perfect rock waiting to be transformed through painting.
Cleaning and Preparing Rocks for Painting
To ensure a stunning finish on your painted rocks, it’s essential to follow a thorough cleaning and preparation process. Here are the key steps to get started:
Start with a soap and water wash to remove dirt, grime, and other impurities. Use a soft-bristled brush to gently scrub any stubborn stains before rinsing the rocks thoroughly.
Once clean, allow the rocks to air-dry completely or use a towel to speed up the process. This step is crucial for preventing moisture from interfering with your painting.
If you want an extra layer of protection and a smoother surface for painting, consider applying a primer. White acrylic paint or a spray primer work well, but be sure to follow the manufacturer’s instructions and let it dry before starting your art project.
By choosing the right rocks and preparing them correctly, you’ll set yourself up for success and create truly unique pieces of art.
Materials and Tools for Rock Painting
When it comes to indulging in the therapeutic hobby of rock painting, having the perfect combination of materials and tools can be a game-changer. Whether you’re just starting out or are an experienced artist looking to elevate their skills, knowing what essentials to have at your disposal is crucial. In this realm, let’s take a closer look at the must-haves that will bring your rock art visions to fruition.
Paint Types
When it comes to rock painting, acrylic paints are a top choice due to their adaptability, vibrant hues, and rapid drying time. Once dry, they’re water-resistant, but if you want added protection, especially for outdoor rocks, consider using a sealant to ensure your creations remain intact. For a more kid-friendly or classroom setting, tempera paints are a great option – they’re washable and easy to work with. However, keep in mind that they may not be as durable as acrylics when it comes to withstanding the elements outdoors. If you’re looking for a solution that’s specifically designed for outdoor use, opt for paints labeled as outdoor or patio-friendly. These formulas are crafted to better withstand the weather, making them perfect for rocks you plan to place in your garden or walkway.
Brushes and Tools
For adding precision and finesse to your rock art, having the right brushes is crucial. A selection of small, fine-tip brushes can be used to add intricate details and designs, while flat brushes allow for quick coverage of larger areas and bold lines. Additionally, dotting tools in various sizes enable the creation of dots, circles, and even intricate mandala patterns. For those who prefer a more structured approach, stencils provide a helpful aid in achieving precise shapes and designs, eliminating the need for freehand drawing skills.
Essential Extras
To ensure the longevity of your finished rock art, it’s essential to use protective measures against the elements and wear. One effective way is by employing sealants that are specifically designed for outdoor use, available in both spray-on and brush-on forms. Additionally, consider using permanent markers or pens that have a waterproof label, perfect for adding fine details or inscriptions on painted rocks. Alternatively, you can create intricate designs using mosaic tiles, broken ceramics, or even glass pieces, secured with strong adhesive glue. Furthermore, embellishments such as glitter, googly eyes, or small gems can be added to give your rock art a playful, three-dimensional quality.
Where to Buy Supplies Affordably
When it comes to crafting on a budget, finding affordable supplies is key. One effective approach is to explore local resources, such as craft stores that frequently offer sales and coupons. Additionally, online retailers like Amazon and eBay often provide bulk deals that can be a significant cost-saver. For those who prefer to shop in person, dollar stores are an excellent source for basic paints, brushes, and embellishments at an affordable price. Furthermore, thrift stores can be a treasure trove of gently used craft supplies or materials that can be upcycled into unique project components, all while being mindful of the environment.
Beyond Traditional Painting
Feel free to push the boundaries of your rock art by experimenting with different techniques and tools. Permanent markers can provide a high level of precision, making them ideal for intricate designs or detailed writing. For a more complex look, try creating mosaic-style rocks by applying glue to attach your design elements onto the surface. Don’t overlook the impact that embellishments can have on your final product – a dash of glitter or a pair of playful googly eyes can instantly add personality and whimsy to your rock. Embrace your creativity and don’t be afraid to try new things; after all, the joy of rock painting lies in its freedom and spontaneity. As you explore this fun and expressive hobby, remember that it’s all about experimentation and enjoying the process.
Setting Up a Workspace for Rock Painting
When it comes to creating stunning rock art, a well-organized workspace is the foundation for success. Not only does it enhance the overall painting experience, but it also fosters creativity and leads to better outcomes. To get started, let’s explore some essential steps for setting up an ideal space that will help you bring your artistic vision to life.
Protecting Work Surfaces
When setting up your workspace for painting, it’s essential to prioritize protection and convenience. Start by investing in a high-quality, waterproof cover for your work surface. Options like plastic sheets, old newspapers, or reusable silicone mats can effectively shield your table from paint spills and stains. This simple step will save you time and frustration in the long run.To ensure a smooth and mess-free experience, keep cleaning supplies within arm’s reach. Having a wet cloth or paper towels nearby allows for immediate cleanup, preventing paint from drying and sticking to surfaces. By being proactive about maintenance, you’ll be able to focus on the creative process rather than worrying about pesky stains.
Best Lighting for Painting Details
When it comes to setting up your workspace for painting, two crucial elements are essential: natural light and good quality lighting. To start, position yourself near a window where possible. Natural light not only reveals the true colors of your paint but also helps in capturing intricate details without straining your eyes. However, not all paintings can be completed during daylight hours, which is why investing in a reliable lamp with a daylight simulation bulb is vital. This type of bulb provides a bright, clear light that mimics natural daylight, making it easier to focus on the finer details and ensure a precise painting experience.
Creating a Comfortable Painting Area
When it comes to rock painting, setting up a conducive workspace is crucial for maximizing comfort and creativity. Start by ensuring your chair and table height allow for comfortable painting sessions without straining your back or neck. Aim for a setup where your feet rest flat on the floor and your painting surface is positioned at or slightly below elbow level. This simple adjustment can make all the difference in extending your painting time without fatigue.To keep your creative juices flowing, organize your tools and materials with purpose. Use containers or trays to categorize your paints, brushes, rocks, and other supplies, making them easily accessible when needed. Not only does this save valuable time, but it also maintains a clutter-free workspace that fosters inspiration.Personal touches can also play a significant role in stimulating creativity. Incorporate plants, motivational quotes, or cherished art pieces into your space to create an environment that sparks imagination and enthusiasm. By investing time in setting up a dedicated and well-organized workspace, rock painting becomes an even more enjoyable and fulfilling experience.
How to Paint Rocks – Step by Step
Painting rocks has become an increasingly popular hobby that offers a unique combination of creativity and community engagement. As a novice rock painter, it’s easy to get started and join the movement of hiding them for others to discover. This step-by-step guide will provide you with a comprehensive roadmap to begin your stone painting adventure today. With these simple steps, you’ll be able to create stunning and motivational rocks that are sure to bring joy to those who find them.
Choosing Your Rocks
When embarking on a rock-painting adventure, the first step is to source the ideal canvas. Take a stroll around your yard, local parks (provided you have permission), or visit a landscaping store to explore an array of options. Alternatively, online retailers offer a vast selection of rocks for painting. While selecting the perfect rocks, be mindful that smooth ones are generally easier to paint and will showcase your designs with clarity.
Preparing Your Rocks
For a successful rock painting experience, it’s essential to properly prepare your stones first. Start by giving them a gentle rinse under warm water, and then use a vegetable brush to softly scrub away any dirt or debris that may be lingering. Once clean, place the rocks on a flat surface and let them air dry completely, flipping them halfway through the process to ensure even drying on all sides.
Selecting Your Painting Supplies
When it comes to equipping yourself for rock painting, the options are plentiful. While acrylic paints are the most widely used and versatile choice, paint pens also prove to be a great asset – particularly for newcomers to the craft. Their ease of control makes them ideal for adding intricate details. Before embarking on your creative journey, consider whether you want to lay down a foundation coat. This can be achieved using a brush or spray paint, serving as a sturdy backdrop for your designs.
Painting Your Masterpiece
As you embark on the creative journey of painting your rocks, remember that there’s no one-size-fits-all approach. The freedom to express yourself through art is what makes this process so enjoyable. You might opt for intricate designs, playful patterns, or uplifting words. For those who are just starting out, kindness rocks offer a wonderful starting point. Begin with a bold, vibrant background and add a message of positivity. Above all, the goal is to have fun while spreading joy with your unique creations.
Sealing Your Rocks
After allowing your paint to dry thoroughly, it’s crucial to apply a protective sealant to your rocks, particularly if they’ll be exposed to outdoor conditions. A clear spray sealer is an effective choice for this purpose, serving as a barrier against the elements and preserving the integrity of your artwork. Simply follow the product’s instructions and ensure the rock is uniformly coated to reap the benefits of a well-protected piece.
Hiding Your Rocks
As you near the culmination of this creative journey, hiding your rocks around your town or neighborhood can be a truly fulfilling experience. Not only does it allow you to contribute positively to your community, but it also brings joy to those who stumble upon them. To amplify this impact, join local Facebook groups focused on rock hunting and share locations, as well as admire the artistic expressions of fellow enthusiasts.
Video Tutorial
While there’s no substitute for hands-on experience, watching a step-by-step video tutorial on YouTube can be an excellent way to get started with painting rocks. This visual guide, paired with the written instructions provided here, offers a comprehensive resource for mastering the process. As you follow along, not only will you create stunning works of art, but you’ll also become part of a community that’s spreading joy and creativity, one rock at a time.
Troubleshooting and Tips for Rock Painting Success
While rock painting may seem like a straightforward and enjoyable hobby, it’s not immune to pitfalls. With a little awareness and some simple adjustments, however, you can easily sidestep these common mistakes and take your creations to the next level. Whether you’re a seasoned artist or just starting out, this knowledge will help you refine your skills and bring your rock painting visions to life.
Common Mistakes Beginners Make
When it comes to painting rocks, several common pitfalls can lead to subpar results. One such issue is using too much paint at once, which can cause smudging and prolong the drying process. Instead, opt for thin layers that can be built upon gradually. Rushing between layers is another trap to avoid, as insufficient drying time can result in mixed colors or peeling paint. Furthermore, neglecting the base coat can lead to uneven color application and poor adhesion. Finally, overlooking the importance of a sealer can leave your painted rock vulnerable to weathering and wear.
How to Fix Typical Painting Errors
When encountering imperfections on your painting project, there are several techniques to help you correct them. If smudges or bleeding colors appear, it’s likely due to uncured paint. Gently dab the affected area with a damp cloth if the issue is recent. For dried smudges, carefully apply a background color and then reapply the original hue. On the other hand, if peeling paint occurs, it may be caused by insufficient primer or a dirty surface. First, remove the loose paint, followed by a thorough cleaning of the area. Next, apply a primer and finally repaint the affected region. To address uneven layers, start by lightly sanding the area with fine-grit sandpaper to smooth out the texture. Then, reapply thin, even coats of paint to achieve a professional-looking finish.
Techniques for Layering and Blending Paint Effectively
When it comes to layering paint on rocks, patience is essential for achieving a professional-looking finish. Start by applying thin, even layers of paint, allowing each one to dry completely before adding the next. This helps prevent the paint from becoming gloopy or peeling off, ensuring a smooth and consistent base for your design.To blend colors seamlessly, try the wet on wet technique: apply the second color while the first is still slightly wet, using a soft brush to gently mix the edges where the two meet. For a more textured blend, use a dry brush with very little paint to lightly brush over the area where the colors meet, creating a soft and feathered effect.By avoiding common pitfalls and applying these techniques, you’ll be able to take your rock painting projects to new heights of creativity and polish.
Protecting Your Masterpiece
The Importance of Sealant
When it comes to preserving painted rocks, applying a sealant is an essential step to maintain their vibrant colors and intricate designs, especially if they’re intended for outdoor display. Sealants are available in a range of finishes, including glossy, matte, and satin, each offering a unique aesthetic that can be tailored to the desired appearance of your rock art. By selecting the right sealant and finish, you can ensure your painted rocks remain visually striking and well-protected from the elements.
How to Seal Rocks Properly
When displaying your rocks indoors, a simple spray or brush-on sealant is sufficient. To ensure an even coverage, apply the sealant across the entire surface and allow it to dry completely before handling the rocks again. For outdoor displays, you’ll want to use a sealant specifically designed for outdoor use to protect your rocks from the elements. Apply multiple thin coats, allowing each layer to dry thoroughly before reapplying. This will help your rock display withstand the sun, rain, and other outdoor conditions.
Creative Presentation
Transform your painted rocks into more than just decorative trinkets. Unleash your creativity and get inspired by using them as unique paperweights, creative coasters for your coffee table, or even as quirky bookmarks that will make reading a truly memorable experience. The possibilities are endless! Add a personal touch to your journaling practice by using them as visual reminders of special quotes or lyrics. You can also repurpose them as thoughtful gifts for friends and family members. Whether you’re an art enthusiast, a nature lover, or simply someone who appreciates the little things in life, there’s no denying that painted rocks have the power to bring joy and positivity into your daily routine.
Gift Ideas
When seeking a unique and meaningful gift, consider the humble painted rock. These small tokens can be transformed into thoughtful and personalized presents by incorporating designs or messages that hold significance to the recipient. By taking the time to create a customized rock, you’re not only showing you care about the person receiving it, but also adding an extra layer of emotional depth to your gift.
Rock Hiding Games and Groups
Immerse yourself in the thrill of rock hunting by joining forces with fellow enthusiasts online or offline. Local and international groups alike have taken up the mantle of hiding painted rocks, sparking a global phenomenon that’s redefining the concept of community treasure hunts.
Decor Inspiration for Home and Garden
Transform your living space with the vibrant charm of painted rocks. Create a whimsical atmosphere by scattering them among potted plants, adorning doorsteps, or seamlessly integrating them into outdoor features for an unmistakable flair.
Community and Sharing
Building a Community
Joining a local rock painting community can elevate your artistic journey. Platforms like Facebook often host group pages for enthusiasts to showcase their work, exchange techniques, and coordinate rock-hunting excursions. This shared experience allows you to bond with like-minded individuals who appreciate the art of transforming ordinary stones into extraordinary masterpieces.
The Joy of Sharing and Finding Painted Rocks
There’s an undeniable charm to both concealing and discovering painted rocks. This unique phenomenon fosters happiness, creativity, and a sense of community, transforming ordinary spaces into extraordinary ones. The magic lies in the delicate balance between hiding and sharing these tiny works of art.
To ensure responsible rock hiding practices, it’s crucial to place them in safe and environmentally respectful locations. National parks and protected areas should be avoided to preserve natural habitats. Additionally, consider the safety of others who might stumble upon your rock, ensuring a joyful discovery for all involved.
By embracing these guidelines and the spirit of creativity and community, your painted rocks can spread joy and beauty far and wide. Whether displayed proudly in your home, given as thoughtful gifts, or hidden for strangers to find, each rock is a testament to human connection and our capacity to bring light into everyday moments.
FAQs on Painting Rocks for Beginners
Unravel the mysteries of rock painting by exploring frequently posed queries, thereby guaranteeing a seamless and delightful creative journey.
What materials do I need to start painting rocks?
Getting started with rock painting requires just a few essential supplies. First, you’ll need to gather smooth, clean rocks that are free from dirt, grime, and any other imperfections. Next, you’ll need a good quality acrylic paint or paint pen that suits your artistic style. A set of brushes in various sizes will also come in handy for applying the paint and achieving different effects. To mix and blend your colors, you’ll want to have a palette or plate on hand. Additionally, it’s a good idea to keep some water and a cloth nearby to clean up any messes as you work. Finally, once your design is complete, you can seal it with a clear coat to protect it from the elements and make it more durable.
How do I choose the right rocks for painting?
When selecting the perfect rock for your painting project, consider factors such as texture and stability. Look for rocks that have a smooth surface, which will provide an easier canvas for your artistic expression. A flat rock is also ideal, as it will remain stable and easy to display once painted. Additionally, opt for rocks that are relatively clean, with minimal dirt or moss. If needed, you can always give them a gentle wash to remove any impurities before getting creative.
Can I use any type of paint for rock painting?
When it comes to choosing the right type of paint for your artistic endeavors, acrylic paint is often the top choice. And for good reason! Its water-based composition makes cleanup a breeze, eliminating the need for harsh chemicals or tedious scrubbing. Additionally, its quick-drying properties allow you to work efficiently and move on to the next stage of your project without waiting around for lengthy drying times. Furthermore, acrylic paint offers an impressive array of colors to choose from, giving you the freedom to express yourself creatively without being limited by a narrow palette. And if that’s not enough, its versatility also makes it suitable for use on various surfaces, including rocks – offering endless possibilities for artistic experimentation.
How do I prepare my rocks before painting?
Prior to commencing the painting process, it’s essential to thoroughly clean and prepare your rocks for a professional finish. Begin by submerging them in warm soapy water, allowing any dirt or debris to loosen and be easily removed. If necessary, employ a soft-bristled brush to gently scrub away any stubborn impurities. Once cleaned, rinse the rocks under running water to remove all soap residue and then dry them comprehensively with a lint-free cloth or paper towel before proceeding to paint.
What are some easy designs for beginners?
When it comes to incorporating simplicity into your design, there are a few easy and effective ways to do so. For instance, using emojis can add a touch of whimsy and approachability to your design. Alternatively, you could incorporate nature-inspired elements like flowers or animals, such as ladybugs or owls, which can bring a sense of calm and serenity. Simple patterns like dots or stripes can also help to create a clean and uncluttered look, while inspirational words or quotes can provide a thought-provoking and meaningful addition.
How do I seal my painted rocks?
When it comes time to preserve your painted rocks, follow these steps to ensure they remain vibrant for years to come. Start by verifying that the paint is fully dry to prevent any unwanted reactions with the sealant. Next, apply a clear coat using either a spray or brush-on application method, following the product’s guidelines for best results. Finally, allow the sealant to dry completely before exposing your rocks to the elements, thereby safeguarding your design from both weather and wear.
Can I leave my painted rocks outside?
When it comes to installing solar panels, there are several key considerations to keep in mind. First and foremost, it’s essential that the panels are securely sealed to withstand various weather conditions. This ensures they remain effective and durable over time. Additionally, care must be taken to position the panels in areas where they won’t cause harm to the environment or wildlife. Furthermore, local regulations and property rights must also be respected to avoid any potential issues or conflicts.
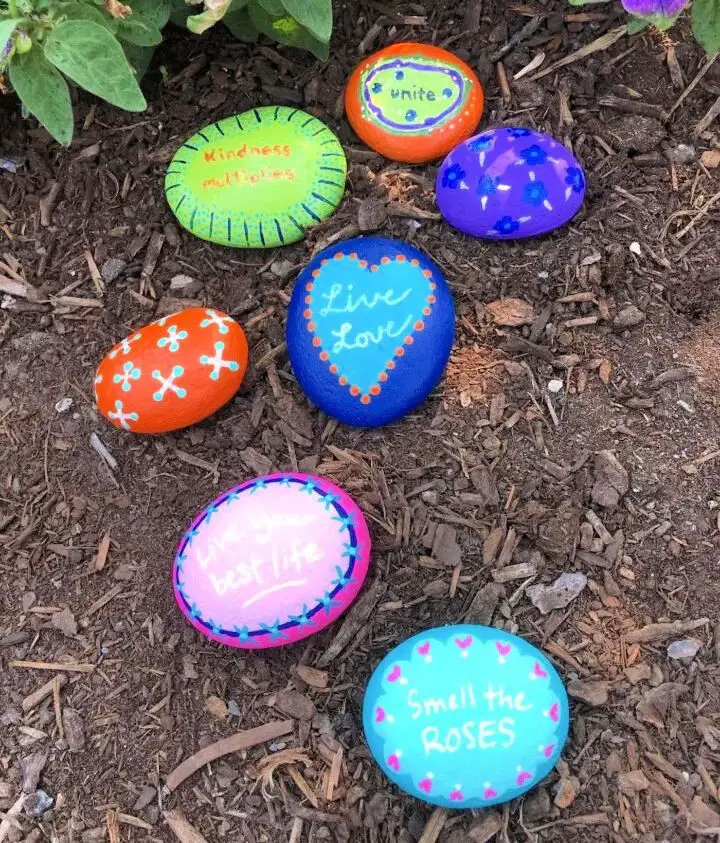
What is the Kindness Rocks Project?
With the aim of fostering a culture of kindness, The Kindness Rocks Project has evolved into a global phenomenon. Its core principles are straightforward yet powerful: take a rock, adorn it with an uplifting message or artistic creation, and then strategically place it in a public space for others to stumble upon. This deceptively simple act has the potential to spark meaningful connections and a sense of community among those who find these hidden gems.
How can rock painting benefit children?
Rock painting offers a multitude of benefits for children, extending far beyond the simple act of decorating a stone. By engaging in this creative activity, kids can experience a surge in creativity and imagination as they bring their unique visions to life. The tactile nature of rock painting also helps to refine fine motor skills and hand-eye coordination, laying the groundwork for future artistic endeavors or even technical pursuits. Furthermore, rock painting encourages children to venture outdoors, exploring and discovering the natural world around them. Moreover, projects like the Kindness Rocks Project instill valuable lessons about kindness, compassion, and the importance of sharing one’s talents with others.
Can I paint rocks with my kids?
Rock painting is a fantastic hobby that brings people together, regardless of age. It’s an activity that not only fosters bonding but also offers a unique learning experience. By exploring the natural world, experimenting with colors, and creating unique designs, family members can develop their skills while strengthening their relationships. Moreover, rock painting provides a wonderful opportunity to instill values such as kindness and community involvement, making it a truly enriching experience for all.
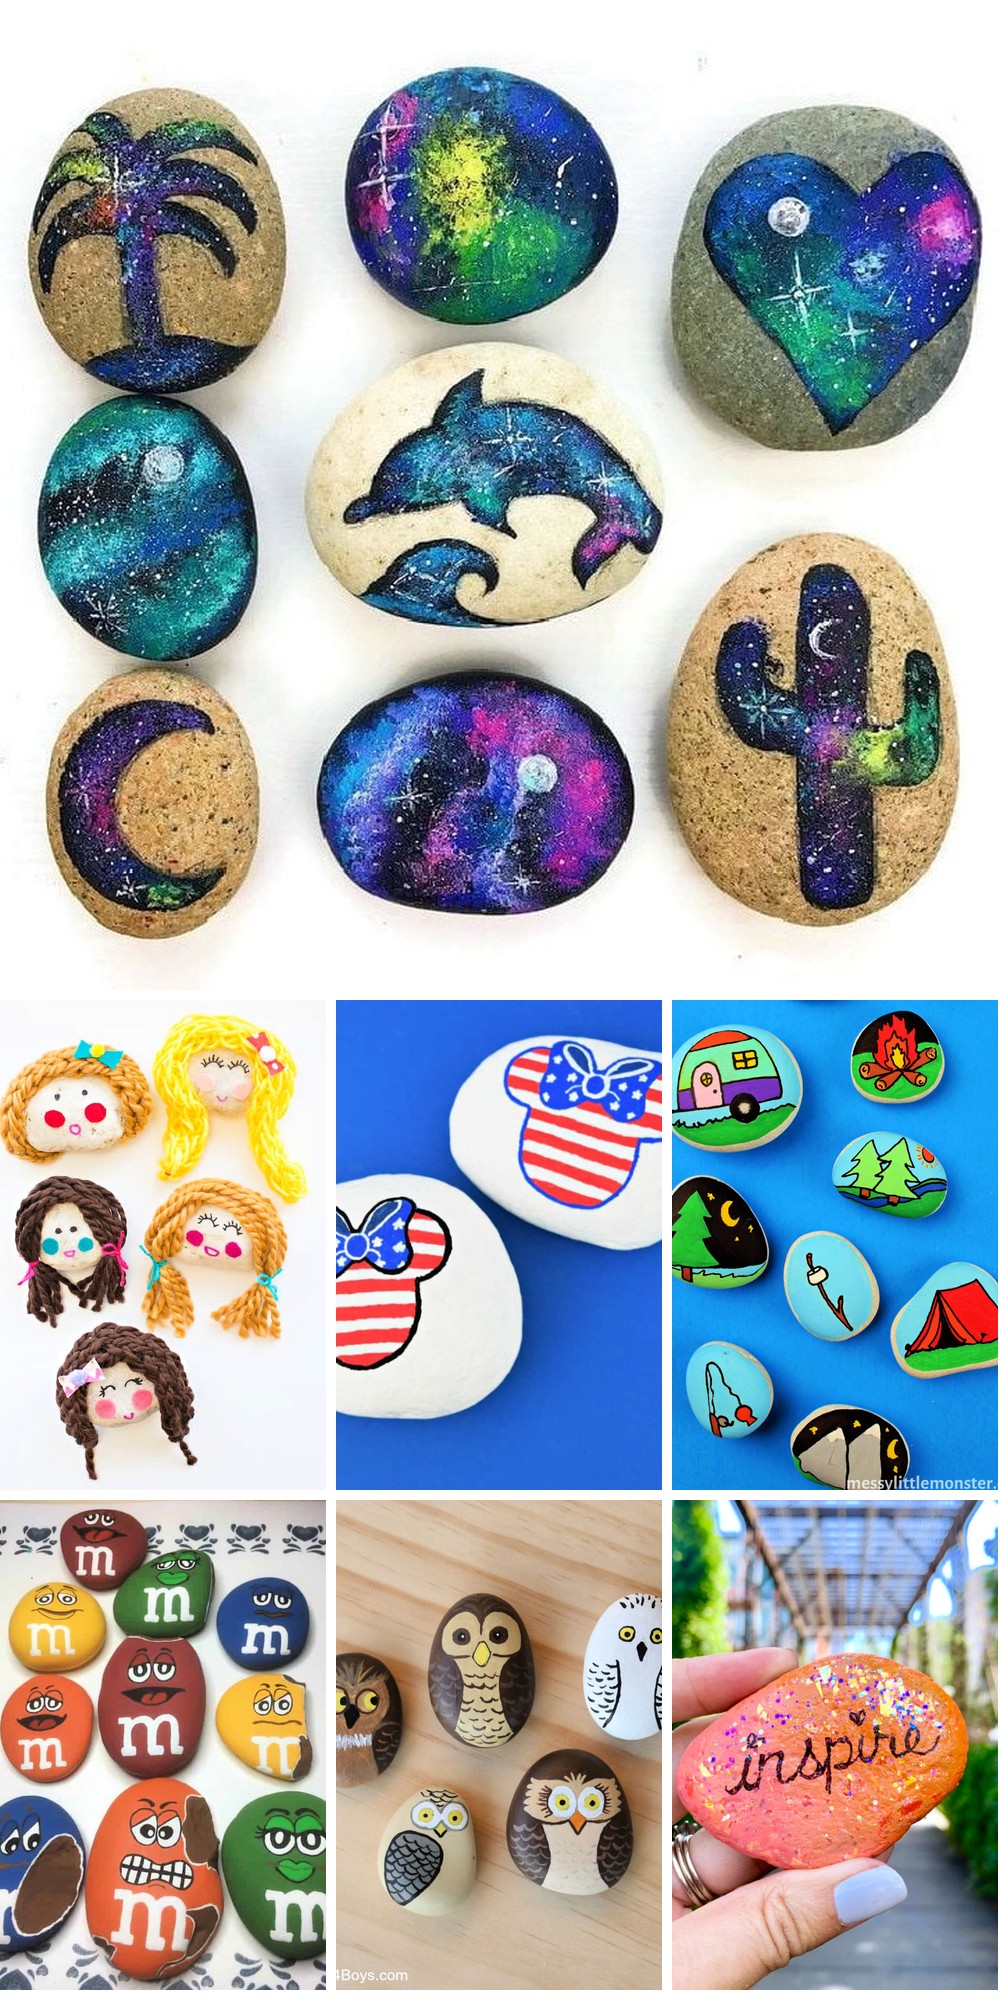
30 Easy Rock Painting Ideas for Beginners
Unleash your inner artist and explore the world of rock painting with our collection of 30 beginner-friendly ideas. This diverse array of designs spans from adorable animal portraits to intricate mandalas, offering something for every creative enthusiast. Get ready to spark your imagination and bring out your artistic side!
How to Make Your Own Weather Rock
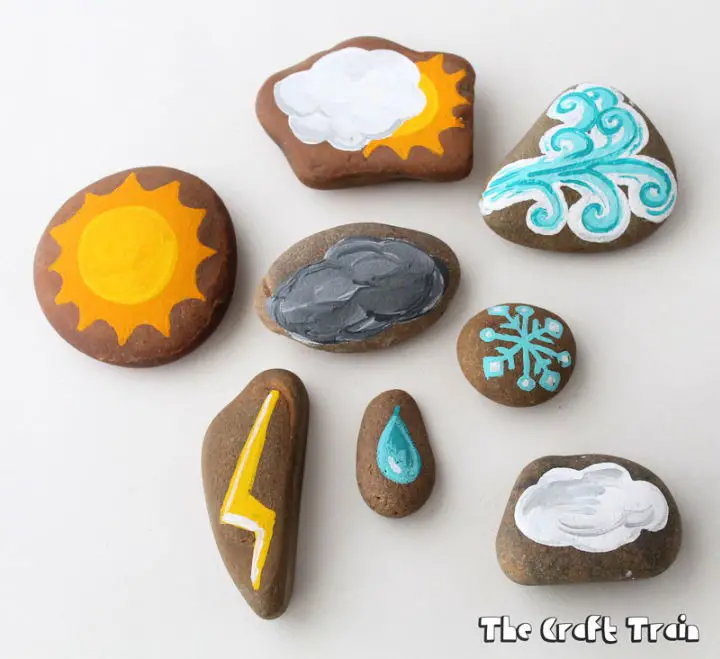
Embark on an imaginative journey by creating weather stones with The Craft Train’s comprehensive guide. This interactive project encourages children to explore weather patterns through hands-on play, combining painting flat stones with sewing a simple felt drawstring bag. By following the step-by-step instructions and utilizing the provided materials, anyone can join in on this engaging activity. As you create this charming DIY toy, not only will your child develop an understanding of the environment but also cultivate their storytelling skills. This delightful project doubles as both a creative outlet and an educational tool, allowing children to cherish and utilize their handmade weather stones in various ways.
Make a Winter Rock Painting
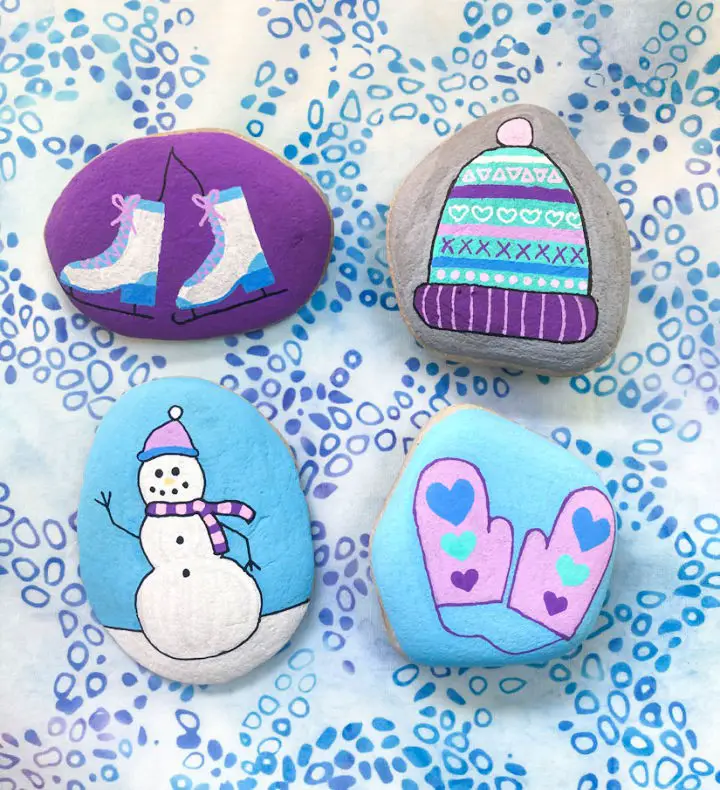
Bring a touch of creativity into your life with easy rock painting ideas from Must Have Mom. This fun and engaging activity allows you to express yourself through art while spreading joy and kindness through the power of hidden winter-themed stones. With step-by-step guides, even the most novice artists can transform ordinary rocks into charming scenes featuring ice skates, snowmen, or cozy winter hats that are perfect for all ages.
All you need to get started is a list of basic supplies, including rocks, pencils, paint, and brushes. Not only do the instructions provide clear guidance on each design, but they also offer valuable insights on selecting the best rocks and sealing your artwork to ensure durability and longevity.
Embark on this creative journey, craft your own unique stones, and consider hiding them for an unsuspecting finder to brighten their day with a little surprise.
DIY Tropical Ferns Paradise Painted Rock
Transform ordinary stones into stunning works of art by following Doodlecraft’s Tropical Ferns Paradise Painted Rocks guide. This creative DIY project is the perfect way to bring a piece of summer’s warmth and vibrancy into your home or garden. Beginning with a smooth rock, you’ll learn to apply a base coat and then unleash your creativity by adding luscious fern patterns using stencils or freehand techniques. To give your artwork an extra touch, add some inspirational words and finish it off with a clear coat. Your personalized rock art is now ready to be admired in any space or given as a thoughtful gift. The easy-to-follow instructions and tips in this guide ensure that you’ll have a successful craft experience.
How to Make a Ladybug Painted Rock
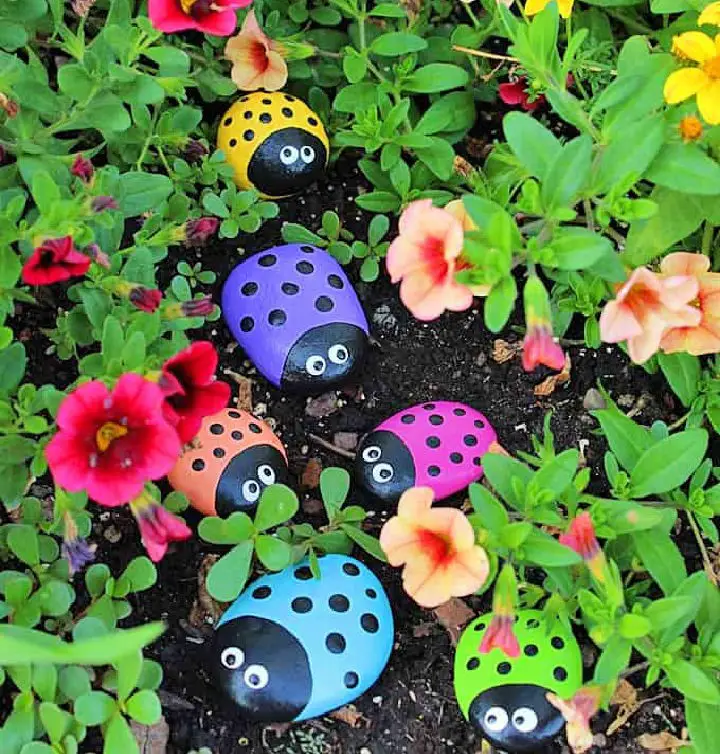
Bring a dash of whimsy to your outdoor space by transforming ordinary rocks into charming ladybug decorations. A fun and creative family activity, this craft project is easy to follow thanks to Crafts by Amanda’s step-by-step guide. Using durable outdoor paint, you’ll be able to create a collection of colorful ladybugs that will delightfully adorn your garden all summer long. With clear instructions and helpful tips, you’ll be well on your way to producing your own unique set of ladybug rocks, perfect for adding a playful touch to your backyard or patio.
Easy DIY Owl Painted Rock
Transform your home decor with the elegance of sophisticated rock painting ideas for adults. Sarah’s engaging guide on Owl Painted Rocks at Frugal Fun For Boys and Girls offers a unique creative journey. By following her step-by-step approach to cleaning, painting, and varnishing Caribbean beach pebbles into stunning owl-themed art, you’ll be guided through the process of bringing your craft to life. Her helpful tips on using acrylic paints and inspiration drawn from nature will empower any craft enthusiast to create their own whimsical owl rocks. Perfect for adding a personal touch to your home decor or as thoughtful handmade gifts, this activity promises fun, artistic expression, and a sense of accomplishment for all ages.
Making Your Own Rock Painting
For individuals seeking to spread positivity and foster creativity in their communities, rock painting presents an enchanting opportunity to craft and connect with others. Mod Podge Rocks offers a wealth of innovative ideas and inspiration perfect for the Kindness Rocks Project or simply enhancing your neighborhood’s aesthetic appeal.
Explore intuitive, step-by-step guides that cater to all skill levels, ensuring your stone art not only turns heads but withstands the elements. From selecting the ideal rocks to sealing your designs, discover expert tips and a vast array of imaginative projects that promise to put a smile on someone’s face. As you transform ordinary stones into vibrant tokens of joy and kindness, you’ll be spreading positivity and fostering creativity in your community.
Homemade Mermaid Scales Painted Rock
Transform ordinary river rocks into enchanting mermaid scales using this easy-to-follow guide from Projects with Kids. To create an oceanic backdrop for your scales, master the art of blending acrylic paints. With just a few simple supplies – including paint, fine-ink pens, and your chosen rocks – you can turn stones into magical treasures that will delight kids at playdates, birthday parties, or as a charming addition to your garden. To ensure your artwork remains durable for outdoor display, seal it with Mod Podge. As you craft these mermaid-inspired rocks, immerse yourself in the mystique of the sea and unleash your creativity.
Patriotic Minnie Mouse Rock Painting
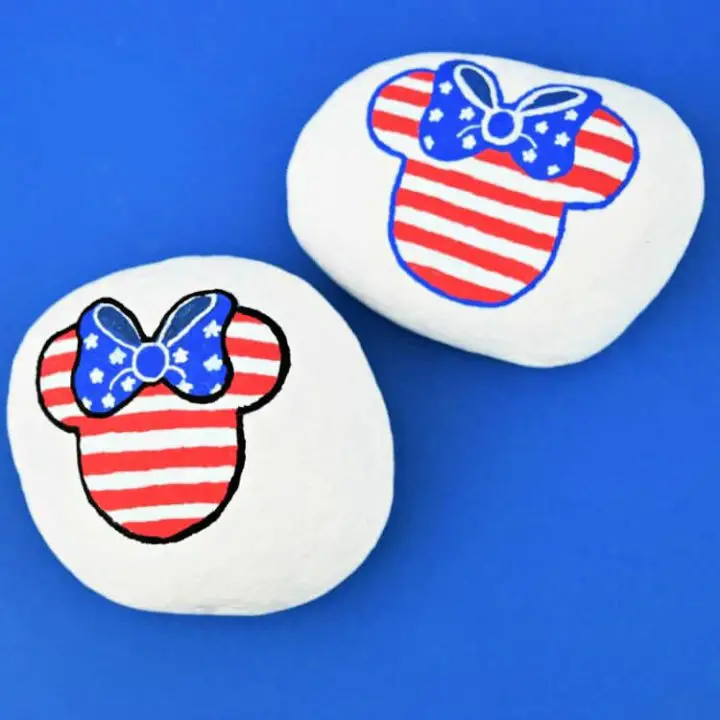
Transform ordinary stones into extraordinary art pieces by exploring creative rock painting ideas. For a unique and vibrant project, turn to the Minnie Mouse rock painting tutorial from Ruffles and Rain Boots. This American flag-inspired masterpiece combines the beloved Minnie Mouse with red, white, and blue hues, making it perfect for Disney fans and crafters alike. With just a few basic supplies like paint pens in bold colors and an optional sealant, you can upcycle a simple rock into a stunning 4th of July decoration. The easy-to-follow instructions ensure a fun and rewarding crafting experience. Showcase your artistic creation proudly or gift it to fellow Disney enthusiasts for a truly memorable keepsake.
Handmade Watermelon Painted Rock
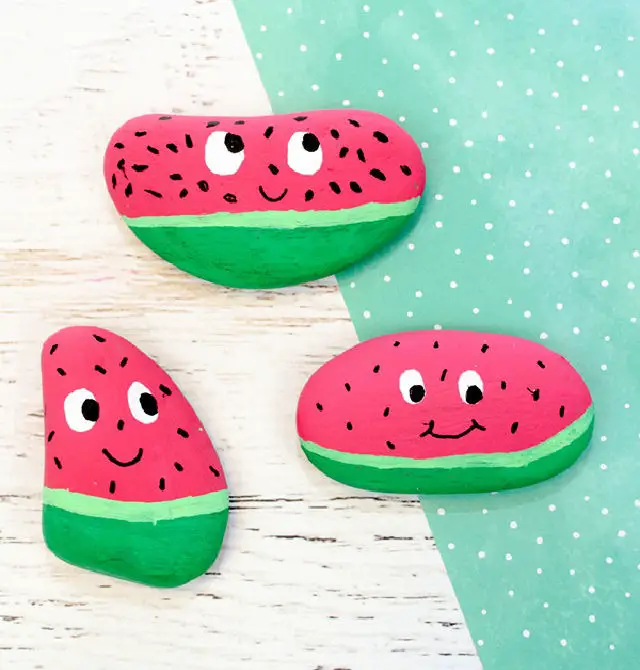
Transform your crafting sessions with kids into a fun-filled summer adventure by transforming simple river rocks into adorable watermelon painted rocks. This engaging activity is perfect for decorating gardens, brightening up indoor spaces, or even hiding around town as a sweet surprise for others to discover. Kids can unleash their creativity by blending red and pink acrylic paints, adding some green paint pen strokes, and drawing the cutest little faces they can imagine. To ensure their masterpieces last, seal them with Mod Podge, especially if they’ll be spending time outdoors. Get ready to enjoy a refreshing craft that’s as delightful as a slice of watermelon on a warm day!
DIY Painted Rock Fairy House
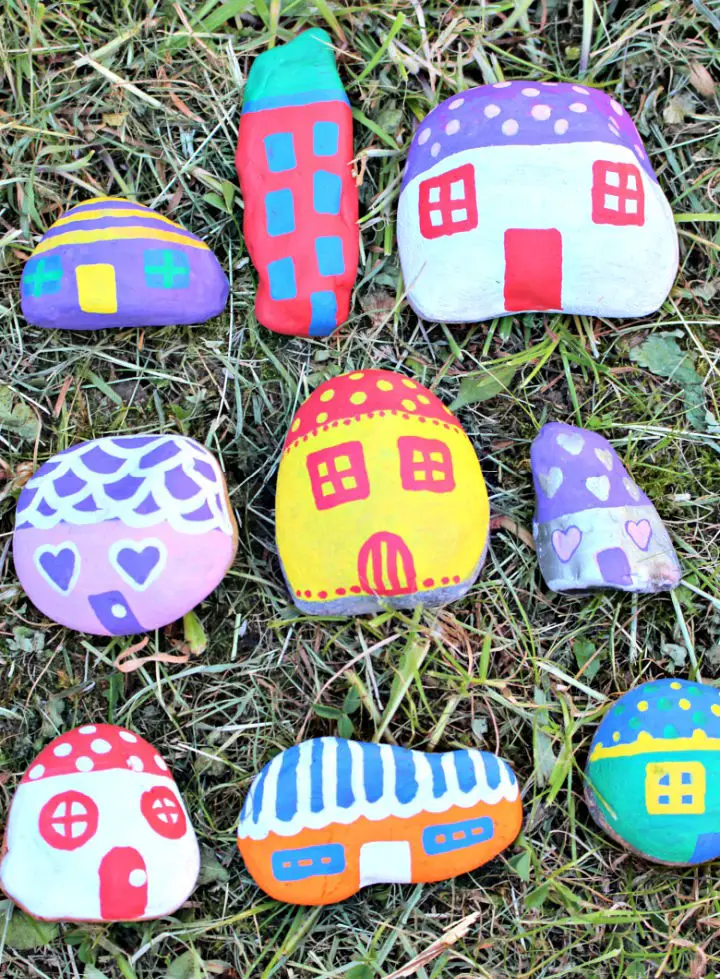
Transform your garden into an enchanting haven with a vibrant display of painted rock fairy houses. This creative project is perfect for kids, encouraging them to explore their artistic side and engage in imaginative play. With just a few simple supplies, including acrylic paint pens and pebbles, the whole family can get creative and add colorful charm to your outdoor space. By following our step-by-step guide on painting, detailing, and sealing these miniature abodes, you’ll ensure they withstand the elements for lasting magic. Assemble a captivating village and watch as imagination takes flight in your very own fairy garden.
Make a Space Rock Fridge Magnet
Transform ordinary stones into enchanting space rock fridge magnets with a simple and fun craft project that’s perfect for kids and adults alike. By blending acrylic paints and applying them to rocks, you can create a miniature night sky effect that’s out of this world. At Adventure in a Box, we’ll guide you through the process step-by-step, providing short and clear instructions that make it easy to follow along. Once painted, attach strong magnets to turn these celestial creations into functional works of art for your refrigerator. This project is all about igniting imagination and bonding over a shared love for space and the cosmos.
Simple DIY Gold Leaf Painted Rock
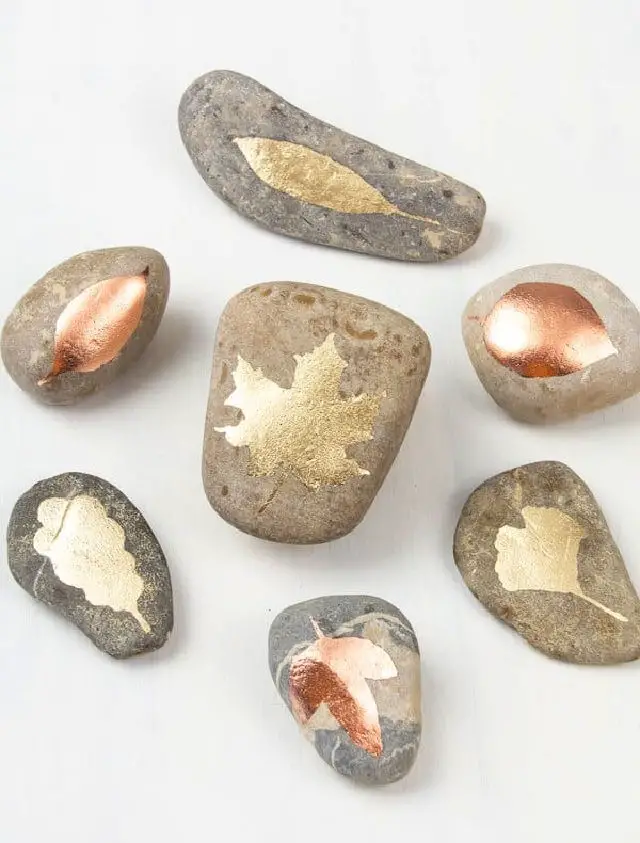
Embark on your creative adventure with effortless rock painting ideas perfect for newcomers to the world of crafting. By following this straightforward tutorial from Country Hill Cottage, you’ll be guided through the process of creating stunning DIY gold leaf painted rocks that exude elegance and sophistication. Whether you’re looking to add a touch of refinement to your home decor or seeking a thoughtful handmade gift, this step-by-step guide ensures an enjoyable and fulfilling crafting experience.
With crystal-clear instructions and a comprehensive list of necessary materials, you’ll master the art of applying shimmering gold leaf to rocks for a mesmerizing effect. This craft project is ideal for unwinding with a relaxing crafting session or perfecting your skills as a creative enthusiast. As you transform ordinary pebbles into breathtaking works of art, you’ll discover the joy of giving new life to humble materials and the pride that comes from creating something truly unique.
Rock and Leaves Painted for Thanksgiving Table

This Thanksgiving, bring a personal touch to your tablescape with a creative DIY project that’s perfect for the whole family. Collect some stones, pine cones, and fallen leaves on your next walk, then transform them into a colorful centerpiece using Delta Ceramcoat Acrylic Paint’s vibrant fall colors available at Target. Simply paint each rock with a solid color, add a festive message by inscribing letters onto them, and press the leaves flat for painting. Use small brushes or cotton swabs to add intricate details to the pine cones. Arrange your painted creations on the table to enjoy a unique, handmade display that’s sure to impress. Not only is this activity a fun way to get kids involved in holiday preparations, but it also adds a charming homemade touch to your celebration.
DIY Rock Doll Face Painting

Transform ordinary stones into enchanting works of art with this fun and creative activity inspired by Agnes Hsu’s hello, Wonderful. Perfect for kids, this project requires just a few simple supplies like yarn, felt, and markers. Begin by giving your chosen rocks a good washing, then get creative with whimsical hairstyles using yarn and a hot glue gun. Next, bring each rock’s face to life by drawing features or attaching playful googly eyes, followed by adding rosy cheeks made from colorful felt. Finish the look with adorable hair bows crafted from patterned felt. These unique painted rock creations are perfect for gifting or play, sparking imagination and making for a delightful craft day.
How to Make a Shark Rock Painting
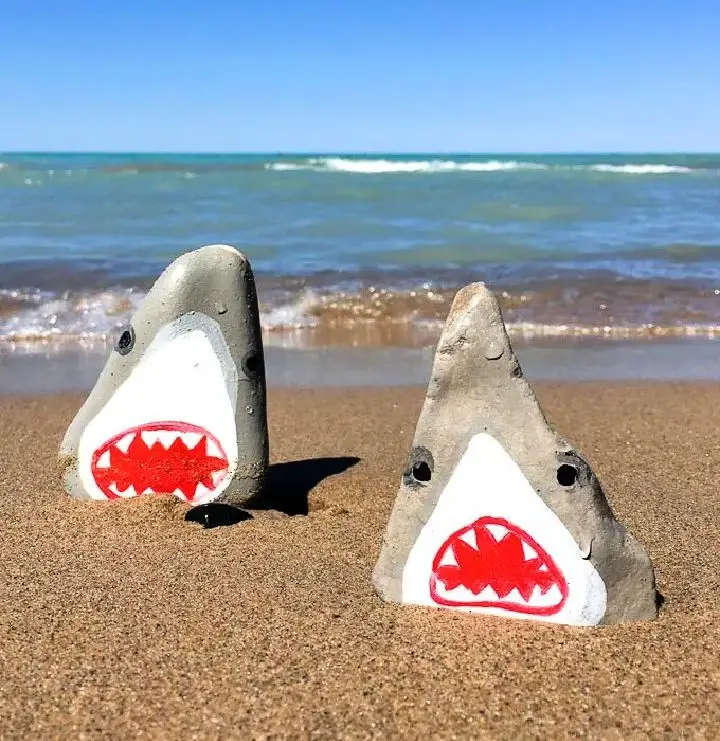
Get ready to sink your teeth into the world of crafting with Sustain My Craft Habit’s comprehensive guide to shark rock painting! This fun and easy tutorial is perfect for a summer afternoon, transforming ordinary rocks into fierce-looking sharks that will leave you hooked. Suitable for both kids and adults, this step-by-step instruction focuses on using durable acrylics to ensure your masterpieces can withstand the elements. Master simple techniques to paint snouts, eyes, and teeth with precision, and discover how rock painting can be a therapeutic hobby that adds a unique touch to garden decor or serves as a thoughtful gesture when placed in community spaces. With a little creativity and some basic supplies, unleash the power of imagination and get ready to have a fin-tastic time!
Cute DIY Penguin Painted Rock
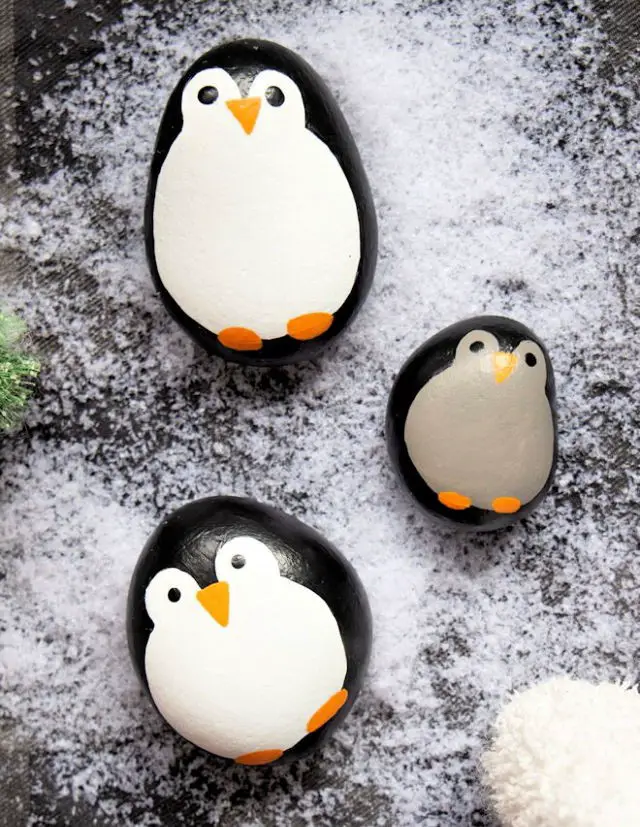
Unleash your creativity with the delightful Penguin Painted Rocks craft from Mom Foodie, a perfect project for the holiday season. By combining simple beach rocks with multi-surface satin craft paints and a few brushes, you can create an adorable penguin family ideal for gifting or decorating. The step-by-step instructions are designed to guide you through the process with ease, while helpful tips like allowing layers to dry keep stress at bay. As you work on these charming penguins, you’ll add a touch of whimsy to your Christmas celebrations.
How to Make a Dessert Painted Rock

Transform your neighborhood into a haven of joy by unleashing the power of painted rocks. Happiness is Homemade offers a comprehensive guide to creating these tiny treasures using rocks and paint, complete with step-by-step instructions that make it accessible to all ages. As you let your creativity shine through vibrant colors and inspiring messages, not only will you be relieving stress and boosting focus, but also spreading warmth and positivity to those around you. With painted rocks, the possibilities are endless – from playful designs to uplifting quotes – giving you the opportunity to brighten someone’s day with every creation. So why not pick up your favorite paint markers and turn ordinary stones into extraordinary tokens of happiness?
Painted Rock Art Project
Unleash your child’s creativity with rock painting ideas that spark imagination and bring joy to outdoor crafting. The simple project of Painted Rock Art is perfect for all ages, requiring just a few supplies: rocks, acrylic paint, and brushes. Begin by collecting a variety of rocks and cleaning them thoroughly to prepare for your creative session. Spread out newspaper or a plastic cloth to ensure mess-free fun, then start painting with vibrant colors. Add intricate details using permanent markers to make each rock truly unique. This relaxing craft is ideal for family time in the great outdoors or as a peaceful solo activity. With this simple yet rewarding project, you can add a personal touch to your garden or mantlepiece, or give thoughtful handcrafted gifts.
DIY Forky Rock Painting at Home
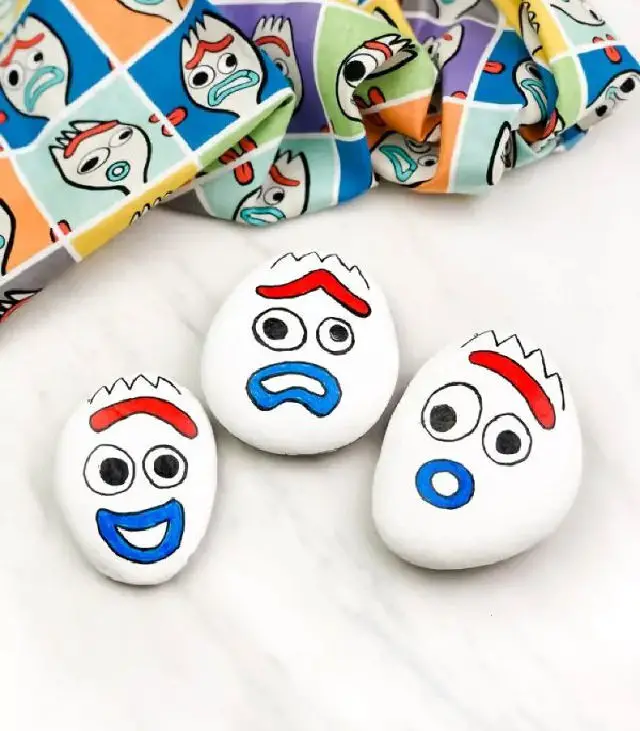
Add a touch of Disney enchantment to your crafting time with this easy and captivating Forky painted rocks activity from Simple Everyday Mom. Perfect for youngsters who adore Toy Story 4, this project not only fosters creativity but also provides an excellent chance to develop fine motor skills in children. To get started, collect smooth, flat rocks and basic painting supplies, then follow the simple, step-by-step instructions to bring Forky to life. Once your masterpieces are complete, seal them for longevity and consider hiding them in the community as a fun surprise for others to stumble upon. This craft is a charming way to create lasting art that can be treasured or shared with friends and family.
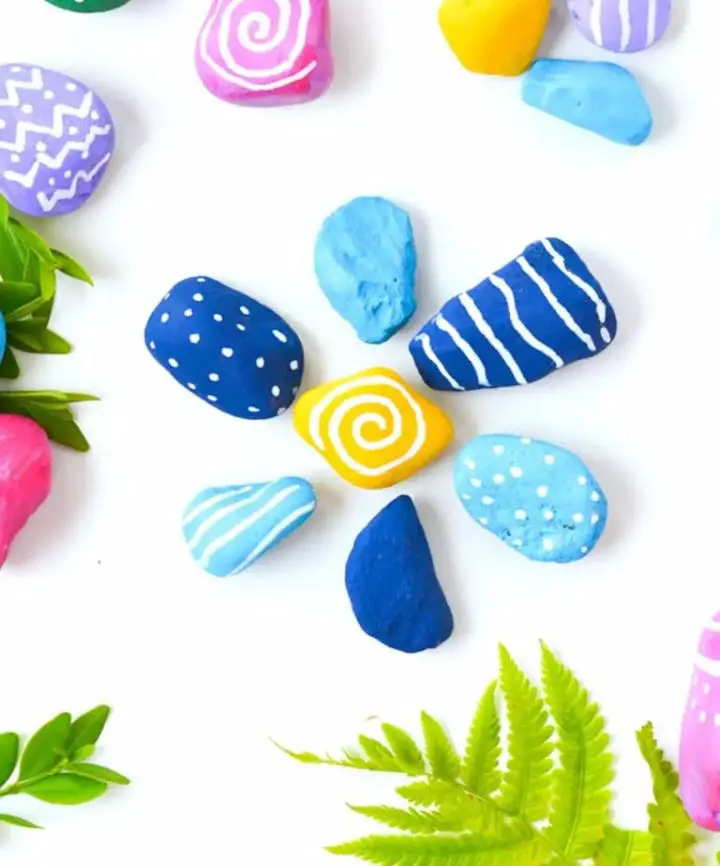
How to Do You Make Flower Painted Rock

Immerse yourself in the world of creative crafting with the Flower Painted Rocks Craft from Living Life as Moms. This innovative activity invites kids to unleash their artistic side on an unexpected canvas – rocks! With just a few simple supplies like acrylic craft paint, brushes, and river rocks, you can transform ordinary stones into stunning floral masterpieces. The instructions are easy to follow, making it an ideal activity for all ages. Once complete, a clear glaze finish ensures your painted flowers remain vibrant and durable, perfect for adding a pop of color to your garden or indoor pots. This delightful craft is a great way to spend quality time with family while creating lasting decorations that will be cherished.
Galaxy Painted Rock With Details Instructions

Transform the world of stone into a breathtaking galaxy with our comprehensive guide. We’ll walk you through the entire process, from choosing the perfect rocks to sealing your masterpiece. Along the way, you’ll learn how to blend colors with sponges, add twinkling stars with precision toothbrush strokes, and incorporate celestial details that make each piece uniquely yours. Whether you’re looking for a calming creative outlet or a thoughtful gift, these galaxy-painted rocks are sure to brighten any space. To achieve the best results, be sure to use acrylic paints and allow each layer to dry before moving on to the next – the wait will be worth it!
Camping Themed Rock Painting Ideas
Combine creativity with geology by transforming pebbles into vibrant works of art. This innovative rock painting activity is perfect for crafters of all levels, from young children to adults. The Painted Rocks Craft – Camping Theme from Messy Little Monster offers a unique way to blend learning and playtime. Kids can unleash their artistic expression by painting a set of rocks with bright paint pens, either following the camping theme or creating their own imaginative designs. The process is simple: start by rinsing the rocks, then sketch out a design with a pencil, followed by coloring in with paint markers and adding final touches to bring the artwork to life. Once dry, these painted rocks can be used for storytelling, teaching, or simply as decorative accents. For added durability, consider applying a protective coat of spray sealer or Mod Podge. This enriching experience fosters imagination and provides a tactile connection to nature.
Handmade M&m Painted Rock Art
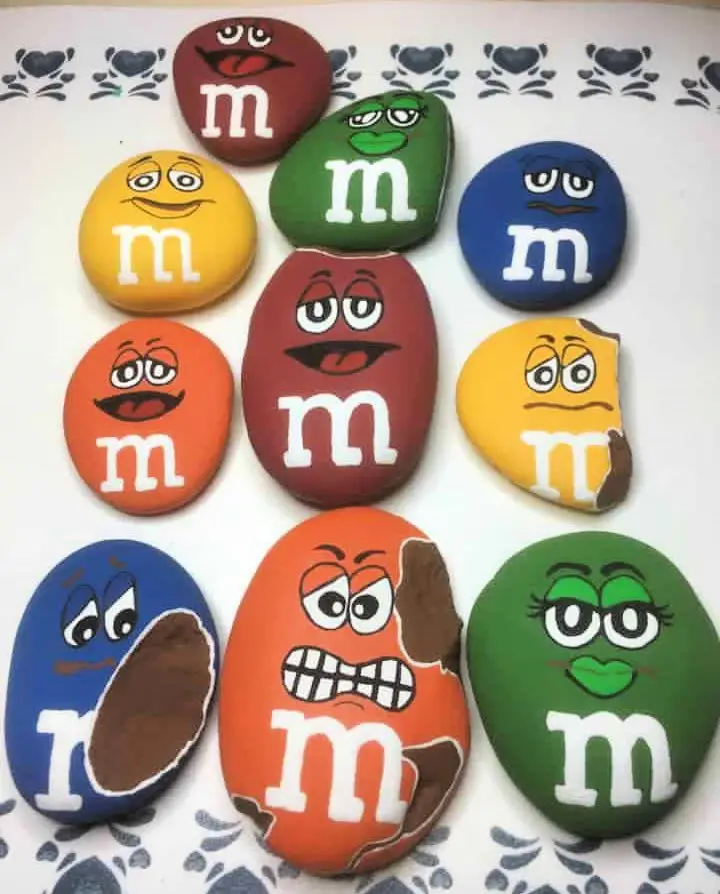
Unleash your creative potential by turning ordinary stones into vibrant works of art with the M&M Painted Rocks Art Tutorial from The Inspiration Edit. This delightful guide, courtesy of Angela Milnes, offers a unique way to breathe new life into chipped rocks, transforming them into charming gifts or hidden treasures. With a detailed list of supplies and step-by-step instructions, you’ll bring your imagination to life by crafting M&M characters with expressive faces and a signature candy shell appearance. Once complete, seal your masterpiece and it’s ready to be admired or cleverly concealed for a lucky finder to discover.
DIY Ice Cream Painted Rock
Crafting adorable ice cream painted rocks is an entertaining and creative activity that’s perfect for bonding with kids. With a minimal set of supplies including river rocks, paintbrushes, paint palettes, paint pens, and a pencil, this project is both accessible and engaging. Kids will delight in painting and personalizing their own ice cream characters, developing their understanding of shapes and colors while exercising their fine motor skills. Each step is designed to inspire imagination, from selecting favorite ice cream flavors to adding adorable faces to their creations. As you follow the instructions, you’ll transform ordinary rocks into charming, scoop-inspired masterpieces that showcase your child’s creativity.
Glitter Word Art Painted Rock
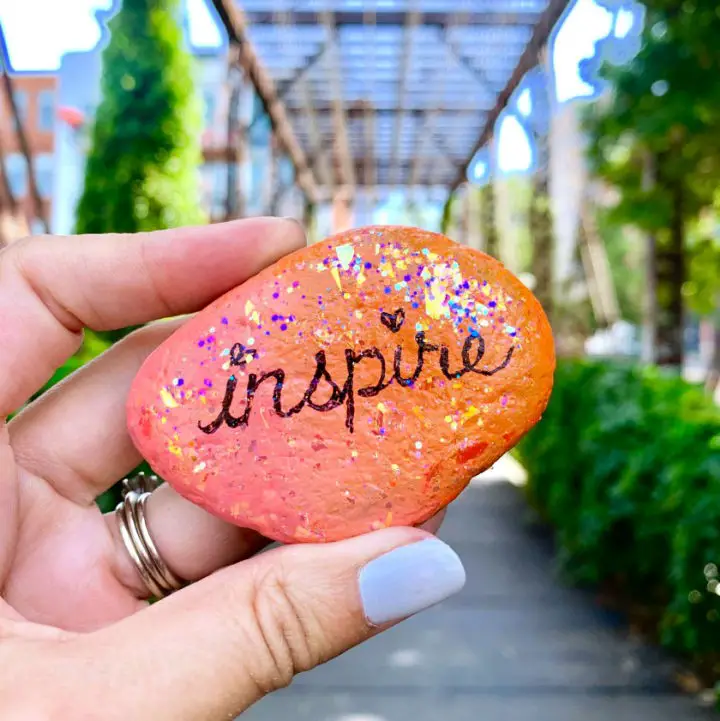
Discover the magic of transforming ordinary stones into vibrant, glittering masterpieces with Jen Goode’s comprehensive tutorial on making word art painted rocks. At 100 Directions, you’ll uncover a delightful project that effortlessly elevates your creativity and yields stunning results. With a mere handful of essential supplies – paint, glitter, and a trusty marker – craft a personalized rock that shines with your chosen words, perfect for gifting, garden decoration, or a fun family bonding experience. Let the sparkle of inspiration guide you as you unleash your inner artist and imbue your rocks with a radiant glow.
DIY Painted Rock – Step by Step Instructions
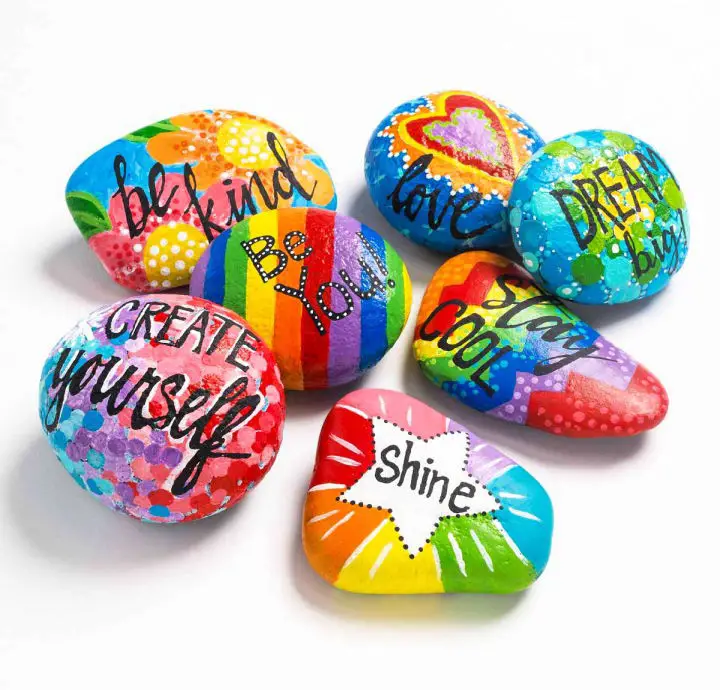
Unlock your creative potential with a charming DIY painted rocks project from Plaid Crafts. This engaging activity is perfect for individuals seeking a fun and rewarding artistic experience. By following the straightforward instructions, you can transform ordinary stones into vibrant masterpieces that bring joy to any space or serve as thoughtful gifts. Start by thoroughly cleaning your rocks, then apply a basecoat of black paint to create a foundation for your design. Once dry, let your creativity shine by adding colorful patterns and uplifting words using the detailed guide. This project is suitable for crafters of all skill levels, making it an excellent way to explore your artistic side. Visit the Plaid Crafts website to access the complete pattern and start creating these eye-catching pieces today.
Moon Landing Painted Rock
Transform your outdoor space into an otherworldly haven by incorporating these innovative rock decorating ideas. Take inspiration from the iconic moon landing quote ‘One small step for man, one giant leap for mankind’ and bring it to life on a smooth round rock. This DIY project seamlessly blends painting and hand lettering techniques to create a celestial masterpiece that’s perfect for space-themed gatherings or as a striking addition to your home decor. To achieve this interstellar design, gather your essential materials: acrylic paints, brushes, Dragonfly glaze for added shimmer, and a clear gloss finish. Follow the step-by-step guide to layer colors, incorporate motivational quotes, and add celestial bodies, resulting in a stunning work of art that’s out of this world. As you embark on this creative journey, enjoy the process of crafting your very own interstellar keepsake and display it with pride.
Customized Painted Mandala Rock Design
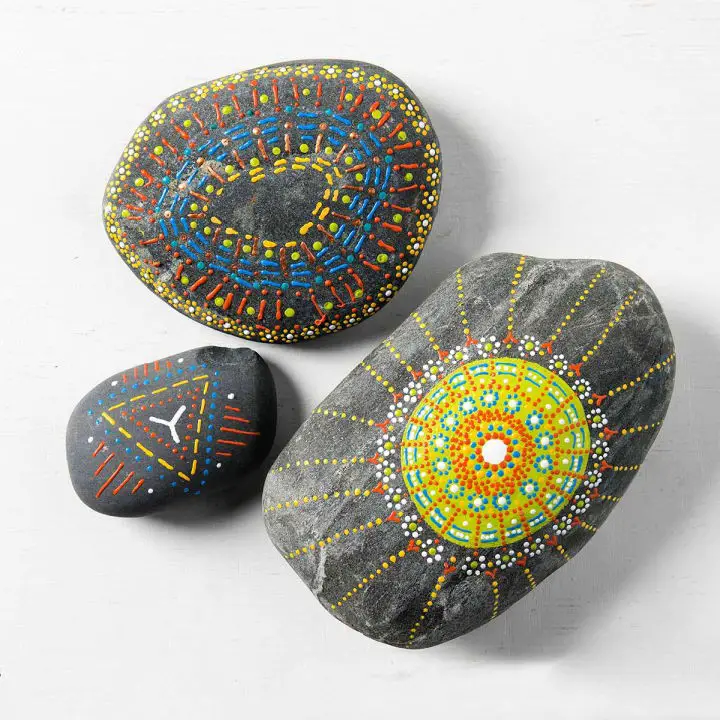
Transform your garden into an artistic oasis by crafting personalized decor with painted mandala rocks. This creative project involves transforming smooth, flat-surfaced stones into vibrant masterpieces using 3D acrylic paints. Begin by thoroughly cleaning the rocks and drying them completely. To ensure a precise design, take some time to experiment with patterns on paper plates before applying paint. Apply consistent pressure to achieve perfect dots and lines, and utilize toothpicks for intricate details. Should mistakes occur, simply wipe them clean with a damp paper towel. Once you’re satisfied with your creation, allow the paint to dry completely before carefully removing any stencil tape. The end result is a stunning, handcrafted mandala rock that can instantly brighten up your outdoor space with a burst of color and creativity.
Rock Animal Giraffe Puzzle
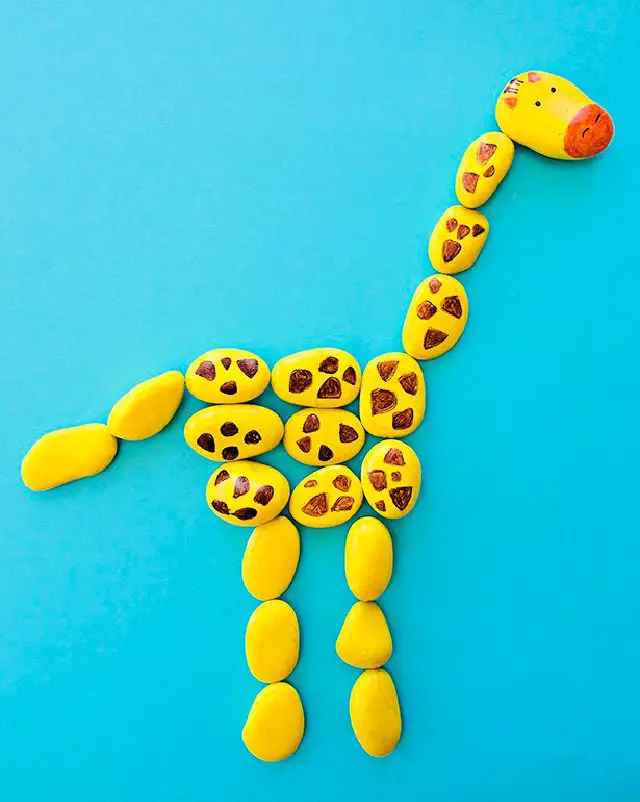
Create your own unique rock animal giraffe puzzle with this engaging and easy-to-do craft from hello, Wonderful. This activity is perfect for families looking to spend quality time together while indulging in a fun art project. Start by collecting rocks of various sizes, then paint them yellow to give them the signature giraffe color. Use markers to add adorable spots and facial features, bringing your rock animal to life. Once your rocks are painted and detailed, you can assemble them into a giraffe shape and enjoy your puzzle game! Not only does this craft help develop fine motor skills, but it also encourages creative expression and imagination. And the best part? You can take your puzzle on-the-go by packing the pieces in a drawstring bag. With just a little creativity, you can transform ordinary rocks into a charming puzzle that’s all your own.
Quickly DIY Daisy Painted Rock
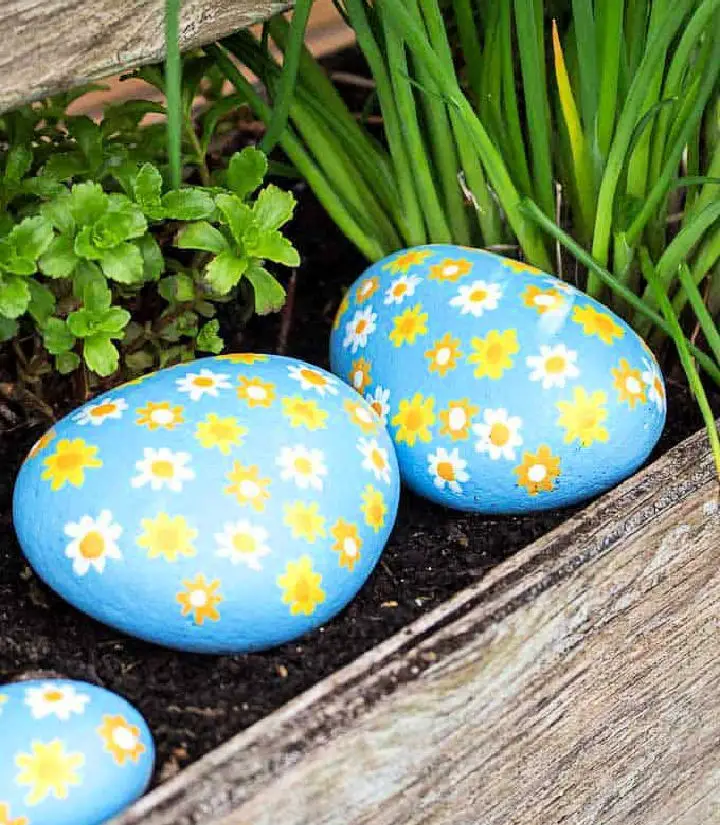
Unleash your inner artist and create adorable whimsical designs on cute rock paintings that will brighten up any space. Follow this easy-to-follow guide from Crafts by Amanda to make charming daisy-painted rocks that are simple, fun, and perfect for decorating your home or garden. To get started, gather a few basic supplies like hand-sized rocks, acrylic paint, and brushes. Then, begin by painting the rock with a soft blue base color. Next, add delicate white and yellow daisy shapes, finishing them off with bright school bus yellow centers. With clear instructions that are easy to follow, even beginners can achieve beautiful results. The process of transforming ordinary rocks into vibrant decorations is not only fun, but also therapeutic, allowing your creativity to bloom with every brushstroke.
Conclusion:
In conclusion, this comprehensive collection of 30 easy rock painting ideas for beginners sets the stage for a creative and rewarding journey. From selecting and preparing the perfect rocks to choosing the ideal painting supplies and applying a sealant for long-lasting results, this guide has provided the fundamental building blocks for embarking on a rock painting adventure. Beyond its artistic appeal, rock painting also fosters connections with like-minded individuals through initiatives such as the Kindness Rocks Project. So, gather your materials and let’s transform ordinary rocks into extraordinary works of art, savoring every moment of this engaging and fulfilling hobby.
