Crafting your own leather earrings is an innovative way to personalize your style, while unleashing your creativity. This comprehensive guide offers 25 distinct DIY leather earring ideas, allowing you to transform everyday materials into captivating pieces of jewelry. With step-by-step instructions, novice crafters and seasoned makers alike can easily follow along, creating unique accessories that reflect their individuality. From selecting the ideal leather to attaching the earring hooks, every aspect is meticulously addressed, ensuring a seamless and enjoyable DIY experience. As you embark on this project, not only will you express your creativity, but also produce one-of-a-kind jewelry pieces that can’t be replicated by mass-produced items. Whether you’re utilizing a Cricut Maker or cutting by hand, these tips and tricks are designed to help you produce professional-looking earrings with a personal touch. Get ready to indulge in the fulfilling process of making your own leather earrings, adding an exclusive element to your jewelry collection.
Why Make Your Own Leather Earrings?
Crafting your own leather earrings offers a unique blend of personal satisfaction and practicality. This DIY project allows for unparalleled customization, empowering you to create pieces that perfectly reflect your style. With the freedom to experiment with different designs, materials, and techniques, you’ll be able to produce earrings that are uniquely yours.Beyond the creative fulfillment, making your own leather earrings can also save you money. The cost of materials is often significantly lower than buying similar items in stores, allowing you to create multiple pairs for the price of one. This not only stretches your budget but also gives you the opportunity to experiment with different designs and materials without breaking the bank.When you’re the one crafting your own earrings, you have complete control over the quality of the materials and the process itself. This means you can ensure that your finished products meet a high standard, rivaling or even surpassing mass-produced alternatives.Upcycling leather scraps is another benefit of making your own earrings. By repurposing materials that would otherwise go to waste, you’re contributing to a more sustainable fashion choice. This eco-friendly approach not only reduces waste but also gives you the opportunity to create one-of-a-kind pieces that reflect your personal style.As you develop your crafting skills, you’ll find that making leather earrings can be a therapeutic and meditative experience. The process of working with your hands can be incredibly relaxing, providing a creative outlet that helps reduce stress and improve mental well-being.In the end, creating your own leather earrings is a rewarding experience that combines creativity, cost-effectiveness, and personal satisfaction. It’s an opportunity to express yourself through fashion while also developing new skills and making a positive impact on the environment.
How to Make Leather Earrings with Cricut Maker
Creating stunning leather earrings with a Cricut Maker is an enjoyable and uncomplicated endeavor that can effortlessly elevate your style. This project is perfect for those seeking to craft one-of-a-kind gifts, enhance their wardrobe, or launch a handmade business. By following this step-by-step guide, you’ll quickly gain the skills to produce exquisite leather earrings with ease.
Materials Needed:
When crafting with the Cricut Maker, a versatile selection of materials is essential. For creating leather-based projects, you’ll need to choose from genuine leather, faux leather, or cork. To ensure smooth cutting and placement, it’s crucial to utilize a Strong Grip Mat in purple. Depending on your specific project, you may require either the Deep Point Blade for genuine leather or the Fine Point Blade for faux leather. The Brayer Tool is also essential for efficiently applying pressure during cutting. For added grip, consider using Contact paper or Transfer tape. To create holes for earrings or other jewelry components, the Leather Hole Punch comes in handy. Finally, jewelry pliers will be necessary for assembling and shaping your finished pieces.
Step 1: Preparing Your Design in Cricut Design Space
To create your custom earring design in Cricut Design Space, start by opening the application and navigating to the Canvas area. From there, access the Shapes library on the left-hand side of the screen and select the Circle option. Next, click on the padlock symbol to unlock it, allowing you to modify the shape into an oval. Adjust the size to approximately 2.5 inches tall and 0.6 inches wide, or customize it to your preference. This will serve as the foundation for your earring design. Once you’re satisfied with the base shape, duplicate it to create a pair. If you’re using two-sided or faux leather materials that require a backing, make additional copies to use as back pieces.
Step 2: Setting Up Your Material
When working with leather materials, it’s essential to create a secure foundation. Start by placing your material on a Strong Grip Mat. If your mat lacks sufficient stickiness, add a layer of contact paper or transfer tape, with the adhesive side facing upwards, to prevent slipping. This extra precaution will ensure a smooth cutting process. Next, utilize a brayer tool to firmly press and adhere the leather or faux leather onto the mat. With your material securely in place, you can now focus on preparing your Cricut Maker for the cutting process. Depending on the type of leather you’re working with, select either the Deep Point Blade for genuine leather or the Fine Point Blade for faux leather materials.
Step 3: Cutting the Leather
To optimize cutting performance and prevent unwanted marks on your material, start by adjusting the star wheels on your machine to the side. Ensure that the correct material type is selected in Design Space – specifically, opt for ‘Genuine Leather’ or its equivalent setting for your specific material. For a precise cut, choose the ‘More Pressure’ option. Once you’re set, proceed with cutting your design. If required, run the design through again to guarantee a complete and accurate cut.
Step 4: Preparing the Earrings
To complete your earring design, start by punching holes at the top of each piece using a leather hole punch. If your design involves folding, be sure to punch holes on both layers for seamless alignment. Once you’ve created the necessary holes, it’s time to attach the earring hooks. For ball wire hooks, begin by slightly opening the hook and inserting the leather, taking care to position it correctly. Finally, secure the hook in place using jewelry pliers, ensuring a sturdy and reliable attachment.
Video Tutorial
If you’re looking for a hands-on approach to creating leather earrings with a Cricut Maker, we recommend checking out our step-by-step video tutorial. By combining the visual guidance of the video with the written instructions provided here, you’ll be able to follow along seamlessly and complete the project with ease.
Conclusion
While the notion of crafting leather earrings may seem intimidating, it’s actually a surprisingly enjoyable DIY project when paired with a Cricut Maker. This versatile cutting machine opens up endless possibilities for customization, allowing you to create unique earrings that perfectly capture your personal style or match any occasion. And don’t worry if your first attempts don’t turn out exactly as planned – the key to success is experimentation and having fun with different designs and materials. As you gain confidence in your skills, you’ll find yourself creating beautiful leather earrings that are uniquely yours.
FAQs on Making Leather Earrings
Crafting unique leather earrings offers a delightful blend of creativity and personalization. To facilitate your foray into this engaging DIY endeavor, we’ve gathered the most commonly asked queries and provided insightful responses to guide you through the process.
What materials do I need to make leather earrings?
When it comes to crafting with leather, there are several essential tools you’ll need to get started. First and foremost, decide on the type of leather you want to work with – do you prefer genuine leather or a more affordable faux option? Next, consider the color palette you envision for your project. From here, you can move on to selecting the perfect earring hooks in various metals and styles to complement your design. To prepare your leather for adornment, you’ll need a trusty leather punch or small hole punch to create holes for the hooks. A pair of scissors or a craft knife will also come in handy for trimming the leather into your desired shape. For added protection and precision, consider investing in a cutting mat and design template – these tools can help keep your work surface clean and ensure crisp edges on your cutouts. Finally, if you’re looking to create intricate designs or custom shapes, a Cricut Maker or similar cutting machine can be a valuable asset in your craft arsenal.
Can I make leather earrings without a Cricut machine?
While it may seem daunting to create leather earrings without a specialized cutting tool like a Cricut machine, the truth is that manual techniques can still produce impressive results. Scissors or a craft knife can be used to cut leather into desired shapes, and using a template can help ensure precision. However, for more intricate designs, a cutting machine can streamline the process and deliver professional-looking results.
How do I choose the right leather for my earrings?
When it comes to selecting the perfect leather for your earring design, there are several factors to consider. The look and feel you’re aiming for will ultimately dictate the type of leather that’s right for you. If you’re after a durable and unique texture, genuine leather is an excellent choice. However, keep in mind that this option may come with a higher price tag. For those on a budget or seeking a more affordable alternative, faux leather offers a range of colors and patterns to choose from. Alternatively, if you’re looking for something lightweight and distinctive, cork leather provides a great compromise between style and substance.
How do I attach the earring hooks to leather earrings?
To complete your leather earrings, you’ll need to attach the hooks to the pre-cut shapes. Follow these steps to ensure a secure and elegant finish.
First, use jewelry pliers to gently open the loop on the earring hook. This will give you enough room to thread it through the hole at the top of the leather piece. Next, slide the hook through the hole, making sure it’s properly aligned. Finally, close the loop securely using the pliers, taking care not to overtighten and damage the leather.
Can I make double-sided leather earrings?
To create double-sided leather earrings, you’ll need two leather pieces for each earring. To achieve this, start by gluing the back sides of the leather pieces together, taking care to align the edges precisely. This approach enables a polished finish on both sides or allows you to combine different colors and textures in a unique way.
How do I care for my leather earrings?
To maintain the appearance of your leather earrings, heed these guidelines: Keep them away from moisture by removing them before showering or engaging in water-based activities. Store them in a dry area shielded from direct sunlight. In the event that they become soiled, use a soft, damp cloth to gently wipe them down, steering clear of harsh cleaning agents. To revitalize their appearance if they begin to look dull or parched, apply a leather conditioner on occasion.
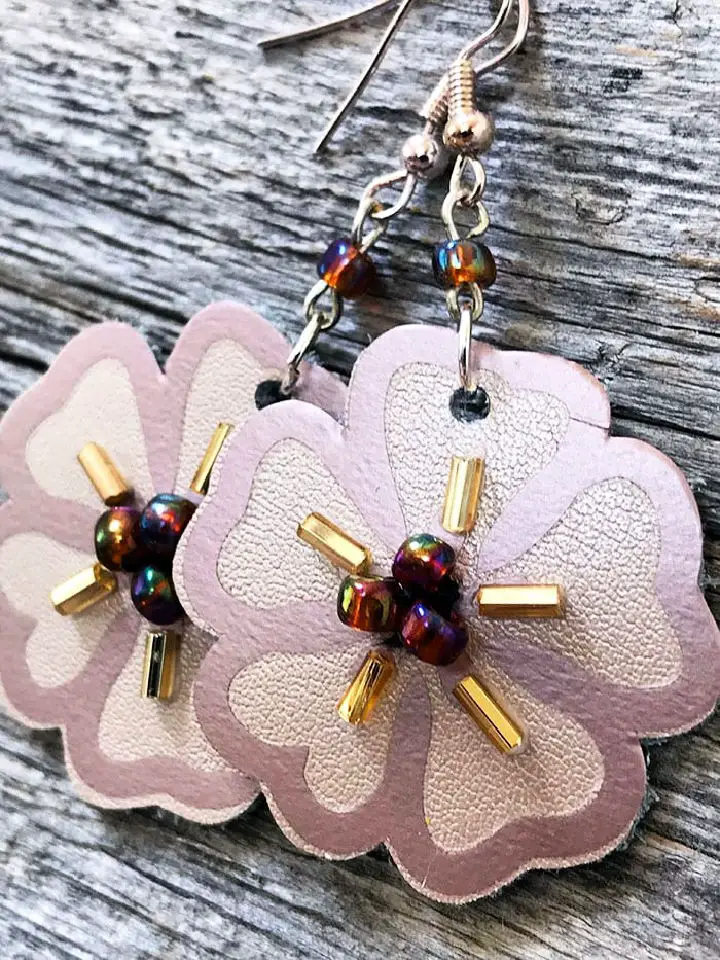
Can I add embellishments to my leather earrings?
Incorporating small details can elevate the overall aesthetic of your leather earrings. Consider adding beads, feathers, or tiny charms to give your creation a one-of-a-kind flair. Secure these embellishments with robust adhesive or cleverly integrate them into the process of attaching the earring hooks.
How to Make Leather Earrings: 25 DIY Leather Earring Ideas
Unlock your crafting potential and get ready to add a touch of elegance to your style with our comprehensive guide on creating one-of-a-kind leather earrings from the comfort of your own home. With 25 innovative DIY ideas, you’ll be spoiled for choice as you embark on this fun and rewarding project.
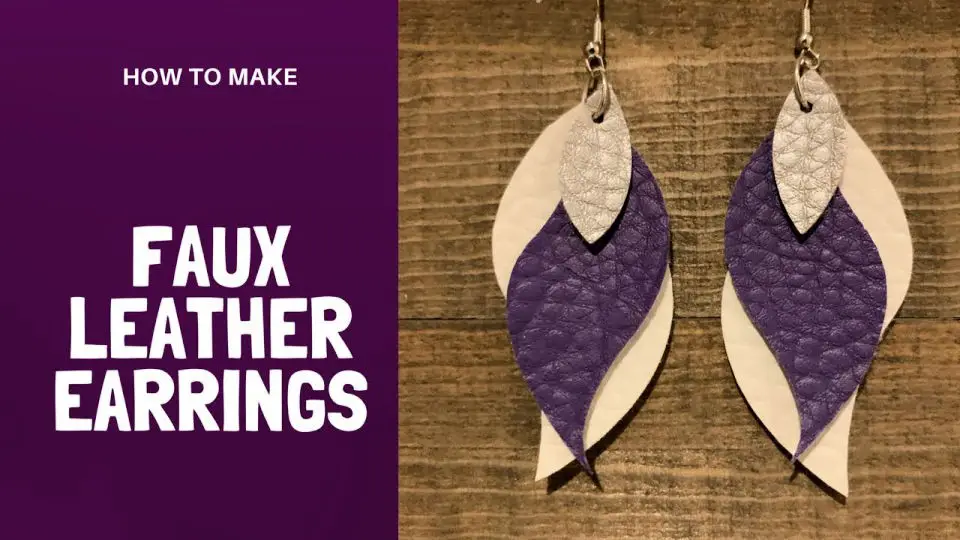
Making Leather Earrings with Cricut
Unleash your creativity and fashion sense by transforming supple leather into stunning earrings using your Cricut machine! Start by selecting the desired earring design in Cricut Design Space and pairing it with a suitable piece of leather. To ensure seamless cutting, secure the leather firmly to a strong grip cutting mat, minimizing any potential movement during the process. The Deep-Point Blade is an excellent choice for precise cuts on leather, so be sure to select it along with the appropriate settings for the material. Once cut, carefully peel off your earring shapes and add jewelry hardware like hooks or jump rings to complete the look. With these bespoke leather earrings, you’ll not only have a unique accessory but also the satisfaction of creating something with your own hands. As an added bonus, testing your cuts on small leather pieces before committing to larger projects will help minimize waste and ensure flawless results every time.
Handmade Leather Earrings With Cricut
Transform your Cricut machine into a powerhouse of creative expression by unleashing the art of making stunning leather earrings. This comprehensive guide will walk you through the process of turning simple leather sheets into elegant, one-of-a-kind accessories that showcase your unique style and flair for handmade fashion. Whether you’re an experienced crafter or a DIY enthusiast looking to add some personal touches to their wardrobe, these step-by-step instructions will empower you to design and cut intricate patterns, ensuring your earrings are both visually striking and conversation-starting. With this guide, you’ll be able to craft custom leather earrings that reflect your personality and add a touch of sophistication to any outfit, making them the perfect accessory for everyday wear or as a thoughtful gift for friends and family.
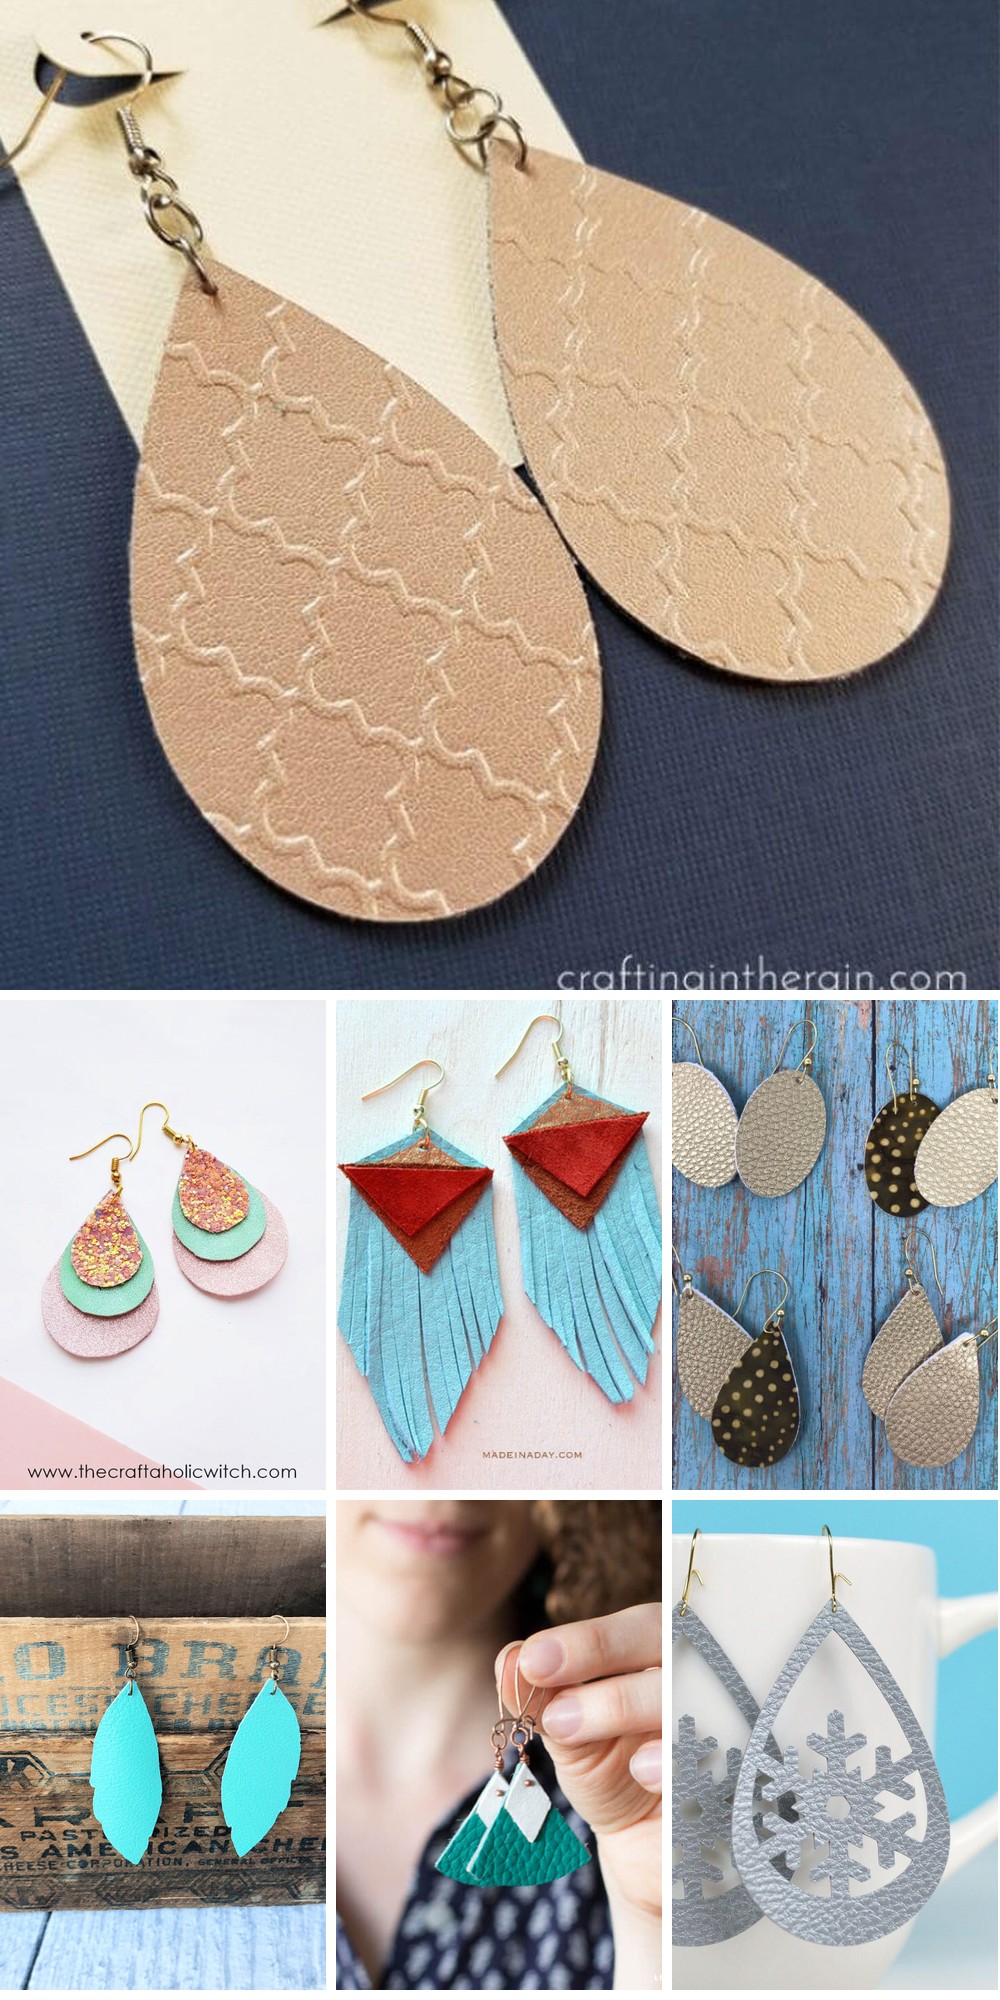
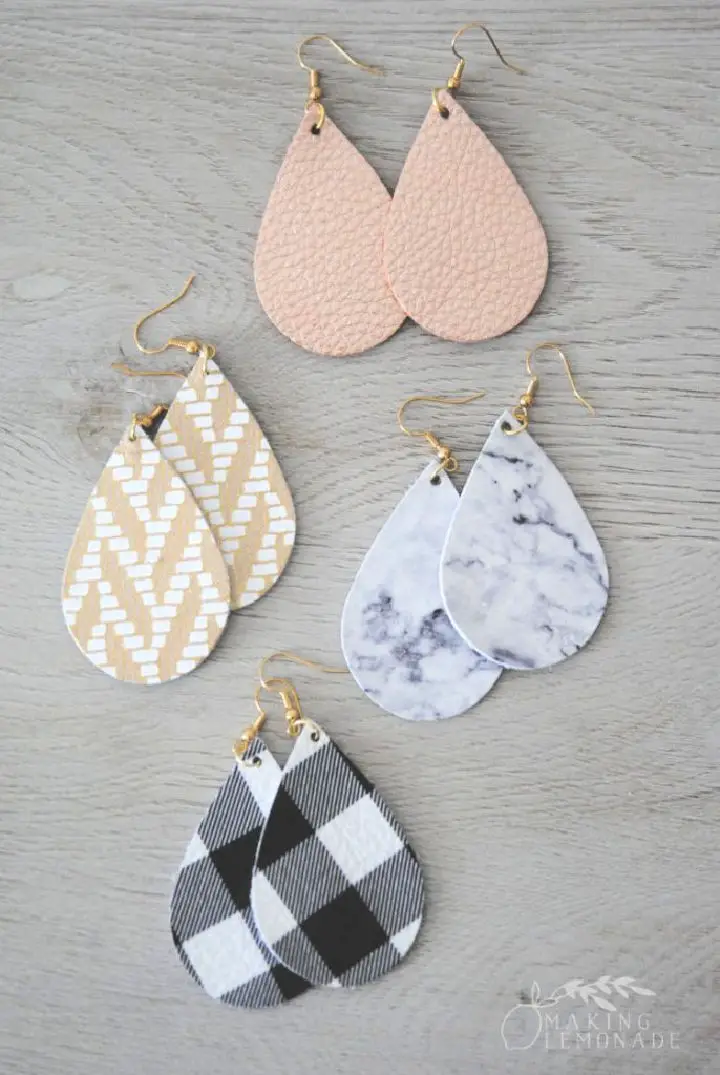
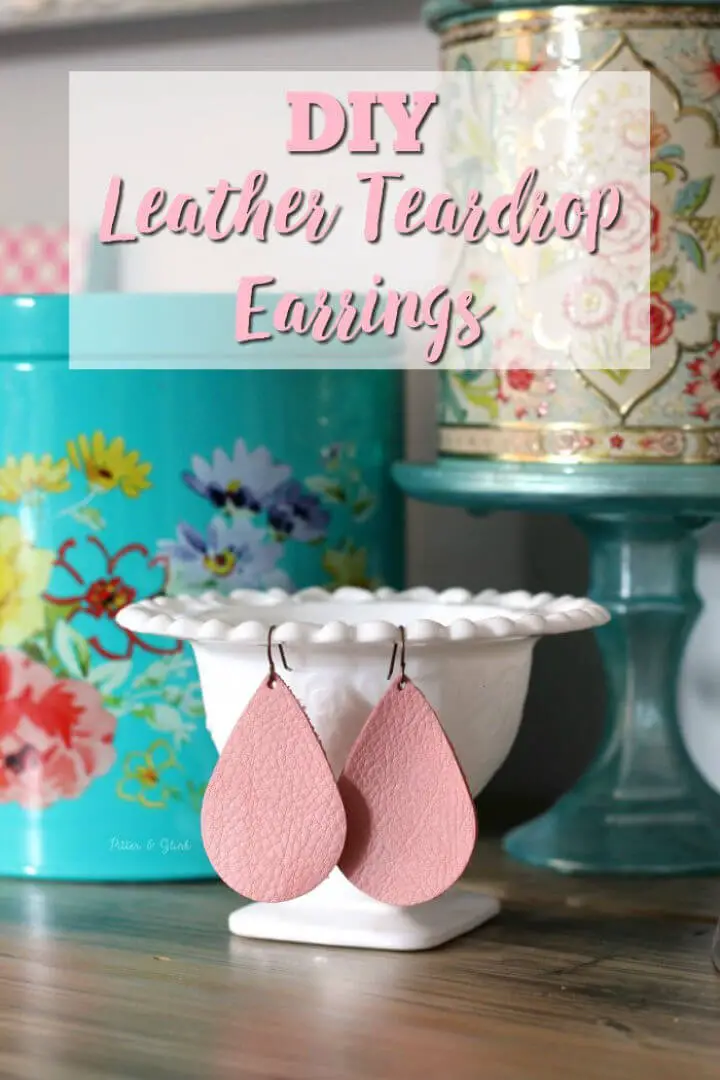
Teardrop Style Leather Earrings + Free Template
Create stunning leather teardrop earrings with ease by following The Craftaholic Witch’s step-by-step guide. This DIY project is ideal for adding a touch of sophistication to your jewelry collection, requiring only 10-15 minutes of your time. With a free template and simple instructions, you’ll be able to craft these chic accessories using materials like faux leather, earring hooks, and jump rings, along with basic tools such as scissors and pliers. Perfect for personalizing your style or gifting, these handmade earrings are an excellent way to showcase your creativity while enhancing your crafting skills. Make a fashion statement with your very own leather teardrop earrings.
Earrings with Iron on Vinyl and Leather
Transform your personal style with a one-of-a-kind DIY earring project using iron-on vinyl and leather. Begin by selecting a piece of soft leather as the foundation – its durability and elegant touch make it an ideal choice. Next, choose iron-on vinyl in your preferred colors or patterns to add a customized flair. When applying the vinyl, ensure your iron is at the optimal temperature and use a protective cloth to prevent direct contact. With precision, cut out the leather into the desired earring shape, attach the vinyl, and finally, secure the piece with earring hooks. As you complete this DIY endeavor, you’ll be left with a chic and original pair of earrings that are perfect for any occasion.
Make Faux Leather Earrings without Cricut
Creating stylish faux leather earrings without relying on a Cricut machine is an enjoyable and straightforward process. Start by choosing a piece of soft faux leather and sketch your desired earring shape onto the reverse side of the material, opting for teardrop shapes, circles, or geometric patterns. Using sharp scissors, carefully cut out your design, ensuring smooth edges that exude a polished finish.
Next, punch a small hole at the top of each cutout using either a leather punch or a needle. Then, attach your earring hooks through the holes by opening and closing the hooks’ loops with small pliers. To add an extra touch of personality, consider embellishing with paint, beads, or other decorative elements.
Voilà! You now possess a one-of-a-kind pair of handmade faux leather earrings that reflect your unique style and creativity.
How to Cut Faux Leather with A Cricut Explore
Transforming your Cricut Explore into a tool of creative expression, create stunning DIY faux leather earrings that exude elegance. Begin by choosing an inspiring cut file from platforms like Pinterest or Etsy and upload it to the Cricut Design Space. Customize the size to suit your unique style, and utilize the color-coding feature to ensure clarity in your design. The secret to precise cuts lies in utilizing the mirror feature, especially crucial when working with materials featuring fuzzy backings. To guarantee a flawless cut, activate the shimmered leather settings, safeguarding both your machine and mat from damage. Complete your bespoke accessory by incorporating a leather punch, jump rings, and earring hooks, crafting a personalized piece that embodies individuality or team spirit. Perfect for fashion enthusiasts seeking to create one-of-a-kind, handmade jewelry.
How to Make Leather Earrings
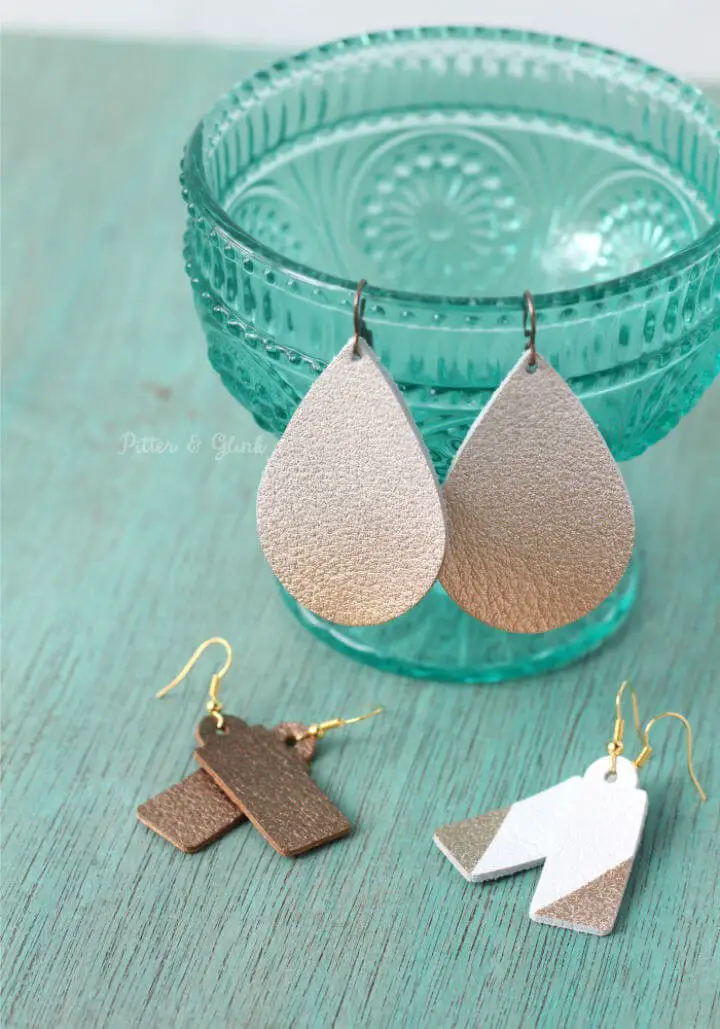
Transforming a simple leather crafting project into an exquisite piece of art is within your reach with this comprehensive guide from Pitter & Glink. By combining basic supplies such as a Sizzix Big Shot, high-quality leather, and vibrant spray paint, you’ll be able to create feather-light and fashion-forward leather earrings that exude elegance and sophistication. Whether you’re looking for a thoughtful gift or seeking to elevate your personal style, these DIY leather earrings offer an unbeatable combination of affordability and flair. Follow the step-by-step instructions to master the art of cutting, painting, and assembling your creations with ease, ensuring each handmade piece boasts a professional finish that’s sure to turn heads.
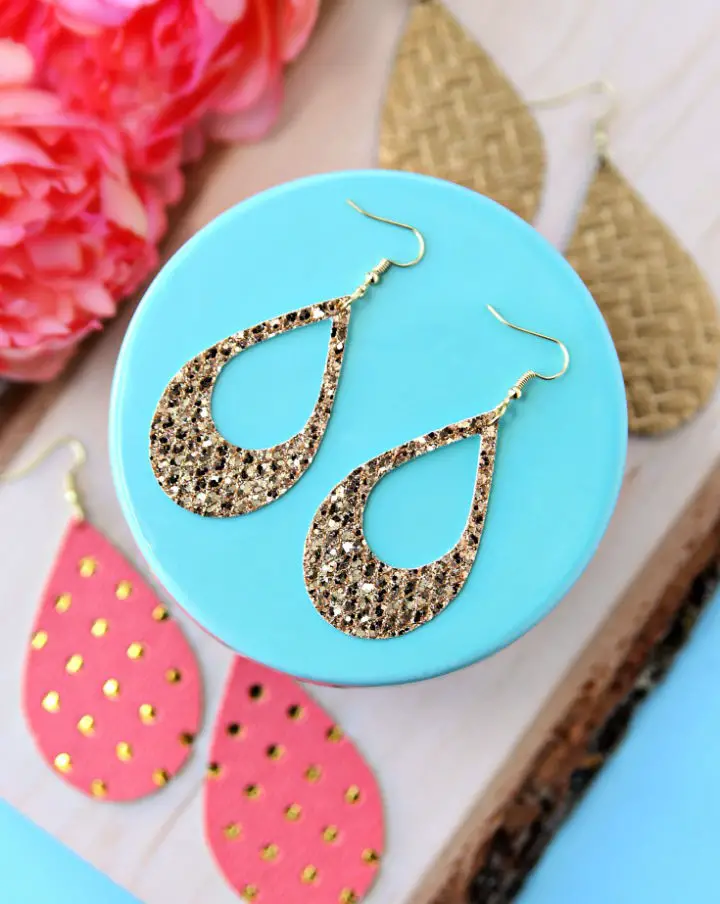
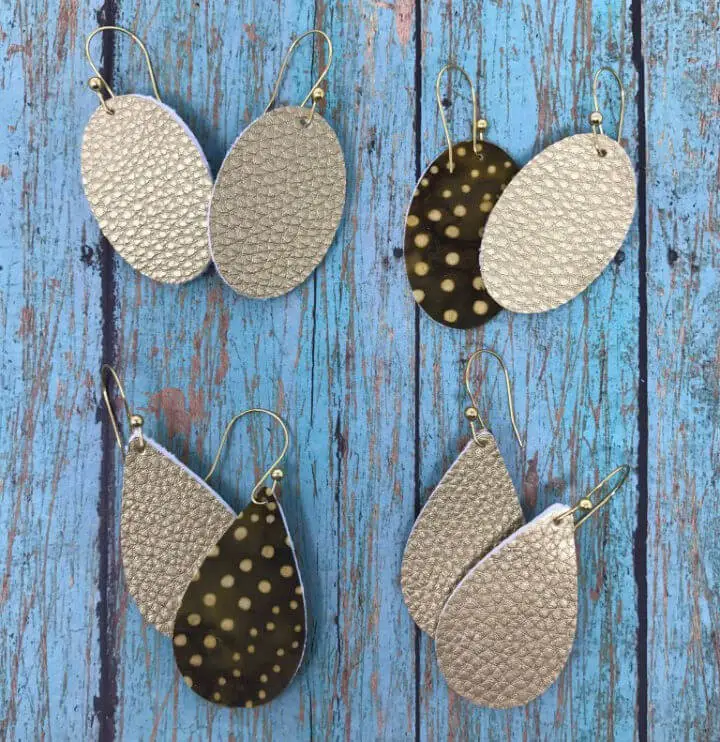
Homemade Embossed Leather Earrings
Making stylish embossed leather earrings with a Cricut machine and Cuttlebug tool is now easier than ever thanks to the comprehensive guide offered by Making in the Rain. This tutorial caters specifically to crafters who enjoy working with leather, providing a step-by-step process that starts with precise cutting and culminates in a chic, textured finish achieved through embossing. By following easy-to-understand instructions and utilizing simple supplies such as metallic rose gold leather and earring hooks, you can create one-of-a-kind accessories that perfectly complement any outfit. The guide is designed to deliver a rewarding crafting experience with professional-looking results, making it an excellent choice for those looking to add a personal touch to their jewelry collection or craft unique gifts for friends. With this DIY project, you’re sure to impress and enjoy the satisfaction of creating something special.
Easy DIY Leather Diffuser Earrings
Looking to elevate your jewelry collection with a touch of sophistication? Look no further than crafting your own leather diffuser earrings. This DIY project is the perfect way to add some functional flair to your accessories, allowing you to enjoy a subtle fragrance wherever you go.
With just a few simple materials and easy-to-follow instructions, you’ll be able to create a statement piece that’s not only stylish but also makes for a thoughtful gift. Simply add a few drops of your favorite essential oils to the rough back of the leather, allowing the aroma to subtly diffuse throughout the day.
This crafty adventure is all about personalization – choose from a range of colors and scents to create earrings that truly reflect your unique style.
Faux Leather Earrings with Cricut Iron-on
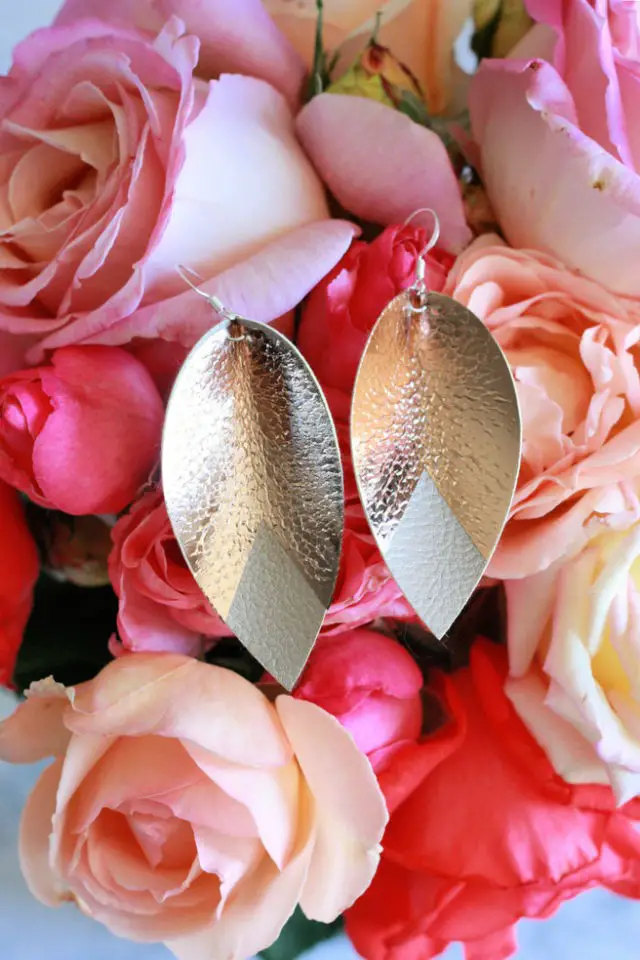
Crafting unique faux leather earrings with a Cricut iron-on is an excellent way to infuse personal style into everyday looks. This DIY project, sponsored by JOANN, brings together the inspiration of Magnolia Market and the expertise of Hildie & Jo. The result is a stunning accessory that can be customized to fit individual tastes. For those who enjoy jewelry making or are looking to start, this guide provides a comprehensive step-by-step process for designing and creating rose gold foil detailed earrings. By utilizing Cricut’s Design Space for precise cuts and shapes, users can achieve a professional-looking finish. The outcome is a pair of chic, handmade earrings that are sure to garner attention. With the freedom to get creative and customize, craft your own distinctive fashion statements today.
Pretty DIY Leather Earrings

With a Cricut machine, crafting custom leather earrings becomes an accessible and creative way to express your personal style. By following Lauras Crafty Life’s comprehensive guide, you’ll gain the skills to transform designs into reality, ensuring a seamless DIY experience from start to finish. The tutorial takes you through selecting the perfect design, sizing it accurately, and cutting the leather with precision. Additionally, you’ll learn valuable tips for attaching findings to complete your earrings. With the right supplies and expert instructions at hand, you can customize your earrings in any design, style, or color, making them one-of-a-kind creations that reflect your unique taste. By embracing your crafty side and getting creative, you can start making your own leather earrings today.
Make Your Own Faux Leather Earrings
Crafting faux leather earrings can be a delightful experience, yielding professional-quality results with the right materials and techniques. When working with Hobby Lobby’s faux leather ribbon, it’s crucial to choose simpler designs due to the material’s thickness and ensure you’re using a fresh cutting mat and blade for precise cuts. To further optimize the cutting process, consider stabilizing the ribbon with Heat ‘n Bond Ultrahold. Once your earrings are complete, consider backing them with a contrasting fabric to add a polished finish. As a final precaution, always conduct a test cut before beginning your project to conserve time and materials. For additional guidance and inspiration, visit Caught by Design to elevate your crafting skills.
DIY Leather Earrings with Cricut
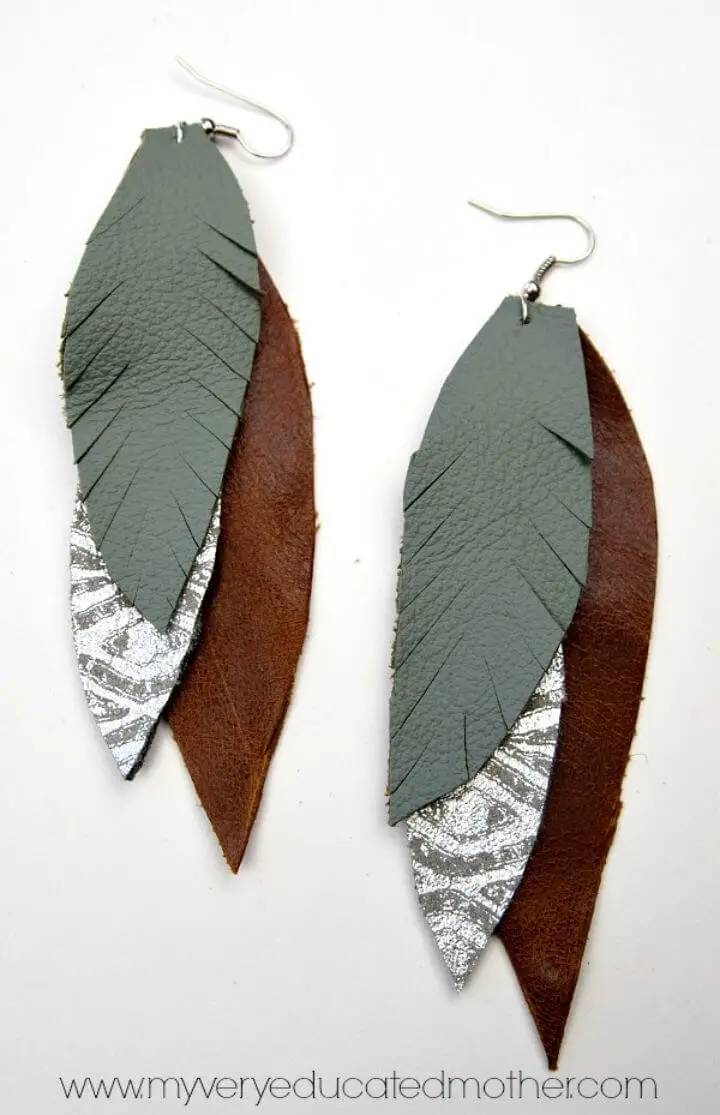
Want to add a unique touch to your fashion accessories? We’re excited to share an easy DIY guide on creating stylish leather feather earrings using a Cricut machine. These lightweight yet chic earrings will perfectly complement any outfit, making them a must-have accessory for any occasion. With just a few basic supplies like leather, a deep-cut blade, and some jewelry findings, you can create your own pair in no time. This budget-friendly project yields stunning results that are sure to turn heads. So grab your Cricut and let’s get started on crafting those statement earrings!
Simple DIY Leather Earrings
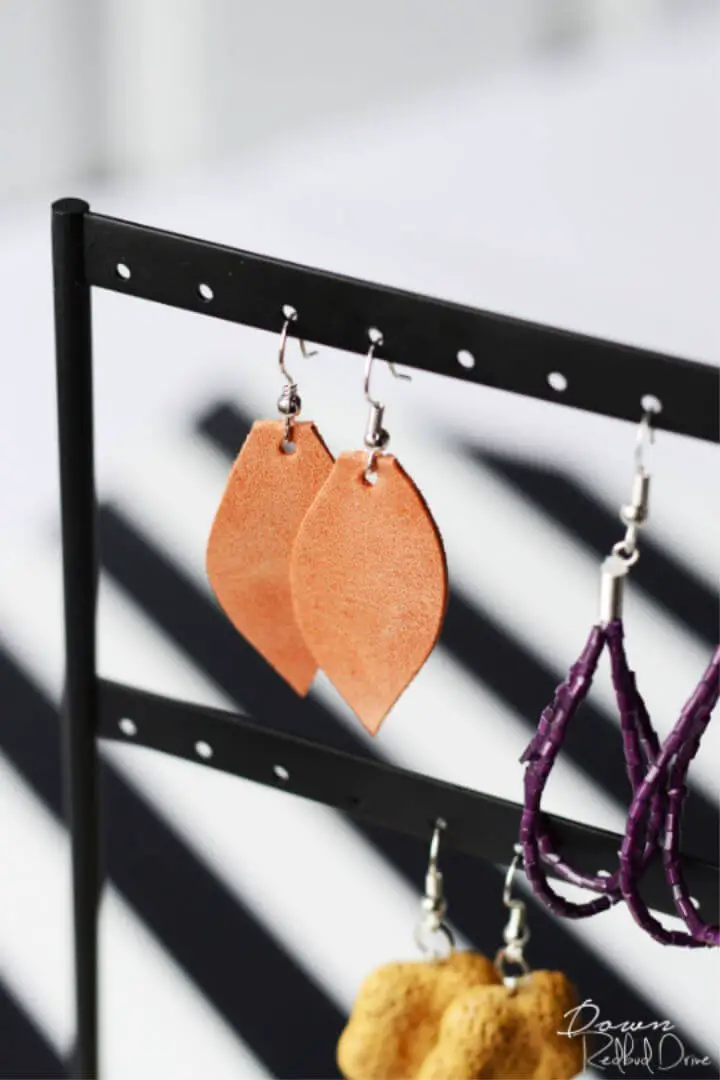
Transform your jewelry collection with this straightforward DIY guide to crafting stylish leather earrings from Down Redbud Drive. Whether you’re looking for unique gifts or a personal touch, these trendy accessories are an affordable and budget-friendly option. With just a few basic supplies such as thin leather strips, a leather punch, jump rings, earring hoops, pliers, and scissors, you can start creating your custom designs. By mastering the technique of punching clean holes and securely fastening jump rings, you’ll achieve professional-looking earrings that are both durable and charming. As an added bonus, these leather earrings double as essential oil diffusers, releasing a delightful aroma into your day. Let your creativity shine while enjoying the process of making these long-lasting and captivating earrings from the comfort of your own home.
Ornate Faux Leather Earrings Using Silhouette Curio
To create stunning ornate faux leather earrings, simply follow this step-by-step DIY guide sponsored by Silhouette America. The new Deep Cut Blade on the Silhouette Curio makes quick work of cutting through leather materials, often requiring just one pass. With only a few basic supplies like faux leather, painter’s tape, and the Silhouette Curio, you’ll be creating beautiful jewelry at home in no time. For optimal results, experiment with different blade settings, thicknesses, and speeds to achieve precise cuts. Once cut, assemble your earrings by attaching hooks and jump rings. Whether updating your own accessory collection or crafting unique gifts, these earrings are a chic addition that’s sure to turn heads. To get started, download the provided template and embark on your creative journey with confidence.
DIY Painted Leather Earrings
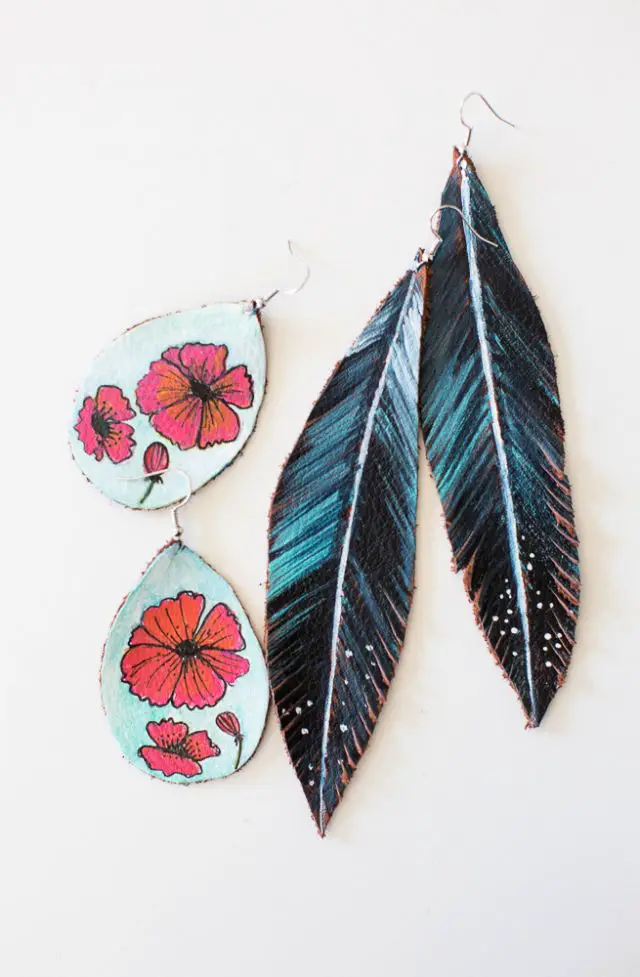
Transforming plain leather into stunning, one-of-a-kind earrings is an achievable DIY endeavor. By following a few simple steps, you can unlock the creative potential of painted leather earrings. Begin by preparing the leather for painting, ensuring a smooth and even surface. Next, unleash your artistic side with acrylic or leather paints, crafting unique designs that reflect your personality. Once the paint has dried, seal the earrings to preserve your masterpiece and add an extra layer of protection. With these handcrafted accessories, you’ll not only be showcasing your individuality but also sharing a thoughtful gift with friends and loved ones. Embark on this creative journey and take your accessory game to new heights.
Awesome DIY Geometric Leather Earrings
With Inspiration Made Simple’s easy-to-follow guide, create one-of-a-kind geometric leather earrings and necklaces using a Cricut Explore machine, leather scraps, and basic jewelry findings. By following the step-by-step instructions, you’ll be able to cut out unique shapes, assemble your pieces, and personalize your accessories with a custom touch. This project is perfect for fashion enthusiasts and DIY lovers alike, offering a fun and engaging crafting experience that requires no prior expertise. In just a few steps, you’ll be creating stunning, handcrafted jewelry that adds a modern flair to any outfit – and it makes for an excellent handmade gift idea as well.
Cheap DIY Geometric Leather Earrings
Transforming leather scraps into bespoke earrings is a fun and rewarding DIY endeavour, perfect for those seeking to create a thoughtful gift on a budget. With minimal tools like a leather punch, glue, and a craft knife, you can craft stunning accessories that exude a sense of personal touch. The beauty of this project lies in its versatility – simply select from an array of colours and shapes to perfectly match the style of your intended recipient. Not only will this DIY endeavour save you money, but it also imbues the gift with an authenticity and uniqueness that store-bought alternatives can’t replicate.
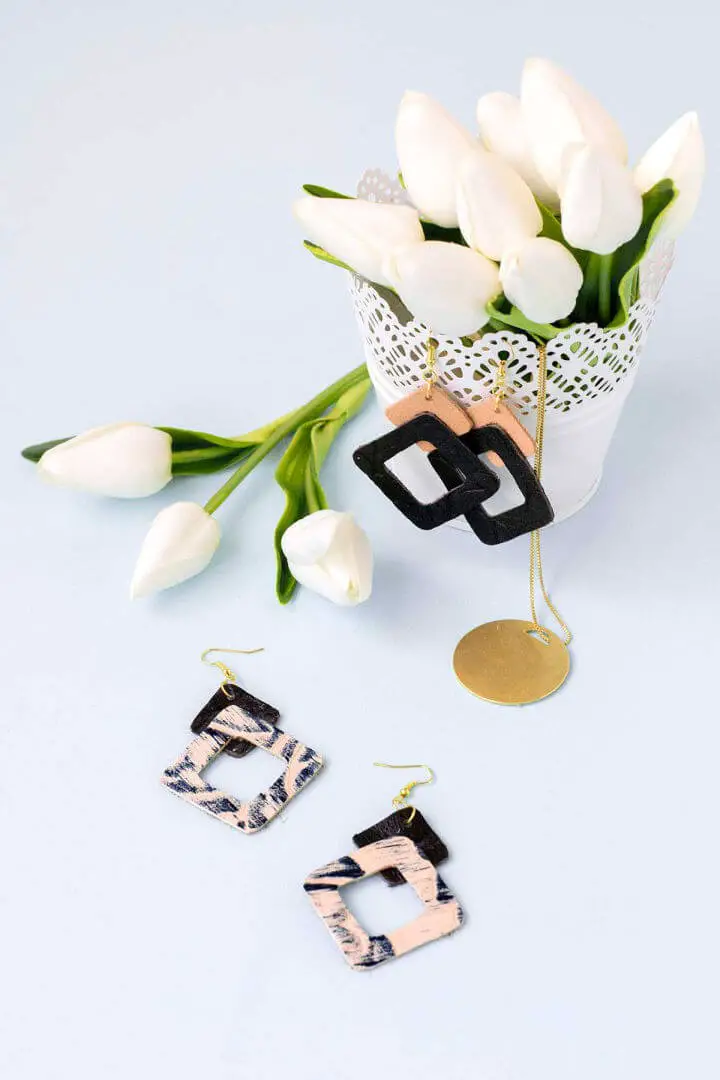
DIY Geometric Leather Earrings
Get creative and craft chic, minimalist geometric earrings at home! With Domino’s easy-to-follow guide, you can design and assemble lightweight, statement accessories that make perfect gifts or trendy additions to your jewelry collection. To get started, gather a few simple supplies like neutral leather, gold earring posts, spray paint, and Gorilla Glue. Then, follow along as the tutorial takes you through each step, from punching out leather circles to attaching the hardware. Plus, learn a bonus packaging tip for beautifully gifting your handmade creations. With this fashionable project, you’ll be elevating your DIY skills in no time!
Creative Leather Feather Earrings
Transform any ordinary 15 minutes into a creative explosion with our DIY Leather Feather Earrings project. Perfect for Mother’s Day or as a stylish accessory for yourself, this chic craft is surprisingly easy to make. With minimal materials and clear instructions, you’ll be well on your way to creating a pair of elegant earrings that exude luxury and personal style. The beauty of this project lies in its versatility – simply swap out leather types and colors to create unique and one-of-a-kind treasures that reflect your individuality. Whether you’re looking for a thoughtful gift or a special treat for yourself, this DIY endeavor is sure to bring a touch of sophistication and creativity to your wardrobe.
DIY Leather Tassel Earrings
Transforming ordinary accessories into extraordinary pieces has never been more exciting than with handmade leather tassel earrings. By following Golden Age Beads Blog’s straightforward guide, you’ll embark on a creative journey that yields stylish, one-of-a-kind jewelry. The process begins with basic components like leather strips, jump rings, and earring hooks, which can be manipulated to create either a leather wrap or wire wrap finish. As you progress through the step-by-step instructions, you’ll gain valuable insights into cutting, assembling, and finishing your tassels, allowing you to produce a pair of chic earrings that effortlessly complement any outfit. With clear guidance and a dash of creativity, crafting leather tassel earrings becomes an enjoyable experience that yields a unique accessory that reflects your personal style.
Beautiful DIY Geometric Leather Earrings
Discover the art of crafting geometric leather earrings with Lia Griffith’s step-by-step tutorial. This DIY project is perfect for accessorizing with unique creations or gifting thoughtful presents to loved ones. To get started, simply gather essential tools and materials like leather, paint, and earring hooks. Then, use hand-cutting techniques or precision cutting with a Cricut Maker to shape your design. For a personalized touch, add vibrant colors by painting the leather and assemble the earrings with ease, following clear instructions. Join Lia Griffith’s crafting community for endless inspiration and access to a wealth of creative projects. This engaging guide makes it easy to keep your crafting skills on point.
Pretty DIY Suede Fringe Earrings
Transforming raw materials into stylish accessories is an art that anyone can master, regardless of their crafting experience. Made in a Day’s comprehensive tutorial makes it easy to create one-of-a-kind suede fringe earrings that blend perfectly with bohemian-inspired necklaces. The process requires just a few essential tools and a dash of creativity, as you cut, paint, and assemble the leather pieces into stunning geometric or peacock-themed earrings. This engaging project is ideal for anyone looking to infuse their jewelry collection with a personal touch, making each piece a reflection of their unique style.
Ten-Minute DIY Leather Teardrop Earrings
In just ten minutes, you can create chic DIY leather earrings that add a personalized touch to your accessory collection. The process is straightforward, requiring only a few simple tools: a Sizzix Bigshot Plus, magnetic die set, leather punch, earring wires, and some basic crafting supplies. Start by cutting the leather into teardrop shapes, then punch holes for the wires and attach them. With a wide range of leather colors available, you can craft a pair to match every outfit. These lightweight and stylish earrings are perfect for adding a touch of elegance to your jewelry rotation. Let your creativity shine with this fun and easy DIY project.
DIY Snowflake Faux Leather Earrings
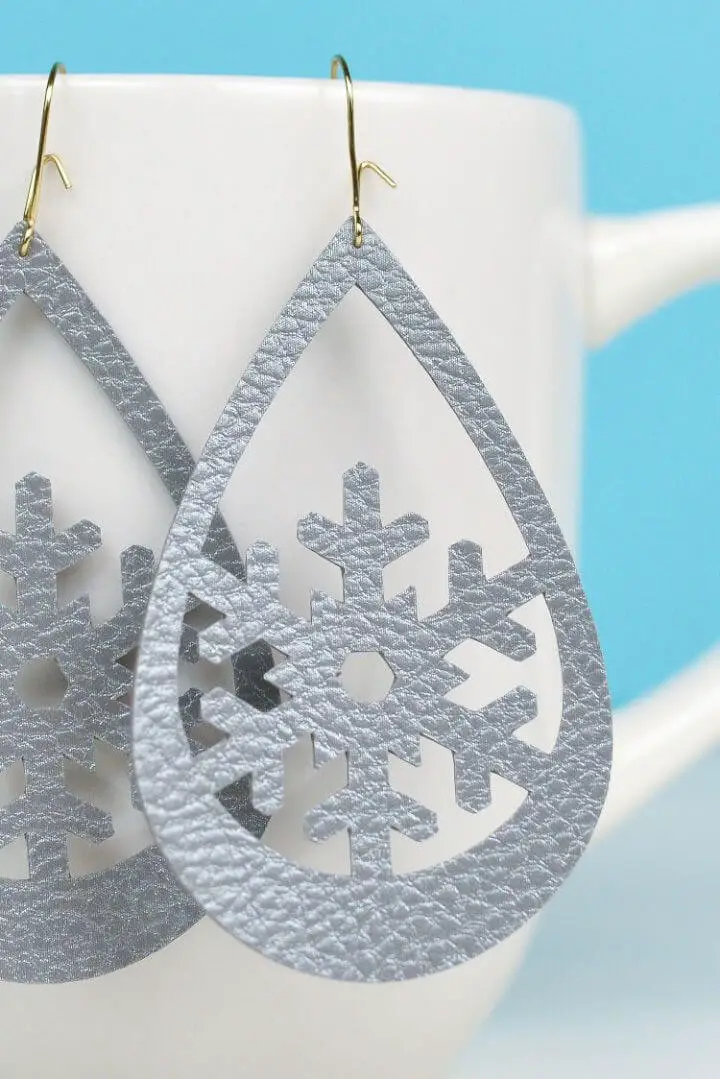
With the holiday season just around the corner, it’s the perfect time to get creative with your Cricut machine and make charming snowflake faux leather earrings. These understated yet tasteful accessories are a great way to add a touch of elegance to your winter wardrobe without going overboard on flashiness. Our step-by-step guide at Hey, Let’s Make Stuff shows you how to craft these lightweight earrings using faux leather and a few simple tools. The best part? This project is quick and easy, taking less than 10 minutes to complete from start to finish. Simply download the free SVG file, follow our instructions to cut, punch, and assemble, and you’ll be rocking your new festive accessory in no time. We’ve also included helpful tips along the way, such as using a Strong Grip mat for precision cutting, to ensure that your crafting experience is both enjoyable and accessible.
Conclusion:
With the skills learned from this comprehensive guide on 25 DIY leather earring ideas, you’ll unlock a realm of self-expression and creativity. The Cricut Maker is just one of the many tools at your disposal to bring your unique vision to life. From sourcing the ideal leather to attaching the final touches with earring hooks, you now possess the expertise to craft stunning, handmade accessories that reflect your personal style. Whether you’re looking to elevate your own wardrobe or gift someone special, your handcrafted leather earrings are sure to leave a lasting impression. As you embark on this creative journey, remember that experimentation and practice are key to refining your skills, so don’t be afraid to get creative and push the boundaries of what’s possible.
