Creating paper hats can be a delightful experience that brings people of all ages together! Whether you’re preparing for a party, a theatrical performance, or simply seeking a fun and creative outlet at home, mastering the art of making paper hats in no time is an invaluable skill to possess. With this comprehensive guide, we’ll take you on a journey to explore classic designs, unique creations, and even provide valuable tips to overcome common obstacles. From novice crafters to seasoned experts, our straightforward approach will empower you to produce remarkable paper hats that stand out from the crowd. So, are you ready to embark on an exciting adventure in paper hat-making? Read on to discover simple yet innovative ideas that will elevate your crafting abilities.
How to Make a Paper Hat – Step by Step Guide
Embarking on a delightful adventure, making a paper hat is an uncomplicated and entertaining endeavor suitable for a drizzly afternoon or lively celebration. With this comprehensive guide, you’ll effortlessly create either a timeless classic cap or a stylish cone hat. Let’s dive into the creative process!
Materials Needed
To create a unique and stylish hat, you’ll need to gather a few essential materials. For the classic hat design, start with an 8 by 11-inch piece of paper as your foundation. For a more elaborate cone-shaped hat, construction paper will be necessary. In addition to these papers, you’ll also require a ruler to ensure precise measurements, a compass (for the cone hat) to achieve symmetry, and a pair of scissors for cutting out any shapes or designs. Finally, have a stapler or some strong tape on hand to secure your creation together.
Step-by-Step Guide
To create a paper hat in just a few simple steps, follow along:
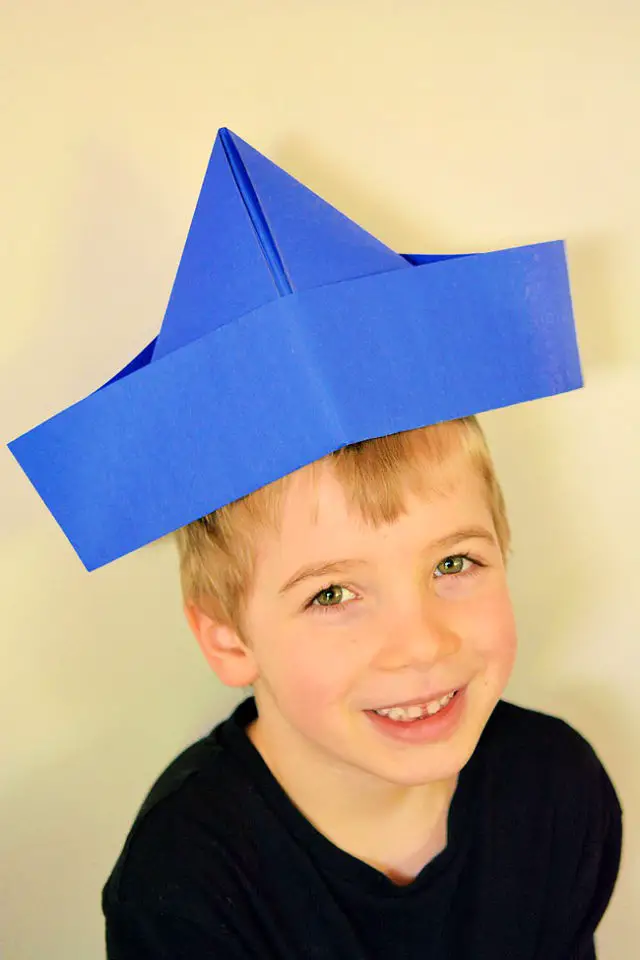
For the classic design, start by taking an 8×11-inch piece of paper and folding it lengthwise, then unfolding it to create an initial crease.
Next, fold the paper in half from top to bottom, creating a foundation for your folds.
Now, take the top left corner and fold it down towards the middle crease, forming a triangle at the top. Repeat this step with the top right corner, ensuring both meet in the middle to form a diamond shape.
Locate the bottom edge of the paper and find the strip below the diamond shape. Fold this upwards to create the brim of your hat, ensuring an even fold across.
Flip the paper over and repeat the process on the other side.
Finally, gently pull apart the bottom edges of the hat to open up the space inside. You can mold it slightly with your hands if needed, and voilà! Your classic paper hat is complete.
Alternatively, you can create a cone-shaped hat by drawing a half-circle on 6-8 inch (15-18 cm) construction paper using a compass. Cut out the shape and bring the straight ends together to form a cone. The amount of overlap will determine the cone’s opening size – more overlap for a tighter fit.
Secure the cone by stapling or taping the ends together at the base, making any necessary adjustments to ensure it fits comfortably on your head.
With either design, you can customize your paper hat further with drawings, stickers, or even paint. This straightforward craft offers endless joy and creativity.
Video Tutorial
To further enhance your learning experience, we’ve created a comprehensive video tutorial on crafting a paper hat. This visual companion to the written guide provides a more immersive and interactive way to grasp each step, making it easier to follow along and retain the information. By combining the written instructions with the visual guidance of the video, you’ll gain a deeper understanding of the process and be able to recreate your own paper hat with greater ease.
Variations and Customizations for Paper Hats
Crafting paper hats offers an excellent opportunity for self-expression and creativity. This engaging activity can be tailored to suit various purposes, such as party decorations, educational projects with children, or simply for personal enjoyment. To elevate the aesthetic appeal of your paper hats, consider incorporating these unique elements:
Styles and Shapes
Step out of your comfort zone and explore new horizons with your paper hat creations! Don’t be afraid to think outside the box (or hat) by experimenting with unconventional shapes, such as a rounded ‘newsboy’ cap style that adds a touch of vintage charm or a wide-brimmed hat that transforms into a stylish sunhat. For added flair, try folding your paper into a samurai helmet shape for an edgy look. The possibilities are endless! Meanwhile, remember that size truly matters. By adjusting the scale of your creation, you can create tiny hats for dolls or pets that add a dash of whimsy or go big with oversized ones that are sure to bring a smile to someone’s face.
Decorations
Transform your hats into vibrant masterpieces by incorporating colors, textures, and personal touches. Start by using colored paper or painting, drawing, or coloring on the hats themselves to add patterns, stripes, polka dots, or even a tie-dye effect. To give your hats some added depth, glue on materials like cotton balls for a soft, fluffy rim or attach pieces of aluminum foil for a metallic finish. Finally, make each hat truly unique by customizing it with the wearer’s name, favorite symbols, or characters using stickers and stencils.
Themes
Transforming Your Hat-Making Experience: Create Unique Occasion-Based and Culturally Inspired Masterpieces!To elevate the excitement of birthday parties, consider designing hats with balloon-inspired details or incorporating the celebrant’s age as a creative element. For holidays, craft hats that reflect the season, such as pumpkins for Halloween or trees for Christmas.Sports enthusiasts can also get in on the action by creating hats that showcase team colors or logos. By tailoring your hat-making to specific occasions, you’ll add an extra layer of fun and memorability to the experience.But why stop there? Draw inspiration from diverse cultures’ traditional headwear, like Japan’s kasa, Mexico’s sombrero, or Egypt’s nemes. Add your own twist by incorporating unique variations and customizations. Let your imagination run wild, and revel in the joy of creation!
Troubleshooting Common Issues
As you embark on the creative journey of crafting paper hats, it’s not uncommon to stumble upon a few obstacles. To ensure a seamless and enjoyable process, here are some common issues and their corresponding solutions.
Hat Doesn’t Fit
When crafting a custom hat, it’s essential to get the fit just right. To achieve this, begin by measuring the head circumference of the individual who will be wearing the final product. This measurement should include an extra inch to account for any overlap where the hat will be secured.
By incorporating adjustable designs into your hat-making process, you can create a more versatile and practical piece. Consider adding features such as tabs and slots that allow for size adjustments or incorporating strings that tie the hat in place. These clever design elements enable the wearer to customize the fit to their liking, ensuring a comfortable and stylish experience.
Hat Loses Shape
To achieve sharp creases in your hat-making endeavors, consider employing a ruler or blunt edge to sharpen your folds. This simple trick will enable the hat to retain its shape with greater ease. Moreover, if you find regular paper lacking in terms of durability, experiment with using cardstock or construction paper instead – these materials are designed to provide added strength and longevity.
Decorations Fall Off
When choosing the right adhesive for your craft project, consider the weight and type of decoration you’re working with. For heavier embellishments, opt for a stronger bond like hot glue or double-sided tape to ensure a secure hold. On the other hand, if you’re working with lighter materials, regular glue might suffice. The key is finding the right balance between adhesion and stability.It’s also important to remember that sometimes less really is more when it comes to decorations. Too many embellishments can overwhelm the design and cause the paper to become heavy or saggy. To avoid this, keep your design simple and balanced by distributing heavier items across multiple layers of paper, or reinforcing areas where you’ll be attaching larger decorations.
Hat Isn’t Standing Out
To add visual appeal to your hat designs, consider juxtaposing contrasting colors or harmonious complementary shades. For instance, pairing a somber black hat with a vibrant red band creates a striking combination that would be lost in a single-color design. This contrast not only catches the eye but also adds an air of sophistication.Another technique to enhance the visual impact is to incorporate layers. By adding multiple layers of paper or different materials, you can create a 3D effect that lends depth and interest to your hat. This textured approach invites the viewer to explore every nook and cranny, making for a more engaging experience.Ultimately, anticipating potential issues and embracing creative experimentation are key to achieving success in paper hat-making. By doing so, you’ll not only produce unique creations but also enjoy the process of bringing them to life.
Sustainability Tips for Paper Hats
To minimize the environmental footprint of your paper hat project, consider the eco-friendliness of your materials and methods from the start. Here’s how: Start by opting for recycled or eco-certified paper – this could be old newspapers, magazines, or scrap paper from previous projects. Then, encourage creativity in reuse by thinking outside the box (or hat, in this case!) about ways to repurpose your finished hats. For instance, a party hat can later become a decorative piece or a playful toy for a pet. When it comes to decorations, choose biodegradable options like leaves, flowers, or eco-friendly glitter to minimize waste. Avoid plastic-based embellishments and adhesives altogether, instead using natural materials like twine or water-based glues. Finally, don’t forget to provide guidance on responsible disposal – whether that means recycling, composting, or simply responsibly disposing of the hats when they’re no longer needed. By incorporating these sustainable practices into your project, you’ll not only have fun making a creative craft but also contribute to a healthier planet.
Historical Context of Paper Hats
Paper hats have been a staple in various cultures for centuries, with their history spanning from ancient times to modern-day celebrations. The tradition of creating intricate paper shapes, including hats, is believed to have originated in ancient China, where paper was used not only for practical purposes but also for ceremonial occasions.
In Europe during the Middle Ages, paper was a precious commodity, and as a result, hats were often crafted from less expensive materials. However, paper hats did make appearances at festive gatherings and celebrations, adding a touch of whimsy to the proceedings.
Fast-forward to modern times, and paper hats have become an integral part of party culture, particularly on New Year’s Eve and birthdays. They serve as a symbol of festivity, providing a fun and disposable accessory for celebrants.
Uncovering the historical context surrounding paper hats can enrich your understanding of this simple yet significant item, ultimately fostering a deeper appreciation among readers.
FAQs About Making Paper Hats
As the creative process of crafting paper hats unfolds, a multitude of inquiries tend to emerge. To provide clarity and alleviate any uncertainty, this section aims to tackle these frequently asked questions with concise and trustworthy responses.
How do I choose the right paper?
When it comes to creating durable and long-lasting party hats, the quality of the paper is crucial. Opting for sturdy cardstock ensures that your hats can withstand the wear and tear of excited revelers. The size of the sheets is also important, as larger ones allow you to create bigger hats that fit comfortably on the wearer’s head. To achieve the perfect fit, simply adjust the size based on the individual’s head size. Finally, consider the occasion and the tone you want to set. For festive celebrations, vibrant colors and playful patterns can add an extra layer of fun to your party hats.
What if my hat doesn’t fit properly?
When it comes to adjusting the size of your hat, start by measuring the head circumference and consider adding an inch to account for any potential overlap. To ensure a comfortable and secure fit, incorporate flexible closures such as string ties or adjustable tabs that can be adjusted to suit individual preferences.
Can I make my paper hat waterproof?
When it comes to reinforcing the integrity of your hat, there are a few creative solutions you can employ. One option is to use wax paper as a base layer, which provides a subtle level of water resistance. Another approach is to cover the entire hat with clear tape, although this may impact its recyclability.
How can I make my paper hat stand out?
To take your hat design to the next level, consider incorporating bold and vibrant colors or patterns. You can also experiment with unique shapes that deviate from traditional designs. Furthermore, adding 3D elements such as layers or pop-up features can give your hats a truly three-dimensional effect, setting them apart from the rest.
How do I keep my hat from falling apart?
To achieve crisp folds in your paper hats, employ a ruler to precisely crease them. Furthermore, choose an appropriate adhesive, such as glue or tape, carefully considering the decoration’s weight. By integrating these FAQs into your content, you’ll offer valuable insights that elevate the reader’s experience and guarantee a seamless and enjoyable paper hat-making process.
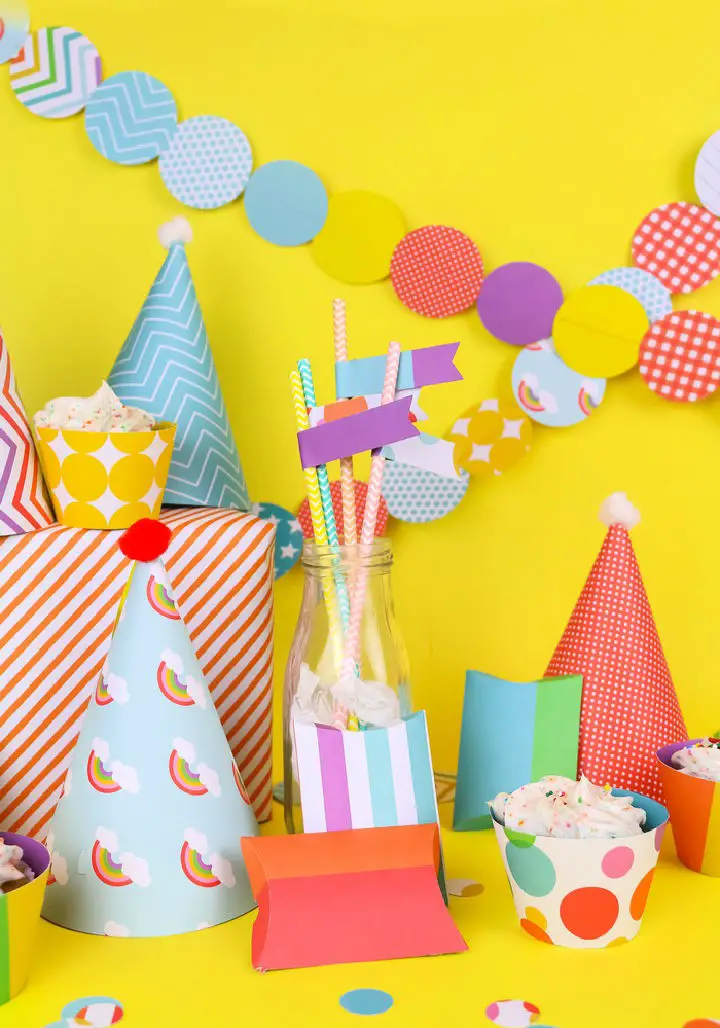
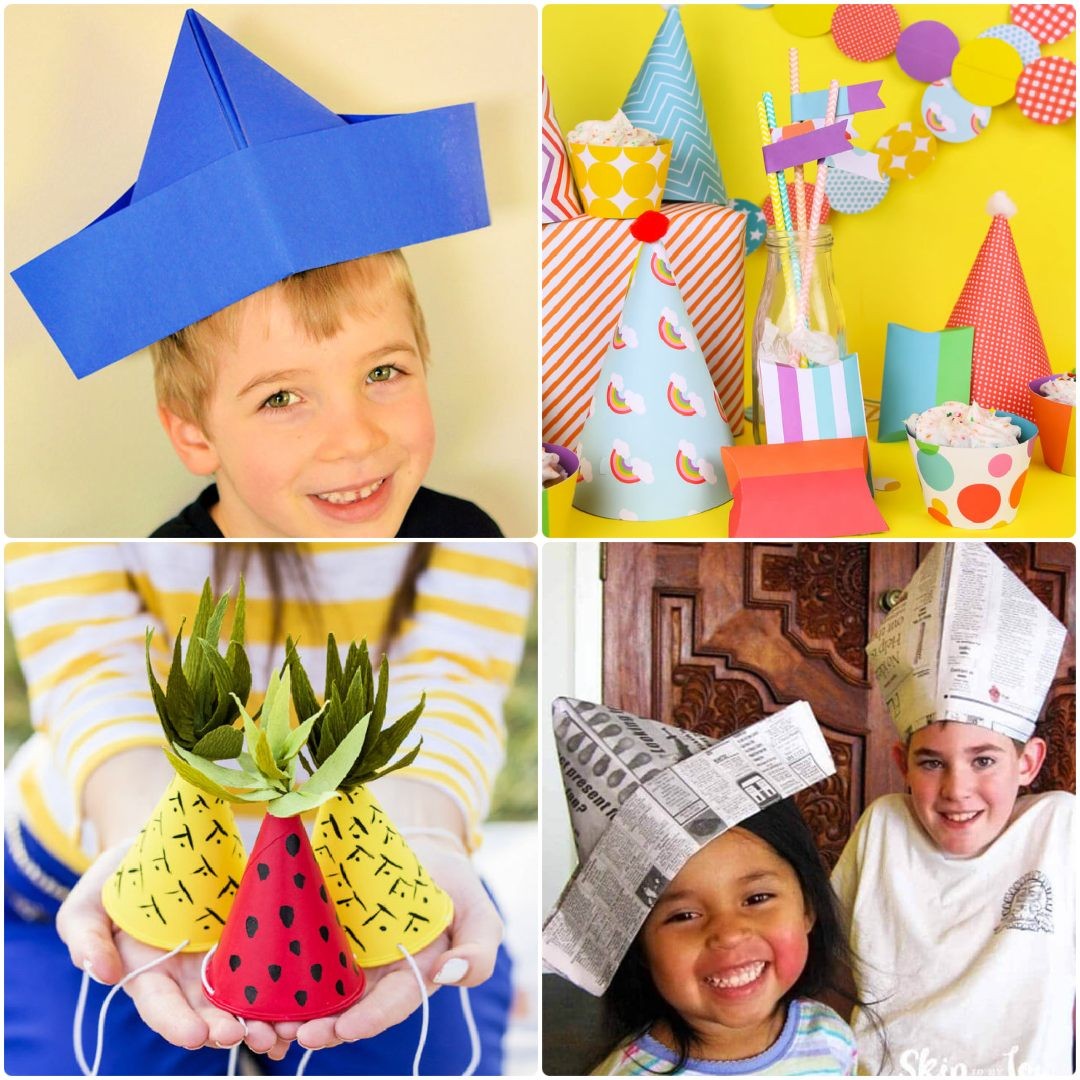
25 Easy Paper Hats to Make for All Ages!
In just a few short minutes, you can create 25 delightful paper hats that will bring joy to people of all ages. Our step-by-step DIY guide makes it easy to get started, even if you’re new to crafting or don’t consider yourself artistic.
How to Make a Paper Hat – Step by Step
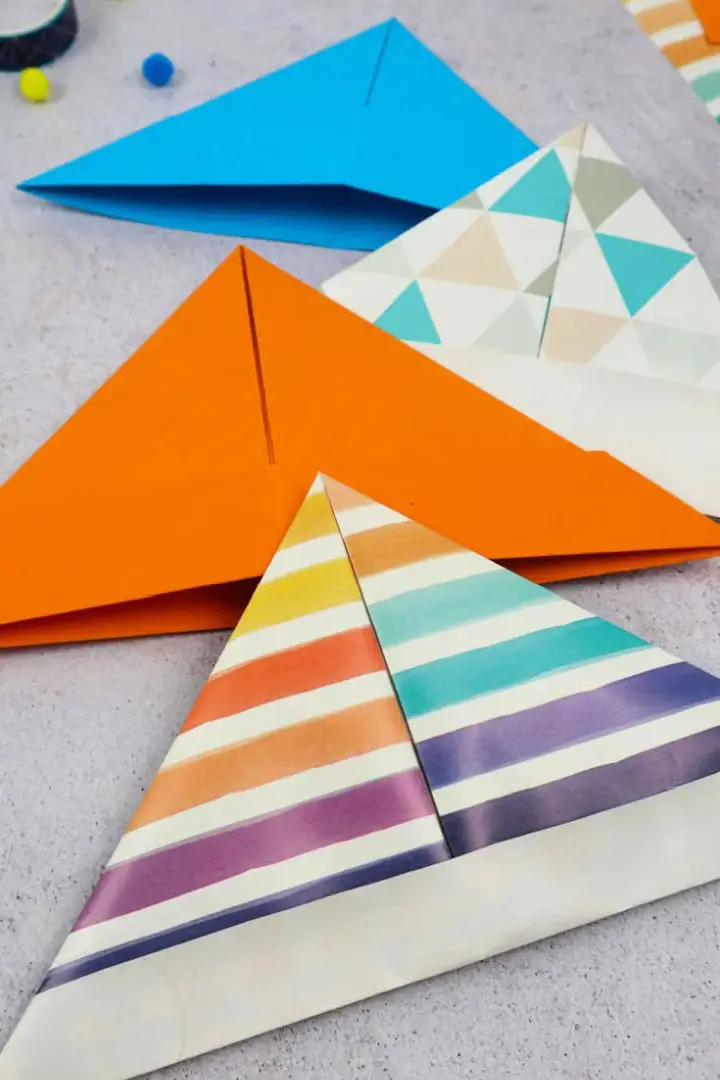
Transform any gathering or playtime into an unforgettable experience by crafting paper hats in just 5 minutes with only two sheets of construction paper. This delightful DIY activity is the perfect way to infuse creativity, fun, and personalization into parties, costumes, or simply a relaxing afternoon. With a straightforward step-by-step guide or video tutorial, you’ll be guided through the process with ease. Add your own flair with vibrant markers, pencil crayons, and stickers to make each hat uniquely yours. Suitable for all ages, this craft is an excellent way to bond with family and friends, or simply let loose and get creative. So why hesitate? Dive into this exciting DIY project today and discover the joy of crafting paper hats.
Make Your Own Origami Pirate Hat
Transform your imagination into a treasure trove of pirate adventures with a DIY origami pirate hat project that’s as easy as it is engaging. Gather just four essential items – a large rectangular piece of craft paper, a pencil, a black marker, and scotch tape – and get ready to unleash the swashbuckler within. This collaborative effort of creativity and playfulness makes for an exceptional summer activity for kids. By following this simple step-by-step guide, you’ll be able to create a stunning Bicorn-style hat perfect for staged sword fights and treasure hunts. With minimal folds and creases, you can transform an ordinary piece of paper into a pivotal part of a pirate costume. So set the anchor loose and get ready to embark on a thrilling escapade with this uncomplicated yet captivating origami pirate hat project!
Mini Fruit-Inspired Party Hats
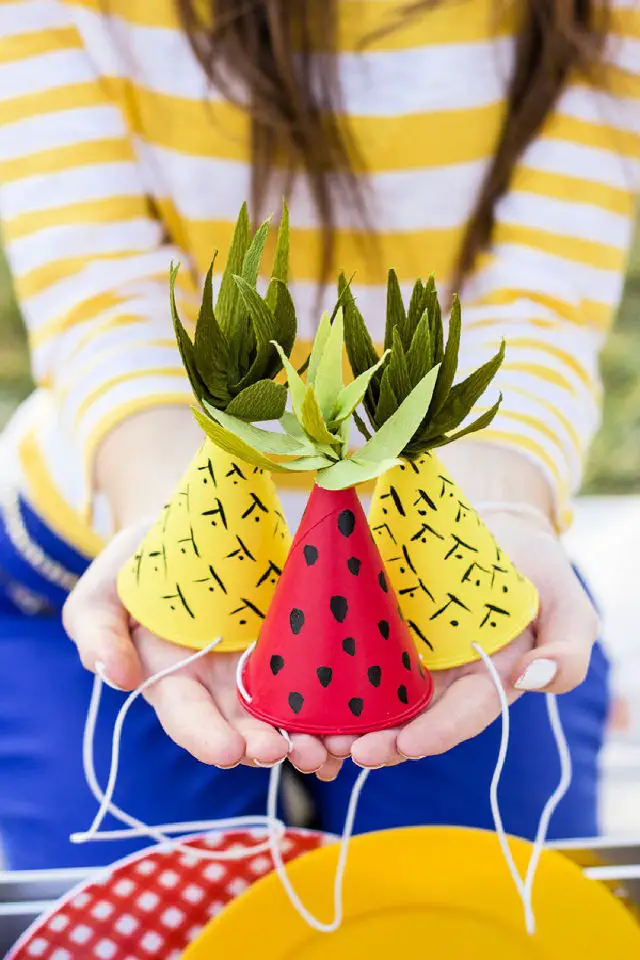
Transform your party with adorable DIY fruit-inspired mini-party hats that are perfect for picnics and fruit-themed birthday celebrations. Using budget-friendly paper cone cups, you can easily craft vibrant strawberry and pineapple hats with craft paint and green crepe paper. The preparation process is a breeze, allowing for hours of fun creativity. Not only do these unique hats add a special touch to your events, but they also serve as fantastic decorative pieces in children’s rooms post-party. Get creative today and bring fruity flair to your celebrations!
Wonderful DIY Paper Hats for Kid’s
Bring back the whimsy of childhood with a delightful DIY endeavor that’s as simple as folding a piece of paper! Create one-of-a-kind paper hats that are perfect for kids’ celebrations, performances, and imaginative play. With just rectangular paper sheets (A4, A3, or A2) and a dash of creativity, these hats can be crafted in no time. Add some flair with craft pompoms, washi tape, letter stickers, and decorative glue to make them truly unique. The best part? Each hat can be customized to the maker’s style, making it an excellent activity for kids to express their creativity. Reconnect with your childhood spirit while fostering imagination and creativity in young minds through this effortless, budget-friendly, and engaging project.
Making a Paper Graduation Cap

Create an extraordinary graduation surprise with this DIY paper craft project. A template download provides the foundation for transforming a standard round box into a one-of-a-kind keepsake, resembling a mortarboard and tassel, in the graduate’s school colors. The result is a charming container perfect for concealing sweet treats or a class ring. Adding an envelope on top offers ample space to stash more substantial gifts, making this personalized creation an ideal way to express your heartfelt congratulations and commemorate this significant milestone.
How to Make a Birthday Party Paper Hat
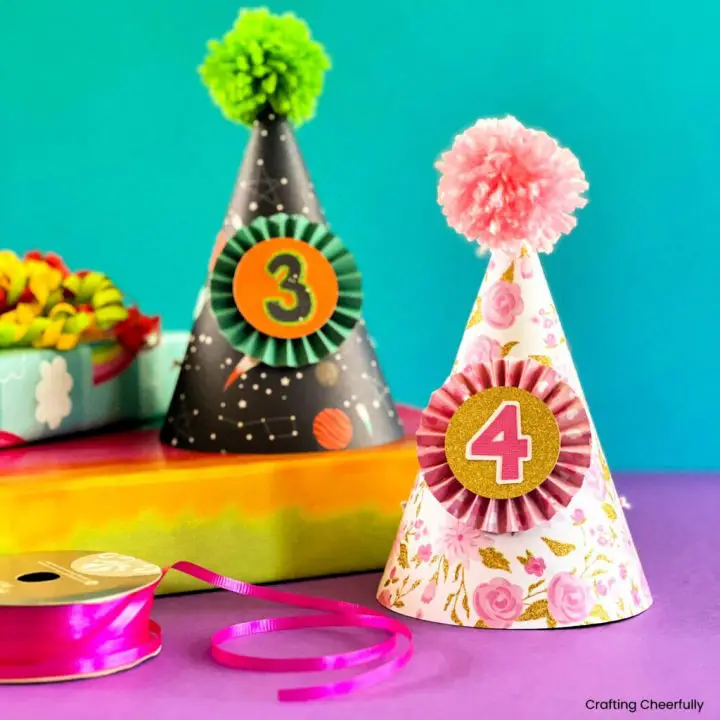
Transform any birthday party into an unforgettable celebration by crafting unique, themed DIY party hats using scrapbook paper and yarn. With endless possibilities for customization, these handmade hats can be tailored to match any theme or occasion. By utilizing a free template and SVG cut file, you’ll be able to create not only a one-of-a-kind hat for the birthday child but also an exclusive keepsake that commemorates their special day. Alternatively, consider making individual hats for each guest to make the party even more memorable. The best part? These DIY hats are surprisingly easy to make and can be completed in no time. Whether you’re planning a whimsical Winnie the Pooh-themed party or a rustic Woodland Animal Party, these customizable party hats will add an extra layer of charm and personality to your celebration.
Make a Pikachu Paper Hat – Free Printable Template
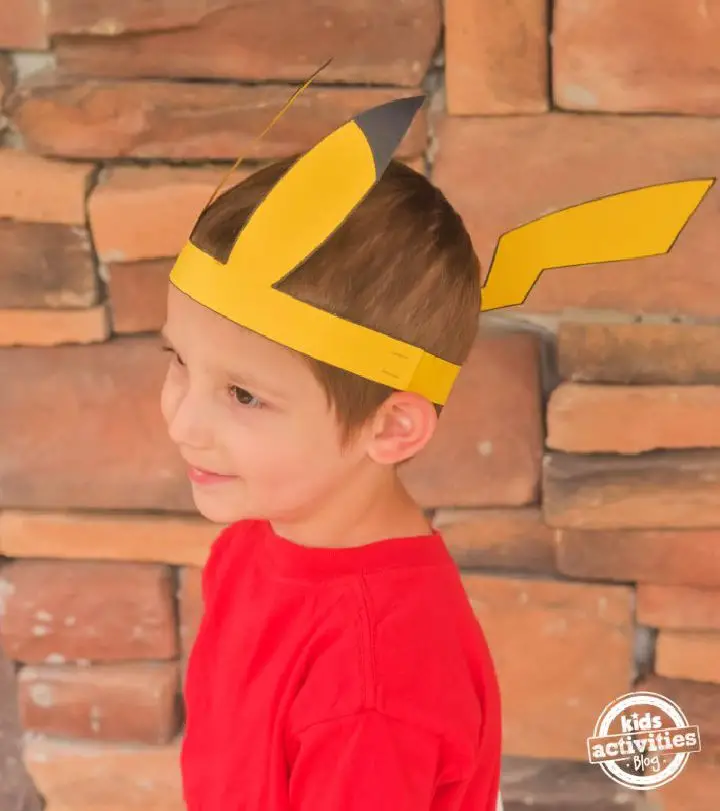
Bring out your inner Pokémon trainer by crafting a DIY Pikachu hat that’s as adorable as it is easy to make. Using simple materials like yellow, black, and brown cardstock, scissors, a stapler, glue, and a Sharpie, you can create this charming accessory in no time. Simply download the Pikachu hat template, or get creative and design your own, then follow our step-by-step guide to bring it to life. The iconic Pikachu ears and lightning-bolt tail add an exciting twist to this project, making it perfect for kids and Pokémon fans alike. Whether you’re looking for a fun activity to do at home or in the classroom, this DIY hat is sure to delight. So why not unleash your ‘pika pika’ spirit and make your own Pikachu hat today?
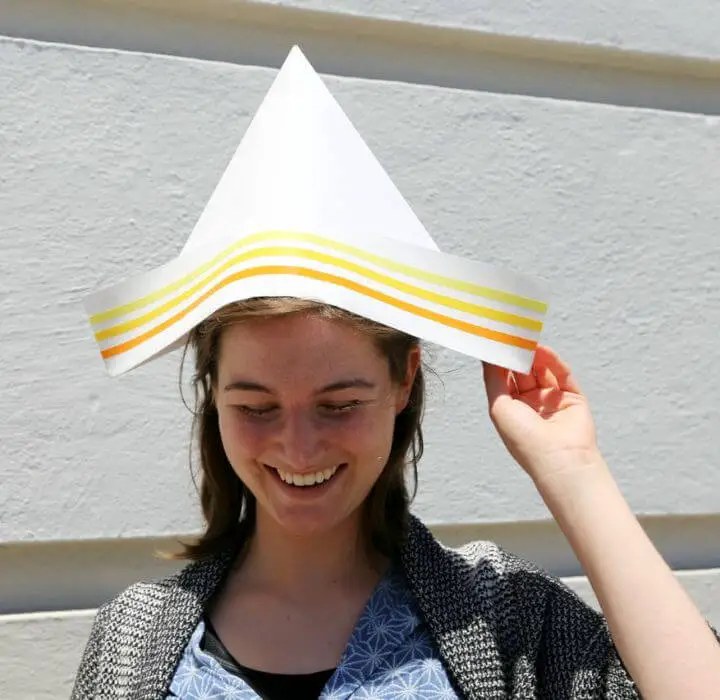
Simple DIY Paper Hat for Columbus Day
This Columbus Day, bring out the creative kid in you (or your little ones) and craft a fun DIY paper hat origami! It’s an effortless way to commemorate this special day while sparking imaginations. You’ll need a decent-sized sheet of paper – 18×24 construction paper or even a newspaper will do. Simply follow these easy folds:
Fold the paper in half, lengthwise.
Make a gentle crease down the middle.
Align the corners to meet at the center.
Fold up the flaps from the bottom.
Once you’ve mastered the folding, your hat is ready to wear! Add some personal flair with markers or feathers and enjoy this delightful activity that’s sure to bring smiles to faces of all ages.
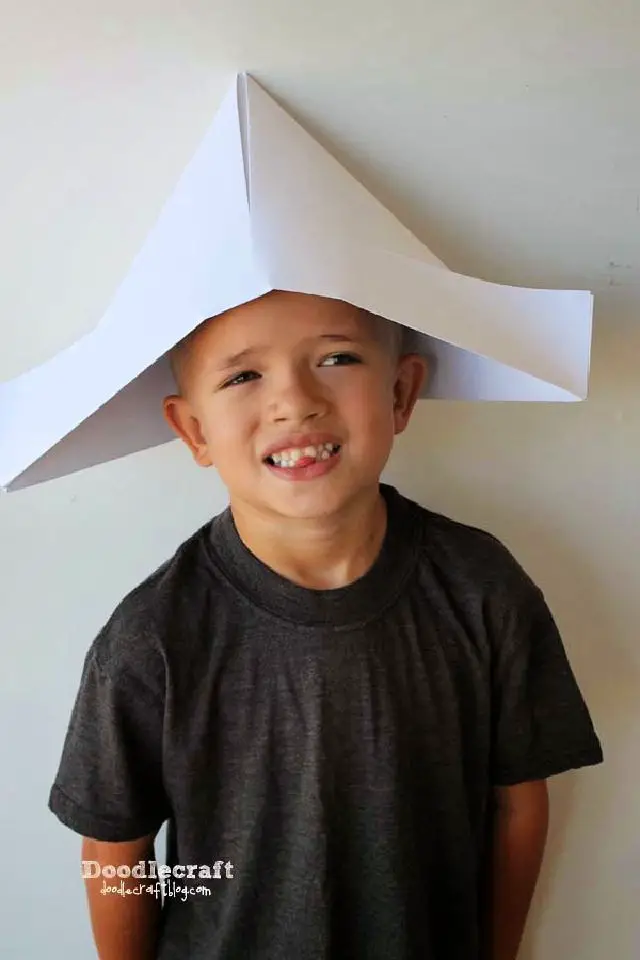
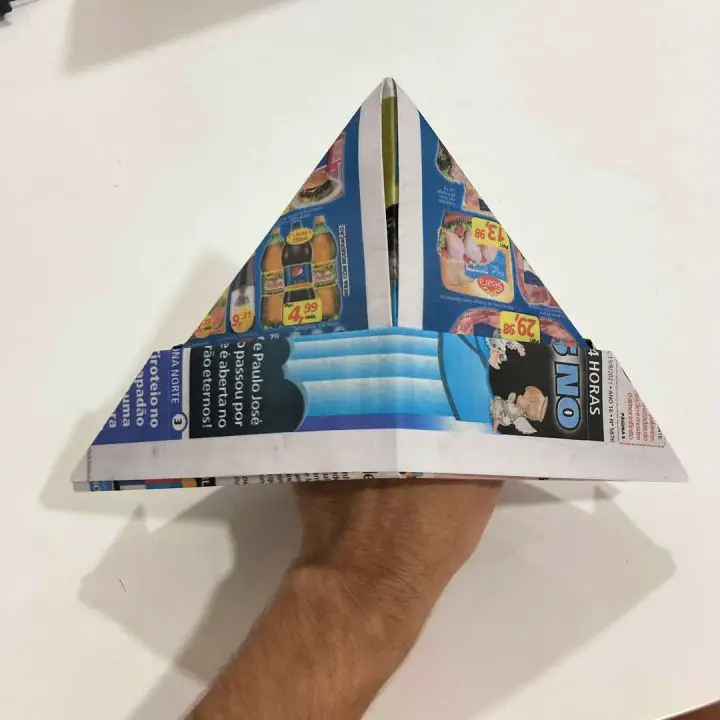
How to Make a Newspaper Hat

Unleash your child’s creativity with the timeless art of newspaper hat-making. This engaging DIY activity can transform ordinary kids into exciting characters – sailors, soldiers, pirates, and more. With a simple sheet of newspaper and a vivid imagination, you can create a classic hat that adds an element of fun to playtime. Just be mindful of the ink, as it may transfer to hands or furniture. To adjust the hat size, simply trim the non-folded edges. This versatile hat can also morph into various objects, such as a fireman’s hat or even a paper boat. For added excitement, tear the sides and top to create a life jacket, adding layers to your imaginative story. Remember, newspapers aren’t just for reading – they can be a source of endless fun with this charming activity.
Cheap DIY Newspaper Party Hat
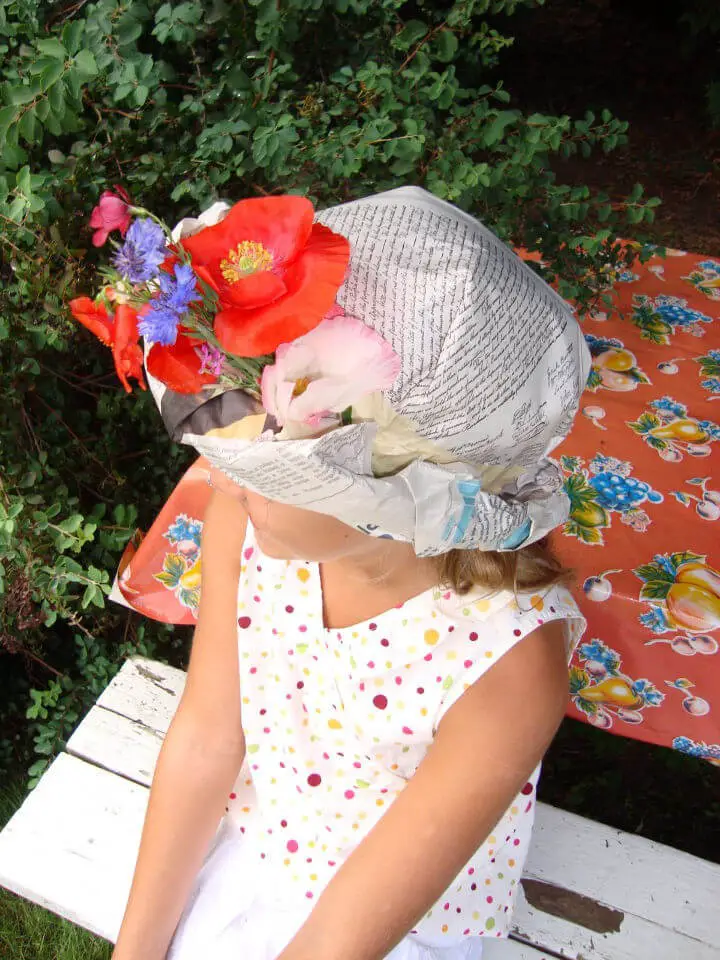
Transform your celebration into an environmentally friendly extravaganza by crafting one-of-a-kind DIY party hats from recycled newspapers! This creative tutorial will guide you through a simple process to create unique headpieces using just three essential materials: newspaper, masking tape, and flowers. By molding a few sheets of newspaper around your head and securing it with tape, you can customize your hat to fit your personal style. Add a pop of color by incorporating fresh or paper flowers for an extra touch of vibrancy. Not only will these hats provide endless fun as a party activity, but they’ll also promote recycling and composting – two crucial values that align perfectly with the principles of sustainability. As you enjoy the festivities, rest assured that your creative masterpiece can be disposed of responsibly after the event, making this eco-friendly project an absolute delight for all involved.
Making a Paper Hat With Written Instructions
With minimal materials required, this DIY paper hat project is an accessible and enjoyable activity for all ages. Begin by selecting a large piece of paper – 18” x 24” for an adult-sized hat or 15” x 20” for a kid-sized one. Newspaper or wrapping paper can be used as alternatives, although it’s worth noting that newsprint ink may affect the final product. Once you’ve cut your paper to size, follow a straightforward six-step process involving folding, creating the brim, customizing with designs, and finally wearing your creation with pride. Unleash your creativity by decorating with paint, markers, stamps, or washi tape – the possibilities are endless. This unique hat is not only fun to make but also adds a touch of individuality and flair to any outfit. So why wait? Start crafting your own hip paper hat today!
Perfect Paper Hat for Parties

Add an unforgettable twist to your celebration by crafting a one-of-a-kind DIY hat that will undoubtedly be a showstopper! This delightful project is ideal for New Year’s Eve or any other festive gathering, providing endless hours of fun and entertainment for both kids and adults. As the party atmosphere reaches new heights, you can create a sailor, pirate, or bishop-inspired hat using just a simple newspaper fold – a technique that requires no prior expertise. By embracing this creative activity, you’ll not only alleviate boredom but also infuse your party costumes with a unique touch. Feel free to experiment and customize the design to fit your personal style, making it an unforgettable addition to your celebration. With this DIY project, get ready to ignite joy and excitement at your next gathering!
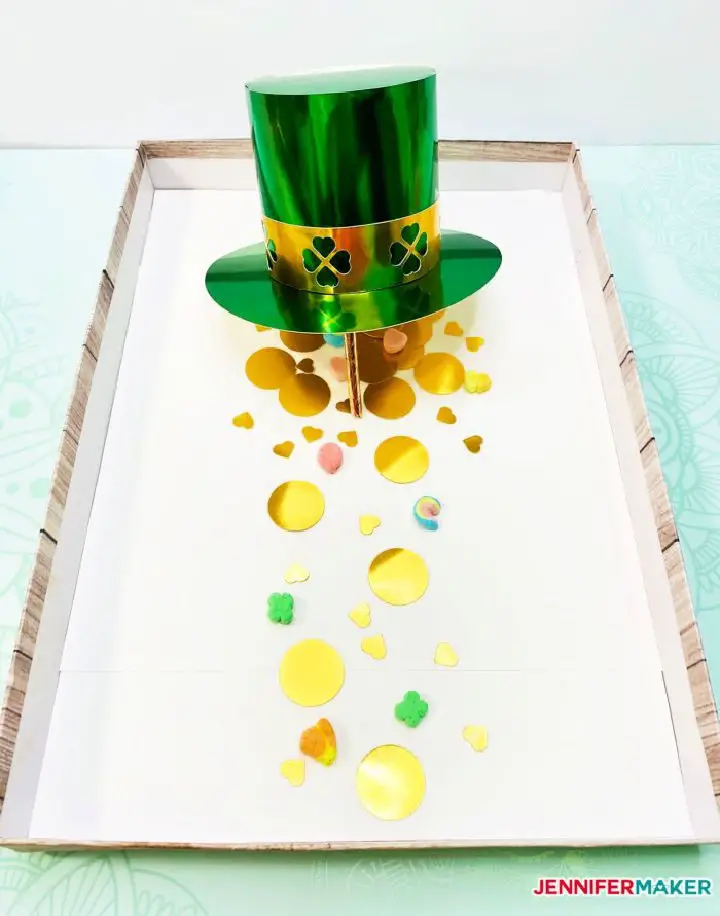
Cool DIY Paper Leprechaun Hat
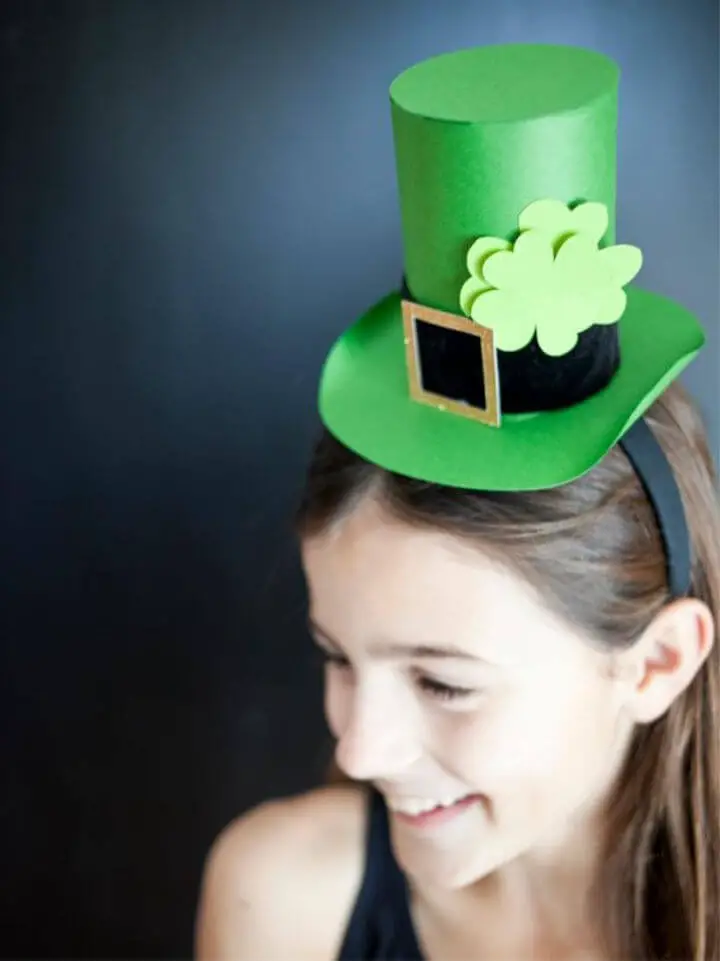
Celebrate St. Patrick’s Day with a touch of whimsy by crafting your own leprechaun hat. With just a few simple materials, including green card stock, a 3-inch hole punch, and a headband, you can create a one-of-a-kind DIY accessory that’s sure to bring a smile. Start by downloading the hat pattern and cutting out the pieces. Assemble the hat using your crafting skills, then add some flair with a wide black ribbon and a square-shaped gold paper buckle. Attach the finished hat to a plain headband, and you’ll be ready to rock your festive look! This fun project is the perfect way to get into the St. Patrick’s Day spirit and showcase your creativity.
Quick and Easy Tissue Paper Chef Hat
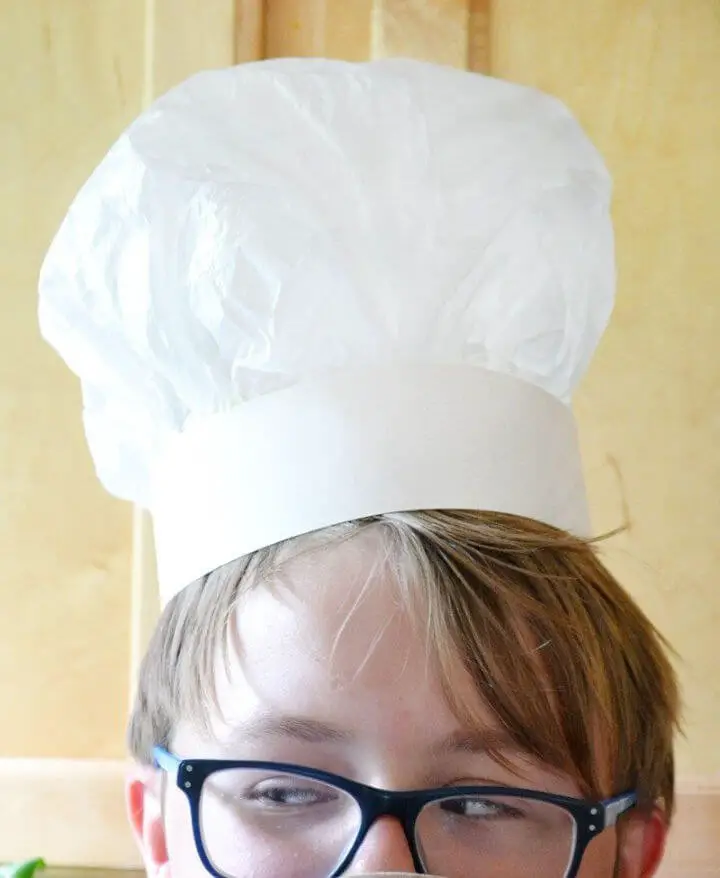
Take your little chefs on a creative culinary adventure while fostering a healthy relationship with food by crafting this DIY chef hat using readily available materials like tissue paper, copy paper, and tape. This fun and cost-effective project is perfect for budding cooks of all ages. Start by measuring the child’s head circumference using card stock, then pleat and attach tissue paper to create a comfortable fit. The step-by-step instructions make it easy and exciting for kids to follow along. This chef hat is a great addition to their pretend play kitchen set or cooking adventures, encouraging creativity and a love of making in the kitchen.
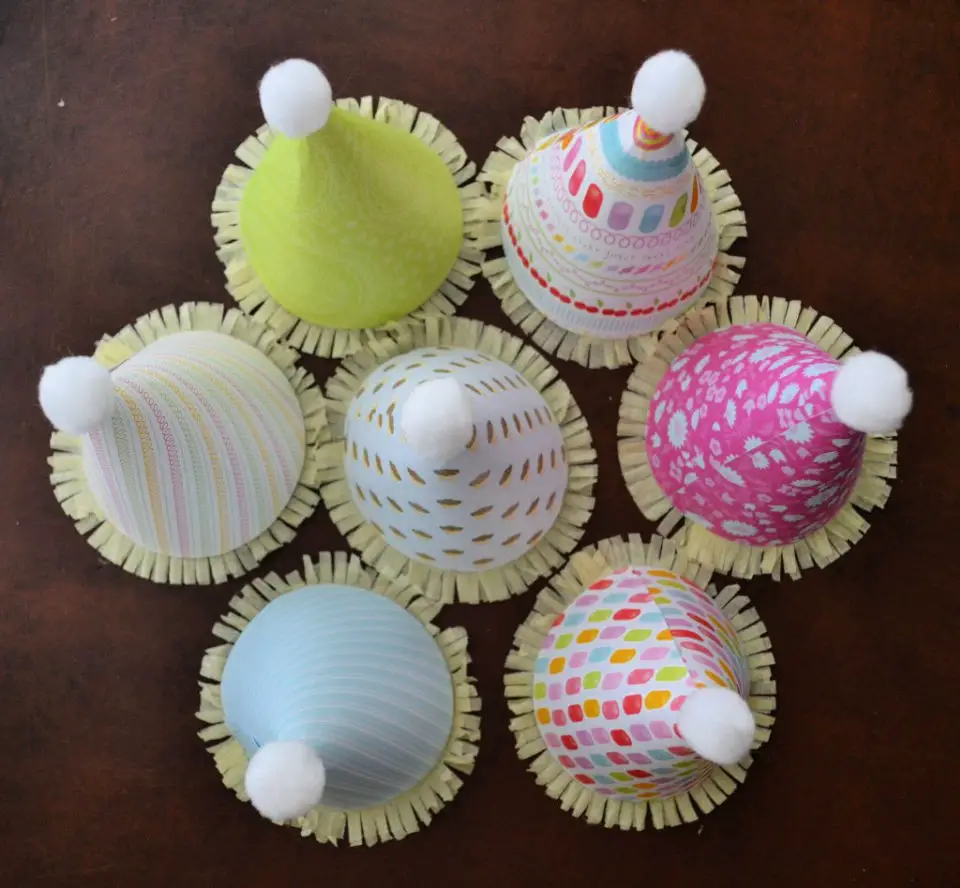
How to Make a Paper Hat for Kids
Transform your child’s free time into an enriching experience by guiding them through the process of creating a visually striking chart paper hat. This engaging DIY project not only encourages creativity but also hones their fine motor skills. To get started, gather a few essential materials: chart papers in various colors, glue, scissors, and a pencil. The creative journey begins with drawing and cutting out circular shapes of distinct diameters from the chart paper, followed by the creation of fringes and strategic gluing. For an added touch of elegance, wrap a colorful band around the hat to complete it. This interactive activity is perfect for making your child’s leisure time not only enjoyable but also productive.
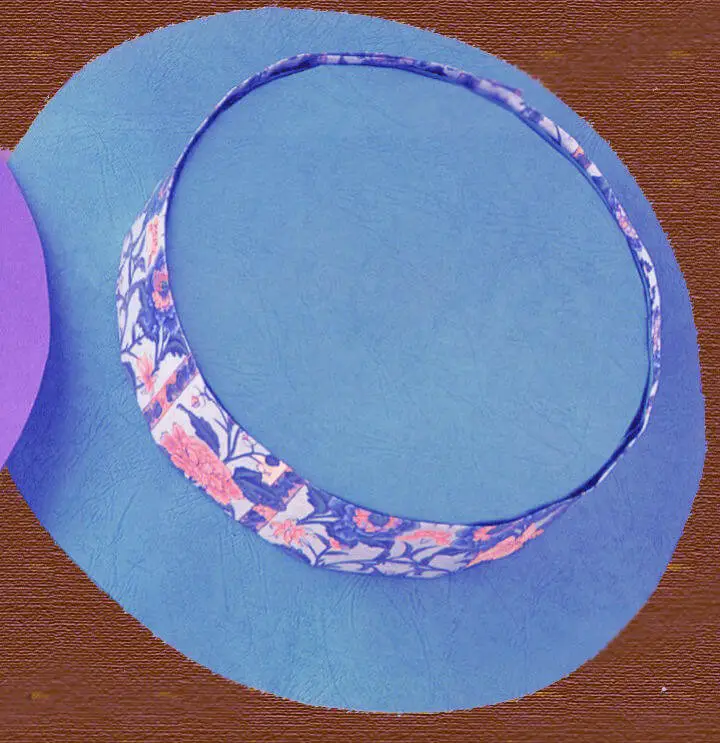
Pretty DIY Paper Party Top Hat
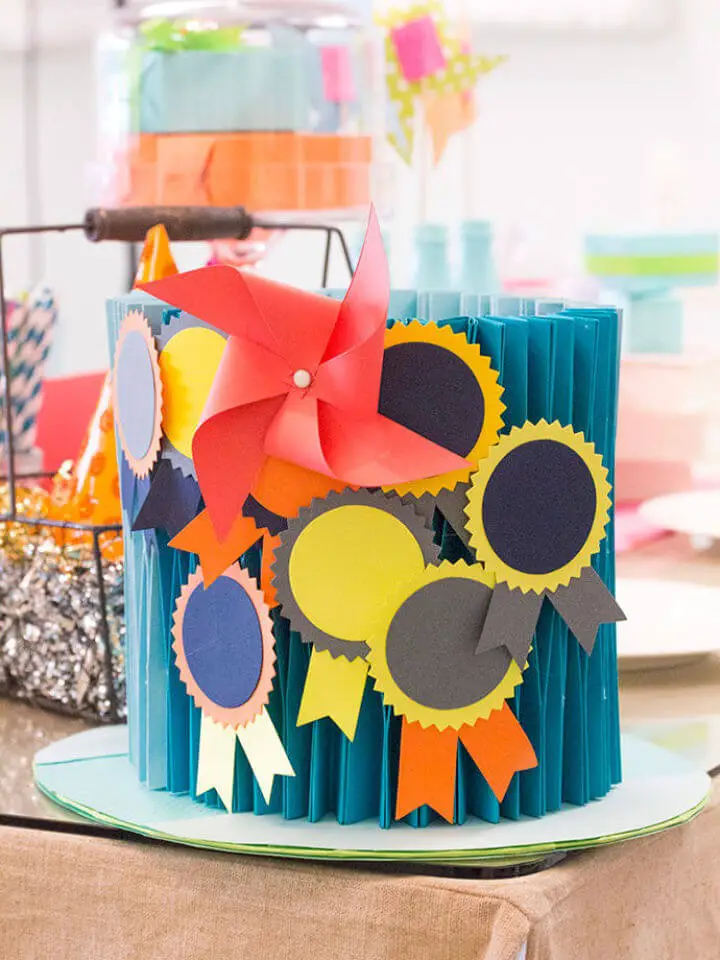
Discover the thrill of crafting with our step-by-step guide to creating an exquisite paper-smocked top hat. With the Sizzix Big Shot Plus, precision cutting is effortless, allowing you to effortlessly work through multiple sheets of scrapbooking paper or cardstock to achieve perfect shapes every time. Additional essential materials include a hot glue gun, spray adhesive, and scrap cardboard, which simplify the process further. To guarantee project success, we’ve included a step-by-step video tutorial and downloadable template. This stunning top hat is sure to be the showstopper at any gathering, providing a creative outlet for your artistic side. So, gather your materials and start crafting this masterpiece today!
Make Paper Flower Party Hats
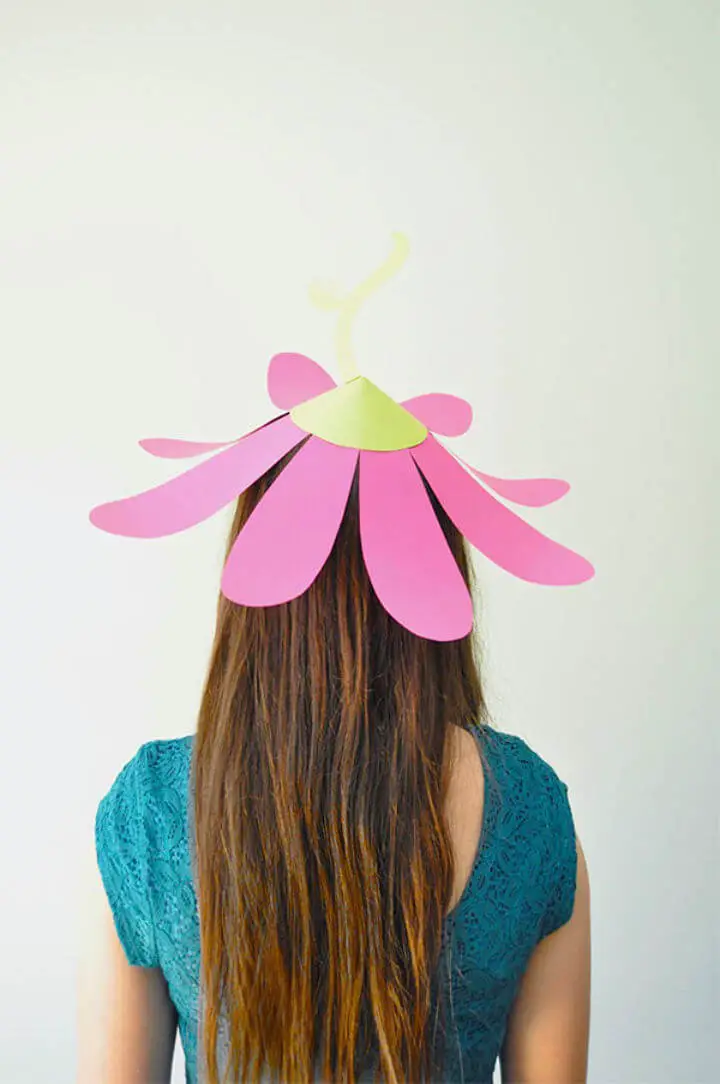
Bring the vibrant spirit of spring into your gathering by hosting an unforgettable ‘April Showers Bring May Flowers’ themed celebration. This unique DIY project will have your guests radiating joy like a burst of colorful blooms, making for one-of-a-kind photo memories.To create these stunning paper flower hats, you’ll need green and petal-colored cardstock, a pencil, scissors, a hot glue gun, an elastic cord, and optional washi tape. Start by crafting the hat base using a 5-inch circle of green cardstock, adding delicate stem, leaf, and petal details that will transport your guests to a sunny spring day.Finish the look with a realistic touch by gently curling the petals upwards, then secure the hat with an adjustable elastic cord for a comfortable fit. With these DIY hats, you’ll be able to create as many unique masterpieces as needed, bringing your springtime party to life and creating memories that will blossom like a beautiful flower.
Uncle Sam’s Paper Hat With Cricut
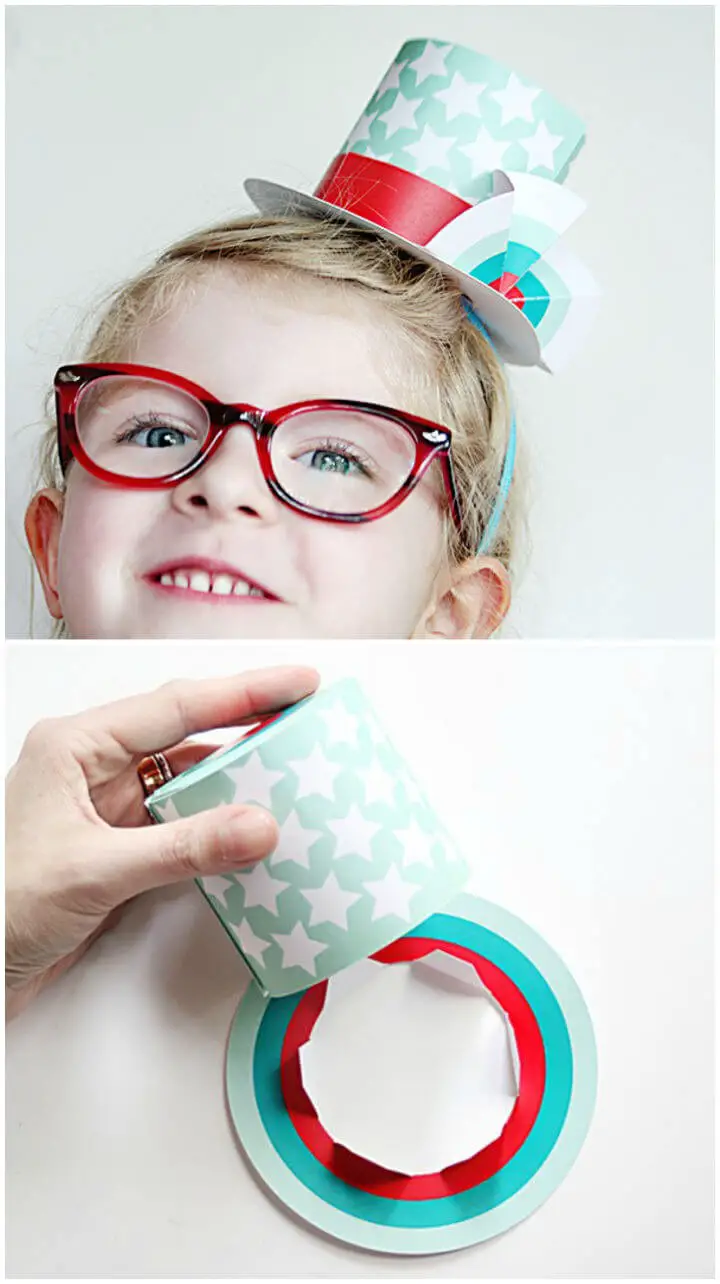
Embark on a delightful adventure with this DIY mini top hat project, bringing a playful touch to your 4th of July celebrations. Inspired by Uncle Sam’s iconic style, these dapper hats feature mini bunting, offering a fashion statement that appeals to all ages. Craft multiple pieces for friends or assemble them at your Independence Day party as a group activity. This project requires the Cricut Explore machine, Cricut Design Space software, and basic crafting materials like cardstock, glue, and a headband or accessory to attach to the hat. By creating these patriotic hats, you’ll not only be making wearable art but also memories that will last a lifetime. It’s about more than just crafting – it’s about sharing joy through creative expression.
Mini Paper Flower Party Hats
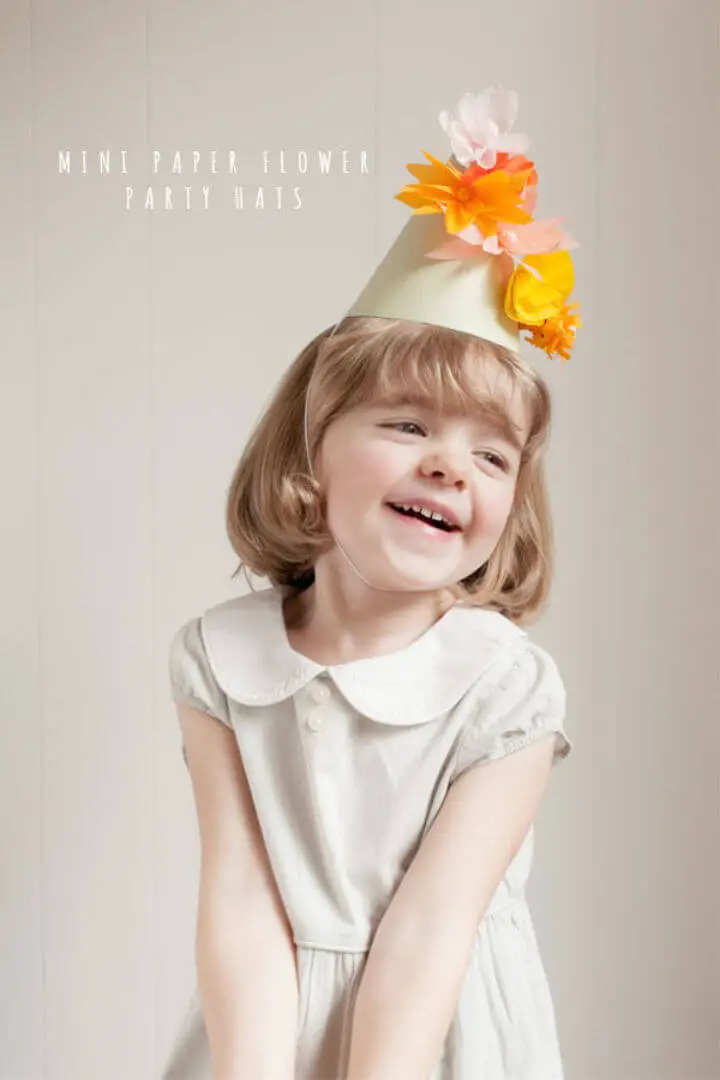
Elevate your party decor with a creative DIY project that’s sure to impress – paper flower party hats! These vibrant and festive headpieces are perfect for springtime gatherings and can be tailored to fit any theme. To create these stunning hats, you’ll need just a few basic materials: a party hat template, colored and crepe paper, jewelry wire, elastic, scissors, an X-Acto knife, and tape. By following the simple step-by-step instructions, you’ll be able to assemble the hat and attach beautiful crepe paper flowers using the jewelry wire. The best part? You can customize the color and design of the hats to match your party’s theme, ensuring a unique and personalized celebration. With their striking appearance and the joy of handcrafting, these paper flower party hats are sure to be a hit at your next event.
Awesome DIY Paper Hat for Party
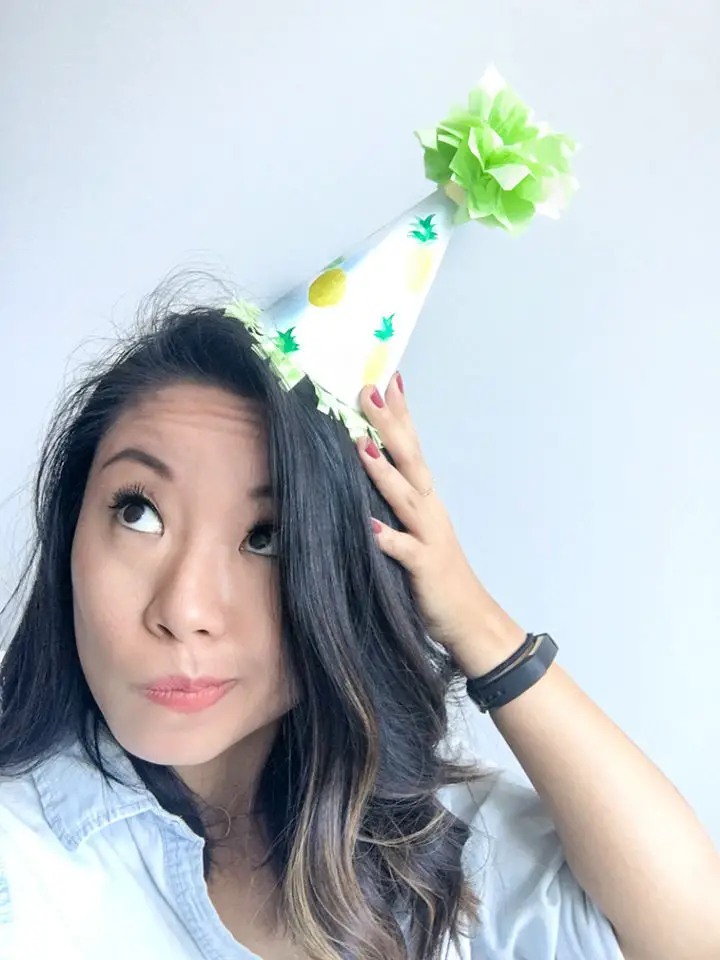
Transform any celebration into a vibrant fiesta by crafting your own DIY paper hats! With just a few simple materials – colored or patterned cardstock, a template, scissors, a Xacto knife, and some string or ribbon – you can create an array of delightful hats without needing glue or tape. This step-by-step guide takes the guesswork out of crafting, allowing you to quickly turn plain cardstock into a stunning hat that perfectly matches your party theme. Take it to the next level by adding decorative flourishes like tissue paper pompoms or fringe, giving your hat an extra touch of whimsy and flair. The best part? These handmade hats are a unique way to express yourself and share in the joy with friends and loved ones.
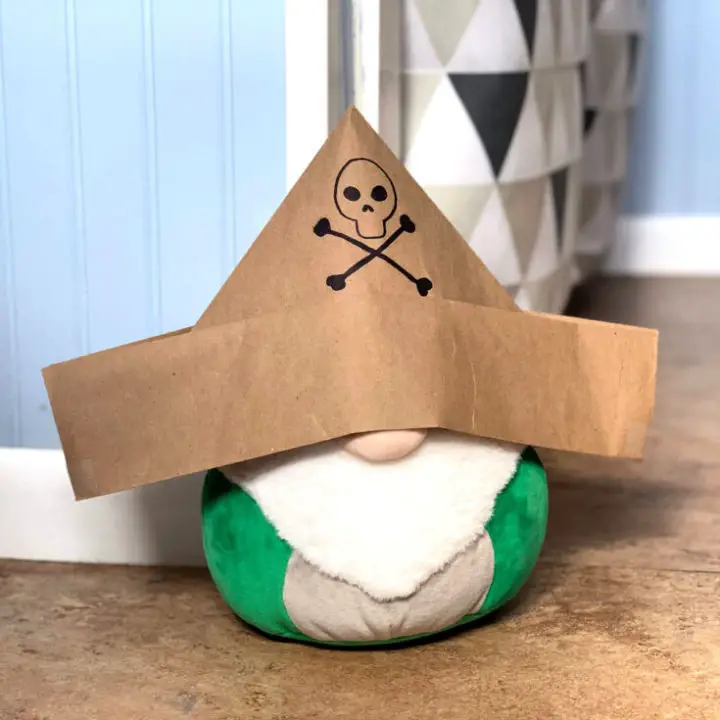
How to Make a Pirate Paper Hat
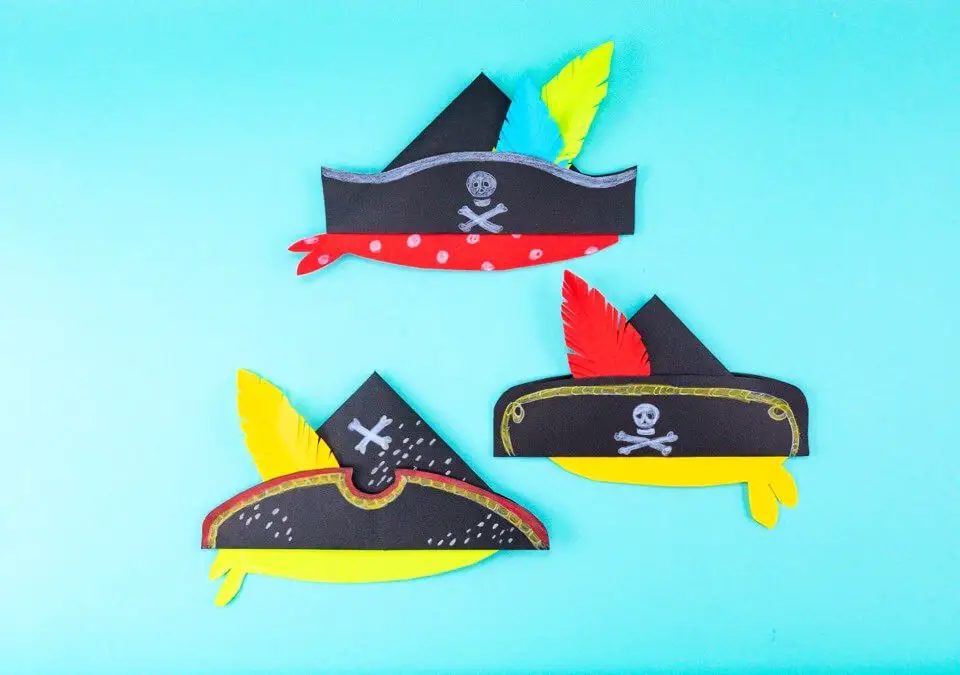
Get ready to set sail on a creative adventure with this DIY pirate paper hat project. To create your treasure, gather two sheets of black construction paper, colorful paper for feathers, pencil crayons, a glue stick, scissors, and tape. As you embark on this artistic journey, be prepared to tap into your imagination, folding, trimming, and decorating your hat with beautiful features that make it uniquely yours. Give your hat an authentic pirate feel by drawing a skull or fancy gold trim using pencil crayons. Add some extra flair by crafting feathers from construction paper and attaching them to the hat’s brim. Finally, secure your masterpiece on your little pirate’s head with a bandana and a piece of yarn. This project is not just about crafting – it’s an invitation to make a world of pirate adventures come alive!
Make Your Own Paper Party Hat
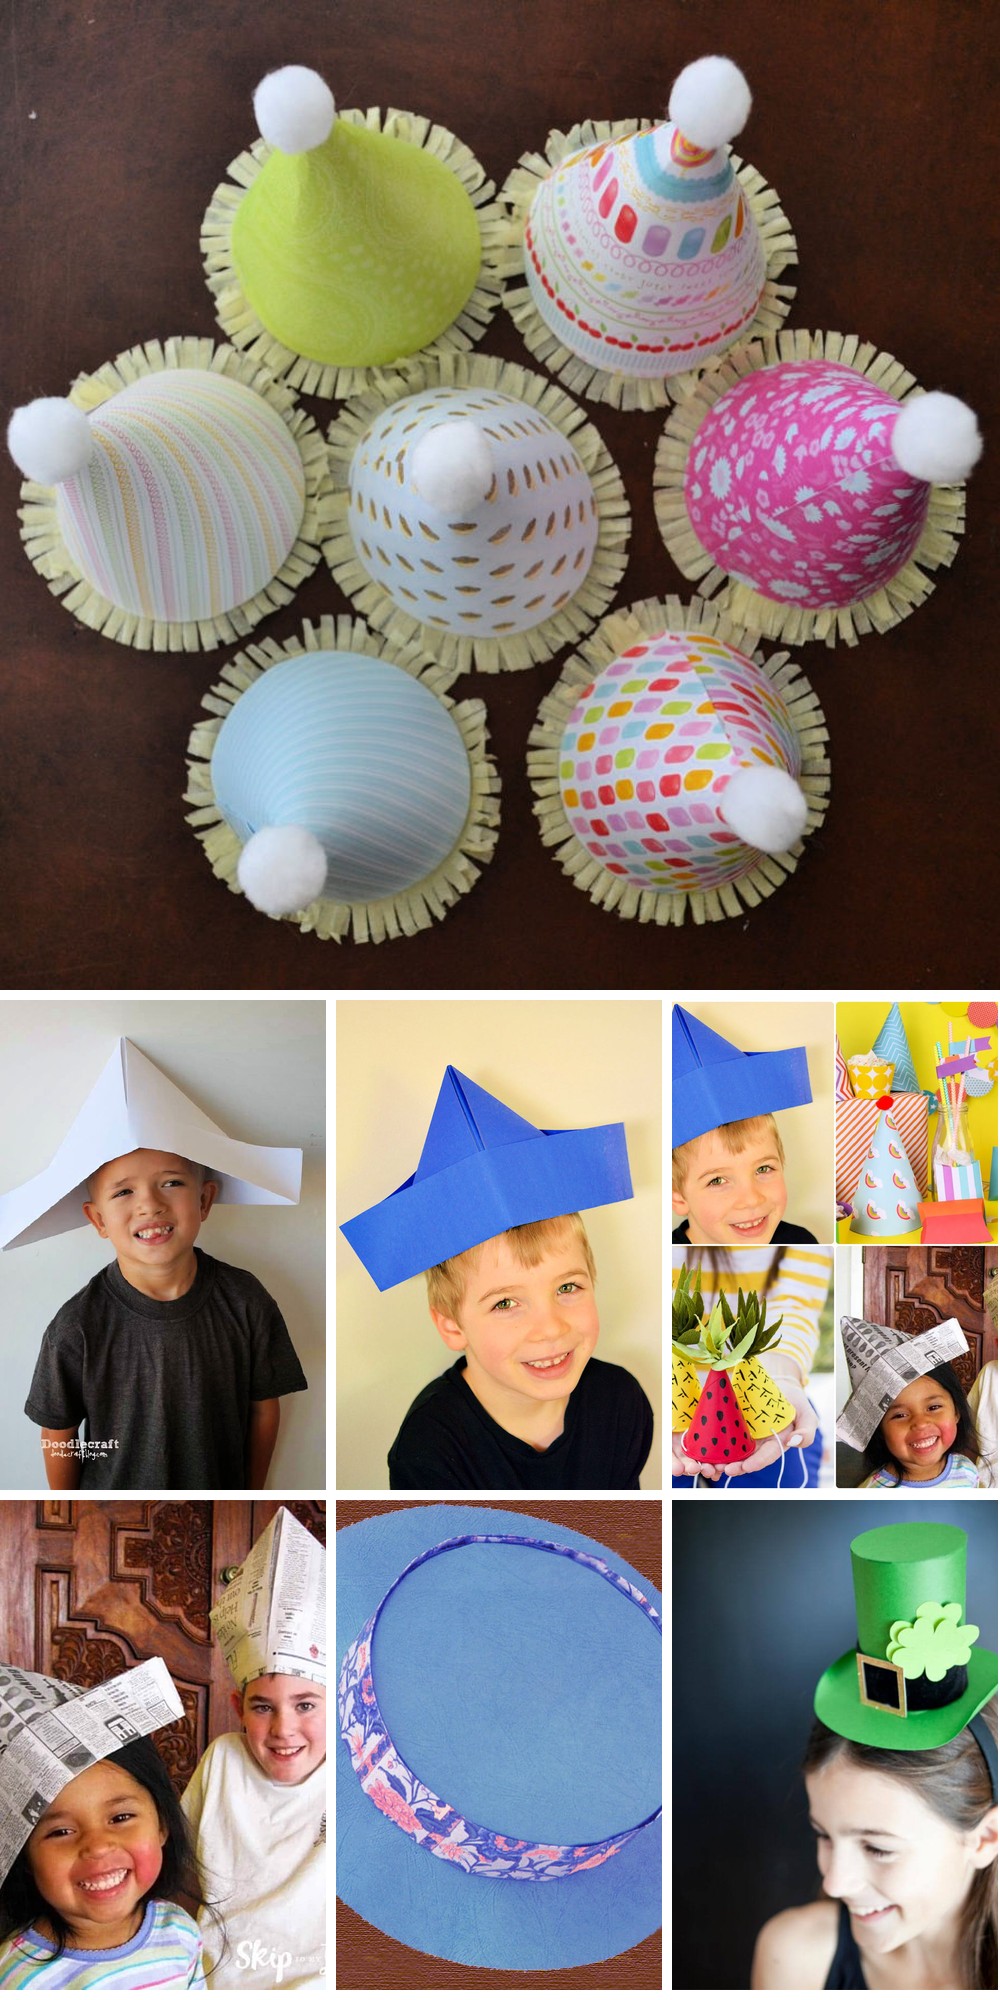
Transforming ordinary gatherings into unforgettable celebrations is just a scrapbook paper away. By combining 12×12 cardstock, fringed crepe paper, pompoms, elastic cording, and hot glue, you can craft DIY party hats that surpass store-bought alternatives in terms of customization and flair. With minimal tools like staplers, scissors, and sewing machines required, this project embodies the essence of effortless creativity. As you work through this fun-filled preparation, you’ll be amazed at how a regular crafting session can lead to a vibrant, memorable party atmosphere that promises to turn heads and spread joy.
Handmade Paper Hat and Leprechaun Trap
Bring the joy of festive crafting and St. Patrick’s Day magic to life with this enchanting DIY project. By following easy-to-follow instructions, you’ll learn how to create a charming mini paper hat fascinator that doubles as a playful leprechaun trap. This whimsical accessory is the perfect way to add a touch of wonder and playfulness to your St. Patrick’s Day celebrations.
Crafted with simplicity using cardstock, tacky glue, and everyday household items, this project offers a wonderful opportunity for quality time with family while honing your craft skills. Whether you’re accessorizing for a festive gathering or setting a whimsical trap for those mischievous leprechauns, this DIY creation is sure to bring smiles and delight to all who see it.
News Paper Hat Craft for Kids
Unleash your child’s creative genius by crafting unique origami hats from recycled newspaper. This fun and eco-friendly DIY project not only sparks imagination but also teaches valuable lessons about reusing materials. With just half a sheet of newspaper and some basic adhesives, kids can develop their origami skills while creating one-of-a-kind paper hats. From classic sailor styles to bold pirate designs, the possibilities are endless. Add a pop of color or pattern with different papers, and watch your child’s creativity soar. This activity is perfect for parties, playdates, or a regular day at home, providing hours of fun and artistic exploration.
DIY Paper Party Hats With Cricut
Transform your next celebration into a whimsical wonderland with DIY party hats that blend creativity and sustainability. Ditch store-bought options and unleash your artistic flair by combining scrapbook paper, Cricut machine, and Design Space canvas to create unique, coordinated hats for any occasion. The process is surprisingly effortless, thanks to clear instructions that guide you every step of the way.
Not only do these party hats reduce waste, but they also add a personal touch to your decor. With a single paper pack, you can craft multiple elements, from cupcake wrappers to garlands, elevating your party’s aesthetic and ambiance.
Take it to the next level by topping them off with a colorful pompom and attaching an elastic cord for a comfortable fit. Let your imagination run wild and design hats that perfectly capture your party’s theme. As your guests delight in their customized headgear, you’ll witness the magic of creative party planning on full display.
Conclusion:
Mastering the art of crafting 25 easy paper hats in just 5 minutes for all ages can elevate any occasion with a dash of fun and creativity. By following our comprehensive guide, you’ll learn how to select the perfect materials and customize each hat for unique events, ensuring stunning results that bring joy to everyone involved. If any issues arise during the process, such as fit or durability concerns, our troubleshooting tips will provide expert guidance. What’s more, creating paper hats is not only an entertaining activity but also a sustainable way to add vibrant colors and excitement to your celebrations. Now that you’re equipped with the knowledge and inspiration, it’s time to transform ordinary paper into extraordinary creations that are sure to amaze!
