As you begin your journey in hand embroidery, you’re likely seeking ways to add unique and intricate designs to your clothing or home decor projects. This is where our collection of 30 free embroidery patterns comes in – a treasure trove of inspiration and instruction perfect for beginners just starting out. These carefully curated patterns ensure that newcomers can easily follow along, creating beautiful pieces from the very start.
Embroidery not only provides an outlet for creativity but also gives you a sense of achievement once your finished piece is complete. This guide aims to equip you with everything you need to start your stitching journey, from planning and designing to the final touches – think of it as your roadmap to embroidery mastery.
So, get ready to thread that needle as we delve into the world of free embroidery patterns and designs for beginners. As we explore this step-by-step guide together, we’ll demystify the embroidery process, making it accessible and enjoyable for all – whether you’re a seasoned stitcher or just starting out.
Why Embroidery Is a Worthwhile Hobby
Embroidery, an age-old craft, transcends mere creation of beautiful designs. Its significance extends far beyond the fabric itself. When delving into this timeless art form, you’ll discover a treasure trove of benefits that can positively impact your life. The repetitive motion and concentration required to stitch can quiet the mind, providing a respite from the daily grind. As you become fully immersed in the process, you may find your thoughts unraveling, much like the threads of yarn on your needle. This meditative quality fosters a sense of calm, allowing you to recharge and refocus.Embroidery also invites creative expression, as you weave together colors, textures, and patterns that reflect your unique perspective. Whether you’re following a pattern or charting new territory, this artistic outlet nurtures imagination and innovation. Your dexterity and hand-eye coordination will benefit from mastering various stitches, leading to enhanced fine motor skills and patience.Beyond the personal benefits, embroidery also offers an opportunity for connection and community building. By sharing your creations, tips, and experiences with like-minded individuals, you can forge meaningful relationships that transcend geographical boundaries. This shared passion becomes a bridge between people, fostering friendships and a sense of belonging.As you complete projects and receive feedback from others, you’ll experience the thrill of accomplishment. The tangible result of your labor – a beautiful piece of embroidered art – serves as a testament to your creativity, perseverance, and skill. These feelings of pride and satisfaction will resonate long after the project is finished, inspiring motivation and driving you to continue exploring the world of embroidery.
Before You Start: Essential Tools and Supplies
When it comes to starting embroidery, having the right tools and supplies is essential for a seamless and enjoyable experience. To ensure you’re well-equipped for your stitching journey, I’ve curated a list of must-have items and helpful extras that will take your embroidery endeavors to the next level.
The foundation of any successful embroidery project lies in the right equipment. Begin with the basics:
A sturdy embroidery hoop is a must-have, as it keeps your fabric taut while you work, allowing for even stitches. Choose one that fits your project’s size and scope.
Next, stock up on embroidery needles – also known as crewel needles – which boast a larger eye than regular sewing needles, making threading embroidery floss a breeze. Having a variety of sizes at hand is always beneficial.
When it comes to fabric, start simple with cotton or linen. These materials are easy to work with and perfect for beginners.
Threads are the lifeblood of any embroidery project, and high-quality threads like DMC and Anchor are highly recommended for their exceptional color palette and durability.
Lastly, a water-soluble marker is an essential tool for transferring your pattern onto the fabric. The markings can be easily removed with water once your embroidery is complete.
Beyond these must-haves, there are several helpful extras that can enhance your embroidery experience:
A good pair of embroidery scissors is crucial for snipping thread cleanly. Look for ones with a sharp point for precision and accuracy.
If threading needles proves to be a challenge, consider investing in a threader – it can simplify the process significantly.
Good lighting is also essential for any embroidery project. A portable lamp or light box can help you see your work more clearly, especially when working with fine details.
Finally, pattern transfer tools like light tables or carbon paper can be used to transfer your design onto the fabric, depending on its complexity.
Understanding Your Tools
In the world of embroidery, every tool and supply serves a vital function. The humble hoop provides stability to your fabric, needles and threads bring your design to vibrant life, while markers help guide your stitches with precision. While these fundamental tools are essential for success, it’s the additional accessories that can truly elevate your craft, making the process more efficient and enjoyable. Embroidery is a harmonious blend of creativity and practicality, requiring not only an artistic eye but also a solid understanding of how to utilize each tool effectively. As you begin your embroidery journey, feel free to experiment and find the tools that work best for you. And remember, there’s always more to learn, with numerous online resources and local craft stores offering a wealth of knowledge and high-quality supplies at your fingertips.
Mastering the Basic Stitches
Embroidery is an art form that requires finesse and creativity to bring designs to life with just a needle and thread. To get started, we’ll delve into the top 5 beginner-friendly stitches that are essential for any embroidery project. With clear illustrations and real-life photographs, you’ll be guided through each stitch, making your learning process enjoyable and seamless. We’ll also explore the common uses for each stitch, ensuring you know exactly when to apply them. For those who prefer visual learning, we recommend short and easy-to-follow YouTube tutorials.The running stitch is a fundamental technique that involves creating small, evenly spaced stitches that flow smoothly across the fabric. Its versatility makes it perfect for adding subtle details, creating dashed outlines, and even gathering fabric.In contrast, the back stitch creates a continuous line and is stronger than the running stitch. It’s ideal for creating defined outlines and text embroidery due to its clean and seamless appearance.The split stitch involves splitting the thread of the previous stitch with the needle and thread of the next stitch, resulting in a braided look. Its flexibility makes it great for outlining curves and creating textured fills.The satin stitch is perfect for filling shapes with solid color, giving a smooth, satin-like appearance. It’s ideal for leaves, petals, and other design elements that require a filled look.Lastly, the French knot involves wrapping the thread around the needle and then inserting the needle close to where it came up, creating a knot. Its textured appearance makes it perfect for adding small details such as flower centers, eyes, or dotted textures.
Video Link-outs
To support your learning journey, we’ve curated a series of concise video tutorials that demystify each stitch. These bite-sized lessons are designed specifically for beginners, with clear explanations and step-by-step demonstrations. The tutorials cover the Running Stitch, Back Stitch, Split Stitch, Satin Stitch, and French Knot – essential skills to master before embarking on your embroidery projects. By watching these videos, you’ll reinforce your understanding of each stitch and gain the confidence to start creating your own unique pieces.
Choosing Your First Embroidery Project
Embarking on the embroidery journey can be an exhilarating experience, with endless creative possibilities unfolding before you. To ensure a fulfilling experience, it’s essential to begin with the right project. Here’s how to select your first embroidery endeavor, ensuring it’s both enjoyable and achievable.
Start Small, But Mighty
Begin with something modest. A small project allows you to complete it quickly, providing an early sense of accomplishment that motivates you to continue stitching. These smaller endeavors require less time and resources, making them more manageable for beginners. They offer a fantastic opportunity to practice fundamental stitches and techniques without the commitment to a large piece.
Find Your Inspiration
Discover a theme that sparks joy and motivates you to keep creating. Here are some beginner-friendly themes that blend simplicity with delight:
Florals: Timeless flowers can be as intricate or simple as you like.
Initials: Personalize your project with your own or a loved one’s initials.
Simple Shapes: Stars, hearts, and geometric patterns are perfect for practicing stitches.
Fun Quotes: Stitching your favorite short quote or saying adds a personal touch.
Uncovering Patterns
Embark on a pattern treasure hunt! While I offer free embroidery patterns ideal for beginners, expanding your collection can further inspire your creative journey. Here are some reputable sources for free patterns:
Discover DIYCraftsy, your go-to source for free embroidery patterns suitable for all skill levels.
Remember, the internet is vast, and these are just starting points. Always ensure the patterns you find come from reliable sources.
Fabric Choices
Select the right fabric wisely. Starting with the correct fabric can make your project easier and more enjoyable. For beginners, cotton and linen are excellent choices due to their sturdy nature, smooth texture, and ability to withstand repeated needle punctures without fraying. These fabrics come in various weights and weaves, allowing you to experiment with what feels best to you. Avoid overly stretchy or slippery fabrics that may be challenging to manage without experience.
By choosing your first embroidery project wisely, you’re setting yourself up for a successful and enjoyable experience. Start small, select an inspiring theme, find reliable patterns, and choose the right fabric – and you’ll be well on your way to mastering this timeless craft.
Troubleshooting Tips
While mastering the art of embroidery can be a delightful experience, it’s not uncommon for beginners to encounter various hurdles along the way. However, by being aware of these common challenges and having practical strategies to overcome them, you’ll be well on your way to creating beautiful embroidered pieces with ease. From pesky fabric wrinkles to frustrating thread tangles, this guide will walk you through the most prevalent problems and provide actionable advice to help you navigate them.
Puckered Fabric
When dealing with embroidery, a common issue that can arise is pucker-prone fabrics resulting in unsightly wrinkles or bunching. To combat this, it’s essential to ensure your fabric is properly secured within a hoop before commencing stitching. Aim for a taut but not overly strained surface, akin to the smooth drumhead. Should puckering occur during the process, simply mist the fabric with water and iron it flat to restore its original shape. Additionally, incorporating a stabilizer on the back of your fabric can significantly reduce the likelihood of puckering by maintaining even tension as you stitch.
Tangled Threads
When working with threads, it’s common to encounter tangled knots that can be frustrating and messy. To address this issue, start by attempting to gently tease out the knot using a needle or your fingers. If this method doesn’t work, try carefully cutting the tangled section away and re-threading your needle. When stitching, remember to maintain control and slow movements as you pull your stitches through to prevent further tangling.
To proactively avoid thread tangles in the first place, consider using shorter threads, approximately 18 inches in length. Additionally, make it a habit to periodically allow your needle and thread to dangle freely from the fabric, giving you an opportunity to untwist any developing knots.
Uneven Stitches
When uneven stitches mar the beauty of your embroidery, don’t worry – it’s an easy fix. To rectify the issue, use a seam ripper to carefully remove the uneven stitches and re-stitch the area with precision. As you work through this process, remember that practice makes perfect. Before moving on to your actual project, consider honing your stitch length skills on a scrap piece of fabric. This will help you develop muscle memory and improve the overall consistency of your embroidery.To prevent uneven stitches from occurring in the first place, mark your desired stitch length with a fabric pencil or use a piece of washi tape as a guide until you feel comfortable with the length. With time and practice, these mistakes will become less frequent, and you’ll be able to enjoy the satisfaction of creating beautiful embroidery pieces. Remember that everyone makes mistakes, even experienced embroiderers, and it’s all part of the learning process. By embracing your progress, no matter how small, you’ll stay motivated and happy as you continue to stitch.
A 7-Day Guide to Crafting This Embroidery Design
Embroidery is an art form that requires not only creativity but also patience and dedication. For those eager to embark on a new adventure, we’ve crafted a 7-day plan to guide you through the process of creating a stunning embroidery design featuring lush green flowers. This comprehensive guide is inspired by a Hand Embroidery Art tutorial, providing all the necessary tools and expertise for a successful project.
Day 1: Planning and Designing
Before embarking on the embroidery process, it’s essential to create a digital sketch of your design on your computer. This initial step allows you to visualize the final product and make any necessary adjustments. Once you’re satisfied with your digital design, translate it onto a plastic sheet by creating perforation lines using a needle. These marks will serve as a guide for transferring the design onto your fabric. Finally, utilize a specialized ink designed specifically for the craft village tutorial, which is renowned for its ability to maintain its integrity and not spread once dry. This unique ink enables you to seamlessly transfer your design from the plastic sheet onto your fabric.
Day 2: Starting the Embroidery
When it comes to selecting the perfect thread for your project, there are several options to consider. For a realistic and moderate sheen, cotton thread is an excellent choice. Alternatively, if you’re looking for a brighter, more luminous finish, synthetic silk threads can provide a sleeker appearance. The key is finding a thread that suits your creative vision.As you begin to plan your design, think about the color palette you’ll be working with. For this particular project, we’ve focused on a harmonious blend of blues, greens, and whites. By carefully transitioning between these hues, you can create a sense of balance and visual cohesion in your finished piece. The nuances of color choice will be crucial in achieving the desired aesthetic.
Day 3-6: Embroidering the Design
For the next four days, you will work on different elements of the design, following a precise process. Day one involves embroidering the flower petals using white thread (AT60) with staggered stitches to achieve a natural appearance. As you progress, gradually switch to blue thread (PT09) to add depth and dimension to your creation. Next, move on to the flower stamen, utilizing orange thread (PT65) and a larger needle due to the use of 6 strands. This will give the desired texture and visual interest. The leaves are then embroidered using PT18 thread with only 2 strands for a delicate finish.
Day 7: Final Touches
As you near the completion of your embroidery project, take a moment to review your work with a critical eye. Make any necessary adjustments to guarantee that each element meets your exceptional standards. Once satisfied, it’s time to secure and tidy up any loose threads, effectively preparing your masterpiece for display or gifting.
Video Tutorial
Embroidery enthusiasts, rejoice! For those who prefer learning through visual aids, we’ve got a step-by-step video tutorial that pairs perfectly with this written guide. The video serves as a supplementary resource, breaking down techniques into easily digestible chunks, making the process more accessible and enjoyable.Starting an embroidery project is not just about following a set of instructions; it’s also about infusing your personal touch. As you work on your 7-day embroidery project, don’t be afraid to let your creativity shine through. Whether you choose to stick to the guidelines or deviate from them, the journey will undoubtedly be a fulfilling one.
FAQs on Embroidery for Beginners
Embroidery is a captivating hobby that provides an outlet for creativity and serves as a stress-relieving activity. For those new to this craft, understanding how to begin, selecting suitable patterns, and gathering necessary materials can be overwhelming. To address these concerns, we’ve compiled answers to some of the most frequently asked questions about embroidery for beginners, offering a comprehensive guide to kick-start your stitching journey.
What do I need to start embroidering?
As you embark on the world of embroidery, it’s essential to start with the fundamental tools required for this creative journey. These basic supplies will form the foundation of your embroidery experience.
At its core, embroidery begins with the right needles, specifically designed with larger eyes that make threading easier and efficient. This is a crucial element in setting up your project.
Next, you’ll need a range of colors from your embroidery floss, which comes in various hues to match your creative vision. The vibrant threads will bring your design to life.
To maintain control and precision while stitching, an embroidery hoop is indispensable. This versatile tool keeps your fabric taut, allowing for smooth and even stitches.
For a beginner-friendly start, choose a simple cotton or linen fabric that provides a solid base for your embroidery endeavors.
Finally, don’t overlook the importance of sharp scissors, specifically designed for cutting thread. A clean cut is essential in maintaining the integrity of your project.
Last but not least, select a pattern that resonates with you and your skill level. This will provide a guiding light as you navigate the world of embroidery and ensure a fulfilling experience.
How do I transfer an embroidery pattern onto fabric?
When it comes to transferring embroidery patterns onto fabric, there are several techniques to explore. One approach is tracing: simply place your fabric over the pattern and use a pencil or water-soluble pen to directly mark the design onto the fabric. Another method involves using specialized transfer paper, which serves as an intermediary layer between the pattern and the fabric. To execute this technique, you’ll need a stylus or pen to trace over the pattern and transfer the design onto the fabric. For those seeking an even more straightforward solution, iron-on transfers are also an option – simply place the transfer on your fabric and apply heat from an iron to fix the design in place.
Can I make my own embroidery designs?
Unleash your creative potential by crafting custom embroidery designs from scratch! Begin by conceptualizing your idea on paper, refining your sketch until you’re satisfied. Next, transfer your design onto fabric using a method of your choice, such as tracing or stenciling. Feel empowered to explore different color palettes and stitching techniques to infuse your unique vision with personality.
How do I choose the right fabric for my embroidery project?
For successful embroidery, it’s essential to select a fabric that can effectively support the stitches without distorting the material. A tightly woven fabric is ideal, as it will allow you to achieve crisp, even stitching. Cotton, linen, and canvas are popular choices for beginners, offering a stable base for your creative endeavors. On the other hand, fabrics with significant stretch or loose weaves can be more demanding to work with, making them less than ideal for embroidery projects. By opting for a fabric that meets these criteria, you’ll be able to focus on perfecting your stitches without worrying about puckering or distortion.
What are the easiest stitches for beginners?
For those just starting their stitching journey, it’s essential to master some fundamental techniques. Fortunately, there are several beginner-friendly stitches that can help you get started and build confidence in your abilities. At the core of any stitcher’s repertoire are the running stitch, backstitch, split stitch, satin stitch, and French knot. The running stitch is a great foundation for outlining and creating basic shapes, while the backstitch excels at producing solid lines. For adding texture and depth to your designs, the split stitch is an excellent choice. When you need to fill in areas with smooth, satin-liked stitches, the satin stitch is the way to go. Finally, the French knot is perfect for creating small, decorative dots that can add a touch of whimsy to your work.
How do I finish and display my embroidery project?
When you’ve completed your embroidery, the final steps are to tidy up the excess fabric, secure it in place, and showcase your creation.
To trim the excess fabric, leave about an inch of material around the embroidery design. This will give you a clean edge to work with. Next, use a running stitch to gather the fabric at the back of the hoop, pulling the thread tight as you go to secure it in place.
Once your piece is finished, consider displaying it in its original hoop or framing it for a more polished look. This will allow you to showcase your handiwork and enjoy the fruits of your labor.
Embroidery is a wonderful hobby that offers a unique combination of creativity, relaxation, and stress relief. With time and practice, you’ll find yourself becoming increasingly confident in your abilities and producing beautiful pieces of art that reflect your personal style.
30 Free Embroidery Patterns for Beginners
Begin your embroidery adventure by exploring a vast collection of 30 free and beginner-friendly designs, carefully crafted to guide you through the stitching process with ease. Embark on this creative journey today!
Free Rose Embroidery Pattern
Start your embroidery journey with The Stitch Floral free rose pattern, an ideal starting point for newcomers to needlework. This delightful design not only features an intuitive layout but also comes with a comprehensive tutorial that walks you through each step, allowing you to develop essential skills like split back stitch and long and short stitching. As you work on the petals, you’ll gain hands-on experience with French knots, experimenting with different thread wraps to achieve distinct textures. This beginner-friendly pattern is designed to help novice stitchers build confidence in their skills while creating a beautiful floral piece that showcases your artistry. Take the first step towards mastering hand embroidery and download the pattern now.
Fun and Simple Home Embroidery Pattern
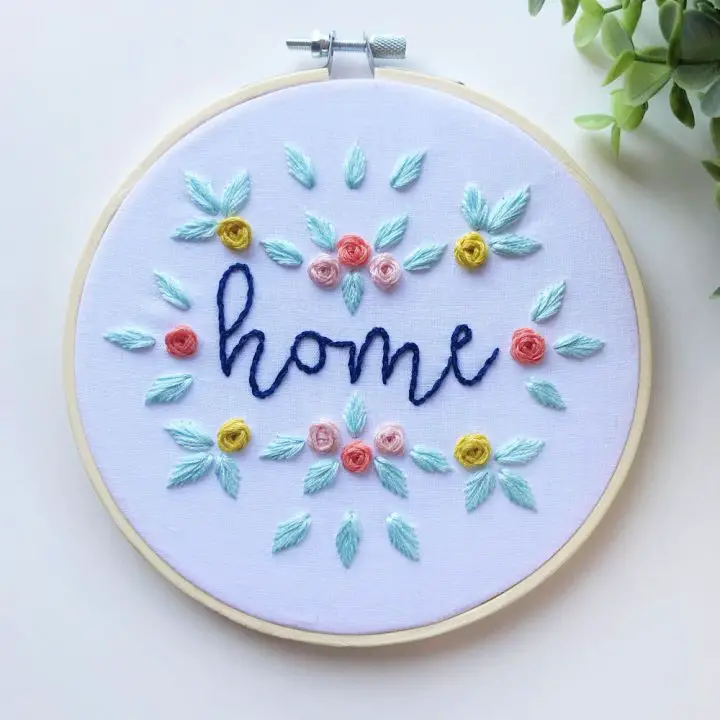
Discover the delightful art of embroidery with the home embroidery pattern by Kayleigh from Floss & Hoop, available as a downloadable PDF in English. This charming pattern is perfect for crafters who desire to infuse their home decor with personal touches, and can be adapted to various hoop sizes despite being designed for a 6-inch circle. The package includes a color guide featuring DMC Embroidery Floss hues and easy-to-follow stitch instructions that make it accessible to crafters of all levels. To get started, you’ll need a wooden embroidery hoop, embroidery floss, tightly woven fabric, and an embroidery needle. With only three pages of instructions, this pattern is ideal for those looking to begin a creative project. Find the design on LoveCrafts, where Kayleigh’s unique style awaits to elevate your crafting experience.
Make a Sunflower Hand Embroidery
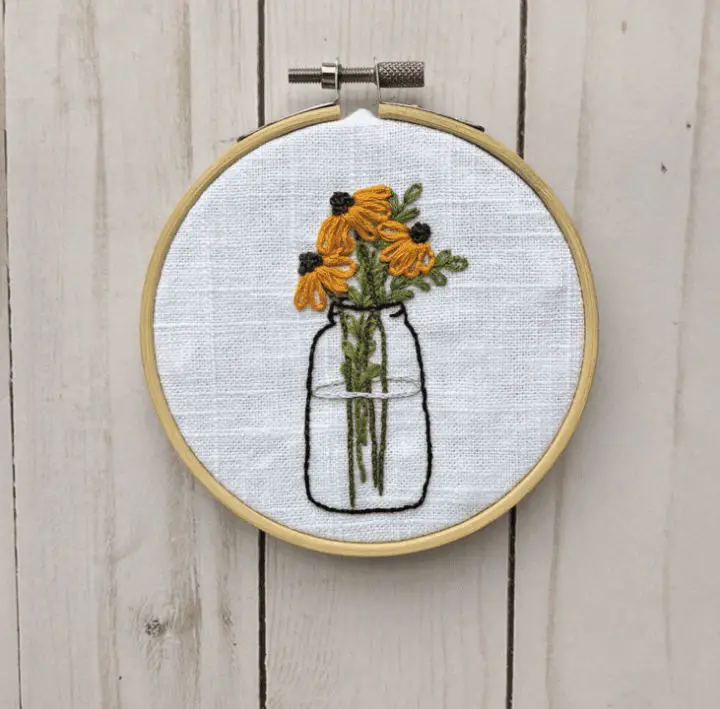
As you begin your embroidery journey, immerse yourself in the warmth of autumn with A Lively Hope’s free sunflowers hand embroidery pattern. This accessible design is perfect for newcomers to the craft, allowing you to create a thoughtful gift or charming ornament while developing your skills. The pattern features a delightful floral arrangement nestled within a mason jar, exuding the cozy atmosphere of fall. For an added layer of challenge and creative expression, consider one of the two autumn-themed embroidery kits offered by the site. These comprehensive patterns, complete with clear instructions and engaging visuals, not only enhance your surroundings but also provide a means to refine your technique as you stitch.
Floral Heart Hand Embroidery – Free Pattern
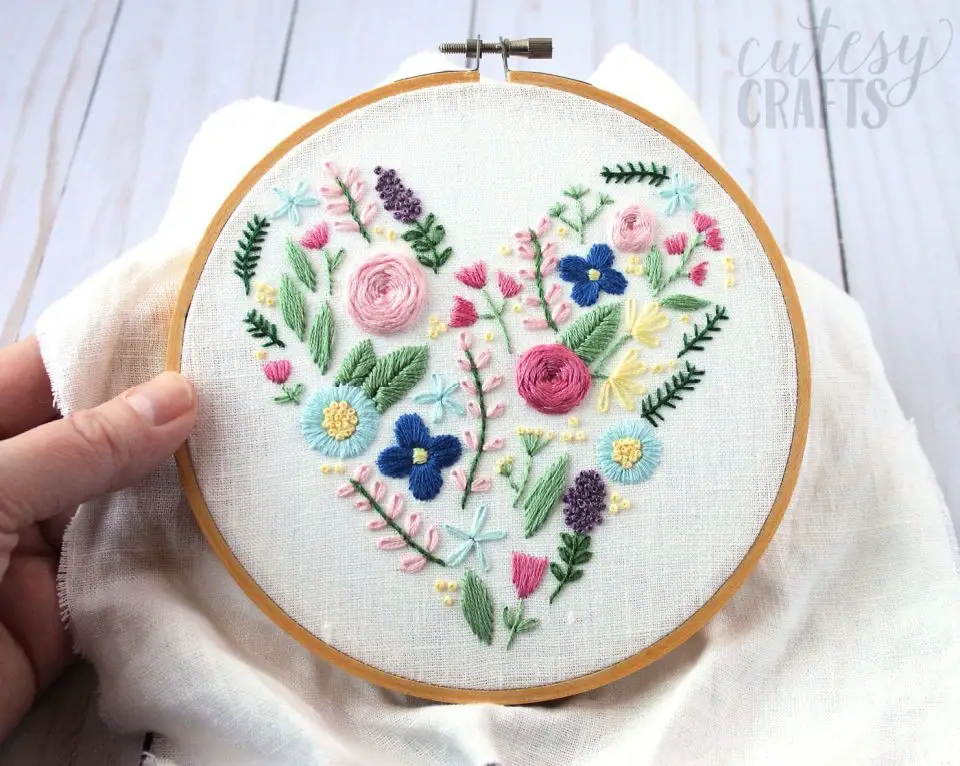
Embroidery enthusiasts, rejoice! If you’re eager to create a charming stitching project that’s not limited to Valentine’s Day, the floral heart pattern from The Polka Dot Chair is an excellent choice. Designed by Jessica of Cutesy Crafts, this lovely design offers endless possibilities for practicing various stitches as it features a variety of flowers. With the free pattern and some colorful floss at your disposal, you can transform a simple piece of linen into a stunning floral heart that showcases your embroidery skills. The guide is comprehensive and easy to follow, making it perfect for crafters looking to improve their stitching abilities while creating a beautiful piece of hoop art.
Homemade Sloth Embroidery
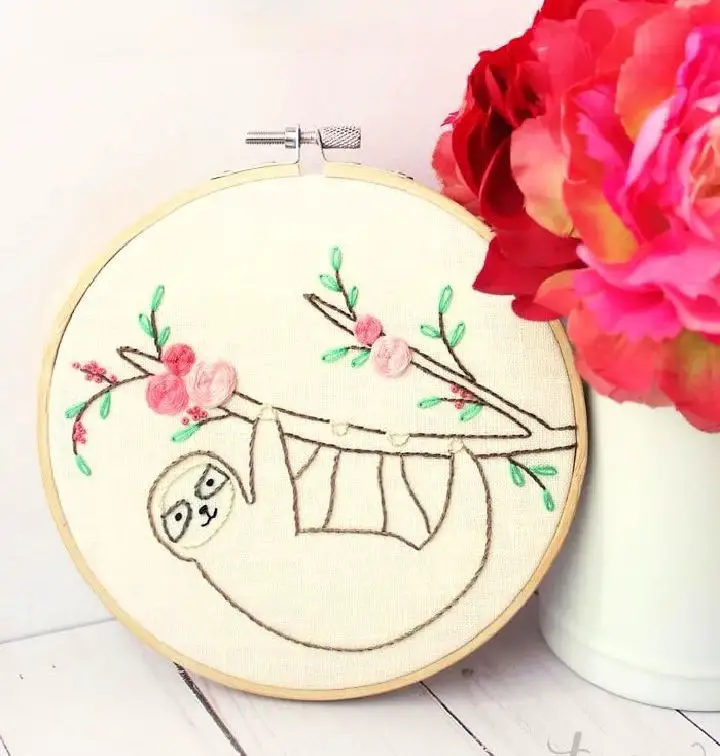
Indulge in the soothing art of hand embroidery with Cutesy Crafts’ Sloth Easy Embroidery Pattern. This delightful sloth design is designed for crafters looking to venture into new creative territories, offering an accessible and engaging experience. The comprehensive guide includes a downloadable pattern, a list of essential materials such as fabric, embroidery floss, and a hoop, and expert stitching advice, guiding you through each step with clarity and precision.As you embark on creating your very own sloth masterpiece, perfect for decorating your space or gifting to fellow sloth enthusiasts, the clear instructions and techniques like the woven wheel stitch will help you refine your embroidery skills. This rewarding crafting experience is not only an opportunity to create something beautiful but also a chance to unwind and relax while nurturing your creativity.
Anchor Home Sweet Home Embroidery to Downloadable PDF
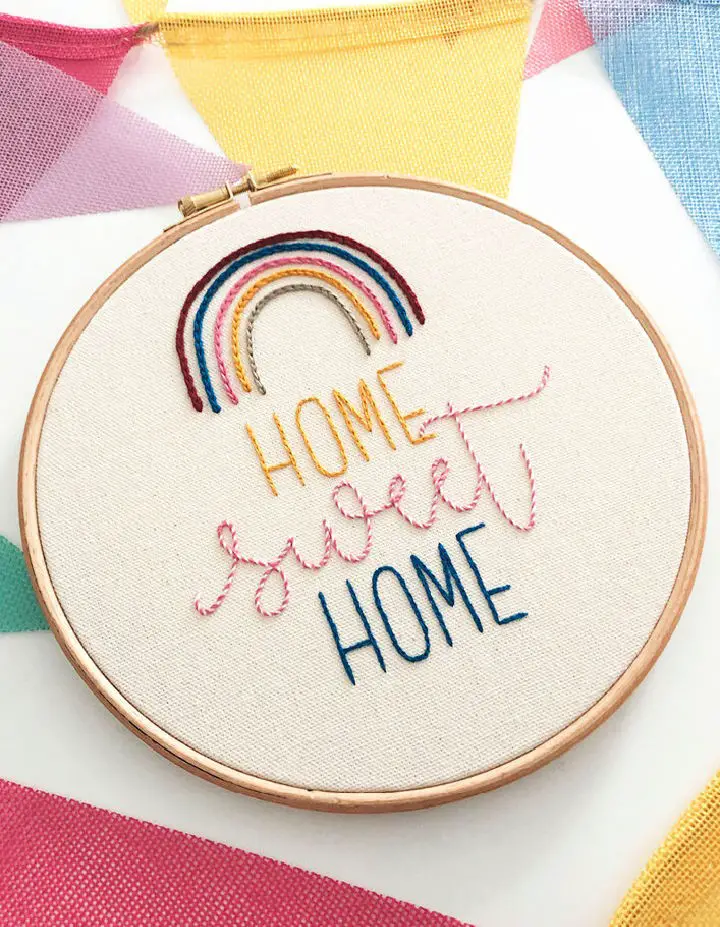
Transform your home into a cozy haven with the Anchor Home Sweet Home – ANC0003-41 downloadable PDF pattern. Designed by Ana Clara Bordou, this charming design is ideal for those who delight in embroidery and cross-stitch. The pattern’s clear English instructions make it an excellent choice for newcomers to the craft, guiding them through a comprehensive four-page guide. The result is a single, enchanting pattern that masterfully embodies the essence of a warm and inviting home. As soon as you purchase the digital pattern, you’ll have instant access to get started on your next creative project. With its user-friendly approach, this pattern promises an enjoyable experience that culminates in a stunning piece of handmade decor, perfect for showcasing your personal touch.
Beginners Hand Daisy Embroidery Pattern
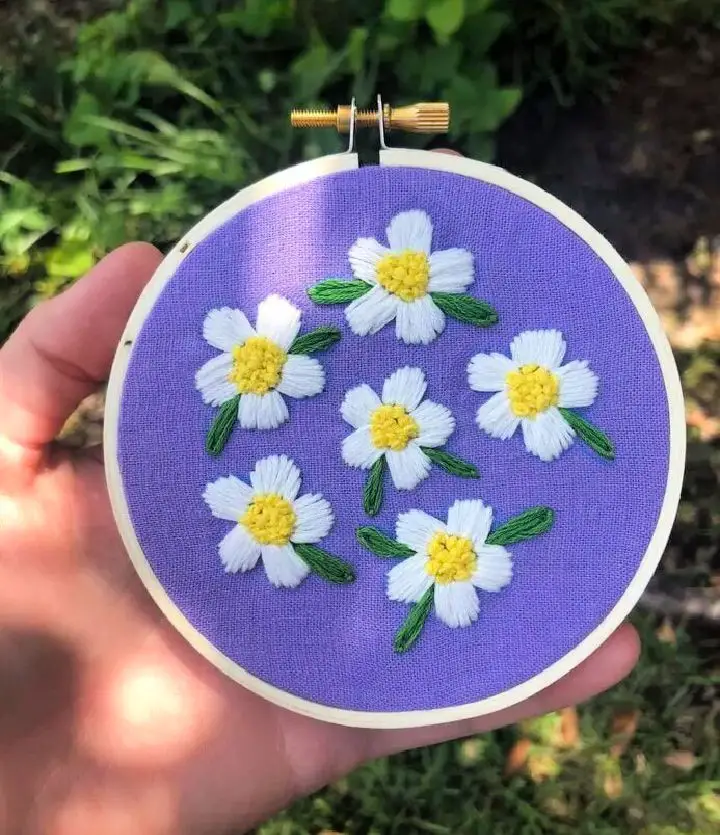
Discover the art of traditional stitching with Crewel Ghoul’s comprehensive hand embroidery patterns for all skill levels. As the seasons change, bring a touch of handmade elegance to your spring decor or create a thoughtful gift by learning to embroider a daisy using their free pattern and Amanda’s step-by-step tutorial. This charming project combines satin stitch petals and French knot centers to produce stunning floral designs.
To get started, gather your essential supplies: an embroidery hoop, fabric, scissors, and DMC threads. Whether you’re looking to add a personal touch to your home decor or craft a unique present, this pattern will guide you in developing your stitching skills while creating a beautiful blooming piece with clear instructions and recommended materials.
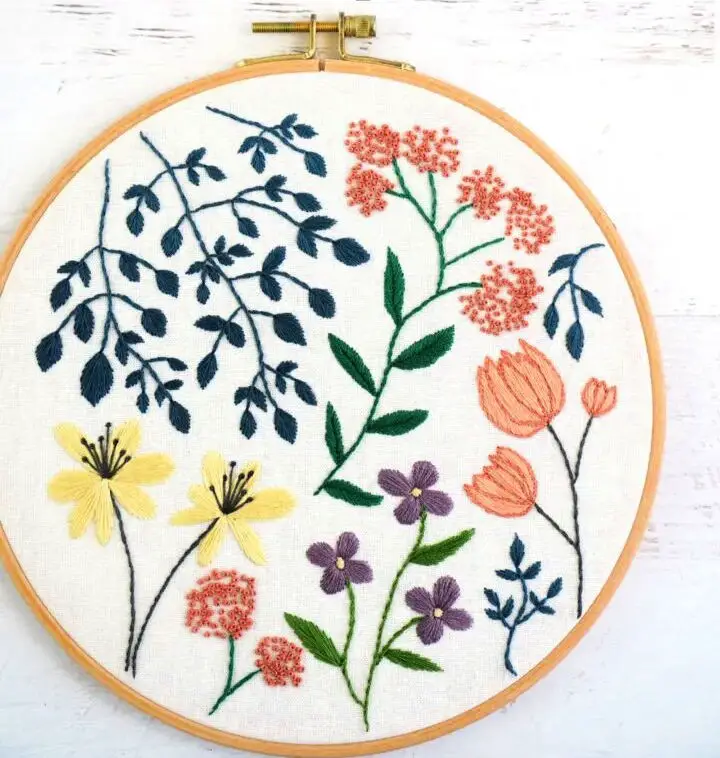
Free Floral Embroidery Pattern
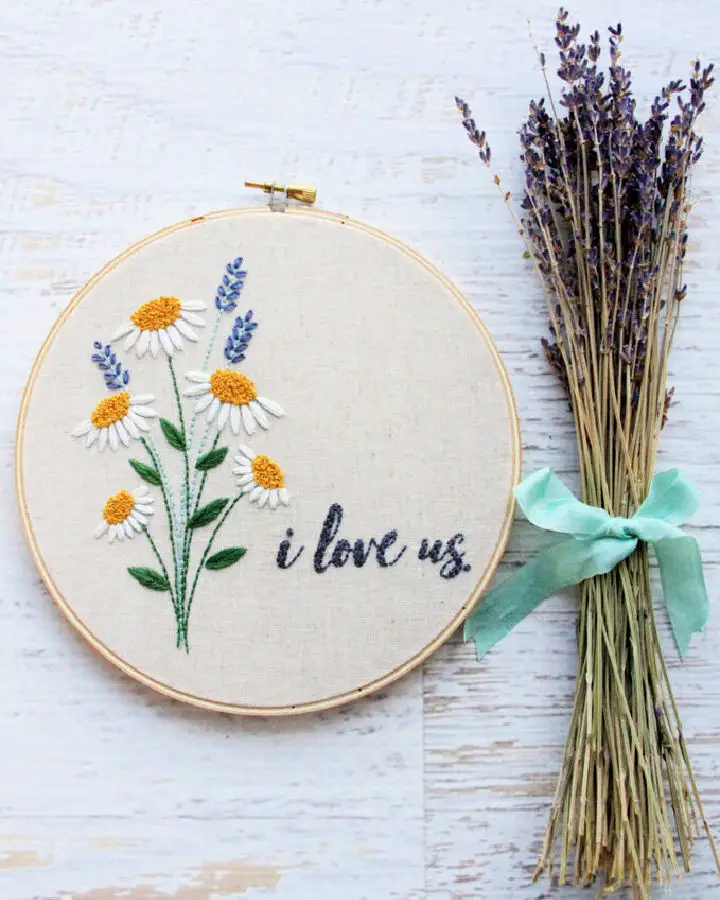
Embroider a charming keepsake with ease using the I Love Us Free Floral Embroidery Pattern from Flamingo Toes. This delightful design is perfect for gifting or adding a personal touch to your home decor, requiring only basic embroidery stitches that are suitable for both beginners and seasoned crafters alike. To get started, gather your essential supplies: linen, embroidery floss, hoop, and needle. Then, follow the easy-to-follow instructions to create a beautiful floral design. For an extra special touch, consider framing your work or incorporating it into a quilt or pillow. With clear guidance and material suggestions, you’ll have a lovely piece of embroidery that’s sure to bring joy.
Floral Sewing Machine Embroidery
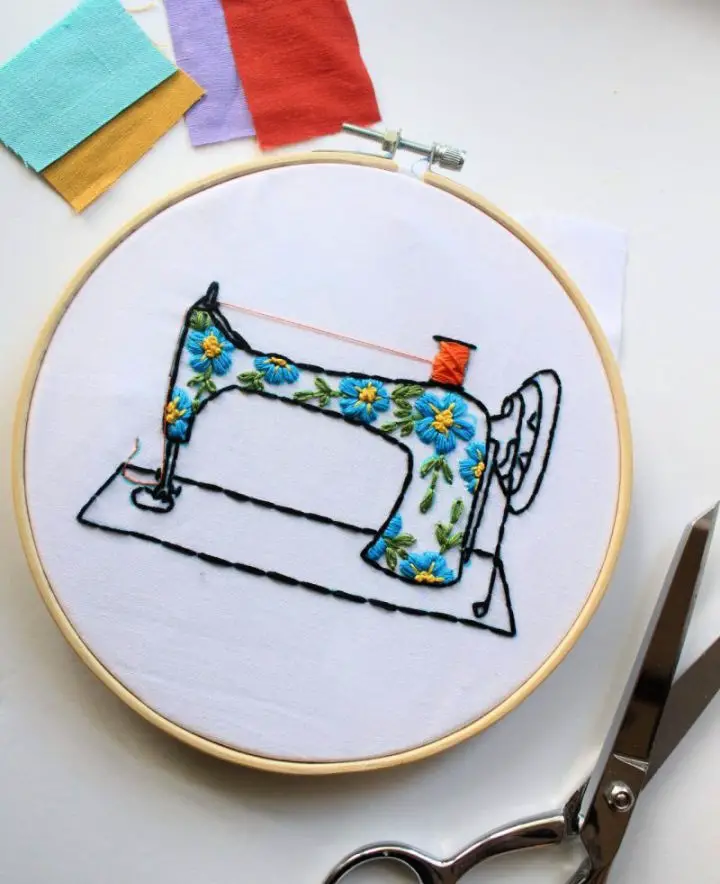
Take your embroidery skills to new heights with the Floral Sewing Machine Embroidery pattern from Crewel Ghoul, a free resource suitable for crafters of all levels. This comprehensive guide features clear instructions and accompanying images, making it easy to follow along. The pattern utilizes simple stitches like satin, French knots, and backstitching to create stunning flowers, leaves, and a charming sewing machine motif. To get started, gather your materials – DMC floss, an embroidery needle, a hoop, and your favorite fabric. With over 15 years of embroidery expertise, Amanda has ensured that this project is seamless and results in a beautiful handmade piece.
Floral Unicorn Embroidery Pattern
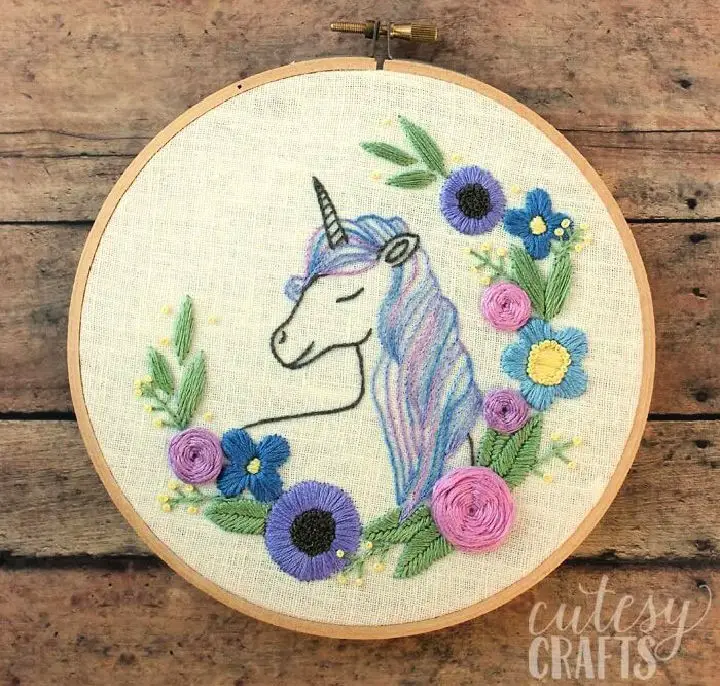
Step into an enchanting world of craftiness with Cutesy Crafts’ floral unicorn embroidery pattern, brought to life by Jessica’s creative vision. This delightful design combines a majestic unicorn surrounded by lush florals, all thanks to the magic of color-changing embroidery floss. Ideal for those with some embroidery experience, this charming piece adds a touch of whimsy to any collection. To guide you through the process, step-by-step video instructions are available, making it easy to follow along. With a complimentary pattern, a list of necessary materials, and the option to back your hoop with felt, your crafting adventure promises a stunning outcome. And for further inspiration, explore more hand embroidery designs on the site.
Make Your Own Chicken Embroidery
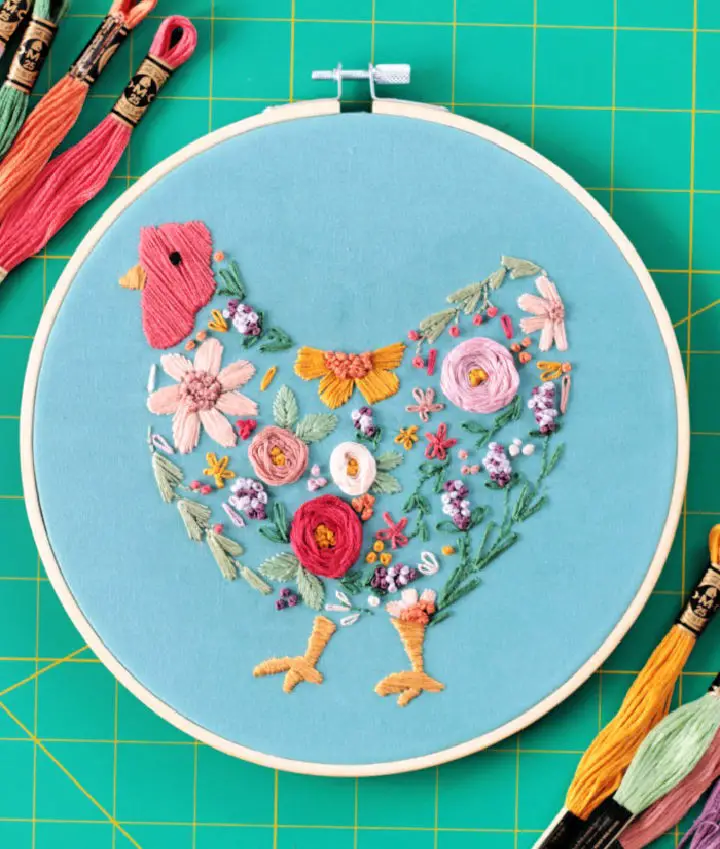
Start your embroidery adventure with our complimentary chicken pattern, expertly crafted by Gluesticks Blog! This delightful design is perfect for crafty individuals looking to add a charming touch to their embroidery wall. Although created to fit an 8-inch hoop, it’s easily adaptable to suit your style preferences. Simply transfer the pattern onto fabric and bring the colorful hen to life with a variety of stitches and colors as guided in our instructions. The download process is seamless – simply save or print directly from the provided link. As you begin, feel free to infuse your creation with unique flair for a one-of-a-kind piece that truly reflects your artistic personality.
Sunshine and Rainbow Embroidery Pattern
Add a pop of color and personality to your sewing space with this delightful sunshine & rainbow embroidery project. This easy-to-follow guide takes you on a step-by-step journey from tracing the design to framing the finished piece, making it perfect for beginners or those looking for a calming creative outlet. Using basic supplies like white cotton fabric, water-soluble marker, and embroidery floss, you’ll create a charming handmade decoration that’s sure to brighten up any room. As you bring each element to life – from the vibrant rainbow hues to the cheerful sun and clouds – you’ll find yourself relaxing and fulfilled by the process. So, gather your supplies and let’s get stitching! With this free embroidery pattern, you’ll be able to create a beautiful and unique piece that’s sure to become a treasured possession.
Embroidered Autumn Leaves
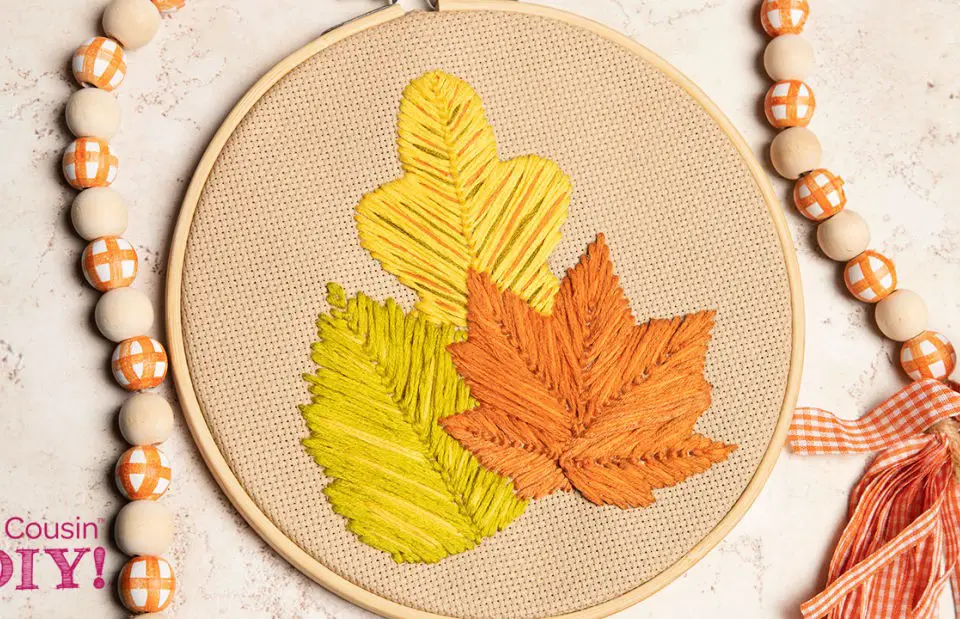
Unleash your creativity without breaking the bank by exploring free hand embroidery patterns. One standout example is Cousin DIY’s autumn leaves pattern, which lets you create a stunning display of seasonal colors using the closed fly stitch and straight stitch techniques. This project is perfect for those who enjoy handcrafting and want to add a cozy, autumnal touch to their home. With a comprehensive step-by-step guide and downloadable PDF instructions, you can transform a simple piece of fabric into a beautiful work of art. Whether you’re an experienced crafter or just starting out, this engaging and rewarding fall embroidery craft is sure to charm and inspire.
How to Make Dragonfly Embroidery
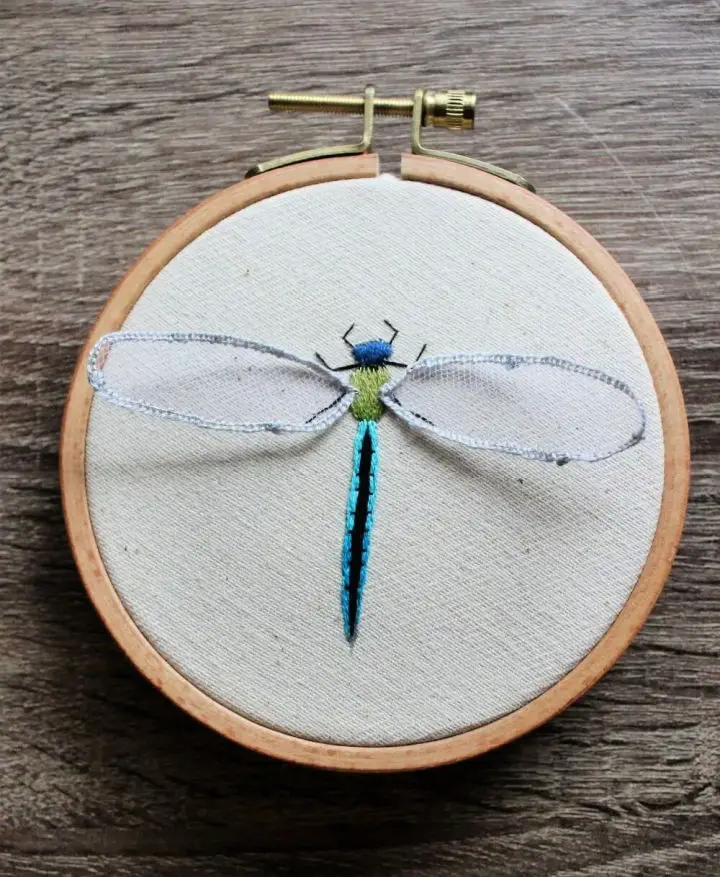
Elevate your embroidery skills with a whimsical twist by mastering the art of creating a three-dimensional dragonfly using tulle and stumpwork. Crewel Ghoul’s comprehensive tutorial, crafted by Amanda, takes you on a step-by-step journey through the process of bringing this stunning insect to life. From selecting the right materials – including an embroidery hoop, crafting wire, and specific DMC thread colors – to executing the intricate stitches, this guide offers a clear and easy-to-follow approach for achieving a vibrant and realistic result. Perfect for adding a touch of nature-inspired charm to your work, this unique technique is sure to impress and expand your repertoire.
Flower Embroidery Pattern
For those who relish charming embroidery projects, Cutesy Crafts’ free flower pattern is a treasure trove of creativity. This vibrant piece is bursting with life and color, making it an ideal addition to any craft collection. With Jessica’s straightforward guide, even novice embroiderers can follow along and add a touch of nature’s beauty to their repertoire. The required materials are minimal – just an 8-inch hoop, white fabric, and a variety of floss colors – making this project accessible to all skill levels. As you bring the floral design to life with a range of stitches, you’ll discover the joy of crafting and elevate your embroidery skills in no time.
DIY Floral Hand Embroidery
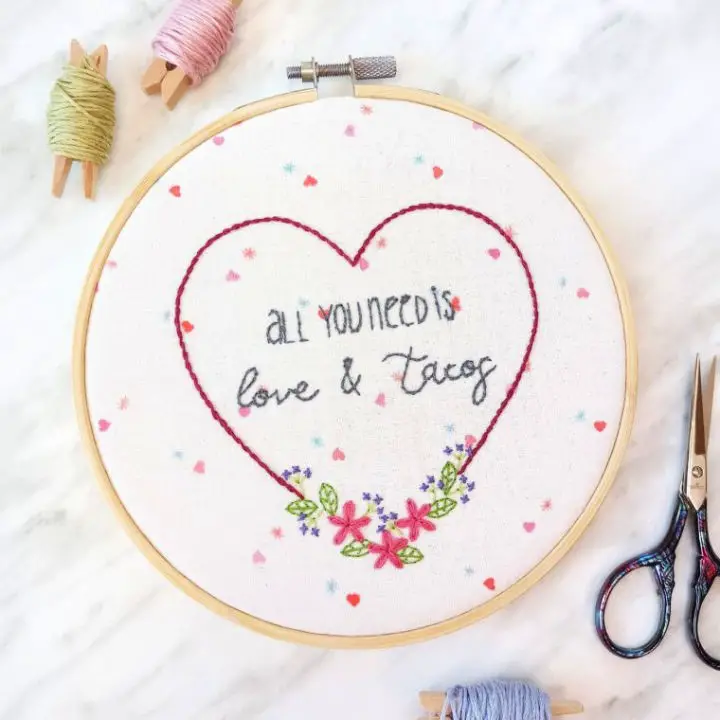
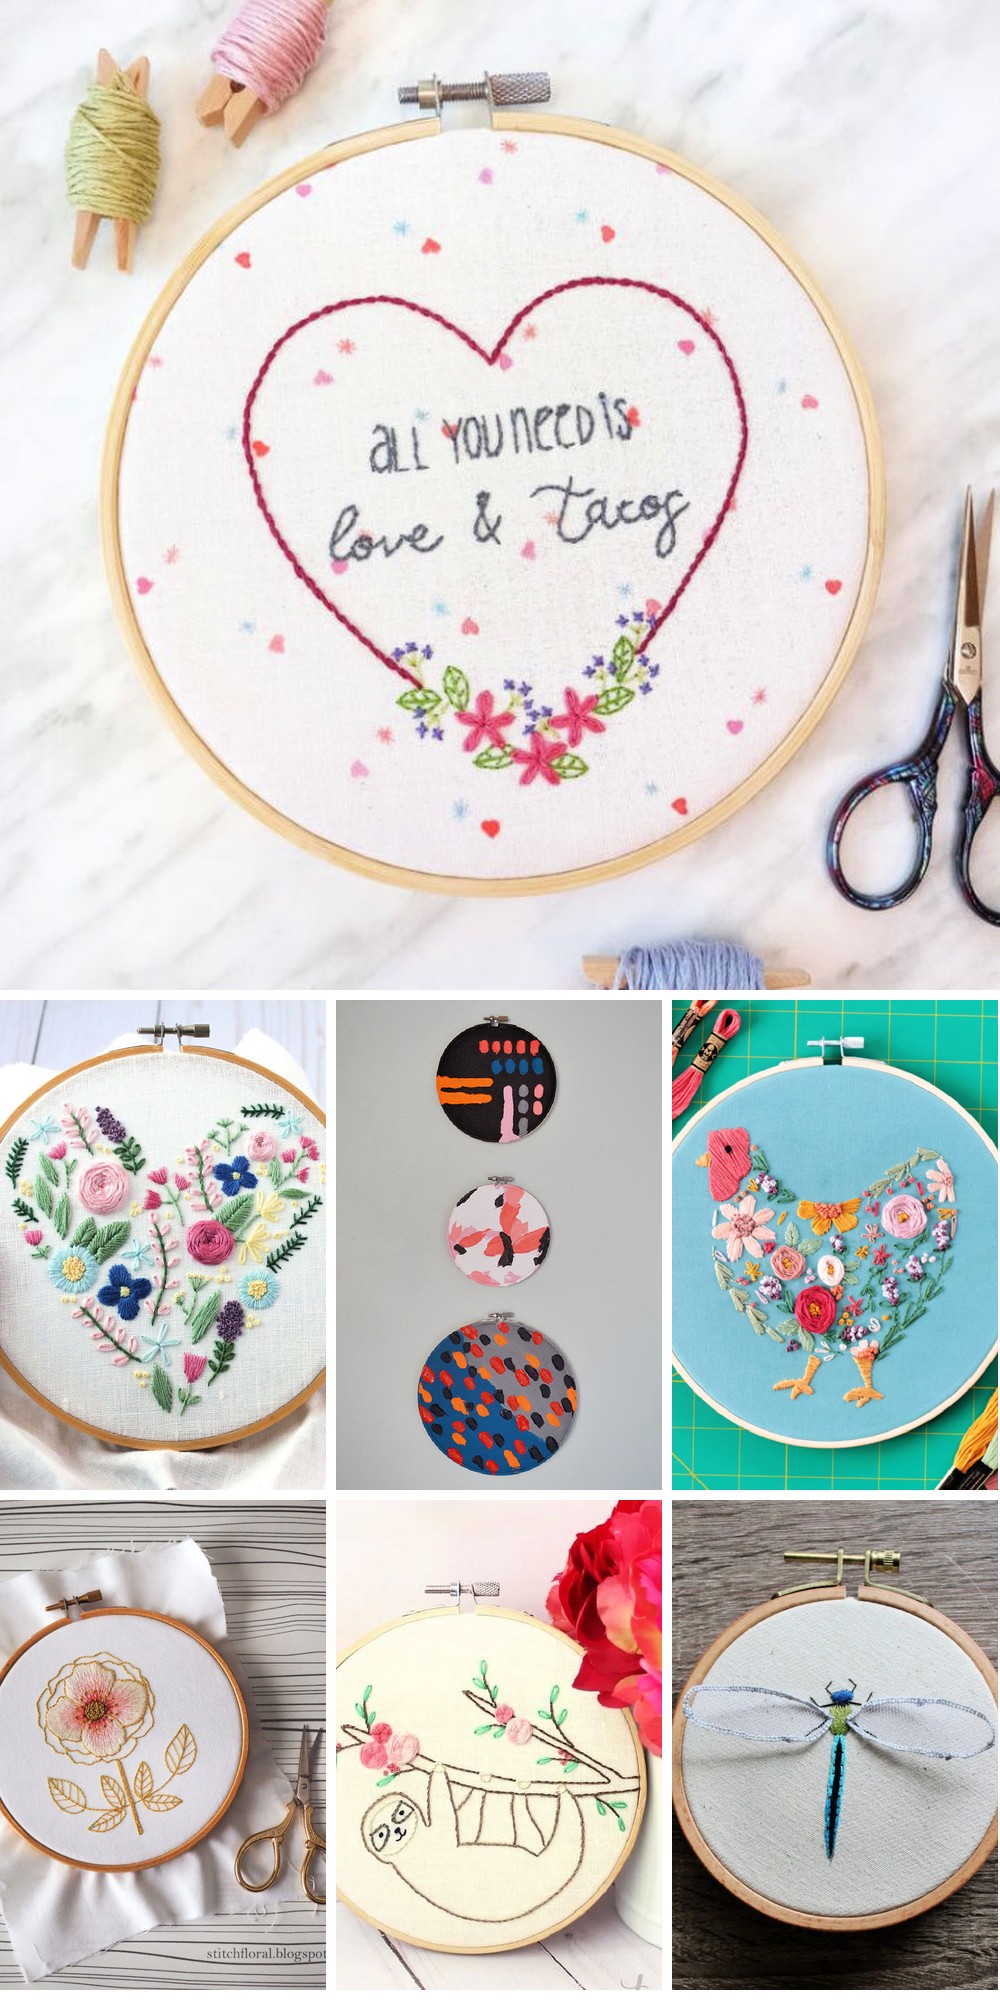
Embark on a journey of playful creativity with The Yellow Birdhouse’s free-hand embroidery pattern, guaranteed to bring a smile to your face. Perfect for beginners or those seeking a quick and delightful project, this love-and-tacos-themed design adds a charming touch to your handmade treasures. To get started, gather the essentials: an embroidery hoop, fabric, felt, and threads. With The Yellow Birdhouse’s comprehensive guide, you’ll master the art of hand-embroidery with ease, from the first stem stitch to the final French knot. As you work through the pattern, discover the therapeutic benefits of this relaxing hobby and infuse your day with a dash of whimsy.
Floral Wreath Embroidery Pattern for Beginners
Start your embroidery projects with ease using precise templates that bring your designs to life. This relaxing hobby offers endless creativity, allowing you to create stunning pieces of art. For beginners, a simple floral wreath is an excellent way to learn fundamental stitches and techniques. Diana Vingert’s YouTube tutorial provides a free downloadable pattern, perfect for those looking to dip their toes into embroidery. With clear step-by-step instructions, you’ll be guided through the process of creating a delicate floral design. The video’s pace is designed for ease of follow, ensuring a seamless learning experience. As you work through the pattern, not only will your skills improve, but you’ll also end up with a beautiful piece of handmade art. Visit Vingert’s store to obtain the pattern and begin your embroidery journey today.
Sweet Cupcake Embroidery Pattern
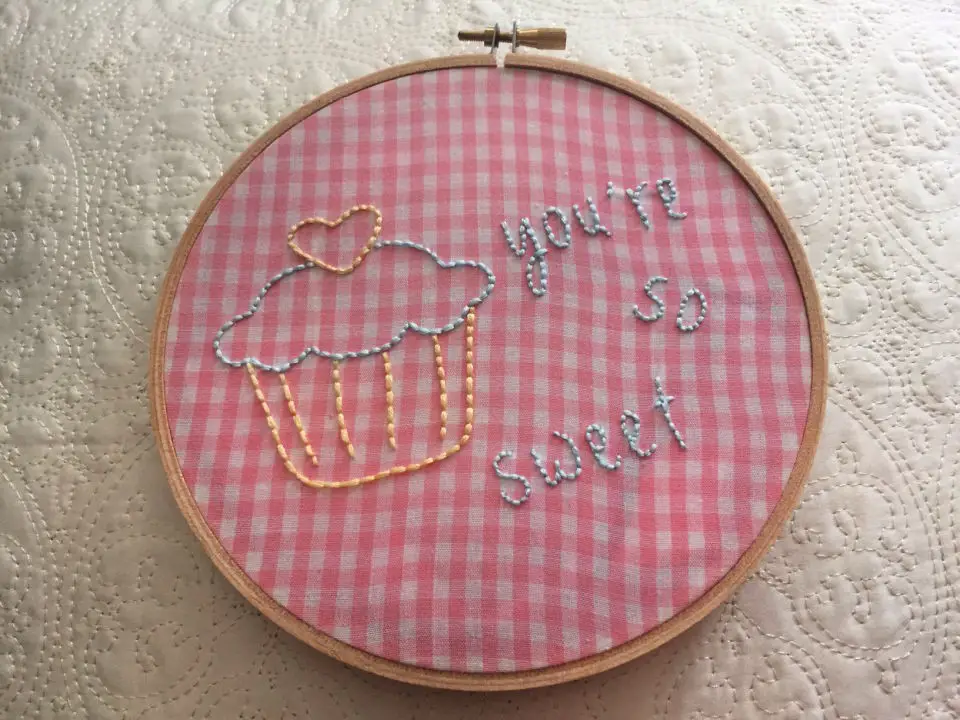
Add a dash of romance to your Valentine’s Day crafts by diving into Pink Bows & Twinkle Toes’ captivating hand embroidery project. This engaging endeavour requires just a few simple supplies – think embroidery floss, fabric, and a hoop – yet yields a charming cupcake motif that perfectly captures the essence of love and crafting. The DIY guide takes you through each step with ease, from tracing your design to mastering the back stitch technique, ensuring a fun and fulfilling experience. To give your project an extra touch of whimsy, don’t be afraid to personalise with unique font choices. As you work on this delightful hand-stitched piece, you’ll end up with a treasured keepsake or a thoughtful gift for loved ones.
Modern Botanical Embroidery Hoop Design
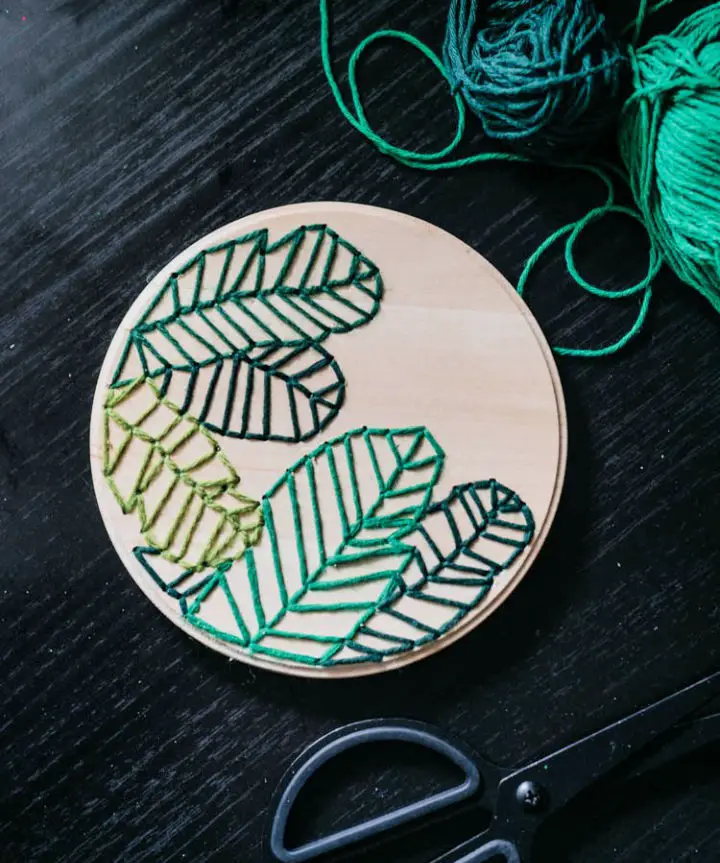
Get creative with our extensive library of free embroidery patterns and start stitching today! Embellish a plain wooden round with a simple DIY technique, transforming it into an enchanting decorative piece. In this comprehensive tutorial from Lemon Thistle, you’ll master the art of combining yarn and needles to craft a modern botanical embroidery hoop design that brings a touch of nature to any small space. With step-by-step guidance, you’ll effortlessly sketch, drill, and stitch your way to a unique craft piece using everyday tools and materials. Create a stunning wood embroidered decoration that’s sure to impress.
How to Make Mother’s Day Embroidery
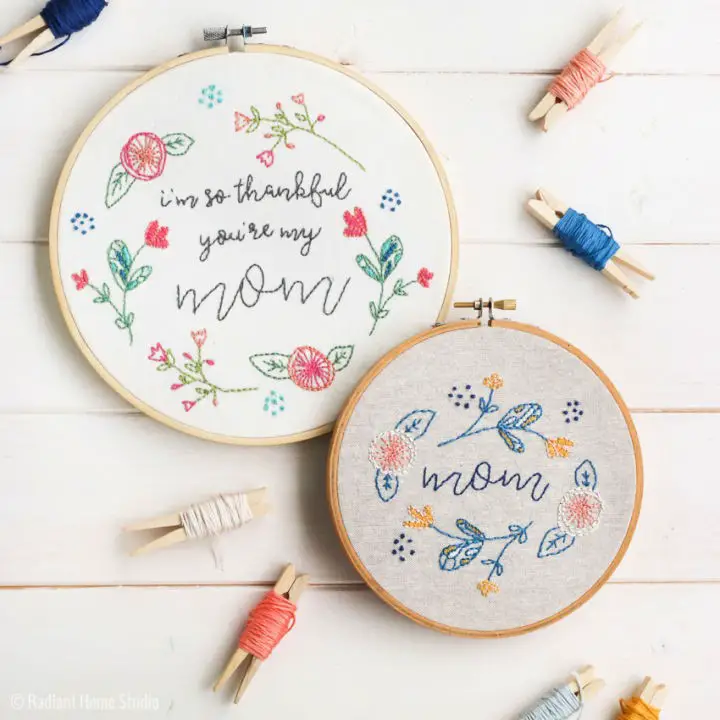
Create a thoughtful, handmade gift for Mother’s Day using Radiant Home Studio’s complimentary embroidery pattern. This design, featuring the heartfelt message ‘I’m so thankful you’re my mom,’ is versatile enough to be a year-round token of appreciation for any cherished mother figure. Whether it’s a birthday surprise or a spontaneous thank you, this pattern is perfectly timed to help you craft a meaningful gift. The step-by-step instructions, accompanied by detailed photos, guide you through various hoop sizes and stitches like the backstitch, satin stitch, and colonial knot. Simply sign up with your email address to access the free pattern and additional resources, then dive into the project and express your gratitude with a beautifully stitched creation that will be treasured for years to come.
Embroidery Sampler Pattern
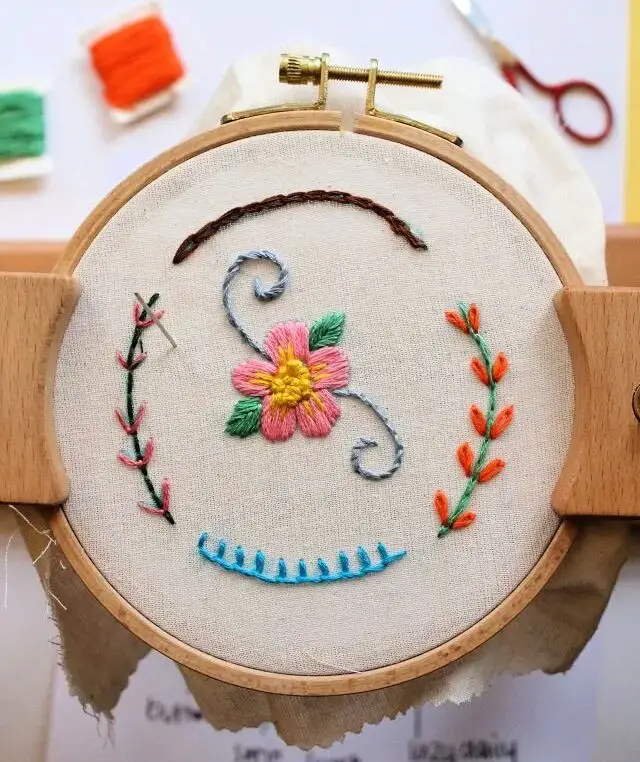
Embroidery enthusiasts can now dive into the world of stitching with Crewel Ghoul’s comprehensive free printable embroidery sampler pattern. This user-friendly guide is perfect for beginners looking to master fundamental stitches, offering a fun and engaging approach to creating unique hoop art. To ensure a seamless learning experience, Amanda provides a video tutorial that walks you through each step, allowing you to follow along effortlessly. All you need to get started is an embroidery hoop, needle, floss, and fabric – making it easy to begin your project immediately. As you progress, the design can be transformed into a thoughtful handmade gift, perfect for special occasions or personal use. Additionally, the Crewel Ghoul website offers a treasure trove of patterns and resources to further develop your skills and take your embroidery game to the next level. With these tools at your disposal, you’ll be inspired to start your embroidery adventure today!
Best Rainbow Embroidery Pattern
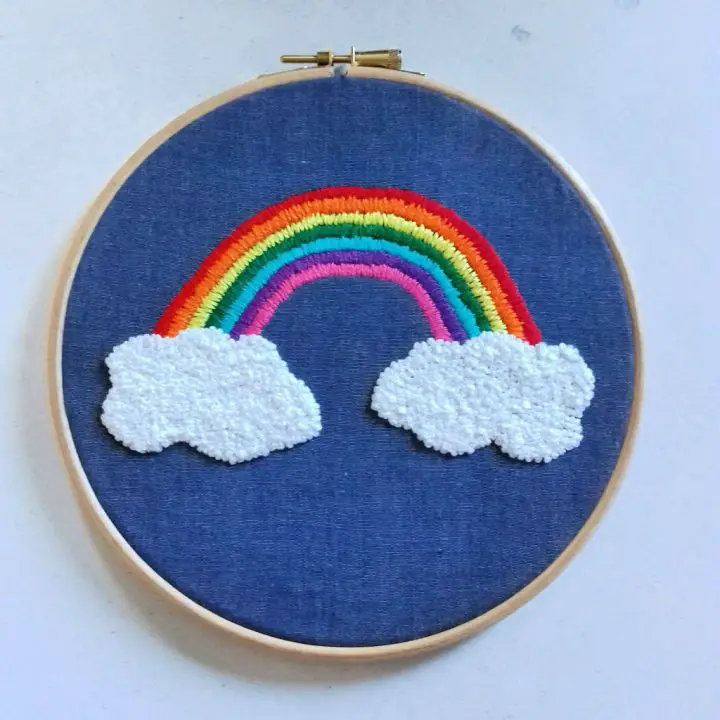
Embrace the therapeutic benefits of needlework with Amy Loves to Sew’s Rainbow of Hope embroidery pattern, a beacon of positivity amidst global uncertainty. This accessible project invites you to escape into the world of stitches, where simple satin stitch and French knots come together to create a vibrant symbol of optimism. With an embroidery hoop, fabric, and a kaleidoscope of threads at your fingertips, craft a stunning representation of hope that transcends borders. Whether you’re a seasoned sewing enthusiast seeking meaning in your craft or a newcomer looking to connect with others through the universal language of needlework, this pattern promises solace and community.
Cherry Blossom on Printed Fabric Embroidery
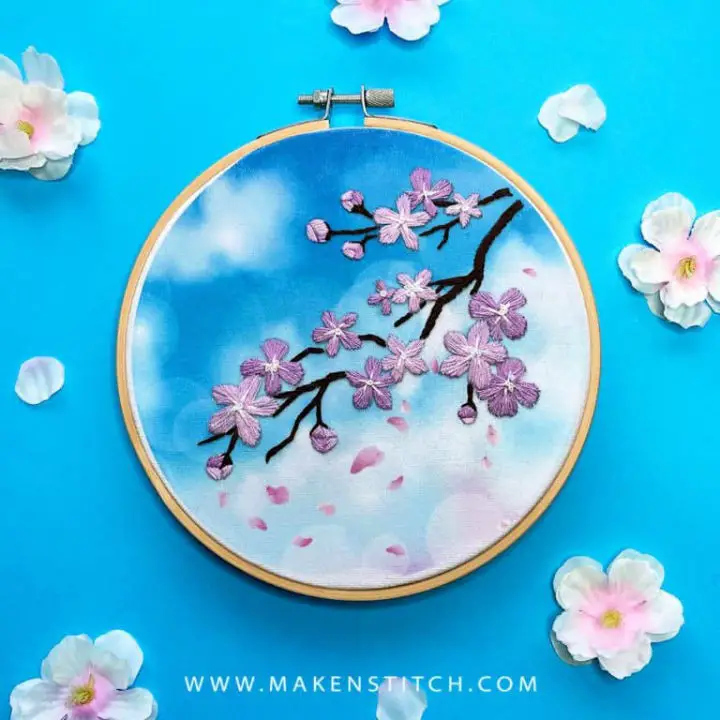
Embroidery enthusiasts, rejoice! Get inspired by our extensive collection of creative ideas for personal projects and thoughtful gifts. Our comprehensive tutorial on making beautifully embroidered cherry blossoms on printed fabric is a must-try. This step-by-step guide takes you through the process of printing on fabric and embellishing it with embroidery, utilizing straightforward techniques that require minimal equipment investment. With household items and affordable supplies at your disposal, you’ll be creating stunning mixed-media pieces in no time. Our focus lies in helping you enjoy the crafting journey, encouraging experimentation and self-expression. For a chance to elevate your creativity, check out Make N Stitch for access to our free embroidery pattern and more detailed information.
Homemade Embroidery Round Clock
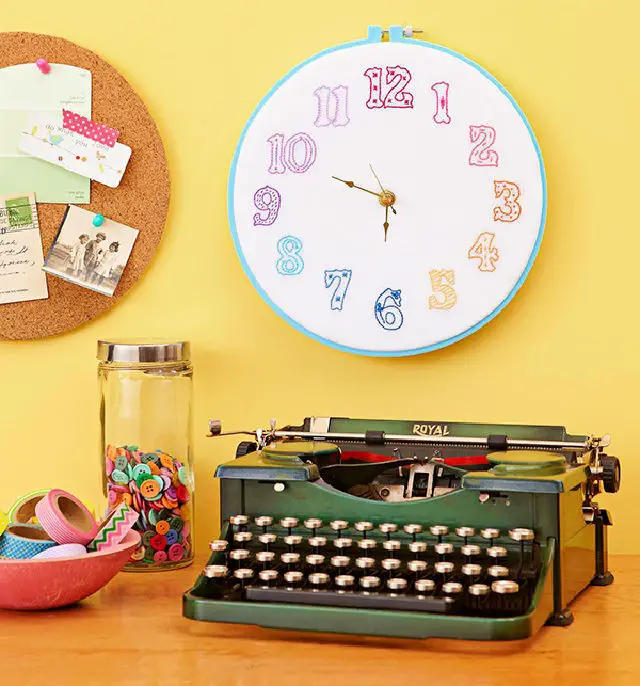
Add a personal touch to your home decor with a unique handcrafted element from AllPeopleQuilt.com. Their clock sampler project is more than just a functional piece – it’s a conversation starter! Each numeral on the clock face features a distinct motif, making every glance at the time a delightful experience. To bring this creative idea to life, start by grabbing a plastic embroidery hoop and letting your stitches infuse color and charm into any room. This project is less about crafting and more about capturing moments that last – tick by tick. Follow their guide to create a vibrant addition to your living space that showcases your stitching flair and becomes a treasured keepsake.
How to Make an Embroidered Bouquet
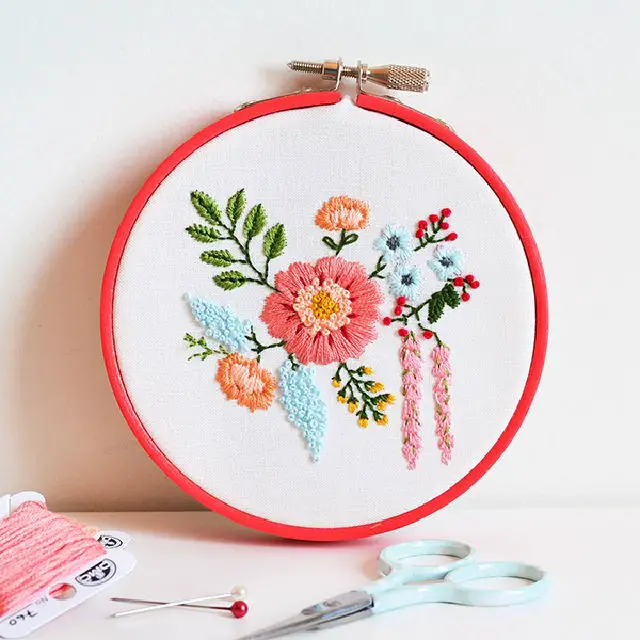
Unleash your creativity by embarking on an enchanting embroidery adventure with our comprehensive bouquet tutorial. This step-by-step guide is designed to empower you with the skills to craft a stunning feature panel that exudes warmth and character. By providing clear instructions for materials preparation, stitching techniques, and pattern application, we ensure that your journey from novice to accomplished embroiderer is seamless. Explore the realm of satin stitches, French knots, and fishbone embroidery, as these intricate details come together to create a visually captivating bouquet that will be treasured by all who behold it.
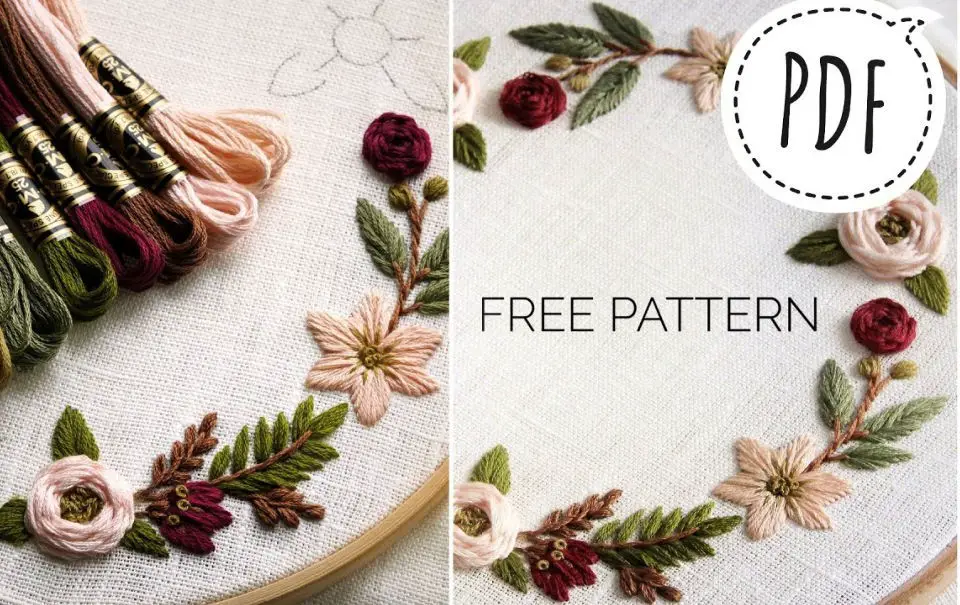
Making an Embroidery Wreath
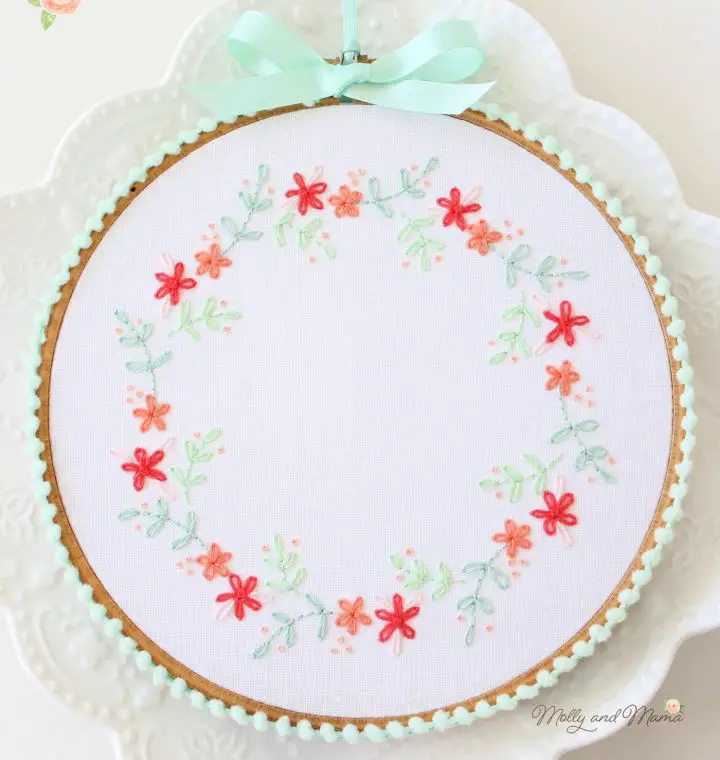
Transform your crafts with the unique charm of free-hand embroidery designs. The creative team at Molly and Mama invites you to join their Aurifil Artisan Challenge, where you can discover the joys of hand embroidery through a simple yet elegant wreath pattern. This design showcases the beauty of pastel florals created using beginner-friendly stitches like the back stitch, lazy daisy, and French knots. The versatility of embroidery is showcased as the design shifts remarkably with different color threads and fabrics. To access this lovely pattern, simply sign up for the Molly and Mama newsletter, which also offers a helpful series on Embroidery for Beginners. For further inspiration, explore their instant download patterns in their store, perfect for starting your sewing journey. As you craft with Aurifil’s smooth Cotton Floss, let your creativity bloom!
Fresh Geometric Embroidery Pattern
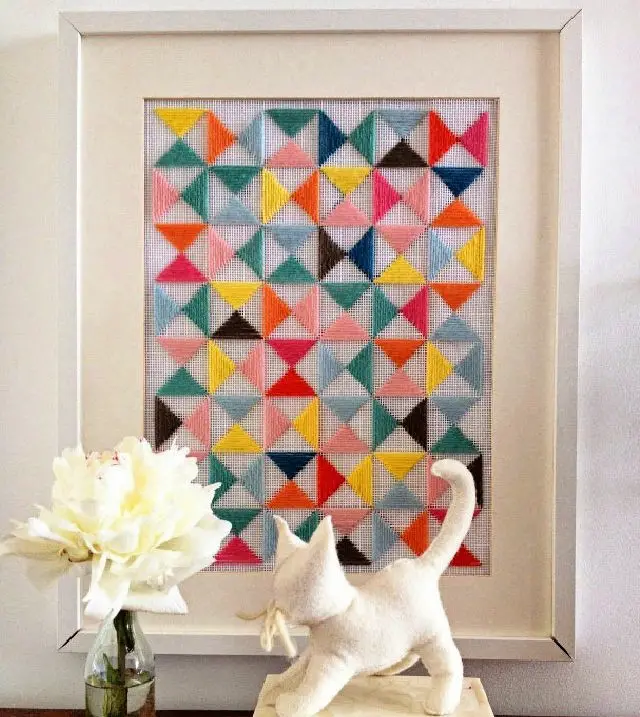
Embroidery enthusiasts seeking a modern spin on traditional needlework will find solace in Build House Home’s engaging geometric embroidery tutorial. This comprehensive guide takes the mystery out of creating a stunning piece of art, perfect for a calming evening project. By breaking down the process into easy-to-follow steps, including material selection, stitching patterns, and expert framing advice, this tutorial is designed to delight those who appreciate contemporary design in embroidery. As you embark on this creative journey, discover how effortlessly you can elevate basic embroidery into a chic statement piece for your home.
Primrose Botanical Embroidery
Indulge in our collection of free printable embroidery patterns and find inspiration for your next creative project. One standout piece is the charming botanical embroidery tutorial by Stitch Floral, which guides you in crafting a beautiful Primrose masterpiece. This comprehensive guide is ideal for embroidery enthusiasts looking to hone their skills while working on a small yet rewarding project. The step-by-step instructions are clear and easy to follow, making it simple to create your own spring-inspired textile art. By mastering techniques such as the split stitch for stems and long and short stitches for vibrant petals, you’ll be able to bring your primrose design to life. This engaging tutorial is designed to be both informative and enjoyable, ensuring a satisfying embroidery experience. For the pattern and tutorial, visit Stitch Floral and get started on your Primrose embroidery today.
Butterfly Garden Embroidery Pattern
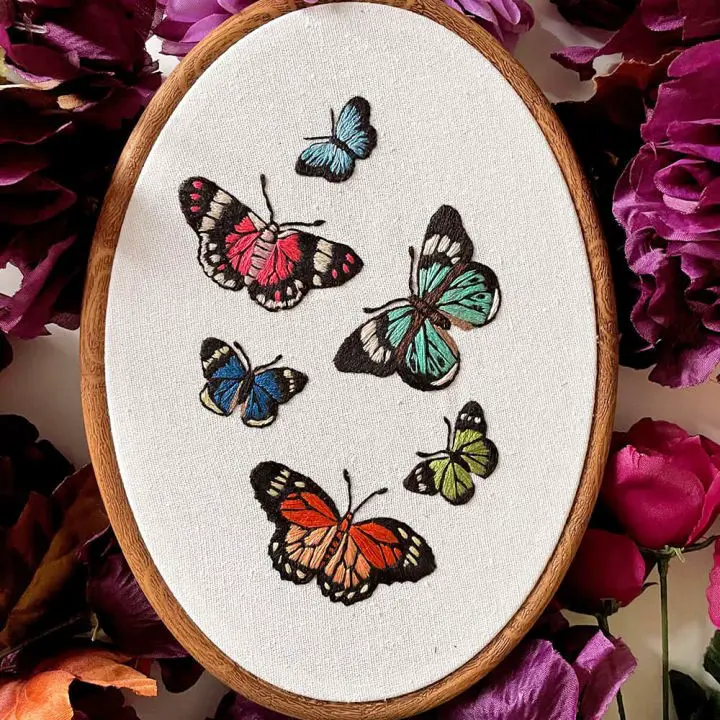
Indulge in the whimsical world of Makenstitch’s butterfly garden embroidery tutorial, where vibrant colors and meticulous stitching come together in a harmonious dance. This comprehensive guide, complete with a complimentary pattern and crystal-clear instructions, invites crafters of all skill levels to join Gabriela on a delightful journey from start to finish. With expert guidance on materials, visual aids courtesy of a video tutorial, and a thorough breakdown of the stitches employed, this tutorial ensures an engaging experience that will leave you beaming with pride as you bring this stunning piece to life and infuse your décor with a touch of sophistication.
Abstract Embroidery Hoop Art
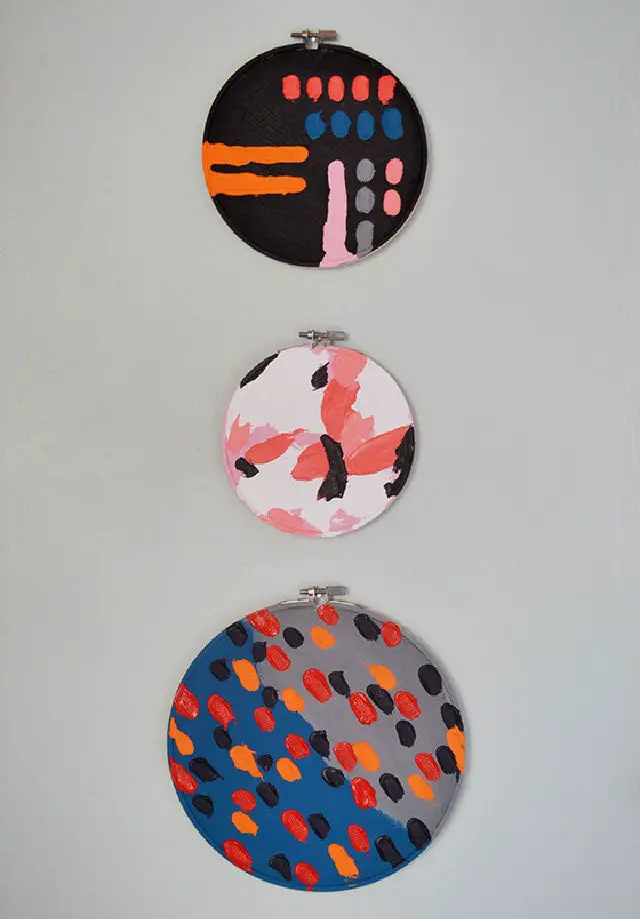
Unleash your artistic side by embracing the tactile world of abstract embroidery hoop art, as showcased in Design Crush’s DIY guide. This comprehensive tutorial empowers you to create a collection of one-of-a-kind pieces that add a personal touch to any room. With a minimal set of supplies, including embroidery hoops, fabric, acrylic paints, and a palette knife, you’ll be able to craft unique artworks that blend your favorite color palettes and textures. By building upon layers of paint, you can produce a series of visually striking pieces that tell a story when displayed together. As with any creative project, patience is key – allow the paint to dry completely before showcasing your masterpieces. Let Design Crush guide you on this engaging journey as you explore the world of abstract embroidery hoop art and unleash your inner artist.
Conclusion:
As you conclude this journey into embroidery, the possibilities for crafting and creativity are endless, thanks to the 30 free embroidery patterns for beginners (ultimate designs). This hobby not only hones your skills but also brings immense joy from creating something beautiful from scratch. The comprehensive article, replete with valuable tips, a 7-day guide, and frequently asked questions, empowers you to embark on your embroidery adventure with confidence. With the perfect blend of patterns, guidance, and enthusiasm, you’re poised to bring your ultimate designs to life. As you begin this creative journey, happy stitching!
