Immerse yourself in a world of creative play with DIY wood toys, a sustainable way to nurture children’s imagination and problem-solving skills. With 40 simple yet engaging projects at your fingertips, you’ll be inspired to turn ordinary wooden scraps into extraordinary playthings. From wooden cars to puzzles, this guide will walk you through the step-by-step process of crafting unique and fun DIY wood toys that cater to all skill levels. As we delve into the world of wooden toy making, we’ll explore the educational benefits, essential tools and methods, and creative customization ideas to make your creations truly one-of-a-kind. Additionally, we’ll address concerns about safety, sustainability, and maintenance, providing you with the knowledge to troubleshoot common issues and keep your DIY wood toys in top condition. To further ease any doubts, we’ve compiled a comprehensive list of FAQs that will have all your questions answered. Join us on this crafting adventure as we explore the joy of making memorable wooden toys for the little ones in your life.
How to Make Wood Toys at Home
Immerse yourself in the world of woodworking and bring a touch of nostalgia to your home by creating your own wooden toys. With our comprehensive, easy-to-follow guide, you’ll be well on your way to crafting a variety of charming wooden playthings for kids of all ages.
Materials Needed
To bring your DIY helicopter project to life, you’ll need a variety of materials. For the skids, you’ll require scrap timber or pine, which can be readily sourced from any local hardware store or even salvaged from old pallets. Additionally, you’ll need 19mm dowel for the skid’s structural support. Moving on to the rotor components, thinner pine will suffice for the main blades, while a jigsaw and sandpaper will help you shape them to perfection. A set of drill bits is also essential, including a 6mm bit for any final adjustments or additions. For the car wheel components, a 35mm hole saw will come in handy. To keep everything secure and rust-free, nylon washers are a must-have. When it comes to bonding your wooden pieces together, wood glue is your best friend. Finally, to give your helicopter that extra pop of color, you’ll need paint (both undercoat and your chosen colors) and a speed square to ensure all your cuts and measurements are spot on.
Helicopter
Step 1: Sketch and Cut
Begin by sketching the helicopter’s silhouette onto your wooden material. Utilizing a jigsaw, carefully cut along the lines to remove the excess wood and reveal the shape. Once you’ve achieved the desired outline, smooth out any rough edges using sandpaper to create a seamless finish.
Step 2: Prepare the Skids and Rotors
When assembling the helicopter’s landing gear, it’s essential to use the right materials and precision drilling techniques. For the skids, opt for the 19mm dowel, while reserving the thinner pine for the rotors. To secure these parts to the body, create six-millimeter holes using a drill bit. A crucial step in achieving stability is ensuring the skid holes are drilled at precisely 45 degrees. To achieve this, utilize your speed square as a reference point, guaranteeing a sturdy and balanced landing setup.
Step 3: Painting
When it comes to giving your toy helicopters a fresh new look, start by painting each component individually. Begin with a base coat, opting for bold and bright hues that will captivate young imaginations. Allow ample time for the paint to fully set before moving on to the next step.
Step 4: Assembly
To guarantee a smooth spinning motion, insert nylon washers between the propeller and rotor. Next, secure the dowels for the skids and rotor using glue. With these steps complete, your helicopter model is prepared to embark on thrilling, imaginative flight adventures.
Race Car
Step 1: Shape and Cut
Start by selecting a piece of dressed pine that measures 50 inches by 30 inches. Using a pencil, draw the outline of your race car, making sure to include the driver’s seat. Use a 25mm spade bit to cut out the driver’s seat from the wood. Then, employ a jigsaw to carefully craft the car’s shape, following the lines you drew earlier. Once the basic shape is complete, drill two 6mm holes – one at the front and one at the back of the car – which will serve as the axles for your wooden vehicle.
Step 2: Wheels
To create the foundation for your project’s mobility, start by fashioning four wheels using a 35mm hole saw and a thinner piece of pine as your material. Once you’ve successfully cut out the wheels, it’s time to attach them to the axles. Apply glue to secure each wheel in place, but be sure to leave one side unglued for now, leaving room for future adjustments or modifications.
Step 3: Sanding and Painting
Once the adhesive has fully set, initiate the sanding process to achieve a uniform surface texture. This is crucial for ensuring a flawless base for subsequent coats. Next, apply an underlayer to provide a suitable foundation for your chosen paint hues. Allow ample time for this layer to dry completely before moving on to the final decorative stage.
Step 4: Final Assembly
To complete your DIY drift car, integrate nylon washers strategically between the wheels and the vehicle’s chassis to guarantee a seamless rolling motion. Next, secure the remaining wheel edges to the axles using a sturdy adhesive. With these final touches in place, your custom-built drift machine is now primed for high-speed thrills and adrenaline-fueled escapades.
Video Tutorial
To further enhance your creative journey, we recommend supplementing this guide with a step-by-step video tutorial available on our YouTube channel, Great Home Ideas. This visual companion piece perfectly complements the written instructions, providing a well-rounded and immersive crafting experience that combines the best of both worlds.
Educational Value of DIY Wood Toys
Beyond being simple playthings, DIY wood toys serve as valuable tools for learning and growth. The process of crafting wooden toys provides a unique hands-on educational experience that can have a profound impact on children’s development. By engaging with wooden toys, kids can develop essential skills such as problem-solving, creativity, and fine motor control, while also fostering an appreciation for the natural world.
Fostering Creativity and Imagination
Unlike electronic toys that are bound by programming and predefined functions, wooden toys offer children the freedom to explore their imagination. Their simplicity and versatility allow kids to transform them into anything they envision, whether it’s a simple block morphing into a car or a set of shapes coming together to create characters in a story. This open-ended nature fosters creativity, problem-solving skills, and critical thinking, as children learn to think outside the box and bring their ideas to life.
Enhancing Cognitive Skills
Playing with wooden toys offers a unique opportunity for children to develop their cognitive skills, particularly in the areas of problem-solving and spatial reasoning. A prime example is the process of assembling a wooden puzzle, which requires youngsters to identify patterns and shapes – essential abilities that lay the foundation for mathematical and logical thinking.
Developing Fine Motor Skills
Developing fine motor skills is a crucial aspect of childhood development, and one effective way to do so is by engaging in activities that involve working with small pieces and assembling parts. Tasks like stacking, fitting, and balancing not only refine these essential skills but also lay the foundation for more complex actions such as writing and tying shoelaces. By breaking down larger tasks into smaller, manageable components, children can build confidence and dexterity, ultimately fostering a strong sense of independence as they master various motor skills.
Encouraging Physical Interaction
In today’s digital age, where screens are omnipresent, wooden toys offer a unique opportunity for children to engage in hands-on play that stimulates their senses and fosters motor skills. The simple act of touching, feeling, and manipulating these tactile objects can have a profound impact on a child’s sensory development and hand-eye coordination, laying the foundation for future cognitive and social abilities.
Promoting Concentration and Patience
Through DIY wood toy projects, children can develop essential skills such as concentration and patience. The process of creating a toy from scratch demands sustained attention and perseverance, traits that will benefit them in the long run. Furthermore, engaging in DIY wood toys enables adults to provide kids with an entertaining yet educational experience that fosters learning and creativity.
Essential Tools and Techniques for Crafting DIY Wood Toys
Embarking on a DIY woodworking adventure is an exhilarating experience, allowing you to create sturdy, secure, and treasured playthings that will bring joy to children for years to come. To begin your woodworking journey, it’s essential to have the right tools and techniques at your disposal.
Basic Tools You’ll Need
To kick-start your woodworking journey, you’ll need to gather some essential tools that serve as the foundation of your toolkit. The following are must-haves for any woodworker:
A saw – whether it’s a hand saw or jigsaw – is crucial for shaping and cutting wood into desired forms.
A drill is necessary for creating precise holes, regardless of whether you’re building axles or adding decorative elements.
To ensure the smooth surface finish of your wooden creations, don’t forget to include sandpaper in your arsenal.
Chisels are perfect for intricate carving and shaping, allowing you to add fine details to your projects.
Finally, a set of paintbrushes will come in handy when it’s time to add color and bring your masterpieces to life.
Techniques to Master
To take your toy-making skills to the next level, focus on mastering four essential techniques: cutting and shaping, sanding, drilling, and painting. Cutting and shaping require precision to produce accurate and well-formed wood pieces, while sanding is vital for achieving a smooth finish that’s safe for children to handle. Drilling straight and clean holes is also crucial for assembling toy parts effectively. Finally, developing your painting skills will enable you to add vibrant, non-toxic colors to your creations, bringing them to life and making them even more engaging for kids.
Safety First
When tackling projects that involve tools and materials, it’s crucial to prioritize safety above all else. This can be achieved by adopting several key habits. First and foremost, always wear the necessary protective gear, including safety glasses and gloves. These simple precautions can significantly reduce the risk of injury. Additionally, work in a well-ventilated area whenever possible, particularly when working with materials that release fumes or particles, such as paints or finishes. A clean workspace is also essential for maintaining safety; clutter and disorganization can lead to accidents and mishaps. By incorporating these habits into your workflow, you’ll be better equipped to handle the challenges that come with working with tools and materials.
Customization Ideas for DIY Wood Toys
While crafting DIY wood toys, the true artistry lies in infusing personal flair into each creation. This involves more than simply following a recipe – it’s an opportunity to let imagination run wild and shape the final product according to your unique aesthetic. To spark inspiration for customization, consider the following ideas:
Choose Your Theme
When crafting a mosaic art piece, begin by choosing a theme that speaks to you or the individual you’re creating it for. This central idea will serve as a guiding force, influencing the selection of shapes, colors, and distinctive features. Consider drawing inspiration from realms like dinosaurs, space exploration, farm animals, or beloved fairy tales – letting your chosen theme be the catalyst for bringing your mosaic art piece to life.
Paint and Color
Bring toys to life through a kaleidoscope of colors! Using child-safe paints, you can add a pop of vibrancy to your favorite playthings. Here’s how to get started:
To ensure an even and long-lasting color job, begin with a base coat. This layer sets the stage for the colorful details to follow.
For small features like eyes or intricate patterns, use fine brushes to add precision. These tiny touches can make all the difference in bringing your toys to life.
Finally, seal your masterpiece with a non-toxic finish to protect the paint job and ensure it remains intact over time.
Add Textures
Textures play a crucial role in adding visual appeal and encouraging tactile interaction. To create a visually appealing and engaging environment, consider incorporating different textures through various means. For instance, you can use sanding techniques to smooth out certain areas while leaving others rough for contrast, creating a sense of depth and dimensionality. Additionally, fabric or felt pieces can be glued onto surfaces to add softness and tactile interest. This subtle combination of textures can greatly enhance the overall sensory experience, making it more inviting and memorable.
Personalize with Names
To make a toy even more endearing to a child, consider personalizing it with their name. There are several ways to achieve this unique touch. For instance, you can use a wood-burning tool to create a rustic, charred effect or carve the name using a small chisel for a more traditional look. Alternatively, you could write the name in bold letters with a paint pen, adding a pop of color to the toy’s design. These subtle yet thoughtful touches can make the toy feel like a one-of-a-kind treasure for the child.
Mix and Match Parts
Unleash the inventor within you by creating toys with modular design principles. Design and build interchangeable parts like limbs, heads, or wheels that can be easily swapped out to create an endless array of unique toy combinations. This hands-on approach fosters creativity, problem-solving skills, and a deeper understanding of how things work.
Incorporate Movement
When it comes to creating engaging and interactive play experiences, incorporating movable elements can be a game-changer. To do this, consider adding the following features to your toy design:
Wheels: By attaching wheels to certain components, you can create rolling toys that allow children to explore different textures, sounds, and movements.
Hinges: Hinges are perfect for creating parts that need to fold or bend, such as arms or legs. This can lead to a greater sense of realism and interactivity in your toy design.
Elastic: Elastic materials can be used to create stretchable or bouncy elements that add an extra layer of fun and excitement to the play experience. Whether it’s a bouncy animal or a stretchy rope, elastic components can help bring your toy design to life.
Ensuring Safety and Sustainability in DIY Wood Toys
To create eco-friendly and child-safe DIY wood toys, it’s crucial to consider two vital aspects: safety and sustainability. Prioritize your wooden creations by adopting environmentally conscious practices and incorporating thoughtful design elements that minimize hazards for young users.
Selecting Safe and Sustainable Materials
When selecting the perfect wood for your child’s toy, prioritize sustainability by opting for FSC-certified options. Additionally, steer clear of woods treated with chemicals or paints that may pose potential health risks to young children. Furthermore, ensure that any finishes used on the toys are non-toxic and safe for little hands to touch. When shopping, look for products bearing labels indicating they’re non-toxic or food-safe, providing peace of mind as your child plays.
Crafting with Care
When it comes to ensuring the safety and quality of children’s toys, there are several key factors to consider. Firstly, attention should be paid to the edges and corners of the toy, as rough or sharp surfaces can pose a risk of splinters or injuries. A simple yet effective solution is to smooth out these edges using sandpaper or a similar tool. Next, it’s crucial to verify that all parts of the toy are securely attached to prevent any potential choking hazards. This may involve double-checking screws, bolts, and other connections to ensure they’re tightened properly. Finally, regular inspections should be conducted to identify any signs of wear or damage, allowing for prompt repair or replacement if necessary.
Troubleshooting Common Issues in DIY Wood Toys
While wooden toys are renowned for their durability and sustainability, they’re not immune to potential issues. In fact, even with proper care, wood-based playthings may face a few common challenges. If you’ve noticed your child’s beloved wooden toy exhibiting some of these signs, don’t worry – we’ve got you covered.
Fixing Loose Joints
When it comes to fixing things around the house, having the right tools and materials can make all the difference. One crucial aspect is choosing the suitable wood adhesive for your repair job. To ensure a strong bond, start by thoroughly cleaning the area you’ll be working on. Next, apply a generous amount of the chosen adhesive, making sure to cover the entire surface that needs to be fixed. Finally, use clamps or other appropriate tools to hold everything in place until the glue has fully dried and set.
Dealing with Splinters
When it comes to refining the texture of your woodwork, fine-grit sandpaper is an essential tool in your arsenal. By carefully working through even the most stubborn imperfections, you’ll be left with a surface that’s not only smooth but also free from any lingering rough spots. And to provide an added layer of protection for your newly-sanded wood, consider applying a non-toxic sealant to safeguard against damage and wear.
Refreshing Faded Paint
When it comes to repainting toys for your little ones, safety should always be top of mind. To ensure a safe and healthy environment, opt for child-safe paints that are free from harmful chemicals and toxins. Apply the paint thinly and evenly, allowing for ample drying time to prevent any accidental ingestion or skin contact.
Maintenance and Care for DIY Wood Toys
To extend the lifespan of your handmade wooden toys and preserve their value as a treasured childhood companion, it’s crucial to adopt proper maintenance and care practices. This simple guide outlines the essential steps to keep your DIY wood creations in exceptional condition, ensuring they remain a beloved part of your child’s playtime for years to come.
Cleaning and Handling
When it comes to cleaning wooden toys, a gentle approach is key. Start by wiping down the surface with a damp cloth, taking care not to soak the wood in water. Soaking can actually damage the material, so be sure to avoid getting it too wet.
Once you’ve removed any dirt or debris, allow the toys to air dry completely. It’s important to avoid exposing them to direct sunlight or high temperatures during this process, as these can cause warping and other damage. Instead, let them dry naturally at room temperature, and they’ll be good as new.
Regular Maintenance
Thoroughly inspect toys on a regular basis to detect any signs of wear and tear. Perform a visual check for loose components, splinters, or chipped paint that may have developed over time. As you inspect, make note of any damaged or worn-out parts that require attention.
Once identified, take proactive measures to address these issues. For loose joints, apply a secure tightening force to prevent further damage. If needed, supplement with a strong wood adhesive to ensure a lasting fix.
Long-Term Care
When it comes to storing your wooden toys, it’s crucial to keep them in a well-ventilated area that’s protected from humidity. This will help prevent the growth of mold and mildew. Additionally, consider treating the wood periodically with a high-quality oil or wax to maintain its natural appearance and prevent drying out over time.
FAQs About DIY Wood Toys
For those embarking on a DIY woodworking adventure to create wooden toys, several questions often arise. To navigate this creative journey, let’s tackle some of the most common inquiries. With these answers, you’ll be better equipped to bring your wooden toy-making endeavors to life.
What is the best type of wood to use for making toys?
When it comes to crafting toys, selecting the right type of wood is crucial. While there are various options available, hardwoods like maple, beech, and birch tend to stand out as top choices. This is because they possess a unique combination of durability and resistance to splintering, making them an ideal material for creating safe and long-lasting toys for children.
Are there any safety concerns I should be aware of?
When it comes to creating wooden toys for kids, safety should always be your top priority. To minimize the risk of injury or choking hazards, make sure to thoroughly sand any rough edges to prevent splinters from forming. Additionally, opt for non-toxic finishes that won’t harm children if they accidentally ingest small amounts. Furthermore, steer clear of tiny parts or accessories that could easily become lodged in a child’s throat and pose a serious risk.
Do I need advanced woodworking tools to start making wood toys?
When beginning your woodworking journey, it’s not necessary to break the bank on specialized equipment right off the bat. In fact, you can start by familiarizing yourself with the basics, such as a saw, drill, sandpaper, and chisels. As your skills and confidence grow, you may find that investing in more advanced tools becomes a worthwhile investment for refining your craft.
How can I add color to my wood toys?
When it comes to enhancing the aesthetic appeal of wooden toys, you have a plethora of options at your disposal. One effective approach is to utilize child-safe paints or stains that not only add a pop of color but also ensure the overall safety of the toy. It’s essential to exercise caution and opt for finishes that are completely non-toxic and suitable for young children.
Can I make wood toys that are suitable for toddlers?
When it comes to creating wooden toys for toddlers, safety is paramount. It’s crucial to design the toys with children’s size and developmental stage in mind, ensuring that they are large enough to reduce the risk of choking hazards and free from any sharp edges or small parts that could pose a threat.
How do I make sure the toys are durable?
When crafting wooden toys that can withstand the rigors of playtime, it’s essential to prioritize durability by combining three key elements: selecting high-quality wood, employing robust joinery techniques, and applying a reliable protective finish. By doing so, you’ll be able to create toys that can handle repeated use without showing signs of wear and tear.
What are some simple wood toy projects for beginners?
For beginners, it’s best to start with smaller and more manageable projects that don’t require a lot of complex tools or expertise. Examples of such projects include building blocks, toy cars, puzzles, and simple animal figurines. These types of projects are excellent for learning the fundamentals of crafting and can help you develop your skills without feeling overwhelmed. Plus, they’re often easy to make and require minimal resources, making them perfect for a quick creative fix.
How can I personalize the wood toys I make?
To give a toy an extra special touch, consider personalizing it with the child’s name, incorporating their favorite colors, or designing it around their unique interests. This thoughtful approach can help create a stronger emotional connection between the child and the toy, making playtime even more enjoyable.
How do I maintain and care for wood toys?
When it comes to maintaining wooden toys, a gentle approach is key. A soft, damp cloth is your best friend when it comes to wiping down these treasures. Be sure to steer clear of submerging them in water, as this can cause more harm than good. Additionally, take the time to regularly inspect your wooden toys for any signs of wear or damage. Should you spot any issues, be sure to address them promptly through minor repairs or touch-ups.
Where can I find inspiration and ideas for wood toy projects?
For those seeking inspiration, there are numerous sources to draw from. Online forums and social media groups dedicated to woodworking, DIY, and crafting offer a wealth of ideas. In addition, perusing pages in woodworking books or exploring the world of traditional toys and applying your own unique spin can lead to innovative creations.
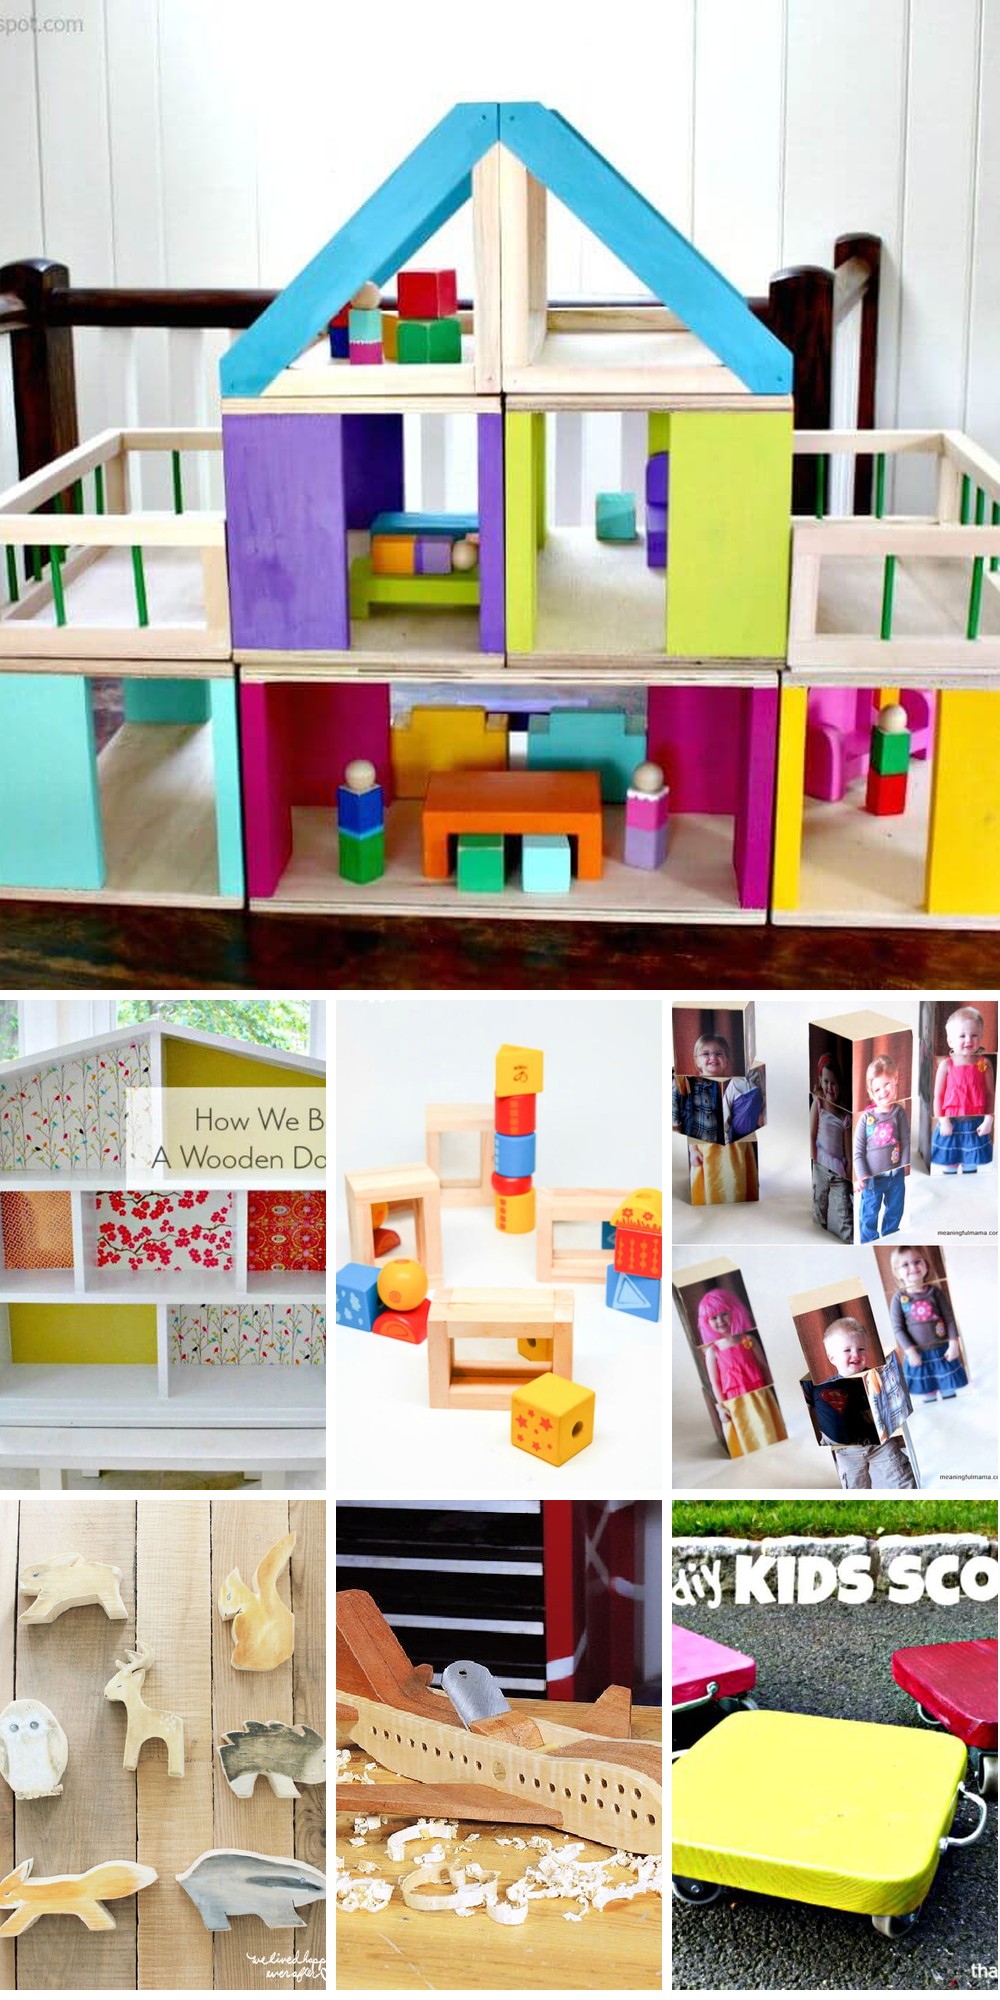
40 Easy DIY Wood Toys to Make for Kids
Explore a world of creativity and hands-on learning with 40 easy and engaging DIY wood toy projects perfect for kids. Bring out the little inventor in them by crafting unique and imaginative wooden toys, starting now!
DIY Retro TV Style iPad Holder
Transform your space with a unique DIY project that harmoniously blends retro charm with modern functionality. This tablet or iPad holder is an engaging DIY adventure perfect for kids, requiring just thirty minutes of creative time. Crafted from readily available materials such as 1×6, 1×2, and 1×4 boards, along with scrap dowel pieces you may already have on hand, this project can be easily customized to fit any tablet or iPad model. By combining nostalgic appeal with modern technology, this holder provides a secure and quirky solution for displaying your device in any room. Bring joy and whimsy into your daily routine by constructing this adorable, portable, and genuinely useful DIY iPad holder.
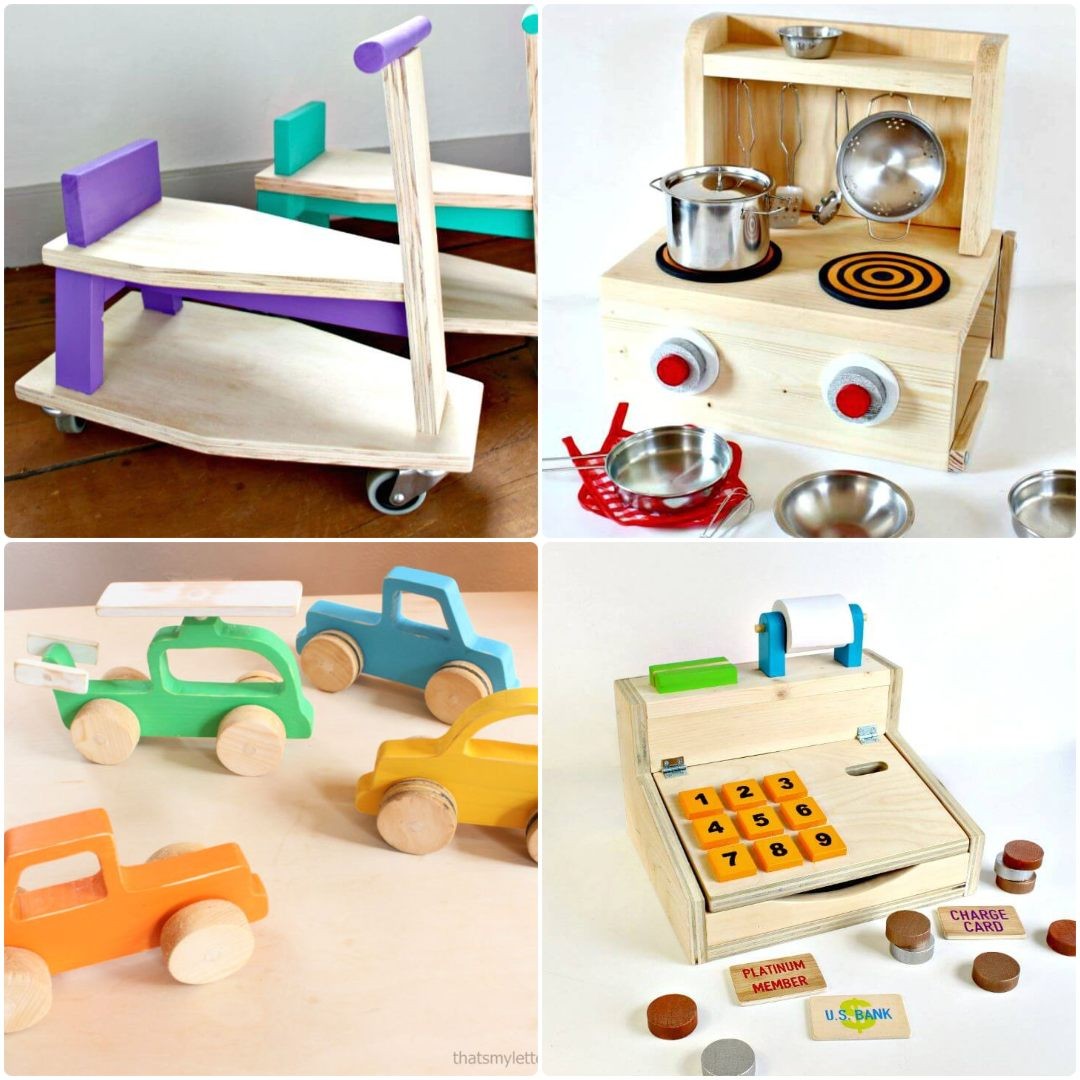
How to Build Wooden Scooters for Toddlers
Transforming scraps of wood into a beloved toy for little ones is an incredibly rewarding experience. The DIY wooden scooter ride-on is the perfect project to spark joy in children aged 14 months to three years old, serving as both a push toy and an indoor playmate. This enchanting creation requires only a few basic supplies, including construction screws and paint, making it an accessible and budget-friendly endeavor. As you bring this charming ride-on to life, you’ll not only be crafting a treasured gift but also creating lasting memories with your child. The best part? You’ll be repurposing leftover materials, turning what would otherwise be waste into something truly special. So why not gather your tools and embark on this delightful DIY adventure, transforming scraps of wood into a cherished toy that will bring smiles for hours to come?
How to Make a Tabletop Play Kitchen
Let your child’s creativity flourish with their very own DIY play kitchen – a compact and convenient tabletop haven for imaginative cooking! Built using 1x4s, 1x3s, and a piece of 1/2-inch plywood, this mini culinary masterpiece is an excellent project to refine your woodworking skills while crafting something delightful for your little ones. The play kitchen features a small cabinet perfect for hanging utensils and storing toys after playtime, encouraging imaginative play and promoting organization as it neatly tucks away its contents. With straightforward instructions in hand, you can effortlessly construct this charming play kitchen that combines fun with functionality. So why not embark on this creative adventure today and add a touch of whimsy to your home?
DIY Wood Cash Register
Create a charming cash register using a DIY wood plan that’s as easy as 1-2-3! This budget-friendly project is perfect for repurposing scrap wood, making it an eco-friendly gift idea or a fun family activity. The simple design features a hinged top and requires minimal materials, including 1x boards, plywood, and dowel pieces for the toy coins and credit cards.
By following these straightforward steps, you’ll bring this unique keepsake to life, from marking the side profiles to attaching the top with small hinges. This project is designed to be accessible to crafters of all ages and skill levels, making it an excellent way to spend quality time with loved ones or create a thoughtful holiday gift.
So why not give it a try? With its customizable design and eco-friendly appeal, this wooden cash register is sure to delight both young and old. Start building today and make it a holiday season to remember!
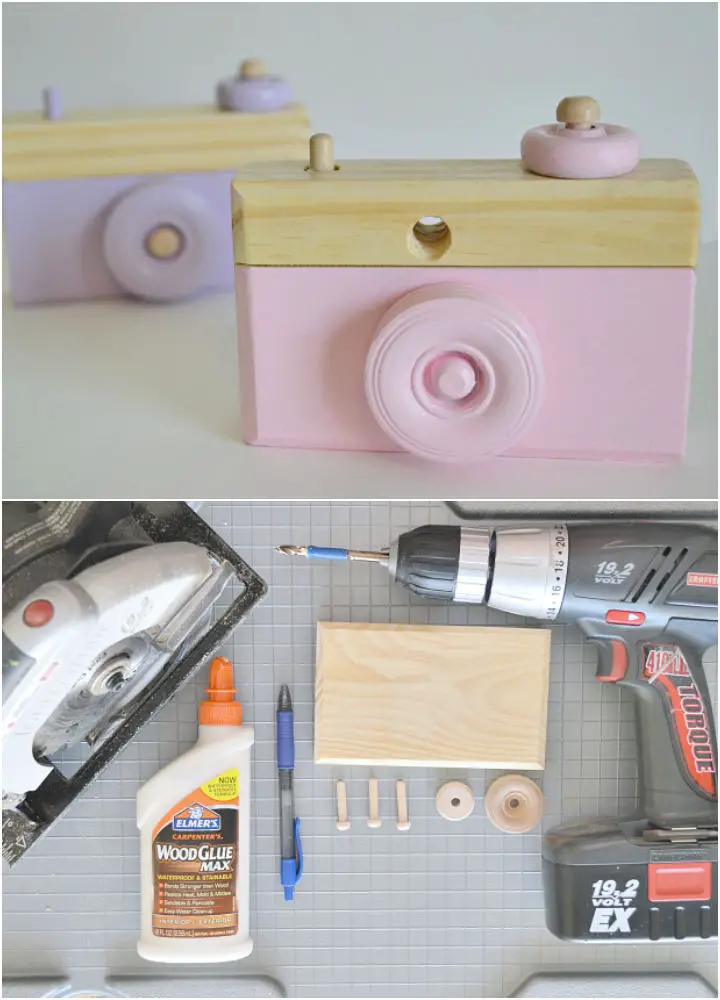
Make Your Own Wood Toy Camera
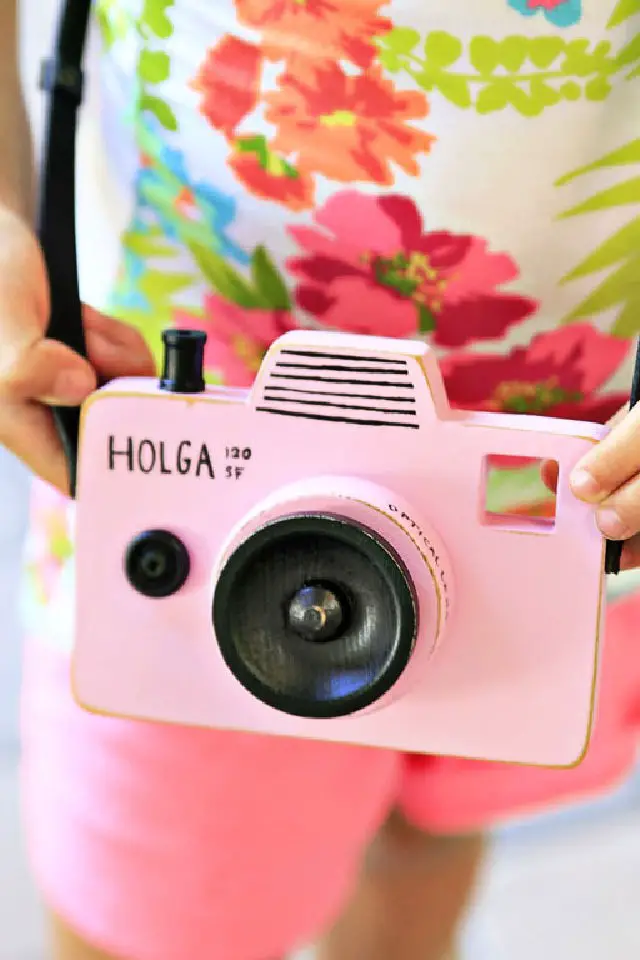
Create a whimsical photography experience with this delightful DIY wooden pretend camera, designed specifically for young explorers. The project begins by shaping the camera body using a compact scroll saw like the Dremel Moto-Saw from a single piece of scrap wood, requiring precision and patience to carve out the viewfinder. Spare craft wood pieces are then used to create the lens and knobs, adding intricate details to the camera’s design. A pop of color is added with pink paint, complemented by black accents for a charming aesthetic. The addition of a real leather strap elevates the authenticity of the finished product, which can be used as a fun toy, an interesting photo prop, or a unique decor piece. With a clear varnish finish, this camera is ready for countless adventures and serves as a testament to the power of creativity and DIY craftsmanship.
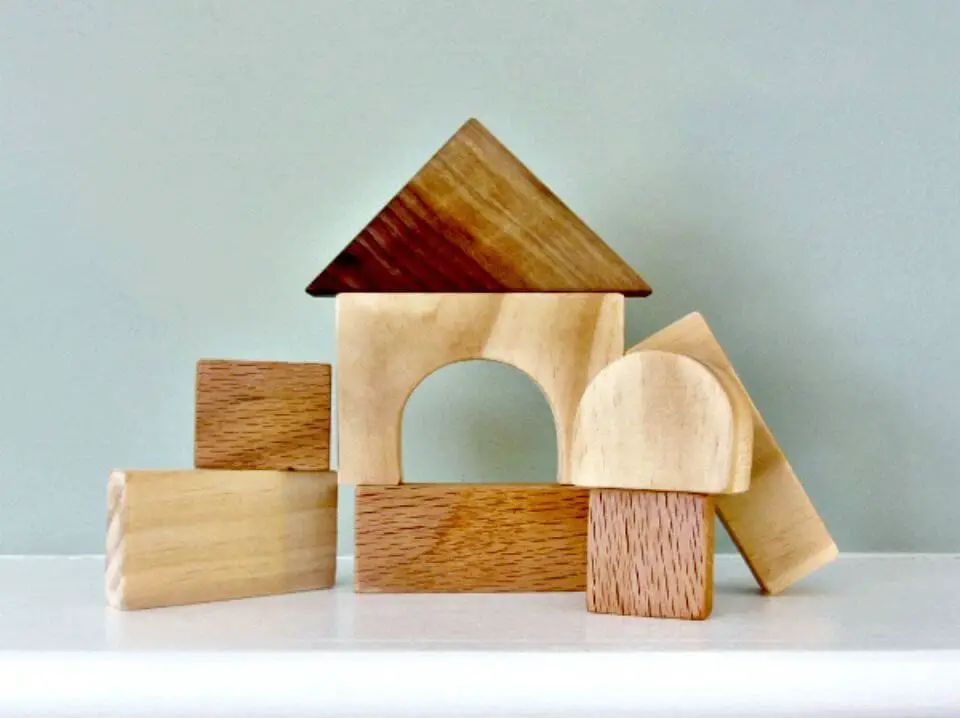
Handmade Texture Blocks
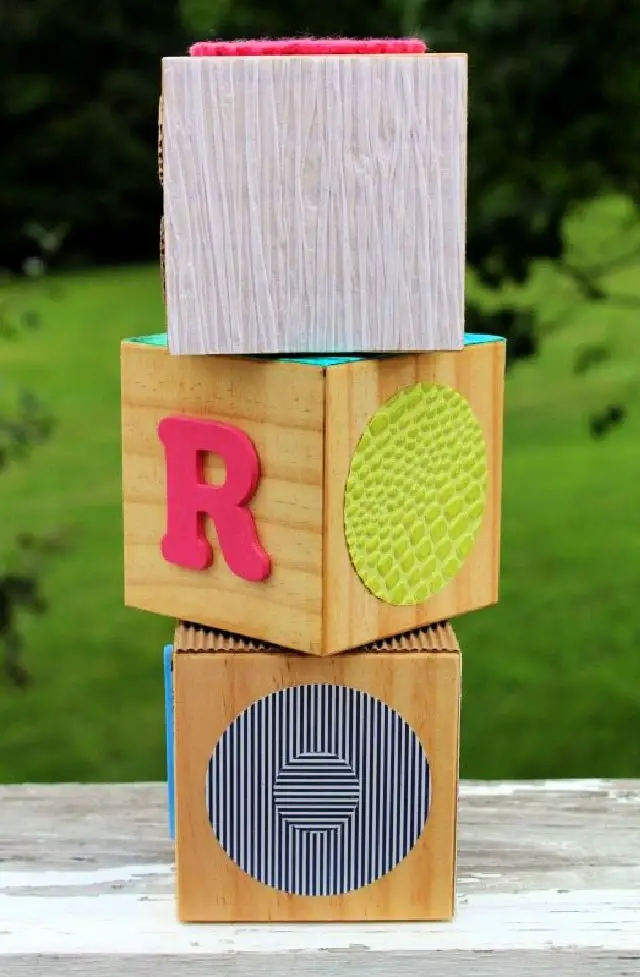
Enter the enchanting realm of handmade texture blocks, where sensory exploration meets cognitive development. These meticulously crafted pine wooden blocks, adorned with a medley of fabrics, woods, and papers, transport your baby on an tactile adventure akin to touch-and-feel books. Not only do they captivate your little one’s attention, but they also fortify the neural pathways essential for learning and growth.
As you customize these blocks with personal touches such as a nursery theme or the child’s initials, they transform into treasured keepsakes. Unleash your creativity and witness your baby’s joy as they embark on a hands-on journey of discovery.
DIY Toy Paddle Boat

Step into the world of sailing with your little one by crafting a DIY wooden paddle boat together. This engaging project not only allows you to bond over a fun activity but also introduces your child to the fascinating concept of movement mechanics. The unique mechanism propelling this handmade vessel forward creates an immersive experience, combining education and playtime. As you create this wooden wonder, consider it a perfect companion for summer escapades on the Great Lakes or even in a neighbor’s pool. This project harmonizes learning and recreation, making it an excellent way to spend quality time with your child. So why not set sail on this exciting DIY adventure today!
Balloon-Powered Wooden Toy Boat
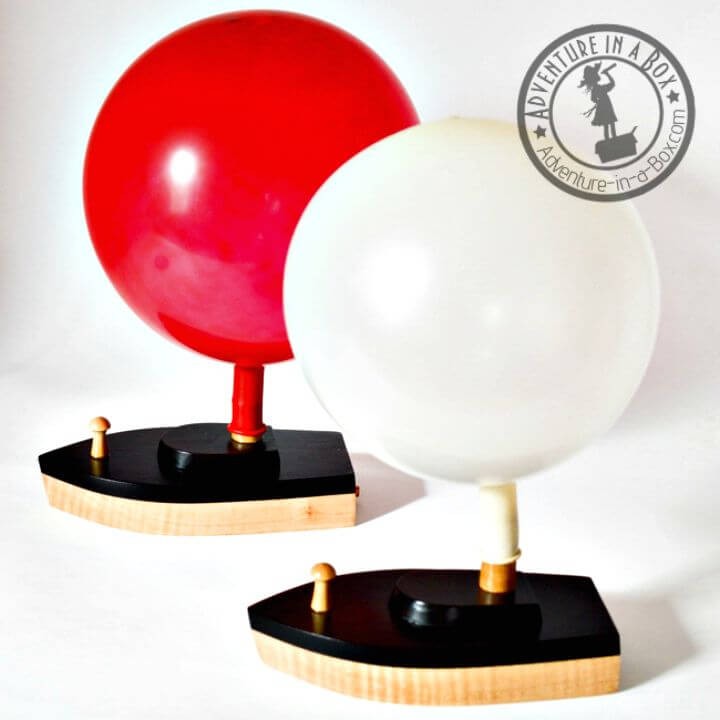
Unlock the thrill of discovery as you create and command your own homemade balloon-powered boat. This captivating project has captivated both kids and adults, combining science, mechanics, and playful exploration. With our step-by-step guide, transform simple materials into an engaging experiment that’s ready to launch in your bathtub. As you build and test your boat, you’ll cultivate a sense of adventure and deepen your understanding of complex mechanical systems, blending science and fun in a unique way.
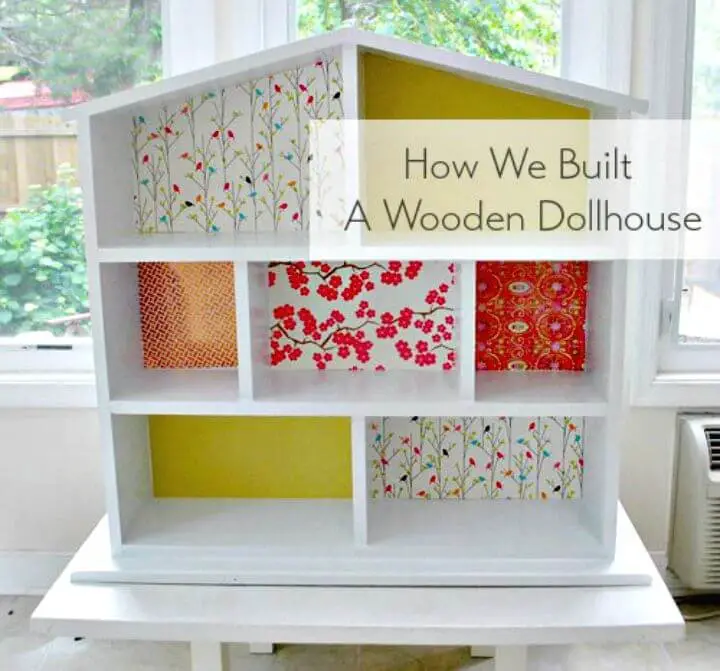
DIY Wooden Dream Dollhouse
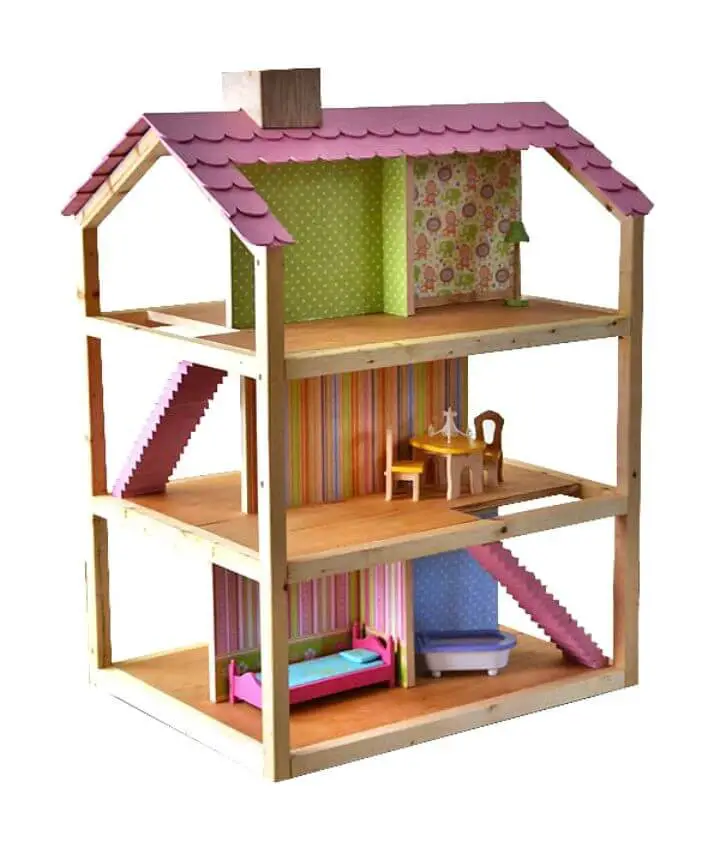
Imagine the delight in your child’s eyes when they explore a one-of-a-kind DIY three-story dollhouse designed specifically for 12-inch dolls. This unique project combines creativity with eco-friendliness, featuring soy-based plywood construction and non-toxic linseed oil finishings. As sturdy as it is beautiful, this dollhouse withstands the test of time, becoming a treasured part of your child’s childhood memories.
The attention to detail is evident in every aspect, from the decoupaged scrapbooking paper adorning each room to the intricately crafted stairway. The assembly process is straightforward, requiring common materials such as 3/4-inch PureBond Plywood, pine 2x2s, linseed oil, and pink paint for accessories.
This dollhouse is an open invitation to your child’s creativity and imagination, keeping them engaged for hours on end. And with its versatility, it can double as a bookshelf later on, making it a smart addition to your home.
Cute DIY Wooden Robot Buddy
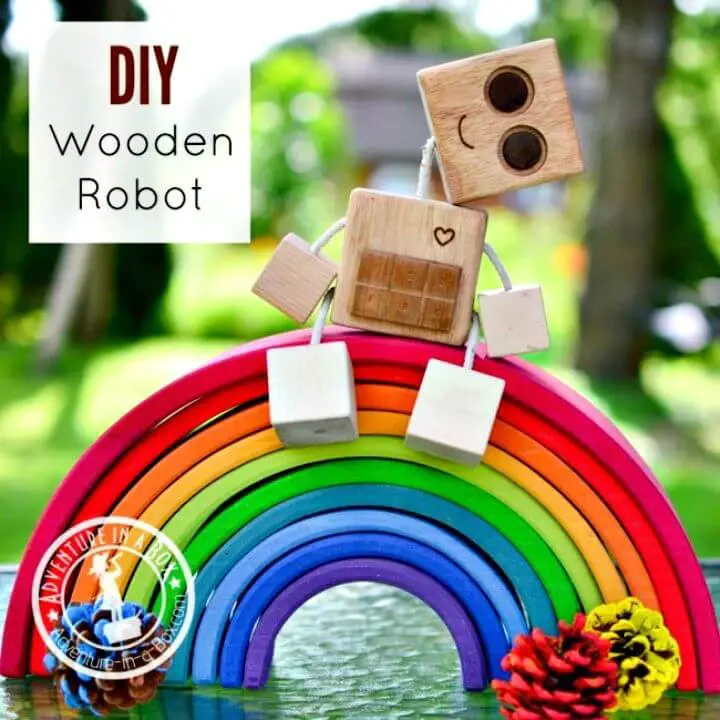
Create meaningful moments with your loved ones by bringing DIY wooden toys to life! This charming project transforms ordinary wooden blocks into an endearing companion that will capture the hearts of children. Not only is it a delightful way to spend quality time together, but it’s also an excellent opportunity to introduce kids to the world of woodworking, nurturing their creativity and handiness. As you craft this eco-friendly toy, you’ll be creating a safe and natural play option that can withstand even the most enthusiastic play and teething. This DIY wooden robot is more than just a plaything – it’s a symbol of love that will become a treasured friend in your child’s life. Imagine watching them light up with excitement upon discovering their new best friend, or seeing their face light up as they use their imagination to bring the toy to life. Start crafting today and fill your home with laughter and joy!
DIY 2×4 Jig Saw Wood Block Animals
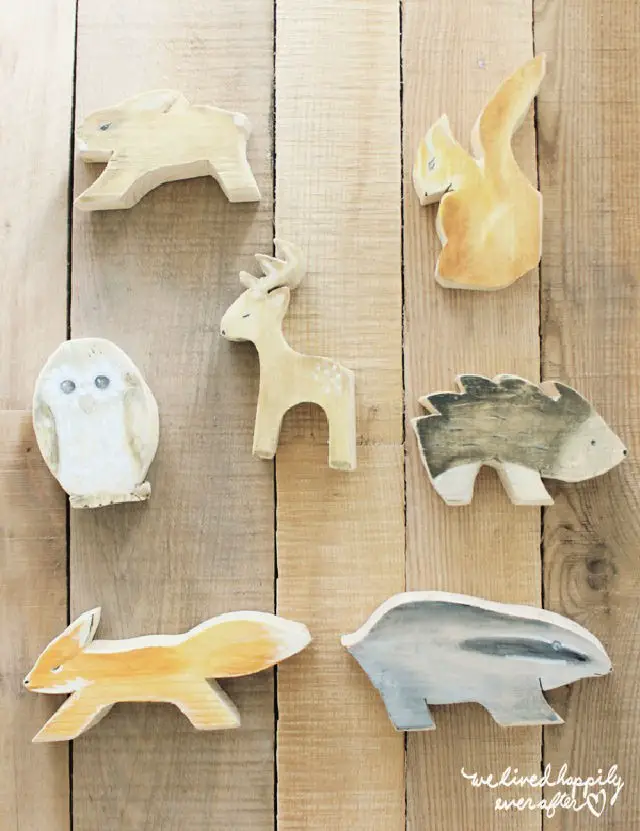
Crafting wooden animal blocks from 2×4 scraps is an innovative way to foster creativity and skills in children. This DIY guide transforms unused materials into eco-friendly toys that kids will love. Start by tracing animal silhouettes onto the 2×4 board, then carefully cut them out using a jig saw. Sandpaper gives the wooden blocks a smooth finish before they’re painted with vibrant acrylic colors. What’s impressive is how the use of shades and consistent color schemes creates a harmonious feel across all the animals. Join this fun project to repurpose your leftover 2×4 boards into a charming menagerie that will delight children and promote imagination.
How to Make Mirror Wooden Blocks – – DIY Wood Toys
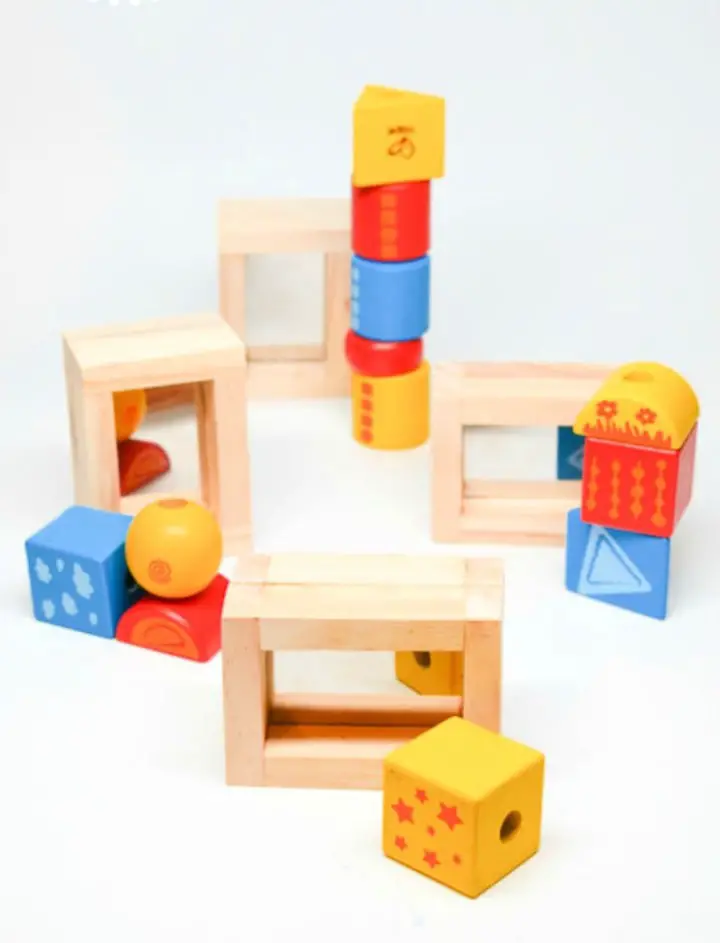
Transform your child’s playtime with this DIY guide to creating personalized mirror blocks! With a simple and affordable project, you can bring both fun and learning experiences to their play routine. Start by assembling wooden blocks into rectangular frames and inserting mirrored sheets. The best part? Each block costs under seven dollars to make, making it a budget-friendly alternative to store-bought options. As your child plays with these unique creations, they’ll be fostering creativity and imagination while enjoying a mesmerizing experience. Whether you’re looking for a fun activity or a handmade Christmas gift, these mirror blocks are sure to be a hit with the little ones!
How to Do Modular Stackable Dollhouse
Transform your little ones’ creative potential with this delightful DIY dollhouse project. Perfect for beginners, this modular masterpiece is comprised of individual rooms that stack, allowing kids to build a one-of-a-kind playset tailored to their unique imagination. With an estimated project time of just a few hours, this fun-filled weekend activity requires easily accessible materials like 1/2″ plywood, 3/4″ molding, and 1×4 boards. As your child assembles the dollhouse, they’ll develop essential spatial skills while exercising their creativity through imaginative play. By joining in on the DIY process, you’ll witness your child’s creative potential soar as they bring their personalized dollhouse to life.
DIY Natural Wooden Blocks for Children
Immerse yourself in a creative DIY adventure as you craft your own natural wooden blocks! This tutorial serves as the perfect starting point for developing fundamental woodworking skills while creating an enduring gift for children. Utilizing straightforward tools such as scroll saws or band saws, and versatile materials like timber of varying lengths, you’ll bring your project to life. As you draw, cut, and sand your blocks into unique shapes and sizes, remember to prioritize safety with protective eyewear and undivided attention. Once complete, take the next step by applying a child-friendly finish using non-toxic oils or paints to elevate the visual appeal of your creations. The end result is a one-of-a-kind set of wooden building blocks, a treasured hands-on experience, and a keepsake to be cherished for years to come.
Painted Wooden Toy Bowling Set
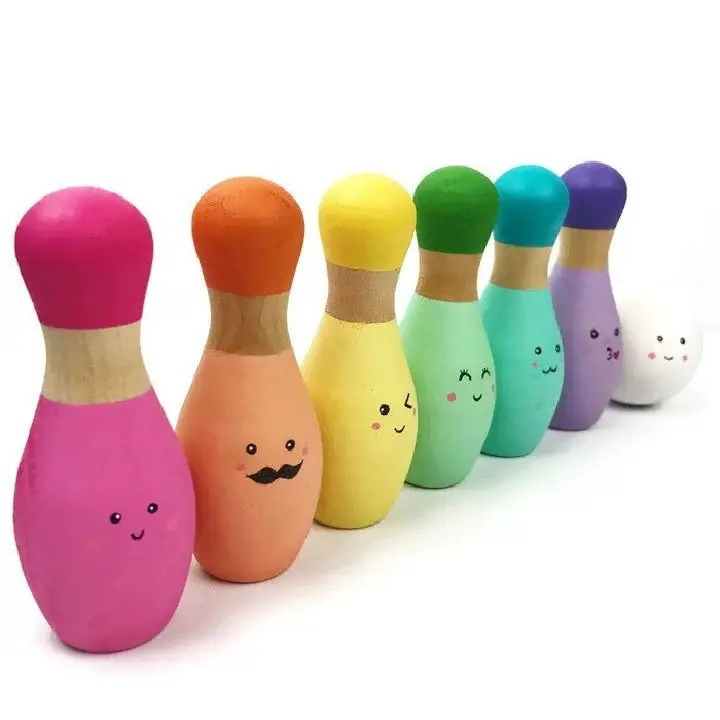
Reviving traditional playtime with a DIY twist doesn’t require carpentry skills. With basic tools and imagination, you can create delightful wooden toys that evoke nostalgia while making new memories. The wooden bowling set project is an excellent example of this. All you need are some unfinished wooden pins, acrylic paint, dotting tools or paintbrushes, washi tape, and a sealant to transform them into adorable, kawaii-inspired creations. The process involves painting stripes and endearing faces onto the pins, resulting in a charming set that kids will adore. This DIY project also makes for a unique and thoughtful gift on special occasions and birthdays. Bring joy and nostalgia to any party with this handmade wooden bowling pin set.
Personalized Name Puzzle Tutorial
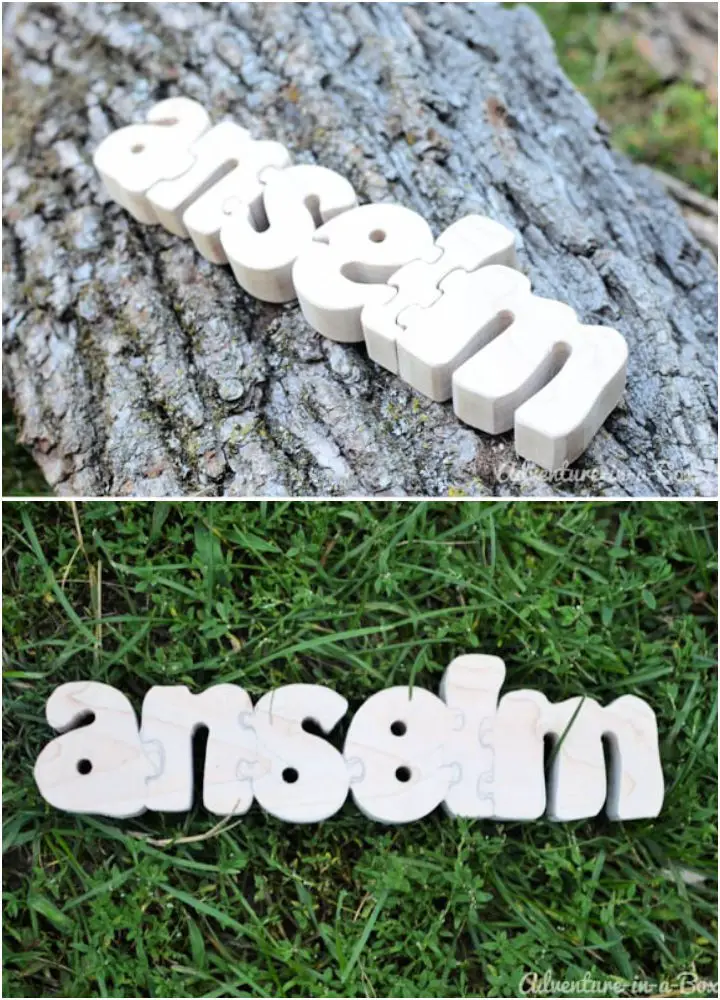
Create an immersive playtime experience with a DIY name puzzle that brings traditional jigsaw puzzles to life. This innovative project is specifically designed to captivate young minds, promoting early letter recognition and honing fine motor skills through hands-on interaction. Using a scroll saw or fretsaw, transform a simple piece of wood or cardboard into an educational toy that doubles as a charming nursery decoration or exclusive baby shower gift. As your child plays with this engaging activity, they’ll develop their literacy skills in a fun and interactive way. Make a name puzzle today and unlock a world of learning opportunities for your little ones.
DIY Wood Push Car, Truck, and Helicopter Toys
Embark on a creative adventure and transform ordinary 1×4 scrap wood into extraordinary DIY wooden toy vehicles. This beginner-friendly project is designed to be easily replicable with simple tools and materials, making it perfect for those new to DIY crafting. With the guidance of step-by-step instructions, you’ll bring charming push cars, trucks, and helicopters to life using versatile materials like wood dowels, hole saw bits, and store-bought wheels. Not only will you create functional toys that spark imagination and creativity in children, but also develop a sense of fulfillment by upcycling and repurposing readily available or recyclable materials. So, gather your supplies, don your crafting hat, and get ready to craft delightful wooden playthings that will bring joy to the young ones in your life.
How to Make Wooden Flower Stacker
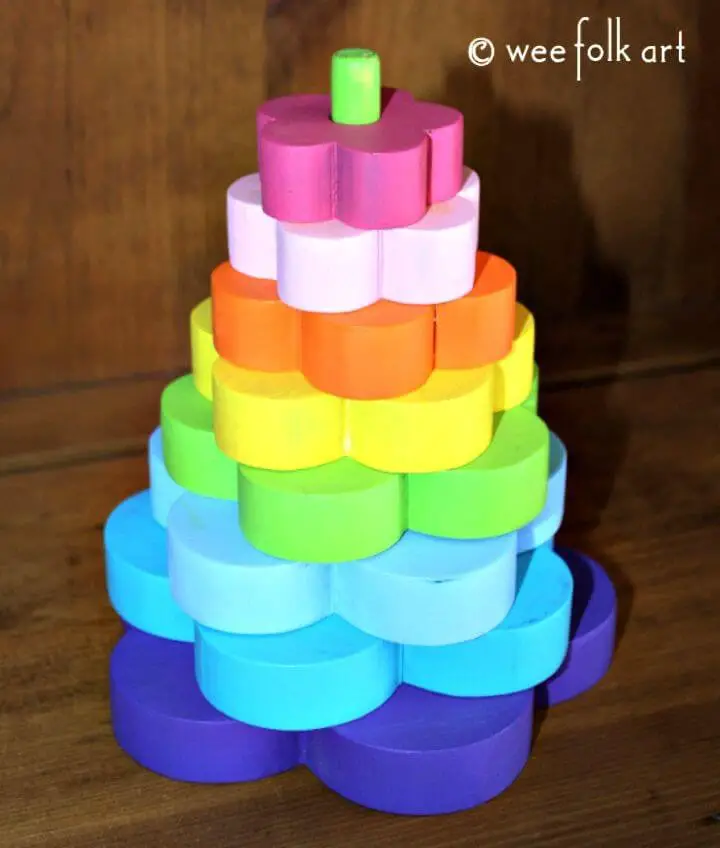
Indulge in the tactile experience of crafting a delightful DIY wooden flower stacker with your little ones. This project presents an exciting fusion of fun and learning that’s sure to delight both you and your child. Although the process requires precision due to its intricate curves, the end result – a charmingly imperfect yet engagingly beautiful stacker – is well worth the effort.
nThe journey begins with using essential tools like scroll saws, electric drills, and safety equipment, as you meticulously craft each flower step-by-step, honing your woodworking skills in the process. This hands-on experience will not only cultivate skill, agility, and hand-eye coordination but also enhance children’s sorting, sequencing, and color recognition abilities. As you work together to bring this project to life, witness how your efforts transform into a treasured toy that will be cherished for years to come.
DIY Wooden Roads and Ramps for Toy Cars
Transform ordinary wood into a treasure trove of DIY wooden toys, perfect for enriching your child’s playtime. One such masterpiece is the creation of homemade wooden roads and ramps for toy cars. Not only will this project save you money, but it also offers endless possibilities for imaginative play. Using 36in x 3.5in x 3/4in poplar boards, you can paint them with black and optional yellow hues to create a striking contrast that’s perfect for indoor or outdoor adventures. What makes this project truly remarkable is its simplicity and versatility – kids can arrange the boards in countless formations, crafting their own road networks or daring ramps that ignite their creativity and motor skills. With this easy-to-make wooden toy car roads and ramps project, you’ll be encouraging your child’s imagination to run wild.
Waldorf Square Geometric 3D Wooden Puzzle Blocks
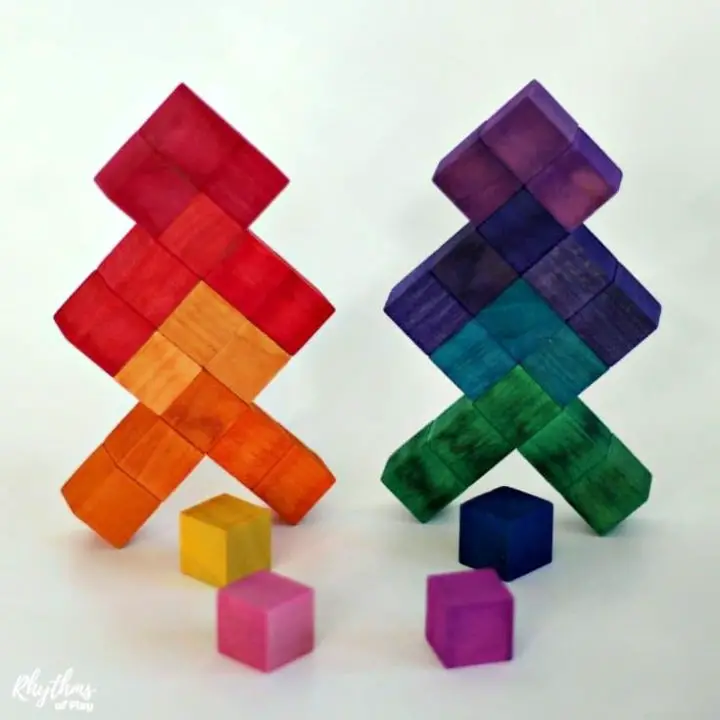
Unlock the joy of creative play with a Waldorf square geometric puzzle, a delightful DIY toy that sparks young minds and fosters geometric and spatial learning. By combining wooden blocks with vibrant liquid watercolor paints, this 3D wooden puzzle becomes an engaging activity for kids to enjoy for hours on end, while nurturing their creativity. As they transform simple wooden blocks into a visually captivating, interactive toy, children can use it as either energetic building blocks or a challenging puzzle. Perfect for promoting STEAM education, this toy keeps little ones engaged in a fun and productive way. Whether you’re looking for a unique addition to your home or an ideal gift that continues to inspire, craft your Waldorf square geometric puzzle today and discover the limitless possibilities of shapes, colors, and patterns it presents.
Make a Puppet Theatre
Create an immersive puppet show experience at home or in the classroom with a sturdy DIY theatre made from plywood, baseboard molding, and decorative moldings. Painted to perfection, this durable design ensures years of creative storytelling and skill-building for kids. With customizable accent colors and an optional curtain, your theatre is ready to bring beloved stories to life. Whether you’re introducing shadow puppetry to infants or staging fairy tales for older children, this versatile puppet theatre is the perfect catalyst for endless imagination and fun.
How to Build a Dollhouse at Home
Step into the enchanting realm of DIY dollhouses, where creativity and craftsmanship come together to create a miniature masterpiece. The project kicks off with a straightforward yet durable design featuring a three-story structure with seven rooms crafted from economical 1×8″ basic white wood, an affordable and versatile material choice. As you embark on this fun-filled building adventure, you’ll navigate the process of constructing walls, designing floors, and culminating with a sloped roof that adds a touch of whimsy to your creation. The end result is a functional and engaging space that proves even small-scale DIY projects can be both delightful and accessible. To get started, the total material cost comes in at a moderate $35, making this an excellent introduction to the world of DIY dollhouse building for young crafters and seasoned enthusiasts alike.
Handmade Balance Board
Embrace the warmth of summer by transforming your backyard into a playground for your kids with this innovative DIY balance board. This interactive creation, crafted from scrap wood, presents an exhilarating outdoor activity that will keep children engaged and active throughout the season.
Combining stability with creativity, this balance board is made from 2×4 and 2×3 wood pieces for a sturdy foundation, while 1/4-inch plywood serves as the surface. The simple steps to build this imaginative play structure can be easily followed, allowing you to customize it with vibrant paint colors or intriguing designs to make it irresistible.
For optimal safety, consider placing the balance board on a rug or carpeted surface. This unique DIY project is an excellent way to encourage kids to spend more time outdoors and enjoy the benefits of physical activity while having fun.
How to Make Kids Scooter
Transforming scrap wood into eco-friendly gifts has never been more exciting. This summer, take on a DIY adventure with your kids by crafting a wooden balance board. Not only will this project keep your little ones active and engaged, but it’ll also foster their balance and motor skills. The best part? You can customize the design with vibrant colors and intriguing patterns, making it a one-of-a-kind attraction for your tiny tots to enjoy.
To get started, you’ll need 2×4 and 2×3 wood, 1/4 inch plywood, wood glue, and wood screws. With this easy-to-follow guide, you’ll learn how to carve out a rocker shape, attach it to the center support, and secure the setup to the plywood top.
Remember, safety always comes first. When using these balance boards, it’s best to set them up outside or on carpeted surfaces to ensure a fun and safe experience for your kids. As you create this unique balance challenge, let your imagination run wild and watch your kids delight in their new favorite activity.
Make a Viking Play Tent
Transform your child’s play area into a world of endless exploration with this authentic DIY Viking tent. Constructed from durable pine boards, dowels, and undyed cotton fabric, this unique tent features intriguing dragon head carvings and assembles without the need for nails. The result is a stunning historical tent that not only provides a cozy retreat but also serves as a canvas for imaginative play. With guidance on applying tent sealant and outdoor varnish, you can ensure your creation stands up to the elements. This project offers more than just a fun and creative experience – it’s an opportunity to learn about Viking culture and explore the rich history behind this fascinating era. As a multi-purpose structure, the possibilities are endless, from a bear’s den to an Inuit igloo, and everything in between.
Easy DIY Chalkboard City Blocks
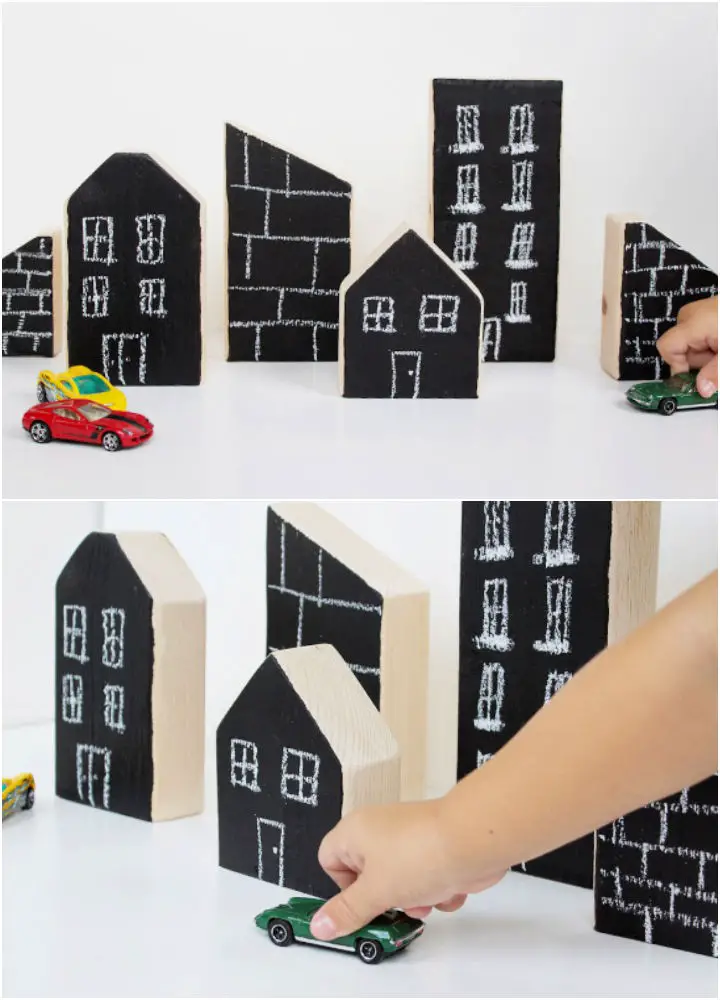
Transform your living room into an urban playground with DIY chalkboard city blocks! These versatile creations let your child’s imagination run wild, serving as the perfect backdrop for toy cars, action figures, or simply sparking their creativity. The process is surprisingly simple: grab a length of 2X4 lumber, chalkboard paint, a foam roller, a paint tray, and some sandpaper. You can find these materials at local stores without breaking the bank. The best part? These affordable blocks open up a world of creative possibilities for your child to express themselves with just a touch of chalk. As they draw, create, and reimagine city scenes, you’ll be amazed by the endless adventures their imagination conjures up. These DIY city blocks are sure to become a beloved favorite in your household, providing countless hours of imaginative play.
DIY Toy Wooden Barn
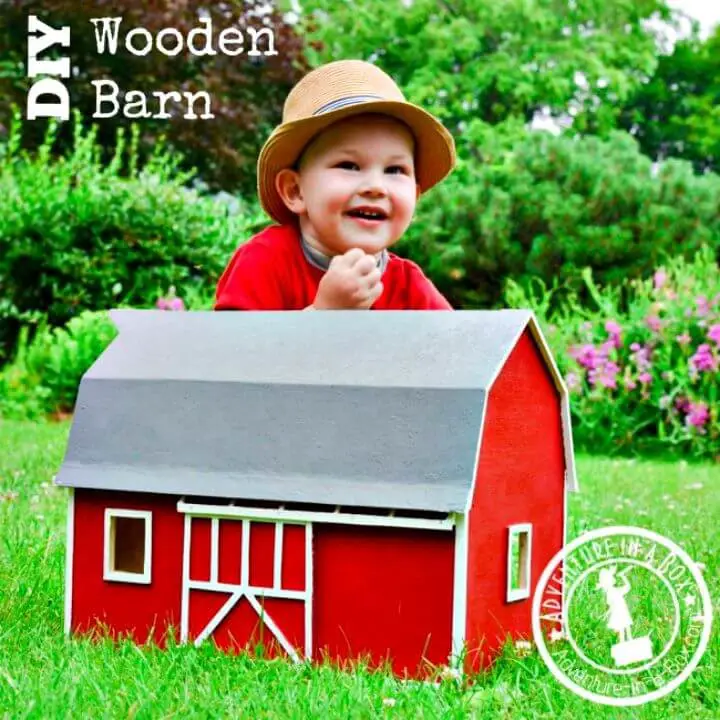
Create lasting memories and foster your child’s imagination by building a custom DIY wooden barn toy that’s not only safer and more durable than store-bought options, but also offers endless possibilities for customization. Made from versatile materials like plywood, dowels, and paint, this handmade playset sets the stage for imaginative play, serving as a home to various farm and wild animal figurines. As your child plays with the toy, they’ll have the opportunity to engage with nature on a miniature scale, whether it’s grazing outside in the summer or cozying up in the loft during winter. The real magic of DIY wooden toys lies in the personal touch, allowing you to add unique features like ladders and sliding doors that make the play experience truly one-of-a-kind.
Turn a Cabinet Into Play Kitchen
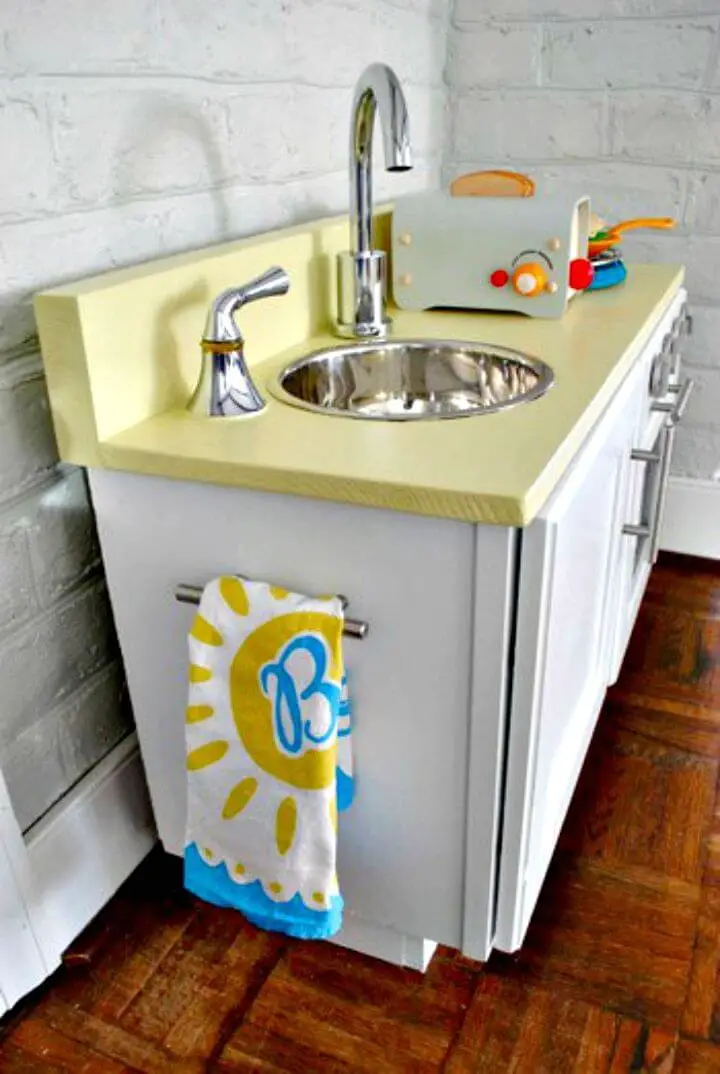
Transform an old cabinet into a charming play kitchen with minimal tools and maximum creativity! Give your little chef a space to mimic their favorite culinary creations by upcycling a spare cabinet into a delightful play kitchen. For under $99, you can craft a whimsical kitchen complete with functional details like turnable oven knobs, a glowing oven light, a retractable baking rack, and a movable faucet.
To bring this project to life, you’ll need a pre-loved cabinet, a faucet and handle, a stainless steel sink bowl, oven knobs and frame, hinges, plexiglass and wood trim, a wire oven shelf, a tap light, scrap lumber, and some hardware handles.
This creative endeavour will ignite your child’s imagination, providing hours of imaginative play. As a cost-effective project, it’s the perfect addition to their toy collection – offering endless opportunities for role-playing and creativity.
Make Your Kids Into Interchangeable Blocks
Unlock a world of imaginative play with this innovative DIY project, where children can bring their favorite memories to life using interchangeable photo blocks. This interactive toy is an excellent way to introduce kids to their extended family members by incorporating pictures of distant relatives.
To start, prepare wooden squares by cutting and sanding them into uniform pieces. Then, embark on a fun photo shoot with your little ones, capturing them in their favorite outfits and poses.
Once the images are resized and printed, cut them to fit the blocks perfectly. Using Mod Podge, carefully apply the photos to the blocks, and watch as they come to life – providing hours of entertainment and meaningful connections for your kids.
How to Make Mini Magnetic Blocks Toy
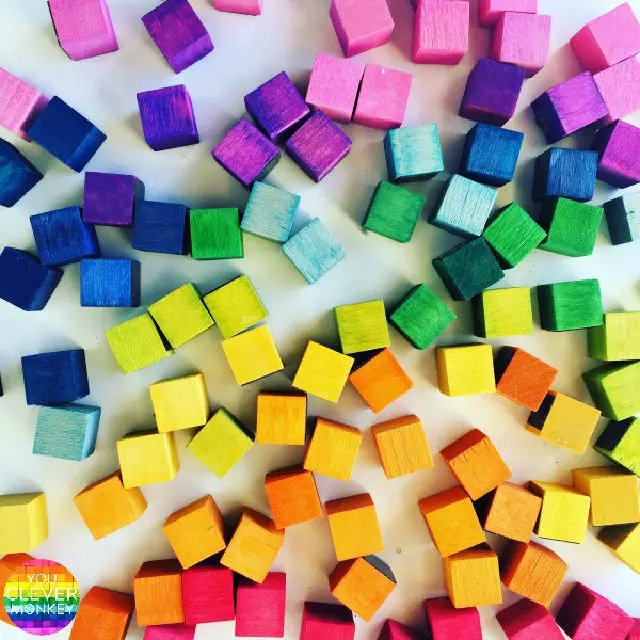
Transform your child’s playtime with DIY mini magnetic wooden blocks, a fun and creative project that nurtures their imagination and fine motor skills. By upcycling raw wooden blocks into vibrant art pieces using liquid watercolors, you can add a pop of color and enthusiasm to their play. The self-adhesive magnet paper allows for versatile play on any metallic surface, making it an excellent teaching tool to illustrate grouping concepts or foster creativity. Although these blocks are not suitable for children who still mouth objects due to their small size and non-sealed nature, they can add a colorful dimension to play and learning when made today!
Make Your Own Wooden Blocks
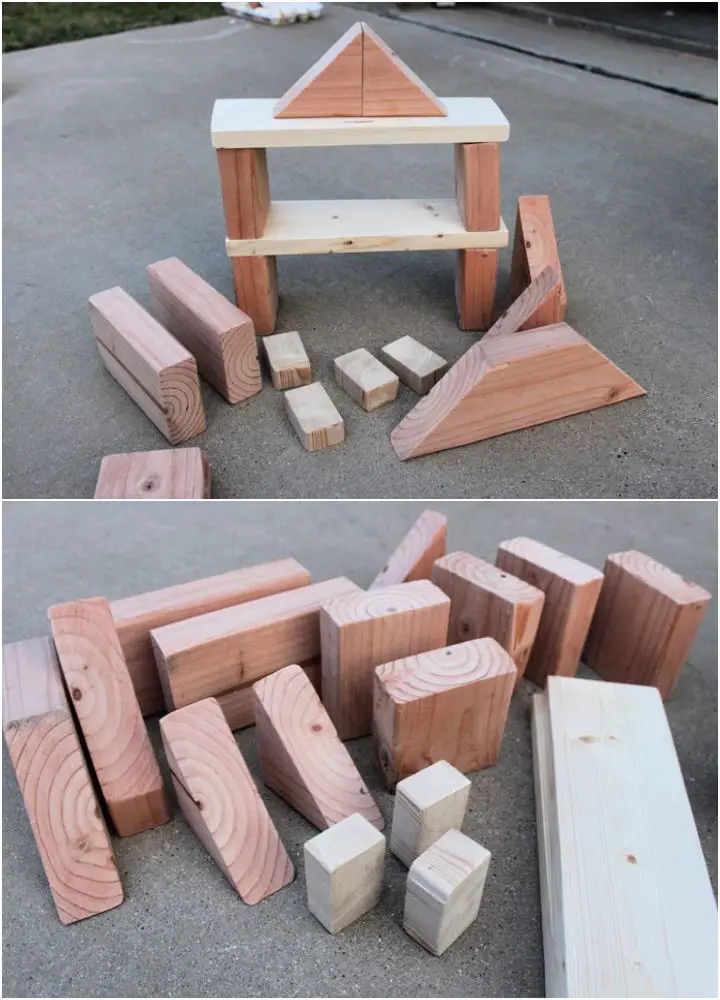
Bring joy to a special birthday with a thoughtful, handmade gift that showcases your love and creativity. A set of wooden blocks crafted with basic woodworking skills is the perfect way to celebrate this milestone. For children like two-year-old Owen who are often difficult to shop for, these unique gifts offer endless possibilities for imaginative play. Whether building structures or creating ramps for toy cars, kids will love using their new wooden blocks. The best part? You can repurpose leftover wood for future projects, such as a bathtub boat, extending the fun and fostering creativity. This cost-effective DIY project is not only an excellent way to bond with your child but also create lasting memories. Grab your tools and start crafting your wooden blocks today!
Homemade Wooden Toy Camera
Transform playtime into an immersive experience with a handmade wooden toy camera that combines the quality of store-bought versions with the joy of DIY creativity. With just a few simple materials – including basswood planks, wooden pegs and wheels, a small spring, and wood glue – you can craft a unique, imagination-sparking toy for your child. The straightforward process involves basic cutting and drilling, allowing ample opportunities for customization, such as adding a pop of color. By taking on this DIY project, you’ll not only save money but also create a one-of-a-kind keepsake that will bring joy to your child for years to come. So, gather your tools and start building a treasured wooden camera today!
2 in 1 Pattern Building Blocks
Transform your child’s playtime into a stimulating learning experience with DIY pattern blocks! This innovative STEM toy not only captivates kids but also nurtures their creative thinking and problem-solving skills. With just a few simple materials like wooden cubes, paint, and Sharpies, you can bring this engaging concept to life. Start by painting the wooden blocks white and drawing center-aligned lines on each side with a Sharpie, creating a unique project that allows the blocks to connect regardless of their orientation. Once crafted, your kids can form various open or closed shapes, challenge themselves to build the longest continuous line, or explore endless possibilities by creating new patterns. For added complexity and fun, introduce contrasting patterns featuring black and white triangles on the opposite side. The excitement lies in every new pattern discovered, making this project a perfect way to inspire your children to explore and learn.
DIY Wooden Teethers, Rattles Toys
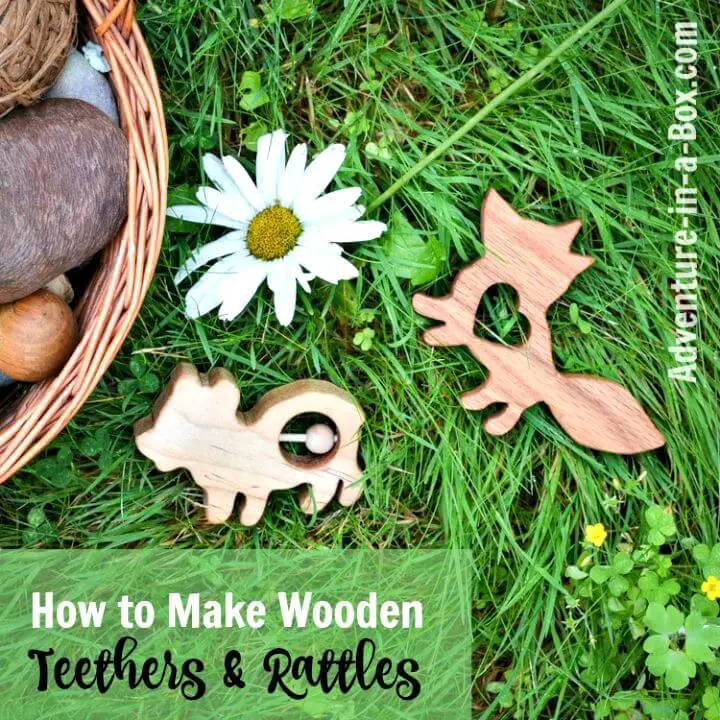
Unleash your creativity by crafting unique wooden toys for children using a scroll saw, a versatile tool perfect for intricate designs. This DIY guide will take you through the process of creating beautiful and simple wooden animals, from sketching a silhouette on cardstock to finishing the toy with food-safe tung oil. As you work with different types of wood, such as maple, walnut, cherry, and oak, you’ll discover their distinct characteristics and aesthetic appeal. These durable and safe toys are ideal for inspiring imaginative play, making them perfect for Waldorf-inspired activities. This fun and creative venture is a great way to spend quality time and develop a new skill. As you dive into this craft, your list of projects will grow, along with the joy it brings to the children who receive them.
Free Kids Workbench Plan – DIY Wood Toys
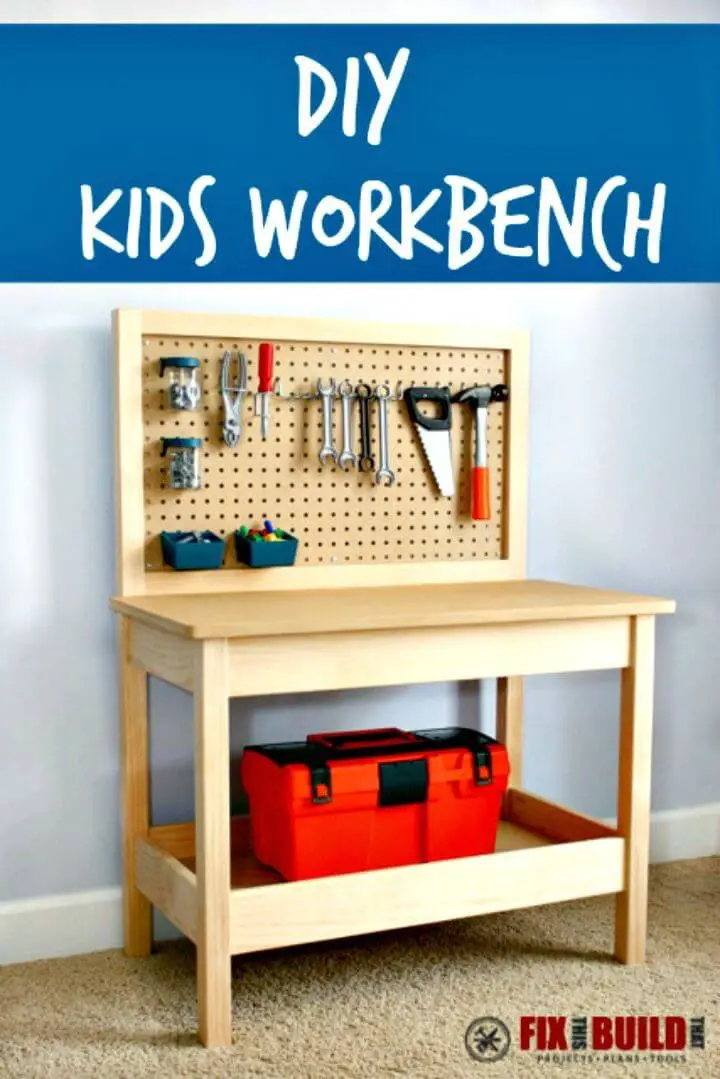
Give the budding DIY enthusiasts in your life a head start by building them a fun and functional kid’s workbench. This versatile workstation can serve as both a practical spot for small hands to tinker and a safe play area, thanks to the use of plastic tools. Standing at an inviting 24 inches tall, the workbench boasts a built-in storage shelf for storing tiny parts and a pegboard for neatly organizing tools. The clever design features hidden pocket hole joinery, making it possible for even DIY newcomers to complete this project over a weekend. Constructed using straightforward materials like 2x2s for the legs, 1x4s for the stretchers, and 1/2-inch MDF for the top and shelf, this build benefits from the precision of a Kreg K4 drill press. Add some pegboard organizers to finish it off, and your child’s new workbench is ready to spark their imagination and inspire creative play.
Painting Your Own Matryoshka Doll
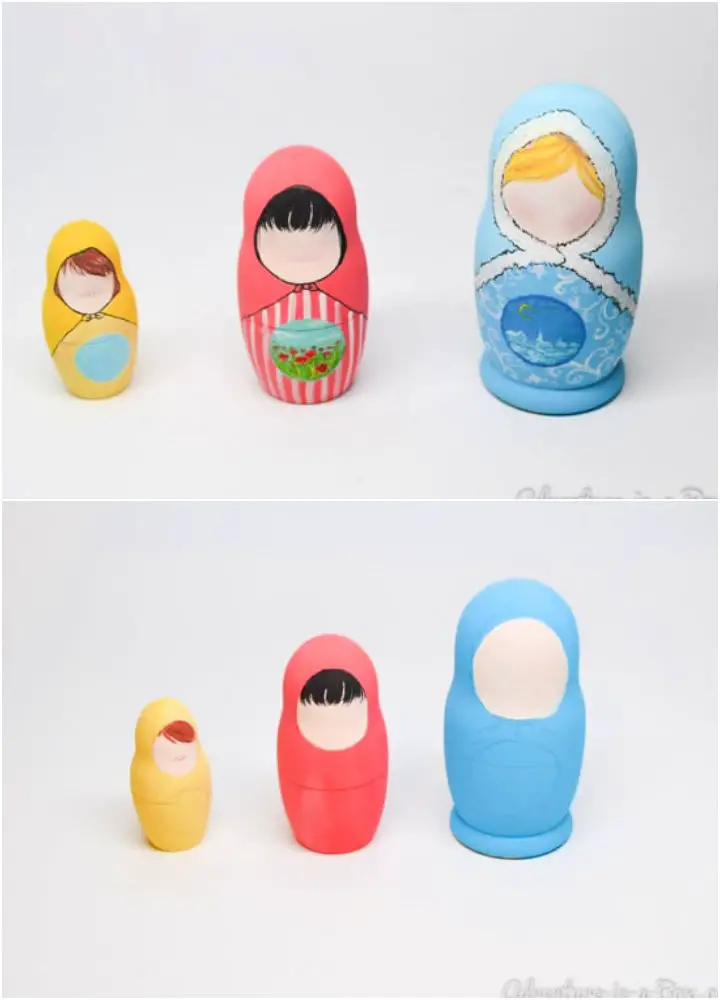
Embark on a creative journey by crafting your own DIY matryoshka dolls, steeped in Eastern European tradition and bursting with educational benefits for children. These intricate nesting dolls serve as a unique canvas for developing fine motor skills, grasping size concepts, and exploring cultural heritage. By involving your family in the process, you’ll infuse this project with a personal touch, making it an engaging and memorable experience. With just a few simple materials – including blank wooden sets and paint (gouache or acrylics) – unleash your creativity and watch as your child’s imagination comes alive while painting and playing with these vibrant matryoshkas.
DIY Tree Trunk Stompers
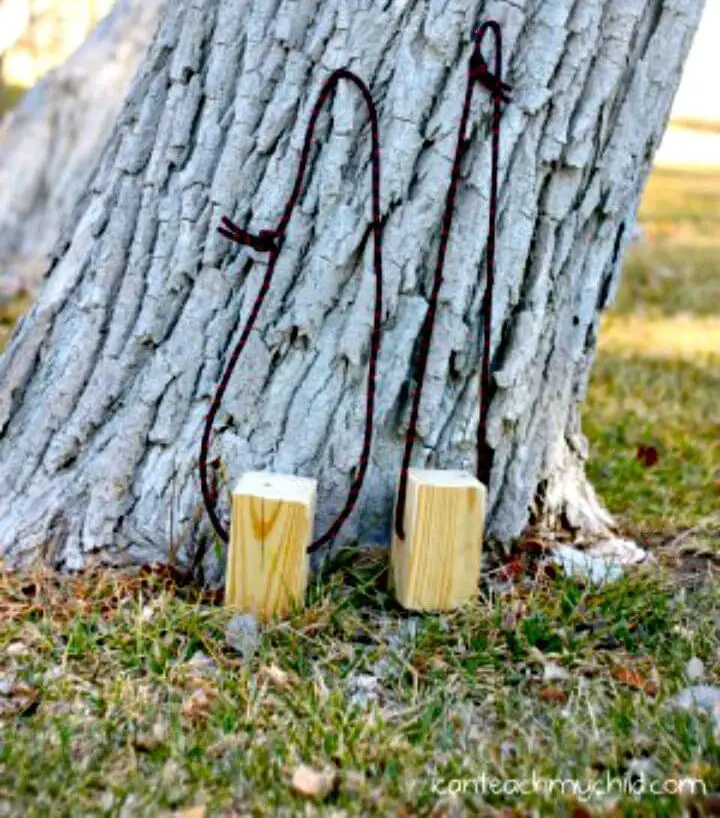
Constructing DIY wooden stilts offers a unique blend of fun, skill-building, and coordination-improving activities suitable for children across various age groups. This engaging project not only provides an outlet for creative expression but also fosters essential gross motor skills. By using basic materials like 4×4 lumber, saws, drills, sturdy ropes, and sandpaper, individuals can create their own wooden stilts with ease.
DIY Kids Wooden Tool Set
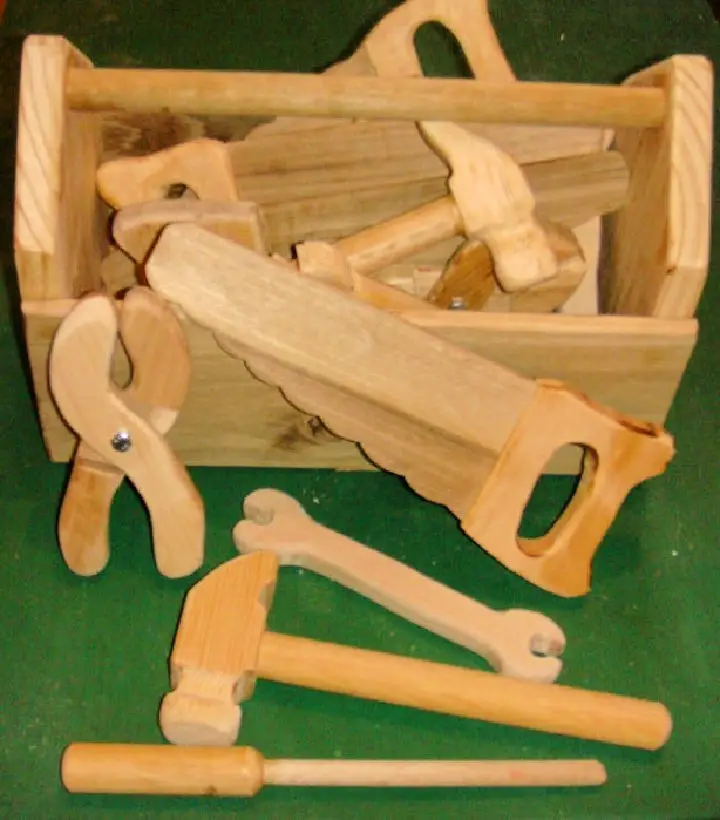
Transform your child’s toy collection with the charm of DIY wooden toys. Take your crafting skills to the next level by creating a unique wooden tool set project that’s perfect for fostering creativity and imagination in young minds. With just a few basic materials and tools, you can bring this engaging project to life. The set’s miniature hand plane is sure to captivate children’s attention, while its eco-friendly construction from a single 2×6 board makes it an economical choice. So why not turn the next playdate into a fun woodworking session? Simply gather your materials and get started on building this whimsical wooden tool set for your little one today!
Airplane Hand Plane Tutorial
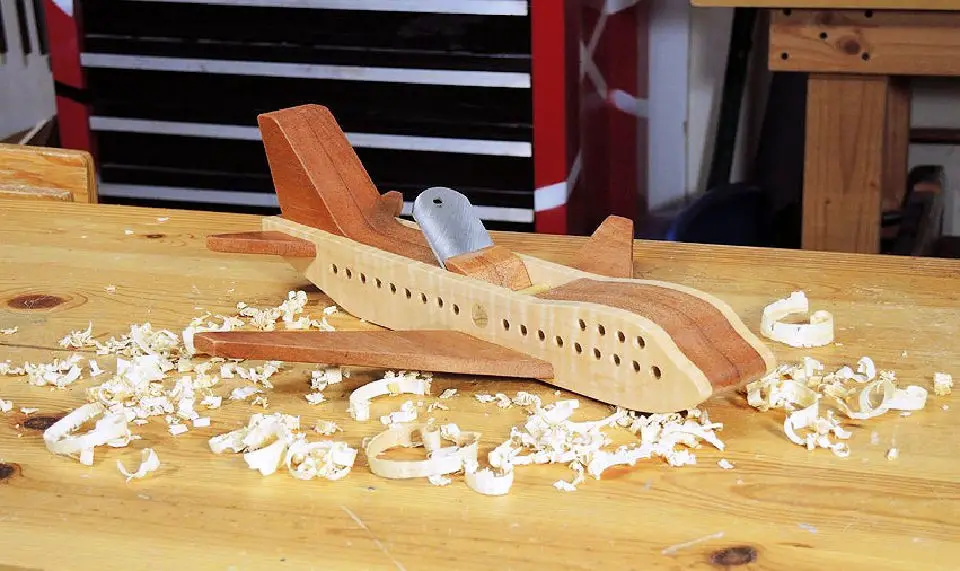
Elevate your woodworking expertise by embarking on an intriguing DIY adventure – crafting a stunning airplane hand plane from mahogany and maple. This visually appealing instrument not only serves as a functional plane but also a beautiful display piece in your workshop, perfect for showcasing your skills. Moreover, this project provides a safe and engaging way to introduce children to the world of woodworking. The eight-step process involves: printing custom templates, carefully cutting and assembling the various parts, applying a finish that enhances its aesthetic appeal, and – the most satisfying part – making shavings with your completed tool. To bring this innovative creation to life, you’ll need mahogany and maple wood, a suitable blade, and your preferred finish. This unique project harmoniously blends functionality and creativity, serving as both an operational tool for woodworkers and a delightful toy for young crafters to enjoy.
DIY Dollhouse in a Box
Unlock the creative potential within by transforming a simple wooden box into a charming DIY dollhouse-in-a-box. This versatile toy fosters imagination and storytelling, perfect for young ones and adults alike. With just a few basic materials – including scrapbooking paper, craft sticks, paint, and glue – you can turn an ordinary container into an extraordinary abode. Whether it’s a cozy cottage or a whimsical wizard’s lair, the possibilities are endless. The best part? This project is not only easy on the wallet but also gentle on fragile items, making it an ideal activity for families to enjoy together.
Conclusion:
Embracing the project of crafting 40 easy DIY wood toys for kids presents a multifaceted experience that extends beyond creating unique and personalized gifts. It also offers a realm of learning and bonding opportunities, allowing children to develop important skills while fostering meaningful relationships with their caregivers. Throughout this journey, you’ve gained valuable knowledge on mastering simple techniques, understanding the educational benefits that include nurturing creativity and enhancing cognitive abilities. As you move forward, remember that safety is paramount, and it’s essential to prioritize proper precautions when working on your projects. With this expertise in hand, you’re ready to embark on a fulfilling creative adventure.
