Crafting a DIY tablet case or iPad cover offers an unparalleled opportunity to infuse personal style and creativity into one’s digital companion. With 15 distinct DIY tablet case ideas at your disposal, you can design a case that not only safeguards your device from daily wear and tear but also reflects your unique flair. These innovative concepts cater to a broad spectrum of skills and preferences, ensuring there’s an ideal project for everyone. Beyond aesthetics, crafting your own case provides a practical means of protecting your tablet from scratches and bumps, making it a valuable exercise in both creativity and functionality. As you embark on this DIY adventure, you’ll delve into a diverse range of materials and step-by-step guides that walk you through the process, from measuring and cutting to adding embellishments and tech-savvy enhancements. Whether you aim to create a simple, understated cover or something more elaborate and decorative, these tips and tricks will empower you to achieve a durable and stylish outcome. Moreover, you’ll gain valuable insights into the environmental implications of your project, ensuring that your creation not only stands out but also promotes eco-friendliness.
How to Make a Tablet Case – Step by Step
Transform your tablet experience with a personalized cardboard case or stand that adds a unique touch. To get started, follow these straightforward steps:
Materials Needed
To create a sturdy and functional DIY tablet case, you’ll need a few basic materials. First, gather a piece of cardboard that’s substantial enough to support the weight of your tablet. Next, grab a ruler for precision cutting, as well as a pencil for marking and tracing patterns. A utility knife or scissors will also come in handy for trimming excess material. To hold everything together, you’ll need some glue. If you want to add an extra layer of flair, consider using decorative paper or fabric. Finally, if you plan to include a closure mechanism, such as velcro or magnets, be sure to have those on hand.
Step 1: Measure and Cut the Cardboard
To create your tablet cover, start by measuring the dimensions of your device. Add an extra inch to both the length and width to account for the overlap of the cover’s edges. Mark these expanded dimensions onto a piece of cardboard using a ruler and pencil to ensure straight lines. Then, carefully cut out the cardboard using a utility knife or scissors, taking care not to distort the shape. The result will be a precise template to guide your cutting and sewing process.
Step 2: Making the Spine
To create a functional spine for your tablet case that allows for smooth opening and closing, you’ll need to prepare two slender cardboard strips. These strips should be approximately the same length as your tablet’s height, while their width can range from 1-2 inches depending on personal preference. Secure these strips along the top and bottom edges of your previously prepared cardboard piece, ensuring precise alignment to facilitate seamless operation.
Step 3: Bending and Shaping
Shape the primary cardboard component by carefully curving it around the spine strips, allowing the basic form of your tablet case to take shape. This crucial step establishes the foundation for the opening mechanism of the case, ensuring a smooth and secure fold. Proceed with gentle precision to prevent any unwanted creases or breaks in the process.
Step 4: Finishing Touches
To give your tablet case a personalized touch, start by selecting a decorative paper or fabric that suits your style. Apply a thin layer of glue to the cardboard backing and gently place your chosen material on top, taking care to smooth out any air pockets or wrinkles that may form. For added functionality, consider adding a closure mechanism such as velcro or magnets to the flap’s interior and the opposing side of the case. This will allow you to easily secure and release the flap as needed.
Step 5: Making It Stand
Transforming your case into a presentation stand requires a strategic approach. Start by cutting a smaller cardboard piece that will serve as the foundation of your stand. Secure it to the back of your case using a hinge mechanism, either through fabric or flexible cardboard. The key is to create a prop that can effortlessly unfold to support your tablet and fold back in when not in use, ensuring a seamless presentation experience.
Tips for Success
As you begin the process of crafting your unique case, remember to take your time and prioritize precision. Selecting the right material is crucial, so opt for a sturdy cardboard that will withstand the test of time. Once you’ve found the perfect base, get creative and personalize it with stickers, drawings, or any other element that reflects your personality. This is your chance to add a touch of individuality to your case, making it truly one-of-a-kind.
Video Tutorial
To create a custom tablet case with a personalized touch, follow Mits Crafts & DIY’s step-by-step video tutorial on YouTube. This visual guide is designed to simplify each technique, making it easy for anyone to replicate the process. The DIY approach not only saves money but also allows you to add your unique flair. By following these simple steps, you can craft a one-of-a-kind cover that reflects your personal style and protects your tablet in the process.
Customization Ideas for Your DIY Tablet Case
When crafting a DIY tablet case, the possibilities are endless. To create a truly unique and functional design, consider the following customization ideas:
Start by selecting a fabric that reflects your personal style. You can choose from a wide range of materials, including bold patterns, solid colors, and textured fabrics. For a durable case, opt for canvas or leather, while felt or cotton provides a cozy feel.
To add functionality to your case, sew in pockets or compartments to store accessories like earphones, charging cables, or styluses. This not only keeps your gadgets organized but also ensures everything you need is within reach.
For added protection, include a layer of padding between the fabric layers. Foam or batting can be used to cushion your tablet against bumps and drops.
To take your design to the next level, incorporate embellishments like embroidery, appliqué, beads, or buttons. These personal touches allow you to showcase your creativity and make your case truly one-of-a-kind.
Choose a closure that complements your design and keeps your tablet safe. Velcro, snaps, zippers, and magnetic clasps are all practical options that can also serve as decorative elements.
Consider adding an adjustable strap or handle for easy carrying. This feature is especially useful if you’re always on the go and need to keep your hands free.
Finally, think green! Look for ways to upcycle materials you already have at home, such as old clothes, blankets, or bags. By repurposing these items, you can create a stylish and sustainable tablet case that aligns with your values.
By incorporating these ideas into your DIY project, you’ll make a tablet case that’s both practical and protective, as well as a reflection of your personality and lifestyle.
Troubleshooting Tips for DIY Tablet Cases
As you embark on creating your own custom tablet case, you may encounter a few obstacles. To facilitate a seamless DIY process, here’s a list of common issues and their solutions.
Choosing the Right Materials
When dealing with fabrics that are either too thin or too thick, finding an effective solution can be a challenge. One common issue is the tendency for thin fabrics to tear or wear out quickly, while thicker fabrics can be stiff and difficult to manipulate. To overcome these problems, consider using interfacing to add stability and structure to thin fabrics, effectively creating a stronger foundation that’s better suited for your project. Alternatively, you might find it more practical to choose a different material altogether that provides the necessary protection and ease of use.
Cutting and Measuring
When it comes to crafting with pieces that require precise alignment, frustration can quickly set in if they don’t fit together as expected. To avoid this issue, it’s essential to double-check your measurements before cutting any materials. This simple step can save you a significant amount of time and stress in the long run. Additionally, using a template or pattern can help ensure consistency across all the pieces, making assembly a breeze.
Sewing and Assembly
When working with stitches, it’s not uncommon to encounter issues such as uneven stitches or thread breakage. To overcome these problems, take a step back and assess your sewing machine’s tension. Ensure that it’s properly adjusted to prevent any further mishaps. Additionally, double-check the type of needle and thread you’re using for your fabric. It’s possible that you’ve been using the wrong combination, leading to frustrating errors. By making this simple adjustment, you can breathe new life into your sewing projects and enjoy a smoother experience.
Adding Embellishments
Embellishments can be a beautiful addition to any garment, but when they start to fall off or appear misplaced, it’s time to take action. A common issue many crafters face is embellishments that are no longer securely attached. To prevent this from happening in the first place, it’s essential to plan the placement of your embellishments before attaching them. This will ensure a sturdy bond and a professional finish. If you do find yourself dealing with loose or misplaced embellishments, there are a few simple solutions to resolve the issue. You can secure them using strong adhesive or add additional stitches to keep them in place.
Fitting Your Tablet
To achieve the perfect fit, it’s essential to accurately measure the dimensions of your tablet. This will help you avoid the frustration of a case that is either too tight or too loose. By taking this simple step, you can ensure that your case fits comfortably around your device, providing optimal protection and usability. Additionally, consider incorporating elastic or adjustable components into your case design to further enhance its fit.
Finishing Touches
Mastering the art of DIY requires patience and practice. One common pitfall is an unfinished or rough-looking project. To overcome this, add a finishing touch by incorporating bias tape or piping into the edges for a clean, professional appearance. This attention to detail not only enhances the overall look but also serves as a testament to your growing skills. Remember, mistakes are opportunities to learn and improve – don’t be discouraged by setbacks. With persistence and these helpful tips, you’ll be well on your way to creating a stunning and functional tablet case that showcases your DIY prowess.
Maintenance and Care for Your DIY Tablet Case
To maintain the condition and effectiveness of your DIY tablet case, follow these straightforward tips: Start by regularly cleaning the surface with a soft cloth to remove dust and dirt that may accumulate over time. For fabric cases, use a lint roller to pick up stray fibers. When it comes to stain removal, don’t hesitate – act quickly to prevent damage. For most fabric cases, a mild soap and water solution can be used to spot clean, but always test the solution on a small area first. Keep your case away from direct sunlight and high temperatures, as these can cause warping or fading, especially if it’s made of plastic or leather. To add an extra layer of protection, consider treating your case with a waterproofing spray to guard against accidental spills. When storing your case, keep it in a cool, dry place, laying foldable designs flat to avoid creases. Finally, regularly inspect your case for signs of wear and tear, such as loose threads or weakened seams, and address these issues promptly to prevent further damage. By following these simple care instructions, you can extend the life of your DIY tablet case and keep it looking like new.
Tech-Savvy Enhancements for Your DIY Tablet Case
When incorporating technology into your DIY tablet case, you can elevate its functionality and uniqueness. To achieve this, consider the following tech-savvy enhancements: A foldable stand, crafted from sturdy materials like cardboard or plastic, and covered in matching fabric, offers hands-free video watching or reading. For stylus users, a simple loop or pocket to store it can be a practical addition. This can be achieved using elastic bands or leather straps.To keep charging cables organized and easily accessible, design a small compartment or clips within the case. You can also enhance your tablet’s audio by adding areas that redirect and amplify sound. This can be done through clever folding techniques or attaching small, hollow tubes that funnel the sound.For added protection against impacts, use lightweight yet effective materials like neoprene or memory foam. Moreover, consider designs or materials that promote better airflow to prevent overheating, such as breathable fabrics or vented sections.By incorporating these technological touches, your DIY tablet case will not only offer stylish and protective features but also a high level of functionality, making it an incredibly useful companion for your tablet.
Understanding the Environmental Impact of DIY Tablet Cases
While designing a DIY tablet case, it’s crucial to think about the eco-friendly implications of the materials and techniques used. By selecting sustainable options and mindful methods, you can reduce your environmental impact while creating a unique and practical cover for your device.
Material Selection
When it comes to choosing eco-friendly textiles, it’s crucial to opt for natural fibers like cotton, linen, and hemp. These biodegradable materials have a significantly lower environmental impact compared to synthetic alternatives. Not only do they minimize waste, but their production processes are also often more energy-efficient and less polluting. Additionally, consider incorporating recycled materials into your designs. This not only reduces the demand for virgin resources but also gives old materials a new lease on life, keeping them out of landfills and incinerators. Furthermore, support companies that prioritize sustainability in their practices. This can include water-conserving dye methods or fair labor policies that promote social responsibility.
Crafting Process
When it comes to minimizing waste during project planning, it’s essential to think ahead and strategize effectively to reduce the amount of offcuts and scraps generated. A clever approach is to repurpose leftover materials into smaller projects or decorative elements, ensuring that nothing goes to waste. Furthermore, opting for eco-friendly adhesives that are free from toxic chemicals not only benefits the environment but also has a positive impact on your own well-being. Additionally, when utilizing tools that rely on power, such as sewing machines, look for energy-efficient models or work in natural light to conserve electricity and contribute to a more sustainable future.
Longevity and Disposal
When crafting a DIY tablet case, consider building it to last by incorporating sturdy stitching and high-quality materials. This approach reduces the need for frequent replacements and minimizes waste. Additionally, think about how your case can be repurposed at its end of life. Can it transform into a pouch, mat, or even part of a quilt? If not, research local recycling options for textiles or plastics, depending on the materials used. By adopting this environmentally conscious mindset, you can create a tablet case that effectively protects your device while also reducing its ecological footprint.
FAQs for DIY Tablet Cases
As you venture into creating your own DIY tablet case, you might encounter uncertainties. To alleviate these doubts, I’ve curated a collection of frequently asked questions, accompanied by straightforward responses. These clarifications aim to guide you through the process with confidence.
What materials are best for a DIY tablet case?
When crafting a DIY tablet case, it’s crucial to balance durability with visual appeal. A combination of rugged materials like canvas, leather, or neoprene can provide the necessary protection, while options like cotton or felt offer a softer, more tactile experience.
How can I ensure my tablet case fits properly?
When preparing to insert or remove your tablet from its case, it’s crucial to ensure accurate measurements of its dimensions. To avoid any issues, add a small margin for comfort and flexibility. As you work through the process, test the fit regularly and make any necessary adjustments to guarantee a seamless experience.
Can I make my tablet case water-resistant?
When it comes to protecting your fabric cases from the elements, there are a couple of effective strategies you can employ. For starters, you can consider applying a waterproofing spray to provide an added layer of defense against moisture. Alternatively, you could opt for using naturally water-resistant materials like waxed canvas or synthetic leather, which can offer robust protection without the need for additional treatments.
How do I add a stand to my tablet case?
To create a custom stand for your case, consider incorporating a foldable flap or utilizing materials like cardboard or plastic as the base. Then, wrap these components in fabric that complements your case’s aesthetic, ensuring a seamless integration.
What’s the best way to clean my tablet case?
When it comes to cleaning your bag’s outer casing, the approach depends on the material used. For fabric-based cases, gently apply a mild soap and water solution to remove any stubborn stains. However, if your bag features leather or synthetic materials, you’ll want to use products specifically designed for those surfaces to avoid causing any damage.
How can I personalize my tablet case?
When crafting a unique case for your tablet, consider elevating it with decorative details such as embroidery, patches, or intricate stitching. Additionally, you can incorporate functional elements like pockets or pen holders to make the most of your DIY project. By addressing these frequently asked questions, you’ll gain the knowledge and confidence to tackle your project with ease. Most importantly, remember to let your creativity flow and have fun with the process!
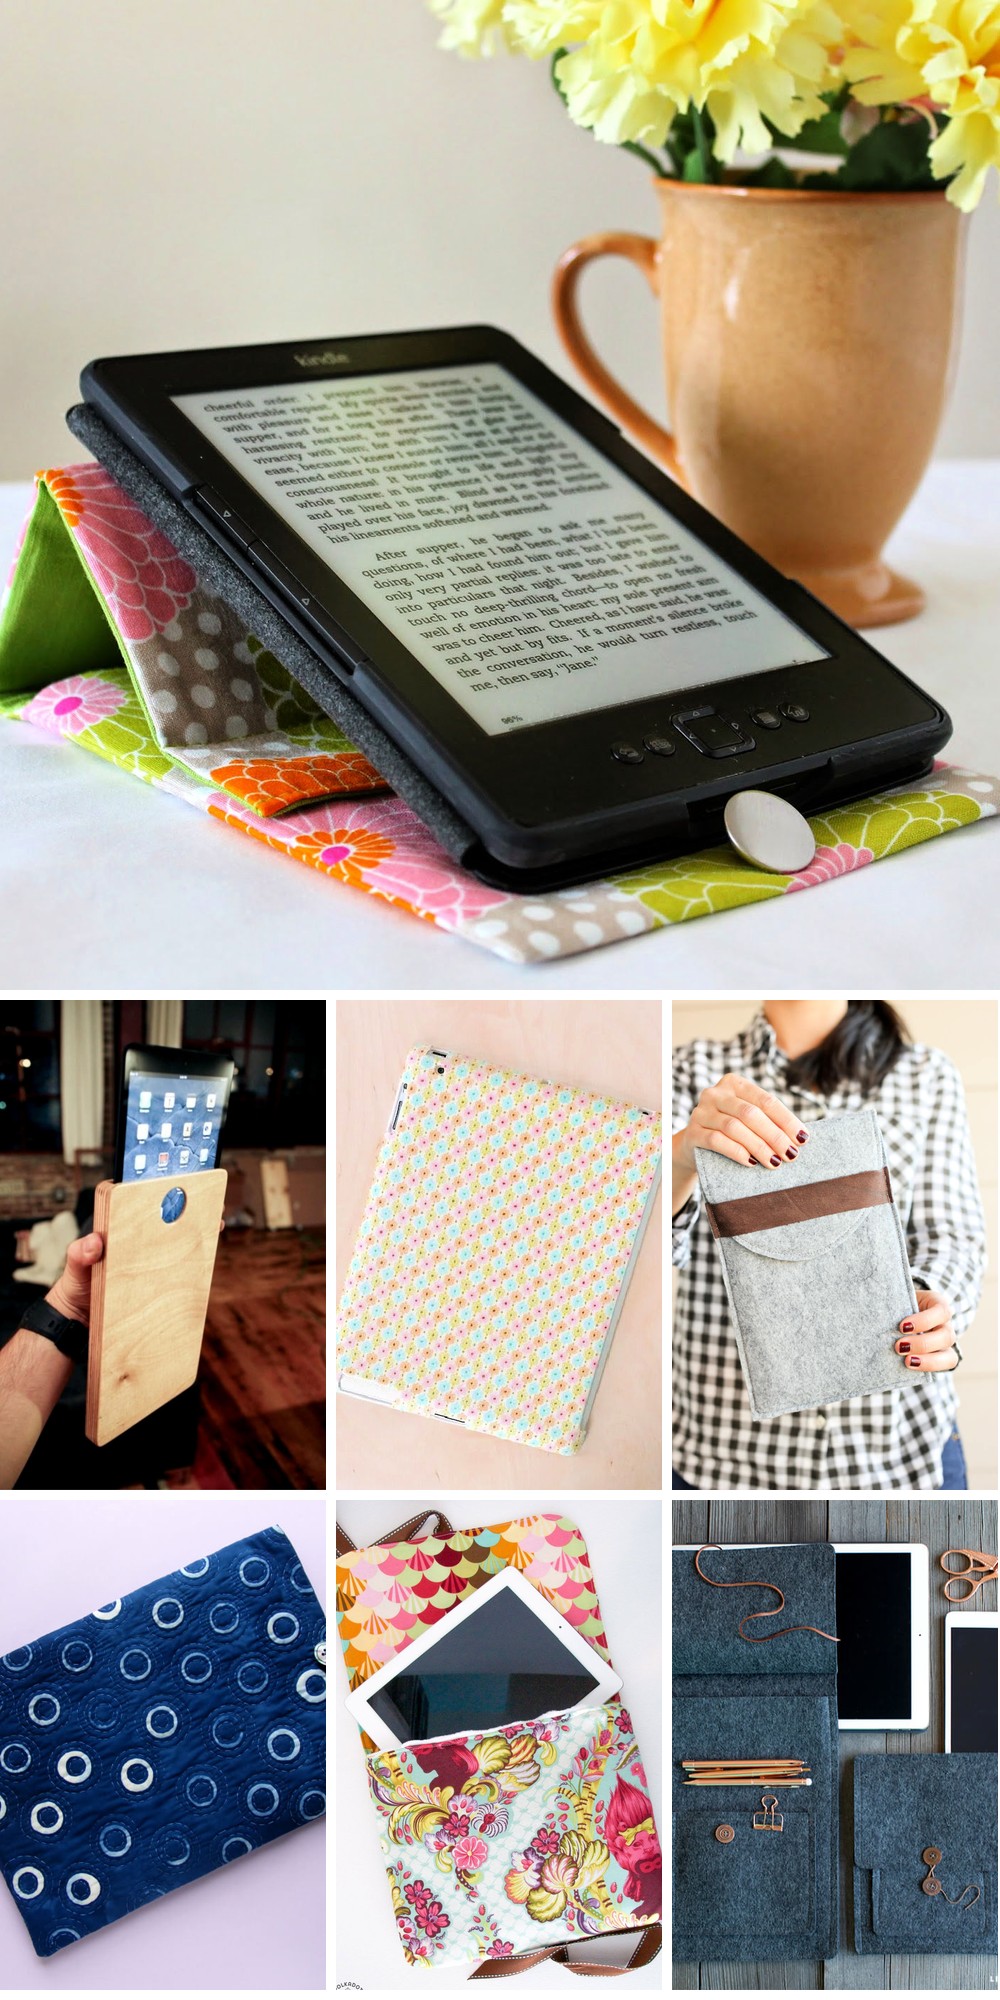
15 Unique DIY Tablet Case & iPad Cover Ideas
Transforming your tablet or iPad into a one-of-a-kind masterpiece is easier than you think. With these 15 innovative DIY tablet case and iPad cover ideas, you can add a personal touch to your device while keeping it safe from scratches and other damages. From creative reuses of everyday materials to clever repurposing of old objects, the possibilities are endless.
How to Make Felt Tablet Cover
Transform your tablet into a stylish and protective masterpiece with Lia Griffith’s comprehensive DIY guide. This versatile project is perfect for anyone seeking to safeguard their iPad, Kindle, or other tablets with a personalized touch, accommodating three different tablet sizes. To get started, gather your essential supplies including 3mm thick wool felt, leather lace, and coconut buttons, then fire up your sewing machine and let the creative process begin. With Lia Griffith’s step-by-step instructions, crafting a custom tablet case becomes an enjoyable and rewarding experience that yields a functional and chic accessory for your electronic device.
Homemade Leather Tablet Case
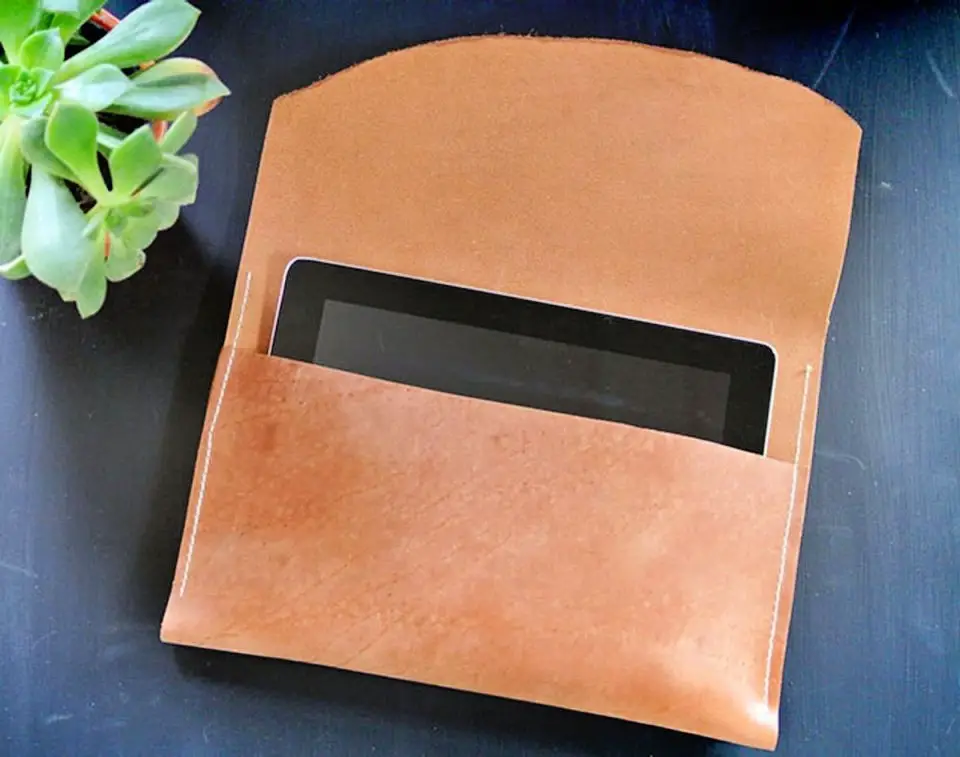
Transform a stylish and durable leather or vinyl tablet case without breaking a sweat. Follow this step-by-step guide and unleash your creativity as you measure, cut, and sew a custom-fit case that not only shields your tech but also showcases your DIY prowess. This budget-friendly project is an ideal outlet for anyone looking to add a personal touch to their device, and the sense of accomplishment will be the icing on the cake.
Making a Dollar Store iPad Case
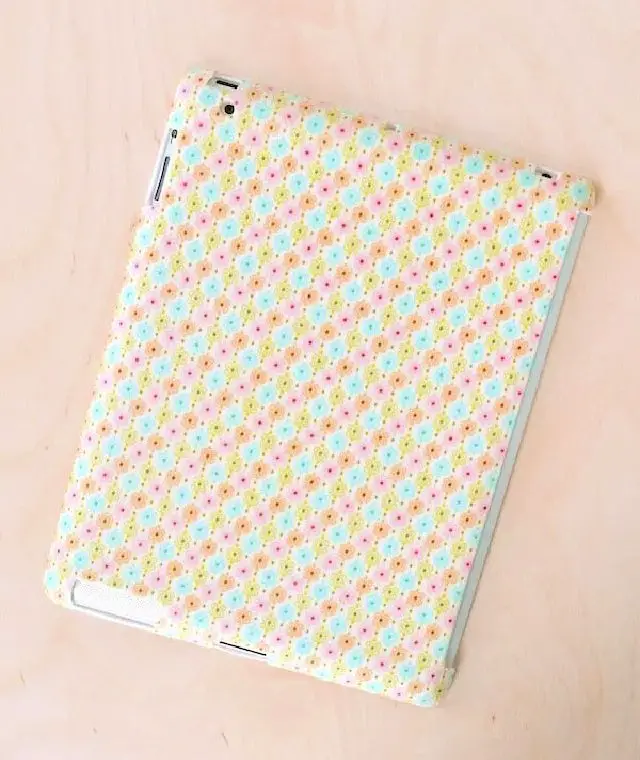
Transforming a humble dollar store find into a sophisticated, customized iPad case is easier than you think. With step-by-step instructions, even beginners can create a functional and stylish accessory for their device. This DIY project from Mod Podge Rocks demonstrates how to decoupage fabric onto a plastic case using Fabric Mod Podge for durability and Satin Mod Podge for a sleek finish. By following this tutorial, you’ll learn how to prepare your fabric, sand the case for better adhesion, neatly cover the surface, and trim the fabric to fit around ports and buttons. As you work through the process, you’ll find it engaging and rewarding, resulting in a personalized iPad case that’s both affordable and distinctive. Take the leap and give your iPad a fresh new look.
Easy DIY Tablet Case From Old Jeans
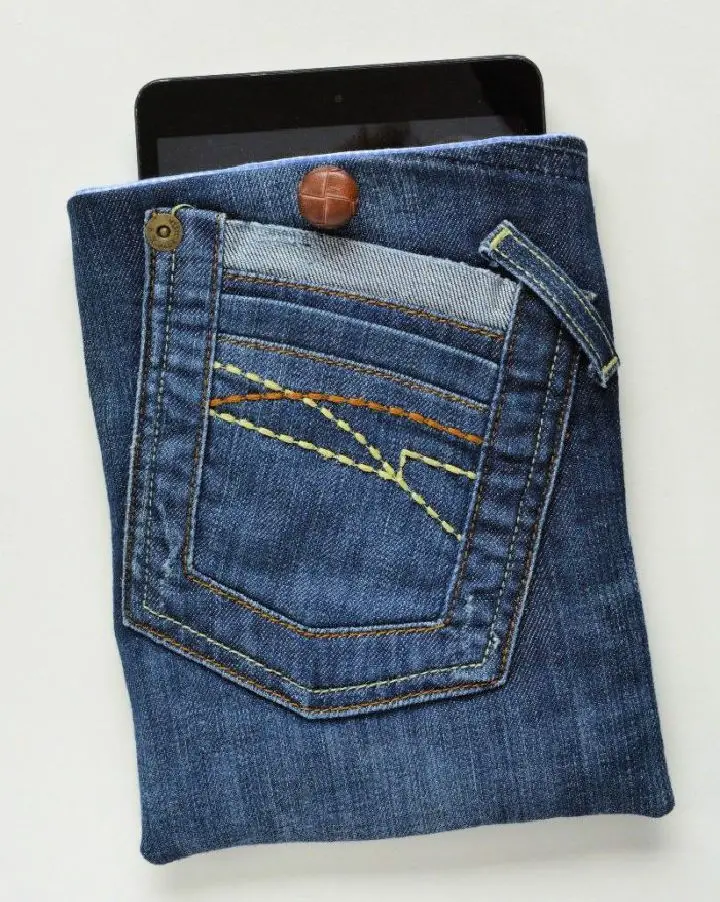
Turn an old pair of jeans into a fashionable and durable tablet case with VickyMyersCreations’ DIY guide. This upcycling project not only helps you breathe new life into discarded denim but also provides a stylish way to protect your tech. By combining simple materials like cotton fabric, fusible fleece, a button, and elastic thread, you can create a one-of-a-kind case that snugly fits your tablet. With clear instructions guiding the process of measuring your device, cutting the necessary pieces, and sewing them together, even novice crafters can achieve a professional-looking result. A functional pocket detail salvaged from the jeans adds both convenience and visual appeal. Not only is this handmade case an excellent gift option, but it also showcases your crafting prowess and eco-conscious attitude. Ultimately, this DIY project offers a delightful combination of functionality and creativity, making it perfect for keeping your tablet safe and secure.
Make a Fabric Tablet Cover
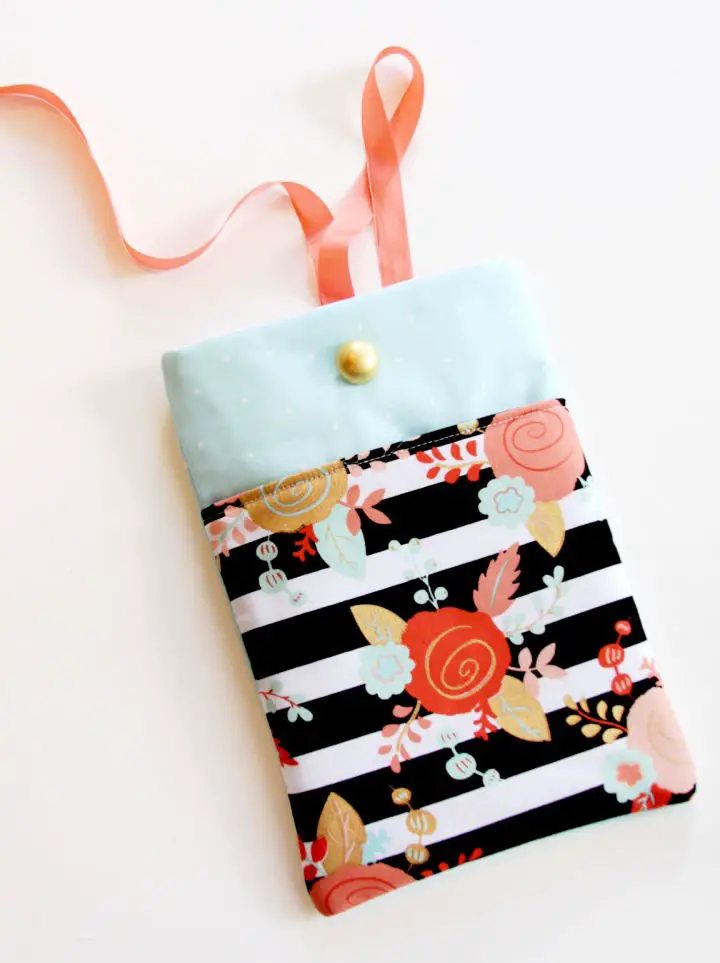
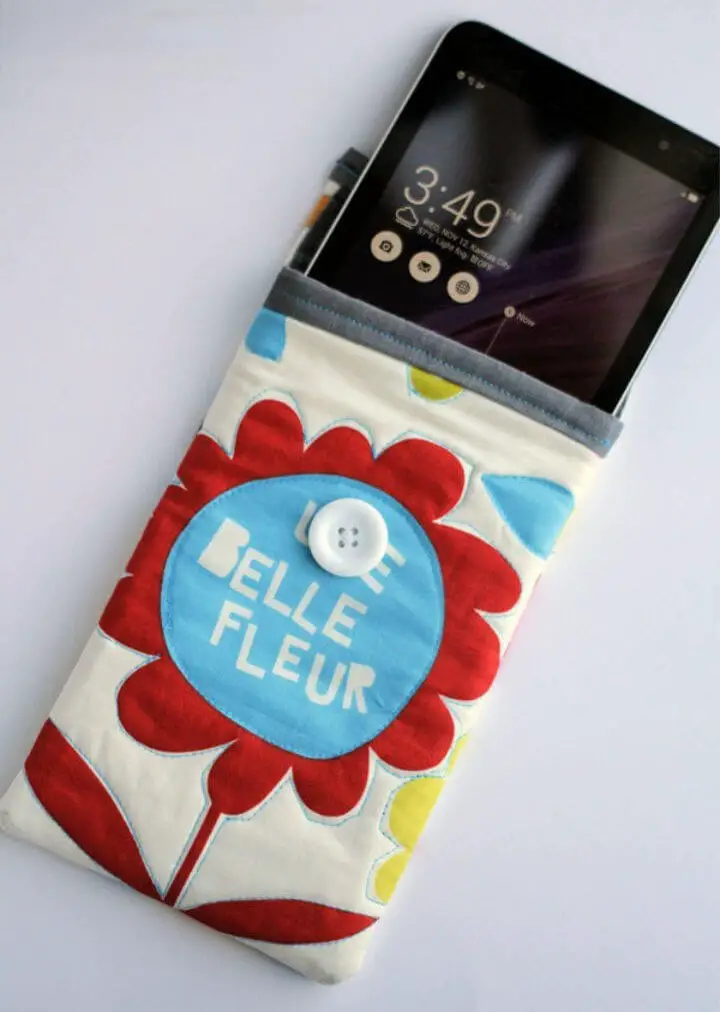
For those who want to add a personal touch to their tech accessories, Flamingo Toes offers a delightful DIY project: the Ribbon Tie Tablet Cover. This straightforward tutorial is perfect for showcasing favorite fabrics and features a convenient pocket for storing essentials like earbuds or pens. The ribbon tie makes it easy to secure the cover without worrying about complicated closures, making it accessible to anyone with basic sewing skills. With materials such as fabric, fusible fleece, a button, and ribbon, along with some essential sewing tools, you’ll be guided through measuring, cutting, and stitching your way to a one-of-a-kind tablet case. Whether it’s a thoughtful handmade gift or a stylish way to protect your device, this project promises both functionality and flair. Give it a try and craft a unique cover for your Kindle, iPad, or other tablets.
Tablet Carrying Case With Details Instructions
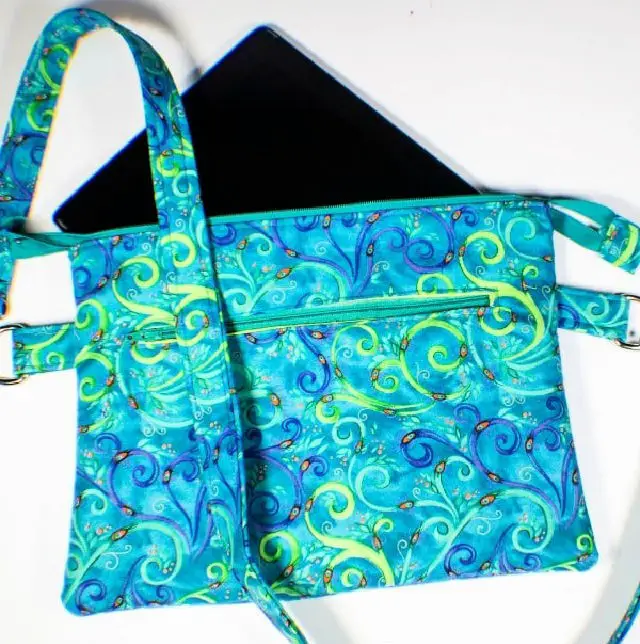
With Sewverycrafty’s comprehensive guide, you can create a custom tablet carrying case that effectively safeguards your device while on-the-go. This step-by-step tutorial is ideal for those with basic sewing skills and provides detailed instructions for crafting a protective case featuring a zippered pouch specifically designed for the tablet, as well as an additional pocket for storing accessories. The process begins with precise measurement, cutting, and assembly of materials, allowing you to add personal touches through your fabric selection. By following this tutorial, not only will you create a functional item, but you’ll also enhance your overall sewing capabilities.
Handmade Wooden Tablet Case
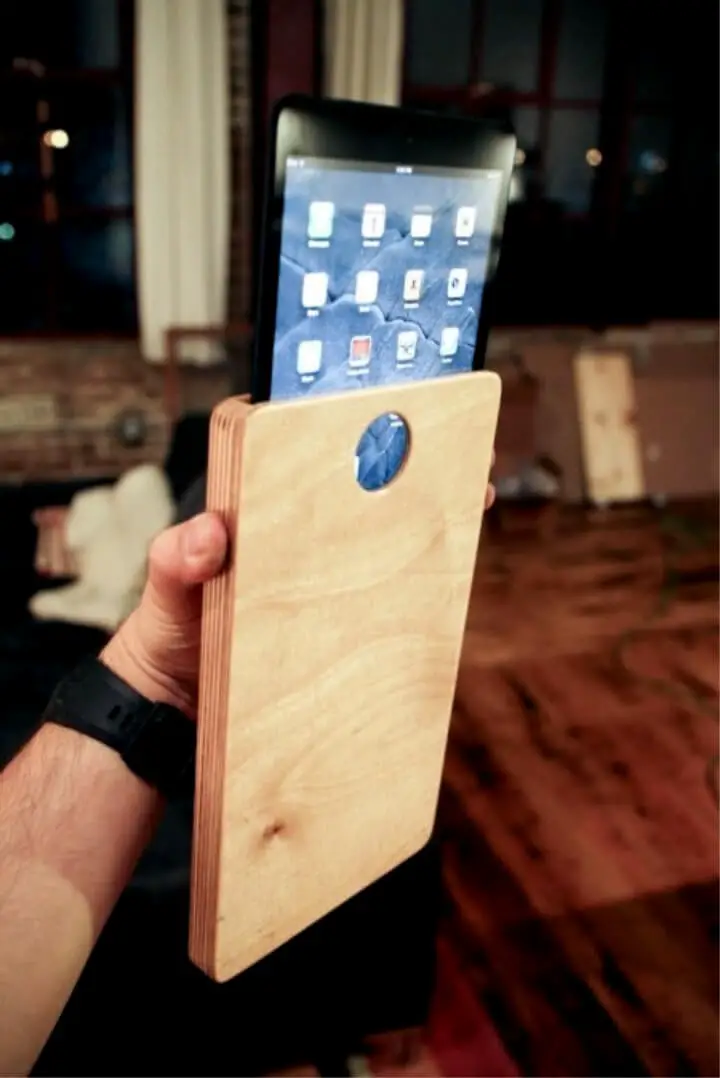
For woodwork enthusiasts and DIY enthusiasts alike, crafting a wooden iPad or tablet case can be an exciting project. Mike from Tinkering Monkey takes the reader on a step-by-step journey through this weekend project, providing clear instructions accompanied by photographs of each stage. While precise measurements are not provided, Mike’s detailed process allows for customization to fit your device perfectly. This tutorial offers a unique opportunity to protect your tablet in style while honing one’s woodworking skills and exploring creativity.
DIY Prop Up Tablet Case at Home
Unleash your creativity by crafting a custom-fit tablet case with an integrated prop-stand using The Inspired Wren’s detailed and easy-to-follow tutorial. This project is ideal for sewing enthusiasts seeking a stylish, functional way to protect their device. With the guidance of step-by-step instructions, you’ll learn how to measure your tablet, cut the necessary materials – such as fabric and cardboard – and assemble the components. From constructing the fabric envelope to crafting the prop-stand flap, the tutorial takes you through each phase of construction with clarity. Perfect for personal use or as a thoughtful handmade gift, this tablet case serves as a practical addition to any tote, ensuring your device remains safe and easily accessible wherever you are.
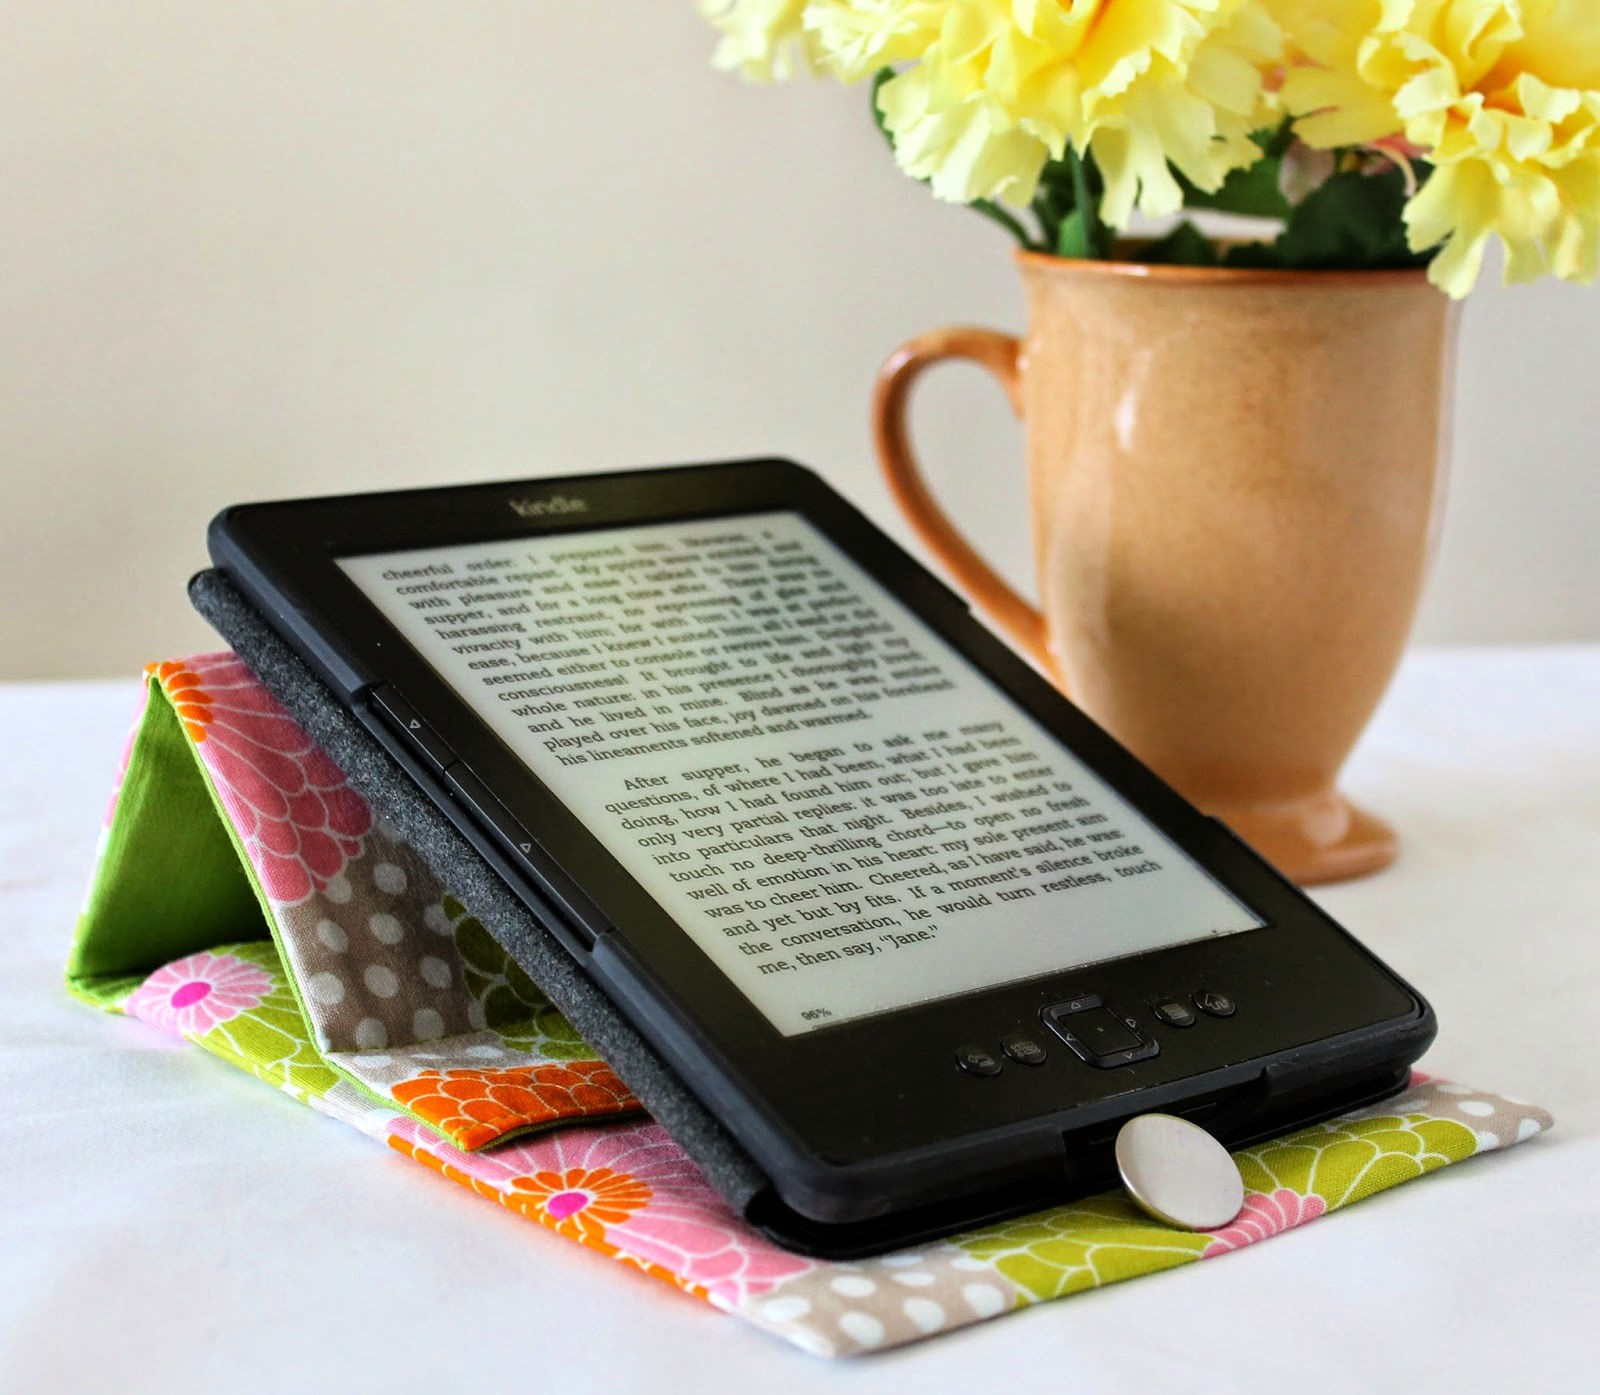
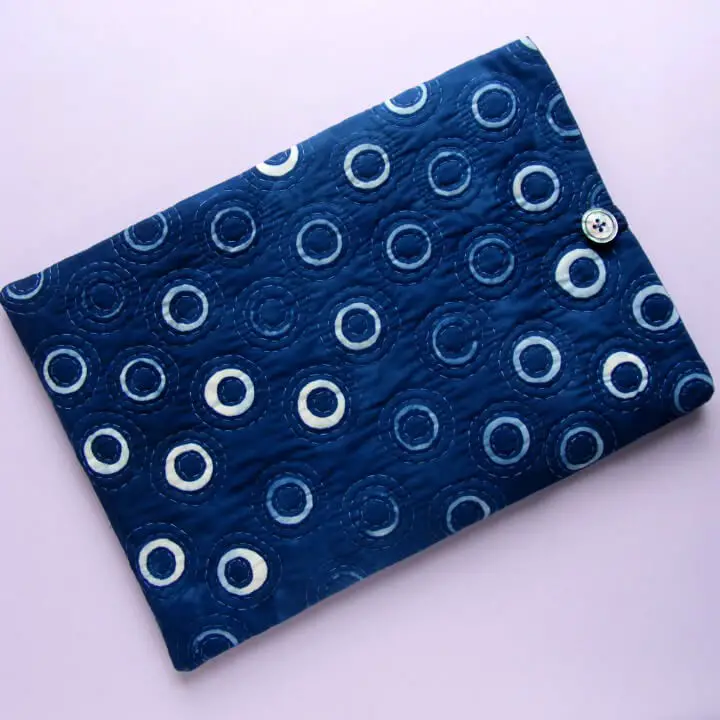
How to Make Your Own Quilted Tablet Case
For those seeking a unique gift or looking to safeguard their tablet, Skip To My Lou provides an accessible guide for crafting a DIY Quilted Tablet Case. This straightforward sewing project is ideal for utilizing leftover fabric pieces and can be completed swiftly, making it perfect for last-minute holiday gifting or personal use. The tutorial’s clear instructions detail the necessary materials, including outer and inner fabrics, batting, bias tape, a button, and elastic, allowing you to easily follow along. By measuring, cutting, quilting, and assembling the case with binding and a secure button closure, you’ll be able to create a custom-designed cover that reflects your personal style. With this engaging and informative tutorial, you can protect your technology in style while showcasing your creativity.
DIY Tablet Case Using Felt and Leather
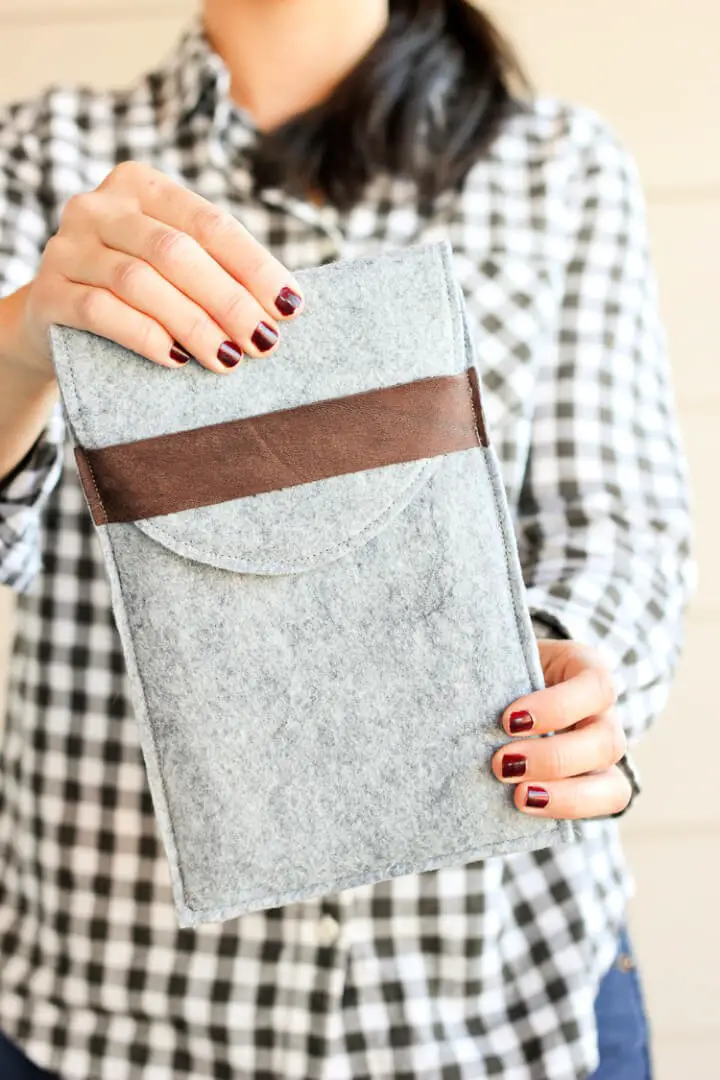
Create a bespoke felt and leather tablet case by following this comprehensive DIY guide. The union of durable felt and supple leather yields a stylish and functional accessory that perfectly complements your tablet. This step-by-step tutorial will have you crafting a sturdy case using thick interfacing, readily available at local craft stores. With the aid of scissors, spray adhesive, and a dash of sewing, you can design a custom-fit case that not only safeguards your device but also showcases your unique personality. This project is ideal for those who appreciate the harmonious blend of traditional materials and modern design, offering a personalized touch to your tech arsenal.
Tablet Case From an Old Leather Jacket
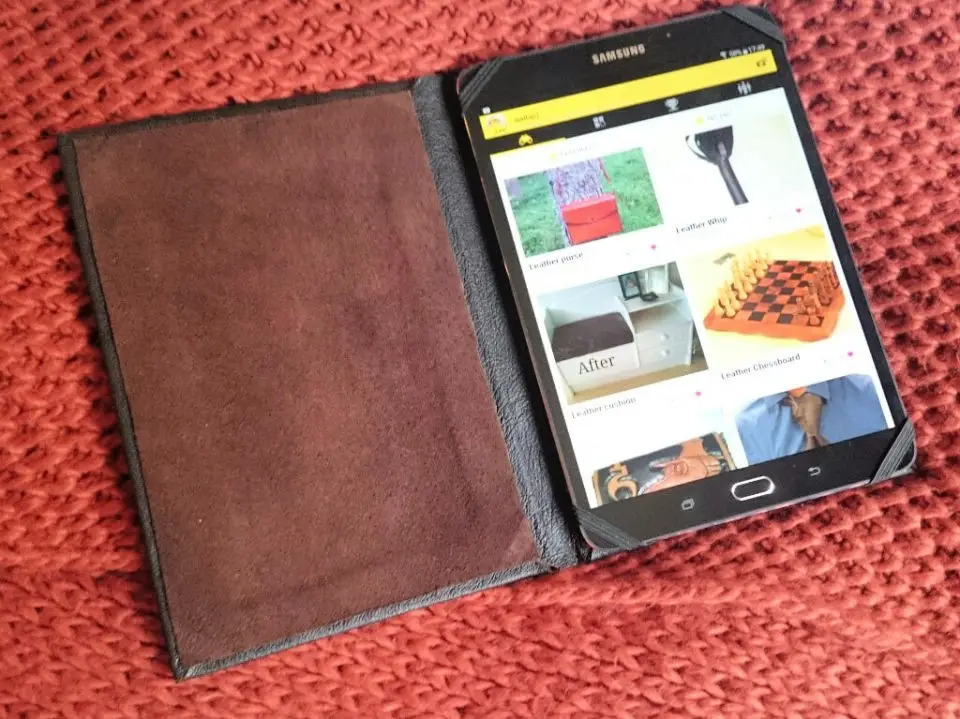
Turn an old leather jacket into a one-of-a-kind, protective sleeve for your tablet through this DIY project from Instructables. By repurposing recycled materials, you’ll not only breathe new life into an otherwise discarded item but also infuse your device with a personal touch. From creating a precise cardboard template to carefully cutting and gluing the leather, every step of the process is meticulously outlined, ensuring that even novice crafters can achieve success. With this tutorial’s guidance, you’ll be able to transform unused leather items into a functional accessory for your 8-inch Samsung Tab S2 or any other tablet, complete with adjustable tips for accommodating different sizes. As you embark on this creative journey, you’ll not only protect your device but also give it a stylish makeover with a handmade leather case.
Digital Doodles Into Ipad Case

Transform your digital art into a one-of-a-kind iPad case with ease using Spoonflower’s guide. By combining Canva’s user-friendly design tool with Spoonflower’s fabric printing expertise, you can effortlessly transfer your creations from screen to fabric. This step-by-step process ensures that your custom designs are printed onto high-quality fabric, ready to be crafted into a personalized tablet cover that showcases your unique style and creativity. To achieve the perfect result, follow Spoonflower’s tips on selecting harmonious color palettes and maximizing fabric usage, making this DIY project an enjoyable and rewarding experience.
DIY Quilted Tablet Cover Step by Step Instructions
Embark on a creative journey by crafting a unique tablet cover with Shiny Happy World’s comprehensive guide. This step-by-step tutorial empowers crafters to measure their tablet accurately, cut fabric to the ideal size, and unleash their artistic side by incorporating quilting, embroidery, or appliqué techniques. As you sew the outer pieces together, adding padding for extra protection, attach an elastic loop for a secure closure, and top it off with a stylish button, you’ll be creating a one-of-a-kind accessory that not only safeguards your device but also reflects your personal style. Whether you’re looking to protect your iPad or another tablet, this tutorial ensures a seamless crafting experience, allowing you to sew and enjoy the process while showcasing your creativity.
How to Make a K’nex Tablet Case
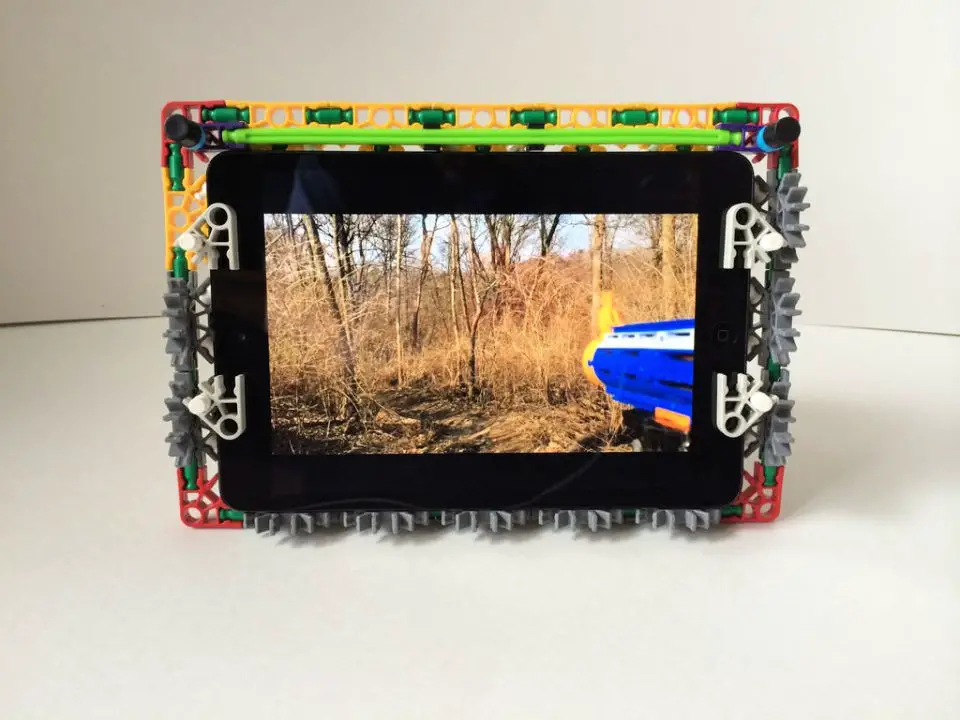
Transforming an iPad Mini or 8-inch tablet into a one-of-a-kind accessory is easier than ever with this DIY guide. By following the step-by-step tutorial on Instructables, you can create a functional and visually striking K’NEX case that doubles as a protective cover and features a convenient back stand for comfortable viewing. While this customized case adds a personal touch, please note that it may not provide full protection against damage. Nevertheless, with these instructions, you’ll be able to craft a unique accessory that’s sure to spark conversations at your next meeting or gathering.
Free Padded iPad Case Sewing Pattern

Transform your tablet’s home with the free padded iPad case sewing tutorial from The Polka Dot Chair. Melissa Mortenson skillfully guides you through each step of creating a functional and stylish case featuring a back zippered pocket for storing accessories. This project boasts simplicity and versatility, effortlessly accommodating various iPad models. With the provided pattern and clear instructions, sewing this padded case becomes an enjoyable and achievable experience. By combining your fabric choices with a dash of creativity, you’ll craft a one-of-a-kind, snug-fitting case that keeps your device securely cushioned. Get ready to fire up your sewing machine and take your crafting skills to new heights while giving your tablet a fresh, cozy makeover.
Conclusion:
Ultimately, the 15 DIY tablet case & iPad cover ideas presented here offer a fantastic chance to create something unique and functional for your device that truly reflects your personality. By following the step-by-step guide and incorporating the customization suggestions and troubleshooting tips provided, you’ll be able to craft a cover that not only safeguards but also showcases your individuality. The key to achieving success in DIY projects lies in selecting the right materials, measuring accurately, and infusing your creative spirit. Whether it’s for personal use or as a thoughtful gift, a handmade tablet case is an excellent way to merge practicality with creativity. As you start crafting your custom tablet case, remember to keep these essential tips at the forefront of your mind.
