Building a DIY table is an empowering experience that combines creativity, practicality, and cost-effectiveness. This comprehensive guide offers 25 innovative ideas for transforming basic materials into functional pieces of furniture, catering to both beginners and experienced DIY enthusiasts seeking simplicity and affordability without compromising on quality. By embarking on this journey, you’ll not only gain the satisfaction of creating something from scratch but also tailor the design to perfectly fit your space and needs. As we delve into the process of making your own table, you’ll discover how to start your project, find inspiration, and acquire the basic skills necessary to bring your vision to life.
Why Build Your Own Table?
When deciding whether to build your own table or purchase one from a store, it’s essential to consider the benefits that come with taking on a DIY project. One of the primary advantages is cost-effectiveness – by choosing to make your own table, you can avoid the often steep prices associated with buying one from a retailer. This not only saves you money but also gives you complete control over the budget, allowing you to allocate funds as needed.Another significant benefit of building your own table is customization. When working on a DIY project, you have the ability to tailor every aspect of the final product to your specific needs and preferences. This means you can create a piece that perfectly fits your space, meets your requirements, and reflects your personal style.In addition to these practical benefits, building a table also presents an opportunity for skill-building. Even if you’re new to DIY projects or woodworking, creating a table is an excellent way to develop your skills and build confidence in your abilities. As you work on the project, you’ll gain experience and knowledge that can be applied to future endeavors.The sense of achievement that comes from completing a DIY project is another significant advantage. When you use your new table for the first time, you’ll have a deep sense of pride and satisfaction knowing that you created it with your own hands. This feeling will only grow stronger as you continue to use the table and appreciate its unique features.Finally, building a table can also be an environmentally friendly choice. By selecting sustainable materials or repurposing old ones, you’re making a conscious decision to reduce waste and minimize your impact on the environment. DIY projects often offer more eco-conscious options than mass-produced items, allowing you to feel good about your creation’s environmental footprint.In conclusion, building your own table offers a range of benefits that make it an attractive option for many people. By considering these advantages – cost-effectiveness, customization, skill-building, sense of achievement, and sustainability – you can make an informed decision about whether to take on the challenge or purchase one from a retailer.
Essential Tools and Techniques for Crafting a DIY Table
Creating a DIY table can be a fulfilling project that adds a personal touch to your home. To achieve success, it’s essential to have the right tools and understand the techniques required. Here’s a comprehensive guide to help you get started: To begin with, gather the necessary tools: a measuring tape for accurate measurements, a saw for cutting materials to size – whether it’s a circular saw or handsaw, a drill for making holes and driving screws, a sander for smoothing out rough edges and surfaces, clamps for holding pieces together while working, and a screwdriver set for assembly and adjustments. Next, focus on mastering the necessary techniques: measuring and marking accurately, using guides with your saw to achieve clean and straight cuts, drilling pilot holes before inserting screws to prevent wood from splitting, sanding with progressively finer grits to achieve a smooth finish, and applying basic joinery techniques like pocket holes or lap joints to add strength to your table. With these tools and skills, you’ll be well on your way to creating a great DIY table. As with any project, patience and practice are crucial for achieving the desired results.
Selecting the Right Materials for Your DIY Table
When building a DIY table, the choice of materials is pivotal. It not only affects the aesthetics and feel of the finished piece but also its durability and usability. To make an informed decision, consider the intended use of your table, the desired finish, environmental concerns, and your skill level as a woodworker.
Start by thinking about how you’ll be using your table. If it’s going to see heavy use, opt for durable hardwoods like oak, maple, or walnut. For lighter use, softer woods like pine can be a more affordable option.
Next, consider the finish you want to achieve. A natural look requires choosing a wood with a grain pattern you love and applying a clear sealant. Alternatively, if you’re aiming for a painted table, you can opt for a less expensive wood as the paint will cover the natural grain.
In addition to functionality and aesthetics, think about the environmental impact of your material choice. Look for woods certified by the Forest Stewardship Council (FSC) to ensure they come from responsibly managed forests. Reclaimed or salvaged wood is another eco-friendly option that adds character and history to your table.
Lastly, factor in your skill level as a woodworker. Beginners may want to start with softer woods, which are easier to cut and shape. More experienced crafters can opt for hardwoods, which offer a higher-end finish but require more expertise to work with.
By balancing looks, use, and eco-friendliness, you’ll be able to select the ideal material for your DIY table. With the right materials in place, you’ll have a beautiful, functional, and satisfying project that reflects your skills and style.
Design Customization for Your DIY Table
When crafting a DIY table, the possibilities are endless, allowing you to infuse your personal style and space with a one-of-a-kind piece of furniture. To get started, consider the overall aesthetic you want to achieve. Do you lean towards a sleek, modern design or a rustic, vintage vibe? The choice is yours, as long as it complements the existing decor in your room.The materials you select will greatly impact the look and feel of your table. For a classic, warm touch, opt for hardwoods like oak or walnut. If budget is a concern, softwoods like pine can provide a cost-effective alternative. To add an industrial twist, incorporate metal elements such as hairpin legs or a steel frame to create a striking contrast with the wood.The color and finish of your table can completely transform its appearance. Staining the wood can highlight its natural grain, while painting it can give a fresh, bold look. Be sure to choose non-toxic paints and stains, especially if the table will be used frequently or by children.In addition to aesthetics, consider the functionality of your table. Do you need additional storage? Think about adding shelves or drawers to keep items organized. If the table will be used for various activities, you might want to include features like adjustable height or a foldable design for easy storage.Personalize your table with decorative details that reflect your personality. Inlay patterns, edge routing, or even a simple strip of contrasting wood can add character. For a more artistic touch, decoupage the tabletop with maps, photographs, or artwork.If sustainability is important to you, explore eco-friendly materials like bamboo or reclaimed wood. These options not only promote environmental responsibility but also add a unique story to your furniture.Finally, remember that the key to a successful DIY project is enjoying the process and expressing yourself. Your table should reflect your personality and lifestyle, making it a statement piece in your home.
Sustainability and Maintenance in DIY Table Projects
When it comes to DIY table projects, prioritizing sustainability and maintenance is crucial for ensuring the longevity and eco-friendliness of your creation. By considering these factors, you can design a project that not only looks great but also has a positive impact on the environment. For instance, using reclaimed or recycled materials, selecting finishes with low VOCs, and choosing sustainably sourced woods can all contribute to a more environmentally friendly final product.
Upcycling and Sustainability
Upcycling is a creative way to breathe new life into discarded items, turning waste into valuable possessions with stories to tell. It’s not just about repurposing old materials, but also about honoring their history. By giving these items a second chance, we’re not only reducing waste but also preserving the memories and character that come with each piece. To get started, scour local thrift stores, online marketplaces, or flea markets for unique finds like wooden planks, metal frames, or even entire pieces of furniture that can be transformed into something new. When designing your upcycled masterpiece, incorporate elements that reflect its past, such as an old door becoming a tabletop or a window frame serving as a one-of-a-kind base. To make it truly eco-friendly, opt for sustainable materials like bamboo or reclaimed wood and use non-toxic finishes and adhesives to minimize the project’s environmental footprint.
Maintenance and Care
To safeguard the longevity of your DIY table, it’s crucial to apply a durable finish that shields the wood from stains and water damage. A consistent cleaning routine is also essential to maintain its appearance. For this, use gentle, non-abrasive cleaners and dust the surface regularly. Additionally, consider learning basic repair techniques to address any scratches or dents that may arise over time. This can include sanding down rough spots or filling in gaps with wood filler. Furthermore, employ preventive measures such as using coasters and placemats to prevent rings and scratches, avoiding direct contact between hot items and the wood, and utilizing felt pads under table legs to protect floors. By adopting these practices, you’ll be able to create a lasting, cherished piece that not only catches the eye but also respects the environment.
Expert Insights on DIY Tables
When embarking on a DIY table project, it’s essential to have the right foundation – understanding the properties of different types of wood. As an expert in carpentry, I’ll guide you through the process of selecting the perfect wood for your table. Hardwoods like maple, oak, and walnut are ideal for tabletops due to their durability, while softwoods like pine are more budget-friendly but may require additional care. Once you’ve chosen the right wood, it’s time to focus on joinery techniques. A strong table hinges on precise joins, such as mortise-and-tenon, dovetails, or pocket-hole screws. Choose a method that aligns with your skill level and desired design.Beyond the foundation, the finishing touches can make all the difference in the appearance and durability of your table. A natural finish like oil or wax will enhance the wood’s grain pattern, while polyurethane or varnish provides additional protection. Remember to thoroughly sand the wood before applying any finish to ensure a smooth surface.As with any DIY project, it’s crucial to master the tools involved. Familiarize yourself with your equipment and practice on scrap wood before diving into your actual project. This will not only improve your skills but also prevent potential mistakes.Finally, remember that safety should always be your top priority when working with wood and tools. Wear appropriate protective gear, keep your workspace organized, and avoid accidents by being mindful of your surroundings.
Cost Analysis for Building a DIY Table
When considering a DIY table project, it’s essential to factor in not only the cost of materials but also the investment of time and tools. Wood prices vary depending on type and quality, with hardwoods generally being more expensive than softwoods. Additionally, you’ll need to account for the expense of screws, glue, and finish. If you don’t already possess the necessary tools, you may need to factor in their purchase or rental cost. While this initial investment can be higher, these tools can be used for future projects. Moreover, your time is a valuable resource, and building a DIY table requires hours spent designing, constructing, and finishing the piece. Although the sense of accomplishment that comes with creating something with your own hands is invaluable, it’s still an aspect to consider when weighing the costs. On the other hand, a well-built DIY table can last for years, ultimately saving you money in the long run. Unlike mass-produced furniture, you can repair and refinish your DIY table, extending its lifespan even further. With expert guidance and a realistic budget, you can create a DIY table that meets your needs while reaping the benefits of cost savings and personal satisfaction.
Accessibility Features for DIY Tables
To create a DIY table that’s accessible to everyone, it’s crucial to consider the needs of individuals with different abilities. One key aspect is adjustable height. Incorporate mechanisms like telescopic legs or adjustable risers to allow users to set the table height according to their requirements. This will enable people with mobility impairments, such as those who use wheelchairs, to navigate the space comfortably. Additionally, ensure there’s sufficient legroom under the table for easy movement. For individuals with visual impairments, provide visual contrast by using contrasting colors for the tabletop and edges. Furthermore, consider adding tactile markers like raised dots or edges to help visually impaired users locate objects on the table. By incorporating these features, your DIY table will be more inclusive, allowing people of all abilities to enjoy its functionality.
Safety Precautions for DIY Tables
When embarking on a DIY project, it’s crucial to prioritize safety above all else. To ensure a successful build of your table, consider the following precautions:
Firstly, focus on a stable design that will prevent the table from tipping or collapsing. This is particularly important if you plan to use the table for dining or other activities where items may be placed on it.
Next, take steps to smooth out any sharp edges or corners. Not only can these pose a tripping hazard, but they can also cause cuts and scrapes if not addressed.
When selecting materials and finishes, prioritize non-toxic options that won’t pose a risk to users. This is especially important in areas where the table will be used for food preparation or consumption.
Finally, invest time in creating clear and detailed assembly instructions. These should highlight any potential safety risks and provide guidance on how to avoid them, ensuring a safe and successful build.
How to Get Started with DIY Table Projects
Embarking on a DIY table project can evoke mixed emotions – excitement and trepidation often coexist. Yet, by adopting the right mindset, you can navigate this creative journey with aplomb. To set yourself up for success, consider this straightforward and thorough guide as your trusted companion.
Understand Your Needs
When embarking on a project to create a custom table, it’s essential to define its intended use from the outset. This consideration sets the stage for the entire endeavor. To begin, contemplate the purpose of the table: Will it serve as a dining surface, a workspace, or perhaps a coffee table? The answer will have a direct impact on factors such as size, height, and durability. Next, measure the space where the table will reside to ensure that your finished product fits comfortably within its intended surroundings. Finally, think about the design aesthetic you want to achieve: Do you lean towards modern, rustic, or something else entirely? Your design preference will inform material and finishing choices, ultimately guiding the overall direction of the project.
Gather Inspiration
Tap into the vast creative potential of online platforms, such as Pinterest and Instagram, which serve as a constant source of inspiration for crafting unique design concepts. For instance, browse DIY blogs and websites to discover innovative ideas and save those that resonate with you for future reference.
Plan Your Project
A successful project requires a solid plan to serve as its foundation. To create one, begin by taking the time to thoroughly envision your outcome through visualization and reference points. This process is crucial in setting the stage for what’s to come.First, take out a piece of paper or fire up your drawing software and start sketching out your design. This exercise helps you better understand your final product and will serve as a guiding light throughout the build process. Don’t worry too much about perfection at this stage – just focus on getting your ideas down on paper.Next, make a list of all the materials and tools needed to bring your vision to life. This includes everything from wood types and screws to saws and drills. Having a comprehensive list ensures you’re prepared for any unexpected challenges that may arise during the build. It also gives you a better understanding of what’s required to stay within your budget.Finally, set a realistic budget for your project. DIY endeavors can be incredibly cost-effective, but expenses can still add up quickly. Be sure to include a small buffer in your calculations to account for any unexpected costs that may arise. By taking the time to plan and prepare, you’ll be well on your way to creating something truly remarkable.
Learn Basic Skills and Safety
When embarking on a woodworking or DIY table plan adventure for the first time, it’s essential to establish a strong foundation by familiarizing yourself with the basics. One effective way to do this is by watching video tutorials designed specifically for beginners. These instructional guides can teach you fundamental skills such as measuring, cutting, and assembling, providing a solid understanding of the process. Additionally, it’s crucial to prioritize safety throughout your project. Before using any tool, take the time to learn how to use each one safely and properly. This includes donning protective gear like goggles and gloves to minimize the risk of injury.
Start Small
When starting out with woodworking, it’s essential to begin with a manageable and straightforward project that allows you to develop fundamental skills without feeling overwhelmed. Consider creating a simple side table or a basic stool as your inaugural project. These types of projects can help you master core techniques while building confidence in your abilities.
Prepare Your Workspace
To optimize your workflow, establish a dedicated workspace that provides adequate ventilation and ample space for movement. A clutter-free environment with easily accessible tools and supplies can significantly boost productivity.
Take Your Time
When it comes to crafting DIY table ideas, patience is key. Taking the time to thoroughly complete each step is crucial, especially when you’re still honing your skills. It’s not just about the final result – the journey itself holds equal importance.
Ask for Help if Needed
When embarking on a DIY project, don’t be afraid to seek guidance from others. This can include turning to friends or family members who have prior experience in the specific skill or hobby you’re interested in learning. Alternatively, online forums and communities dedicated to DIY enthusiasts can also provide valuable support and advice.
Enjoy the Process
As you embark on the journey of building your own table, remember to savor the process. It’s an opportunity to flex your creative muscles, develop new skills, and produce something tangible that reflects your unique style and personality. Don’t be too hard on yourself if things don’t turn out exactly as planned – after all, every master craftsman started somewhere. Focus on the journey, learn from any mistakes, and celebrate each small victory along the way.
FAQS on DIY Table Projects
As you venture into the realm of DIY table projects, it’s natural to encounter a few roadblocks along the way. To better equip you for success, we’ve compiled a comprehensive list of frequently asked questions that will provide valuable insight and guidance throughout your creative process.
What materials do I need for a basic DIY table project?
When embarking on a DIY table project, there are several essential components to have at your disposal. Firstly, you’ll need the raw materials themselves: wood, which can vary depending on the specific design and purpose of your creation. Next, you’ll require some type of fastening mechanism – screws or nails will suffice. To ensure a sturdy bond between different pieces of wood, wood glue is also an absolute must-have. For a smooth finish, sandpaper will be necessary to remove any imperfections or rough edges. Finally, a topcoat in the form of paint, stain, or varnish will add the finishing touches and protect your handiwork from damage. Lastly, don’t forget the tools – a saw for cutting wood to size, a drill for making precise holes, a hammer for driving those fasteners home, and a trusty measuring tape to keep everything in proportion.
How do I choose the right wood for my table?
When selecting the perfect wood for your table, consider both its purpose and your budget. If you’re creating an outdoor table, weather-resistant woods such as cedar or teak are ideal choices, capable of withstanding the elements. For indoor tables, pine is often a cost-effective option that’s also easy to work with. Alternatively, if you’re looking for durability and a sophisticated appearance, hardwoods like oak or walnut could be the way to go.
Can I make a table if I have no woodworking experience?
Kickstart your crafting journey by embarking on a straightforward project that fosters confidence and hones your skills. Supplementing this hands-on approach with online tutorials, woodworking classes, and valuable insights from seasoned craftsmen can significantly accelerate the learning process for novices.
How much does it cost to DIY a table?
The cost of building a table can be quite diverse, influenced by factors such as the piece’s size, design, and materials used. On one end of the spectrum, straightforward projects may only require an investment of $50, while more intricate or larger tables might necessitate a budget of $200 or more. By being mindful of your planning and shopping habits, you can effectively keep costs under control.
How do I ensure my DIY table is stable?
When it comes to building a stable structure, attention to detail is crucial. To ensure your table remains steadfast, you must begin with precise measurements and a solid construction foundation. This means ensuring that every piece is cut accurately, and joints are securely fastened together. Moreover, incorporating additional support elements like braces or aprons underneath the table can further augment its stability.
What tools do I need for a DIY table project?
When it comes to tackling DIY projects or woodworking tasks, having the right set of tools is crucial. A few essentials can make all the difference in the quality and efficiency of your work. Here are some must-haves that should be included in your arsenal:A saw is a fundamental tool for any woodworking project. You’ll want to have at least one type on hand, whether it’s a handheld saw like a hand saw or circular saw, or a more specialized tool like a miter saw.In addition to cutting through materials, a drill is another essential tool that allows you to drive screws and make precise holes. It’s an indispensable tool for any DIY project.Measuring up: A measuring tape is a simple but vital tool that helps you get accurate measurements. This is especially important when working with wood or other materials where precision is key.For smoothing out surfaces, sandpaper or a sander is a must-have. This will help remove imperfections and give your finished product a professional-looking finish.Clamps are often overlooked, but they’re crucial for holding pieces together while you work on them. Without clamps, your project can quickly become misaligned, leading to poor results.Last but not least, a square is an essential tool for ensuring that your pieces are properly aligned and symmetrical. This is particularly important when working with wood or other materials where precision is paramount.
How long does it take to build a table?
The time it takes to complete a design project can be influenced by two key factors: the complexity of the project itself and the individual’s skill level. For instance, simple table designs may only require a few hours of work, whereas intricate designs that demand a higher level of expertise could take several days or even a full weekend to finish.
Is it cheaper to build or buy a table?
Constructing a table can be a more cost-effective option compared to purchasing a similar piece of furniture, particularly when considering the potential savings from leveraging existing tools and materials. Moreover, DIY projects offer unparalleled customization opportunities, which may prove costly or even impossible to achieve through retail channels.
How do I protect my DIY table?
The level of protection required for a table depends on its placement and intended purpose. Outdoor tables, for instance, need to withstand the elements, making weather-resistant finishes essential. In contrast, indoor tables are more susceptible to spills and scratches, where polyurethane or similar coatings can provide effective protection. By implementing regular maintenance routines, you can ensure your table remains in pristine condition for years to come.
Can I repurpose old materials for my table project?
Crafting a unique and cost-effective dining table by repurposing vintage wood, metal, or other materials can be an exciting DIY endeavor. However, it’s crucial to carefully consider the condition and durability of these reclaimed materials before incorporating them into your project, ensuring they are sturdy enough to withstand daily use and support the weight of plates, glasses, and other tableware.
How do I add a personal touch to my DIY table?
Endless possibilities await when it comes to personalizing your DIY table project. Think beyond traditional finishes and explore intricate designs or incorporate unique elements like stencils and carvings that reflect your personality. The only limit is your imagination, as you bring your creative vision to life. As with any skill, mastering the art of DIY begins with taking the first step – and we’re here to guide you through that process.
How to Build a Table (25 Cheap DIY Table Ideas)
Transforming your living or working space can be achieved without breaking the bank, thanks to a wide range of affordable DIY table ideas. In this comprehensive guide, we’ll explore 25 creative and budget-friendly ways to build a table that will elevate your interior design without denting your wallet.
Build Your Own Miter Saw Table
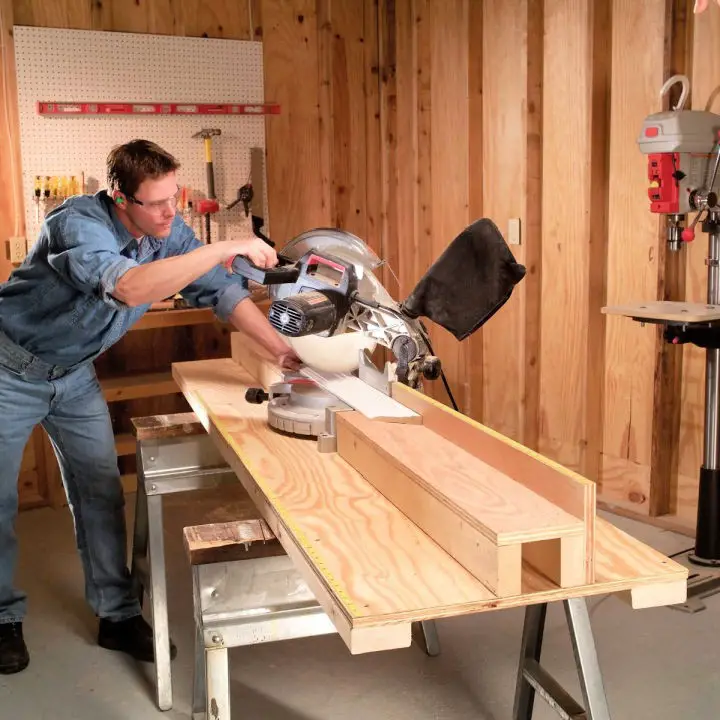
If you’re looking to take your woodworking skills to the next level, building a miter saw table is an excellent project to tackle. And with our step-by-step guide available at Family Handyman, you can create a durable and versatile worktable that enhances your cutting precision and efficiency in just half a day. The best part? This DIY project is accessible to all skill levels and won’t break the bank, costing between $100 and $150. Our comprehensive guide includes clear instructions, a detailed materials list, and required tools to ensure you craft a table that supports long boards and makes repetitive cuts a breeze. Plus, it features handy storage spaces for your tools and parts, maximizing your workspace’s utility.
How to Make a Boho Picnic Table

Transform your outdoor gatherings into warm and inviting experiences with a unique, low-profile boho picnic table that’s as stylish as it is easy to construct. This DIY project is ideal for those who crave adding personality and coziness to their patios, decks, or backyards. With just basic tools and treated lumber, you can create a charming focal point that fosters memorable moments with loved ones. For a detailed, step-by-step guide featuring materials and expert tips, visit TheDIYMommy.com. Whether it’s for a family barbecue or a relaxed evening under the stars, this boho picnic table is sure to become your go-to summer DIY project.
Homemade Live Edge Sofa Table

Elevate your living space’s aesthetic appeal without breaking the bank by creating a one-of-a-kind DIY Live Edge Sofa Table. This budget-friendly project is designed to enhance the look of oversized sofas, offering a designer touch at a fraction of the cost. With just a few basic supplies including live edge wood, brackets, screws, stain, and lacquer, you can craft a piece that showcases unique natural characteristics for around $200. Following simple steps, you’ll achieve a sturdy table that doubles as a charming snack bar for your family, adding functionality to your home decor.
Free Outdoor Bar Table Plan
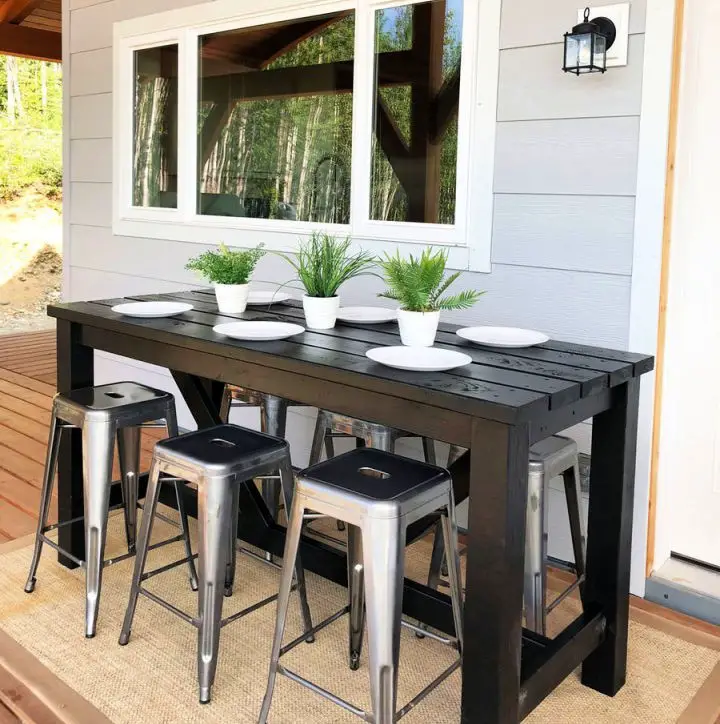
Transform your outdoor space into an inviting haven without sacrificing style or functionality with Ana White’s DIY Outdoor Bar Table. This clever design makes the most of limited space while providing ample room for 6-8 guests to gather. With a budget-friendly price tag of around $60 and readily available materials, this project is accessible to anyone looking to elevate their outdoor entertaining. The use of a Kreg Jig ensures seamless joinery and adds a touch of sophistication to the overall design. Simply add a coat of your favorite paint for a personalized finish that perfectly complements your existing decor. This sturdy table is designed to withstand breezy days, making it perfect for decks or patios. Whether you’re hosting intimate meals or lively gatherings, this space-saving bar-height table is sure to become your new go-to spot.
Cheap DIY Sensory Table for Under $50
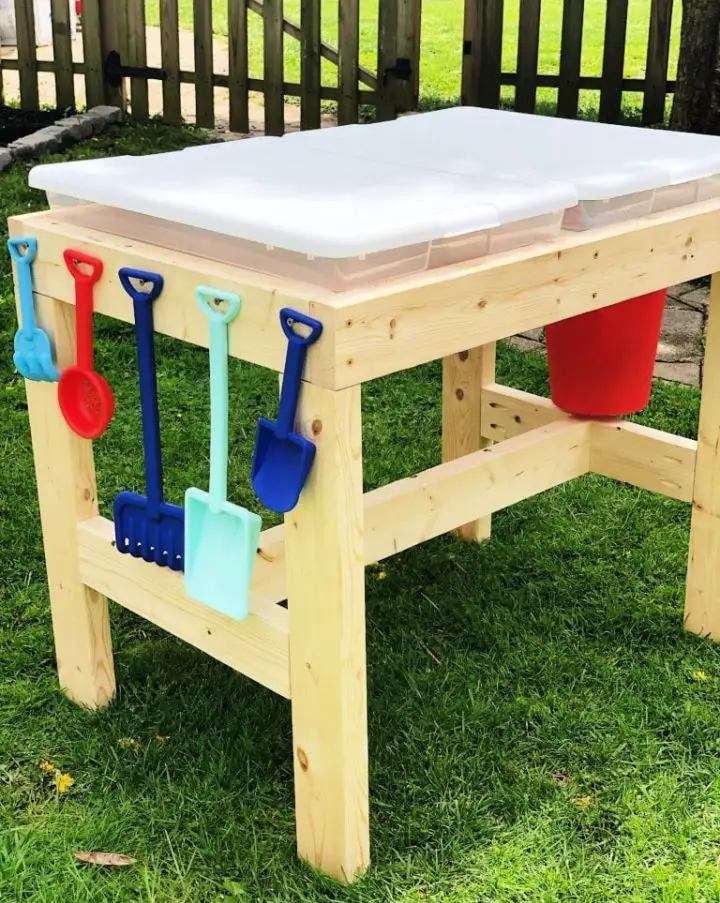
Discover the magic of outdoor play with our step-by-step guide to crafting a unique sensory table for under $50. By combining simple materials and basic tools like a miter saw, speed square, and drill, you can create a sturdy and inviting sensory experience for children in just three hours. This DIY project not only sparks imagination but also demonstrates the perfect blend of functionality and craftsmanship, making it an ideal addition to any family’s outdoor space.
Life-Sized Peg Game Outdoor Table Plan
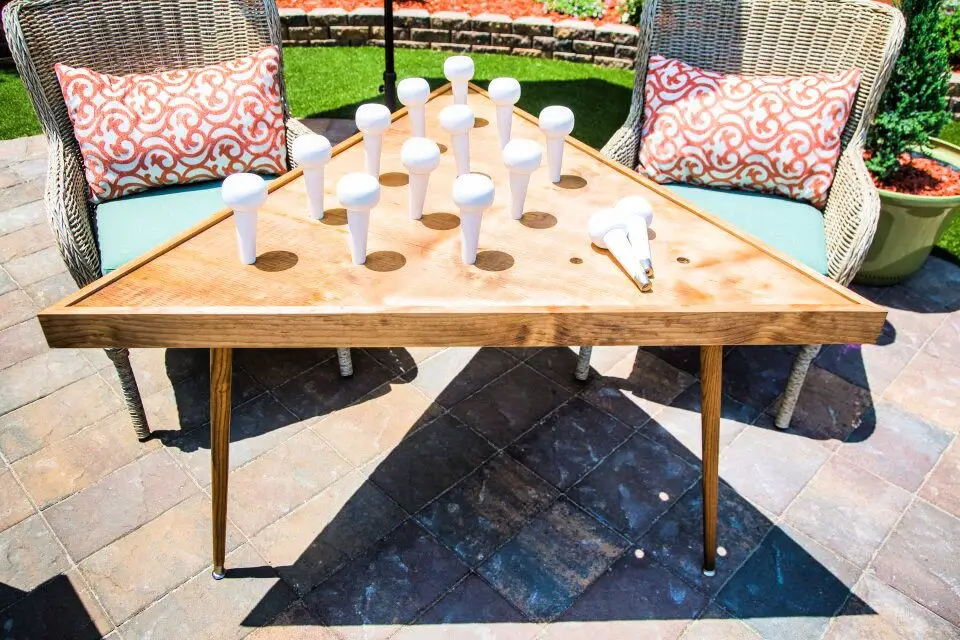
Elevate your outdoor entertainment experience by crafting a life-sized Peg Game Outdoor Table that’s perfect for lively gatherings. This DIY project harmoniously blends creativity with practicality. To get started, you’ll need materials like plywood, table legs, a jigsaw, and a drill. Begin by constructing a triangular playing board, carefully drilling holes for the pegs to ensure smooth gameplay. Next, attach sturdy legs for stability and add a lip around the edges to prevent pieces from falling off. To put your personal touch on it, customize the pegs with paint or any other medium that suits your style. As you assemble this game table, you’ll be thrilled to see how easily it becomes the centerpiece of any gathering, guaranteed to delight friends and family alike.
Easy DIY End Table for Beginners
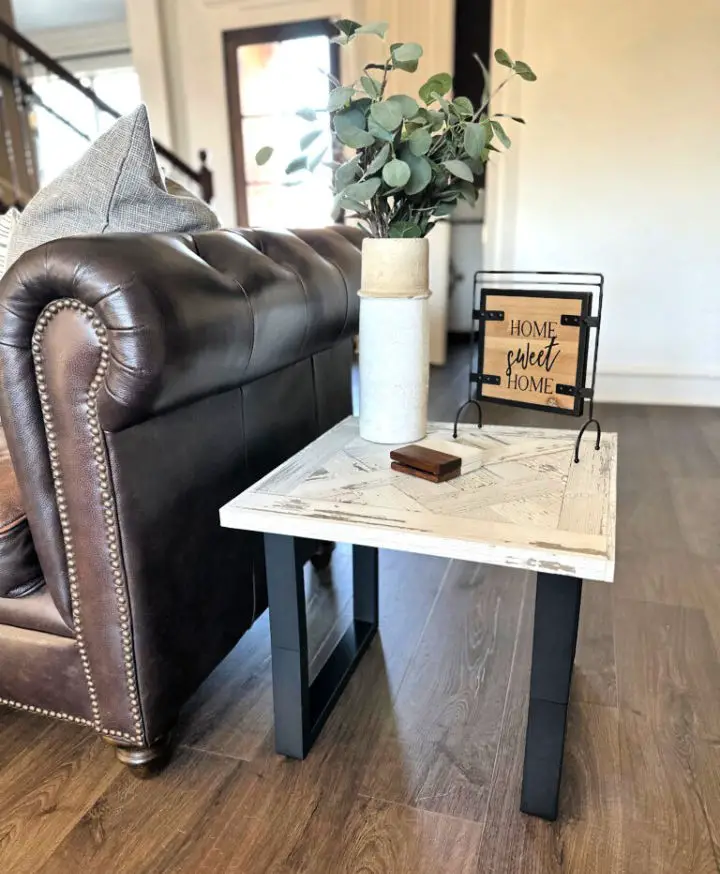
Transform your living space by crafting an end table on a budget, savoring the fulfillment that comes with creating something beautiful with your own hands. Shanty2Chic’s straightforward plans will walk you through each step with clarity, eliminating any concerns about complexity. The allure of a parquet top design or the pride of building furniture that harmonizes with your home decor make this project a joy to undertake. Whether you’re a seasoned DIY enthusiast or just starting out, Shanty2Chic’s guide ensures a rewarding and enjoyable experience as you bring your unique piece to life from scratch.
Make a Gas Fire Pit Table for Porch
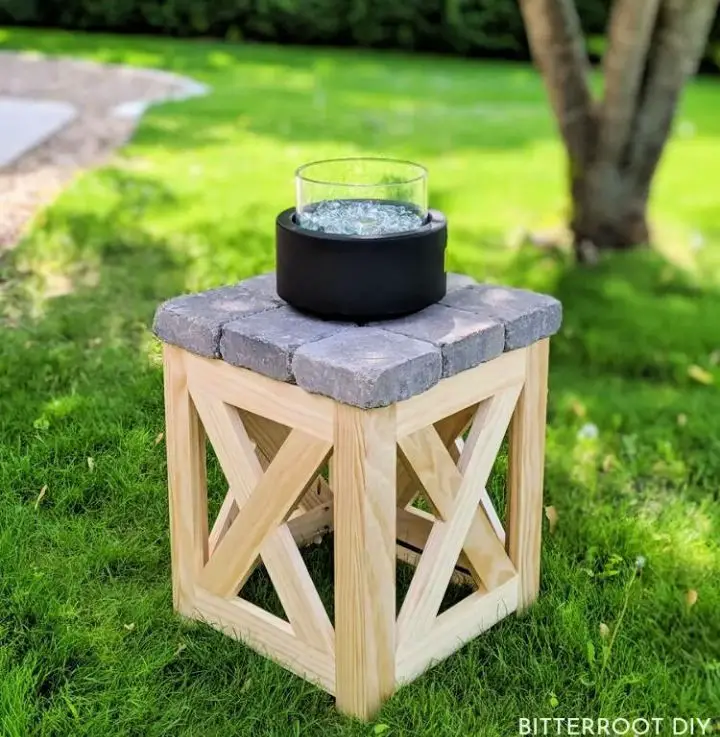
Transform your outdoor haven by crafting a custom-built gas fire pit table that seamlessly integrates with your 20lb propane tank. This step-by-step DIY guide is designed to provide you with the satisfaction of building a functional and long-lasting centerpiece for your porch or patio, while emphasizing the importance of using exterior-grade materials and precision assembly. By following the comprehensive instructions from selecting the perfect frame to applying the finishing touches, you’ll be able to create a unique space that reflects your personal style and meets your specific needs, ultimately elevating your outdoor experience.
Make Your Own Ping Pong Table
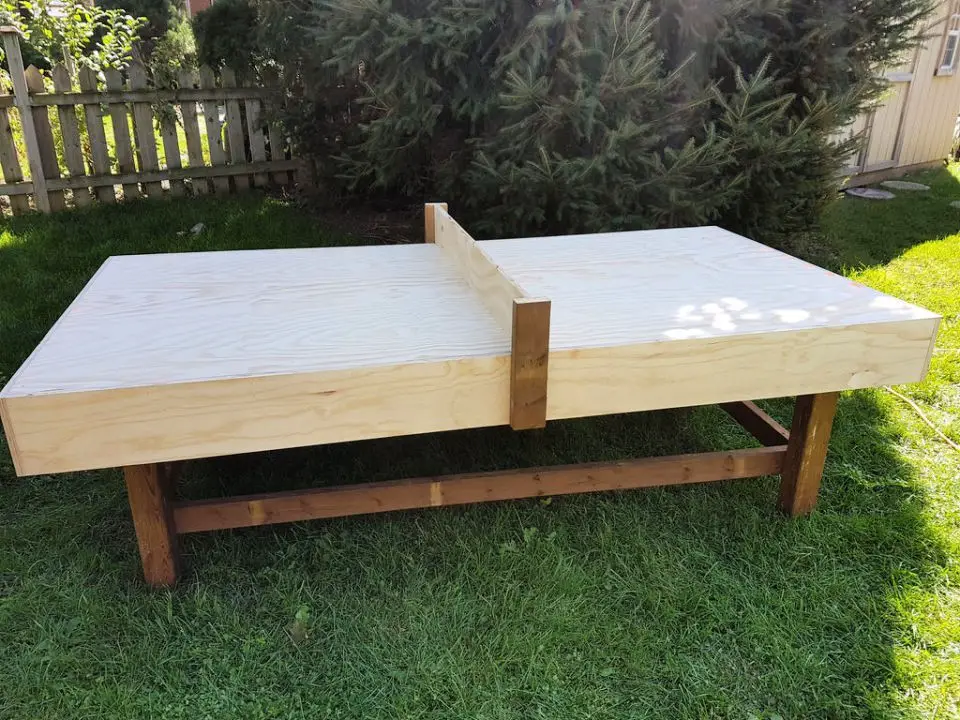
Transform any space into an entertaining haven with this DIY Ping Pong Table project from Instructables. Designed for both outdoor and indoor settings, this budget-friendly endeavour not only brings people together but also showcases a unique blend of creativity and practicality. With a meticulous shopping list and easy-to-follow step-by-step instructions, you’ll effortlessly turn ordinary materials into an exceptional ping pong table that’s sure to be the focal point of your home.
DIY Makeup Vanity Table With Lights
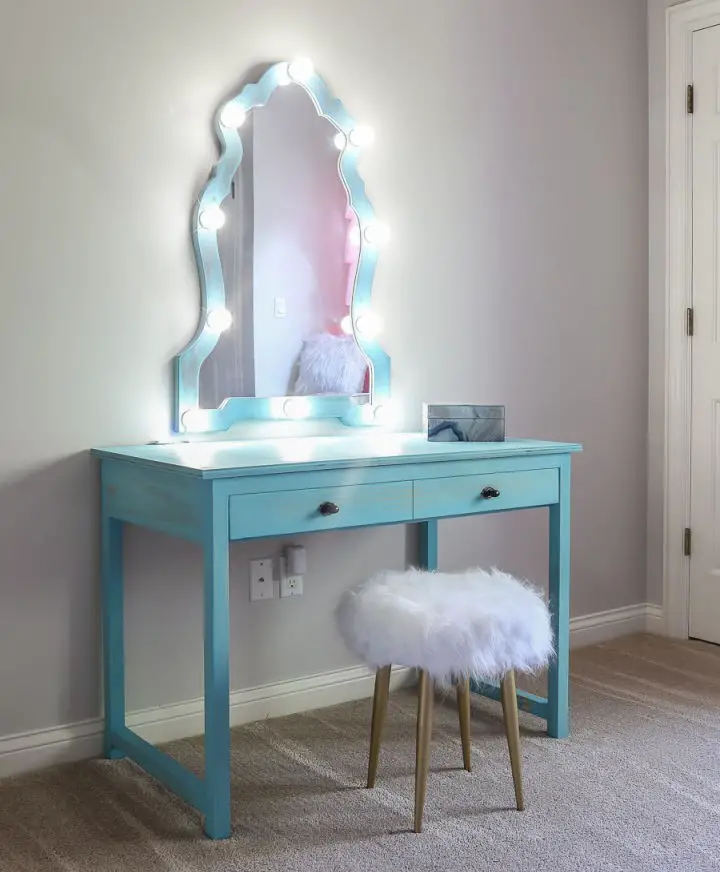
Transforming your space into a luxurious makeup haven is now possible with a DIY Makeup Vanity featuring a Hollywood Lighted Mirror. This project is perfect for aspiring makeup enthusiasts who want to create a stylish and functional space. To achieve this look, start by rejuvenating a wood framed mirror with trendy Vintage Aqua wood stain, giving it a classic and elegant feel. Next, enhance the mirror with striking LED vanity lights that add a touch of glamour to the overall design. With these easy-to-follow step-by-step instructions, you can create a stunning vanity that your child will adore. For more creative ideas and a complete guide on how to build this masterpiece, visit Jen Woodhouse. By following this DIY project, you’ll not only elevate your DIY skills but also build a makeup setup that’s sure to impress.
$50 DIY Drafting Table
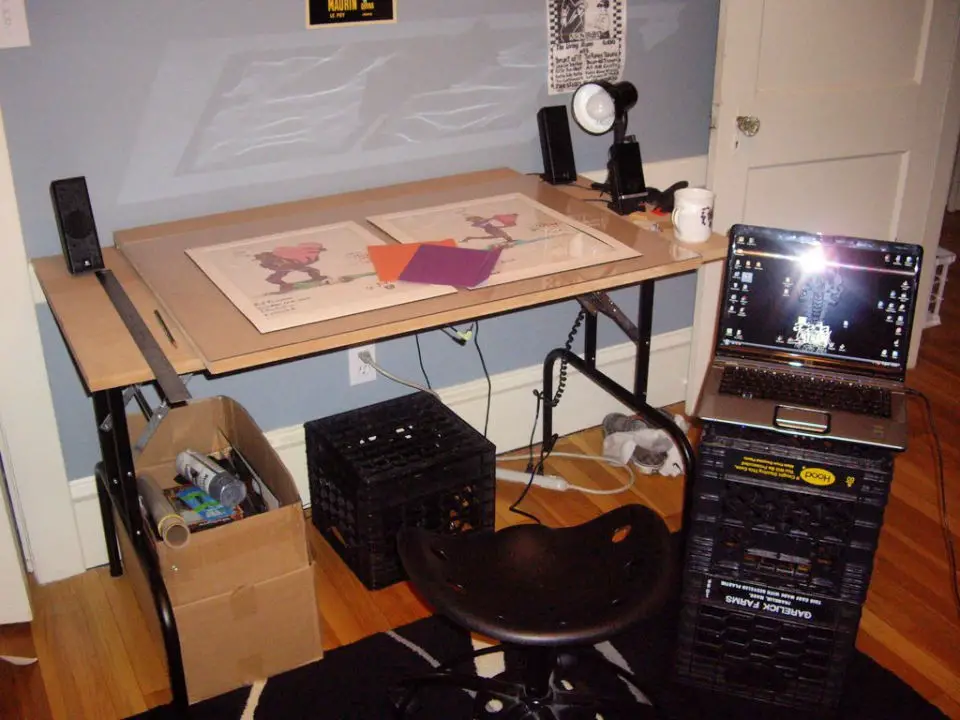
Revamp your workspace without compromising on creativity or budget with this innovative $50 DIY Drafting Table project. A perfect solution for artists, architects, and hobbyists alike, this Instructables tutorial provides a comprehensive step-by-step guide to constructing a fully customizable and practical drafting table that suits your unique needs.
Modern DIY Farmhouse Dining Table and Bench
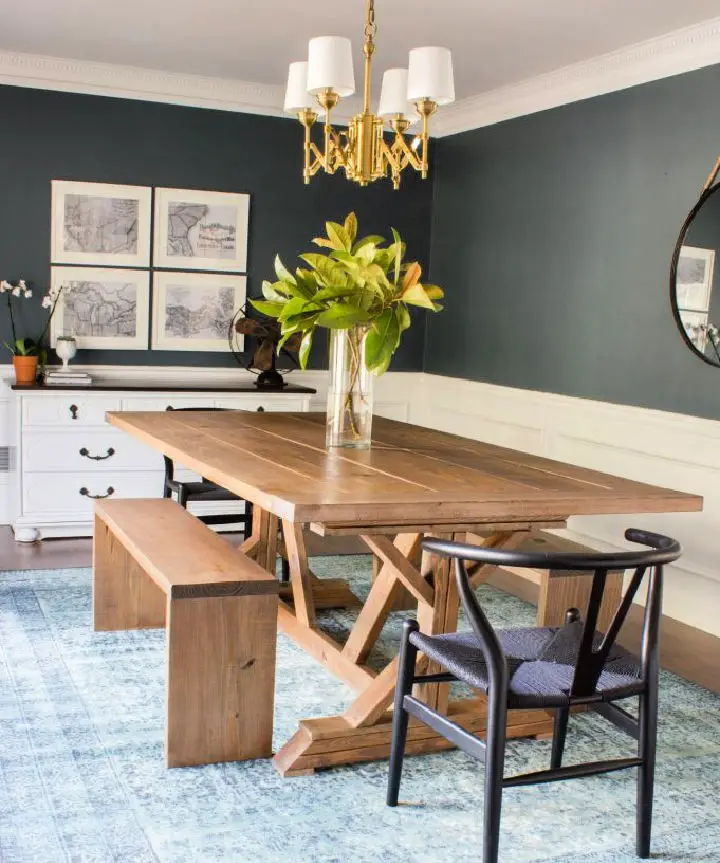
Transform your dining room with the timeless charm of a Modern Farmhouse Dining Table & Benches by following Erin Spain’s comprehensive guide. Not only will you save money on this DIY project, but you’ll also have the freedom to tailor it to your unique taste. By modifying Ana White’s plan and selecting affordable materials, Erin shares her expertise in creating a one-of-a-kind piece that combines beauty with functionality. Whether you’re looking for a sense of accomplishment or a statement piece to anchor your space, this guide ensures you’ll build a table that perfectly reflects your style and complements your surroundings.
$50 Square Hairpin Leg Coffee Table Ideas
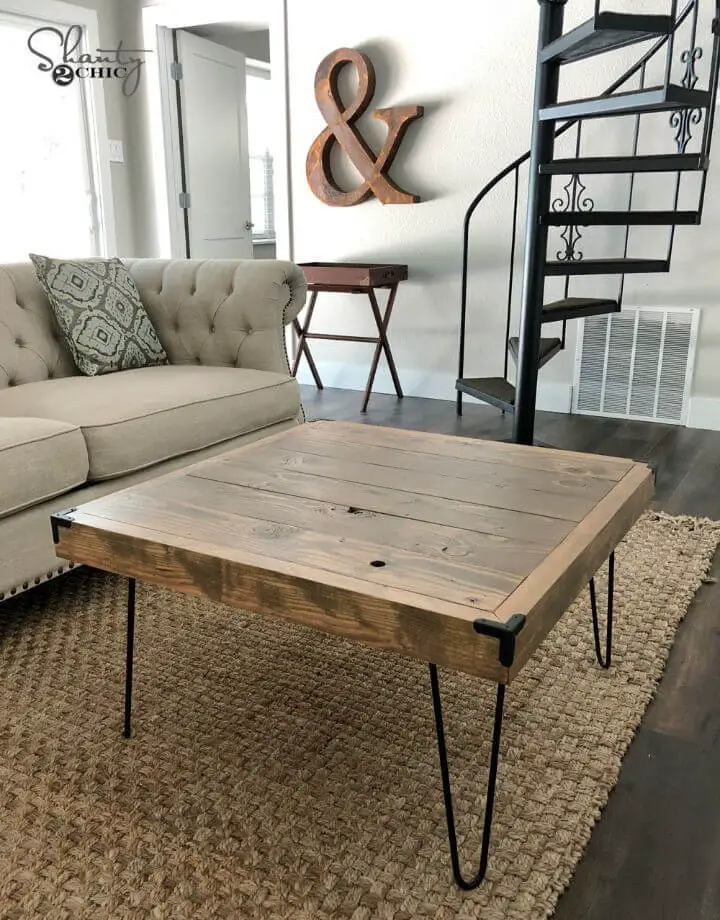
Elevate your living space with a budget-friendly DIY project that’s both stylish and resourceful. Shanty2Chic’s Hairpin Coffee Table is a game-changer, marrying affordability with chic design for just $50. This square coffee table boasts sleek hairpin legs, effortlessly blending modern and traditional décors. By following their step-by-step guide, you’ll create a one-of-a-kind piece that not only adds personality to your room but also showcases your DIY skills. Perfect for those who crave visually appealing and functional furniture without breaking the bank.
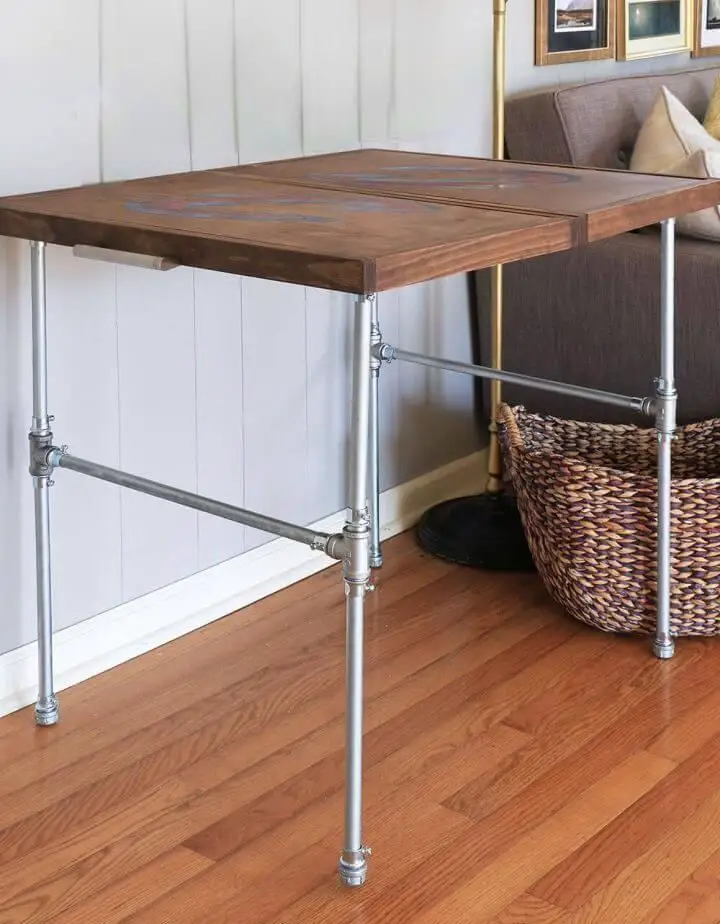
Making a Crate and Pipe Industrial Table
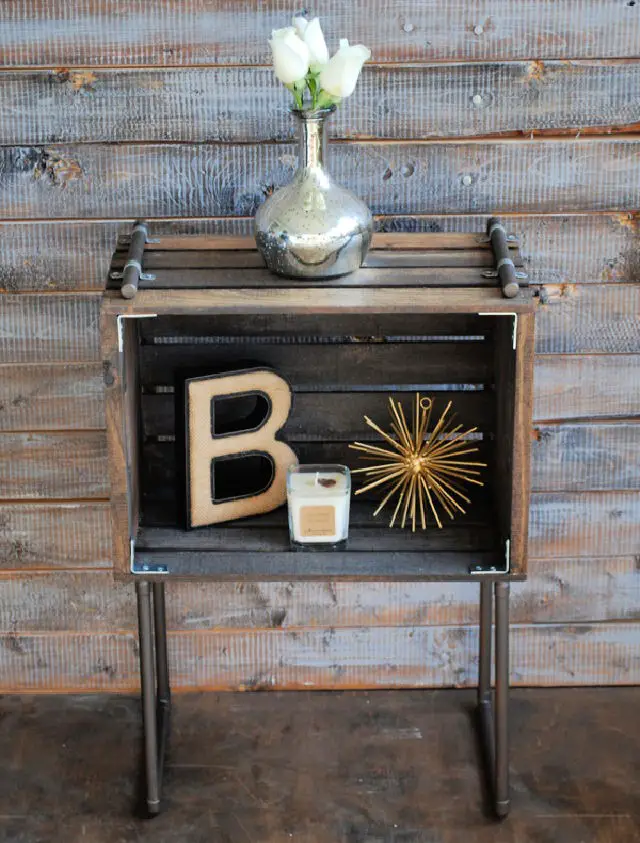
Transforming raw materials into a one-of-a-kind masterpiece is just a few steps away with this comprehensive guide on crafting a DIY Crate & Pipe Industrial Table. Drawing inspiration from the world of upcycling, Brepurposed simplifies the process of turning ordinary copper piping and wooden crates into an extraordinary piece of furniture that exudes rustic charm and modern sophistication. By following expert tips on selecting the perfect materials, constructing the pipe frame, and achieving a flawless finish, you’ll unlock your creative potential and create a functional work of art that can be tailored to suit any room in your home.
Modern DIY Side Table
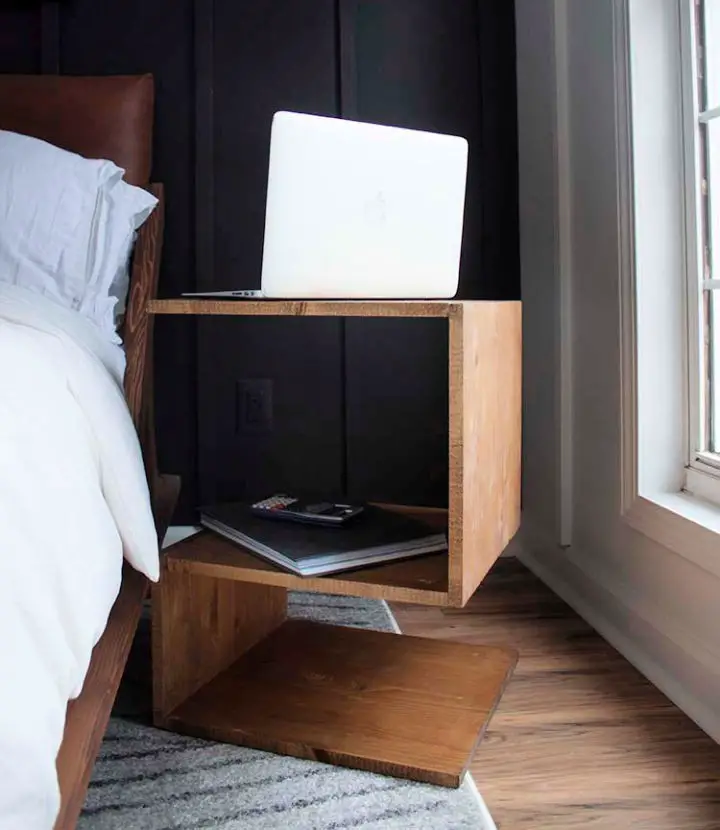
Transform your living space without breaking the bank with this straightforward DIY side table project from Southern Revivals. This budget-friendly solution offers ample storage and a sleek surface, making it perfect for any room in need of a stylish boost. With its versatility and customizability, you can tailor the design to fit your unique aesthetic, adding a touch of modern flair to your home. Whether you’re looking to showcase vinyl records, hold books, or create a cozy reading nook, this project’s simplicity and cost-effectiveness make it an ideal choice for any homeowner seeking to elevate their décor without sacrificing style.
Handmade Wood Slice Table
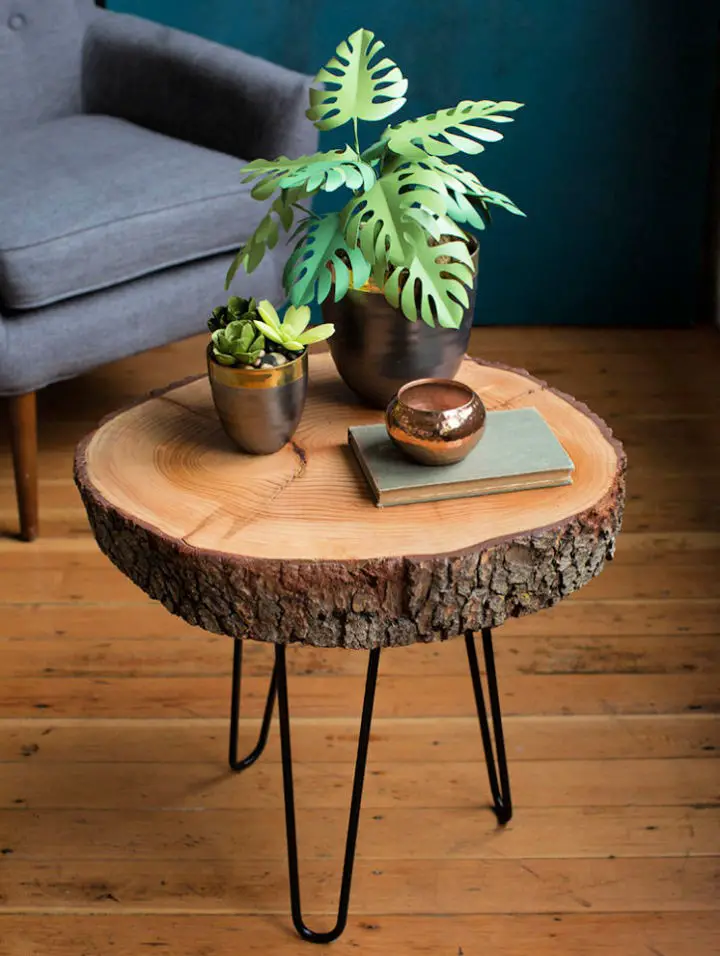
Elevate your living space by embracing the beauty of nature through a DIY wood slice table project. With minimal tools and materials required, this endeavour from Lia Griffith offers a charming and functional piece that can seamlessly blend with any room’s decor. Perfect for adding a rustic or mid-century touch, this DIY task is ideal for home decor enthusiasts seeking to incorporate natural elements into their space. The project comes complete with styling tips and alternative ideas, making it an excellent weekend activity with satisfying results. Turn a simple wood slice into a stunning table that adds warmth and character to your home.
How to Make a Kids Craft Table
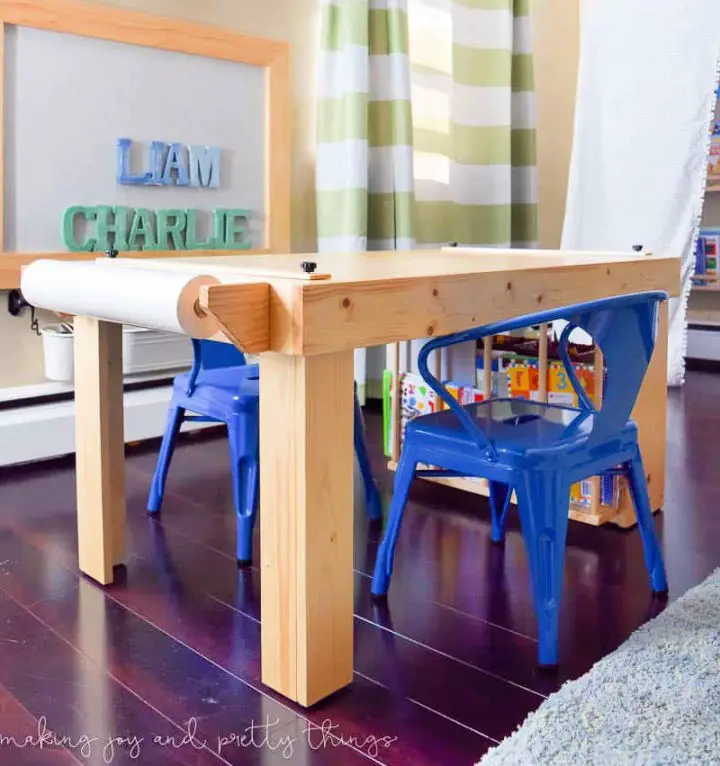
Create a haven for creative expression with a DIY Kid’s Craft Table that’s both budget-friendly and tailored to their unique needs. Our table boasts ample storage and customizable dimensions, making it an ideal space for storing all sorts of craft supplies. In our previous post, Making Joy and Pretty Things, we shared the step-by-step process for building this functional piece, perfect for sparking imagination and fostering a sense of creativity in your child. By following our simple instructions, you’ll be able to create a playroom staple that will delight both you and your little ones.
Space Saving Train Table Building Plan
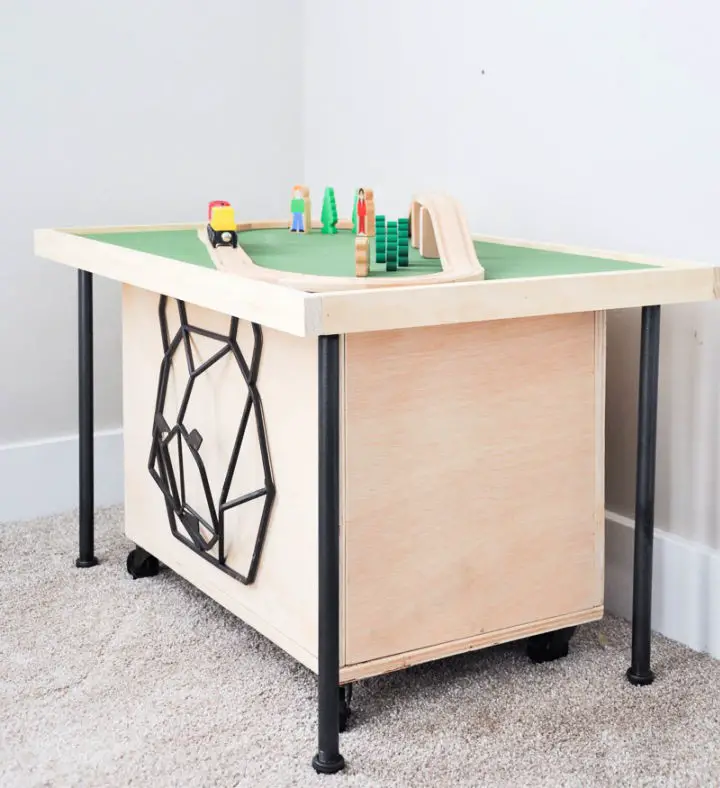
Discover how to turn tight spaces into vibrant zones with Cherished Bliss’ ingenious solution! One such masterpiece is the DIY Train Table, featuring removable legs and an ultra-slim design that makes storage a breeze. Perfect for little conductors, this compact creation doesn’t dominate your living space, ensuring effortless entertainment and organization. To bring this cozy corner to life, simply secure the complimentary plans now and unleash imagination and play without overwhelming your home.
How to Make Your Own Hanging Table
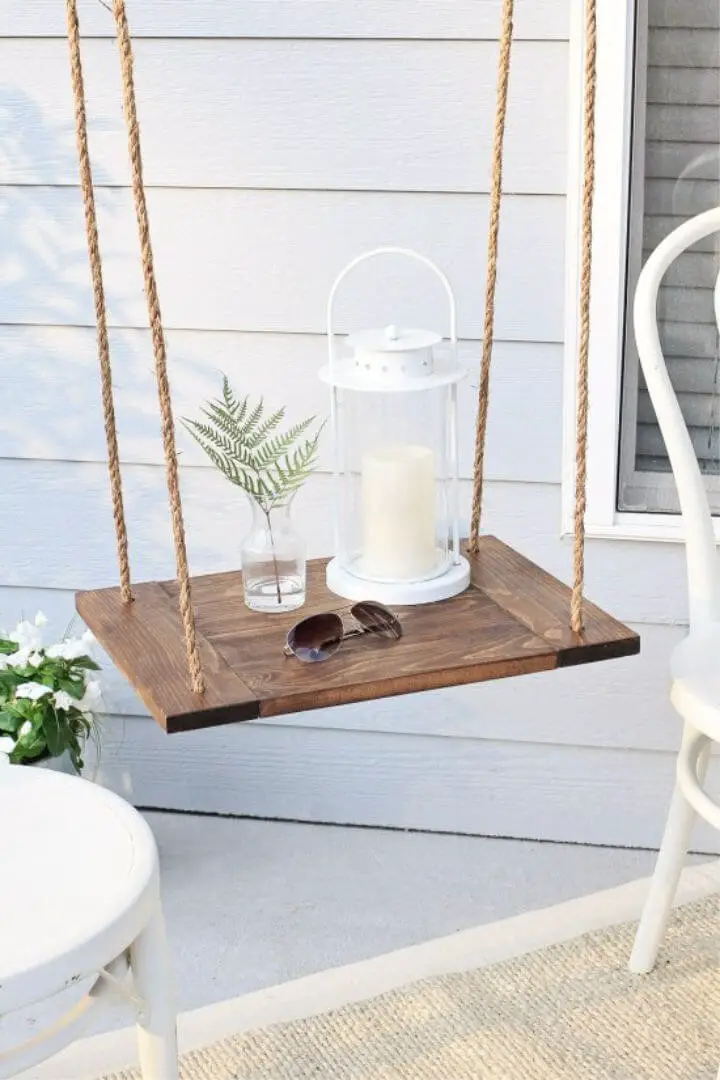
Transform your patio space with Angela Marie Made’s comprehensive DIY guide to creating a charming floating table. This ingenious project is perfect for tight spaces, combining functionality with rustic farmhouse flair using simple materials like wood and sisal rope, along with basic tools. Whether you’re serving drinks or reading your favorite book, this hanging table adds a unique touch to any outdoor or indoor area. By investing just under $17, you can build a practical and stylish piece that keeps essentials within reach while adding a touch of elegance to your small patio.
DIY Outdoor Game Table for Under $40
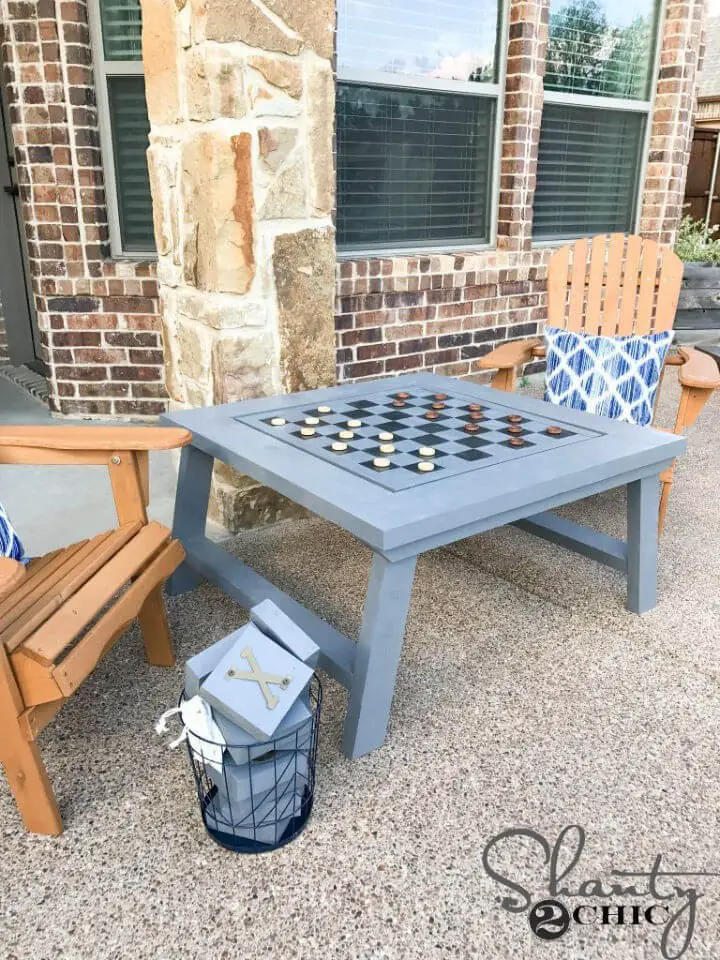
Transform your outdoor space into an entertainment haven by crafting a delightful DIY Outdoor Game Table. This multi-functional masterpiece offers endless fun with games like tic-tac-toe, checkers, or chess, while also serving as a charming coffee table when you’re not engaged in friendly competition. A fantastic project for a sunny weekend, this game table is surprisingly straightforward to build and budget-friendly, requiring only $40 worth of lumber. With clear step-by-step instructions and complimentary printable plans, you can effortlessly bring this engaging piece to your backyard. Gather your tools and get ready to create memories with friends and family as the summer days unfold.
Quick and Easy Pallet Console Table
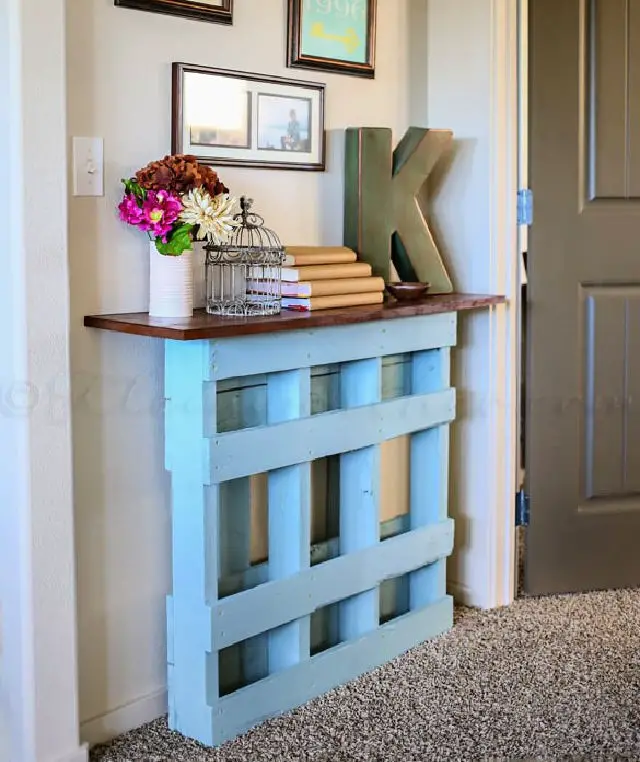
Elevate your space with a unique DIY Pallet Console Table that brings new purpose to recycled materials. This easy-to-assemble project is ideal for entryways or narrow corridors, requiring just a few hours to complete and providing a sustainable, stylish solution for small spaces. By embracing creativity, you can transform any room with the rustic charm of this simple yet impactful DIY endeavor.
DIY Industrial Folding Table at Home
Improve your game-day setup with the DIY Industrial Folding Table tutorial from Home Made by Carmona. This comprehensive guide provides easy-to-follow instructions for crafting a functional, space-saving table that seamlessly combines style and practicality. Whether you’re showcasing snacks or displaying team spirit, this versatile piece can be customized to match your favorite team’s colors or logo, effortlessly integrating with your decor. By embarking on this engaging project, you’ll not only elevate your entertaining space but also enjoy the satisfaction of creating a unique, personalized item that reflects your personality.
Truss Beam Farmhouse Style Outdoor Table
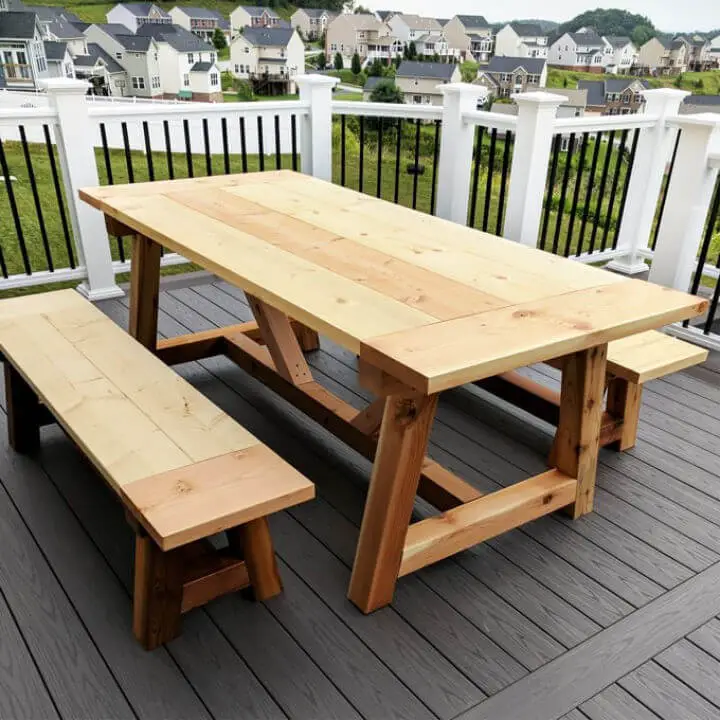
Elevate your outdoor dining experience with a unique Truss Beam Farmhouse Style Outdoor Table and Benches project, inspired by Restoration Hardware’s elegant designs. By following our step-by-step guide and practical tips, you can create a rustic-chic piece that brings warmth and charm to your patio or deck, perfect for gathering with family and friends or enjoying leisurely meals. This DIY project is surprisingly accessible, requiring only basic skills and materials. With its sturdy construction and stunning design, this table and benches will become the centerpiece of your outdoor space. Ready to embark on a rewarding DIY adventure? Start by visiting Just a Girl and Her Blog for the comprehensive tutorial.
DIY X Leg Patio Table With Pipe Trestle

Take the first step in transforming your patio into an inviting outdoor oasis by crafting a stunning X-Leg Patio Table with Pipe Trestle. By mastering woodworking basics and incorporating creative pipe trestle design, you’ll create a sturdy and visually appealing table perfect for hosting gatherings or simply enjoying quality time with loved ones. Don’t be intimidated – this DIY project requires only basic tools and materials like lumber, conduit pipe, and a willingness to learn. With these simple components, even novice woodworkers can successfully complete the project, resulting in a one-of-a-kind addition that elevates your patio’s charm.
How to Build a Pallet Porch Table
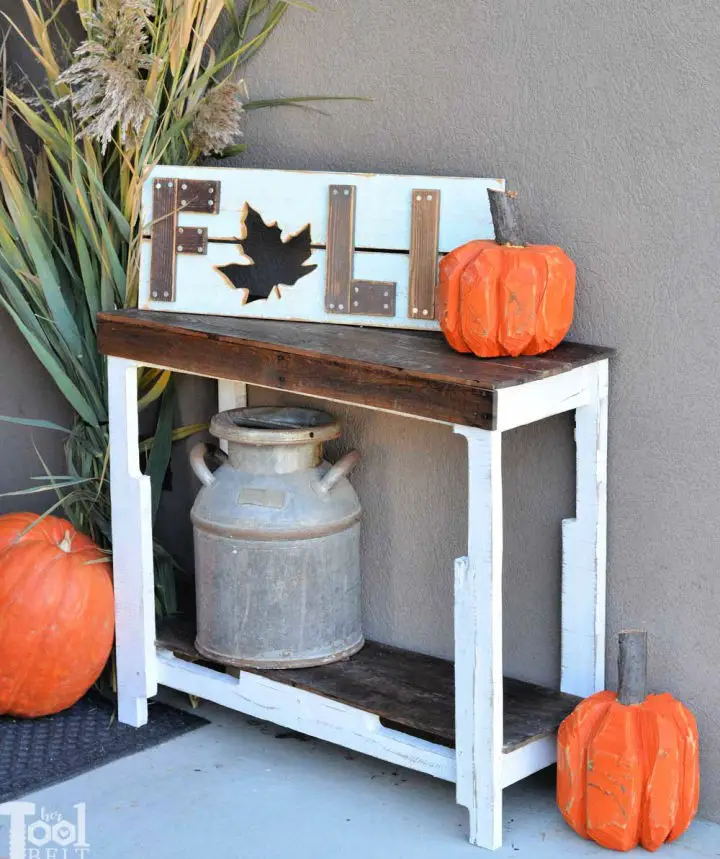
Transform your outdoor space with a charming DIY pallet table, courtesy of Her Tool Belt. This comprehensive guide takes you on a step-by-step journey to create a sturdy and functional pallet porch table that won’t break the bank. With just a few essential materials like hardwood pallets, screws, and paint, you’ll craft a stylish addition that’s perfect for showcasing holiday decorations or enjoying morning coffee. The simple process involves cutting, assembling, and finishing, resulting in a one-of-a-kind look that adds character to any porch. Perfect for those who love practical and visually appealing DIY table projects!
Conclusion:
As we wrap up this exploration of 25 affordable DIY table ideas, it’s clear that learning how to build a table is not only a fulfilling experience but also a fantastic way to put your own personal touch on your space without breaking the bank. We’ve covered the essential steps from identifying your needs and gathering inspiration to planning and executing your DIY project. Whether you’re embarking on your first project or looking to hone your skills, these insights are designed to guide you through the process of creating something truly unique and functional for your home. The key to a successful DIY table project lies in preparation, patience, and creativity. With the right mindset and tools at your disposal, you’re ready to start building and bring your vision to life.
