Crafting DIY suncatchers is an excellent way to infuse color and vibrancy into your windows. With 25 easy and engaging DIY suncatcher projects for both kids and adults, transforming simple materials into stunning displays becomes a breeze. The art of crafting suncatchers seamlessly blends traditional techniques with modern creativity, allowing you to put your personal touch on the process. This guide will walk you through the fundamentals, from selecting designs to gathering essential supplies. Suncatchers serve as a unique fusion of art and tradition, providing a canvas for expressing personal style and cultural significance. Whether you’re inspired by nature or incorporate meaningful symbols, understanding the process of making suncatchers is key to creating your own beautiful, light-catching decorations. As we embark on this creative journey, let’s start with exploring the first steps in crafting your very own suncatcher project.
DIY Crystal Suncatchers Tutorial
Creating a crystal suncatcher embellished with moons and stars is a charming project that harmoniously blends creativity with straightforward simplicity. This comprehensive guide navigates each step with precision, providing clarity and ease for both novice and experienced crafters alike. With this tutorial, you’ll be able to craft a stunning suncatcher that effortlessly brightens any room, making it an ideal addition to your home or office.
Materials Needed
To craft a stunning Crystal Suncatcher Kit, you’ll need to gather a few essential materials. Online retailers offer a variety of kits that include everything needed to get started. If you prefer to assemble your own kit, here’s what you’ll require: a good pair of scissors, a ruler for precision, 1 meter of thin wire in gold, two metal hoops in different sizes, and a selection of crystal beads featuring gold, clear, and blue chip crystals. To add an extra layer of security to your design, double jump loops are recommended. A prism will be the centerpiece of your suncatcher, while a 50-centimeter chain provides a convenient way to hang your finished piece. Finally, jewelry pliers can come in handy for making adjustments, but they’re not strictly necessary.
Step 1: Prepare the Hoops
Initiate the process by carefully positioning the two metal hoops in tandem, matching the weld points exactly. Next, take the gold wire and apply a snug wrap around the combined hoops, focusing on keeping them closely aligned. To guarantee a robust connection, repeat this wrapping motion 22 times, gradually building tension with each pass.
Step 2: Create the Zigzag Pattern
To complete the securing process, initiate the wrapping phase by threading the wire in an alternating zigzag pattern around both hoops. Begin at the center of the structure, applying gentle tension as you work your way outward. As you progress, deliberately increase the spacing between each coil to create a visually appealing sun-like design. If necessary, take the time to carefully unwind and rewrap any sections that may have gone awry, ensuring a polished finish.
Step 3: Add the Beads
As you prepare to create your next crystal-adorned masterpiece, begin by unwinding a meter of wire and threading onto it a sequence of beads. The pattern should consist of alternating gold, clear, blue chip crystal, and clear beads, with the sequence repeating as you go. Once the beads are strung, wrap the wire around the hoops in a gradual increase, leaving one bead at the front after each wrap. This will create a stunning, intricate design that showcases the beauty of the crystals.
Step 4: Secure and Finish the Wrapping
As you near completion of placing the beads, shift your focus to securing the wire in place. Ensure each wrap is evenly spaced by adjusting the tension, taking care not to create any gaps that might detract from the overall appearance. Once satisfied with the result, trim the excess wire and carefully tuck the end away to prevent it from coming loose.
Step 5: Attach the Prism and Decorative Elements
To create your unique suncatcher, begin by opening a jump ring and threading it through the prism. Next, attach the jump ring to the center of your design, serving as an anchor point for any additional decorative elements you wish to add. Consider incorporating octagons or a heart-shaped crystal at the bottom, securing each piece with a jump ring to ensure they’re evenly spaced and harmoniously arranged.
Step 6: Hang Your Suncatcher
To complete your suncatcher, attach a 50cm chain to the top using a jump ring. This versatile feature enables you to adjust the length of your suncatcher to perfectly capture the light and showcase its stunning features, whether you prefer a shorter or longer display.
Video Tutorial
If you’re looking for a more hands-on approach to creating a crystal suncatcher with moons and stars, we recommend checking out our YouTube video tutorial that breaks down each step in detail. This visual guide is designed to be used in conjunction with this written guide, offering a comprehensive resource that covers all the techniques needed to bring your project to life. By following along with both the video and written instructions, you’ll have everything you need to create a truly stunning crystal suncatcher. As you work through the process, remember to take your time and enjoy the journey – the end result is sure to be a beautiful addition to any room.
How to Get Started with DIY Suncatcher Crafts
A DIY suncatcher project is the perfect way to add a pop of color and personality to your living space. Not only is it a fun and creative activity, but it’s also a great way to spend quality time with family or friends. Whether you’re looking for a new hobby or just want to add some visual interest to your home, making suncatchers is an enjoyable and rewarding experience that can be tailored to any skill level.
Choosing Your Suncatcher Design
When embarking on a suncatcher crafting journey, the first crucial step is deciding on a design that resonates with you. Inspiration can strike from nature’s wonders, seasonal themes, or abstract patterns that captivate your imagination. As you ponder what to create, consider how it might harmonize with its eventual display location. With simplicity as your guide, you could opt for straightforward shapes like hearts and stars or venture into more intricate designs featuring butterflies, flowers, or other motifs that spark joy.
Gathering Supplies
When it comes to crafting your own suncatcher, you might be surprised at just how many everyday materials you can repurpose to get the job done. In fact, many of the essentials can likely be found lurking around your home or local craft store. Here’s a rundown of the typical supplies you’ll need to get creative:First up, you’ll want some transparent bases to serve as the foundation for your design. Old CDs, clear plastic sheets, and even contact paper can all work well in this capacity.Next, it’s time to add some colorful flair to your project. Tissue paper, glass paints, beads, or colored cellophane are all great options for injecting a pop of color into your suncatcher.Of course, no craft project is complete without the right adhesives on hand. Depending on what you’re working with, you might need some trusty old glue, double-sided tape, or even a hot glue gun to keep everything in place.Finally, when it comes to getting precise and making sure your design turns out just right, templates and tools are key. Scissors, markers, and printable templates (if you’re following a specific design) will all play important roles in helping you bring your suncatcher to life.
Making Your Suncatcher
To begin, clear a dedicated workspace by removing any clutter or distractions. Cover the surface with a protective layer, such as newspaper or a craft mat, to safeguard against accidental spills or cuts. With your area prepared, gather all necessary supplies and materials for your project.Next, bring your design to life by cutting out shapes from your chosen medium, whether it’s transparent material or colorful substances like beads or crayons. Arrange these elements on the base until you’re satisfied with the overall appearance.Once your design is taking shape, secure the pieces in place using glue, double-sided tape, or other suitable adhesives. If your project involves melting materials, be sure to follow proper safety guidelines and utilize appropriate tools to avoid any potential hazards.Finally, add the finishing touches to your masterpiece. This might involve outlining shapes with a marker or adding a hanging mechanism, such as a string or suction cup. Allow any adhesives or melted materials to cool and dry completely before making any final adjustments.
Displaying Your Suncatcher
As you create a suncatcher, one of the most rewarding aspects is witnessing it capture the light’s warm glow. To fully appreciate its beauty, hang your finished piece in a sunny window or glass door. For an even more breathtaking display, consider crafting multiple suncatchers that will work together to illuminate and brighten up any room.
Sharing and Expanding Your Skills
As you complete your DIY suncatcher project, don’t be afraid to showcase it on social media or share it with friends and family. Who knows, you might just inspire others to try their hand at crafting a unique piece that reflects their personality. With each creation, feel free to experiment with new materials and techniques to continually push the boundaries of what’s possible. As you become more confident in your abilities, you’ll find yourself eager to take on even more complex designs that truly make your suncatcher stand out. And when it comes to starting a DIY suncatcher project, simplicity is key – just choose a design, gather your supplies, and let your creativity flow. Whether you’re just beginning or have years of crafting experience under your belt, the joy of making a suncatcher lies in the process of bringing your own personal touch to your home décor through the subtle yet striking combination of color and light.
Customization Tips for Suncatcher Crafts
When crafting a suncatcher, the process transcends mere instruction-following; it’s an opportunity to infuse your creation with personal flair. By adding unique touches, you’re not only making the piece special, but also imbuing it with a sense of self. This personalized approach can elevate the humble suncatcher into a treasured possession or meaningful gift. To help you achieve this level of customization, consider the following tips:
Choose a Theme
To initiate your creative journey, begin by selecting a theme that speaks to you on a personal level. This theme can be inspired by various aspects of life, such as the natural world – think vibrant flowers or majestic animals – or perhaps an abstract pattern that resonates with your artistic vision. Alternatively, draw inspiration from your own passions and hobbies. As you settle on a theme, you’ll start to see how it influences the colors and shapes you incorporate into your design, serving as a guiding force throughout the creative process.
Select Your Colors
When it comes to selecting colors for your suncatcher, consider how they’ll impact the mood and atmosphere of the space. Warm hues like reds and oranges can inject a sense of energy and warmth, while cool tones such as blues and greens can foster a calming ambiance. Opt for colors that resonate with your personality or align with the desired mood you want to create.
Incorporate Personal Symbols
Incorporating symbols with personal significance can elevate your suncatcher’s design to a new level. This could include a peace sign, heart, or even a meaningful religious icon. By doing so, you’re infusing the piece with emotional resonance and giving it a unique story to tell. The resulting design will not only catch the sun’s rays but also reflect your personality and values.
Add Initials or Names
Personalize your suncatcher by incorporating meaningful touches that make it truly unique. Consider adding your initials, name, or the name of the recipient, making it a thoughtful and special gift. To achieve this, you can utilize beads to add a decorative element, paint on a personalized message or symbol, or even opt for etching techniques to create a permanent and delicate design.
Play with Textures
To elevate the visual appeal of your suncatcher, incorporate a mix of textures to create a visually appealing piece. This can be achieved by combining smooth glass components with rougher, translucent beads, or even adding metallic elements for an added layer of tactility.
Experiment with Light
When crafting suncatchers, it’s essential to select materials that engage with light. This means choosing items that will create captivating light displays on your walls as the sun shines through. One effective approach is to utilize translucent and iridescent materials, which can produce a stunning array of colors. As the sunlight passes through these materials, it will refract and scatter in various ways, casting a kaleidoscope of hues across your walls.
Make It Interactive
To add a layer of depth and engagement to your suncatcher, consider incorporating movable or audible components. Small chimes or dangling elements can create a mesmerizing effect as they sway gently in the breeze, appealing to multiple senses simultaneously.
Keep It Eco-Friendly
When it comes to crafting your suncatcher, consider giving old materials new life by incorporating recycled and upcycled items. Not only does this eco-friendly approach reduce waste, but it also imbues your creation with a rich narrative. Think beyond traditional materials and explore the possibilities of repurposing old jewelry, shards of glass, or even scraps of metal to add depth and character to your suncatcher.
Involve Others
When presenting the suncatcher as a gift, consider making it a collaborative effort with the recipient. By involving them in the design process, you’ll not only create a more personalized and unique piece, but also instill a sense of ownership and appreciation for the finished product. This can lead to a truly special and meaningful gift that they’ll treasure for years to come.
Reflect on the Process
As you bring your suncatcher to life, pause to contemplate its significance. The journey of creation holds its own value, rivaling the end result’s impact. It’s in these moments of reflection that you’ll discover the true essence of your handmade piece.
By embracing this mindfulness and incorporating the following insights, you’ll craft a suncatcher that not only catches the eye but also embodies your unique creative spirit.
Design Ideas and Inspiration for Suncatcher Crafts
Imagine embarking on a vibrant journey where artistry meets imagination. The realm of suncatcher crafting beckons creatives of all levels, from seasoned artists to enthusiastic newcomers, to explore the infinite possibilities of color, light, and self-expression. As you embark on this adventure, discover fresh inspiration and design ideas that ignite your passion for artistic expression.
Nature-Inspired Designs
Nature’s diverse landscapes provide a vast array of inspiration for suncatcher crafts. One way to capture its essence is by creating suncatchers that reflect the characteristics of each season. Imagine crafting pieces that evoke the vibrancy of spring with blossoming flowers, buzzing bees, and delicate butterflies. Alternatively, you could create suncatchers that capture the warmth of summer through lush green leaves, vibrant sunsets, and ocean waves. For a more subdued tone, autumn-inspired suncatchers featuring falling leaves, acorns, and warm hues could be created. Finally, winter’s stark beauty can be captured through snowflakes, icicles, and the simplicity of bare branches.
Abstract and Geometric Patterns
For those seeking a sleeker, more contemporary vibe, consider embracing the world of abstract and geometric patterns. By incorporating bold shapes and thoughtfully placed lines, you can create visually striking designs that cleverly manipulate light and darkness to capture attention.
Personal Interests and Hobbies
Tap into the creative potential of your personal interests by transforming them into stunning visual representations. Turn your passion for music into a radiant sun catcher featuring notes and treble clefs, or craft a beautiful piece showcasing book covers or iconic sports logos that reflect your enthusiasm. Let your hobbies shine through in a way that’s both visually striking and deeply meaningful.
Cultural Motifs
Bring a sense of cultural depth to your handmade suncatchers by infusing them with traditional motifs that celebrate your own heritage or pay homage to other cultures. Consider incorporating intricate Celtic knotwork, the meditative beauty of mandalas, or the vibrant energy of tribal patterns.
Inspirational Quotes and Words
Incorporating powerful words into your suncatchers can imbue these decorative pieces with a deeper sense of meaning and personal significance. Consider selecting quotes, affirmations, or standalone words that hold special importance for you, allowing their essence to shine through the clear glass or acrylic of your suncatcher.
Upcycling with a Purpose
Transform the ordinary objects scattered throughout your home into extraordinary suncatchers by repurposing them. From old CDs and bottle caps to even broken glass, think outside the box (or jar) and get creative with materials you might otherwise discard.
Color Therapy
The subtle yet profound impact of colors on our emotional state is a well-documented phenomenon. By harnessing the power of color therapy, you can create stunning suncatchers that not only bring warmth and light into your space but also evoke specific emotions in those who behold them. From the soothing tones that promote serenity to the vibrant hues that inspire joy and energy, the possibilities are endless when it comes to using colors to shape our emotional experiences.
Interactive Elements
Bring your suncatchers to life by incorporating movable or audible components, such as dangling crystals or beads that respond to gentle breezes. This will create an captivating visual display that’s sure to brighten up any space. The subtle movement or soft sounds emitted by these elements can add a mesmerizing layer of depth to the overall piece, making it even more engaging and enjoyable to behold.
Seasonal Celebrations
To give your sun catchers a personal touch and make them more meaningful, consider creating themed designs for specific holidays or celebrations. Imagine crafting pumpkin-shaped sun catchers for Halloween, star-themed ones for Christmas, or heart-adorned designs for Valentine’s Day. These customized sun catchers can serve as unique decorations for your home or thoughtful gifts for loved ones.
For the Little Ones
Create vibrant, kid-friendly suncatchers by combining bright colors with simple shapes. This collaborative project is an excellent way to introduce children to the world of crafting, making it a fun and educational activity. As you craft together, let the warmth of the sunlight be your inspiration, just as it would be your ‘canvas.’ Use glass as your medium, allowing its transparency to become a canvas for color and design. In doing so, you’ll not only create something beautiful but also spread joy to those around you.
Safety Tips for Suncatcher Crafts
When engaging in the charming activity of crafting suncatchers, safety should be top priority, particularly when working with children or utilizing specific materials. To guarantee a secure and enjoyable experience, heed these essential safety guidelines:
Use Safe Materials
When it comes to selecting materials for your craft project, safety should be a top priority. Opt for non-toxic and age-friendly options that eliminate the risk of accidental harm. Specifically, steer clear of lead-based products and sharp glass pieces, which can pose a significant threat to young participants in your crafting activity.
Supervise Children
Supervising children during craft activities is crucial for their safety and creative growth. As you work alongside them, take the opportunity to teach essential skills, such as material handling and process navigation. By providing consistent guidance, you’ll empower your young collaborators to explore their artistic expression while minimizing the risk of accidents or mishaps.
Wear Protective Gear
When handling materials that pose a risk of injury, it’s essential to prioritize your safety. Ensure you’re properly equipped by donning safety glasses and gloves before starting your project.
Work in a Well-Ventilated Area
When engaging in suncatcher crafting, it’s crucial to prioritize your health and safety by working in a well-ventilated environment. Certain materials like adhesives or paints may release fumes that can be hazardous if inhaled. By taking this simple precaution, you’ll minimize the risk of exposure to potentially harmful substances.
Keep a Clean Workspace
To elevate your crafting experience, it’s essential to maintain a tidy and well-organized workspace. Not only does this significantly reduce the risk of accidents, but it also fosters a sense of calm and focus, allowing you to fully immerse yourself in the creative process.
Store Materials Properly
To guarantee the safety of your little ones and furry friends, it’s crucial to secure all art supplies and materials in a designated area that is inaccessible to children and pets. Make sure all containers are tightly sealed and clearly marked with their contents. This simple step can help prevent accidents and unwanted messes.
Dispose of Waste Responsibly
When it comes to disposing of waste materials like glass shards or excess adhesives, it’s crucial to do so in a way that prioritizes both safety and environmental responsibility. This not only prevents potential injuries but also minimizes the risk of causing harm to our planet.
Read Instructions Carefully
When introducing novel materials or tools into your workflow, it’s essential to thoroughly comprehend their usage guidelines. By doing so, you’ll not only avoid potential mishaps but also optimize outcomes, guaranteeing a seamless integration.
Be Mindful of Allergies
When preparing for a crafting session, it’s essential to consider potential allergens that might affect you or your fellow crafters. Certain adhesives, paints, and other materials can cause adverse reactions, ranging from mild discomfort to severe symptoms. To ensure a comfortable and enjoyable experience, take the time to identify any potential allergens and make necessary accommodations.
First Aid Kit
When venturing into the world of crafting, it’s essential to have a first aid kit on hand to address minor mishaps that may arise. A well-stocked kit should include essentials like bandages, antiseptic wipes, and tweezers for safely removing splinters or other debris from your skin. By prioritizing safety, you’ll be able to create stunning suncatchers without compromising the well-being of yourself or others involved in the process. As a fundamental aspect of any enjoyable crafting experience, safety serves as the solid foundation upon which creativity and fun are built.
Maintenance and Care for Suncatcher Crafts
To preserve the vibrancy and radiance of your suncatchers, it’s essential to dedicate some time to their upkeep. With a few simple steps, you can keep these lovely decorations sparkling for years to come. For instance, gently dust them with a soft cloth to remove any dirt or debris that may have accumulated on their surface. Avoid using harsh chemicals or abrasive materials, as these could scratch or dull the suncatcher’s finish. Additionally, consider storing your suncatchers in a protective case or bag when not in use to prevent damage from accidental knocks or environmental elements.
Regular Cleaning
To maintain the brilliance of your suncatcher, regular cleaning is crucial. Start by lightly dusting the surface with a soft, lint-free cloth to remove any loose particles. If the dirt has built up, you can use a mild soap and water solution to gently scrub away stubborn grime. Always be sure to thoroughly dry your suncatcher with a clean cloth to prevent streaks or water spots.
Avoid Harsh Chemicals
When it comes to maintaining the integrity of your suncatcher, it’s crucial to exercise caution when cleaning. Harsh chemical agents can easily damage the delicate materials used in its construction. Instead, opt for gentle cleaning solutions specifically designed for the task at hand. Additionally, steer clear of abrasive materials that may scratch the glass surface or cause colors to fade prematurely.
Proper Display
When showcasing your suncatcher’s radiant display, choose a spot where it can effectively capture the sun’s rays. Yet, be aware of intense temperatures and direct sunlight, which can impact certain materials’ durability over time. If your suncatcher contains components susceptible to fading, consider placing it in an area that receives soft, indirect light instead.
Storage
When storing your suncatcher, take a gentle approach to ensure its longevity. Wrap the piece in a plush cloth or bubble wrap to shield it from potential scratches and scuffs. For optimal preservation, keep the suncatcher in a dry, temperature-controlled environment that’s protected from direct sunlight and extreme temperatures.
Handling with Care
To relocate your suncatcher, exercise caution to prevent damage. While some models may be fragile, the slightest drop can result in unsightly chips or cracks. It’s crucial to grasp it firmly and avoid any mishaps when handling this delicate item.
Check for Damage
As you go about maintaining the beauty and functionality of your suncatcher, it’s essential to perform regular inspections to identify any signs of damage or wear. This includes checking for cracks, loose parts, or other imperfections that may affect its overall appearance or performance. If you do notice any issues, consider attempting a DIY repair or seeking the expertise of a professional restorer to revive your suncatcher to its former glory.
Enjoy Your Craft
Savor the visual delight your suncatcher brings to its surroundings. The kaleidoscope of colors and patterns is designed to bring joy, so select a spot where it can be fully appreciated by everyone. As you follow these straightforward care guidelines, you’ll ensure that your suncatcher remains a beacon of warmth and happiness for years to come, consistently brightening your days.
Environmental Impact of Crafting Materials
As crafters, we hold a unique responsibility – the power to shape our environmental footprint with each stitch, snip, and selection. Every decision, from the materials we choose to the way we manage waste, has a ripple effect on our planet’s well-being. To make sustainable choices in our creative endeavors, consider the following:
Understanding the Impact
When it comes to crafting, the environmental impact of materials is a crucial consideration. The sustainability of a material depends on its entire lifecycle, including production, usage, and eventual disposal. Some materials may demand considerable resources to manufacture, while others can be sourced in a way that minimizes their ecological footprint. To make informed decisions about your craft supplies, it’s essential to investigate the environmental implications of each material you use.
Choosing Sustainable Materials
When selecting materials for your project, consider opting for renewable, recycled, or upcycled options. Natural fibers like wool, cotton, and bamboo are excellent choices as they have a lower environmental impact compared to synthetic alternatives. In addition, these natural fibers biodegrade more easily, making them a sustainable choice. Furthermore, prioritize sources with a lower carbon footprint to minimize your overall ecological footprint.
Reducing Waste
As you work on your creative projects, remember to prioritize sustainability by minimizing waste. To achieve this, plan your projects carefully to utilize materials effectively, and get creative with repurposing any scraps that remain. This might involve transforming fabric remnants into unique patchwork pieces or knitting leftover yarn into smaller accessories that can be used elsewhere. By adopting these mindful habits, you’ll not only reduce your environmental footprint but also cultivate a sense of resourcefulness and creativity.
Eco-Friendly Practices
As a crafty individual, it’s easy to overlook the environmental impact of your creative pursuits. However, by incorporating eco-friendly practices into your routine, you can significantly reduce your ecological footprint. Start by opting for non-toxic adhesives, paints, and dyes that minimize harm to humans and the environment. Furthermore, prioritize products with minimal packaging to reduce waste and minimize your carbon footprint. For those involved in activities like pottery or jewelry-making, consider the energy consumption of kilns and other equipment. Make conscious choices about your materials and processes to create a more sustainable crafting experience.
Educating and Sharing
By actively sharing your expertise and creative endeavors within the crafting sphere, you not only foster a sense of camaraderie among like-minded individuals but also contribute significantly to raising environmental awareness. By empowering others with knowledge on sustainable crafting practices, you can inspire a collective shift towards more eco-conscious decision-making, ultimately promoting a culture of responsible consumption within the community.
Supporting Local and Ethical Suppliers
When making purchasing decisions, consider the environmental impact by opting for locally sourced products whenever feasible. Additionally, prioritize businesses that demonstrate a dedication to ethics and sustainable practices, thereby fostering a positive impact on the environment through your everyday choices.
Longevity and Quality
When it comes to crafting, investing in high-quality tools and materials that will withstand the test of time is crucial. Not only does this reduce waste and minimize the need for frequent replacements, but it also ensures your finished projects remain exceptional. By adopting this approach, you’ll not only be conserving resources but also contributing to a more sustainable future. As small actions accumulate, we can collectively make a meaningful impact on the environment.
FAQs About Suncatcher Crafts
Discover the world of Suncatcher Crafts, where creativity meets sunlight. Get answers to your most pressing questions about the essential materials, diverse techniques, and inspiring ideas that bring this unique form of art to life. Whether you’re a seasoned crafter or just starting out, this comprehensive guide has everything you need to create stunning sun-catching masterpieces.
What is a suncatcher?
Suncatchers are ornamental pieces engineered to be suspended in front of windows, harnessing and refracting sunlight to create stunning optical effects within a space. As the sun’s rays interact with the suncatcher’s design, intricate patterns of light dance across walls, floors, and furnishings, adding an extra layer of visual interest to the room.
How do you make a simple suncatcher?
To craft a vibrant suncatcher, start by combining two versatile materials: clear adhesive paper and colorful tissue paper. Begin by cutting out various shapes from the tissue paper, then peel off the backing of the adhesive paper to create a receptive surface. Next, carefully stick the tissue paper pieces onto the adhesive layer, ensuring they’re evenly distributed and securely attached. Finally, seal your design with an additional layer of adhesive paper and trim any excess material to achieve a clean, polished finish.
Can I make suncatchers with kids?
Suncatcher crafts offer an engaging and accessible way for children to learn about colors and light, while promoting creativity and imagination. When working on these projects with kids, it’s essential to provide close supervision and utilize safe materials to ensure a fun and educational experience.
What materials do I need for suncatcher crafts?
A variety of materials are commonly used to create unique and creative designs for scrapbooking, including transparent adhesives such as paper or contact paper, delicate tissue papers, intricate beads, and ornate ribbons. In some cases, wire or metal frames may also be employed to add a touch of structure and dimensionality. Additionally, glass paint can be applied to clear plastic sheets to create a distinctive and eye-catching visual effect.
How can I hang my suncatcher?
For a secure and effortless installation, consider fastening your suncatcher to a window using a suction cup hook. Alternatively, if the piece is relatively light, you can utilize clear fishing line or a thin ribbon to suspend it in place.
Are there any eco-friendly options for making suncatchers?
While traditional crafting materials may not always be the most eco-friendly option, there are ways to get creative without harming the environment. One approach is to repurpose recycled materials like old CDs, glass pieces, or beads, which can add a unique touch to your project. Additionally, you can explore biodegradable or recyclable materials that not only reduce waste but also offer a sustainable alternative for your craft.
How do I clean my suncatcher?
For optimal care and maintenance, start by gently wiping your suncatcher with a soft, damp cloth. If it’s crafted from delicate glass, consider using a gentle glass cleaner to avoid streaks or residue. Be cautious when cleaning, as abrasive materials can potentially scratch the surface, compromising its visual appeal.
Can suncatchers be used outdoors?
When it comes to creating a suncatcher for outdoor use, selecting the right materials is crucial. Opt for weather-resistant options that can brave the elements without compromising their appearance or durability. This will ensure your artistic creation remains vibrant and intact, even in the face of unpredictable weather conditions.
How long does it take to make a suncatcher?
While the duration required to create a stunning suncatcher can fluctuate significantly based on the intricacy of the design, it’s not uncommon for simpler creations to require only around 30 minutes of crafting time. On the other hand, more complex and detailed designs may necessitate several hours of meticulous work to bring them to life.
Can I make a suncatcher without glass?
When it comes to shielding your work from damage or unwanted touch, you have alternatives to traditional glass surfaces. Clear plastic sheets and laminating pouches can serve as effective substitutes, offering a safer option – particularly for projects that involve children.
Do suncatchers serve any purpose other than decoration?
Suncatchers, often viewed as simply decorative, hold a wealth of benefits beyond their aesthetic appeal. For instance, they can serve as interactive learning tools for kids, fostering an understanding of the relationship between light and color. Additionally, suncatcher crafting can be a calming and meditative experience, offering individuals a chance to unwind and express themselves creatively.
25 Easy Suncatcher Crafts
Embrace your creativity and explore a world of stunning suncatchers, crafted with ease. This comprehensive guide is designed to cater to all skill levels, offering 25 simple yet impressive DIY projects that will leave you in awe.
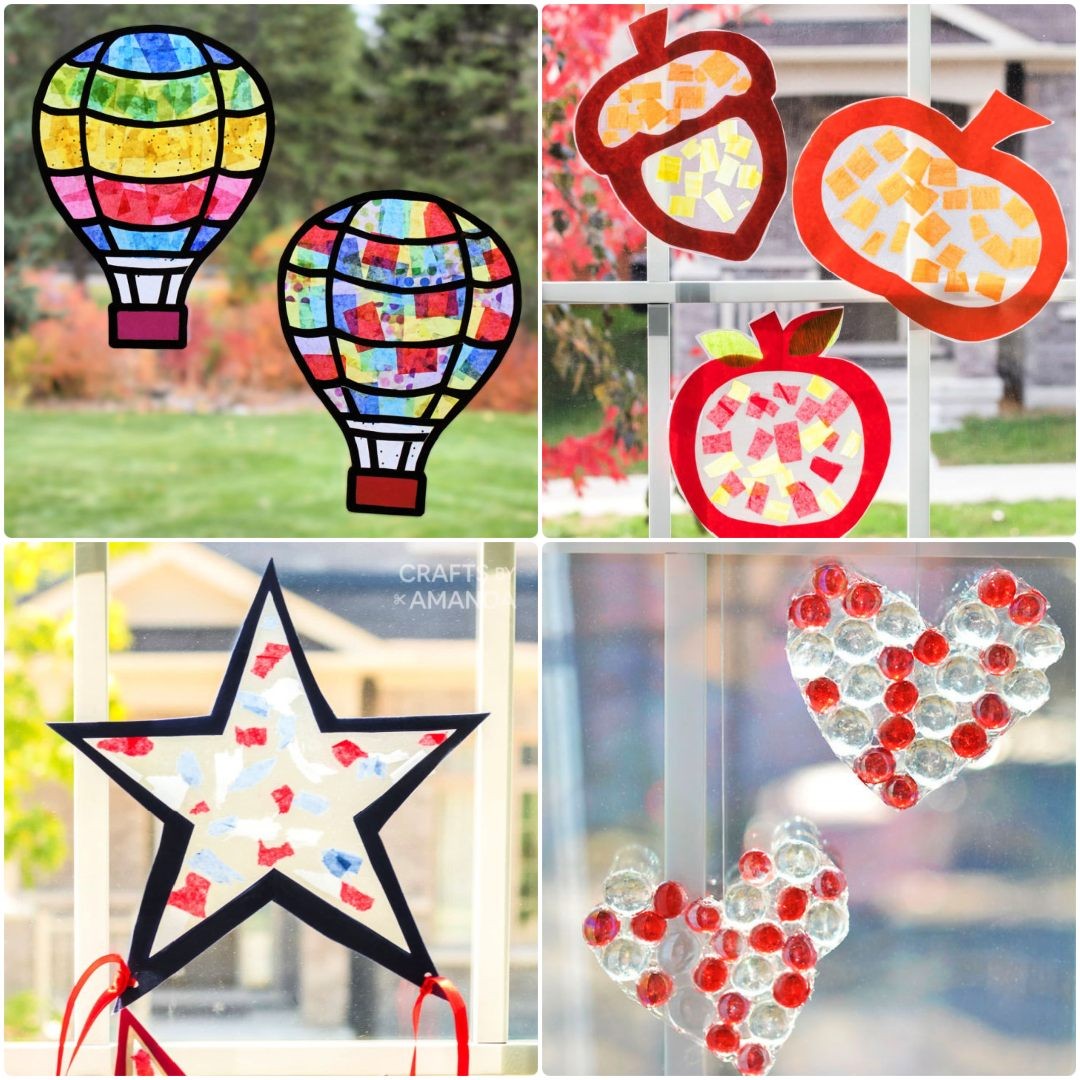
DIY Hot Air Balloon Suncatchers

Transform your windows with these delightful DIY hot air balloon suncatchers that add a splash of color and whimsy. Kids will delight in choosing their favorite tissue paper hues to create one-of-a-kind designs. Simply download the printable template and let your creativity take off as you bring this engaging craft activity to life. To get started, gather materials like white cardstock, scissors, a black marker, craft glue, colorful tissue paper, and vibrant colored cardstock for the basket. Once completed, these stunning suncatchers make perfect decorations for birthday celebrations, playrooms, or classrooms, inviting your imagination to soar.
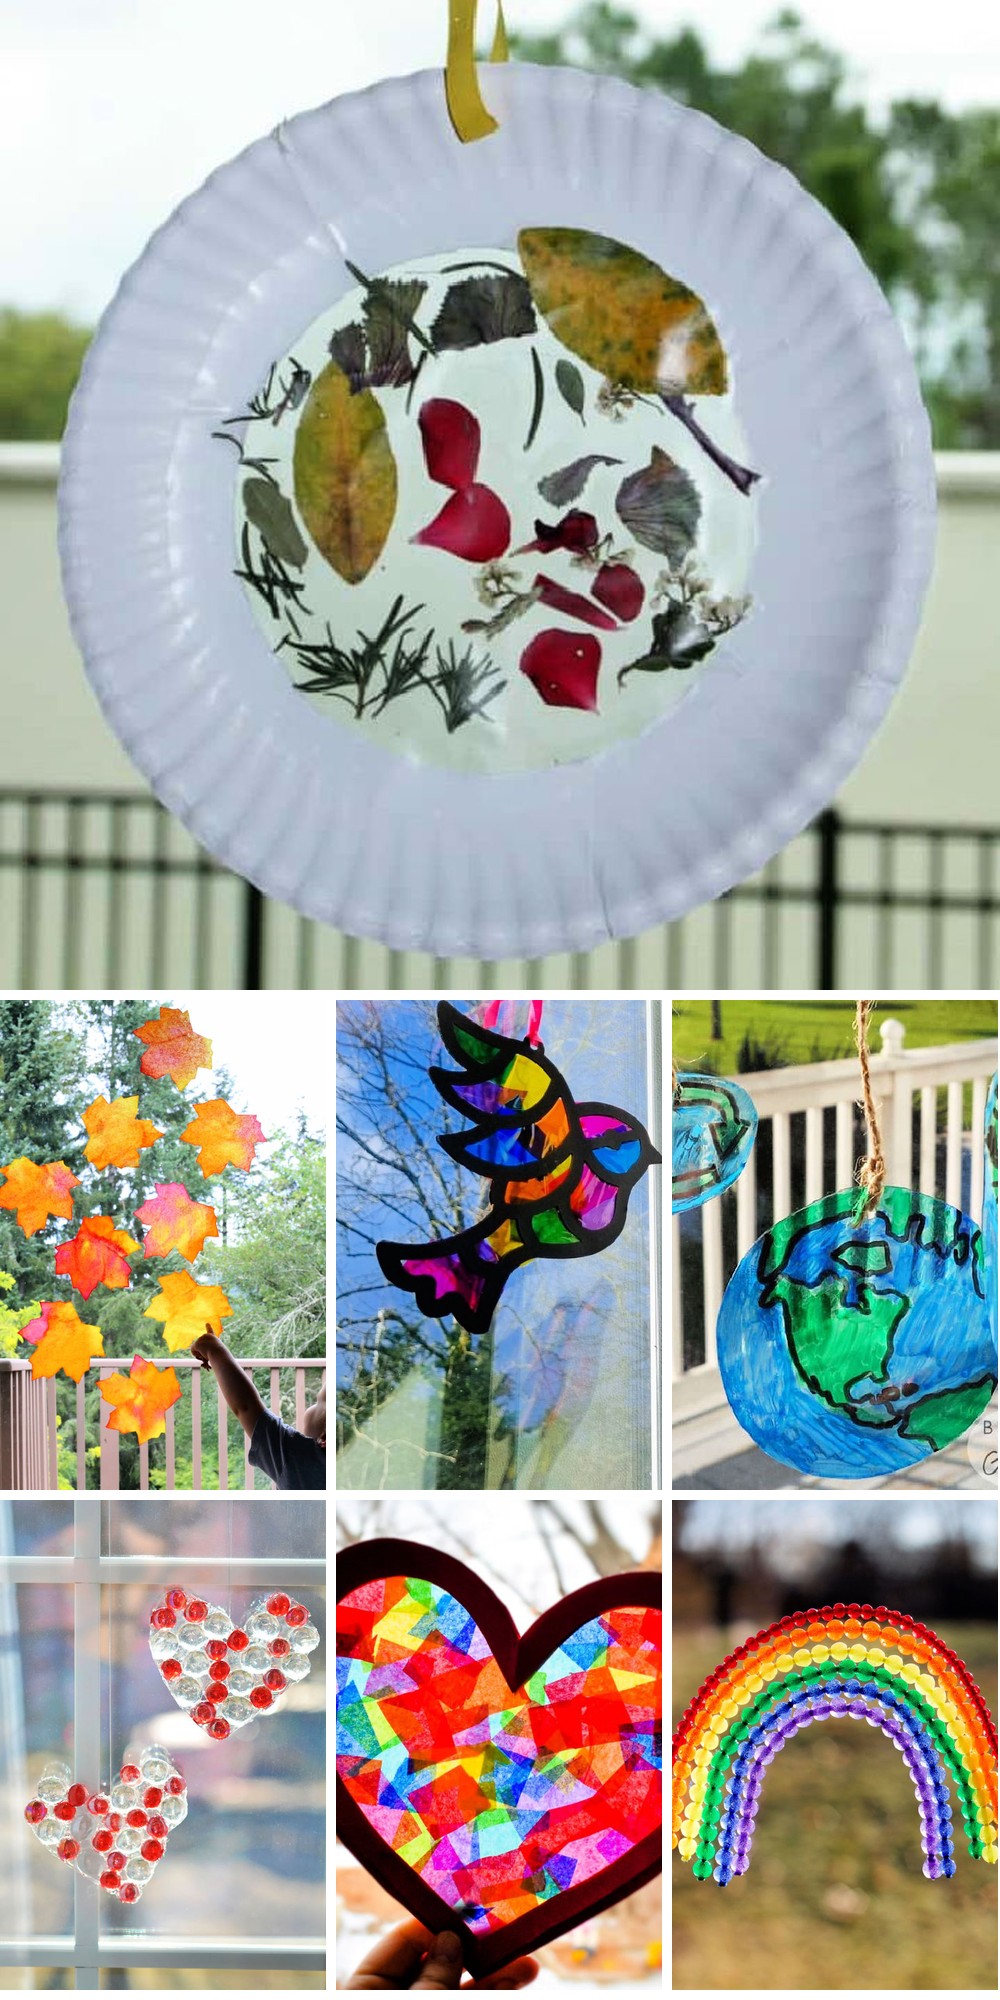
Making a Fused Bead Rainbow Suncatcher

Transform your home into a vibrant oasis this spring by creating stunning DIY fused bead rainbow suncatchers! This engaging fine-motor craft not only teaches preschoolers about colors, but also fosters creativity and imagination. With just a few simple materials like rainbow chenille stems, faceted plastic beads, and basic tools such as scissors and fishing lines, you can create a breathtaking masterpiece that adds a pop of color to any room. To start, thread the beads onto the chenille stems, carefully bending them into an arc shape before arranging them on a parchment paper-lined cookie sheet. Once baked in the oven, the beads melt and fuse together, forming a beautiful rainbow effect. Hang your suncatcher in a window to enjoy the kaleidoscope of colors and add a touch of whimsy to your home decor.
Homemade Apple, Acorn, and Pumpkin Fall Suncatchers
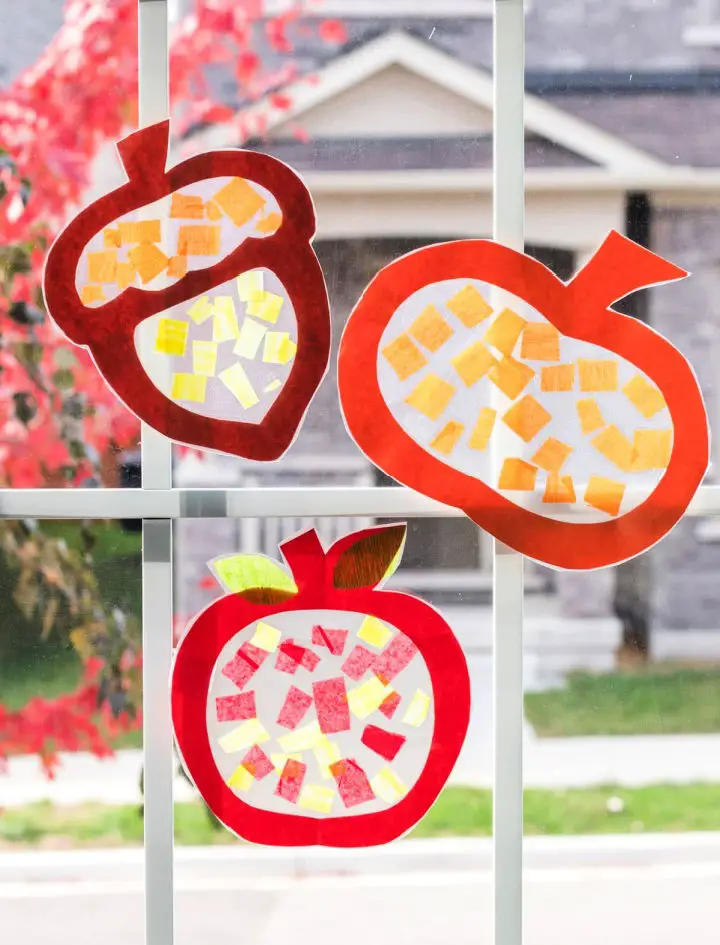
This autumn, create enchanting DIY suncatchers with tissue paper, construction paper, and contact paper! A perfect activity for kids as Halloween and Thanksgiving approach. As the leaves change colors and the air cools, fall is a season of transformation. By following simple instructions, children can craft their own pumpkin, apple, and acorn suncatchers to brighten up windows and add warmth to shorter days. The required materials are readily available, making this project not only enjoyable but also budget-friendly. Allow your kids to unleash their creativity while learning more about the season through this engaging DIY endeavor.
Free Printable Leaf Suncatchers Template
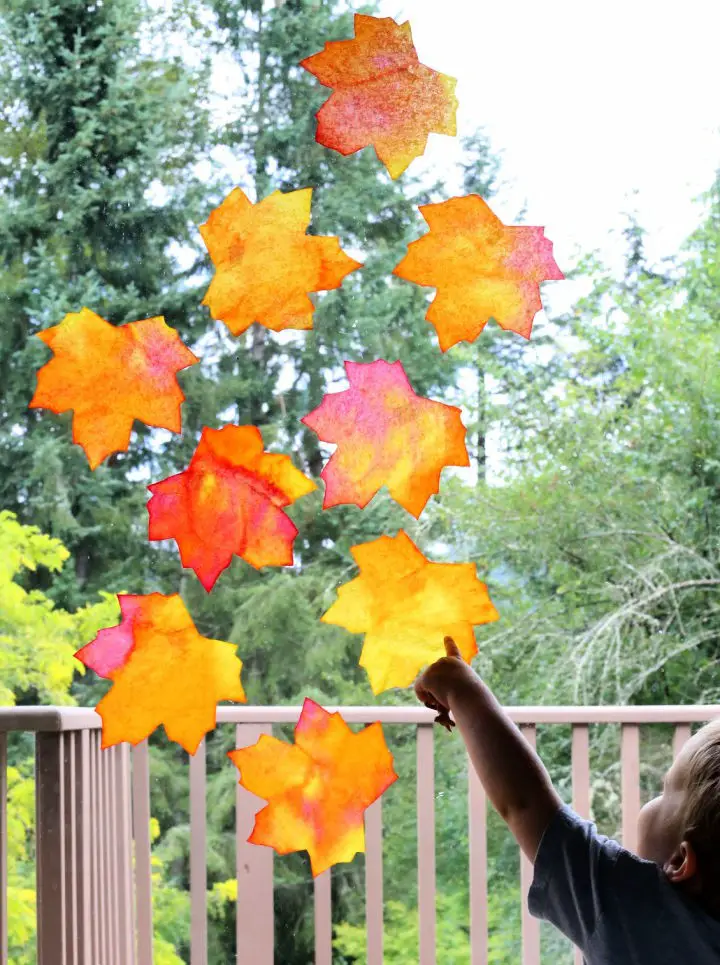
As fall arrives, bring warmth and charm to your home with DIY suncatchers that are perfect for kids to create. With Halloween and Thanksgiving just around the corner, this craft project is an ideal way to get into the seasonal spirit. The transformation of nature’s colors and cooler air make fall a season ripe for creativity. By following these simple steps, children can craft their own pumpkin, apple, and acorn suncatchers to adorn windows, adding a splash of brightness to shorter days. With easily accessible materials and a minimal estimated cost, this budget-friendly activity is a great way to encourage kids’ imagination and learning while embracing the season’s unique qualities.
Cool DIY Pressed Flower Suncatcher
Transform your windows into a stunning work of art with this one-of-a-kind DIY suncatcher! Perfect for adding a touch of nature’s elegance to any room, these charming creations make wonderful gifts or classroom decorations. To get started, gather and press wildflowers or fallen blooms from your garden. Once the petals are dry, use them as a decorative base for your suncatcher. Begin by tracing a small plate or bowl onto a self-adhesive sheet, then arrange the pressed flowers on the sticky side. Add another layer of lamination to seal everything in place and give it a professional finish. Cut out the suncatcher shape and secure it to your window using double-sided tape or glue dots. As the sun shines through, your masterpiece will come alive with an enchanting display of light and color.
Handmade Springtime Suncatchers
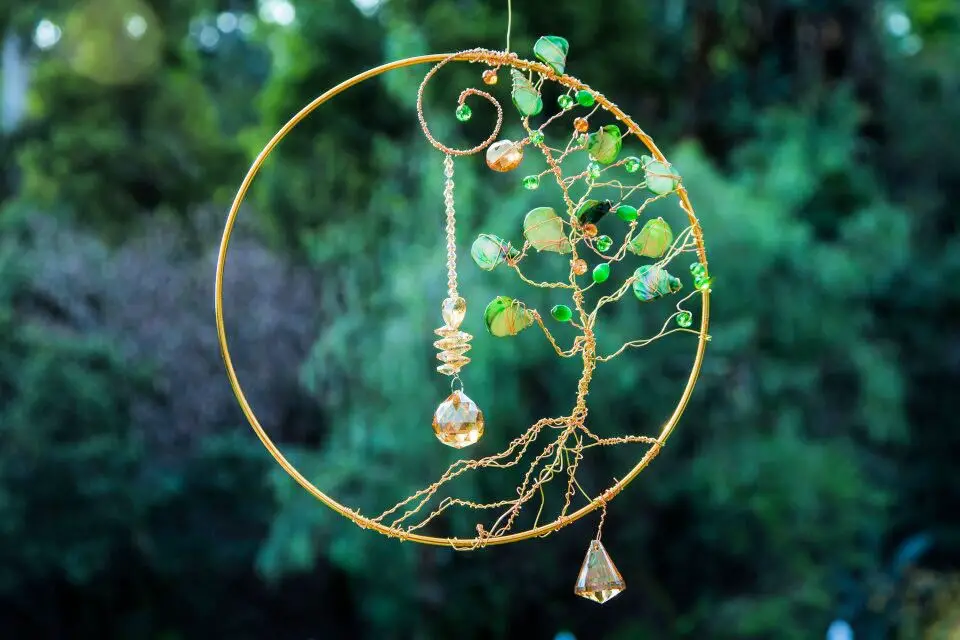
Transform your space into a vibrant oasis by crafting a stunning DIY springtime suncatcher! With a few simple materials like a metal hoop, copper wire, bicone crystals, larger crystals, and jewelry pliers, you can create a radiant piece that will bring a burst of energy to any room. Start by shaping the hanging point for your largest crystal within the hoop, allowing it to become the centerpiece of your design. Next, craft a whimsical tree shape by wrapping wire around the base and working your way up, carefully adding branches and layers to create a textured, organic look. To add an extra touch of sparkle, thread crystals onto the wire, securing those without holes with delicate wire wraps. As the seasons change outside, bring the beauty of spring indoors with this delightful and artistic suncatcher project.
Upcycled Plastic Earth Day Suncatchers
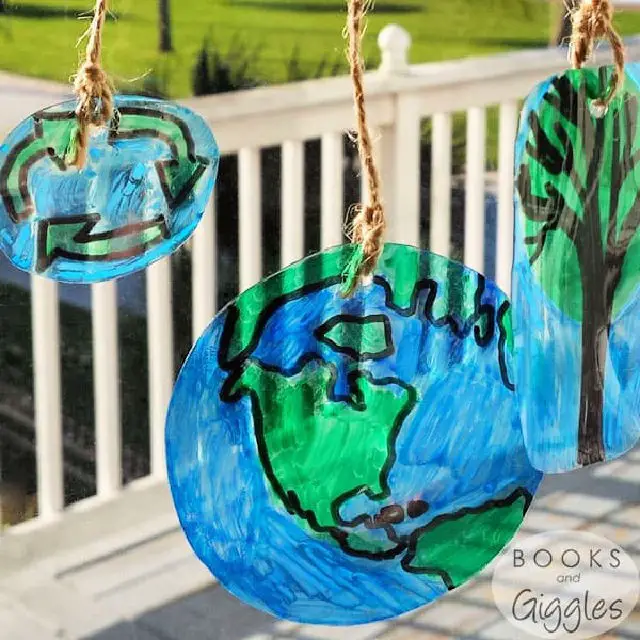
Transform Earth Day into a creative and educational experience for kids by repurposing recycled plastic into stunning DIY suncatchers. Utilize clear plastic berry boxes or takeout box lids to create this eco-friendly craft project. Start by cutting out small circles from the plastic, then add some color with permanent markers before punching holes in each circle. Finally, attach them to a small twig using twine to bring your masterpiece to life.
Hang your finished suncatcher up and let it serve as a gentle reminder to reduce, reuse, and recycle. This engaging Earth Day activity not only fosters creativity but also imparts valuable lessons on environmental sustainability to kids. To take your upcycling game further, explore more innovative ideas with your little ones and make a positive impact on the planet!
Colorful Apple Suncatchers Craft for Toddler
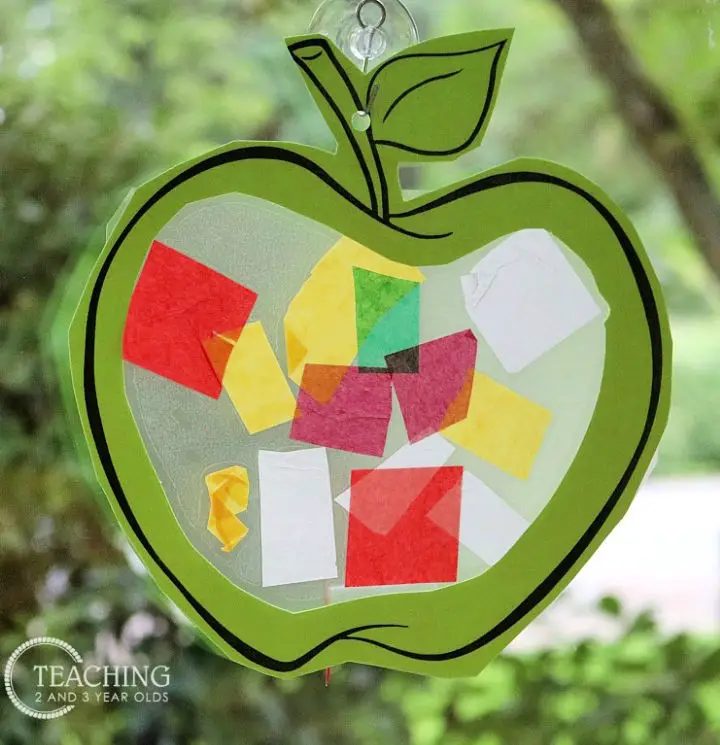
Create a vibrant and engaging DIY project with your toddler using just a few simple materials! With an Apple printable template as the base, you’ll need colorful tissue paper, ConTact (sticky) paper, and red or green paper for printing. This easy activity is perfect for little ones and helps develop fine motor skills. Start by cutting out apple shapes, removing the center, and covering the negative space with ConTact paper. Let your toddler’s creativity shine by pressing on tissue paper squares onto the sticky surface, creating a beautiful mosaic of colors. Once complete, add another layer of contact paper to secure the design and punch a hole for hanging. Display these cheerful apple suncatchers in your classroom or home, bringing a touch of autumn charm to any space.
How to Make a Suncatcher With Glass Beads
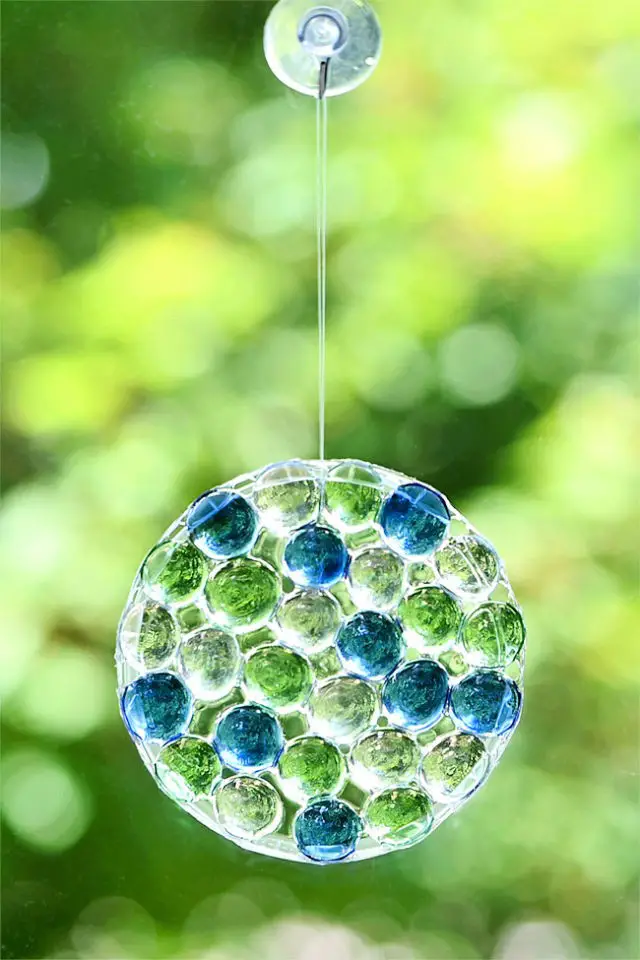
Transform any room with a kaleidoscope of colors using this easy DIY suncatcher project featuring glass beads! Using clear glue and a plastic lid, create intricate patterns or go for a random design – the possibilities are endless. Hang your colorful creations in the window to infuse the space with a lively ambiance. This budget-friendly craft is accessible with materials readily available at most dollar stores. To give your suncatchers an extra personal touch, customize them for special occasions or use as thoughtful gifts by selecting specific colors or incorporating other types of beads. Follow our step-by-step guide to create your stunning glass bead suncatcher and delight in the beautiful interplay of light.
Ocean Animal Coffee Filter Suncatcher for Kids
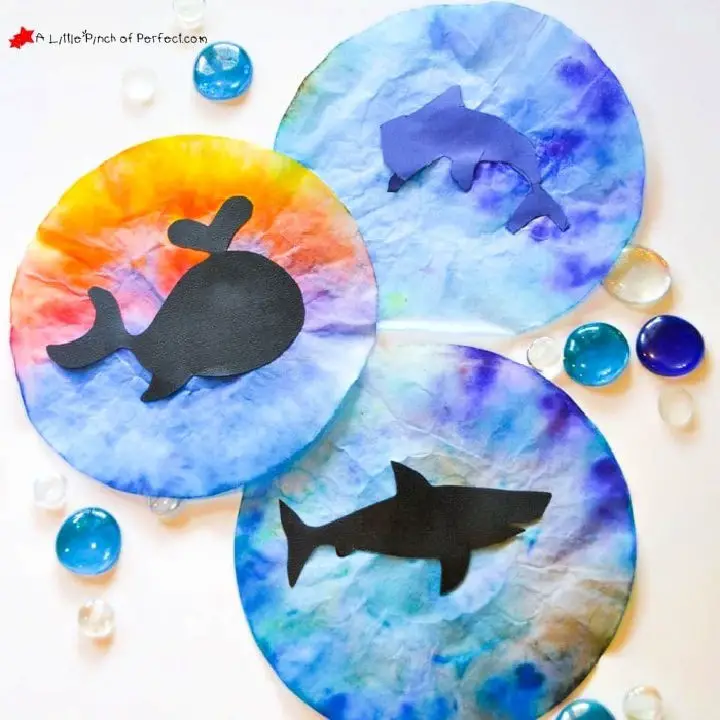
Unleash your child’s creativity by crafting a vibrant ocean animal suncatcher using coffee filters and simple silhouettes. This engaging DIY project is perfect for decorating windows, capturing the essence of the ocean, and exploring the wonders of marine life with your little ones. With a free template and easy-to-follow instructions, you can create colorful suncatchers featuring dolphins, sharks, whales, and fish. Get ready to brighten up any room with this fun and imaginative activity!
How to Make Heart Suncatcher

Transform any space into a radiant haven with this effortless DIY heart suncatcher, a delightful combination of sunshine and affection! With minimal materials – cardstock, tissue paper, clear contact paper, and scissors – you can create a captivating window decoration. Begin by crafting a heart outline from cardstock, then apply contact paper to one side. Next, arrange tissue paper squares onto the contact paper, securing it with an additional piece on the reverse. This innovative, mess-free craft is perfect for kids, requiring zero preparation. Ideal for Valentine’s Day celebrations or as a thoughtful gift for parents, this project allows your creativity to flourish in a simple yet engaging way.
Nature Paper Plate Suncatcher Tutorial
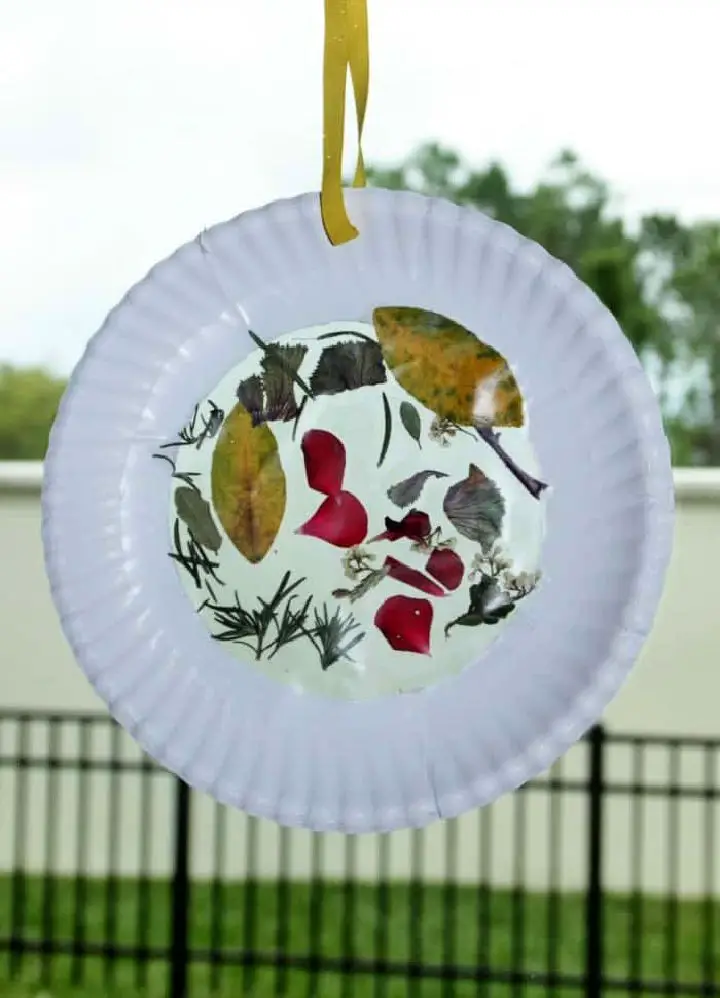
Transforming everyday moments into lasting memories has never been more enchanting than with this DIY nature suncatcher project! Join the adventure of collecting flowers, leaves, and herbs on a family nature walk, then bring those treasures to life by crafting stunning suncatchers. The journey begins with minimal materials: a paper plate, contact paper, ribbon, and scissors. Simply follow our step-by-step guide to unleash your creativity and create multi-sensory masterpieces that infuse any space with whimsy. Feel free to adapt this delightful activity to match the seasons and holidays, making it a timeless and engaging experience for all.
Glass Bead Heart Suncatcher Idea
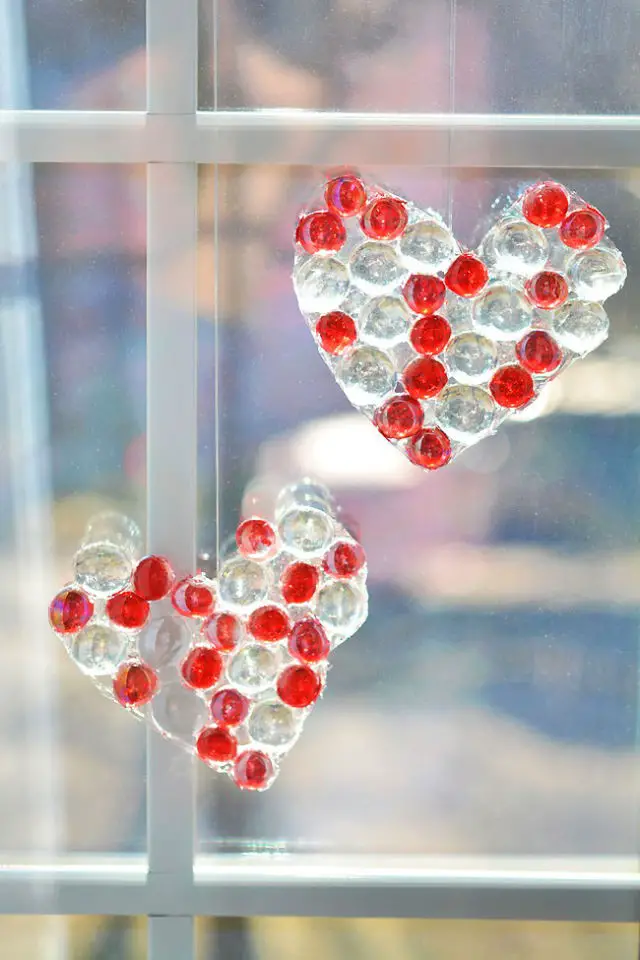
Transform your home into a haven of love and light with this DIY glass bead heart suncatcher. This charming project is perfect for celebrating special occasions like Valentine’s Day, Mother’s Day, or Father’s Day, making it an ideal gift to express heartfelt sentiments.
To craft this beautiful piece, create a heart-shaped mold using everyday materials such as tin foil, clear glue, and flat glass beads. Apply a thin layer of glue to the mold and carefully press the glass beads into it, arranging them in a pattern or design that speaks to your creativity. Allow the mixture to dry for a few days.
Once dry, remove the suncatcher from the mold, trim any excess glue, and attach a fishing line for easy hanging.
The finished product will be a stunning glass bead heart suncatcher that radiates warmth and light when sunlight filters through it. Get creative and add a touch of love to your living space with this affordable and enjoyable craft project.
How to Make Your Own Ladybug and Leaves Suncatchers
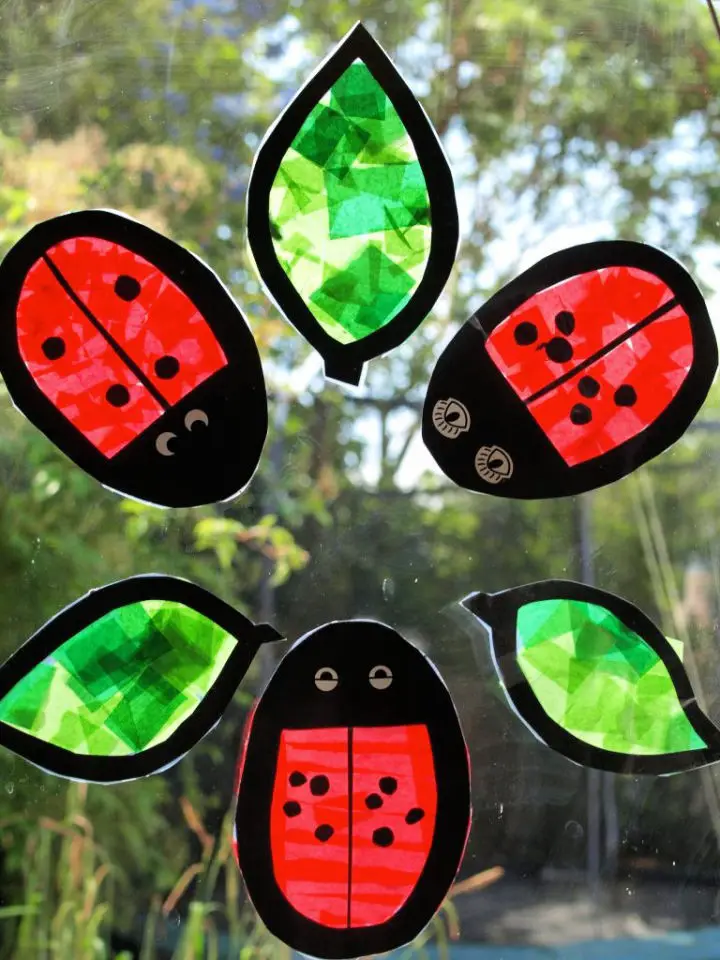
Transform any window into a vibrant summer haven by crafting your own DIY ladybug and leaves suncatchers. This delightful project is perfect for children, adding a touch of whimsy to any room. To bring this charming creation to life, you’ll need just a few simple materials: contact paper, black and red cardstock, red and green tissue paper, and some eyes. Begin by cutting out ladybug and leaf shapes from the black cardstock, then attach them to the contact paper. Next, cover the shapes with tissue paper, making sure to seal any gaps. Once complete, simply cut out the shapes and adhere them to a window using blu tack. The result is a stunning display of ladybugs that can also serve as a fun way for kids to learn about numbers. For even more inspiration, explore our collection of ladybug-themed crafts and activities. Let your imagination run wild with these lovely ladybug sun catchers!
Homemade Raindrop Suncatcher
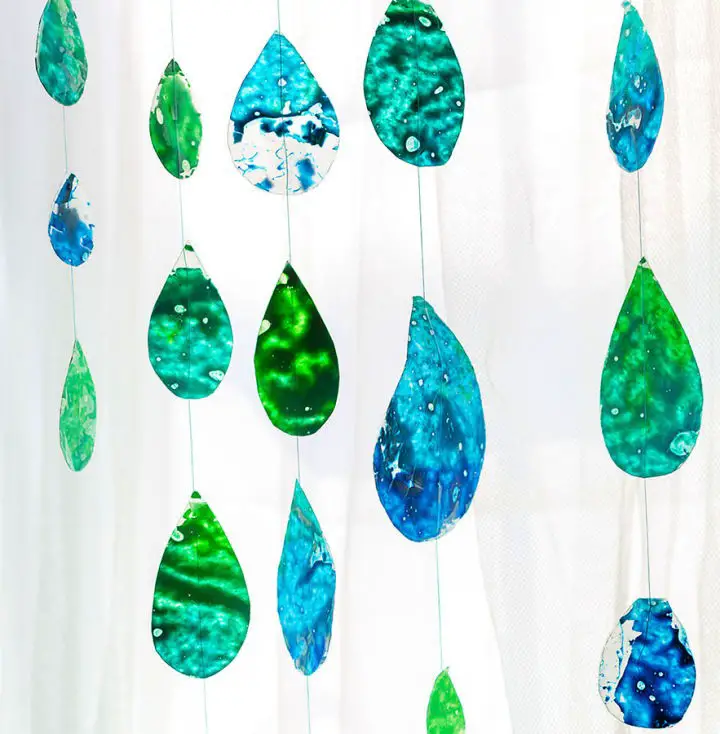
Bring a burst of sunshine into your home with a colorful homemade suncatcher. This fun and engaging craft project, perfect for spring and April showers, combines vibrant colors and creative melting techniques to create a stunning display. Gather your supplies: Crayola crayons, scissors, duct tape, a wooden dowel, wax paper, a hairdryer, and string.
Start by unwrapping 4-6 crayons and sharpening them into shavings. Spread the shavings evenly on a piece of wax paper, cover with another sheet, and secure the edges with duct tape. With adult supervision, use a hairdryer to melt the crayon shavings, watching as they transform into a vibrant, translucent material.
Allow the melted mixture to cool for 15 minutes before cutting out raindrop shapes from the resulting wax paper. Thread the shapes onto a string tied to a wooden dowel, repeating the process until your suncatcher is complete. Hang it up and bask in the beauty of catching a sun shower with your unique creation, a colorful reflection of your creativity.
DIY CD Suncatchers for Adults
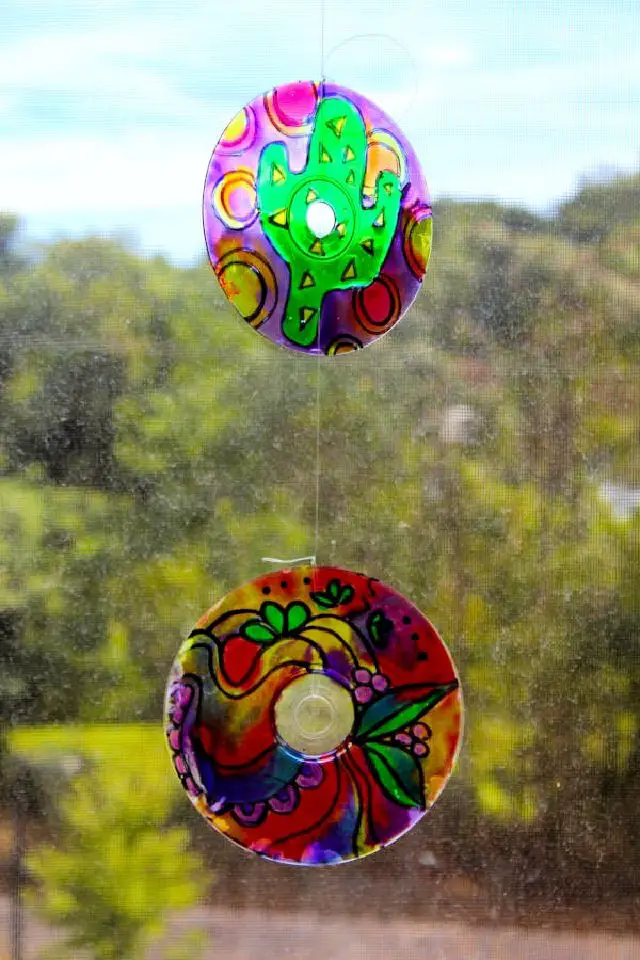
Transform your home into a warm and welcoming space by crafting beautiful suncatchers from recycled CDs. This easy DIY project is an excellent way for adults and kids alike to express their creativity while having fun. By repurposing the painted side of CDs, you’ll create stunning pieces that refract light and add a touch of personality to your windows. All you need are a few simple supplies – tape, scissors, markers or paint pens, suncatcher paint, and fishing line – to bring your unique designs to life. As you work on this therapeutic craft project, get ready to unwind and create mini masterpieces that will leave you feeling relaxed and fulfilled.
DIY Black Glue and Sharpies Butterfly Suncatcher
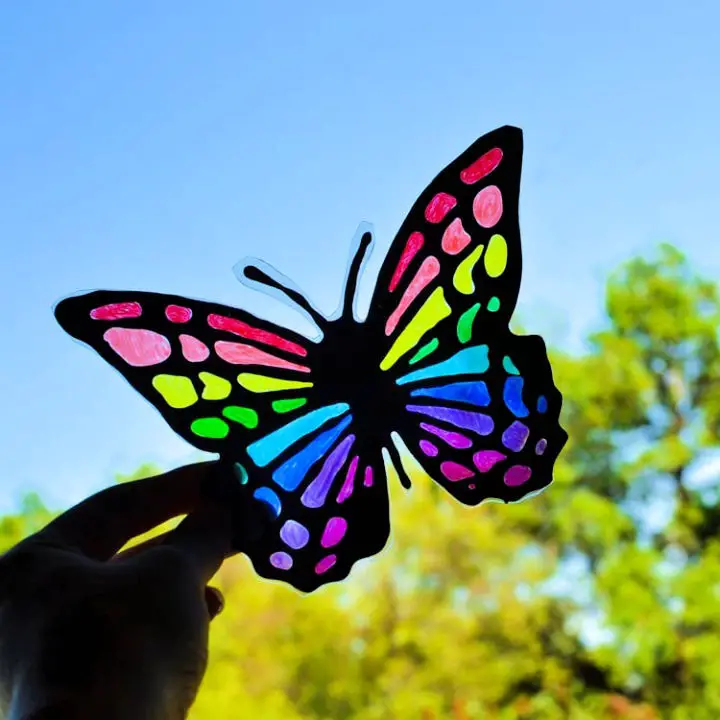
Transform your day with a delightful DIY project that’s as easy as it is affordable – creating a stunning butterfly suncatcher using black glue and Sharpies. Start by concocting your own black glue by blending black acrylic paint with white Elmer’s glue, storing any excess for future use. Then, apply the mixture to clear plastic surfaces, unleashing your creativity as you draw delicate butterfly outlines. The subtle texture of the raised lines will add a mesmerizing touch. Allow the glue to dry overnight before bringing your butterflies to life with vibrant Sharpie markers, ensuring consistent results. Once dry, simply cut out the shapes, leaving a small border around the edges, and marvel at your unique suncatchers. Ready to get started? Download our butterfly template to begin this captivating craft adventure!
DIY Stained Glass Style Owl Sun Catcher
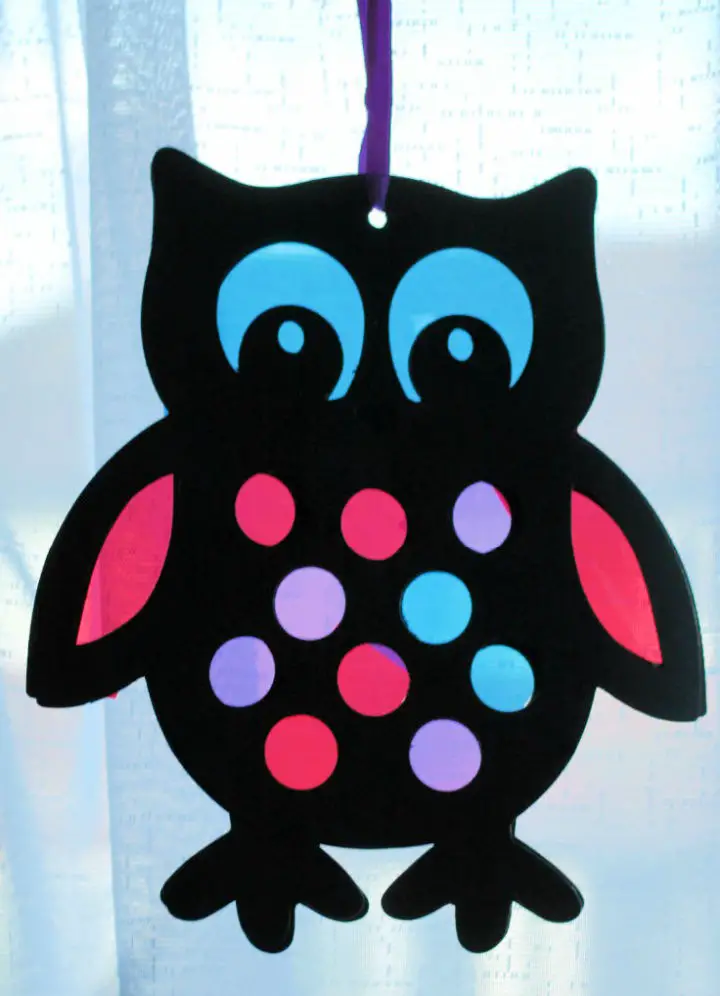
Transform your home decor with this vibrant DIY owl suncatcher! By combining black card templates with an array of colorful cellophane, you can create a stunning and eye-catching piece that brings warmth and light to any room. While kits like Baker Ross make the process more streamlined, you can easily replicate the effect using readily available materials.
Start by cutting the cellophane into small pieces and placing them over the holes in the owl template, allowing the colors to shine through. To seal the sun catcher, apply glue to one side of a second owl template and press it down on the cellophane-covered template, creating a seamless and durable finish.
Hang your masterpiece in a sunny window and bask in the radiant beauty of your handmade creation. This owl suncatcher is perfect for any time of year, but its autumnal hues make it especially fitting for the fall season. With its whimsical and enchanting touch, it’s sure to become a cherished addition to your living space.
Make Your Own Melted Crayon Suncatchers
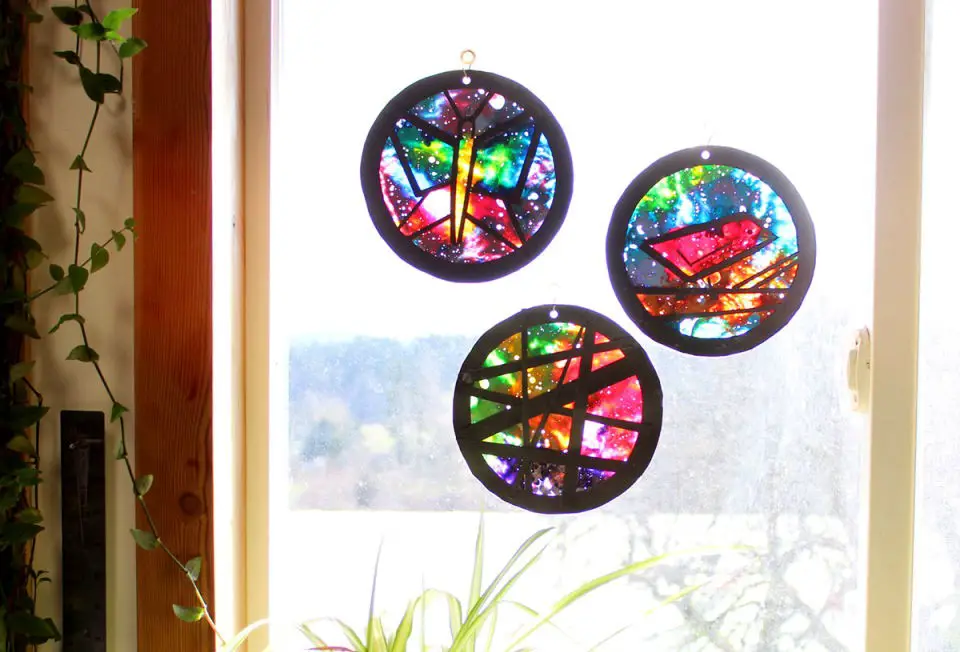
Create a radiant summer-inspired suncatcher using everyday materials like waxed paper, crayons, and black cardstock. This DIY project yields a stunning stained glass effect that bursts with color when sunlight passes through. To achieve this vibrant result, follow these straightforward steps: shape the cardstock ring, melt crayon shavings between sheets of waxed paper, and frame your masterpiece with black cardstock. For an added layer of creativity, design a picture or use strips of cardstock to form geometric shapes that dance across your suncatcher’s surface. Once complete, hang your finished piece in a sunny window and let it brighten your space with its kaleidoscope of colors. This craft is an inclusive and enjoyable way for all ages to celebrate the carefree spirit of summer.
Easy DIY Snowflake Suncatcher
Transform your windows into a winter wonderland with this simple DIY snowflake suncatcher project! Using free printable templates or your own creative designs, you can easily craft these breathtaking suncatchers with construction paper and tissue paper. This comprehensive guide provides detailed step-by-step instructions and a video tutorial to ensure a seamless process. To get started, gather supplies like clear contact paper, tissue paper, white cardstock, scissors, and adhesive dots for hanging. Simply cut out the snowflake templates, place the tissue paper on sticky laminating paper, and cover it with another sheet to create the suncatchers. Finally, hang them on windows using double-sided tape for a dazzling winter display that will leave everyone mesmerized!
Simple DIY Star Suncatcher for the 4th of July

Transform your Fourth of July celebrations into a dazzling display with this easy-to-make DIY star suncatcher. This festive craft is perfect for kids, requiring only basic supplies like construction paper, contact paper, and tissue paper in red, white, and blue hues. The step-by-step guide makes the process seamless, allowing you to add an extra touch by attaching a ribbon for a shooting star effect. Hang these sparkling suncatchers on your windows to infuse your holiday decor with a celebratory atmosphere. This craft is versatile enough to be enjoyed during 4th of July, Memorial Day, or Patriot Day gatherings, keeping kids entertained and engaged throughout the summer.
How Do You Make a Pumpkin Sun Catcher
Transform your home with the warm glow of autumn through a stunning DIY pumpkin suncatcher, perfect for fall or Halloween celebrations. This mess-free craft activity is an excellent way to engage your little ones while practicing their scissor skills and nurturing their creativity.
With just a few simple materials like orange construction paper, printable pumpkin templates, tissue paper, contact paper, and scissors, you can create a durable decoration that will be treasured for years to come. Simply download the free template, cut out the pumpkin outline, and let your child’s imagination run wild by adding face parts and covering them with tissue paper squares over the contact paper.
Once complete, hang your masterpiece in a window or use a string to add an extra touch of magic. For even more Halloween kid’s crafts, explore our collection of festive activities to make this season truly unforgettable.
Make Jellyfish Sun Catcher With Free Template

Transform your home into an underwater oasis with this delightful DIY jellyfish sun catcher craft, perfect for summertime. This fun and easy project allows kids to unleash their creativity while creating colorful jellyfish to hang in the windows. With basic supplies like contact paper, tissue paper squares, white cardstock, and more, you can follow the simple instructions to assemble your own unique sun catcher. It’s an excellent way to keep kids engaged and entertained, bringing a touch of the ocean’s beauty indoors.
Making Your Own Flower Mandala Suncatchers
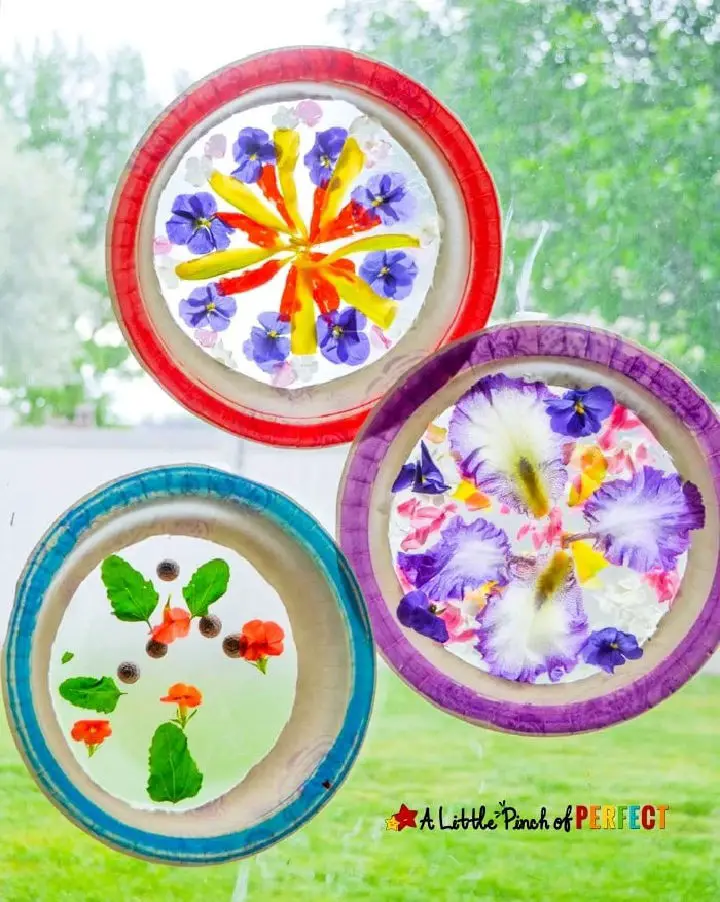
Transform your home into a stunning art gallery with a collaborative project that fosters creativity and connection with nature! Gather your little ones and embark on an adventure to collect flowers, petals, and leaves, inspiring their imagination and appreciation for the natural world.
Utilizing paper plates and transparent contact paper, create a template for your kids to follow, crafting symmetrical circles that mirror the beauty of nature. As they decorate their mandalas, encourage them to count and strategically place their collected treasures within each section, developing an eye for symmetry and design.
Secure their masterpieces with a second layer of contact paper, allowing the finished art pieces to shine in harmony with the sunlight, casting a warm glow on your home’s interior. This engaging activity not only cultivates creativity but also nurtures a sense of wonder and awe for the intricate patterns found in nature.
Make a Bird Shape Suncatcher
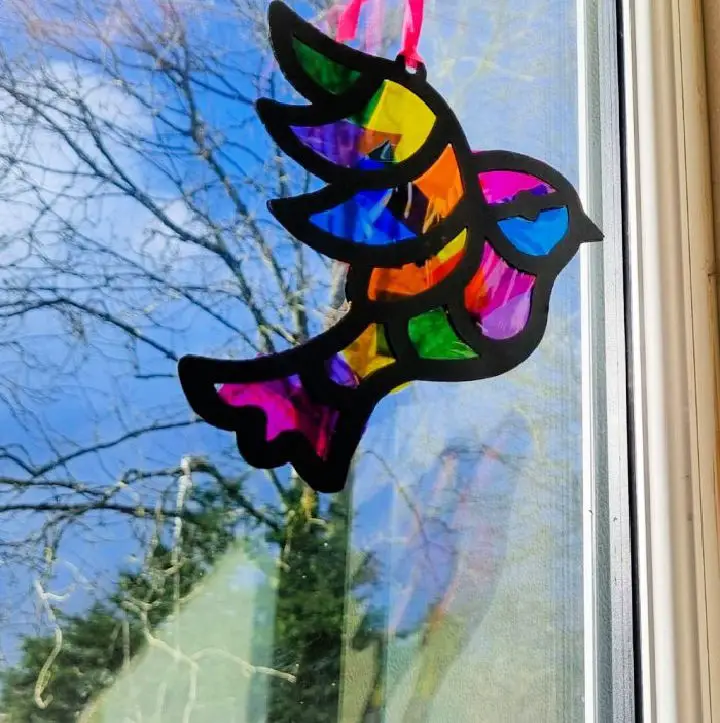
Transform any room or garden into a radiant oasis by crafting a stunning bird-shaped suncatcher. This enchanting DIY project is perfect for sparking imagination in kids and adults alike. By combining various materials like stained glass, beads, or crystals, you can create a mesmerizing display of colors and patterns that seem to come alive when sunlight shines through them.
To bring this magical creation to life, simply gather the following materials: black cardstock, transparent cellophane sheets, ribbon, scissors, a pencil, and a glue stick. As the sun’s rays dance across your suncatcher, you’ll be treated to a kaleidoscope of colors that will leave you in awe.
Get creative with different shapes, colors, and materials to craft unique suncatchers that make perfect gifts or personal treasures. Hang your finished masterpiece in a sunny window and bask in the beauty it brings to your home.
Conclusion:
As our exploration of suncatcher crafts comes full circle, we’ve not only delved into the process of creating these beautiful pieces but also uncovered their rich history and cultural significance. The versatility of suncatchers lies not only in their ability to bring warmth and color to any space, but also in the countless opportunities for customization and self-expression that they offer.
From selecting the perfect design and gathering the right materials, to adding the final flourishes to your creation and considering their eco-friendly impact, we’ve covered the essential steps to help you successfully create a suncatcher that reflects your unique style. As you embark on your own suncatcher journey, remember that the true joy lies not only in the act of creating, but also in the satisfaction of displaying your handiwork and basking in its warm glow.
