Beat the summer heat with a DIY sun shade that’s not only cool but also budget-friendly and eco-conscious. We’ve curated 25 inspiring ideas for your patio, covering everything from design tips to cost analysis and environmental impact. Whether you’re looking to add some color, integrate plant life, or simply create a safe and inviting outdoor space, we’ve got you covered. Our comprehensive guide will walk you through each step of the DIY process, including crucial safety precautions, maintenance tips, and FAQs. Ready to transform your patio into a comfortable oasis? Let’s get started!
How to Make a Sun Shade – Step by Step Guide
Transforming your outdoor space into a cozy haven from the harsh sun’s glare is a wonderful prospect. With a patio shade structure, you can create a welcoming retreat that invites relaxation and socialization. In this article, we’ll walk you through a straightforward, novice-friendly guide to building one for your backyard, so you can enjoy the warmth of the outdoors without sacrificing comfort.
What You’ll Need:
When building a deck, there are several essential tools and materials that you’ll need to get started. At the very foundation of your project is the shovel, which will be used to clear the area where your deck will sit. As you move up the level, you’ll also need paver stones or other base materials to create a solid foundation for your structure. To support these pavers, you may want to use pots filled with concrete, allowing the mixture to set quickly before moving on to the next step. A water hose is also a must-have, as it will be used to clean up any spills and wash away dirt and debris. For the main framework of your deck, you’ll need cedar posts (typically 4x4s) and 2×4 pressure-treated lumber that’s at least 10 feet long. To secure these components together, you’ll need deck screws that are at least 3 inches in length. Finally, to ensure that your structure is square and level, you’ll want to have a drill with various drill bits on hand, as well as a circular saw for cutting through any necessary materials. A speed square will also come in handy when it comes time to cut precise angles and shapes. And of course, no deck-building project would be complete without a sturdy ladder that allows you to safely access all areas of your structure. With these tools and materials at your disposal, you’ll be well on your way to creating the perfect outdoor space.
Step by Step Instructions
Step 1: Preparing the Base
To begin building your shade structure, start by placing a paver on the ground at the desired location for each post. Verify that it’s perfectly level to guarantee a sturdy foundation. Next, carefully position the pot on top of the paver, taking care to maintain its levelness. Double-check the alignment to ensure your entire structure remains stable and even.
Step 2: Setting the Posts
To install your cedar post, start by leaning it against a sturdy support, such as a patio chair, and position it within the pot. Next, follow the package instructions to mix the concrete, filling the container while ensuring the post remains upright and level. Be sure to add water to the mixture in sufficient quantities to reach the bottom of the pot, guaranteeing a strong bond between the post and its foundation.
Step 3: Assembling the Frame
Before pouring the concrete, ensure your pressure-treated lumber is ready for use. To prevent the wood from splitting during attachment to the cedar posts, measure and drill pilot holes first. Then, construct the top frame by securing the 2x4s to the cedar posts with deck screws, verifying that all components are level and square in the process.
Step 4: Attaching the Sunshade
Once the frame is assembled, place the sunshade fabric over it to determine its optimal position. Secure the fabric utilizing the supplied bungee cords and zip ties. To achieve added tightness and longevity, consider substituting some or all of the bungees with additional zip ties. Finally, drill screws into the tops of the posts to firmly anchor the fabric’s corners.
Step 5: Adding Bracing for Stability
To provide added stability, cut two 2x4s at a precise 45-degree angle to create corner braces. Measure and mark the areas where these supports will be attached, before drilling pilot holes. Securely screw them into place, ensuring the structure is robust and rigid, with no risk of collapse or movement.
Final Touches
Before installing your patio shade, it’s crucial to double-check its level and ensure the structure is perfectly square. Any adjustments needed should be made at this stage, as a well-aligned frame will provide a sturdy foundation for your new outdoor retreat. With the structural integrity in place, you’ll be able to fully appreciate the benefits of your shaded patio, including relief from the sun’s harsh rays and a cozy space perfect for relaxing with family and friends.
Video Tutorial
To supplement your understanding of the process, we’ve created a step-by-step video tutorial that’s available on our YouTube channel. The visual demonstration complements the written instructions provided below, making it easier for you to grasp the techniques involved in building a patio shade structure.
Design Ideas for Your DIY Sun Shade
Creating a sun shade is an engaging and fulfilling DIY endeavor that not only offers shelter from the sun’s harsh rays but also infuses your outdoor area with a dash of personal flair. With a few creative strokes, you can transform your patio or backyard into an inviting oasis. Here are some innovative design concepts to spark your imagination:
Choose the Right Material
When it comes to selecting the right material for your sun shade, there are several popular options to consider. Each has its own unique characteristics that can impact the overall durability and effectiveness of your shade solution. For instance, canvas is a durable choice that provides excellent protection from the sun’s rays. Its sturdy construction makes it well-suited for heavy use or exposure to harsh weather conditions. On the other hand, polyethylene is a lightweight option that resists moisture, making it an ideal choice for areas where water may be present. Meanwhile, shade cloth offers a more flexible solution by allowing some light through while still blocking UV rays. Ultimately, the right material for your sun shade will depend on your specific needs and preferences.
Consider the Shape and Size
When selecting a sun shade, it’s essential to consider the shape and size in relation to the area you want to cover. A rectangular design is well-suited for larger spaces, providing ample coverage. For smaller areas or those looking to add a touch of modern flair, triangular shapes can be an excellent choice. Ultimately, the possibilities are endless, as custom shapes allow you to get creative and tailor your sun shade to meet specific needs.
Add a Pop of Color
Elevate the ambiance of your outdoor space by introducing a vibrant sun shade. Select shades that harmonize with your existing decor, or make a statement by opting for bold, contrasting hues that add visual interest.
Integrate Plant Life
To bring a touch of nature to your outdoor space, consider incorporating climbing plants or creating a lush hanging garden. Not only will this visually stunning feature enhance the overall ambiance, but it will also have a positive impact on the environment by purifying the air and promoting a healthier atmosphere.
Lighting for Evening Ambiance
Transforming your outdoor space into an inviting haven is just as important as the structure itself. A clever addition can be incorporating string lights or solar-powered lamps to create a warm and welcoming ambiance, perfect for evening get-togethers under the comfort of your sun shade.
Personal Touches
Transform your sun shade into a unique masterpiece by incorporating personalized patterns, artwork, or even your own hand-painted designs. To ensure a successful DIY endeavor, it’s crucial to plan meticulously, choose materials thoughtfully, and relish the creative process. Your sun shade should not only reflect your personal style but also cater to your outdoor needs and preferences.
Safety Precautions for DIY Sun Shade Projects
As you begin your DIY sun shade venture, prioritizing safety is crucial for a stress-free and successful outcome. To minimize risks, consider the following essential safeguards:
Personal Protective Equipment (PPE)
When it comes to ensuring a safe work environment, don’t forget the importance of wearing appropriate personal protective equipment (PPE). This includes three essential components: safety glasses, gloves, and sunscreen.
Safety glasses are crucial for protecting your eyes from debris and other hazards that could cause injury. On the job site, it’s not uncommon to encounter flying particles, chemicals, or other materials that could pose a risk to your vision. By wearing safety glasses, you can rest assured that your eyes will be well-protected.
Gloves are another vital piece of PPE that can help prevent injuries. They shield your hands from sharp objects and friction, which can cause cuts, abrasions, or other types of trauma. Depending on the type of work you’re doing, gloves may also provide additional benefits such as grip enhancement, vibration reduction, or temperature regulation.
Finally, if you’ll be working outdoors, don’t forget to apply sunscreen. UV rays from the sun can cause serious damage to your skin over time, including premature aging and even skin cancer. By applying a broad-spectrum sunscreen with at least SPF 30, you can help prevent these issues and maintain healthy-looking skin.
In summary, wearing appropriate PPE is critical for maintaining a safe work environment. Make sure to include safety glasses, gloves, and sunscreen in your daily routine to ensure your overall well-being.
Tool Safety
When working with tools, it’s essential to exercise caution and follow proper guidelines to ensure safe and effective usage. Start by reading and thoroughly understanding the manual that comes with each tool, as this will help you become familiar with its operation. Next, inspect your tools for any signs of damage or wear before using them. This will prevent accidents from occurring due to faulty equipment. Finally, use each tool according to its intended purpose, taking care not to misuse or overuse it. By following these simple steps, you’ll be able to work efficiently and safely with your tools.
Ladder Safety
When utilizing a ladder for climbing purposes, it is crucial to adhere to the following essential guidelines to ensure maximum safety. Firstly, establish a stable foundation by placing the ladder on a firm, level surface free from any obstructions or slippery substances. Next, position the ladder at an optimal angle, adhering to the 75-degree rule to minimize the risk of slipping or losing balance. Finally, maintain three points of contact with the ladder at all times, whether it be two hands and one foot or vice versa, to guarantee a secure footing and prevent any potential accidents.
Installation Safety
To guarantee a secure and reliable installation, consider the following key factors:
Firstly, anchor points are crucial in withstanding the weight of the sun shade. Sturdy and robust anchor points should be used to ensure that the structure remains stable and does not topple over due to external forces.
In addition, it’s essential to take wind considerations into account. Install the sun shade in a way that can withstand potential wind gusts, which may vary depending on your location and environmental conditions.
Cost Analysis for DIY Sun Shade Projects
Creating a sun shade without overspending is achievable. To keep costs in check, consider these budget-friendly strategies:
Firstly, repurpose an existing structure like a pergola or gazebo. This can save you money on building materials and labor.
Next, opt for a DIY approach using affordable materials such as fabric, PVC pipes, or wooden frames. You can find plenty of tutorials online to guide your project.
Finally, consider upcycling or recycling old items like umbrellas, tents, or even cardboard boxes to create a unique and eco-friendly sun shade.
Material Costs
When selecting materials for your project, strike a balance between quality and affordability by considering the following options:
Firstly, compare prices across different retailers or online marketplaces to identify the most competitive deals. This simple step can help you save a significant amount of money.
Another effective way to reduce costs is to make bulk purchases whenever possible. Buying materials in larger quantities often results in lower unit prices, allowing you to stretch your budget further.
DIY vs. Professional Installation
When evaluating the pros and cons of taking on a DIY project versus hiring a professional, one crucial factor to consider is the potential cost savings or expenditures. On one hand, undertaking a task yourself can lead to significant labor cost reductions. However, this approach may also compromise the overall quality of the outcome. Conversely, opting for a professional’s expertise often results in a more enduring and satisfactory result, albeit at a potentially higher upfront cost.
Budgeting Tips
To ensure your DIY project stays within budget, it’s essential to plan ahead with meticulous detail. Start by creating a comprehensive budget that accounts for every anticipated expense. This will help you avoid costly surprises down the line.
As you work on your project, maintain a record of all purchases and costs incurred. This not only helps you track your expenses but also provides valuable insights into areas where you can optimize your spending.
Another crucial aspect is identifying cost-effective alternatives that don’t compromise on quality. By seeking out affordable solutions without sacrificing performance, you can achieve your goals while staying within budget.
By combining careful planning with thoughtful expense tracking and smart cost analysis, you’ll be well-equipped to create a safe and budget-friendly sun shade that meets your needs.
Environmental Impact of DIY Sun Shades
By integrating a do-it-yourself solar screen into your living space, you can simultaneously enhance your indoor climate and make a sustainable impact. The eco-friendly benefits are multifaceted, including reducing the need for artificial lighting, decreasing energy consumption, and lowering greenhouse gas emissions. This practical approach to home decor not only promotes well-being but also fosters a sense of environmental responsibility.
Reducing Energy Consumption
Sun shades make a substantial contribution to energy efficiency by playing a crucial part in regulating indoor temperatures and reducing the reliance on cooling systems. By blocking direct sunlight, they prevent excessive heat from entering the space, thereby minimizing the need for air conditioning and subsequent energy consumption. Furthermore, sun shades help maintain a consistent temperature, resulting in less energy expenditure as buildings do not require constant adjustments to heating or cooling systems.
Eco-Friendly Materials
When selecting materials for your sun shade, consider not only the initial eco-friendliness of the product but also the sustainability of its components. One way to achieve this is by choosing fabrics that have been crafted from recycled materials. This approach reduces waste and conserves natural resources. Additionally, opt for natural fibers like bamboo or cotton, which are renewable and biodegradable, allowing them to seamlessly integrate into nature’s cycle at the end of their lifespan.
Carbon Footprint Reduction
Incorporating sun shades into your building design can have a significant impact on the environment by minimizing the reliance on energy-intensive cooling systems. By doing so, you’ll not only be reducing your carbon footprint but also contributing to a healthier planet.
Maintenance Tips for Your DIY Sun Shade
To keep your sun shade functioning optimally and looking its best for years to come, it’s crucial to implement the following routine maintenance tasks: First, inspect your sun shade regularly for any signs of wear or damage. Check for loose screws, torn fabric, or fading colors that may indicate a need for repairs. Next, clean your sun shade thoroughly with mild soap and water to remove dirt, grime, and debris that can reduce its effectiveness. Additionally, consider applying a waterproofing treatment to protect the material from harsh weather conditions and UV rays. Finally, if your sun shade has removable parts, make sure to store them properly after use to prevent loss or damage.
Regular Cleaning
To maintain the optimal performance of your sun shade, follow these simple maintenance tips:
Ensure a thorough cleaning by gently removing dust and debris to prevent buildup. This step is crucial in keeping your sun shade’s fabric free from dirt and allergens.
For more thorough cleansing, wash the fabric according to the manufacturer’s guidelines, typically using mild soap and water. By doing so, you’ll not only remove stubborn stains but also help extend the lifespan of your sun shade.
Seasonal Checks
Regularly inspect your sunshade to ensure its optimal performance throughout the year. This includes checking on it before the summer season, making sure it’s prepared to handle the intense heat and sunlight. Additionally, after experiencing harsh weather conditions such as severe storms or strong winds, inspect the sunshade for any damage that may have occurred. By doing so, you can identify and address any issues promptly, extending its lifespan and maintaining its effectiveness in providing shade and comfort.
Storage Solutions
To store your sun shade effectively, prioritize its drying and folding. Firstly, allow it to air completely to prevent mold and mildew buildup. This step is crucial in maintaining the fabric’s integrity. Once dry, carefully fold the shade to minimize creases and potential damage. By following these steps, you’ll be able to store your sunshade in a cool, dry place without compromising its quality. This thoughtful approach not only preserves your DIY project but also contributes to a healthier environment.
FAQs About DIY Sun Shades
What materials are best for a DIY sun shade?
When it comes to crafting a DIY sun shade, it’s essential to choose materials that can withstand the elements while also providing reliable UV protection. Top contenders for this task are durable textiles like canvas, polyethylene-based fabrics, and specialized shade cloths. These options not only offer resistance to harsh weather conditions but also boast impressive UV-blocking capabilities, making them ideal for creating a comfortable outdoor space.
How do I choose the right size for my sun shade?
When planning your outdoor space, it’s essential to account for the sun’s movement throughout the day. To achieve optimal coverage, measure the area you want to cover and consider adding a few extra feet to each dimension. This will ensure that you’re not leaving any areas in the shade or exposed to harsh sunlight.
Can I install a sun shade by myself?
While some sun shades can be easily installed with a DIY approach, bigger and more intricate systems may require additional support. Whether that’s an extra set of hands or the assistance of a professional, it’s essential to consider the level of complexity involved when deciding how to install your sun shade.
How do I maintain my sun shade?
In addition to routine upkeep, it’s essential to perform regular maintenance tasks on your equipment. This involves thoroughly cleansing the components using a gentle soap and water solution, inspecting the parts for signs of wear or damage, and guaranteeing that all connections are secure and firmly in place.
Are sun shades waterproof?
While some sun shades may boast water-resistance, it’s essential to note that not all of them offer complete waterproof protection. When searching for a product that can withstand the elements, scrutinize the material specifications beforehand to ensure the item meets your needs.
How do I prevent my sun shade from sagging?
To avoid compromising the integrity of your newly installed feature, it’s crucial to maintain optimal tension throughout the process. Regularly monitor and fine-tune the tension as needed to prevent unwanted sagging or drooping, ensuring a sturdy and long-lasting outcome.
Can I use a sun shade in windy conditions?
When it comes to using sun shades in windy conditions, proper installation is key. This means ensuring that the shade has secure anchor points that can withstand the wind’s force, as well as being tensioned correctly to prevent any instability or damage. By taking these precautions, you can confidently use your sun shade even when the weather is not ideal.
What is the lifespan of a DIY sun shade?
A sun shade’s longevity hinges on a trifecta of factors: the type of material used in its construction, the quality of the initial installation, and the level of maintenance it receives over time. While the lifespan may vary depending on these variables, a well-maintained sun shade can indeed thrive for several years when all conditions are met.
How can I add lighting to my sun shade?
To enhance your outdoor space, consider installing outdoor lights along the perimeter to create ambiance and visibility. Alternatively, opt for solar-powered lamps that offer a hassle-free, wire-free solution.
Do I need a permit to install a sun shade?
While permit regulations differ across locations, it’s essential to consult with your local authorities to verify whether a permit is necessary for your sun shade installation. This step ensures compliance with specific laws and regulations governing construction projects in your area.
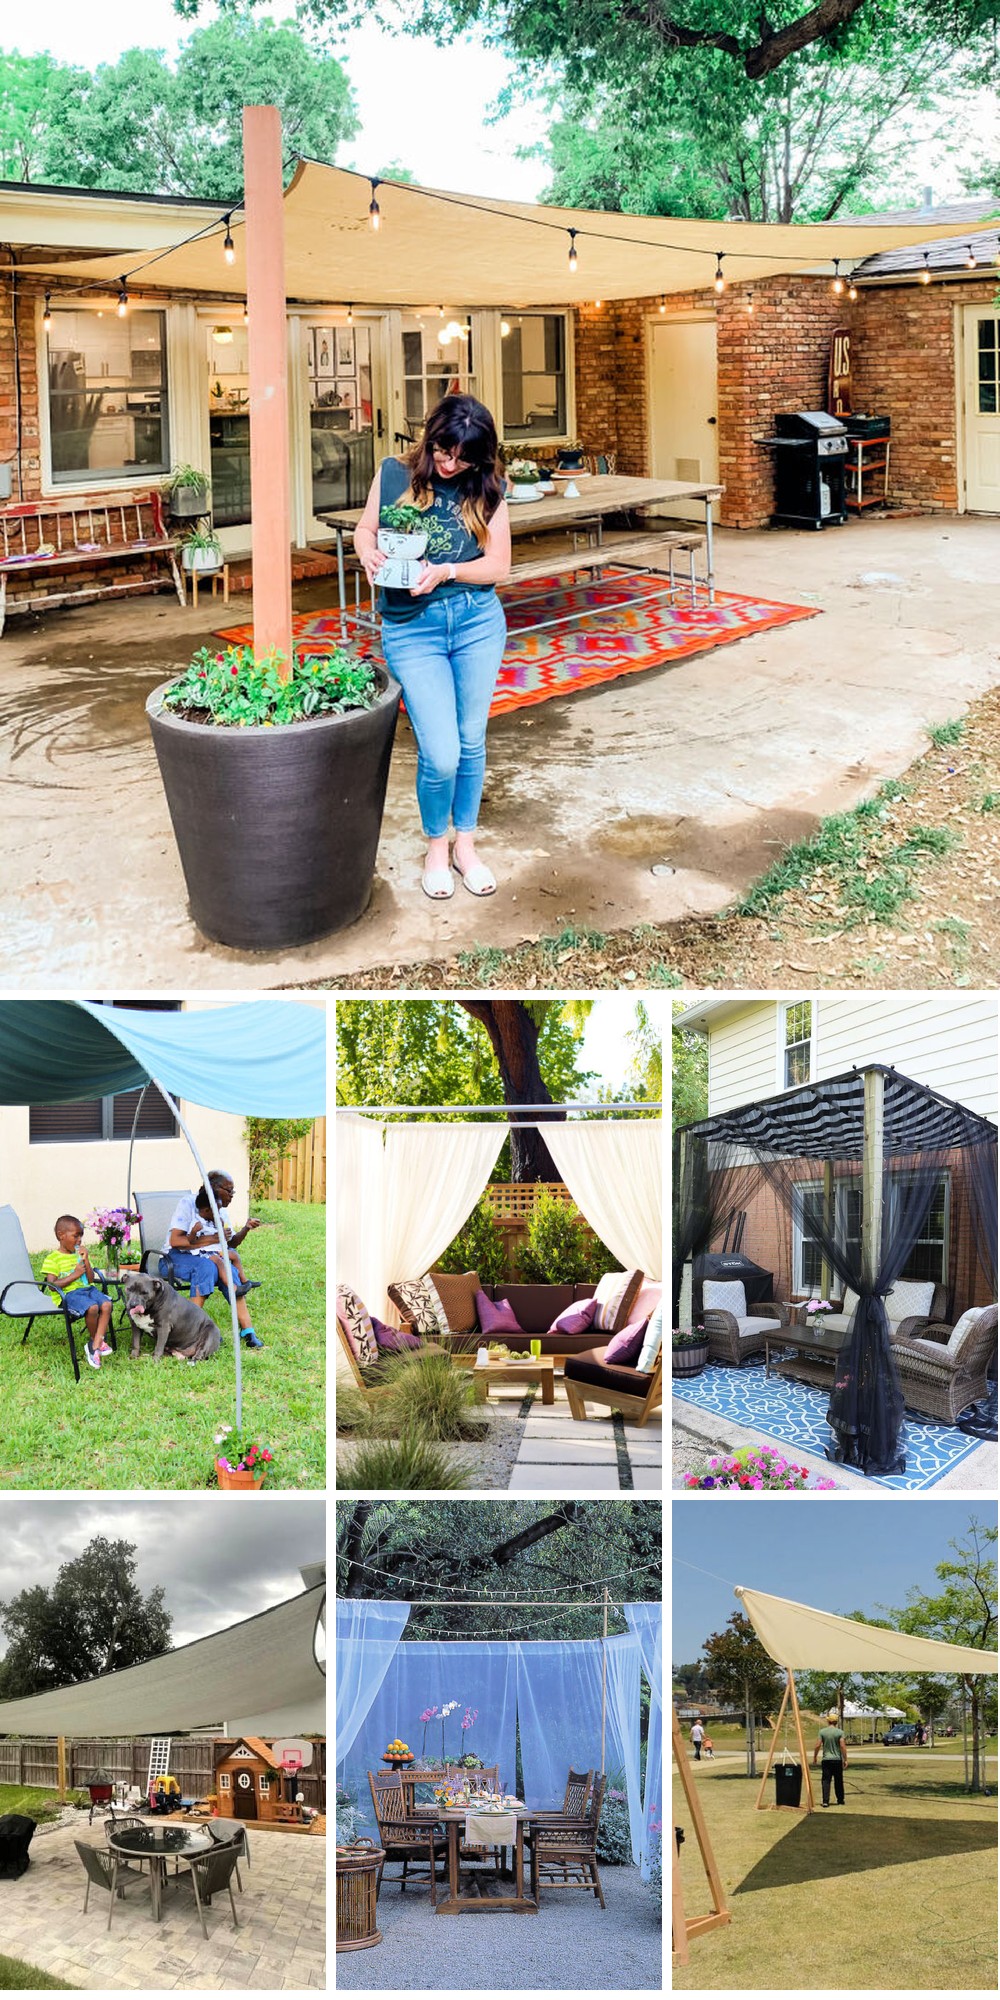
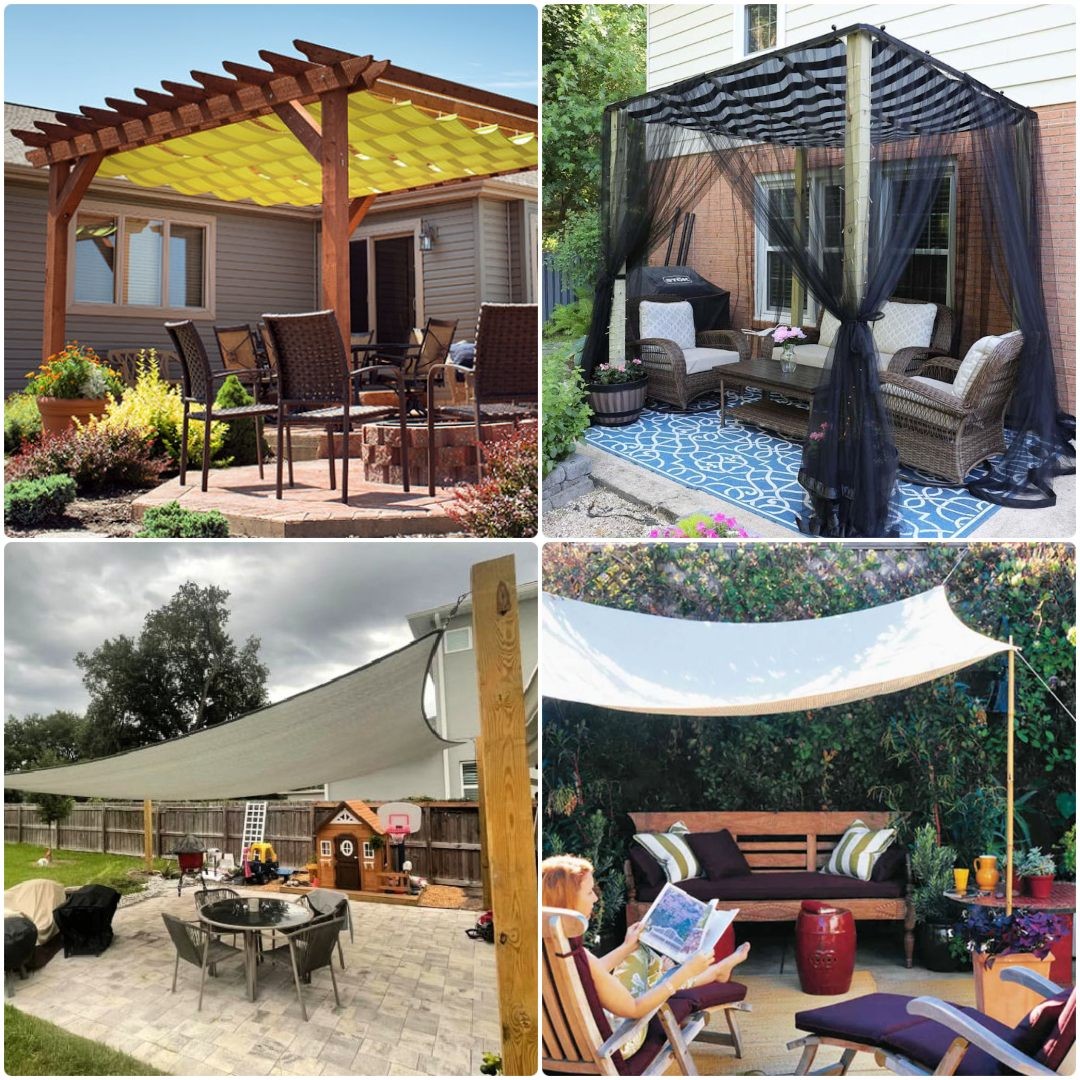
25 Cheap DIY Sun Shade Ideas for Your Patio
Transform your patio into a cozy retreat without breaking the bank by embracing these 25 innovative, budget-friendly DIY sun shade ideas. From simple to elaborate, each solution offers a practical way to shield yourself from the harsh sun rays while enjoying the great outdoors.
Cheap DIY Outdoor PVC Canopy

Transform your outdoor oasis into a cozy retreat with a DIY PVC canopy that’s as functional as it is affordable. This innovative structure ensures you can savor those morning coffee moments or keep an eye on the kids in the garden without the scorching sun interrupting your serenity. The project’s foundation lies in a combination of rebar posts, PVC conduits, conduit tee fittings, curtains, and terra cotta pots, all brought together with a dash of creative panache. This budget-friendly and easy-to-assemble canopy takes center stage with its out-of-the-box use of PVC pipes and curtains, allowing for customization and a touch of style. The end result? A personalized, shaded haven right in your own backyard, perfect for those sun-kissed Miami mornings or any day you want to escape the heat. By taking on this project, you’ll be embracing the joy of making and upgrading your outdoor space with a unique and functional addition.
DIY Sun Shade From an Old Sail
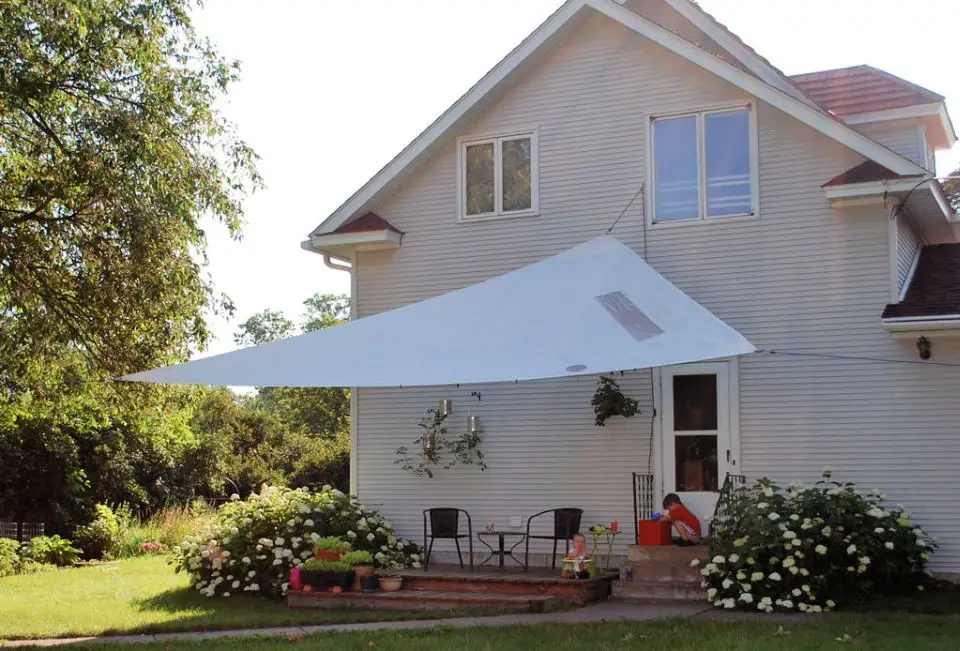
Transform an old sail into a unique DIY sunshade that captures the essence of sailing in your backyard! This adaptable solution is perfect for hot summer days. To create this shade, start by identifying the ideal spot, sourcing an old sail, and setting it up. Although sails aren’t designed to withstand UV rays and may require replacement over time, you can easily adjust the rigging system to accommodate different sail sizes, minimizing concerns. With no cost involved in acquiring the sail and a flexible setup process, you’re free to get creative and build your charming sunshade today! Simply follow the instructions to bring this project to life.
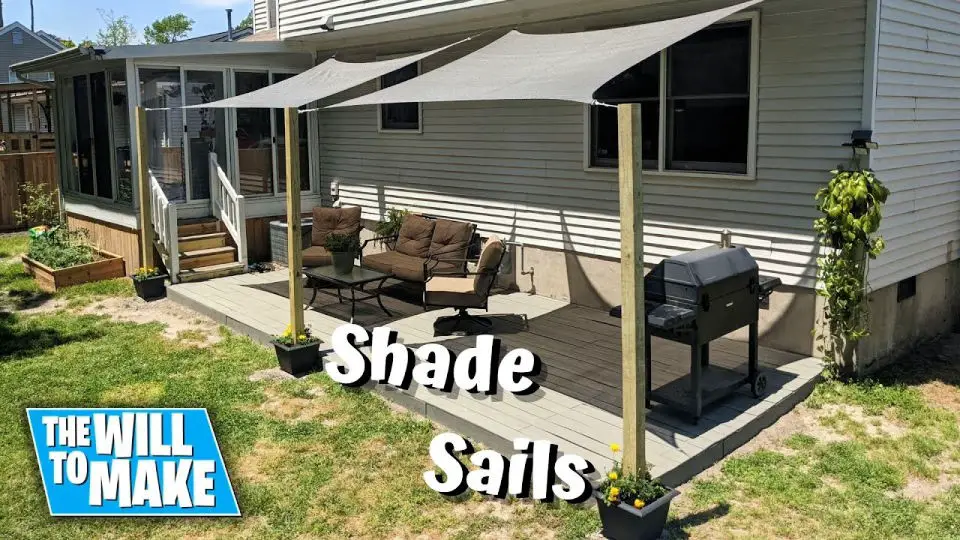
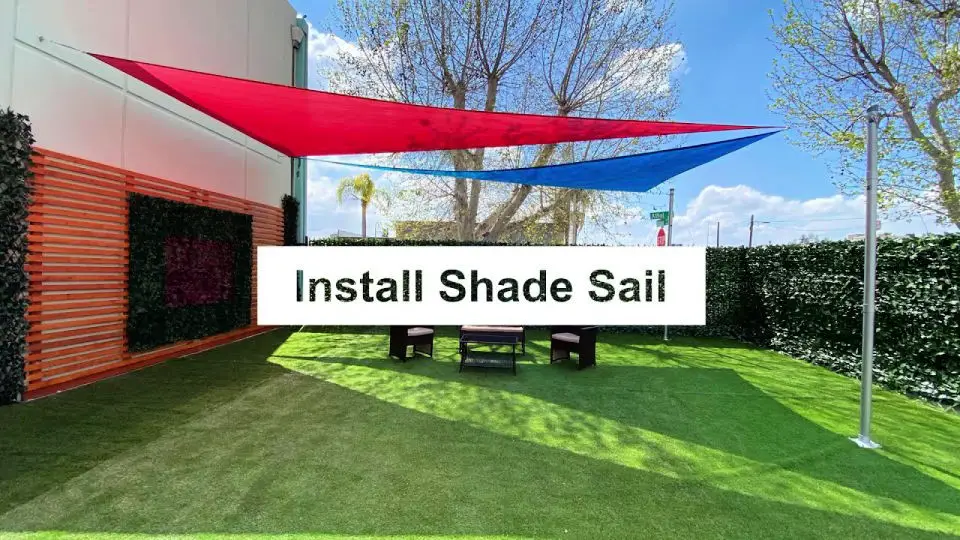
Make Shade Sails for the Backyard
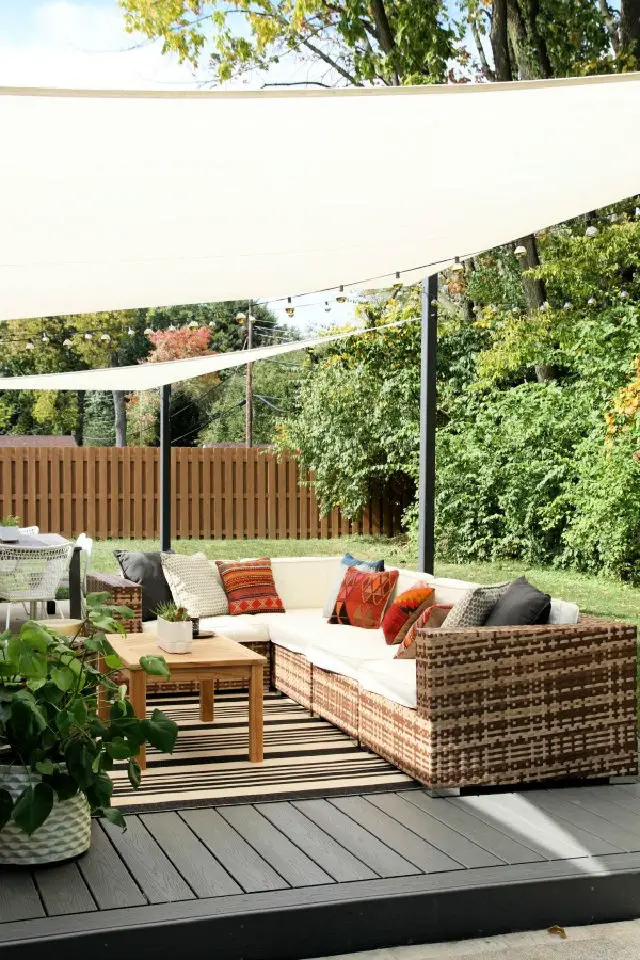
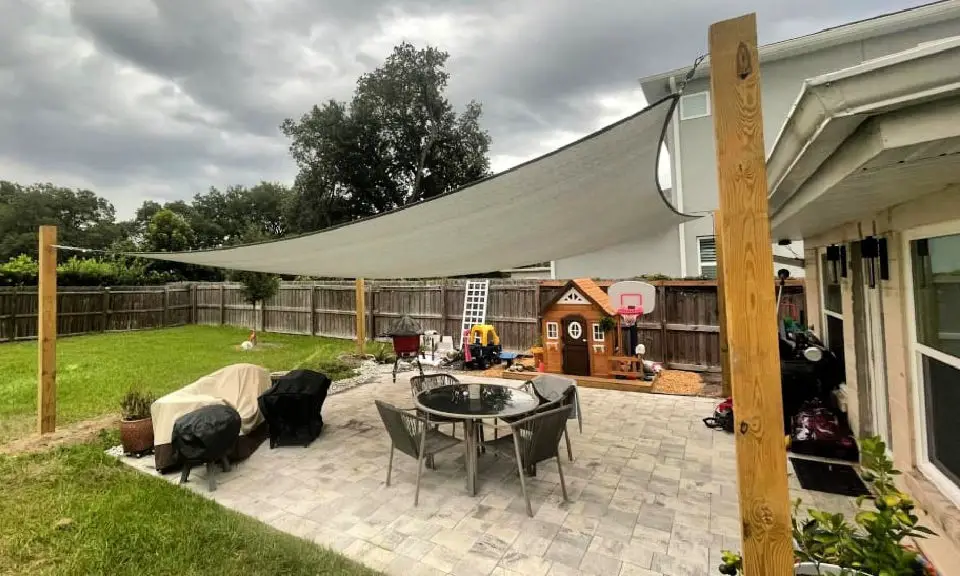
Transform your backyard into a serene retreat with this DIY shade sail project! This ingenious solution can significantly reduce outdoor temperatures by up to 15 degrees Celsius, making your deck an inviting oasis during the scorching summer heat. The custom-made sails are expertly strung on heavy-duty hardware, supported by robust 4-by-4 steel posts that provide unyielding stability.
Whether you choose a single large rectangular sail or multiple triangular ones, this project offers an affordable alternative to pricier pergolas or retractable awnings. With an investment of approximately $2,338, you’ll gain a unique, functional addition to your backyard perfect for hot summer days and endless entertainment possibilities. This DIY shade sail endeavor is a versatile, cost-effective, and stylish way to elevate your outdoor living space.
Easy DIY Patio Sun Awning
Elevate your outdoor space without sacrificing style or breaking the bank with these innovative patio shade ideas. This summer, transform your empty yard into a vibrant oasis by creating a DIY canopy that provides both comfort and shelter. With just a few simple materials like drop cloths, grommet kits, tent poles, and sturdy cords, you can create a cozy atmosphere in no time. Unlike permanent structures, this project requires minimal commitment and expense, making it an ideal solution for those seeking flexibility and affordability.
The beauty of canopy installation lies in its adaptability – hang it from poles or extend it between walls or rooflines to suit your preference. Add a personal touch by opting for patterned canopies, such as sewing together two lightweight cotton bedspreads, which can add a unique flair to your outdoor space.
The best part? Your canopy is effortlessly removable at the end of the season or during unpredictable weather conditions, making it the perfect solution for those seeking a cost-effective and adaptable way to maximize their outdoor living areas.
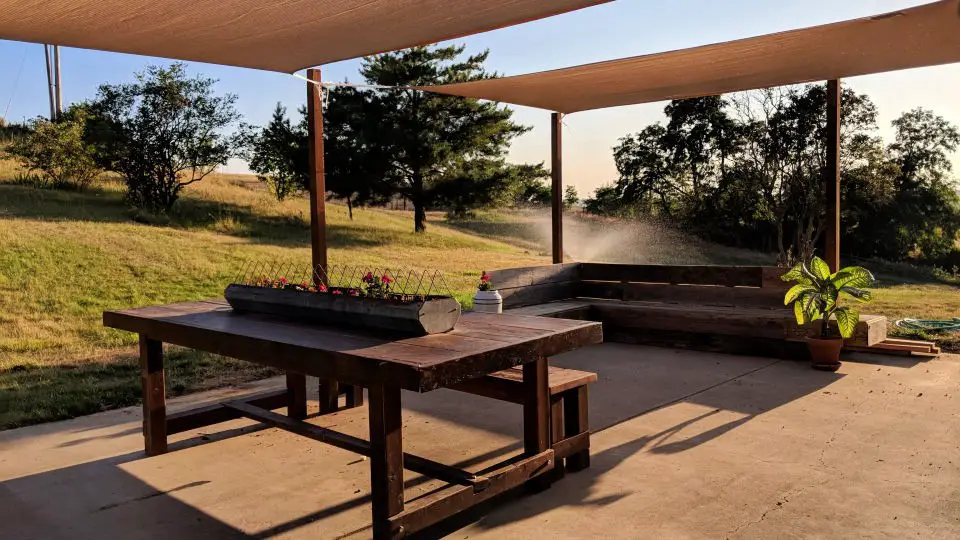
How to Make Sun Shade in the Backyard
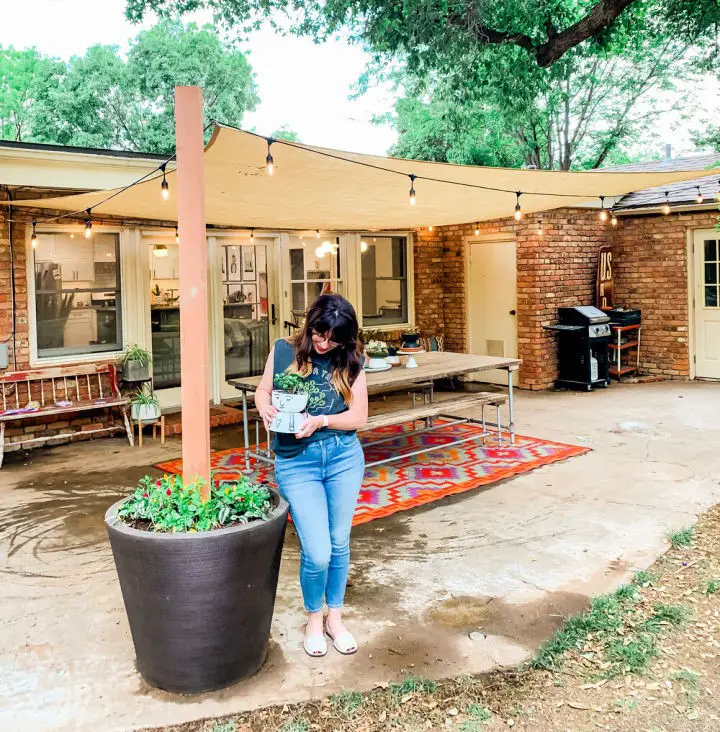
Transform your backyard patio into a serene oasis with this budget-friendly DIY sunshade project. The straightforward guide utilizes affordable materials like shade sails, string lights, planters, concrete, cedar posts, and essential fasteners. Begin by setting the stage for stability by preparing your planter post and securing it in a concrete base. Pay meticulous attention to anchor points that ensure tension and keep the shade taut, using existing structures like your home or tree as reference points. To make installation easier and allow for weather-resistant removal during harsh conditions or winter, incorporate carabiners into the design. As the final touch, add some charm with outdoor lights and a pop of greenery by planting inside the planter base. This simple DIY project yields a delightful shaded patio space perfect for relaxation and outdoor entertaining.
How to Install a Shade Sail in 8 Easy Steps
Beat the heat this summer with a DIY shade sail, a budget-friendly way to upgrade your patio’s comfort level. By stretching breathable fabric over a sturdy framework, you can create a cozy outdoor retreat that shields you from UV rays and harsh sunlight. To get started, gather the following essentials: pressure-treated posts, a post-hole digger, a portable ladder, and hardware like stainless steel eye hooks and spring snaps. With these simple materials, you can transform your backyard into a refreshing oasis where family and friends can gather on even the warmest days.
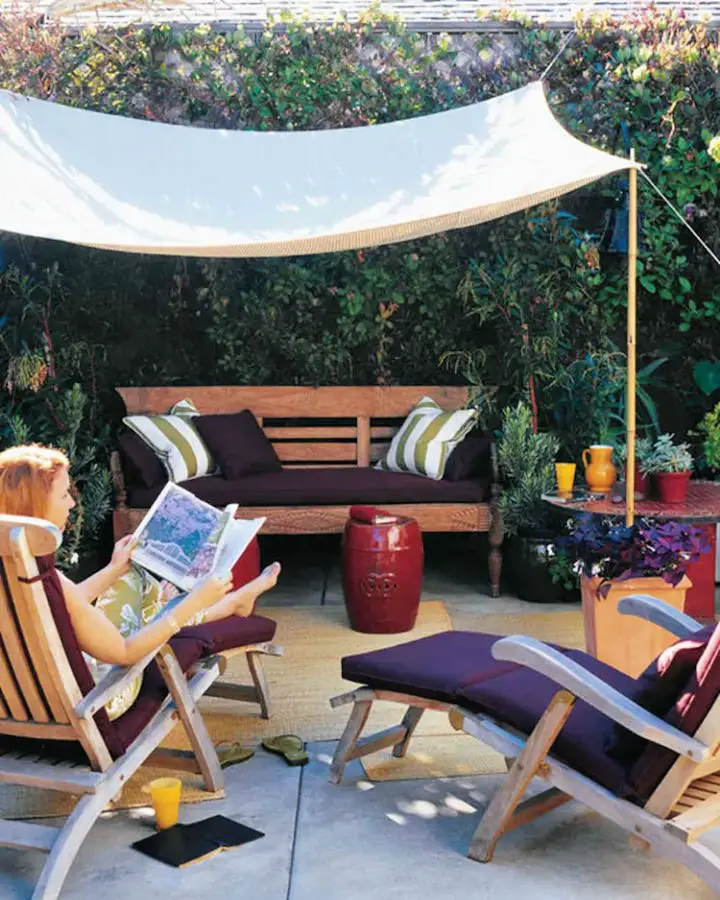
Pergola Sitting Space With Shade Curtains
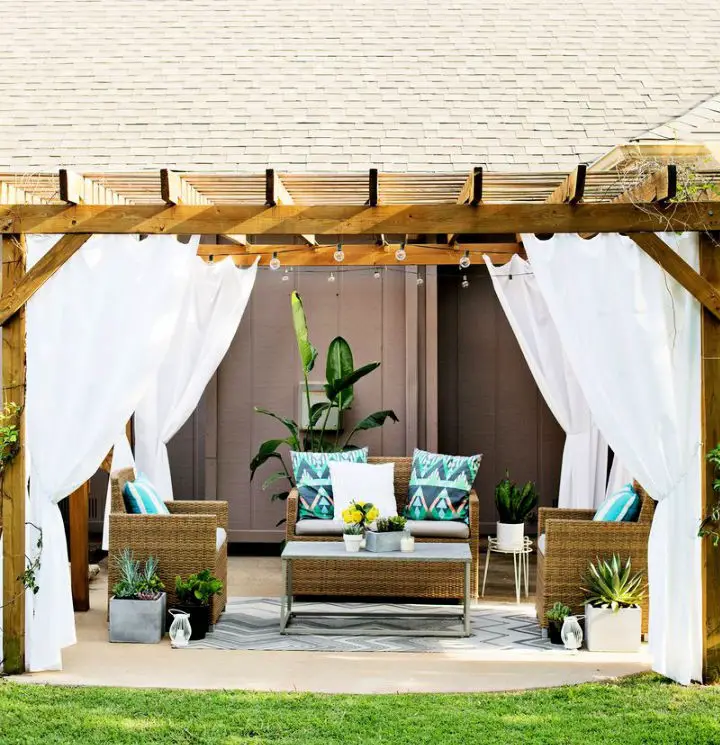
Transform your outdoor living space into a serene oasis with these effortless DIY curtains. Inspired by the luxurious ambiance of a resort cabana, these curtains provide a sense of seclusion and coziness to your pergola. Made from basic white fabric, this project is as budget-friendly as it is beautiful. To achieve this stylish retreat, you’ll need approximately 20 yards of fabric, a grommet kit, scissors, cup hooks, and a chain. Additionally, weather-resistant fabric spray ensures your creation remains resilient against the elements. Follow along with detailed instructions to measure, cut, hem, and insert grommets into your fabric. Once installed, these charming curtains become delightful tiebacks, crafting an inviting nook reminiscent of a dreamy tropical getaway. Turn your backyard pergola into an intimate retreat, and indulge in the tranquility that awaits you at home.
DIY Canopy Shade With Mosquito Net

Transform your patio into a serene and inviting oasis without breaking the bank. Create a functional yet stylish retreat by crafting a budget-friendly canopy shade that incorporates a built-in mosquito net. This DIY project is perfect for upgrading any outdoor space, allowing you to seamlessly transition between basking in the sun’s warmth and enjoying the coolness of the shade while keeping pesky insects at bay. To construct this innovative structure, gather a few essential supplies: 4×4 posts, planters, outdoor fabric, 2×2 boards, hook-and-loop tape, and a mosquito net. The design is intentionally removable, granting you the flexibility to control sunlight in adjacent indoor areas. With this easy-to-follow guide, you’ll be able to turn an underutilized patio into your go-to summer haven.
How to Make Cabana Shade Using PVC Pipes

Transform your backyard into a luxurious retreat with this DIY PVC Pipe cabana project. By investing around $300 and dedicating about two days to the process, you can create a versatile space perfect for entertaining guests, relaxing in private, or enjoying the outdoors year-round. The key components include PVC pipes, outdoor fabric, fusible sewing tape, spray paint, and basic construction equipment. With this comprehensive guide, you’ll learn step-by-step how to build the frame, dig foundation holes, add legs, and craft curtains that will elevate your outdoor space into a cozy haven.
How to Make Patio Sunshade Using Triangular Fabric
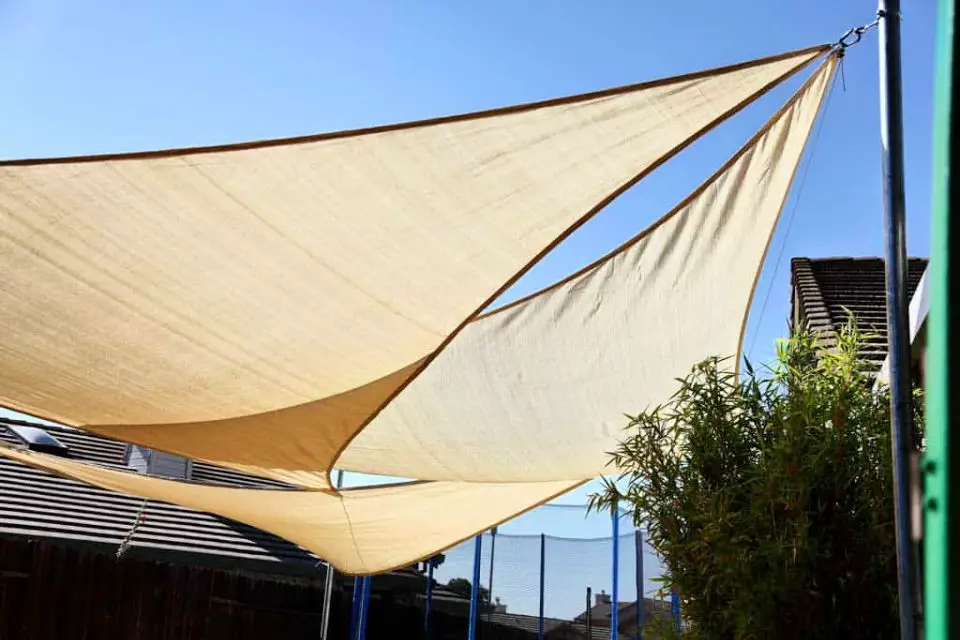
Transform your backyard into a serene retreat by crafting a triangular patio sunshade that effortlessly blocks out harsh summer sunlight. By utilizing freestanding posts secured to a concrete slab and sunshade fabric, you can create an inviting outdoor oasis perfect for relaxation. This ingenious solution is particularly beneficial for properties lacking natural shade, as it not only provides a cooling escape from the sun but also reduces heat reflection from concrete surfaces onto adjacent buildings. The key components include a 20’x20’x20′ triangular canopy, aircraft cables, and concrete anchors. What’s more, the unique design ensures minimal risk of damage to existing structures, even on windy days. With this innovative sunshade solution, you’ll be able to enjoy your backyard in comfort and style.
Free Standing Sun Shade Idea
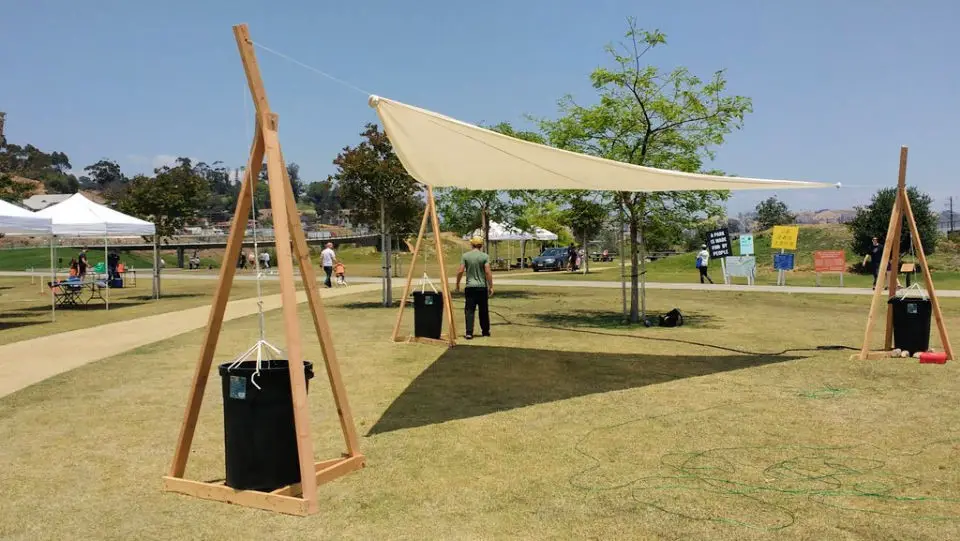
Create a freestanding DIY sunshade for your backyard or events to combat the sweltering summer heat. This self-supporting structure is constructed using three towers, each comprised of six beams held in place by tension and stabilized with water-filled waste bins. Its assembly is swift and flexible, requiring no staking into the ground. The required materials are readily accessible, including 2×4 beams, bolts, screws, muslin cloth for shade, rope, and waste bins. With a project cost of around $150 and completion time of just one day, this sunshade offers an inviting, shaded outdoor space at an affordable price. Additionally, its framework provides a foundation for hanging clotheslines, string lights, or other suspended lines in tension. Elevate your outdoor experiences with this practical and ingenious DIY solution.
DIY Slide-On Wire-Hung Canopy
Transform your outdoor living space with a cutting-edge DIY wire-hung canopy system that offers adjustable shading. This innovative solution features beautifully crafted shades that glide effortlessly along cables, allowing you to control the amount of shade you desire for your pergola or standalone structure. With comprehensive instructions and a step-by-step video tutorial on sewing custom canopy panels, you’ll be able to create a functional and stylish shaded haven in no time. Take it to the next level by adding an optional rope pulley system for seamless opening and closing, or opt for a simple webbing strap if that’s your preferred approach. Regardless of which method you choose, you’ll be treated to the perfect blend of form and function as you create a cozy retreat in your backyard.
Inexpensive DIY Clamshell Sunshade
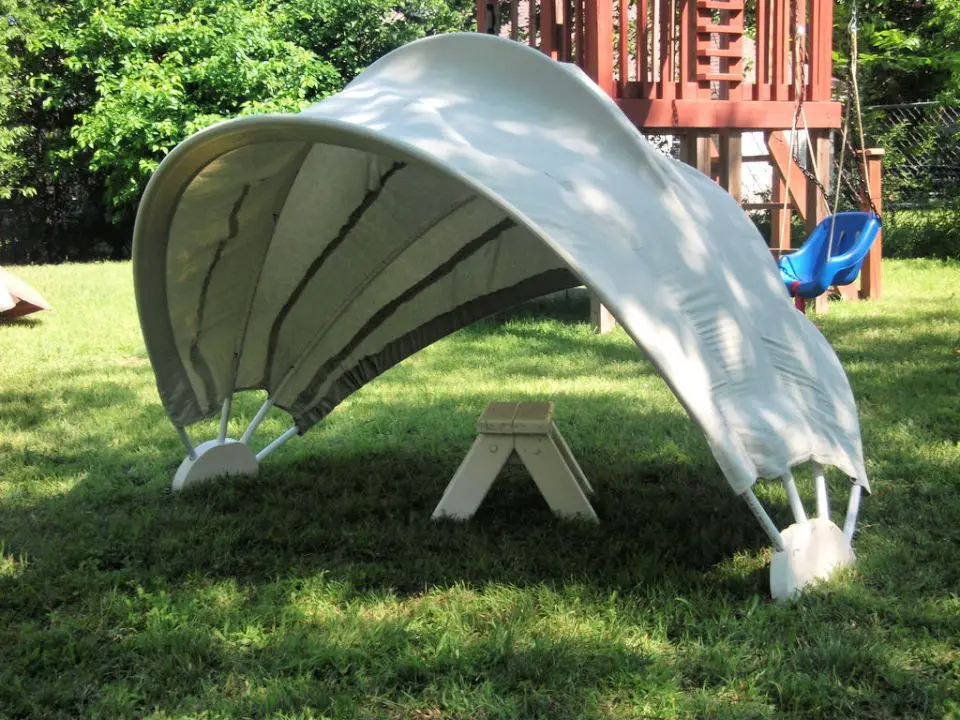
Transform your backyard into an inviting oasis on a budget with creative shade solutions. One innovative approach is the DIY clamshell sunshade, a fun and safe way to provide relief from the sun’s intense rays for you and your kids. This project repurposes readily available materials like scrap 2″ x 6″ wood, 1/2″ PVC pipe, a king-sized cotton sheet, and flat stock metal into a functional canopy. By upcycling these materials, you’ll not only save money but also reduce waste. The end supports are coated with durable oil-based enamel, while the re-purposed sheet creates a cozy shade. This sunshade is easy to construct, dismantle, and store away when not in use. With its unique clamshell design, it’s an ideal solution for creating a secure outdoor play space for your children. So, get creative and make your own DIY clamshell sunshade today!
Handmade Sunroom Window Shade

Transform any room into a cozy retreat with this DIY sunroom window shade. By cleverly manipulating movable panels, you can effortlessly control the amount of sunlight streaming in, creating a warm and inviting ambiance. Crafted from humble materials like untreated wood, wood trim, shade cloth, and paint, these panels are designed to blend seamlessly into your sunroom, adding a touch of elegance while ensuring a comfortable, sun-safe environment. What’s more, this project offers a significant cost savings of over $300 compared to commercial alternatives, allowing you to enjoy the picturesque view of your backyard without the harsh glare of the sun spoiling the scenery. This DIY sunroom window shade is the perfect solution for creating a heat-free haven where you can unwind and relax in style.
Outdoor Dining Space With Sheer Curtain
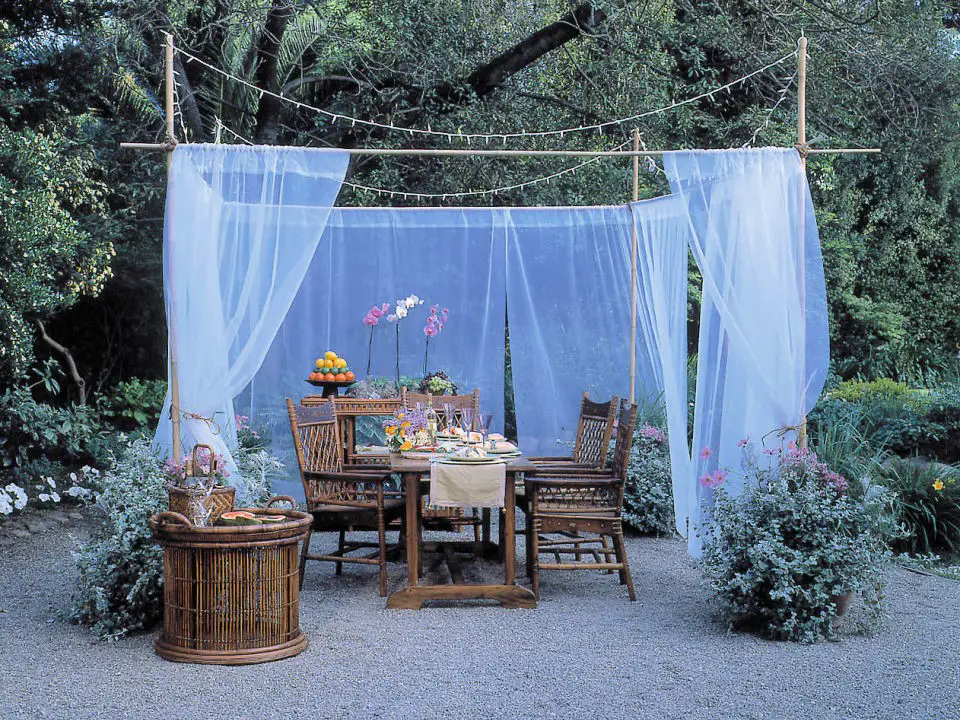
Transform your backyard into an enchanting outdoor dining room with this DIY project. The serene ambiance is achieved by incorporating plant-filled pots at the corners, mosquito netting for a cozy atmosphere, and soft candlelight or twinkling string lights to create a warm glow. This inviting space can be created in just two to three days, requiring approximately $200 worth of materials including PVC pipes, flowerpots, mosquito netting, bamboo poles, and basic tools for assembly. A detailed guide is provided to help you construct the structure and add decorative elements like string lights, allowing you to craft a one-of-a-kind dining setup that exudes elegance and warmth.
Installing Shade Sails in Easy Way
Transform your outdoor living space into a serene oasis by installing DIY shade sails. Perfect for homes bathed in direct sunlight all day, these shade structures provide a comfortable retreat from the sun’s intense rays. By repurposing readily available materials like pressure-treated posts, cement, eye screws, and rope, this project is surprisingly straightforward and budget-friendly.
The simplicity of the installation belies its impressive impact – your patio will be transformed into a cozy haven that still allows for generous natural light to filter in. Whether you’re hosting an alfresco dinner or simply seeking solace with a good book, these shade sails promise to elevate your outdoor experience. As an added bonus, they offer a cost-effective alternative to pergolas, making them an ideal choice for larger patios.
With DIY shade sails, the possibilities are endless – and so is the potential to redefine your patio’s boundaries.
DIY Gazebo Sun Shade
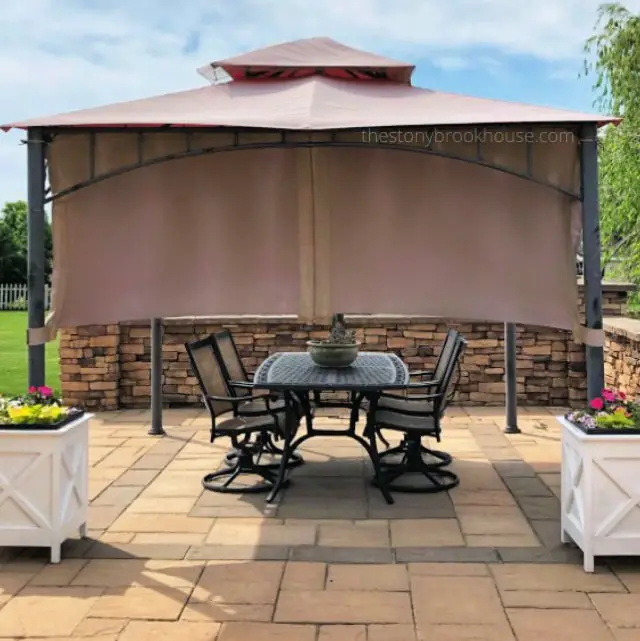
Elevate your patio experience without breaking the bank with these clever cost-effective patio shade ideas. Not only do they provide a welcome respite from the sun’s harsh rays, but also add visual interest to your outdoor space. One innovative solution is to repurpose DIY sunshade curtains for your gazebo, offering an effective way to shield yourself from the sun during dinner or other outdoor activities. The process is surprisingly straightforward: simply measure the area that requires shading, cut the sunshade to size, and attach it to your existing curtains using a sewing technique. This budget-friendly solution won’t set you back much, with each shade priced at just $29.99. What’s more, these shades are incredibly versatile – when not in use, they can be rolled up and tied away, allowing breezes to circulate freely and maintaining a comfortable atmosphere on your patio. And the best part? These curtains have proven their durability over time, remaining effective even after years of use. By implementing this practical DIY upgrade, you’ll be able to enjoy your gazebo in comfort for years to come.
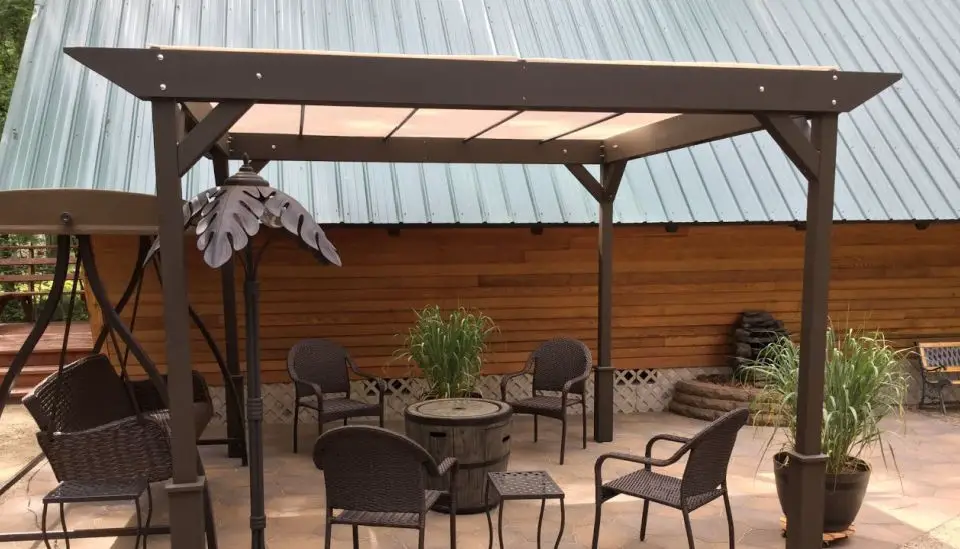
Make Your Own Shade Sails
Transform your outdoor living space with a creative DIY shade sail installation over your platform deck! This hands-on woodworking project revolutionizes your deck’s comfort, enabling you to enjoy the great outdoors for hours on end. With a timeline of just two days, this endeavor is surprisingly effortless. To bring your vision to life, gather these essential materials: shade sails, tape measure, circular saw, speed square, drill and driver, box cutter, and post-hole digger. The innovative approach behind this project lies in its practical solution to excessive sunlight on a deck, utilizing a simple yet effective shade sail setup. As you embark on this woodworking journey, not only will your deck take on a fresh aesthetic appeal, but it will also foster outdoor relaxation and gathering, ultimately elevating the overall backyard experience.
Making Your Own Sun Shade
Transform your outdoor space into a tranquil oasis with a DIY 10×10 pergola that will leave your neighbors green with envy! This budget-friendly masterpiece boasts innovative features like adjustable metal caps, making it a perfect addition to your backyard. Crafted with 10′ 4×4’s, 12′ 1×8’s, and a 10′ electrical conduit, the structure stands 8′ high and stretches 12′ tip-to-tip on two sides, creating an inviting spot for relaxation. The removable sunshade material ensures year-round comfort, whether you’re lounging in the sun or seeking shade from harsh weather conditions. For those looking to elevate their outdoor living area without breaking the bank, this DIY project is a must-try. With a little creativity and some basic materials, you can enjoy shaded comfort for years to come.
How to Make Sunshade Sail
Transform your backyard into an inviting retreat by installing a sunshade sail, a straightforward solution that turns your outdoor space into a cool and tranquil oasis. The process begins with a Diamond Pad Eye installation, which involves strategic drilling and screw placement, ultimately securing the sail with a snap hook for added stability. As you progress, you’ll employ a turnbuckle to fine-tune the distance and maintain proper tension. The addition of a one-way cable kit and rope further enhances stability and durability. With minimal time investment and just a few steps, you can enjoy the sheltered serenity your sunshade sail provides, making it an ideal spot for relaxation.
Best DIY Shade Canopy Under $50
Create an inviting outdoor retreat without breaking the bank by incorporating affordable patio shade ideas. One such concept is a DIY pergola shade canopy, which not only enhances the aesthetic appeal of your outdoor space but also provides a serene escape from the scorching summer sun. This budget-friendly project requires minimal investment, with fabric and lights totaling around $50, making it an excellent value for the ambiance and relaxation it offers. However, to ensure stability in windy conditions and withstand rain showers, careful planning and execution are crucial. When done correctly, this pergola can become the crown jewel of your patio, providing a peaceful oasis or the perfect setting for your next gathering. For inspiration and guidance on how to bring this idea to life, check out the video at https://www.youtube.com/watch?v=Sh3ndVu57Dg&ab_channel=LifeInCalifornia.
Make a Portable Sun Shade
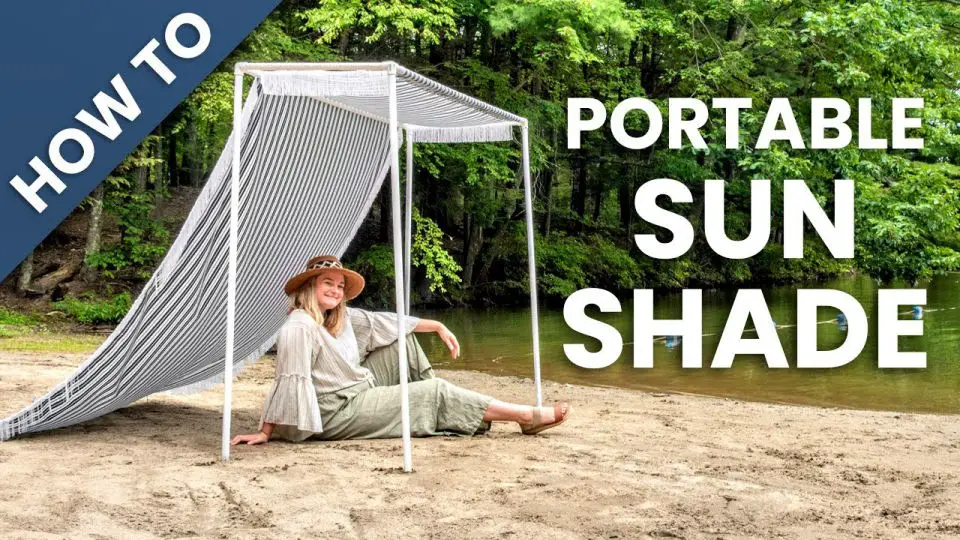
Create a budget-friendly, portable DIY sunshade that provides welcome relief from scorching summer days. With readily available materials like sturdy fabric, two poles, and connectors, you can craft a lightweight, easily transportable sunshade tailored to your specific needs. This versatile solution not only assists with tasks like rooftop HVAC maintenance but also offers a convenient escape during outdoor activities.
The adaptable design allows for customization based on your height or work requirements, making it practical and functional. Additionally, its ability to withstand high winds adds durability to the structure. Utilize old bed sheets or purchase fabric, assemble a frame, and say goodbye to expensive store-bought sunshades. This DIY sunshade is the ultimate heat-beating companion!
Making a Garden Shade Cloth
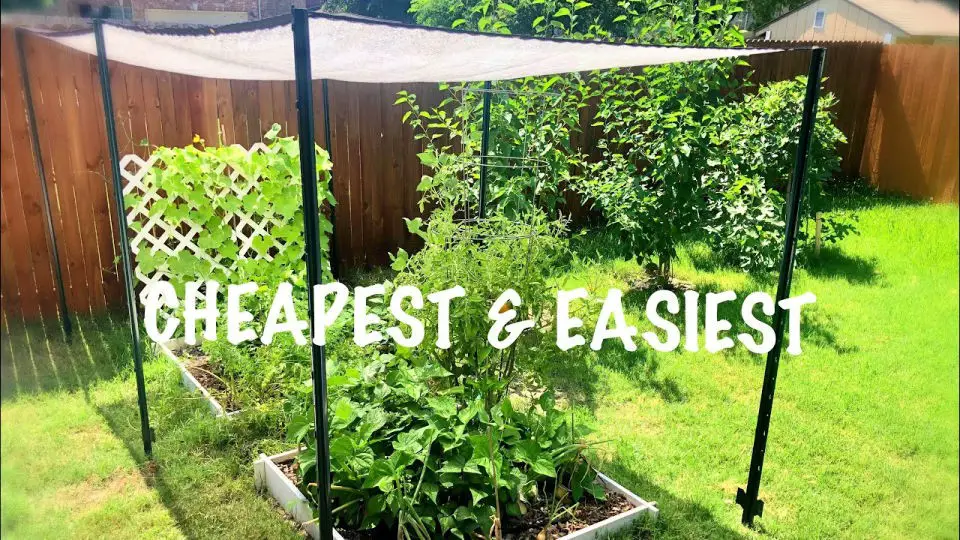
As the mercury rises in your garden, you’re likely looking for ways to mitigate the effects of intense heat. One effective solution is installing a shade cloth, which can make a significant difference in plant survival and comfort. This budget-friendly DIY project involves securing a lightweight fabric using metal rods, creating a canopy that reduces temperatures by up to 15 degrees when it reaches 100°F. The benefits are twofold: not only does the shade cloth protect your plants from scorching sun rays, but it also enhances the overall aesthetic of your garden. With its ease of installation and adaptability to sandy soils and extreme heat conditions, a shade cloth is an excellent addition to any gardening arsenal. By providing this simple yet effective solution, you can rest assured that your plants will continue to thrive even in the most challenging environmental conditions.
How to Hang a Sunshade With Posts
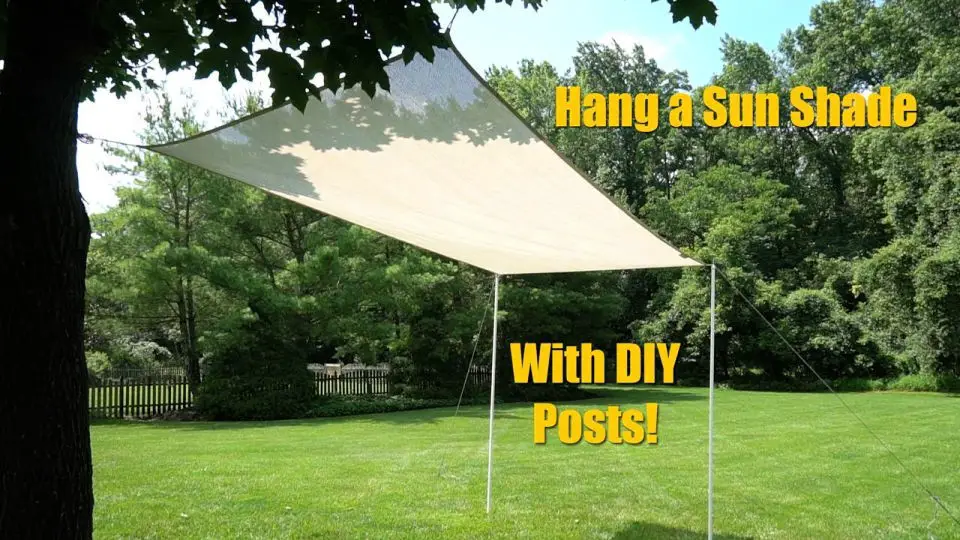
Create a refreshing oasis in your own backyard by crafting a DIY sunshade. This clever project requires minimal tools and materials – primarily 3/4 inch PVC pipe, caps, and full-length thread hex bolts. The key to this easy and fun setup is cutting the PVC pipes into 8-foot lengths for anchoring the shade. A hand saw and drill are all you’ll need to get started.
To avoid any last-minute hiccups, remember to bring your hand saw along when purchasing the PVC pipe – leaving it in a hot car could cause it to bend irreparably. Additionally, ensure the anchor lines are positioned at a 45-degree angle from the shade for optimal support.
For the actual shading component, you can opt for the Coolaroo shade sail or explore alternative options like adjustable tent poles. As with any project involving tools, be sure to exercise caution and consider enlisting professional help if needed. With your new sunshade in place, enjoy the comfort of a cool and shaded backyard on even the warmest summer days.
Simple DIY Shade Sail for Pool
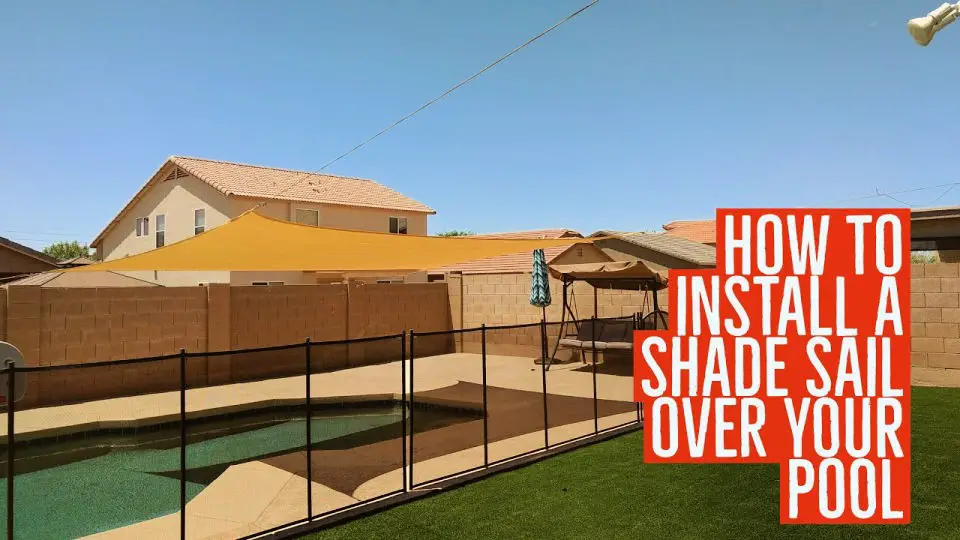
Transform your outdoor pool experience with a DIY shade sail that provides instant relief from the sun’s rays. By following simple instructions to attach the sail to your fence and house, you’ll create a cozy oasis for relaxing and soaking up the fun on those scorching summer days.
To set up this innovative solution, you’ll need a few essential tools and supplies, including a Cool Area rectangle sun shade sail, stainless steel hardware kit, and shade sail rope kit – all designed to offer superior UV protection and durability.
By embracing this creative setup, you’ll not only keep your pool cooler but also make it more inviting for swimming, lounging, and making memories with friends and family. Remember, it’s not just about the swim; it’s about maximizing your outdoor enjoyment while minimizing the harsh effects of the sun. So, let’s harness the power of shade to elevate your pool experience!
Conclusion:
Ultimately, the 25 affordable DIY sun shade concepts presented here provide a practical solution for upgrading your outdoor space without incurring significant expenses. This comprehensive guide covers all aspects of creating a stunning and functional sun shade, including material selection, personal touches, and safety considerations. With this wealth of information, you’re empowered to turn your patio into a serene retreat with the creative application of these budget-friendly ideas.
