Why Choose DIY Streamer Backdrops?
When it comes to adding a pop of personality, color, and flair to your next event, DIY streamer backdrops offer an unbeatable combination of cost-effectiveness, customization, simplicity, versatility, and fun. By taking matters into your own hands, you can create stunning visual effects without breaking the bank or requiring specialized skills. With complete control over colors, patterns, and design, personalization is at your fingertips. The process itself is remarkably straightforward, even for those who aren’t naturally crafty. Plus, with minimal additional supplies needed, this approach is a budget-friendly way to make a lasting impression. Whether you’re looking to match your decor, fit a specific theme, or simply add some festive flair, DIY streamer backdrops are the perfect choice for anyone seeking to elevate their event without overcomplicating things.
How to Make Streamer Backdrop
Crafting a vibrant and cheerful streamer backdrop is an excellent way to add a pop of color to any celebration without exceeding your budget. This DIY project is not only easy on the wallet but also simple to execute, making it perfect for parties, photo booths, or simply giving your decor a dash of fun. With just a few basic materials and some creativity, you can create a stunning streamer backdrop for under $10.
What You’ll Need:
To create a visually appealing and functional streamer display, you’ll need a few essential materials. Start by gathering red, white, and pink (or any color combination that suits your style) streamers. You can also use string or baker’s twine for added texture and stiffness – its ease of use makes it a great choice. To cut the streamers to the desired length, have some scissors on hand. For damage-free hanging, consider using command hooks, which provide a secure and mess-free way to display your streamers.
Step 1: Prepare the String
Before commencing with the backdrop installation, take precise measurements of the area where it will be hung. Cut a piece of string that matches this measurement, allowing for a few extra feet to accommodate any necessary adjustments or knot-tying. It’s more advantageous to have an excess of string than not enough, as you can always trim the excess once the backdrop is in place.
Step 2: Cut and Fold Streamers
When crafting your streamer design, start by determining the ideal hang time. To achieve this, measure from the top of the string to the floor or desired stopping point. Using this measurement as a guide, cut each streamer into pieces that are twice as long. Next, fold each piece in half, effectively doubling the thickness of your streamers and creating a fuller, more vibrant backdrop.
Step 3: Attach Streamers to String
Two straightforward approaches exist for attaching streamers: looping and knotting. The Loop Method involves folding the streamer over the string, then looping the ends through itself before gently pulling tight. It’s essential to avoid tearing the streamer during this process. In contrast, the Knot Method involves tying the streamer onto the string with a basic knot. This method is quicker and less likely to cause tears, although it may not produce the same aesthetic as the looped approach. Regardless of the chosen method, it’s crucial to repeat this step, alternating between colors or following a desired pattern. Be gentle when handling streamers, as they can tear easily.
Step 4: Final Touches
To complete the attachment process, thread the remaining ends of your streamers through small loops and secure them to your command hooks. This will enable effortless hanging. For an added touch of elegance, ensure the loops are neatly tucked away among the streamers or cleverly conceal them with decorative bows for a polished appearance.
Step 5: Hanging Your Backdrop
When setting up your backdrop, begin by securing it to the wall at its intended width using the command hooks provided. Make sure the loops on the end of your hanging string are firmly attached to prevent any accidental slippage. Finally, tweak the spacing of your streamers to achieve a lush and full appearance that perfectly complements your setup.
Customize Your Backdrop
One of the most captivating aspects of this DIY project lies in its capacity for customization. Without restrictions, you’re free to explore an array of creative possibilities – from experimenting with different hues and lengths to crafting unique patterns that perfectly align with your event’s motif. The scope for personalization is truly vast, allowing you to imbue your backdrop with a personalized touch that reflects your vision and creativity.
Video Tutorial
To take your streaming setup to the next level, I’ve created a comprehensive video tutorial that breaks down the process of making a streamer backdrop into manageable steps. This visual companion piece to my written guide simplifies complex techniques, making it easier for you to understand and execute. The DIY project itself strikes an ideal balance between simplicity, affordability, and creativity, allowing you to create a unique and captivating space whether you’re decorating for a special occasion or just looking to add some personality to your environment.
FAQs on DIY Streamer Backdrop
Enliven any event with a vibrant and playful DIY streamer backdrop. To guide you in creating a one-of-a-kind design, here’s a comprehensive breakdown of the process.
What materials do I need for a DIY streamer backdrop?
To create an eye-catching backdrop for your stream, you’ll need to gather the following essential materials. Firstly, acquire a variety of streamers in the colours that match your brand’s aesthetic or the theme of your stream. Next, procure some string or baker’s twine, which will serve as the foundation for your backdrop’s structure. Additionally, make sure you have a pair of scissors on hand to trim and shape your streamers to perfection. Furthermore, command hooks are crucial for securely hanging your backdrop without causing any damage to your walls. With these supplies at the ready, you’ll be well-equipped to craft a visually appealing and professional-looking backdrop that will elevate your streaming experience.
How do I choose the right colors for my streamer backdrop?
When designing your event’s decor, consider the theme and color scheme as a starting point. To create a cohesive atmosphere, choose streamers that harmonize with your decorations, invitations, or overall aesthetic. Feel free to experiment with different hues and combinations to add depth and visual interest. By matching your streamers to your event’s underlying theme, you’ll achieve a polished and thoughtful presentation that enhances the overall experience.
Can I make a streamer backdrop if I’m not crafty?
One of the most attractive aspects of streamer backdrops is their ease of use. By leveraging basic materials and uncomplicated guidance, even those without extensive crafting backgrounds can create breathtakingly simple yet effective backdrops.
How do I hang my streamer backdrop without damaging the wall?
When it comes to setting up streamer backdrops without causing any harm to your walls or command strips, using command hooks is an excellent solution. To ensure a seamless experience, be certain to carefully follow the manufacturer’s guidelines for installation and removal of these adhesive-free hanging solutions.
How can I make my streamer backdrop look fuller?
For a more voluminous appearance, consider implementing these techniques: By doubling up the streamers, you can fold them before attaching them to the main string. This will create a denser look that adds depth. To further enhance the illusion of fullness, try reducing the space between each streamer when tying them together. Another method for achieving a fuller appearance is to use multiple layers of string and hang them closely together. By layering these elements, you can create a lush, textured look that draws the eye in.
Can I reuse my DIY streamer backdrop?
When it’s time to pack away your decorations, start by gently removing any loose items like backdrops and streamers that aren’t secured with glue or other permanent fasteners. Roll these up carefully to prevent creases and damage, then store them in a dry, protected area where they’ll remain undisturbed until next year’s celebration.
How long does it take to make a streamer backdrop?
While the timeframe for creating a custom streamer backdrop may fluctuate depending on the complexity of your design and the size of the backdrop itself, it’s possible to craft a simple yet effective backdrop within a relatively short period – roughly an hour or two, making it a convenient option for last-minute decorating needs.
How can I customize my streamer backdrop for different events?
When it comes to elevating the ambiance of themed events or personal gatherings, getting creative with decorations can make all the difference. One simple yet effective approach is to experiment with different colors and patterns, adding lights, flowers, or other decorative elements to create a unique atmosphere. For an added touch, try making shapes or letters with streamers to convey personalized messages or add a playful flair. The possibilities are endless, allowing you to express your creativity and bring your vision to life. By embracing DIY projects like crafting a streamer backdrop, you can create a beautiful decoration that not only impresses your guests but also reflects your personal style. With these ideas in mind, you’re well on your way to designing a celebration that’s truly unforgettable.
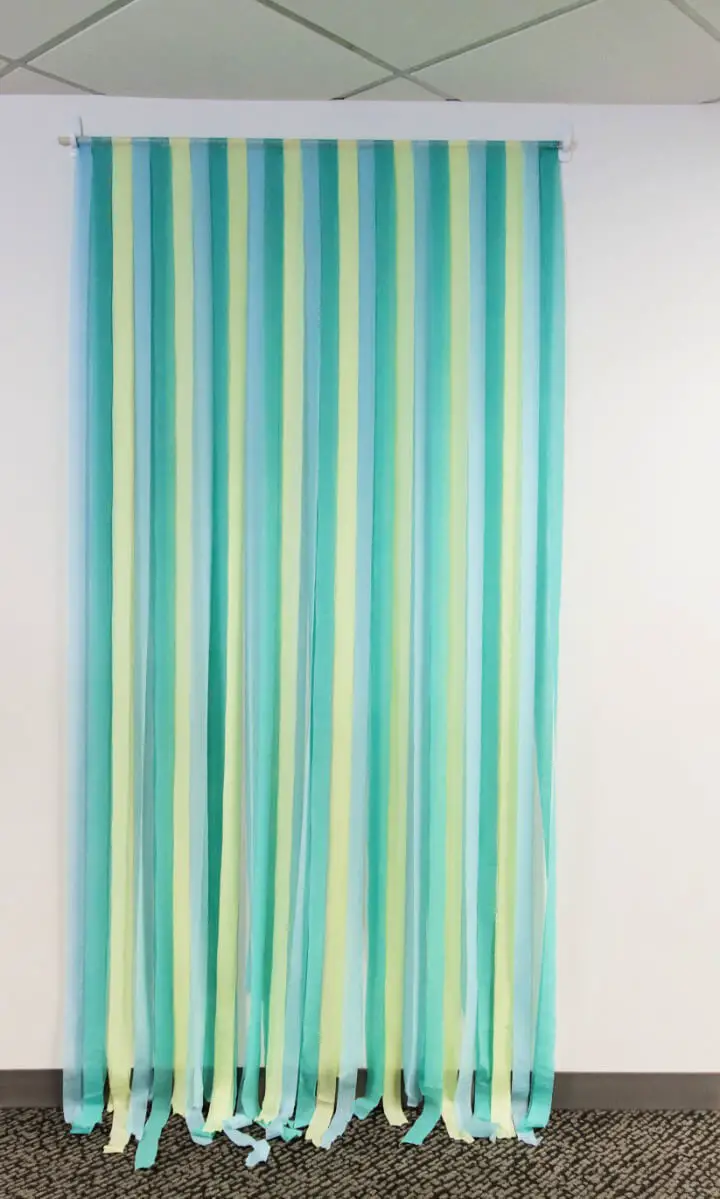
10 DIY Streamer Backdrop Ideas (How to Hang Streamers)
Unleash your creativity with these innovative DIY streamer backdrop ideas, ideal for elevating parties, events, and photography shoots. Our comprehensive guide will walk you through the process of crafting stunning streamer installations that will leave a lasting impression.
DIY Streamer Backdrop from 99 Cent Streamers
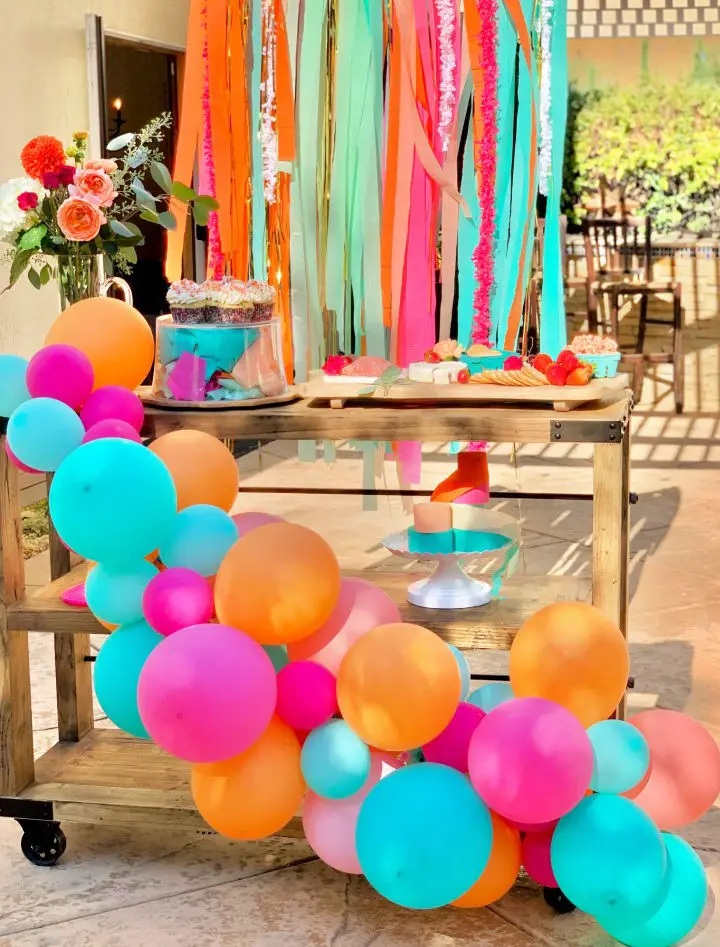
Transform dull spaces into lively party settings with Pop of Gold’s DIY streamer backdrop guide. Perfect for summer pool parties, this project combines 99-cent streamers in a rainbow of colors with metallic accents and tissue fringe for added depth. The comprehensive guide includes a list of materials and step-by-step instructions to create a textured, dazzling backdrop that’s both budget-friendly and easy to execute. From securing the base twine to achieving a layered look through varying streamer lengths, this tutorial guarantees a visually stunning result that will elevate any party atmosphere.
How to Make a Streamer Backdrop
Transform your events with a unique, handmade streamer backdrop that will leave a lasting impression! With the guidance of Megan Picazo Events, you can easily create a visually stunning piece using readily available materials like scissors, tape measure, plastic tablecloths, and fencing. This DIY project is perfect for any occasion, allowing you to customize your event with a personalized touch.
Discover expert tips on how to seamlessly cover fencing visibility and optimize your streamer cutting process with Megan’s step-by-step instructions. By incorporating this creative element into your next event, you’ll elevate the overall atmosphere and create unforgettable memories. Get inspired and start crafting your own masterpiece by visiting Megan Picazo Events!
How to Build a Fiesta Backdrop
Transform your party into a vibrant celebration with Riles & Bash’s Fiesta Backdrop. To create this show-stopping decoration, start by crafting a foundation of colorful streamers, then build upon it with lush crepe paper flowers in varying sizes to add depth and visual interest. Finish the look with ruffled streamers for a dynamic texture that adds movement to your backdrop. This DIY guide is perfect for any celebration, from birthdays to holidays, and will leave your guests in awe of your creativity and attention to detail.
DIY Streamer Backdrop & Boho Party
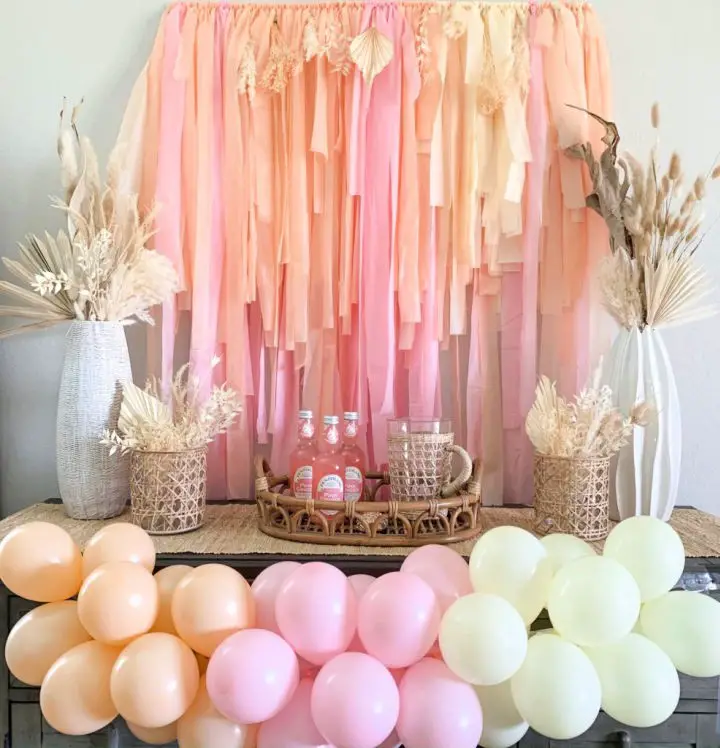
Transform your party space with an effortless yet show-stopping DIY project inspired by Lauren’s Oh How Charming guide to creating a captivating boho-chic streamer backdrop. This easy-to-execute, budget-friendly endeavor requires just three essential materials: scissors, plastic tablecloths, and fencing. To elevate the look, incorporate dried floral accents for a touch of whimsy. With this straightforward DIY, you can effortlessly convert any room into a cozy, laid-back oasis perfect for memorable gatherings, all without breaking the bank.
Homemade Streamer Photo Backdrop
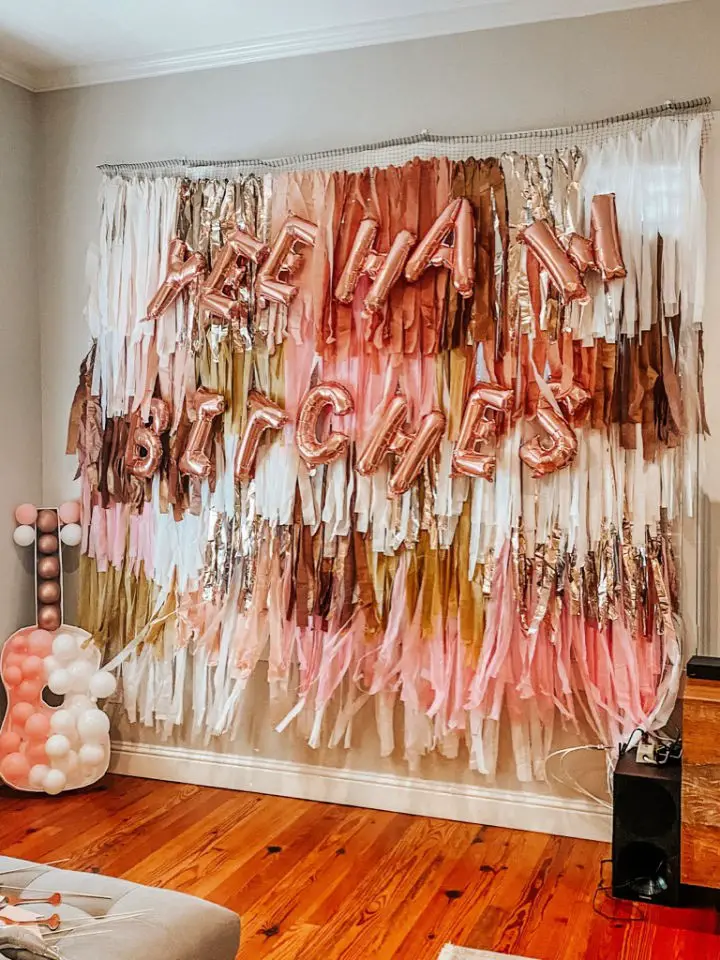
Transform your bachelorette party with an unforgettable DIY Streamer Photo Booth Backdrop, boasting a unique blend of elegance and creativity. Start by collecting a medley of colorful plastic tablecloths, metallic accents to add some flair, and basic crafting tools like scissors and push pins. Drawing from personal experience, I’ve learned that using sturdy tablecloths as the base is crucial, while generous streamer cuts create a lush appearance. To make attachment a breeze, utilize a plastic grid netting, resulting in a vibrant, voluminous effect that’s sure to impress. This show-stopping backdrop effortlessly becomes the focal point of your party photos and its lightweight design ensures seamless transportation and setup. For a comprehensive guide filled with insider tips, visit TaylorMae’d Designs for a stress-free project that will undoubtedly be the highlight of your celebration.
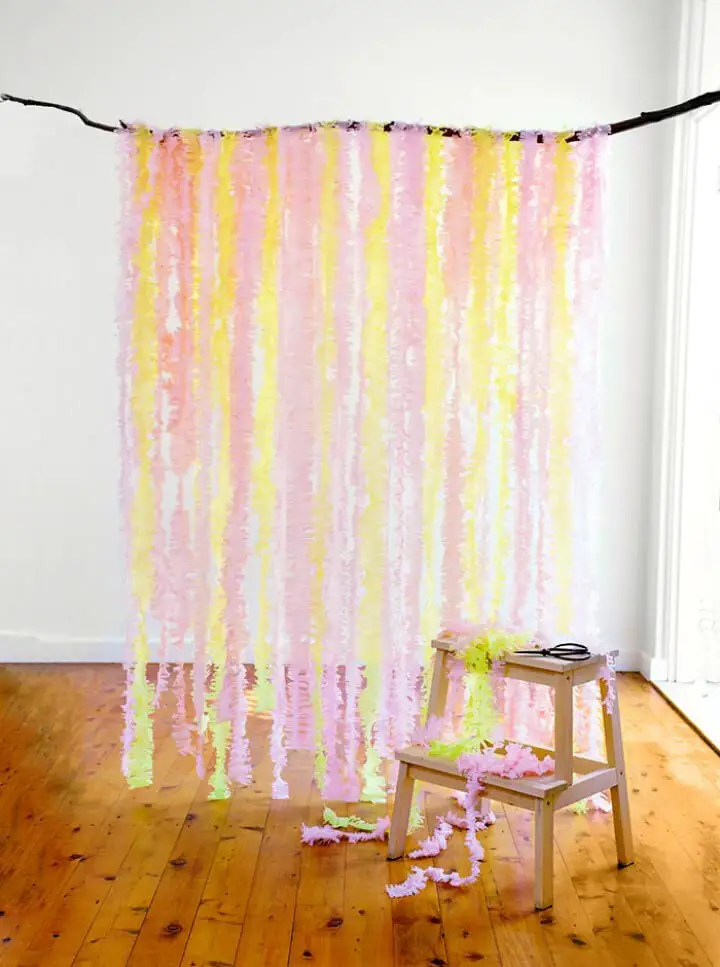
Crepe Paper Streamer Backdrop Design

Transform your celebration with a vibrant crepe paper streamer backdrop that’s as effortless to create as it is captivating. This DIY project is an excellent way to add a burst of color and whimsy to any event, all while being budget-friendly. Whether you’re hosting a unicorn-themed party or any other festive gathering, this beautiful backdrop will surely delight your guests. Simply gather some crepe paper, a dowel, and a few basic household supplies, then follow the easy-to-follow steps outlined at A Visual Merriment to create an enchanting setting that’s sure to leave lasting memories.
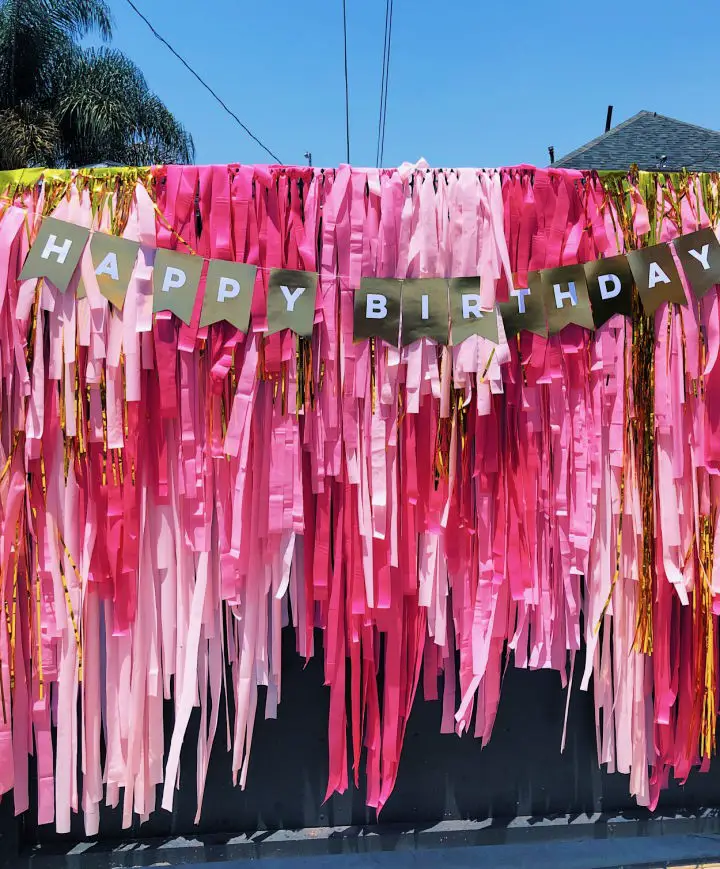
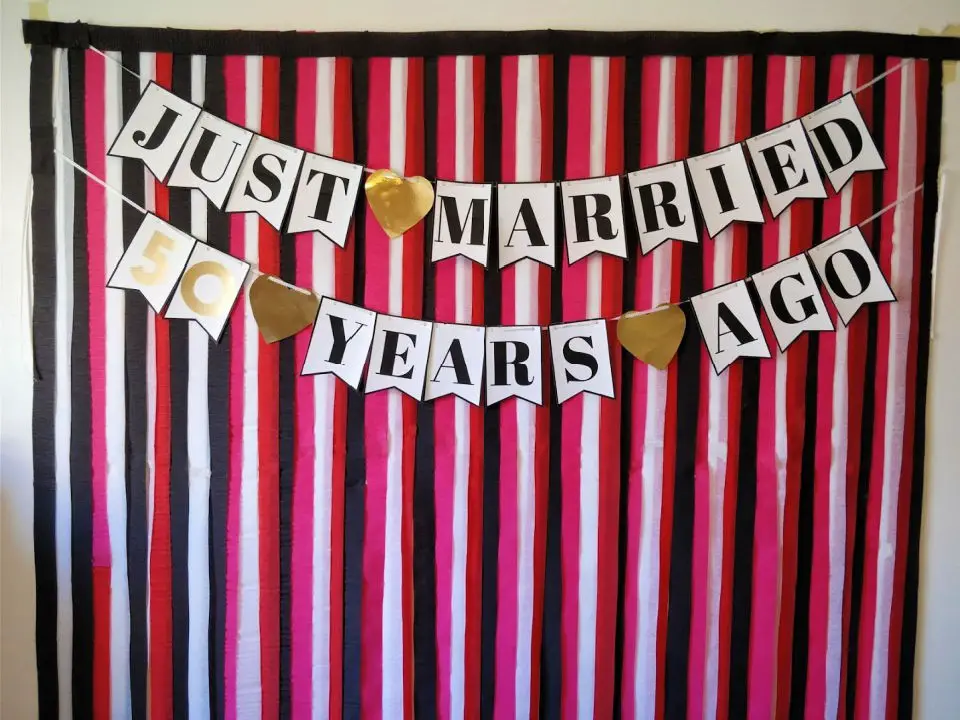
How to Make Party Streamers
Transform your celebration’s visual narrative by crafting a vibrant DIY photo backdrop using party streamers! This clever solution is ideal for weddings or any occasion, allowing you to infuse your event with creativity and whimsy. By following our straightforward guide on WeddingWire, you’ll be able to create a one-of-a-kind setting that will leave a lasting impression on your guests. Simply gather some essential materials – party streamers, tape, and a backdrop hanger – and get ready to make your special day even more unforgettable. With this easy DIY project, personalization has never been easier or more fun!
Make a Streamer Backdrop for A Photobooth
Transform your party atmosphere with a bold DIY streamer backdrop, perfect for capturing unforgettable photobooth memories. This thrifty project lets you tailor it to any theme – from birthday bashes to graduation celebrations and beyond – using customizable colors that perfectly match your event’s style. And the best part? It’s surprisingly easy to create, requiring only paper party steamers and a dash of creativity. For an extra special touch, be sure to check out the free printable banners waiting for you at the end of this tutorial. Get ready to set the stage for an unforgettable experience by diving into the full DIY guide here at Feeling Nifty!
Wedding Streamer Backdrop Ideas
Transform the ambiance of your wedding celebration by creating a show-stopping DIY streamer backdrop. This charming and effortless decoration is perfect for adding a pop of color and whimsy to any area of your special day. Whether you’re looking to elevate the ceremony space, sweeten up the dessert station, or create a memorable photo booth background, this project requires only a few basic materials: crepe paper, scissors, and pins. By following our simple, step-by-step guide, you’ll be able to craft an enchanting streamer garland that will leave your guests in awe. For more inspiration and guidance, visit Modern Wedding for the inside scoop.
DIY Rainbow Streamer Curtains
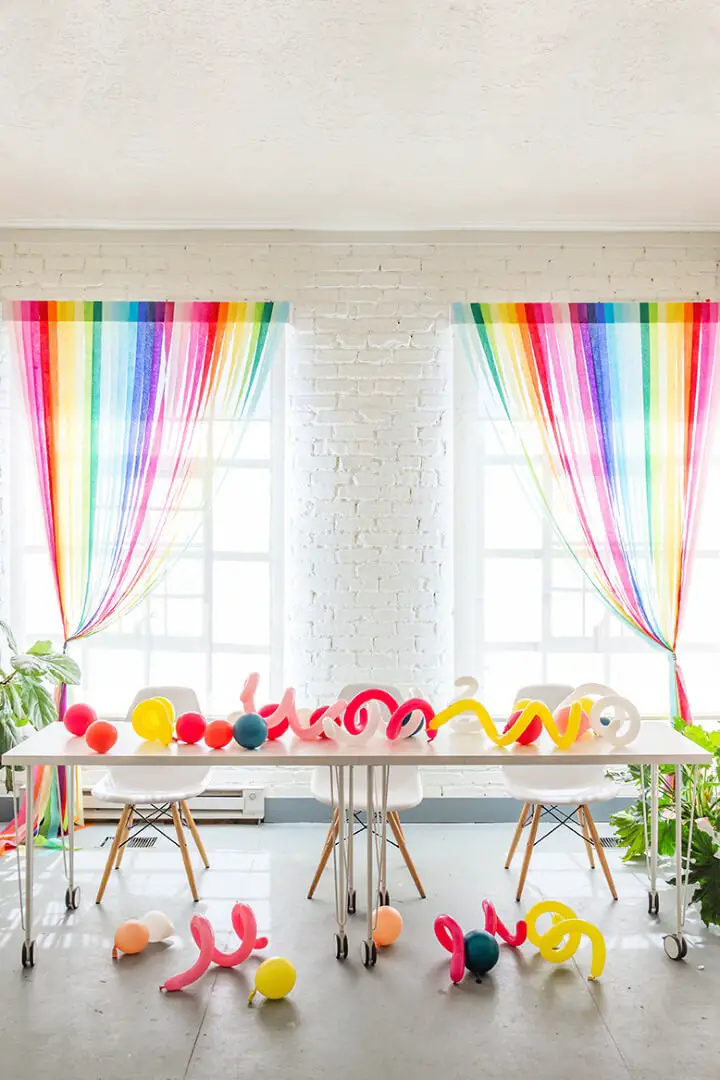
Breathe new life into your space with the vibrant and playful DIY rainbow streamer curtains. Ditch those dull, outdated drapes of yesteryear and bring in a fresh, lively alternative that’s as much fun to create as it is to admire. By leveraging colorful crepe paper streamers, this project not only won’t break the bank but also couldn’t be simpler to execute. Whether you’re looking to brighten up a gloomy day or add a pop of color to your room year-round, these joyful curtains are sure to bring a smile to anyone’s face. And if you need guidance on how to get started, The House That Lars Built has got you covered with easy-to-follow step-by-step instructions.
Conclusion:
Mastering the art of creating a DIY streamer backdrop offers a unique blend of creative expression and practical application. As you navigate the process from selecting colors to hanging your finished product, you’ll find that this simple yet effective guide empowers you to transform any space into an extraordinary setting for special occasions or everyday enjoyment. With the ability to tailor your design to specific events or themes, this DIY project is remarkably adaptable. Whether you’re planning a party, a photo shoot, or simply seeking to elevate your environment, these 10 DIY streamer backdrop ideas serve as a comprehensive resource for crafting an eye-catching feature that’s sure to leave a lasting impression.
