Why Make DIY Stepping Stones?
Crafting DIY stepping stones offers an unparalleled combination of self-expression, practicality, and creative fulfillment for outdoor enthusiasts. This hands-on project not only yields functional pathways but also fosters a deeper connection to your garden’s unique character.
Through the process of designing and creating these stepping stones, you’ll unleash your creativity by embedding colorful tiles, imprinted leaves, or mosaic designs. Each stone becomes a reflection of your personal style, allowing for endless experimentation and artistic expression.
Furthermore, DIY stepping stones provide an excellent opportunity to bond with family members over shared creative pursuits. Children delight in watching their creations become a permanent fixture in the garden, serving as a testament to the joy of collaboration and shared creativity.
In addition to its creative benefits, this project also offers a budget-friendly alternative to purchasing premade stepping stones. Most materials can be sourced from home or local hardware stores at an affordable cost.
DIY stepping stones also promote eco-friendliness by repurposing broken dishes, leftover tiles, or beach glass, reducing waste and minimizing the environmental impact of your creative endeavors.
As a personalized touch to your outdoor spaces, custom stepping stones tell stories, commemorate special occasions, or simply add pops of color to green spaces. They also provide enhanced accessibility through protected pathways that safeguard your lawn from foot traffic and facilitate effortless navigation through your garden.
How to Make Your Own DIY Stepping Stones Quickly and Easily
Transform your outdoor space with a unique DIY project that combines creativity with durability. By crafting your own stepping stones, you can add a personalized touch to your garden or walkway. This fun and easy endeavor allows for limitless creative expression while yielding a weather-resistant decoration that will withstand the elements. Building upon Marvelous Miriam’s comprehensive YouTube tutorial, we’ll guide you through the process of creating stunning stepping stones that reflect your personal style.
Materials Needed:
When it comes to conducting experiments, having the right tools is crucial. A few essential items that should be in your arsenal include quick-setting concrete, a mesh wire for reinforcement, wire cutters for trimming excess material, and a tin foil pie plate for containment. For mixing and drilling tasks, you’ll need attachments specifically designed for those purposes. Of course, no experiment would be complete without water – a vital component for many chemical reactions. Additionally, having some rocks and marbles on hand can provide a fun and engaging way to demonstrate concepts like buoyancy or gravity. And, if you’re working with potentially hazardous materials, consider donning gloves (optional but recommended for added protection)
Step-by-Step Guide:
To create your stepping stones, start by preparing the concrete mixture. Pour the quick concrete mix into a large bucket and gradually add water while stirring continuously to avoid lumps. Aim for a thick batter-like texture. A drill with a mixing attachment can simplify this process.Next, cut a piece of mesh wire to fit inside the tin foil pie plate using wire cutters. Wear gloves to protect your hands from sharp edges. Bend and tuck the wire edges to ensure a snug fit within the plate. The wire mesh prevents cracking and allows the concrete to settle properly.Assemble the stepping stones by laying the pie plate flat and filling it with the concrete mixture, covering about one-third of the plate. Place the cut wire mesh on top of this layer, then cover the mesh with more concrete until it’s fully concealed.Now, get creative and decorate your stepping stone with rocks and marbles! Design any pattern you like – arrange green marbles in the center to mimic a flower, use black rocks to form lines around it, and fill in gaps with different colored rocks for a vibrant design.Finally, allow your stepping stone to dry in a safe, dry place for 24 to 48 hours. It’s crucial to ensure the concrete fully sets before moving or using the stone.
Video Tutorial
By combining a visual guide with written instructions, this project becomes even more accessible and enjoyable. The DIY Stepping Stones video tutorial provides an engaging way to see the creative process in action, while the following written guide offers a detailed overview of each step. With these simple yet effective steps, you can create unique and durable decorations that reflect your personal style and add character to your outdoor space. Whether you’re looking to enhance a garden or walkway, making DIY stepping stones is an excellent way to add a touch of personality and creativity.
DIY Stepping Stones FAQs
Enhancing your outdoor space with a personalized touch can be achieved by creating one-of-a-kind DIY stepping stones. To embark on this creative journey, let’s address the most frequently inquired about aspects of this project.
What materials do I need to make DIY stepping stones?
To create your mini-garden, you’ll need the following basic materials: A mix of quick-setting concrete will provide a sturdy foundation. You’ll also require a mold to shape your design – think outside the box and get creative with items like tin foil pie plates or plastic containers. Water will be essential for mixing and blending the concrete. Add some visual interest with decoration items such as pebbles, tiles, glass beads, or marbles. For added reinforcement, you can incorporate mesh wire into your design. Don’t forget to protect yourself with a pair of gloves while working with the materials.
How do I mix concrete for stepping stones?
Combine the quick-setting concrete mix in a large bucket. As you pour the mixture, introduce small increments of water while simultaneously stirring the concoction to prevent lumps from forming. Target a viscosity similar to that of thick batter. To simplify the process and ensure a smooth consistency, consider employing a drill equipped with a mixing attachment.
Can I make stepping stones with kids?
Supervising children as they create stepping stones with their families can be an enjoyable and creative experience. While mixing concrete and handling decorative materials, it’s essential to ensure young ones are properly supervised to avoid any potential hazards. This collaborative activity allows kids to express themselves artistically and contribute to the overall aesthetic of your garden’s design.
How long does it take for stepping stones to dry?
When it comes to stepping stones, it’s essential to allow them sufficient time to properly cure. On average, they require 24 to 48 hours to dry completely. During this period, make sure they’re stored in a safe and dry environment to prevent any damage or contamination. Once the concrete has fully set, you can then move or utilize the stones without compromising their integrity.
Can I use natural items to decorate my stepping stones?
As you pour your creativity into the concrete, consider incorporating natural elements like leaves, small branches, and stones to create intricate, organic designs. Simply press these materials into the wet surface, allowing their unique textures and forms to leave lasting imprints. Just keep in mind that organic matter is subject to decay, leaving behind subtle reminders of its former presence.
Is it possible to make stepping stones without concrete?
While it’s true that other options exist, such as blending sand and cement minus gravel or employing plaster for interior decorative purposes like stepping stones, when it comes to ensuring longevity – particularly in outdoor settings – concrete remains the top choice due to its inherent durability.
How do I prevent my stepping stones from cracking?
To successfully create and maintain stepping stones that withstand the test of time, it’s crucial to pay attention to several key factors during their creation and installation. Firstly, make sure the mixture you’re using isn’t too watery, as this can lead to a weakened structure. One effective way to add strength is by incorporating mesh wire within the stone. Additionally, proper curing techniques are essential – avoid rapid drying methods that can cause the stones to crack or become brittle. Finally, ensure the stepping stones are placed on a level surface in your garden to prevent uneven pressure and potential damage. By following these guidelines, you’ll be able to create beautiful and durable stepping stones that will remain a staple in your outdoor space for years to come.
Can stepping stones be used in areas with heavy rain?
While concrete stepping stones are renowned for their durability, it’s crucial to ensure they’re adequately sealed to prevent water damage and erosion caused by heavy rainfall. This simple step can significantly extend the lifespan of your decorative pathway.
How can I make my stepping stones glow in the dark?
Combine glow-in-the-dark powder with your concrete mix or employ glow-in-the-dark paint to adorn the stones, allowing them to charge during the day and radiate a magical ambiance at night. As you follow these guidelines and FAQs, you’ll effortlessly create stunning, long-lasting DIY stepping stones that will elevate your garden or outdoor area.
30 DIY Stepping Stones (Make Garden Stepping Stones)
Elevate your outdoor living spaces by creating stunning garden pathways using just 30 simple yet effective DIY stepping stone designs. Whether you’re a seasoned gardener or a novice, this array of creative and budget-friendly ideas will inspire you to transform your backyard oasis.
DIY Garden Stepping Stones
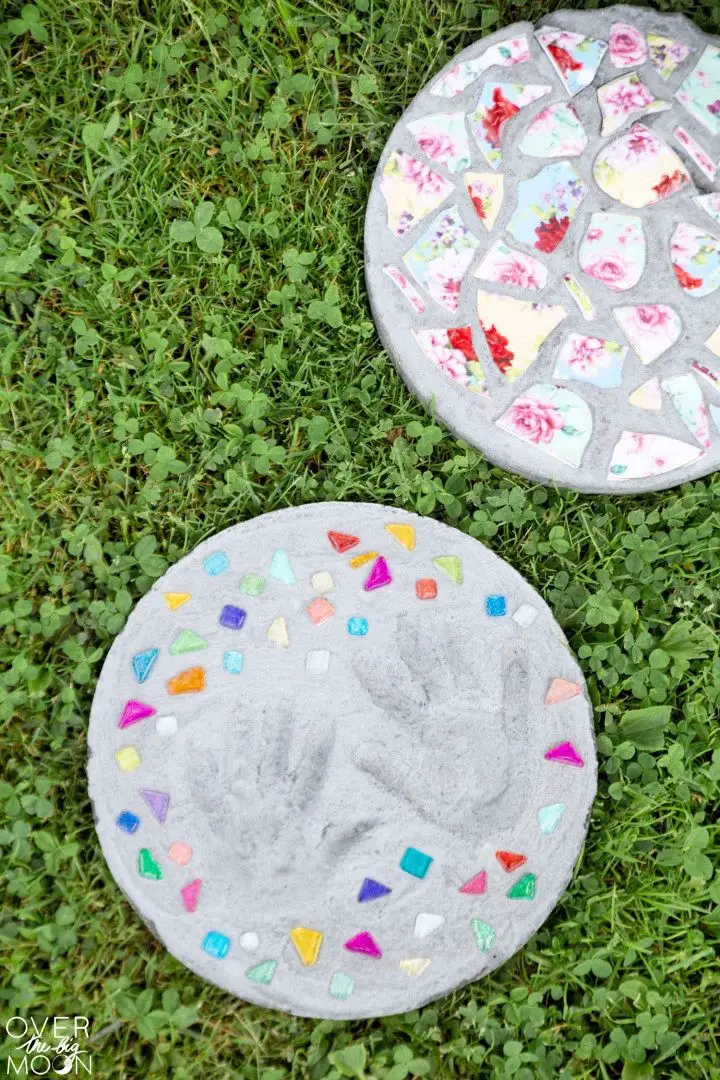
Transforming your outdoor space with Over The Big Moon’s DIY garden stone tutorial is an excellent way to add a personal touch to your garden. This comprehensive guide provides detailed instructions on how to create unique, handcrafted stones using a variety of materials, including broken china, gems, and more.
The tutorial focuses on simplicity, making it accessible to crafters of all levels. With step-by-step guidance, you’ll learn how to mix and pour the perfect mortar, safely break china into artistic pieces, and embed objects for a truly one-of-a-kind look. The informative content is designed to ensure a seamless crafting experience, while the optimized approach caters to both search engines and craft enthusiasts eager to beautify their gardens.
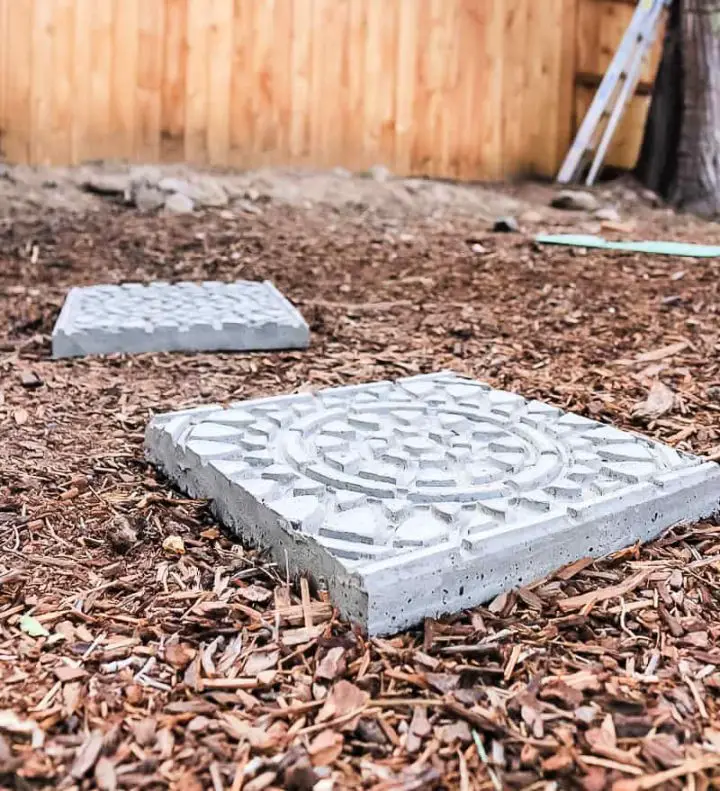
How to Make Embossed Stepping Stones
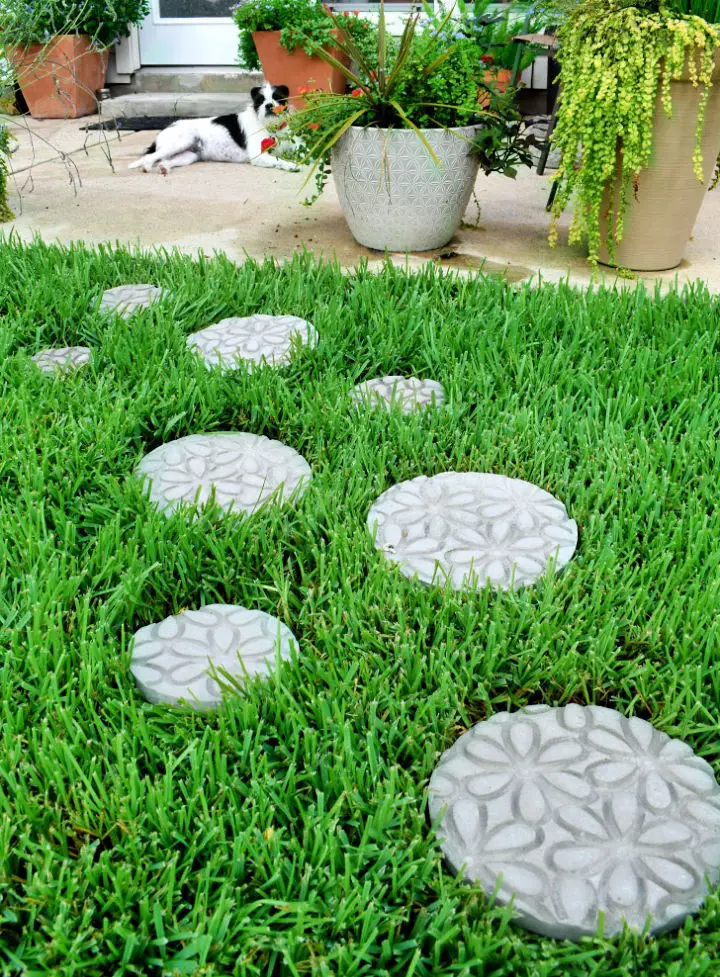
Embark on a creative journey to craft your own personalized embossed stepping stones with our comprehensive guide from Dream a Little Bigger. This engaging DIY project allows you to add a unique touch to your garden paths, making it an excellent way to elevate the ambiance of your outdoor space.
To get started, you’ll need a few essential supplies, including a rubber doormat for intricate designs and sand/topping mix for added durability. With our step-by-step instructions, you’ll learn how to mold, emboss, and cure your creations, resulting in beautifully finished stepping stones that will leave a lasting impression.
What sets this project apart is its simplicity, making it accessible to home gardeners of all skill levels. Our detailed guide ensures a satisfying outcome, allowing you to enjoy the fruits of your labor as you stroll along your newly enhanced pathway.
Faux Grass Decorative Stepping Stones
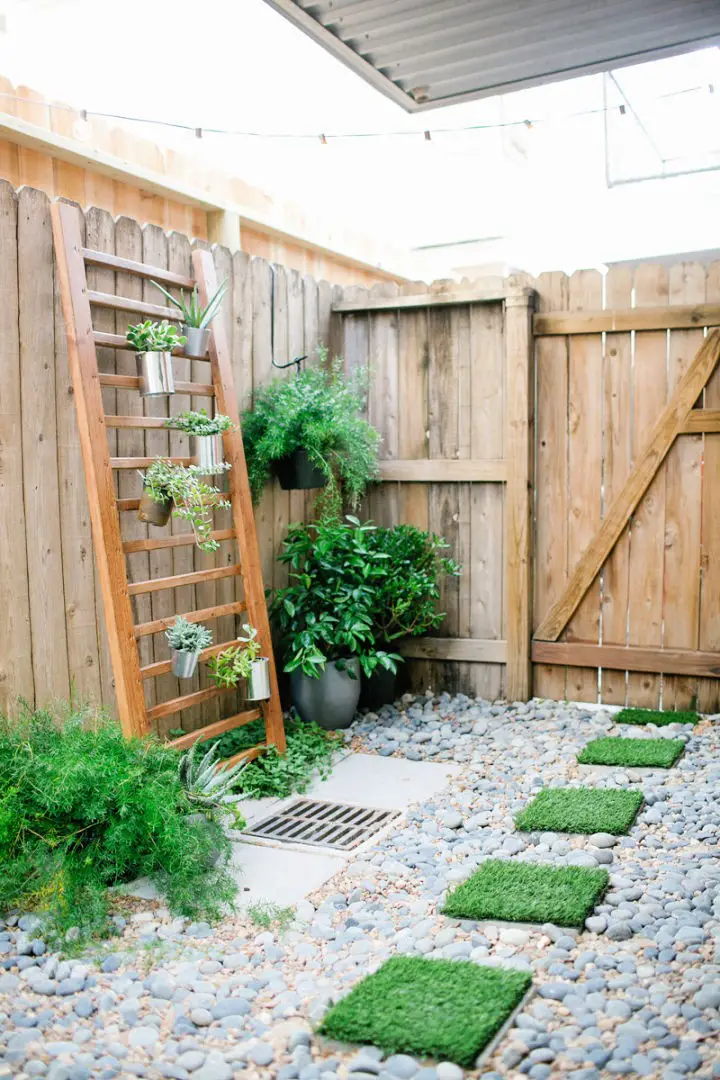
Transform your patio into an oasis by incorporating zero-maintenance greenery that adds charm without the upkeep hassles. Sugar & Cloth’s DIY faux grass decorative stepping stones guide offers a creative solution to bring a touch of elegance to your outdoor space. This tutorial will walk you through crafting your own unique garden stones using faux grass and concrete pavers, complete with simple steps for assembly and expert tips for long-lasting results. Perfect for those who want to enhance their outdoor decor without the burden of lawn care, these stepping stones promise to deliver both durability and style. So, gather your materials and let’s infuse your garden with a pop of evergreen sophistication! By following this easy guide, you’ll be able to create a beautiful focal point that will draw attention without requiring constant maintenance.
DIY Terrazzo Stepping Stones
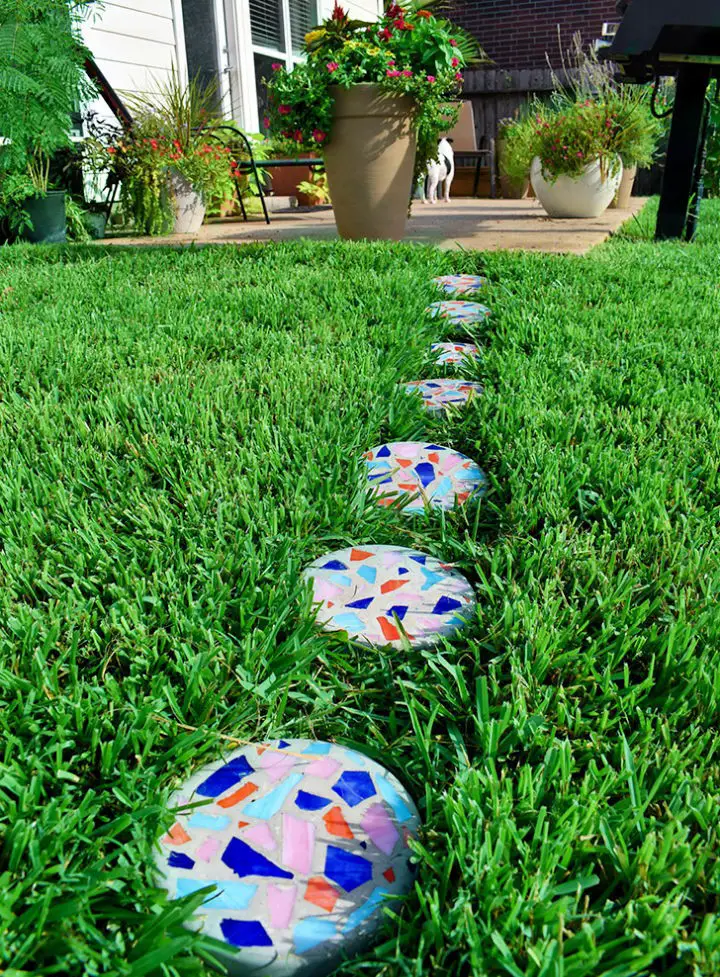
Transform your outdoor space with vibrant, handmade terrazzo stepping stones that reflect your personal style. With minimal supplies like sand, stained glass, and basic tools, Allison Murray of Dream a Little Bigger shares a simple yet creative DIY project to add an artistic touch to your garden. This fun and easy-to-follow guide is perfect for a relaxing weekend activity, yielding stunning results that will elevate the beauty of your garden path.
Making Garden Stepping Stones
Transforming ordinary outdoor spaces into extraordinary ones just got a whole lot more fun! By crafting unique stepping stones using everyday household items as embellishments, you can add a personal touch to your garden or any other outdoor area. The beauty of this project lies in its simplicity and versatility, making it an ideal activity for people of all ages. Whether you’re looking for a family bonding experience or a creative outlet with friends, crafting stepping stones is an excellent way to spend quality time together. Simply gather materials like sea glass, beads, or glitter, and let your imagination run wild! Just remember to take some precautions – avoid washing mortar down the sink and consider wearing gloves if you have sensitive skin. With these tips in mind, dive into this hands-on project and create your own mosaic masterpieces that will surely be the talk of the town.
Handmade Pebble Mosaic Stepping Stones
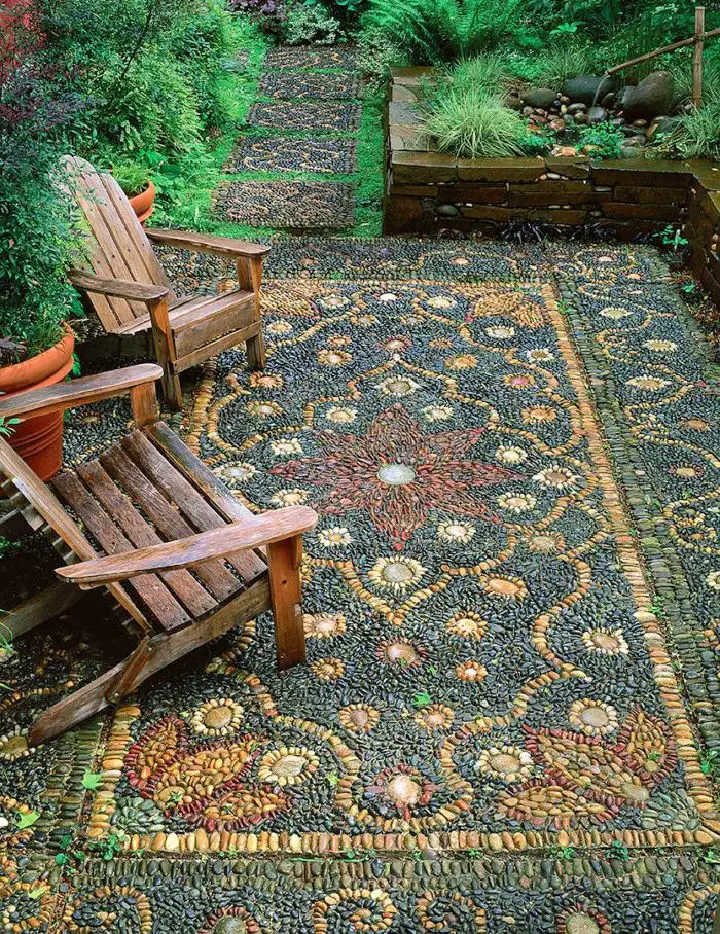
Transform your outdoor space into a masterpiece of pebble art using the expertise of FineGardening. This comprehensive guide will walk you through the process of creating breathtaking mosaics, from carefully selecting stones to mixing and applying mortar. With a focus on preparation and technique, you’ll be able to craft enduring patios, pathways, and decorative features that will leave a lasting impression on all who visit. Whether you’re looking to add a personal touch with a custom stepping stone or tackle a larger patio project, this instructive resource is designed to help you achieve stunning results.
Constructing NES Stepping Stones
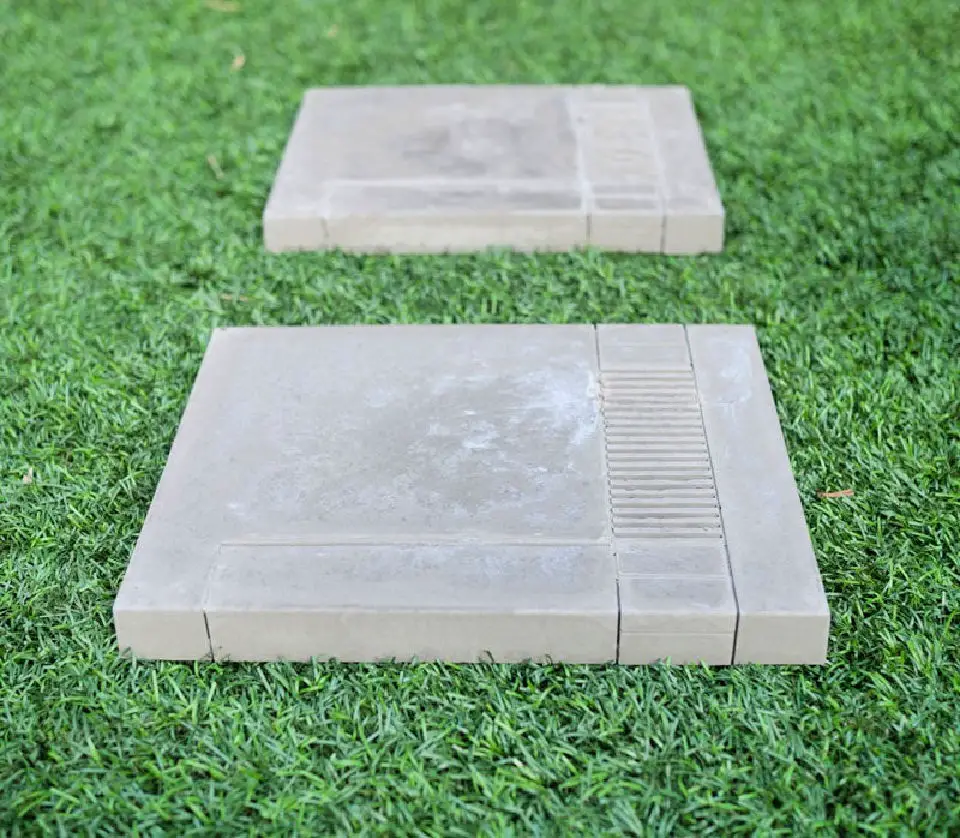
Revive the nostalgia of classic gaming by transforming your old Nintendo Entertainment System (NES) into unique stepping stones for your garden. This creative project combines DIY expertise with a love for retro gaming, breathing new life into outdated hardware. Perfect for gamers and crafty individuals, this tutorial provides clear instructions on how to upcycle your cherished NES console into decorative stepping stones that pay homage to the iconic 8-bit era. With each step carefully detailed, you’ll find this project both enjoyable and fulfilling as it infuses your outdoor space with a retro flair.
Colorful DIY Stepping Stones
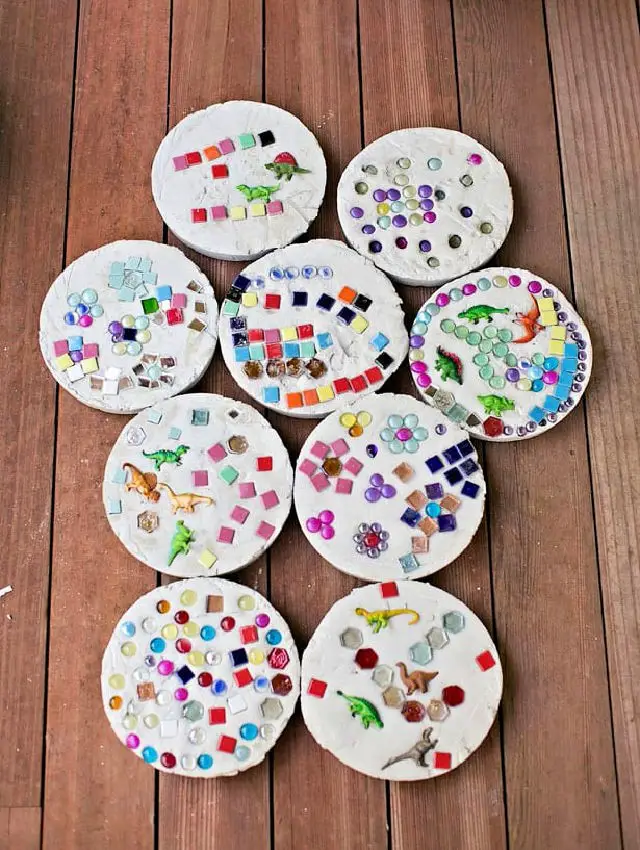
Transform your garden path into an enchanting journey with a DIY stepping stone project that’s equally delightful for kids and adults alike. This hands-on activity, guided by Hello, Wonderful, empowers you to create colorful, customized stones using quick-drying concrete, circular molds, and a medley of tiles, pebbles, and playful objects. Start by envisioning your design, then mix the cement and watch as your one-of-a-kind garden stones take shape. This engaging project not only elevates your outdoor space but also serves as an excellent way to involve the entire family in a creative adventure. With straightforward instructions, your homemade stepping stones will be ready for use within a day, infusing your yard with a personal touch that’s sure to delight.
DIY Sea Glass Stepping Stone
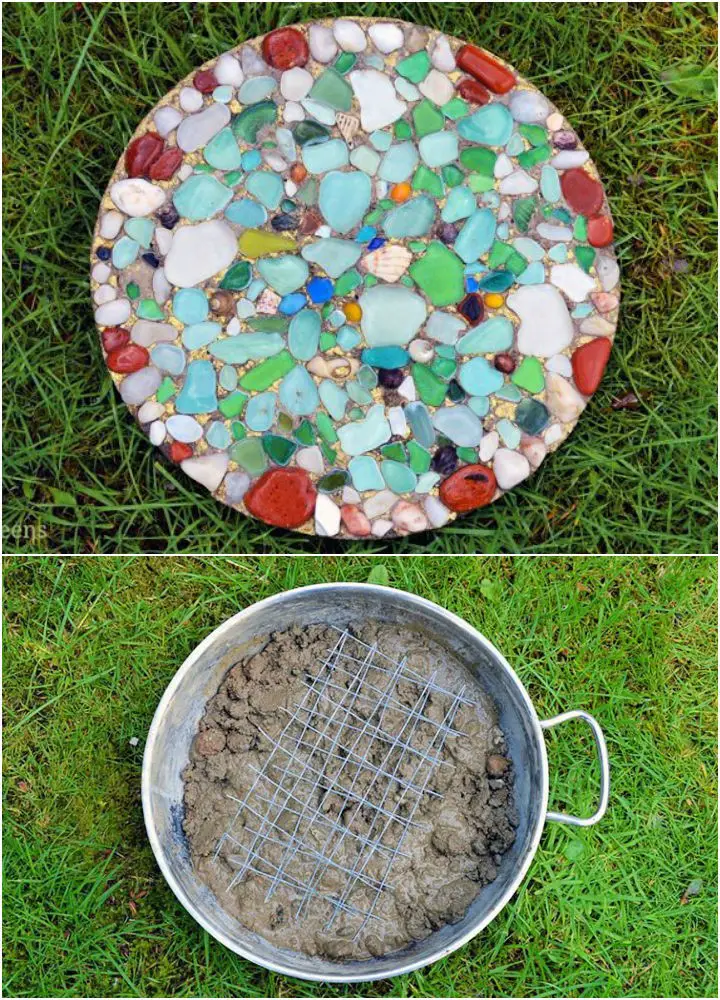
As you gaze out at your garden, imagine the vibrant colors of sea glass embedded in stepping stones, adding a delightful coastal flair to your outdoor oasis. To bring this vision to life, follow Lovely Greens’ step-by-step guide and gather your essential materials: sea glass, cement, and recycled molds. With these eco-friendly components, you’ll not only be recycling materials but also creating functional pathways that sparkle with personality. As Tanya Anderson wisely notes, a crucial secret to preserving the glass hues lies in its strategic placement against the concrete foundation. This clever technique ensures your stepping stones radiate their beauty even on the gloomiest days. For those who relish hands-on creative pursuits, this project offers a unique opportunity to infuse your outdoor space with a personal touch and transform it into a serene retreat.
How to Make Button Stepping Stones

Transform your garden pathway into a whimsical wonderland by crafting charming cement button stepping stones, guided by Instructables’ easy-to-follow tutorial. These functional yet playful accents not only add a touch of personality to your outdoor space but also provide a sturdy walking surface. With our step-by-step guide and list of materials, you’ll be empowered to mold and design unique garden features that reflect your personal style. Whether you’re an experienced crafter or a DIY newcomer, this project is perfect for anyone looking to elevate their garden’s aesthetics and create a one-of-a-kind atmosphere.
DIY Lace Like Stepping Stones
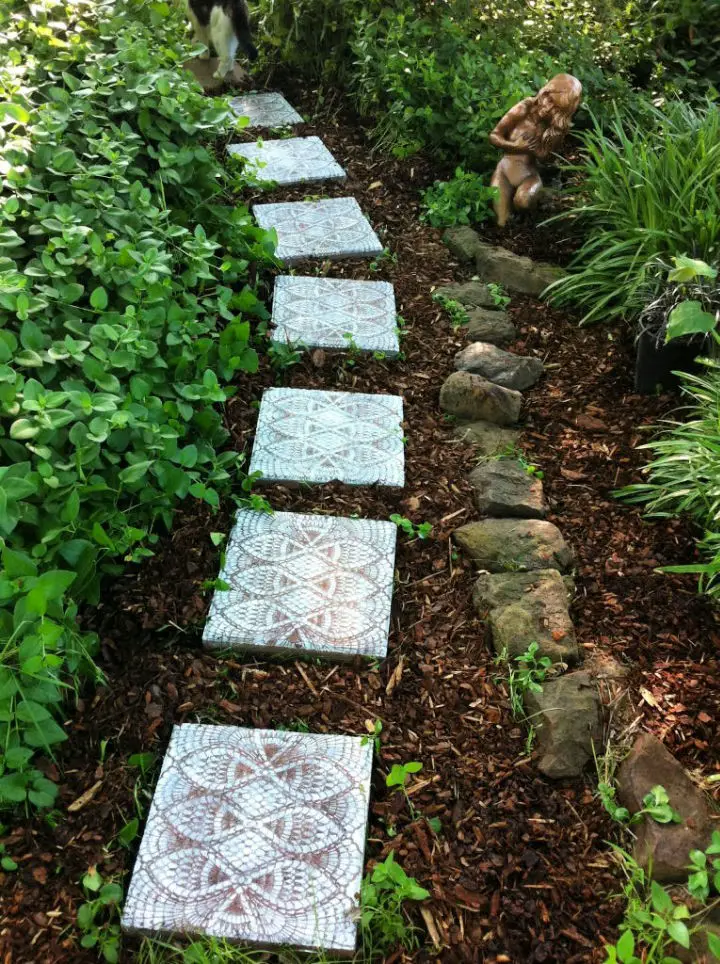
Transform your garden into an enchanting retreat by crafting intricate lace-like stepping stones using Instructables’ DIY guide. This project is ideal for elevating the visual appeal of your outdoor space with a touch of refinement. Discover how to choose the right materials, prepare your stones, and apply a one-of-a-kind lace pattern utilizing spray paint and doilies. The comprehensive guide also offers expert advice on adding a protective coating and optional glow-in-the-dark features for an captivating nighttime ambiance. By following these straightforward steps, you can create a personalized garden path that will leave a lasting impression on visitors and provide years of joy.
Make Your Own Stepping Stones
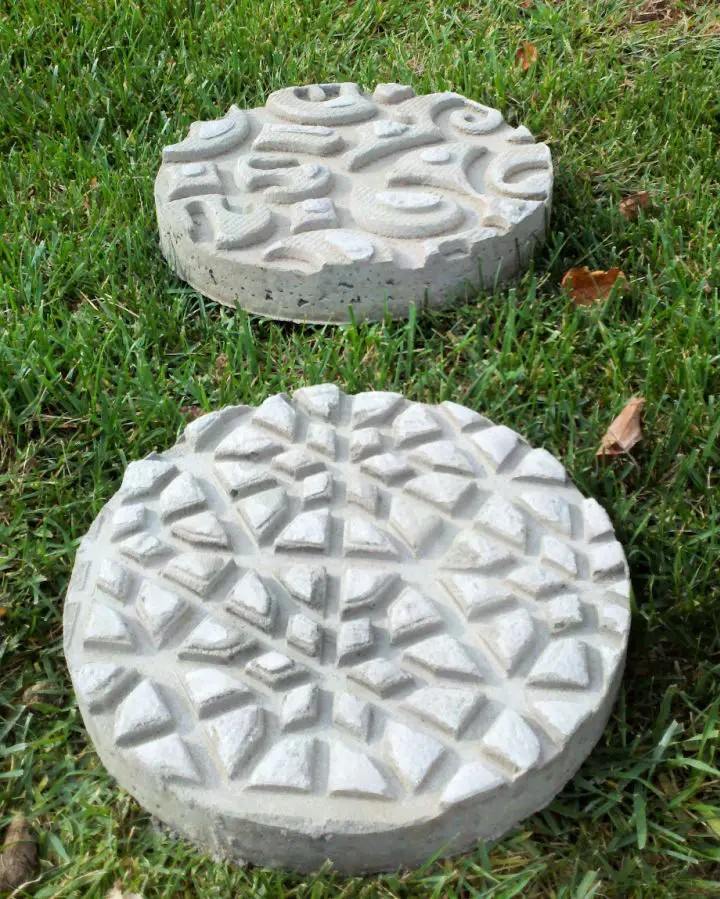
Transform your outdoor space with a unique touch by crafting DIY stepping stones in your garden. With a simple guide from The Mizelle Group, create charming pathways using fine concrete, cardboard tubing, and a rubber doormat. By following these easy steps – cutting the tubing, preparing the mold, mixing the concrete, and imprinting your design – you can add a personalized flair to your garden in just 24-48 hours. This enjoyable and rewarding project is perfect for enhancing any outdoor space, reflecting your personal style and creativity.
Concrete Stepping Stones Shaped Like Natural Stone
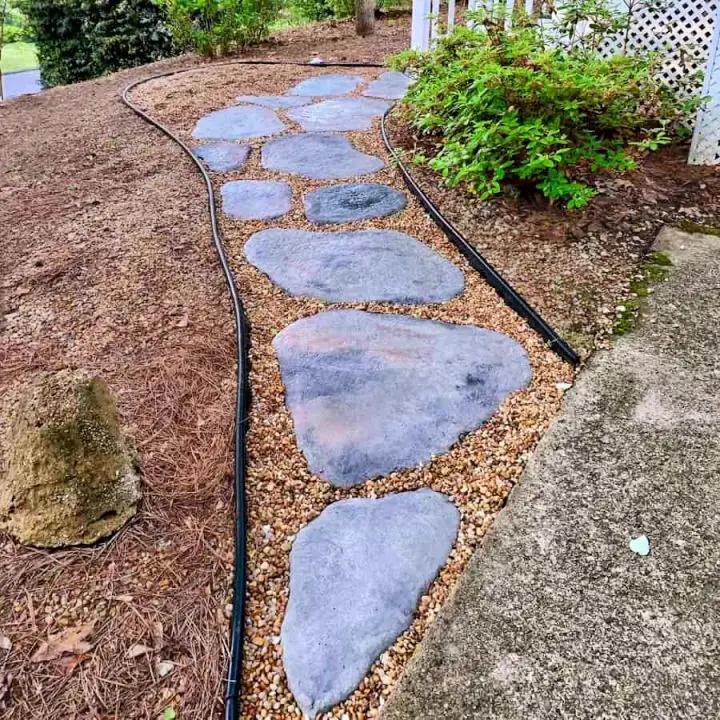
Transform your outdoor space with a personal touch by crafting your own DIY concrete stepping stones that evoke the charm of natural fieldstone. Our comprehensive guide makes it easy for crafty individuals to enhance their yard with a unique feature. The tutorial breaks down the process into manageable steps, ensuring a fun and rewarding experience. From selecting the perfect concrete mix to adding colorant for that authentic stone appearance, we’ve got you covered. These stepping stones are not only budget-friendly but also durable and customizable to fit your landscape design, making them perfect for pathways or garden accents. By embracing the art of DIY, you can create a beautiful and functional feature that reflects your personal style.
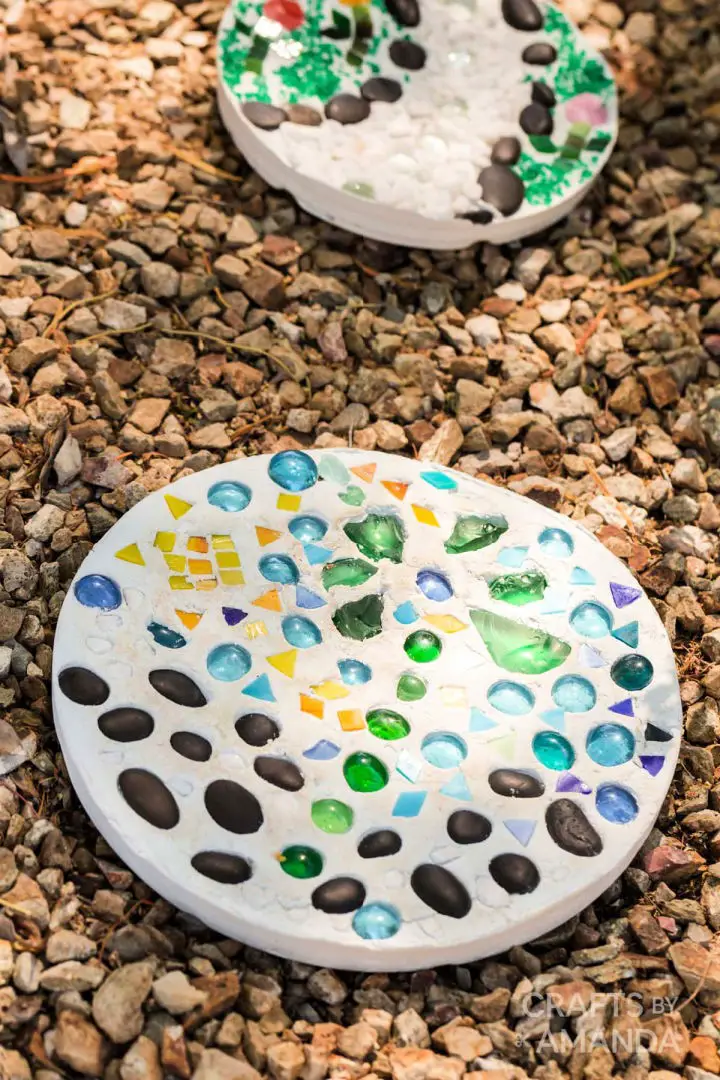
Decorative DIY Stepping Stones
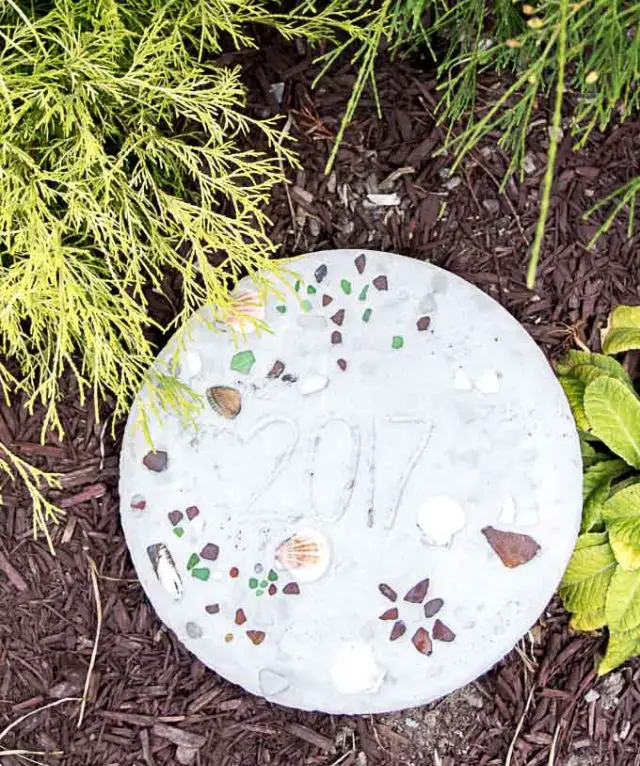
Create lasting memories with DIY stepping stones, a family tradition that’s perfect for lazy summers by the lake. At Sustain My Craft Habit, we’re excited to share our simple and creative approach to crafting personalized stepping stones using found beach treasures like sea glass and shells. This fun activity is an excellent way to encourage kids to express their creativity and take pride in their own unique design. With just a few basic supplies, including Portland Cement, sand, and a round tray, you can start creating your very own stepping stones. Follow our easy-to-follow instructions for mixing, setting, and decorating your masterpiece, then let it set for 24-48 hours before unveiling your one-of-a-kind garden ornament. These handcrafted treasures not only add a touch of personality to any outdoor space but also serve as a heartfelt reminder of the special moments you shared with loved ones.
How to Make a Stepping Stone Pathway
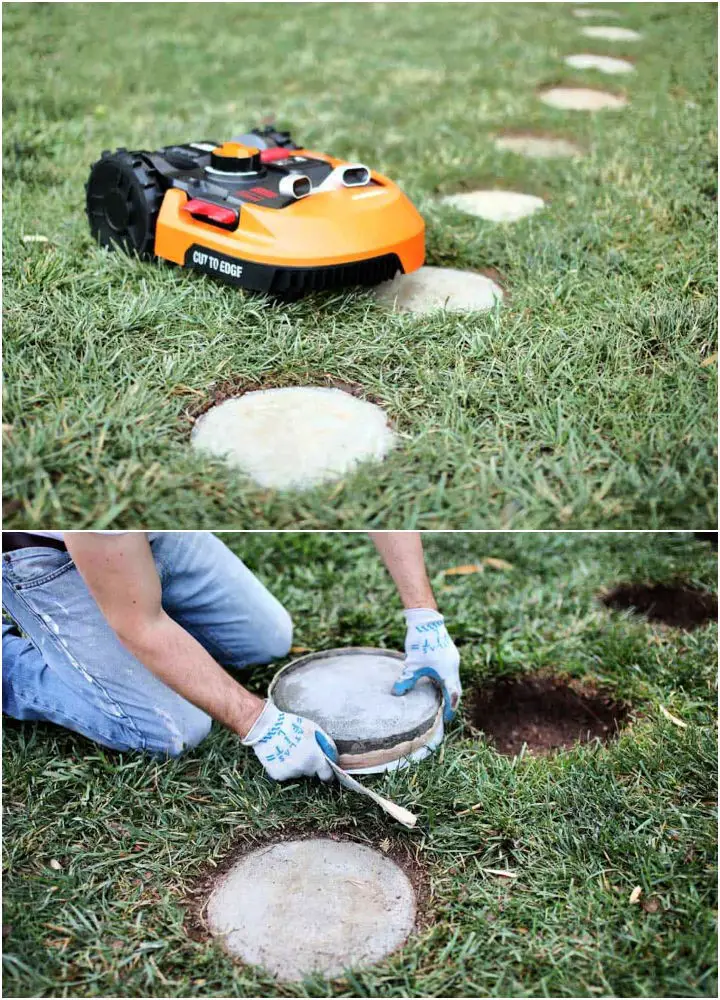
Create a stunning and practical backyard feature with a DIY stepping stone pathway. By following our comprehensive guide, you can craft concrete stepping stones tailored to your outdoor space using a simple mold made from a concrete tube. This project is perfect for any level of DIY enthusiast, as it not only enhances the aesthetic appeal of your garden but also protects your grass from wear and tear, making it an ideal choice for those who use robotic lawnmowers. With a step-by-step process that covers digging, mixing, pouring, and setting the stones, you’ll be able to create a beautiful and functional pathway that adds value to your home.
DIY Pebble Mosaic Stepping Stone
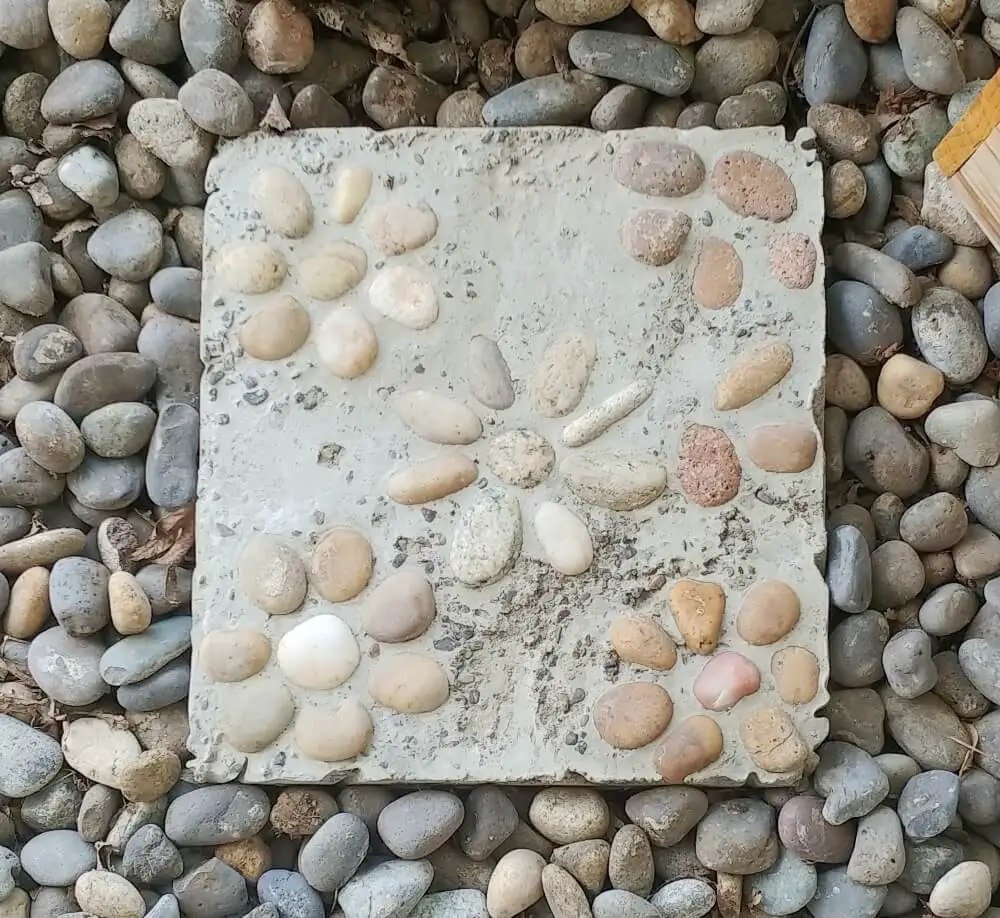
Immerse yourself in the creative process as Tania Pelletier guides you through crafting a one-of-a-kind DIY rock mosaic stepping stone on Little Vintage Cottage. This accessible project requires minimal materials – scrap wood, concrete, and smooth river rocks readily available from your own backyard. As you work through the step-by-step instructions to create a mold, mix the concrete, and carefully embed your chosen rocks into a personalized design, Tania shares her personal experiences with real-life challenges, offering valuable insights and encouragement for fellow DIY enthusiasts. Embrace the imperfections that arise during this creative journey, just as we cherish our unique quirks. This engaging, budget-friendly stepping-stone project will infuse your garden or outdoor space with a touch of homemade charm.
DIY Stenciled Garden Stepping Stones
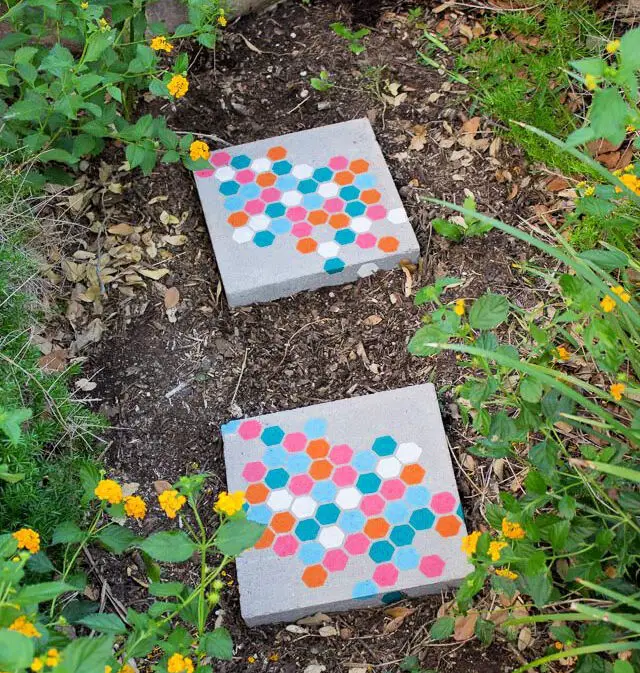
Transform ordinary concrete pavers into an enchanting walkway by adding stenciled stepping stones to your garden. With just a few simple supplies like weather-resistant acrylic craft paints and a honeycomb stencil, you can infuse personality into your outdoor space. By carefully applying paint through the stencil with a foam brush, each stone will boast a unique design. The process is straightforward, allowing you to achieve professional-looking results with ease. Not only are these handcrafted stones practical for navigating your garden, but they also serve as vibrant accents that enhance its natural beauty. After a quick drying time, these decorative stones are ready for display and can withstand the elements for at least a season. When it’s time for a change, simply refresh the paint or try a new design. Let your creativity shine and elevate your garden with personalized stepping stones.
Make Your Own Stepping Stones
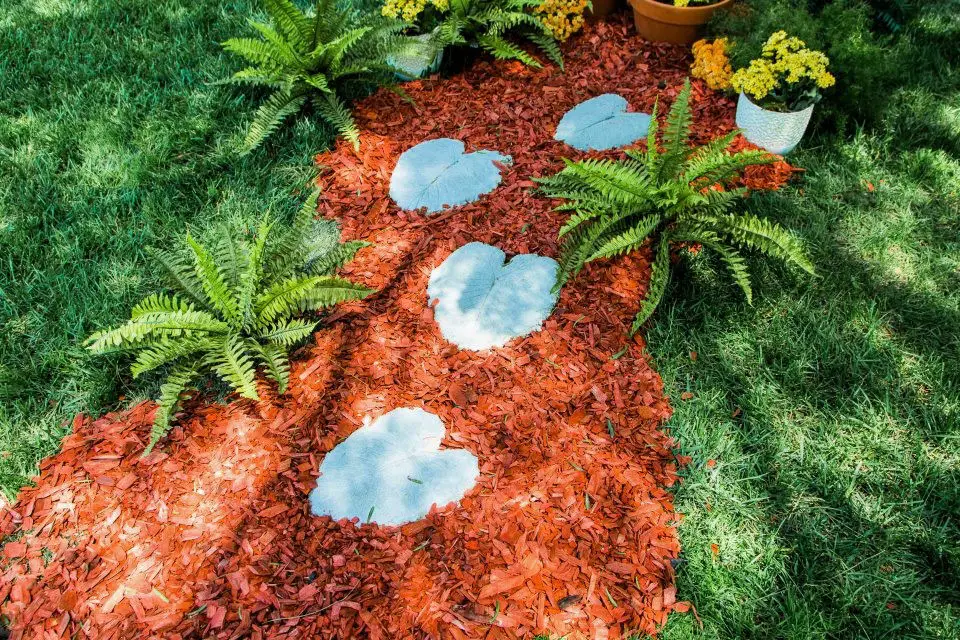
Transform your backyard oasis into a charming retreat with a simple yet effective DIY project inspired by Ken Wingard’s expertise, showcased on the Hallmark Channel. By following an easy-to-follow guide, you’ll be able to create unique stepping stones using large leaves with prominent veins, adding a touch of natural elegance to your outdoor spaces. Gather a few essential materials, including concrete mix, a statement leaf, and some basic supplies, to get started on this engaging and practical crafting experience. Simply combine the ingredients, pour, and let set to bring a personal touch to your garden paths or patio areas. To ensure your creation remains beautiful throughout the seasons, apply a sealant to preserve its charm.
How to Make Footprint Stepping Stones
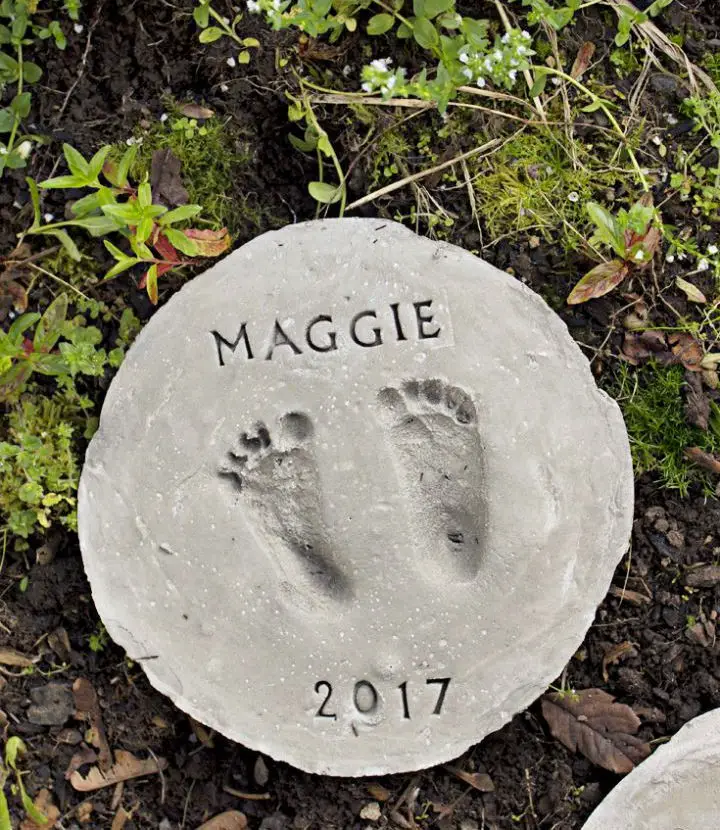
Transforming a garden pathway into a personalized haven is a thoughtful way to commemorate the tiny footprints of your little ones. By crafting stepping stones, you can infuse your outdoor space with sentimental value and create a meaningful keepsake. With a few simple materials like concrete mix, disposable trays, and custom stamps, you can produce durable decorations that will withstand daily use. To ensure the stepping stones remain intact underfoot, aim for a thickness of 1.5-2 inches. This DIY project not only adds a unique touch to your garden but also makes for a heartfelt gift for loved ones. As you embark on this creative journey, watch as your pathway comes alive with every step, filled with memories and charm.
Concrete Stepping Stones with Glass
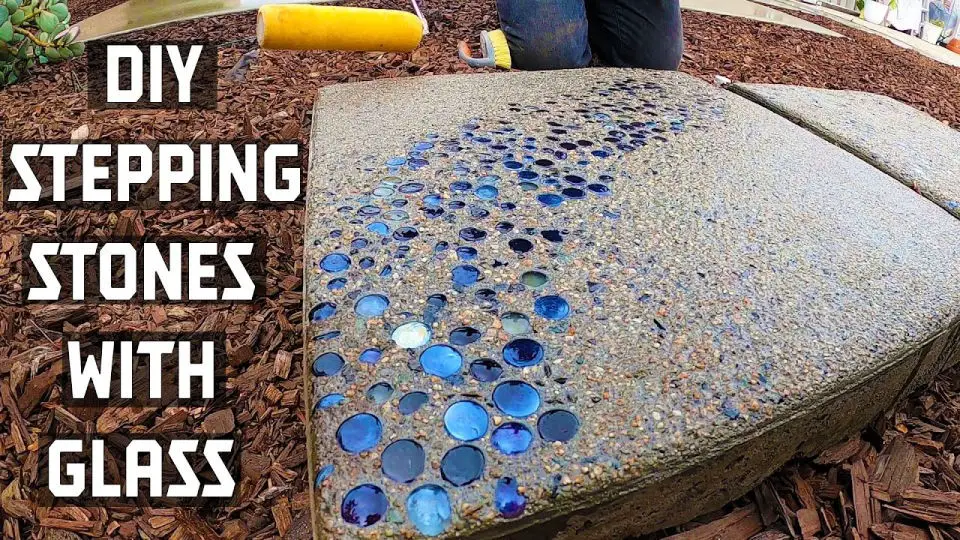
Transform any ordinary garden path into an extraordinary masterpiece by crafting stunning concrete stepping stones embedded with glass beads. This DIY project is surprisingly simple yet incredibly impactful, requiring only premixed concrete, glass beads, and basic tools. The result is a functional and artistic addition to your outdoor space that combines the practicality of a pathway with the visual appeal of a work of art.
The process begins by molding concrete into the desired shape, followed by the creative insertion of colorful glass beads for a mesmerizing effect. Finally, apply a sealant to protect your handiwork from the elements and ensure its durability. With this cost-effective guide, you can bring a personal touch to your garden landscape without breaking the bank. Follow these easy steps to create stepping stones that not only reflect your style but also become a unique focal point in your outdoor space.
Kids Footprint Keepsakes With DIY Cement Molds
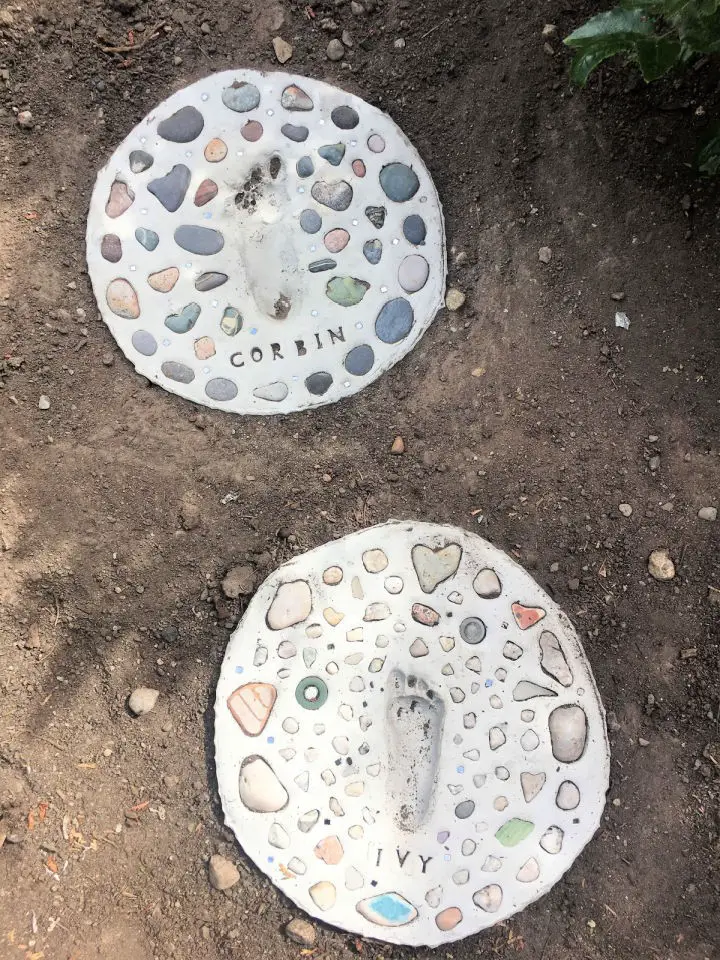
Create personalized stepping stones that capture the growth of your children while adding charm to your garden. This unique project allows you to create lasting mementos by incorporating your kids’ footprints into custom cement molds. By following our easy-to-follow tutorial at Making Things is Awesome, you’ll learn how to craft DIY stepping stones with a kid-friendly twist.
To add an extra layer of personalization, decorate the stones with chosen rocks, glass, or tiles. Just remember to let the cement cure properly, as it can get quite hot during the setting process. As your garden path transforms into a timeline of cherished memories, you’ll treasure these handmade keepsakes for years to come.
Gigantosaurus Themed Dinosaur Fossil Stepping Stones
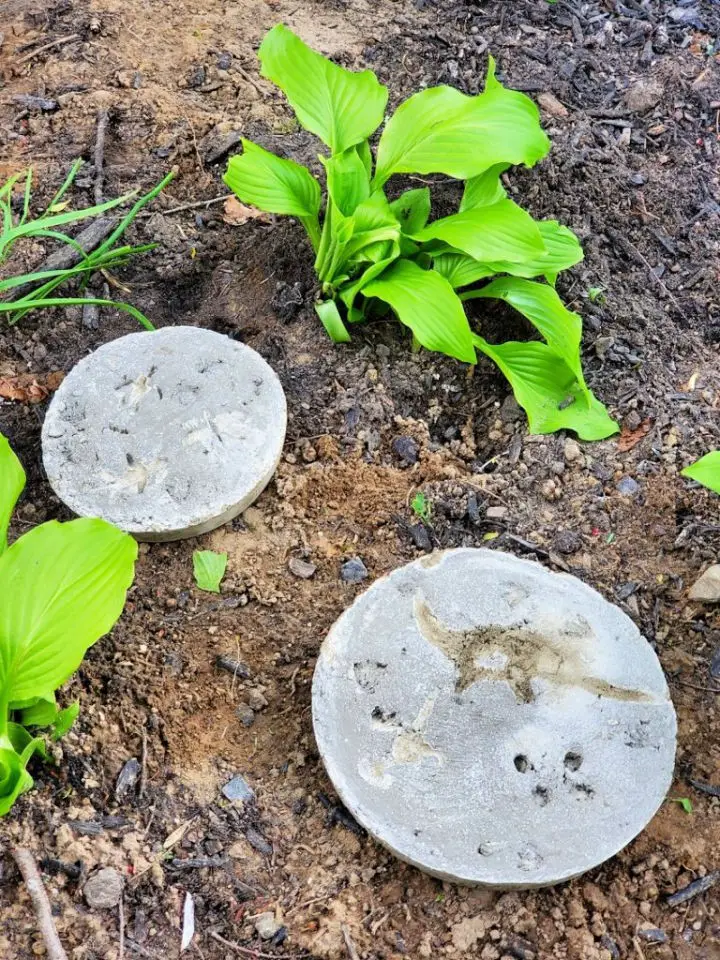
Get ready to celebrate International Dinosaur Day with a fun and educational twist! For families, Mama’s Geeky has created an engaging DIY activity that combines creativity with learning: making dinosaur fossil stepping stones inspired by the show Gigantosaurus. This project seamlessly blends STEAM education with playtime, using toy dinosaurs, quick-dry concrete, and common household items. Simply follow the easy steps to create your own prehistoric impressions, which can be customized with paint and seal for a lasting outdoor display. Perfect for adding an air of ancient mystery to your garden, these stepping stones not only make for a delightful craft project but also serve as a unique way to foster curiosity and imagination in kids.
Construct An Easy Stepping Stone

Transform your outdoor space into a personalized oasis by creating your own garden art using this DIY stepping stone guide from Garden Gate. By upcycling simple materials like pizza boxes, concrete, and garden leaves, you can craft a unique and charming addition to your garden paths or patio. This project is perfect for anyone looking to add a personal touch to their outdoor area. The process is easy to follow and engaging, allowing for plenty of creative expression as you bring your vision to life. With each step, you’ll be able to create a beautiful and functional stepping stone that not only showcases your love for gardening but also serves as a stunning piece in your landscape. Enjoy the satisfaction of handcrafting decor that harmoniously blends with nature’s beauty.
Hand-painted DIY Stepping Stones
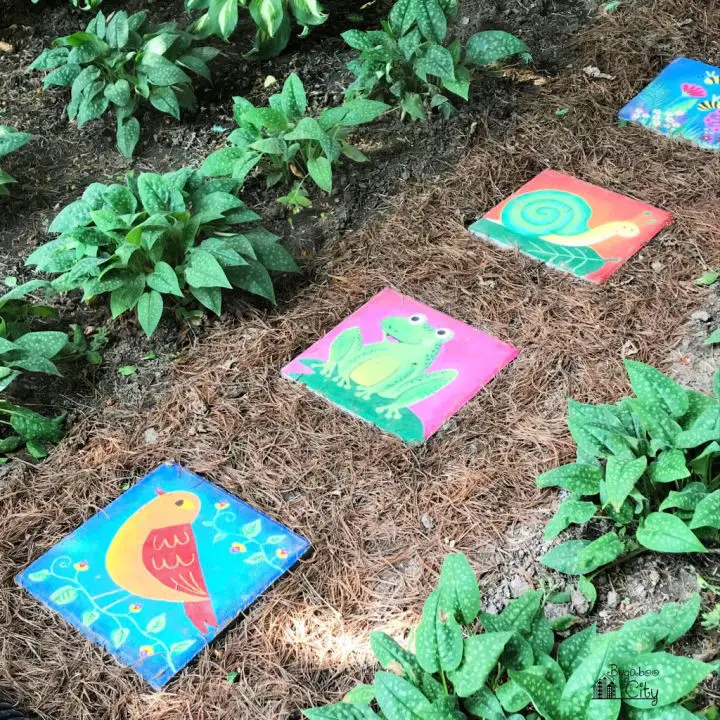
Transform your garden into a charming haven by infusing it with personalized charm through hand-painted stepping stones. With Crafting Cheerfully’s guide to creating colorful and playful garden stones using outdoor acrylic paint, you’ll be able to add a whimsical pathway or accentuate flower beds that reflect the unique style of your garden. From quaint creatures to vibrant patterns, this craft offers endless possibilities for customization. As you bring simple stones to life with brushstrokes of creativity, you’ll find yourself engaged and rewarded by the process. With practical tips and a step-by-step approach, you’ll be able to give your outdoor space a bright, artistic flair that’s sure to delight.
Rainbow Flower Stepping Stone Ideas
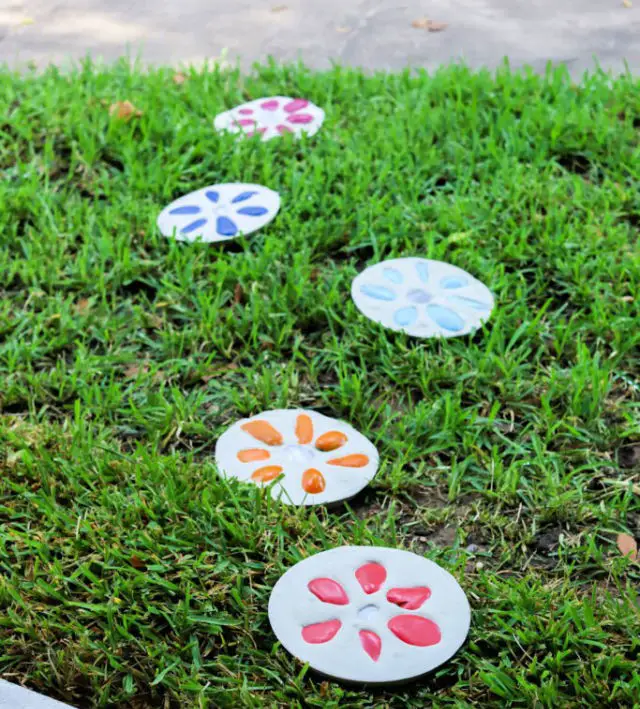
Transform your garden’s ambiance with a kaleidoscope of colors by creating DIY flower-shaped stepping stones inspired by Amber Oliver’s creative guide. This engaging project allows you to infuse your backyard with personal flair in just an afternoon. By following Amber’s straightforward tutorial, you can turn plain pie tins into stunning, multi-hued walkway accents that add a pop of color and whimsy to your outdoor space. To ensure the vibrancy lasts, use high-quality spray paint like Colorshot for a durable finish. While these stepping stones are primarily designed for decoration, with added thickness and concrete reinforcement, they can also provide functional support. Take a creative leap and give your garden a rainbow makeover, making it a true reflection of your unique personality.
How to Make Mosaic Garden Stepping Stones

Transform your outdoor space into a vibrant oasis with the beauty of handmade mosaic stepping stones. With simple yet creative steps from Midwest Living, you can bring a pop of color to your garden path or enhance other decorative elements like pots, birdbaths, and benches. Start by gathering materials such as ceramic tiles, safety glasses, and stepping stones. Then, spread mortar, arrange your tile shards artfully, and grout to secure the pieces in place. In just a couple of days, you’ll have a personalized stone that’s ready to add a touch of elegance to your garden landscape.
Concrete Stepping Stones In the Backyard
Transform your garden into an inviting oasis by crafting unique stepping stones using concrete and a rubber door mat. This DIY guide breaks down the process into simple steps, resulting in durable and beautiful creations that will elevate your outdoor space’s ambiance. With this easy-to-follow project, you’ll be able to create bohemian-inspired stepping stones that perfectly complement any backyard or garden path. The process is straightforward, covering key tasks such as making a mold, mixing concrete, and imprinting designs that add character to your outdoor area. Get ready to reimagine your garden with this engaging DIY project that promises to bring new life to your environment.
How To Make Footprint Stepping Stone
Create a cherished memento of your child’s growth by crafting a footprint stepping stone. I Watch Them Grow provides a comprehensive guide on how to make this treasured keepsake for your garden. Courtney shares her personal experience, offering practical tips and clear instructions from mixing cement to imprinting tiny feet. This DIY project is ideal as a heartfelt gift or a unique feature in your own outdoor space, allowing you to celebrate family milestones in a creative and lasting way.
Make Stepping Stones Out Of Concrete

Creating personalized DIY concrete stepping stones is an engaging project that can elevate any garden’s aesthetic appeal. With C.R.A.F.T.’s straightforward guidance, you’ll be able to craft these functional and visually striking accents with ease. Gather a few simple supplies like a bucket, quick-drying concrete mix, and pie tins to involve children in the creative process and create unique gifts for loved ones. Take it to the next level by incorporating embellishments such as shells, marbles, or handprints to make each stone truly one-of-a-kind. To ensure successful results, be mindful of mixing the concrete to a thick batter-like consistency, allowing the stones to dry thoroughly before use, and cleaning your tools while the concrete is still wet. Get ready to add a personal touch to your outdoor space with these handmade stepping stones.
Personalized Garden Stepping Stones
Transform your outdoor oasis into an intimate retreat by crafting unique stepping stones that reflect your personal style. A fun and rewarding DIY project, making your own stepping stones is easier than you think, thanks to the clear instructions provided by Instructables. By following their step-by-step guide, you’ll learn how to select the perfect forms, mix a durable concrete blend, and use a hotwire machine to create custom designs and messages on foam. Get creative with font styles and colors, and watch your garden pathway come alive with these one-of-a-kind stones that add a special touch to any outdoor space.
Conclusion:
As you wrap up this DIY stepping stone project, it’s essential to recognize that creating 30 unique stones isn’t just about building a functional pathway, but also an opportunity to infuse your outdoor space with a personal touch. Throughout our guide, we’ve walked you through the crucial steps and expert tips to craft these garden accents quickly and efficiently. From material selection to concrete mixing, and from simple to elaborate designs, we hope our advice has been both motivating and actionable. As you envision your finished pathway, remember that each stone is a testament to your creativity and passion for gardening. With this project, you’re not just building a series of stepping stones – you’re creating a reflection of yourself in the midst of nature.
