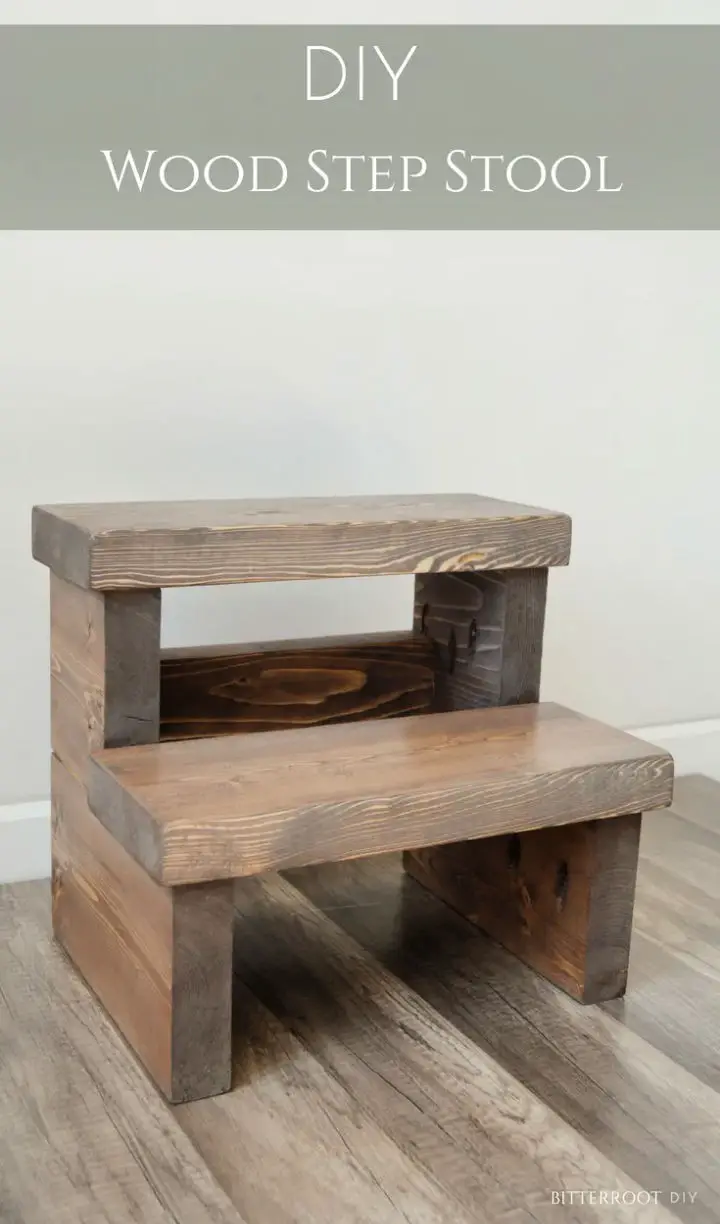
As you strive to elevate your DIY game, why not start by building a sturdy step stool that’ll take your creativity to new heights? With 30 free plans at your disposal, the possibilities are endless. From selecting the perfect color palette and finish to adding unique patterns and textures, make your step stool a true reflection of your personal style. But before you get started, don’t forget to prioritize safety by equipping yourself with the right protective gear and setting up a safe workspace.
If you’re looking to take things to the next level, explore advanced techniques like joinery, wood finishing, decorative carving, and inlays to give your step stool a professional touch. And when it’s all said and done, don’t forget to maintain your masterpiece by regularly inspecting, cleaning, and protecting the finish.
Have questions or need guidance? Our FAQs are here to help with answers on wood selection, stability, tools needed, eco-friendly options, and more. Start crafting your dream step stool today!
How to Make a Step Stool – Step by Step Guide
To get started, you can learn the art of crafting a functional and sturdy step stool by following a straightforward, step-by-step approach. From planning to completion, we’ll walk you through every stage of building your own step stool.
Materials and Tools
To embark on this woodworking project, it’s essential to gather all the necessary materials and tools. You’ll need a supply of high-quality wood, such as cherry hardwood or your preferred type. Additionally, you’ll require certain adhesives, including yellow PVA glue, which is crucial for bonding the different components together effectively. Furthermore, you’ll need to acquire dowels measuring 3/8 inch in diameter, figure 8 fasteners for securely attaching the tops, and oil-based wiping varnish for achieving a professional-looking finish. On the tool front, make sure you have a well-stocked workshop with equipment such as table saws, jointers, planers, clamps, miter saws, dado blade sets, dowel jigs, drills equipped with drill bits and Forstner bits, pocket hole jigs, and sanders. Having all these materials and tools at your disposal will enable you to complete the project efficiently and effectively.
Step by Step Instructions
Step 1: Preparing the Wood
When working with wooden boards, the first step is to cut them to a manageable size if they’re rough-hewn. This simplifies the process of removing any twists or warping that may be present. A jointer comes in handy here, allowing you to face-joint one side and then plane the boards down to a uniform thickness – typically around 3/4 inch. If your wood is already surfaced and ready for use, you can skip this step altogether.
Step 2: Making the Stool Tops
To begin constructing the stools’ tops, start by cutting the wood into sections that will eventually make up the surface of your seats. Next, utilize a jointer to create a precise 90-degree angle on each board, ensuring the edge is perfectly parallel to the planed face. Once you’ve achieved this, it’s time to bring the boards together, applying glue and securing them with clamps until the adhesive sets.
Step 3: Forming Stool Bases
To complete your coffee table project, you’ll want to prepare your remaining boards. Start by planing them down to achieve a smooth and uniform surface. Once they’re ready, rip them to the desired width for the legs and rails, following your design specifications. Next, cut out the legs and rails themselves, making sure to add a 5-degree splay to the leg ends. This slight angle will help provide a stable base for your coffee table. Finally, assemble the pieces by creating dados on the lower rails for the stretchers. Make sure these joints fit together tightly to ensure a sturdy and level surface.
Step 4: Assembly and Joinery
When constructing the stool’s frame, employ a dowel joint technique to create robust side assemblies. This method provides added stability and ensures a sturdy structure. Alternatively, you can opt for pocket screws, which are ideal when planning to paint the stools as they provide a clean, hidden fastening system.
To ensure a secure connection, repeat the doweling process for all four side assemblies, taking care that each joint aligns properly. This attention to detail will result in a sturdy and reliable stool that can withstand daily use.
Step 5: Constructing Aprons
To ensure accurate placement of the apron connections, start by drilling holes at the ends of the aprons for the dowels. Next, utilize dowel center points to transfer these marks to the sides, guaranteeing precise alignment. Once you’ve achieved this, apply adhesive and employ clamps to secure the aprons to the side, utilizing right-angle blocks to maintain squareness and prevent any warping or shifting during the bonding process.
Step 6: Attaching the Tops
To complete the assembly process, you’ll want to securely attach the tops to the bases using Figure 8 fasteners. This clever design ensures that the wooden components can expand and contract naturally without compromising the structural integrity of the entire piece. The fasteners provide a snug fit, keeping everything in place while allowing for subtle movements due to changes in humidity or temperature.
Step 7: Finishing Touches
When it comes to achieving a premium finish, attention to detail is crucial. Start by sanding the wood surface down to a fine grit – specifically, aim for 220 grit or higher. This step ensures a smooth foundation for your final coat of varnish. Once you’ve reached the desired level of smoothness, move on to applying four to five coats of oil-based wiping varnish. This type of varnish not only provides a rich, glossy finish but also showcases the natural beauty of the wood grain itself.
Video Tutorial
For those who prefer a hands-on learning experience, a YouTube video tutorial is available, perfectly complementing this written guide. The visual representation of the techniques and methods discussed in this post provides an intuitive and easy-to-follow approach to building a DIY nesting step stool, making it accessible to individuals of all skill levels.
Design Customization for Your DIY Step Stool
A well-crafted step stool can be a standout feature in any room, combining form and function with ease. To elevate the design of your DIY step stool, consider infusing it with personal touches that reflect your unique style. This approach not only adds an element of creativity but also makes the project more meaningful and rewarding.
Choose Your Style
As you embark on customizing your space, consider the visual identity you wish to create. Will it be a sleek, contemporary setting or a cozy, distressed retreat? Your initial design decision sets the tone for the entire customization process, influencing every subsequent choice you make.
Selecting Colors and Finishes
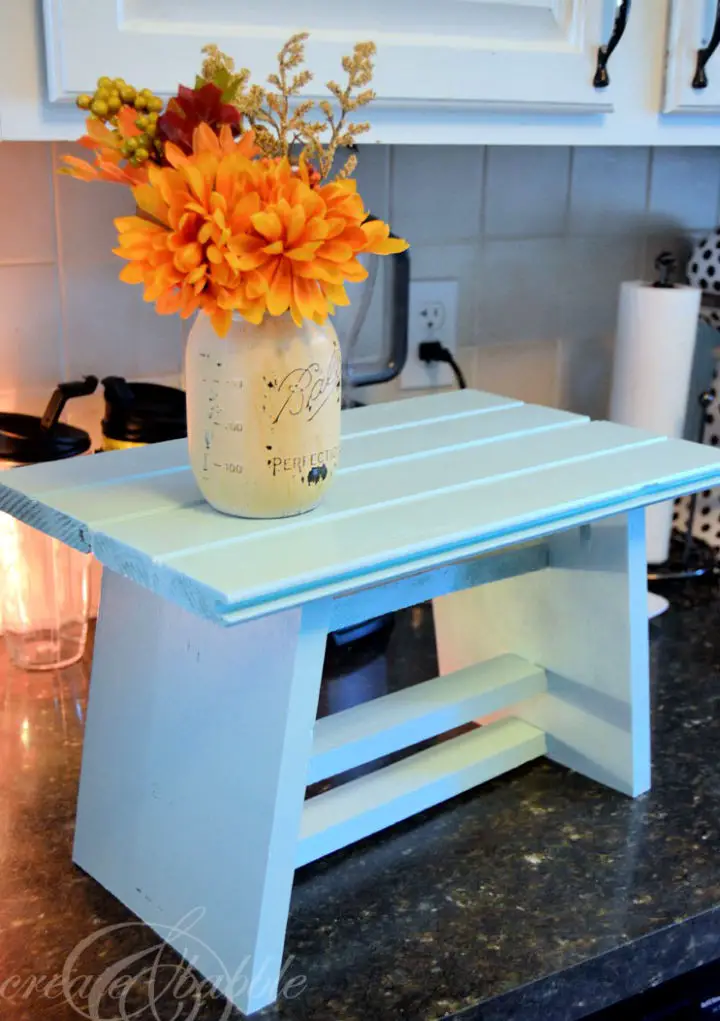
When it comes to giving your step stool a pop of personality, bold colors are an excellent way to make it stand out from the crowd. On the other hand, opting for neutral tones can help it seamlessly integrate with its surroundings. As you’re selecting a color scheme, be sure to prioritize safety by choosing non-toxic paints and varnishes, particularly if children will be using the stool.
Adding Patterns and Designs
Transform your step stool into a one-of-a-kind piece by incorporating patterns and designs. Opt for a straightforward approach like painting horizontal stripes or playful polka dots, or take it to the next level with a beautifully hand-painted mural. Choose stencils for a more controlled look or go freehand for a truly personalized touch, regardless of your artistic abilities.
Personalizing with Decals and Stickers
For those who don’t consider themselves artistic, a more practical alternative is available. Decals or stickers offer a wide range of designs and are incredibly straightforward to apply. The best part? They’re completely removable, allowing you to effortlessly switch out the design whenever you desire to try something new.
Incorporating Textures
When designing a step stool, incorporating various textures can be an effective way to create visual interest and add functionality. One approach is to pair a plush cushion on the top surface with a soft, tactile experience that invites users to linger. Alternatively, introducing non-slip pads or coatings to the base of the stool can provide a reassuring grip, ensuring the structure remains stable and secure even on slick or uneven surfaces.
Functional Add-Ons
When it comes to creating a functional and stylish step stool, consider incorporating thoughtful design elements that enhance its usability. Adding storage compartments or folding mechanisms can significantly boost the stool’s versatility, allowing you to efficiently utilize even the most limited spaces. By doing so, you’ll craft a piece that not only reflects your unique aesthetic but also serves as a reliable companion in your daily life. As you work on the project, strive to create something you’ll be proud to display and use with confidence.
Safety Precautions for Building a DIY Step Stool
When embarking on a DIY endeavor, it’s crucial to prioritize safety above all else. The construction of a step stool is no exception. To minimize the risk of accidents and ensure a successful project, follow these essential guidelines:
Personal Protective Equipment (PPE)
When it comes to ensuring a safe working environment, personal protective equipment (PPE) plays a crucial role. To minimize the risk of injury or damage, it’s essential to don the right gear every time you start a project. This includes safety goggles that shield your eyes from hazardous particles and debris, work gloves that protect your hands from splinters, cuts, and other potential hazards, and ear protection if you’re working with loud power tools that could cause permanent hearing loss.
Workspace Safety
To maintain a safe and efficient workspace, prioritize organization and minimize hazards. Start by ensuring a tidy and uncluttered area to prevent tripping hazards. Implement non-slip mats or surfaces to provide stable footing. Additionally, store tools and materials at an accessible yet out-of-the-way location to streamline your workflow.
Tool Safety
When working with tools, it’s essential to maintain a sense of responsibility and respect for their capabilities. To start, always utilize equipment according to its intended purpose and adhere to the manufacturer’s guidelines. Prior to utilization, thoroughly inspect each tool to guarantee it remains in good condition. Furthermore, when not in use, keep sharp tools safely stored and covered to prevent any potential hazards or damage.
Material Handling
When working with materials, it’s essential to prioritize caution and considerate handling techniques. To minimize the risk of injury or discomfort, opt for lifting heavy wood panels using your leg muscles rather than relying on your back. This simple adjustment can make a significant difference in preventing strain and fatigue. Similarly, when cutting materials, ensure you’re working in a well-ventilated area to prevent inhaling sawdust and other airborne particles. By adopting these straightforward yet effective precautions, you’ll be better equipped to tackle tasks with confidence and care.
First Aid
When embarking on a DIY project, it’s essential to be prepared for minor injuries that may occur. To minimize risks, keep a well-stocked first aid kit nearby, featuring essentials such as bandages and antiseptic wipes. Moreover, familiarize yourself with basic first aid procedures for treating cuts or abrasions. By following established safety guidelines, you’ll not only reduce the likelihood of accidents but also enhance the overall DIY experience.
Advanced Techniques for Your DIY Step Stool
Transforming a DIY step stool into a masterpiece requires more than just functionality – it demands visual flair as well. By incorporating cutting-edge techniques, you can elevate your project’s utility and curb appeal simultaneously. To achieve this synergy, explore the following innovative approaches:
Joinery Techniques
The foundation of long-lasting furniture lies in its joints. Two effective joinery methods that ensure durability are dovetail joints for corners, renowned for their ability to withstand being pulled apart, and mortise and tenon joints, which provide a robust connection between the stool’s legs and steps. These techniques work together to create a sturdy framework that can withstand daily use.
Wood Finishing
When it comes to finishing the look of your stool, a beautiful and protected surface is key. To achieve this, start by applying a sand sealer before you begin staining. This will help ensure an even finish that showcases the beauty of your wood. When it comes to choosing the right type of finish, consider oil-based options for a natural, warm appearance or polyurethane for added durability and resistance to wear.
Decorative Carving
With the right tools and expertise at hand, incorporating decorative carving into your project can infuse it with a unique sense of personality.
From clean-lined geometric motifs that lend a contemporary flair to more detailed, flowing floral patterns that evoke a timeless elegance, there’s an endless array of possibilities for adding visual interest and character.
Adding Inlays
When crafting a stool, incorporating inlays is an excellent way to introduce various materials and add visual interest. One approach is to utilize contrasting wood or metal strips to create striking patterns. Alternatively, you can opt for luxurious elements like mother-of-pearl or stone to elevate your design. By employing these techniques, not only will your stool showcase your woodworking prowess but also serve as a functional piece that exudes uniqueness. As you work on the project, be sure to appreciate the process and the sense of accomplishment that comes with creating something truly special.
Maintenance Tips for Your DIY Step Stool
To ensure your DIY step stool remains a staple in your home, it’s crucial to maintain it properly. With regular upkeep, you can keep your creative project not only functional but also aesthetically pleasing for years to come. To achieve this, follow these essential steps:
Regular Inspection
To ensure the longevity and safety of your step stool, it’s crucial to perform regular inspections for any signs of wear or damage. This includes checking for loose screws or nails that need tightening or replacement, as well as cracks or splits in the wood that may require filling or sanding. By addressing these issues promptly, you can prevent accidents and extend the life of your step stool.
Cleaning and Care
To ensure your step stool remains in optimal condition, follow these simple maintenance tips. First, use a soft, damp cloth to wipe away any accumulated dust or dirt. It’s also important to avoid exposing your step stool to harsh chemicals, as they can potentially damage the finish and compromise its overall durability.
Protecting the Finish
While the finish on your step stool serves as both an aesthetically pleasing and protective layer, it’s essential to maintain its integrity through regular maintenance. To safeguard the wood from moisture and wear, reapply a sealant or varnish annually. Additionally, if your step stool is painted, be sure to touch up any chipped or peeling paint as needed to prevent further deterioration.
Storing Properly
To maintain its durability and structural integrity, it’s essential to store your step stool in a specific environment when not in use. Opt for a dry, indoor space where it can be protected from moisture and humidity. This will prevent warping or rotting of the steps, ensuring they remain stable and secure for future use. Moreover, refrain from placing heavy objects on top of the step stool as this could cause deformation or damage to its structural components.
Addressing Issues Promptly
Don’t hesitate to address any issues that arise with your DIY step stool. By taking prompt action, you’ll prevent minor problems from escalating into more significant ones.
As soon as you notice any loose parts or rough surfaces, take the initiative to tighten and sand them respectively. This proactive approach will ensure your step stool remains both reliable and visually appealing for a longer period.
FAQs About DIY Step Stools
What is the best wood to use for a DIY step stool?
When it comes to crafting a DIY step stool, the type of wood you choose is crucial. You’ll want to opt for a material that offers both sturdiness and durability. Woods like pine, oak, and maple are excellent options, as they possess the ability to support weight effectively while also boasting long-lasting qualities.
How do I ensure my step stool is stable?
When constructing a stable structure, it’s crucial to focus on ensuring equal leg lengths and a level top. Achieving this can be accomplished through the implementation of robust joinery methods. Furthermore, incorporating cross-bracing between the legs can also significantly enhance overall stability.
Can I make a folding step stool?
Crafting a folding step stool requires careful consideration of its functionality and usability. By incorporating hinges and a locking mechanism, you can create a sturdy and reliable design that remains stable when unfolded and folds away neatly for convenient storage. This clever combination allows the stool to adapt to different environments, making it an ideal solution for homeowners and DIY enthusiasts alike.
What tools do I need to build a step stool?
To embark on your woodworking project, you’ll need to gather the essential tools. A saw is crucial for making precise cuts, while a drill will help you create holes with ease. Screws are necessary for assembling and fastening various parts together. Sandpaper is vital for smoothing out rough edges and surfaces. Depending on the complexity of your design, a hammer may also come in handy to tap pieces into place. For those looking to add an extra layer of sophistication to their project, consider investing in a router, which can be used to create decorative edges and add texture to your woodwork.
How can I customize my step stool?
Elevate the functionality and aesthetic appeal of your step stool by experimenting with a variety of customization options. Consider applying a bold coat of paint, introducing rich tones through stains, or adding decorative flair via decals. For an added personal touch, incorporate meaningful elements such as your initials or patterns that harmonize with your home’s décor.
What safety precautions should I take when building a step stool?
To minimize the risk of accidents, it’s essential to take precautions from the outset. This includes donning essential personal protective equipment (PPE) like safety goggles and gloves. Additionally, ensure you’re working in a well-ventilated area and maintain a clean and organized workspace. By taking these simple steps, you’ll be better equipped to handle any unexpected situations that may arise.
How do I protect my step stool from water damage?
To safeguard your wooden stool against the elements, consider applying a waterproof sealant or varnish. This precaution is particularly crucial when placing the stool in humid environments such as bathrooms and kitchens, where moisture can seep into the wood and cause damage.
How can I make my step stool eco-friendly?
When it comes to crafting your ideal eco-friendly space, consider sourcing wood from sustainable forests or opting for reclaimed materials to minimize your environmental footprint. Furthermore, select water-based paints and finishes that are designed with the planet’s well-being in mind, boasting lower toxicity levels compared to their solvent-based counterparts.
What is the ideal height for a step stool?
When it comes to determining the ideal height of a stool, context plays a significant role. If you’re looking to reach high shelves or store items that are out of easy reach, a taller stool may be necessary to ensure comfortable and safe access. On the other hand, if the stool is intended for use by children, a shorter stature becomes crucial for maintaining safety and practicality. A height that’s too tall can pose a risk of falls, while one that’s too short may not provide sufficient support or stability.
How do I fix a wobbly step stool?
To ensure your step stool is sturdy and functional, take a closer look at any loose components such as screws or joints. Make any necessary adjustments to secure them firmly in place. Additionally, if the legs of the stool are uneven, consider trimming them down to a uniform length to maintain stability. To further prevent slipping or movement on uneven floors, add felt pads to the legs for added balance and support.
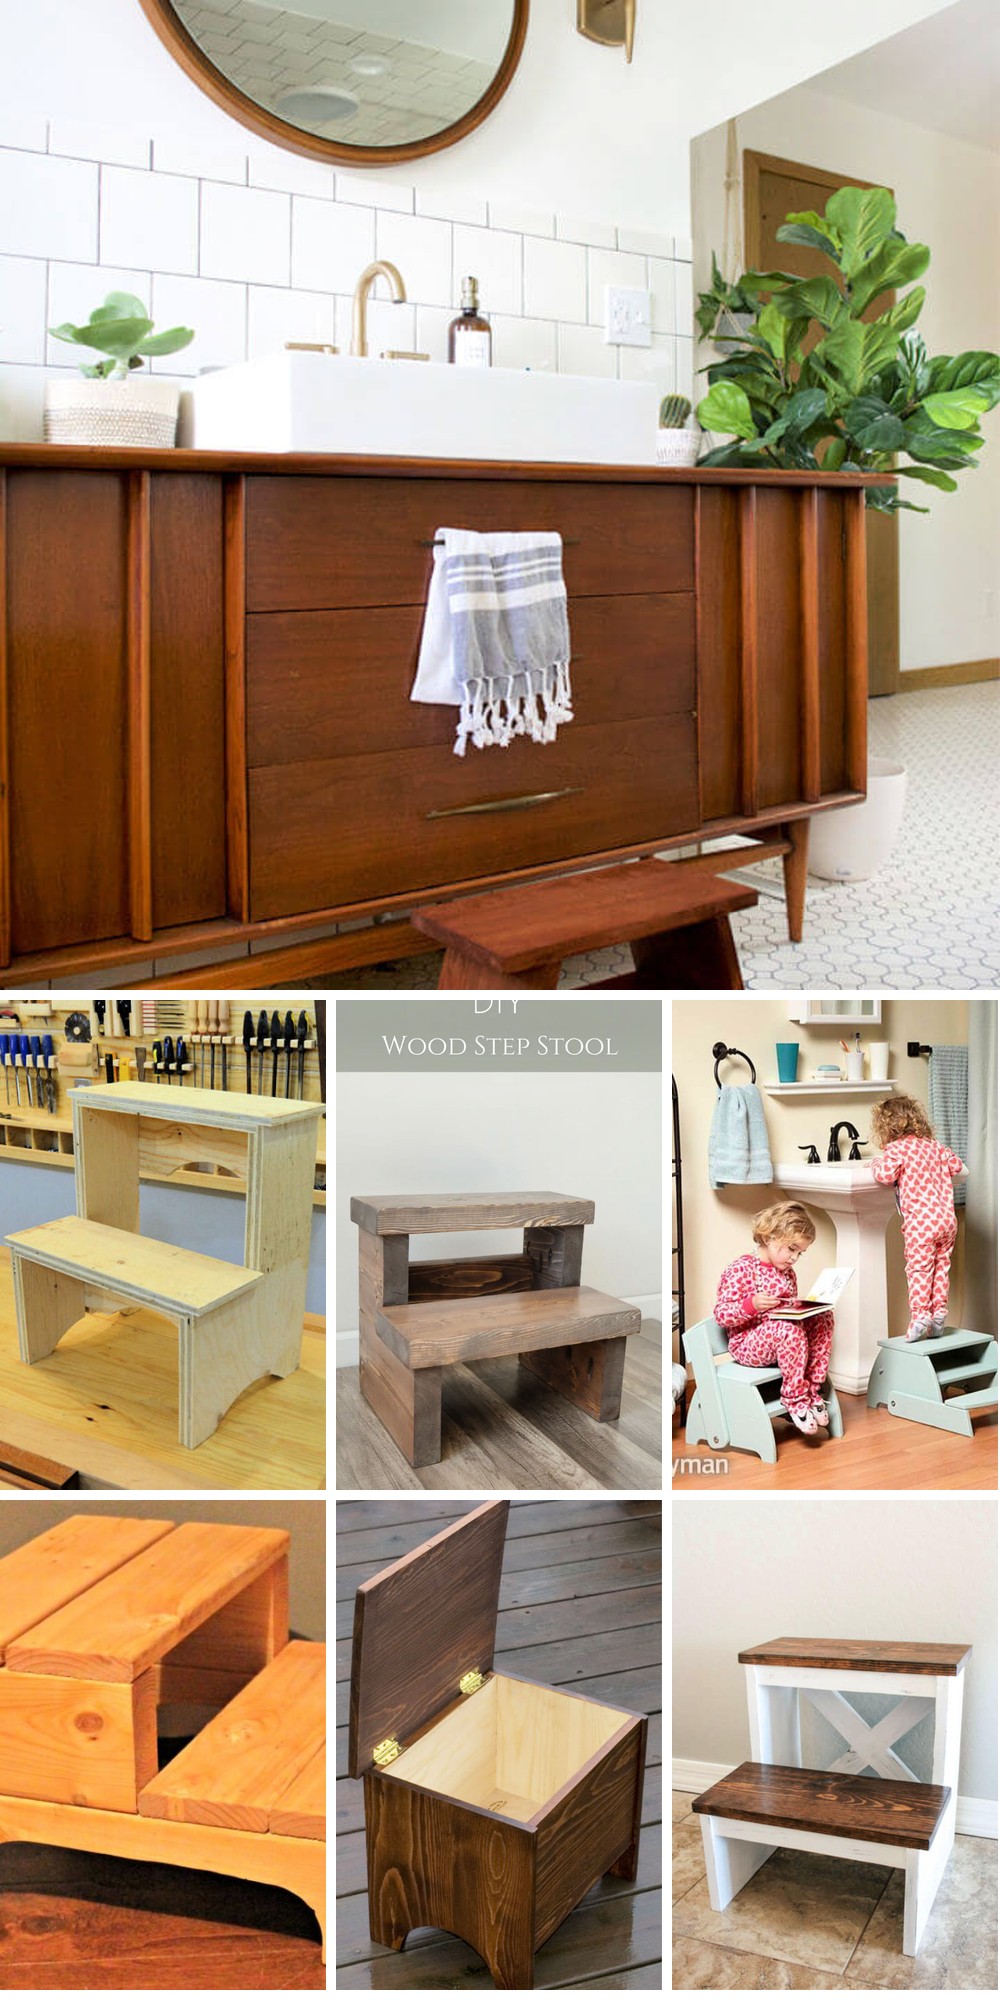
30 Free DIY Step Stool Plans
Embark on a creative journey by exploring 30 comprehensive DIY step stool plans, each offering a unique blend of functionality and style. With straightforward guidance, you’ll be able to construct a reliable and visually appealing step stool for your next project.
DIY Kid’s Step Stool
Transform your bathroom into a haven of practicality with a sturdy DIY kid’s step stool, perfect for individuals who are vertically challenged or have tiny humans at home. This clever creation can be brought to life using a single 1x8x8 board, 1 1/4-inch pocket screws, and wood glue. Simply start by cutting the wood pieces according to the diagram, then secure the stairs and their supports with screws and wood glue for a rock-solid foundation. Finish off the look with some sanding, painting, and staining for a beautifully distressed finish. The total cost of materials comes out to approximately $8.91, making this step stool an affordable addition to any home. Its ergonomic design ensures comfort and safety while providing easy access to high shelves and hard-to-reach areas.
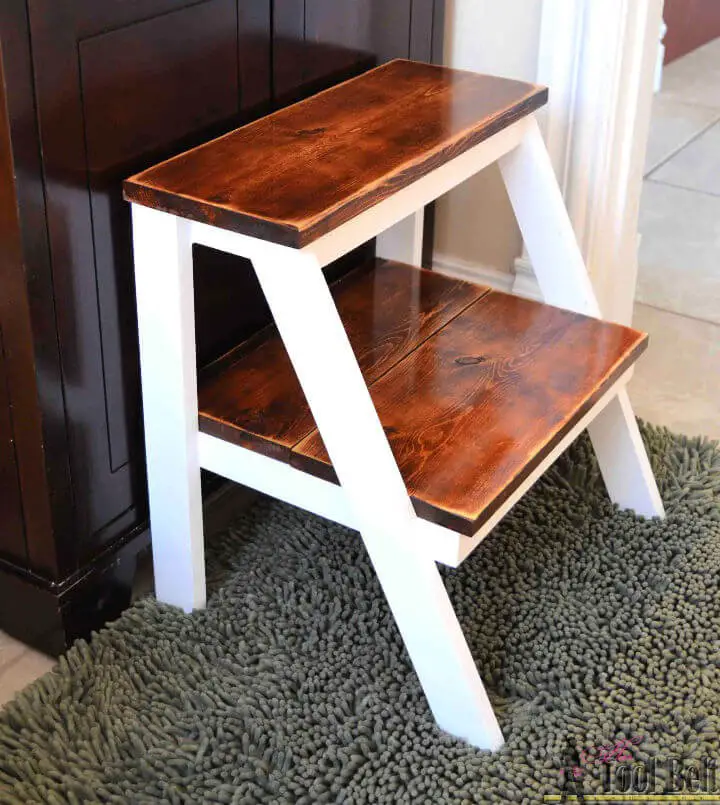
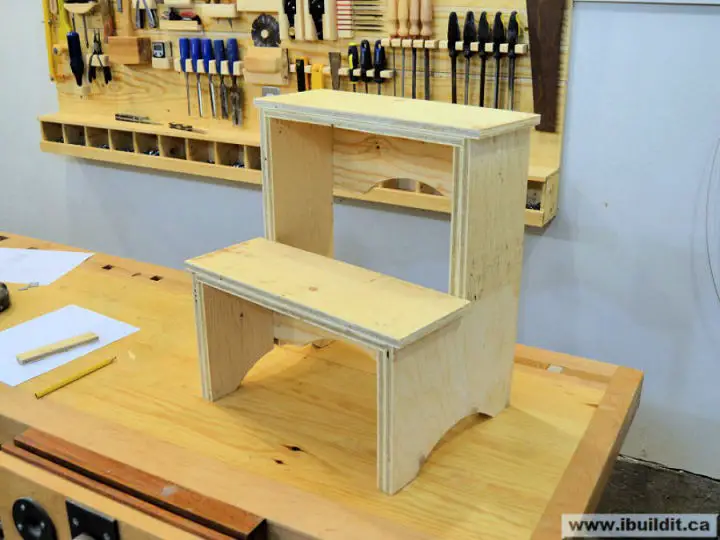
How to Build a Stepstool
Elevate your home’s functionality and style with a charming DIY step stool that’s surprisingly simple to build. This lightweight, versatile piece can be placed anywhere to provide convenient access to high shelves or help little ones reach the sink. The best part? It requires just a few basic materials and tools, making it accessible to DIY enthusiasts of all skill levels.
To create this stepstool, start by constructing the step frames using 1x2s and pocket hole screws. Next, add the front and back legs, followed by attaching the frames together with wood glue and more pocket hole screws. Finally, attach and finish the steps to complete your project.
With its quick build time and easy construction, this stepstool serves as a delightful addition to any space, blending form and function in perfect harmony. By embracing the joy of DIY crafting, you’ll not only create something useful but also transform the spaces that matter most to you.
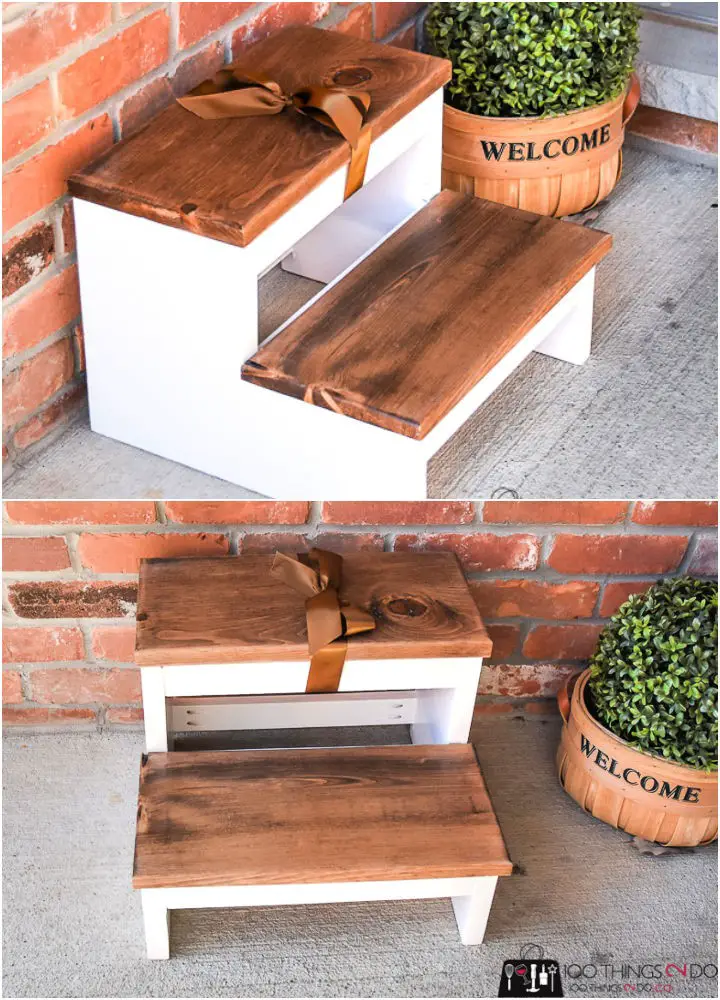
Making a Step Stool Under $15
Indulge in the comfort and convenience of a sturdy DIY wood step stool, crafted from solid wood for a lifetime of reliability. The ingenious design features angled legs that provide added stability and durability, making it an effortless build for about $15 using 1x10s and 1x3s. Personalize your creation with paint or stain to add a touch of individuality.
nThe construction process is remarkably straightforward, requiring only a few minutes to complete after making the necessary cuts. This practical and economical tool serves as more than just a means to reach high cupboards; it also provides an invaluable height boost for little ones in your family.
nWhether you’re looking to make your home more accessible in the kitchen or bathroom, this wooden step stool plan offers a simple solution to everyday challenges. Ana White’s design is a testament to the power of creativity and resourcefulness, inviting you to take the first step towards a more comfortable and convenient living space.
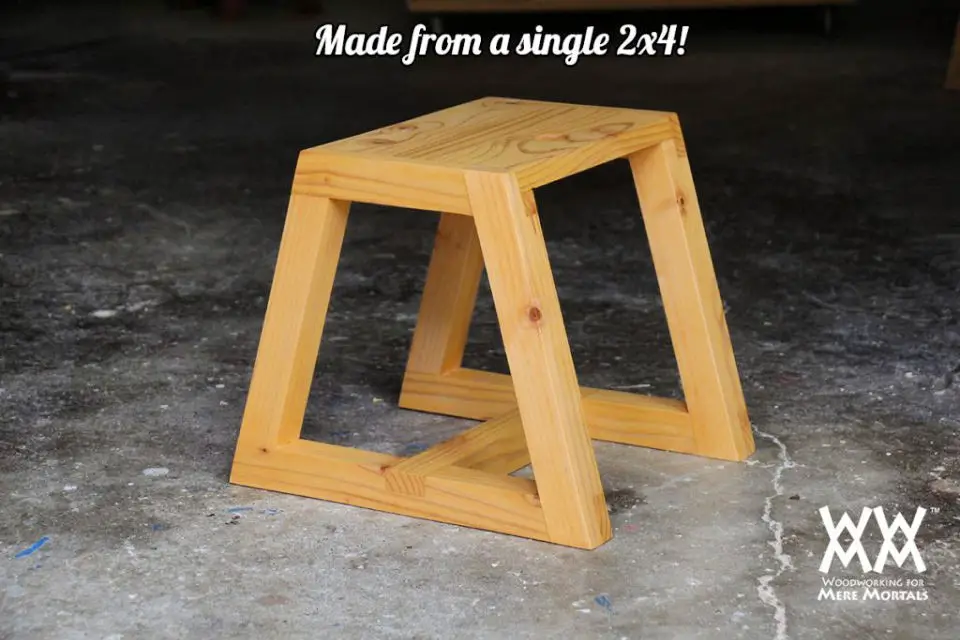
Simple Step Stool Out of 2×4’s
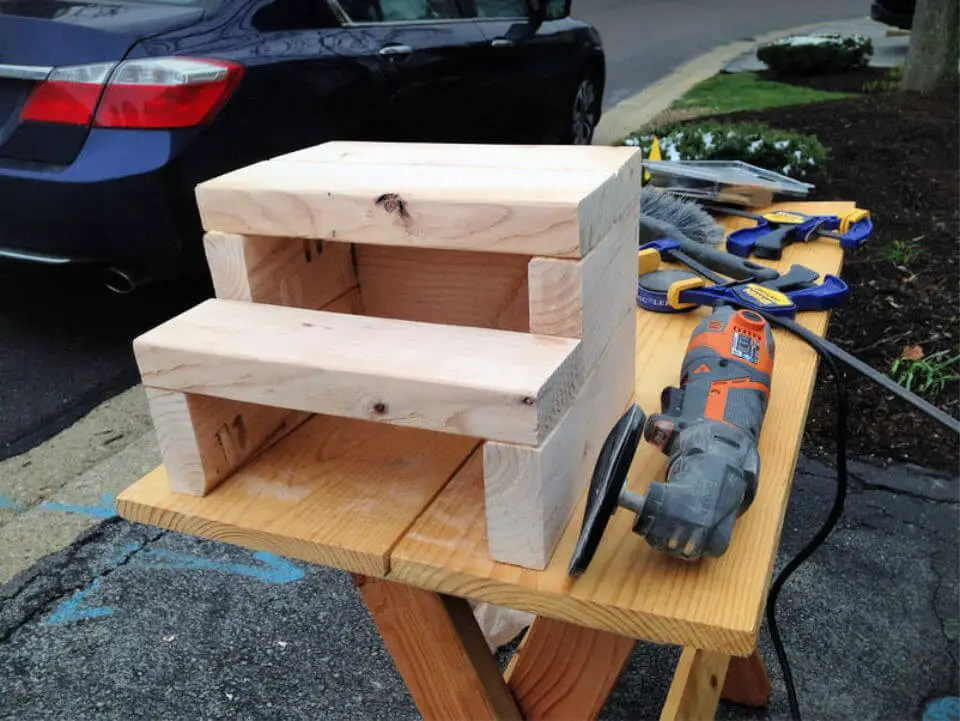
Elevate your DIY skills by creating a practical step stool from basic 2×4 lumber. This versatile addition to any home is perfect for kids reaching for the sink or adults struggling with high shelves. With just a few materials, including a single 2×4, wood glue, filler, and screws, this project is an affordable venture.Following the provided cut list, you’ll need only a drill and saw to shape the wood. The finished stool stands at 8.5 inches tall, 12 inches wide, and 10.5 inches deep, making it suitable for various uses around the home. To ensure success, focus on pre-drilling, countersinking screws, and meticulous measurement.Add your personal touch by applying a finish of your choice, whether matching your cabinets or adding a pop of vibrant color. With this straightforward guide, you can create a functional step stool today and enjoy increased reach tomorrow.
DIY Step Stool With Storage
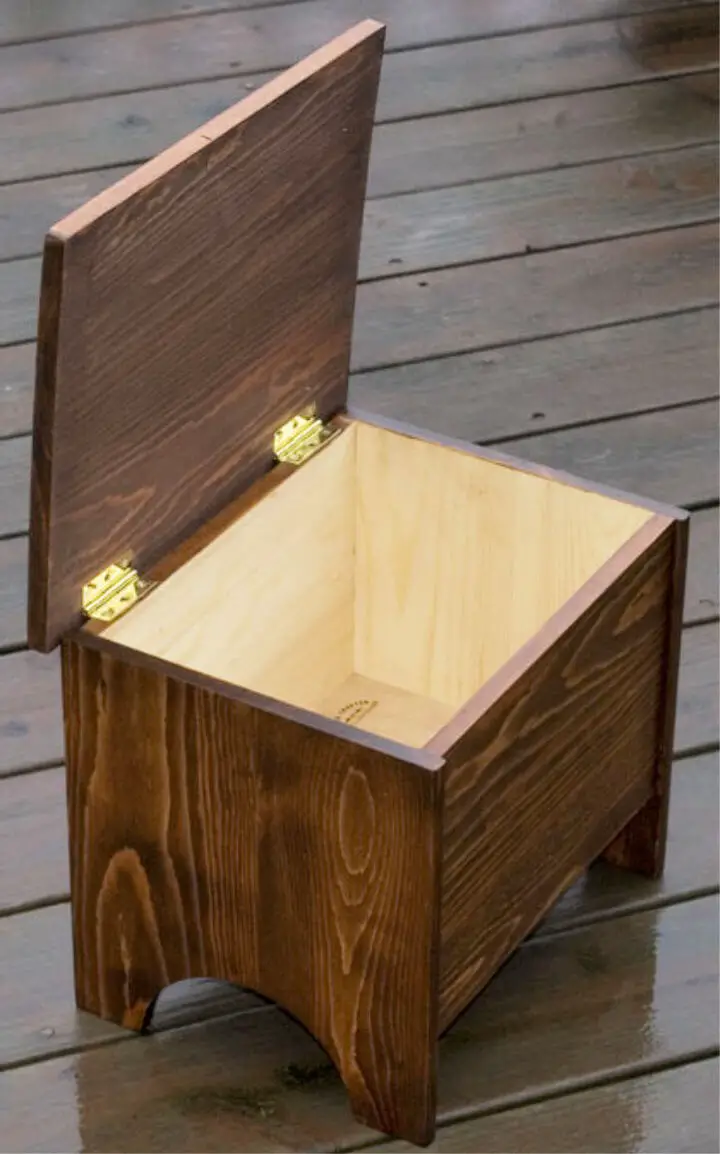
Bring out your inner craftsman and create a sturdy, visually appealing storage box with this captivating DIY endeavor. Employing a biscuit joiner, plywood, and a selection of fundamental tools, you’ll embark on a step-by-step journey to assemble the box. Start by marking the alignment for the biscuits and cutting your panels to precision. The assembly process involves gluing and clamping the pieces together, ensuring a seamless surface. As you progress, run the panels through a planer to smooth them out and trim them to size for a bespoke finish. Utilizing your biscuit joiner, create slots at the end of each panel, then carve a groove for your plywood. Next, router round-over bits lend a subtle, rounded edge, while the box’s legs are carefully crafted to precision. The top is meticulously cut wider and deeper than the box, allowing it to fit snugly with the aid of hinges. Once assembled, every surface is sanded to perfection, enabling you to apply your preferred stain for a personalized touch. This bespoke storage box project embodies creative carpentry at its best.
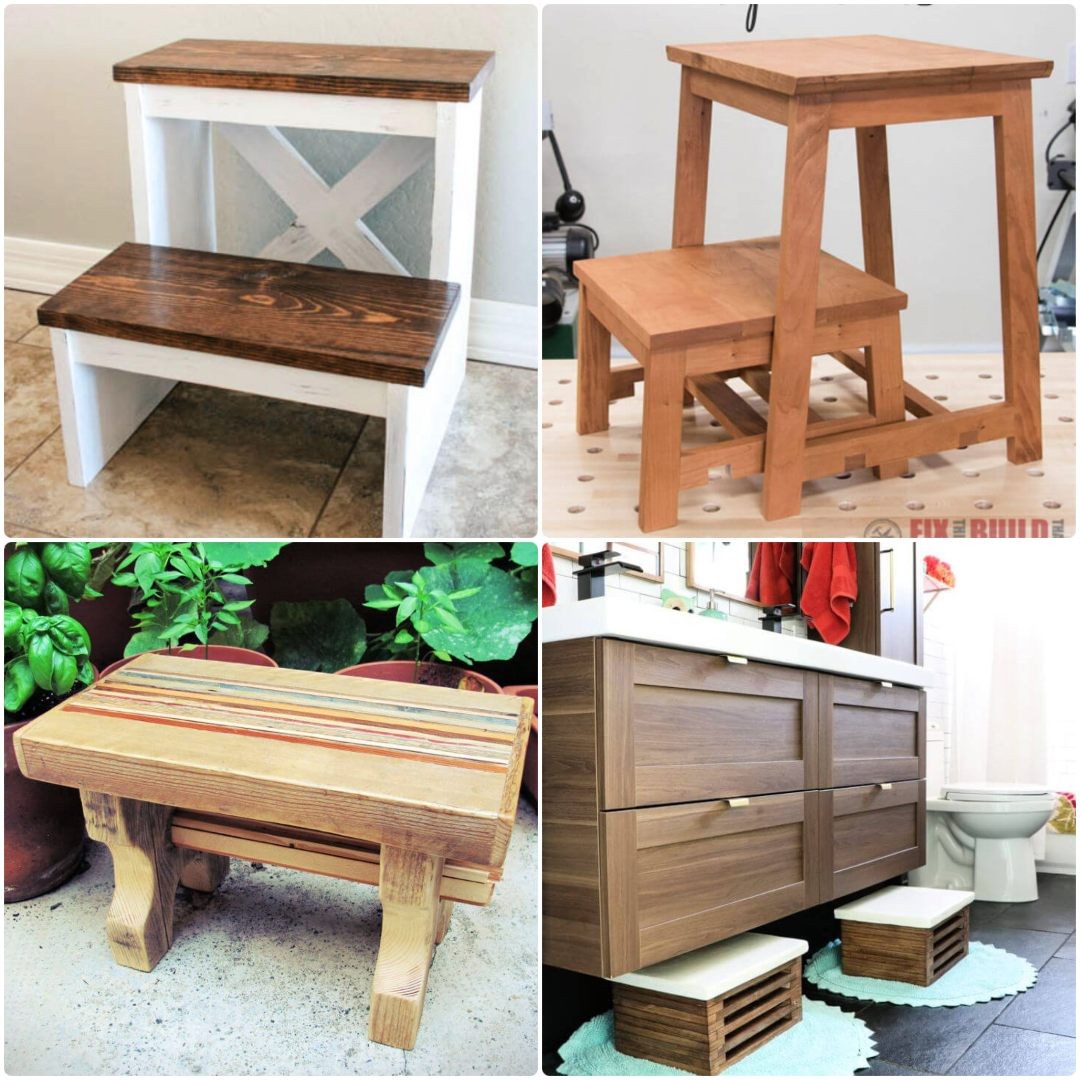
How to Build a Step Stool
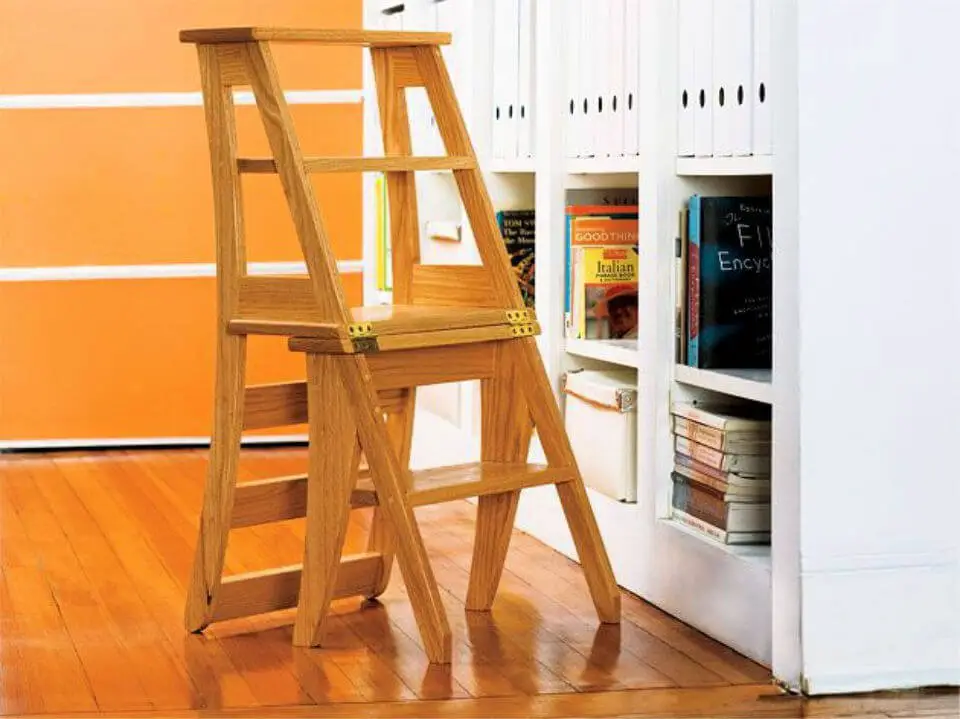
Transform your living space with a one-of-a-kind DIY step stool that seamlessly blends function and flair. By combining the practicality of a step stool with the comfort of a chair, this ingenious project adds a unique touch to any room. Constructed from durable red oak, this build is surprisingly straightforward, requiring only basic tools like a jigsaw, router, drill/driver, and sander to shape the wood and bring it together. The clever use of screws and wood glue ensures stability and longevity, making this piece a true standout in your home. To make it even easier to execute, simply follow along with the downloadable animated walkthrough and printable plans. This creative tribute to Benjamin Franklin’s legacy is sure to inspire conversation and admiration, all while adding a touch of history to your décor.
DIY Step Stool from Scrap Wood
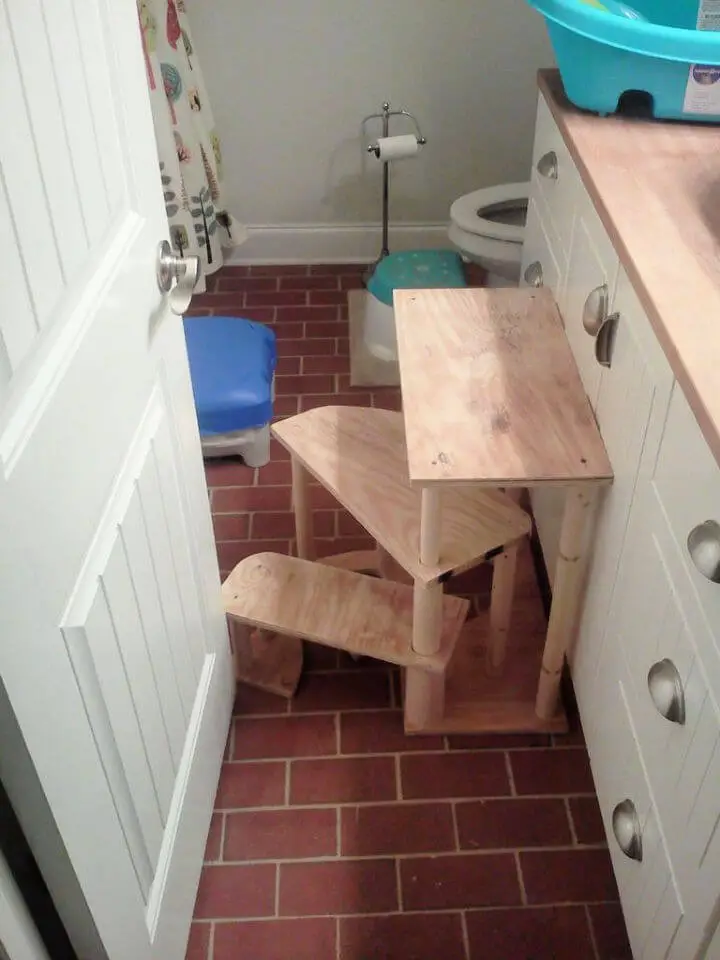
Transform your home with a charming DIY spiral step stool crafted from scrap wood and brought to life by this comprehensive guide! Specifically designed for compact spaces like bathrooms, this toddler-friendly creation is the perfect solution for families. The building process unfolds in three distinct stages: first, create sturdy legs that provide a solid foundation; next, prepare the tiered and bottom parts that give the stool its signature shape; finally, carefully assemble each component to ensure optimal balance and stability. As you work through these steps, you’ll be amazed by the emergence of a unique, visually striking design that’s not only functional but also an eye-catching decor piece. Don’t stop there – add your personal touch with a favorite paint color and turn this practical project into a truly one-of-a-kind masterpiece that complements any room. Get started on this inspiring DIY adventure and watch as your little one’s imagination runs wild with the possibilities!
Free Vintage Step Stool Plan
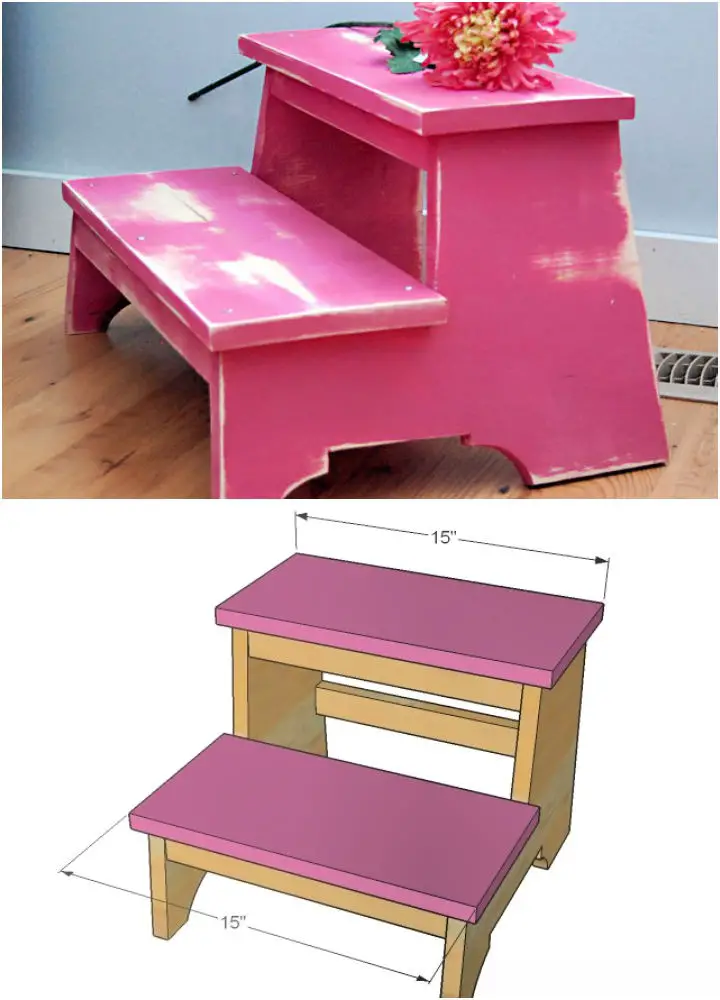
Discover the delight of woodworking with our comprehensive DIY step stool plans, guaranteeing a triumphant project every time. Create a nostalgic charm reminiscent of bygone eras with this vintage-inspired step stool. This functional masterpiece takes on an endearing, well-loved aesthetic, featuring deliberate uneven cuts and visible screws for that distinctive antique flair. Perfect for beginners, the project requires everyday materials like 1×12 and 1×2 wood, screws, wood glue, and paint.
This stool is crafted in four straightforward steps – shaping the sides, attaching the bottom supports, adding the top supports, and applying your preferred paint for a flawless finish. The result is a decorative and practical piece that helps little ones access sinks, beds, and more with ease. So, don your apron and begin building this captivating and handy creation today!
Build Your Own Step Stool
Immerse yourself in the world of woodworking by crafting a DIY step stool, an engaging project that demystifies the process of creating a functional piece from scratch. Using premium materials like pine, cedar, or redwood, paired with precise measurements, detailed instructions, and informative diagrams, this endeavor promises a fun and rewarding journey. The entire process is streamlined, allowing you to complete it in just one day. As you work on this project, you’ll not only create a handy step stool for your home or workspace but also nurture your creativity and develop hands-on skills. Start your woodworking adventure today and elevate your space’s functionality and style!
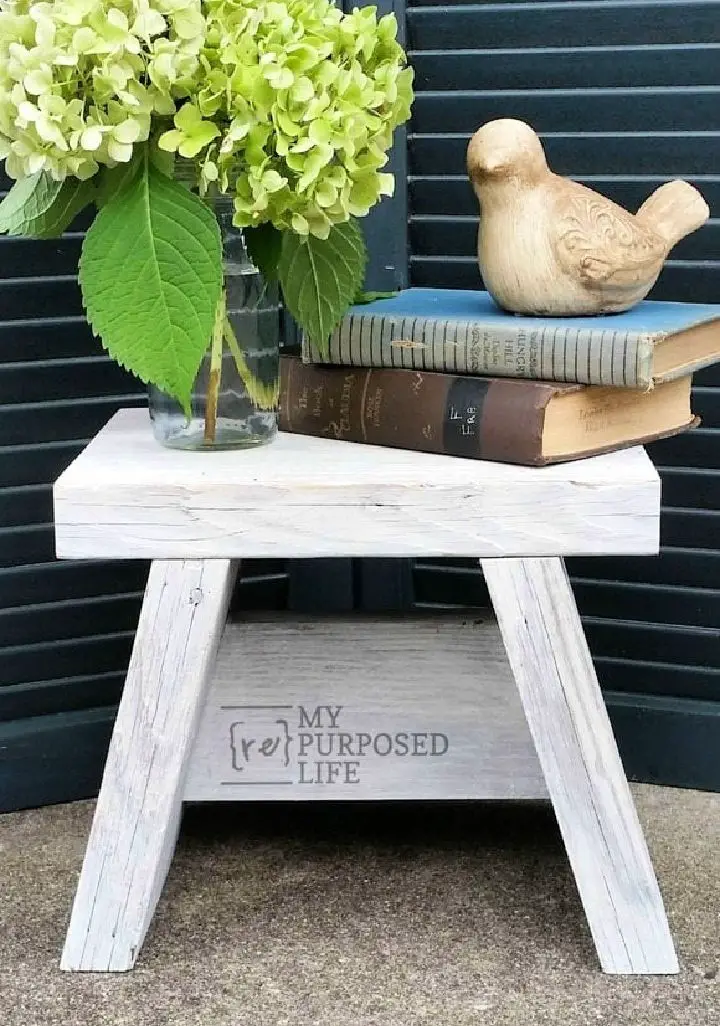
DIY Reclaimed Wood Step Stools
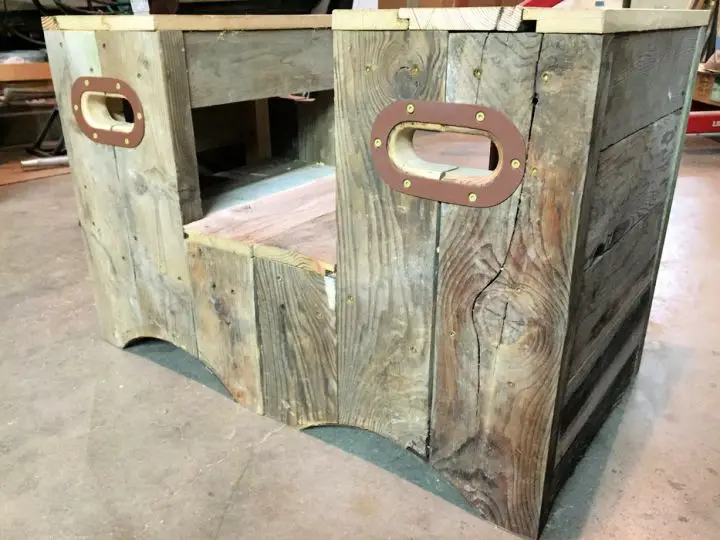
Transform reclaimed materials into a sturdy and versatile DIY multifunctional step stool that serves as both a portable workbench and a support system for long items. Weighing approximately 36 pounds, this heavy-duty stool is crafted from leftover shiplap boards, combining durability with an aesthetic appeal.The construction process is straightforward, allowing even novice DIY enthusiasts to follow along and create their own unique piece. While the steps may not be exhaustive, they provide sufficient guidance for most. What sets this step stool apart is its distinct design and functionality, differing significantly from typical step stools on the market.By repurposing materials and transforming scraps into something useful, reliable, and visually striking, you can tap into the beauty of upcycling and create a one-of-a-kind piece that serves as both a functional tool and a conversation starter.
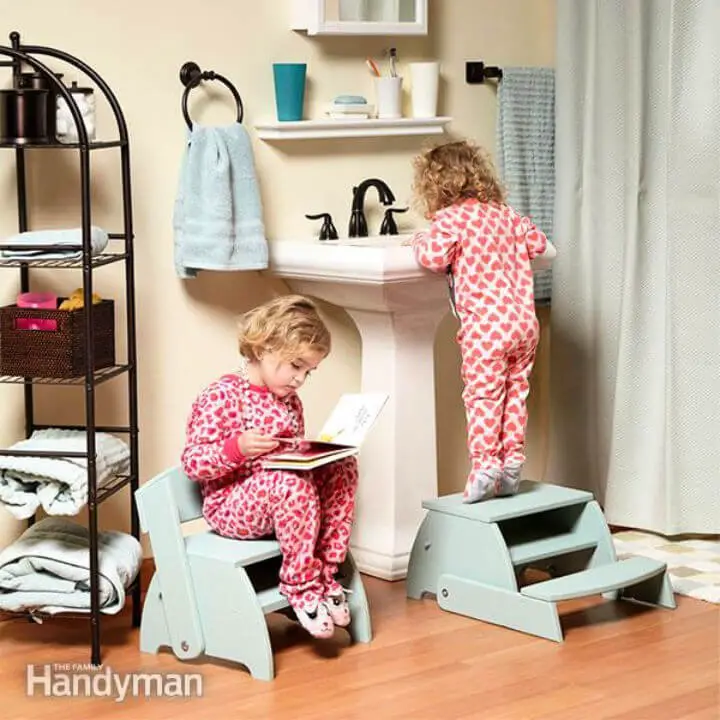
Make a Step Stool Chair for Kids’

Crafting a charming DIY kids’ step stool chair is an unparalleled way to bring joy and functionality into any child’s room, potentially even creating a family heirloom that will be treasured for years to come. This woodworking project may require some familiarity with tools, but the end result is well worth the effort – a sturdy seat where little ones can sit, read, or reach those out-of-the-way places with ease.
To bring this delightful project to life, you’ll need supplies like a common board, square dowel, miter saw, circular saw, paint, and a printable template. This hands-on endeavor is the perfect way to foster creativity and practicality in your little ones, while also creating something truly special.
The finished chair will provide years of enjoyment, making it a valuable investment of time and effort. Take this opportunity to get creative, work with your hands, and build something unique and cherished for your children – a true labour of love.
Wooden Step Stool That Doubles As a Chair
Immerse yourself in the transformation of your home by building a DIY wooden step stool that doubles as a chair, requiring minimal carpentry skills and a dash of creativity. This versatile piece will effortlessly fit into any room, serving as a practical solution for reaching high kitchen shelves or doubling as a playful reading nook for kids.
Crafted from 1/2-inch thick MDF and a sturdy 1-inch interior stair tread, this step stool chair exudes style while catering to your DIY cravings. The touch of paint adds a charming flair, seamlessly blending functionality with aesthetics.
This project is an affordable investment, estimated at just $20, with an active construction time of only 3 hours. It’s not just carpentry; it’s an adventure in creativity and practical design, awaiting your creative spark to bring it to life.
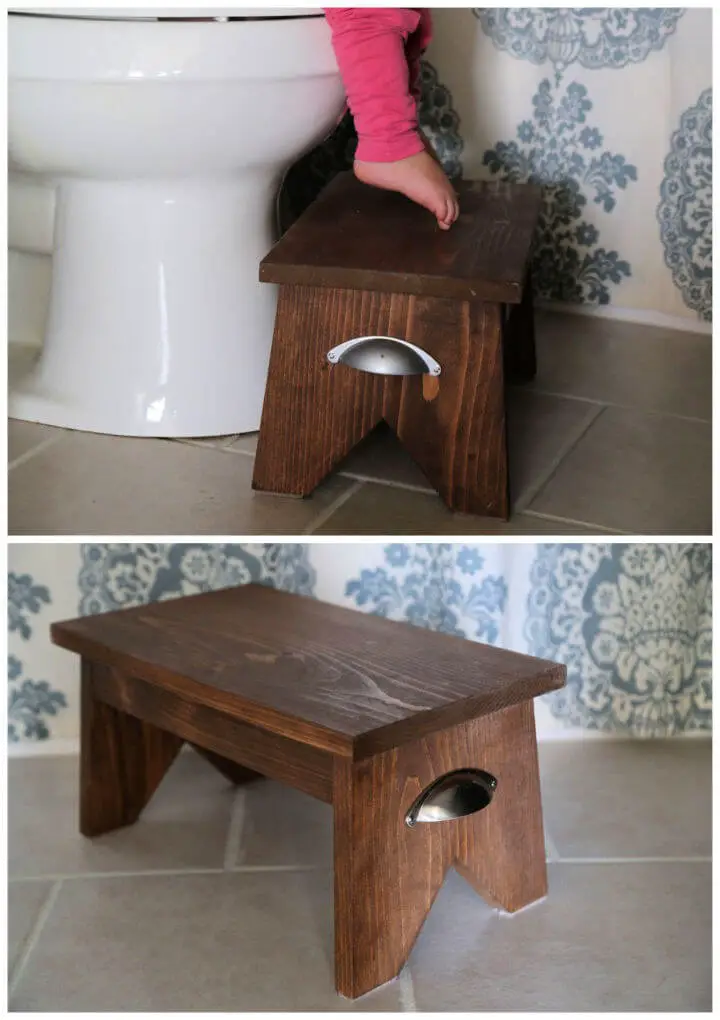
DIY Small Step Stool for the Bathroom
With our DIY step stool plans, you can create a one-of-a-kind piece of furniture that not only boosts your child’s independence but also adds a touch of handmade charm to their surroundings. By following this step-by-step guide, you’ll be able to craft a sturdy and safe wooden step stool that will help your little ones navigate spaces like the kitchen or bathroom with ease. The best part? This project is surprisingly affordable and requires minimal materials, including a 1x10x4ft board, a 1x2x5ft board, 1.25-inch screws, and a dash of love and creativity. With detailed instructions that walk you through every cut, pocket hole, and sanding stroke, you’ll be able to apply a finished stain and polycrylic coating for added protection against water damage. So why wait? Get started today and celebrate your child’s journey towards self-reliance with this easy-to-follow step stool tutorial!
Rustic DIY X Back Step Stool
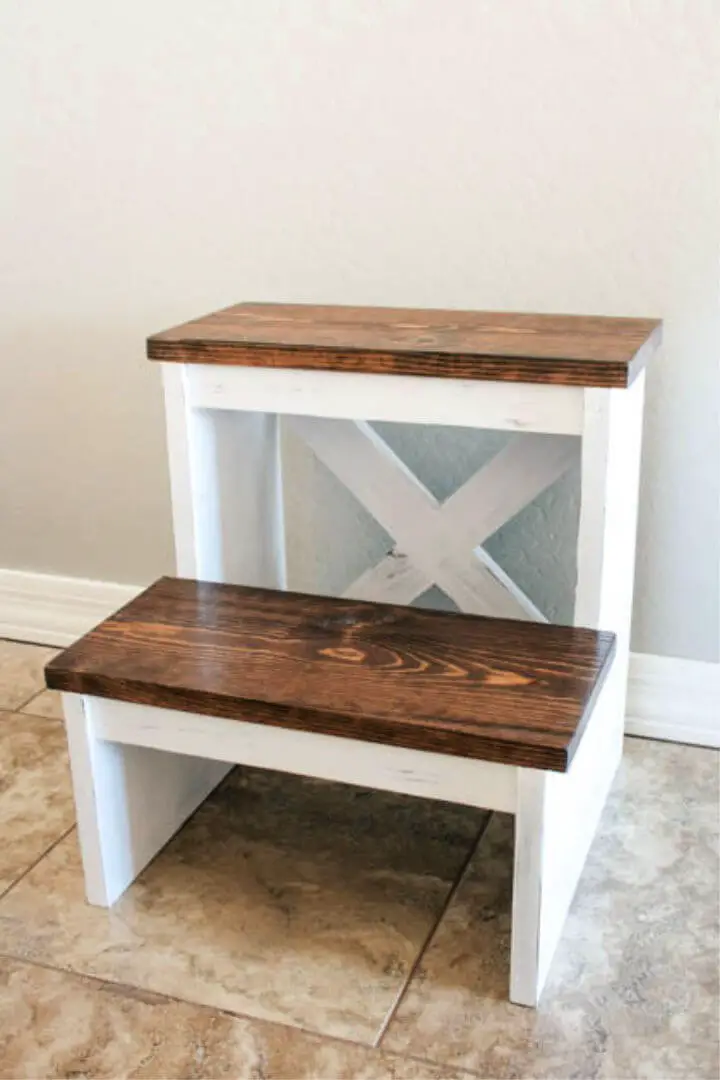
Transform a humble 1x8x8′ board into a practical and portable step stool that will become an indispensable companion for young ones in your home. By thoughtfully utilizing every inch of the board, you can create a sturdy and functional construction that begins with a table saw and miter saw, carefully ripping and cutting the board into the necessary parts. With drilled pocket holes, wood glue, and pocket screws, assembly is a straightforward process that yields impressive results. Adding an ‘X’ back not only provides style but also reinforces the structure’s integrity. The finishing touch comes from a distinctive two-tone distressed look achieved through Minwax stain and homemade chalk paint. This cleverly crafted step stool enables little ones to reach higher shelves while supporting adults, seamlessly combining utility and aesthetics in one project. Take on this hands-on challenge and simplify your daily routine!
Easy Small Step Stool – One Board Project
Transform your space with a functional yet charming DIY small step stool crafted from a single reclaimed board. This clever creation is ideal for accessing those pesky kitchen cupboards, adding an extra boost to a closet, or even serving as a one-of-a-kind ‘time out’ zone for kids. With its straightforward build process involving precise cuts and secure assembly using wood glue and screws, you’ll be able to enjoy the fruits of your labor in no time. Feel free to add a personal touch with paint or stain to match your unique style. Not only will this step stool provide practical benefits around the house, but it also celebrates the beauty of upcycling and showcases your craftsmanship. So why not take on the power tool challenge and get creative today? The result is sure to be a stunning addition to any room.
Wooden Step Stool With White Concrete Top
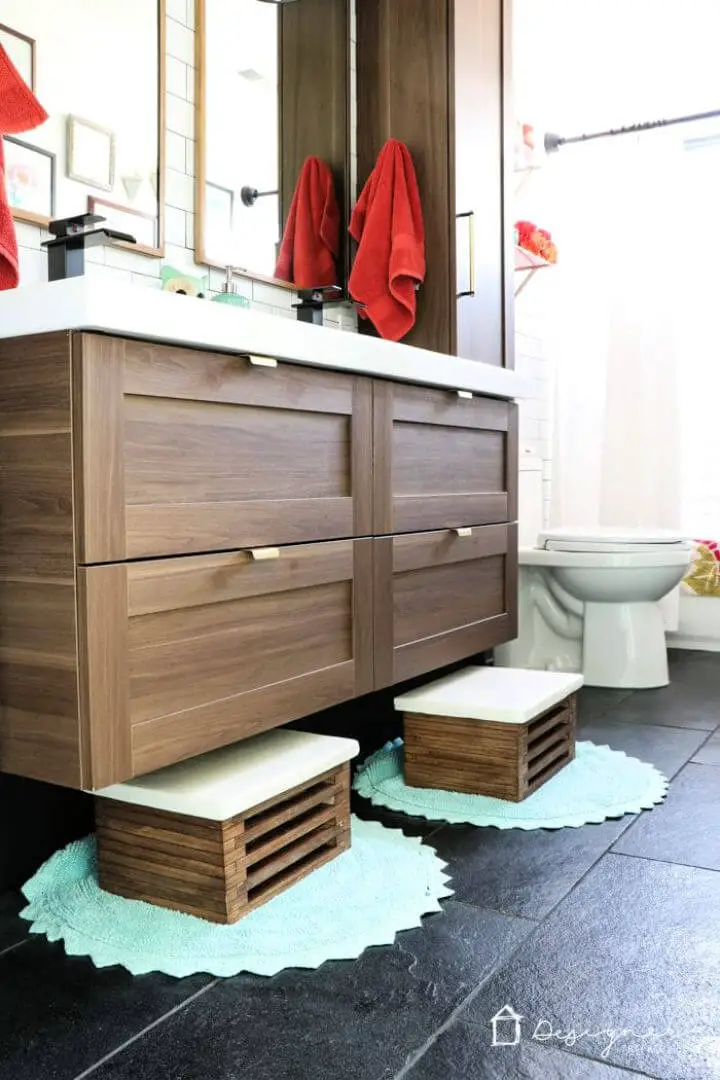
Transform your bathroom’s functionality and style with this easy-to-follow DIY wooden step stool tutorial. Designed specifically for little ones to reach bathroom sinks, these stools strike a perfect balance between practicality and aesthetic appeal, boasting a sleek modern design and a durable white concrete top. Constructed from high-quality walnut design edge plywood and OSB materials, these steps can effortlessly slide under floating vanities, providing an additional layer of functionality. With this comprehensive guide, you’ll learn how to build your own step stool using an orbital sander, table saw, and possibly a miter saw, among other essential tools. To ensure a seamless learning experience, the tutorial includes detailed step-by-step instructions, accompanying diagrams for enhanced visual understanding, and a video tutorial that walks you through each stage of the process. Not only will this project enhance your bathroom’s usability, but it’ll also elevate its overall look, effortlessly integrating with any modern decor. So why not give it a try? Happy crafting!
DIY Step Stool for Children
Creating a simple step stool for kids is an excellent way to promote independence and self-reliance, one step at a time! Made from a single piece of 1×5 reclaimed lumber and 12 wood screws, this sturdy stool can support adults too. To offer more versatility, you can opt for 1×6 or 2×6 lumber to create a slightly taller design. The key materials required for this project include a table saw, electric orbital sander, power drill, Phillips screwdriver, and countersink drill bit. If you don’t have access to these tools, consider alternatives like a handheld circular saw or hand saw with sandpaper wrapped around a wood block. This practical piece of DIY furniture adds a touch of rustic charm to your home decor while ensuring safety and accessibility for your child.
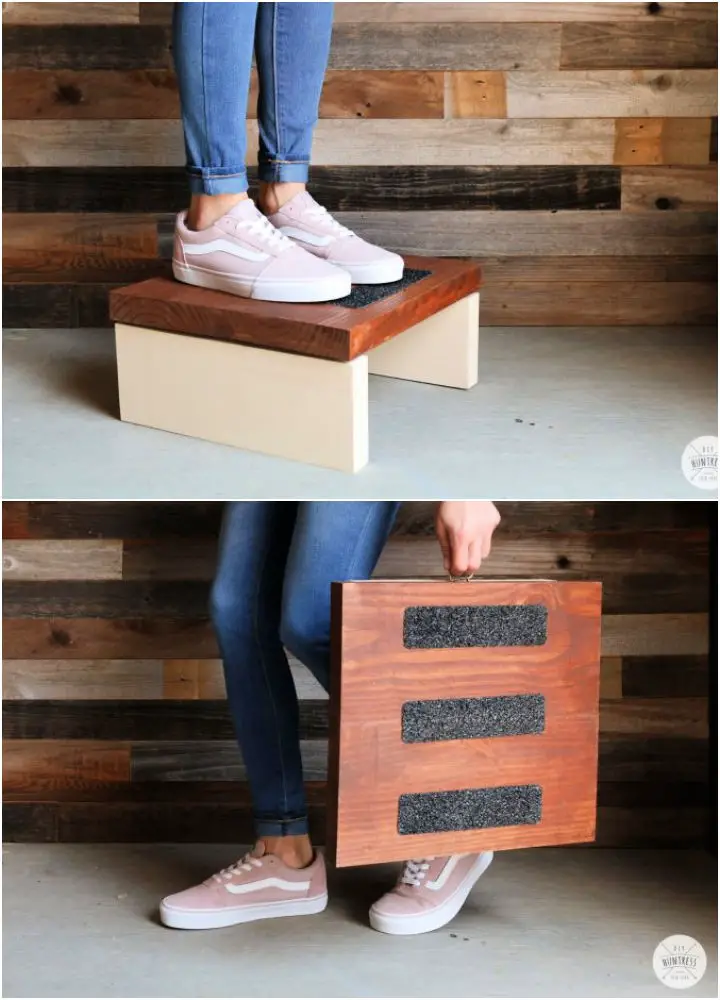
DIY Versatile Flip-flop Step Stool
Craft a bespoke, multi-purpose masterpiece with our DIY step stool plans, blending form and function to create an indispensable addition to your home. Perfect for families with kids, this adaptable flip-flop stool seamlessly transforms from a chair to a step stool, injecting a touch of practicality and convenience into daily life. When the back is up, it becomes an ideal perch for youngsters; with the back down, it doubles as a step stool, effortlessly reaching those hard-to-access areas like faucets, shelves, or cabinets. A budget-friendly project that can be completed in just one day, this beginner-friendly endeavor involves measuring, cutting, assembling, and installing parts, all within a price range of $51-$100. Beyond its practical applications, the flip-flop stool also prioritizes child safety by providing an extra boost when needed, making it an invaluable asset for any household, whether in the bathroom or kitchen.
Free Striped Wooden Stool Plan
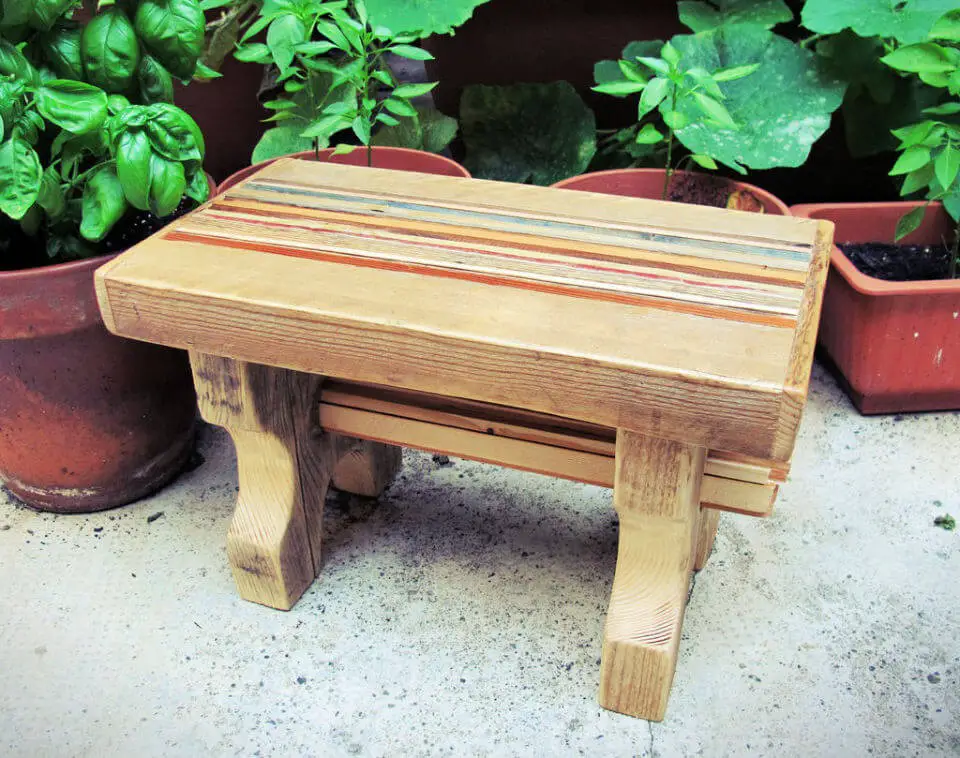
Bring a burst of personality to your space by crafting a one-of-a-kind wooden stool featuring bold, colorful stripes. This DIY project seamlessly blends the warmth of natural wood with the vibrancy of a carefully curated color palette. Begin by selecting wooden strips that harmonize with your existing décor, then choose an eye-catching combination of hues to add visual interest. The assembly process is surprisingly straightforward, requiring only a few simple steps and basic materials like glue and a steady hand. Once complete, add sturdy legs and a comfortable bar for support, finishing the piece off with a coat of polish for a refined, polished look. The result is a uniquely personalized stool that’s sure to become a conversation starter in any modern home setting.
DIY Step Stool Using Scrap Wood
Transform your space with a unique DIY step stool created from reclaimed wood, accessible even for novice crafters! This functional wooden step stool is straightforward to build using leftover lumber, offering a simple yet practical design perfect for reaching high shelves or providing a boost for little ones. The step-by-step tutorial guides you through the process, requiring materials like sanding sponges, tack cloths, heat shrink torches, propane tanks, and other essential woodworking tools. By adopting a cost-effective approach that repurposes scrap wood, you not only create something valuable but also contribute to environmental sustainability. Start building your step stool today and infuse your home with a touch of homemade charm.
How to Make a Plywood Step Stool
Get ready to take your DIY game to new heights by building a sturdy and functional plywood step stool! This innovative project utilizes leftover 1/2-inch plywood, minimizing waste while adding convenience and safety to your workspace or household. With minimal supplies required – including plywood, glue, and brads – this is an excellent opportunity to breathe new life into spare materials. The comprehensive guide takes you through every stage of the process, from crafting semi-circular cutouts using an 11-inch light fixture for a decorative touch, to applying a single coat of polyurethane for protection and a sleek finish. Stability is also prioritized with additional plywood feet added to prevent tipping, ensuring your step stool remains secure and reliable. By elevating your reach and enhancing your DIY skills, this versatile project will become an indispensable tool in your workshop arsenal.
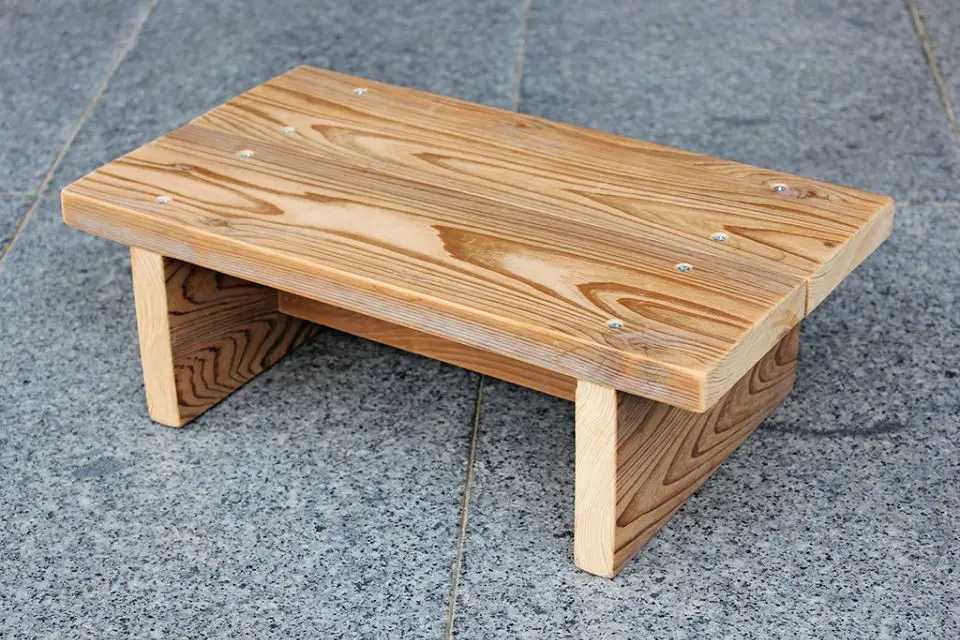
Building a Wooden Step Stool
For DIY enthusiasts on a budget, our step stool plans offer an excellent starting point. By repurposing scrap wood from old projects, you can create a sturdy and functional tool for your home. Combine rough pine and plywood to produce a two-tone design that adds visual flair with minimal additional expense. Following our straightforward instructions, you’ll be able to transform scraps into a usable step stool in just one hour, without breaking the bank. The broad steps, crafted from 1×12 rough pine, provide ample support for adults, ensuring safety and stability. This project’s cost-effectiveness makes it an ideal solution for those looking to boost their home’s functionality and aesthetic appeal.
Make a Child’s Step Stool
Immerse yourself in a DIY adventure by crafting a simple yet rewarding woodworking project – a versatile step stool. This engaging venture not only allows you to develop your woodworking skills but also provides an opportunity to express your creativity and showcase your craftsmanship.
To get started, gather essential materials like wooden dowels, wood glue, and a range of tools including a miter saw, table saw, and orbital sander. With these, you’ll be able to bring your step stool to life in no time.
The beauty of this project lies not just in its practicality but also in its aesthetic appeal. You’re free to customize the design to suit your needs or personal style, making it a unique reflection of your taste and creativity.
So why wait? Grab your tools, get the build plans, and start crafting your very own step stool today!
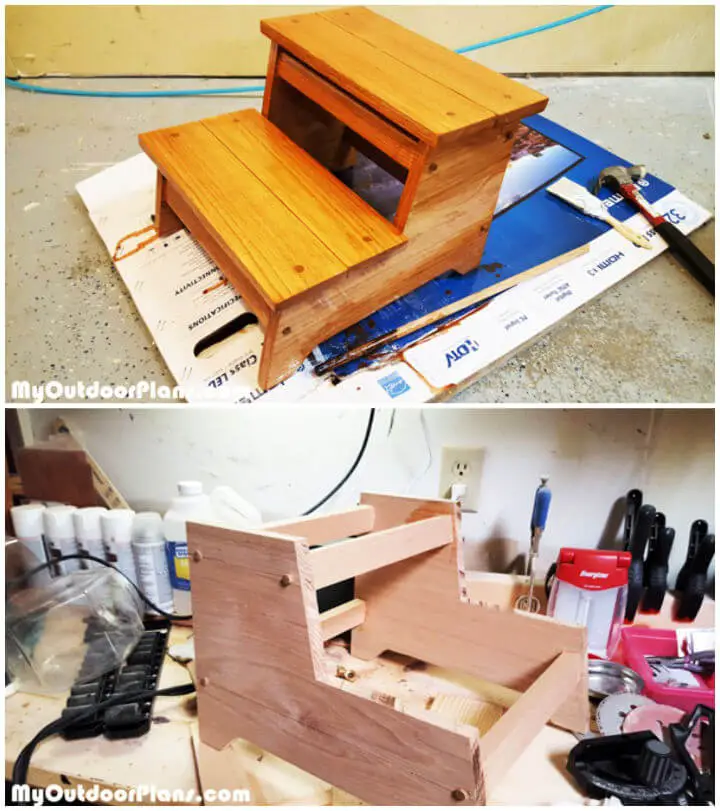
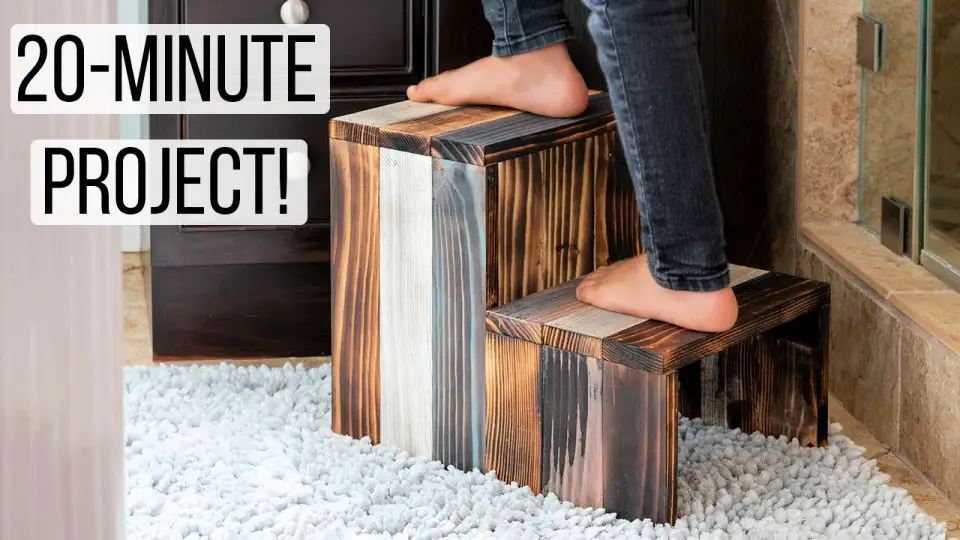
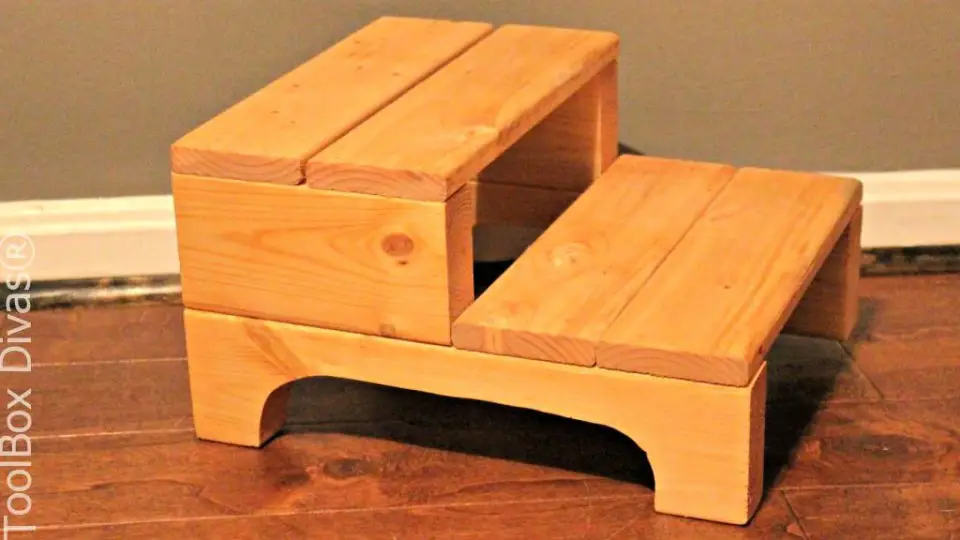
DIY Step Stool With 3-in-1 Nesting Feature
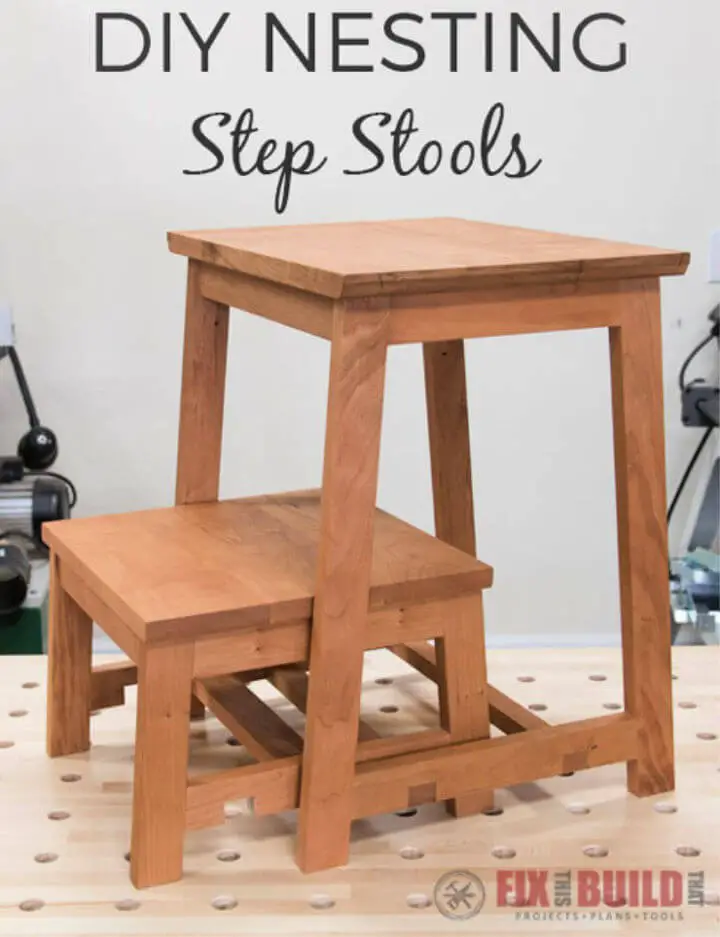
Unlock the secrets to creating a functional and stylish DIY step stool that elevates your kitchen’s functionality and decor. With its unique 3-in-1 nesting feature, this versatile tool allows you to access hard-to-reach kitchen cabinets while keeping countertops safe for children. To bring this project to life, you’ll need to gather tools such as a table saw, miter saw, pocket hole jig, and others. The essential materials include hardwood, dowels, and pocket hole screws. Follow our step-by-step guide to build the step stool tops, assemble the base, and attach the stool top. The result is a compact two-tiered step stool that occupies just the space of a single kitchen stool, promising enhanced kitchen convenience and space optimization for families of any size.
DIY Folding Step Stool
Transform surplus scrap wood into a functional DIY folding step stool, perfect for reaching high shelves or saving space. This practical project requires a range of tools, including a miter saw, table saw, sander, pocket hole jig, and drill. You’ll need some scrap 2×8 board, 2×6 board, T-Rex Extreme Tread Tape, and butt hinges, among other materials. With clear steps guiding you through the process, from cutting wood pieces to measuring and attaching legs, you can complete this project quickly. The finishing touch is applying non-slip T-Rex Extreme Tread Tape, ensuring a safe and sturdy stool. This simple DIY project helps you make the most of your leftover wood, turning it into a handy piece that can be folded away when not in use.
Modern Farmhouse Style Step Stool
Discover the joy of DIY woodworking with this comprehensive guide to building a modern step stool using the innovative Kreg Jig R3 kit. By following this straightforward tutorial, you’ll learn to craft a practical and stylish household essential that showcases your newfound woodworking skills. With the Kreg Jig, a clamp, Kreg screws, and a 1x4x8 pine board as your tools of choice, you’ll master the art of woodworking and create a beautiful and functional piece for your home. The step-by-step guide covers every stage, from preparing the wood to applying a finishing touch, ensuring that your final product is not only sturdy but also aesthetically pleasing. As you work through this project, you’ll appreciate how the Kreg Jig simplifies drilling and making pocket holes, allowing you to focus on perfecting your woodworking techniques. Start building your very own modern step stool today and unlock a world of creative possibilities!
How to Make a Step Stool
Transforming raw materials into a functional step stool is a DIY project that’s both practical and enjoyable. Perfect for those seeking an extra reach or for kids to access elevated areas, this endeavour requires basic supplies such as 2×4 and 1×4 wood pieces, 4-inch spax screws, rapid-fuse wood glue, sandpaper, and your preferred stain or paint. As you work through the project, you’ll have the opportunity to hone your skills with fundamental power tools, following clear and easy-to-follow instructions. This endeavour extends beyond producing a useful step stool, offering an engaging and creative experience that teaches valuable woodworking skills and instils a sense of accomplishment upon completion.
DIY Step Stool from Scrap Wood
Transform your home with a custom-built DIY wooden step stool that’s both functional and stylish. Perfect for reaching those hard-to-access kitchen cabinets or other high spaces, this sturdy and durable stool is made from just one piece of 2 x 6 lumber and basic tools like a saw, drill, and Kreg Jig.
Following the easy-to-follow instructions, you’ll start by crafting the two side pieces before gradually adding the top and bottom steps. To ensure stability, secure each step with wood glue and 2 1/2-inch pocket hole screws.
Once complete, give your stool a finishing touch by sanding and applying your preferred color, such as a warm gray-brown achieved with Minwax Special Walnut and Classic Gray. For added protection and durability, seal the entire piece with polyurethane, especially if it’s destined for high-traffic areas like the kitchen.
Start building your ultimate convenience companion today and enjoy the satisfaction of having a one-of-a-kind, handcrafted wooden step stool that reflects your personal style.
Make Your Own Kitchen Step Stool
Experience the thrill of self-sufficiency with this simple DIY kitchen step stool project that won’t break the bank. By repurposing scraps of wood, you’ll not only save money but also reduce waste. With a Ryobi compound sliding miter saw and Kreg jig at your disposal, you can construct a sturdy and dependable step stool that effortlessly grants access to even the highest shelves. This ingenious creation is particularly beneficial for individuals who stand on the shorter side, providing an elevated perspective without straining or using a cumbersome chair.
This DIY guide provides a clear roadmap for assembling and painting your step stool, allowing you to tailor its appearance to match your kitchen’s unique style. As you bring this project to life, you’ll not only gain functional benefits but also infuse your cooking space with a touch of personal flair. The end result is a practical and visually appealing addition that empowers you to reach new heights in the kitchen.
DIY Kid’s Wood Step Stool
Give your little ones the gift of independence with this effortless DIY wood step stool project. This sturdy, eco-friendly stool allows kids to reach the sink or toilet without compromising on style, effortlessly blending in with your home decor. Unlike flashy plastic alternatives, this wooden masterpiece is a thoughtful addition to any bathroom. The simple materials needed include 2 x 4 x 8 wood, a nail gun or hammer, wood glue, and paint or stain – all of which can be sourced at an affordable cost. By following the straightforward cutting and assembly guidelines, you’ll create a one-of-a-kind stool that not only fosters your child’s self-reliance but also adds a touch of warmth to your bathroom’s ambiance. This budget-friendly project is the perfect starting point for a noticeable transformation that will leave you beaming with pride.
Free Sturdy Utility Step Stool Plans
Want to create a unique and profitable woodworking project that showcases your craftsmanship? Look no further than this DIY utility stool made from a single 8-foot 2×4. The half-lap joints used in its construction give it a distinct handmade feel that will surely appeal to consumers. This type of attention to detail can significantly add value to your creation, potentially fetching prices upwards of $25 per stool at a craft fair or online marketplaces. Not only is this project an excellent woodworking exercise, but it also provides the opportunity to turn your hobby into a rewarding income source. With the right modifications, you can make this utility stool truly one-of-a-kind and perfect for selling at craft fairs, online, or even as part of a larger furniture collection. This project is a great way to enjoy woodworking while creating a high-value product that will be appreciated by others.
Step Stool Makeover With Mod Podge
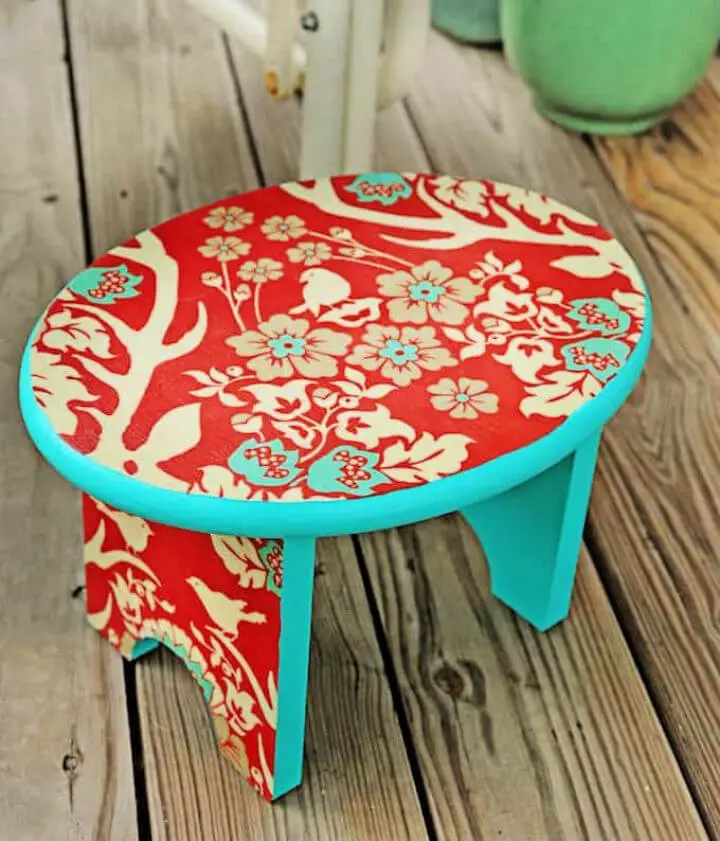
Elevate your space with a customized DIY step stool that combines functionality and flair. This fun project transforms a basic wooden stool into a vibrant masterpiece by wrapping it with colorful fabric, showcasing the perfect blend of creativity and practicality.
To get started, gather the essentials: a wooden stool, Mod Podge, acrylic paint, and your favorite fabric. Follow our step-by-step guide to bring your unique vision to life in no time. With just a few easy steps, you’ll create a one-of-a-kind stool that not only adds a splash of color to your surroundings but also reflects your personality and creativity.
This project is more than just a step stool – it’s an opportunity to express yourself and showcase your artistic side. By combining functionality with style, you’re turning a simple necessity into a meaningful piece that reflects your individuality.
Conclusion:
As we conclude the collection of 30 free DIY step stool plans, it’s clear that the wealth of information provided offers a comprehensive resource for crafting a personalized and functional piece. The guide covers not only the design options but also essential safety guidelines, advanced techniques, and maintenance advice to ensure your project is both stylish and secure. With this knowledge at your fingertips, you’ll be empowered to customize your step stool’s style, color, texture, and add-ons, unleashing your creativity as you bring your vision to life.
