Step into the realm of stencil craft, where centuries-old techniques meet modern-day creativity. This ancient art form has been used to adorn surfaces and textiles for generations, offering a world of possibilities for crafting enthusiasts. From personalizing everyday items to creating one-of-a-kind works of art, stenciling is an accessible and versatile medium that’s sure to inspire. With its rich history dating back to ancient times, stencil craft remains a beloved choice for adding a touch of flair and character to contemporary projects.
Introduction to Stencil Craft
With its roots tracing back to ancient civilizations, stenciling is an intriguing art form that has evolved over time, blending cultures and techniques. By applying pigmented designs through cut-out templates onto various surfaces, this age-old method has served as a means of adornment, identification, and communication throughout human history.
The Origins of Stenciling
Dating back over 35,000 years, the earliest known stencils were created through a simple yet effective process: blowing pigment over a hand placed against a wall. This primitive form of artistic expression was not only a means of self-expression but also a way to convey stories and emotions. As human civilizations evolved, so did the art of stenciling. In ancient China around the 8th century, artisans began crafting intricate designs using cardboard or metal stencils to decorate textiles and walls. The technique soon spread to Japan, where skilled artisans refined the process by employing delicate materials like silk and human hair to create exquisite patterns for dyeing fabrics, a method known as Katazome. This early form of stencil art not only showcases human creativity but also highlights the cultural exchange and innovation that took place across ancient civilizations.
Stenciling Through the Ages
In medieval Europe, stencils revolutionized the mass production of manuscripts, playing cards, and illustrations for books, fabrics, and wallpaper. This versatile technique was not only used for practical purposes but also for artistic expression, as seen in its application to decorate church walls.
The adaptability of stenciling continued to be recognized in modern times. In the 20th century, renowned artists like Pablo Picasso, Joan Miró, and Henri Matisse leveraged stencils to create prints and illustrations for books, demonstrating the technique’s potential in fine art. Additionally, stencils found their way into street art, with pioneering artists such as Banksy utilizing them to make powerful social statements.
Why Stencil Craft Matters Today
Stenciling’s enduring appeal lies in its versatility and ease of use, making it a hobby that transcends age and skill levels. The ability to reuse designs and create unique pieces without breaking the bank has cemented its place as a beloved craft. Whether you’re seeking to inject personal flair into your home decor, craft one-of-a-kind fashion items, or simply enjoy a fun project with family and friends, stenciling offers an endless array of creative possibilities.
With an understanding of stencil craft’s rich history, we can not only appreciate its timeless charm but also innovate and push the boundaries of this art form. Let us celebrate the beauty that can be created with our stencils!
Project Ideas for Stencil Craft
Beyond being an art form, stenciling offers a means of unleashing your creative expression and infusing personal touches into your surroundings. From novice crafters to seasoned DIY enthusiasts, the possibilities for stenciling projects are endless. The following innovative and captivating ideas will undoubtedly motivate you to grab a stencil and start crafting, regardless of your level of experience.
Personalized Tote Bags
Elevate a humble tote bag into a fashion statement by incorporating stencils. Select a design that resonates with your personal style – whether it’s a thought-provoking quote, an intricate geometric pattern, or a whimsical floral motif. By combining fabric paint with a touch of patience, you can create a one-of-a-kind tote bag that reflects your individuality.
Customized T-Shirts
Embrace individuality by creating your own unique fashion statement, rather than conforming to the crowd. Select a stencil that reflects your personality and apply it to a blank t-shirt. This DIY project is enjoyable for people of all ages, allowing you to express yourself and stand out from the norm.
Decorative Pillows
Elevate the ambiance of your living room or bedroom by incorporating stenciled pillows into your décor. By choosing a design that harmonizes with your existing aesthetic, you can effortlessly revitalize your space without investing in entirely new pillows.
Wall Art
Transforming the ambiance of a room is as easy as creating your own unique wall art using stencils. This versatile technique allows you to make a statement with bold murals or add subtle nuances with intricate designs, effortlessly elevating the aesthetic of any space.
Furniture Makeover
Breathing new life into vintage pieces is as simple as adding a dash of creativity with stencils. By transforming an old tabletop, chair, or dresser, you can create a showstopping focal point that ties together the entire space. To get started, select a design that harmonizes with the piece’s style and the room’s aesthetic, allowing your unique touch to shine.
Greeting Cards
There’s something undeniably unique about handmade greeting cards. One way to infuse them with an extra layer of thoughtfulness is by incorporating stencils into the design process. This technique can be applied to create one-of-a-kind cards for birthdays, holidays, or simply as a spontaneous expression of appreciation. The end result is a heartfelt way to show someone you’re thinking of them and genuinely care about their special day.
Stenciled Cake Decorations
Elevate your baking skills by incorporating stenciled cake decorations into your creations. Utilizing food-safe stencils allows for intricate designs to be added to cakes and cupcakes, making them perfect for impressing guests at your next gathering or celebration.
Not only do these project ideas provide a starting point, but they also serve as a gateway to endless possibilities when working with stencils. So, gather your materials, select a project that sparks your creativity, and begin stenciling your way to artistic baking mastery today.
How to Get Started with DIY Stencils
Unleashing your creative potential through DIY stenciling can be an incredibly empowering experience, allowing you to breathe new life into your living space. Whether you’re looking to revamp your floors, walls, or create one-of-a-kind pieces of art, the process is surprisingly accessible. With a straightforward and reliable guide to get you started, the possibilities are endless, and the journey begins here.
Choose Your Project
Before embarking on this DIY stencil adventure, take the time to decide which project you’d like to tackle first. The possibilities are endless, but here are some ideas to get you started: stenciling tile floors, creating a statement piece for your kitchen backsplash, or even adding some flair to your wall art and furniture. You can also apply your stencil skills to fabric-based projects, such as tote bags or t-shirts. Having a clear project in mind will help guide the materials and tools you’ll need, ensuring a smooth and successful process from start to finish.
Gather Your Materials
When you’ve chosen a project to start with, it’s time to gather the necessary materials. The list below serves as a starting point:
The first essential item is a stencil. You can either purchase pre-made stencils from craft stores or online, or create your own custom design using thick paper, plastic sheets, or thin cardboard.
Next, you’ll need paint to bring your project to life. Acrylic paint is a versatile option that works well on various surfaces. However, for fabric projects, it’s best to use fabric paint instead. For stenciling floors or furniture, consider using chalk paint or a durable latex paint.
To apply the paint evenly and prevent bleeding under the stencil, you’ll need brushes or sponges specifically designed for stenciling. Foam brushes or pouncers are ideal for this purpose.
Painter’s tape is another crucial item that will help secure your stencil in place while you work.
Finally, don’t forget measuring tapes and levels to ensure your stencil is positioned correctly and evenly, especially when working on projects like walls or floors.
Prepare Your Surface
Properly preparing your surface is crucial for achieving the desired outcome in your project. To ensure a successful finish, start by thoroughly cleaning the area to remove any dust or grease that may be present. For surfaces that will be painted, such as walls or furniture, applying a coat of primer can provide an excellent base for your paint to adhere to. Be sure to allow any prep coats to fully dry before proceeding with the next step.
Position and Secure Your Stencil
To achieve precise results when using a stencil, start by carefully positioning it where you want the design to appear. Utilize a measuring tape and level to ensure the stencil is straight and centered on your surface. Once satisfied with its placement, secure the stencil in place using painter’s tape to prevent any movement while painting.
Apply the Paint
To achieve a crisp and clean finish when working with stencils, start by lightly loading your brush or sponge with paint. Gently dab off any excess, leaving just enough to cover the stencil’s surface area. Using an up-and-down motion, apply the paint in small, controlled strokes rather than sweeping brushstrokes. This technique prevents unwanted seepage under the stencil’s edges. Instead of building layers too quickly, opt for a build-up approach by applying multiple thin coats. This not only reduces the risk of bleeding but also allows for greater color control and accuracy.
Remove the Stencil and Touch Up
To achieve optimal outcomes, delicately remove the stencil from the painting while the paint remains slightly tacky. Should the paint have seeped beneath the stencil or exhibit minor flaws, utilize a small artist’s brush to make precise touch-ups and refine the design.
Seal and Protect Your Work
To ensure the longevity of your design, applying a sealant may be necessary depending on the project’s requirements. For instance, clear polyurethane sealers are ideal for protecting floors and furniture from wear and tear. When it comes to fabrics, ironing over the painted design with a cloth barrier between the iron and paint can help set the colors in place.
Embarking on a DIY stencil adventure is an excellent way to infuse your space with personal touches and create one-of-a-kind masterpieces. With some thoughtful planning, the right materials at hand, and a dash of creativity, you’ll be amazed at how easily you can achieve professional-looking results that will make you feel proud to showcase.
Advanced Techniques in Stencil Craft
To elevate your stencil craft, mastering advanced techniques is crucial. These innovative methods will enable you to infuse depth, texture, and intricacy into your projects, pushing the boundaries of what’s possible with stencil art. By delving deeper into these techniques, you’ll be able to transform your creations into stunning works that showcase your artistic prowess.
Layering Stencils
Creating complex designs using layering stencils requires a thoughtful approach. It begins with a foundation layer, which sets the tone for the entire piece. Subsequent layers are then added, each one carefully aligned to the previous one, allowing for intricate details and nuanced color transitions. This method is particularly well-suited for producing visually striking florals, landscapes, or other multi-hued artworks that require a high degree of precision and cohesion.
Using Modeling Paste
When enhancing your stenciling projects, consider incorporating modeling paste, also referred to as molding paste, to introduce a three-dimensional element. To achieve this effect, apply the paste through the stencil using a palette knife or a sturdy card, carefully removing the stencil afterwards to reveal the raised design. Once the paste is fully dry, you can opt to paint over it for added color and dimension, or leave it in its natural white state for a unique textured appearance.
Making a Bokeh Effect
The bokeh effect, a captivating visual phenomenon inspired by the blurred lights often seen in photography, can be recreated using stencils and various artistic tools. To achieve this dreamy, ethereal look, apply soft circles of color in diverse sizes and opacities. This can be accomplished by employing sponge daubers or blending brushes with ink or paint, allowing for a unique, soft-focus quality to be imbued on your creative projects.
Shadow Stenciling
Crafting a striking shadow effect is surprisingly straightforward. Start by creating a stencil of your design using a light-colored material, and then subtly shift its position before applying a richer, darker hue. By doing so, you’ll create an illusion of depth that draws the viewer’s eye and makes your design truly pop off the surface.
Water Stenciling
To achieve a unique and mesmerizing design, try incorporating water stenciling into your creative process. This technique yields a stunning tie-dye or watercolor-inspired effect by combining ink with water. Simply apply the ink to your surface of choice, position the stencil on top, and then use a sprayer to gently mist the area with water. As the liquid reacts with the pigment, it will produce an intricate, fluid pattern that’s sure to capture attention.
Stenciling with Spray Ink
With spray inks, artists can unleash vibrant colors and ease of application. By simply spraying through stencils onto their surface, designers can create quick and colorful designs with the freedom to layer different hues or employ masking techniques for added complexity. As users delve into these advanced stencil craft methods, they’ll be encouraged to push creative boundaries and explore innovative ideas. The key to mastering these techniques lies in practice, so it’s essential to be willing to experiment, learn from mistakes, and continuously refine one’s skills as a stencil artist.
Maintenance and Care for Stencils
To ensure the longevity and effectiveness of your stencils, it is essential to prioritize proper maintenance and care. This involves adhering to a series of best practices that promote the preservation of stencil quality and extend their usable lifespan. By following these simple yet effective tips, you can confidently expect to enjoy optimal performance from your stencils.
Cleaning Your Stencils
To maintain optimal performance and prevent stubborn residue from forming, it’s crucial to thoroughly clean your stencils after each use. Water-based paints require a gentle soaking in warm soapy water, which helps to loosen the paint and make removal easier with a soft brush or sponge. Oil-based paints, on the other hand, benefit from a delicate approach using white spirit, taking care not to damage intricate areas. For spray paints, build up the layer over multiple uses until it forms a cohesive layer that can be simply peeled away, streamlining your stencil-cleaning process.
Storing Your Stencils
To ensure your stencils remain in pristine condition, always store them flat and away from direct sunlight or outdoor exposure that could cause warping. When you receive a rolled stencil for shipping, lay it flat under a weight until it regains its original shape. Additionally, when using repositionable spray adhesive, store the stencil on a sheet of baking paper to prevent unwanted sticking to other surfaces.
General Care
When utilizing handle stencils, it’s essential to start with a clean slate – literally. Make sure your hands are free from any oils or dirt that could compromise the accuracy of your stencil work. A quick inspection before use will also help you detect and remove any residue or debris that might interfere with a smooth application. By following these simple steps, you’ll be able to enjoy your stencils for many creative projects to come.
FAQs About Stencil Craft
With its limitless possibilities, stenciling has become a beloved activity among many. To ensure a smooth experience, we’ve compiled a list of frequently encountered queries, covering the basics and addressing potential hiccups, allowing you to dive into the world of stenciling with confidence.
What is a stencil?
A stencil is essentially a template crafted by carefully cutting out a design from a thin material like plastic, paper, or metal. This clever contraption enables artists and DIY enthusiasts alike to effortlessly reproduce their desired image onto various surfaces by simply applying paint or ink through the pre-cut areas of the stencil.
What materials can I use for stenciling?
While stenciling can be applied to a range of surfaces, from traditional mediums like paper and fabric to more unconventional ones such as wood and even walls, it’s crucial to prioritize a smooth canvas for optimal outcomes. This allows for crisp lines, vibrant colors, and a professional-looking finish.
What kind of paint should I use for stenciling?
When it comes to stenciling, acrylic paint is a popular choice due to its fast-drying properties and rich color palette. However, you may also want to consider alternative mediums like stencil creams, spray paints, or fabric paints, each offering unique benefits that can enhance your project’s overall appearance.
How do I prevent paint from bleeding under the stencil?
When it comes to stenciling, preventing paint bleed is crucial for achieving crisp, clean lines. To do so, start by applying a minimal amount of paint using a dry brush or sponge – this will help contain the color and prevent it from seeping under the stencil. Alternatively, you can use spray adhesive to firmly secure the stencil in position, ensuring that the paint stays exactly where you want it.
Can I reuse stencils?
To maximize the longevity of your stencils, it’s essential to adopt a proper maintenance routine. After each use, thoroughly clean them with mild soap and warm water to prevent debris from accumulating. Additionally, store your stencils in a flat position to preserve their original shape and ensure they remain usable for numerous projects.
How do I align my stencil for a repeating pattern?
When working with stencils, it’s crucial to maintain precise alignment to achieve the desired design. To ensure accuracy, use a ruler or grid lines to position your stencil correctly. Additionally, mark specific registration points on your stencil to facilitate easy placement during subsequent repeats.
What is the best way to clean stencils?
When dealing with paint residue on stencils, it’s essential to approach the process differently depending on the type of paint used. For water-based paints, submerge the stencil in warm soapy water and softly scrub off the unwanted color. In contrast, oil-based paints require a solvent like white spirit for effective removal.
Can I make my own stencils?
Creating personalized stencils requires minimal effort and creativity, as you can easily produce unique designs using a craft knife or advanced cutting machines.
How do I add shading or dimension to my stenciled design?
To achieve a unique dimensional effect, consider combining different colors and techniques to create depth and visual interest. This can be accomplished by layering various shades of paint, blending them seamlessly to produce a cohesive look. Additionally, experimenting with textured mediums like modeling paste or building up layers of stencils can add an extra dimension to your artwork.
What should I do if my stencil starts to curl or warp?
To revive a curled plastic stencil, simply place it under the weight of a heavy book and let the pressure do its magic to flatten it out. A more important consideration, however, is avoiding exposure to heat sources, which can lead to warping and further damage to the stencil. By taking these simple precautions, you can keep your stencils in good condition and ensure they remain effective for future use.
Can I stencil on a textured surface?
When working with textured surfaces and stenciling, it’s crucial to consider the potential for paint bleeding. To achieve optimal results, aim for a surface as smooth as possible. By keeping these fundamental considerations in mind, you’ll be better prepared to navigate any challenges that arise during your stenciling project or subsequent endeavors.
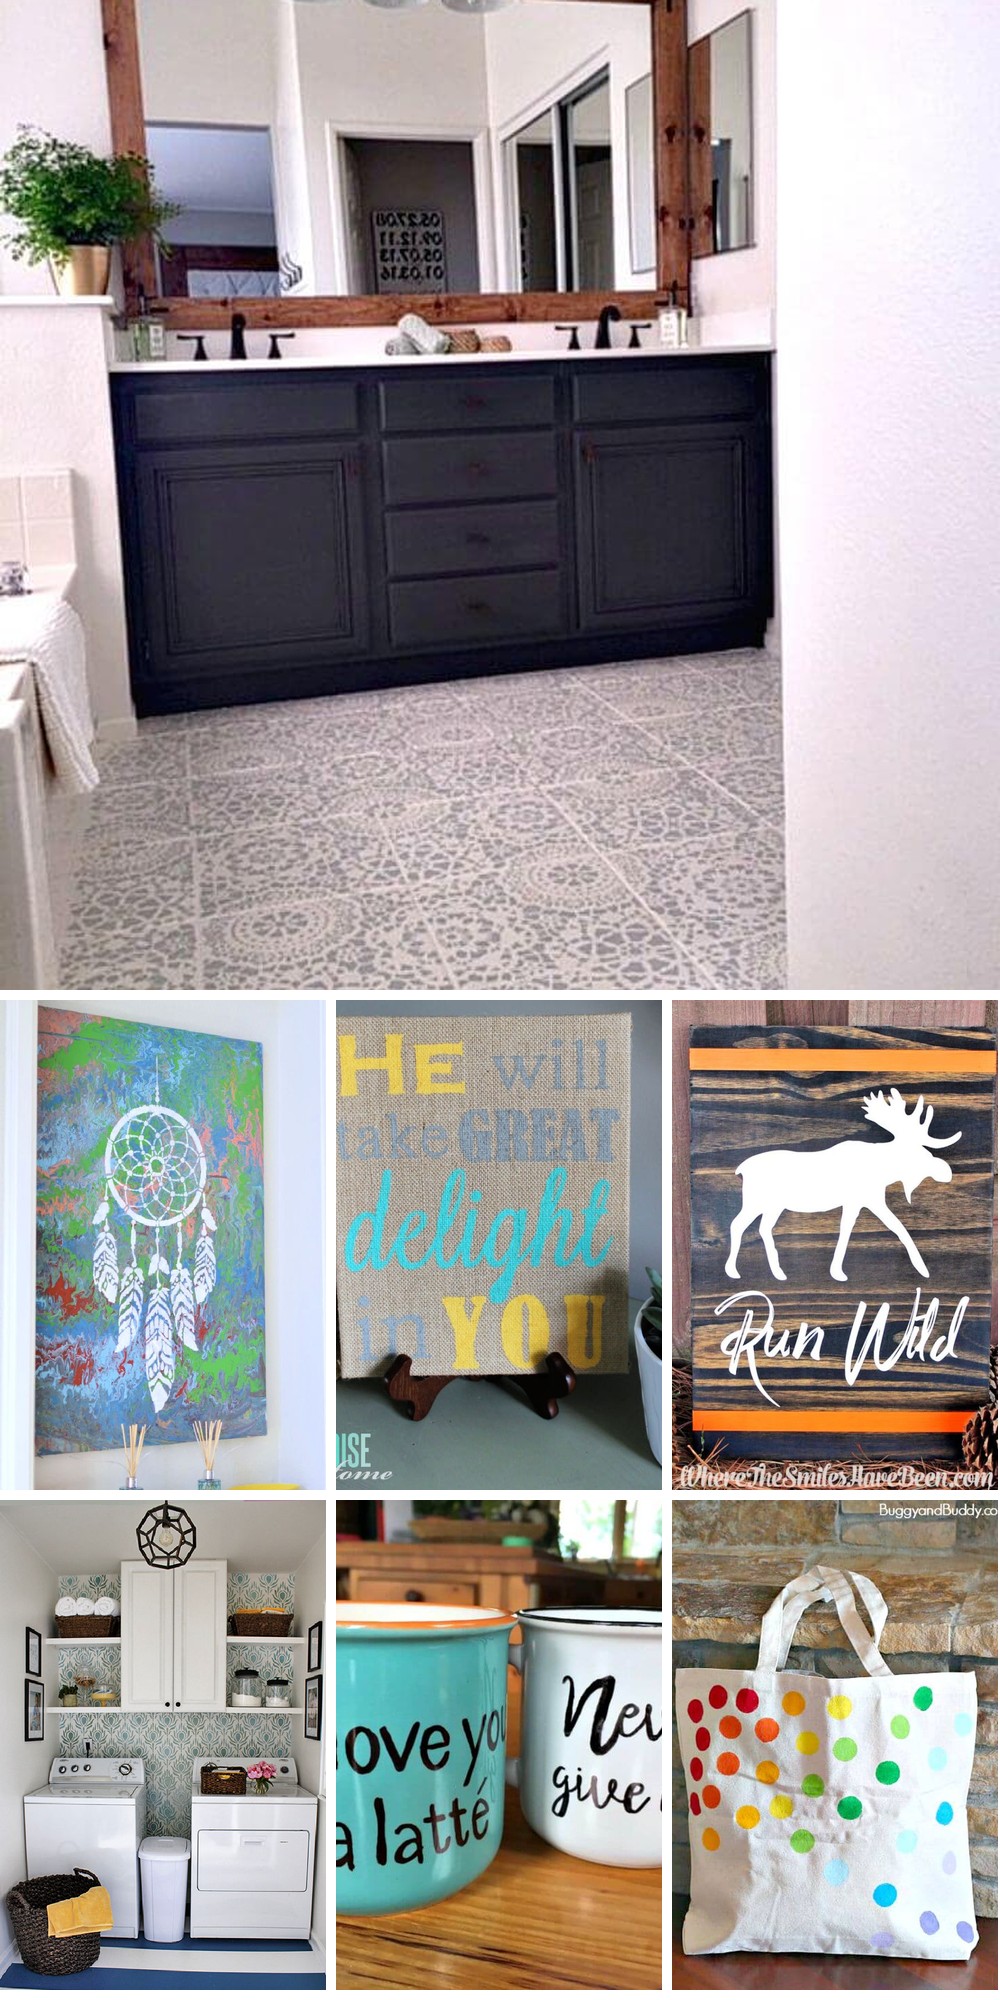
20 DIY Stencils and Stencil Craft Ideas
Discover the world of DIY stencil crafts, where creativity knows no bounds. With a collection of 20 unique and inspiring projects, plus accompanying tutorials and templates, you’ll be empowered to bring your artistic vision to life. From decorative accents to functional items, stencils offer endless possibilities for personalizing your space and making it truly yours.
Adorable DIY Stenciled Tile Floors
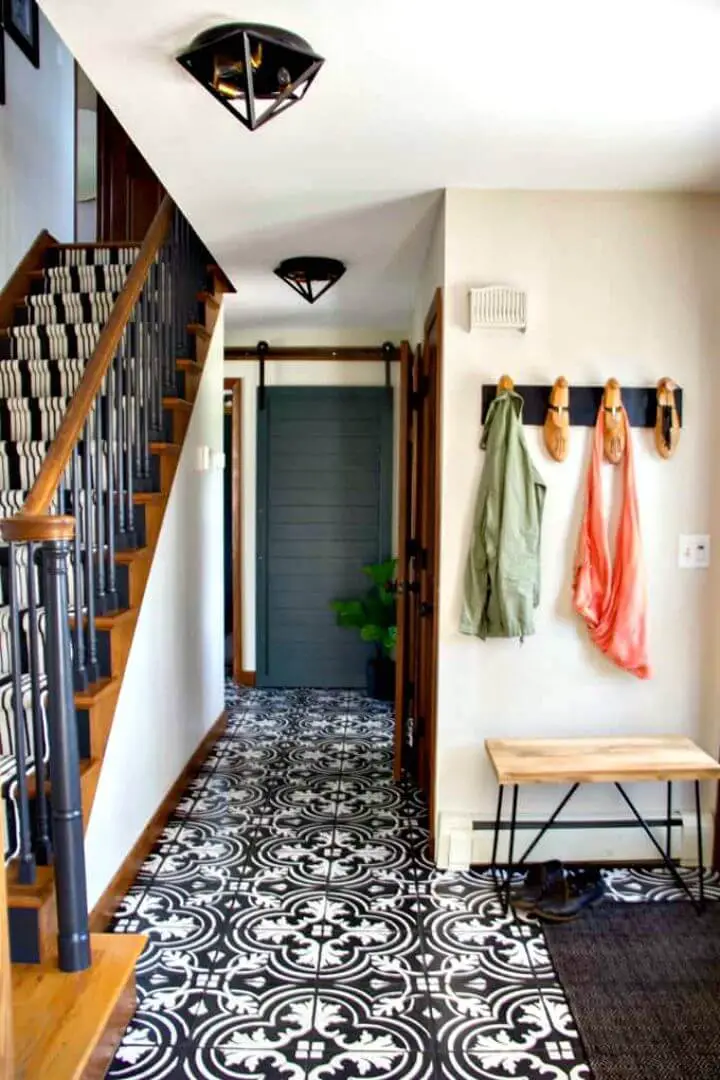
Transform your outdated tile floors into a stunning space by following Bright Green Door’s comprehensive guide on creating faux cement tile painted floors. The step-by-step tutorial covers essential techniques, from repairing tiles to designing a beautiful stencil pattern. Additionally, the resource provides practical advice on selecting the right paint and sealing the finish for durability. Whether you’re looking to refresh your home’s look or seeking inspiration for your flooring project, this guide is a valuable resource that will empower you to take on the task with confidence.
How to Make a Faux Cement Stenciled Tile
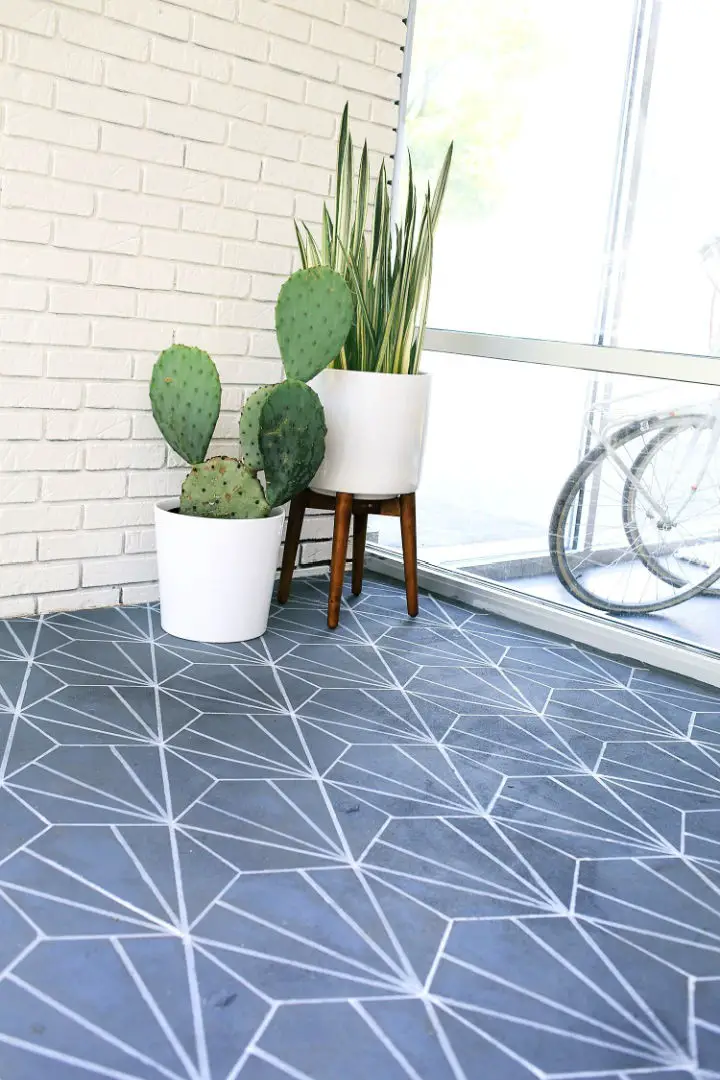
Transform your space with a stunning faux cement tile DIY project inspired by Elsie Larson of A Beautiful Mess. This budget-friendly hack will have you adding a personalized touch to any area, from the entryway to a cozy nook. By using paint and Sharpie markers to recreate chic tile designs, you’ll be able to achieve professional-looking results without breaking the bank. With clear instructions and a focus on cost-effectiveness and style, this tutorial is perfect for anyone looking to take their creativity to the next level and make a unique statement in their home.
Cute DIY Stenciled Wrapping Paper
Transform your gift-giving experience by creating one-of-a-kind wrapping paper using the DIY Stenciled Wrapping Paper guide from A Night Owl Blog. Kimberly Sneed’s tutorial reveals how to effortlessly elevate your presents with custom designs, requiring only basic materials like plain white or kraft wrapping paper, Martha Stewart Paper Stencils, paints, and foam pouncers. With a step-by-step approach, this craft empowers you to inject personal flair and creativity into any gift, making it perfect for holidays, birthdays, and special occasions alike. The project’s accessibility ensures that all craft enthusiasts can participate, while the included tips and chance to win a stencil and paint set guarantee your gifts will radiate with handmade appeal.
Cool Laundry Room Stenciling Wall
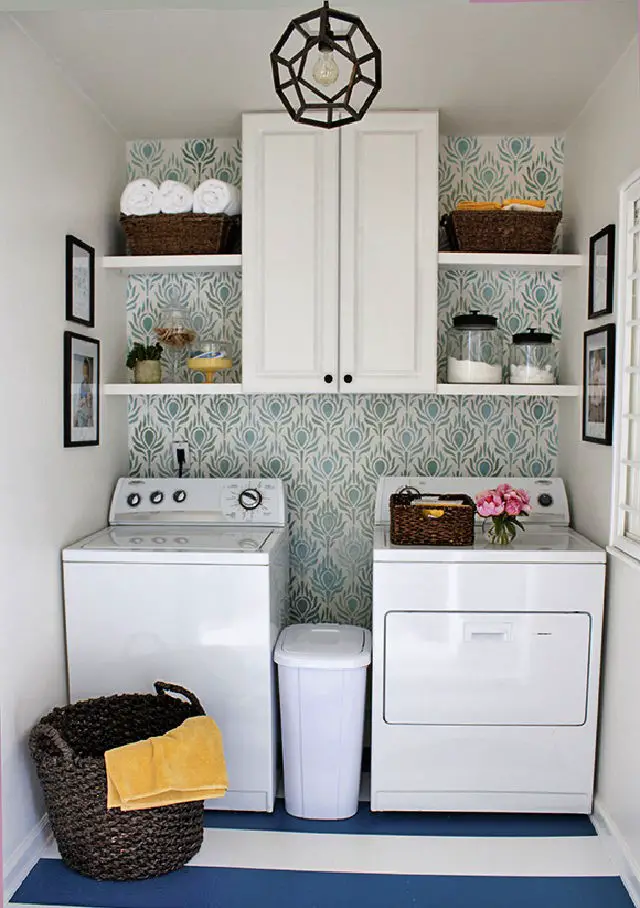
Transforming the humble laundry room into a harmonious blend of function and style is well within reach, even on a limited budget. The View Along the Way’s inspiring makeover serves as a testament to this, showcasing a previously drab space transformed through clever storage solutions, an ingenious DIY drying rack, and a fresh coat of paint that breathes new life into the area.
For those looking to revamp their own laundry room without breaking the bank, this guide offers practical guidance on navigating budget constraints while still making impactful changes. From repurposing a thrift-store cabinet find to creatively painting vinyl floors, these creative solutions will empower you to give your laundry space a personal touch and newfound efficiency.
Get ready to turn your laundry routine into a joyful experience in a room that radiates happiness.
Stenciled Burlap Art With Free Silhouette Stencil Files
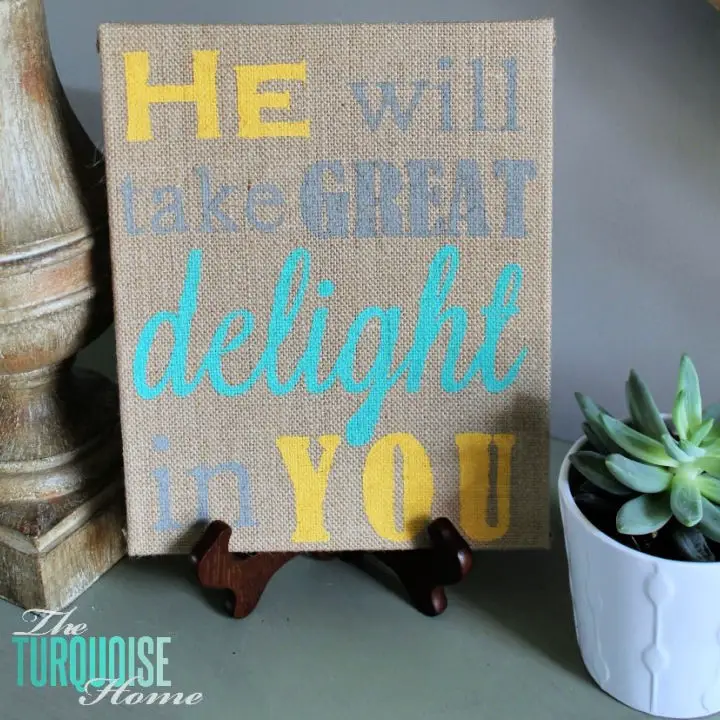
Get creative with our step-by-step guide on how to craft personalized burlap art at The Turquoise Home. In this comprehensive DIY tutorial, Laura shares the simplicity of stenciled burlap artwork using a Silhouette machine. Whether you’re a home decor enthusiast or seeking to add a handmade touch to your living space, this easy-to-follow method requires minimal materials and is perfect for a crafting session alone or with friends. You’ll learn how to choose and cut stencil designs, prepare them with repositionable adhesive, and apply acrylic paint to achieve stunning results. With these instructions, you’ll be able to transform plain burlap into a unique piece of art that reflects your personal style.
How to Make Packing Tape Transfers
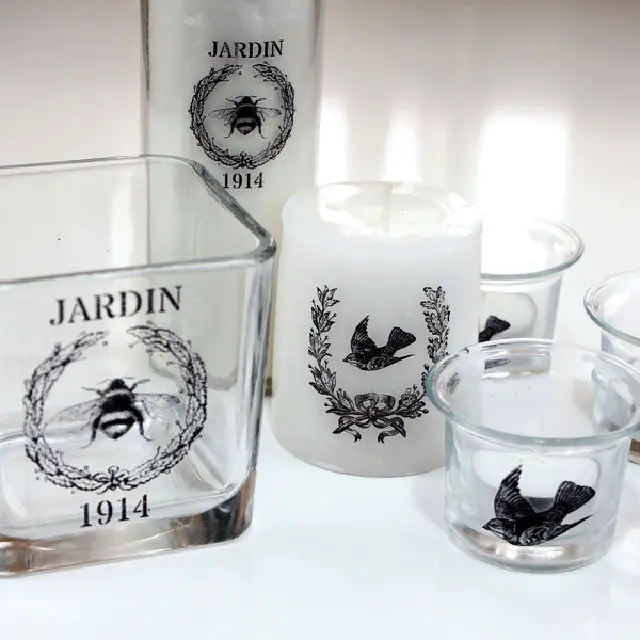
Transform everyday glass items into one-of-a-kind masterpieces with the help of DIY Packing Tape Transfers! This ingenious technique, courtesy of Andrea from The Cottage Market, allows you to effortlessly transfer your favorite images onto glass surfaces. To get started, you’ll need a few simple supplies: heavy-duty packing tape, scissors, a burnisher or craft stick, and high-quality printouts of your chosen graphics, whether they’re laser- or toner-based. This cost-effective method is perfect for personalizing glassware, designing unique labels, or adding a special touch to gifts. With its versatility and ease of use, this technique is sure to delight crafty enthusiasts looking to infuse their projects with a dash of creativity.
DIY Painted Floors with Annie Sloan Chalk Paint
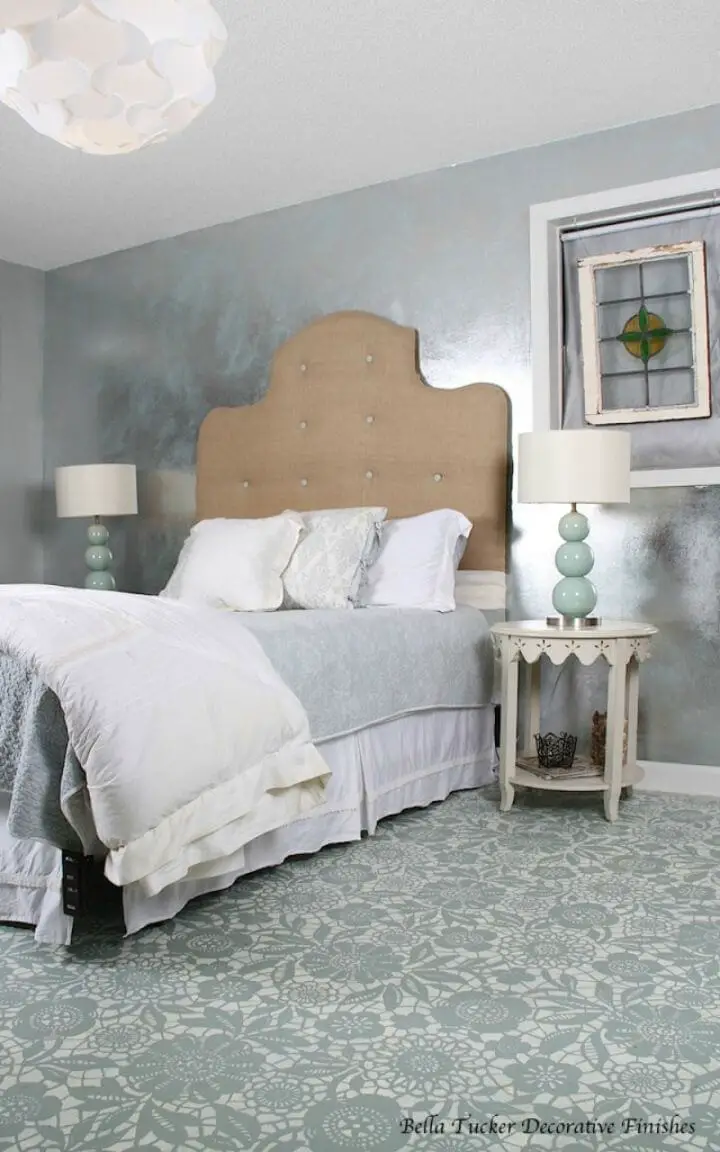
With Annie Sloan Chalk Paint, it’s possible to transform an uninviting space into a cozy retreat. Bella Tucker Decorative Finishes took on the challenge of revamping a gloomy basement bedroom and turned it into a welcoming guest room with a beautifully painted floor as the pièce de résistance. The team meticulously painted over the concrete subfloor using Skylar’s Lace Stencil from Royal Design Studio, combining Duck Egg Blue and Old White chalk paints to achieve a unique, stylish finish. To ensure durability, they sealed the floor with Modern Master’s Dead Flat Varnish. The new flooring was complemented by fresh coats of paint on the walls and trim, creating a harmonious and serene environment perfect for hosting pool parties or simply relaxing. For homeowners in the Nashville TN area seeking inspiration for similar decorative projects, Bella Tucker offers their expertise to help bring your vision to life.
Handmade Stenciled Welcome Mat
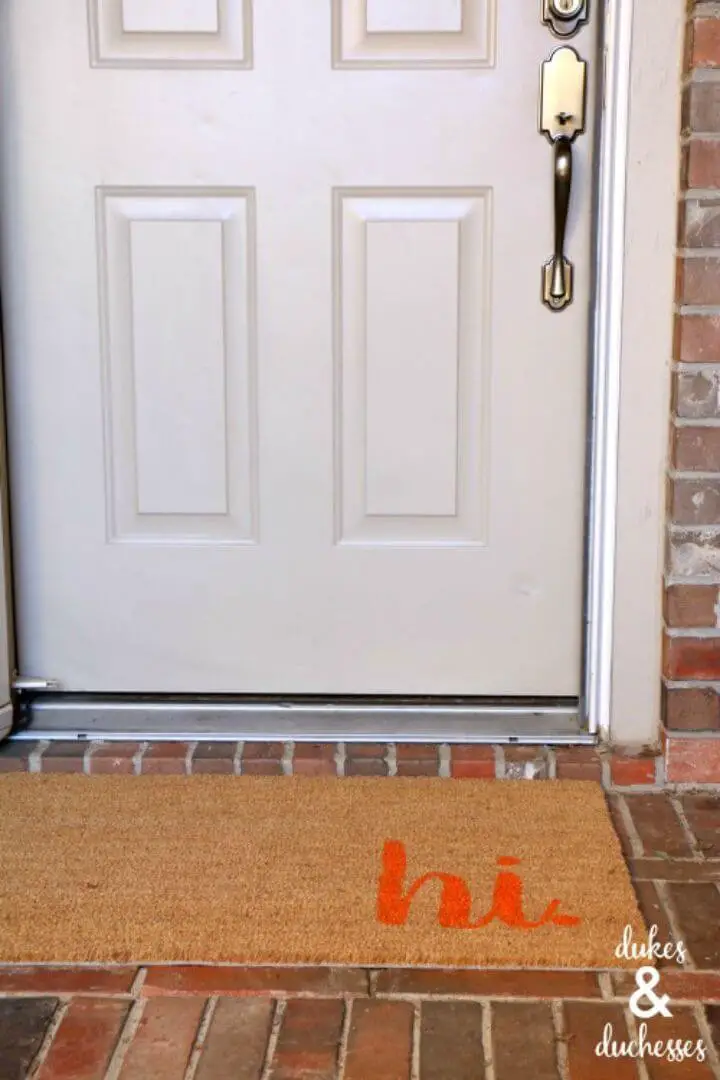
Transform the entrance of your home into a welcoming haven by crafting a one-of-a-kind stenciled welcome mat with ease! Randi Dukes from Dukes and Duchesses shares her expertise in creating a personalized and whimsical doormat that showcases your distinctive style. By following her step-by-step guide, you’ll learn how to revamp a plain door mat into a vibrant greeting for your guests, complete with practical tips for working with stencils and paint on textured surfaces. Perfect for crafters seeking quick and impactful projects, this tutorial is both informative and engaging, ensuring that your finished product makes a charming first impression that sets the tone for a warm and inviting home.
Simple DIY Painted Kitchen Floors

Transform your kitchen space by breathing new life into your linoleum floors with a creative and durable solution – painting! Our comprehensive guide will walk you through the process of revitalizing your kitchen, covering cleaning, painting, and protecting your floors for a lasting finish. We’ll delve into the specific materials and colors used in a successful floor-painting project, including the types of paint and polyurethane that can withstand the demands of a busy kitchen. If you have any questions or concerns along the way, don’t hesitate to reach out for personalized advice. With these helpful tips, you can achieve a stunning kitchen update that’s both budget-friendly and stylish – perfect for anyone looking to give their home a fresh new look. Sally Preston
Making a Stenciled Bathroom Tile
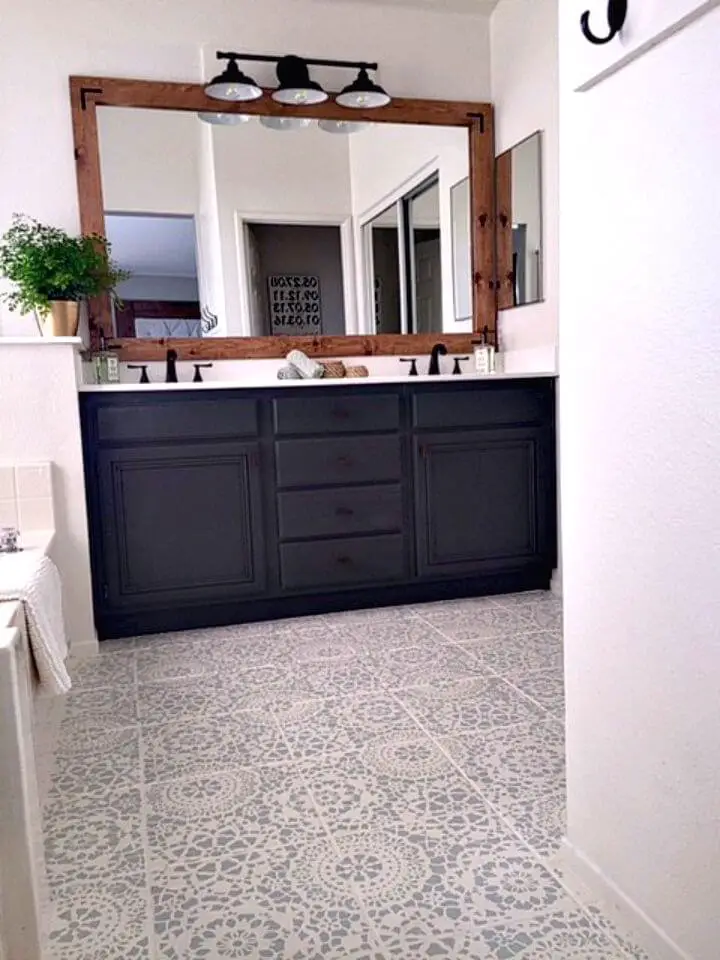
Transforming your master bathroom is easier than you think when you follow Kelly’s DIY floor tile painting tutorial from Domestic Blonde. Without breaking the bank, this comprehensive guide takes you through her step-by-step process to breathe new life into outdated tiles, turning them into a stunning focal point that will be the envy of all who see it. From selecting the perfect primer and paint to mastering the art of stencil application, you’ll discover all the essential tips and tricks needed to achieve a professional-quality finish. This tutorial not only promises a dramatic transformation but also shares valuable insights on choosing durable materials and navigating those tricky corners and edges with ease. So why wait? Put on your DIY hat and get ready to give your bathroom floor a fresh, personalized look that’s sure to impress even the most skeptical of home critics!
Cheap and Easy DIY Tote Bag Using Stencils
Transform ordinary tote bags into one-of-a-kind accessories by crafting with stencils! This easy-to-follow guide from Buggy and Buddy provides a simple yet engaging way to unleash your creativity with kids. Simply gather acrylic or fabric paints, paper plates, stenciling brushes, and your preferred stencils. For an added layer of creativity, create your own custom stencils using cardboard. With a dabbing motion, apply the paint once it’s dry, and you’ll be left with a unique tote perfect for library trips, car rides, or as a special sharing bag in the classroom.
Make Your Own Stencil Mugs
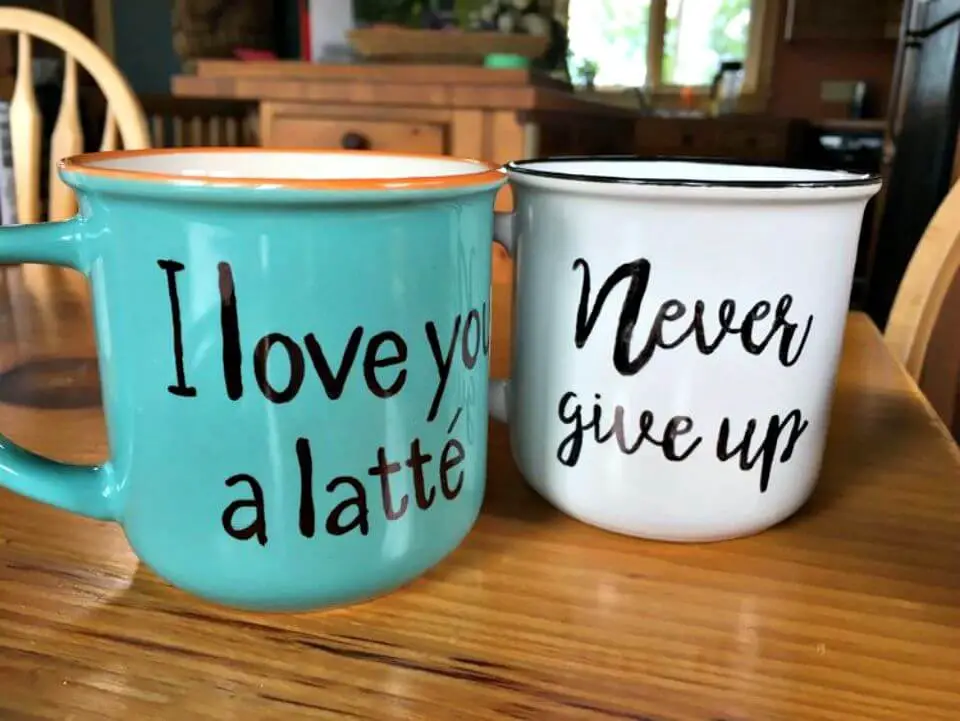
Elevate your morning coffee ritual by putting a personal touch on your mug using Rapid Resizer’s letter stencil maker. This accessible DIY project is perfect for crafters of all skill levels, requiring only basic materials like a mug, pencil, permanent marker, stencil, and tape. To create your one-of-a-kind design, start by shading the back of your printed stencil, then transfer it onto the mug using gentle pencil pressure. Next, use a permanent marker to carefully trace over the design. For added durability, bake your mug at 250 degrees Fahrenheit for 15 minutes. When washing, be sure to handle your mug with care to preserve the unique design and start each day feeling inspired by your handcrafted coffee cup.
Make Stencils Chopping Mats With Dollar Tree
Transform ordinary Dollar Tree chopping mats into extraordinary, reusable stencils by following the step-by-step guide on Doodlecraft. This DIY project is ideal for crafty enthusiasts seeking to create personalized stencils without breaking the bank. The process is surprisingly straightforward: select a stencil design in Cricut Design Space, attach the chopping mat to a strong grip Cricut mat, and cut out your design using a deep point blade. With multiple passes, you’ll yield a precise and clean stencil cutout that’s just waiting for some creative expression.
Once you’ve crafted your stencils, bring them to life with Plaid FolkArt paints and a stencil brush. Transfer your unique designs onto various surfaces, from tote bags to walls, to add a personal touch to your crafts. The best part? These washable stencils can be used multiple times, offering a budget-friendly solution to customizing your projects. Join the fun and let your creativity soar with this easy and fulfilling DIY activity.
Awesome Freezer Paper Stencil Craft
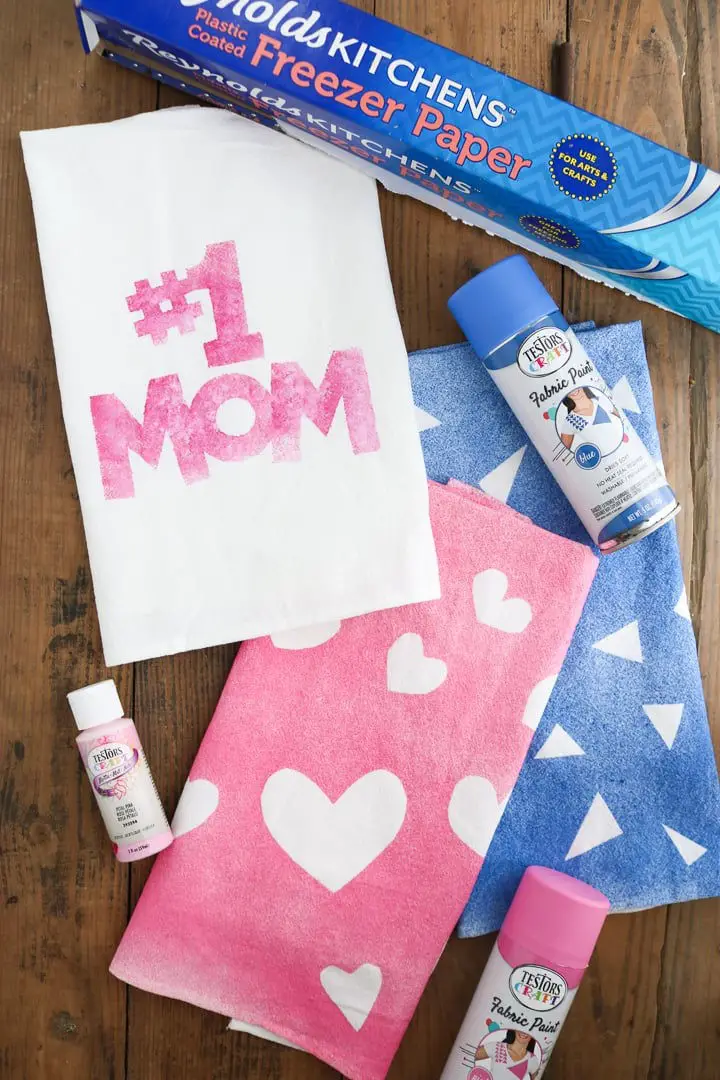
Transform your fabric projects with the versatile and budget-friendly world of freezer paper stenciling. Angie Holden’s comprehensive guide makes it easy to get creative with simple household items, taking your tea towels, aprons, and pillowcases from ordinary to extraordinary. With clear instructions and a range of techniques for both hand-cut and machine-cut stencils, crafters of all skill levels can unlock their full potential and infuse their home with the unique charm of handmade creations.
Cool DIY Stenciled Burlap Magnetic Board
Transform your home with a personalized DIY Stenciled Burlap Magnetic Board, inspired by Maryann at Domestically Speaking. This straightforward craft project breathes new life into a plain piece of sheet metal, elevating it to a functional and visually appealing magnetic board perfect for any room. The process is simple: wrap burlap around the metal, secure it with hot glue, and add visual flair with stencils and acrylic paint. Not only does this creation serve as a practical space for holding notes and reminders, but it also doubles as striking wall art. To take it to the next level, incorporate your own magnet decorations and complete the look with a ribbon, hammer, and nail. This creative activity can be completed in a single evening or weekend afternoon, providing a unique and handcrafted update for your space.
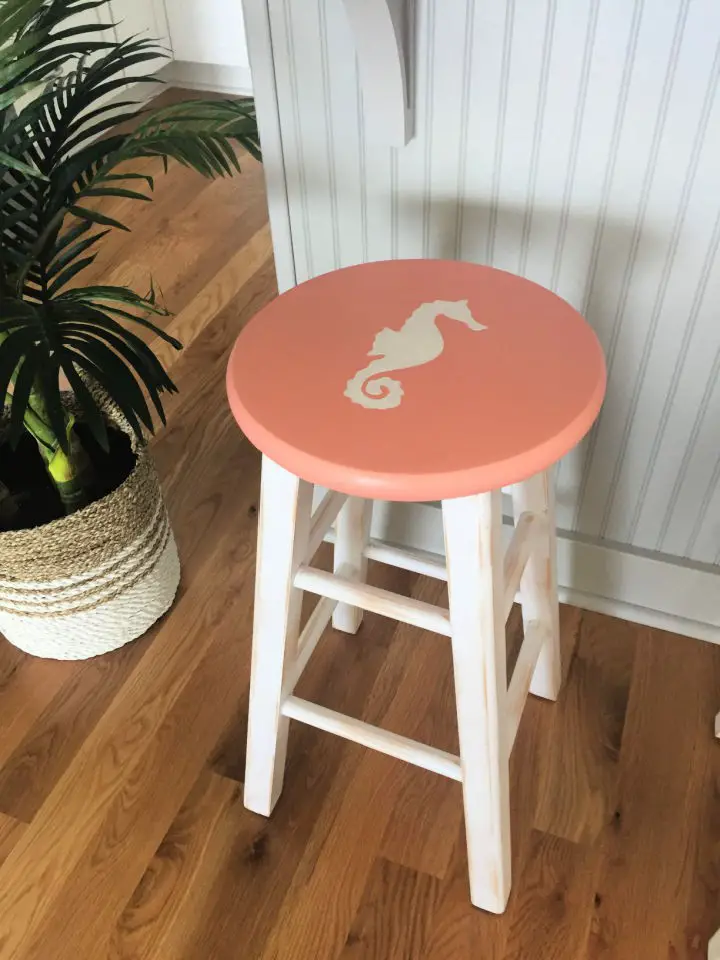
Farmhouse Touches Stenciling for Gift Box
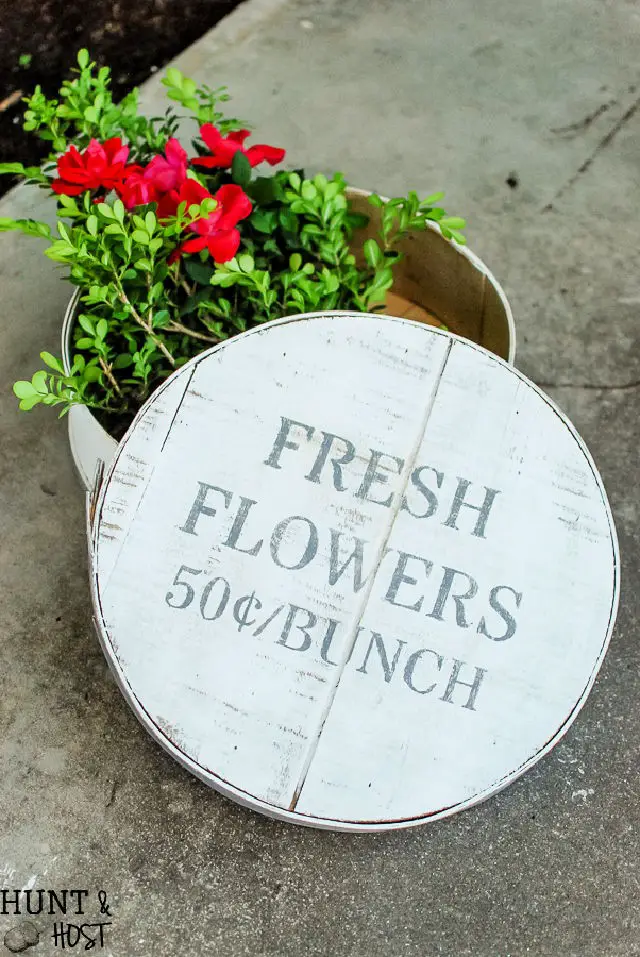
Stenciling is an innovative way to infuse your home decor with a personal farmhouse flair. This budget-friendly craft offers a wealth of creative possibilities, allowing you to transform everyday items into unique, bespoke pieces that reflect your personal style. By mastering the art of stenciling, you’ll learn how to prepare surfaces, center your stencil for precision, and use the right tools to achieve clean, crisp lines. Additionally, with tips on paint consistency and finishing touches, you’ll be able to elevate your living space with simple, yet effective techniques that yield stunning results. With DIY stenciling, the possibilities are endless, allowing you to express your creativity and refresh your home with a touch of paint and imagination.
How to Use Stencil Film With Cutting Machines
Mastering the art of stencil film with cutting machines like Silhouette and Cricut is a valuable skill for any crafter. Where The Smiles Have Been shares insightful tips on how to achieve perfect, crisp lines on wood signs and home decor projects using stencil film. By choosing the right film, carefully cutting and weeding your design, and applying it correctly, you can elevate your crafting skills and produce beautifully painted finishes. Whether you’re creating custom gifts or keepsakes for personal enjoyment, these helpful suggestions will guide you in improving your stencil work.
Easy DIY Stenciled Monogram Burlap
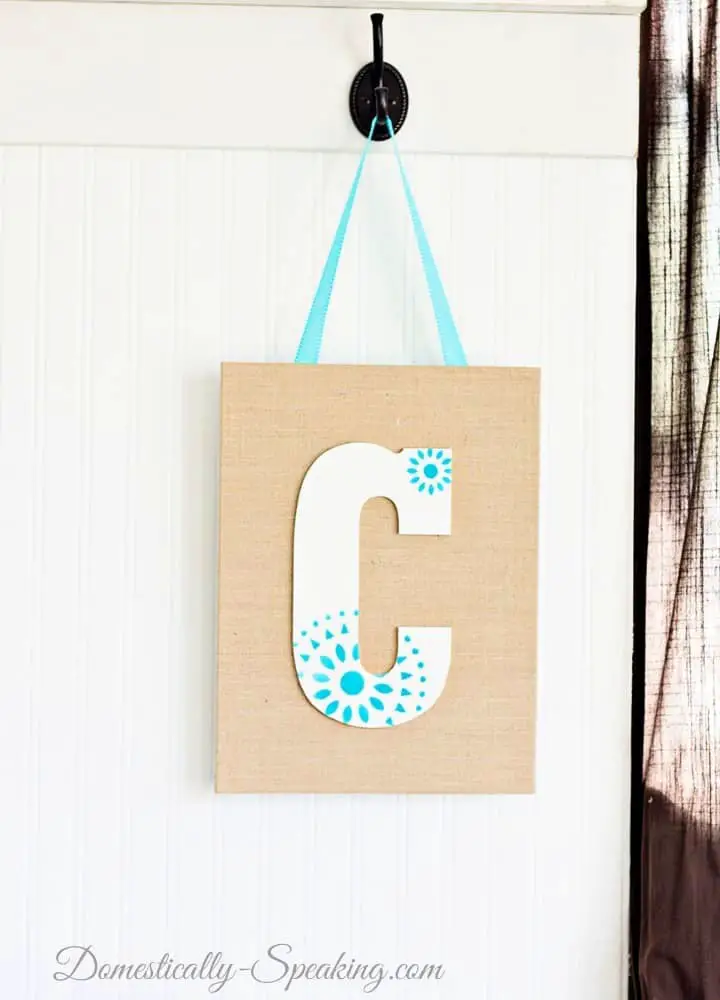
Transform a wooden monogram into a unique piece of personalized art by combining it with a charming ribbon and some rustic charm. At Domestically Speaking, we’re excited to share our step-by-step guide on making a stenciled monogram on burlap. This DIY project is perfect for adding a touch of elegance to your home decor. Start by painting the wooden monogram in your preferred color using a foam pouncer brush and your favorite stencil design. Once you’ve achieved the desired look, attach your custom monogram to a piece of stretched burlap using hot glue. Add a charming ribbon to complete the look, and you’ll have a one-of-a-kind masterpiece that’s sure to be the envy of all who see it. And the best part? Our easy-to-follow tutorial makes this craft adaptable with various stencils and paint combinations, so your creation is truly unique.
Craft Boho Chic Wall Art Using Stencils

Transform your living space into a bohemian oasis by creating one-of-a-kind wall art using stencils. Our simple yet striking project, featuring the Dream Catcher Wall Stencil from Stencil Stories, will guide you in turning a blank canvas into a breathtaking decorative piece. Start by giving your canvas a subtle marbled base, then carefully position and secure the stencil, applying a light layer of paint to achieve a crisp design. It’s essential to use minimal paint to prevent bleeding and preserve the stencil’s integrity. This DIY art is perfect for hanging above the bed or in a cozy nook, adding a personalized touch and serene ambiance to your home. By embracing this creative endeavor, you’ll infuse your walls with unique charm and character.
Beautiful Stencil Craft for Adults
To give your DIY projects a unique touch, creating your own stencils is an excellent approach. At The Craft Crib, we’ve developed a simple and effective method for crafting durable and accurate stencils. With just a few basic materials such as a design, carbon paper, cardstock, and an X-ACTO knife, you’ll be able to create reusable templates that can be used to add precise designs to various surfaces. This process eliminates the need for freehand skills while still allowing for professional-looking results. By following our step-by-step guide, you’ll be able to craft stencils that will elevate your next project and make it truly one-of-a-kind.
Conclusion:
Unleashing your creative potential through DIY stencils and stencil crafts is a journey that not only personalizes your space but also gives life to old furniture and transforms ordinary objects into unique works of art. The versatility of stencil crafts lies in its ability to adapt to various surfaces, from old trunks to greeting cards, allowing you to bring your artistic vision to life in a way that’s truly yours. As we’ve explored the fundamental aspects of getting started with stencils, honed advanced techniques, and learned essential care for your tools, it becomes clear that stencil craft is more than just an art form – it’s a meaningful way to leave a personal touch on the world around you. So, gather your materials, pick a project that speaks to you, and embark on the satisfying process of turning the ordinary into the extraordinary with stencil crafts.
