Transforming ordinary objects into extraordinary DIY snow globes is an incredibly rewarding experience. With 40 innovative ideas to draw from, you’ll be well on your way to creating personalized decorations or one-of-a-kind gifts that captivate the imagination. These charming decorations have a unique ability to transport us to a winter wonderland, making them perfect for personal use or as thoughtful presents.Throughout this comprehensive guide, we’ll take you by the hand and walk you through the essential steps and materials required to bring your snow globe creations to life. From selecting the ideal container to adding the finishing touches that give your globe its signature sparkle, our user-friendly instructions will ensure your project is a success from start to finish.As you embark on this creative journey, we’ll also share valuable tips on customization, safety precautions, and maintenance to guarantee your snow globe not only looks stunning but remains a treasured possession for years to come. Whether you’re looking to add a personal touch to your home decor or craft a unique present, our guide will empower you to create something truly remarkable.
How to Make a Snow Globe – Step by Step
Whether you’re a seasoned crafter or just looking for a fun and creative activity to enjoy with family and friends, creating a DIY snow globe is an excellent way to bring a touch of winter magic into your life. With its whimsical charm and endearing appeal, this project has the power to become a treasured keepsake that’s cherished for years to come. This comprehensive guide will take you by the hand, guiding you through each step of the process with clarity and ease, ensuring that your crafting experience is nothing short of enchanting.
Supplies You Will Need:
To create a unique and whimsical winter wonderland scene, you’ll need the following materials: first and foremost, a plastic snow globe container to serve as the base of your miniature world. Next, gather some figurines or small decorative items that fit with your desired theme – these will be the focal points of your scene. If you want to add some textured terrain to your setup, consider using Model Magic, which can be molded into mounds and hills to create a visually appealing landscape. For added sparkle, sprinkle some glitter around your scene, or use it to create a decorative border. Vegetable glycerin can also be used to create a realistic snow effect by mixing it with water and then pouring it over the surface of your miniature world. To hold everything together, have some Super glue on hand – this will come in handy when attaching any small decorations or figurines to the container. Finally, if you want to add an extra touch of elegance to your creation, consider using ribbon to create a decorative wrap or accentuate certain elements within your scene. And for those who plan to use Model Magic, a polyurethane spray can be used to seal and protect the material from damage.
Step-by-Step Guide:
To begin creating your unique snow globe, start by preparing your figurines or decorative items for inclusion inside the globe. You can use small figurines that fit comfortably within the sphere, or sculpt a base or mound using Model Magic to support your chosen decorations. Allow any wet components to dry according to the package instructions before moving forward.
Next, secure your figurines to the base or directly to the inner surface of the globe’s cap or base using super glue. If you’re not using a base, attach your items to the inside of the globe instead. Be patient and allow the glue to dry completely to prevent any potential issues.
It’s essential to note that Model Magic can potentially cloud the water over time, so consider using larger figurines that don’t require a base for optimal long-term clarity.
Now it’s time to add some magic to your snow globe. Fill the sphere with water, leaving enough room for your decorations and ensuring it won’t overflow. Add glitter to the mixture, and you can’t go wrong – a mix of white and silver creates a beautiful snowfall effect.
To achieve a slow and mesmerizing glitter fall, add approximately six drops of vegetable glycerin to the water. This will thicken the liquid slightly and enhance the movement of the glitter, mimicking the gentle fall of snowflakes.
Finally, screw the decorated cap back onto the globe, ensuring it’s secure to prevent leakage. If you’re concerned about leaks or have little ones who might try to open the globe, consider sealing the edges with super glue for added peace of mind.
For an optional touch, you can adorn the base of your snow globe with a ribbon or apply polyurethane to seal the Model Magic base before placing it in water. Once complete, give your snow globe a gentle shake and enjoy the glitter swirling beautifully around your figurines. If everything is secure and there are no leaks, congratulations – you’ve successfully created your DIY snow globe!
Common Troubleshoot:
In the event that you observe signs of cloudiness or leakage, it’s possible that the globe needs to be re-sealed or that the Model Magic is breaking down. If this is the case, you may need to start over with a new design or opt for larger, base-less figurines instead.
Video Tutorial
For those who learn best through visual demonstrations, creating a snow globe is even more enjoyable with a step-by-step guide like this DIY Snow Globe Tutorial YouTube video. As you watch the video, you’ll get to see each stage of the crafting process unfold before your eyes. This combination of written and visual guidance is particularly useful for hands-on learners who prefer to follow along while watching. Making a snow globe at home can be an enchanting project that brings out your creativity and allows you to add a personal touch to your home decor or give it as a thoughtful gift. By combining patience with imagination, you can create a winter wonderland in a bottle that embodies the magic of the season.
Customization Ideas for Your DIY Snow Globe
When crafting a DIY snow globe, creativity knows no bounds. This unique project allows you to express yourself and create something truly special. Whether you’re making it for personal enjoyment or as a gift, here are some ways to put your personal touch on the globe and make it stand out.
Start by envisioning a theme that resonates with you – it could be anything from a winter wonderland to a cherished memory or a favorite holiday. From there, select figurines that bring your vision to life, whether they’re store-bought miniatures or handmade clay sculptures.
Bring in some natural elements like small twigs, artificial flowers, or pebbles to give the globe a more realistic feel and add depth to the scene. Then, use a mix of fine and coarse glitter or faux snow to create a mesmerizing effect when you shake the globe.
Take it to the next level by adding personal touches like a photo cutout, written message, or small trinket that holds sentimental value. Choose a color scheme that complements your theme, as coordinated colors can enhance the overall aesthetic of the globe.
Don’t forget about lighting – small LED lights can add a warm glow and make the globe stand out, especially in dim lighting. Just be sure to use waterproof lights if they’ll be submerged.
Finally, don’t neglect the base of your snow globe. You can paint it, wrap it with fabric, or adorn it with ribbons and beads. The beauty of a DIY project is that there are no strict rules – feel free to experiment and let your imagination run wild. Just remember to have fun and create something you’ll treasure.
Safety Precautions for Crafting Your DIY Snow Globe
When crafting a DIY snow globe, prioritizing safety is crucial to ensure a enjoyable and incident-free experience. To achieve this, it’s essential to follow some basic guidelines.
Firstly, opt for non-toxic materials, particularly when selecting the liquid inside your globe. Stick to distilled water and glycerin or a safe snow globe mixture readily available at craft stores. This will help minimize any potential risks associated with exposure to harsh chemicals.
When it comes to the actual globe, consider using plastic instead of glass if children are involved in the project. Not only is this a more durable option, but it also reduces the risk of breakage and injury.
Supervise children at all times during the crafting process, especially when they’re handling small parts and adhesives. This will help prevent accidents from occurring and ensure that everyone remains safe.
When working with sharp objects like scissors or craft knives, exercise caution to avoid any potential harm. Always cut away from your body and keep your fingers clear of the blades to minimize the risk of injury.
In addition to these precautions, make sure you’re using the right glue for securing items inside your snow globe. Choose a waterproof adhesive that dries clear and always work in a well-ventilated area when handling strong adhesives.
Before adding your final touches, ensure that the globe is properly sealed to prevent leaks. Conduct a simple water test to validate the seal before introducing your figurines and decorations.
Finally, don’t forget to clean up your workspace after completing your snow globe. Dispose of any sharp objects or broken materials safely, and store all tools and materials out of reach of young children. By following these safety guidelines, you can create a beautiful and safe DIY snow globe that will be cherished for years to come.
Troubleshooting Tips for Your DIY Snow Globe
When creating a DIY snow globe, even the most meticulous projects can encounter unexpected issues. Fortunately, with some troubleshooting expertise, you can resolve these problems and ensure your creation remains both visually appealing and functional. One common issue is cloudy water, which can be prevented by using distilled water or alleviated with a few drops of glycerin if impurities are the culprit. To prevent leaks, it’s essential to create an airtight seal between the globe and base; you can achieve this by using waterproof silicone or specialized snow globe sealant. If a leak does occur, empty the globe, thoroughly dry it, and reseal it. Air bubbles can form when sealing the globe, but this can be minimized by filling the globe as much as possible and inserting figurines slowly to displace water without trapping air. Figurines that come loose can be reattached using a strong waterproof adhesive, allowing time for it to cure before refilling the globe. Direct sunlight should be avoided, as UV rays can cause colors to fade; instead, protect your snow globe from harsh light and consider laminating photos or paper elements to prevent water damage. Finally, if glitter clumps together, it may be too heavy or not properly mixed with the water; try using a finer glitter or reducing the amount used, ensuring it’s evenly distributed before sealing the globe. By addressing these common issues, your DIY snow globe can remain beautiful and functional, requiring patience and attention to detail for success.
Maintenance and Care for Your DIY Snow Globe
To preserve the charm and sentimental value of your DIY snow globe, it’s essential to follow some simple maintenance tips. Start by regularly dusting the exterior with a soft cloth, taking care not to disturb the delicate figurines or other decorations inside. For more thorough cleaning, gently wipe down the outside with a damp cloth, making sure to avoid getting any liquid into the globe itself.When storing your snow globe, choose a cool, dry place and wrap it in soft tissue paper or bubble wrap to prevent scratches. A sturdy box will also help protect it from damage. If you need to make adjustments to the water level over time, carefully open the globe (if possible) and add distilled water to refill it.To keep your snow globe in top condition, avoid exposing it to direct sunlight, which can cause colors to fade and water to become discolored. You should also steer clear of extreme temperatures, as these can cause the glass to crack or the base to warp. Finally, always handle your snow globe with care, using both hands to support it, and keep it out of reach of small children and pets.By following these simple steps, you’ll be able to enjoy your DIY snow globe for years to come, knowing that it’s being properly cared for.
FAQs About DIY Snow Globes
As you embark on creating a DIY snow globe, you may encounter some uncertainty. To alleviate any concerns and ensure a successful outcome, here’s a comprehensive guide that addresses some of the most frequently asked questions. By understanding these common queries, you’ll be well-equipped to craft your very own snow globe with precision and finesse.
What type of container is best for a DIY snow globe?
When it comes to crafting the perfect snow globe, the type of container used is crucial. For a traditional glass jar approach, opt for clear jars with tight- sealing lids to create a realistic winter wonderland effect. However, if you’re concerned about breakage or looking for a more durable option, consider switching to plastic or acrylic globes instead.
Can I use tap water for my snow globe?
When it comes to creating a stunning snow globe, using the right type of water is crucial to achieve crystal-clear results. Distilled water is the preferred choice, as it eliminates the risk of cloudiness and mineral buildup caused by impurities found in tap water. These impurities can significantly impact the clarity of your miniature winter wonderland, making it less visually appealing.
What can I use instead of glycerin for the snow globe liquid?
If you’re unable to find glycerin, there are two alternative options that can provide a similar slow-falling effect for your glitter or faux snow: clear corn syrup and baby oil. Both of these substances will help create a captivating display as the particles fall slowly through the air.
How do I secure the figurines inside the snow globe?
To securely fasten the figurines to their bases, utilize a water-resistant adhesive such as silicone or epoxy. It is crucial to allow the adhesive to dry thoroughly prior to introducing water to the setup, ensuring a strong and durable bond between the figurine and its base.
How much glitter should I add to my snow globe?
When crafting your own sparkle, begin by introducing a subtle touch of glitter. As you build upon this foundation, be mindful that excess glitter can lead to an overwhelming cluster. Instead, opt for a gradual addition, allowing you to gauge the desired level of shine and adjust accordingly.
How do I prevent air bubbles in my snow globe?
To successfully submerge the figurines in a miniature aquatic environment, start by filling the globe to its maximum capacity with water. Then, carefully introduce the figurines into the water at a slow and deliberate pace. As you do this, pay attention to the water level, ensuring that it displaces any air bubbles that may form. If bubbles persist, use a gentle tapping motion to coax them out of the way, allowing for a smooth and bubble-free immersion.
What should I do if my snow globe starts to leak?
To ensure a watertight seal, start by thoroughly emptying the globe. Next, carefully clean any residue from the edges to prevent impurities from affecting the adhesive’s performance. Then, reseal the globe using a waterproof adhesive, applying it evenly and smoothly to create a solid bond. Finally, test the seal by exposing the globe to water – if it remains watertight, you’re ready to refill with your snow globe mixture.
Can I use real snow in my snow globe?
Instead of relying on real snow, which can melt and potentially foster mold growth, consider using synthetic alternatives like artificial snow or non-reactive glitters that maintain their texture regardless of temperature fluctuations.
How do I clean the inside of my snow globe?
When it’s time to clean the interior of your lamp, start by gently opening the globe and allowing any excess liquid to drain out. Next, use a soft, damp cloth to wipe down the inside surface. Be sure to dry the area thoroughly with a separate, lint-free cloth before reassembling the lamp to prevent water spots or mineral deposits from forming.
Is it safe to make a snow globe with children?
When engaging children in craft projects, it’s crucial to ensure adult supervision is present, particularly when working with materials like adhesives and small parts that may pose a risk of injury or choking hazards. To minimize potential risks, opt for non-toxic materials and consider using a plastic container to contain any mess or loose pieces. This will not only keep the workspace safe but also promote a sense of responsibility and fun for kids as they create.
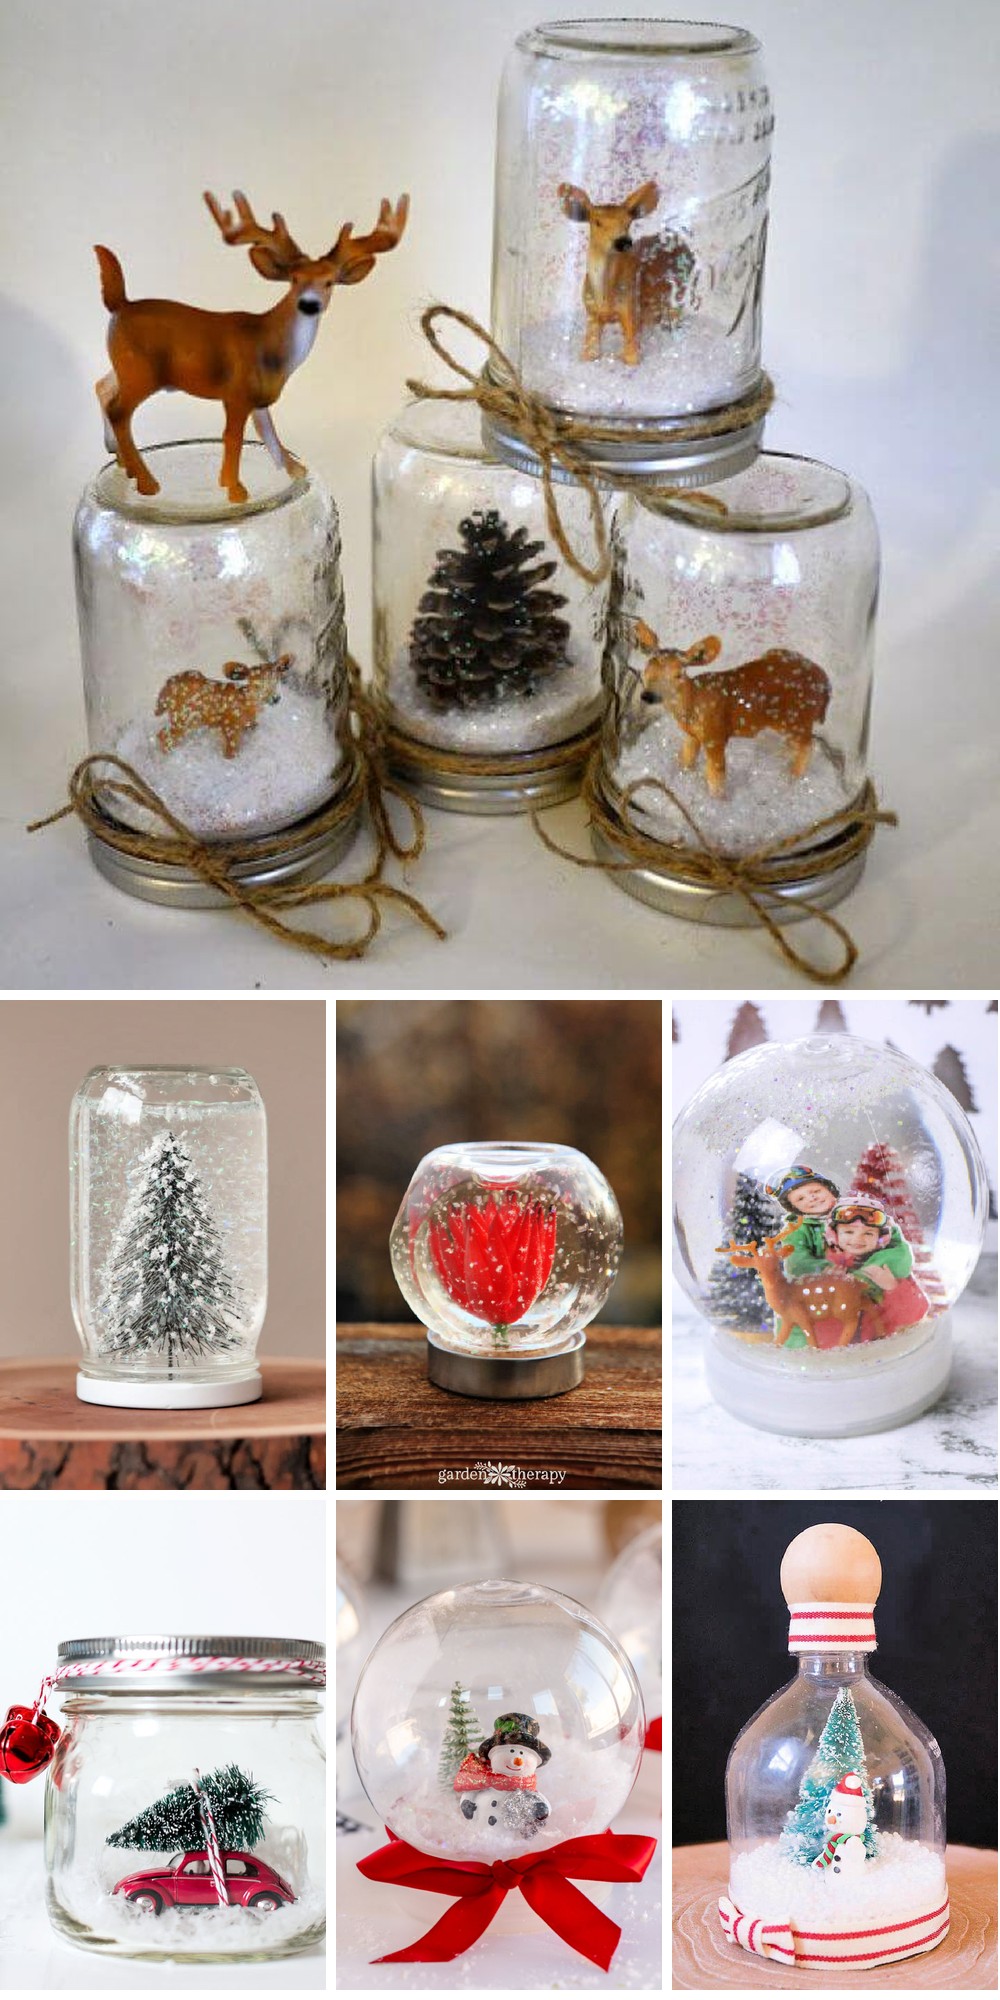
40 Homemade DIY Snow Globe Ideas
Transform your space with the magic of homemade snow globes! Here, you’ll find inspiration to craft 40 unique DIY projects that will bring a whimsical touch to your winter decor. From intricate details to personalized charms, get ready to create your very own winter wonderland and make this season one to remember.
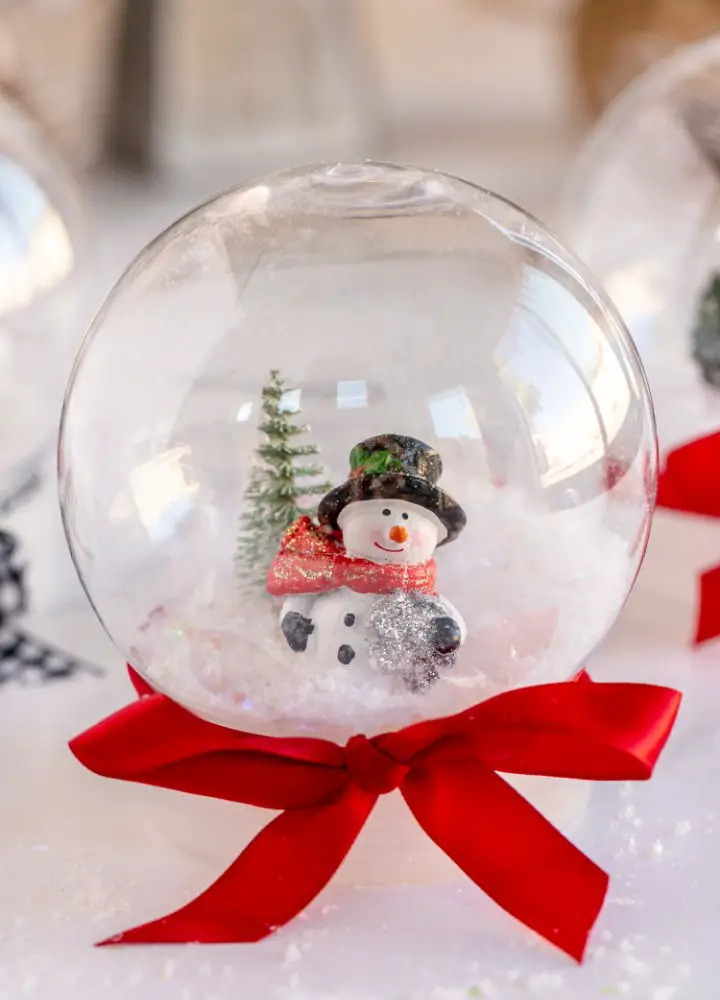
Fun and Easy DIY Snow Globe for a Gift

Transform your space into a winter wonderland by crafting a DIY snow globe that’s as easy to make as it is delightful. You won’t need to venture far to gather the necessary materials, which include a snow globe kit or small jars, tiny ornaments, glitter or fake snow, and a hot glue gun – all of which can be found at home or your local dollar store. A step-by-step guide will walk you through prepping your base and ornament, filling the globe with water, glitter, and glycerin for an added layer of depth, and finally, sealing your creation. This charming craft makes for a lovely holiday decoration and also serves as a thoughtful homemade gift option. Just keep in mind that metal bottle brush trees may rust over time, so consider using non-metallic ornaments or creating a waterless snow globe instead. By expressing your creativity and adding a touch of winter magic to your home, you’ll be sure to bring joy and festive cheer to all who behold it.
Make a Charming Snow Globe
Transform your holiday season into a winter wonderland by creating enchanting DIY snow globes! With just under 10 minutes of effort, these charming decorations can become an integral part of your festive tradition, captivating both adults and children alike. Crafted using everyday materials like jars, glitter, glue, and water, they’re not only easy to assemble but also affordable. Personalize these snow globes by incorporating your favorite figurines or miniature Christmas trees, making each one a unique reflection of your holiday spirit. As you bring the snow globes to life in your hands, the tinsel glitter will resemble falling snow, while the glycerin adds a touch of magic to slow down its descent. To ensure these delicate decorations stand the test of time, be sure to use clean jars, sandpaper, and epoxy as essential components. These snow globes are the perfect way to celebrate the holiday season – whether you’re gifting them, using them as home decor, or enjoying a fun family crafting session together.
How to Make a Snow Globe With Kids
Transform your winter evenings into a magical experience with this enchanting DIY light-up snow globe project, perfect for indoor family bonding during the holiday season. Not only will these creative snow globes spark imagination and creativity, but they’ll also double as whimsical nightlights, filling your home with a warm and cozy glow.
By substituting traditional water with fake snow, our snow globes eliminate mess and safety concerns, making them an ideal activity for kids. The result is a charming and mesmerizing display that will have children of all ages excited to arrange their favorite holiday figurines.
As a treasured keepsake, these snow globes will remain a beloved part of your family’s winter tradition long after the holidays have passed. So why not gather around the light-up snow globe and create lasting memories with your loved ones this winter?
Creative Glitter Snow Globe
Imagine a winter wonderland in the palm of your hand with this enchanting DIY glitter snow globe! A perfect activity for families, this project brings joy and bonding to people of all ages. The creative process begins by selecting a captivating focal point – a festive Christmas ornament or an adorable character – and attaching it to the lid of a glass jar using a hot glue gun. As you work, excitement builds as you envision the glittery snowfall within your miniature world. To customize the sparkle level, simply adjust the glue quantity in distilled water, creating a mesmerizing effect when you turn the globe upside down. This delightful craft is not limited to winter festivities; it’s an ideal gift or year-round decoration that can be enjoyed by anyone. To bring this whimsical scene to life, gather your supplies: a hot glue gun, clear glue, a glass jar, and your chosen focal point. With just 25 minutes of crafting time, you’ll have a beautiful budget-friendly snow globe that will fill any room with its snowy charm.
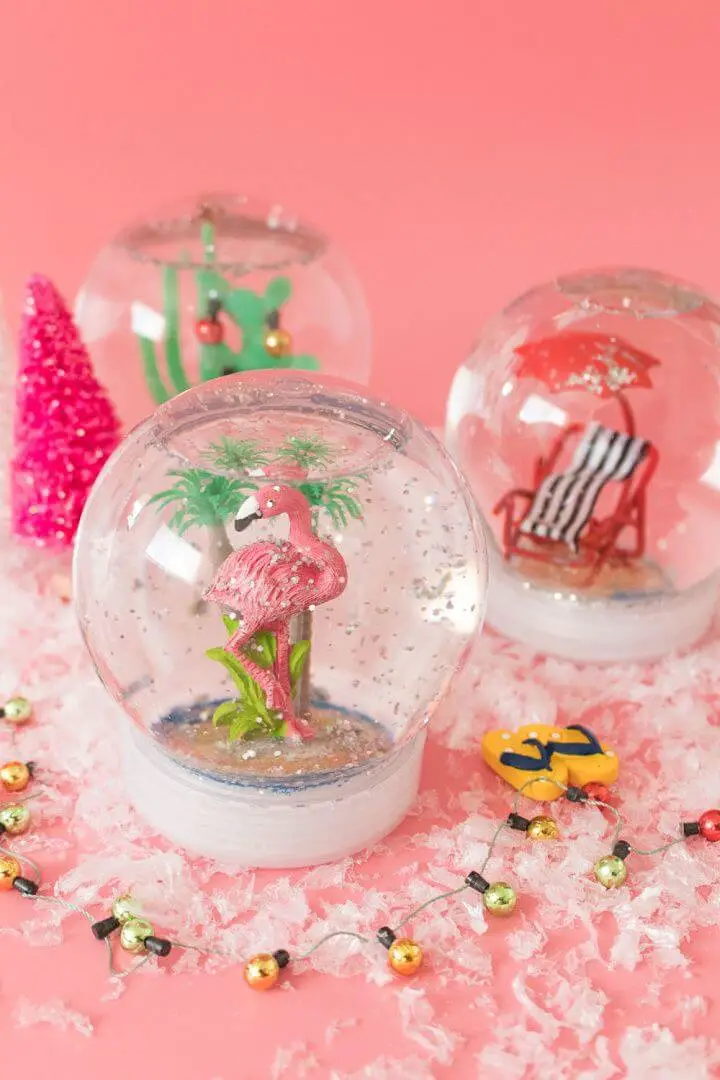
Flamingos Snow Globes for Summer
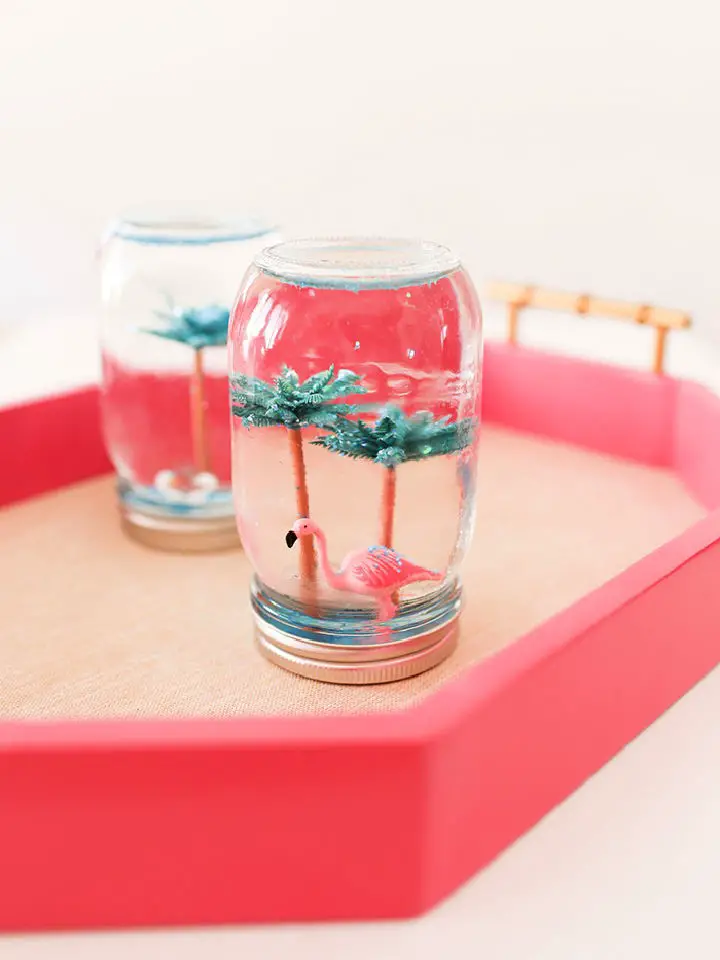
Transform your space with the charm of DIY summer snow globes, inspired by Gray Malin’s vibrant prints like Poolside Palm Trees, Skinny Dip, and Flamingo Balloons. These aren’t ordinary snow globes, but rather miniature scenes that evoke nostalgia and add a personal touch to your decor. With just a few simple supplies – a mason jar, plastic figurines for a summery feel, blue glitter, glycerin, and a hot glue gun – you can create your own unique summer scene. Simply attach the figurines inside the lid of the jar using the hot glue gun, fill it with water, add a dash of glitter and glycerin for a floating effect, and you’ve got yourself a beautiful summer snow globe that also makes a thoughtful handmade gift. This delightful project is perfect for adding a splash of summer to your home decor, and as an added bonus, it’s a great way to get creative and craft something truly one-of-a-kind.
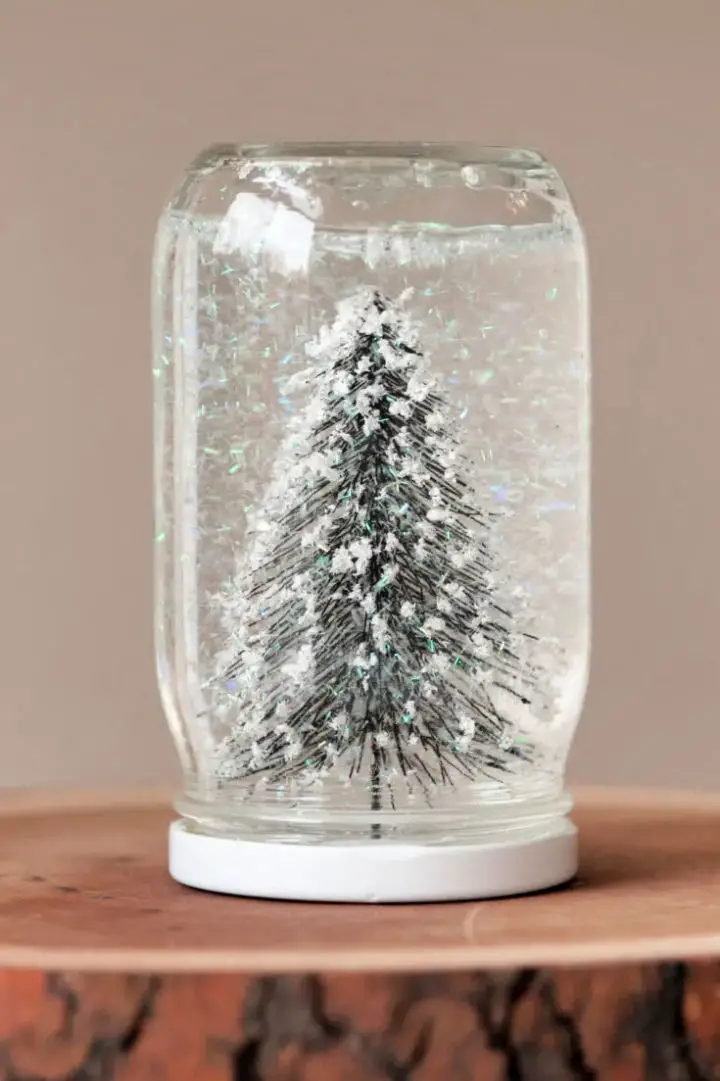
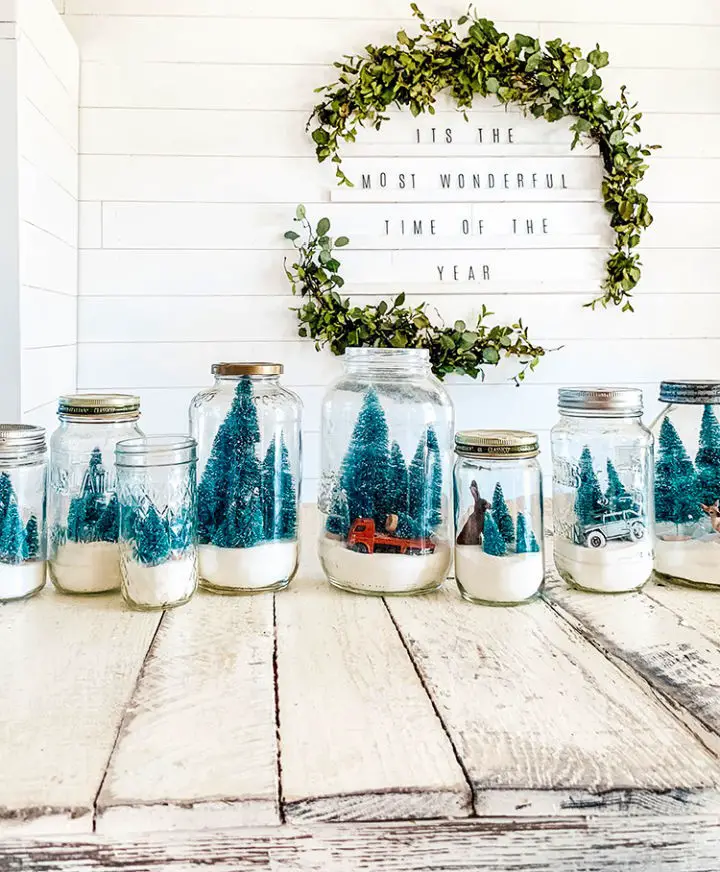
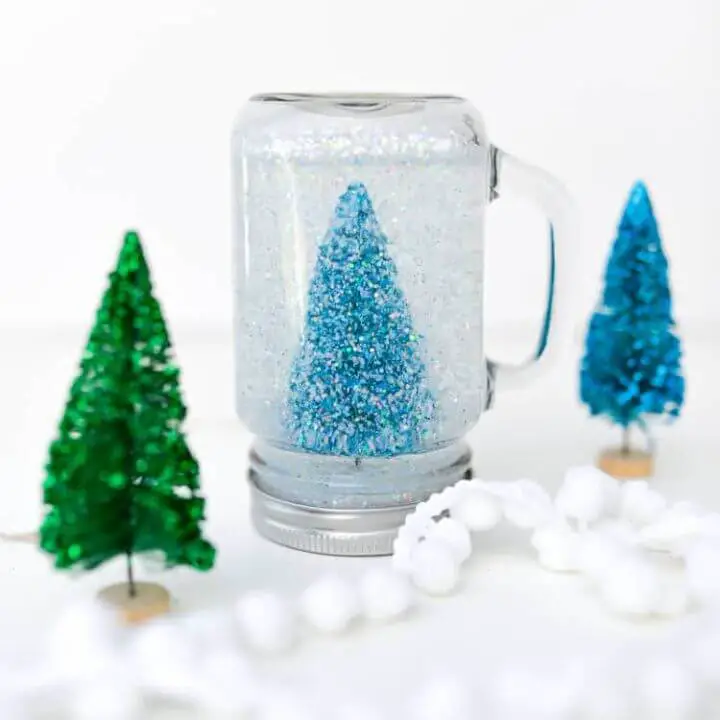
Mason Jar Snow Globe for Room Decor
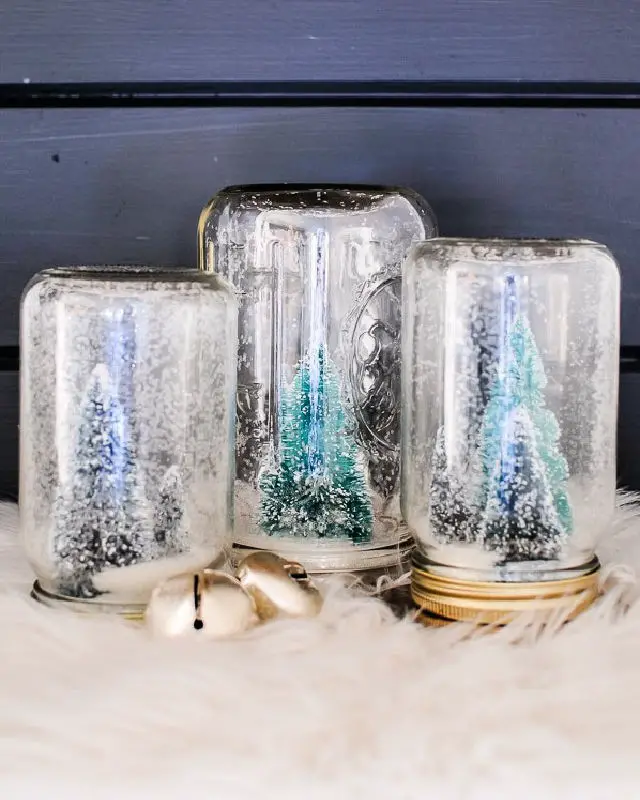
Transform your home into a winter wonderland by crafting DIY bottle brush mason jar snow globes in just under 5 minutes. With only three easy steps and minimal materials – including a mason jar, bottle brush trees, artificial snow, and a glue gun – you can create a unique and charming decor piece that complements your interior design. The simplicity of this project makes it accessible to anyone, allowing for endless possibilities by experimenting with different colored trees or snow, varying the jar or tree sizes, and even opting for gold or silver jar lids. Not only are these snow globes an affordable way to enhance your festive season decorations, but their neutral design ensures they blend seamlessly with your winter decor. Add a touch of snowy magic to your home with this delightful DIY project!
Make a Snow Globe With a Picture
Transform your home into a winter wonderland without braving the cold! Create a one-of-a-kind DIY snow globe project that puts your child’s face front and center. This budget-friendly, easy-to-make craft is an ideal way to spend quality time with your little ones while fostering their creativity and making lasting memories during the colder months.
With just a few simple ingredients – think plastic snow globes, cardstock, a special picture, waterproof glue, glitter, and optional glycerin for added visual flair – you can turn everyday items into a treasured keepsake. As your masterpiece takes shape, it’ll become a charming decoration or thoughtful gift that captures the magic of the season.
Let your imagination run wild and create an exquisite piece of decor that will be cherished for years to come.
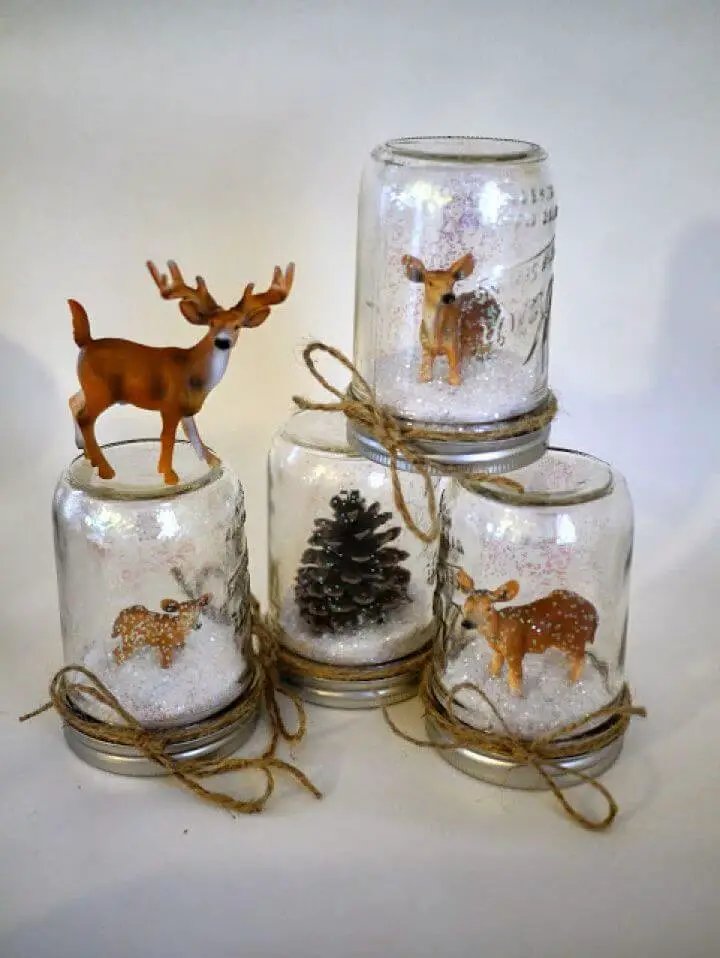
Gorgeous Mason Jar Snow Globe
Delight in the magic of the holiday season by crafting enchanting DIY snow globes that can be treasured for years to come. These waterless creations, made from a mix of common crafting materials like plastic globes, miniature figurines, glitter, faux snow, and glue, offer endless opportunities for customization. By avoiding water, you can confidently incorporate metallic elements without worrying about rust or corrosion over time.
As you bring your globe to life, attach your chosen figurines to the mason jar lid, add a pinch of whimsy with glitter and faux snow, and don’t forget to top it off with a decorative ribbon or twine around the lid. The possibilities are truly endless, allowing you to create a one-of-a-kind masterpiece that adds a personal touch to your holiday decorations.
Whimsical DIY Mason Jar Snow Globes
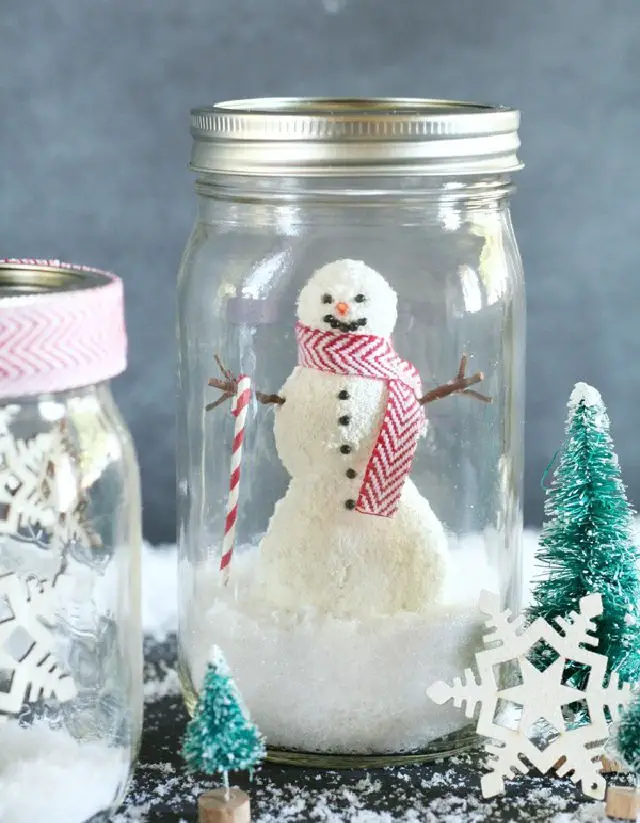
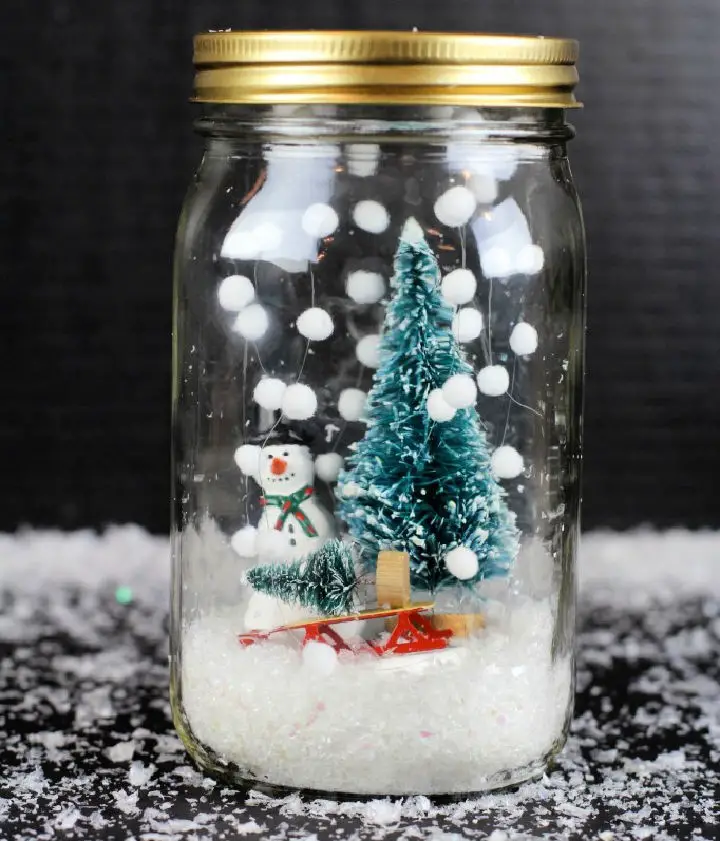
Transform ordinary mason jars into breathtaking winter scenes by crafting enchanting DIY snowglobes using a combination of seasonal supplies and everyday materials. The process begins with creating a captivating snowman or intricate snowflake design, followed by adding a dusting of glittery fake snow to bring the scene to life. Next, secure the lid to preserve the magic within. These charming snowglobes not only make for a personalized and unique decoration, but also serve as an imaginative gift option. By unleashing your creative energy, you can turn simple mason jars into stunning winter wonderlands, perfect for sharing with loved ones or displaying in your own home.
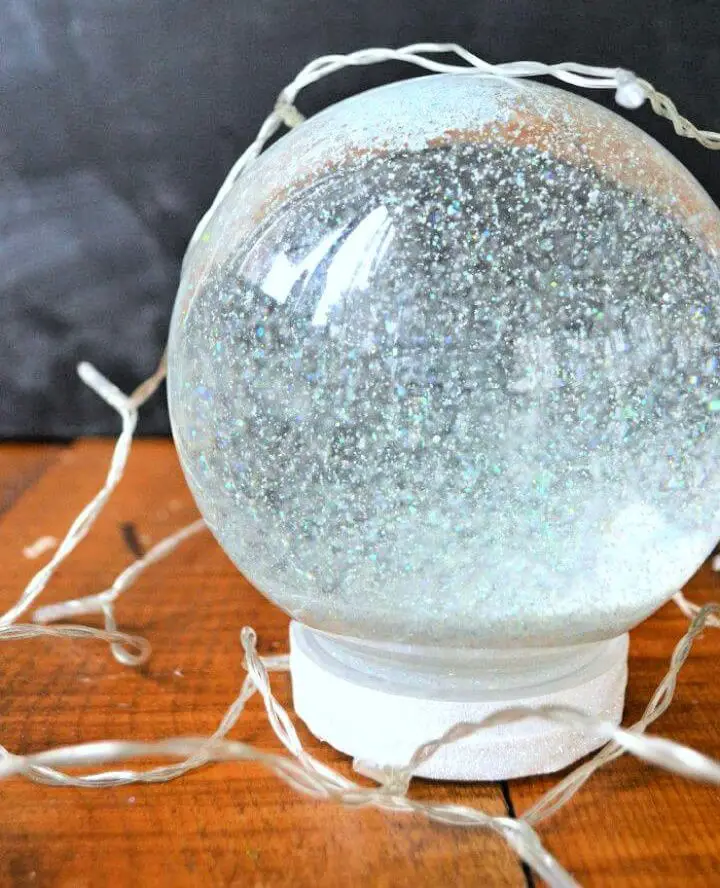
Stunning Glitter Snow Globes
Transform your winter wonderland experience by crafting enchanting DIY snow globes that bring joy to both kids and adults. With minimal supplies, including a plastic snow globe or mason jar, distilled water, vegetable glycerin, and chunky glitter, you can create an immersive miniature world within minutes. Take it to the next level by personalizing each sphere with waterproof toys that reflect your child’s passions, making the process both fun and meaningful. As you follow a simple step-by-step guide, this engaging DIY project also serves as a gateway to introducing kids to fundamental scientific concepts, such as viscosity. To elevate the experience further, turn your crafting session into an experiment by exploring how varying glycerin concentrations affect snowfall speed inside the globe. Let the magic unfold and create mesmerizing snow globes that will captivate the imagination of all who behold them.
Mason Jar and Sugar Snow Globe
Transform any room into a winter wonderland with these charming DIY sugar snow globes in mason jars! This delightful project brings the magic of the season indoors, regardless of the weather. Simply combine mason jars, toy cars and animals, and sugar to create a whimsical snow-filled scene. Add miniature bottle brush trees and forest animals for an added touch of realism, making each globe a unique winter wonderland. Kids will love assembling these globes, making it a fun family project that’s perfect for the holidays. The finished globes emit a warm, vintage charm that complements any home decor, especially above the fireplace. This project is not only easy and affordable but also enjoyable for all skill levels. Bring warmth and joy to your winter decor with these enchanting sugar snow globes and start crafting your own winter wonderland today!
Make a Snow Globe With Written Instructions
Bring the magic of Christmas crafts to life with this fun and easy DIY snow globe guide for kids! Who says crafting has to be boring? With a few simple materials, you can create a unique and personalized snow globe that will capture your child’s imagination. The best part? They get to choose their own figurines – from Disney princesses to their favorite cartoon characters. This activity is like making a sensory bottle, but better! It’s an interactive way for kids to engage with the holiday season, exploring texture, color, and movement. By following our step-by-step instructions, you’ll be able to create a beautiful snow globe that will slowly reveal its secrets when shaken. With tips on using glycerin to make the glitter fall just right, this project is sure to become a new family favorite. Gather your materials – including distilled water, glitter, sequins, waterproof characters, a snow globe kit, and glue – and get ready to unleash your child’s creativity this holiday season.
Awesome DIY Family Portrait Snow Globe
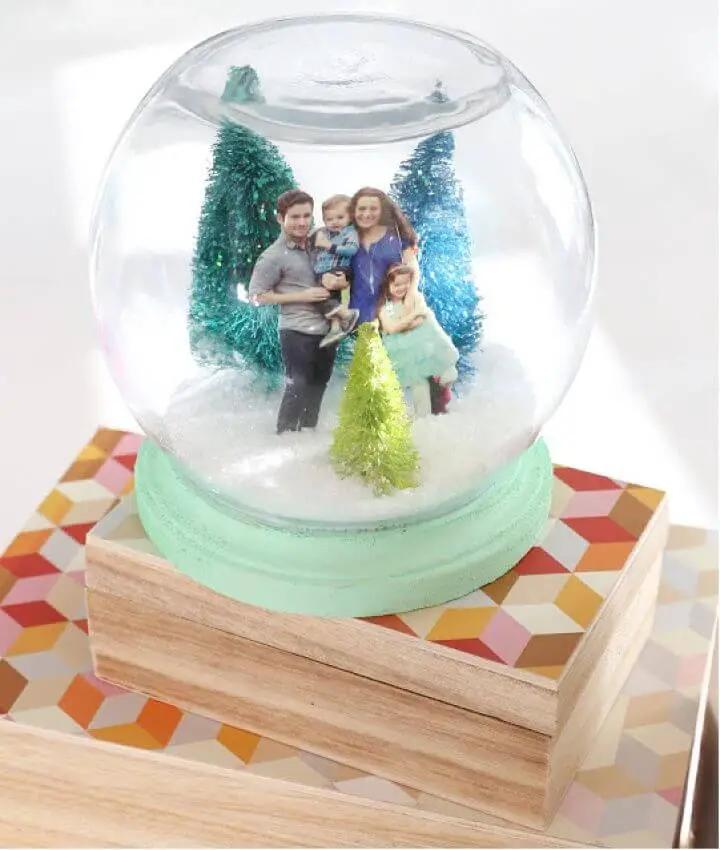
This winter, infuse your holiday decor with a warm and cozy touch by creating a DIY family portrait snow globe. This innovative project brings together traditional festive elements with personalization, making it a unique and charming addition to your seasonal celebrations.
By combining bottle brush trees, inkjet shrunk plastic, and a digital family photo, you’ll create a one-of-a-kind snow globe that captures cherished memories within a timeless winter wonderland setting. The pièce de résistance? A ‘snowy’ atmosphere achieved using regular salt in your glass bowl.
With an affordable price tag of under $20, this project can yield 4-6 personalized snow globes, perfect for last-minute gifts or treasured keepsakes. Your very own family portrait snow globe embodies the magic and joy of the holiday season, making it a thoughtful and memorable gift for loved ones.
Handmade Glittery Mason Jar Snow Globe
Indulge in the magic of winter with a DIY mason jar snow globe that’s sure to become a festive centerpiece or calming companion. This radiant, glittering masterpiece brings the wonder of a white Christmas to life, regardless of your location.To create this enchanting scene, you’ll need just a few simple ingredients: a Mason Jar, Elmer’s Clear Glue, a snack cup, scissors, a hot glue gun, a bottlebrush Christmas Tree, and plenty of glitter. The key to transforming it into a calming jar lies in adding glue to the water inside the jar, increasing its viscosity and allowing the glitter to settle slowly. This mesmerizing effect will transport you to a peaceful world, perfect for unwinding and finding serenity.With clear, step-by-step instructions and an innovative design, you can adjust the tree’s position to create a unique and captivating display. Simply shake the globe gently, and watch as the water, glue, and glitter mingle to form a stunning, snow-filled wonderland. Experience the joy of crafting and treasure your handmade snow globe this Christmas.
Making a Winter Snow Globe – Step by Step

Transform your home into a winter wonderland with this enchanting DIY snowglobe project. Perfect for those seeking to infuse their holiday decor with personal flair, this crafty endeavor requires only basic supplies like figurines, snow globes, E6000 glue, distilled water, glycerine, glitter, and measuring spoons. By following the simple four-step process, you’ll be able to create a one-of-a-kind masterpiece in no time. Not only does this snow globe make for an impressive addition to your holiday decorations, but it also serves as a thoughtful gift option. For added guidance, refer to the accompanying video tutorial that provides a detailed walkthrough of this festive ornament-making process. As you craft your unique snowglobe, you’ll experience the unparalleled joy of creating something beautiful with your own hands. Bring the magic of the season to your table today and indulge in this captivating project.
Recycled Snow Globe for Beginners
Create a delightful DIY recycled snow globe that’s not only eco-friendly but also a fun activity for craft clubs or kids’ groups. With everyday materials like a round disk, a recycled beverage container, a small fake tree, and Styrofoam snow, you can transform your creative vision into a personalized winter landscape within 15 minutes. The step-by-step guide ensures a seamless crafting process, while the customizability of the project allows for endless possibilities, from a tiny snowman to a mini nativity scene. Gather your supplies and start bringing your unique creation to life today! The simplicity and creativity of this project make it an ideal activity for anyone looking to get crafty and make a positive impact on the environment.
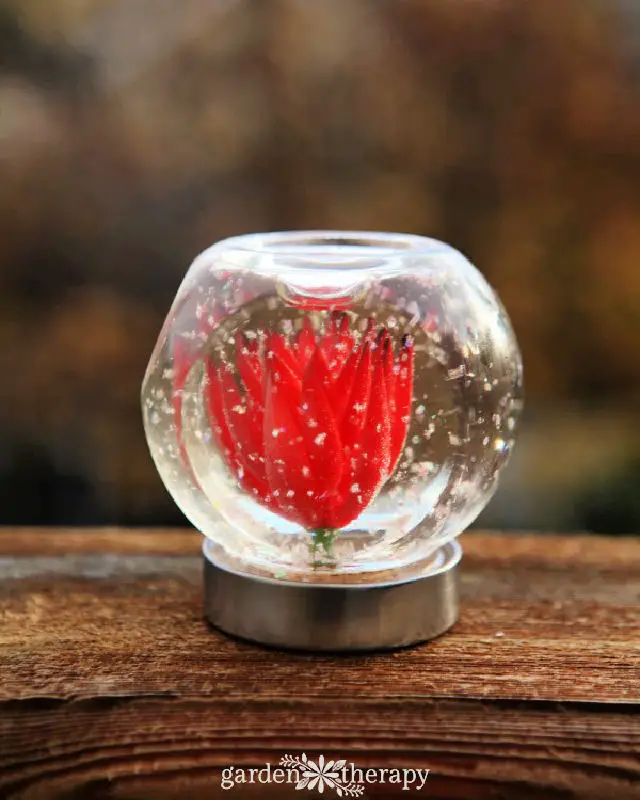
Unique DIY Fishbowl Snow Globe

Indulge your holiday cheer by transforming a ordinary fishbowl into a one-of-a-kind winter wonderland scene. This DIY project is an invitation to unleash your creativity, add a touch of whimsy to your Christmas decor, and create a sense of magic in your home. As you fill the bowl with modern Christmas trees, tiny ornaments, jingle bells, and sparkling holiday trinkets, you’ll be crafting more than just a festive decoration – you’ll be crafting memories with loved ones. This project is an excellent way to spend quality time with family, particularly children who will delight in adding their favorite snowflakes or decorative items to their own personalized snow globe. And when you’re done, you can gift your masterpiece to friends and family, giving them a truly unique and thoughtful present. Dive into the joy of creating this DIY fishbowl snow globe and let the magic of the holiday season shine through!
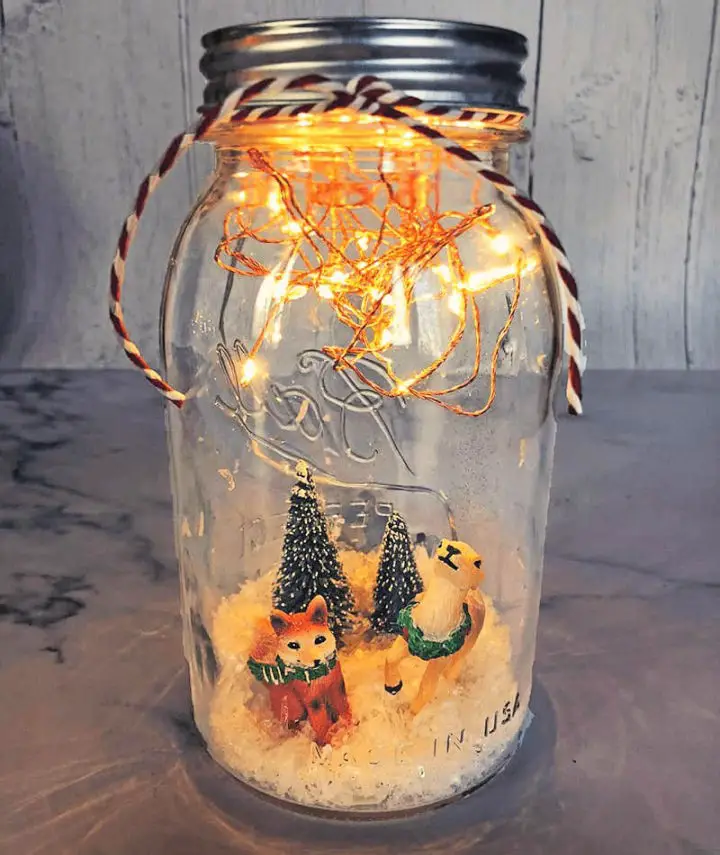
Illuminated Snow Globe Scene in a Jar
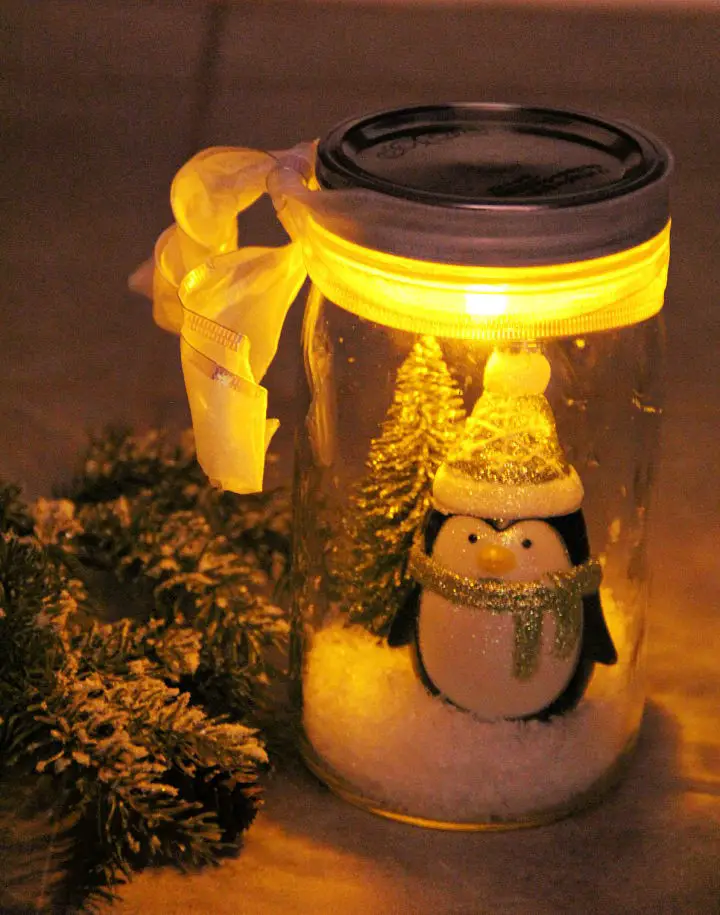
Transform your home into a miniature winter wonderland with this enchanting DIY mason jar project. Combine childhood memories with modern convenience by creating a lighted snow scene within a Kerr brand mason jar. Start by filling the wide-mouth jar with faux snow, then add your chosen figurines to bring the scene to life. Use a button magnet to secure the battery-operated tealight to the jar’s lid, and finish with a ribbon around the neck for a touch of festive flair. This handmade illuminated mason jar project offers a unique and personalized way to capture the magic of winter right in your living room. A simple, fun, and cost-effective DIY endeavor that rekindles the joy of the holiday season.
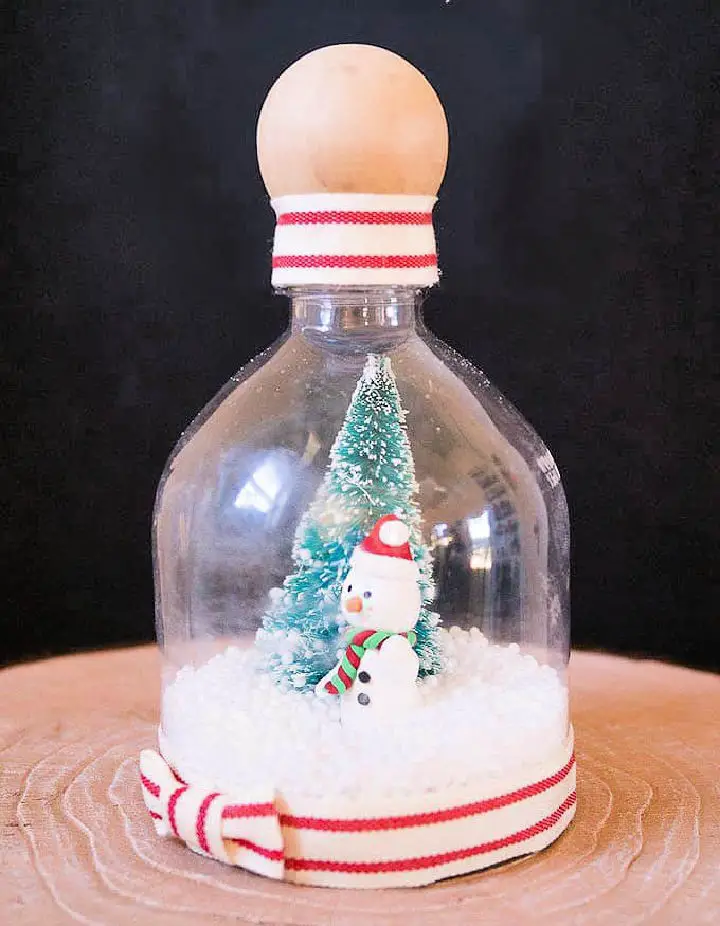
How to Make a Succulent Snow Globe
Transforming a humble spice jar into an enchanting miniature winter garden is just one of the many joys of this DIY succulent snow globe project. As you bring a touch of greenery indoors, you’ll be creating a unique centerpiece for your holiday decorations that’s sure to delight friends and family alike. To get started, gather these essential materials: a small round spice jar, artificial succulents or cacti, a wine cork, waterproof adhesive, and iridescent glitter. With this project, you’ll craft an irresistible snow globe where faux succulents appear to thrive amidst falling snowflakes. It’s the perfect addition to your home décor this festive season, and with its beauty and charm, it can even serve as a special keepsake, capturing the essence of your garden, even in the heart of winter.
Homemade Novelty Snow Globes
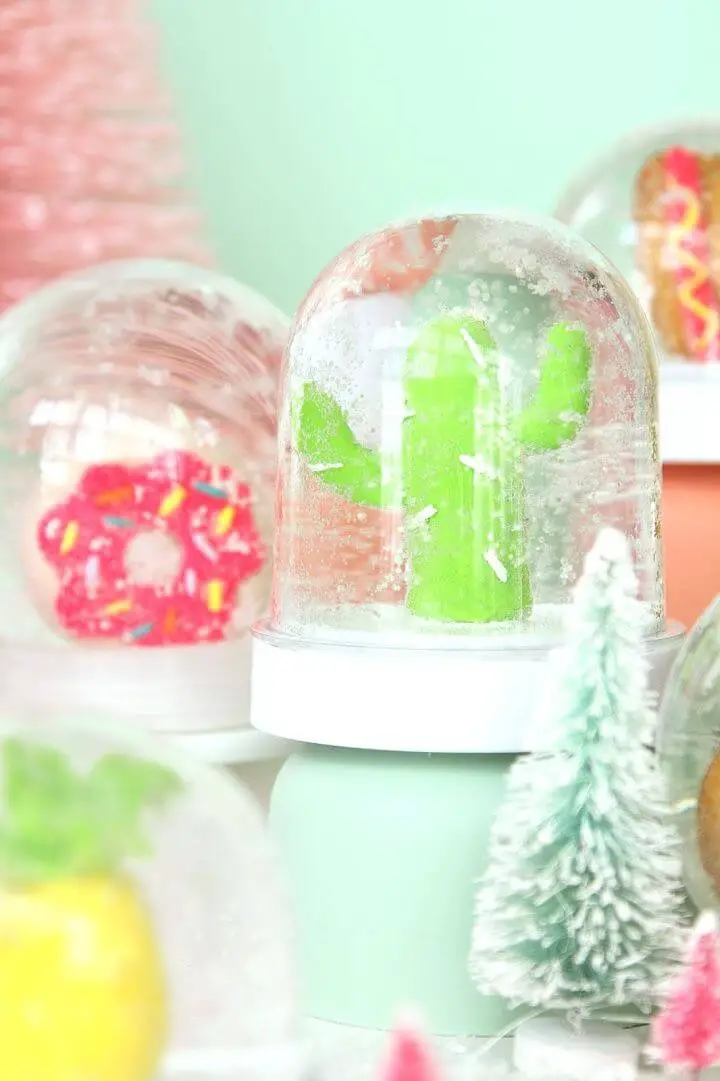
Transform your holiday season with an unconventional twist on traditional Christmas decorations – DIY snow globes filled with unique, whimsical objects. This fusion of festive charm and personal flair is perfect for showcasing your favorite items, whether it’s a miniature cactus, a clay pineapple, or even a tiny donut. As a refreshing departure from the typical holiday color palette, these easy-to-create snow globes will add a touch of tropical or culinary magic to your winter wonderland.
To get started, gather the following materials: Sculpey clay, empty snow globes, glitter, glycerin, clay tools, super glue, and waterproof epoxy. These enchanting creations aren’t just limited to personal use – they make exceptional one-of-a-kind gifts or party favors that your loved ones will cherish. Try this creative project today and bring a piece of tropical or food-inspired whimsy into the festive season.
Snow Globe Jars for Home Decoration
Get into the holiday spirit by crafting a DIY snow globe jar that’s both whimsical and effortless. This project is perfect for celebrating Christmas, even when the weather outside is anything but festive. To get started, gather everyday items like glass jars, faux snow, and adorable car ornaments to bring your winter wonderland to life. Put on some festive tunes and let the crafting fun begin! Begin by layering faux snow and miniature Christmas trees in your chosen jar, then add a charming car ornament for a cozy touch. This DIY project is not only an aesthetically pleasing addition to your holiday decor, but also a great way to involve kids in the decoration process, encouraging their creativity and imagination. So why wait for the first snowfall? Create your own winter wonderland at home with these easy-to-make snow globe jars.
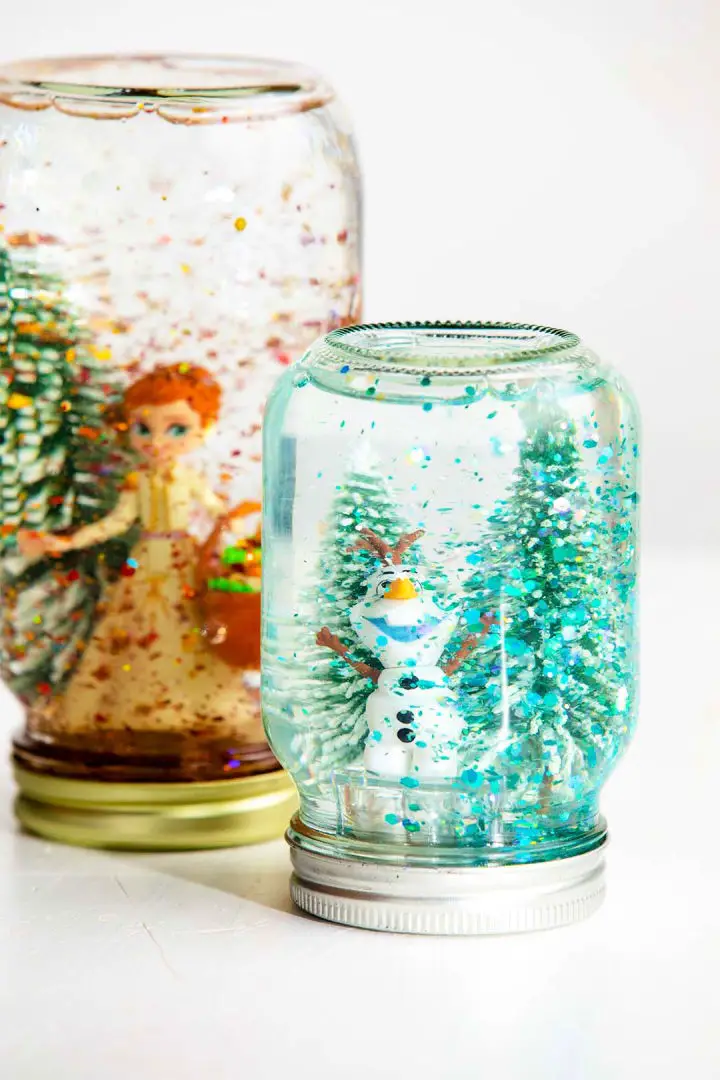
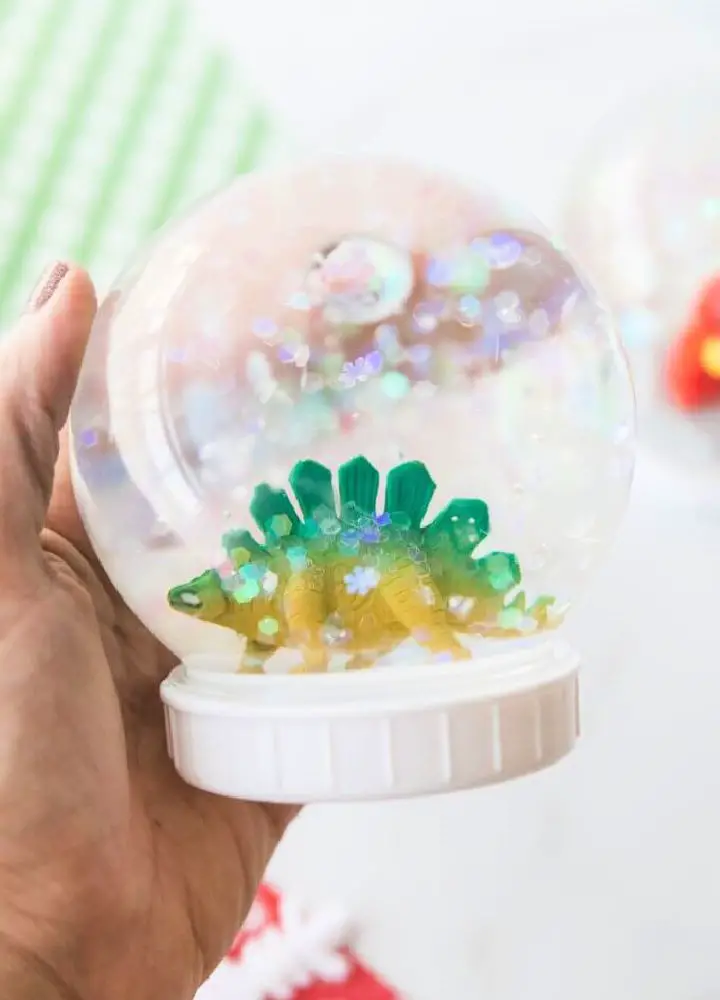
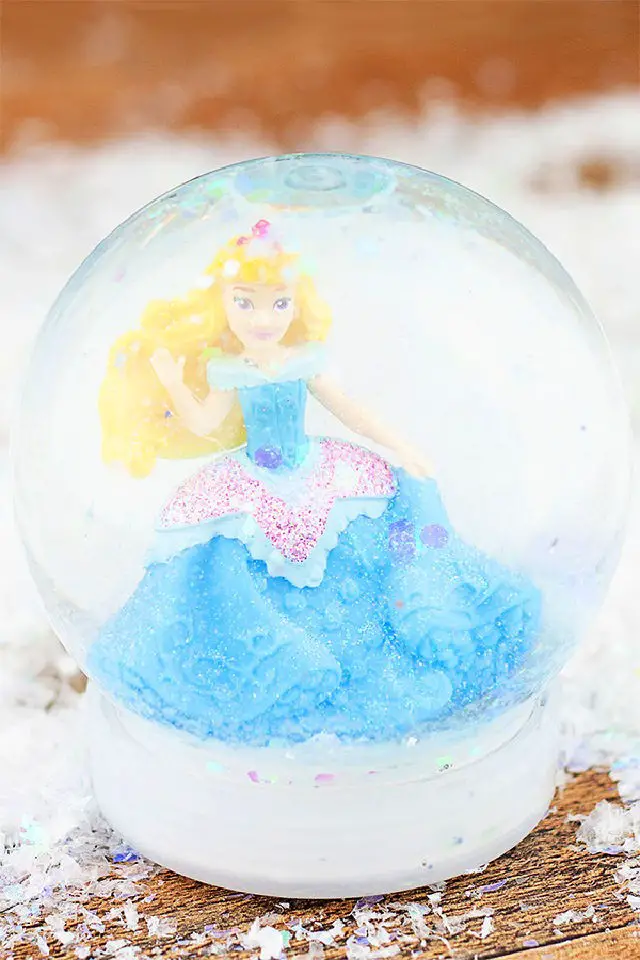
DIY Disney Frozen Olaf Snow Globe
Transform your holiday decor into a winter wonderland with this enchanting DIY Olaf snow globe inspired by Disney’s Frozen. Ditch the water and opt for a mesmerizing flurry of glitter snow that keeps your miniature Olaf and tiny trees sparkling and festive. To create this delightful decoration, you’ll need a plastic snow globe, an Olaf figurine, miniature trees, buffalo snow, and plenty of glitter. Assembling the globe is a breeze, requiring only hot glue or E6000 to secure Olaf and trees to the base. Simply add your snowy landscape, sprinkle on some extra sparkle with blue glitter tape for a finishing touch, and you’ll be transported to a Frozen-themed world in the comfort of your own home. This DIY project is not only a beautiful decoration but also a fun activity that’s perfect for the whole family to enjoy together.
Homemade Waterless Snow Globe

Create enchanting, risk-free waterless snow globes with your children! Not only do these unique decorations add visual appeal to any space, but they also eliminate potential hazards associated with traditional snow globes, such as water leakage or breakage. With a few simple materials – cardboard or thick paper plates, clear plastic cups, cotton balls, glue, mini ornaments, mini styrofoam balls, glitter, a pen, and scissors – your kids can unleash their creativity, craft one-of-a-kind gifts for friends and neighbors, and develop important skills like fine motor control, artistic expression, and problem-solving. This fun, easy, and engaging activity is perfect for the whole family to enjoy together.
Make Your Own Disney Snow Globes
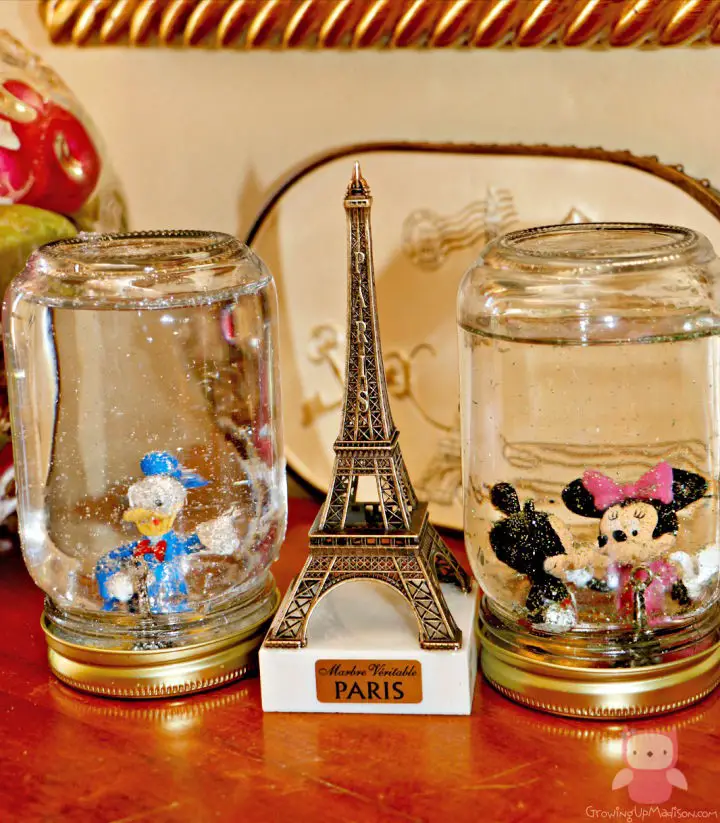
Transform a cherished family vacation memory into a whimsical DIY treasure – create your own Disney-themed snow globes inspired by the enchanting Disneyland Paris experience. For enthusiasts of both Disney and crafting, this project requires just a few simple materials: mason jars, glue, Disney figurines, glitter, baby oil, and water. Begin by adhering your favorite figurines to the jar cover, then fill the container with a mesmerizing mixture of water and glitter. To add an extra touch of magic, introduce a drop of baby oil to create a hypnotic effect as the glitter appears to float effortlessly. This budget-friendly alternative to commercial snow globes offers a delightful experience for you and your child to share, while serving as a unique keepsake from your Disneyland Paris adventure.
Simple DIY Dollar Tree Snow Glob
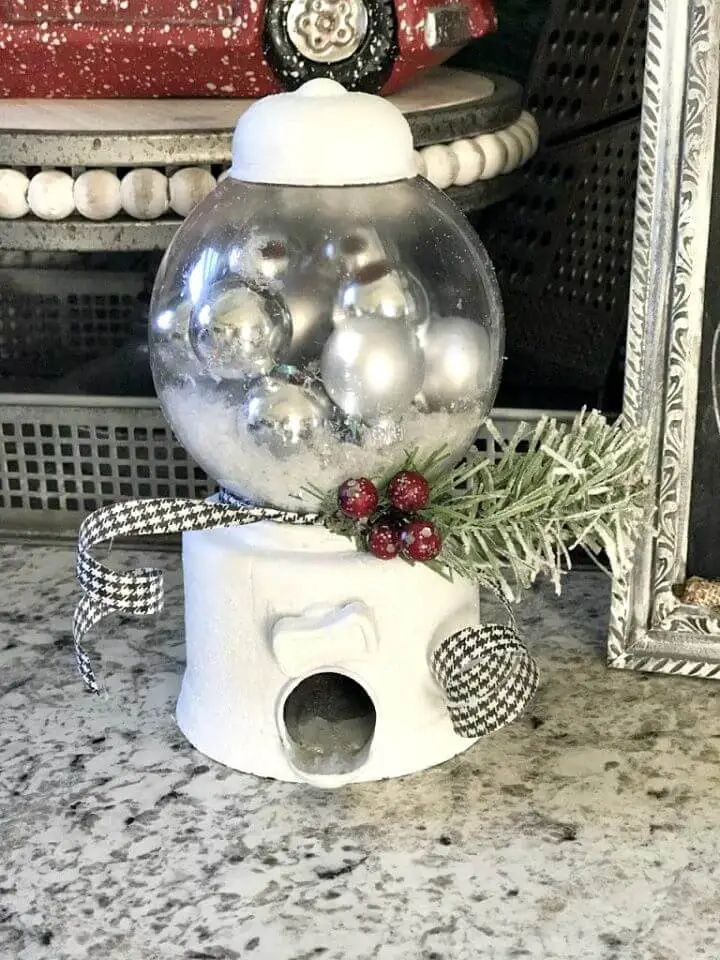
Transform everyday Dollar Tree items into enchanting snow globes with this clever DIY project. By upcycling a simple gumball machine, you’ll create a magical winter scene that’s sure to delight. With just a few essential materials like iridescent glitter, white chalk paint, and mini glass ornaments, you’ll be well on your way to crafting a stunning holiday keepsake with a beautiful shimmer effect. To complete the look, add a festive ribbon and greenery arrangement as the crowning touch. This delightful and affordable DIY project will turn a handful of dollar items into an eye-catching piece of home decor that’s sure to bring joy.
Easy to Make Waterless Snow Globes
Transform the festive season with homemade waterless snow globes, a creative DIY project that redefines traditional Christmas crafts. Gather the following materials: clean jars, animal figurines, pine cones, mini Christmas trees, hot glue gun, cork tiles, glitter, white pompoms, craft glue, and jute twine. Begin by cutting cork tiles to fit inside jar lids, elevating your figurines or pine cones. Secure them with hot glue once dry. Then, create a ‘snowy’ base within the jars using halved pompoms, allowing it to dry overnight. The excitement builds as you add glitter to the jars, setting the stage for your winter wonderland. Once satisfied, secure the lid, shake it gently, and bask in the joy of your creation. To complete the look, wrap jute twine around the jar lid, tying a bow for an added touch. These waterless snow globes become charming home decor items and thoughtful Christmas gifts for loved ones. Create one today and infuse your home with Christmas magic!
Making a Light Bulb Snow Globe
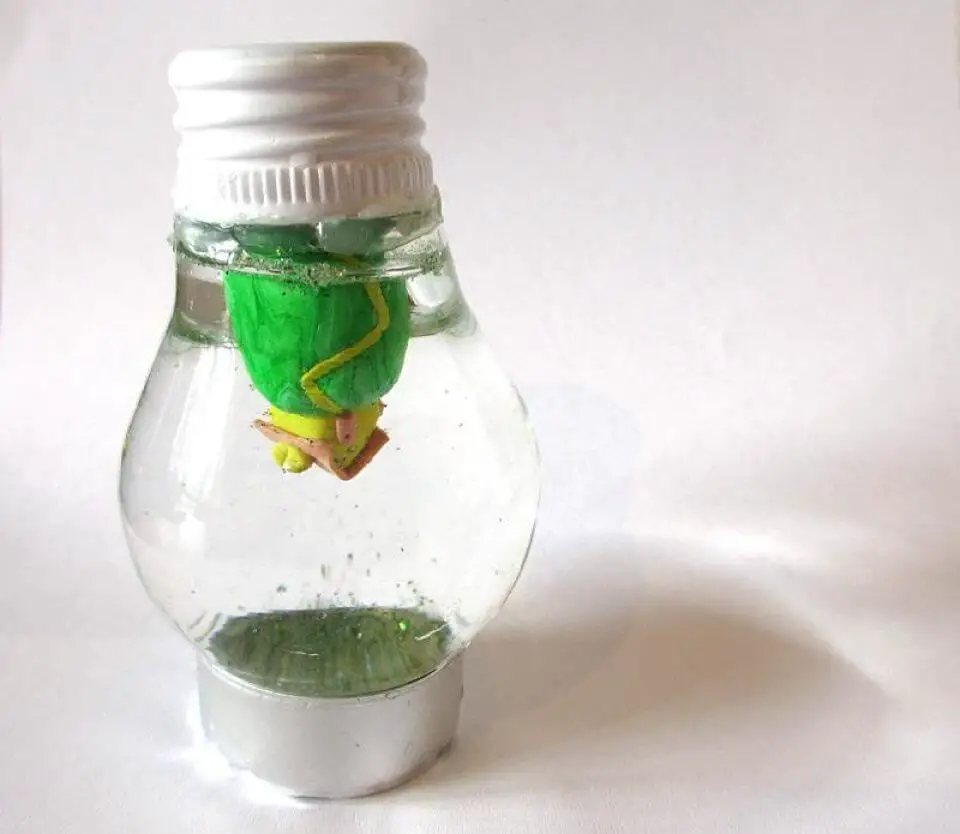
Transform your creativity into a mesmerizing DIY experience by crafting a snow globe within a light bulb! This innovative project begins with the meticulous process of hollowing out the glass using an extraordinary tool – glow stick fluid. As you shape the mini centerpiece, envision a whimsical world taking form. A small clay house atop a hill serves as the perfect focal point, awaiting its place within the snow globe. The magic unfolds when you adorn it with a glossy layer of nail polish and attach it to a wine bottle cap, creating a stunning centerpiece. Next, add a pinch of glitter and water to bring your miniature universe to life, sealed with a glue gun for a lasting finish. With a gentle shake, your glittering snow globe comes alive, inviting creativity, patience, and experimentation. Despite the delicate nature of the glass, your final product will be a charming conversation piece with a personal touch. So, why not bring your own magical miniature world to life within a light bulb today?
Inexpensive DIY Legoman Snow Globe
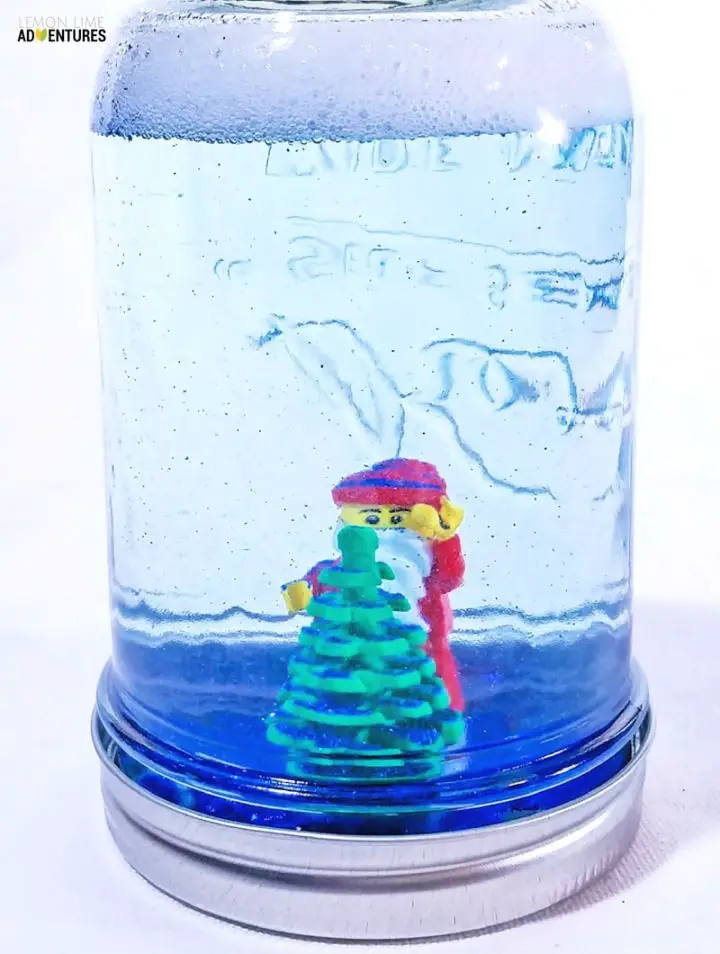
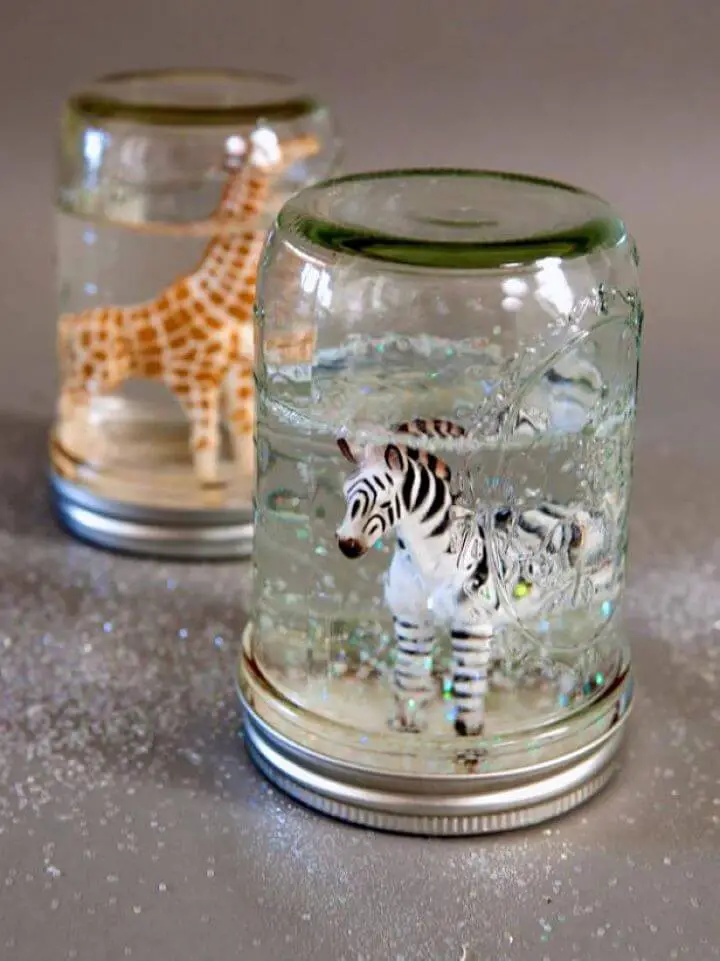
Bring the joy of homeschooling and crafting together through this unique DIY project – creating miniature snow globes using LEGO enthusiasts’ favorite figurines. By combining everyday items like jelly jars with LEGO mini-figures, you’ll create a delightful and educational experience for the whole family. Not only will they develop their creativity and hands-on skills, but they’ll also learn about fundamental science concepts like water displacement and density.
As an added bonus, these snow globes can be customized to fit any theme or occasion, making them perfect as homemade gifts or a fun activity to enjoy together.
So why not gather your LEGO pieces and some glitter, and let your imagination run wild as you build your very own Legoman snow globe? The possibilities are endless!
Picture Snow Globe for Kids
As the festive season approaches, bring a touch of winter magic into your home with this delightful DIY snow globe project. This easy-to-create craft is perfect for both kids and adults to enjoy together, making it a thoughtful handmade gift or a charming decoration for the holiday season.
With just a few simple materials like a plastic snow globe, a laminated picture, glitter, sequins, and distilled water, you can create a personalized snow globe with a cherished photo and sparkly snowfall. Follow this step-by-step guide to make your own unique keepsake, filled with memories that will last long after the holidays are over.
Make a Snow Globe Calming Jar
Transform an ordinary plastic snow globe into a therapeutic tool and elegant desk decoration by creating a DIY calming jar. To make this mesmerizing, swirling spectacle, combine hot water, light corn syrup, and a mix of fine white, teal, holo silver, and course white iridescent glitters. The resulting glittery swirl can be used to refocus attention and promote deep breathing, making it perfect for stressful moments at work or home. Plus, the discreet design allows you to keep this tranquil treasure on your desk without drawing attention. Whether for kids or adults, this easy-to-make calming jar serves as a perfect mindfulness tool, helping to calm the mind and soothe the soul.
Cool DIY California Snow Globes
Step into the warmth and magic of a Southern California Christmas by creating your own DIY California snow globe. These miniature masterpieces capture the essence of the Golden State’s laid-back vibes, from palm trees to sandy beaches. What’s more, they’re surprisingly easy to craft using everyday items like shatterproof globes, tiny figurines, artificial sand, and glitter. With a few simple tricks, you can ensure your snow globe remains durable and the glitter falls slowly, creating a mesmerizing effect. As you display these unique creations, you’ll be transported to the sun-kissed coast of California, right in the comfort of your own home.
Beautiful and Magical Unicorn Snow Globe
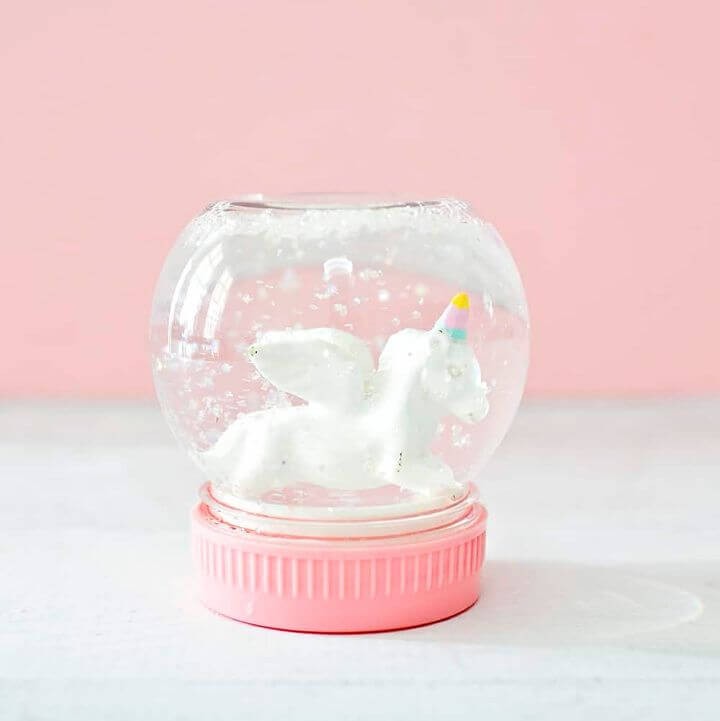
Indulge in the whimsy of DIY craftsmanship with this captivating unicorn snow globe project. By repurposing ordinary objects into enchanting trinkets, you can create one-of-a-kind gifts or decorations that exude a touch of magic. Start by combining mini plastic unicorn figurines with a sprinkle of glitter inside clear jars, transforming them into mystical keepsakes. The addition of glycerin will slow down the glitter’s descent, producing an alluring snowfall effect. A comprehensive video guide ensures a seamless crafting experience for crafters of all ages and skill levels. This mesmerizing project is perfect for adding a touch of wonder to your holiday celebrations or exploring the realm of unicorn-themed crafts that can bring magic into your daily life.
Make It Yourself Waterless Snow Globes

Transform traditional holiday crafts into modern masterpieces by creating easy and engaging DIY waterless snow globes. Perfect for sparking personal creativity or group activities, these festive decorations are constructed using accessible materials like glass jars, artificial snow, mini Christmas trees, and snowmen. The addition of a frosty lid finish courtesy of Krylon Glitter Blast or white spray paint, along with optional glitter, adds a touch of magic to your miniature winter scene. What sets these snow globes apart is their adaptability to your personal touch, allowing you to customize them in just half an hour. Whether used as festive centerpieces or a fun hands-on activity for kids, these delightful creations bring the enchantment of a snowy wonderland to your fingertips, regardless of the weather outside.
Wonderful DIY Mason Jar Snow Globe
Turn an ordinary mason jar into a breathtaking winter wonderland with this simple DIY craft project. Perfect for gifting to a thoughtful teacher or enjoying with family, this creative endeavor involves crafting a mesmerizing snowfall effect within the jar. To get started, gather a few essential supplies: a mason jar, artificial snow, small figurines, white pom-poms, fishing line, a needle, and tape – all easily accessible at your local craft store. With these materials, you’ll be well on your way to transforming everyday objects into an enchanting winter scene, filled with endless creative possibilities. Why not bring a touch of whimsical magic into your home or gift it to someone special today? The process is surprisingly straightforward, making this project an ideal choice for those looking to add a little bit of festive flair to their daily routine.
Glitter Snow Globes From Mason Jars
Get your kids in on the winter wonderland fun by creating a one-of-a-kind handmade snow globe DIY project. Take their favorite toys or cherished mementos and give them new life as the star of the show. Start by gathering a sturdy figurine, plastic toy, Mason jar, waterproof adhesive, glycerin, and some sparkle-inducing glitter.
With the figurine securely attached to the lid using the glue, let it dry completely before moving on to the next step. Fill the jar with water, making sure the figure is fully submerged when placed inside. Next, add a splash of glycerin for that magical snowfall effect and sprinkle in some glitter for extra flair.
Seal the jar tightly with the adhesive, allowing it to dry before giving the globe a good shake. This unique craft activity will keep your kids engaged and entertained while producing a charming keepsake that’s sure to be treasured.
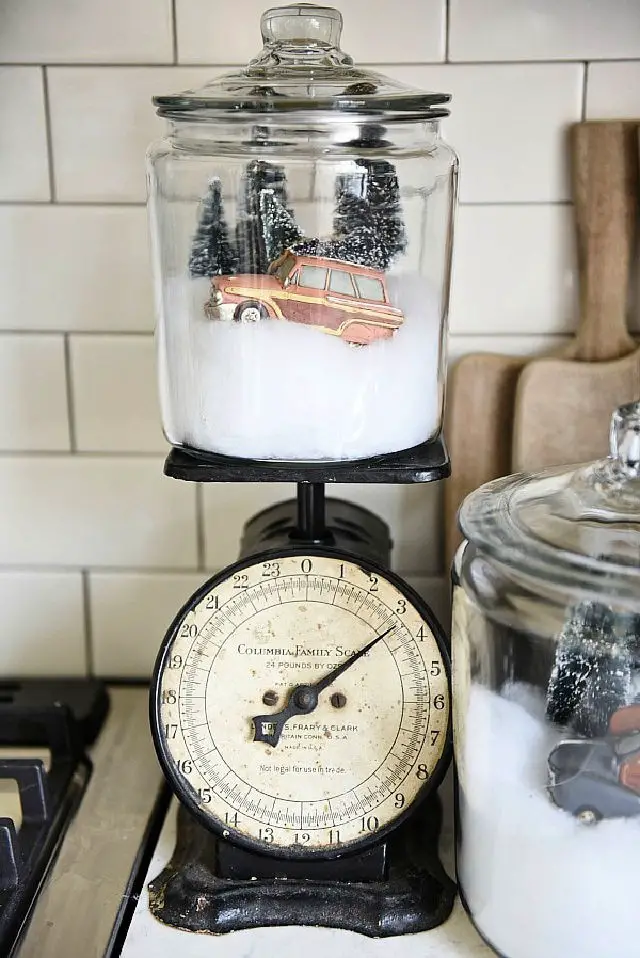
Car in Jar Snow Globe Tutorial
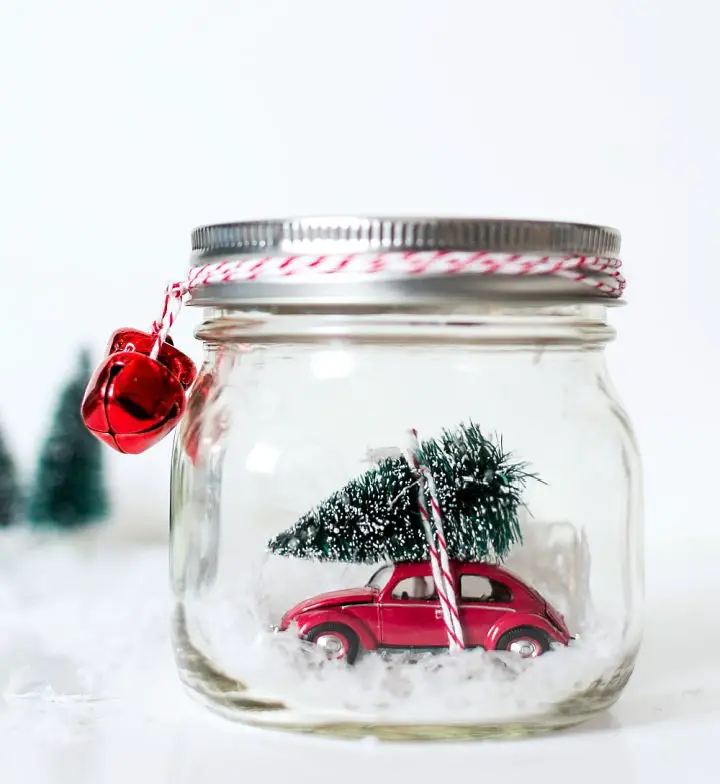
Transport yourself to a whimsical winter wonderland with a one-of-a-kind DIY car-in-jar snow globe that’s a cinch to create. This charming craft combines vintage diecast cars, including a retro Volkswagen Beetle and a classic red Woody station wagon, with a pint-sized Mason jar, bottle brush trees, faux snow, and baker’s twine. In just a few effortless steps, secure the bottle brush tree to the car using the twine, add a dusting of faux snow to the bottom of the Mason jar, and voila! Your enchanting snow globe is ready to mesmerize friends and family alike. Not only does this delightful decoration make for a beautiful centerpiece in your home, but it also makes an unforgettable gift for Christmas.
DIY Glass Figurine Snow Globe
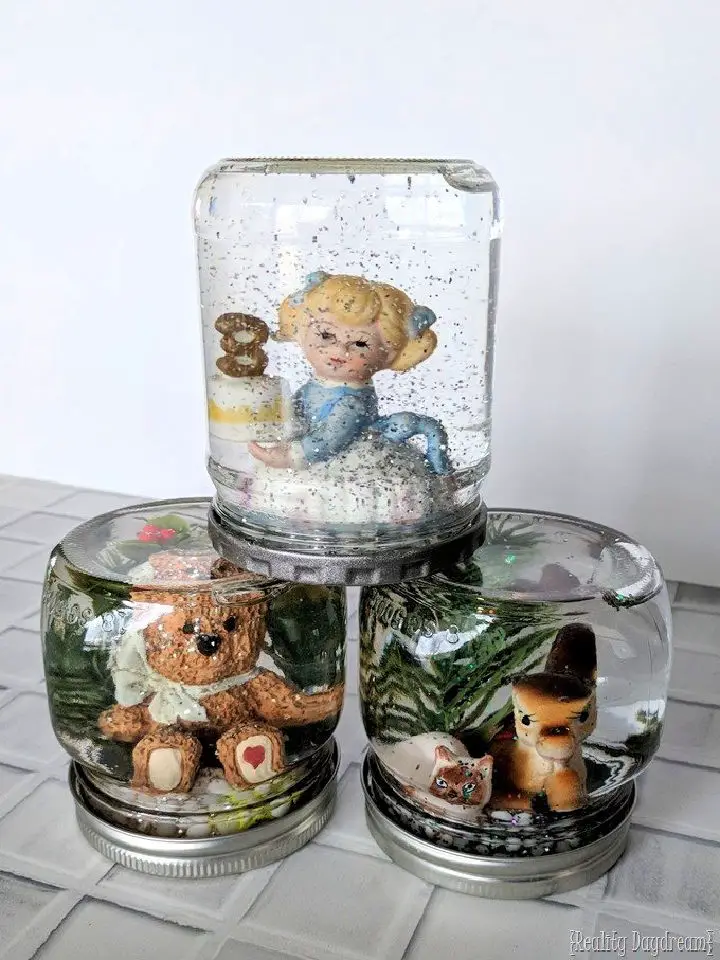
Transform your home into a winter wonderland by creating a one-of-a-kind DIY snow globe with your kids. This fun project is an excellent way to nurture their creativity while introducing them to the world of crafting. To get started, gather the following materials: a glass figurine, a jar with a lid, Xacto Knife, Rapid Fuse adhesive, and glitter – white or silver work perfectly for this project. The process is straightforward: secure the figurine onto the jar’s lid using the adhesive, fill the jar with water and add a dash of magic with the glitter. Finally, screw on the lid tightly to create a mesmerizing miniature winter scene. For an added touch of whimsy, consider adding small white pebbles or faux greenery to give your snow globe an extra layer of charm. This engaging activity is perfect for kids and can also serve as a unique centerpiece for your next social gathering. The sense of accomplishment you’ll feel when you unveil your finished snow globe will be truly magical.
Vintage Style Mason Jar Snow Globe
Transform your space into a winter wonderland with this delightful DIY project: a mason jar snow globe. Perfect for adding a touch of nostalgia to your holiday decorations, you’ll need a medium-sized mason jar, tiny figurines or trees, artificial powdered snow, a glue gun, scissors, and a small scoop.
This enchanting project uses a unique blue mason jar, miniature trees, and shimmering ornament flakes. With these materials, you can create a mini winter wonderland in a jar! Simply attach the trees to the lid using your glue gun, add a generous helping of snow and ornament flakes, and give it a gentle shake.
/nTo take it to the next level, personalize your creation by adding a ribbon or decorative paper to the lid. As you display these charming snow globes throughout your home, get ready to transform your space into a holiday masterpiece.
Make a Mason Jar Snow Globe With Step by Step Guides
Step into the enchanting realm of DIY holiday crafts with our captivating snow globe project. This charming creation is made from readily available supplies such as a mason jar, Krazy glue, glycerin, glitter, and tiny figurines. As you bring this miniature winter wonderland to life, you can opt for a classic winter scene or infuse your personality by selecting unique figurines that reflect your style. With straightforward instructions guiding you through the process, you’ll discover the delight of crafting this treasured keepsake. Not only is this homemade snow globe a delightful addition to your decor, but it also has the potential to become a thoughtful, personalized gift for loved ones. Immerse yourself in the joy of crafting your own miniature winter wonderland with this project.
Easy DIY Photo Snow Globe for Kids
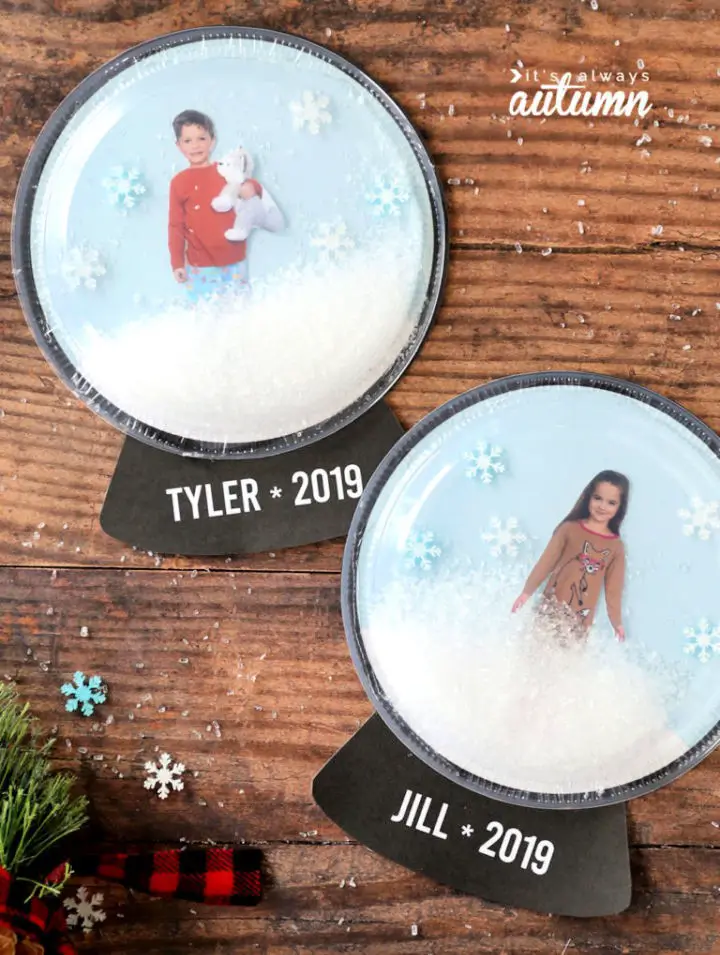
Transform your child’s imagination into a magical winter wonderland by creating a DIY photo snow globe. This enchanting project harmoniously combines their fascination with snow globes and the joy of seeing themselves in a whimsical winter setting. To bring this interactive piece to life, gather a few simple materials: a printable snow globe template, a 4×6 photograph of your child, 7-inch clear plastic plates, Epsom salt, winter-themed decorations, and a hot glue gun. With just a few easy steps, you’ll craft a personalized photo snow globe within a glittering snow globe made from a plastic plate. This delightful craft not only provides an entertaining activity but also fosters creativity and hand-eye coordination in children. Let your kids treasure their unique photo snow globe, a keepsake to remember their winter adventures!
Conclusion:
While creating a DIY snow globe may seem like a daunting task, the end result is well worth the effort. With the right materials and a clear guide, anyone can craft a mesmerizing winter scene trapped in glass. The process itself offers ample opportunities to personalize your creation, from choosing the ideal container to adding the perfect finishing touches of glitter and glycerin. And with the added bonus of troubleshooting tips and maintenance advice, your homemade snow globe can remain a sparkling centerpiece for years to come. If you’re seeking a unique way to add some holiday cheer to your decor or want a thoughtful gift idea, these 40 DIY snow globe projects offer an endless array of inspiration.
