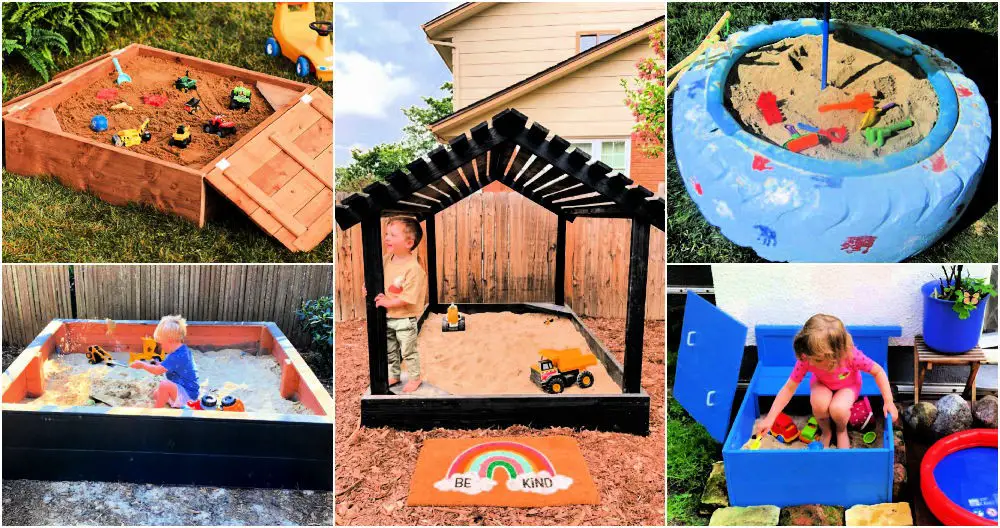
25 Easy DIY Sandbox Ideas and Free Plans
Are you searching for innovative and budget-friendly DIY sandbox plans that your kids will adore? Look no further! We’ve curated a collection of 25 affordable DIY sandbox ideas, complete with step-by-step guides and PDF plans to help you create a sandbox from scratch. Whether you’re looking to repurpose recycled materials or craft a one-of-a-kind covered sandbox, our diverse range of DIY sandbox designs has got you covered. From simple yet effective lid-based sandboxes to unique homemade creations that will leave your kids beaming with excitement, we’ve got the perfect plans for you. And the best part? Each idea comes with detailed instructions and free blueprints, making it easy to get started today!
What is a play sandbox?
In imaginative play environments like sandboxes, children are free to explore and create without boundaries. These enclosed spaces allow kids to unleash their inner architects, digging, building, and constructing intricate structures that bring their imagination to life. As they work together or independently, they develop essential skills such as communication, problem-solving, and social interaction. Physical activity is also a natural byproduct of this unstructured play, allowing children to get moving while having fun. Sandboxes serve as a perfect blend of entertainment and education, providing kids with an outlet for creativity, learning, and growth.
What are 4 styles of sandboxes?
Sandboxes come in various forms, each designed to cater to different aspects of childhood development. Four primary types stand out: sensory, play/activity, water, and outdoor. Sensory sandboxes are a treasure trove of textures and materials, such as rice, beans, or shells, which stimulate the senses and encourage exploration. Play/activity sandboxes offer a vibrant array of shapes, colors, and toys for kids to engage with, fostering creativity and imagination. Water sandboxes provide a safe haven for youngsters to interact with H2O, while outdoor sandboxes typically span larger areas using long-lasting materials like pea gravel or sand. Across these styles, one common thread remains: each offers an engaging and enjoyable experience for children to explore, learn, and play.
3 factors to consider before building a DIY sandbox?
When it comes to setting up a sandbox, there are several key factors to consider before getting started. First and foremost, you’ll need to think about budget – is the cost of building and maintaining the sandbox feasible for your project? This will help you determine whether or not the investment is worth making. Next, you’ll want to decide on the size of the sandbox, taking into account your project’s specific needs and requirements. Will a small, intimate space suffice, or do you need something larger to accommodate your team and stakeholders? Finally, consider where the sandbox will be located – ideally, it should be easily accessible by all relevant parties, with minimal obstacles or disruptions to daily operations. By carefully considering these factors, you’ll be well on your way to setting up a productive and effective sandbox that meets your project’s unique needs.
How to make a cheap sandbox?
Creating an affordable backyard playground is surprisingly straightforward. Start by identifying a suitable plot of land in your yard that can accommodate the desired sandbox size. Next, acquire either wooden planks or a plastic liner to line the space, followed by filling it with sand. To complete the setup, add some playthings and you’ll have a wonderful outdoor play area for kids without putting too much strain on your budget.
What can be used for a building a sandbox?
When it comes to constructing a sandbox, you’re spoiled for choice when it comes to materials. Wood, sand, gravel, soft mulch, and rubber mats are all viable options. However, safety should be your top priority – opt for materials that are splinter-free and chemical-free to ensure kids can play without risk of harm. Sand is often the go-to choice due to its non-toxic nature and ease of manipulation. To get started, make sure the base layer is firmly packed to prevent shifting and consider adding a protective liner for added durability. Once you’ve got your foundation in place, add edges and sides using wood or plastic to contain the sand and keep it from spilling out. With these simple steps, you’ll be well on your way to creating a sandbox that’s perfect for kids of all ages.
Can you build a sandbox using recycled material?
With the rise of eco-consciousness, building a sustainable playground is not only possible but also essential. One such creative endeavor is crafting a recycled-material sandbox that’s both environmentally friendly and cost-effective. Think outside the box (or pallet, as it were) – old pallets, plastic containers, tires, and large cardboard boxes can be repurposed to create a one-of-a-kind play area for your backyard. By incorporating these materials into your project, you’ll not only reduce waste but also provide a unique and engaging space for kids to enjoy.
How can I make my sandbox more fun?
Enliven your sandbox experience by incorporating engaging elements! Consider introducing tactile toys like buckets, shovels, and rakes, which can be just as thrilling for little ones. Vibrant additions such as balls or inflatable marine creatures can bring an extra layer of excitement. Beyond the traditional sand play, consider fostering creativity through watercolor painting or setting up an outdoor obstacle course that winds its way around the sandbox. Moreover, don’t underestimate the power of imaginative play – strive to ignite curiosity and inspire kids to think outside the box!
How to make a cheap sandbox?
To create an affordable and DIY-friendly sandbox, gather essential materials such as wooden planks, nails, and a decent amount of sand. Measure and cut the wood into four identical sections, which will serve as the walls of your sandbox. Next, secure the pieces together with nails to form a square structure. Once the frame is complete, fill it with an abundance of sand. To add a personal touch, feel free to decorate your creation however you see fit. With your new homemade sandbox ready, grab some friends and have a blast playing in it!
Is a sandbox a good idea?
In many ways, a sandbox is the ultimate playground for kids. It’s an ideal setting where they can unleash their creativity, explore new ideas, and learn valuable skills in a safe and controlled environment. What’s more, sandboxes are relatively affordable and require minimal upkeep, making them an attractive option for families. When children engage with sandboxes, they’re not only having fun but also developing essential skills like hand-eye coordination, problem-solving, and self-expression through art. Moreover, sandboxes provide a unique opportunity for kids to socialize with friends, build relationships, and foster important life skills like teamwork and communication.
Does a DIY sandbox need drainage?
Proper drainage is crucial in a sandbox, as it prevents the accumulation of water that can cause the sand to become soggy. To achieve this, one corner of the sandbox should be excavated and connected to a drainpipe or simply covered with gravel. This design allows excess water to slowly seep away, keeping the sand dry and mold-free.
How deep should a sand box be?
When it comes to creating an effective sandbox, the depth is a crucial consideration. The ideal depth depends on the intended use and size of the box. For young children, a minimum depth of 6 inches is recommended for safety reasons. For larger kids or adults, you can opt for a deeper sandbox, ranging from 12 to 18 inches in depth. If you’re using your sandbox as a garden bed, an intermediate depth of 8-12 inches should suffice. Regardless of the chosen depth, it’s essential to line the bottom with a durable tarp or fabric liner and fill the box with clean, safe sand for optimal play and gardening experiences.
How Long Will it take to build the sandbox?
The time spent building a sandbox can vary significantly depending on several factors. On the simpler end, constructing a basic one can take around 4-6 hours, while more intricate projects may require up to 16 hours or even longer. It’s crucial to consider variables such as project size and complexity, soil conditions, material types, and available tools when planning ahead for this endeavour.
What wood is the best to build a sandbox?
When it comes to building a sandbox, cedar stands out as an excellent choice due to its innate resistance to rot and insect damage. Its lightweight nature and ease of working with also make it a practical option for various projects. Furthermore, cedar is cost-effective and readily available in diverse sizes, shapes, and styles. To ensure the wood’s longevity, consider applying a sealant or stain prior to assembly. Additionally, opt for stainless steel screws to enhance durability and simplify cleaning efforts. With proper care, a well-built cedar sandbox can provide countless hours of outdoor enjoyment.
Selecting a suitable location for the sandbox
As you’re selecting a spot for your sandbox, it’s essential to take into account the surrounding environment. Opt for an area that is flat and even, far removed from any potentially hazardous obstacles like trees or shrubs. Ideally, the playground should be situated in an open space where children can move about freely without being confined by walls or fences. Additionally, keep an eye out for nearby sources of shade, which can help regulate sand temperatures on hot days, creating a comfortable and enjoyable experience for kids playing in the sandbox.
Is it cost-friendly to build a sandbox?
When it comes to building a sandbox, the costs can be surprisingly manageable. The choice of materials plays a significant role in determining the overall expense. Sand and gravel are typically affordable options, whereas more decorative elements like bricks or pavers will naturally increase the price tag. Alternatively, opting for pre-assembled kits can be the most budget-friendly route. By carefully planning and budgeting, you can create your own backyard retreat without sacrificing your wallet’s well-being.
Are there other modifications for a sandbox?
When it comes to DIY sandboxes, the possibilities for customization are truly limitless. Beyond simply digging a hole and filling it with sand, there are numerous ways to enhance the experience. You could add shading elements to provide relief from the sun, utilize weather-resistant materials to ensure longevity, or even expand the size of your sandbox to accommodate more playtime. For an added touch, consider incorporating seating areas, playful features like bridges or slides, or creating a water-based element with waterproof containers. The end result is a one-of-a-kind playground that’s tailored to your family’s unique needs and preferences. With a dash of creativity and a willingness to get DIY, you can create a backyard oasis that’s both fun and functional.
Safety and maintenance about sandbox?
Maintaining a sandbox is crucial for ensuring a safe and enjoyable experience for children. This involves conducting regular checks for any sharp objects or debris that could pose a risk to little fingers and toes. Additionally, it’s essential to inspect the area for holes or depressions that can trap tiny extremities. To keep the sand clean and free from contaminants, ensure you cover the sandbox when not in use and replace old sand with fresh material. Moreover, regular sweeping is necessary to remove debris and maintain a hygienic environment. Finally, providing shade over the area can significantly reduce the risk of overheating and sunburns, promoting a more comfortable and relaxed atmosphere.
How to calculate how much sand to fill a sand box?
To determine the ideal amount of sand for a sandbox, start by taking precise measurements of its length, width, and depth. Once you have these figures, multiply them together to calculate the volume of the sandbox. You can express this volume in cubic feet or yards, whichever unit is most convenient for your needs. Next, purchase enough loose-fill material – such as playground sand – to fill this calculated volume. To account for settling over time and ensure a safe play environment, consider adding 10-15% extra sand to your total calculation.
How to build a sand box table?
To construct a functional sandbox table, you’ll require a few basic materials: wood, screws, a drill, saw, and an ample supply of sand. Begin by measuring the designated area where you plan to create the sandbox. Next, cut the wooden pieces to fit this space using your saw. Assemble the wooden framework together with either screws or nails, ensuring a sturdy base for the sandbox. Once the structure is in place, fill it with sand and secure any loose grains with a tarp if necessary to prevent them from being swept away by wind. With these simple steps, you’ll be able to enjoy your very own homemade sandbox table.
What kind of sand should I use for a sandbox?
When setting up a sandbox for children, it’s crucial to use play sand that is specially designed for kids’ playgrounds. This type of sand has been thoroughly cleaned and sifted to remove any debris or large particles, which helps prevent skin irritation or eye infections. Before making a purchase, be sure to check the label for any potential allergens. To keep the sand clean and free of bacteria, consider mixing in some baking soda, which offers additional benefits for maintaining a healthy and safe play environment.
How many bags of sand do I need for Sandbox?
When it comes to stocking a sandbox, the amount of play sand needed depends on the box’s dimensions and shape. A medium-sized square sandbox typically requires around 10 bags of play sand, which translates to approximately one cubic yard of material. However, if you’re working with larger or irregularly-shaped boxes, it’s essential to take precise measurements to ensure an accurate calculation of the required sand volume. Furthermore, deeper sandboxes may necessitate additional quantities of play sand to achieve the desired depth.
How to keep your sandbox safe and sanitary?
To maintain a clean and germ-free sandbox, establish a regular cleaning routine that involves washing the sand with soap and water. This will help eliminate bacteria and other microorganisms. Before covering the sandbox when not in use, ensure the sand is completely dry to prevent moisture from attracting pests or creating an ideal environment for bacterial growth. When storing the sandbox, keep it away from areas that may have been contaminated, such as pet waste or garbage. Regularly inspect the sand for insects, debris, and other unwanted elements, and remove any that you find. Additionally, consider covering the sandbox when not in use to prevent animals or the elements from disturbing its contents. By following these simple steps, you can keep your sandbox safe and sanitary for everyone who uses it.
Is pressure treated wood safe for DIY Sandbox?
When it comes to building a sandbox, pressure treated wood is a safe and practical choice. The treatment process involves injecting chemicals into the wood to prevent decay and damage from insects. To ensure you’re using a safe product, look for timber with a label indicating it’s been treated with an appropriate chemical preservative. Additionally, consider covering the sand surface with landscape fabric or another non-porous material to keep moisture away from the wood and maintain its integrity.
Can you build a sandbox with bench boards?
Building a sandbox with bench boards is a creative and cost-effective solution for creating a fun outdoor play area. To construct one, start by cutting the boards into uniform pieces that fit your desired sandbox shape. Use screws or nails to secure the boards together, ensuring the structure remains sturdy and won’t collapse easily. Once assembled, fill it with sand, and your sandbox is ready for kids to enjoy! For added convenience, you can also use the same bench boards to build a cover for the sandbox, keeping it clean and protected from the elements. This simple yet effective DIY project allows you to create a safe and inviting space for kids to play and explore.
Can you make a sandbox with wheels?
Creating a mobile sandbox is an innovative way to provide children with endless hours of creative play. To achieve this, you’ll need to construct or purchase a sandbox frame equipped with sturdy caster wheels capable of supporting the weight of the sand. Simply fill the frame with play sand, and your kids will have a versatile playground that can be easily relocated around your yard or stored away when not in use. The added mobility offers unparalleled convenience, allowing children to take their imaginative play wherever they desire.
How to build a sandbox out of pallets?
Constructing a functional sandbox from pallets is a straightforward process that requires minimal tools and materials. Begin by gathering 4-6 sturdy pallets and configure them in a square or rectangular shape, depending on the desired dimensions of your sandbox. To ensure stability, secure the pallets together using screws or nails. Next, fill the enclosure with an ample amount of sand to create a comfortable playing surface. For added security, you can anchor the structure to the ground by driving stakes into the earth and tying them off with rope, or alternatively, staple fabric to the underside of each pallet to prevent shifting and erosion.
DIY Sandbox with Slatted Roof
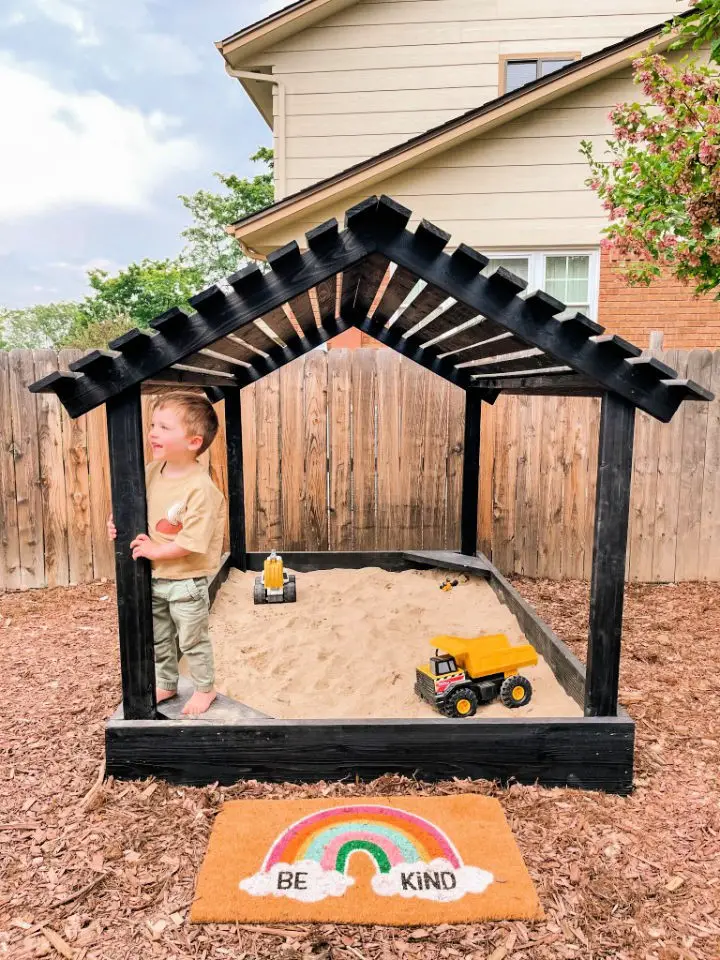
If you’re looking for a fun and creative way to keep your kids entertained in the backyard, look no further than this simple DIY sandbox with a slatted roof. With just one day’s effort and some readily available materials like Fir Boards, play sand, exterior screws, Varathane Classic Black Wood Stain, and landscape fabric, you can create a unique outdoor space that will delight your little ones. Here’s how to bring it all together: Start by cutting the fir boards to size, then assemble the frame of the sandbox using 3-inch screws, taking care to predrill the holes first. Next, cover the frame with landscape fabric and secure it in place with staples. Fill the sandbox with play sand, and finally, add a touch of elegance to the slatted roof by staining it with Varathane Classic Black Wood Stain. For even more detailed instructions and tips, check out the easy DIY tutorial that’s been attached for your convenience.
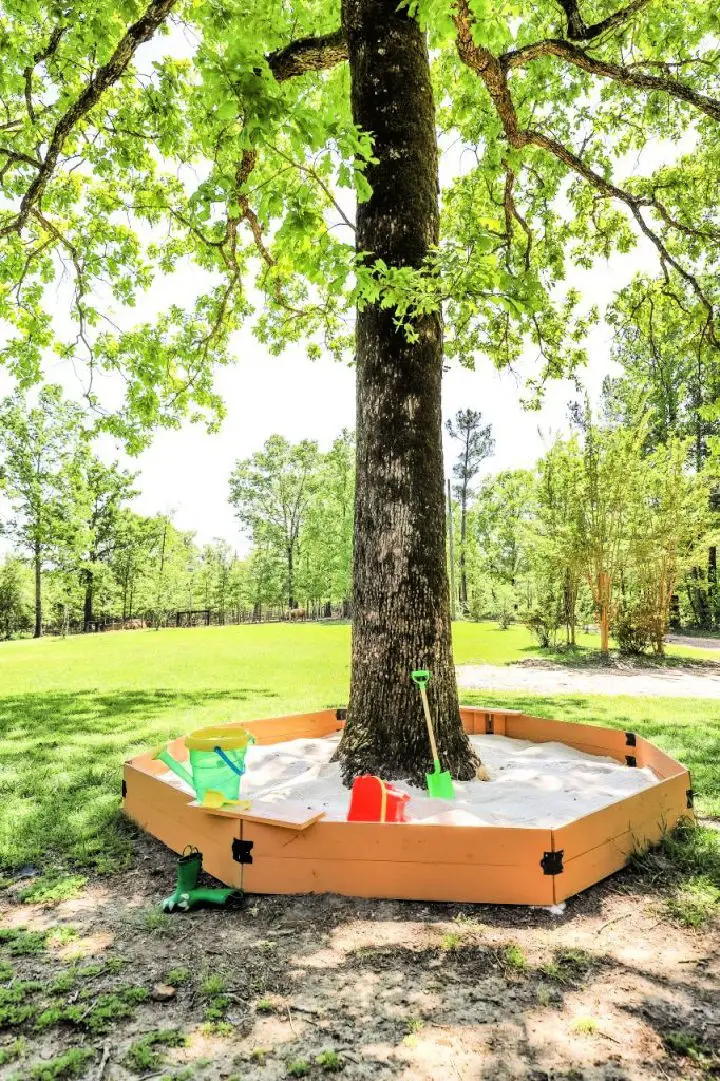
Homemade Hexagon Sandbox
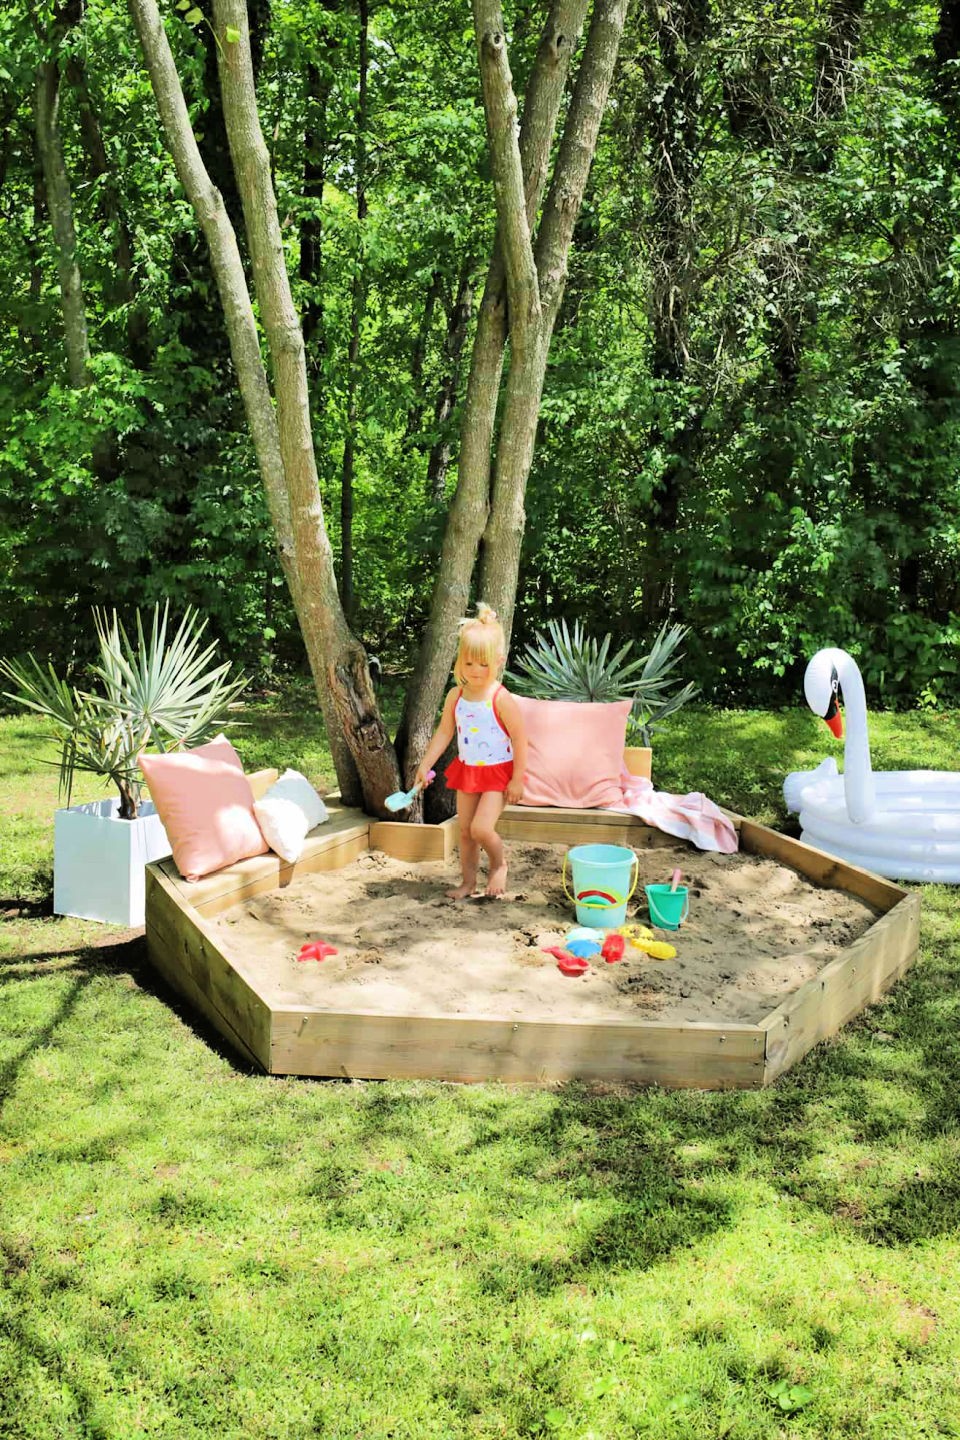
Imagine creating a unique and functional DIY project that combines the joys of summer with the thrill of creativity – this hexagonal sandbox with built-in benches is just the thing. With its simple steps and minimal materials, it’s an ideal activity for kids (and adults!) to enjoy on hot days. To get started, you’ll need some basic supplies listed below. Once you have them at hand, let’s dive into the easy-to-follow steps:First, create the hexagonal shape by cutting six 2×8 lumber boards into equal lengths. Then, use deck screws to attach them together at each corner, forming a sturdy base for your sandbox. Next, cut two 2×4 lumber boards for each seat and attach them perpendicularly to the inside of your hexagon frame using deck screws. For added stability, screw in a 1/2-galvanized pipe horizontally along each 2×4 board.After that, it’s time to add some character to your sandbox. Stain or paint it if you like, and let it dry completely before filling it with sand. If your sandbox isn’t going to be on level ground, mound up some soil in the center first, so everything is level when you lay down your landscape fabric and sand.Finally, place a piece of landscape fabric over your sandbox, securing it with landscape pins spaced evenly around the perimeter. Then, add a layer of sand that’s about 6 inches deep, and level it off as best you can. That’s it! Your hexagonal sandbox is now ready for hours of fun in the sun.
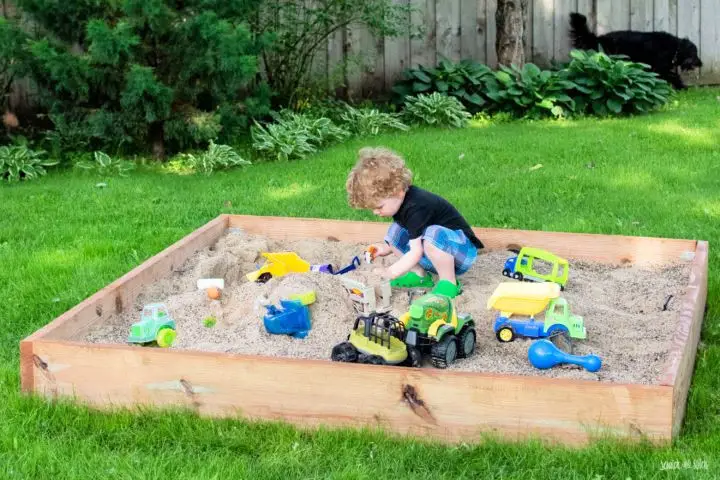
How to Build a Sandbox for Kids
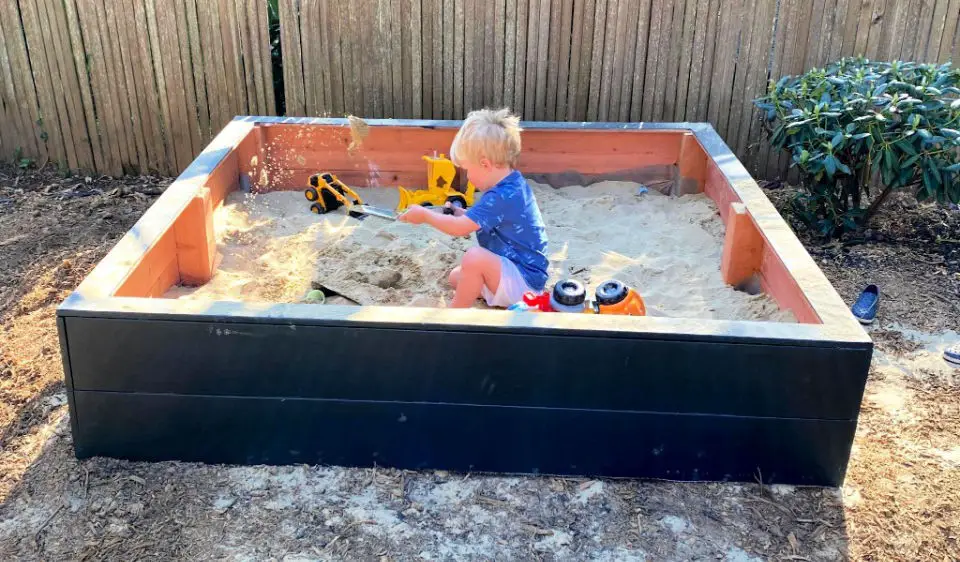
Creating a DIY kids’ sandbox is an excellent way to encourage outdoor play in your backyard. This simple guide will walk you through the process of building a sandbox that offers ample space for kids to engage in creative play, and can be completed with ease. To get started, you’ll need just a few basic materials: redwood boards, wood screws, wood filler putty, outdoor primer, outdoor paint, and, of course, sandbox sand. With these simple components and a dash of creativity, you can create a DIY kids’ sandbox that will bring years of joy to your children. The process is straightforward, and the end result is well worth the effort.
Upcycled DIY Sandbox Plans

Transforming old items into new treasures is an art form in itself, and upcycling is a fantastic way to do just that. Not only does it breathe new life into discarded things, but it’s also a clever way to save some cash. And if you’re looking for the perfect blend of creativity and practicality, look no further than this DIY Upcycled Sandbox. Originally an old dresser on its last legs, it’s been lovingly transformed into a kids’ play area that’s not only functional, but also features a cozy mini bench where your little ones can sit and play. The best part? It’s incredibly easy to build and won’t break the bank. So if you’re ready to get creative without sacrificing your budget, dive in and follow our tutorial below.
DIY Wooden Sandbox With a Lid
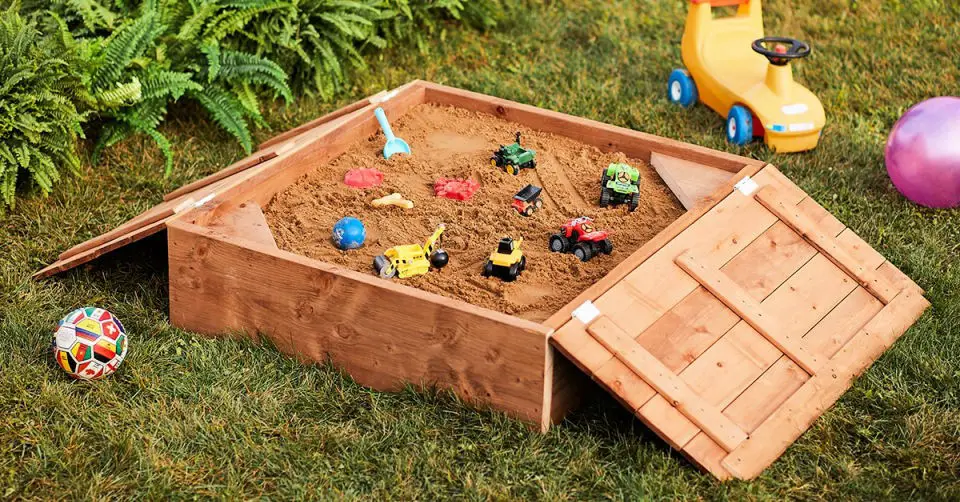
Creating a DIY wooden sandbox with a lid not only safeguards your child’s playing area from contamination but also provides a convenient way to close it once playtime is over. This intermediate-level project requires approximately four hours to complete and can be customized to fit your needs.
To build this functional and fun feature, you’ll need the following materials: treated wood, treated wood screws, outdoor hinges, outdoor handles, exterior paint, satin finish, play sand, landscape fabric, and staples. By following this step-by-step guide, you can construct a sturdy and appealing DIY wooden sandbox with a lid that will provide endless hours of entertainment for your little ones.
How to Make a Sandbox for Two Kids
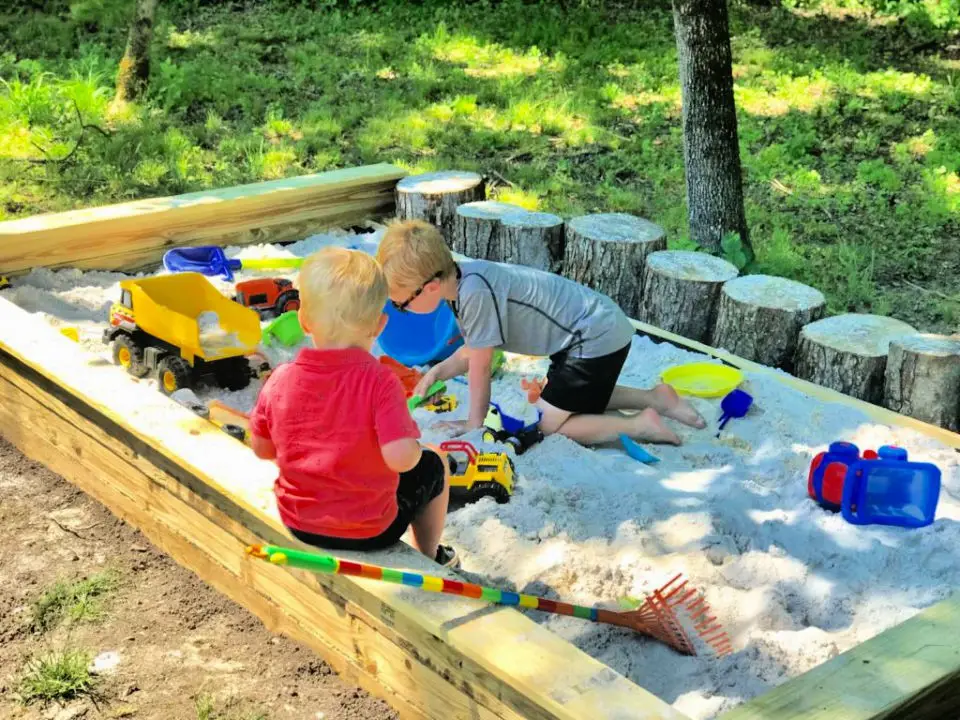
Create an immersive and creative space for your little ones with this easy DIY sandbox project, perfect for boys or kids who love to explore. With just a few basic materials like tree logs, 4x4s, decking boards, screws, landscape fabric, staples, and play sand, you can quickly assemble a unique and engaging sandbox that will be the envy of all the neighborhood kids.
Building a Sandbox With Cover
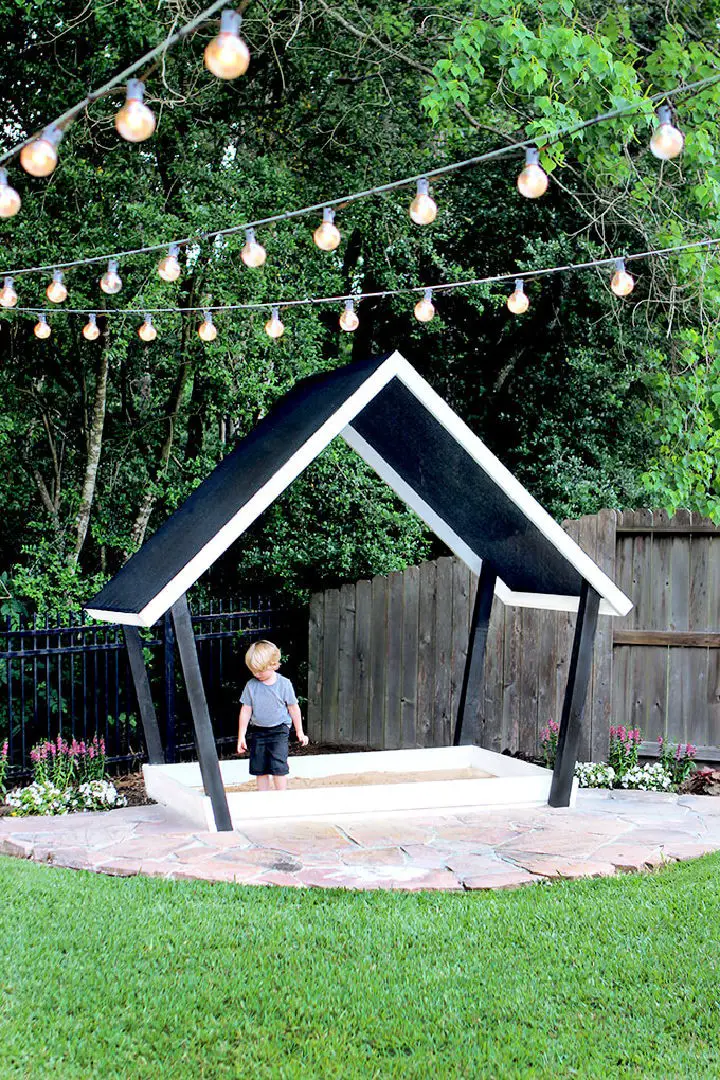
Building a DIY sandbox house is an exciting project that the whole family can enjoy together. To create a unique and eye-catching structure, all you need are a few essential supplies. This tutorial will guide you through the simple steps to build a striking black and white sandbox house that will become a focal point in your backyard. The construction process involves pressure-treated pine, exterior paints, and a heavy-duty sunscreen fabric shade roll with a black finish. Additionally, you’ll require a miter saw, drill, and staple gun to bring your design to life. With this easy-to-follow DIY plan, you’ll be able to create your own backyard retreat in no time.
DIY Color Block Sandbox Ideas
Transform any backyard into a haven for playtime with this easy DIY Color Block Sandbox project. By upcycling an old bookcase, you’ll not only be creating a fun and functional space for your kids but also breathing new life into an old item. With its compact size and vibrant color block design, this sandbox is the perfect addition to any outdoor area. And the best part? It’s incredibly quick and easy to build, requiring just a few hours of your time. To get started, you’ll need only basic materials and some simple tools. Just follow our step-by-step guide below and let your creativity shine!To begin, prime the bookcase with Zinsser 123 primer to ensure a smooth paint job and prevent rust. Then, give it a bright and cheerful coat of yellow spray paint, allowing it to dry completely before moving on to the next step.Use painter’s tape to create a colorful block pattern on the bookcase – you can go for two rows of three blocks or get creative with your design. Once you’re happy with your layout, paint over the exposed areas with blue spray paint and let it dry again.Next, remove the tape to reveal your unique color block design. Add some bold color to the outside of the sandbox using Rustoleum red paint for a pop of personality.To ensure your sandbox is sturdy and safe for playtime, reinforce all the junctions with screws. You’ll also want to add some extra protection to the base, end panels, and lid by attaching pieces of 3/4-inch plywood using screws. Top it off with a castle stencil on the lid, cut out with a Cricut machine, for an added touch of whimsy.Finally, fill your sandbox with sand and get ready to create some backyard magic! Add some toys or accessories like sun umbrellas or buckets to make the most of this new outdoor playground.
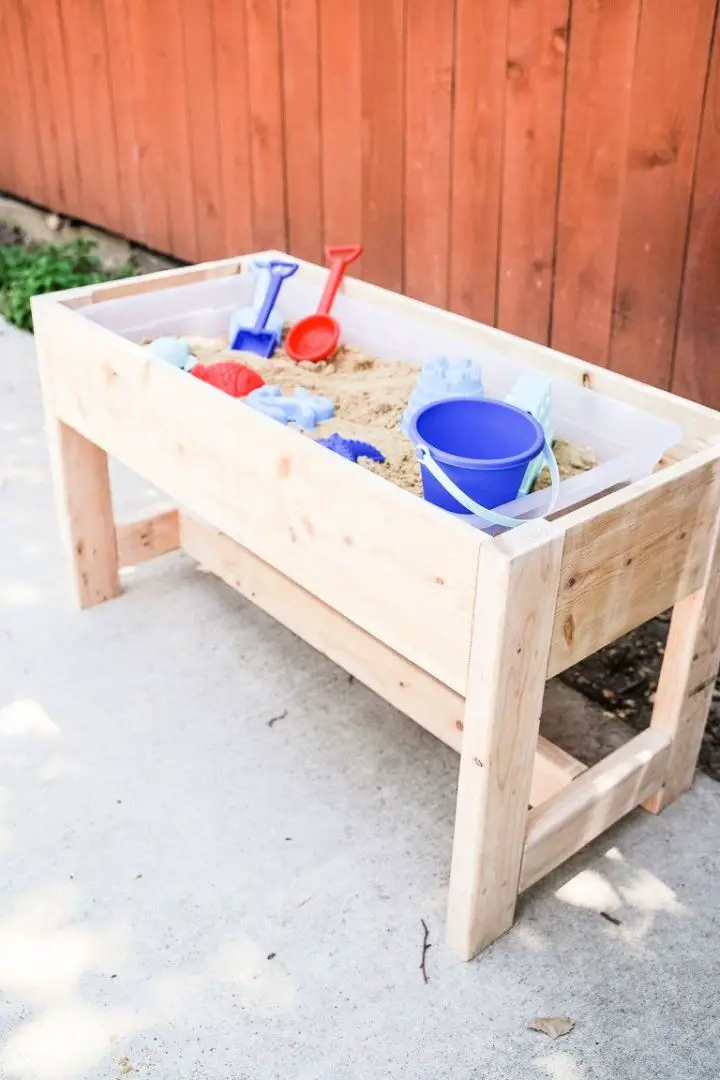
How to Build a Raised Sandbox
A DIY raised sandbox can be a fantastic addition to any backyard, providing endless hours of entertainment for kids of all ages while also fostering their gross motor skills and creativity. The best part? It’s surprisingly easy to build using simple supplies readily available at most hardware stores. All it takes is a few hours of your time to create this fun and functional feature. To get started, gather the following materials: wood (specifically, 1x8x12, 3x4x8, and one pre-cut plywood board measuring 2ft x 4ft), screws, play sand, paint, a paintbrush, and liquid nails clear sealant. Once you have your supplies, follow these straightforward steps to construct your very own DIY raised sandbox.
Making Sand Box with Built-In Seats
For the novice DIY enthusiast, this DIY sand box with built-in seats offers a straightforward and rapid build. The lid’s dual functionality as both a seat and a covering mechanism simplifies the construction process, eliminating the need to wrestle with heavy lids. Furthermore, the incorporated seating eliminates the necessity for separate chairs, providing an all-encompassing recreational space. To bring this convenience to your outdoor area, follow the step-by-step instructions below to create your own DIY sand box with built-in seats. With minimal effort, you can transform a barren landscape into a vibrant playground.The versatility of rock painting allows individuals to unleash their creativity and produce breathtaking works of art. By combining basic materials such as paint, rocks, and imagination, one can craft floral painted designs, animal faces, intricate mandalas, abstract patterns, scenic landscapes, personalized quotes or messages, and many more. The possibilities are endless, making it an ideal activity for individuals seeking to express themselves artistically.
Build Your Own DIY Covered Sandbox
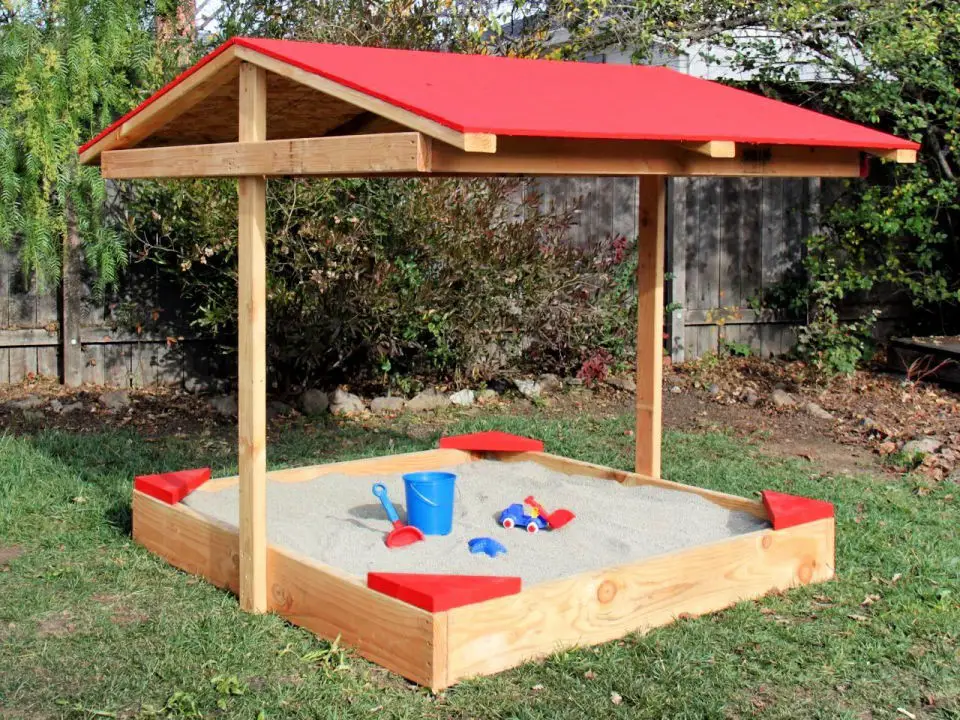
A covered sandbox is an excellent addition to any backyard play area, offering a functional space that’s also well-shaded, free from dirt and rain. The best part? Corner seats provide seating for kids or adults. And the best news? It’s easy to build! With just a few simple materials and some step-by-step guidance, you can create your own DIY covered sandbox.
To get started, gather the following materials: two 4×8 sheets of half-inch plywood, two 2×8 pressure-treated boards that are 12 feet long, seven 2×4 pressure-treated boards that are 10 feet long, trim-head screws, a staple gun, galvanized staples, landscape fabric, a paintbrush, roller and painter’s tape, exterior-grade paint, and kid-safe sand. Once you have all your materials in hand, follow the instructions to bring your DIY covered sandbox to life.
DIY Sandbox With Lid Seats
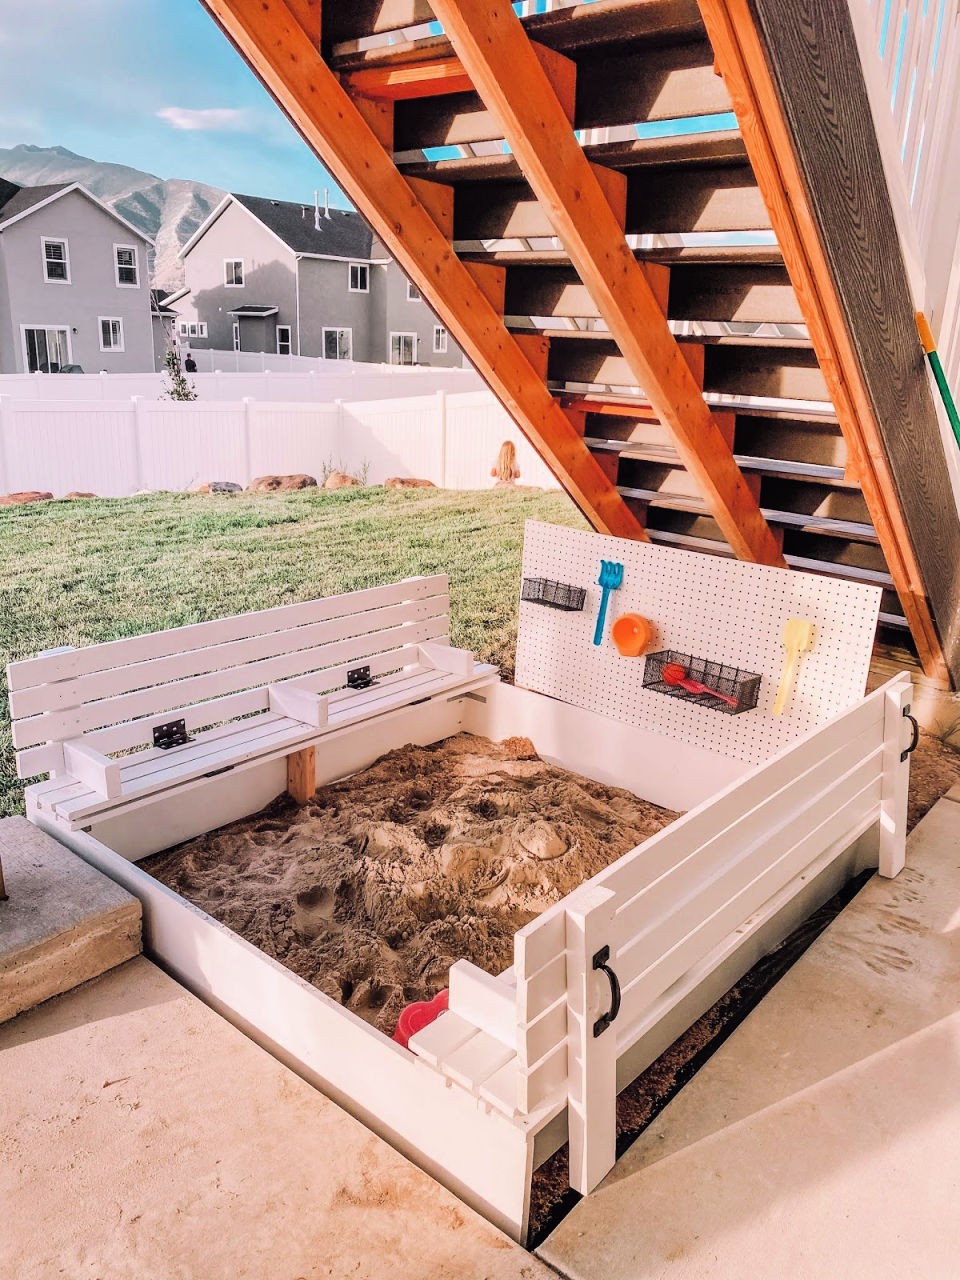
Creating a DIY sandbox with lid seats is an ideal way to utilize an unused space while keeping costs minimal. This project not only provides a shaded area for kids to play, but also features a lid that doubles as seating and protects the sandbox from dirt and rain, while storing children’s play tools. To build this unique sandbox, you’ll need a combination of materials, including one or four 1x10x8 boards, twenty 1x3x8 boards, two 2×4’s, exterior screws, Kreg screws, corner supports, hinges, and gate handles.
To get started, cut all the necessary boards according to your list of required materials. Next, create the seats by attaching the 1x3s to the two outside boards using the Kreg Jig on all four sides, as depicted in the accompanying image. Be sure to maintain a maximum distance of 19 inches between each seat to ensure it can support an adult.
Once the seats are complete, sand the entire structure to smooth out any rough edges. Then, apply your desired finish – whether that’s paint or a wood conditioner – and let it dry completely before proceeding.
Finally, attach hinges to the lids as directed in the following tutorial, and add handles to make opening and closing the lids easier. Position your newly built sandbox in its final location and fill it with sand for a fun and functional play area. With these simple steps, you’ve successfully constructed a DIY sandbox with lid seats.
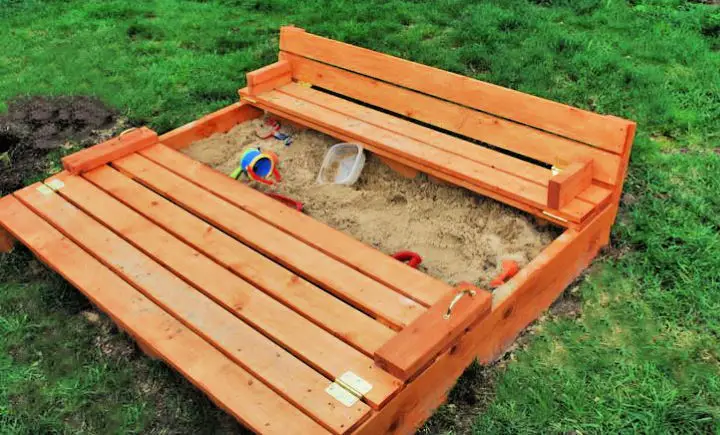
Sandbox With Folding Lid and Seat
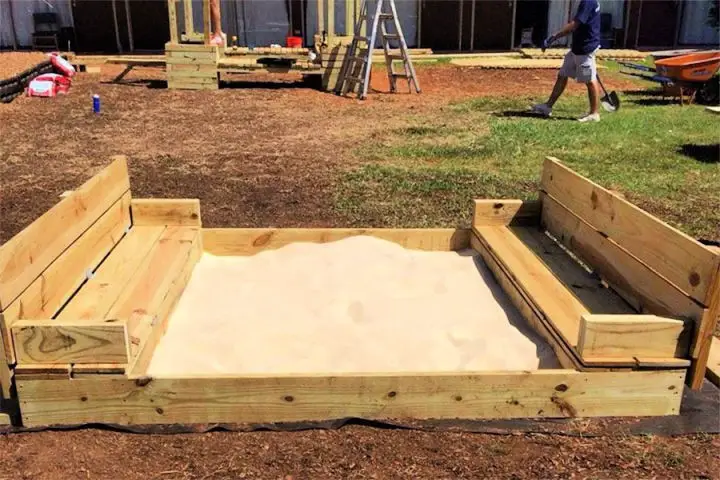
The DIY Sandbox with Folding Lid and Seat is an innovative playground solution that fosters healthy development, social skills, and coordination in children. Its unique features include ease of construction and maintenance, making it a fantastic addition to any backyard. The sandbox’s simplicity belies its numerous benefits, which make it a great value for the money.
What sets this DIY project apart is its straightforward build process, which requires minimal materials: 1x8x8′ boards, 2x8x8′ boards, 2x6x8′ boards, heavy gate handles, duty strap hinges, screws, deck screws, sandpaper sheets, and Play sand. By following the step-by-step guide, you can create a sandbox that provides hours of entertainment for kids without breaking the bank. With its versatility and affordability, this DIY Sandbox with Folding Lid and Seat is an ideal choice for families seeking to enhance their outdoor play experience.
DIY Backyard Sandbox Design
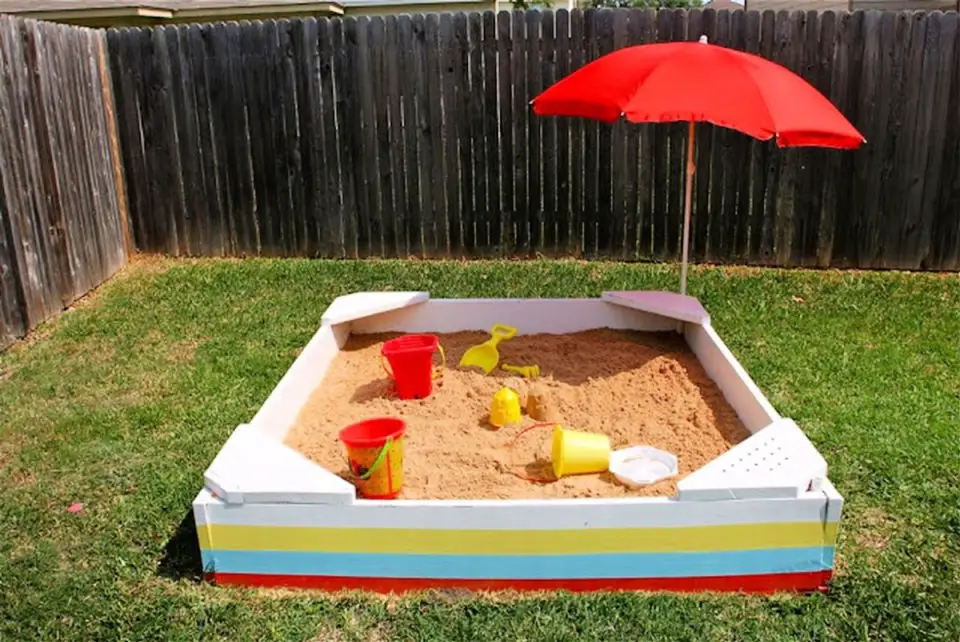
Creating a DIY backyard sandbox is an excellent way to bring a touch of the beach to your outdoor space. This project not only adds a pop of color and texture to your yard but also provides a fun and practical spot for kids (and adults!) to play. To get started, gather the necessary materials: wooden slats for the base, leftover wood for seats or benches, screws, PVC pipe for adjustable corner supports, and sand. Begin by constructing the sandbox frame, followed by adding the bottom slats. Next, attach the sides, ensuring everything is securely fastened to prevent shifting. Finally, fill the sandbox with sand and enjoy a beachy ambiance in your own backyard.
Easy DIY Pallet Sandbox
Transform an old pallet into a fun and functional DIY sandbox that’s perfect for quality time with kids. With minimal materials and effort, you can create this entertaining project in the afternoon. Choose sturdy pallets in good condition to ensure a safe and enjoyable experience. To prevent rust, opt for yellow zinc passivated screws and nails. Assemble the sandbox, then finish it off with a stain or leave it as is. Add some sand and toys, and your DIY creation is ready for hours of imaginative play. Follow these easy steps to upcycle this pallet into a one-of-a-kind sandbox that’s sure to delight kids of all ages.
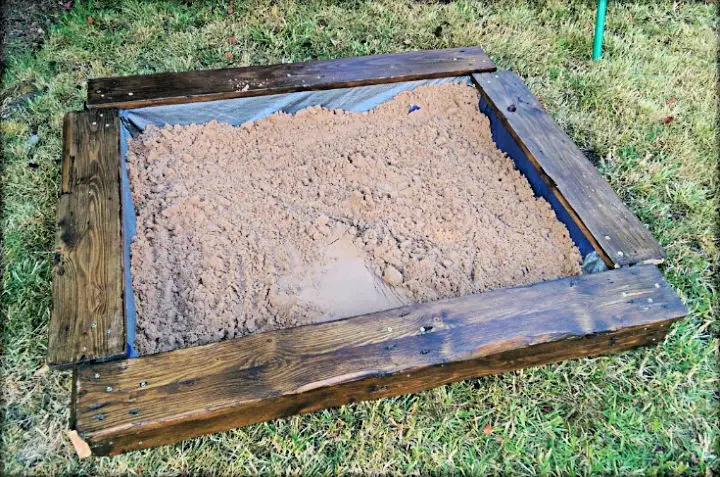
Cheap DIY Sandbox at Home

For families on a budget, building a rustic DIY sandbox is an affordable way to create a fun outdoor play space for kids. With just a few hours of effort and under $25 in materials, you can construct a sand-filled haven that’s perfect for little ones to dig, build, and explore. To bring this project to life, gather the following essentials: Barn wood ties, plastic lining, sand, brackets, and basic tools. Simply follow the step-by-step guide, and before you know it, you’ll have a charming and functional DIY sandbox that your children will adore.
Upcycled Tire Sandbox Ideas
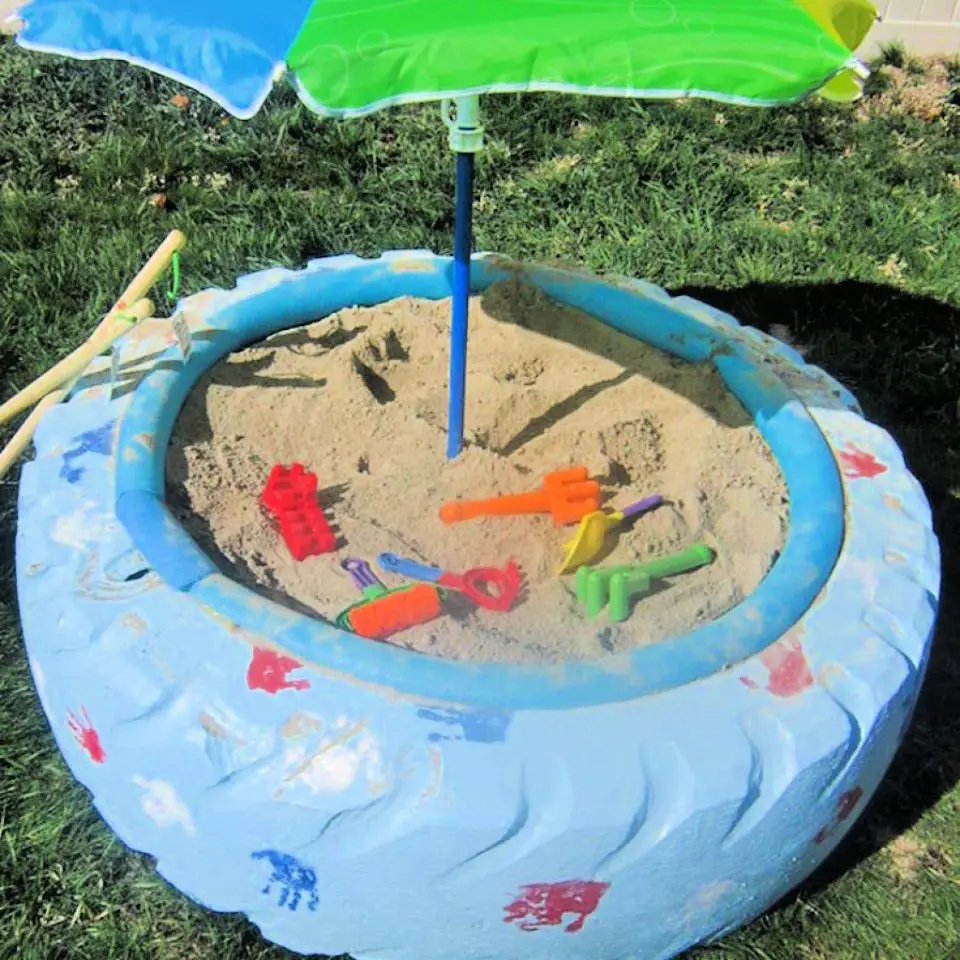
Transforming an old tractor tire into a functional and eco-friendly sandbox is a fantastic way to bring excitement to your backyard while being mindful of the environment. Not only is this project easy on the wallet, but it’s also a great way to encourage kids to spend more time outdoors, promoting healthy development. To create this unique playground, you’ll need an old tractor tire, a pool noodle, an old sheet or weed guard, sand, and plywood for a sandbox cover. You can likely source most of these items from around your house or a local hardware store. Here’s how to bring it all together: First, cut the pool noodle into thirds using a reciprocating saw and place them evenly around the tire’s perimeter. This will provide a comfortable cushion for the sand. Next, line the inside of the tire with the old sheet or weed guard, ensuring the sand remains clean and free of debris.Fill the tire with sand, packing it down as you go to prevent spills. Once the tire is filled, place the plywood on top and cut out a hole in the center that’s large enough for your child to crawl through. And just like that, your DIY upcycled tire sandbox is complete, ready for hours of fun-filled play!
DIY Sandbox Picnic Table
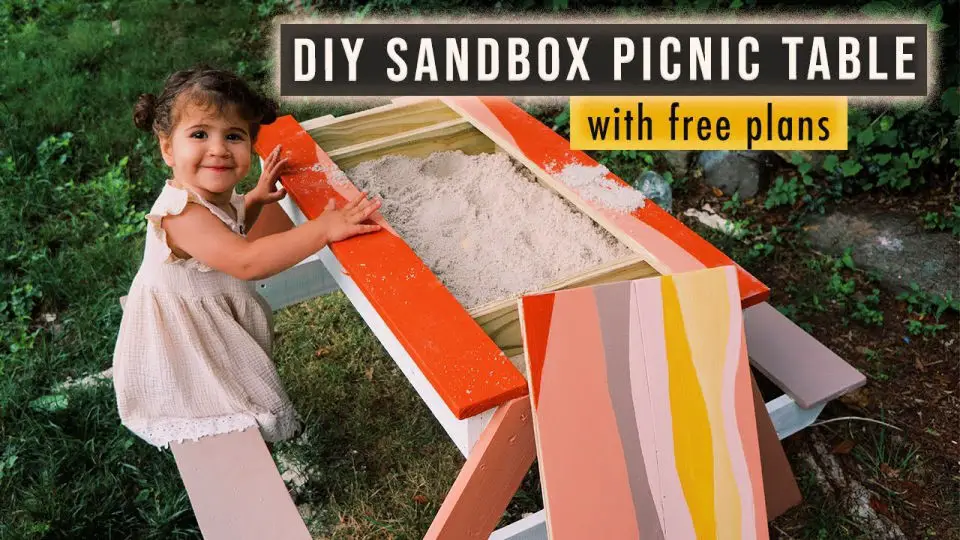
For those new to DIY projects, the DIY Sandbox Picnic Table is an excellent starting point. This multifaceted creation offers endless entertainment options for young children during the summer months, while also providing a unique and functional piece for your outdoor space. By combining storage, sandbox, and picnic table functionalities, this project offers a versatile solution for parents seeking to create engaging activities for their kids. Building this DIY Sandbox Picnic Table is an accessible endeavour that can be completed in just two hours with minimal materials. Simply gather the necessary supplies and follow the step-by-step instructions below to construct your own DIY Sandbox Picnic Table, providing your children with a fun-filled experience.
Simple DIY Sand Table
Transform your backyard into a whimsical haven with a Simple DIY Sand Table that doubles as an outdoor table when the sandy fun is over. This project requires minimal supplies, which you may already have lying around the house. Begin by collecting wood boards of various dimensions and sizes, along with screws, spar varnish, deck stain, and play sand. Then, follow the easy-to-follow instructions below to create your very own Simple DIY Sand Table and enjoy the versatility this project has to offer.
How Do You Make a Large Sandbox
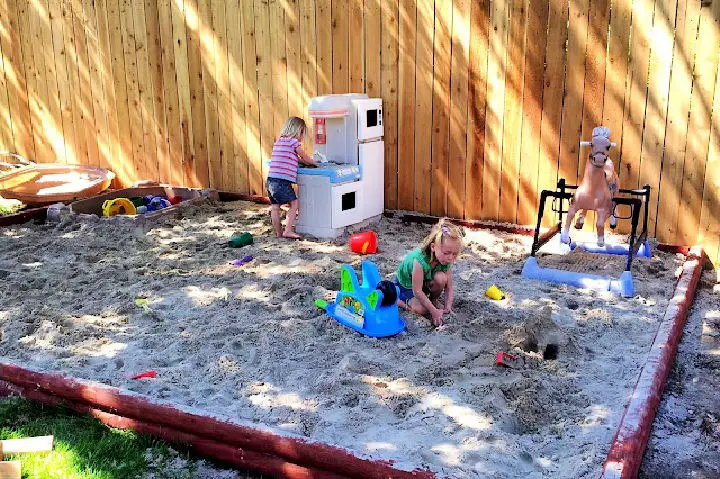
Transform your outdoor space into a beachy haven with a DIY giant sandbox. This project requires minimal effort but yields maximum fun for kids and adults alike. With proper care, this masterpiece will withstand the test of time. To get started, gather these essential materials: 14 red landscape beams, rebar for frame support, heavy-duty filter fabric, and a generous supply of sand.
Follow these straightforward steps to bring your vision to life:
Construct the rectangular frame using the red landscape beams and secure them with rebar. Ensure the structure is sturdy and even.
Cover the frame with the filter fabric, ensuring there are no gaps or openings for optimal sand retention.
Fill the frame with sand until it reaches a depth of approximately 6 inches. And that’s it! Simply pour in some fun and enjoy the fruits of your labor.
Wooden Sandbox Plan With Seating
Create a haven for your little ones in your very own backyard with this simple yet ingenious DIY wooden sandbox with built-in seating! Not only is it easy to construct, but it’s also highly customizable to suit your personal taste. The required materials are minimal and readily available: just wood boards, brackets, stain, gardening fabric, and sand. What’s more, the sandbox features a cleverly integrated seating area, ensuring your kids can stay comfortable as they indulge in their sandy adventures. To bring this project to life, simply follow the step-by-step guide below and let the creative process begin!
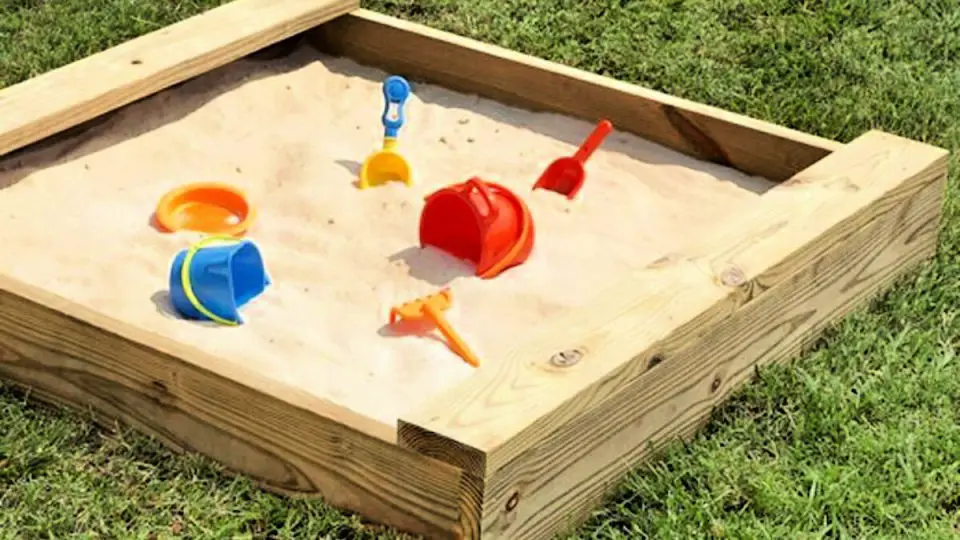
Making Your Own DIY Sandbox
Transform your backyard into a haven for kids and adults alike by building an easy-to-create DIY sandbox. This low-cost project can be completed in just a few hours, making it an ideal activity to tackle with the family. To get started, cut two treated cedar-toned boards into six-foot lengths. Next, secure four 2-inch by 10-inch corner braces to each board using decking screws. After that, line the sandbox with landscape fabric to prevent sand from escaping. Finally, fill the sandbox with play sand and you’ll have a fun-filled space ready for kids to dig and create. With materials costing under $20, this DIY project is an affordable way to bring joy and creativity to your outdoor space.
How to Build a Boat Sandpit
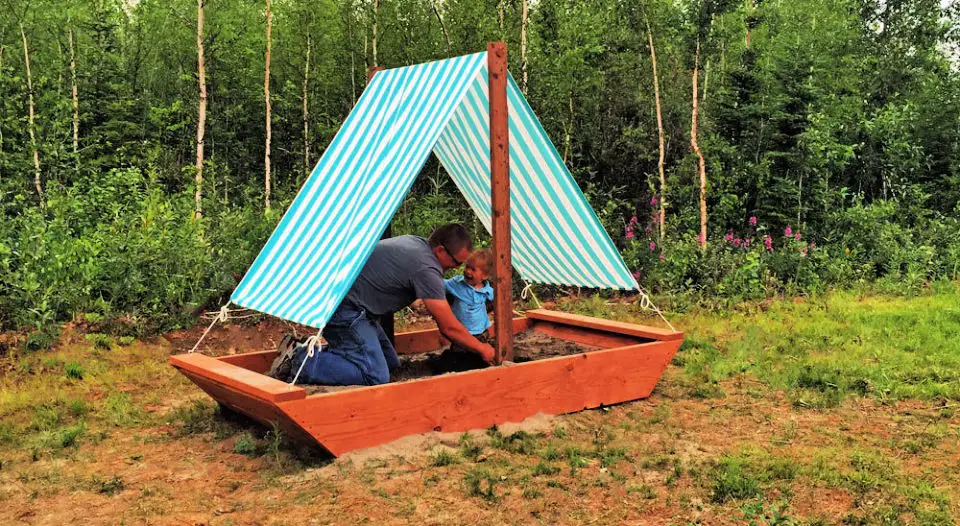
Creating a DIY Boat Sandpit is an excellent way to keep kids or toddlers entertained. With minimal effort, you can bring this project to life using materials you likely already have at home. The sailboat-inspired design makes it an ideal beginner-friendly endeavor that can be completed in just a few hours. To get started, follow the straightforward instructions below and learn how to build your very own DIY Boat Sandpit.
DIY Cedar Outdoor Sandbox
Building a DIY cedar sandbox is an excellent way to create hours of entertainment and fun for your kids and family. With basic woodworking skills, this project can be completed over the weekend, providing years of enjoyment for families. To start, gather the necessary materials: cedar boards, deck screws, construction adhesive, landscape fabric, play sand, sandpaper, landscape fabric pins, exterior stain, mason line, and landscape stakes. This straightforward DIY project requires minimal expertise and can be built using simple tools. By following these easy steps, you’ll have a beautiful and functional cedar sandbox that will become a focal point in your backyard.
How to Create a Portable Sandbox
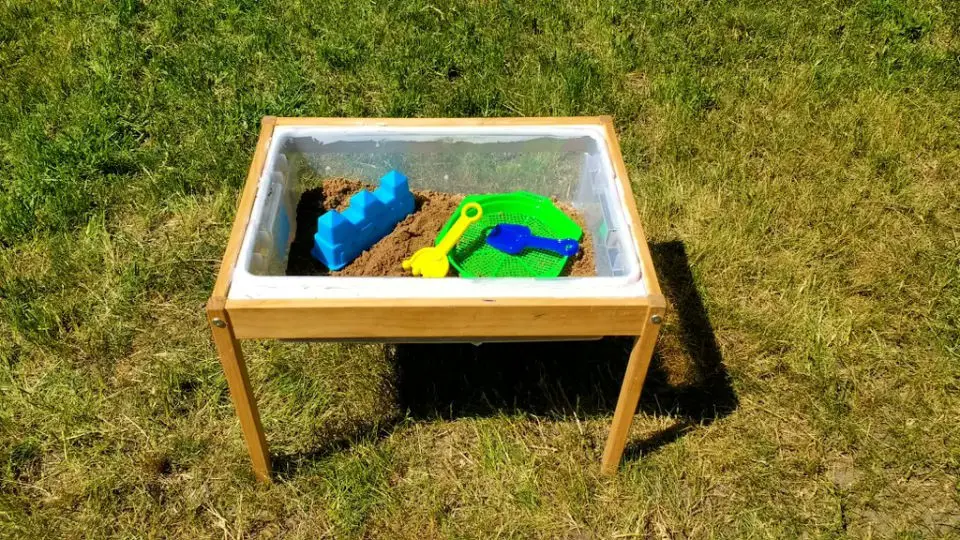
Create a DIY portable sandbox that provides hours of entertainment for your little ones during the summer months. This versatile playground can be used as a traditional sandbox or transformed into a water table with the addition of water. The best part? It’s an affordable and easy-to-assemble project that requires minimal materials. To get started, gather a small kid’s table and a shallow plastic tote that fits comfortably inside the table. For added stability, apply caulk around the edge of the tote to prevent it from shifting during use. Fill the container with sand and toys, and you’re ready to let your kids’ imaginations run wild. When it’s time to move or store the sandbox, simply lift the tote off the table and stash it inside until next time.
Conclusion:
With a plethora of 25 unique DIY sandbox designs and ideas at your fingertips, finding the perfect one for you and your family is effortless. If you’re willing to put in the time and want to save some cash, building a homemade DIY sandbox can be an incredibly rewarding experience. As you peruse these 25 easy-to-implement DIY sandbox ideas, you’re bound to come across several that will spark your imagination. Before diving into your build, take the time to consider all the finer details of each plan. And remember, the most important thing is to have a blast while creating something truly special for your family.
