Why You Should Give Easy DIY Projects a Try
When it comes to transforming your home, major renovations or hefty budgets aren’t always necessary. In fact, small changes can have a profound impact on the overall aesthetic and ambiance of your space. This is where DIY projects shine. By committing just a weekend to these endeavors, you can revitalize your living area, inject personality, and even boost your home’s value. There are several compelling reasons to don your DIY hat this weekend.
Cost-Effective Home Improvements
Transform your space without breaking the bank! Easy DIY projects offer an accessible alternative to expensive home renovations. By leveraging minimal materials and a dash of ingenuity, you can achieve significant results without incurring significant costs.
Personalization of Your Space
With DIY projects, you gain the ability to personalize every detail, making each creation uniquely yours. From refinishing furniture to designing original artwork, this creative freedom enables you to infuse your space with your distinct flavor and style, reflecting your individuality in every aspect.
Sense of Achievement
The joy of creating something with one’s own hands cannot be overstated. As you bring a project to life, step by step, the sense of accomplishment that follows is nothing short of profound. This holistic approach to crafting can be a deeply rewarding experience, offering a perfect blend of personal satisfaction and therapeutic benefits – an ideal way to unwind on a lazy weekend.
Family Bonding Time
While embarking on DIY projects, one of the most significant advantages is the opportunity it presents to foster meaningful connections with loved ones. Collaborating on a creative endeavor can bring people closer together, creating lasting memories and strengthening bonds. As you work side by side, laughter, conversation, and mutual accomplishment can fill the air, making the experience not only productive but also enjoyable.
Environmental Impact
By embracing the principles of upcycling and recycling, DIY enthusiasts can breathe new life into existing materials, reducing waste and promoting sustainability. When tackling projects, consider repurposing items you already possess at home, rather than discarding them and contributing to the growing problem of landfill waste. This eco-conscious approach not only minimizes environmental impact but also fosters creativity and resourcefulness.
Learning New Skills
When embarking on a DIY project, one of the most valuable byproducts is the opportunity for skill building. With every endeavor, you have the chance to expand your knowledge and expertise in a specific area or master a new technique. This could be as simple as learning how to wield a power tool effectively or as complex as developing proficiency in a particular craft. The cumulative effect of these experiences is a significant enhancement to your DIY skill set.
Home Value Enhancement
Transforming your home’s aesthetic doesn’t have to involve major renovations. A few simple updates can significantly boost its appeal, which is especially crucial if you’re thinking of selling in the future. Consider applying a fresh coat of paint, swapping out cabinet hardware, or replacing outdated light fixtures – these minor tweaks can make a world of difference.
Remember, DIY projects are meant to be enjoyable and rewarding. Don’t stress too much about making mistakes; they often serve as valuable learning experiences. So, pick a project that sparks your interest and make the most of your weekend. Let the process unfold, and you’ll likely find yourself having a blast while creating something truly special.
Getting Started with Easy DIY Projects at Home
For those seeking to unleash their creative potential and infuse their living space with personal touches, embarking on DIY projects at home can be an incredibly rewarding experience. Whether you’re a newcomer to the world of DIY or simply looking for easy ways to elevate your home’s ambiance, this step-by-step guide will provide a solid foundation for your journey as a DIY enthusiast.
Choose the Right Project
To get started, take a step back and reflect on your existing skills and passions. Are you drawn to hands-on activities like woodworking, painting, or sewing? Or perhaps you have a green thumb and enjoy gardening?Once you’ve identified what sparks joy in you, look for projects that align with those interests. For instance, if you’re an avid gardener, building a planter box could be a great place to begin. If sewing is your thing, start with a simple apron or pillowcase.Next, define the goal of your project. Is it to enhance the aesthetics of a particular space, boost organization, or improve functionality? Having a clear objective will keep you motivated and guide your selection of projects.
Gather Your Materials
When starting a project, it’s essential to create a thorough materials list to avoid any last-minute surprises. Begin by cataloging all the necessary supplies and tools required for the task at hand. Before making any purchases, take stock of what you already have in your possession to prevent duplicating efforts. This simple step can save you time, money, and stress in the long run.In addition to having what you need on hand, it’s also crucial to shop smart. Scour local hardware stores, craft shops, and online marketplaces for deals that fit within your budget. If possible, consider borrowing tools from friends or neighbors to further reduce costs. By taking these proactive steps, you’ll be well-equipped to tackle your project with confidence and without breaking the bank.
Plan Your Workspace
When it comes to setting up a crafting area, there are a few key considerations to keep in mind. First and foremost, choose a space that is well-lit and has enough room for you to work comfortably. This will help prevent eye strain and fatigue as you work on your projects. Additionally, make sure the chosen area is safe and free from hazards, especially if you’ll be working with tools or toxic materials. It’s also important to organize your tools and materials before starting a project. A tidy workspace can make a big difference in terms of efficiency and enjoyment. Use containers or labels to keep everything in order, which will help streamline the process and reduce stress. By taking these simple steps, you’ll be well on your way to creating a crafting area that is both functional and enjoyable.
Follow the Instructions
Before embarking on your DIY adventure, thoroughly review the instructions provided with your project guide. Take your time to comprehend each step and mentally visualize the process to minimize any unexpected surprises that may arise. Once you have a solid understanding of the task at hand, proceed with caution, tackling one step at a time and avoiding hasty decisions that can lead to mistakes. If a particular step proves challenging, consider taking a break and returning to it later with fresh eyes. It’s also essential to prioritize your safety by wearing appropriate protective gear, such as gloves, goggles, masks, or ear protection, depending on the project’s requirements. This includes exercising caution when handling sharp tools or hot glue guns. Should you encounter any difficulties or feel uncertain about a specific step, don’t hesitate to seek guidance from someone more experienced or utilize online forums and local workshops for valuable advice.
Document Your Progress
Capture the Before-After Transformation: Take photos of your space before and after completion to visually showcase the change. This not only fosters a sense of accomplishment but also serves as a powerful motivator for others to embark on their own DIY endeavors.
Share Your Journey with Others: Consider starting a DIY blog, social media page, or online community where you can share your projects and connect with like-minded individuals. By doing so, you’ll not only receive valuable feedback but also gain new ideas and inspiration for future projects. Ultimately, this will guide you in successfully completing your first easy DIY project at home.
Frequently Asked Questions About DIY Projects
For those embarking on their next DIY project, having access to valuable insights and expert tips can make all the difference between success and frustration. This comprehensive FAQ is designed to provide answers to some of the most common questions surrounding DIY projects, serving as a trusted resource for enthusiasts of all skill levels.
What Are DIY Projects?
The concept of DIY, short for ‘Do It Yourself’, has become an integral part of modern life. Essentially, it involves undertaking projects independently, without relying on professional expertise. This spectrum of activities encompasses a wide range of tasks, from the straightforward crafts to more intricate home renovations, offering individuals a sense of autonomy and accomplishment as they complete each project.
Why Should I Start a DIY Project?
Embarking on a DIY adventure offers a plethora of benefits. Not only does it grant you the satisfaction of creating something from scratch, but it also enables you to save money by doing it yourself. Moreover, the process can be an engaging and enlightening experience that fosters a sense of pride and accomplishment as you bring your project to life.
How Can I Find Easy DIY Projects for Beginners?
When seeking out beginner-friendly projects, focus on ones marked ‘easy’ or ‘beginner-friendly’. These initiatives typically provide clear, step-by-step instructions and often feature user reviews to help gauge the level of challenge. By prioritizing such projects, you’ll be better equipped to tackle new challenges with confidence.
What Tools Do I Need to Start DIY-ing?
The scope of the project will determine the essential toolkit you’ll need to get started. For general DIY endeavors, a core set of fundamental tools typically includes a hammer, screwdrivers in various sizes and types, pliers, tape measure, and level. Additionally, it’s crucial to prioritize safety by incorporating basic personal protective gear such as gloves and goggles. However, if the project requires more specialized attention, you may need to expand your toolset with additional equipment tailored to the specific task at hand.
Can DIY Projects Be Sold for Profit?
While many individuals initially explore their creativity through DIY crafting as a hobby, it’s not uncommon for this passion to evolve into a viable entrepreneurial venture. The demand for one-of-a-kind, bespoke items has created a thriving market on online platforms like Etsy, as well as at local events and craft fairs, making it an attractive opportunity for those looking to turn their skills into a business.
What Are Some Popular DIY Projects to Tackle at Home?
Transforming spaces into havens of creativity and charm is a passion for many. To achieve this, individuals often turn to various DIY endeavors that not only add personal touches but also increase the value of their homes. Some popular ways to do so include upcycling old furniture by giving it new life with fresh coats of paint or creative reworkings. Similarly, painting rooms can be a game-changer, allowing homeowners to express themselves through vibrant colors and unique designs. Building shelves and customizing storage spaces is another effective way to optimize the functionality of any room while also showcasing personal style. When it comes to adding finishing touches, making homemade decor items such as wall art or centerpieces can bring an extra layer of warmth and personality to a space. Furthermore, landscaping and garden projects offer endless opportunities for creativity and self-expression, allowing individuals to craft their own outdoor oases.
Are There Any Precautions I Should Take While Doing DIY Projects?
When it comes to ensuring a safe working environment, it’s crucial to prioritize caution at every turn. To start, make sure you’re equipped with the right safety gear for the task at hand, whether that’s protective eyewear, gloves, or a hard hat. If you’ll be dealing with fumes, ventilate your workspace accordingly and keep an eye out for any signs of hazardous materials. And when it comes to power tools or handling potentially dangerous substances, take your time and follow instructions carefully to avoid any accidents.
Where Can I Learn New DIY Skills?
A wealth of learning opportunities await beyond the confines of traditional education. Online platforms, local workshops, and community-based initiatives offer a diverse range of skills to acquire. From YouTube tutorials and DIY blogs to community college classes, the possibilities for personal and professional growth are vast.
What Is the Best Way to Plan a DIY Project?
Before embarking on your project, take the time to define its scope and develop a comprehensive plan of attack. To do this effectively, gather all necessary materials and tools upfront, and break down the project into smaller, manageable chunks if its scale warrants it. By doing so, you’ll be well-prepared to tackle each stage with confidence, minimizing the risk of costly mistakes and maximizing your chances of achieving success.
How Can I Involve Kids in DIY Projects?
When it comes to fostering creativity and independence in children, it’s essential to choose projects that are both fun and safe. Consider simple activities like painting, planting flowers, or crafting with recyclables. When engaging your little ones in these endeavors, make sure to be present and provide them with age-appropriate tasks to keep them motivated and learning.
What are some simple DIY projects I can start as a beginner?
When embarking on a DIY journey, it’s essential to begin with projects that are both manageable and rewarding. For beginners, I recommend starting with tasks that don’t require extensive experience or specialized skills. Consider the following options: The no-sew apron is an excellent choice for those who want to create something practical without needing to wield a sewing needle. Alternatively, upcycled T-shirt skirts offer a fun way to breathe new life into old shirts while developing basic sewing techniques. If you’re looking for a project that’s more visually oriented, DIY fabric wall art is a great option that combines fabric and frames to create personalized decor. Finally, the chapstick keychain holder is a small but thoughtful sewing project that yields a functional and giftable result.
How can I ensure safety while working on DIY projects?
To ensure a safe and successful experience when tackling various projects, it’s crucial to prioritize safety from the outset. This involves taking proactive measures to minimize potential risks. First and foremost, wear appropriate protective gear such as gloves, goggles, and masks, which can make all the difference in preventing accidents or injuries. Additionally, take the time to thoroughly read and understand any instructions provided, as this can help you avoid costly mistakes or mishaps. Furthermore, handle tools with care, being mindful of sharp objects or power tools that can cause harm if not used properly. Finally, be honest about your own limitations and know when to seek assistance from a professional or more experienced individual, rather than risking personal well-being or the integrity of the project itself.
Can DIY projects be done on a tight budget?
When it comes to budget-friendly DIY projects, it’s all about being resourceful and creative. Start by repurposing materials you already own that can be transformed into what you need. Think outside the box (or toolbox) and get imaginative with items like old pallets, cardboard tubes, or fabric scraps. You’d be surprised at what you can create from scratch.Next, consider borrowing tools instead of buying them outright. Friends, family, or neighbors might be willing to lend a helping hand – or hammer, screwdriver, or drill. This not only saves you money but also builds community and fosters a sense of collaboration.Finally, keep an eye out for sales and discounts on materials at local stores or online. Take advantage of clearance sections, discount bins, or seasonal deals to stock up on what you need without breaking the bank. With a little bit of planning and some clever problem-solving, you can turn your DIY dreams into reality without sacrificing your wallet.
Are there any eco-friendly DIY projects?
Transforming waste into something valuable is at the heart of eco-friendly projects, where creativity meets sustainability. One exciting approach is upcycling, which involves turning discarded furniture or materials into functional pieces with a new purpose. This not only reduces waste but also gives old items a second life. For instance, you can take an old pallet and turn it into a planter box or coffee table. Similarly, you can use natural materials to create a birdseed wreath that not only decorates your garden but also feeds the local bird population. Another clever idea is to repurpose recycled containers as herb planters, allowing you to grow your own herbs while minimizing packaging waste. These projects not only benefit the environment but also provide a sense of accomplishment and pride in being part of a more sustainable future.
How can I involve my family in DIY projects?
Transforming Family Bonding Moments: Start by selecting a collaborative DIY project that sparks enthusiasm in all family members. To ensure a sense of ownership and accomplishment, allocate tasks according to each person’s skills and interests. By incorporating elements of friendly competition or game-like challenges, you can maintain everyone’s engagement and create cherished memories.
How do I keep my workspace organized during a DIY project?
To optimize your workspace organization, start by designating a specific area for DIY projects that is clean, spacious, and free from distractions. Next, implement smart storage solutions by utilizing containers and labels to keep materials and tools organized, making it easy to find what you need when you need it. Finally, adopt the habit of cleaning as you go, regularly tidying up your workspace to prevent clutter and make the DIY process smoother and more enjoyable.
Can I really improve my home’s value with DIY projects?
A few strategic updates can elevate the appeal of your home and increase its value. One way to achieve this is by incorporating simple yet effective changes, such as a fresh coat of paint, modern fixtures, and organized spaces. These tweaks not only make a positive impression on potential buyers but also provide a sense of calm and sophistication. Taking it a step further, personal touches like custom decorations and unique furniture pieces can help your home stand out from the crowd. However, it’s crucial to remember that quality matters just as much as quantity when it comes to enhancing your home’s value. This means ensuring that any projects or renovations are executed flawlessly, as subpar work can detract from the overall appeal of your property.
How do I share my DIY projects with others?
Embracing the DIY Spirit: Sharing Your Creations with Others
To truly appreciate the value of DIY projects, it’s essential to share them with others. This not only allows you to showcase your creativity and skill but also fosters a sense of community among like-minded individuals.
Social media platforms provide an excellent starting point for sharing your creations. Simply post before-and-after photos of your projects and utilize relevant hashtags to expand your audience reach. Not only will this help you connect with fellow DIY enthusiasts, but it may also attract new followers interested in learning more about the process.
In addition to social media, consider starting a blog dedicated to documenting your projects. This allows for a deeper exploration of the techniques and materials used, as well as providing an opportunity to share tips and engage with other hobbyists.
Community workshops offer another fantastic way to connect with locals interested in DIY endeavors. Join existing groups or host your own event, focusing on sharing knowledge, collaborating, and having fun.
Remember, the essence of successful DIY projects lies in embracing the process, not striving for perfection. By doing so, you’ll discover that it’s the journey itself that brings true satisfaction – as well as the unique charm of each handcrafted item.
Explore Easy DIY Projects
Embark on a journey of creative exploration, where the boundaries of imagination know no limits. Explore an extensive array of engaging DIY projects that will ignite your passion for crafting and inspire you to start creating right away!
How to Make a No-Sew Apron at Home
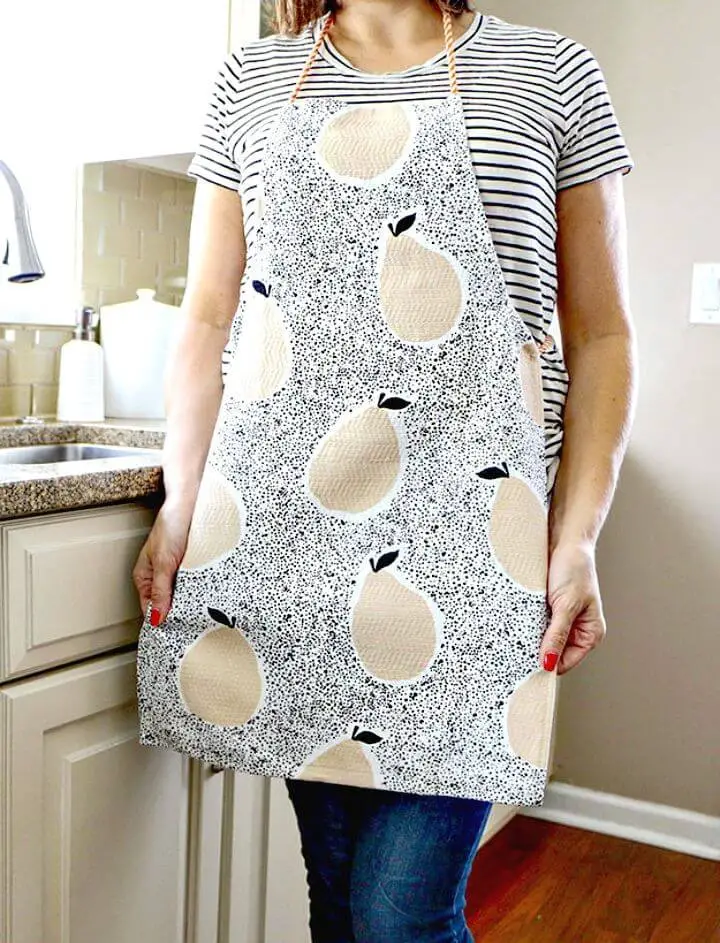
Transform everyday kitchen moments into creative escapades at Happiness Is Creating! The blog delves into crafting experiences without requiring any sewing skills. For instance, a DIY no-sew apron tutorial provides a functional addition to your kitchen arsenal or an thoughtful hostess gift that safeguards against cooking mishaps. Moreover, the site’s culinary offerings extend to personalized barbecue sauce gifts, complete with a whimsical ‘Baste Dad’ wood-burned basting brush – an ideal tribute for Father’s Day. Additionally, the blog takes you on a sweet journey through baking peanut butter cookies using a cherished KitchenAid mixer. These engaging and informative posts cater to those seeking to elevate their cooking and gifting game with a dash of creativity.
Repurposing Old Shirts Into Skirts for Kids

Transform old T-shirts into stylish skirts with a DIY project that’s both cost-effective and creative. Ashley Johnston from Make It & Love It guides you through a simple process that takes thrift store finds or unused shirts in your closet and turns them into fashionable skirts for all ages. With easy-to-follow instructions, you’ll learn how to craft a unique and comfy skirt in just 10 minutes – perfect for adding a personal touch to your wardrobe without breaking the bank. This engaging and practical tutorial is ideal for refreshing your style while being kind to your wallet.
Inexpensive DIY Fabric Art for Bedroom
Transform any space into a stunning work of art with a personalized touch using the DIY fabric art guide from The Inspiration Board. Jamielyn Nye shares a simple and budget-friendly method to add color, pattern, and texture to your walls, requiring just frames, fabric, hot glue, and a few minutes of your time. This project is perfect for anyone seeking to elevate their home’s aesthetic, and can be completed in under an hour. Whether you’re a crafter looking to customize your environment or simply wanting to add a unique touch to your space, this DIY fabric art tutorial is sure to inspire your next creative venture.
Free Chapstick Keychain Holder Pattern
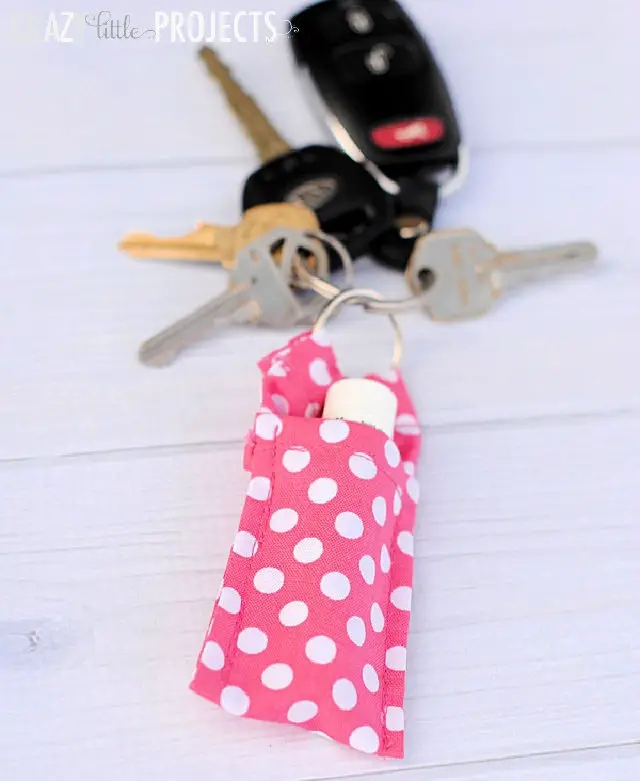
For crafty individuals who enjoy making practical projects, the chapstick keychain holder pattern by Crazy Little Projects is an excellent choice. This quick and easy-to-follow sewing project allows you to create a convenient holder for your chapstick that attaches seamlessly to your keychain. With its clear step-by-step guide, this pattern is perfect even for beginners looking to dip their toes into sewing. Not only will the finished product keep your lip balm within arm’s reach, but it also makes for a thoughtful and personalized gift for friends and family. Get ready to rummage through your scrap fabric stash and sewing kit for a fun-filled crafting experience that yields a unique and functional piece!
Making a Petal Burlap Pumpkin Wreath
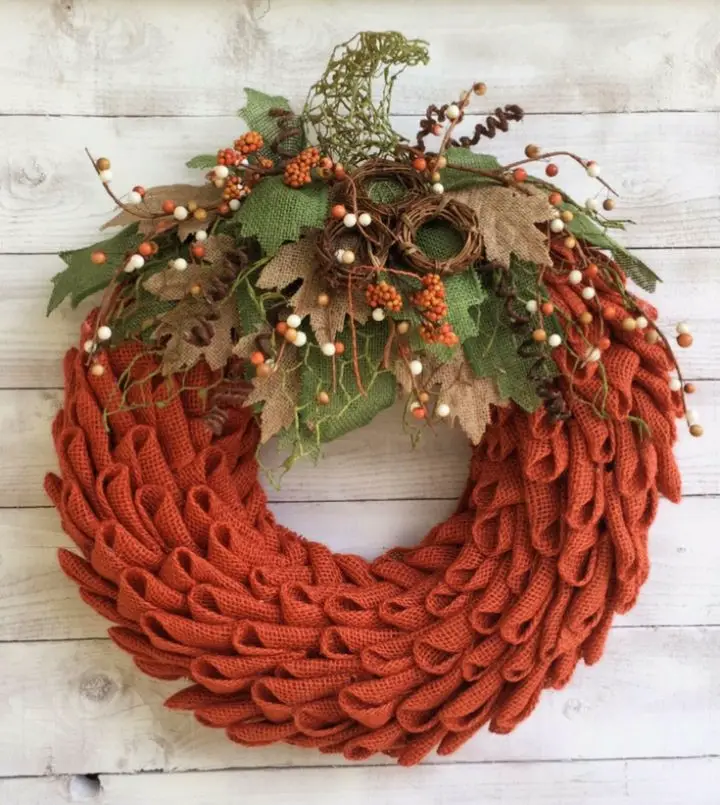
As the seasons change, bring warmth and festivity into your home with a DIY project that captures the essence of autumn. Grillo Designs’ comprehensive guide simplifies the process of creating a charming burlap pumpkin wreath, perfect for fall or Thanksgiving decor. By following their step-by-step approach, you’ll learn to craft intricate burlap petals, assemble them onto a wreath form, and add personalized touches with fall-inspired embellishments. The petal wreath technique is broken down into manageable steps, from selecting the right materials to the final touches of decoration. With clear instructions, helpful tips, and an easy-to-follow format, you’ll find joy in crafting a unique piece of decor that reflects your personal style.
DIY Wooden Bead Statement Necklace

Crafting a statement piece with a chunky wooden bead necklace is an exciting way to add a bold touch to any outfit. For those who enjoy DIY projects, creating your own jewelry can be a rewarding experience, and A Beautiful Mess provides a comprehensive guide to making a stunning accessory. The process begins by selecting the perfect wooden beads, applying wood stain, and assembling the necklace using nylon monofilament and basic jewelry-creating tools. This tutorial is designed to be easy to follow, with clear step-by-step instructions that make it simple to understand and replicate the project. Whether you’re looking to treat yourself or create a unique gift, this necklace project promises a stylish outcome that’s sure to impress.
Make a Camera Strap From a Scarf
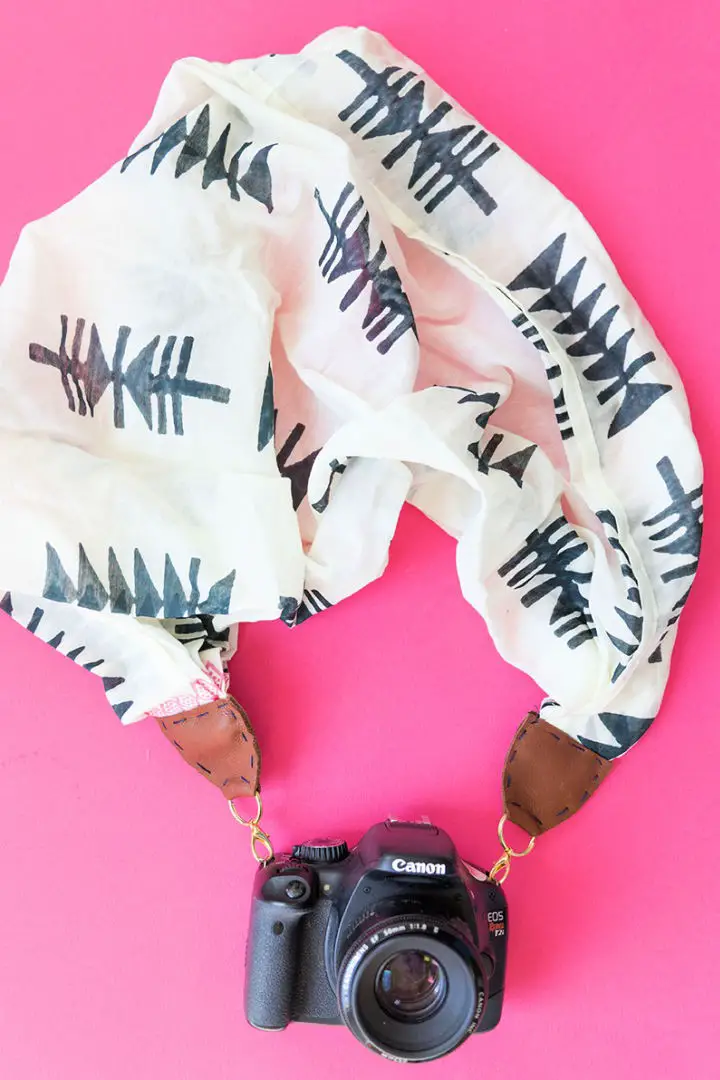
Transform an old scarf into a one-of-a-kind camera strap that reflects your personal style. Following The House That Lars Built’s comprehensive DIY guide, you’ll be guided through a step-by-step process to upcycle your scarf into a unique accessory for your camera. The detailed tutorial is bolstered by accompanying visuals, making it easy to follow along and achieve a professional-looking finish. For those who enjoy putting their own spin on things, this project offers a fantastic opportunity to add a touch of personality to your camera gear while giving an old scarf new life. With the added bonus of a video tutorial to aid in the process, you’ll be treated to an engaging and enjoyable crafting experience that leaves you with a stylish result.
Beautiful DIY Rainbow Soft Rattle
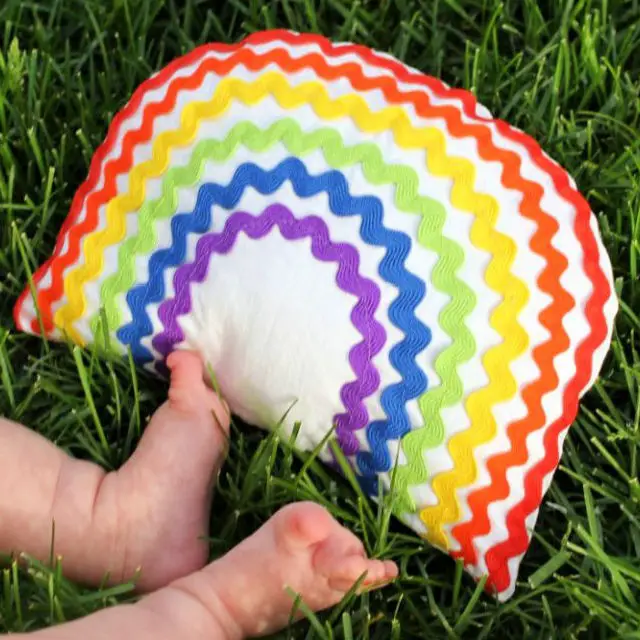
Discover the joy of crafting with Swoodson Says’ free rainbow soft rattle pattern, an ideal DIY project for making a unique and thoughtful baby shower gift. This sewing endeavor is perfect for beginners looking to tackle a quick and rewarding project. The finished toy measures 6.5 inches tall by 9 inches wide, boasting a vibrant array of colors and a soothing rattle sound that’s sure to captivate little ones. With a comprehensive tutorial featuring step-by-step photographs, even the most novice sewers can easily follow along. To get started, gather polyfill stuffing, a rattle insert, and a half yard of white quilting cotton or light canvas – don’t forget to prewash the fabric! You’ll also need coordinating thread, a hand sewing needle, scissors, a chopstick or point turner, glue stick, and ric rac in rainbow hues. Download the pattern piece from Swoodson Says’ website after signing up for their newsletter. This charming project requires minimal materials yet yields maximum cheerfulness, making it an excellent addition to any baby’s playtime collection.
How to Make a Birdseed Wreath – Step by Step
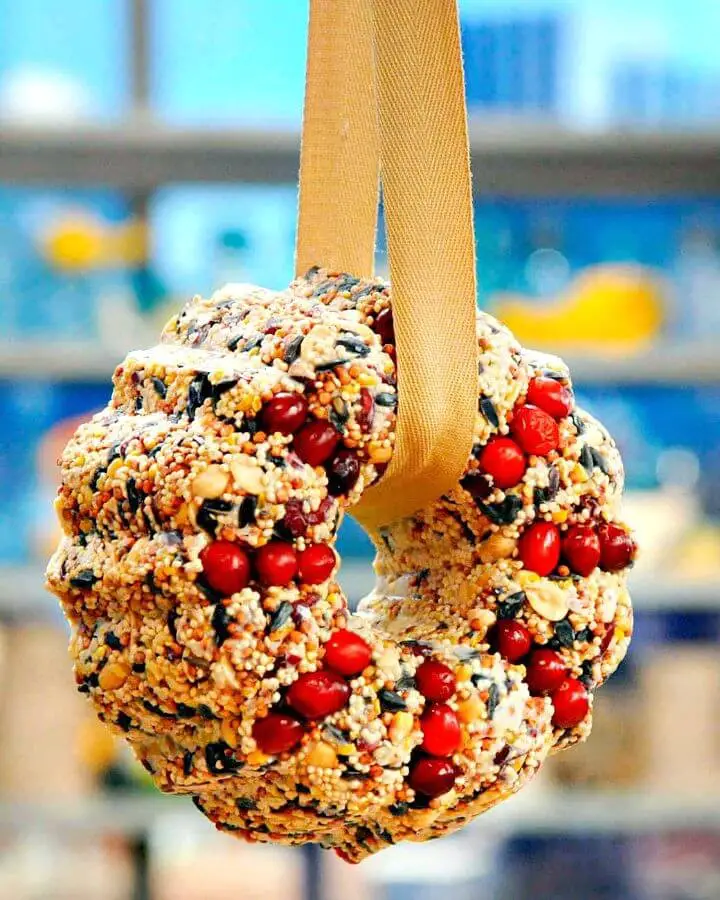
Create a captivating and eco-conscious bird feeder by crafting a homemade birdseed wreath, inspired by Martha Stewart’s project. This charming endeavor utilizes a Bundt pan to shape a suet-birdseed feeder that’s both functional and aesthetically pleasing. To begin, prepare suet by mixing it with wild birdseed, dried cranberries, and peanuts. Gently press the mixture into the pan and let it set before hanging your wreath outdoors in a shaded spot. This easy-to-follow guide is designed to be enjoyable and accessible, providing a wonderful opportunity to connect with nature through a hands-on activity.
Beginner’s Guide to Make a Vase

Transform an ordinary glass bottle into a beautiful vase in just 10 minutes plus drying time with this simple DIY project from The Crafted Life. Start by removing the label and giving the glass a thorough cleaning with warm water and rubbing alcohol. Next, move to a well-ventilated space where you can spray paint the bottle using a circular motion to create a unique speckled effect. Apply thin coats, allowing each layer to dry before adding the next. Remember to handle your new handcrafted vase with care, as it’s not dishwasher-safe and should be cleaned with a damp cloth only.
Adorable DIY Fabric Tissue Box Cover
For anyone struggling with an excessive number of tissue boxes due to allergies or simply seeking to elevate their home’s ambiance, Ashley Johnston’s tutorial on ‘Make It & Love It’ presents a unique and stylish solution. With her guidance, you can transform a plain tissue box into a sophisticated accessory by crafting a fabric cover featuring a grommet opening. This clever hack not only adds an elegant touch to any room but also ensures that tissues remain conveniently accessible. By repurposing readily available materials like home decor fabric and faux leather, you’ll be able to create a chic and functional piece that effortlessly blends form and function.
Cool Homemade Beaded Tassel Bag

Give an old handbag a fresh makeover by infusing it with a personalized touch using this comprehensive DIY guide from Running With A Glue Gun. This step-by-step tutorial transforms a dull bag into a vibrant accessory embellished with ombre tassels and colorful beads, allowing you to add your own creative flair. Perfect for crafty enthusiasts seeking to inject some personality into their wardrobe, this project is not only entertaining but also adaptable to fit your individual style. You can modify the bead sizes, tassel lengths, and color schemes to perfectly align with your unique aesthetic, ensuring a delightful crafting experience that yields a charming result.
Easy DIY Apron With Fat Quarters
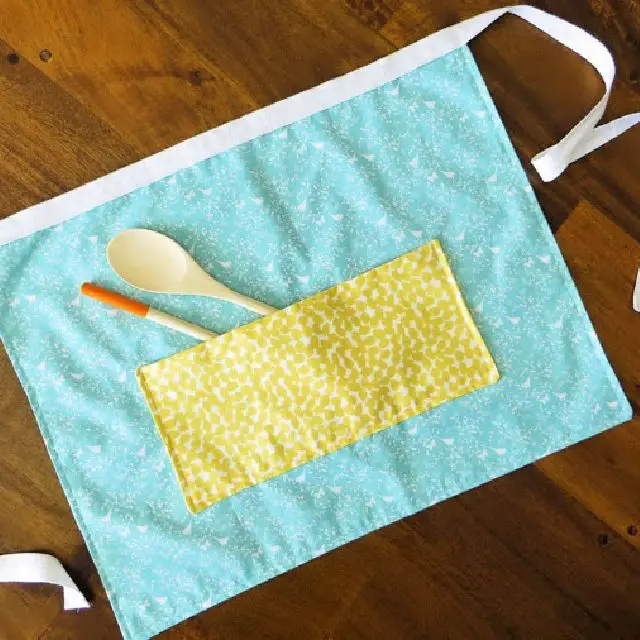
Transforming your kitchen into a creative haven while safeguarding your clothes from messy spills? With Paige Ronchetti’s tutorial from Little Nostalgia, you’re just three fat quarters away from crafting a charming apron that combines practicality and style. This accessible guide is perfect for DIY enthusiasts, new sewers, or anyone seeking to infuse their culinary endeavors with a touch of homemade flair.
Gather your essential materials, including cotton trim and sewing supplies, to bring this simple yet elegant project to life. In a few straightforward steps, you’ll learn how to assemble and sew your own kitchen apron – a thoughtful gift for friends or family members who share your passion for cooking. Get ready to revitalize your culinary experience with a splash of creativity!
Build a Hanging Wood Slice Plant Stand

Transform your space with a charming DIY Hanging Wood Slice Plant Stand, courtesy of Brepurposed. By combining a wood slice from a craft store like Michael’s, suede strips, and a curved plant bracket, you can create a stunning display that brings the outdoors in. The simplicity of this project belies its impact, as it adds warmth and personality to any room. To achieve this look, start by spraying paint on the bracket for a custom finish, then drill holes in the wood slice and attach the suede strips with loops and knots for added support. Finally, hang your creation from the bracket and marvel at the fruits of your labor. This comprehensive guide provides step-by-step instructions to ensure a satisfying DIY experience.
Handmade Metallic Painted Picnic Basket
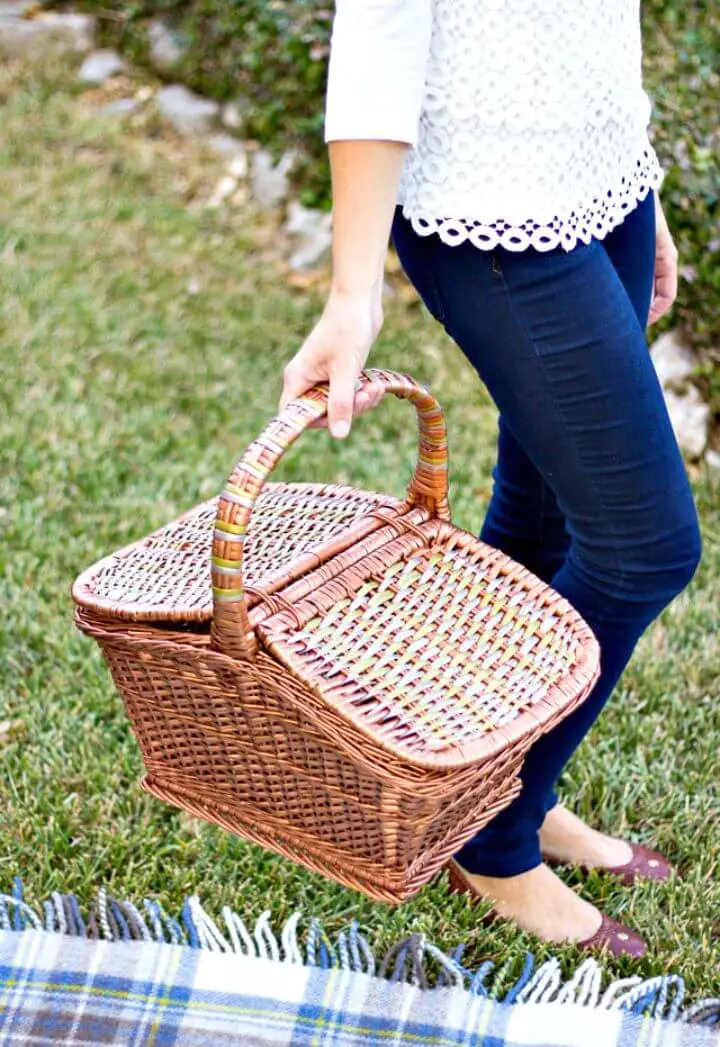
With a dash of creativity and a few simple materials, transform a humble wicker picnic basket into a sleek, metallic masterpiece that exudes sophistication and charm. For crafty enthusiasts and upcyclers alike, Haeley Giambalvo’s DIY tutorial from Design Improvised offers a step-by-step guide to elevating a thrift store find using copper spray paint and metallic markers. The result is a one-of-a-kind basket that seamlessly blends the classic appeal of wicker with a modern twist, perfect for autumn outings or as a stylish storage solution that showcases your creativity and crafting prowess.
How to Make Sharpie Dot Flower Pot
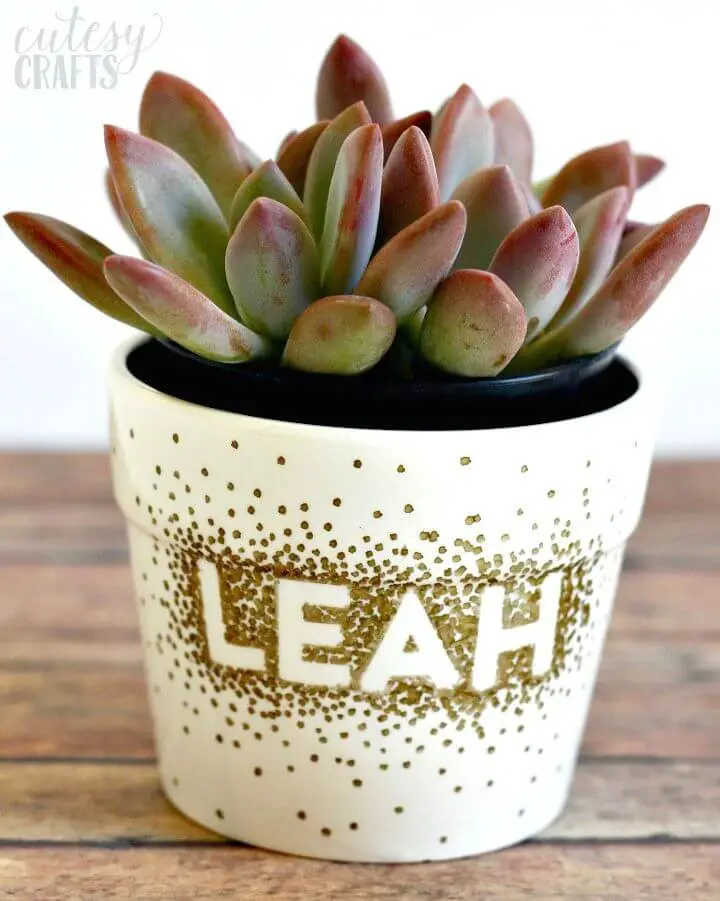
Transform your ceramic flower pots with a personalized touch using a Sharpie! This fun and engaging craft is perfect for kids, teens, and adults, requiring only basic supplies that are easily accessible. In this step-by-step guide, you’ll learn how to prepare your pot, add customized letter stickers, and apply a unique dotted design using a Sharpie. With these easy steps, create your own one-of-a-kind flower pots ideal for gifting or sprucing up your herb garden. Plus, discover helpful tips on fixing any ink mishaps, ensuring a clean and professional finish every time. Embark on this enjoyable crafting experience and add a personal touch to your home decor.
Colorful DIY Fabric Drawstring Bag
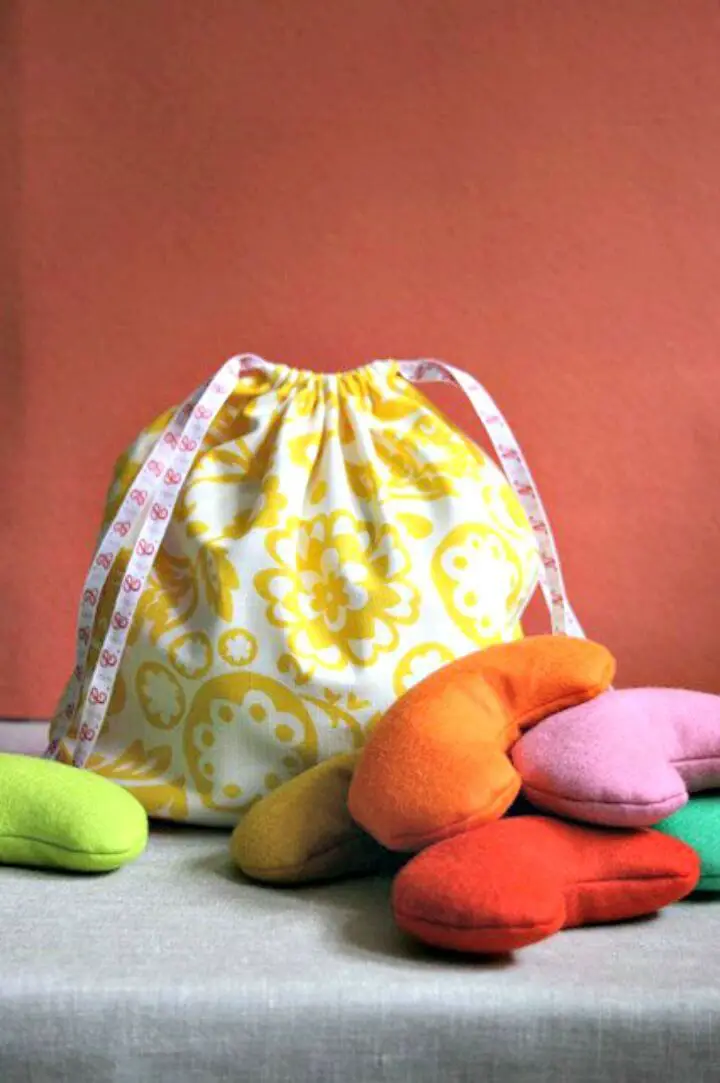
Creating a drawstring bag offers a rewarding DIY sewing experience, perfect for those who enjoy working with fabric. The Easy Drawstring Bag pattern from Purl Soho is an excellent choice, as it provides a customizable and straightforward design that can be adapted to various uses, such as special gift wrapping or organizing small projects. With its clear instructions and material lists, this guide caters to different sizes and fabric types, allowing you to personalize the project to your preferences or needs. As you bring the pattern to life with just a few stitches, you’ll feel a sense of accomplishment and pride in creating a functional item that showcases your skills and style.
Make Your Own Seashell Mirror
Transform your home decor with the essence of the ocean by crafting a beautiful seashell mirror. This DIY project offers a straightforward guide, providing step-by-step instructions to create a unique piece that reflects your personal style. Unlike store-bought options, this handcrafted creation allows you to infuse a coastal vibe into any room, making it perfect for those seeking to add a touch of personality to their space.
Building Wood Frames for Polaroids
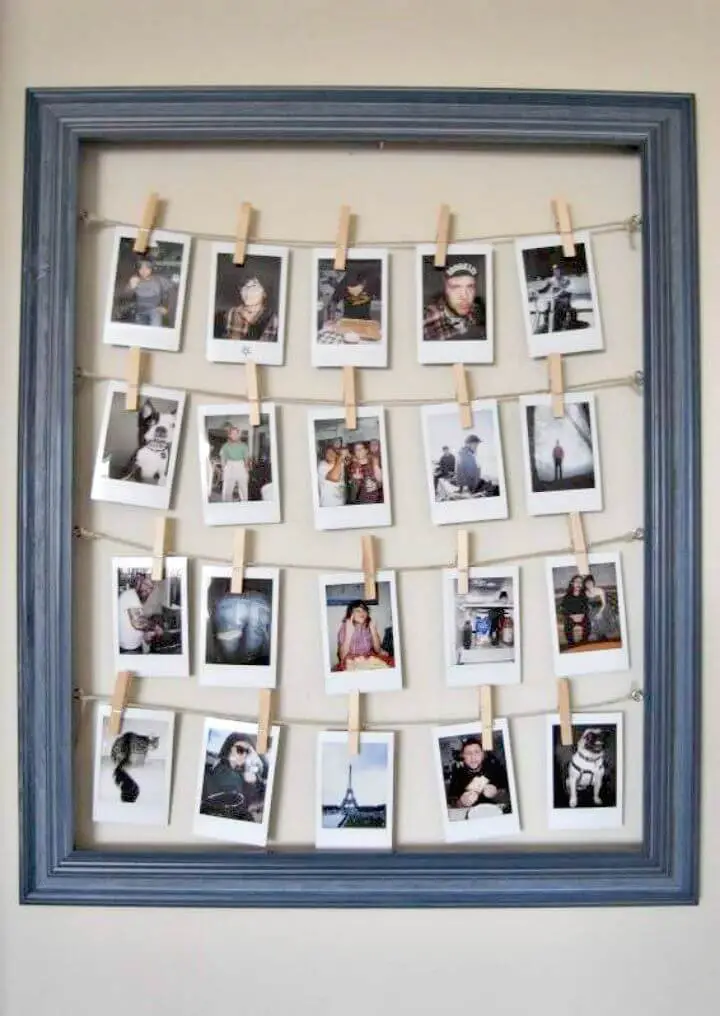
Transforming cherished memories into stunning visual displays is an art form that requires minimal materials and maximum creativity. To create a one-of-a-kind Polaroid frame, start by selecting a frame that harmonizes with your home decor’s unique aesthetic. Once you’ve found the perfect match, gather a few essential tools, including string or wire, frame hanging eyelets, and mini clothespins. The key to this project lies in measuring the distance between eyelets precisely, ensuring an even spacing that adds visual appeal to your display. Secure the eyelets into the frame, then carefully weave the wire through them, creating a sturdy yet elegant structure. Finally, use the clothespins to attach your Polaroids, crafting a narrative that unfolds like a miniature art gallery in your home. Not only will this project make for a thoughtful gift, but it’ll also become a conversation starter as friends and family gather around to admire your handiwork. For those seeking inspiration or a step-by-step guide, visit My Little Artichoke for expert tips on bringing your Polaroid frame display to life.
Awesome DIY Marbled Clay Ring Dish
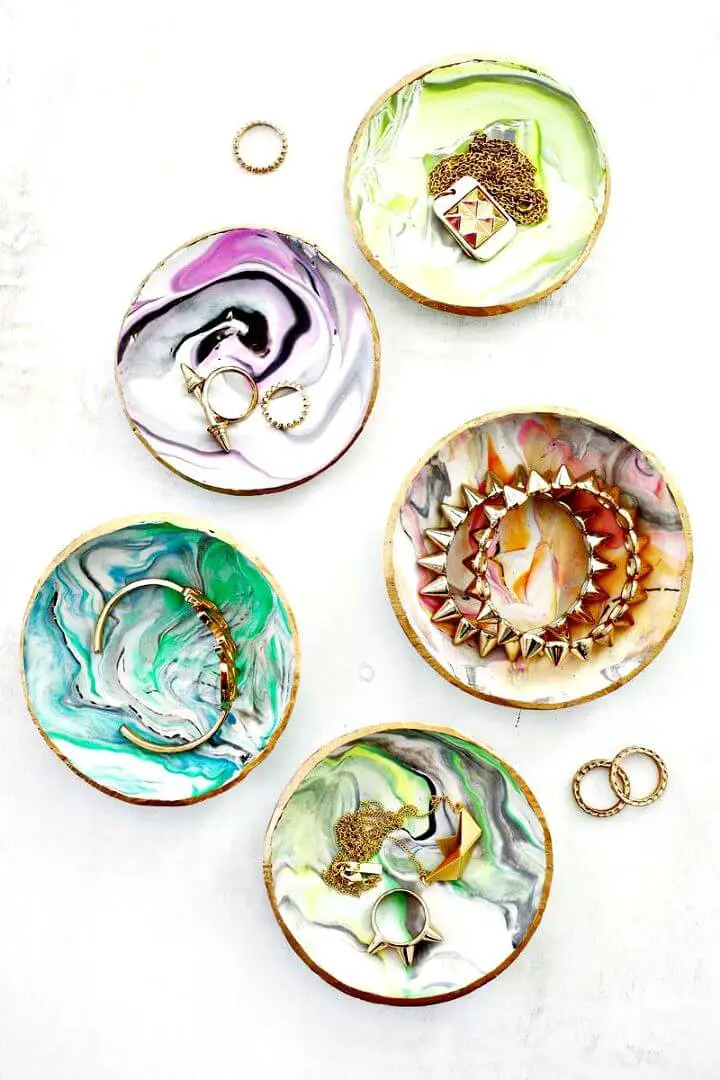
Transform any space into a charming sanctuary by creating one-of-a-kind marbled clay ring dishes using a simple tutorial from A Beautiful Mess. These delightful containers not only beautifully display your jewelry, but also add an air of sophistication and elegance. The process begins with rolling different colors of oven-bake clay into ‘snakes’, skillfully twisting them together to produce a stunning marbled effect. Once the desired pattern is achieved, the clay is then cut and shaped into dish forms before being baked to perfection. After cooling, you have the option to add a touch of luxury by painting the rim with gold paint and sealing it with glaze for a glossy finish. Perfect for personal use or as thoughtful handmade gifts, these ring dishes are an ingenious and budget-friendly way to organize your treasured trinkets.
Creative Marbled Mugs with Nail Polish
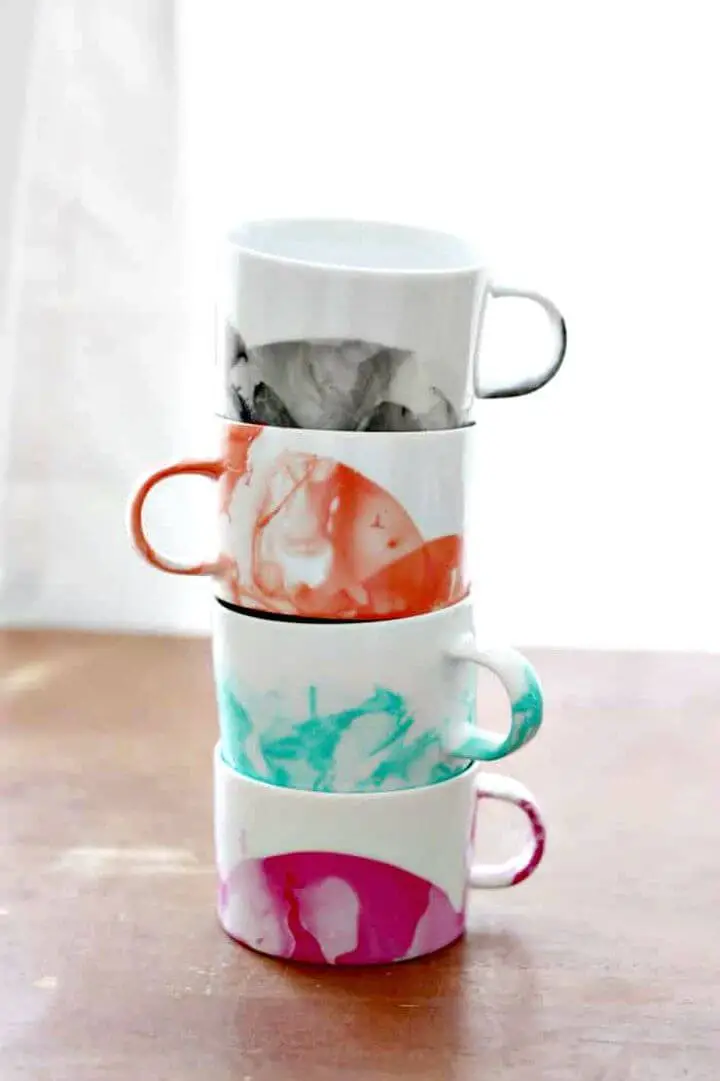
Transforming ordinary mugs into stunning works of art is as simple as combining your creativity with some everyday materials. Crafting marbled mugs with nail polish is an accessible and enjoyable project that requires minimal supplies, including mugs, nail polish, toothpicks, and a disposable container for water. With a step-by-step guide from DIY Candy, you can create unique and stylish mugs in under no time. This innovative way to repurpose old nail polish turns an ordinary mug into an extraordinary piece of art that demands attention. While these handcrafted masterpieces require gentle care and should be washed by hand only, sealing them with Dishwasher Safe Mod Podge can extend their lifespan. Feel free to experiment with different color combinations and revel in the meditative process of marbling to create a functional masterpiece that reflects your personal style.
Free Stools Woodworking Plan
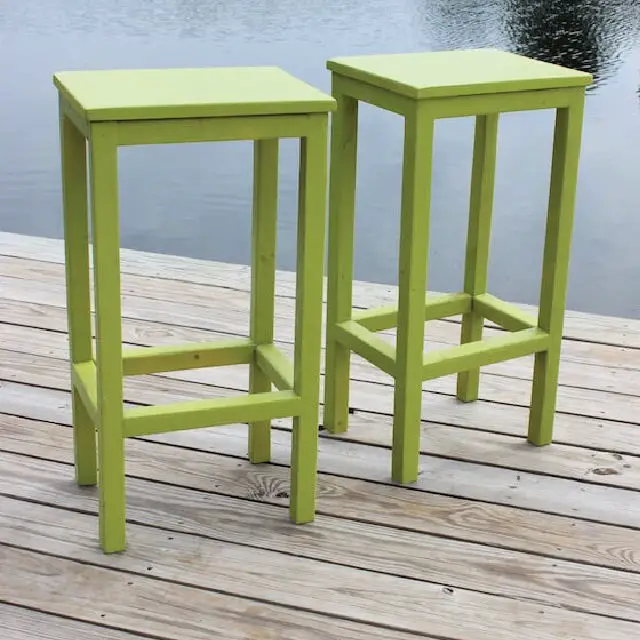
With Rogue Engineer’s free DIY plans, you can effortlessly create functional and stylish bar stools that will elevate any space. Jamison Rantz, an engineer by trade, has crafted a project that’s perfect for those who want to build their own furniture without requiring extensive woodworking expertise. Not only are these bar stools simple to construct, but they also provide an affordable solution for adding seating. The comprehensive guide includes clear dimensions, a cut list, and step-by-step instructions that make the process seamless. By following this resource, you can create two bar stools for as little as $20 or extend the project to build additional stools with minimal extra cost. This DIY task is perfect for those who want to create something practical and rewarding.
How to Make a Hammock Chair
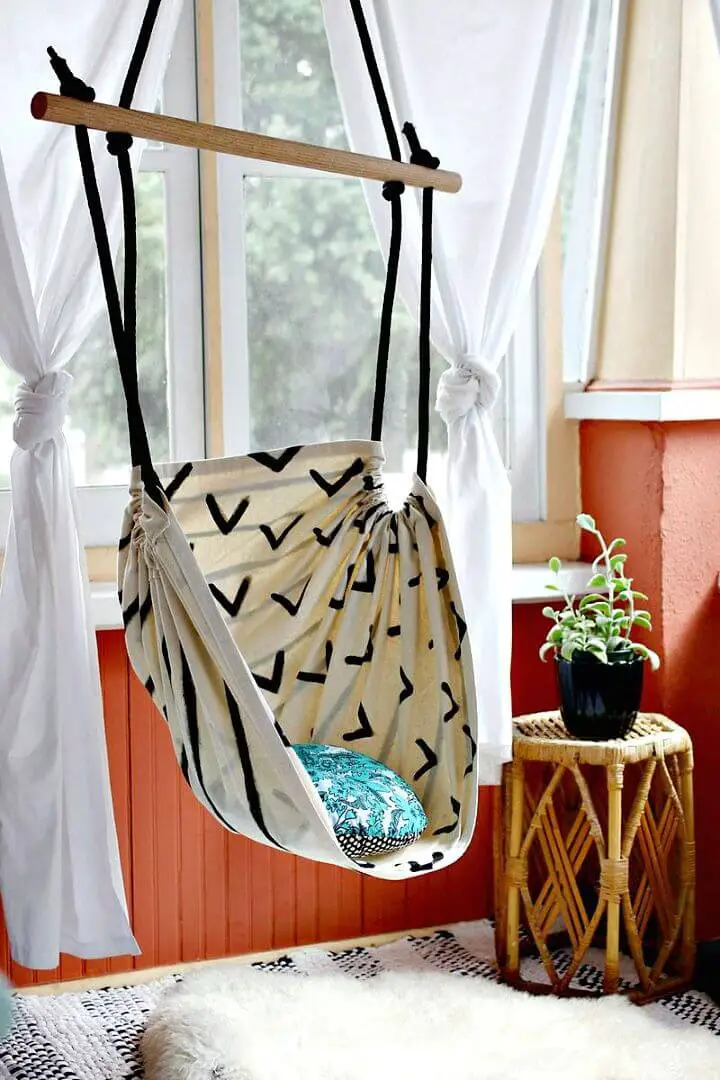
Get creative and craft your own hammock chair with A Beautiful Mess’s DIY guide, courtesy of Rachel Denbow. This comprehensive tutorial is perfect for those who love making things and want to add a unique touch to their home or porch. By following the clear instructions and using easily sourced materials like sturdy oak dowels, braided polypropylene rope, and canvas, you’ll be able to create a durable and cozy hammock chair that reflects your personal style. With a little creativity and some paint designs of your choice, you can customize your chair to suit your taste. Before you know it, you’ll be lounging in your handmade hammock chair, enjoying a quiet moment or diving into your favorite book.
Quick and Easy DIY Hula Tassels
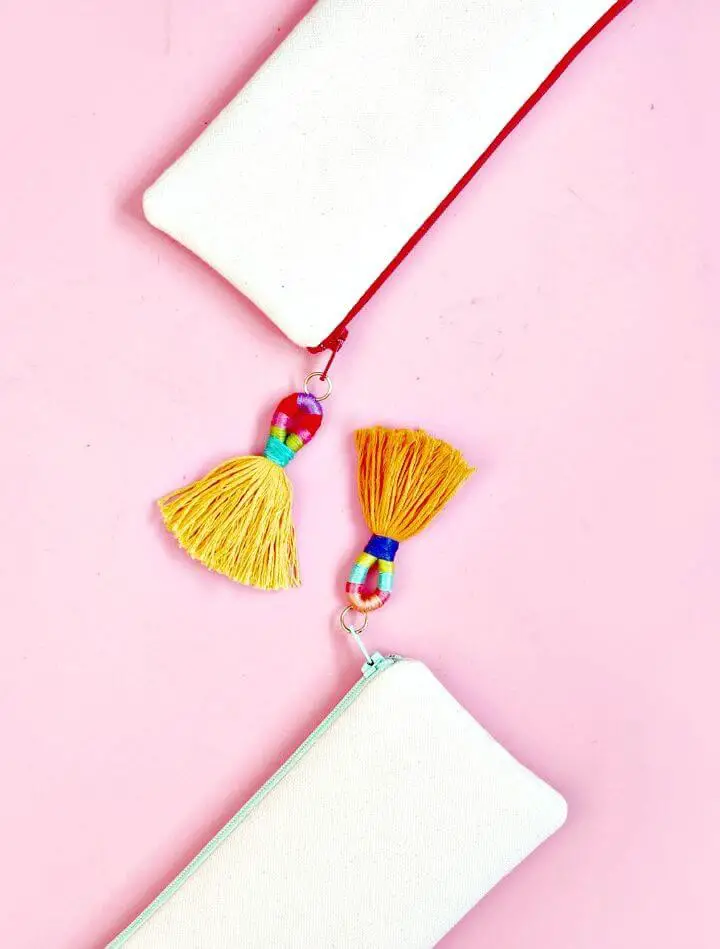
Get ready to add a splash of color and whimsy to your accessories with Damask Love’s easy-to-follow DIY tutorial on creating charming hula tassels using basic embroidery floss and a few simple crafting tools. Perfect for embellishing zippers, keychains, or even as festive party decor, this step-by-step guide transforms the process into manageable tasks. With visual photographs serving as your guide, you’ll be able to craft a vibrant tassel in approximately 15 minutes. Whether you’re looking to unleash your creative side or simply add a touch of personality to your accessories, learning how to make these delightful hula tassels is an experience that’s equal parts fun and rewarding.
Making Your Own No-Sew Footstool
Craft a stylish no-sew footstool in under an hour with Build Basic’s comprehensive guide! Without requiring sewing skills, you’ll learn to assemble a sturdy base, apply foam padding, and neatly wrap your chosen fabric for a polished finish. This DIY project is perfect for adding a personal touch to your home décor or creating a unique gift. The flexibility to adjust the size and choose from various leg styles allows your finished footstool to seamlessly fit any space. Get ready to elevate your living space with this practical and charming no-sew creation.
Gorgeous DIY Ombre Seed Bead Necklace
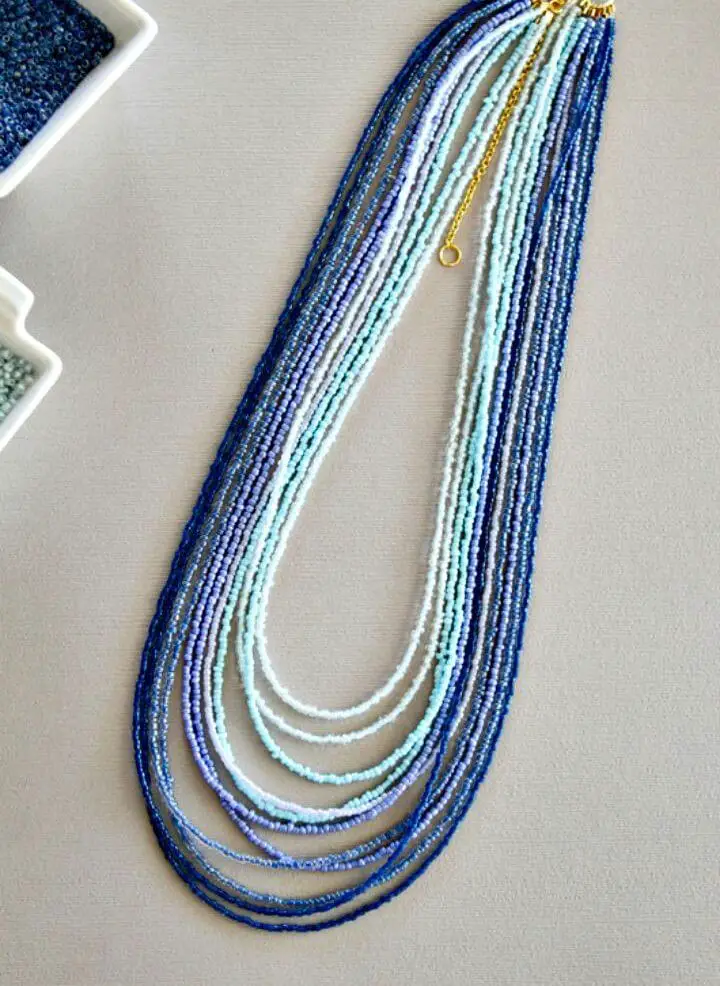
Transform your spring accessory game with Howe We Live’s comprehensive DIY Ombre Seed Bead Necklace guide. This engaging project requires approximately 3 hours to complete, making it an ideal pastime for a relaxing afternoon. With simple yet precise techniques, you’ll create a necklace that adjusts in length to suit various styles, featuring gradient shades of seed beads expertly assembled with jump rings and a secure lobster claw closure. As you follow the clear steps, you’ll gain confidence in your beading skills while crafting a statement piece that embodies one of the most sought-after jewelry-making trends.
How to Sew a Triangle Pouch – Free Pattern
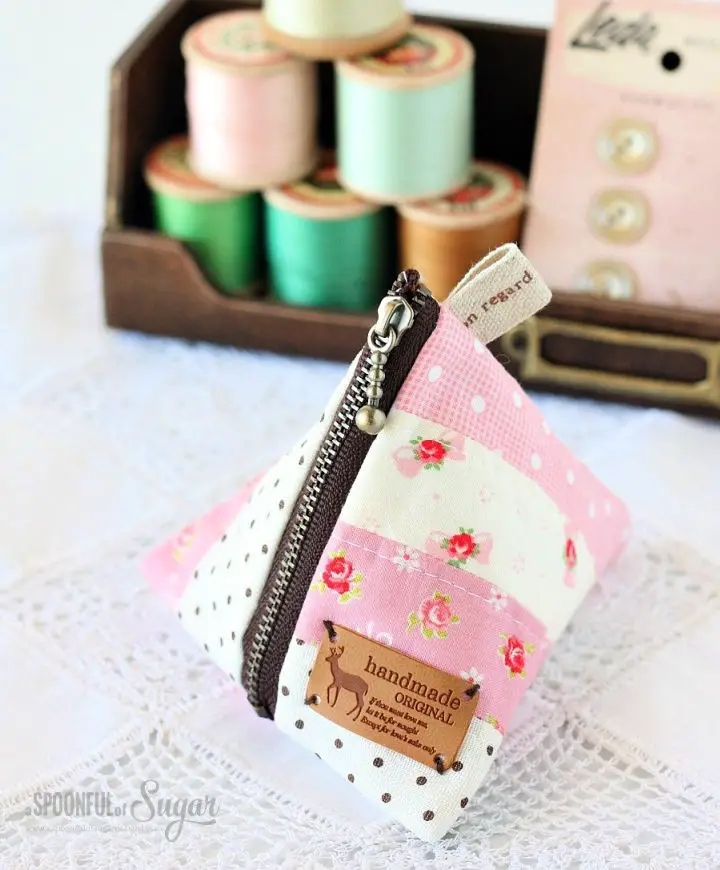
Create a delightful patchwork triangle pouch with ease using A Spoonful of Sugar’s comprehensive sewing guide. Perfect for storing small items like coins, makeup must-haves, or sewing supplies, this project requires only four fabric strips, making it accessible to DIY enthusiasts of all levels. The step-by-step tutorial is designed to be easy to follow, allowing you to assemble a personalized and practical accessory that doubles as a thoughtful handmade gift. With the right coordinating fabrics at hand, you’ll be inspired to create your own unique piece while exploring the joy of crafting. Visit A Spoonful of Sugar for the complete guide and infuse your accessories with a touch of handmade charm.
Homemade Pizza Sauce Recipe
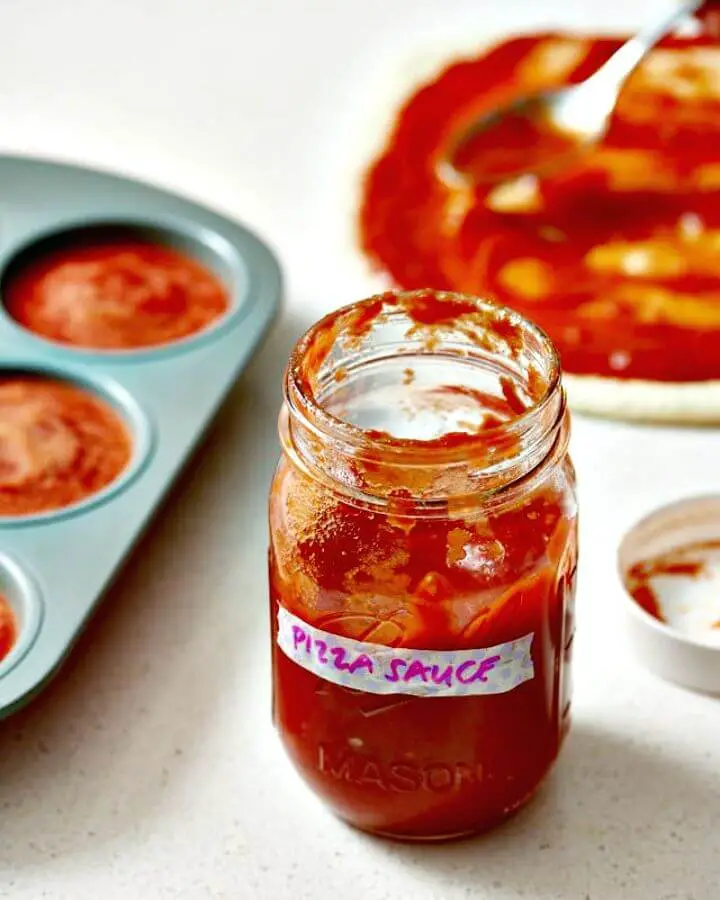
Transforming your homemade pizza experience into a culinary masterpiece starts with a fresh and tantalizing sauce. Kitchn’s effortless yet mouthwatering pizza sauce recipe is the perfect starting point, requiring just canned tomatoes, garlic, balsamic vinegar, and a few essential pantry items. This versatile condiment can be whipped up in no time, making it the ultimate accompaniment to any pizza dough base. With no cooking required, this vibrant tomato sauce remains unchanged even after baking, delivering an authentic flavor that rivals pizzerias. The simple instructions are designed for ease of use, ensuring your pizza night is a stress-free affair. Store leftovers in the fridge or freezer to have your go-to pizza sauce ready for future culinary creations. Enjoy the thrill of creating a gourmet-quality topping from the comfort of your own kitchen with this speedy and scrumptious recipe.
Upcycled Pretty Vintage Tin Lamp
Elevate the charm of your home with a creative DIY project from My So Called Crafty Life. Our comprehensive guide on transforming an old cookie tin into a vintage-inspired lamp is both eco-friendly and uniquely captivating. This step-by-step tutorial simplifies the process, requiring minimal materials such as a lamp kit, drill, screwdriver, PVC tubing, and glue. Even beginners will find this project engaging and achievable, resulting in a functional and stylish light perfect for illuminating your favorite space.
Modern DIY Mid Century Planter
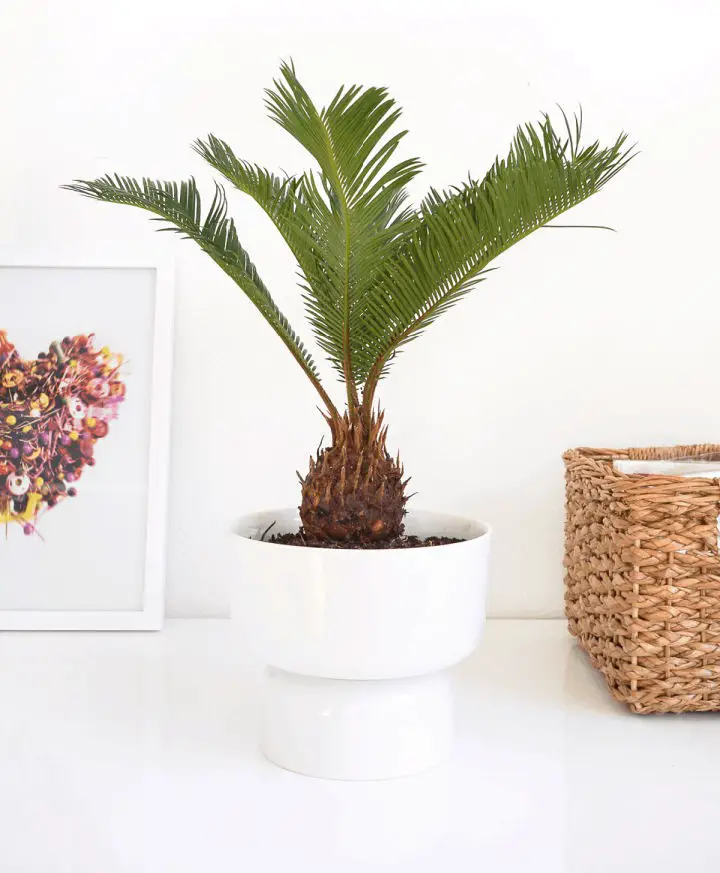
Transform your living space with the timeless elegance of mid-century modern design using this straightforward DIY planter tutorial from Sugar & Cloth. This easy-to-follow guide combines simplicity with style, requiring only two stacked bowls and a few basic materials to create a sophisticated home for your favorite plant. To bring your vision to life, simply apply some industrial-strength glue with a damp cloth, and allow the adhesive to set with patience. Don’t forget to add small rocks for drainage purposes, if needed, before placing your plant in its chic new surroundings. With this DIY planter project, crafting a mid-century modern masterpiece has never been more accessible or enjoyable!
Related DIY Projects:
If you’re looking to spend a relaxing weekend with friends, why not try something creative and engaging? There are plenty of easy DIY projects that you can tackle together. Here are some ideas for fun and simple activities that will bring you all closer.
Conclusion:
Transforming your living space into a reflection of your personality has never been easier! Our comprehensive collection of 30 creative DIY projects and ideas for the home provides an impressive array of options to elevate your surroundings without breaking the bank. From vibrant wall art to customized garden decorations, these innovative projects blend functionality with flair, making them perfect for anyone seeking to add character and charm to their home. As you bring each project to life, savor the sense of accomplishment that comes from crafting something truly unique and enjoy the fruits of your labor in a more beautiful, personalized living space. Embark on your DIY journey today and watch as your humble abode becomes a true testament to your style and creativity.
