Elevate your home decor by crafting a DIY plywood bookshelf that showcases your treasured literary collection. With 25 free plans to choose from, you’ll find inspiration for unique designs featuring built-in lighting, adjustable shelves, and decorative elements. To get started, we’ve curated essential tool recommendations, finishing techniques, and troubleshooting tips to ensure a seamless project experience.
Take your DIY plywood bookshelf to new heights by exploring our guide on advanced customizations, including expert advice on maintenance and care, as well as FAQs answered. With this wealth of knowledge, you’ll be empowered to create a customized bookshelf that reflects your personal style and meets your specific needs.
Join the world of woodworking enthusiasts by embracing our comprehensive resources, designed to guide you every step of the way.
How to Make a Plywood Bookshelf – Step by Step Guide
Crafting a stunning bookshelf that won’t break the bank requires minimal tools and materials, making it an achievable DIY project for any novice woodworker. With plywood as the foundation and basic woodworking tools at your disposal, you can create a functional piece of art to showcase your favorite books or decorative items. By following Shara’s straightforward steps, you’ll be well on your way to completing a successful bookshelf project that exudes style and sophistication.
Materials and Tools Needed
To begin the project, you’ll need to gather your essential materials. The core components include one sheet of plywood, which will serve as the base for your creation. Additionally, wood glue is necessary for bonding the various parts together. A set of pocket hole screws will be used to create strong and concealed joints. Edge banding, if desired, provides a professional-looking finish by covering the exposed edges of the plywood. Clear coat sealer then protects the entire surface from scratches and wear. To facilitate accurate drilling, you’ll require a pocket hole jig. The saws needed for this project are a circular saw with a guide or table saw for making straight cuts, as well as a miter saw for more precise angled cuts. Finally, an iron is necessary if you choose to apply edge banding, and some sandpaper will come in handy for smoothing out any rough edges.
Step by Step Instructions
Step 1: Planning and Cutting
Before you start building, create a cutting plan that optimizes plywood usage and minimizes waste. Begin by dividing the material into two primary components: wider strips for the sides and shorter pieces for the shelves, top, and bottom of the bookshelf. While exact dimensions can be tailored to fit your needs or space constraints, maintaining consistency in shelf width will ensure a cohesive appearance.
Step 2: Edge Banding (Optional)
Elevate the aesthetic appeal of your plywood bookshelf by incorporating edge banding, even if it’s not mandatory. To achieve this polished look, apply the banding to the cut plywood pieces’ visible edges. Secure the banding using an iron, remove any excess with caution, and finally, lightly sand the edges to ensure a silky smooth finish.
Step 3: Assembly
To construct the bookshelf’s framework, start by creating pocket holes at the ends of the top and bottom components. These will serve as anchor points for securing the sides using pocket screws, effectively forming the outer structure of the bookshelf. Next, determine the positioning of the back panel, which can either be flush with the edges or recessed between the top and bottom sections. Trim it to fit your desired aesthetic, then fasten it into place.
Step 4: Adding Shelves
When designing your shelving layout, take into account what items you plan to display. Next, drill pocket holes at the ends of each shelf and secure them within the frame at the desired heights. To ensure the bookshelf remains structurally sound, verify that each shelf is square before permanently fastening it. Begin by attaching one screw per shelf end for ease of adjustment, and then add a second screw once you’re satisfied with the positioning.
Step 5: Final Touches
When working with pocket holes, you can take advantage of the opportunity to create a seamless finish. To do this, fill the holes with wood glue and pocket hole plugs, allowing the glue to fully dry before proceeding. Next, sand down the plugs to achieve a smooth surface. Finally, apply a clear coat sealer to protect the plywood’s natural beauty or your chosen finish, ensuring a long-lasting and visually appealing result.
Preventing Tipping
To ensure the stability and safety of your bookshelf, it’s crucial to secure it to a wall using appropriate anchoring methods. This is particularly important for tall and narrow designs that may be prone to tipping over if not properly secured. As you’re likely aware, safety should always be a top priority in any home environment, especially when there are children and pets present.
Video Tutorial
To further enhance your understanding and execution of building a modern bookshelf from a single sheet of plywood, we recommend supplementing our written guide with Shara’s video tutorial. This comprehensive resource offers a visually-oriented approach that complements the written instructions, providing an additional layer of clarity for each step. By combining the two formats, you’ll be able to more effortlessly follow along and achieve professional-looking results.
Advanced Customizations for Your DIY Plywood Bookshelf
As you’ve gained proficiency in constructing a DIY plywood bookshelf from scratch, you may be ready to take it to the next level by incorporating unique flourishes that showcase your personality and cater to your specific requirements. Consider these innovative customization concepts to spark your creativity and elevate your project:
Built-In Lighting
Elevate the ambiance of your reading space by incorporating LED strip lights beneath each shelf, transforming it into a snug and inviting nook. Not only will this feature draw attention to your book collection, but it will also infuse the surrounding area with a warm glow, creating a cozy atmosphere that’s perfect for curling up with a good read.
Adjustable Shelves
When it comes to shelving, flexibility is crucial. One way to achieve this is by installing adjustable shelf supports that allow you to modify the height of your shelves as your needs change. This is particularly useful when you start accumulating larger books or decide to showcase artistic pieces. With adjustable shelf supports, you can easily adapt your storage solution to accommodate different sizes and types of items, ensuring a clutter-free and organized space.
Integrating with Other Furniture
By incorporating your bookshelf with existing furniture pieces, such as desks or cabinets, you can create a cohesive visual appeal while also optimizing the use of available space. Consider extending your bookshelf to seamlessly merge with these items, fostering a harmonious atmosphere in your room.
Decorative Elements
Elevate your bookshelf’s aesthetic by incorporating decorative accents. Add a touch of sophistication with ornate trim or molding along the edges, creating a visually appealing contrast. For an added layer of flair, utilize stencils to meticulously paint patterns on the sides and back panel, injecting a burst of creativity into the design.
Personal Touches
Transform your bookshelf into an extension of yourself by adding a personal touch. Consider painting it in a vibrant hue that reflects your mood or personality, or use patterned wallpaper to create a one-of-a-kind backdrop. This thoughtful tweak can turn a simple bookshelf into a conversation piece that showcases your unique style and brings a splash of joy to your living space.
Tool Recommendations for Your DIY Plywood Bookshelf
For a satisfying DIY experience, it’s crucial to arm yourself with the appropriate tools before embarking on building a bookshelf. By doing so, you’ll be well-equipped to tackle any challenges that may arise and ultimately enjoy a seamless project from start to finish.
Essential Tools
When embarking on a woodworking project, it’s essential to prioritize safety. Always don the necessary gear, including goggles and gloves, to shield your eyes and hands from potential hazards like splinters and dust. This precautionary measure will help ensure a stress-free experience.Next, accuracy is vital in woodworking. A high-quality measuring tape is an indispensable tool that allows you to double-check your measurements before making any cuts. With the right tape at hand, you’ll be able to achieve precision and avoid costly mistakes.A circular saw is a versatile and user-friendly option for cutting plywood sheets. Its ease of use and adaptability make it an ideal choice for even the most novice woodworkers.For assembling your bookshelf, a power drill is the perfect tool. It streamlines the process of drilling holes and driving screws, making quick work of what might otherwise be a laborious task.Finally, don’t neglect the importance of sanding. Use progressively finer grits of sandpaper to smooth out rough edges and achieve a polished finish. This attention to detail will elevate your finished product and give you a sense of pride in your craftsmanship.
Safety Tips
Before tackling any project, it’s essential to take the time to familiarize yourself with the tools you’ll be using. Start by reading the manual and getting a sense of their functions, capabilities, and safety features. This will help you avoid any potential hazards and ensure that you’re using them correctly. In addition, make sure your work area is clean and organized, as clutter can be a major distraction and even pose a risk to your safety. To prevent accidents, use materials such as clamps to hold plywood in place while cutting, ensuring a straight cut and preventing any unwanted movement. Finally, when you’re not actively using power tools, remember to unplug them to avoid accidental starts and minimize the risk of injury.
Finishing Techniques for Your DIY Plywood Bookshelf
Finishing a bookshelf’s surface is crucial for both functionality and visual appeal, as it safeguards the underlying material while also contributing to its overall attractiveness. Several methods can be employed to achieve this, including…
Sanding
When it comes to achieving a flawless surface, the key is to start rough and finish refined. Begin by employing a coarse-grit sandpaper to address any noticeable imperfections or irregularities. As you progress, gradually transition to finer grits, meticulously smoothing out the area until you’re left with a silky-smooth finish.
Staining
Before applying the stain, test it on a small, inconspicuous area of plywood to gauge its true color and adjust as necessary. This step ensures you’re happy with the final result. Next, apply the stain using a brush or cloth in smooth, even strokes, following the natural direction of the wood grain for optimal results.
Painting
To ensure a flawless finish, start with a strong foundation by applying a primer before painting. This crucial step allows the paint to bond more effectively and results in a consistent, vibrant hue. Once you’ve primed your surface, achieve a deep, rich color by building up thin coats of paint. Permit each layer to dry completely before moving on to the next, allowing for optimal coverage and minimizing any potential drips or runs.
Protecting
When it comes to maintaining the integrity of your bookshelf, don’t overlook the importance of sealing the deal – literally. Applying a sealant can shield your shelf from moisture and wear, ensuring its longevity. Polyurethane is a tried-and-true option due to its impressive durability. As you fine-tune the appearance and resilience of your bookshelf, take care in selecting the techniques that will give it the best possible finish.
Troubleshooting Common Issues
As you construct your DIY plywood bookshelf, you may run into some unexpected challenges. To overcome these obstacles and achieve a successful build, follow these expert tips:
Warped Wood
To prevent warping or distortion, consider laying flat any warped plywood sheets under a significant weight load for a short duration, typically 2-3 days. This simple technique can effectively realign the fibers and restore the material’s natural flatness.
Uneven Shelves
Before commencing the installation process, it is crucial to double-check and accurately measure the shelves to ensure a precise fit. In case the shelves are found to be uneven, take the time to carefully sand them down to achieve a level surface, thereby guaranteeing a sturdy and secure final product.
Assembly Difficulties
When dealing with complex puzzle pieces, it’s essential to take a step back and re-evaluate the situation. If certain elements aren’t falling into place as expected, resist the urge to force the issue. Instead, revisit the original guidelines and ensure that each component is properly aligned. A thorough review may reveal subtle connections or nuances that were previously overlooked, ultimately leading to a more cohesive and effective solution.
Maintenance and Care
The satisfaction of a fully stocked bookshelf is only the beginning. To ensure your literary haven remains a treasured space for years to come, proper care and maintenance are crucial. This meticulous approach will not only preserve the physical condition of your books but also safeguard their sentimental value. It’s an ongoing process that requires attention to detail and a commitment to preserving the integrity of your collection.
Regular Cleaning
When it comes to cleaning your wooden furniture, start by using a microfiber cloth to delicately sweep away any loose dust particles. Be mindful of using harsh chemicals that could potentially compromise the integrity of the wood finish. Instead, opt for gentle and non-abrasive methods that will preserve the beauty of your piece.
Minor Repairs
When dealing with minor damage to your bookshelves, a quick fix can often suffice. To address small scratches, consider using a wood marker that closely matches the original color of your bookcase. This will help blend any imperfections seamlessly. For more substantial issues, such as larger gaps or holes, you may want to turn to plywood patches. These can be carefully applied to restore the shelf’s structural integrity and appearance.
Avoid Moisture
To ensure the longevity of your plywood bookshelf, it’s essential to keep it away from excessive moisture. Prolonged exposure to dampness can cause the material to warp and compromise its structural integrity. To mitigate this risk, place your bookshelf in a dry area and swiftly respond to any accidental spills or mishaps that may occur.
FAQs About DIY Plywood Bookshelves
Get instant solutions to your DIY plywood bookshelf concerns by exploring our comprehensive FAQs section. Gain valuable insights, expert advice, and practical guidance on crafting the ideal bookcase that suits your unique needs.
What is the best type of plywood for a bookshelf?
When it comes to constructing a bookshelf, choosing the right type of plywood is crucial. Two top-notch options that stand out from the rest are Baltic birch and furniture-grade plywood. Characterized by their remarkable durability and sleek finishes, these types of plywood provide an excellent canvas for painting or staining. Their smooth surfaces also make them ideal for showcasing decorative trim and hardware.
How thick should the plywood be for shelves?
When it comes to building shelves, a key consideration is the thickness of the plywood used for the shelves themselves. Specifically, 3/4-inch thick plywood is often recommended as it offers a perfect balance between strength and affordability. This thickness provides ample support for books and other objects without compromising on stability or bending under their weight.
Can I use a hand saw instead of a circular saw?
While it is technically possible to use a hand saw for certain tasks, employing a circular saw can significantly streamline the process. Not only do circular saws facilitate faster cutting times, but they also enable greater precision in terms of straight lines and clean edges. The added efficiency may be particularly important when working on larger or more complex projects.
Do I need to sand plywood before finishing?
The process of sanding is crucial, as it serves two primary purposes – removing any remaining splinters and creating a smooth surface that’s ideal for finishing techniques.
What’s the difference between staining and painting plywood?
When it comes to enhancing the natural beauty of wood, two popular approaches emerge: staining and painting. While both methods can produce stunning results, they differ in their approach to the wood grain. Staining, for instance, allows the natural texture and pattern of the wood to shine through, whereas painting covers the grain entirely with a solid color. The subtlety of staining makes it an attractive option for those who want to highlight the unique characteristics of the wood, whereas painting offers a broader palette of colors to choose from.
How do I prevent my bookshelf from tipping over?
When it comes to securing your bookshelf, one crucial step is to anchor it to the wall using L-brackets or furniture straps. This is particularly vital for households with little ones or furry friends, as their antics can lead to bookshelves toppling over, causing damage and potentially harm. By taking this simple precaution, you’ll ensure your beloved books and decorative items remain safely in place.
Can I add doors to my plywood bookshelf?
When it comes to incorporating doors into your design, one thing to consider is the type of hinge used. A piano hinge can provide a sleek and streamlined appearance while also making installation a breeze. This option is particularly useful when you want to achieve a seamless look without sacrificing functionality.
How do I make adjustable shelves?
For effortless reconfiguration, utilize shelf pins strategically placed within pre-drilled holes situated along the perimeter of your bookshelf. This ingenious design enables you to effortlessly adjust shelf heights by moving them up or down, giving you the flexibility to adapt to changing storage needs.
What kind of finish should I use to protect the plywood?
For optimal results, a polyurethane finish is highly recommended due to its exceptional durability and ability to provide long-lasting protection against the effects of moisture and scratches.
How can I make my bookshelf more eco-friendly?
Opt for eco-friendly plywood options and opt for water-based coatings to minimize environmental impact. Moreover, explore the possibility of reusing or recycling existing plywood to reduce waste and promote a more sustainable approach.
By addressing common concerns and questions, you’ll provide valuable insights that can help boost confidence in tackling your DIY plywood bookshelf project.
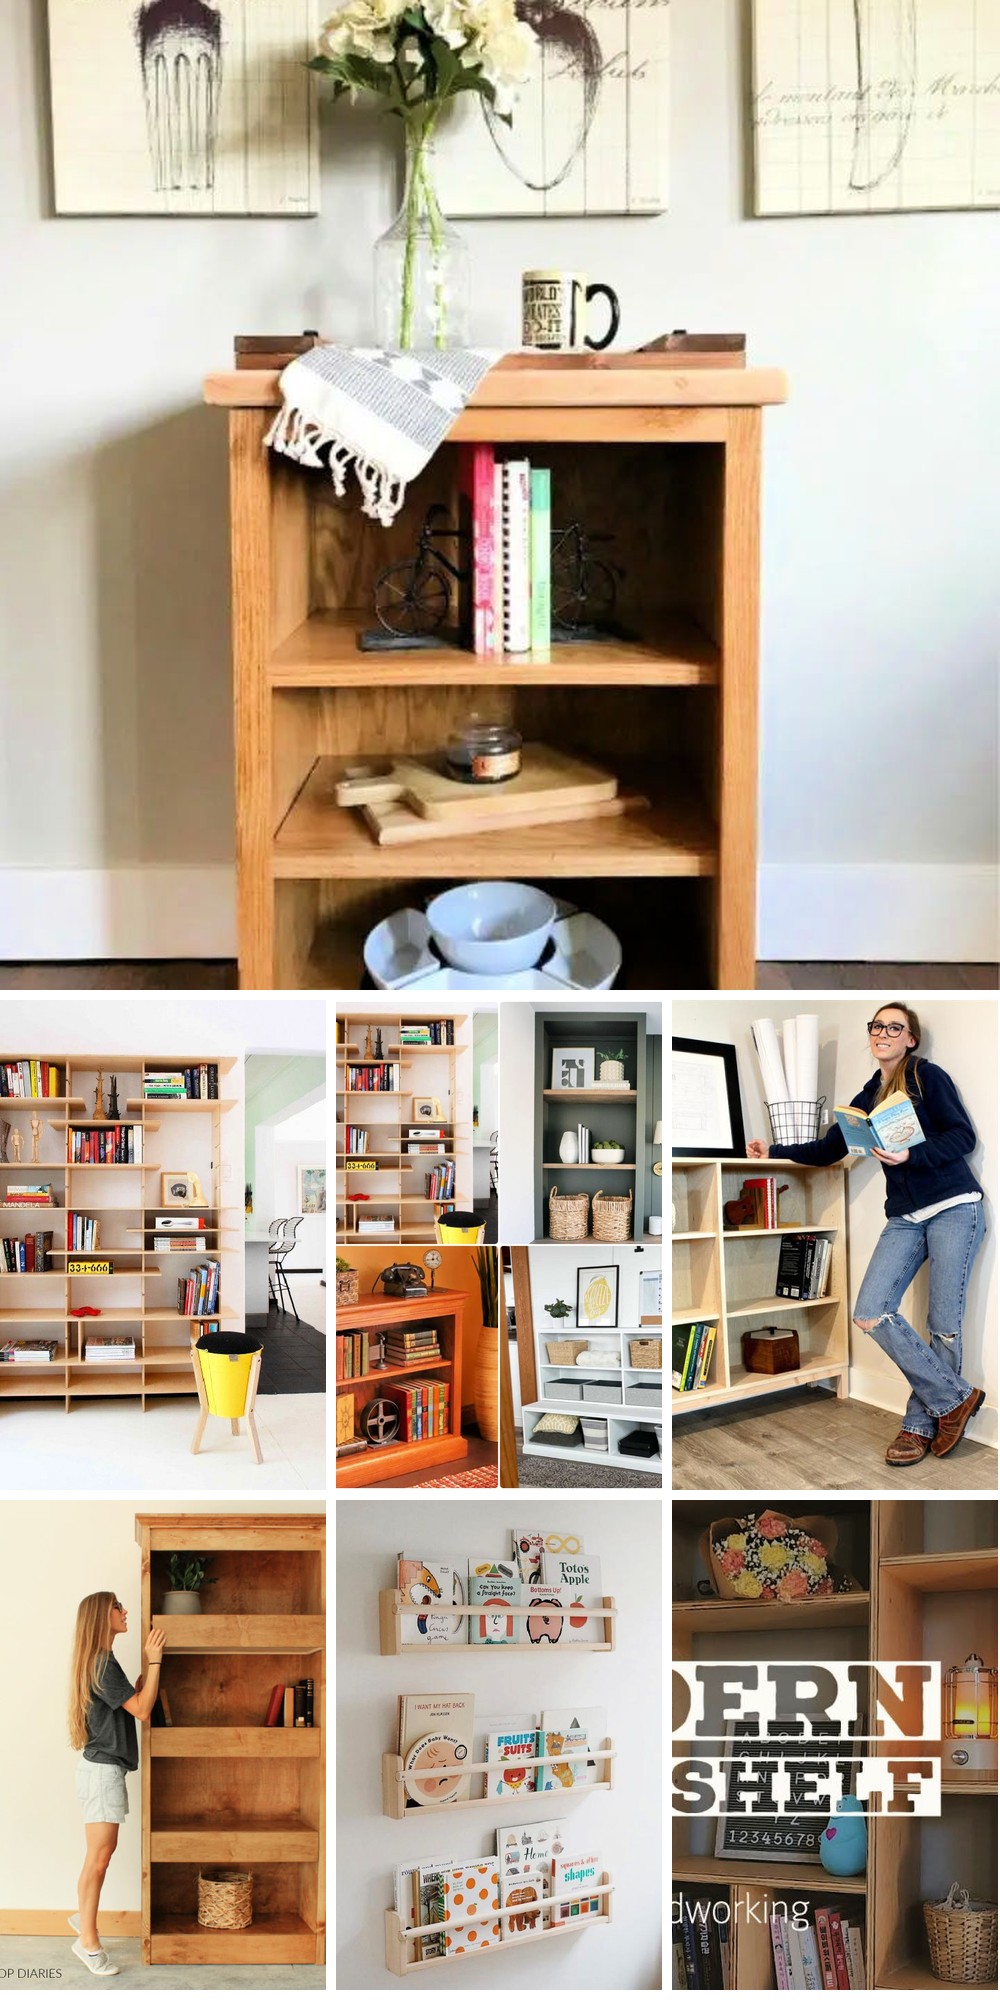
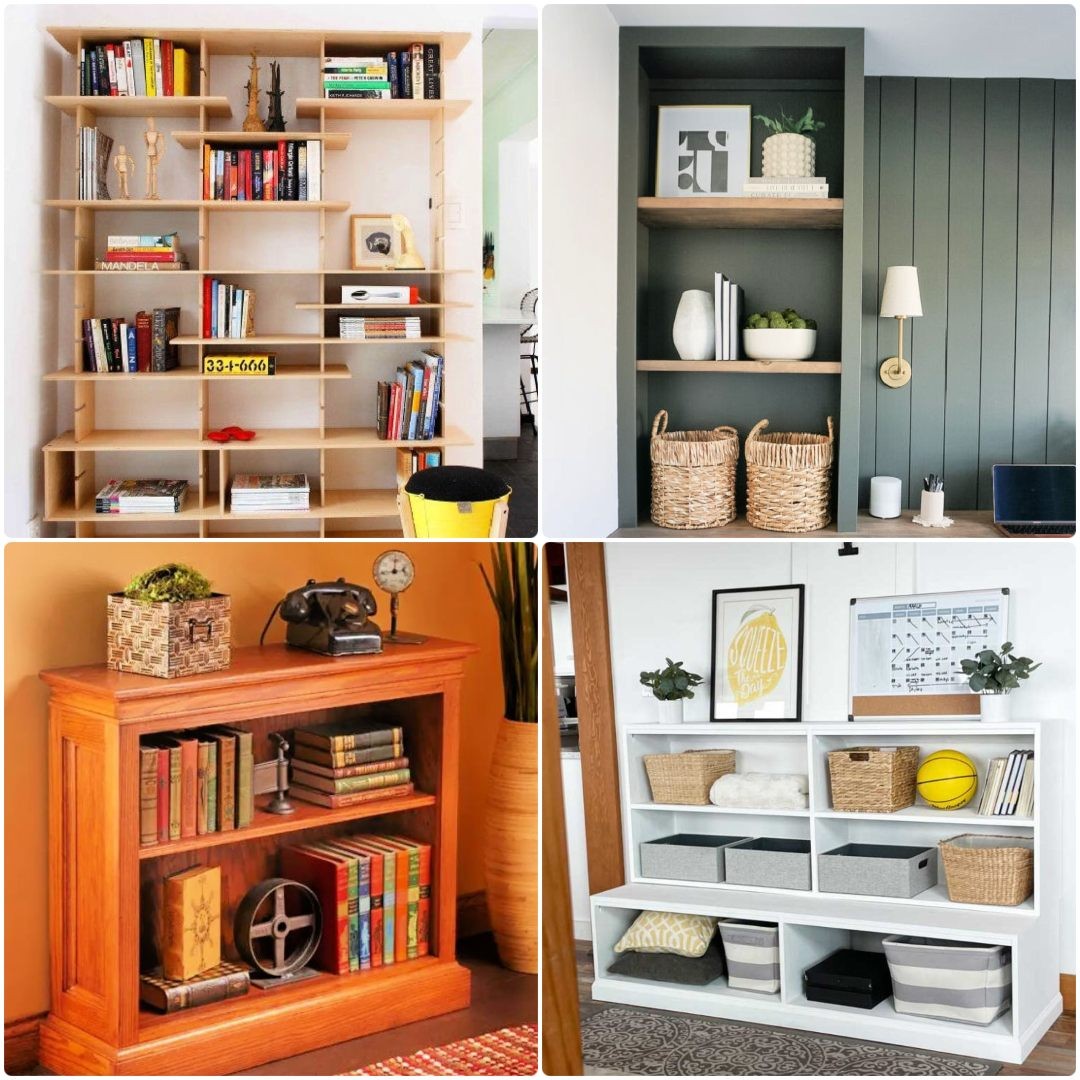
25 Free DIY Plywood Bookshelf Plans
Elevate your home decor without breaking the bank by utilizing 25 complimentary plywood bookshelf blueprints for your next DIY endeavor. These thorough step-by-step guides empower you to construct visually appealing and practical storage solutions that perfectly complement your unique interior design style.
Modern DIY Plywood Bookshelf
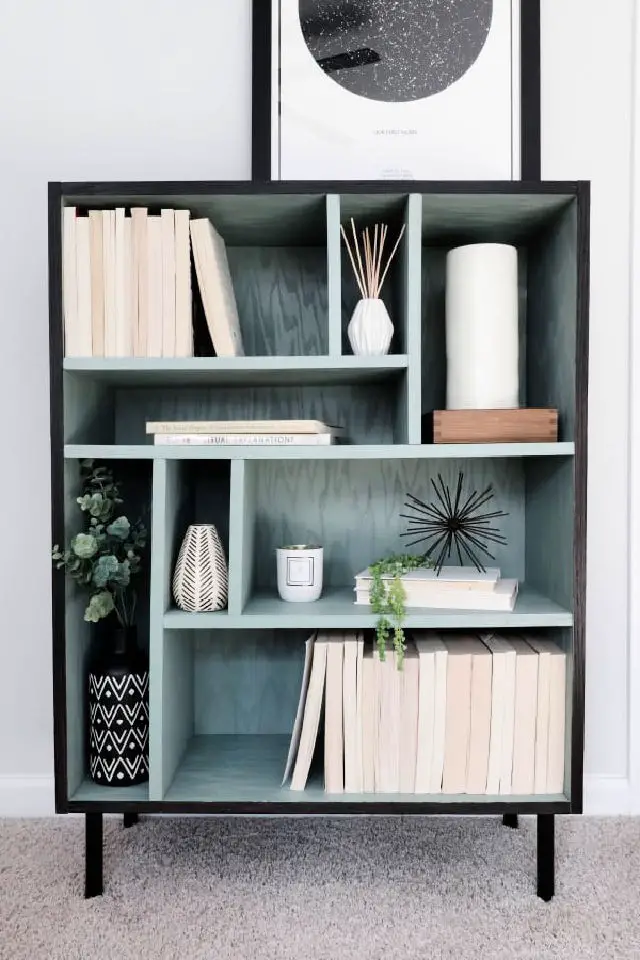
Transform your reading nook into a haven of sophistication by crafting a one-of-a-kind DIY bookcase featuring a stunning Vintage Blue hue. This design leverages the natural texture of plywood, which is preserved through staining, to create a visually striking contrast. Beyond mere storage for books, this piece harmonizes functionality and aesthetics, incorporating compartments for organization and flair. With just a drill, circular saw, Kreg Jig, and electric sander at your disposal, you can bring this masterpiece to life by following an intuitive set of instructions that cover staining, cutting, and assembly. As the finishing touch, prepare to indulge in a sense of serenity as you surround yourself with this serene yet modern bookcase, which elevates a humble structure into something truly unique and indulgent.
How to Build a Plywood Bookcase
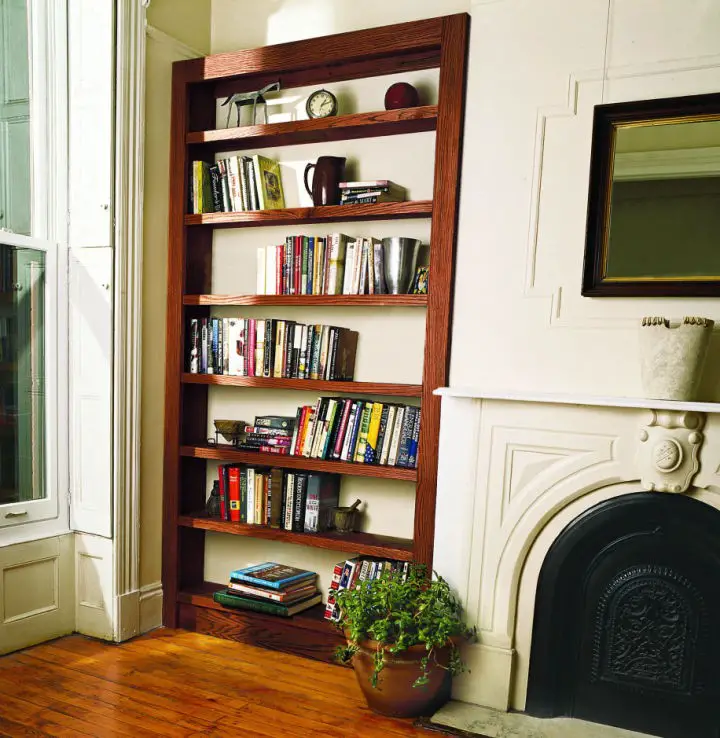
Transform your living space into a cozy haven by crafting a custom-built bookcase without breaking the bank. Veneer plywood offers an affordable alternative to solid wood boards, allowing you to create an elegant and sturdy piece of furniture reminiscent of a grand library. This DIY project employs a clever lamination technique to mimic the look of thick, routed boards. The 8-step guide walks you through the process from cutting the legs, shelves, and supports to adding nosing to shelf faces, providing a comprehensive approach to this moderate-level DIY task. With your new built-in bookcase, you’ll be able to showcase your favorite volumes in style, elevating your home decor with a functional and beautiful piece that’s sure to impress.
How to Make Built Ins Plywood Bookshelves
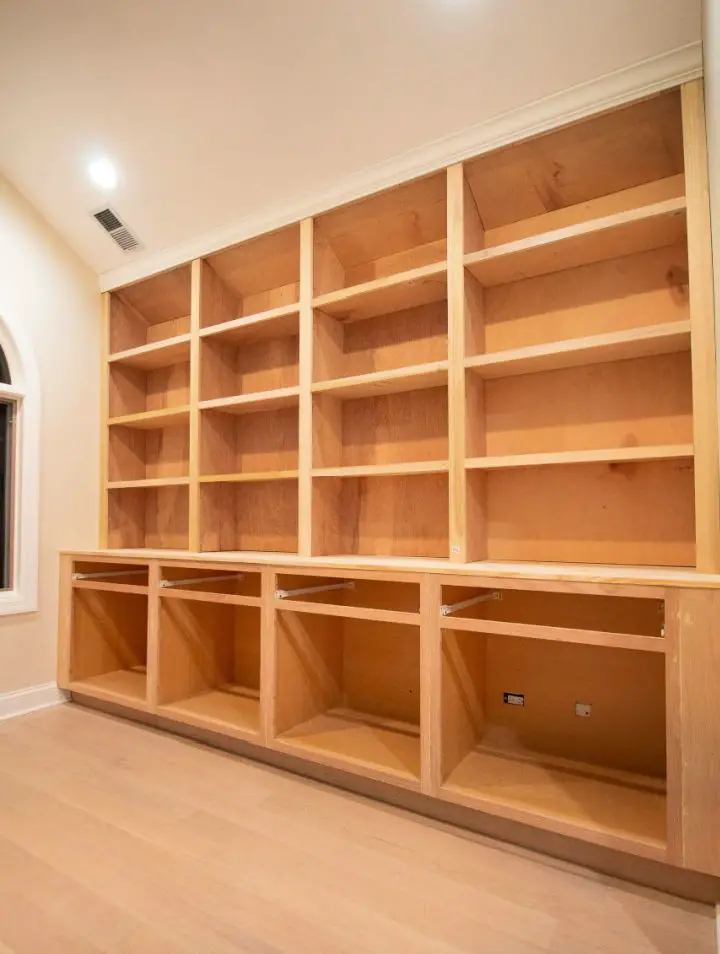
Step into the world of bespoke bookshelves with this innovative DIY project. Building upon a solid kitchen cabinet foundation, you’ll embark on a creative odyssey to design and construct custom storage and display space tailored to your unique room needs. As the project unfolds, intricate details are carefully crafted using birch plywood, poplar, crown molding, and essential tools, transforming what was once daunting into a satisfying accomplishment. The thoughtful integration of bookshelves not only promotes practicality but also fosters creativity, allowing for personal expression through home decor. With this cost-effective and enriching exercise, you’ll enjoy the reward of handcrafting your personalized built-ins, making it a truly fulfilling DIY experience.
Best Plywood Bookshelf Plan
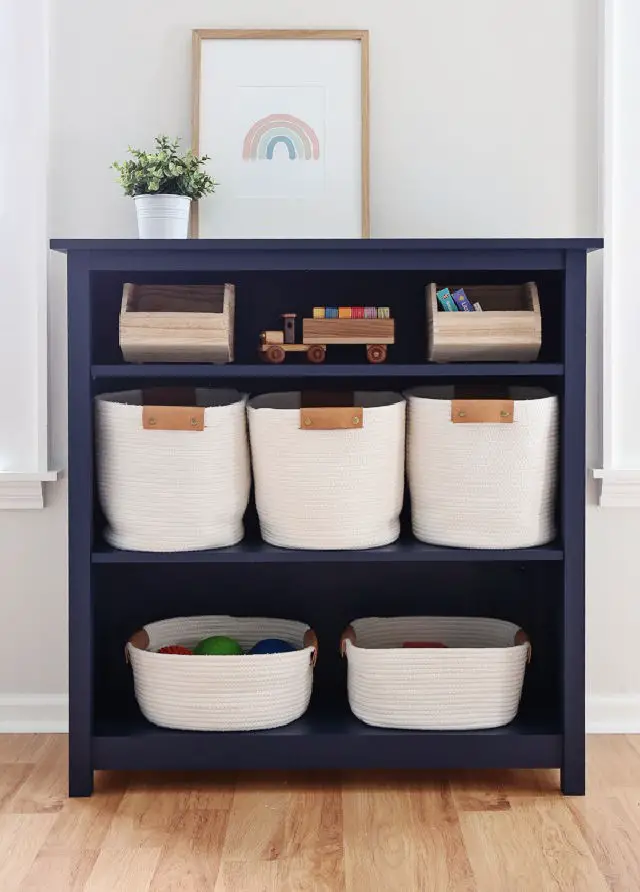
Transform your home’s storage space by crafting a stunning DIY kid’s bookshelf that combines functionality with aesthetic appeal. This three-shelf masterpiece is designed to organize toys and provide a versatile solution for various storage needs. With its classic and timeless look, it’s the perfect addition to any room. By utilizing a single 4ft x 8ft sheet of 1/2″ plywood, you can save both money and materials while still achieving a professional-looking result. The adjustable top and middle shelves offer endless customization options, allowing you to tailor the bookshelf to your unique needs. And with our easy-to-follow printable plans, building this incredible piece is easier than ever. Simply measure 41 inches tall, 40 inches wide, and 14.5 inches deep, and you’ll have a beautiful bookshelf that’s not only functional but also cost-effective.
DIY Built-in Plywood Bookshelf

Transform your office space into a personalized haven by crafting a bespoke built-in bookshelf that adds a touch of uniqueness and elegance. This DIY-friendly project requires minimal expertise, only basic tools such as a circular saw, Kreg rip-cut jig, miter saw, and drill, making it accessible to anyone with a passion for woodworking. Starting with an 8×4 piece of 3/4-inch plywood, a 2x12x6 board, wood glue, screws, and paint, you can create your customized bookshelf measuring approximately 12 inches deep, 5.5 feet high, and 32 inches wide. The comprehensive guide walks you through precise cutting techniques, assembling the structure, securing it to the wall, and finishing with a professional-grade polish. As you perfect your craftsmanship, you’ll not only beautify your workspace but also develop a sense of accomplishment that comes from creating something truly yours.
Slot Joint Adjustable Bookshelves Using Plywood
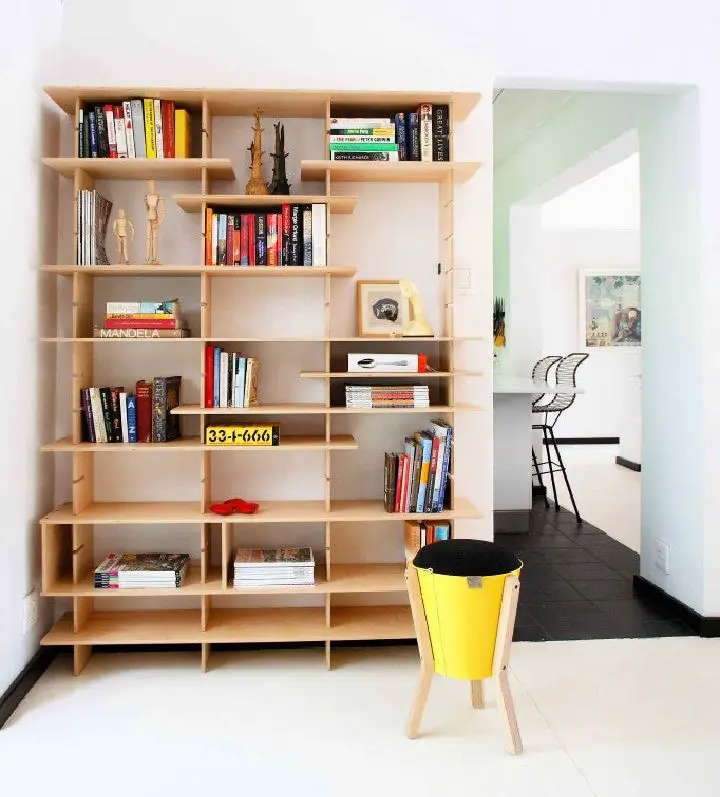
Transform your living space with customizable plywood bookshelf plans that guide you through the creation of a unique and sturdy unit. These DIY slot joint adjustable bookshelves optimize room efficiency and style, making them perfect for loft apartments or small spaces. Crafted from high-quality Apple plywood, these shelves boast sturdiness, versatility, and ease of assembly. With dimensions of 8ft tall, 5ft wide, and 14″ deep, they provide substantial storage for books, clothing, or decorative items. This project’s innovative design relies on slot-fitted joints and dog-bone fillets, minimizing hardware requirements and making assembly a breeze. The total cost comes out to around $550, offering an affordable way to enhance your living space’s functionality and aesthetic appeal. To get started, follow a simple three-step process: cutting the slotted parts, extensive sanding, and finally, sealing and assembling the shelf. The adjustable nature of these bookshelves allows you to adapt to changing storage needs over time, making them a sustainable choice for your household.
Handmade Dowel Rod Plywood Bookshelf
Transform your living room into a cozy haven by infusing it with your unique personality through a DIY dowel rod bookshelf. This modern open- storage piece seamlessly blends with bohemian-inspired decor, creating a harmonious space that’s both functional and visually appealing. With just a few simple materials – including 3/4-inch plywood, six one-inch dowels, edge banding, pocket hole screws, and wood glue – you can construct this chic bookshelf that perfectly balances style and storage needs. The clever design features dowel rod legs and three shelves, expertly organizing your belongings while keeping clutter at bay. Whether you’re a bookworm, toy enthusiast, or simply seeking a stylish spot to display treasured items, this easy DIY project is an absolute must-try for anyone looking for a budget-friendly yet elegant storage solution.
DIY Plywood Bookshelf With Hidden Storage
Discover a clever way to boost your home’s organization with this DIY bookshelf featuring ingenious hidden drawers. Constructed from sturdy plywood and solid wood side trim, this piece strikes a perfect balance between functional storage and stylish design. Perfect for stashing living room essentials or sneaking in some sweet treats, it adds a new layer of convenience to your daily routine.
Standing at an impressive 83 inches tall, 18 inches deep, and 37 inches wide, this bookshelf boasts four spacious shelves and four cleverly concealed drawers. To bring your vision to life, you’ll need wood boards, plywood sheets, drawer slides, and optional edge banding. Follow along with our step-by-step guide as we walk you through the assembly process, from crafting the back panel and installing drawer slides to adding a touch of trim and topping it all off with a sturdy top panel.
While the drawers may initially appear like thick shelves, they offer a surprising amount of practical and discreet storage space. Remember to secure your bookshelf properly to prevent overloading and ensure a safe and satisfying build experience. Get creative, customize your finish, and reap the rewards of this versatile project.
How to Make a Bookcase With Plywood and Crates
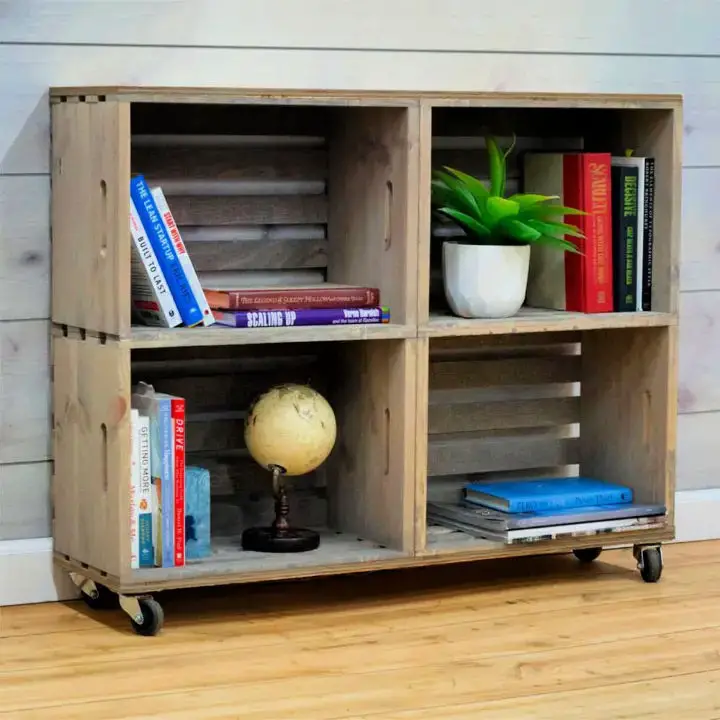
Transform your bedroom into a cozy retreat by creating a stylish and functional DIY crate bookcase. In just under an hour, you can craft a unique piece that combines storage with aesthetic appeal. To bring this project to life, gather four large crates, 1/2 inch plywood, casters, wood screws, brad nails, a circular or miter saw, a drill, and a brad nailer.
Start by assembling two crates side by side, securing them with brad nails or screws, then attach the plywood on top. Repeat this process to create two identical sections. Next, join these units together, ensuring the plywood sides face outwards, and finally, add the casters at the base.
This easy-to-follow project brings a touch of rustic charm to your space while keeping your favorite books and decor items within reach. With its organized and trendy design, it’s an ideal DIY adventure for anyone looking to enhance their bedroom.
Custom DIY Plywood Storage Bookshelf
Transform your living spaces with customized DIY furniture that reflects your unique style! This comprehensive guide takes you on a step-by-step journey to create one-of-a-kind plywood storage pieces, such as bookshelves, that combine functionality with aesthetic appeal. From measuring and designing dimensions using specialized apps to cutting and assembling the components using tools like drills, Kreg Pocket Hole Jigs, brad nailers, and cabinet grade plywood, hardwood, and paint, this resourceful guide provides expert advice on every aspect of the process. With a focus on structural integrity, it emphasizes the importance of bay supports for project stability, recommends backing for content containment and visual appeal at eye-level, and shares finishing techniques to achieve polished results that rival professional craftsmanship.
How to Make a Small Plywood Bookshelf
Get ready to create a charming and functional small bookshelf with minimal effort. This DIY wooden project is an excellent opportunity to showcase your basic woodworking skills and requires only a few common tools, including a pocket hole jig, miter saw, and drill. The simplicity of the design makes it suitable for any room’s decor style while its compact dimensions ensure it won’t overwhelm the space. The bookshelf features ample room on top and beneath for displaying a lamp or plant, as well as two shelves perfect for organizing books or showcasing favorite decorative pieces. Constructed using affordable pine boards, you can customize the finish to your taste – leave it natural, paint it, or apply a stain. Not only will this project refine your woodworking skills, but it will also add a unique personal touch to your space. Start building your small bookshelf today and elevate your DIY game!
Traditional Plywood Bookshelf Idea
Create a stunning DIY bookshelf using readily available materials and clever shortcuts perfect for those who crave woodworking projects but are short on time. This design embodies sophistication, simplicity, and sturdiness, making it an ideal choice for anyone looking to add a touch of elegance to their home. Built from plywood, wood glue, and your preferred finish, the process involves assembling corner stiles, attaching rails, adding cove molding, and securing the top – no advanced woodworking expertise required! The best part? This project is surprisingly straightforward to customize thanks to adjustable shelves and a clever pegboard template. With a manageable build time of just one day, plus additional hours for finishing touches, you can proudly display your favorite reads and showcase your DIY skills in the process.
How to Build a Plywood Bookshelf

Transform your space with a stunning DIY project – a modern plywood shelf that combines functionality with unique flair. This innovative creation leverages a straightforward approach, utilizing a 4 x 8 sheet of 3/4″ maple plywood, a circular saw, a jig saw, a straight board, clamps, a speed square, sandpaper, and a clear polyurethane finish. By cutting the plywood to size and crafting notches for the sliding pieces, this beautiful shelf comes together with ease. The versatility of this project allows it to be painted to match any room’s aesthetic, though a clear polyurethane finish showcases its natural wood beauty. This clever DIY endeavor efficiently utilizes space while providing a platform for creative expression and personal touch. Bring your plywood shelf to life and elevate your room’s decor today!
Make Your Own Plywood Tree Bookshelf
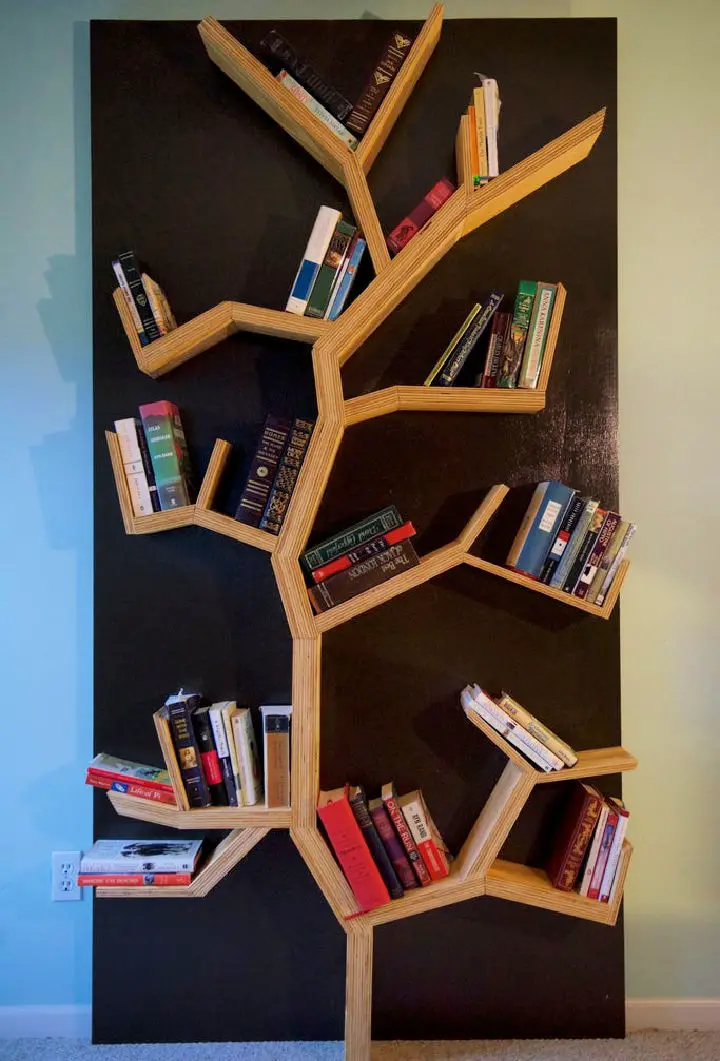
Transform your living space into a serene oasis with this easy DIY guide on building a unique tree bookshelf using minimal tools and materials. This step-by-step project, requiring only basic tools like a table saw, miter saw, drill, and sander, along with essential supplies such as Deckmate screws, wood glue, paint primer, brown paint, and polyurethane, can be completed at a rough cost of $150. With three sheets of 3/4 inch thick plywood meticulously crafted into a tree-like structure featuring branches to hold your favorite books, this project is sure to bring a touch of nature indoors. The detailed instructions guide you through the process of cutting and gluing the plywood together, attaching the branches to the background, and more, making it an ideal DIY project for those looking to add a rustic charm to their home.
Make a Little Plywood Bookshelf
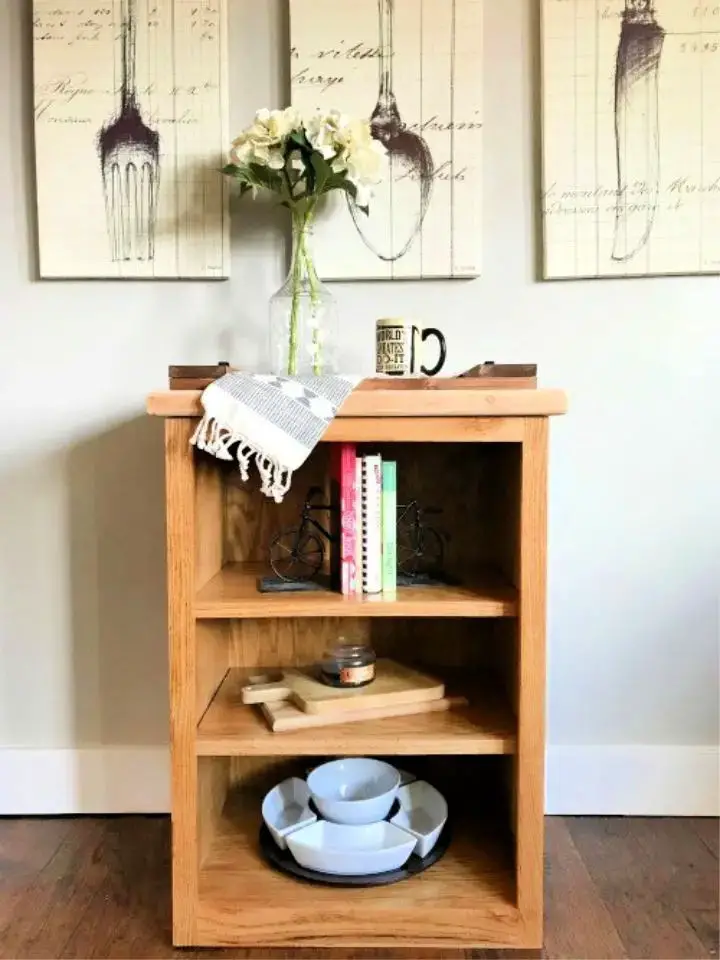
Transform any room in your home with this charming DIY bookshelf project. Made from durable oak plywood, this compact storage solution is perfect for small spaces that crave a touch of character. Its flexible design allows it to seamlessly fit into kitchens, bathrooms, offices, or children’s rooms, serving as more than just a book repository. It can also store kitchen utensils and towels or double up as extra counter space, adapting to any changes in your lifestyle. The adjustable shelves ensure that the bookshelf evolves with you, and its professional appearance makes it a stunning addition to any room. This enjoyable project not only adds personality to your home but also serves as a testament to your creativity and skill.
One Sheet Plywood Bookshelf Building Plans
Transform your home organization with a DIY plywood bookshelf that’s both functional and budget-friendly! This moderately challenging project is perfect for kids’ rooms or playrooms, providing ample storage for books, toys, keepsakes, and more.
Built using 3/4-inch thick full sheet plywood and supported by a sturdy 2×2 base, this bookshelf boasts adjustable shelves that can be customized to your needs. The assembly process involves cutting and assembling the plywood, drilling pocket holes, and installing shelf pins for flexible shelving.
Safety is top priority; upon completion, consider anchoring the bookshelf to the wall to prevent it from tipping over. Unleash your inner handyman and create a cozy storage space with this step-by-step guide to building a plywood bookshelf.
DIY Front-Facing Plywood Bookshelf Under $50
Transform your home with a unique plywood bookshelf, tailored to your space and storage needs. This DIY project combines creativity and practicality, utilizing affordable materials like plywood, lumber boards, wood screws, and drywall anchors. With this comprehensive guide, you’ll be able to construct a sturdy and visually appealing shelving system that’s perfect for a child’s bedroom or playroom. By following precise instructions, you can customize the length, depth, and number of shelves to suit your requirements, all while staying within a budget of under $50. This stylish and effective book organization solution will breathe new life into any room, allowing you to display books in an attractive and easily accessible manner. So why wait? Gather your tools and get started on creating your one-of-a-kind bookshelf today!
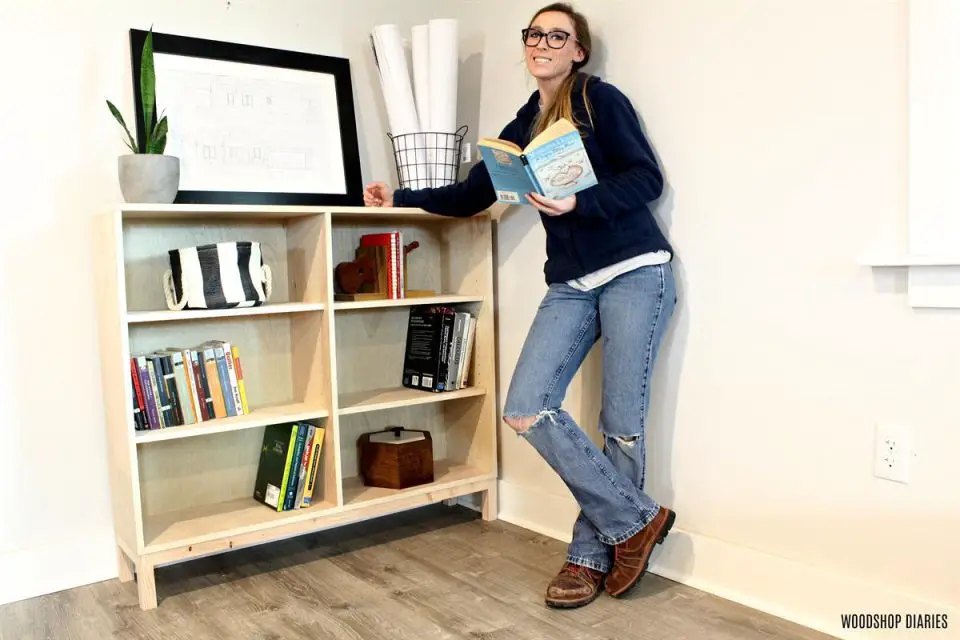
Build a Plywood Bookshelf Unit

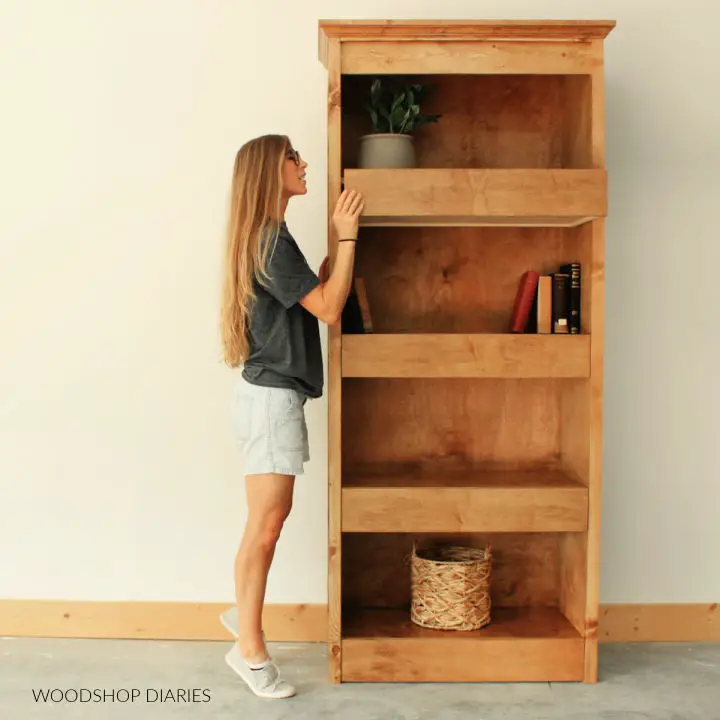
Unlock the full potential of DIY crafting by bringing your unique vision to life with this adaptable plywood bookshelf project. By following our step-by-step guide on constructing a freestanding bookcase from a single sheet of plywood, you’ll not only create a one-of-a-kind piece that reflects your personal style but also develop your DIY skills and confidence. This beautiful yet practical design serves as a canvas for showcasing cherished memories, decorative items, and keepsakes, allowing you to curate a space that truly represents you.
As you work on this adjustable bookshelf, you’ll discover the freedom to experiment with different finishes, such as painting the exterior, staining the shelves, or opting for any other aesthetic that resonates with your taste. By embracing creativity and customization, you’ll be empowered to optimize your space while infusing it with a touch of elegance and sophistication.
So, join us on this DIY journey, and let’s unlock the world of possibilities for creating a truly unique bookshelf that showcases your personality and style.
Free Plywood Bookcase Plan
Transform underutilized spaces in your home into functional storage areas by building a custom-fitted bookcase. This clever solution addresses the challenge of shallow areas beneath countertops that are too small for traditional seating. By using minimal tools, resources, and time, you can create a beautiful and practical space to store items such as cookbooks, glassware, and table linens. With plywood and MDF at your disposal, you’ll be able to construct this attractive bookcase and elevate the aesthetics of your living room with an engaging DIY project that shows how creativity and purpose can turn even the most mundane spaces into comfortable and inviting areas.
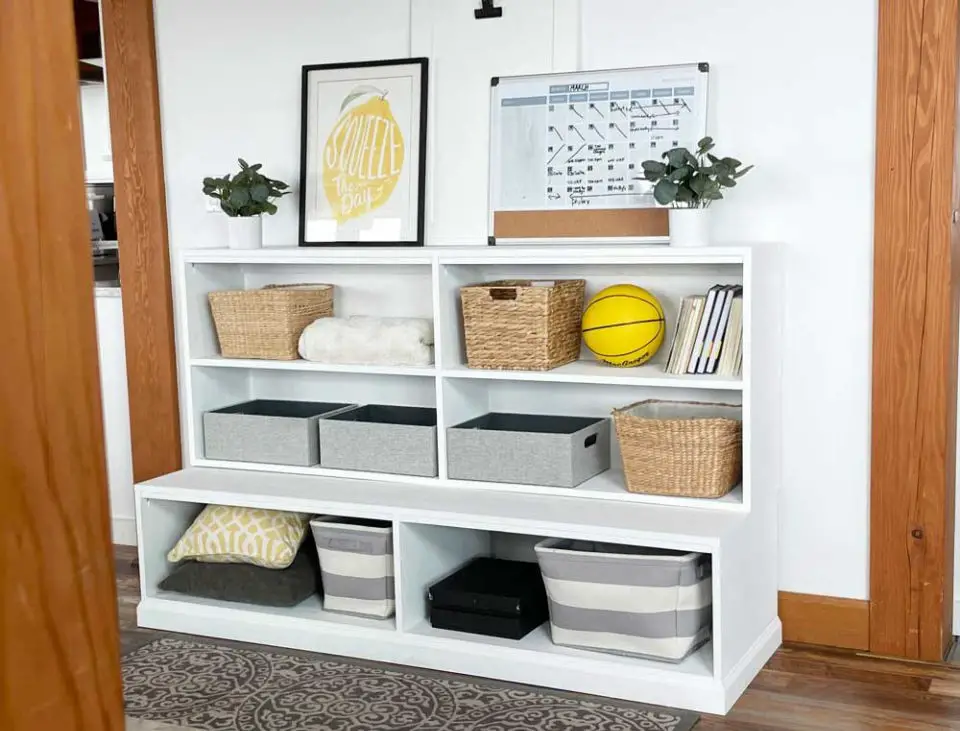
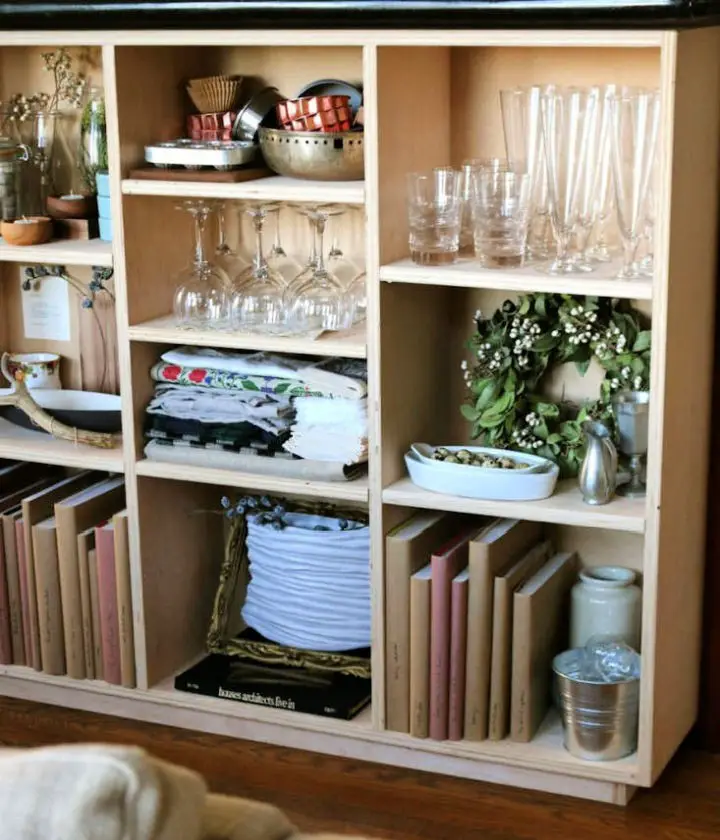
Plywood Bookshelves for a Built-in Desk
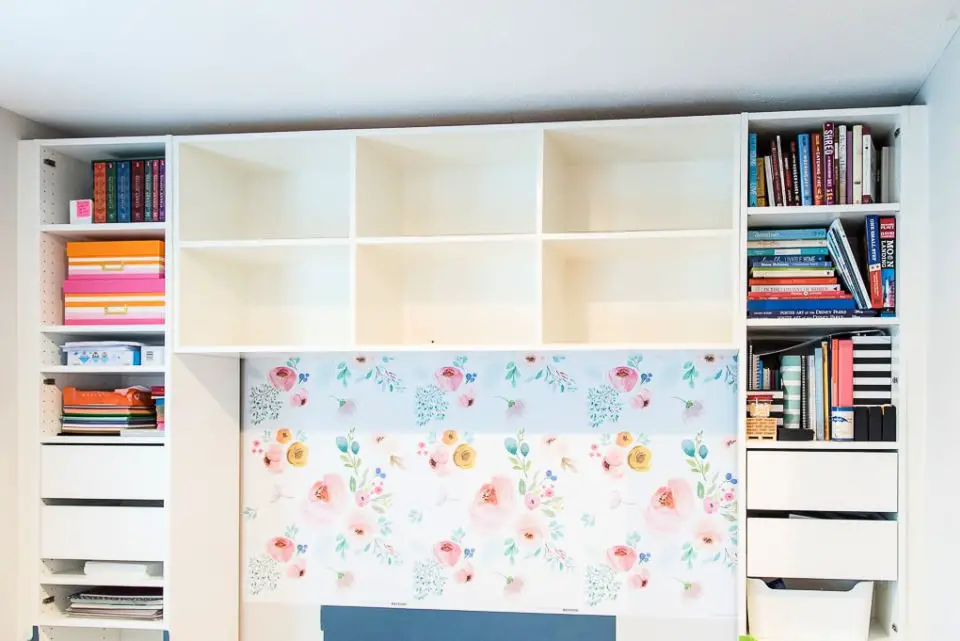
Transform your home office with DIY plywood bookshelves that effortlessly blend functionality and style. Perfect for various skill levels and room sizes, these plans guide you through the process of creating bespoke storage solutions that seamlessly integrate into your built-in desk. Crafted from finishing plywood, these shelves combine the benefits of open storage with the cleverness of hidden storage found in IKEA SEKTION cabinets. The result is a harmonious balance between form and function. Designed specifically to fit between two tall SEKTION cabinets, these bookshelves become an integral part of your desk setup, elevating the aesthetic appeal of your home office. With six spacious cubbies providing ample storage space, you’ll be left with a bright and modern workspace that reflects your unique taste and needs.
How to Make Plywood Bookshelf
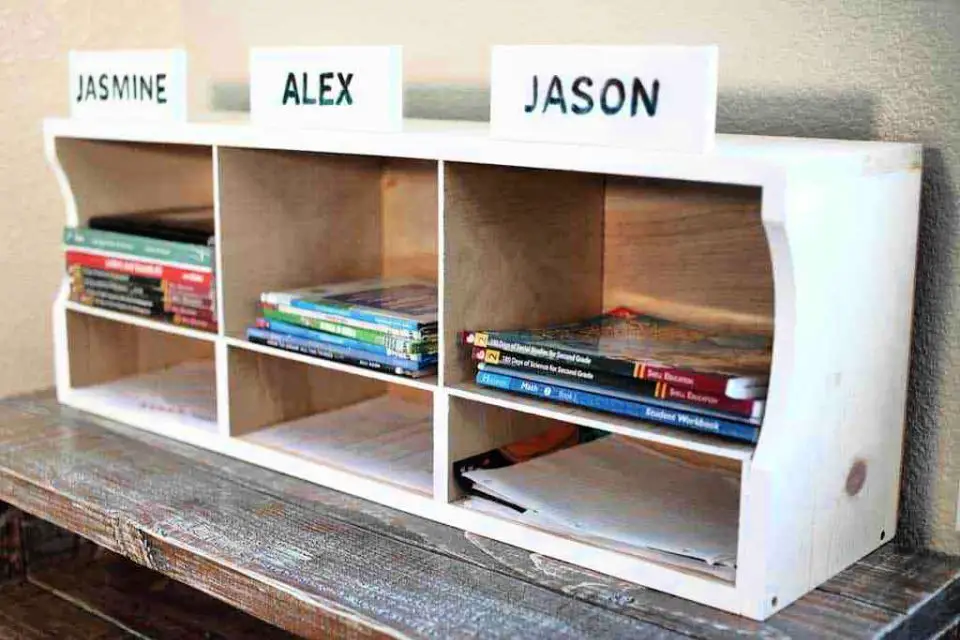
Transform your child’s at-home learning setup into an organized haven by creating a custom DIY bookshelf or homework station. This functional piece of furniture can be built using affordable materials like basswood and plywood, thanks to the Worx MakerX combo set. Add a personal touch by carving each child’s name onto the bookshelf, making it a unique and meaningful addition to their study area.The best part? You can build this bookshelf without breaking the bank, with an estimated budget of $0 for the PDF plan that includes supplies, cut diagrams, and 3D illustrations for each step. This practical project will help you create a personalized learning environment that your child will love and enjoy studying in.
Mid-Century Modern Plywood Bookcase Plan

To create a sturdy and customizable DIY bookshelf using plywood, follow these straightforward steps to craft a mid-century modern masterpiece. This project is perfect for woodworking enthusiasts of all skill levels, as it utilizes simple techniques and requires minimal tools. The 3/4″ maple plywood used in this design provides an elegant yet understated touch to your home decor.To ensure a seamless building process, detailed free plans are provided, including a cut list and helpful tips. The necessary tools include a multi-square, wood glue, a Kreg Jig drill bit, screws, and plugs. Once assembled, you can add a simple finish with wax for a sleek and modern look.This bookshelf not only stores your favorite books but also serves as functional furniture that adds a touch of sophistication to any room. With this project, you can transform your space into a unique masterpiece that reflects your personal style.
Build Your Own Plywood Bookshelf

Create a one-of-a-kind bookcase that showcases your personal taste and book collection while elevating the ambiance of your room. By following this guide and accompanying video, you can effortlessly bring your vision to life. The beauty of this project lies in its adaptability – draw inspiration from various designs and build a truly unique piece that reflects your individuality.To get started, quality plywood is the foundation of this DIY endeavor. This versatile material offers endless possibilities for creative expression, allowing you to add your personal touch through paneling or design. Whether you’re an avid book lover or a decor enthusiast, building your custom bookshelf is a rewarding experience that enables you to make a statement and showcase your style. Let your creativity shine by crafting a personalized bookcase that holds your favorite books, reflects your artistic side, and showcases your unique flair.
Homemade Plywood Bookshelf
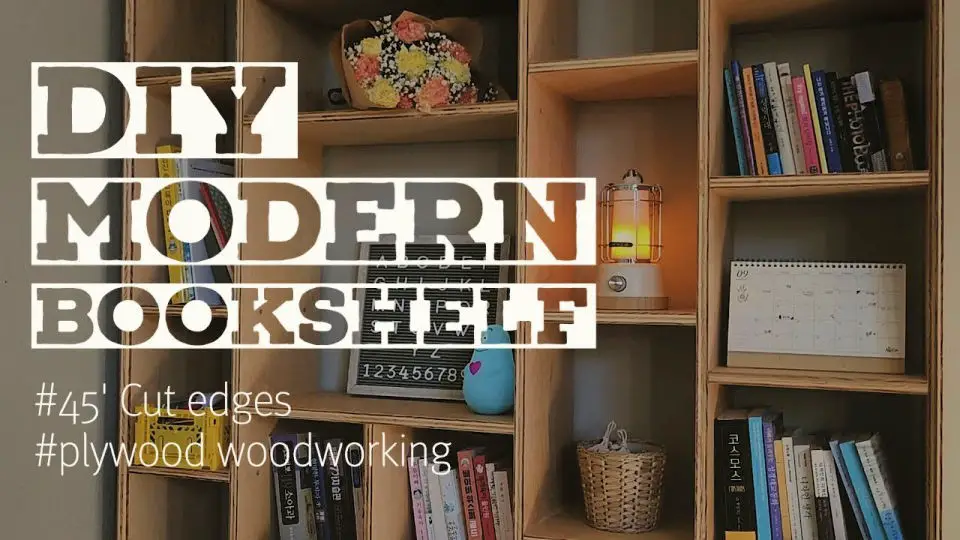
Transform any room’s aesthetic with this innovative DIY plywood bookshelf, boasting an avant-garde design characterized by angled edges and a one-of-a-kind shelf arrangement. This project’s reliance on plywood as the primary material yields a durable and budget-friendly outcome that will endure for years to come.
While some woodworking expertise is necessary, along with basic tools like saws, drills, and sandpaper, this hands-on endeavor provides a sense of accomplishment and creative fulfillment, while also serving as a practical solution for keeping your books and decorative items meticulously organized. By choosing this bookshelf, you’ll effortlessly inject modern flair into your space.
DIY Bookcase Out of Plywood
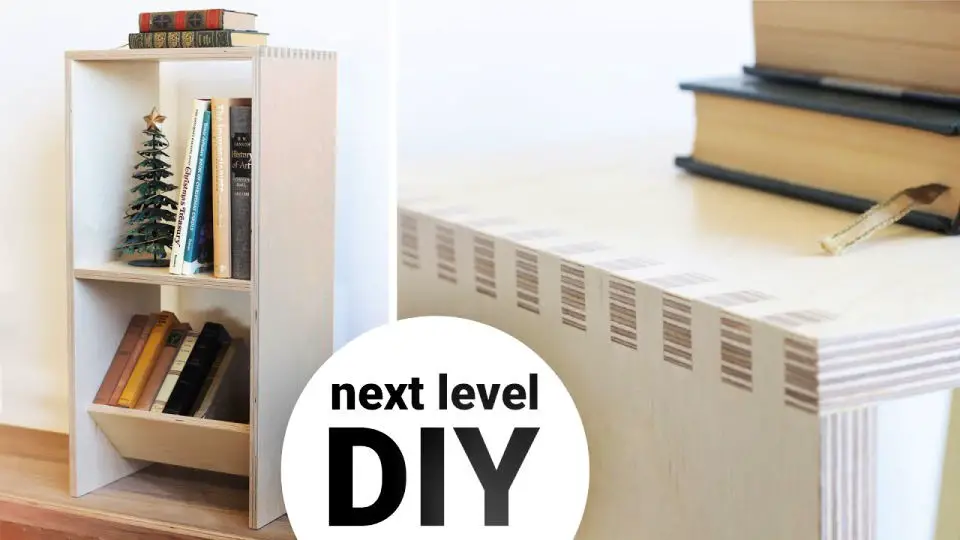
To create a sturdy and customizable DIY bookshelf using plywood, follow these straightforward steps. By incorporating finger joints, you’ll not only add visual interest but also enhance the overall durability of your project. This comprehensive guide will walk you through the process of constructing a unique bookcase that showcases your favorite reads and decor items, while simultaneously showcasing various woodworking techniques. The core of this project revolves around creating table saw finger joints and cutting mortise and tenon joinery using a router. With just a couple of tools and a willingness to learn, you can bring this functional and stylish piece of furniture to life. This DIY endeavor is an excellent opportunity for craft enthusiasts to explore and experiment with different woodworking methods, ultimately elevating their living space.
Conclusion:
Ultimately, this collection of advanced customizations, tool recommendations, finishing techniques, troubleshooting tips, and maintenance advice provides a thorough roadmap for crafting functional and visually appealing storage solutions through DIY plywood bookshelves. By infusing personal flair and decorative elements, you can tailor your project to reflect your distinct aesthetic and requirements. Embark on the creative journey with these 25 free plywood bookshelf plans, offering endless possibilities for your next plywood bookshelf endeavor.
