Crafting your own DIY Plinko board is an excellent way to infuse your home with creativity and excitement, sparking joy and engaging everyone in timeless entertainment. A comprehensive guide to creating these classic games from scratch, this collection of 20 homemade DIY plans offers precise instructions and a detailed list of necessary materials and tools, ensuring that the end result is both functional and visually appealing. Assembling a Plinko board goes beyond mere woodworking; it’s an opportunity to develop your crafting skills, experiment with design, and bond with loved ones over a shared project. By following these step-by-step instructions from preparing the frame to adding legs and dividers, you’ll not only learn the basics of woodworking but also master the small details that make a DIY project truly yours.
Why Make a DIY Plinko Board?
When it comes to creating a Plinko board, building one yourself can be a highly rewarding experience that goes beyond just having fun playing the game. There are numerous benefits to making your own DIY Plinko board, starting with the cost-effectiveness of using materials you likely already have at home or can easily access. This approach not only saves you money but also allows for greater customization, enabling you to tailor your board to your unique preferences and tastes.Beyond the practical advantages, building a Plinko board can be a fantastic way to spend quality time with family members, fostering teamwork, teaching important skills like measuring and cutting, and creating a sense of accomplishment that comes from working together on a project. For parents or educators, this DIY project also offers an opportunity to subtly introduce basic principles of physics and probability in a fun and interactive way.A homemade Plinko board is not only a functional piece of entertainment but also a source of pride and satisfaction, as you get to enjoy the fruits of your labor. The sense of accomplishment that comes from building something with your own hands cannot be replicated by simply buying a premade board. With its unique blend of education, entertainment, and personal fulfillment, making your own Plinko board is an experience that’s sure to bring joy and satisfaction for years to come.
Choosing the Right Materials for Your DIY Plinko Board
Crafting a DIY Plinko board is an engaging endeavor that requires careful consideration of its essential components. The selection of materials plays a crucial role in determining the project’s overall cost, durability, and playability. This guide aims to provide valuable insights to aid in informed material choices, ensuring a successful and enjoyable DIY experience.
The Backboard
Plywood is an affordable option for those on a budget, offering decent durability but vulnerability to warping when exposed to moisture. Its surface may require sanding and painting for optimal results, making it suitable for casual gameplay. In contrast, MDF (Medium Density Fiberboard) provides a slightly smoother finish than plywood, being less prone to warping but still susceptible to swelling and deterioration when wet. This material is ideal for the Plinko puck’s seamless movement. Interestingly, MDF’s cost is comparable to that of plywood, making it a budget-friendly option. On the other hand, Acrylic stands out as the most expensive choice among the three, boasting exceptional durability and resistance to breaking despite repeated use. Its surface is extremely smooth, allowing the Plinko puck to glide effortlessly.
The Pegs
When it comes to assembling wooden structures, whether for furniture making or DIY projects, the choice between wooden dowels, nails, and screws can be overwhelming. Each option has its unique advantages and disadvantages that affect ease of installation and overall sturdiness.
Wooden Dowels: Installation is straightforward, requiring only drilling holes and applying glue. While they provide a sturdy foundation initially, there’s a risk of loosening over time, particularly with intense use or vibrations.
Nails: These are simple to hammer into place but may not offer a uniform appearance. Their sturdiness is decent, yet they can bend or rust if subjected to heavy wear and tear.
Screws: While requiring pre-drilling, screws ensure a secure fit and provide excellent durability. They’re less likely to loosen with use due to their design, making them a reliable choice for wooden structures.
The Cover
When constructing a DIY Plinko board, one crucial decision is the choice of protective material. Three primary options are Plexiglass, standard glass, and no cover at all. Each has its advantages and disadvantages that can significantly impact gameplay and safety.
Plexiglass offers a balance between visibility and protection, providing clear views while safeguarding the board and pegs from damage. Its shatter-resistant design makes it a safer choice compared to traditional glass. Although more expensive than no cover, Plexiglass is a cost-effective alternative to standard glass. The added expense may be justified for frequent users or those who prioritize safety.
Standard glass, on the other hand, provides excellent clarity but lacks any additional benefits that Plexiglass offers. Its fragility poses a safety risk if it shatters, which can lead to injuries and damage to the surrounding area. The cost of standard glass depends on its thickness and type, making it a more significant investment.
Not using a cover at all eliminates the need for additional materials, making it the most budget-friendly option. However, this approach leaves the board and pegs vulnerable to damage from accidental impacts or intentional tampering. The lack of protection can also lead to scratches and catches on exposed pegs.
Ultimately, the choice between Plexiglass, standard glass, and no cover depends on how often the Plinko board will be used, where it will be stored, and who will be playing. By considering these factors, you can select a material that balances gameplay, safety, and cost, ensuring your DIY Plinko board becomes an exciting addition to any gathering.
How to Make a Plinko Board
Transforming any gathering into an immersive experience is as simple as crafting a Plinko board. Whether you’re looking to inject fun and excitement into a personal celebration or elevate your business booth’s engagement quotient, this step-by-step guide will empower you to create your own unique Plinko game. With a focus on people-centric content and easy-to-follow instructions, this comprehensive resource is designed to delight and inform.
Materials and Tools You Will Need
To construct the frame of your project, you’ll need a few essential materials. Start by gathering 1×4 lumber, which will serve as the foundation for your structure. You’ll also require a quarter-inch MDF panel to provide stability and support. For added reinforcement, wood dowels measuring 2 inches in length can be used to create a sturdy bond between components. In addition to these primary materials, you’ll need wood glue to secure everything in place, as well as screws with a half-inch diameter for further stabilization. To protect your wood from the elements and enhance its appearance, boiled linseed oil can be applied as a finish. As for tools, you’ll want to have a saw on hand for making precise cuts, a drill for driving screws, a sander for smoothing out surfaces, a pocket hole jig or Kreg jig for creating flush joints, clamps for applying even pressure, a speed square for ensuring accurate measurements, and a combination of a forstner bit and miter saw or table saw for tackling more complex tasks.
Step 1: Preparing the Frame
Start by gathering 1×4 lumber and cutting two pieces to 33 inches each for the frame’s height. Additionally, cut one piece to 24.5 inches for the bottom plate. You’ll also need three 23-inch boards to provide support for the top, middle, and bottom sections of your Plinko board. If you’re working with less-than-perfect lumber, consider incorporating a technique like shou sugi ban to add texture and visual interest to the wood grain.
Step 2: Preparing the Board
When reusing materials for your DIY project, consider utilizing a quarter-inch MDF panel that can be salvaged from an existing piece of furniture. To incorporate this repurposed material seamlessly into your design, make sure to trim it cleanly to fit within the confines of your frame dimensions. A standard size that works well is 33 inches by 23 inches.
Step 3: Burning and Brushing (Optional)
To inject an extra layer of personality into your woodworking project, consider using a propane torch to scorch the wood. This technique will expose distinct color nuances within the grain, adding depth and visual interest to the final piece. As you work with the flame, be sure to don essential safety gear, including gloves and eye protection, to ensure a safe and enjoyable experience.
Step 4: Applying Finish
To safeguard your wooden frame, utilize a boiled linseed oil treatment that’s absorbed through a lint-free cloth, working in harmony with the wood’s natural grain pattern. Limit the application to only the visually exposed areas of the frame.
Step 5: Marking and Drilling the Board
To begin organizing your Plinko pegs, start by creating a grid template. A suitable starting point is to mark eight inches from the bottom of your board, with marks every three inches up and one inch across. Be sure to leave a 1.5-inch gap on either side for proper placement. Once you have your marks in place, use a quarter-inch drill bit to create holes that will accommodate the pegs, allowing them to snap into position.
Step 6: Adding Pegs
To secure the components together, take two-inch wooden dowels and insert them into the pre-drilled holes. Next, apply a suitable adhesive to hold the dowels firmly in place, ensuring they remain straight and even.
Step 7: Assembling the Frame
Assemble the base framework by combining the cut lumber, utilizing pocket hole joinery to ensure a seamless and professional-looking finish. Next, secure the three 23-inch support beams within the structure, providing a sturdy foundation for your project.
Step 8: Attaching the Frame to the Board
To reinforce the bond between the board and the frame, begin by applying a suitable adhesive and securing them together with clamps. As an added precaution, consider driving screws into both components, making sure they penetrate deeply enough to provide a strong grip.
Step 9: Adding Legs and Dividers
To ensure your DIY Plinko board reaches an optimal angle, start by determining the height of the legs. Once you’ve settled on a suitable height, it’s time to focus on the dividers at the bottom. Begin by dividing the bottom edge into equal sections that will accommodate your Plinko slots. Secure these segments using a combination of glue and nails for a sturdy and professional-looking finish.
Step 10: Test and Enjoy
To guarantee a seamless experience with your Plinko board, conduct a thorough quality control check before putting the finishing touches on it. This involves running a test ball through the system to verify that it moves effortlessly from the starting point to the end, without encountering any obstacles or getting stuck in the process.
Troubleshooting
To prevent frustrating deadlocks, incorporate strategically placed angled pieces that steer the ball clear of troublesome zones – namely, the proximity to the end pegs and the frame itself.
Video Tutorial
If you’re looking to create a unique and engaging experience for your guests, why not try making a customized Plinko board? To get started, I recommend checking out this comprehensive YouTube video tutorial that breaks down the process into easy-to-follow steps. This visual guide is designed to complement our written instructions, offering a dynamic perspective on the crafting process. By following these simple steps and tips, you’ll be able to create a one-of-a-kind Plinko board that’s perfect for any gathering or event. So take your time, enjoy the process, and get ready to experience the thrill of watching those coins cascade down the board!
Customizing Your DIY Plinko Board Design
Transforming a standard Plinko board into a unique masterpiece requires a thoughtful approach to personalization. One of the most effective ways to do so is by experimenting with different peg patterns. This can range from simple yet striking geometric shapes to intricate designs that tell a story. Additionally, incorporating creative flourishes such as colorful embellishments or whimsical doodles can elevate your Plinko board to an art form. By embracing these customization opportunities, you can create a truly one-of-a-kind creation that reflects your personality and style.
Peg Patterns
The game’s foundation is built on three fundamental patterns: Triangle, Diamond, and Random. The Triangle pattern, characterized by a triangular shape, provides an equally spaced and yet unpredictable path for the puck to follow, making it both fair and engaging. This setup offers a sense of anticipation and challenge for players.In contrast, the Diamond pattern introduces complexity, allowing the game to speed up and the landing slot’s predictability to decrease. This variation requires players to think strategically to succeed.For those who crave unpredictability, the Random pattern is an excellent choice. By placing pegs at random intervals, each game presents a unique path for the puck to follow. However, this setup demands careful planning to ensure that every slot remains accessible to the puck.To simplify the process of creating these patterns and experimenting with different designs, consider using a printable template. This tool allows you to evenly space pegs, test various arrangements, and refine your approach before committing to a final design.
Slot Ideas
The foundation of engaging games lies in simplicity and surprise. Classic slot machines with distinct point values or labels are easy to grasp and perfect for short, casual play sessions. Building upon this concept, prize boxes can be incorporated into each slot, introducing an element of excitement as players never know what they might receive. This mechanic adds a layer of unpredictability to the game. To further elevate player engagement, consider tailoring your Plinko board to fit a specific theme, such as holidays or sports teams. Themed slots that align with the overall design not only enhance visual appeal but also foster a sense of connection between the game and its audience.
Creative Touches
Transform your Plinko board into a personalized haven by selecting a theme that speaks to you, whether it’s a bold color palette or a nostalgic nod to your favorite team. The possibilities are endless! To add an extra layer of excitement, consider incorporating decorative borders that not only elevate the board’s aesthetic but also provide a physical barrier to contain the puck’s movement. For a truly immersive experience, incorporate lights and sound effects that react when a slot is hit. This could be as simple as adding battery-operated string lights or taking it to the next level with programmable electronics. With a DIY Plinko board, you can create a one-of-a-kind game that reflects your unique style and creativity, perfect for family gatherings or themed parties.
Game Variations and Rules
Combining elements of luck and strategic thinking, Plinko has become an iconic game that thrives in social settings like parties, family gatherings, or as a learning tool. To elevate the experience, mastering the core mechanics and experimenting with unique twists can significantly enhance the fun factor.
Classic Plinko
The core mechanism in Classic Plinko involves a basic point system where players release pucks from the top of the board, which is vertically positioned with a field of pegs disrupting their path as they fall. The bottom of the board features slots bearing different point values. As the puck lands, the player earns those points, with the central slots typically offering higher rewards but posing greater challenges to hit.
To emerge victorious, players can aim to meet or exceed a predetermined target score through successive turns of dropping pucks. Alternatively, each participant is allocated a fixed number of pucks, and the highest cumulative score after all pucks have been played determines the winner.
Variations
Imagine adding an extra layer of excitement to your puck-based game by introducing a Double-Drop Puck feature. When played, this special puck enables players to simultaneously drop two regular pucks on their next turn, potentially doubling the points earned. This twist adds a thrilling element to the gameplay.To further increase the challenge and strategy, consider incorporating movable obstacles onto the board. These could include small barriers or additional pegs that can be placed before a player’s turn, allowing them to deliberately direct the puck towards high-point slots. The ability to manipulate these obstacles adds a new level of control and unpredictability to the game.For an even more unique experience, replace the point values at the bottom of the board with themed prize slots. This variation is perfect for party settings or special events, offering prizes that range from small toys to chore exemptions. Players can earn rewards that are tailored to the occasion, making the game a fun and engaging way to spend time together.
Fairness and Difficulty
The dynamics of the Plinko game are heavily influenced by two crucial factors: peg spacing and board angle. A closer peg spacing presents a more challenging experience, as the puck’s trajectory is restricted, forcing players to be more precise. Conversely, wider spacing eases the gameplay, making it accessible to younger or less experienced players. The angle of the board also plays a significant role in determining the game’s difficulty level. A steeper incline accelerates the puck’s descent, introducing an element of unpredictability that heightens the challenge. In contrast, a more gradual slope slows down the puck’s movement, granting players a slight advantage when targeting higher-value slots. By manipulating these variables, you can customize your Plinko board to suit different demographics and occasions, guaranteeing an enjoyable experience for all participants.
Tips and Troubleshooting
Crafting a DIY Plinko board presents an exciting opportunity for creativity and fulfillment. Yet, designing a game that balances fairness and functionality demands meticulous consideration, particularly in regards to puck trajectories, player safety, and the avoidance of frequent errors.
Perfecting Puck Paths
When playing Plinko, irregular bounces can quickly become frustrating. If your pucks are behaving erratically, it may be time to revisit the placement of your pegs. A staggered pattern with evenly spaced pegs is key to achieving random and unpredictable paths. Minor adjustments to the peg layout can significantly impact the game’s dynamics.
On the other hand, dead zones where pucks get stuck can bring the fun to a grinding halt. To overcome this issue, ensure that there’s sufficient space between your pegs and the board’s edges – a minimum of 2 inches is recommended. If pucks frequently become lodged behind pegs, consider reducing the diameter of the pegs or increasing the space between them in problem areas to promote smoother puck movement.
Safety Considerations
When it comes to building your Plinko board’s cover, plexiglass is an excellent option due to its exceptional clarity and durability. To ensure a safe installation experience, make sure to smooth out any edges that may be rough or sharp. For added security, fasten the plexiglass with screws at the corners and along the edges at intervals of 10-12 inches. This will not only prevent injuries but also keep your cover firmly in place. In addition to a secure cover, it’s crucial to provide a stable foundation for your Plinko board. If you’re using it on a table, consider attaching non-slip pads or weights to the base to prevent tipping. For freestanding boards, a wider base or support legs at the back can help maintain stability and ensure a fun gaming experience.
Common Mistakes
When crafting your Plinko board, avoid overcrowding the pegs as this can lead to frequent dead zones and decreased enjoyment. Ensure there’s sufficient space for the pucks to navigate the pegs, promoting smooth gameplay. Additionally, pay attention to the angle of your board, as one that’s too steep may result in pucks flying by too quickly, while a shallow angle might render them lacking momentum. Aim for an angle between 15 to 20 degrees for optimal results. Furthermore, don’t overlook test runs with the pucks before finalizing peg placement. This crucial step allows you to identify and address issues related to puck paths, dead zones, and bounce behavior. By heeding these guidelines and troubleshooting common problems, you can create a Plinko board that’s not only enjoyable but also visually appealing and safe to play.
DIY Plinko Board FAQS
Embarking on a DIY Plinko board creation can be an exhilarating adventure for crafty enthusiasts. To facilitate a smooth experience, we’ve compiled a list of frequently asked questions along with their respective answers, ensuring you’re well-prepared to tackle this engaging project.
What materials do I need to make a DIY Plinko board?
To create a Plinko board that’s uniquely yours, you’ll need to gather the following essential materials: a sturdy 1×4 lumber piece for the frame, a quarter-inch MDF panel to serve as the base of your game board, wooden dowels measuring 2 inches in length to function as pegs. Additionally, you’ll require wood glue and half-inch screws to facilitate assembly, as well as a suitable finish such as boiled linseed oil. Furthermore, don’t forget to prepare for the build process by having on hand the necessary tools like a saw, drill, sander, and clamps.
Can I customize my Plinko board?
One of the most exciting aspects of creating a DIY Plinko board is the freedom to personalize it to your heart’s desire. With the flexibility to select from a range of sizes, colors, and themes, you can tailor the project to fit your unique style or match the tone of the event it’s intended for.
Is it cheaper to build a Plinko board than to buy one?
While it’s not always the case, building a Plinko board can indeed be a cost-effective endeavor. A major factor in this is that many of the necessary components might already be within your grasp, either due to existing materials or creative repurposing of items like old furniture, which can significantly reduce overall expenses.
What is the best wood to use for a Plinko board?
When it comes to building the frame and board, certain materials are more suitable than others. A reliable choice for the frame is 1×4 lumber, as it’s both sturdy and easy to work with. Meanwhile, a quarter-inch MDF panel is an excellent option for the board itself. Its smooth surface provides an ideal canvas for the Plinko pegs and ball to slide down effortlessly.
How can I ensure the pegs are securely attached?
As you insert the wooden dowels into the precision-drilled holes on your board, applying a small amount of wood glue helps ensure they remain securely in place. To achieve optimal performance and prevent any misalignment, double-check that the pegs are perfectly straight before the glue dries.
How do I prevent the ball from getting stuck?
When encountering issues during the testing phase, where the ball seems to get stuck, it may be beneficial to introduce customizations to the setup. This can involve incorporating angled components or making strategic adjustments in specific areas to redirect the ball’s trajectory and prevent it from getting trapped between pegs or corners.
Can I make a Plinko board if I’m new to woodworking?
While the idea of creating a Plinko board may seem daunting at first, it’s actually an accessible project perfect for beginners. The abundance of guides and tutorials available online, including those referenced in this piece, offer crystal-clear instructions that make it easy for newcomers to learn as they go.
How do I apply finish to the Plinko board?
To enhance the wood’s natural beauty while safeguarding its integrity, consider applying a coat of boiled linseed oil. This finish not only protects the wood from damage but also imparts a rich, polished sheen. To achieve an even and visually appealing result, apply the oil using a rag, moving in the direction of the wood grain. Focus your efforts on the visible areas of the frame, ensuring a consistent appearance that complements the overall design.
What tools do I need to build a Plinko board?
When it comes to creating wooden joints, having the right tools is crucial. A saw is essential for cutting wood to the required size, while a drill is necessary for making precise holes for pegs. To ensure smooth surfaces and prevent any warping or splitting, a sander should be part of your arsenal. Additionally, clamps are vital for holding pieces together as you work on your project. Depending on the specific design or type of joint, you may also need specialized tools like a pocket hole jig or a forstner bit to get the job done accurately.
Where can I find a video tutorial on making a Plinko board?
YouTube is an excellent platform for discovering video tutorials on creating Plinko boards. Many DIY enthusiasts and craftsmen share their projects, providing visual guidance that complements written instructions and making it easier for individuals to replicate the process at home. The DIY community’s willingness to share knowledge has led to a vast array of creative and innovative projects being showcased online. Building your own Plinko board can be a rewarding project with tangible benefits, such as saving money and enjoying a customized game experience in the comfort of your own home. By combining the right tools, materials, and creativity, you can craft a unique board that brings excitement to family gatherings, parties, and events for years to come.
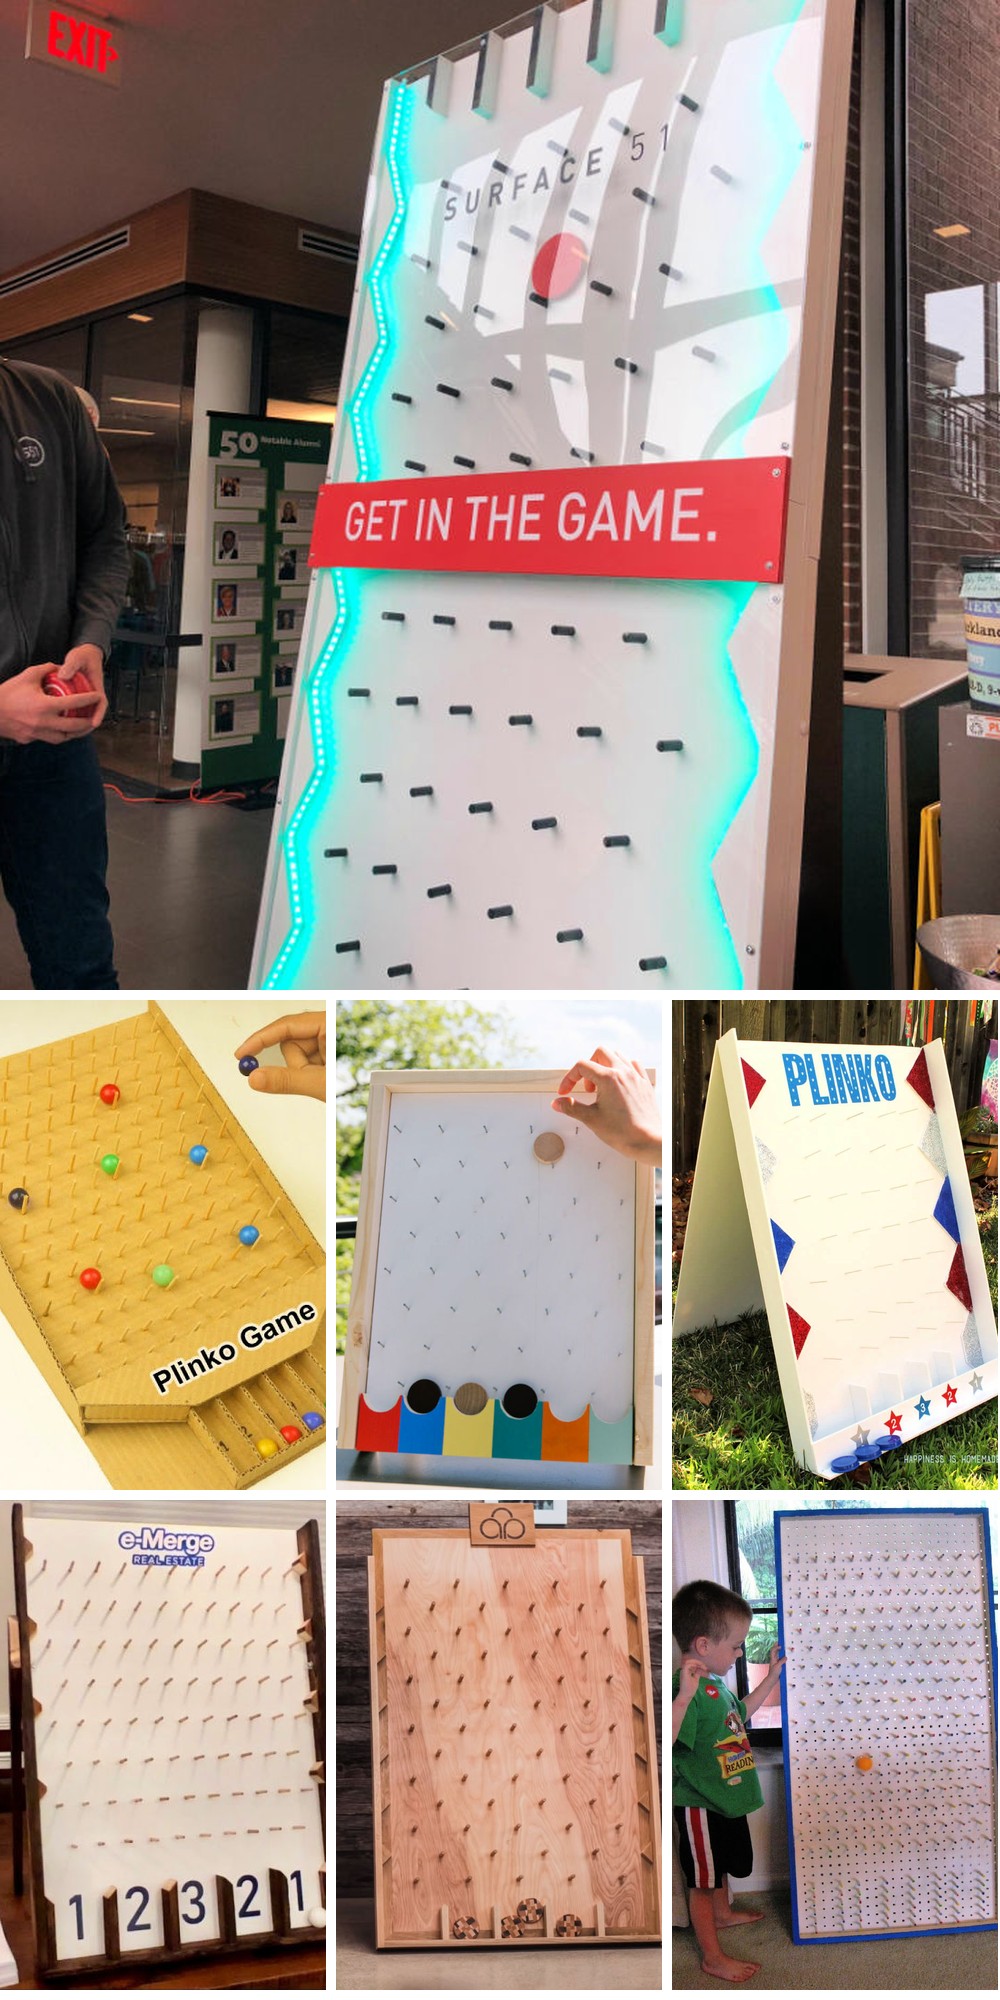
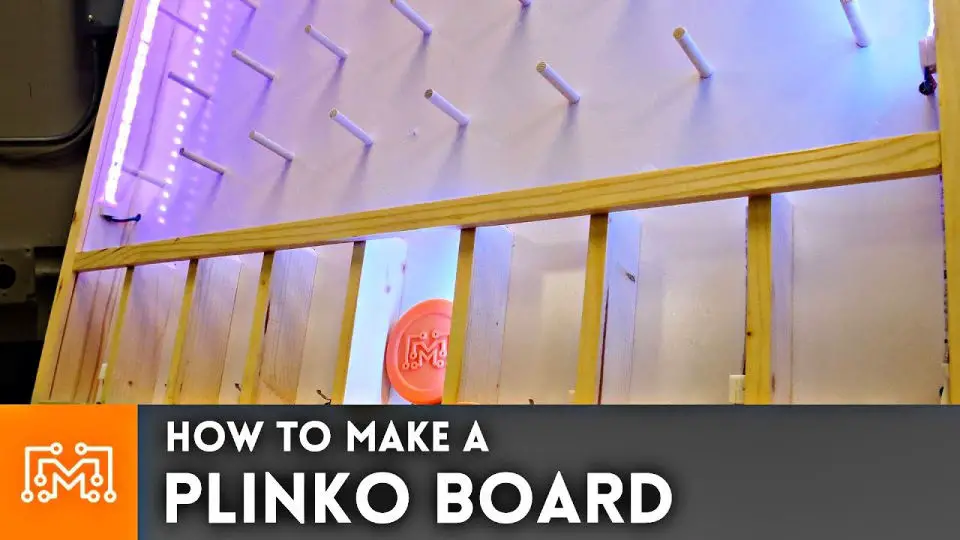
20 Homemade DIY Plinko Board Plans (How to Make)
Embrace the thrill of DIY game-making by exploring a collection of 20 homemade Plinko board plans, each accompanied by detailed, step-by-step guides. Begin creating your own unique gaming experience immediately!
How to Make a Plinko Game Board
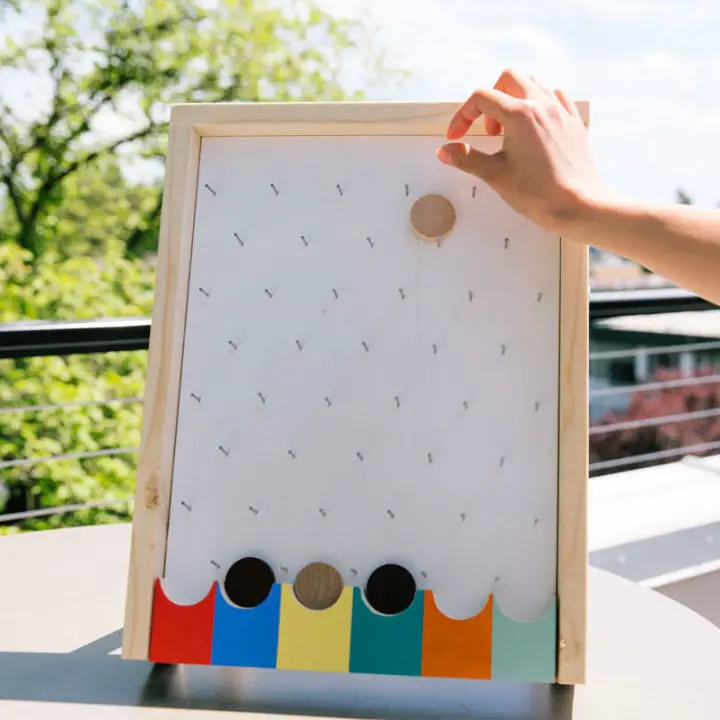
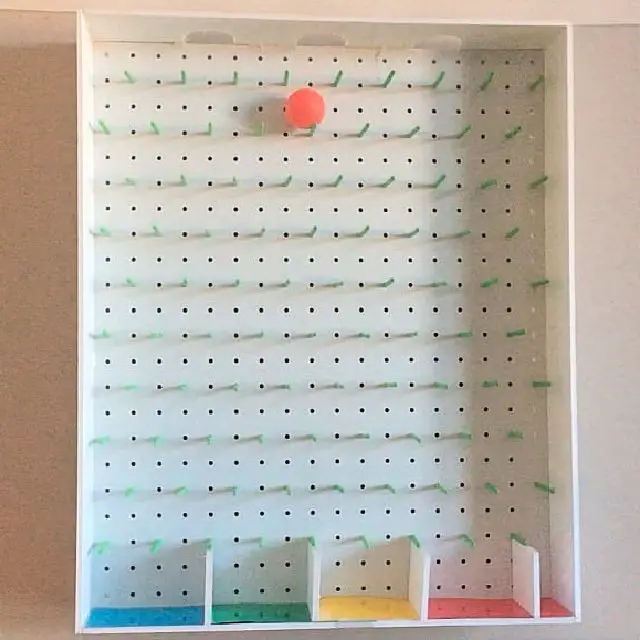
Transform your backyard into a hub of summer fun by crafting your own Plinko game board from scratch. With Dunn DIY’s step-by-step guide, you’ll effortlessly create a engaging activity for crafty enthusiasts. Start by measuring and cutting the board to perfection, then add a pop of color with vibrant hues. Once assembled, set up your game for hours of entertainment as you drop tokens and score points. By focusing on usability and incorporating practical tips, this DIY project makes it easy to store and transport your handmade board, making it a hit at gatherings and a staple for outdoor fun.
Simple DIY Wooden Plinko Board
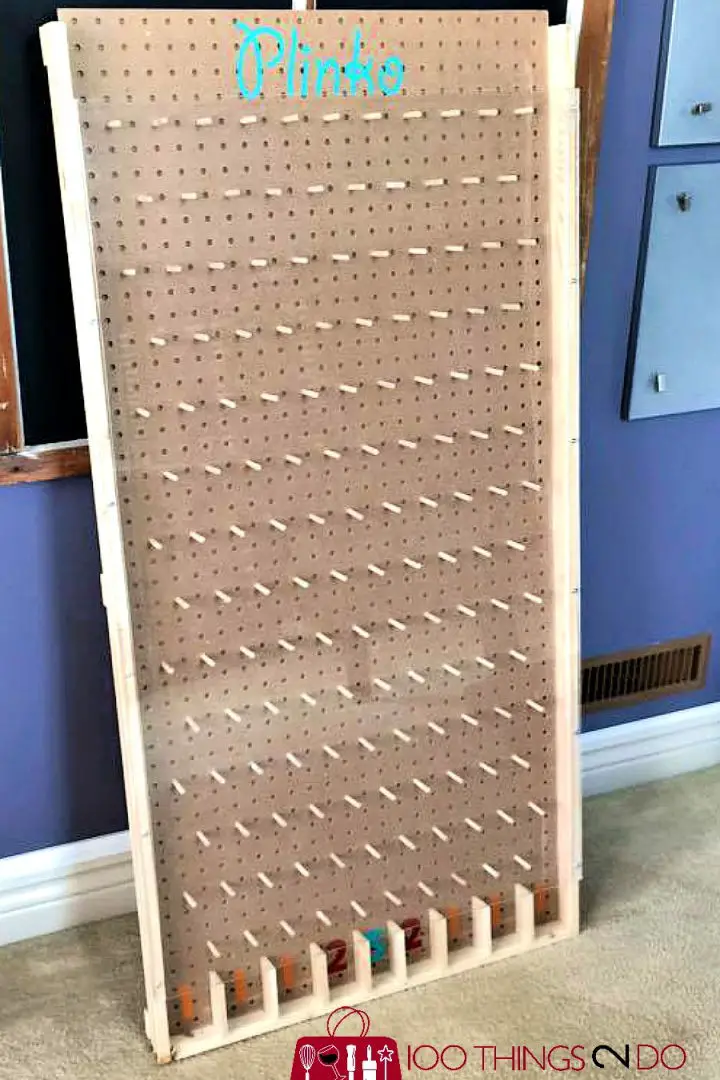
Creating a giant Plinko board can be an exhilarating experience for school carnivals, family gatherings, or even community events. With a clear and concise guide from 100 Things 2 Do, you’ll have everything you need to bring this beloved game to life. The instructions are straightforward, requiring only a few simple materials and steps to assemble the sturdy frame, precisely place the pegs, and select the perfect Plinko chips. Whether your goal is to raise funds or simply enjoy some quality time with friends and family, this DIY project promises hours of entertainment and is designed for easy storage when not in use. By following the guide, you’ll be rewarded with a sense of accomplishment and endless fun.
Free Plinko Board Woodworking Plan
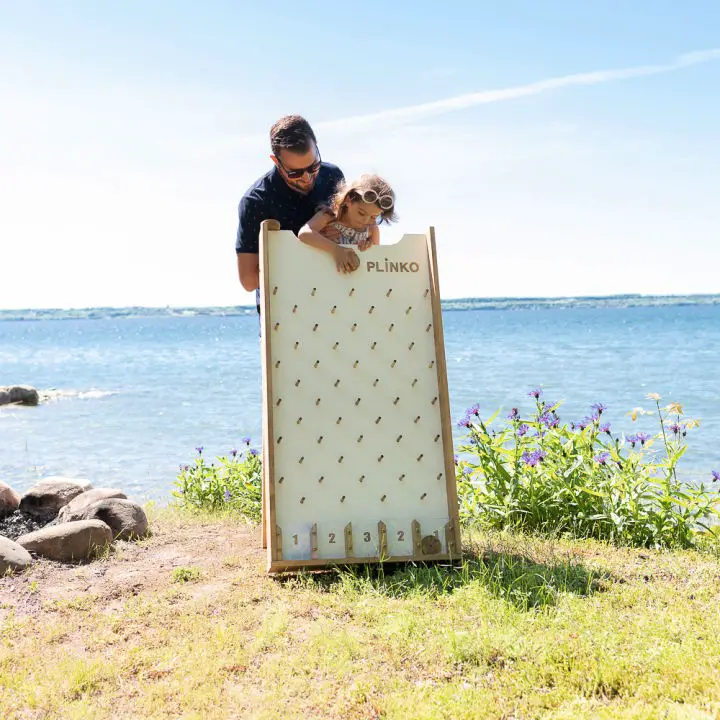
Want to bring a touch of nostalgic fun to your gatherings? You’re in luck because Nick + Alicia are offering free plans for crafting a Plinko board, perfect for livening up backyard parties, school events, or adding excitement to a playroom. The best part is that this project doesn’t require expert woodworking skills, making it accessible to DIY enthusiasts of all levels.
With easy-to-follow instructions, you’ll be able to dive in and start building your own game that spans generations. As you play and watch family and friends revel in the excitement of this timeless game, you’ll feel a sense of satisfaction from knowing you created something special.
So why not give it a try? Build your Plinko board, share it with us, and let’s celebrate your handiwork together!
Handmade Backyard Plinko Party Game Board
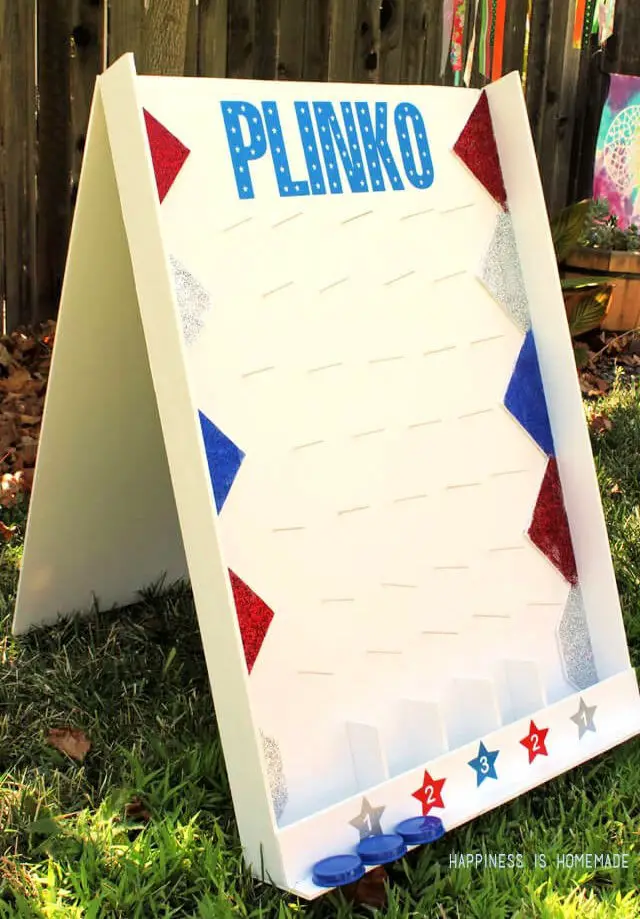
Transform your backyard into an exciting party zone by crafting a DIY Plinko game with Happiness is Homemade’s simple guide. To create this classic entertainment staple, you’ll need just a few basic materials: Elmer’s Foam Board, glue, and some additional supplies. Follow the easy-to-follow instructions to construct and customize your game board, fashion durable pegs, and get ready for hours of fun. This homemade Plinko not only provides endless entertainment for guests but also helps kids develop their math skills through interactive play. Perfect for special occasions like Labor Day or any festive gathering, this creative activity is sure to leave a lasting impression.
Building a Plinko Board With Step by Step Instructions
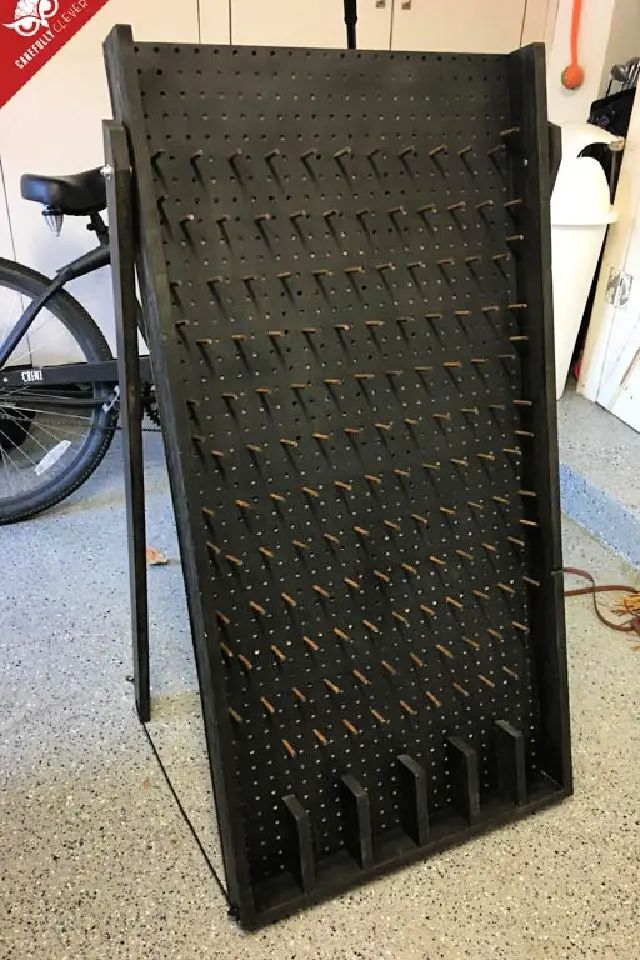
Constructing a Plinko-inspired board, reminiscent of the popular TV show ‘The Price is Right,’ can elevate any gathering into an unforgettable experience. For instance, if you’re hosting a Fantasy Football draft party, creating a custom Drinko version will add an exciting layer to your event. To get started, you’ll need basic materials such as pegboard, dowels, and wood for the frame, accompanied by tools like a saw and sander. The clear instructions provided by Carefully Clever guide you through every step, from cutting the wood to assembling the frame and adding the finishing touches. Painting and personalizing your board allows you to infuse it with your unique style, while the use of a ping pong ball ensures a smooth gameplay experience. By following Carefully Clever’s engaging and helpful steps, you’ll be well-prepared to entertain your guests in no time with your handmade game.
Beginner-Friendly DIY Plinko Board
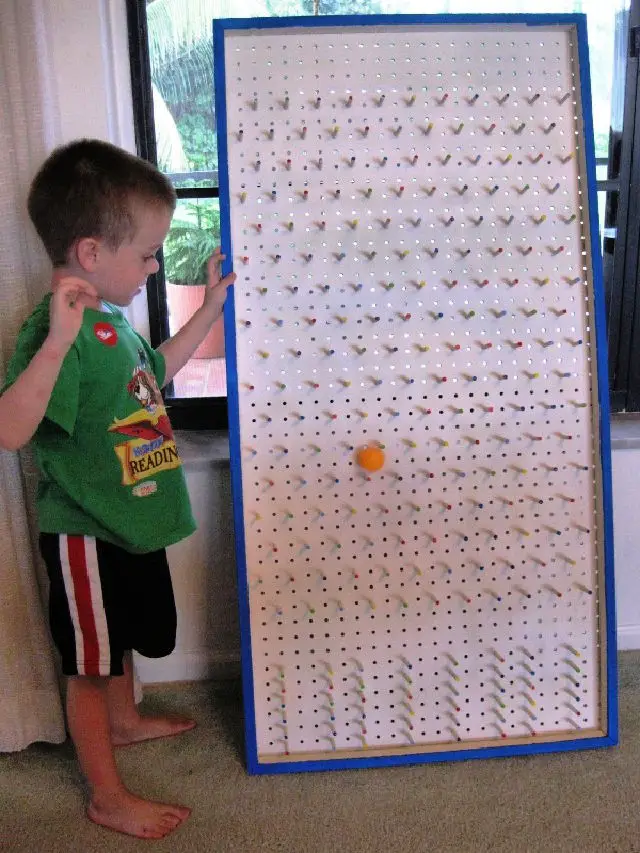
Take a trip down memory lane with BarryAbrams’ innovative guide on creating a Plinko board, courtesy of the popular image-sharing platform Imgur. As a tech director at a branding and marketing agency, Barry showcases his woodworking skills by venturing beyond digital creations and into the world of DIY projects. His comprehensive post delves into the process of designing and building a 7-foot-tall Plinko board for a local networking event, providing valuable insights on the planning phase and utilizing Sketchup for structural design to optimize work around standard plywood dimensions. This engaging and informative content is perfect for DIY enthusiasts looking to tackle an exciting and interactive project that’s sure to be a hit at any gathering.
How to Build a Plinko Board
Creating a Plinko board is a brilliant way to inject fun and creativity into activities with children. For educators seeking innovative ways to engage their young students, this hands-on project is an excellent choice. To get started, gather materials such as a pegboard, wood for framing, dowels, dot stickers, and paint. Begin by constructing the wooden frame, then lay out your pin design using stickers as a guide. Next, attach the dowel pins using wood glue and gently tap them into place to secure them. Once the pins are set, add a base coat of paint and let your imagination run wild with colorful touches. After the paint dries, it’s time to put your board to the test and enjoy the game with your enthusiastic participants. This crafty endeavor has the power to transform even the most mundane moments into an exciting, playful experience.
Easy DIY Plinko Board for Classroom
Transform your teaching space into a lively hub of engagement with a creative DIY Plinko board. Perfect for educators seeking innovative ways to infuse fun into reward systems, review sessions, and lessons, this interactive craft can be easily assembled using versatile materials such as plastic pegboards, foam core boards, golf tees, and ping pong balls. Following We Are Teachers’ comprehensive guide ensures a seamless crafting experience. With your Plinko board ready, adapt it to suit any subject or age group, making learning an immersive and rewarding journey for students. Prepare to captivate your learners and watch their enthusiasm for education soar! As you work with your students to create this engaging project, discover new ways to foster collaboration, critical thinking, and creativity, ultimately enriching the overall classroom experience.
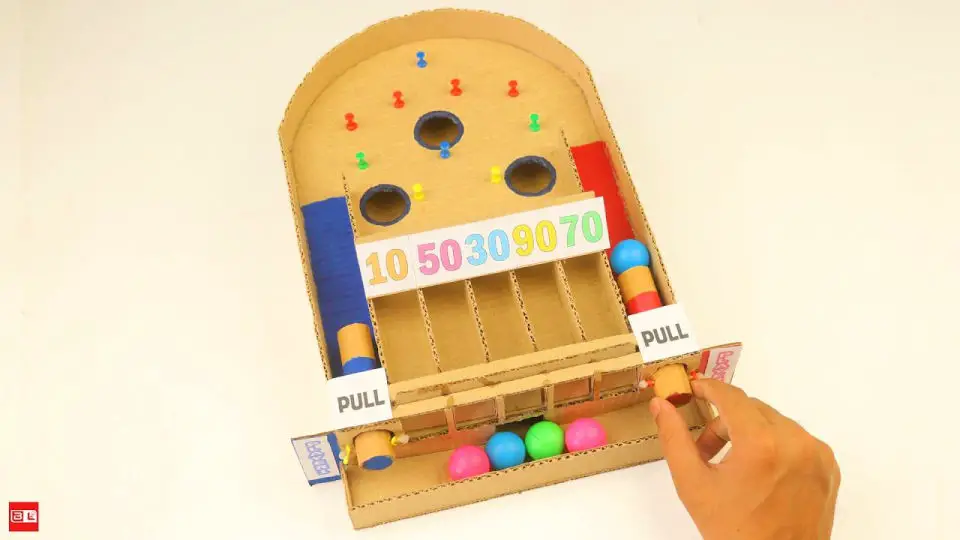
Making a Cardboard Plinko Money Board
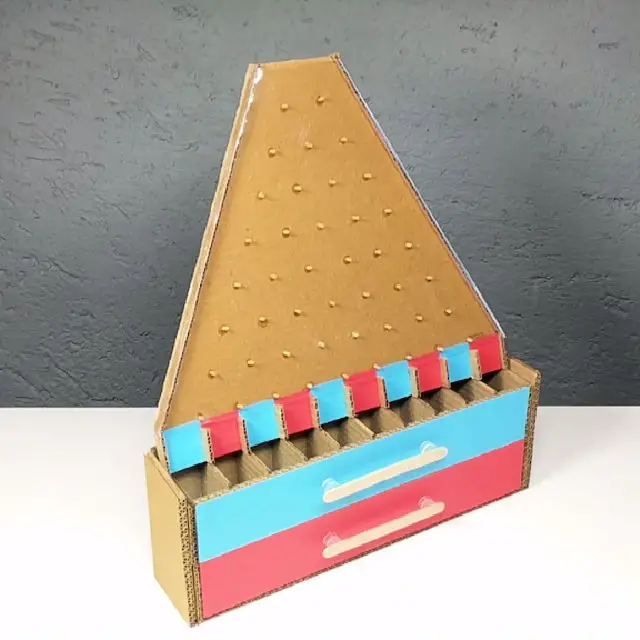
Transforming cardboard into a classic PLINKO game is an innovative DIY project perfect for family bonding or keeping kids entertained on a rainy day. With Instructables’ step-by-step guide, you’ll embark on a hands-on journey that combines precision and creativity to craft a visually appealing game of chance. By following the clear instructions and utilizing the provided materials, you’ll be ensured a successful build, resulting in hours of fun and a sense of accomplishment.
Homemade Father’s Day Plinko Board
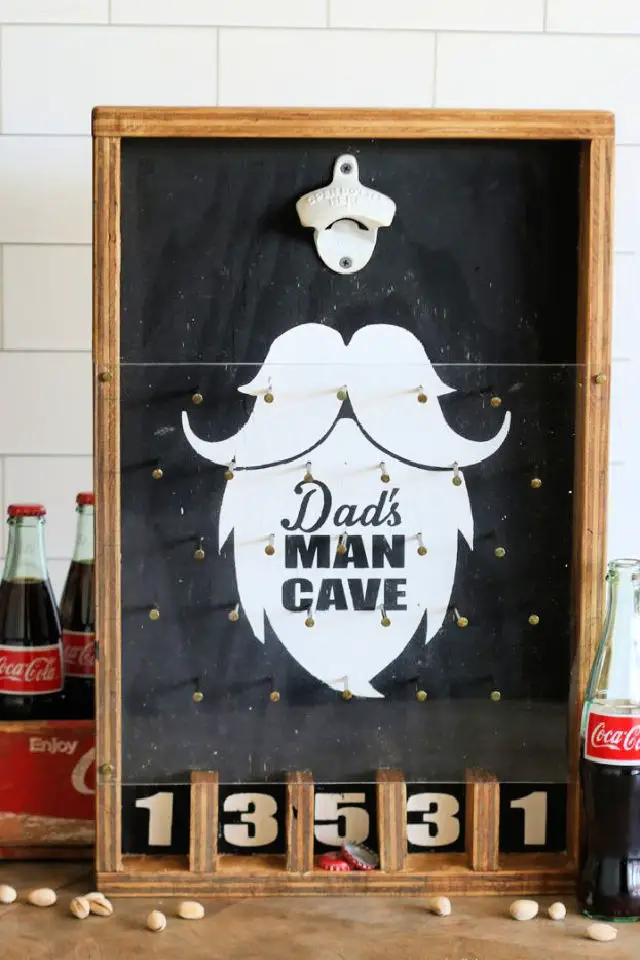
Create an entertaining and budget-friendly Father’s Day Plinko Board in just 45 minutes for only $24 (excluding tax). This DIY project requires beginner-level skills and basic tools, including a circular saw, Brad Nailer, Hammer, Drill, measuring tape, pencil, safety goggles, and sanding block. To make this engaging game, you’ll need sanded plywood, clear acrylic sheets, coated sinker nails, and brad nails. Simply measure and mark the plywood cuts, create a nail pattern, build a frame, attach dividers, secure the acrylic sheet, and add a bottle opener to bring Dad’s special day to life with this unique homemade gift.
Easy-Peasy DIY Wood Plinko Board
Get ready to unleash the fun and make your own Plinko board with our comprehensive guide. This DIY project is perfect for school carnivals, birthday parties, church events, or even adding a twist to daily chores. By using scrap materials, you’ll not only save money but also enjoy the satisfaction of creating something unique and engaging.
Our step-by-step instructions will walk you through the process of sizing your board, spacing nails correctly, and constructing secure chutes that will keep everyone entertained for hours. Whether you’re a parent looking to spice up family game night or an event planner searching for a fun activity, this DIY project is sure to bring excitement and joy to any occasion.
Join the building excitement and share your Plinko adventure with us!
How to Build a Plinko Board With a Step-By-Step Guide
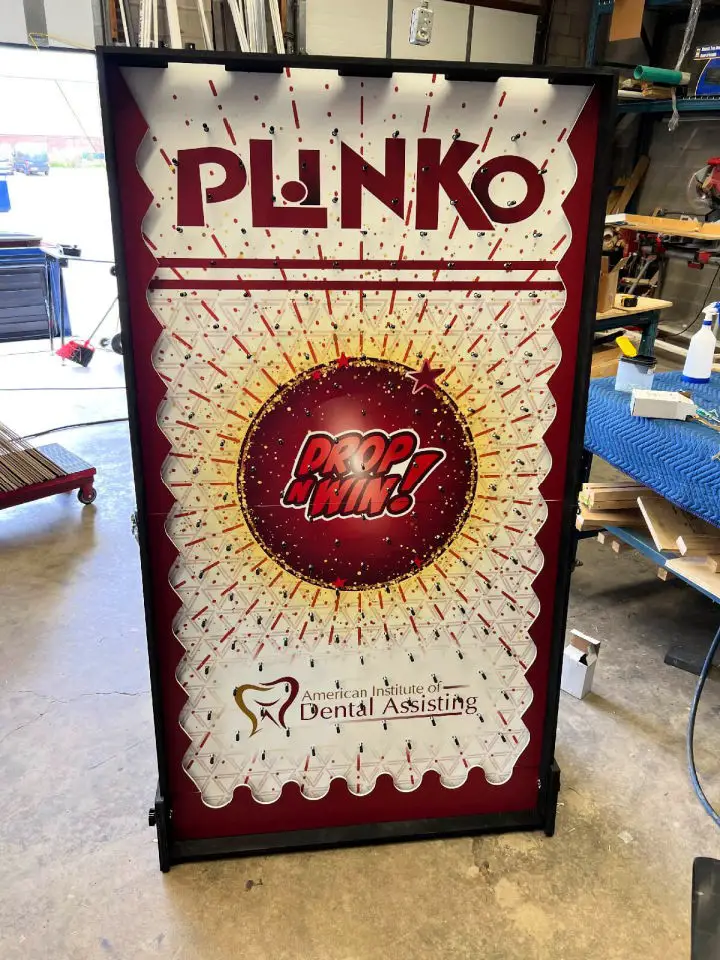
Crafting a Plinko board is an exciting DIY project that can elevate any event with its interactive and entertaining nature. With POP49’s straightforward instructions, you can create your own custom game board that will keep your guests engaged for hours. To start, find a smooth surface and arrange the pegs to ensure seamless token flow. Next, frame the board for a clean finish and add scoring slots. Don’t forget to attach legs for the perfect playing angle. This DIY guide is perfect for anyone looking to create a personalized Plinko board for their next gathering, making it an ideal activity for friends and family.
Make a Plinko Board Candy Dispenser
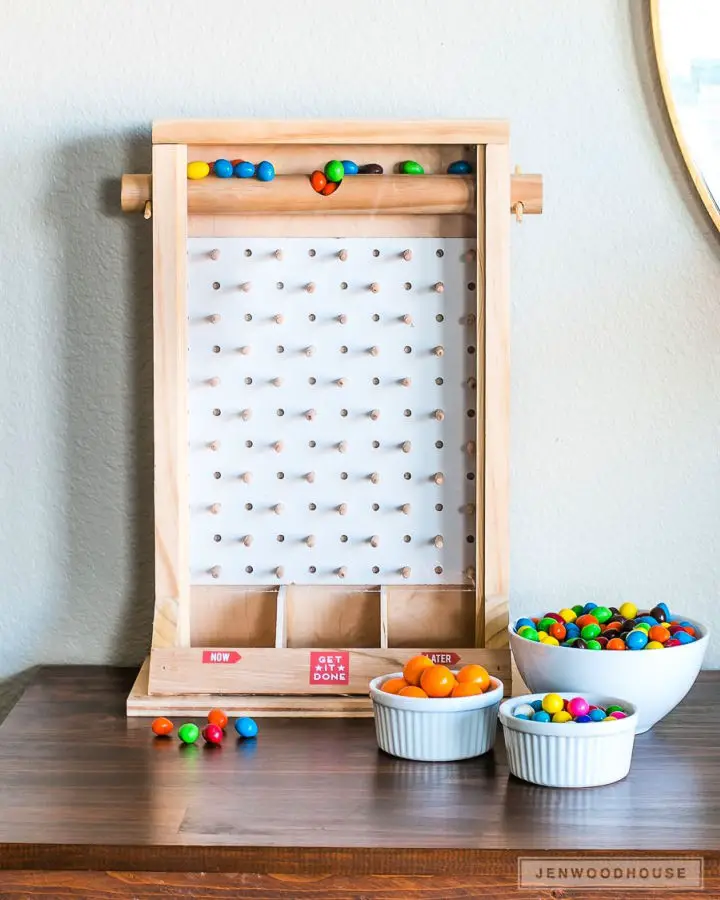
Transform a simple box into a thrilling DIY Candy Dispenser Plinko Game with The House of Wood’s creative approach. This engaging project is perfect for Father’s Day or any special occasion, as it combines the joy of sweet treats with the excitement of a game of chance. Follow a step-by-step guide to build your dispenser, featuring a pegboard back, hinged top, and dowel pins that guide the treats towards their tasty fate. As you work on this hands-on activity, you’ll be rewarded with a charming and functional piece that makes decision-making just a little bit sweeter. With clear instructions and a dash of humor, you’ll have a blast crafting this delightful game that’s sure to be a hit.
DIY Wood Plinko Board Tutorial

Inspiring Builds on YouTube offers a comprehensive step-by-step guide to crafting a Plinko board, specifically designed for real estate booths. The project involves utilizing 1×4 lumber, an MDF panel, and innovative finishing techniques. As you follow along with the video tutorial, you’ll learn expert-level skills such as charing wood for a rustic appearance and applying linseed oil for a high-gloss finish. Additionally, the guide covers the creation of Plinko board dividers to prevent ping pong ball jamming, allowing for seamless gameplay. To take it to the next level, customize your board with customizable slots and prizes, giving you endless possibilities for entertaining events. With this straightforward instruction set, you’ll be well on your way to constructing a one-of-a-kind Plinko board in no time.
How to Make a Plinko Board With Limited Tools
Transform your free time into a fun-filled experience by crafting your very own Plinko board at home. With just a few basic tools and some creativity, you can create an engaging game that’s perfect for entertaining both kids and adults alike. Using a hand saw, drill, clamps, sander, and a vinyl cutter, along with a peg board for stenciling the hole pattern, you’ll be amazed at how easy it is to bring this DIY project to life. And if you’re still unsure, check out our build video shot on an iPhone 6s, where we take you through every step of the process. Get ready to spend hours of entertainment with family and friends!
Make a Cardboard Plinko Game Board
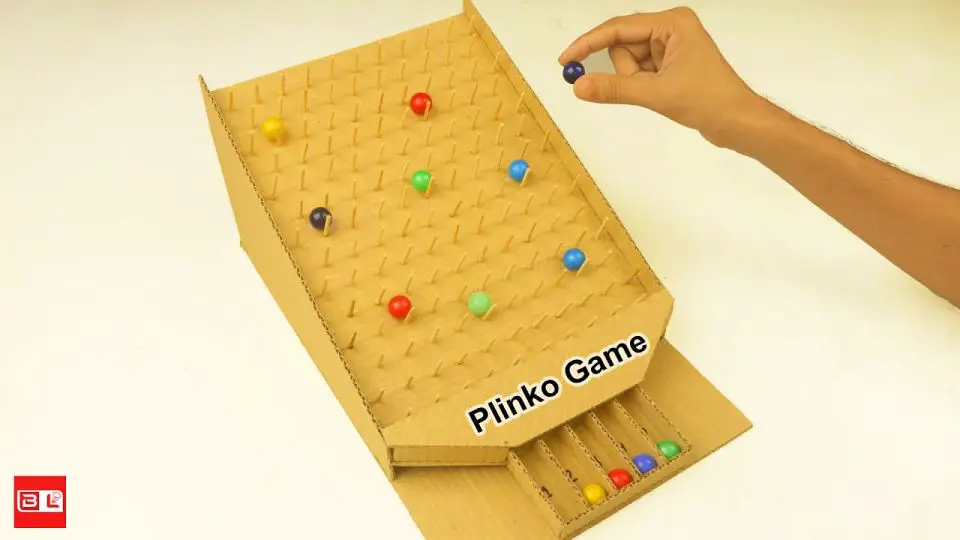
Transform your home into a hub of entertainment with a custom-made Plinko game crafted from cardboard. This innovative DIY project is surprisingly easy to execute, requiring only fundamental materials such as sturdy cardboard, glue, scissors, and small discs or pucks. The creative process involves carefully cutting the cardboard into a board and dividers, ensuring a seamless assembly experience. By following simple instructions, you’ll be able to construct the game board, strategically position the dividers, and create a scoring area. Whether you’re hosting a party, seeking an engaging educational tool, or looking for a unique gift idea, this homemade Plinko game promises hours of excitement and creative expression. As you embark on crafting this beloved game, get ready to experience the rush of anticipation and the thrill of the drop!
Budget-Friendly DIY Tabletop Plinko Board
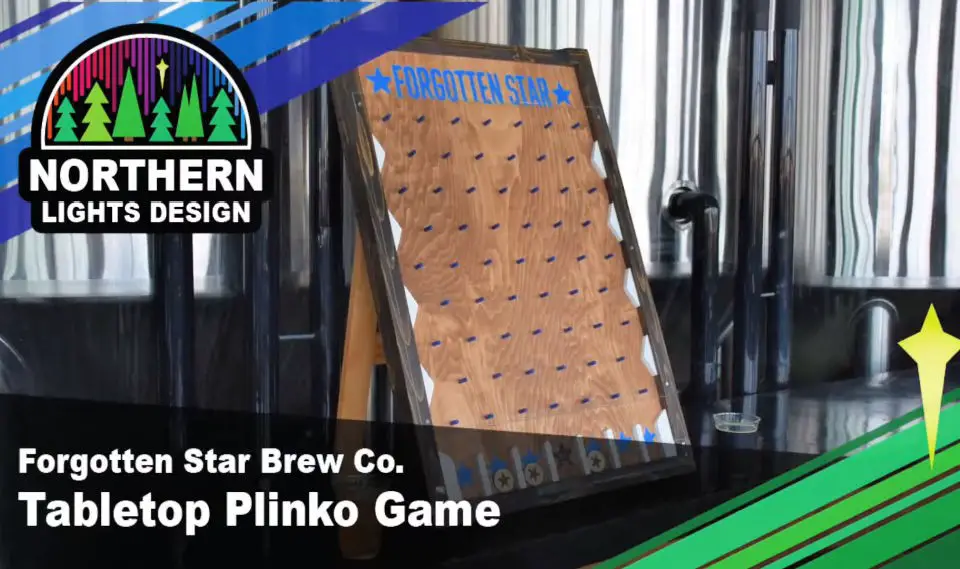
To elevate the ambiance at Forgotten Star Brewing’s events, create a one-of-a-kind Tabletop Plinko Board that combines inspiration from various online designs for an immersive gaming experience. Begin by visualizing your layout and then deliberately position nails to direct the custom marker’s movement. This DIY project not only adds a personal touch to gatherings but also becomes an engaging activity for attendees. Perfect for event hosts or attendees, this handmade Plinko board guarantees to be a showstopping highlight, offering boundless entertainment with its unique twist.
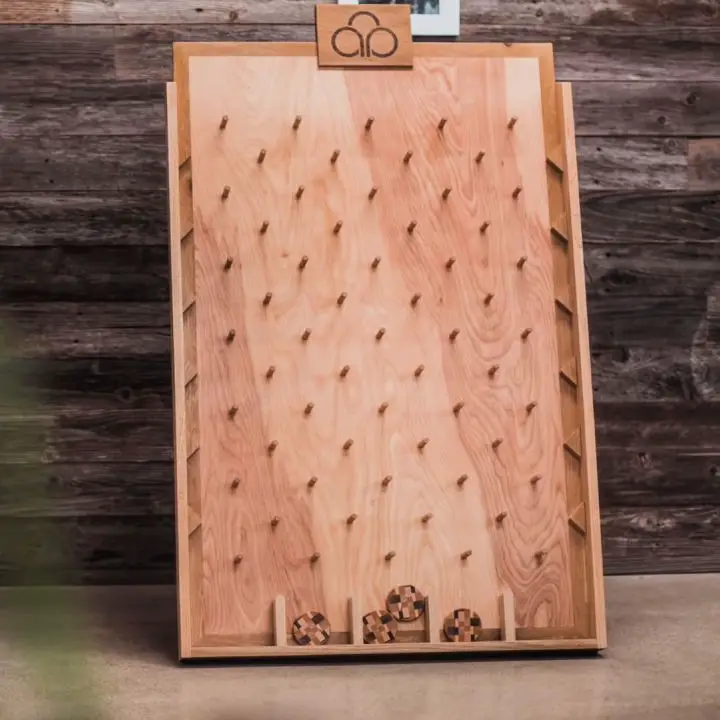
Free Wooden Plinko Board Plan
Transform any gathering into a thrilling experience with your very own Plinko board. Begin by combining the stability of 3/4 inch plywood with the sleekness of whiteboard material to create a smooth, uninterrupted slide for the pucks. A series of detailed steps then follow, guiding you through cutting, gluing, and assembling the frame, as well as precision drilling for pegs that bring the classic Plinko layout to life. To elevate your creation to the next level, incorporate LED lights and micro switches, which will add an interactive dimension to the gameplay. With only basic woodworking tools and materials such as dowels, Plexiglas, and a dash of creativity at your disposal, you’ll be able to construct not only a captivating game but also a visually striking piece of decor that’s sure to impress.
Build a Plinko Game Board With Cardboard
Transform your home into an entertainment haven with a customized Plinko board game, courtesy of Sue’s expert guidance. By combining materials like thick cardboard, clear plastic, wooden sticks, colored paper, and hot glue, you’ll create a one-of-a-kind gaming experience that will delight friends and family alike. This DIY project not only serves as a creative outlet but also fosters social bonding through fun activities. With straightforward instructions and simple supplies, you’ll have your personalized Plinko game up and running in no time, perfect for game nights and guaranteed to bring joy and creativity to all ages. Start building today and unlock the fun!
Modern DIY Wooden Plinko Board
Transform your game nights with a one-of-a-kind DIY modern custom Plinko board, infused with personal style and flair. This engaging project lets you craft a sleek, contemporary version of the classic game, perfect for entertaining friends and family. To bring your vision to life, you’ll need basic materials like plywood, nails, a hammer, and paint, which will guide you through every step, from cutting the board to painting it in your choice of colors. As a creative outlet and source of endless entertainment, this handmade Plinko board is ideal for parties or as a thoughtful gift, guaranteeing hours of fun and laughter with loved ones.
Conclusion:
In the final analysis, the DIY plinko board project culminates in a unique and personalized experience that transcends mere game nights or events. By having acquired the necessary knowledge and materials through this comprehensive guide, you’re now empowered to craft your own bespoke Plinko board from scratch. This creative endeavour not only yields a functional and entertaining product but also fosters creativity and refines your woodworking skills. As you begin constructing your Plinko board, anticipate an enriching experience that will leave a lasting impression.
