
Customizing your home decor with DIY picture frames offers a unique chance to personalize memories in a way that truly reflects your style. With 30 diverse and creative projects, anyone can find an idea that aligns with their skill level and aesthetic. These engaging endeavors not only provide a hands-on approach but also allow for creative experimentation, making each step of the process an opportunity to leave your mark. As you embark on this DIY adventure, discover how selecting materials, assembling pieces, and adding final touches become an invitation to infuse your personality into every aspect of your creation. By following easy-to-follow instructions and tips, you’ll uncover a world of creative possibilities that transform your pictures into stunning works of art for your home.
Why Make Your Own Picture Frames?
Creating your own picture frames offers a unique set of benefits that extend far beyond just saving money. For instance, DIY framing allows you to infuse your home decor with a personal touch by selecting materials and design elements that reflect your personality. This could be as simple as choosing a color palette that matches your room’s aesthetic or incorporating decorative elements that speak to your individuality. The result is a space that truly feels like yours.In addition to the creative freedom, making your own frames also enables you to customize the size and style to perfectly complement your photos or artwork. This can be particularly challenging when searching for store-bought frames, as they often come in standard sizes and limited designs. By taking matters into your own hands, you can create a frame that is tailored to your specific needs.Furthermore, crafting your own frames can also be an eco-friendly endeavor. By repurposing materials or using sustainable supplies, you can reduce waste and ensure that your home decor aligns with your values. This not only benefits the environment but also provides a sense of accomplishment knowing that your project has a positive impact.Beyond the practical benefits, making frames can also serve as a means to develop new skills or hone existing ones. Whether you’re working with wood, paint, or decorative techniques, each project presents an opportunity for growth and learning.Moreover, DIY framing can be a wonderful bonding experience when done with family or friends. It’s a chance to spend quality time together while creating something beautiful for your home – a memory that will last long after the frame is complete.Finally, homemade frames make thoughtful, personalized gifts for loved ones. They demonstrate effort and care, making them more special than store-bought options. By considering these reasons, you may find that making your own picture frames is a rewarding project that adds warmth and character to your living space.
How to Make a Picture Frame
Crafting your own unique picture frames is a rewarding experience that can also be budget-friendly, particularly when seeking distinctive designs. By creating your own custom frames, you can showcase cherished memories, art pieces, or special mementos with a personal touch. This guide will lead you through the process of making oversized custom picture frames, simplifying the task and yielding professional-looking results.
Materials and Supplies
To complete this DIY picture framing project, you’ll need a variety of materials. Start with your visual elements: photos or artwork that will be framed. You’ll also require plexiglass sheets, which come in standard sizes such as 30 inches by 36 inches, but can be customized to fit your specific needs. Next, you’ll need white matte boards, typically measuring 32 inches by 40 inches, although you may need to trim them down to size. For the outer frame, gather 1x2s wood strips, while thinner wood strips or dowels will serve as the inner frame, with a thickness of approximately three-quarters of an inch. To secure these components together, you’ll use wood glue or crazy glue. If you want to add a professional touch, consider applying a finish or stain to your wood. Before you begin assembly, prepare your tools: a utility knife or exacto knife will come in handy for various tasks, and if your plexiglass needs trimming, have a circular saw or specialized cutting tool at the ready. Finally, don’t forget picture frame tabs, which make it easy to hang your finished frame, as well as a sawtooth hanger to complete the look.
Step by Step Instructions
To begin crafting your custom picture frame, start by gathering all necessary materials. If you haven’t already printed out your photos or artwork, now is the time to do so. For wood frames, select plexiglass and matte board sizes based on the artwork size and desired frame size. You can opt for thin wood strips or dowels for the inner frame and 1x2s for the outer frame.Next, cut the wood strips to your desired frame size, taking care to miter the corners at a 45-degree angle for a polished finish. Before assembling the frame, feel free to stain or paint the wood in your chosen color. Allow it to dry completely before proceeding.Once the wood is prepared, assemble the inner frame using wood glue, ensuring each corner is securely joined. The inner frame should be slightly larger than the plexiglass sheet to accommodate it snugly. Let the glue set before moving on to the next step.To create the outer frame, attach 1x2s around the inner frame using wood glue, leaving a consistent gap between the two for aesthetic and structural balance.If your plexiglass doesn’t fit perfectly, carefully cut it to size using a circular saw or specialty plexiglass cutter. Cut your matte board as well, both to the size of the outer frame and with an opening for your artwork.To assemble the frame contents, clean the plexiglass thoroughly before placing it against the inner side of the frame, followed by the matte board and your artwork. Secure everything in place using picture frame tabs.Finally, add a hanging mechanism to the top middle part of the frame for easy display. Use pliers to handle small nails, taking care not to injure your fingers.
Finishing Touches
Before proudly displaying your DIY custom picture frame, take a moment to inspect it carefully. Start by examining the plexiglass for any smudges or imperfections that may need attention. Once you’re satisfied with its condition, find the ideal spot to hang your creation and bask in the sense of accomplishment that comes from crafting something truly unique for your space.
Video Tutorial
For a more hands-on approach, viewers can turn to Shara from Woodshop Diaries’ engaging video tutorial on crafting large picture frames. This step-by-step visual guide not only reinforces the concepts outlined here but also provides an intuitive way to learn the techniques involved in creating these stunning frames.
Customizing Your DIY Picture Frames
When crafting a DIY picture frame, it’s not simply a matter of assembling four sides to enclose a photograph. Rather, it’s an opportunity to infuse the piece with personal flair and create something that truly reflects one’s individuality. By exploring innovative ways to customize your DIY picture frames, you can transform them from mere photo borders into unique works of art that showcase your personality.
Choosing the Right Materials
When it comes to selecting materials for your picture frame, the possibilities are endless. The material you choose can significantly impact the overall aesthetic of the piece. Consider the following options:
Wood is a timeless choice that offers a natural look and feel. You can paint, stain, or leave it as is, depending on the desired outcome.
Metal provides a sleek, modern edge to your frame, adding an air of sophistication to any room.
Cardboard is an eco-friendly option that’s easy to shape and decorate, making it a great choice for those looking for a more sustainable solution.
Adding Texture and Color
When it comes to making your frame truly stand out, the combination of texture and color is crucial. To achieve this, consider incorporating the following elements:
Paint – A straightforward way to introduce a pop of color. By opting for patterns or bold color-blocking, you can give your frame a modern, edgy vibe.
Fabric – Adding fabric to your frame not only brings texture but also warmth and depth. This is particularly effective when paired with rich colors or intricate patterns.
Natural Elements – By incorporating natural materials like shells, stones, or leaves, you can infuse your frame with an organic, earthy feel. This adds a unique dimension that’s both visually appealing and thought-provoking.
Personal Touches
Infuse your picture frame with personality by incorporating meaningful elements that reflect your unique character. One way to do this is by adding inspiring quotes around the frame. Choose a phrase that resonates with you and place it prominently to set the tone for the rest of the display. For an added layer of emotional connection, incorporate small mementos like ticket stubs or pressed flowers that hold special significance to you. These tangible items can serve as conversation starters and remind you of happy memories whenever you glance at the frame. Another creative approach is to use multiple small photos instead of a single larger one. This collage effect allows you to showcase a variety of cherished moments, creating a visually appealing display that’s as unique as you are.
Finishing Touches
As you near the end of your project, consider the finer details that can take your picture frame from good to exceptional. This might include adding a layer of protection with varnish, which not only shields the frame but also gives it a sleek, polished finish. Additionally, think about how you’ll display your finished piece. Will it be hung on a wall or placed prominently on a desk? The mounting process is crucial in ensuring that your frame looks its best and serves as a reflection of your personal style. Furthermore, choose glass that not only protects the photo but also minimizes glare for optimal viewing. With these final touches, you’ll be able to proudly display your unique piece, which will undoubtedly reflect your individual flair.
Troubleshooting Common DIY Picture Frame Issues
While creating DIY picture frames can be an enjoyable endeavor, it’s not uncommon to encounter setbacks that can be frustrating. Fear not, as most of these issues have straightforward solutions. This section will navigate you through common challenges and their remedies, guaranteeing your frames appear fantastic and endure for a long time.
Uneven Corners
When framing issues arise, such as a frame not sitting flush against the wall or imperfect corner alignment, it’s essential to approach the problem with precision. To achieve a seamless fit, measure your cut twice and make one accurate incision. For added assurance of precise angles, utilize a miter box to guide your cuts. Should minor adjustments be necessary, gently sand down any slightly off corners to reveal a smoother finish.
Loose Joints
When dealing with a frame that exhibits a wobbly feel and prone to corner separation, there’s a straightforward solution. Firstly, apply a reliable wood adhesive and secure the frame in place until the glue has fully set. This will effectively eliminate any looseness. To further enhance stability, consider introducing corner reinforcements or splines. These additional measures can be used to prevent future occurrences of this issue.
Glass Breakage
When dealing with glass components in a framing project, one common issue that arises is the cracking or breaking of the material during the insertion process. To mitigate this problem, it’s essential to exercise caution and care when handling glass. A simple yet effective approach is to utilize glazier’s points or small clips to secure the glass within the frame without applying excessive pressure.
Warped Wood
When working with wooden boards, one common issue that arises is that they tend to bend or twist, making it challenging to create a flat frame. To overcome this problem, consider placing the wood under heavy objects for a few days to allow it to flatten out naturally. Additionally, opting for kiln-dried wood can significantly reduce the likelihood of warping and other issues that can arise from moisture content variations.
Adhesive Failures
When it comes to assembling a DIY picture frame, one of the most frustrating problems is when the glue doesn’t hold, causing parts of the frame to come apart. To overcome this issue, it’s essential to ensure that all surfaces are thoroughly cleaned before applying adhesive. Additionally, selecting the right type of glue for the materials you’re working with is crucial. Furthermore, allowing ample time for the glue to dry completely is vital. By addressing these common pitfalls, you’ll be able to create a high-quality and durable DIY picture frame that will withstand the test of time. As with any DIY project, patience and attention to detail are key to achieving success.
Embracing Sustainability in DIY Picture Framing
As the world shifts towards a more environmentally conscious approach, it’s no surprise that sustainability has become a top priority in DIY projects like picture framing. By opting for eco-friendly materials and practices, you can craft stunning frames that not only enhance your favorite memories but also reduce their ecological footprint. To get started on this green journey, consider the following steps:
Choosing Sustainable Materials
When selecting materials for your DIY projects, consider options with minimal environmental impact. A great starting point is recycled materials, bamboo, or reclaimed wood. Not only do these choices support sustainability, but they also bring warmth and texture to your creations. The unique aesthetic they provide can elevate the overall look of your project, making it a standout piece.
Using Eco-Friendly Decorations
When it comes to embellishing your frames, consider opting for eco-friendly materials such as twine or cotton ribbons that derive from nature. A sustainable alternative to traditional glitter is biodegradable glitter crafted from plant-based starch, allowing you to add a touch of sparkle without compromising the environment’s integrity. For paints and finishes, prioritize non-toxic options that are water-based and free from hazardous chemicals, ensuring a healthy and safe decorating experience.
Assembly and Preservation
When it comes to assembling and preserving your DIY picture frames, prioritize eco-friendly options. Water-based adhesives and chemical-free varnishes are a great combination – not only do they reduce environmental impact but also ensure a safer workspace in your home. For preservation, consider glass or acrylic options that provide UV protection, safeguarding your artwork from fading while maintaining a green footprint.
By choosing sustainable materials and methods, you’re not only crafting unique frames for your photos but also demonstrating your commitment to the planet’s well-being.
Maintenance and Care for DIY Picture Frames
The preservation of DIY picture frames is just as crucial as the creation process itself. To extend their lifespan and maintain their pristine condition, it’s essential to implement proper maintenance and care. By following these guidelines, you’ll be able to keep your frames looking like new for a longer period, providing a satisfying reader experience that aligns with Google’s helpful content standards.
Handling and Cleaning
When it comes time to clean your framed artwork or mirror, there are a few key steps you can follow to ensure a streak-free finish. To start, always grasp the frame by its edges and avoid making direct contact with the glass to prevent unsightly fingerprints. For a thorough cleaning, use a soft, dry cloth or a feather duster to gently sweep away any dust that may have accumulated on the frame and glass. If you need to tackle dirt or grime on the glass itself, apply a small amount of glass cleaner to a lint-free cloth before wiping it down. Be sure not to spray the cleaner directly onto the glass, as this can cause damage to the frame’s delicate materials. Instead, apply the cleaner to your cloth and then gently wipe the glass clean.
Environmental Considerations
When it comes to preserving the longevity of your framed pieces, it’s essential to consider the environmental conditions surrounding them. UV rays from direct sunlight can cause photographs and artwork to fade over time, while high humidity can lead to warping or mold growth on wood frames. Additionally, extreme temperatures can cause materials to expand or contract, potentially compromising the integrity of your display. To maintain the condition of your frames and their contents, it’s best to keep them in a stable climate with moderate temperature and humidity levels.
Regular Inspections
Regularly inspect your frames for any indications of wear or damage, such as chips, cracks, or loose corners. Verify that all fittings, including screws, brackets, and hinges, are securely tightened to prevent the frame from separating or compromising its structural integrity. If you notice scratches on the glass or tears in the backing paper, consider replacing these components to preserve the frame’s appearance, functionality, and overall protection.
Storage
To safeguard the integrity of your frames, carefully store them in acid-free paper wrapped containers to shield against damage from scratches or pressure. By stacking frames with protective interlayers, you can effectively prevent any physical harm that might compromise their condition over time. By doing so, you’ll be able to preserve your memories in a beautifully maintained state for years to come.
FAQs on DIY Picture Frame Ideas
Crafting custom picture frames is a fulfilling DIY endeavor, and we’re here to address common concerns that may arise as you embark on this creative journey.
What materials do I need to make a DIY picture frame?
When it comes to building a picture frame, you’ll need a few essential components. First and foremost, you’ll require some type of transparent material to serve as the front face of the frame. This can be either plexiglass sheets or glass, depending on the size and type of frame you’re working with. To add a touch of professionalism to your finished product, consider incorporating matte board into your design. This will provide a clean and elegant finish. The frame itself will need to be constructed from wood strips or dowels, which can then be bonded together using wood glue or another strong adhesive. If you’re looking to add some extra flair to your creation, you may also want to apply a finish or stain to the wood. To keep everything secure and in place, don’t forget to include picture frame tabs in your design. Finally, make sure you have a sawtooth hanger or another suitable hanging mechanism on hand to allow for easy display of your finished piece.
How can I cut plexiglass for my picture frame?
To precision-cut your plexiglass, begin by drawing a straight edge with a steady hand. Next, use a utility knife to score the material along this line multiple times, applying gentle yet consistent pressure. Once scored, position the plexiglass against the edge of a stable surface, such as a workbench or table, aligning it with the marked cutting line. With deliberate force, press down firmly to snap the plexiglass cleanly along the scored line. For thicker plexiglass sheets, you may require the assistance of a circular saw or specialized plexiglass cutting tool.
How do I ensure my DIY frame matches my home decor?
When selecting frames to match your existing decor, consider a harmonious blend of colors, finishes, and styles. Ensure the frame design complements the aesthetic of your room, whether it’s modern, rustic, or traditional. To maintain consistency, choose materials that align with your other home decorations, creating a visually cohesive space.
Can I make a picture frame without woodworking skills?
If you’re not skilled in woodworking or simply want to get creative without breaking out the power tools, fear not! There are numerous ways to craft frames that don’t require traditional woodworking techniques. One approach is to upcycle existing frames by giving them a fresh coat of paint, adding fabric or other decorative elements to breathe new life into them. Alternatively, you can get crafty with cardboard or foam board and create lightweight frames that are perfect for showcasing smaller pieces of art or sentimental items. For a fun and easy project, why not try assembling a frame using Popsicle sticks? This simple yet clever approach allows you to let your imagination run wild while still producing a unique and functional piece.
How can I hang my DIY picture frame securely?
When it comes to hanging smaller to medium-sized frames, a sawtooth hanger provides a secure and stylish solution. Simply attach it to the top center of the frame, ensuring a sturdy hold that won’t slip or fall. For larger or heavier frames, D-rings and wire offer a robust alternative. Start by attaching two D-rings on either side of the frame, then string wire between them to create a reliable anchor point. It’s also crucial to ensure your nail or hook is securely attached to a stud or use a wall anchor for drywall to prevent any accidental falls.
Can DIY picture frames be eco-friendly?
One approach to eco-friendly home decor is to think creatively about repurposing and upcycling. Consider giving old frames, furniture, or materials a new life by transforming them into something unique and functional. This not only reduces waste but also adds character to your space. Additionally, opting for sustainable supplies such as bamboo, reclaimed wood, or other eco-friendly materials can help minimize the environmental impact of your decor choices.
How do I choose the right size for my DIY picture frame?
When it comes to framing your artwork or photo, the first step is to measure its actual size. Next, consider the width of the matte border you want to use – if you’re opting for one at all. This dimension will play a crucial role in determining the overall frame size. To achieve a visually appealing and balanced look, it’s essential that the frame’s proportions are harmonious with those of the artwork itself.
What’s the best way to protect the artwork in my DIY frame?
To protect your artwork from the harsh effects of sunlight, consider implementing a UV-protective barrier such as plexiglass. When doing so, make sure to maintain a gap between the artwork and the glass or plexiglass to prevent any potential damage. Additionally, opt for acid-free matte board to ensure the longevity of your piece by safeguarding it against deterioration.
Can making my own frames save me money?
When dealing with unconventional frame sizes or repurposing materials, custom framing can indeed be a costly endeavor. In such cases, exploring DIY alternatives becomes an attractive option to save on expenses. By opting for do-it-yourself framing solutions, you can enjoy significant cost savings without compromising the overall aesthetic of your project.
30 DIY Picture Frame Ideas (How to Make Picture Frames)
Unleash your creativity with our extensive collection of DIY picture frame ideas. This comprehensive guide will show you how to craft one-of-a-kind picture frames that perfectly complement your home’s décor, making it a true reflection of your personal style.
Homemade Scrabble Tile Picture Frame
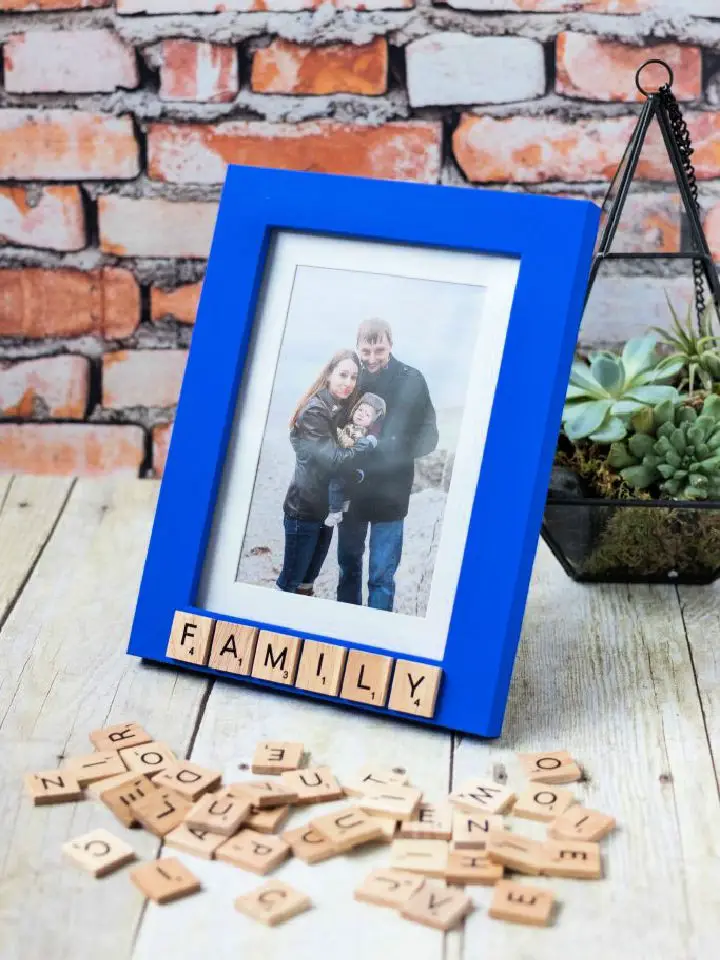
Elevate your gallery wall with modern picture frame ideas that exude personality. For a one-of-a-kind home decor accent, consider a DIY Scrabble tile picture frame project inspired by Rose Clearfield’s website. This straightforward yet engaging craft is perfect for enthusiasts of all skill levels, as it requires only basic supplies like a frame, Scrabble tiles, acrylic paint, and tacky glue. The process involves painting the frame, arranging the tiles, and securing them with glue. Whether you’re looking to create a unique gift or add a personal touch to your own space, this DIY endeavor promises a fun and rewarding experience.
Easy DIY Wooden Picture Frames
With the guidance of Kreg Tool, you can create a custom 11×14 picture frame using a single 1×4 board from home improvement stores. This novice-friendly project requires only basic routing, cutting, and assembly skills to produce a personalized frame that can be easily modified for different photo sizes. The process involves adding decorative touches, assembling the pieces with precision, and preparing the frame for display with keyhole grooves for hassle-free hanging. By following clear instructions and utilizing the right tools, you’ll be able to craft a beautiful frame that showcases your memories perfectly.
How to Make a Seashell Picture Frame
Add a personal touch to your home decor by upcycling a plain wood picture frame into a vibrant keepsake with seashell-inspired DIY decor. Start by prepping the frame with a neutral base coat of Granite Gray, followed by a layer of White for a clean and crisp look. Then, lightly sand the edges to achieve a distressed finish.
Next, get creative with your beach finds! Paint them in an array of colors like Cranberry, Apricot, and Cloudless to bring out their unique beauty. Use a straw to create a tie-dye effect on larger shells and secure them onto the frame using hot glue. For added sparkle, sprinkle crystal glitter between the shells.
With these simple steps, you can craft a one-of-a-kind decoration that captures the essence of seaside memories and adds a touch of personality to your home.
Cool DIY Clothespin Picture Frame
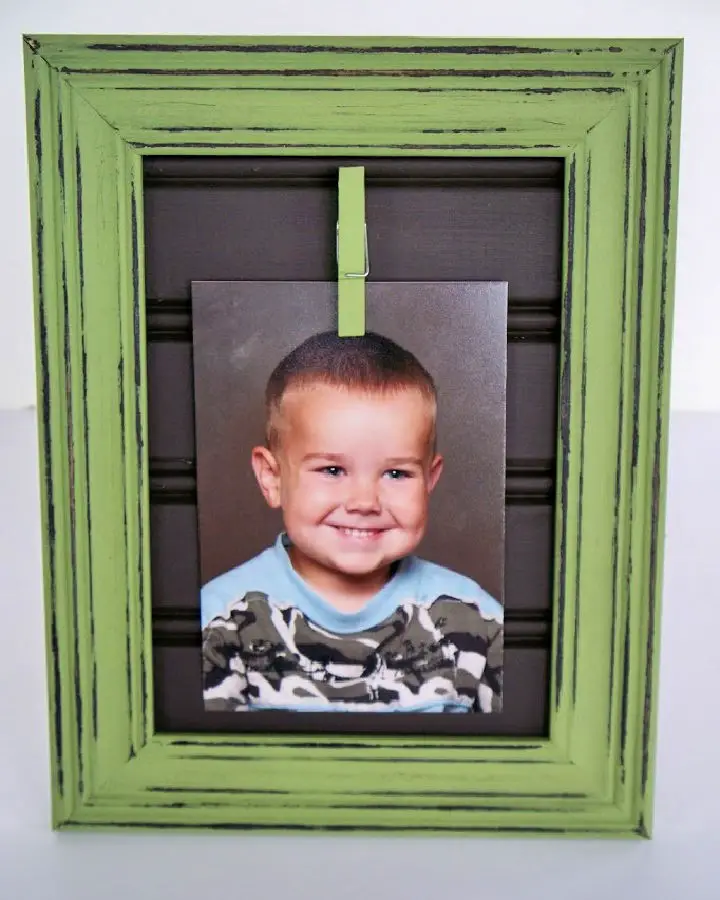
For a charming and functional beadboard picture frame, follow Rachel from Adventures of a DIY Mom’s step-by-step guide on crafting a versatile frame that exudes homespun charm. This DIY project is perfect for displaying recipes in the kitchen, photos in the living room, or memos in the office, making it an ideal addition to any space. To get started, gather simple materials like a 5×7 frame, beadboard scraps, a clothespin, and basic tools. The tutorial provides painting, sanding, and assembling tips to ensure your frame has personality and style. Additionally, the mini easel feature allows the frame to stand independently, making it perfect for placing on any countertop or desk. With this easy-to-follow craft, get creative and personalize your space with a unique piece that reflects your personal touch.
Making a Popsicle Stick Picture Frame
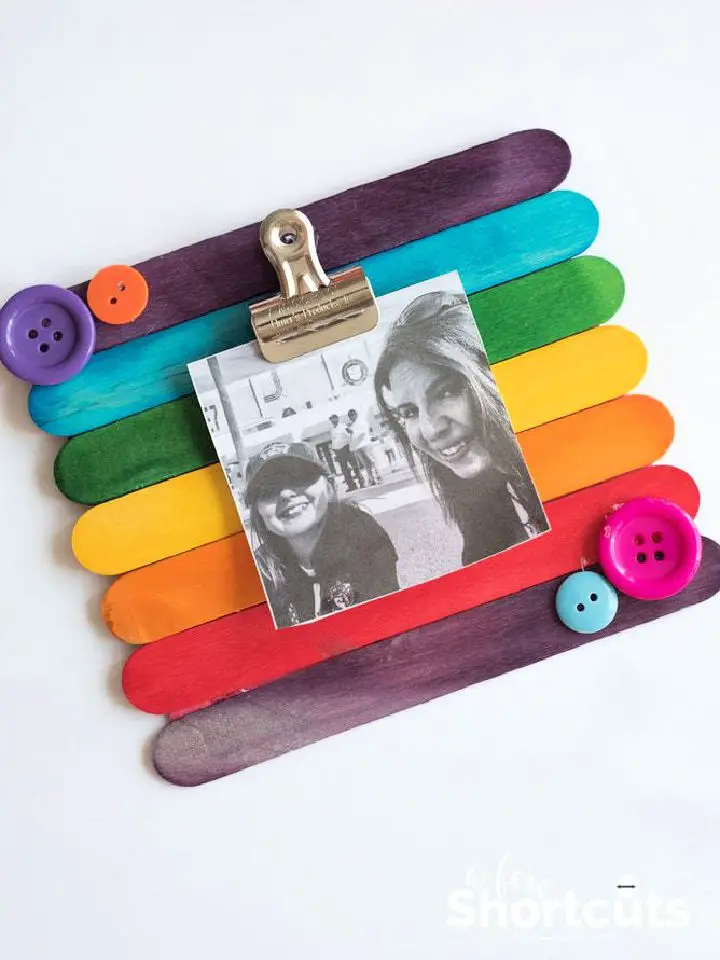
For a fun and easy way to engage kids in a creative activity, consider making a DIY Popsicle Stick Picture Frame together! With minimal materials like popsicle sticks, hot glue gun, construction paper, and decorative buttons or gems, you can create a unique and personalized photo display. This project is perfect for spring break, summer vacation, or a rainy day when you’re looking for a hands-on activity to enjoy with your little ones. By customizing the frame and adding it as a fridge magnet, you’ll have a daily reminder of the special moments you’ve shared together.
How to Build 2×4 Picture Frames
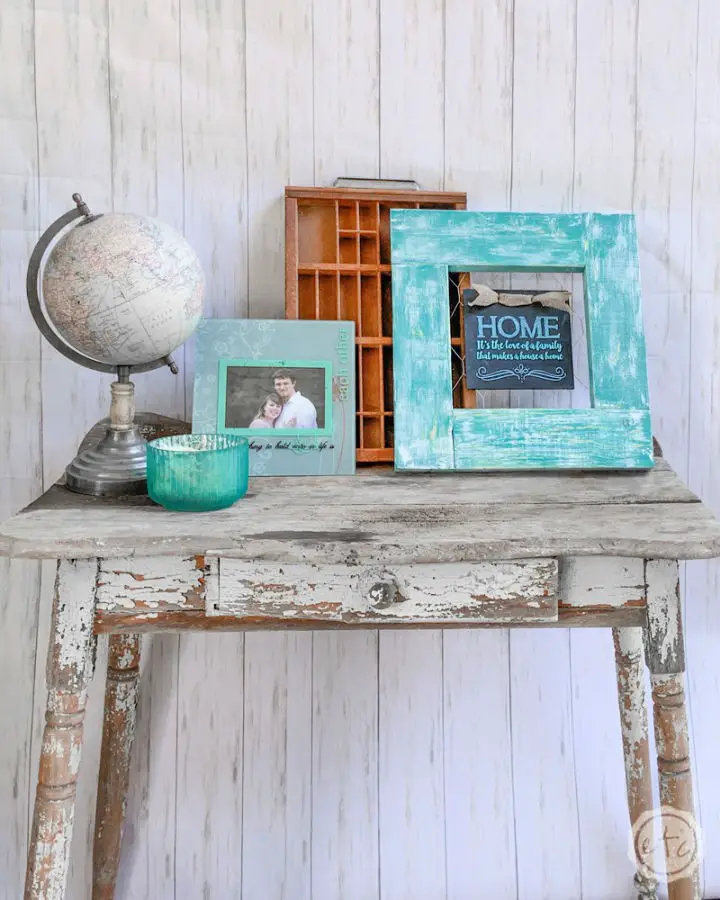
Create a one-of-a-kind farmhouse-style picture frame using 2x4s and chicken wire, all while staying within budget. Happily Ever After, Etc.’s comprehensive guide makes it easy to craft a stunning custom frame, regardless of your DIY level. With a straightforward supply list featuring everyday tools and materials, you’ll be able to follow along seamlessly. The step-by-step instructions take the guesswork out of the process, from cutting and sanding the wood to assembling the frame with pocket hole screws. Add a personal touch with paint and chalkboard elements, then complete your frame with a functional chicken wire backing and clothespins for displaying your favorite photos. With this tutorial, you’ll be able to create a unique and personalized gallery wall that’s sure to impress.
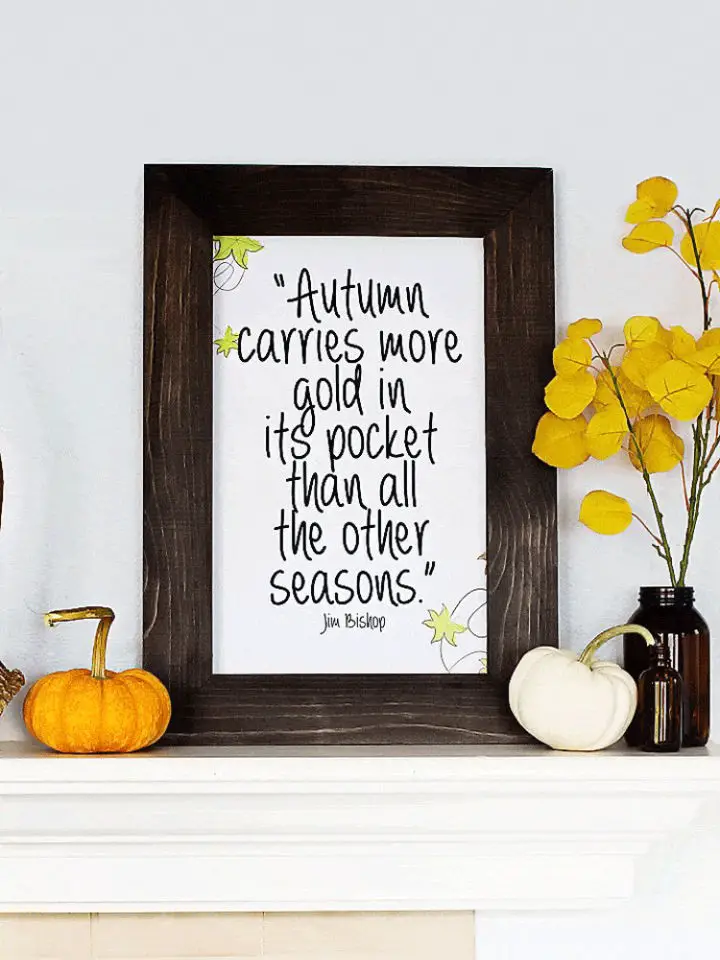
DIY Rustic Twig Picture Frame
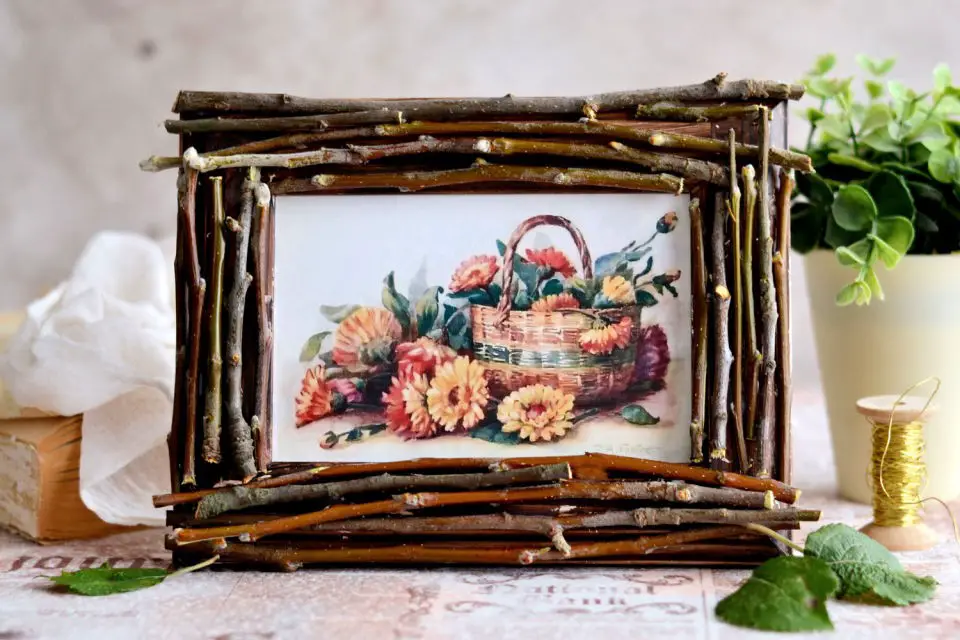
Elevate your home decor by embracing the natural beauty of twigs in a DIY Twig Frame project inspired by The Graphics Fairy. This charming craft invites you to bring the outdoors in by using twigs gathered from your garden or nearby woods to frame a vintage-inspired printable, perfect for adding a touch of rustic charm to your fall decorations or gifting it to a loved one. With its versatility in accommodating frames of various sizes and a straightforward step-by-step guide, this project ensures a delightful and creative crafting experience.
Handmade White Button Picture Frame
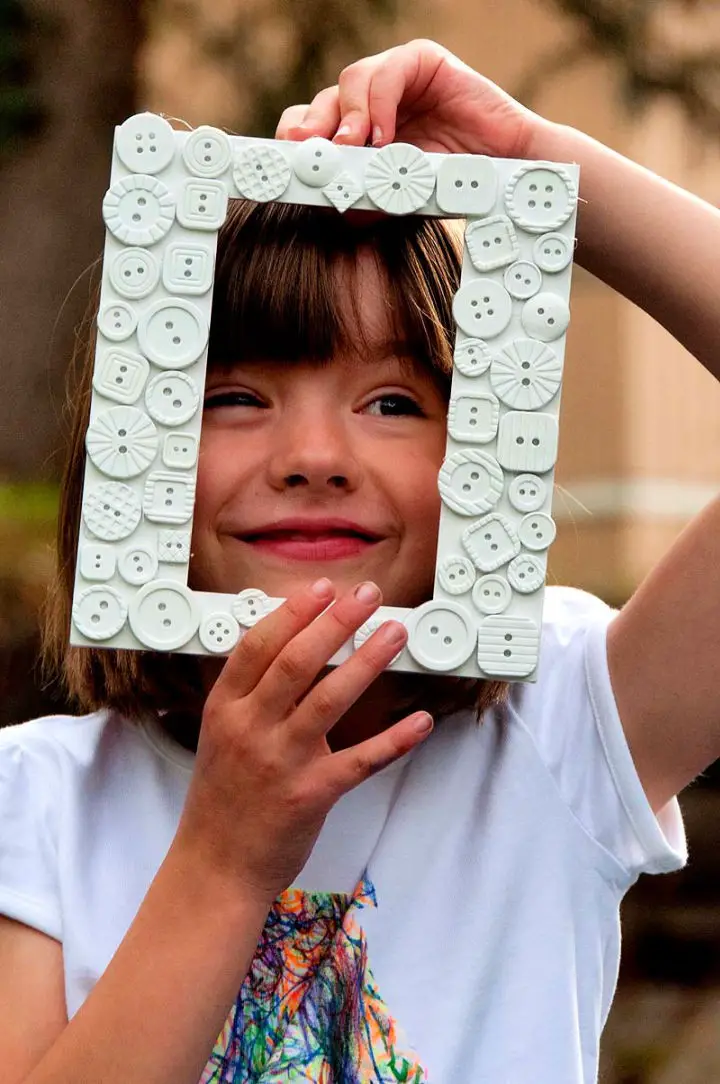
Transform an ordinary picture frame into a charming white button masterpiece with this easy-to-follow DIY guide. Perfect for adding a personal touch to your home decor or creating a thoughtful gift, this project is both fun and straightforward. Begin by choosing a flat-faced picture frame and collecting white buttons, spray paint, and a hot glue gun. Once you’ve got these essentials gathered, follow the steps: first, give the frame a fresh coat of spray paint and let it dry completely. Next, get creative with your button arrangement and secure them to the frame using hot glue. This craft is ideal for special occasions or just because – it’s sure to bring a smile to anyone’s face. And as you work on this project with family or friends, you’ll create memories that will last long after the final product is complete.
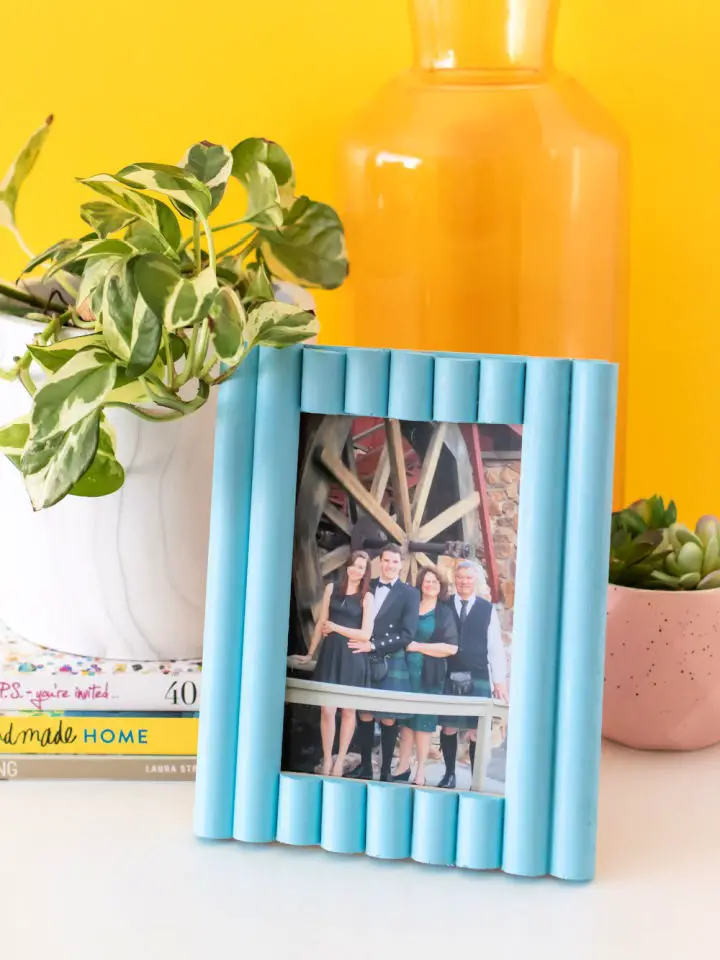
Make a Rolled Paper Picture Frame
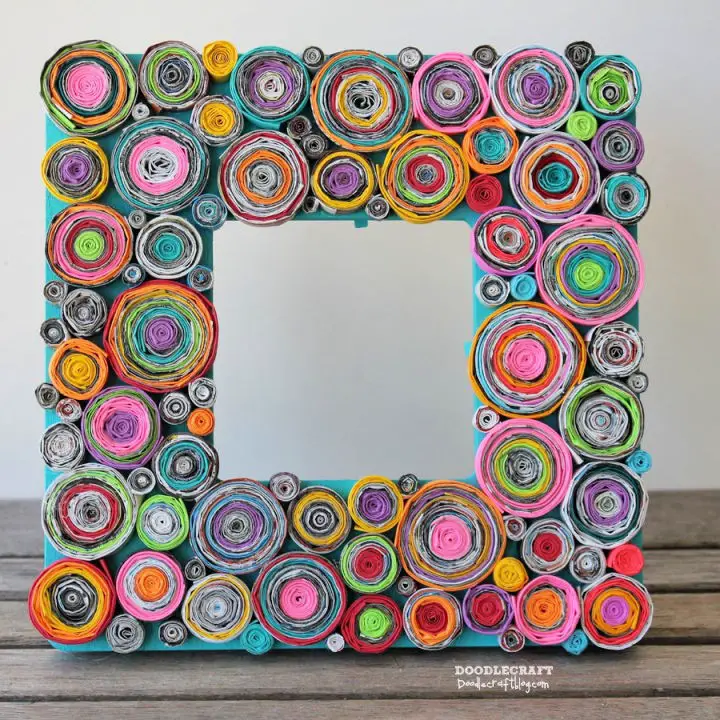
Transform discarded magazines and paper scraps into a stunning, textured picture frame with Instructables’ comprehensive guide on Upcycled Rolled Paper Frame. This eco-friendly project is perfect for crafters seeking creative ways to reduce waste, as it breathes new life into old materials. The step-by-step tutorial provides crystal-clear instructions and valuable tips, making the meticulous rolling process a meditative experience. As you transform scraps into art, you’ll not only create a unique conversation piece but also contribute to a more sustainable lifestyle. This project is ideal for personalizing your space or gifting to friends who appreciate the beauty of repurposing.
DIY Wooden Picture Frames Under $15
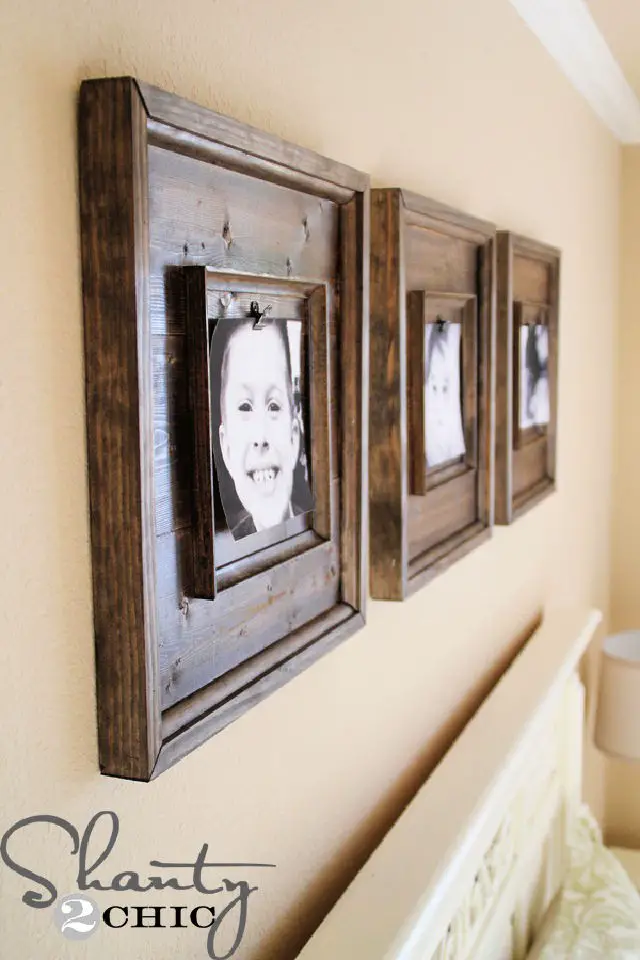
Transform your home decor with personalized DIY picture frames, crafted at an affordable price. With Shanty 2 Chic’s comprehensive guide, you can create stunning wooden frames for wall art in just a few simple steps. By combining straightforward cuts of wood, pocket hole assembly, and decorative molding, you’ll achieve a polished look that complements any room. Add a rich stain and your favorite photos to complete the custom piece, making it a unique and budget-friendly art installation that’s sure to impress.
How to Make a Fruit-Themed Picture Frame
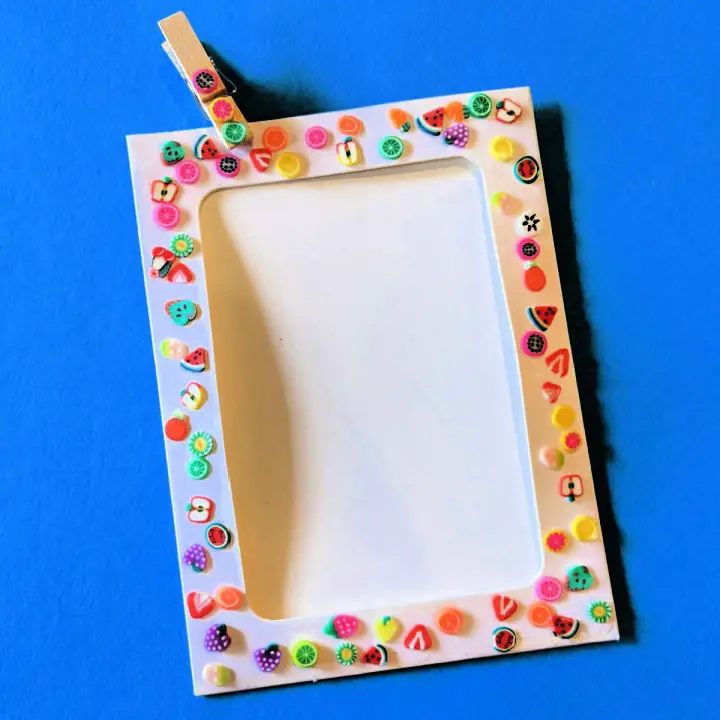
Transform a plain picture frame into a vibrant fruit salad masterpiece with this easy-to-follow DIY tutorial from Mama Likes This. Perfect for injecting a summer feel into your space, this project is suitable for all skill levels and group activities alike. To get started, gather paper picture frames, polymer fruit confetti, glue, and a few other simple materials. Then, follow the step-by-step guide to adorn your frame with colorful fruit slices and showcase your favorite photos in style. Not only will this craft brighten up any room, but it also makes for a thoughtful handmade gift option. Let your creativity flourish as you bring this cheerful, fruit-themed decor piece to life.
Build a Picture Frame for Art and Posters
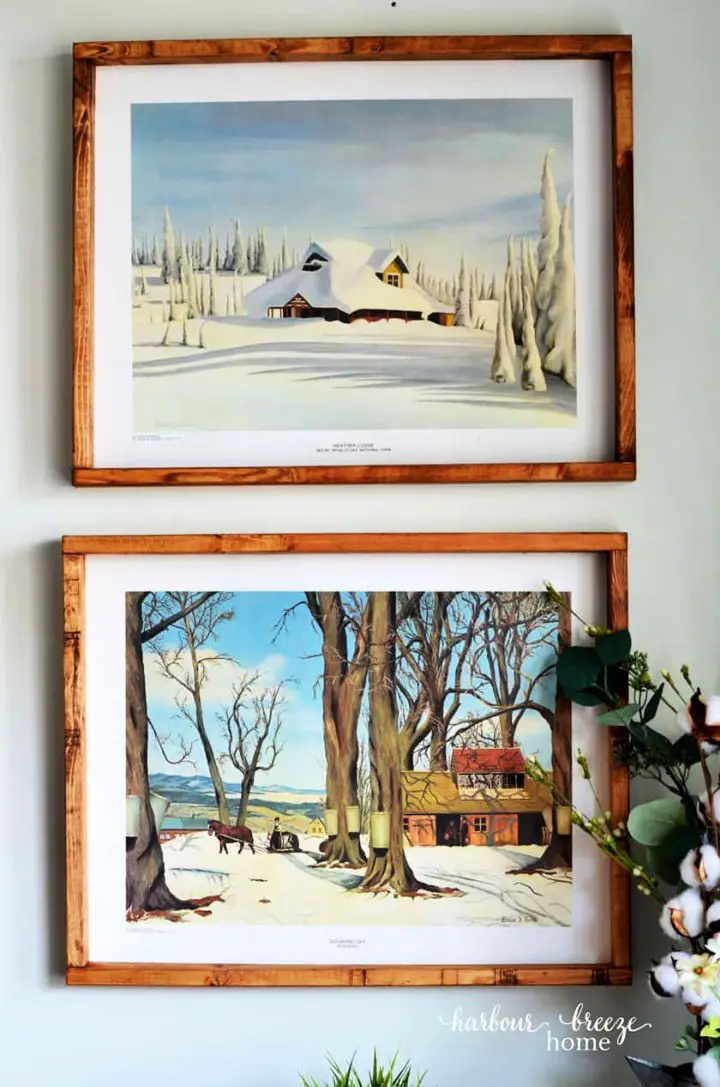
Want to elevate your home decor without breaking the bank? Look no further than these DIY picture frame ideas. With just a few simple tools and some basic materials, you can create a stunning custom-sized frame that adds a touch of rustic charm to any room. The best part? It’s surprisingly easy to do yourself. By following Harbour Breeze Home’s straightforward guide, you’ll be able to build a large picture frame at home with ease. Simply gather your materials – including 1×2 boards, a miter saw, a brad nailer, and some wood stain – and follow the clear instructions to create a professional-looking finish. And when it comes time to hang your masterpiece, the included sawtooth hanger ensures a secure mounting solution that will leave you feeling proud of your handiwork.
Unique DIY Rocky Picture Frame

Transform your space with a one-of-a-kind, rustic rocky picture frame, effortlessly crafted using just a few simple materials. Perfect for those who adore incorporating natural elements into their decor, this DIY project requires only a frame, some paint, polished rocks, and super glue. Start by giving the frame a personalized touch with a coat of your chosen color. Next, carefully arrange the stones from the outer edge inward, achieving a tidy finish. Once the stones are secure, reassemble the frame and insert your favorite photograph. This budget-friendly craft not only adds a touch of nature to any room but also allows for personal touches, such as using rocks collected from meaningful locations. Ideal for gifting to outdoor enthusiasts or adding a unique charm to your own home, this handcrafted frame brings a piece of the great outdoors inside, inviting warmth and serenity into your space.
Making a Valentine’s Jewel Picture Frame
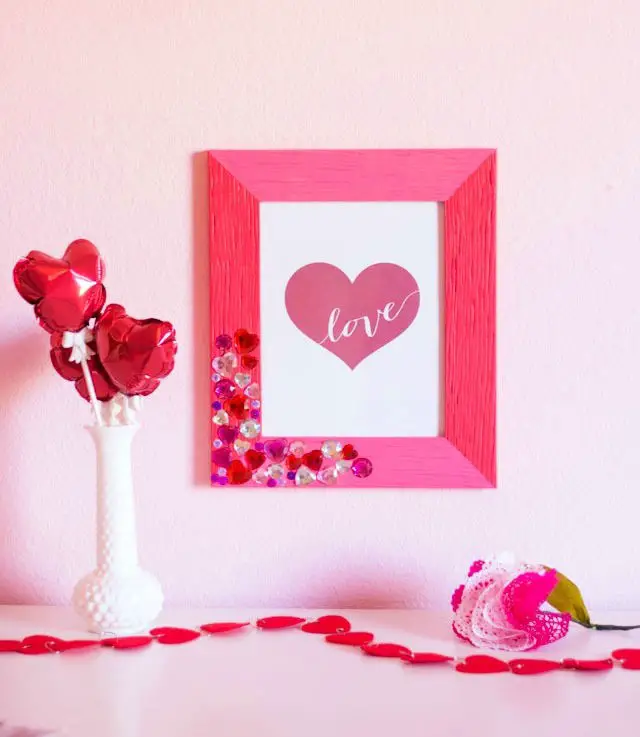
Transform a plain DIY picture frame into a charming Valentine’s jewel masterpiece with ease! To get started, choose a wooden craft frame and a variety of flat-back jewels in romantic colors that evoke the spirit of love. Then, unleash your creativity by painting the frame with craft paint, creating a unique color-blocked design that adds an extra layer of personality to your project. Once the paint is dry, attach the jewels to the frame using craft glue, allowing them to shine brightly and add an extra touch of whimsy to your creation. This engaging DIY project is perfect for adding a personalized touch to your home decor or giving as a heartfelt gift to loved ones on Valentine’s Day.
Colorful Geometric Picture Frame Using Tissue Paper
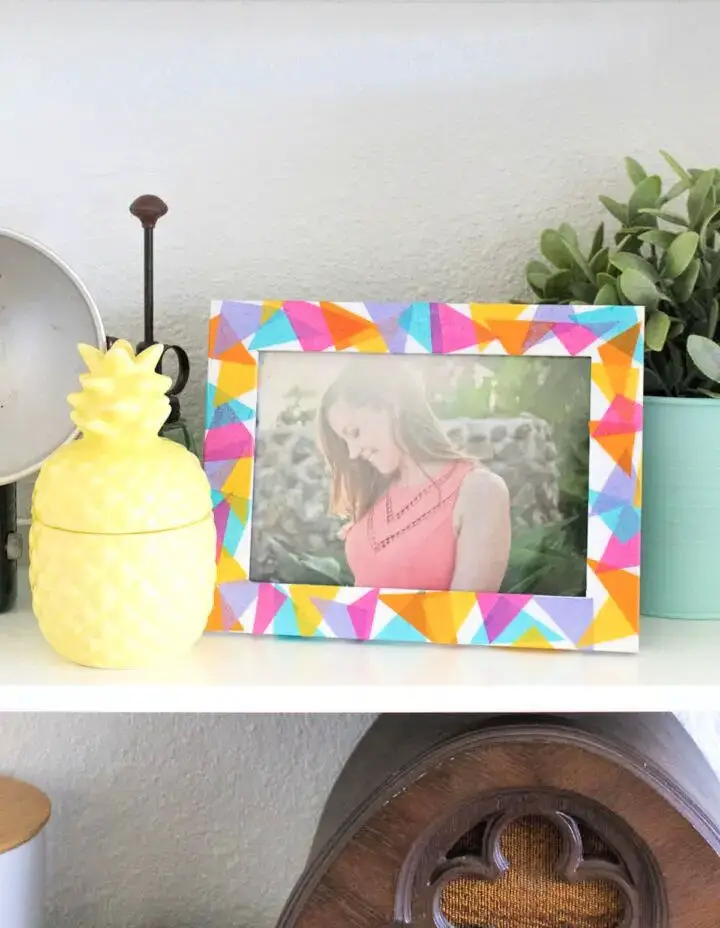
Transform any room into a kaleidoscope of color with this vibrant geometric tissue paper frame craft. Perfect for beginners, this project requires minimal skill, but yields impressive results. Simply cut colorful tissue paper into small triangles and decoupage them onto a plain photo frame using Mod Podge Gloss and a paintbrush. Start by applying a thin layer of Mod Podge to the frame, then begin adding the tissue triangles in an overlapping pattern. Continue until the entire frame is covered, finishing with another layer of Mod Podge to seal and protect your design. Once dry, hang your masterpiece or gift it to someone special.
DIY Mermaid Picture Frame Tutorial
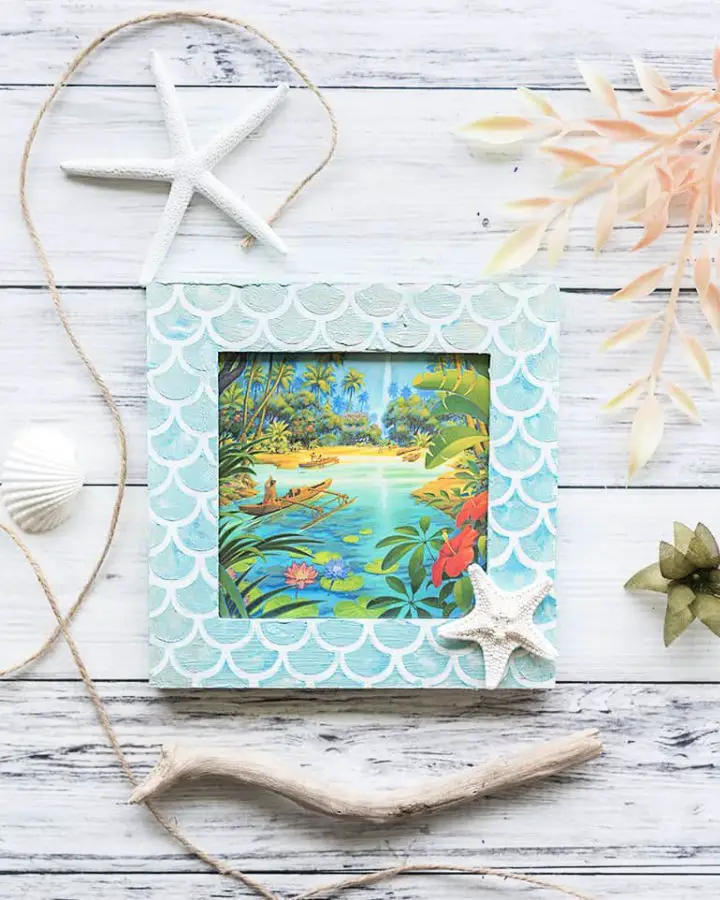
Transform a plain picture frame into a mesmerizing mermaid-themed masterpiece using The Artisan Life’s step-by-step guide. With a downloadable mermaid scale stencil at your disposal, you can create a truly unique piece of decor that captures the essence of summer memories. To get started, gather materials such as a wood frame, acrylic paint, gelatos, and modeling paste. As you apply the textured mermaid scales, don’t be afraid to add personalized touches like shells or charms for an extra dash of oceanic flair. This project is perfect for crafters of all skill levels, offering a fun and creative way to infuse your home with a touch of underwater magic.
How to Build a Wood Picture Frame
Transform a humble wood photo frame into a showstopping display piece with Club Crafted’s step-by-step guide. This DIY endeavor involves adding half-round moulding to a basic frame for an eye-catching effect. Simply gather your materials: a wood frame, half-circle trim, hand saw or power tool, ruler, glue gun, paint, and paintbrush, with optional sandpaper for smoothing rough edges. Begin by selecting the frame’s orientation and measuring the trim to fit seamlessly. Cut the trim to match the frame’s dimensions, then sand the edges to achieve a smooth finish. Next, apply glue and secure the trim in place. Finally, add a few coats of matte paint to complete the transformation. With these simple steps, you can proudly display your cherished memories in a one-of-a-kind, stylish frame that elevates any room’s aesthetic.
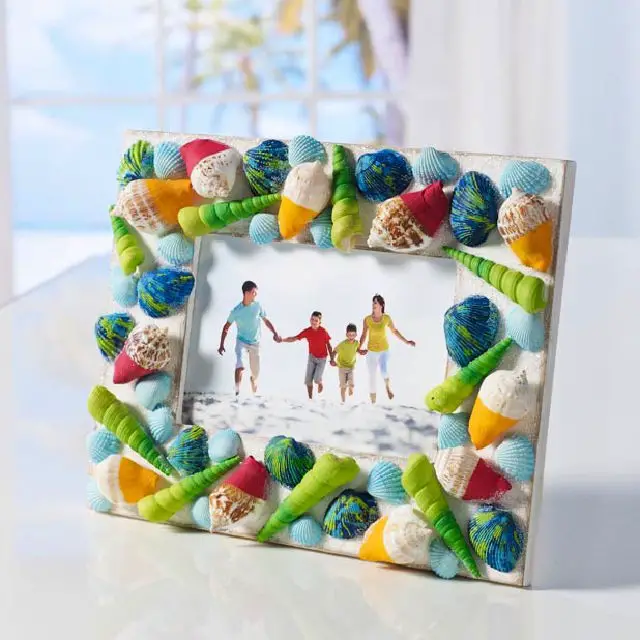
Dollar Store Seashell Picture Frame

Transform a plain picture frame from a dollar store into a beautiful seashell masterpiece with this easy DIY project inspired by The Crazy Craft Lady. Perfect for displaying cherished beach memories, this craft involves adhering an assortment of seashells and pebbles to the frame using hot glue and super glue. To get started, remove the frame’s backing and apply a thin layer of adhesive, then begin decorating with your chosen shells and pebbles, creating a unique design that reflects your personal style. Once complete, simply insert your favorite photo and enjoy a personalized piece of decor that brings the beach to life in your home.
Free Picture Frame Woodworking Plan
With Saws on Skates’ guidance, creating custom picture frames becomes a fun and rewarding DIY project. This straightforward tutorial eliminates the need for costly store-bought options, allowing you to craft unique, handcrafted frames that showcase your favorite photos or artwork beautifully. The process is surprisingly simple, requiring only basic tools and eight straight cuts, making it accessible to anyone looking to personalize their space. By following these easy-to-follow instructions, you can assemble attractive frames in an afternoon, perfect for enhancing your home or creating thoughtful, handmade gifts. Plus, the ability to adjust the size of your frame means endless possibilities for customization, giving you the freedom to create one-of-a-kind masterpieces that truly reflect your personal style.
Simple DIY Wooden Picture Frame
Transform your walls into a personalized canvas with these innovative picture frame painting ideas. Crafting a custom DIY picture frame is an accessible and fulfilling project that can infuse your home decor with a touch of personality. By following the straightforward tutorial offered by Place Of My Taste, you can create a stunning frame for under $5 using a modest set of materials including pine boards, screws, screwdriver, clamps, tape measure, wood stain, and hanging hardware. With these simple components, you’ll be able to construct a frame that proudly displays your cherished photos or artwork.
This comprehensive guide provides clear, step-by-step instructions for measuring, cutting, and assembling the frame with ease, ensuring that even novice DIY enthusiasts can achieve impressive results. The ability to stain the wood allows for customization to suit your personal style, and the final product is a one-of-a-kind, handcrafted piece that’s perfect for gifting or enhancing your own space.
How to Make a Picture Frame at Home
Transform a simple 2.5-inch board into a charming home decor piece with this effortless DIY guide from Domestically Speaking. Perfect for displaying treasured memories or the included free fall printable, this rustic picture frame is sure to add warmth to any room. To get started, gather your materials – including a miter saw and staple gun – and dive into crafting a personalized frame that reflects your unique style. With clear instructions and creative freedom, you’ll enjoy bringing this project to life and enhancing your space with a handmade touch.
Quick and Easy DIY Picture Frames
With Houseful of Handmade’s comprehensive guide, creating DIY picture frames has never been more effortless. In just 20 minutes, you can craft a one-of-a-kind wooden frame that elevates your home decor or serves as a thoughtful gift. The step-by-step process requires minimal tools and materials, allowing you to tackle frames of any size with confidence. Kati’s straightforward instructions make the project accessible to anyone seeking to infuse their space with a personal touch. Moreover, her expert tips on finishing techniques, such as dry brushing, empower you to achieve a charming rustic look that highlights the wood’s natural texture. Prepare to transform your cherished memories into stunning works of art with this engaging and informative tutorial.
Make Your Own Wood Picture Frame
Transform your treasured moments into stunning works of art by creating unique homemade picture frames. The process of crafting a wooden frame from scratch may seem daunting, but with the right guidance, it’s surprisingly accessible. Better Homes & Gardens offers a comprehensive, step-by-step tutorial that empowers you to bring your creative vision to life. Begin by carefully measuring and preparing your frame components, taking into account the crucial rabbet groove that holds everything together.With basic tools like a miter saw, table saw, and sandpaper at your disposal, you’ll effortlessly cut and shape the wood pieces needed for your frame. A gentle touch of sanding will ensure a smooth finish before moving on to glue the frame together, apply your preferred coating, and assemble the acrylic glass, photo, and backing. Finally, secure the frame with nails and add mounting hardware to complete the masterpiece.This engaging guide is designed to make the DIY process enjoyable and stress-free, allowing anyone to infuse their home decor with a personal touch that reflects their unique style.
Homemade Barn Wood Picture Frame
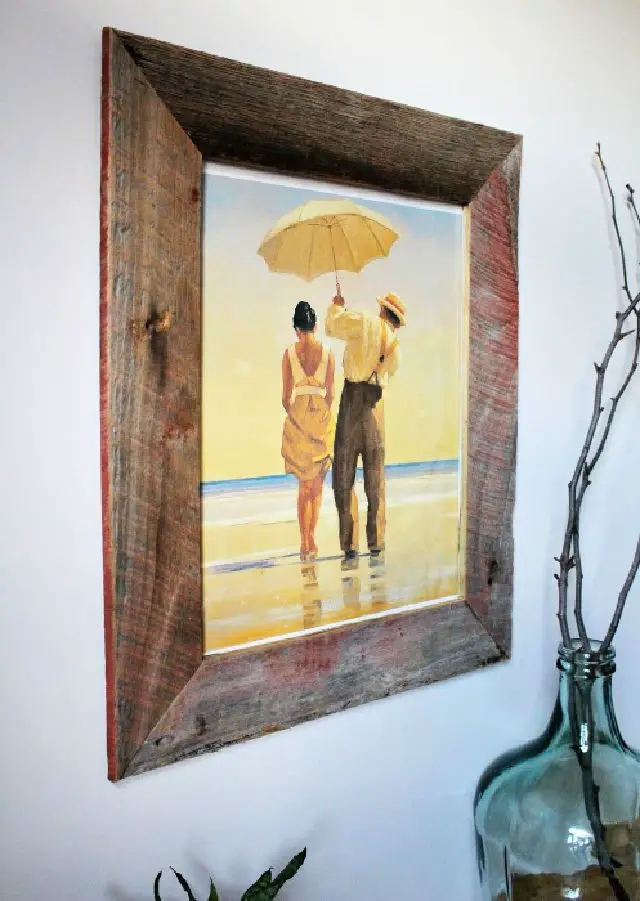
Elevate your home decor by transforming memories into treasured pieces of art using rustic wooden picture frame ideas. The process of creating a DIY Barn Wood Picture Frame is an enjoyable experience that not only showcases cherished moments but also adds a touch of natural charm to any room. This comprehensive guide will walk you through the steps of upcycling reclaimed lumber, from selecting the perfect materials to assembling the frame. With each phase carefully detailed, this project provides an accessible and enjoyable DIY experience. Not only does it offer a unique way to recycle old wood, but it also grants you the satisfaction of creating something personalized with your own hands.
Awesome DIY Book Picture Frame Idea
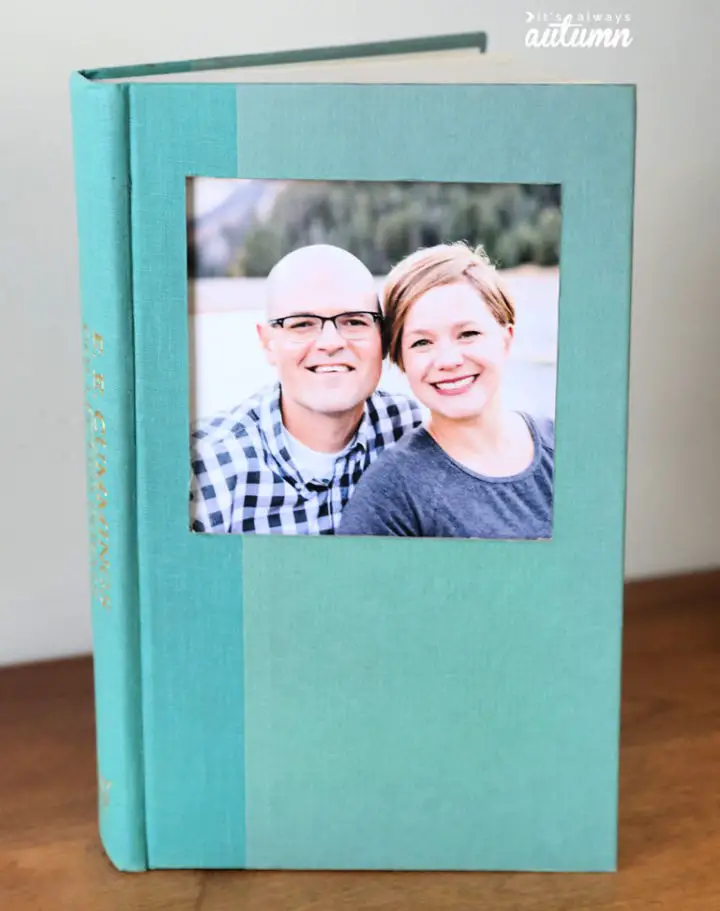
Elevate your photo display with these innovative picture frame ideas that seamlessly blend creativity and nostalgia. Take inspiration from It’s Always Autumn, where you can transform an old hardback into a charming DIY book picture frame. This clever project merges the world of literature with cherished memories, allowing you to showcase your favorite photos without damaging the book or image. With just 15 minutes of your time and basic tools like an Exacto knife and metal edge ruler, you can craft a one-of-a-kind photo frame that also enables easy picture swapping. Whether you choose to use a protective page sleeve or not, this creative project is perfect for personalizing your space with a touch of literary flair.
Making a Cricut Photo Frame for Father’s Day
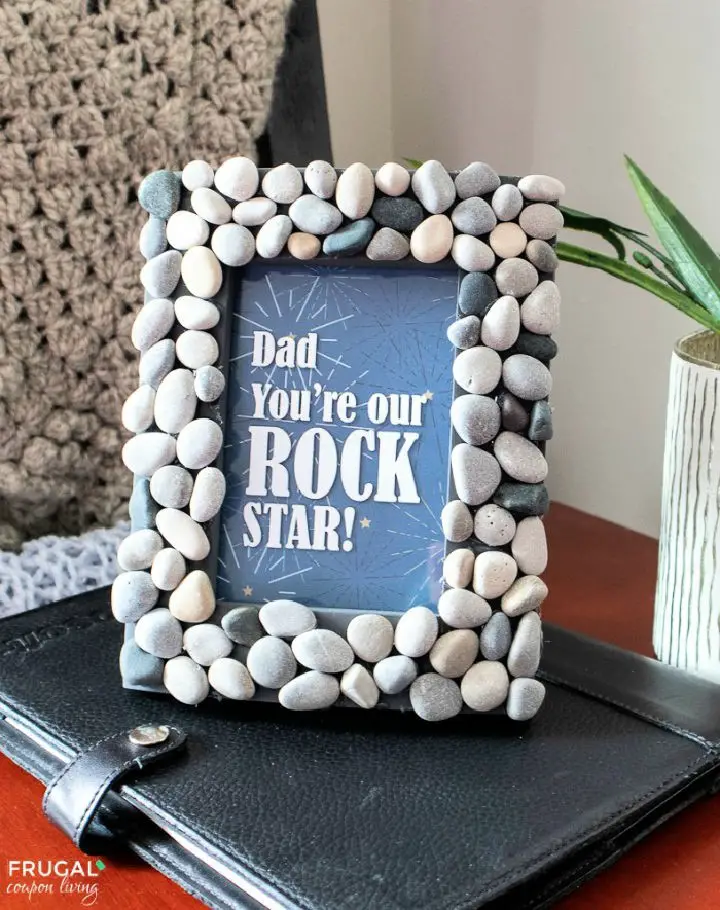
Transform Father’s Day into an unforgettable celebration by crafting a heartfelt gift using Frugal Coupon Living’s DIY Photo Frame tutorial. This straightforward guide empowers you to create a personalized rock-themed picture frame, tailored to highlight Dad’s star status in your life. With complimentary SVG files compatible with Cricut Design Space, this project offers both budget-friendly and customizable options. Simply gather the necessary materials, follow the step-by-step instructions, and get ready to surprise Dad with a one-of-a-kind present that encapsulates your gratitude for all he does.
Building a Wood Burned Picture Frame
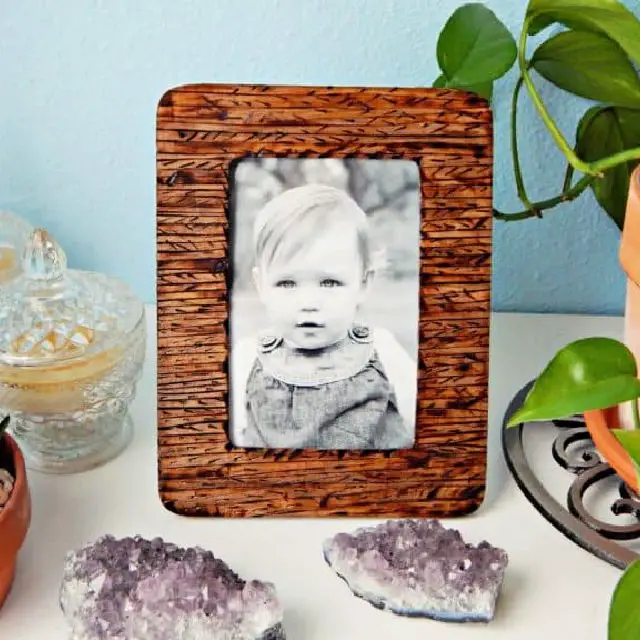
Transform a plain wooden picture frame into a one-of-a-kind masterpiece by following this comprehensive DIY guide from Crafty Little Gnome. The tutorial teaches you how to harness the power of wood-burning tools to create intricate designs that add texture and personality to your frame, all with minimal materials required. You’ll learn a simple process for crafting striped patterns and how to enhance the natural beauty of the wood with a rich walnut stain. This project is perfect for displaying cherished memories or showcasing treasured keepsakes in a way that’s both unique and personalized. With crystal-clear instructions and expert tips, you’ll be able to create your own custom picture frame in no time.
Easy-Peasy DIY Picture Frame
Transform your space with these effortless homemade picture frame ideas. While making a custom picture frame may seem daunting, it’s actually a surprisingly straightforward DIY project that adds a unique personal touch to your home decor. To get started, check out Bunnings New Zealand’s step-by-step guide for creating a frame tailored to your desired size. You’ll need basic tools like a mitre saw, clamps, and a drill, as well as materials such as timber moulding and MDF backing. Begin by cutting your timber to the required length, ensuring precise mitre cuts that fit together seamlessly. Then, assemble the frame using wood glue and secure it with clamps before sanding for a smooth finish. Once complete, simply insert your artwork and secure it with frame stays. To add an extra layer of personalization, consider adding a touch of color with paint or varnish before proudly displaying your one-of-a-kind creation.
How to Paint Picture Frames

Transform tired picture frames into one-of-a-kind masterpieces by giving them a fresh coat of paint and incorporating creative embellishments. Start by disassembling the frames and thoroughly cleaning each component. For smooth surfaces like plastic or metal, apply a primer like Dixie Belle’s Slick Stick to ensure optimal paint adhesion. Select your preferred paint finish – chalk, mineral, or silk – and choose brushes that suit the frame size for a seamless application. To add personality, consider distressing or attaching unique items such as buttons, keys, or Scrabble tiles. Once dry, arrange your newly painted frames to showcase cherished photos and infuse your home decor with a personal touch. With this straightforward guide, you can effortlessly transform your frames into custom pieces that beautifully display memories and elevate your space.
I Love You to Pieces Picture Frame
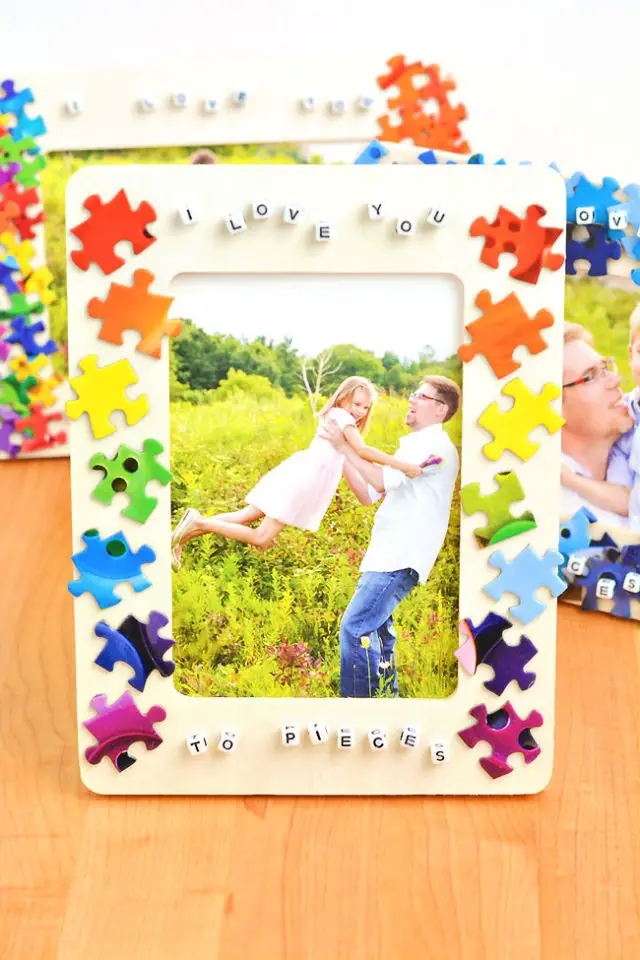
Transform your home’s interior with innovative picture frame design ideas. Create a one-of-a-kind ‘I Love You to Pieces’ masterpiece by tackling a simple DIY project inspired by One Little Project. This charming craft is ideal for Father’s Day, Mother’s Day, or any special occasion, effectively conveying affection through thoughtful details. With readily available materials like letter beads, puzzle pieces, and a wooden frame, you can bring this unique gift to life, showcasing love in every aspect. The straightforward instructions and low-mess process make it an enjoyable activity for all ages. Embark on this creative journey and present a loved one with a treasured keepsake that’s both heartwarming and cleverly designed.
Conclusion:
As you wrap up your DIY picture frame project from our extensive collection of 30 innovative ideas, you’ll not only be able to tailor your home decor to your unique taste but also experience a profound sense of fulfillment. By following our easy-to-follow instructions, you’ll gain the skills and confidence to create one-of-a-kind home accents that showcase your personal style and creativity.Whether it’s mastering the art of woodworking, learning how to expertly assemble the frame, or ensuring it harmonizes seamlessly with your existing decor, this comprehensive guide provides you with the essential tools and knowledge needed. So, gather your materials and let’s turn those cherished memories into stunning works of art, uniquely crafted by your own hands.
