Creating a one-of-a-kind DIY pencil case or pouch is an engaging project that allows for personalization and expression. This step-by-step guide will empower you to craft a unique storage solution for your writing instruments, infusing everyday school or office supplies with a dash of creativity. By following our instructions, you’ll not only produce something tailored to your needs but also develop a sense of accomplishment. The customization process is an integral part of the fun, offering endless possibilities in design and function. You can choose from various techniques, such as hand-sewing or more advanced methods, and rest assured that we’ve covered all the essential materials and tools required for each approach. Additionally, our guide will provide valuable insights into troubleshooting common issues and offer eco-friendly upcycling tips to minimize waste and promote sustainability. Get ready to transform basic materials into a masterpiece of convenience and style, and discover the joy of crafting something both beautiful and practical.
How to Make a Pencil Case – Step by Step Guide
Crafting a spacious and practical pencil case can be a rewarding DIY experience. By following this step-by-step guide, you’ll learn how to create a large-capacity stationery pouch with three zippers, similar to the one showcased in the Sewing Times YouTube tutorial. This reliable guide will walk you through each stage of the process, making it easy to craft your own triple zipper pencil case and enjoy the satisfaction of creating something useful and functional.
Materials You’ll Need:
The outer fabric requirements consist of five distinct pieces, each with its own unique dimensions. The first two pieces measure 24cm x 10.5cm (9* ½″ x 4⅛″), while the next two pieces are slightly larger at 32cm x 4cm (12* ¾″ x 1½″). The final piece measures 31cm x 7cm (12* ¼″ x 2¾″). In total, three pieces of outer fabric are needed. The lining fabric requirements are more extensive, comprising nine pieces in total. Seven of these pieces match the dimensions of the outer fabric, with two additional pieces measuring 24cm x 6.5cm (9* ½″ x 2⅝″) and 15cm x 10.5cm (6″ x 4⅛″), respectively. The zippers required for this project come in three distinct lengths: one piece measures 30cm (12″), while the remaining two pieces are slightly longer at 40cm (16″).
Tools Required:
Essential Tools for Sewing: A Beginner’s Guide
When it comes to starting a new sewing project, having the right tools can make all the difference. From beginner-friendly machines to precision instruments, here are some must-have essentials to get you started.
A high-quality sewing machine is the cornerstone of any sewing setup. For beginners, we recommend the [Amazon Link] – an Amazon-approved bestseller that’s perfect for learning and creating.
But it doesn’t stop there! A good pair of scissors, precision pins or clips, a sturdy ruler, fabric marker, and reliable iron are all crucial components to your sewing arsenal.
Instructions:
Before constructing the fabric pouch, start by cutting out all the outer and lining fabric pieces according to your measurements. Then, add some structure to the outer fabric by ironing fusible fleece onto its wrong side. Follow the manufacturer’s instructions for application.Next, sew the sides of the outer shell together, leaving a 1/4-inch seam allowance for a clean finish. Make sure to arrange the fabric pieces in order before sewing. Once you’ve completed the exterior, attach the zipper between the top edges of the front and back pieces. Ensure it opens and closes smoothly.Repeat this process for the lining, arranging and sewing its pieces together while leaving an opening on one side for turning the case right side out later. Attach the remaining zippers to the lining in the same manner as the outer shell.To join the outer shell and lining, insert the former into the latter with their right sides together and align the zippers. Then, sew around the perimeter, leaving the previously mentioned opening in the lining. Carefully turn the pencil case right side out through this opening, iron it flat, and sew the opening closed.Finally, close the zippers, align any remaining edges, and give your pouch a final press with the iron to sharpen its edges and corners. You can also topstitch along the edges for added durability and a professional finish if desired.
Video Tutorial
While a visual tutorial can be helpful in following this written guide, it’s also important to have a clear understanding of each step involved in crafting a triple zipper pencil case. To that end, I recommend supplementing your reading with the DIY Triple Zipper Pencil Case Tutorial video by sewingtimes on YouTube. This pairing will allow you to seamlessly transition between the written and visual components, ensuring a comprehensive understanding of the process. With this project, you’ll not only be creating a functional and stylish stationery pouch but also honing your sewing skills in the process. Whether you’re making one for personal use or as a thoughtful gift, the end result is sure to bring a smile to those who receive it.
Customization Ideas for Your DIY Pencil Case
Creating a DIY pencil case is an opportunity to inject your personality into the humble stationery holder. With just a few simple tweaks, you can transform it into a true reflection of yourself. Here’s how: Start by selecting a fabric that speaks to you – a vibrant print, a soft denim, or even repurposed old t-shirt. The possibilities are endless and will set the tone for your creation.
Take it up a notch with some added color. Fabric paints or markers can bring out your inner artist, adding simple polka dots or intricate mandalas to the fabric. Let your creativity flow onto the canvas, unshackled by conventional designs.
For an instant personality boost, try iron-on patches. With countless designs available, from favorite bands to animals and quotes, you can add a dash of whimsy or wit to your pencil case. And if embroidery is more your thing, take on the challenge and add your initials or a small design. The handmade touch adds a level of personalization that’s hard to replicate.
Zipper charms are another fun way to add some flair. Attach beads or charms to create a functional feature that also happens to be visually appealing. Every time you reach for a pen, you’ll have a little pick-me-up to brighten your day.
The inside of your pencil case can also be customized with pockets designed specifically for certain items. A small pocket for erasers or a loop for a ruler can add organization and practicality to the mix.
Finally, make it official with personalized labels. Create one with your name or a motivational quote that will serve as a reminder of just how unique this pencil case is – uniquely yours.
The beauty of DIY lies in its ability to reflect our personalities. So go ahead, experiment, and create a pencil case that you’ll be proud to show off!
Troubleshooting Common Issues
As you embark on crafting your DIY pencil case, it’s natural to encounter some snags along the way. But don’t worry – these minor hiccups can actually be opportunities to refine your skills and create something truly unique! Here’s a rundown of common issues that may arise, along with tried-and-true solutions to get you back on track:
One common challenge is fabric fraying, which can occur when the cut edges start to unravel. To prevent this from happening, apply a small amount of clear nail polish or fabric glue along the edges before sewing. This simple step will help keep your fabric in place and ensure a professional-looking finish.
Another issue that might arise is a zipper not functioning smoothly. If this happens, try rubbing a graphite pencil or a bar of soap along the teeth of the zipper – this acts as a lubricant that should get your zipper gliding effortlessly once again.
When it comes to sewing, uneven stitches can be frustratingly common. To overcome this hurdle, take some time to practice on scrap fabric before working on your actual project. Remember to keep a consistent speed and guide the fabric gently through the machine.
Turning your pencil case inside out can also be a challenge – especially if the corners are too tight. To avoid this issue, make sure to clip the corners diagonally before turning the case inside out. This will help create smoother edges that won’t pucker or wrinkle.
If you find that your pencil case is lacking structure and doesn’t stand up as well as you’d like, try using interfacing or a thicker lining to give it more form. Not only will this make the case easier to handle, but it’ll also protect your stationery from damage.
Finally, if you’re concerned about decorations peeling off over time – whether you’ve used iron-on patches or stickers, or painted designs with a sealant spray – remember to apply enough heat according to the instructions. This will ensure that your artwork stays securely in place and doesn’t fade or chip easily.
By anticipating these common issues and knowing how to address them, you’ll be well on your way to creating a beautiful, functional pencil case that’s truly one-of-a-kind.
Upcycling Tips for Your DIY Pencil Case
When it comes to crafting a unique and eco-friendly pencil case, upcycling is an excellent approach. By repurposing old materials, you can create a stylish and functional piece that not only saves resources but also reduces waste. Here’s how to get started:
Rethink Your Old Clothes: Dig through your wardrobe for clothes that no longer fit or are past their prime. You might find the perfect fabric for your project in an old shirt or pair of jeans.
Reuse Packaging Materials: Cardboard from boxes and thick paper from shopping bags can provide structure to your pencil case. Cut them to size, layer with fabric, and sew in place.
Breathe New Life into Old Publications: Turn outdated books and magazines into a colorful collage on your pencil case. Secure the design with clear glue or decoupage medium for added durability.
Get Creative with Fabric Scraps: Use leftover fabric from previous projects to create a patchwork effect. This is an excellent way to use up small scraps that would otherwise end up in the trash.
Jazz Up Your Pencil Case: Add buttons and beads from old jewelry or clothing to give your case a unique touch. They’re easy to sew on, making them a great option for DIY enthusiasts.
Add Some Flair with Ribbons and Laces: Repurpose ribbons from gift wrapping or laces from worn-out shoes as decorative elements or handles for your pencil case. With a little creativity, you can turn something old into something truly special.
By incorporating these upcycling tips, not only will you create a one-of-a-kind pencil case, but you’ll also contribute to a more sustainable environment.
Maintenance and Care for Your DIY Pencil Case
To keep your DIY pencil case in top condition, follow these straightforward maintenance steps: Maintaining the exterior is key to keeping your pencil case looking its best. Start by giving it a gentle wipe with a damp cloth to remove any dust or debris that may have accumulated. If your case has fabric components, you can hand wash them with mild soap and water. For tougher stains, use a stain remover specifically designed for the material of your case. Apply the product as directed, let it sit for a few minutes, then rinse and dry.To prevent damage to your pencil case’s seams or zipper, avoid overloading it with too many items. This will help maintain its shape and prevent wear and tear from getting the better of it.When storing your pencil case, make sure it’s in a dry place away from direct sunlight. This will help protect it from fading and material degradation. If you notice any damage or wear, take care of it promptly with a small sewing kit to prevent further issues. By following these simple tips, you’ll be able to enjoy the use of your DIY pencil case for years to come.
FAQs About DIY Pencil Cases
To ensure a seamless experience while tackling the DIY pencil case project, here are some frequently asked questions and their corresponding answers. This will provide valuable guidance throughout the process, helping you overcome any potential hurdles.
What materials do I need to make a pencil case?
To begin with, you’ll require a few essential materials, including fabric, a zipper, thread, scissors, and either a sewing machine or a trusty needle and thread. While not strictly necessary, having some extra supplies on hand can be beneficial in enhancing the overall quality of your finished project. Consider adding interfacing for added structure and stability, as well as decorative elements like patches or beads to give your creation a personalized touch.
Can I hand sew my pencil case if I don’t have a sewing machine?
While it may require more time and effort, hand-sewing can indeed produce strong and durable results. To achieve maximum strength, consider using the backstitch technique in your stitching process.
How do I choose the right fabric?
When evaluating the materials for your furniture, consider not only their aesthetic appeal but also their durability and ease of cleaning. While cotton remains a timeless favorite, other options like canvas, denim, and even leather are worth exploring. Each material has its own unique characteristics that can impact the overall functionality and longevity of your pieces.
What’s the best way to add a personal touch to my pencil case?
Give your clothing items a unique touch by incorporating various embellishments. You can add fabric paint to create vibrant designs, use embroidery floss to weave intricate patterns, or apply iron-on patches for a more rustic look. For an added layer of personality, consider sewing on buttons and charms that reflect your personal style.
How do I install a zipper?
Secure the zipper in position between the two fabric layers, ensuring it’s evenly aligned and smooth. Next, use a zipper foot or employ meticulous hand-stitching to carefully sew along the edges of the zipper, taking care not to distort its positioning or compromise its functionality.
My fabric is fraying, what can I do?
To reinforce the seams and prevent further unraveling, consider applying a small quantity of clear nail polish or fabric adhesive to the raw edges. Alternatively, you can employ a zigzag stitch technique on your sewing machine to effectively seal the area.
How can I make my pencil case more eco-friendly?
When it comes to crafting a sustainable wardrobe or home decor, one simple yet impactful step is to opt for upcycled materials. This involves giving new life to old items such as clothing that’s no longer wearable or packaging materials like cardboard boxes and plastic containers. By doing so, you’re not only reducing waste but also conserving natural resources like water and energy. Additionally, choosing fabrics that are either naturally sourced or made from recycled materials is a crucial aspect of eco-friendly design. From repurposing vintage fabrics to creating unique textiles from post-consumer waste, there’s an abundance of creative ways to reduce your environmental footprint through the power of upcycling and sustainable fabrics.
How do I clean my pencil case?
When dealing with delicate or specialized materials like fabric, a gentle approach is often the best way to go. For instance, if you’re working with fabric, try turning it inside out before washing it by hand using a mild soap. This will help prevent damage and ensure a thorough clean. Once washed, allow the fabric to air dry to maintain its quality and prevent shrinkage.
The zipper is stuck, how can I fix it?
To get the zipper moving effortlessly, try using a small abrasive tool like a pencil tip or a bar of soap. Simply run them along the teeth of the zipper to eliminate any sticking points and ensure smooth operation.
Can I make a pencil case without a zipper?
If you’re looking for innovative ways to add some flair to your DIY project, consider deviating from the traditional zip closure and opting for something more unconventional instead. For instance, you could incorporate buttons, which can not only provide a secure seal but also add a touch of visual appeal to your design. Alternatively, you might prefer the functionality offered by snaps or Velcro strips with fold-over flaps, offering an adjustable and easy-to-use option. By thinking outside the box (or sewing kit), you can create a truly unique and functional piece that showcases your creativity.
How do I make sure my pencil case is the right size?
When embarking on a DIY pencil case project, it’s essential to take precise measurements of the longest stationery item that will be stored within the case. To ensure a comfortable fit, add an extra inch or two for seam allowance and any additional space you may need. By doing so, you’ll be well-prepared to tackle your project with confidence.
Frequently Asked Questions About DIY Pencil Cases
To get started, here’s a rundown of frequently asked questions and answers that can aid in your DIY pencil case venture. What are the fundamental components required for this project? The list includes materials such as fabric, zippers, threads, scissors, sewing needles, and any additional embellishments you might want to incorporate. How do I begin constructing my pencil case? Start by cutting out the fabric to the desired shape and size, then move on to attaching the zipper followed by adding any decorative elements or embellishments. What if I’m unsure about measuring the fabric accurately? No worries! Simply fold your fabric in half and pin it together before sewing, ensuring a precise fit. Can I use pre-made pencil case templates or patterns? Yes, feel free to explore online resources for inspiration or purchase pre-cut shapes specifically designed for DIY projects like this.
What materials do I need to make a pencil case?
To get started with your project, you’ll require some fundamental materials. These essentials include fabric, a zipper, thread, and scissors. If you’re looking to add some extra functionality to your creation, consider investing in a sewing machine or a needle for manual stitching. While not strictly necessary, adding interfacing can provide structure and stability to your finished product. Additionally, decorative elements like patches, beads, or other embellishments can elevate the overall aesthetic of your project.
Can I hand sew my pencil case if I don’t have a sewing machine?
While it may require more time and effort, hand-sewing can indeed produce results that are just as durable as machine-stitched seams. To achieve this level of sturdiness, consider using the backstitch technique in your sewing process.
How do I choose the right fabric?
When selecting materials for your furniture, consider the dual factors of durability and maintenance ease. While cotton remains a well-liked option, you may also want to explore alternatives like canvas, denim, or even leather. The latter, in particular, offers a unique blend of style and practicality, as it can withstand the rigors of daily use while being relatively simple to clean.
What’s the best way to add a personal touch to my pencil case?
Add a touch of personality to your clothing by incorporating unique embellishments. Consider using fabric paint to add vibrant colors and designs, or try embroidery for a more delicate look. For a bold statement piece, use iron-on patches or sew on buttons and charms to give your outfit an extra layer of character.
How do I install a zipper?
To secure the zipper in position, sandwich it between the two fabric layers and pin them together. Next, use a zipper foot or work meticulously by hand to sew along the edges, ensuring a sturdy and even bond.
My fabric is fraying, what can I do?
To prevent further damage and keep your scarf’s fringe intact, apply a small but strategic amount of clear nail polish or fabric adhesive to the edges. Alternatively, you can also use a zigzag stitch on your sewing machine to create a secure barrier against fraying. Both methods will effectively stop the fibers from unraveling and maintain the overall appearance of your accessory.
How can I make my pencil case more eco-friendly?
To reduce waste and minimize environmental impact, consider upcycling materials like old clothing or repurposing packaging materials. Furthermore, opt for natural or recycled fabrics that not only reduce the demand on resources but also contribute to a more sustainable fashion industry.
How do I clean my pencil case?
When dealing with delicate or sensitive fabrics, a gentle approach is crucial to maintain their integrity. To clean such materials, start by turning them inside out, ensuring that any potential snagging points are facing away from you. Then, gently wash the fabric by hand using a mild soap solution. Finally, allow it to air dry naturally, rather than exposing it to heat or harsh drying methods.
The zipper is stuck, how can I fix it?
To ensure your zipper glides effortlessly, try using a trusty companion for this task – a pencil tip or a bar of soap. Simply run the pointed end of the pencil along the teeth of the zipper or gently glide the soap bar along its length. This simple trick will help reduce friction and make the zipper move smoothly, making it a valuable addition to your DIY toolkit.
Can I make a pencil case without a zipper?
For added convenience and customization, consider opting for alternative fastening solutions like buttons, snap fasteners, or even clever design features like fold-over flaps secured with Velcro. These options can provide the same level of practicality and adjustability as a zipper while offering unique aesthetic benefits.
How do I make sure my pencil case is the right size?
When crafting a DIY pencil case, it’s essential to consider the size of your stationery items. Start by measuring your longest item and add a generous inch or two to account for seam allowance and any extra space you might need. By taking this crucial step into account, you’ll be well-prepared to tackle your project with ease, having anticipated the necessary dimensions from the outset.
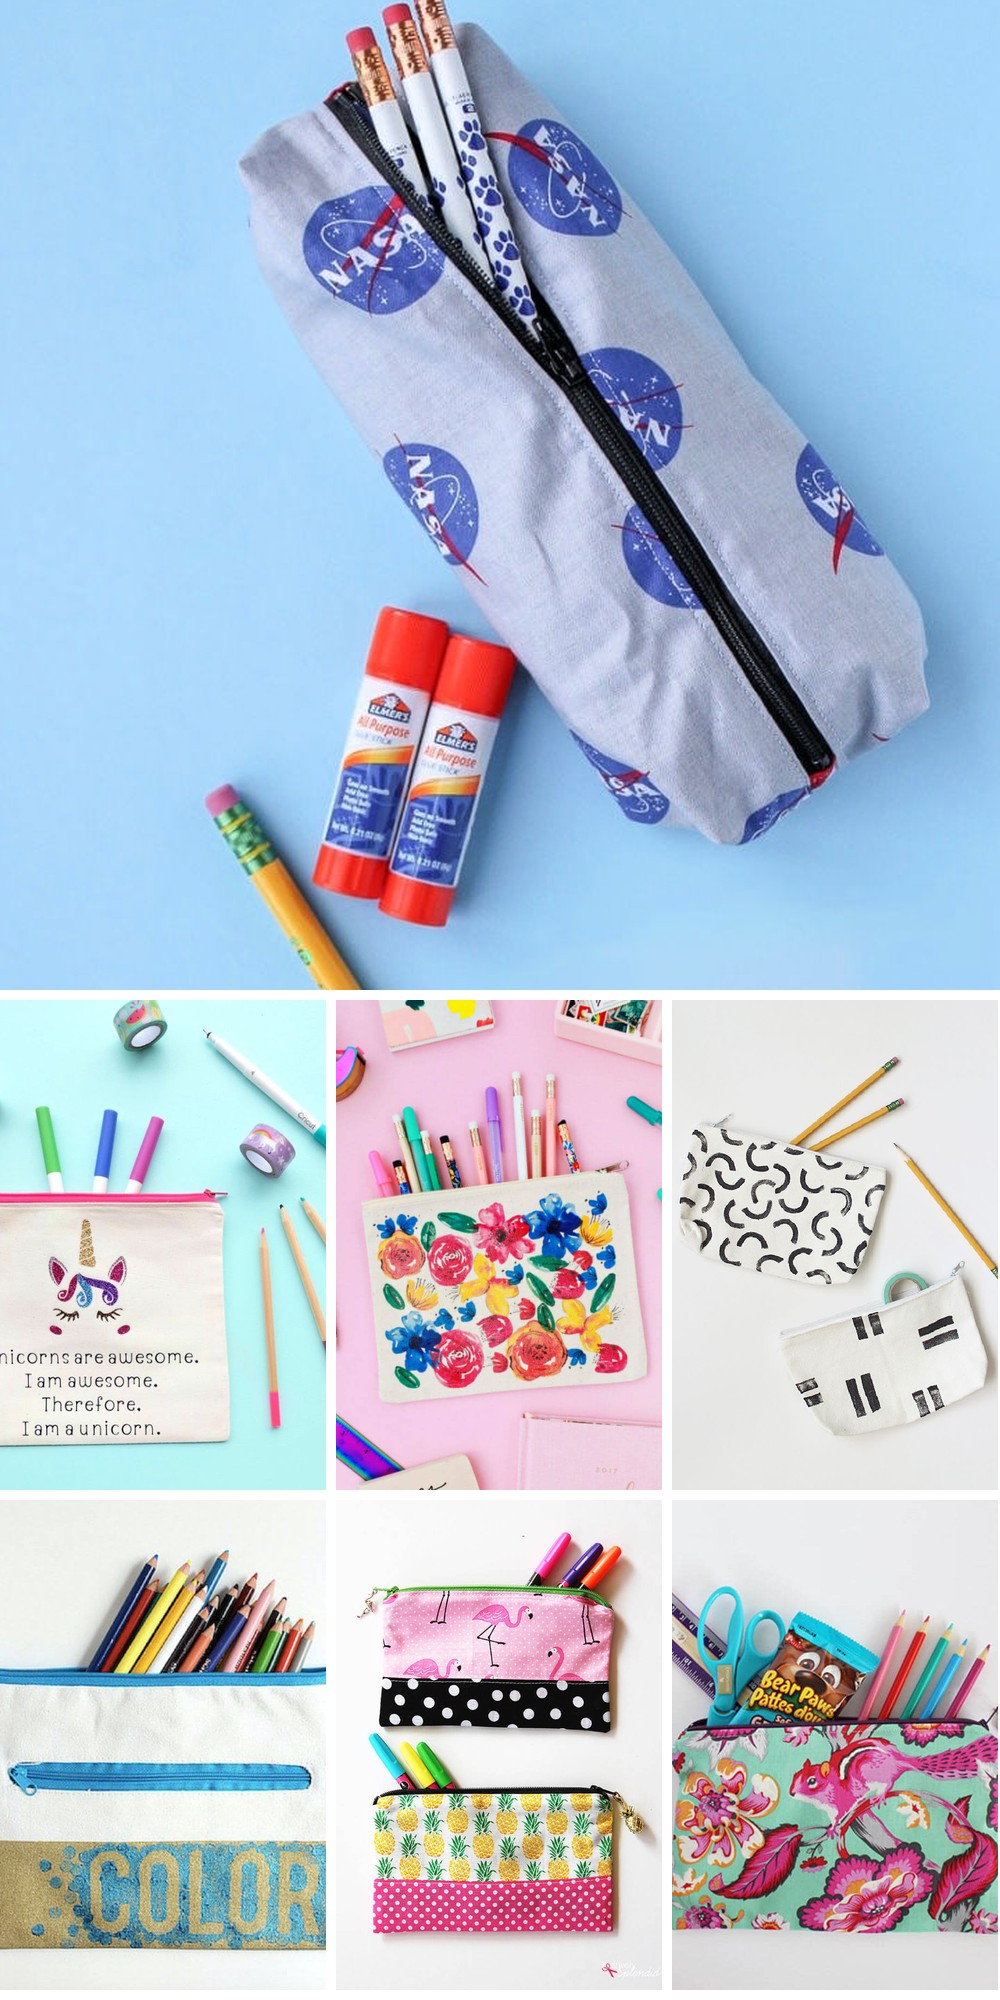
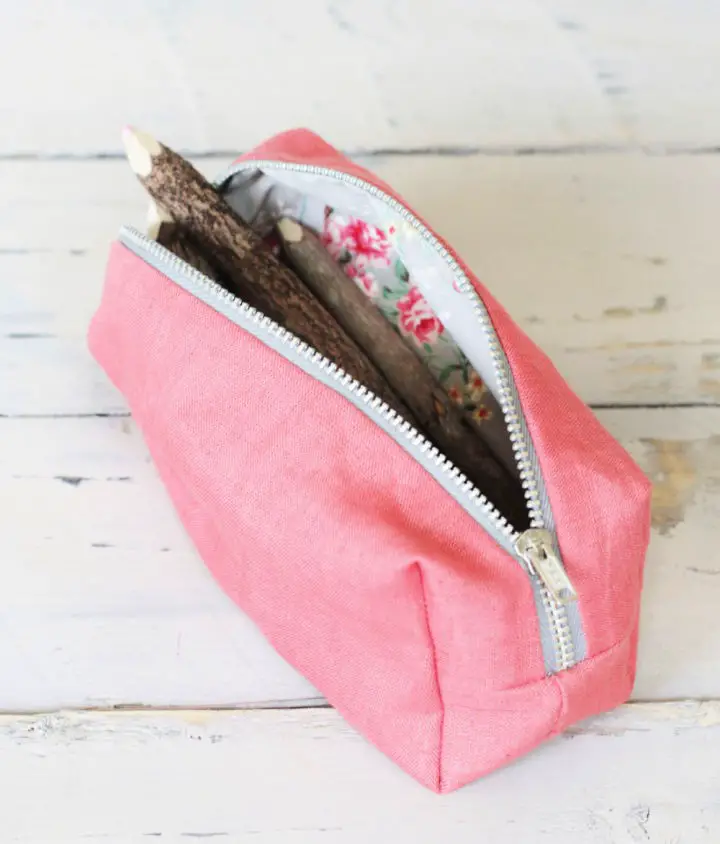
25 DIY Pencil Case Ideas and Pencil Pouch Designs
Unleash your inner crafting genius by exploring a curated selection of 25 innovative DIY pencil case and pencil pouch projects. This comprehensive collection is sure to inspire you to create unique, personalized, and functional storage solutions that reflect your personal style.
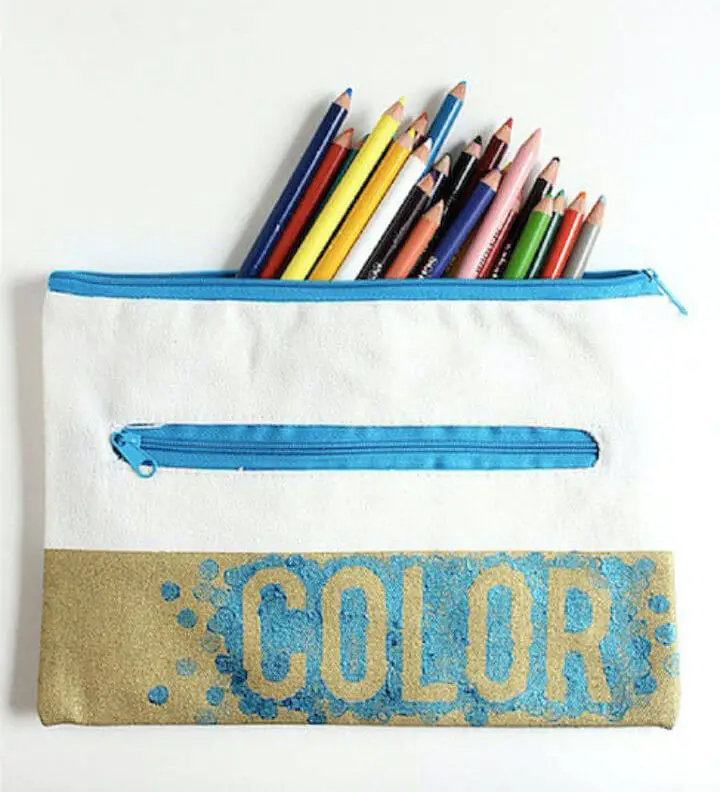
How to Sew Zipper Pencil Pouch
For those who relish the art of organizing their stationery with flair, Positively Splendid’s DIY Zipper Pencil Pouch tutorial offers an accessible and engaging sewing experience. Under Amy’s expert guidance, you’ll learn to transform fabric scraps into a personalized pencil pouch that perfectly complements your school or office supplies. The step-by-step instructions, carefully laid out for ease of understanding, ensure a seamless and enjoyable crafting process, yielding a polished result that seamlessly blends form and function.
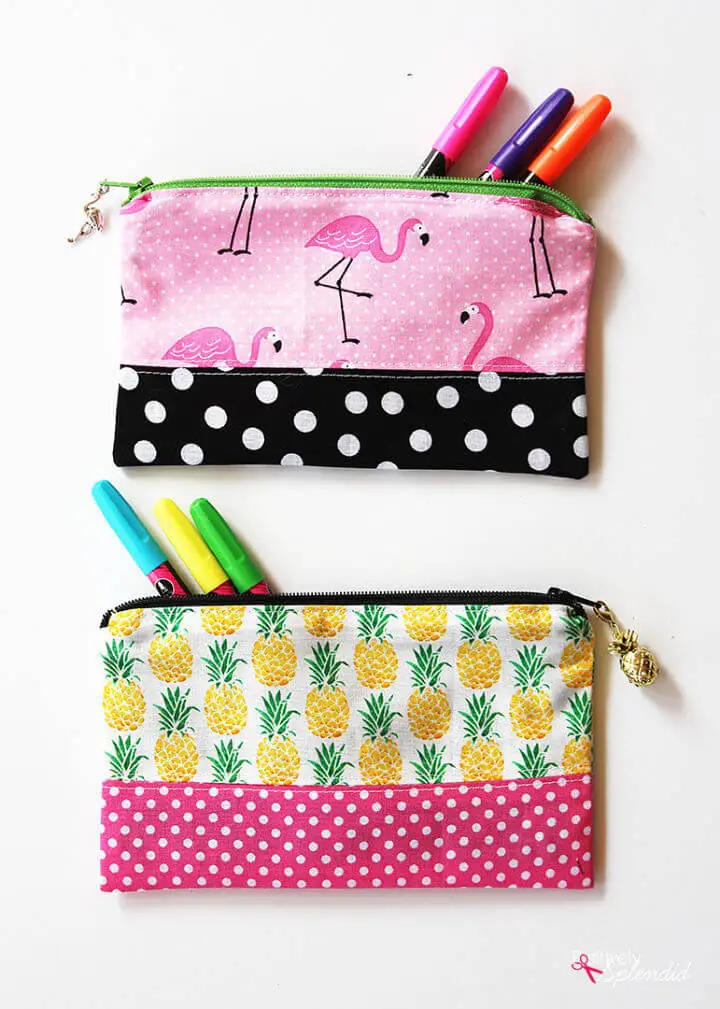
Homemade Flamingo Pencil Pouch
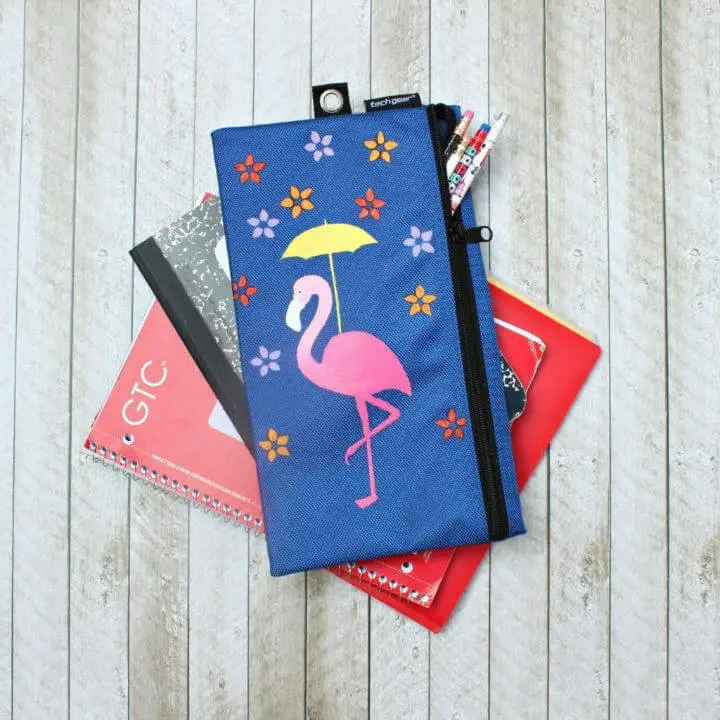
Add a dash of creativity to your back-to-school essentials by crafting a vibrant flamingo pencil pouch. Morena’’s Corner provides a fantastic DIY tutorial that lets you put your personal touch on a practical item. Start by gathering your fabric pouch, an array of colorful paints, and a fabric medium for a soft and durable finish. Follow the step-by-step guide to stencil a charming flamingo design, embellish with floral patterns, and create a gradient effect that’’s sure to turn heads. This handmade pouch combines functionality with a burst of personality, making it perfect for keeping school supplies organized or even as a travel companion for important documents. Dive into this engaging craft and make a statement with your school gear!
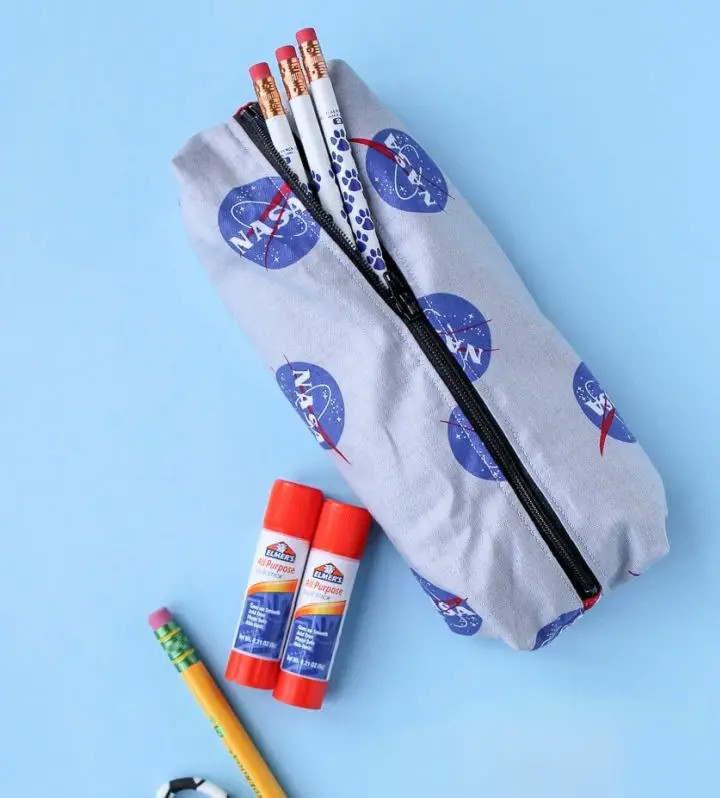
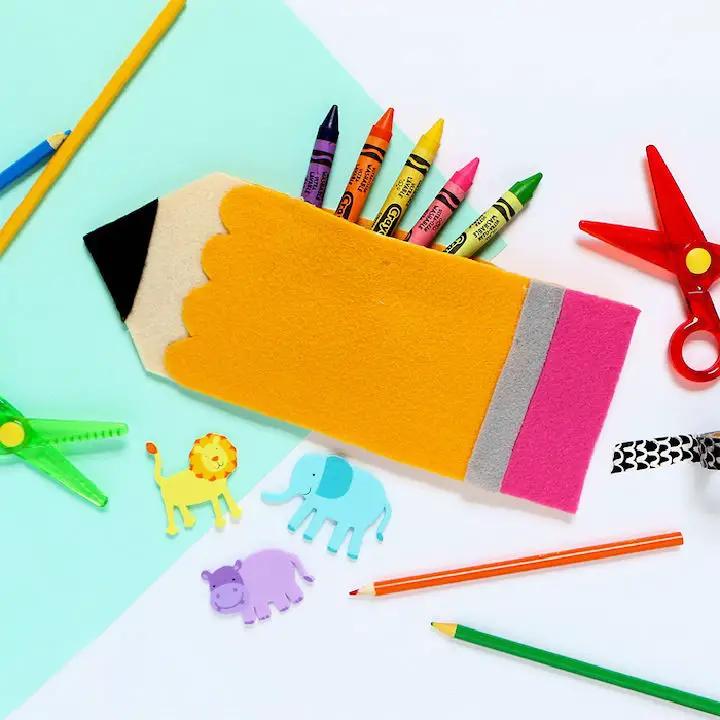
DIY Felt Kitty Pencil Case for Kids
Get ready to add a personal touch to back-to-school season with Lia Griffith’s fun and easy DIY project. By making customized felt pencil pouches, you can give your child’s school supplies a unique twist. With a step-by-step tutorial at your fingertips, these adorable zippered pouches featuring designs like a playful kitty or a whimsical three-eyed monster are perfect for keeping writing utensils organized. To ensure they withstand the rigors of the school year, use high-quality felt and consider investing in a sewing machine for assembly – although hand-sewing is also a viable option. Simply download the provided PDF template, choose your felt colors and a sturdy zipper, and you’ll be on your way to creating a charming addition to your child’s school gear. This engaging craft activity not only fosters creativity but also yields a practical item that will see daily use.
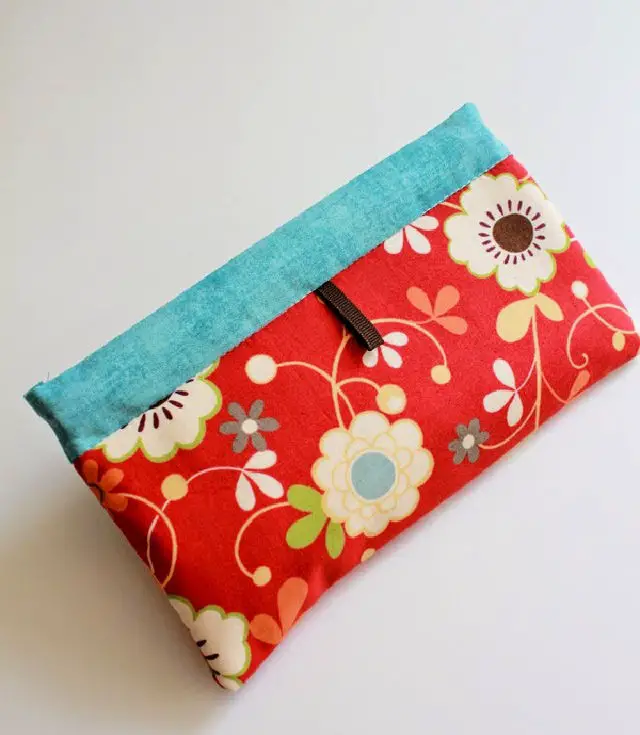
Make Your Own Pencil Pouch
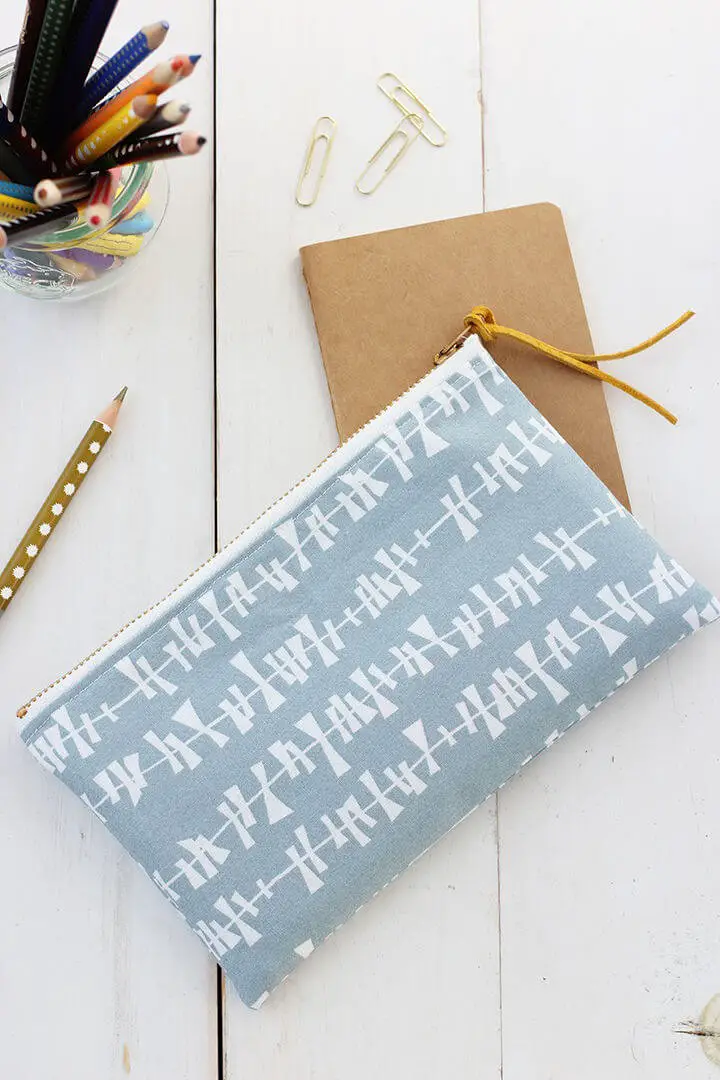
Elevate your school or office supplies with a dash of handmade flair! Alice and Lois’s DIY pencil pouch tutorial is an excellent starting point for beginners, requiring just 15 minutes to complete. With clear instructions, you’ll guide yourself through measuring, cutting, and attaching fabric and interfacing, then sew on a zipper and add finishing touches like a sleek suede cord for the pull. The sense of accomplishment that comes with creating something unique will be matched only by the functionality of your new custom pencil pouch. Join in this fun project and craft a one-of-a-kind supply case that’s both stylish and practical.
Handmade Box Pencil Case
Need a convenient way to store your essential items? Look no further! With the DIY guide from Gathered Threads, you can create a versatile pencil case that doubles as an oil bag or makeup pouch. By following Janice’s clear instructions, you’ll be able to craft a stylish and functional purse using two contrasting fabrics and a zip. The best part? It requires only basic crafting tools and simple sewing techniques, making it accessible to anyone with an interest in sewing. With this project, you can produce a personalized case that’s perfect for keeping school supplies or on-the-go oils organized. Plus, the end result is a practical accessory that adds a touch of handmade charm to your daily essentials.
How to Make a Pencil Pouch
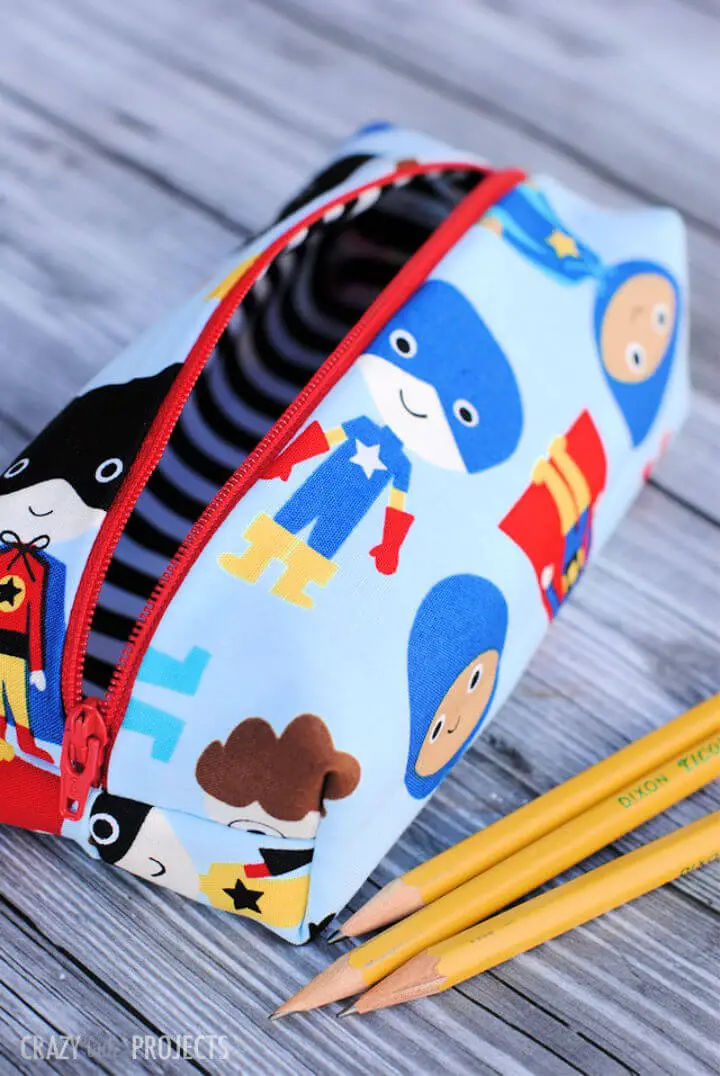
Get creative and sew a delightful pencil case using the pattern from Crazy Little Projects! Suitable for all ages and skill levels, this project is perfect for storing school supplies. The instructions are straightforward, making it easy to follow along, including a step-by-step guide on adding a zipper – often considered a challenging part of sewing. With a range of fun fabrics to choose from, you can personalize the pencil case for both boys and girls. This pattern offers not only a practical storage solution but also an opportunity to create something unique with your own hands. Enjoy making this charming accessory that’s sure to be a hit with kids! The added touch of a zipper makes it even more special.
DIY Embroidered Unicorn Pencil Case
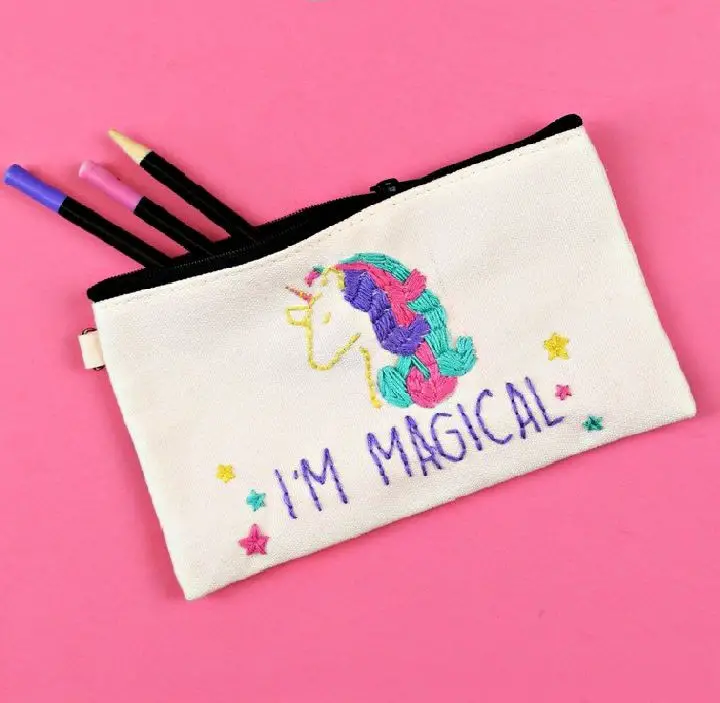
Transform your school supplies into a whimsical wonderland with Mad in Crafts’ enchanting embroidered unicorn pencil pouch guide. Using the Bucilla Fashion Embroidery kit, you can conjure up a one-of-a-kind accessory that’s sure to captivate. Begin by tracing the adorable unicorn and ‘I’m magical’ designs onto your pouch with a water-soluble pen, then let the back stitch and fishbone stitch magic unfold as you work through the stitch instructions. While it may take a leisurely afternoon to complete, the end result is a charmingly personalized pencil pouch that brings a pinch of enchantment to your daily routine. With helpful guidance and all the necessary materials included, your crafting experience will be as delightful as it is fulfilling.
Make a Geometric Zipper Pencil Case
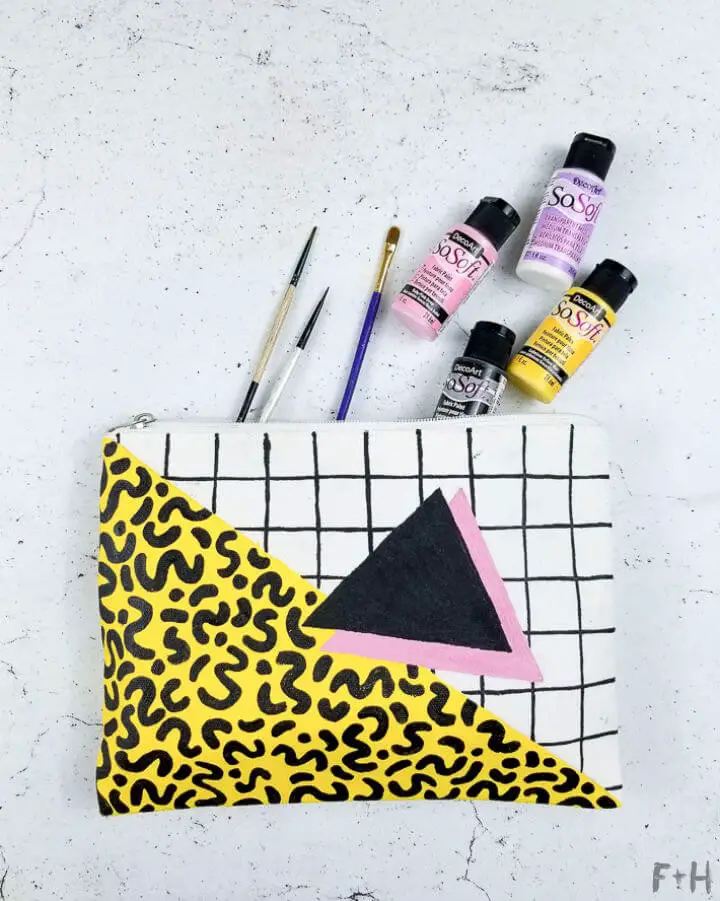
Unleash your creativity with the Easy Memphis Design Zippered Pouch DIY from Fox + Hazel, a step-by-step guide that transforms a plain white canvas pouch into a geometric masterpiece reminiscent of the bold and vibrant essence of the Memphis design movement. By combining DecoArt SoSoft fabric paints with basic painting tools, you’ll be empowered to add unique squiggles and patterns that reflect your personality. Not only will this tutorial provide practical tips for achieving crisp, clean lines, but it will also encourage you to think outside the box and let your imagination run wild. Perfect for housing art supplies or serving as a quirky makeup bag, this DIY zippered pouch is both a fun crafting experience and a stylish accessory that brings a touch of retro flair to your accessories collection.
How to Make Stamped Pencil Cases
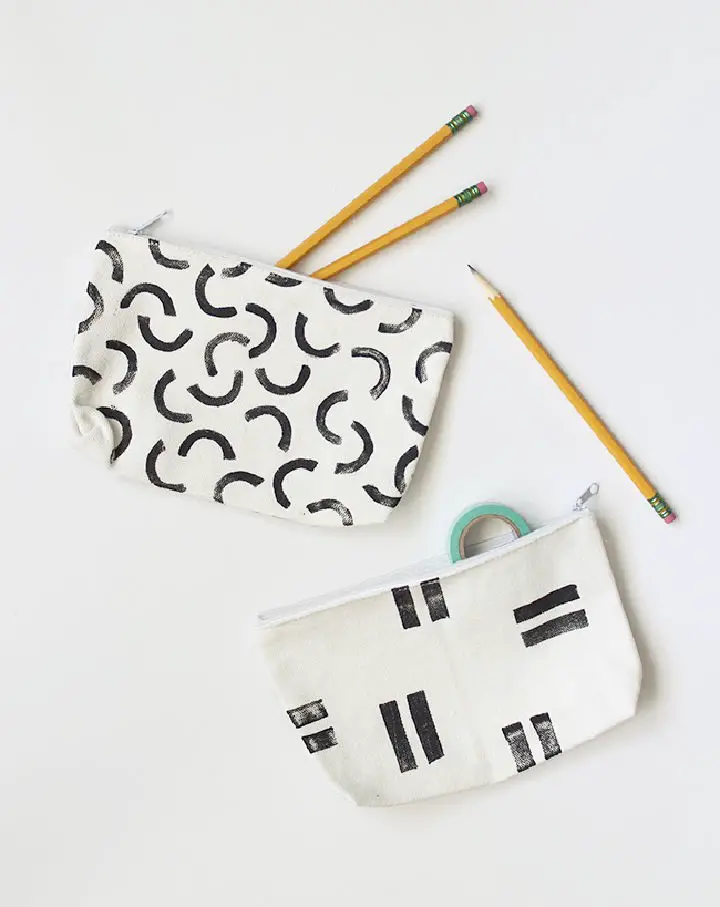
Looking to infuse personality into your stationery collection? A DIY approach is the perfect way to do so, and Almost Makes Perfect’s tutorial on creating custom stamped pencil pouches is an excellent starting point. This engaging project combines functionality with creativity, making it a great activity for the entire year. The straightforward guide requires minimal materials, including blank canvas pouches, adhesive-backed craft foam, cork board, fabric paint, and a foam brush. With a step-by-step process that involves doubling up the foam for added thickness, cutting out custom shapes, and testing your stamp before applying it to the fabric, you’ll be able to create one-of-a-kind pouches that can be used as makeup bags or clutches. This instructive guide promises a rewarding and creative experience, making it an excellent addition to any DIY enthusiast’s toolkit.
Make a Palm Leaf Pencil Pouch
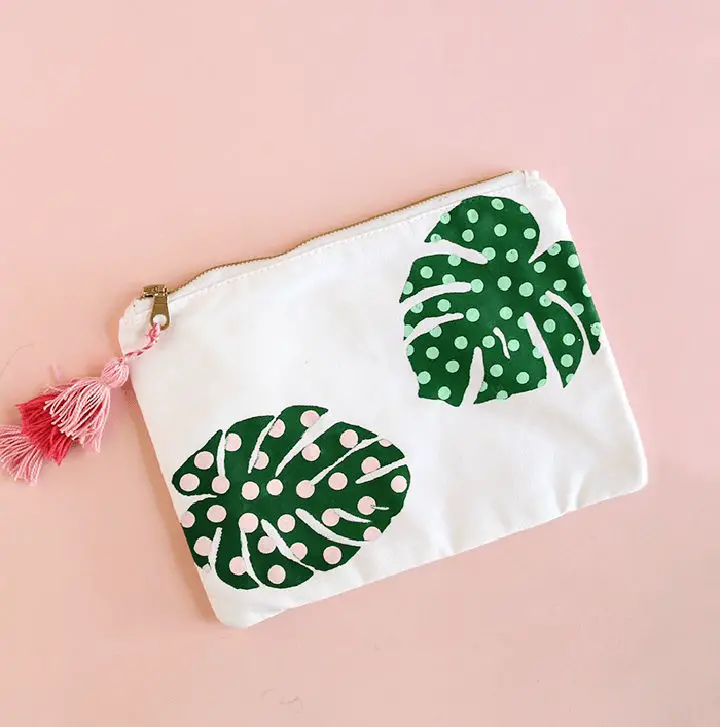
Transform your daily essentials with the charm of the tropical world by creating a DIY palm leaf pencil pouch. This project combines the simplicity of upcycling a zipper pouch with the creativity of adding a unique touch. Follow Persia Lou’s step-by-step guide to turn a blank pouch into a vibrant accessory perfect for holding school supplies, makeup, or any other small items. The process involves making a stencil, applying multi-surface paint for durability, and adding a handmade tassel for an extra layer of personality. With clear instructions, you’ll be able to follow along and achieve impressive results. This crafting adventure is the perfect way to give your items a personalized twist that captures the essence of summer.
Making a Pencil Pouch With Bow
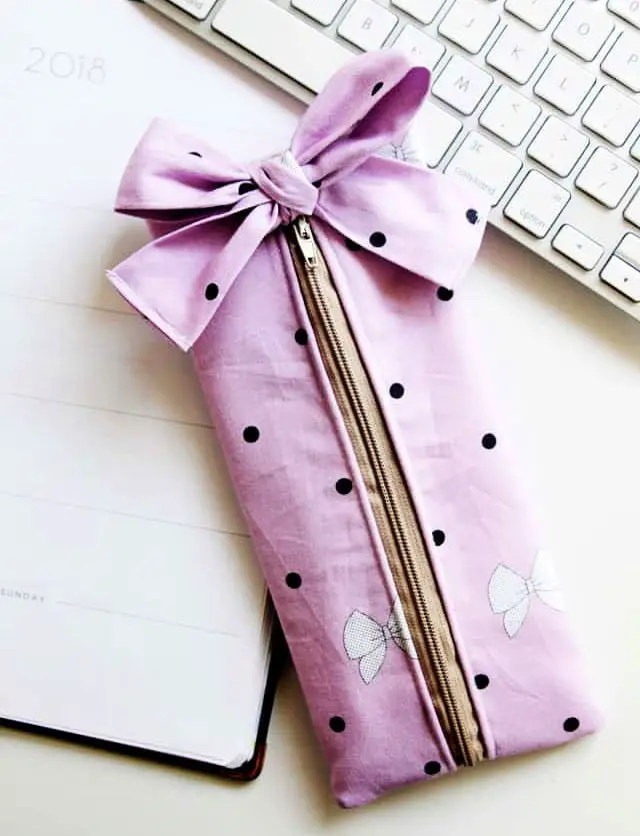
Get creative with a delightful DIY pencil pouch featuring a stylish bow, perfect for keeping stationery or cosmetics tidy. As the back-to-school season approaches, this charming sewing project from See Kate Sew offers a timely and enjoyable opportunity to personalize your creation with unique fabrics or designs. The tutorial breaks down the process into manageable steps, including zipper installation, making it accessible to sewers of all skill levels. With just a few simple materials, such as fabric, a zipper, and basic sewing tools, you can create a one-of-a-kind pencil pouch that’s both functional and adorable. Keep your small items neatly organized in a handmade pouch that’s as charming as it is practical!
Back to School Pencil Case With Lining

Kick off the new school year with a fun and creative activity that you and your kids will love! At The DIY Dreamer, we’re excited to share a step-by-step guide on how to sew a customized pencil case with a lining, perfect for adding some excitement to back-to-school preparations. This project is not only functional but also stylish, allowing you to teach your children the basics of sewing while making something they’ll use and enjoy throughout the year. Our tutorial covers everything from selecting the right fabric to sewing in a zipper and adding those finishing touches that make all the difference. Plus, we’ll show you how to incorporate Mabel’s Labels for a personalized touch on all school supplies, ensuring your kids’ items are easily identifiable and less likely to get lost. By following our detailed instructions and helpful tips, making a DIY pencil case can be a rewarding experience that adds a personal flair to your child’s school gear.
How to Sew Unicorn Pencil Pouch
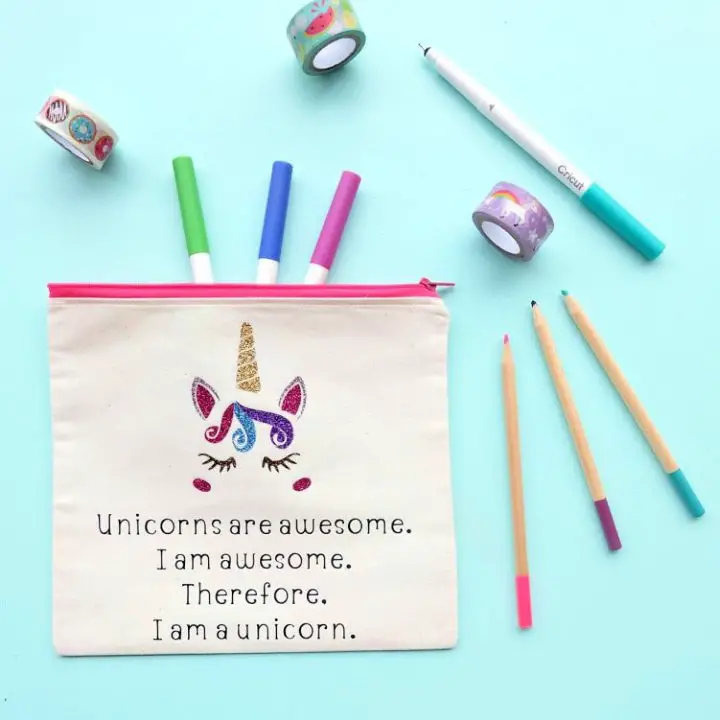
Get ready to infuse your crafting with whimsy as you bring the ‘Unicorns Are Awesome’ pencil pouch sewing project from Hello Creative Family to life. This delightful DIY guide provides a clear and concise tutorial, accompanied by photos, ensuring a seamless sewing experience. The result is not only a practical tool for keeping your writing supplies or small essentials organized but also a delightful surprise with each unzip. Tailor the pouch to your style by selecting from a range of glitter iron-ons and discover how the Cricut Maker and Easy Press can enhance your crafting journey, delivering precision and ease. Perfect for personal use or as a thoughtful gift, this charming accessory offers a unique blend of functionality and charm.
Sew a Pencil Pouch for Back to School
Crafting a bespoke pencil case for school or the office can be an enjoyable and practical project that infuses a personal touch into your stationery arsenal. The Polka Dot Chair’s DIY guide provides a clear, step-by-step approach to creating a custom pencil pouch, perfect for those eager to sew their own accessories. With straightforward instructions and a concise list of materials including fabric, a zipper, and a zipper foot, this tutorial walks you through the process of crafting a stylish and functional writing tool holder that not only keeps your supplies organized but also showcases your creative skills. With the freedom to choose your preferred fabric, you can create an item that truly reflects your personality.
Easy DIY Photo Pencil Pouch
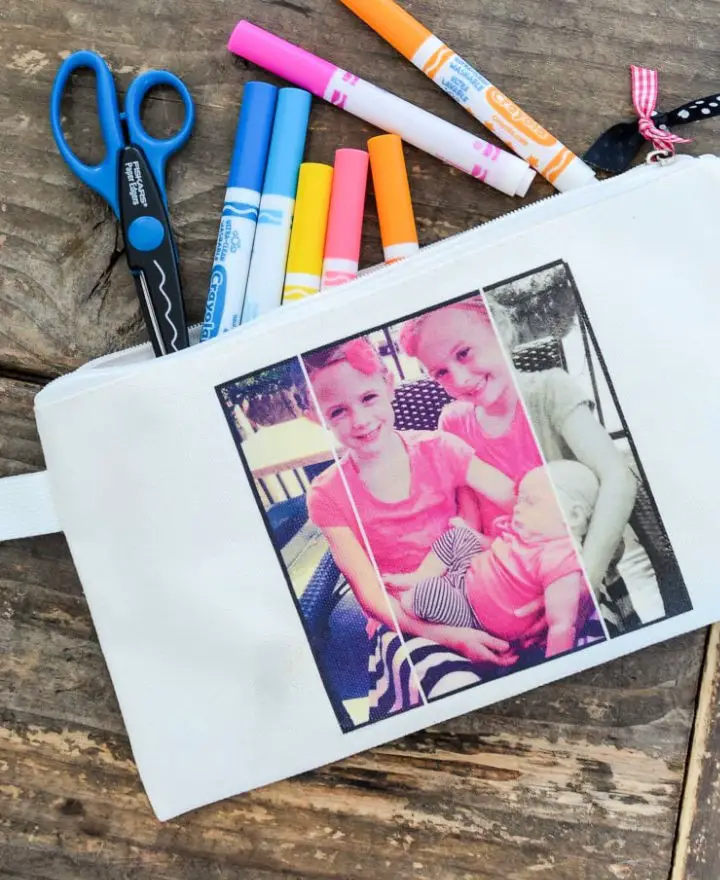
For those who relish the art of personalization and crafting, Old Salt Farm offers a comprehensive guide to creating one-of-a-kind photo pencil pouches. This DIY project harmoniously blends functionality with emotional value, making it an ideal gift or personal treasure. By leveraging Adobe Photoshop Elements 15, you can effortlessly apply captivating Effects Collages to your favorite photos, imbuing them with a distinctive, filtered charm before transferring the images onto a canvas pouch.
The process is remarkably straightforward, requiring only a simple iron-on technique that ensures your cherished memories are vividly showcased on the fabric. Don’t forget to mirror your image if necessary, to guarantee its correct display on the pouch. Embark on this creative journey and, in under 30 minutes, you’ll have a charming, functional pencil pouch proudly displaying your treasured moments.
Scalloped Pencil Pouch for Back to School
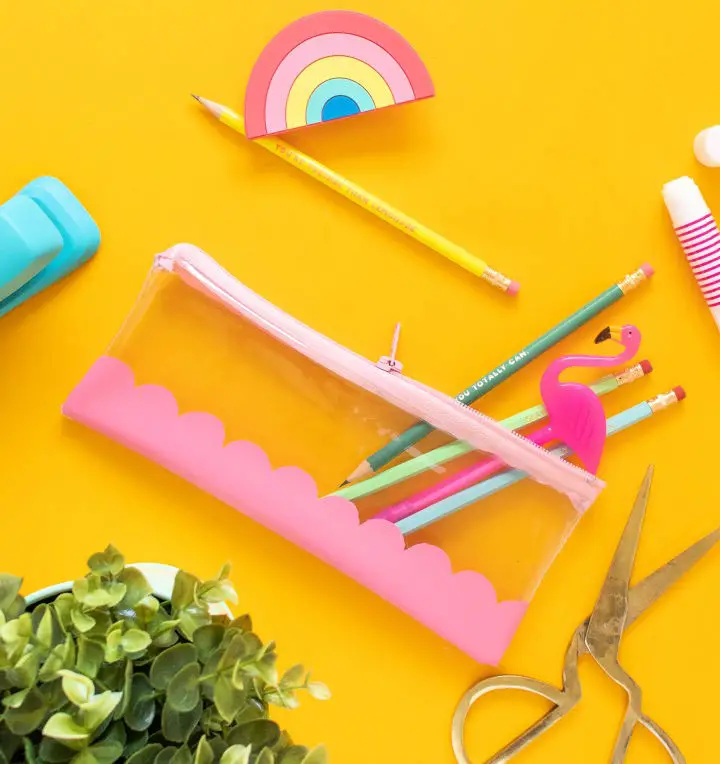
Transform your daily routine with a personalized clear scalloped pencil pouch, effortlessly crafted using Holly Wade’s straightforward sewing tutorial on Sarah Hearts. With just medium-weight clear vinyl, a fashion zipper, and basic sewing essentials at hand, you’ll be whipping up a charming accessory in no time. The added touch of a scalloped paint detail injects a dash of personality into your creation, making it a unique and functional companion for organizing pencils, art supplies, or even makeup. To ensure a seamless sewing experience, simply swap to a plastic foot on your machine or apply tape to prevent the vinyl from sticking. In under 30 minutes, you’ll have a one-of-a-kind pouch that not only keeps your essentials in check but also adds a touch of whimsy to your daily carry.
Pretty DIY Watercolor Floral Pencil Pouch
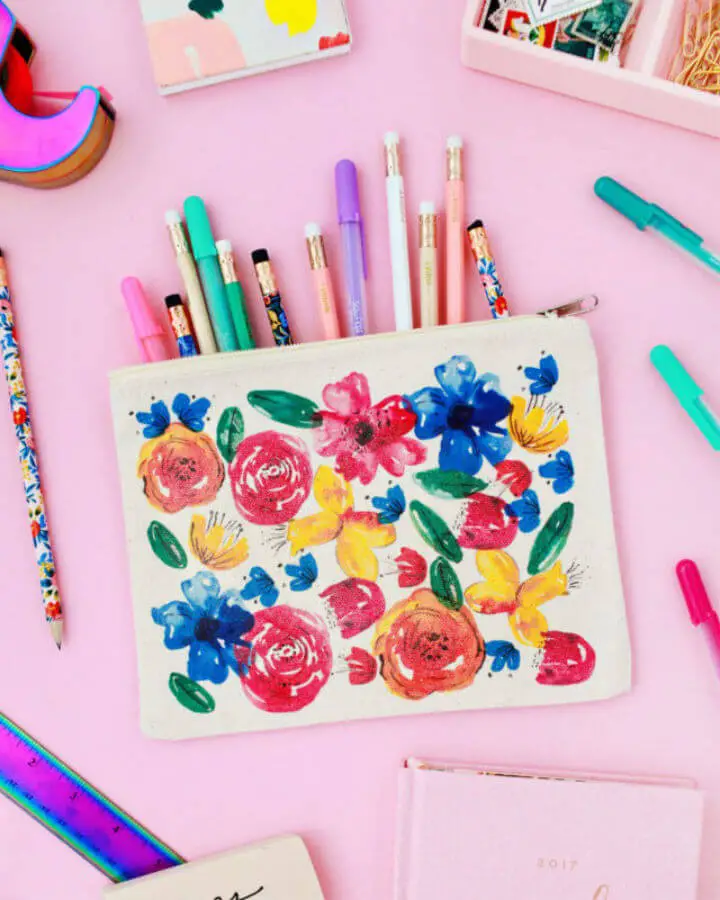
Transform your everyday essentials into a vibrant work of art with this delightful DIY guide from Oh So Beautiful Paper. By combining simple instructions with unique materials, you’ll create a personalized watercolor floral pencil pouch that’s as functional as it is fashionable. Whether you’re an avid student or a beauty enthusiast, this charming project will add a pop of color to your daily routine. With just a few supplies – including a printable pattern, blank zipper pouch, iron-on transfer sheets, scissors, and an iron – you’ll be well on your way to crafting a one-of-a-kind accessory that’s sure to elevate your style.
How to Make a Zipper Pencil Case
Create a one-of-a-kind zipper pencil case with a personalized touch by following Cassie May’s straightforward tutorial on Little Red Window. This DIY project is ideal for artists, students, or anyone seeking a convenient storage solution. With a few simple materials like fabric, a zipper, and batting, you’ll be able to craft a sturdy and charming accessory that reflects your unique style. The step-by-step guide features clear instructions accompanied by photos, making the process effortless and enjoyable. As you sew together this custom creation, you’ll end up with a functional and stylish companion for your drawing tools.
Duck Tape Pennant Pencil Pouch
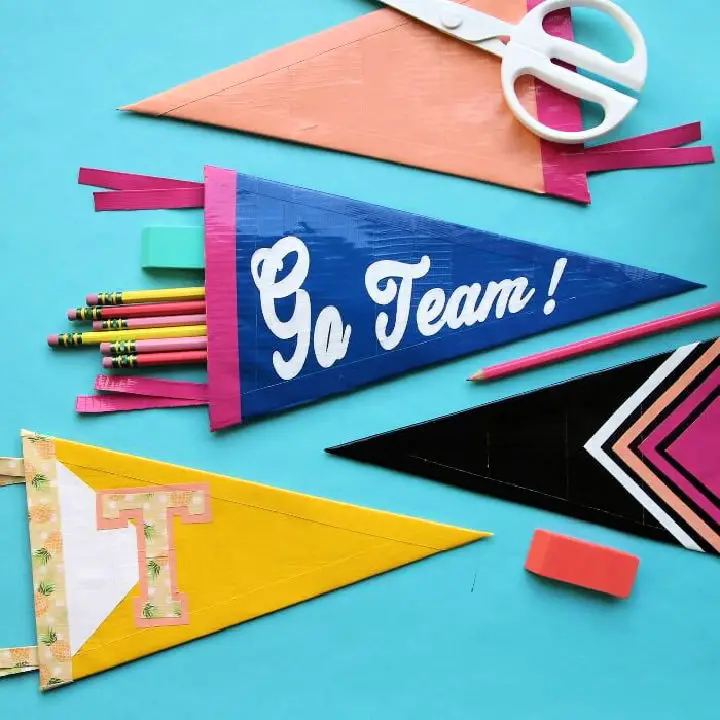
Create a one-of-a-kind Duck Tape pennant pencil pouch with Persia Lou’s step-by-step guide! This DIY project is perfect for students and crafty individuals who want to add a personal touch to their everyday school supplies. With an array of vibrant Duck Tape colors and patterns to choose from, you can design a pouch that perfectly reflects your personality.
All you need are a few basic tools and materials, including Duck Tape, a cutting mat, a craft knife, and adhesive hook and loop closures. This DIY project is ideal for organizing pencils and adds a fun, creative element to your stationery collection. Learn how to cut, assemble, and customize your pencil pouch for a durable and charming addition to your school gear.
Kiddo Personalized Pencil Case Using Paint
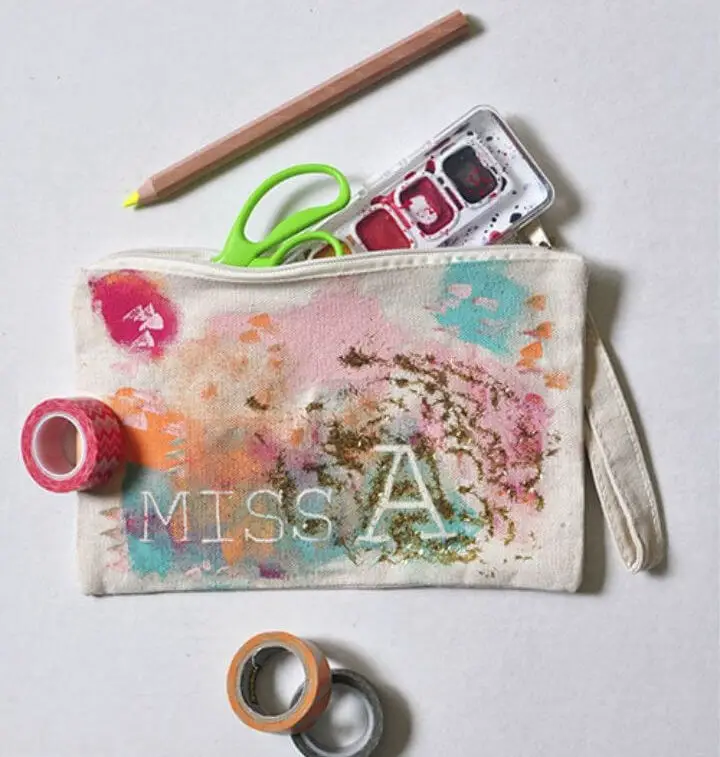
Transform a plain canvas bag into a stunning and functional masterpiece with your child’s personal touch. Gather an array of creative materials like acrylic paints, die-cut letters, stickers, Elmer’s Glue, and a dash of glitter for a fun-filled crafting session. This engaging activity not only fosters creativity but also yields a unique and practical item for school that showcases their personality.
As you embark on this step-by-step journey, your little one will have the opportunity to express themselves through art while transforming a simple canvas bag into a vibrant and eye-catching accessory that will undoubtedly make their school supplies stand out. Don’t forget to keep some Wet Ones on hand for easy cleanup after the creative chaos settles.
The end result? A personalized pencil case that your child will proudly display, showcasing their creativity and individuality.
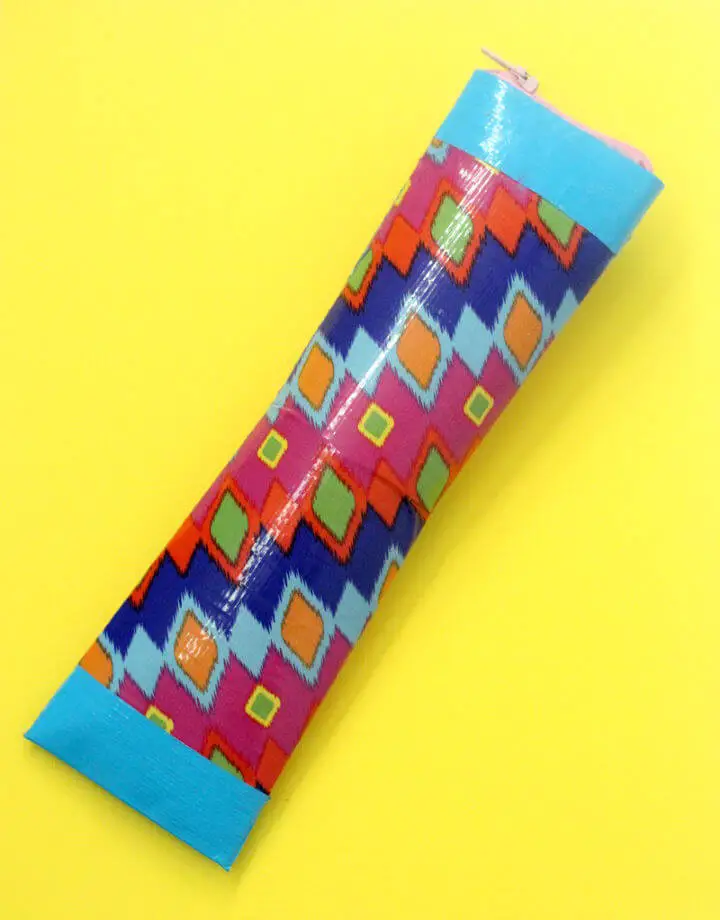
Pencil Pouch From Cardboard Tubes
Turn household waste into a stylish storage solution with Moms & Crafters’ DIY tutorial! By transforming empty toilet paper rolls into compact pencil cases, you’ll not only reduce waste but also create a functional item for storing writing utensils. This eco-friendly project requires just a few simple materials – duct tape, craft knife, scissors, zipper, and glue. Perfect for artists, students, or anyone who values organization, this washable surface features a polished look that’s perfect for holding pens and pencils. Learn how to make your own pencil case with this engaging guide and add a touch of handmade charm to your stationery setup.
How to Make Your Own Pencil Case
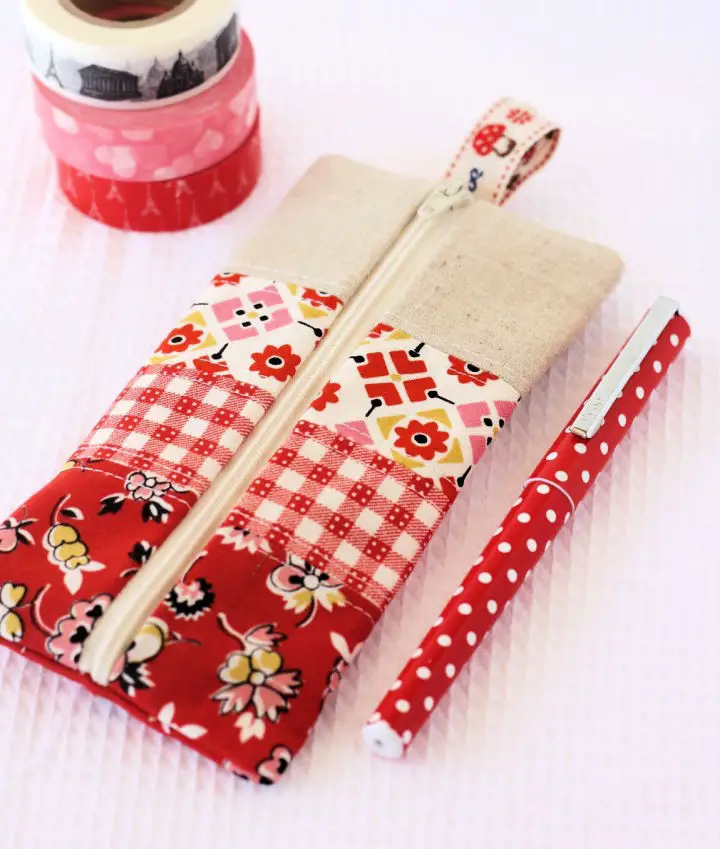
As the new school year approaches in Australia, why not start off on the right foot by creating a charming, homemade pencil case with A Spoonful of Sugar’s helpful tutorial? This fun and easy-to-follow guide is perfect for using up those pesky fabric scraps lying around, and will have you crafting a zippered patchwork pencil case that’s both functional and stylish. At 3 1/2 x 6 3/4 inches in size, this cute little case is ideal for storing pens, a small notebook, or other essential school supplies. With a comprehensive list of materials needed, clear cutting and sewing directions, and helpful photographs to guide you along the way, you’ll be well on your way to creating a successful project that’s both practical and personalized for the school year ahead.
DIY Stenciled Pencil Pouch at Home
Transform a plain canvas makeup bag into a personalized accessory for your colored pencils with All Things Target’s stenciled pencil pouch DIY guide. In this informative post, Analisa shares a simple yet creative craft that turns a mundane bag into an organized haven for your coloring essentials. By utilizing adhesive letters and fabric paint, the technique involves reverse stenciling to achieve a one-of-a-kind, handcrafted look. This project is perfect for art enthusiasts and crafty individuals alike, offering both a fun and practical way to keep your coloring tools in order.
Felt Pencil Pouch With Details Instructions
Immerse yourself in a creative journey by crafting a personalized DIY Felt Pencil Pouch, courtesy of Craft Box Girls’ step-by-step tutorial. This beginner-friendly project is designed to accommodate crafters of all skill levels, sans sewing expertise required. With a mere handful of materials – including felt, scissors, Velcro, and a hot glue gun – you’ll be able to fashion a functional and stylish pencil case that not only keeps your writing tools organized but also serves as a canvas for self-expression. As the ultimate back-to-school accessory, this DIY masterpiece allows you to stand out from the crowd while effortlessly carrying your favorite school supplies.
How to Do You Make a Pencil Case
Create a stress-free and enjoyable pencil case with our easy-to-follow tutorial. Tired of dealing with zippers and buttons? Our guide uses two simple strips of tape measure to create a snap-shut design that’s perfect for students or anyone on-the-go. Say goodbye to the frustration of digging through your backpack for writing tools – these handmade pencil cases open and close quickly and quietly, making them a thoughtful gift or fun project idea for the holiday season. Join us as we walk you through each step, guaranteeing a crafting experience that’s both practical and stylish.
Conclusion:
As we conclude our comprehensive guide on 25 DIY pencil case ideas and designs, you’re now equipped with the knowledge, skills, and creative freedom to craft a one-of-a-kind storage solution that not only serves its purpose but also showcases your unique personality. From selecting the perfect fabric to overcoming common challenges, we’ve covered the essential groundwork to help you create a truly functional and visually appealing pencil case. To take your DIY project to the next level, don’t be afraid to add a personal touch – after all, it’s often the little details that make a piece truly special. So, gather your materials and let your imagination run wild as you bring these creative ideas to life.
