Crafting stunning decorations at home has never been more accessible than with these 25 DIY paper garland ideas. By making your own paper garland, you not only gain a fun and creative experience but also infuse your space with a personalized touch. This comprehensive guide is designed to make the process straightforward, allowing anyone to create beautiful decorations regardless of their skill level. From selecting the ideal type of paper to the final touches, each step is crafted to ensure an enjoyable and fruitful crafting journey. As you embark on this creative adventure, you’ll discover various ways to customize your garland, ensuring it harmonizes perfectly with your space. We also address essential safety tips, troubleshoot common issues, and provide guidance on making your project as sustainable as possible. With helpful FAQs and a video tutorial at your disposal, creating your very own paper garland is merely a few steps away.
How to Make Paper Garland: A Simple Guide for Stunning Decorations
Transform any space with a beautiful paper garland that adds a touch of festive cheer to your home decor. Whether celebrating a birthday, wedding, or simply wanting to add some color to your interior design, making a stunning paper garland is a fun and easy activity that requires minimal materials and maximum creativity. Inspired by the Orthy Art & Crafts YouTube tutorial, this step-by-step guide will walk you through the process of creating a mesmerizing paper garland that’s sure to impress.
What You Will Need:
Step by Step Process:
To create a stunning paper garland, begin by selecting vibrant A4 papers that resonate with your theme or personal style. The colors you choose will set the tone for your final design. Next, fold each sheet of paper in half lengthwise and cut strips approximately 1 cm wide, leaving a small margin at the folded edge. This margin is crucial as it allows the strips to connect seamlessly. For added visual interest, you can vary the thickness of your strips depending on the look you’re striving for.Once you’ve prepared all the strips, unfold the paper to reveal the connected loops. Take one strip and form a loop by gluing its end to the base near the fold. Continue this process, creating loops with each strip until you have a cohesive design. This step is essential in building the intricate, layered look of your garland.With all the loops prepared, it’s time to assemble them into a string. Cut a length of thread that matches the desired length of your garland and slide it through the top part of each looped design, spacing them as desired. Secure each loop by adding a small amount of glue if necessary.Finally, hang your garland up to ensure all is well. You can make adjustments by adding more loops, adjusting the spacing, or incorporating different colors or patterns to give your design a unique touch.
Video Tutorial
While there’s no substitute for hands-on experience, watching Orthy Art & Crafts’ YouTube tutorial on making paper garland can be an excellent supplement to this written guide. The video walkthrough provides a dynamic visual representation of each step, allowing you to easily follow and internalize the techniques described. This synergy between text and visuals makes it easier to grasp the process and achieve a beautiful handmade garland that adds a personal touch to your decorations. With its charming charm and ability to bring joy to any space, crafting a paper garland is an enjoyable experience with a wonderful result.
Customization Ideas for Your DIY Paper Garland
When crafting a DIY paper garland, the possibilities are endless. It’s not just about following instructions – it’s an opportunity to infuse your personality into every detail. Here are some ideas to get you started: To give your garland a unique identity, consider aligning it with the theme of the event. For a whimsical birthday party, bright colors and shapes like balloons or cakes would be fitting. On the other hand, a more elegant affair like a wedding might call for white or pastel hues paired with subtle touches of gold or silver.Feel free to think outside the box (or circle, triangle, etc.) when it comes to shapes. Stars, hearts, animals – the list is endless. You can also mix and match shapes for a playful effect that’s all your own.Texture adds another layer of depth to your garland. Combine smooth, glossy paper with matte finishes or embossed patterns for visual interest.Want to take your design to new heights? Layer multiple pieces of paper to create a 3D effect. This can be as simple as placing smaller shapes on top of larger ones or crafting intricate designs with several layers.Finally, don’t forget about the little things that can make a big impact. Add some sparkle with glitter, beads, ribbons, or stickers to give your garland an extra dose of personality. Ultimately, there’s no one ‘right’ way to customize your garland. The most important thing is that it reflects your style and brings joy to your space – so don’t be afraid to get creative and make it your own!
Safety Precautions for Crafting Your DIY Paper Garland
When it comes to crafting, especially when kids are involved, safety should be your top priority. To ensure a enjoyable experience for all, consider the following guidelines: Always handle scissors with caution, and provide child-friendly options with rounded tips if necessary. When it comes to adhesives, opt for non-toxic glue and keep it out of reach from eyes and mouths; tape can be a safer alternative for younger crafters. Staplers should only be used by adults or under close adult supervision, keeping your fingers clear of the stapling area to avoid accidents. A clean and organized workspace not only prevents mishaps but also enhances the overall crafting experience. Most importantly, maintain close supervision when working with children, teaching them safe tool usage and intervening when necessary. By prioritizing safety, you can focus on what really matters – creating something unique and beautiful.
Troubleshooting Tips for DIY Paper Garland
When faced with common challenges while making your DIY paper garland, don’t let frustration get the best of you. Instead, try these troubleshooting tips to overcome issues like paper tearing, uneven shapes, garland tangling, and color bleeding.
For paper that’s prone to tearing, switch to a thicker variety or reinforce the holes with tape before threading your garland together. To ensure uniform shapes, use a template as a guide. Simply trace the template onto your paper to achieve symmetrical results.
Keep your garland from getting tangled by laying it out flat while you work on it. Once complete, store it by wrapping it around a piece of cardboard to prevent knots and snags. If you’re concerned about color bleeding, opt for high-quality, colorfast paper that can withstand moisture without running.
Remember, encountering issues is all part of the crafting process. Don’t get discouraged – with a little patience and perseverance, you’ll be able to create a beautiful garland that you can proudly display.
Sustainability Tips for Your DIY Paper Garland
Incorporating eco-friendly practices into your crafts not only benefits the environment but also infuses your creations with a deeper sense of purpose. To do so, consider the following suggestions:
Reuse and Recycle: Transform old magazines, newspapers, or book pages into recycled paper for a truly sustainable choice.
Biodegradable Materials: Opt for natural twine or cotton thread to string your garland, as they are gentle on the planet.
Design with Reusability in Mind: Craft your garland with ease of disassembly and storage in mind, allowing it to be reused for future events.
Safe Adhesives: Select non-toxic and environmentally friendly adhesives that won’t harm the environment or those who come into contact with them.
By adopting these eco-conscious approaches, you’ll not only create a stunning garland but also contribute positively to our planet’s well-being.
FAQs About DIY Paper Garlands
As you embark on creating a DIY paper garland, it’s natural to have questions. To ensure a seamless experience, here are some frequently asked queries and their corresponding answers that can serve as a guiding light throughout your creative journey.
What type of paper is best for making garlands?
When it comes to crafting beautiful garlands, the right paper can make all the difference. For a garland that will hold its shape and flow elegantly, look for a sturdy yet lightweight material. Options like cardstock, scrapbook paper, and construction paper are excellent choices, offering a perfect balance of durability and drape.
Can I use recycled paper for my garland?
Embracing sustainability, using recycled materials such as vintage magazine cutouts or repurposed book pages can significantly reduce waste while adding an unconventional charm to your garland. This eco-friendly approach not only aligns with environmentally conscious values but also introduces a dash of personality and whimsy.
How do I keep my paper garland from tangling?
To maintain the appearance and usability of your garland, store it on a flat surface, such as a piece of cardboard. This simple technique keeps the garland organized and prepared for its next use, ensuring it remains a treasured addition to your holiday decor.
What can I use to string the garland if I don’t have twine?
When it comes to finding substitutes for traditional twine, you have a wide range of options at your disposal. From unconventional materials like yarn and dental floss to more conventional choices such as thin ribbon, the possibilities are endless. This flexibility is one of the many benefits of exploring alternatives to twine.
How can I make my garland more durable?
When it comes to creating a long-lasting garland, a few simple techniques can make all the difference. One approach is to use laminating sheets to shape the paper and add extra durability, while another option is to apply clear tape strategically to provide additional reinforcement.
Is it possible to make a garland without a sewing machine or needle?
When it comes to crafting a garland, you have a variety of options beyond traditional sewing methods. For instance, you can utilize adhesive-based solutions like tape or glue, or even opt for simple staples to bring your design together.
How long does it take to make a DIY paper garland?
While the time required to create a garland may vary depending on its intricacy and size, a basic design can typically be completed within 30 minutes to an hour. The complexity of the project will ultimately dictate the timeframe needed for completion.
Can I make a garland with different shapes?
Embrace creativity by combining various forms to craft a one-of-a-kind visual masterpiece. Don’t be limited by traditional boundaries – instead, experiment with diverse shapes to create a truly original composition that reflects your personal style.
How do I hang my paper garland without damaging the walls?
Consider using innovative and damage-free methods to suspend your garland, such as removable adhesive hooks or versatile washi tape, which can effectively hang your decoration without leaving any unsightly marks or residue on the walls.
Can children participate in making a paper garland?
When it comes to creating a garland with kids, one of the most important considerations is ensuring a safe and enjoyable experience for everyone involved. With proper supervision, children can have a blast crafting their own garland, as long as you prioritize the use of safety scissors and non-toxic adhesives to minimize any potential risks.
What should I do if the paper shapes keep flipping over?
To prevent your shapes from tilting or falling over, consider adding a small weight such as a bead or button to the bottom of each one. This simple trick will ensure they remain facing forward, creating a visually appealing display. By keeping these tips in mind, you’ll be able to create a stunning and effective DIY paper garland that showcases your creativity.
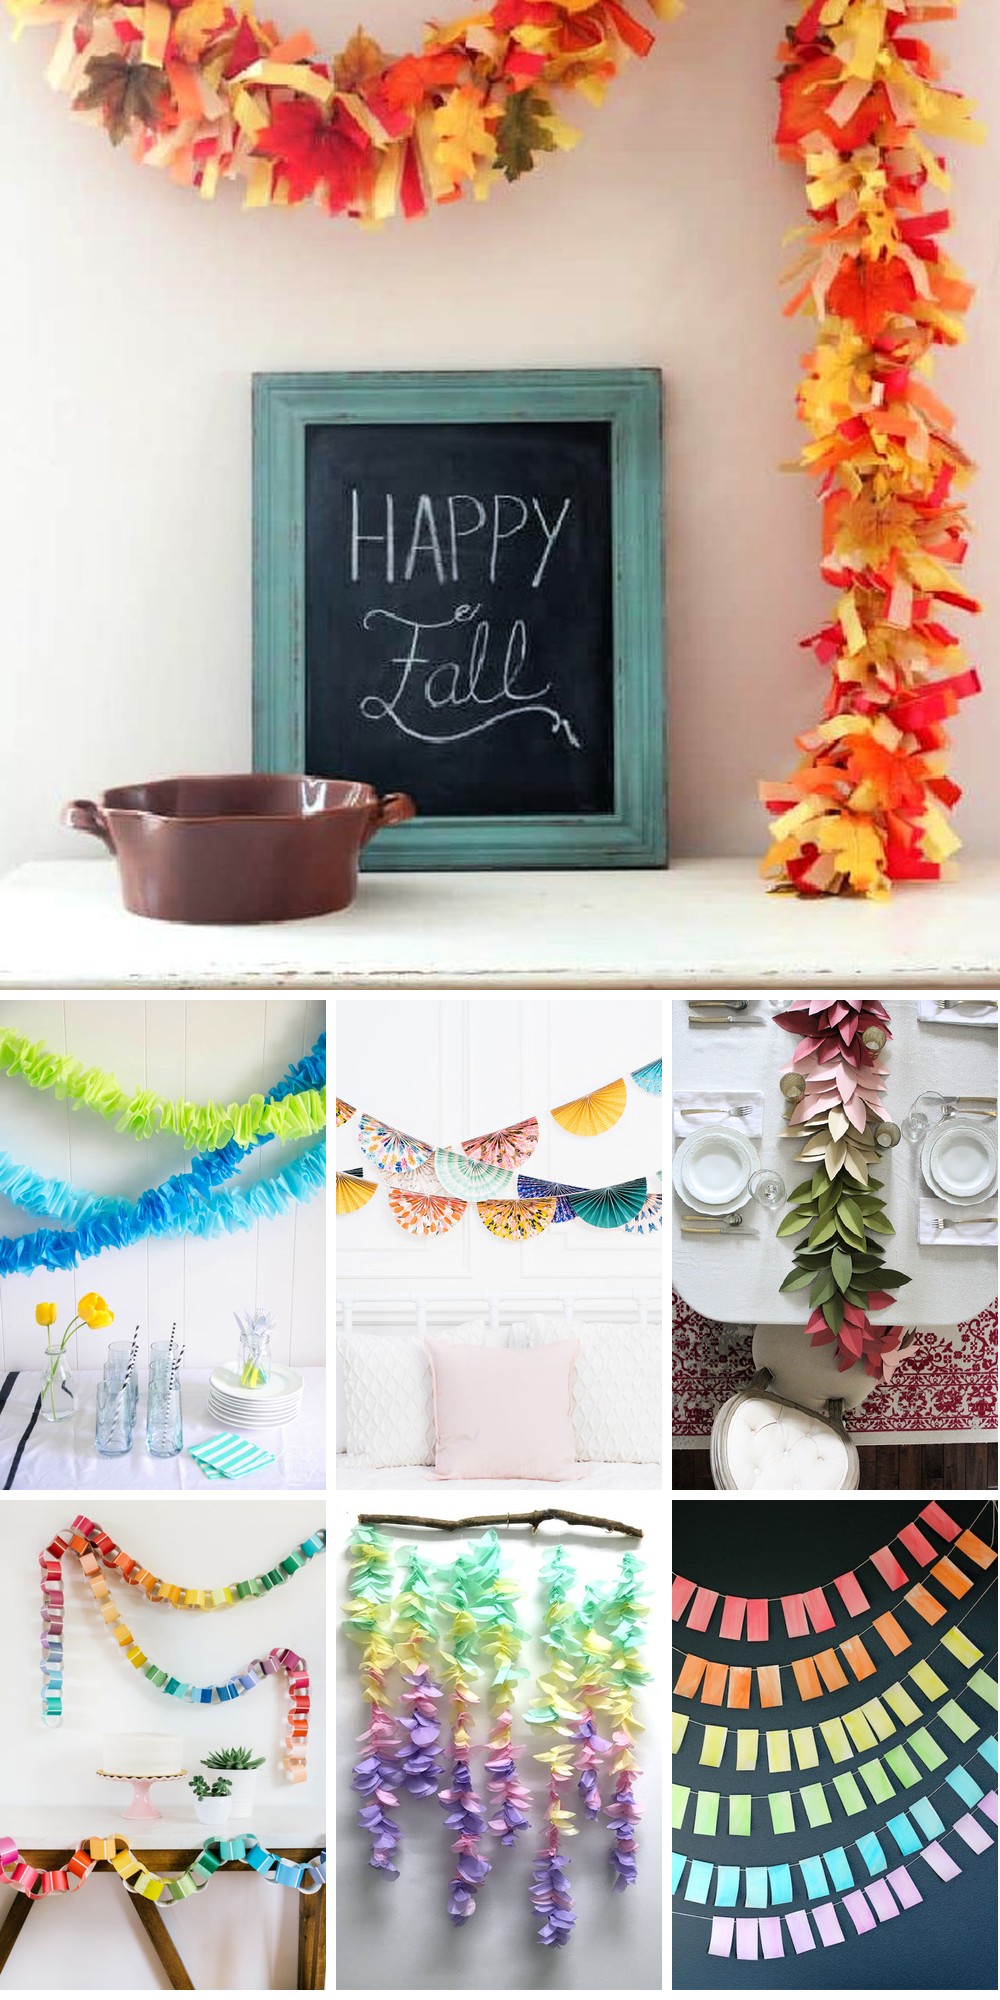
25 DIY Paper Garland Ideas To Make
Elevate your interior design game by unleashing the creative potential within you. With 25 unique DIY paper garland ideas, you can transform any room into a masterpiece that exudes personality and charm. These handmade decorations are not only visually stunning but also an excellent way to express yourself and showcase your artistic side.
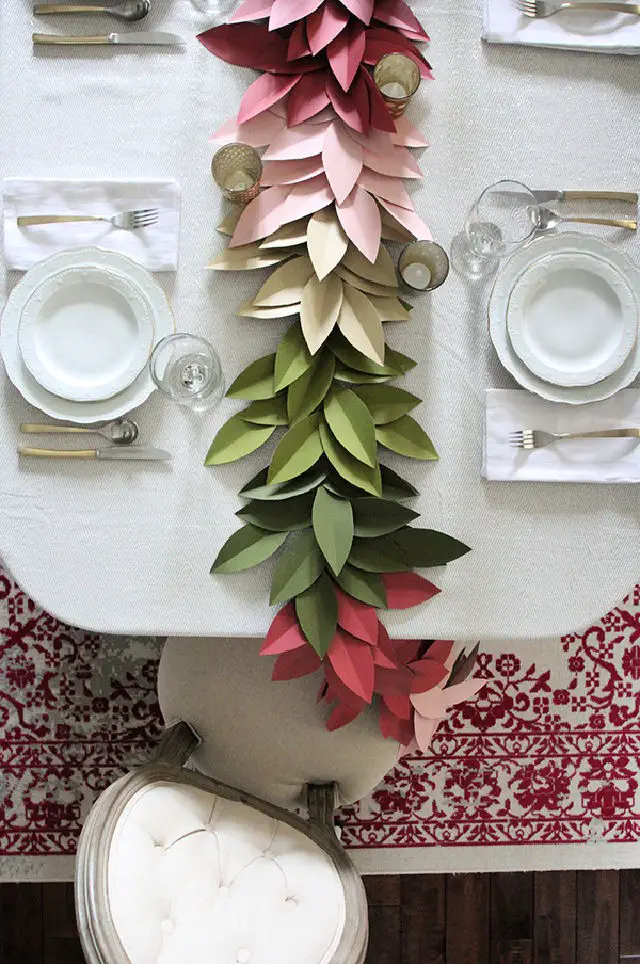
DIY Paper Leaves Garland in 30 Minutes
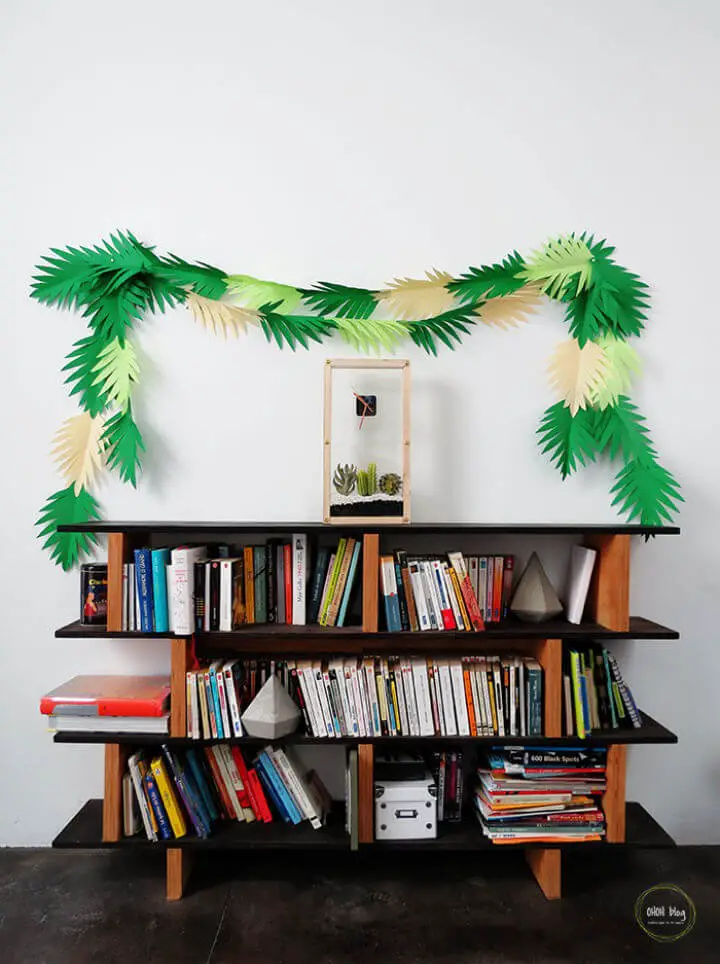
Transform your living space or elevate your next gathering with a stunning handmade paper leaves garland. This creative project requires just 30 minutes of your time, courtesy of Ohoh Deco’s straightforward tutorial. To get started, gather basic materials – colored paper, scissors, a pencil, and a glue stick – and let your imagination run wild. By alternating shades of green for added depth, you can create a truly dynamic effect. For an extra splash of color, consider pairing your garland with tissue paper tropical flowers. The result is a charming, jungle-inspired nook that brings the outdoors in, perfect for serving as a photo backdrop or adding a pop of personality to a room.
Awesome DIY Paper Leaf Fall Garland
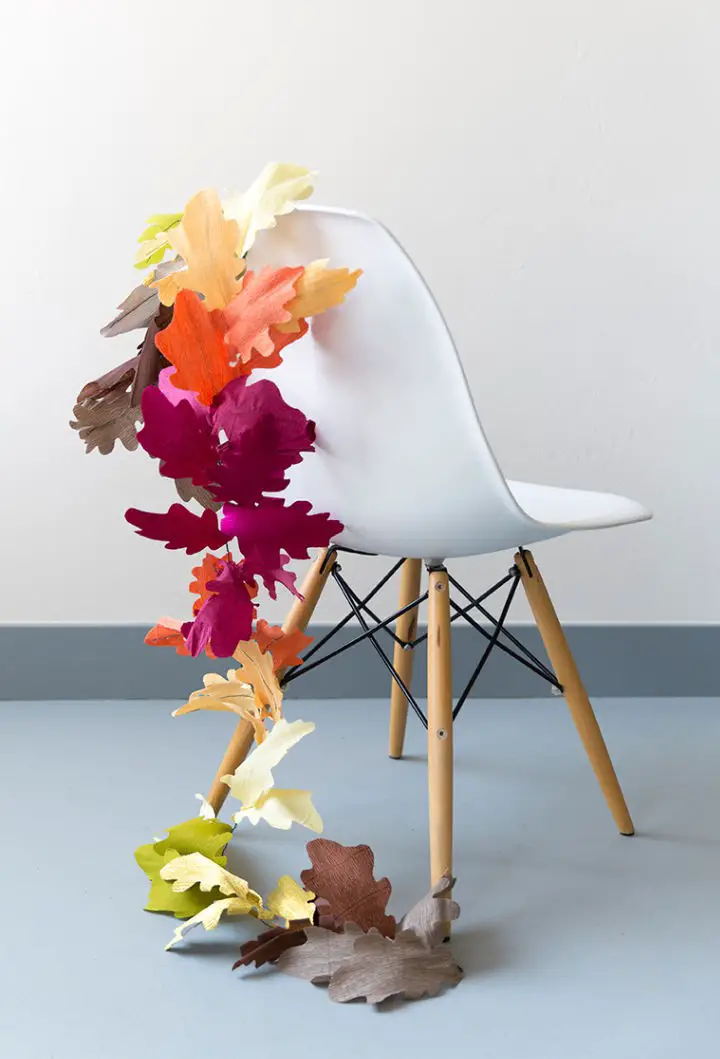
As autumn arrives, bring warmth and coziness to your home with a unique paper leaf garland, inspired by the creative minds at The House That Lars Built. This charming DIY project is perfect for adding a touch of nature’s beauty without the mess of real leaves. To get started, gather crepe paper in a range of fall hues, scissors, a leaf template, floral wire, wire cutters, and a glue gun. The process is surprisingly simple: craft individual leaves by cutting out shapes from the crepe paper, add structure with floral wire, and then assemble your garland by twisting the wires together. Hang it proudly on your mantle or in any space that could use a pop of autumnal flair. This engaging craft will result in a stunning seasonal decoration that will last long after the fall festivities have passed.
Pretty DIY Paper Geode Garland
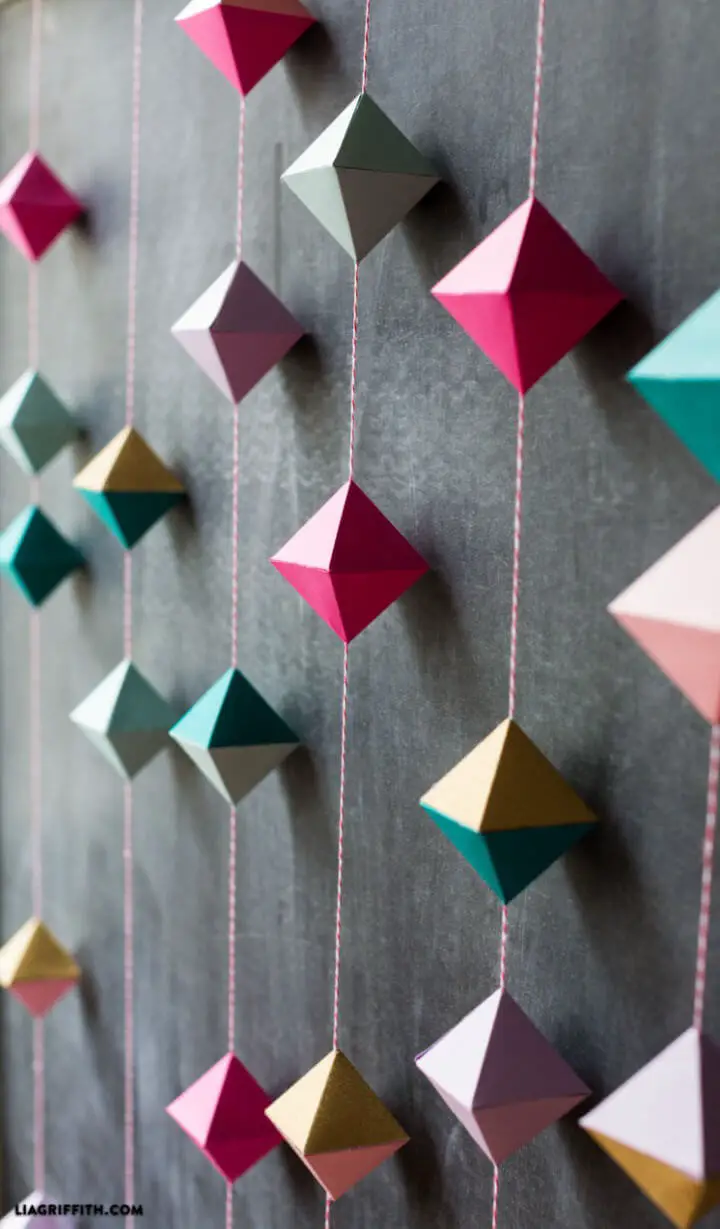
Transform your living space into a stunning work of art by creating a beautiful paper geode garland at home. With just a simple craft knife and an array of colorful papers, you can bring Lia Griffith’s engaging pattern and tutorial to life. This charming DIY project is not only rewarding to make but also boasts a unique, eye-catching display that’s perfect for sprucing up your living area or adding a personal touch to celebrations. The versatility of using different papers allows you to tailor the color palette to suit your individual style, making it an ideal way to infuse your space with a personal, crafted touch. To assemble the garland, a hot glue gun is recommended, ensuring a strong hold and easy crafting process. For more creative home decor ideas that inspire personal expression, visit Lia Griffith for a wealth of innovative solutions.
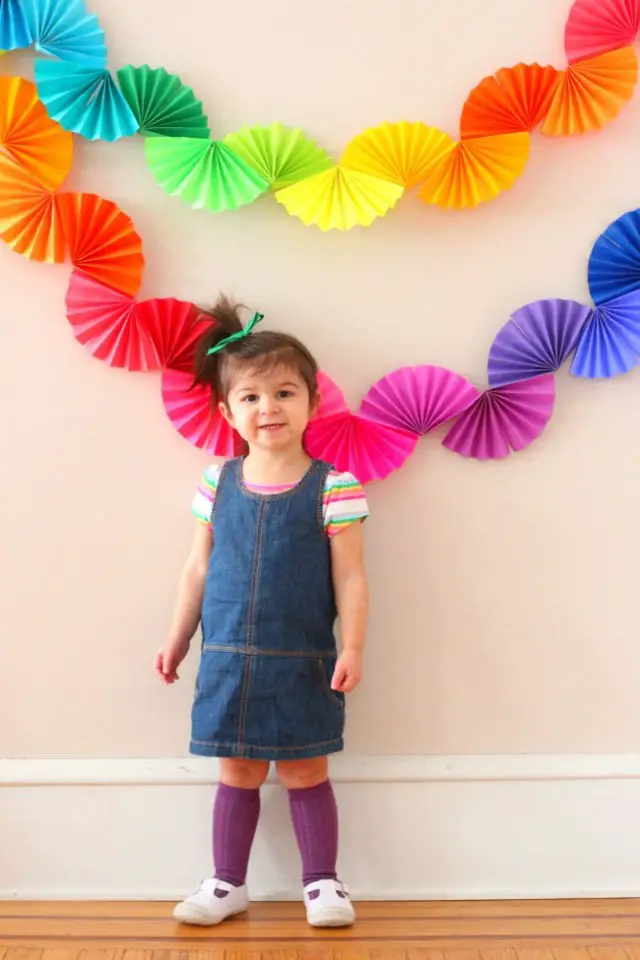
Making St. Patrick’s Day Rainbow Garland
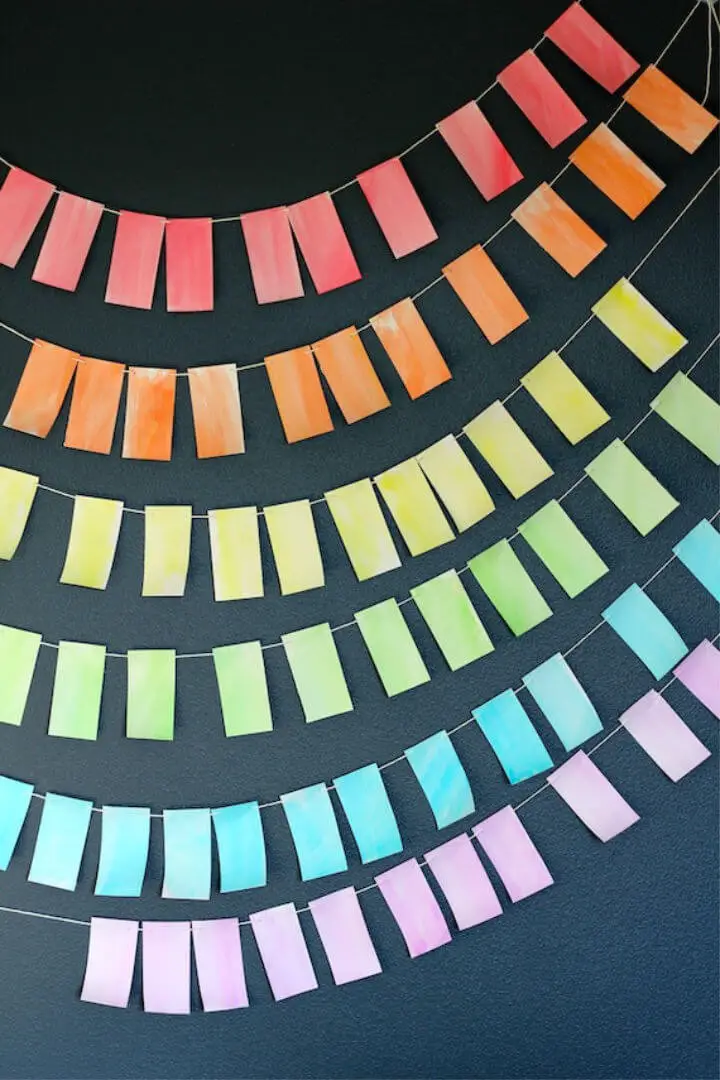
Add a pop of color to your St. Patrick’s Day celebrations by creating a vibrant rainbow garland that doubles as a charming holiday decoration. This DIY project, courtesy of Julep, is an easy and accessible way to bring a touch of creativity and festive flair to your home. To get started, gather basic supplies like card stock, watercolor paints, and twine. Then, follow the simple steps to paint, cut, and string together your paper rectangles, resulting in a unique and eye-catching addition to your holiday decor. With clear instructions and minimal fuss, this craft is perfect for anyone looking to inject some rainbow magic into their St. Patrick’s Day celebrations.
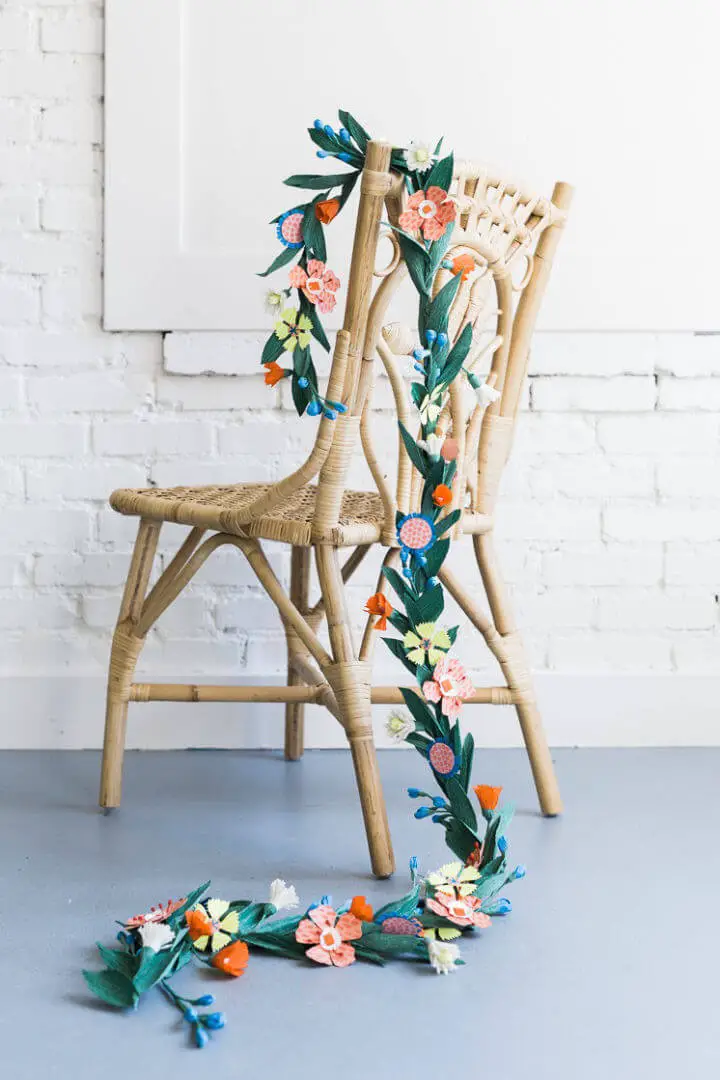
Handmade Spring Paper Flower Garland
Transforming your space with a touch of spring charm is as easy as crafting a beautiful paper flower garland. By following Lia Griffith’s straightforward tutorial, you can create an array of flowers and leaves using simple templates and vibrant metallic papers. Assembling the pieces into a stunning garland adds a unique decorative element to mantels, windows, or any room in your home. With just a few basic crafting tools and some downloadable patterns from Lia Griffith’s website, you’ll be able to turn paper into a breathtaking display. And if you’re looking for more creative inspiration, join the growing community of crafty enthusiasts at Lia Griffith.
Gorgeous Summer Flower Garland
Add a splash of summer charm to your home with a DIY flower garland. This delightful project is not only an affordable way to decorate but also a fun activity to enjoy with friends or family. With its fully customizable design, you can choose colors that match your personal style and adorn your space with a beautiful staircase garland, doorway decoration, or wall art. To make the most of this creative endeavor, head over to The House That Lars Built for a comprehensive guide on crafting a vibrant summer flower garland that will brighten up any room.
Cool Dipped Crepe Paper Garland for Chair
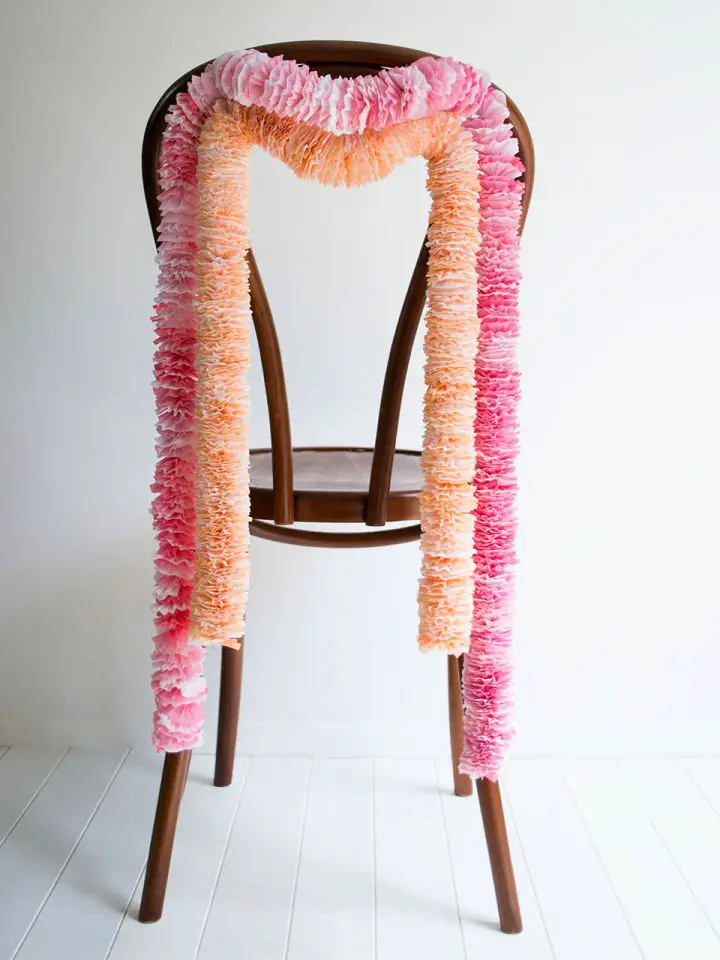
Discover the art of crafting dipped crepe paper chair garlands, a unique and personal touch for your special day. As featured on Love My Dress UK Wedding Blog, this step-by-step tutorial guides you in transforming simple strips of crepe paper into elegant decorations using watercolors and basic craft supplies.
Perfect for DIY enthusiasts and those looking to add an extra layer of charm to their ceremony or reception chairs, these garlands are surprisingly easy to make. By following our easy-to-follow instructions, you’ll unlock the secret to creating beautiful, cost-effective accents that will elevate your wedding aesthetic and leave a lasting impression on your guests.
Creative Paper Leaf Garland

Transform your space with a show-stopping DIY paper leaf garland, courtesy of The House That Lars Built’s effortless tutorial. To create this nature-inspired masterpiece, gather basic materials: green crepe paper, scissors, a template, and a sewing machine. Begin by carefully cutting out the leaves using the provided template, ensuring the grain runs vertically for a crisp, authentic look. Next, sew the leaves together in a crisscross pattern down the middle, repeating this process until you’ve reached your desired length. This reusable garland is perfect for adding a touch of organic elegance to your home decor or elevating seasonal celebrations. With its simplicity and sophistication, get crafting and take your decorating game to new heights!
Make Your Own Paper Net Garland
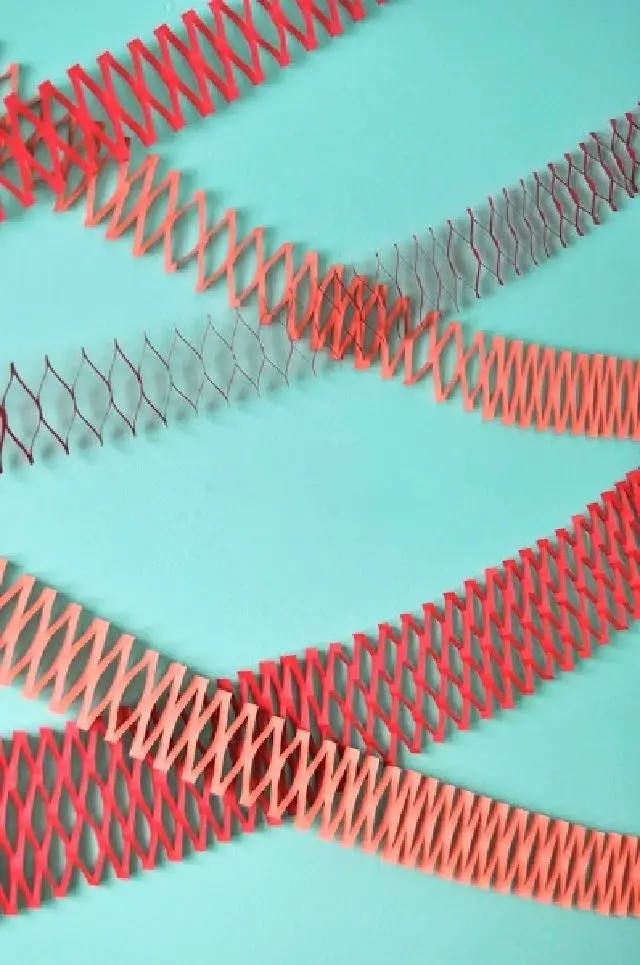
Transform your space with a charming paper net garland inspired by vintage craft books. This DIY guide shows you how to create a festive decoration using simple materials and techniques. Start by cutting a long strip of paper, then fold it lengthwise to create a foundation for your garland. Make alternating snips along the edges of the folded paper, being careful not to cut all the way through. Unfold the paper gently, and use a flat surface to flatten the crease created by the folding. For added length, simply glue multiple garlands together. To hang your masterpiece, attach it to walls using washi tape for an instant decorative lift. This easy and engaging craft project adds a vintage touch to any occasion or setting.
Pretty DIY Triangle Paper Garland
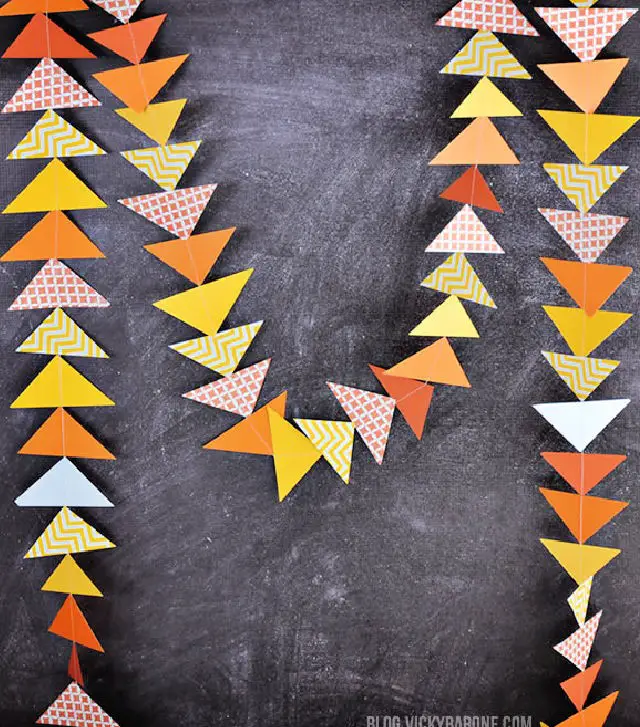
Create a whimsical and charming triangle paper garland with ease by following Vicky Barone’s DIY tutorial on her blog. This delightful craft project is perfect for adding a playful touch to any kid’s room, playroom, or office. To get started, simply gather your materials: scrapbook paper, a paper cutter, and a sewing machine. Cut the paper into squares, then triangles, and use your sewing machine to stitch them together, creating a delightful décor piece that you can customize using patterned or solid-colored papers and varying triangle sizes. This fun crafting session is not only enjoyable but also allows you to personalize your space with a unique and creative addition. For the full step-by-step guide and more inspiring ideas, visit Vicky Barone’s blog.
Tissue Paper Flower Garland Design

Transforming your living space with handmade charm has never been easier. This DIY tissue paper flower garland guide from JAM Paper offers an enchanting and colorful way to add a personal touch to your décor. Whether you’re looking to create a show-stopping centerpiece for a party, a unique piece of wall art for your bedroom, or a striking ceiling hanging, this project is sure to deliver. With just a few simple supplies – including colorful tissue paper, a needle, clear string, and scissors – you can craft an eye-catching garland that reflects your personal style and adds a touch of elegance to any room. The process may be straightforward, but the results are undeniably impressive, making it a cost-effective alternative to store-bought decorations that’s easily customizable to match any interior design scheme.
Beautiful DIY Ruffled Tissue Garland
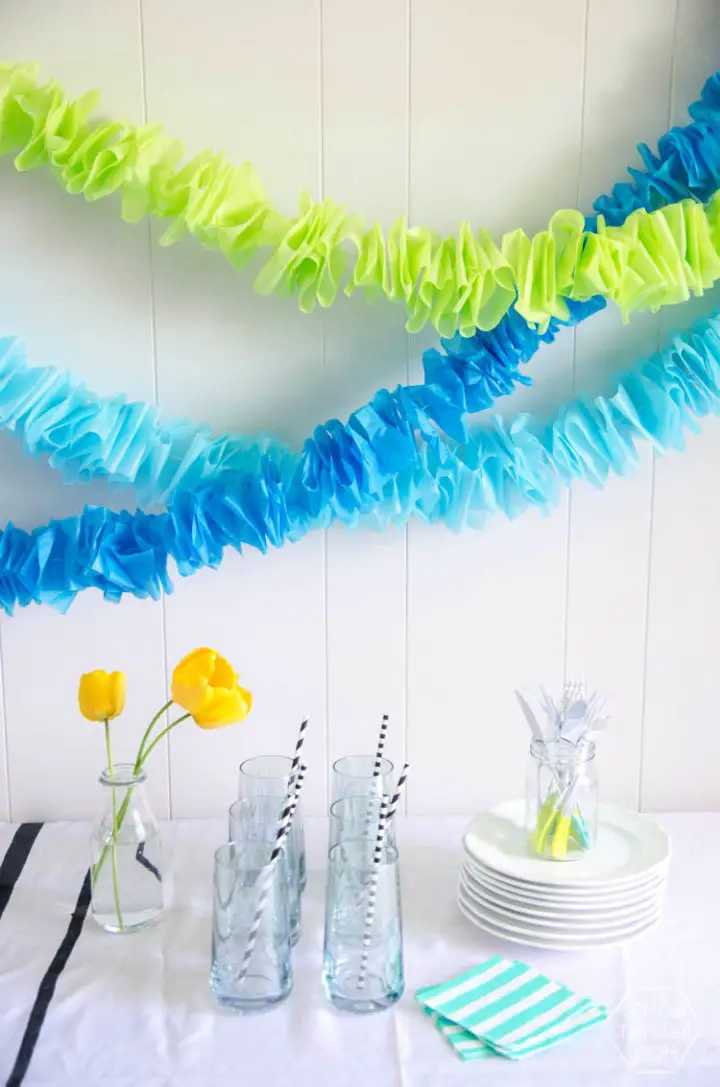
Transform your party atmosphere into a whimsical wonderland by crafting a DIY Ruffled Tissue Garland that’s as delightful to create as it is charming to behold. With Lemon Thistle’s comprehensive guide, you can easily bring this cost-effective decoration to life without breaking the bank.
Gather your supplies: tissue paper in your preferred hues, a length of string, a large needle, and scissors. In under an hour, you’ll be able to breathe new life into your space with a colorful, ruffled accent that’s fully customizable to fit any event theme. This engaging tutorial ensures your decor exudes a personal, handcrafted charm that will leave your guests in awe.
Make a Paint Chip Paper Chain Garland
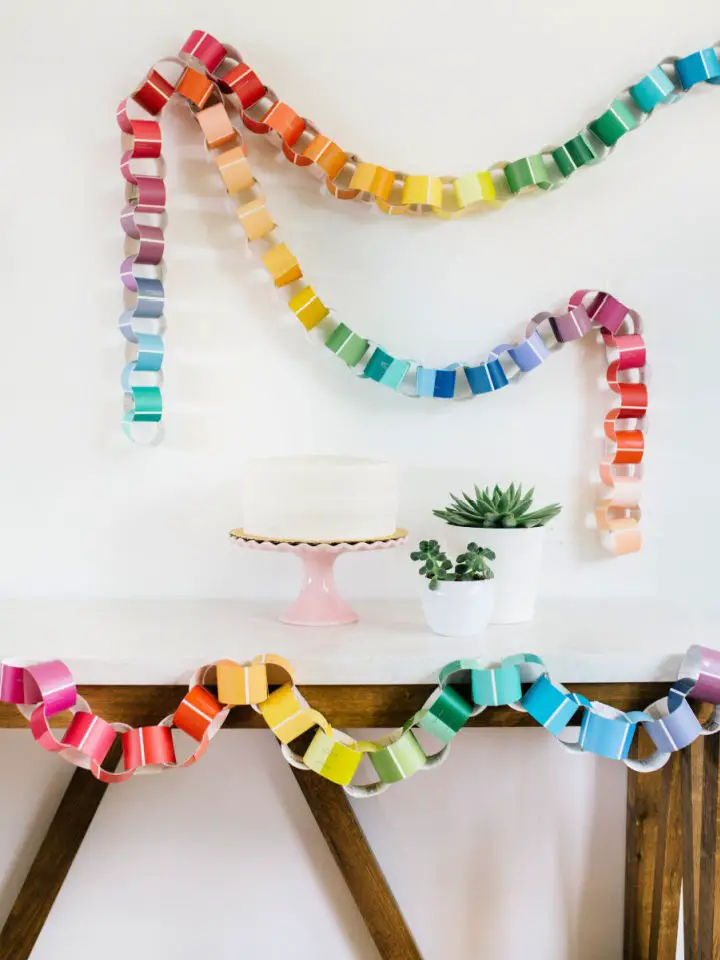
Looking to add a pop of color to your celebration? The Pretty Life Girls show you how to create a stunning DIY Paint Chip Paper Chain Garland that’s not only vibrant but also budget-friendly. Start by collecting paint chips in your favorite hues, along with some basic crafting supplies like scissors, a stapler, and string or tape. Then, simply cut the chips into uniform strips, loop them into rings, secure each one with staples, and keep linking until you reach your desired length. Once complete, hang your garland to instantly add a cheerful, personalized touch to any space. Whether it’s for a party or just a special occasion, this easy-to-make decor is sure to bring joy and inspire creativity in every fold and staple.
Colorful Homemade Paper Garland
Add a splash of vibrancy to your party decor or brighten up a space with the simplicity of crafting a DIY paper garland. With basic materials such as construction paper, scissors, a ruler, and a pen at hand, you can create a colorful masterpiece in no time. For a comprehensive guide that’s perfect for crafters of all skill levels, look no further than DIY Candy. The process begins with folding the paper, marking measurements, and creating alternating cuts to form an accordion-style chain. Unfold the chain, repeat the process with various colors, and you’ll have a stunning decoration ready to be hung and admired. What’s more, this project is not only budget-friendly but also a fun activity that kids can join in on, making it an excellent way to spend quality time together while being creative. Get inspired and enjoy crafting your custom paper garland for any occasion!
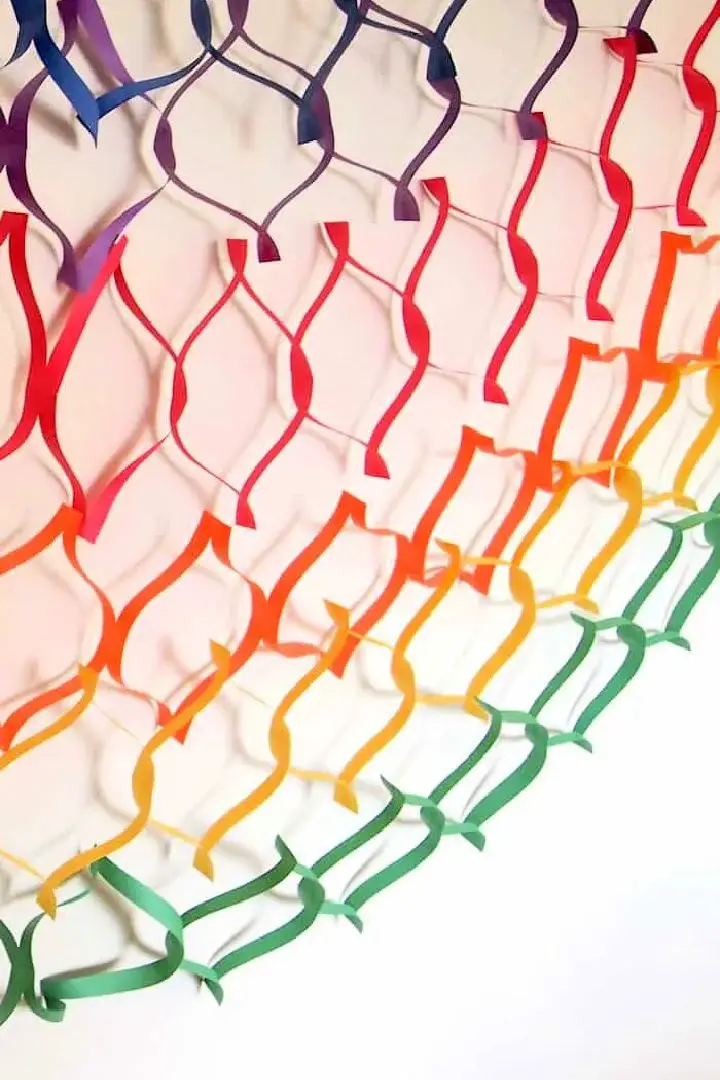
DIY Rainbow Paper Garland for Party Decoration
Add a splash of whimsy to your celebration with a vibrant DIY decoration – a Rainbow Fan Garland made from paper. This easy-to-make garland is perfect for a rainbow-themed or art-inspired party, requiring only basic supplies like scissors, colored paper, and tape. To start, cut the paper into squares and fold each one into an accordion shape, securing the middle with tape. Arrange the fans in a gradient of colors, alternating their direction to create visual interest. Connect the fans side by side, and you’ll have a stunning garland that’s sure to delight. This budget-friendly DIY project is a great way to add a pop of color and fun to any event.
Making a Paper Heart Garland
Transform any room into a charming sanctuary with a handmade paper heart garland, perfect for Valentine’s Day celebrations or as a year-round decorative accent. At A Wonderful Thought, we’re delighted to share a straightforward guide on how to create this lovely decoration, requiring just a few essential supplies: heart punches, paper, and a sewing machine. Follow our simple steps and you’ll be crafting a whimsical garland in no time, complete with a variety of heart sizes to add visual interest. Simply punch out your hearts, sew them together, and voila! A beautiful, one-of-a-kind decoration ready to adorn a mantel or window. Let your creativity flourish as you bring a personal touch to your home decor.
Handmade Paper Flower Garland
Transforming your space with a touch of elegance is just a few steps away, courtesy of a stunning paper flower garland. By embracing this DIY project, you can create a vibrant, long-lasting decoration that effortlessly captures the essence of any season. With a minimal investment in colored cardstock and a hole punch, you’ll be able to craft blooms that burst with color and charm. Whether you’re preparing for a party or simply seeking to add a pop of color to your living space, this eco-friendly project is sure to delight. Not only does it provide an environmentally responsible alternative to traditional floral arrangements, but it also invites creativity and self-expression. As you bring the beauty of nature indoors without the need for frequent watering, you’ll discover that this DIY endeavor is more than just a decoration – it’s an experience that will leave your space feeling refreshed and revitalized.
Beginner-Friendly DIY Paper Garland
Crafting a vibrant paper garland with Design Fixation’s DIY tutorial is an excellent way to breathe new life into your space. This engaging activity requires minimal materials, including colored copy paper and jute twine, yet yields stunning results. By following the clear, step-by-step instructions, you’ll effortlessly fold and assemble your paper creation, allowing for customization to suit your personal style and aesthetic preferences. Whether you’re looking to add a pop of color to your home decor or create a festive atmosphere for an upcoming party, this DIY project is perfect for anyone seeking to infuse their surroundings with a handmade touch.
Paper Fall Leaves Fringe Garland for Party
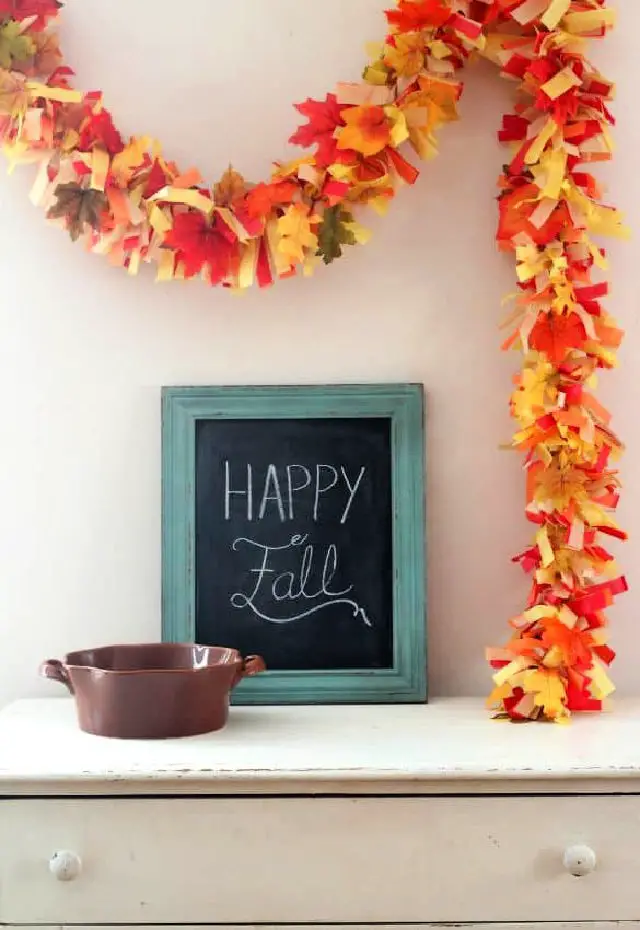
As the crisp autumn air sets in, why not create a warm and inviting atmosphere for your next gathering with a DIY Fall Leaves Fringe Party Garland? This charming decoration is surprisingly easy to make using just tissue paper and faux fall leaves. With its lightweight design, it can be effortlessly hung to add a touch of seasonal cheer to your space – perfect for back-to-school events, showers, or cozy nights in with friends. By following this simple guide, you’ll create a beautiful garland that not only won’t break the bank but will also elevate your party décor to new heights.
How to Make a Paper Leaf Garland for Fall
As the seasons transition, infuse your home with a handmade touch by crafting a vibrant paper leaf garland. The engaging project from Less Than Perfect Life of Bliss brings autumn’s charm indoors, featuring a stunning cascade of colorful leaves. This accessible craft requires minimal materials: colored cardstock, scissors, a leaf template, an Xacto knife, cutting mat, ruler, twine, and a hot glue gun. By carefully cutting and scoring the leaves, then strategically gluing them to the twine, you’ll create a festive garland ideal for mantles or tables. This craft not only adds a burst of color to your decor but also offers a fun activity to share with loved ones. Get creative and let this fall-inspired garland illuminate your living space!
DIY Tissue Paper Garland for 4th of July
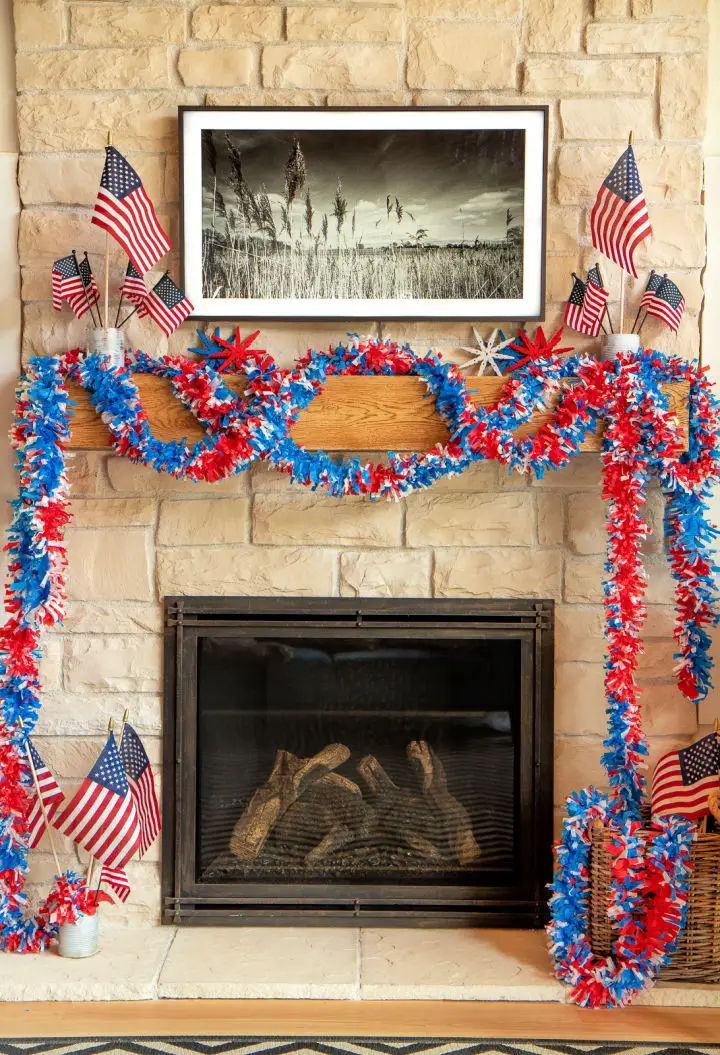
Transform your 4th of July celebrations with a DIY tissue paper garland that exudes patriotic flair! With just red, white, and blue tissue paper, scissors, and a stapler, you can create a charming decoration that’s perfect for draping over mantels or adding a pop of color to your outdoor space. The best part? This craft is surprisingly easy and fun, requiring no advanced skills – even beginners can join in on the creative process. By following our simple step-by-step instructions, you’ll be able to create a stunning garland that adds a homemade touch to your decor, filling your space with the spirit of Americana.
Making an Autumn Leaf Paper Garland for Curbly

Transform your home into a warm and inviting oasis this fall by creating a stunning handmade colorful leaf garland. With Curbly’s easy-to-follow DIY guide, you can bring the cozy vibes of the season to life in no time. To get started, gather just a few simple materials – white cardboard, fall-colored paper, scissors, and twine. No prior crafting experience is required, as this project is designed to be both fun and accessible. In fact, the only skill needed is a willingness to get creative and add a personal touch to your fall decor. The end result is a charming and budget-friendly addition that will elevate your Thanksgiving celebrations and beyond.
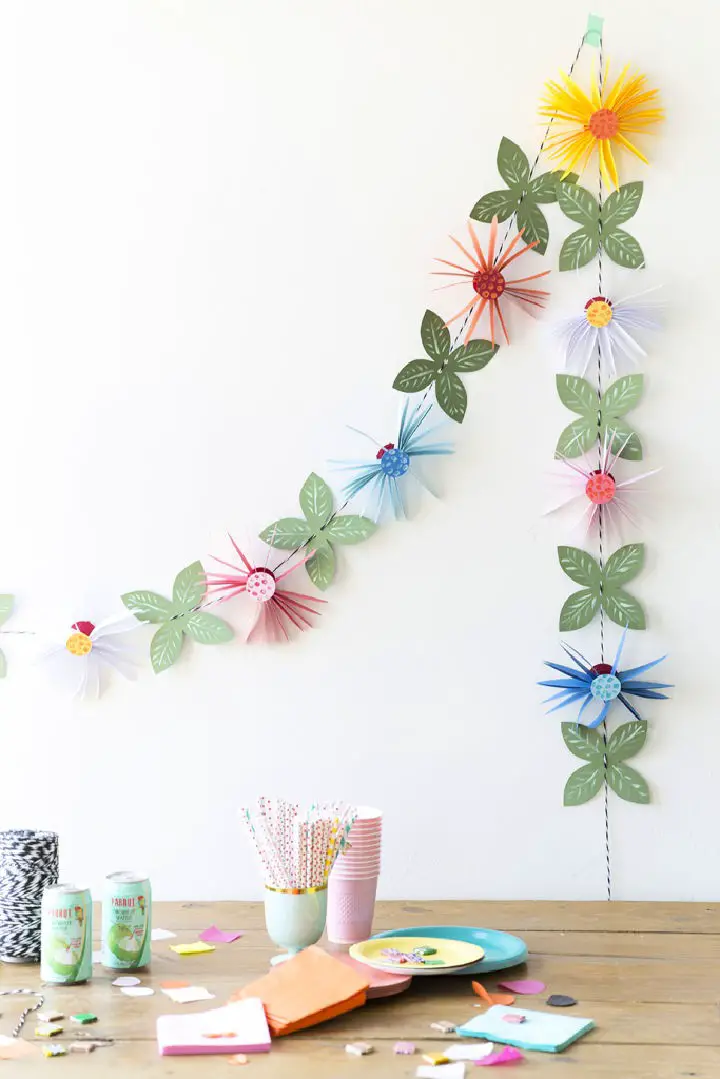
Tropical Paper Garland for Summer Party
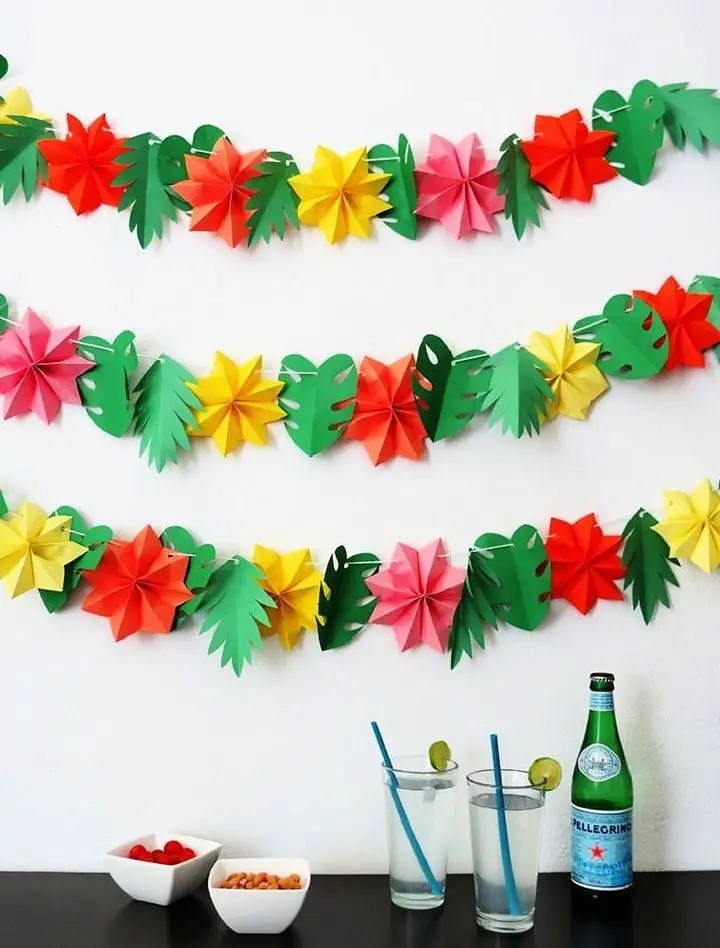
Transform your summer party into a vibrant oasis with a stunning handmade tropical garland from Dream a Little Bigger. This comprehensive DIY guide walks you through an interactive step-by-step process, crafting radiant paper flowers and lush tropical leaves that will leave your guests in awe. To bring this tropical beauty to life, all you need is some basic supplies like colored paper, glue, scissors, yarn, and a dash of creativity. By mastering simple folding and cutting techniques, you’ll be able to craft breathtaking decor that’s sure to impress. With the addition of carefully placed holes and a few strings, your summer bash will be effortlessly elevated into a festive celebration that exudes warmth and joy. This accessible and enjoyable craft is perfect for anyone looking to add a personal touch to their party ambiance, making it an ideal activity for DIY enthusiasts and party planners alike.
DIY Punched Tissue Paper Garland
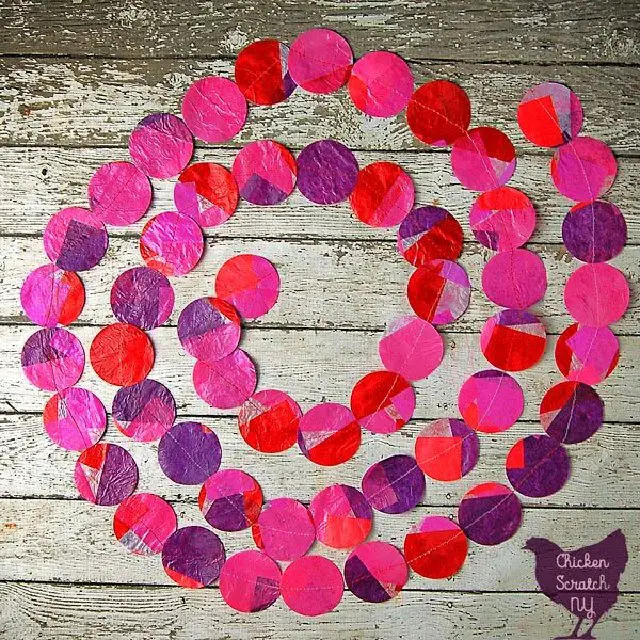
Transforming your home decor with a splash of color has never been easier! With just a few simple supplies, including tissue paper, Mod Podge, and a sewing machine, you can create a stunning tissue paper garland that’s perfect for any celebration or everyday ambiance. This DIY project is not only fun but also customizable to fit your unique style. Here’s how to bring your vision to life: start by laying out the background tissue, followed by applying Mod Podge in sections and sticking and sealing colorful tissue pieces on top. Once dry, punch out circles and sew them together to form a vibrant garland that’s sure to brighten up any room. With this creative project from Chicken Scratch NY, you’ll be hanging your masterpiece in no time, ready to bask in the lively atmosphere it brings!
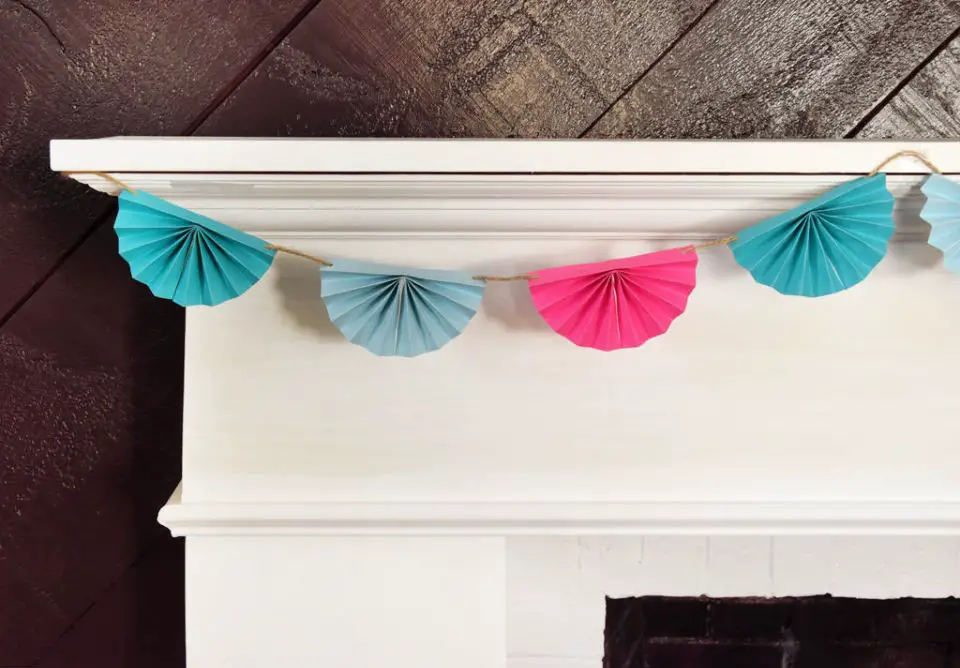
Homemade Paper Fan Garland
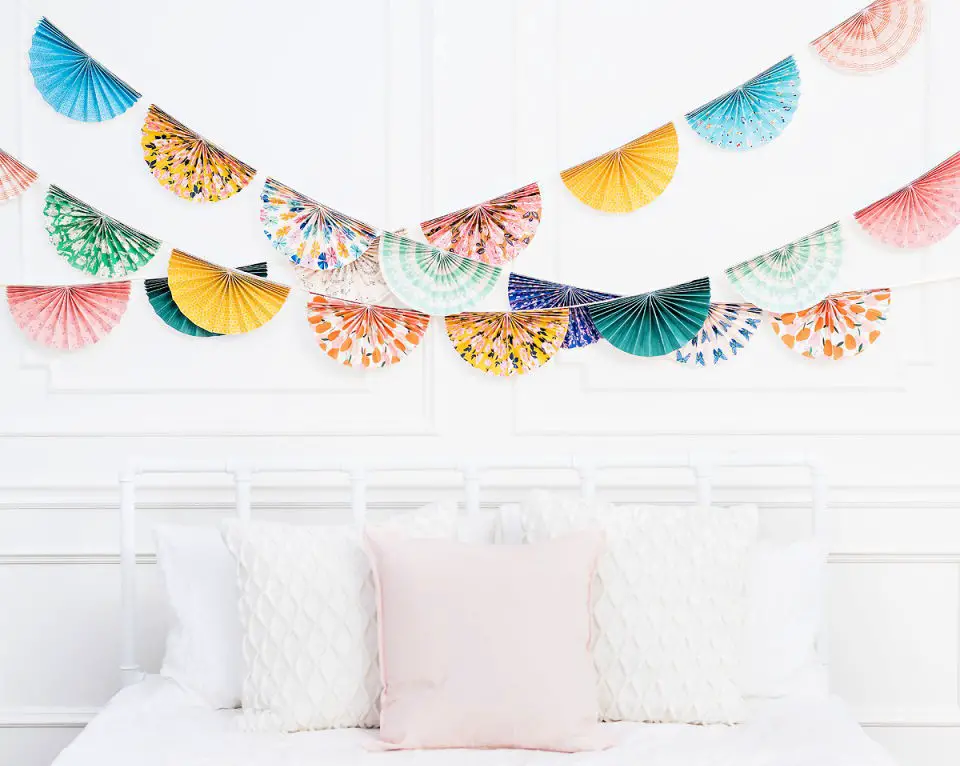
Transform any setting into a whimsical wonderland by crafting charming paper fan garlands with Maggie Holmes Design’s comprehensive tutorial. This delightful project adds a touch of personality to parties, weddings, or home decor, all with simple materials like patterned paper, a scoring tool, and a hot glue gun. With the step-by-step instructions accompanied by a convenient free printable guide, you’ll effortlessly create stunning rosettes that bring color and flair to your space. Feel free to get creative with your garland’s design by selecting papers that reflect your unique style, and bask in the pride of creating one-of-a-kind DIY decor that’s sure to impress. Visit Maggie Holmes Design for the full tutorial and start elevating your space today.
Conclusion:
As we wrap up our exploration of 25 DIY paper garland ideas, you’re now empowered with the skills and creativity to craft one-of-a-kind decorations that can instantly elevate any space. By mastering the intricacies of selecting the perfect paper to the precise steps involved in creating your masterpiece, this comprehensive guide has equipped you to bring your DIY vision to life. With customization options allowing for personal flair, while prioritizing safety measures to ensure a seamless crafting experience, you’re all set to create something truly special. Should any unexpected challenges arise, our expert troubleshooting tips are just a click away to help you overcome any obstacles. Moreover, our eco-friendly suggestions guarantee that your crafting endeavors not only bring joy but also contribute to a more sustainable future. So go ahead and start crafting your DIY paper garland today – the possibilities are endless!
