Immerse yourself in a comprehensive guide that unlocks the secrets of crafting functional and stylish outdoor seating solutions with built-in storage. Dive into 20 free DIY outdoor storage bench plans, replete with customization ideas, safety precautions, and troubleshooting tips to ensure your project is a success. Learn how to select the perfect materials, incorporate comfort features like cushions, and infuse personal touches to transform your outdoor space into a unique oasis.
Delve into the significance of sustainability and environmental impact in DIY endeavors and discover practical strategies for maintaining and caring for your outdoor storage bench. A list of frequently asked questions addresses common concerns, empowering you to tackle your next DIY project with confidence and creativity.
Embark on this journey of discovery today and unlock a world of creative possibilities.
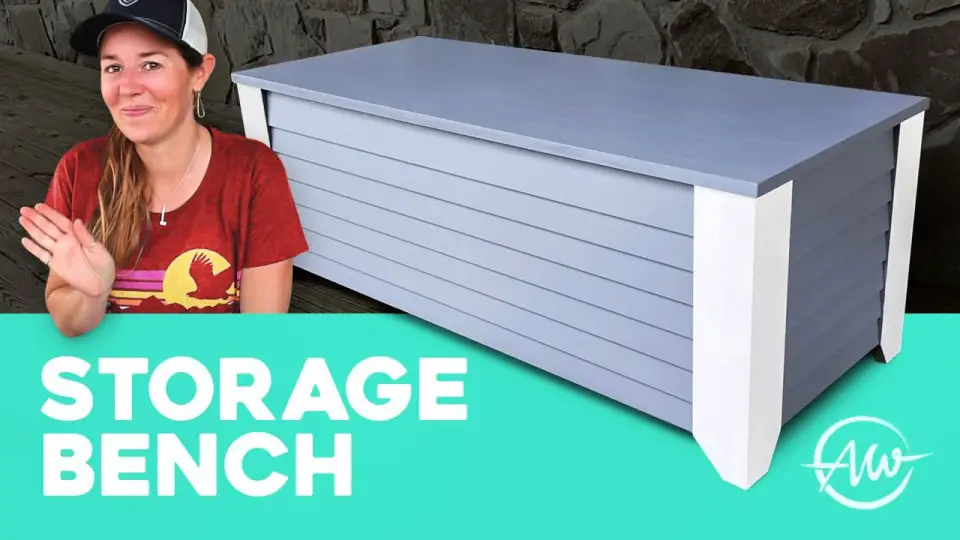
How to Build an Outdoor Storage Bench – Step by Step Guide
Elevate your space’s aesthetic while adding practicality with a storage bench that seamlessly combines form and function. This accessible DIY endeavor is suitable for any skill level, as demonstrated by April Wilkerson’s straightforward instructions.
Materials and Tools Required
Before commencing your project, ensure you have the necessary materials and tools at hand. A comprehensive list includes exterior-rated MDF (Medium-Density Fibreboard), specifically Armorite for its exceptional moisture resistance and durability. Additionally, gather exterior wood glue, screws, Brad Nails, and paint or sealant suitable for outdoor use. Furthermore, prepare your basic woodworking arsenal by having a saw, drill, nail gun, and sander readily available.
Step by Step Instructions
Step 1: Preparing the Wood
To begin the project, it’s essential to prepare all the necessary components according to the cut list specified in the plans. When fabricating the bench body, legs, and siding, utilize exterior-rated MDF for each part. Having all elements neatly organized and ready for assembly will significantly simplify the construction process, allowing you to focus on bringing your design to life.
Step 2: Assembling the Bench Body
To construct the wooden bench, start by combining the front piece with one of the sides using a combination of exterior wood glue and screws. To avoid splitting the wood, pre-drill the holes before assembly. Next, attach the other side in a similar fashion, ensuring a secure bond between the pieces. With the two sides in place, slide the bottom piece into position, carefully aligning it between the sides, and secure it with screws. Finally, attach the back side to complete the bench body, effectively sealing off the structure.
Step 3: Attaching the Legs
To achieve a sleek, modern aesthetic, subtly angle-cut the bottom edges of the legs using a miter saw. This precise technique creates a clean, streamlined appearance. Next, secure two pieces together per leg, relying on a combination of wood glue and brad nails to form a sturdy bond. For optimal results, attach the smaller side first, thereby ensuring a uniform look throughout. Finally, integrate these newly constructed legs into the main body of the bench, solidifying their presence in the overall design.
Step 4: Adding Siding for Aesthetic Appeal
To begin installing your exterior siding, start by creating a bump-off at the bottom for the first strip. This will provide a clean starting point for the rest of the installation. Next, grab your trusty nail gun and attach the siding strips, taking care to maintain even spacing with the aid of a spacer. Keep in mind that due to the minimal contact areas between the siding and the body of the structure, it’s essential to switch from wood glue to construction adhesive for added durability and a secure hold.
Step 5: Crafting and Attaching the Lid
When designing the lid of your DIY storage bench, consider opting for a straightforward MDF slab that can be easily elevated by cushions for comfortable seating. To achieve a sleek appearance, secure the lid with hinges and ensure it aligns flush with the back of the bench. Additionally, think about incorporating a chain mechanism to prevent the lid from swinging open too wide when not positioned against a wall.
Step 6: Finishing Touches
To begin, sand all edges to prevent splinters and create a smooth surface for painting. Next, apply an outdoor-grade coat of paint or sealant, taking care to reach into every nook and cranny. Allow the coating to dry completely before placing your newly restored bench in its intended location. Finally, add any finishing touches by filling the space with cushions or other storage items.
Additional Tips:
To get started on a successful project, it’s essential to begin by creating a clutter-free workspace. This will help you stay focused and avoid wasting valuable time searching for misplaced materials. A well-organized workstation also allows you to prioritize tasks more effectively and make the most of your assembly process. Another crucial step is to take the time to accurately measure and cut all necessary components beforehand, as this will greatly reduce the likelihood of errors and delays during actual construction. Furthermore, when working with power tools or other equipment that carries a risk of injury, always remember to wear appropriate personal protective gear such as gloves and goggles to minimize your exposure to potential hazards.
Video Tutorial
For those seeking a comprehensive learning experience, April Wilkerson’s YouTube tutorial ‘Indoor/Outdoor Bench with Storage’ offers an engaging visual companion to this written guide. By combining the step-by-step instructions with the video’s hands-on demonstration, both newcomers and experienced DIY enthusiasts can gain a deeper understanding of the techniques involved. With these detailed steps as your guide, you’ll be well on your way to constructing a functional and aesthetically pleasing indoor/outdoor bench in no time.
Customization Ideas for Your DIY Outdoor Storage Bench
When crafting a DIY outdoor storage bench, the project transcends mere functionality, becoming an opportunity to infuse your outdoor space with your unique personality and flair. By incorporating personalized touches, you can transform the bench into a reflection of your individual style, making it a true showpiece in your yard or patio.
Choose a Color Scheme
To give your garden an extra boost of personality, consider adding a pop of color with a bold and vibrant paint job. This could be achieved through the use of sunny yellows, bright blues, or lively greens that will add an instant injection of energy to your outdoor space. Alternatively, if you’re looking for a more understated approach, you could opt for natural tones that blend seamlessly with the surrounding environment. Earthy browns, muted greens, and soft grays are all great options that can help to create a sense of harmony between your garden and its surroundings.
Select the Right Materials
When it comes to building outdoor furniture, the wood choice is crucial for longevity. Cedar and redwood are excellent options due to their inherent resistance to decay, ensuring your bench remains sturdy and attractive over time. For a more budget-friendly approach, pressure-treated lumber can be stained to mimic the look of higher-end materials. In addition to selecting the right type of wood, it’s essential to choose hardware that can withstand the elements. Stainless steel or coated screws and hinges are ideal choices as they resist rusting, thereby maintaining the bench’s appearance for years to come.
Add Comfort with Cushions
Elevate the comfort of your bench by incorporating weather-resistant cushions that can withstand the elements. For a playful and welcoming ambiance, combine various patterns and textures in a creative mix-and-match approach. To further enhance the coziness, consider crafting your own DIY cushion covers using outdoor fabrics. This practical solution enables effortless washing and allows you to effortlessly update the designs with each season’s arrival.
Incorporate Functional Features
When designing your dream garden bench, consider incorporating thoughtful details that make it truly functional and comfortable. One innovative idea is to create a section of the bench with a hidden compartment for storing valuable items or gardening tools. This clever feature can help keep your belongings safe from the elements while also keeping them organized and out of the way. Additionally, think about adding an adjustable backrest to ensure maximum comfort during long summer evenings spent lounging in your garden. This simple yet practical design element can make all the difference in making your outdoor seating area a true oasis.
Personal Touches
Transform your storage bench into a unique reflection of your personality by incorporating decorative elements and artistic flair. One approach is to use stencils to add intricate patterns or motifs, making it a collaborative and enjoyable activity for the whole family. Alternatively, consider adding mosaic tiles or painted designs that align with your interests or the garden’s aesthetic. By doing so, you can turn a functional piece of furniture into a stunning work of art that showcases your creativity and style.
Safety Precautions for Building Your DIY Outdoor Storage Bench
As you embark on the DIY adventure of constructing an outdoor storage bench, prioritizing safety above all else is crucial. To guarantee a successful and incident-free experience, heed these fundamental safety guidelines, carefully designed to safeguard you from potential risks.
Use the Right Tools for the Job
When it comes to tackling projects or tasks, having the right equipment is crucial. This doesn’t just mean any equipment will do; you need high-quality tools that are in good working condition to ensure your safety and efficiency. In fact, using subpar tools can increase the risk of accidents occurring, which can have serious consequences. It’s also important to use the right tool for the job, as using a saw to cut wood is much safer and more effective than trying to do it with a knife. This attention to detail and commitment to quality can make all the difference in getting the job done successfully.
Wear Protective Gear
When engaging in DIY projects or working with materials that can be hazardous to your health, it’s crucial to prioritize personal protective equipment (PPE). To ensure your eyes are shielded from potential harm, always don safety goggles when dealing with flying debris. Furthermore, safeguard your hands by wearing gloves whenever you’re at risk of encountering splinters or sharp edges. Additionally, if you’ll be sanding or painting, it’s essential to wear a dust mask to prevent inhaling particles that could aggravate respiratory issues.
Work in a Safe Environment
To ensure a successful DIY project, it’s essential to start with a solid foundation – literally. Establish a stable work surface by placing your area on a flat, unwavering base that won’t wobble or tip. This will prevent any accidents or mishaps that could arise from an unstable workspace.
In addition to a stable surface, working in a well-lit area is crucial. Adequate lighting allows you to see every detail clearly, ensuring that your project turns out as intended. No more squinting to decipher tiny text or trying to make out what’s happening in the shadows.
Finally, keep your workspace tidy and organized. A cluttered environment can be hazardous, with tools and materials scattered about, just waiting to trip you up. By keeping things in order, you’ll be able to work more efficiently and effectively.
Troubleshooting Common Issues with Your DIY Outdoor Storage Bench
Despite meticulous planning, unexpected challenges may arise when constructing an outdoor storage bench. Fortunately, the following solutions address common obstacles that may hinder your project’s progress.
Wood Splitting
When working with wood, it’s essential to take precautions to prevent damage and ensure a smooth project outcome. One crucial step is to anticipate potential splitting by taking preventative measures before drilling or nailing. For screws, create pre-drilled holes that are just a hair smaller than the screw’s diameter. This simple step will help guide the screw into place without causing unnecessary stress on the wood. Similarly, when using nails, apply gentle hammering strokes to avoid imparting excessive force on the wood and potentially splitting it. By taking these precautions, you’ll be well on your way to achieving a professional-looking finish and avoiding costly mistakes.
Paint Problems
When it comes to painting a surface, two key factors can make all the difference between a professional-looking finish and a messy, imperfect outcome. Firstly, apply the paint in thin, even layers to prevent drips and runs from forming. This not only ensures a smoother, more consistent finish but also helps to reduce waste and minimize the risk of mistakes. Additionally, it’s crucial to allow each coat of paint to dry completely before applying the next one. This allows the previous layer to fully cure and bond with the surface, resulting in a stronger, more durable finish.
Bench Stability
To ensure a sturdy and reliable outdoor storage bench, it’s crucial to examine each joint thoroughly. Start by inspecting the joints of your bench for any signs of looseness or wear and tear. If you notice any loose screws or bolts, take the time to tighten them properly. A wobbly bench can be hazardous, so don’t hesitate to make these adjustments. Next, verify that all legs are cut to the same length. This will guarantee a stable base for your storage bench. By following these simple safety tips, you’ll be able to construct an outdoor storage bench that will withstand the elements and provide years of dependable service.
Environmental Impact and Sustainability in DIY Projects
As you embark on a DIY outdoor storage bench project, it’s crucial to think about its ecological footprint and long-term sustainability. To minimize your project’s environmental impact, consider the following eco-friendly approaches:
Choose Sustainable Materials
When it comes to building materials, consider opting for recycled or reclaimed wood instead of fresh lumber. This not only reduces the demand for new trees but also helps combat deforestation’s environmental footprint. Additionally, look for eco-friendly finishes and paints that have low levels of volatile organic compounds (VOCs) to minimize air pollution.
Upcycle and Repurpose
When it comes to building on a budget, one of the most effective strategies is to repurpose items you already have on hand. This could include old furniture, leftover construction supplies, or even materials that would normally end up in the trash. By giving these items new life, you can save money and reduce waste at the same time.
One way to do this is through creative reuse. For instance, an old pallet can be transformed into a unique storage bench with a rustic charm. Similarly, an old door can become a one-of-a-kind coffee table or headboard. The key is to think outside the box and find new purposes for items that might otherwise go unused.
By embracing repurposing and creative reuse, you can create a more sustainable and budget-friendly approach to building and decorating your space.
Maintenance and Care for Your Outdoor Storage Bench
To ensure your outdoor storage bench remains a valuable addition to your yard for years to come, regular maintenance is crucial. By following these simple tips, you can prevent damage, maintain its appearance, and even extend its lifespan. Start by regularly cleaning the bench with mild soap and water, paying particular attention to any crevices or corners where dirt may accumulate. This will help prevent the buildup of mold and mildew, which can cause permanent damage if left unchecked. Next, inspect your bench for any signs of wear and tear, such as loose screws or damaged slats. Addressing these issues promptly will prevent further deterioration and ensure the structural integrity of the bench remains intact. Finally, consider applying a waterproof sealant to protect the wood from the elements and extend its lifespan.
Regular Cleaning
When it comes to maintaining your wooden bench, a gentle approach is key. Start by washing it down regularly with a mild soap and water solution to remove any dirt or debris that may have accumulated. This will not only keep your bench looking its best but also help prevent the growth of mildew.
To avoid causing any damage to the wood or finish, be sure to steer clear of harsh chemicals and abrasive cleaners. Instead, opt for a gentle cleaning solution that is specifically designed for use on wood surfaces.
Weather Protection
To safeguard your wooden outdoor bench against the elements, consider applying a water-resistant sealant. This will effectively shield the wood from rain and moisture, ensuring its longevity. Additionally, incorporate products that provide UV protection to prevent fading and sun damage, which can significantly impact the appearance of your bench over time. By adopting eco-friendly practices in the construction process, you’ll not only create a beautiful outdoor seating area but also contribute to preserving the planet for future generations.
FAQs About DIY Outdoor Storage Benches
To tackle the construction of a DIY outdoor storage bench, numerous queries may emerge. For clarity, this section addresses some of the most commonly encountered questions, offering valuable insights and guidance throughout the project.
What is the best wood to use for an outdoor storage bench?
When it comes to crafting high-quality outdoor furniture, the type of wood used is crucial. To ensure your pieces remain sturdy and resistant to decay, opt for naturally durable options like cedar, redwood, and teak. Alternatively, pressure-treated lumber can be a cost-effective solution that offers impressive durability, making it an attractive choice for those on a budget.
How do I ensure my storage bench is waterproof?
When it comes to keeping your storage bench dry, a watertight coating is essential. You can achieve this by using either a waterproof sealant or a wood stain that boasts built-in water-repellent properties. It’s crucial to apply the chosen solution to all surfaces, including the underside and interior of the storage compartment, to ensure optimal protection against moisture.
Can I build a storage bench if I have limited woodworking experience?
While it’s true that planning a trip can seem daunting, there are numerous straightforward plans designed specifically with beginners in mind. To ensure a smooth experience, be sure to follow the guidelines meticulously, and don’t hesitate to slow down if needed. Moreover, remember that prioritizing safety above all else is crucial.
What tools will I need to build an outdoor storage bench?
To get started with your DIY project, you’ll want to gather the fundamental tools of the trade. These essentials typically consist of a reliable saw, drill, screwdriver, hammer, sandpaper, and a trusty measuring tape. While these basic instruments will cover most of your needs, it’s possible that your specific design may require additional specialized tools. In any case, having a solid foundation of fundamental tools will allow you to tackle even the most ambitious projects with confidence.
How can I customize my storage bench?
To give your outdoor bench a cohesive look, select a paint or stain color that harmonizes with the surrounding outdoor decor. For added convenience, incorporate plush cushions or pillows to provide a comfortable seating experience. Furthermore, incorporating hinges can grant effortless access to the storage compartment, making it easy to retrieve and store items as needed.
How much does it cost to build a DIY storage bench?
The budget for this project is flexible, influenced by the selection of materials and the availability of required tools. On average, one can anticipate a cost range of $50 to $200, with the actual expenditure falling somewhere within this spectrum.
How long does it take to build a storage bench?
While the duration may fluctuate depending on the scope and complexity of your project, a typical storage bench DIY endeavor can be wrapped up within the confines of a single weekend.
What should I store in my outdoor storage bench?
When decluttering your backyard storage space, consider stashing away items like outdoor cushions, which can withstand the elements, as well as essentials like gardening tools, pool accessories, and kids’ playthings. Just be sure to store these items in a way that protects them from harsh weather conditions.
How do I maintain my outdoor storage bench?
To maintain the integrity and longevity of your wooden bench, it’s essential to establish a routine for cleaning and protecting it from the elements. Start by regularly wiping down the surface with mild soap and water to remove any dirt, grime, or debris that may have accumulated. This will help prevent scratches and stains from forming. Additionally, reapply sealant or stain as needed to maintain its natural appearance and protect it from moisture, UV rays, and extreme temperatures.
Can I add wheels to my storage bench for mobility?
You can customize your outdoor storage bench by adding wheels to the base. Opt for high-quality, outdoor-grade wheels that can withstand various weather conditions. Additionally, consider incorporating locking mechanisms to secure the bench in place when needed. By addressing these common questions, you’ll be well-prepared for a successful DIY project. The keys to success lie in careful planning, patience, and creativity.
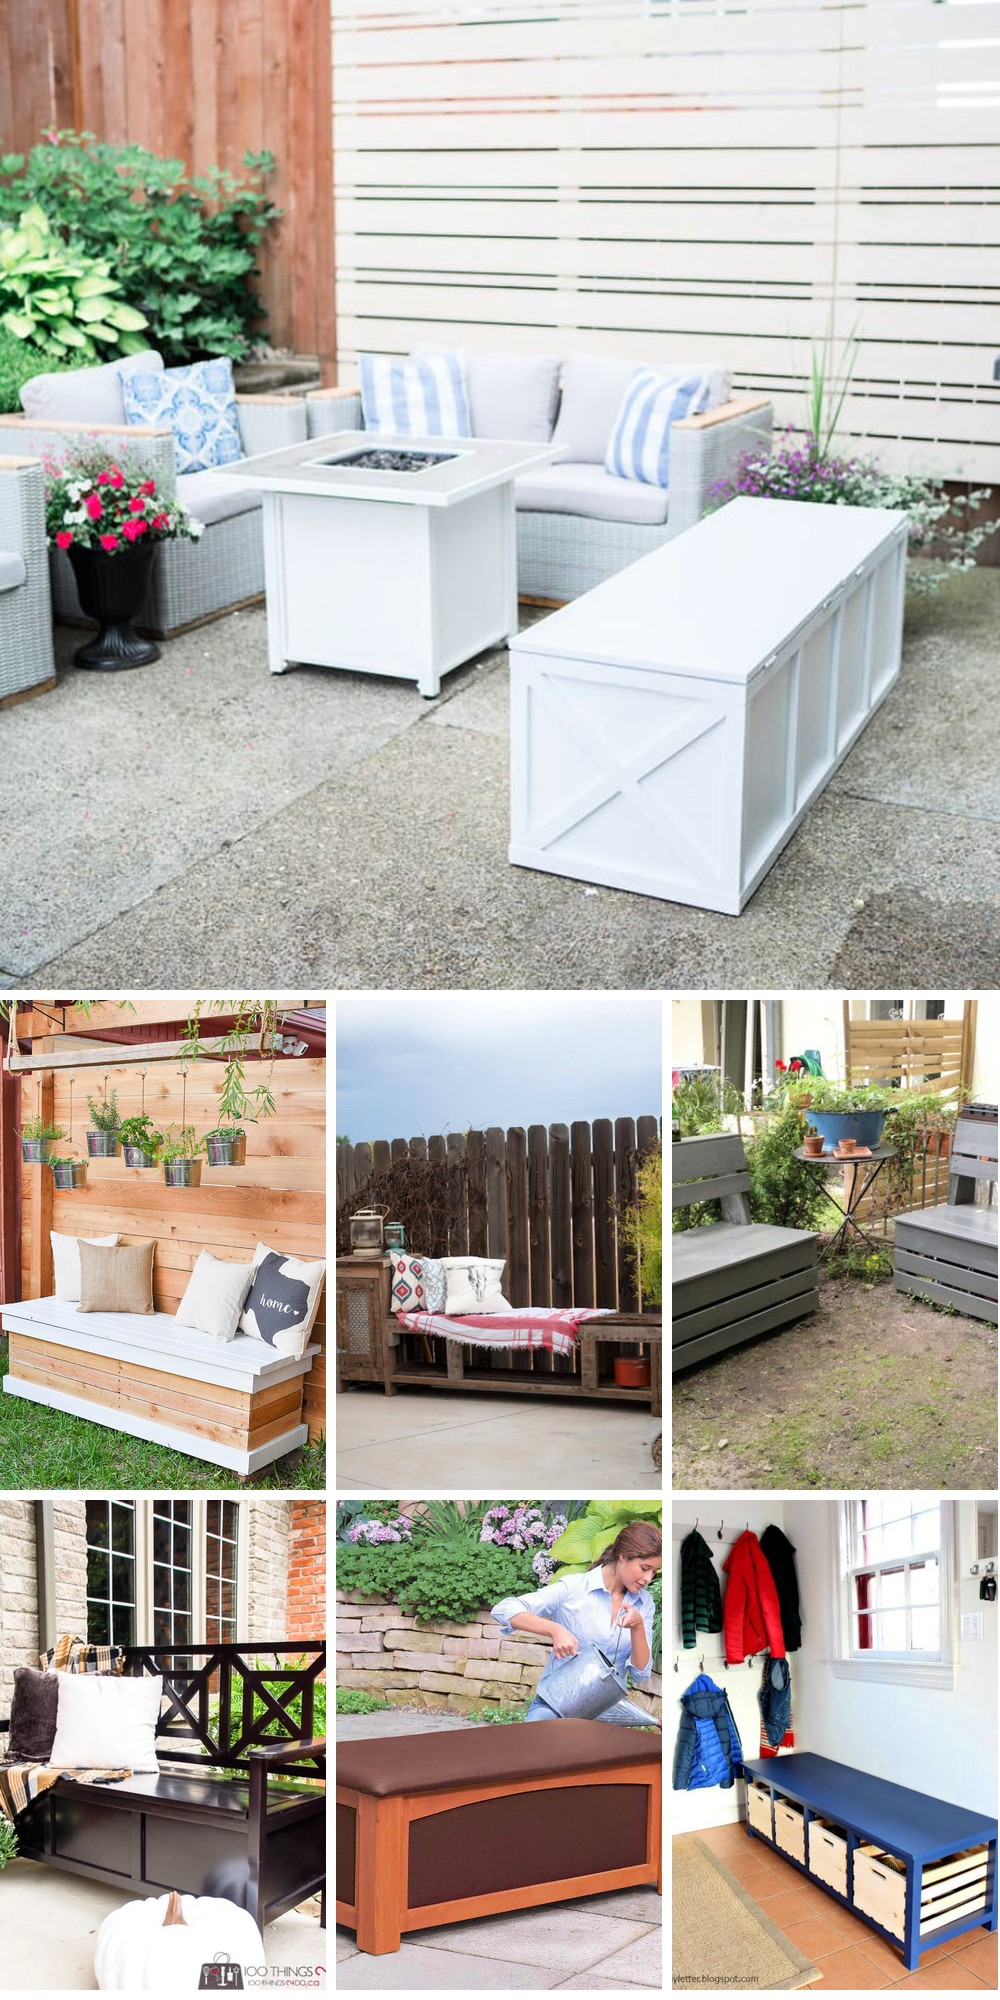
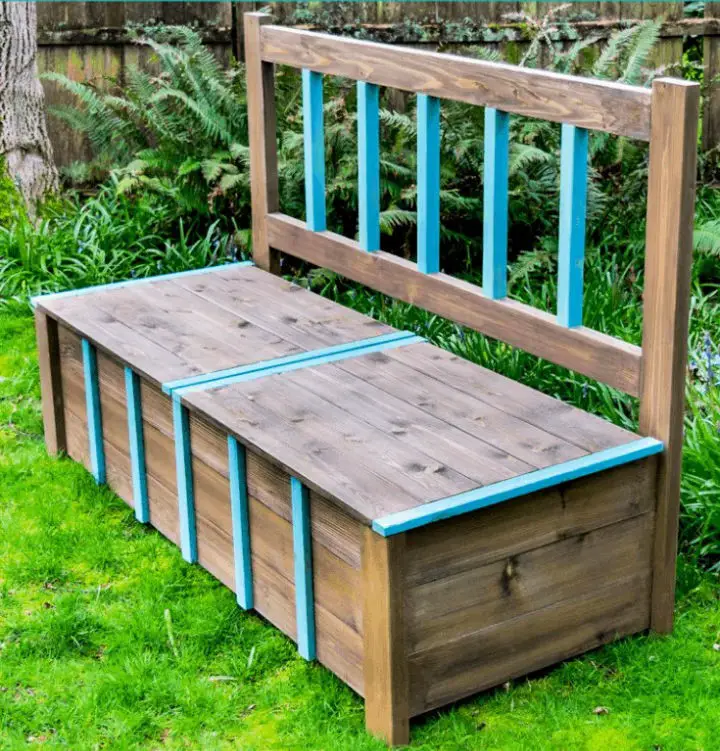
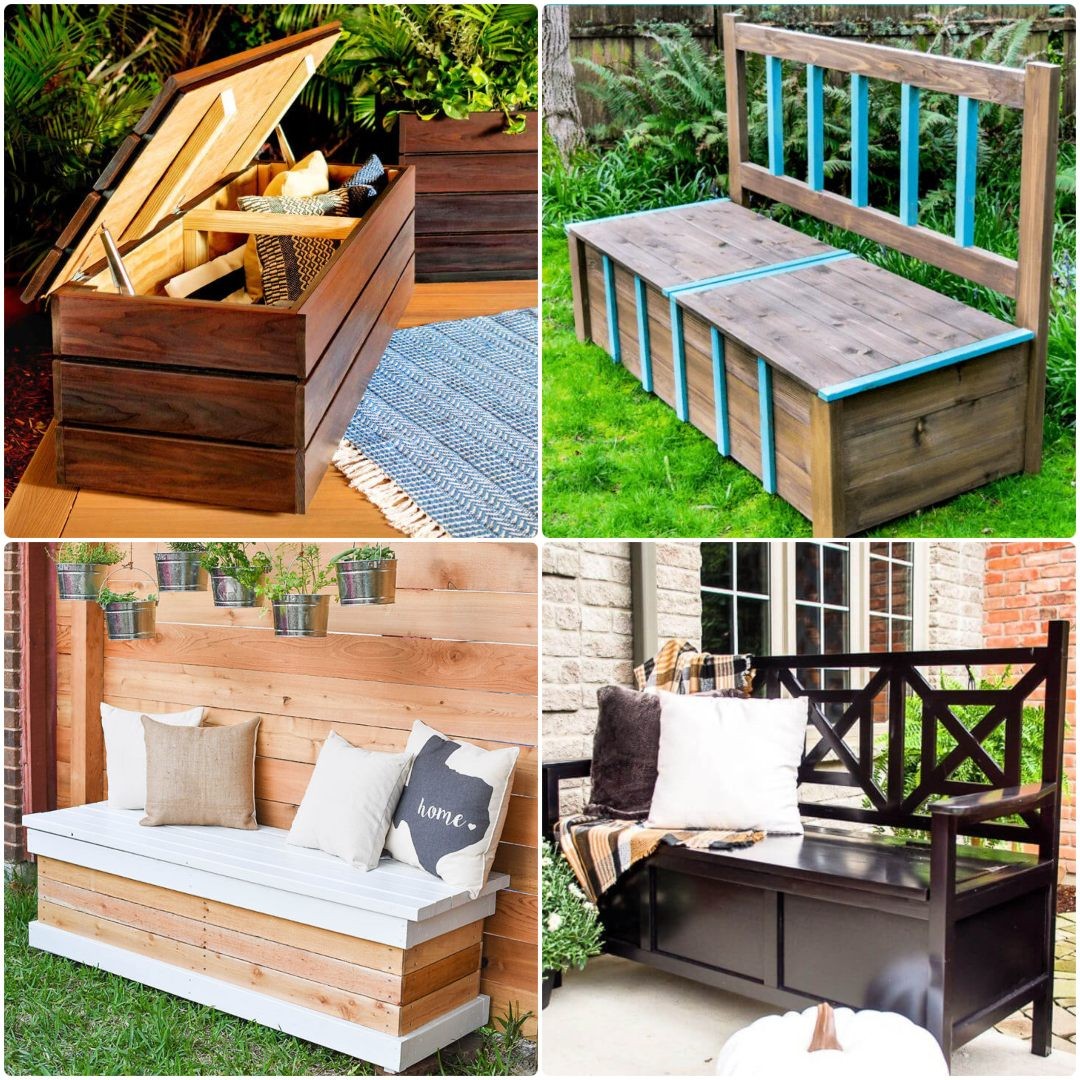
20 Free DIY Outdoor Storage Bench Plans
Elevate your outdoor living area by transforming it into a haven for relaxation, functionality, and beauty. Achieve this goal without breaking the bank by utilizing 20 free DIY outdoor storage bench plans that seamlessly blend form and function.
How to Make a Wooden Outdoor Storage Bench
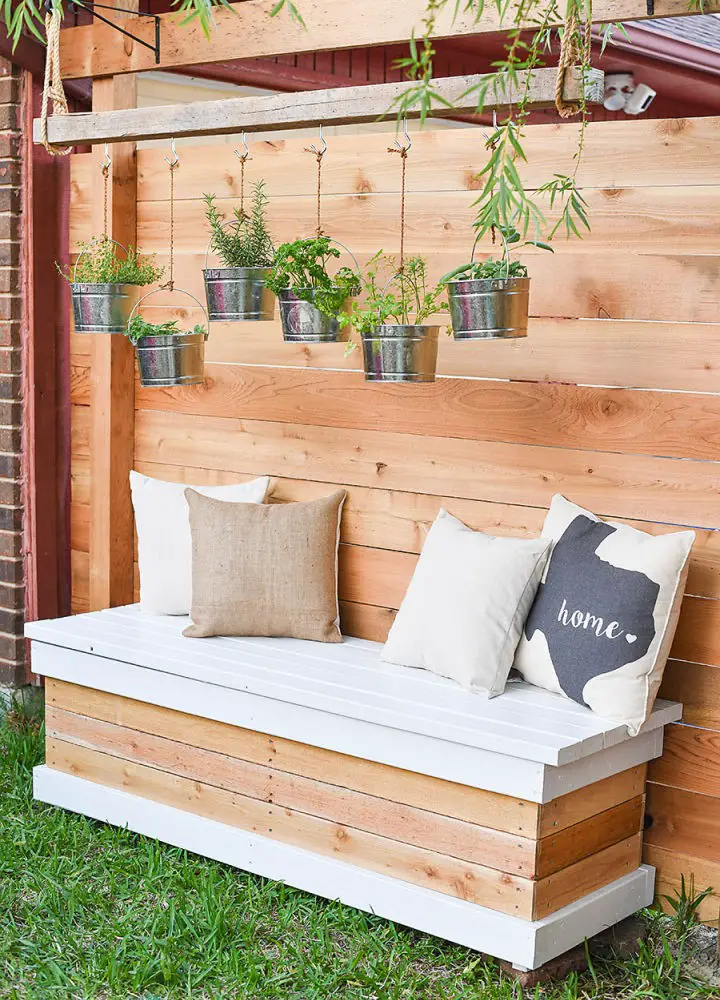
Transform your backyard into an oasis with a clever DIY outdoor storage bench! This weather-resistant masterpiece combines durability and style, boasting coated screws, white exterior paint, and cedar fence pickets for a sturdy foundation.
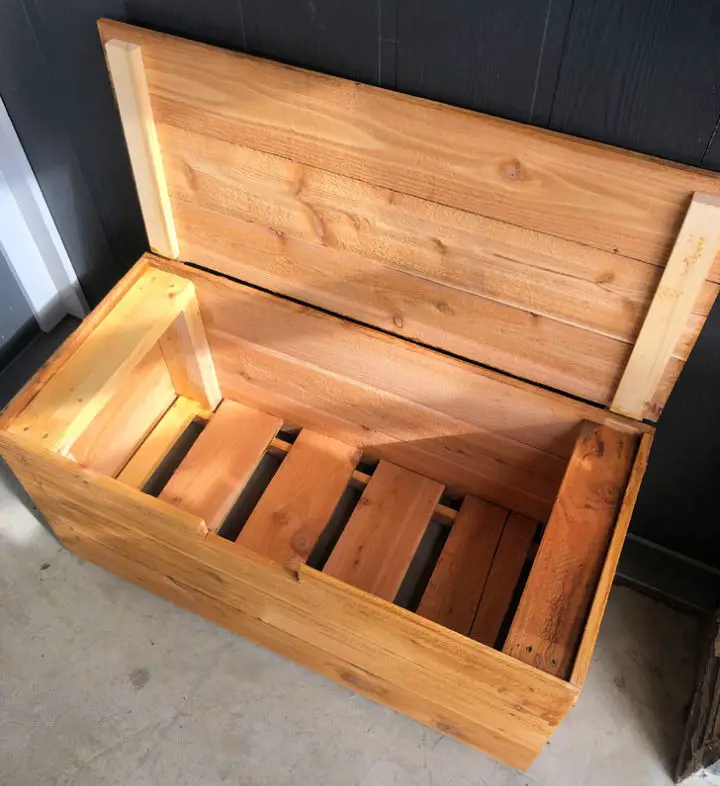
Not only does it provide a spacious secret compartment perfect for stashing two rubber totes, ideal for hiding pool toys, gardening tools, or patio cushions, but also serves as a chic addition to your outdoor space.
What’s more? This project is designed with beginners in mind, requiring no complex equipment or intricate cuts. Simply follow the steps and enjoy the perfect blend of functionality and aesthetics as you create this stunning piece of outdoor furniture.
Making an Outdoor Storage Bench
Transform your outdoor space into a harmonious haven by constructing a DIY storage bench that combines seating for three with functional storage for outdoor gear. Crafted using durable cedar boards, metal mesh hardware cloth, and stainless steel hinges, this weather-resistant bench ensures longevity. To make the process seamless, a comprehensive guide is available for download. With this guide, you can create an elegant and organized outdoor environment that not only provides a cozy seating area but also keeps your yard free from clutter. The best part? This project allows for creative expression, enabling you to add a pop of color with contrasting trim. If you’re tired of tripping over outdoor toys and seeking a stylish, dual-purpose furniture piece, this weekend DIY project is the perfect solution.
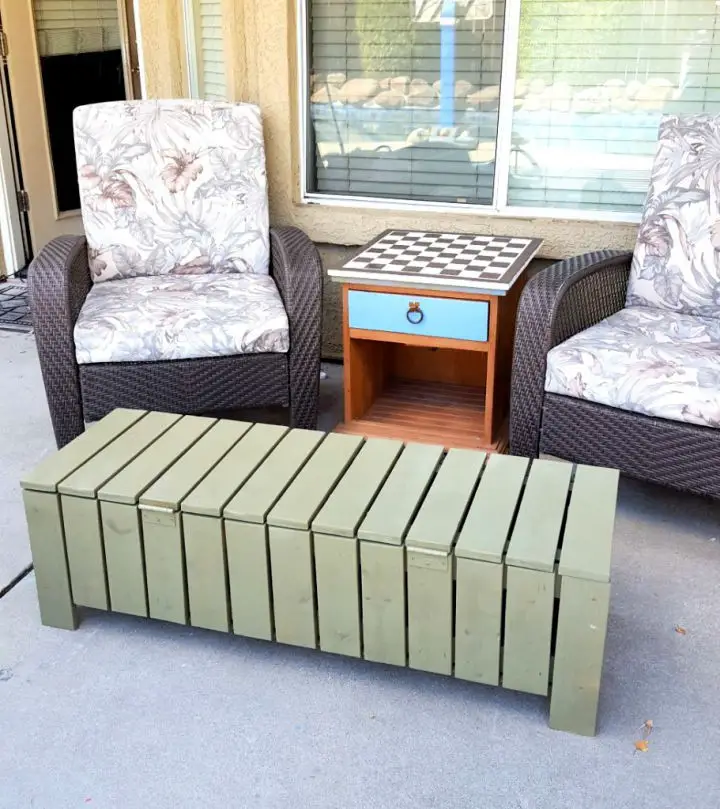
Modern DIY Cedar Outdoor Storage Bench
Elevate your outdoor sanctuary with a functional and stylish storage bench, all for under $40. This accessible project offers ample storage space to stow away packages, shoes, sports equipment, or toys, while also serving as a comfortable seating area. The clean-lined design seamlessly integrates into any outdoor setting, providing a tasteful touch that doubles as a cozy spot to relax.
With readily available materials like cedar fence pickets, 2x4s, and hinges, coupled with basic tools, constructing this storage bench is a straightforward process. Plus, it’s an eco-friendly way to upcycle old cedar fence pickets or 1×6 boards, promoting decluttering and enhancing outdoor decor.
Embark on this creative DIY adventure and experience the dual benefits of a clutter-free space and a beautiful outdoor setting.
Free Outdoor Storage Bench Woodworking Plan
Transform your outdoor space into a cozy retreat with a DIY outdoor storage bench, crafted from durable weather-resistant lumber like cedar, redwood, or pine. This sturdy bench offers both a comfortable seating area and an ingenious storage solution for your outdoor essentials.
With its straight slats and solid base, this project can be completed in just a day. The angled back legs add a touch of visual appeal, making it perfect for your backyard.
A cleverly designed floor featuring small gaps ensures water drainage, keeping your items safe and dry. The finishing touches include fine sanding and multiple coats of wood stain for a polished finish that will leave you proud of your handiwork.
Unleash the joy of DIY creation and elevate your outdoor living experience with this outdoor storage bench project.
Build a Beautiful Outdoor Storage Bench

Transform your outdoor living space into a harmonious blend of functionality and beauty with this ingenious DIY cedar outdoor storage bench that effortlessly doubles as a planter. By combining quality materials like cedar boards, exterior screws, and decorative angles, you’ll create a multifaceted masterpiece that not only solves storage woes but also injects a touch of charm into your backyard or deck.With meticulous attention to detail, the right tools, and clear step-by-step instructions including precise measurements and assembly guidelines, building this stunning piece can be achieved in just a week’s time. The beauty of cedar is undeniable, and by investing in this dual-purpose outdoor bench, you’ll unlock lasting utility and aesthetics that will leave your friends and family impressed.Feel free to unleash your creativity with your chosen plants and bask in the convenience of this beautifully crafted outdoor storage bench. Don’t just declutter – elevate your outdoor space into a haven that’s both beautiful and functional.
Handmade Outdoor Coffee Table Storage Bench
Transform your outdoor space into a haven with this clever DIY project that reinvents Ana White’s design as a dual-purpose coffee table and storage bench. This versatile piece not only provides ample storage for toys, games, or other outdoor essentials but also offers a cozy spot to relax and put your feet up.
With meticulous planning and some hands-on effort, you can assemble this outdoor gem using readily available materials like 1×4, 1×3, and 1×2 boards, along with gorilla glue and exterior paint. The result is a bench measuring 48.5 inches in length, 16 1/4 inches in depth, and 14 inches in height, offering ample space to get comfortable.
One of the best parts about this project? The opportunity to put your personal touch on it by choosing the perfect paint color to match your outdoor aesthetic. So why wait? Grab your tools and start crafting this multifunctional outdoor fixture today!
DIY Wooden Patio Storage Bench
Transform your outdoor space into a cozy retreat with this impressive DIY patio storage bench. As a masterclass in functionality and style, this versatile piece seamlessly blends seating and storage, making it an ideal addition to any room – whether you’re hosting alfresco gatherings or simply seeking a peaceful spot to relax.
Crafted from durable plywood sheets, the bench boasts a sturdy foundation that can withstand the elements. With hinges, outdoor primer, paint, wood glue, and caulking all playing their part in its construction, this project is as easy to execute as it is rewarding to behold.
But beyond mere practicality, this patio storage bench brings a touch of warmth and personality to your outdoor area. Whether you’re looking for a spot to stash pillows and blankets or simply seeking additional seating for impromptu gatherings, this charming piece is sure to delight.
With its universal appeal and adaptability to various spaces – from entrance halls to playrooms – this DIY patio storage bench is the perfect way to breathe new life into your home decor.
Make an Outdoor Storage Bench
Elevate your outdoor ambiance with a clever DIY project that combines style and practicality. This ingenious outdoor bench boasts ample storage space, making it an ideal solution for keeping your patio tidy. The minimalist design is deceptively simple, requiring only a few essential materials like treated plywood, wood screws, and a lid support hinge. For a more rustic touch, consider substituting the plywood with construction-grade pine or opt for rot-resistant options like cedar decking or thermally modified wood (TMW). With costs ranging from $251 to $500, this project is friendly for beginners and can be completed in just one day. As you upgrade your patio decor, this outdoor bench serves as a testament to the perfect blend of form and function.
How to Build an Outdoor Storage Bench
Transform your small balcony into a functional haven with this DIY outdoor storage bench. This compact creation combines stylish seating for dining or lounging in the sun with clever storage for gardening tools or cushions. The simplicity of its construction, using 2×3, 1×6, and 1×2 boards, makes it an enjoyable build process. A detailed guide takes you through every step, from cutting lumber to staining and assembly, ensuring a fun and fast DIY project. Not only does the bench provide a cozy retreat, but its practical design also adds value to your home. So why wait? Start building and turn your balcony into a warm and inviting sanctuary.
Adorable DIY Outdoor Storage Bench
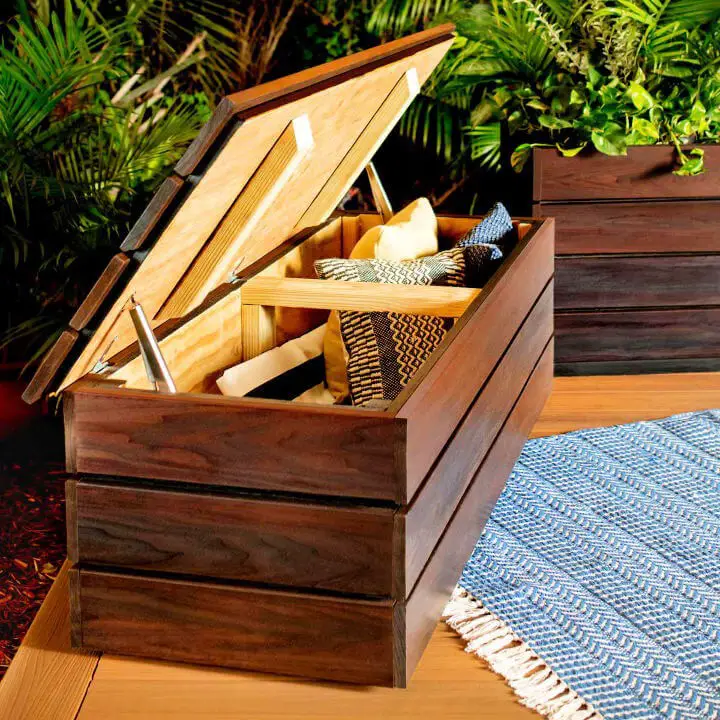
Transform your outdoor space into a haven of functionality and style by crafting a DIY outdoor storage bench. This comprehensive project combines the benefits of added seating and practical storage, all wrapped up in a durable cedar package. The clever design features lift-off panels for effortless access, eliminating the need for hardware that could rust over time. The bench’s sturdy construction is made possible through the use of pocket-hole screws, making it both easy to assemble and long-lasting. To get started, you’ll need various sizes of cedar boards, exterior pocket-hole screws, deck screws, and exterior wood glue. With these materials in hand, you’ll be guided through a series of straightforward steps, including making endboards, assembling panels, crafting bottom and top boards, and even adding a stylish finish. As you work your way through the project, you’ll enjoy the benefits of additional outdoor seating and the convenience of extra storage – perfect for storing patio furniture cushions, outdoor toys, or other essentials.
Outdoor Storage Bench With Wall Panel
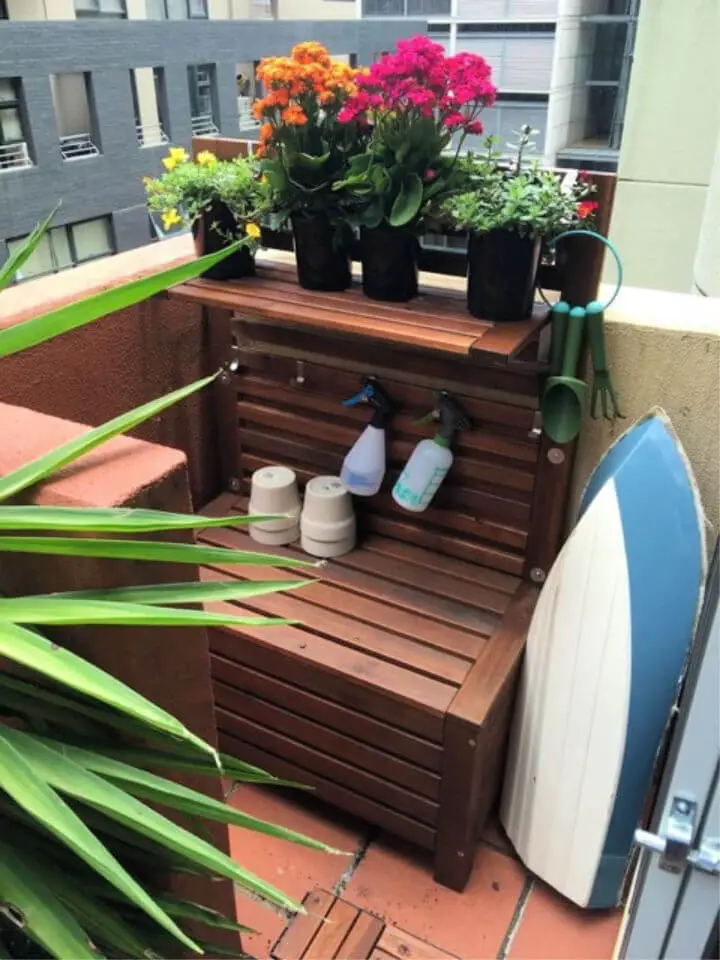
Transform a compact corner of your balcony into a multifunctional haven by crafting a DIY outdoor storage bench and potting table. This ingenious project reimagines the ÄPPLARÖ wall panel and storage bench combination, tailored to suit rental apartments or spaces where drilling is not feasible. The comprehensive process involves adapting the ÄPPLARÖ components, securing them together, and designing a sturdy weight-bearing structure that can withstand various loads. With step-by-step guidance, you can create a functional and visually appealing outdoor storage solution that amplifies your balcony’s usability. Perfect for green-fingered enthusiasts or anyone seeking additional storage space.
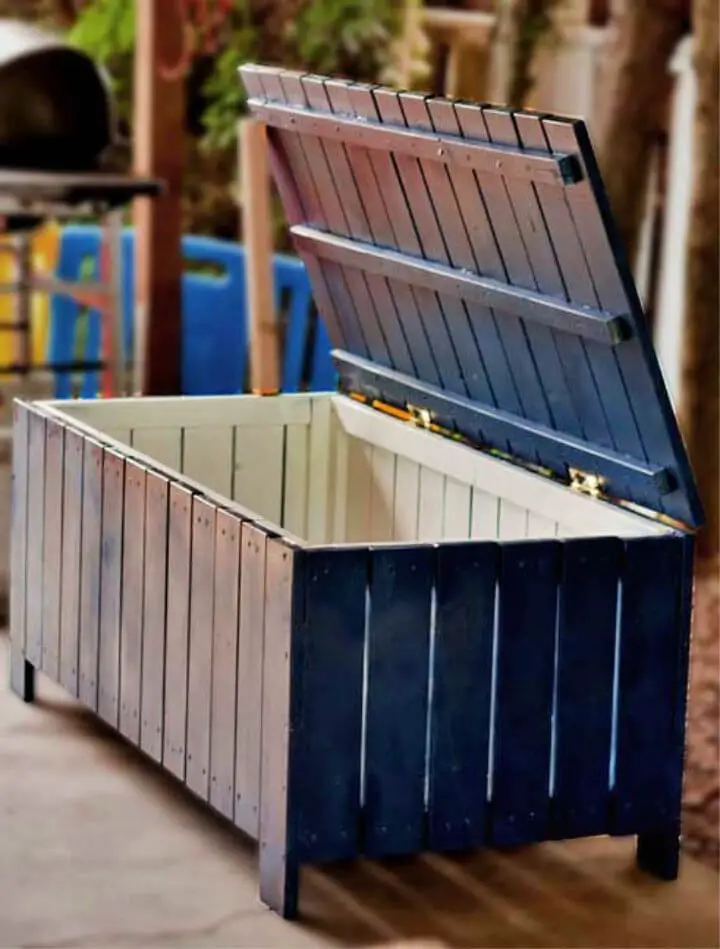
Building an Outdoor Storage Bench Using a Kreg Jig

Elevate the ambiance of your patio or backyard with this ingenious DIY bench that doubles as additional seating and storage for firewood and BBQ supplies. Crafted from reclaimed wood and infused with innovative design, this project redefines practicality and style. By repurposing existing materials and minimizing external purchases, you’ll be amazed at how easily you can bring this multifunctional masterpiece to life. To start building, gather your essentials: a Kreg Jig, screws, and drill. Once complete, personalize the bench’s rustic charm with a coat of paint or clear finish, transforming it into an invaluable addition to your outdoor space.
Make X-Leg Wooden Bench With Crate Storage
Transform your outdoor space into a haven with a clever DIY storage bench that serves two purposes – keeping clutter at bay while providing a cozy seating area. This budget-friendly solution is perfect for small backyards, requiring only $40 worth of lumber and some creative repurposing of thrift-store finds. The addition of rustic wooden crates adds a touch of charm to the overall design. To ensure longevity, finish the bench with Behr’s Transparent Weatherproofing stain. With basic tools like a Kreg Jig, drill/driver, chop/miter saw, and wooden crates, you can create this functional yet stylish storage bench that will elevate your backyard’s ambiance.
DIY Outdoor Storage Bench – Free Plan
Transform your backyard or patio into a charming oasis by building a DIY outdoor storage bench that’s as practical as it is stylish. This versatile piece of furniture combines storage for outdoor items like pillows, toys, or gardening tools with a comfortable seating area. The bold color scheme and rustic charm will add a fresh accent to your outdoor space.
The assembly process is surprisingly straightforward, requiring just basic materials like 1×4 and 1×3 boards, door hinges for exterior use, screws, sandpaper, primer, paint, and a paintbrush. A detailed cut list ensures precision, making this project accessible even for those new to DIY endeavors.
This bench not only provides a practical solution for storing outdoor essentials but also offers a cozy spot to sit and relax. With its unique blend of form and function, you’ll be eager to gather your supplies and transform your outdoor space with this functional and aesthetically pleasing outdoor storage bench.
Inexpensive Outdoor Storage Bench
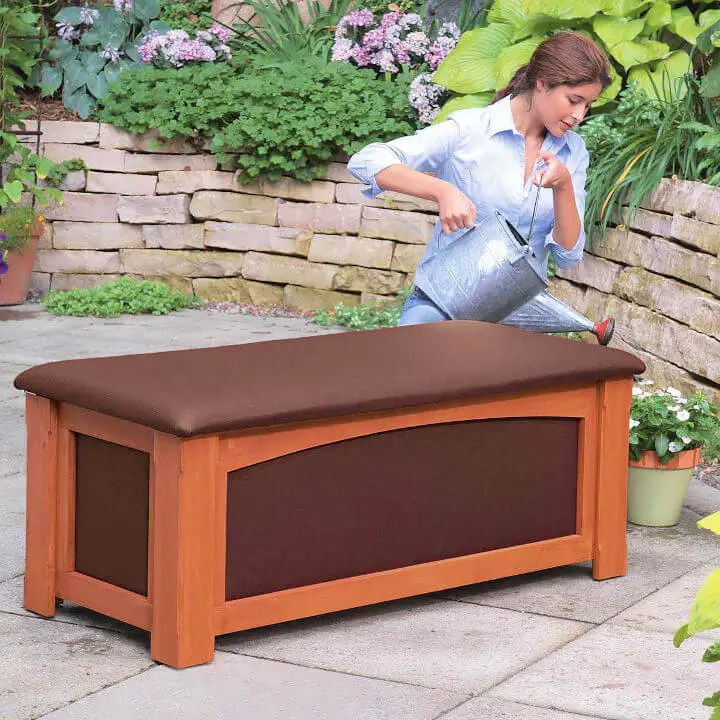
Transform your outdoor space into a harmonious blend of functionality and style by crafting a versatile storage bench. This DIY project converts a humble bench into an efficient storage solution that seamlessly integrates form and function. The structure features four plywood frames wrapped in waterproof fabric for durability, topped with a foam and fabric seat that combines comfort and charm. With the option to customize dimensions, fabrics, and wood stain or paint to match your outdoor decor, this project offers endless possibilities. Estimated costs range from $101 to $250, making it a feasible weekend endeavor. By building this multi-purpose storage bench, you’ll create a space-saving haven for storing outdoor essentials while also providing a cozy seating area. As you work on the project, you’ll enjoy the process and appreciate the end result: a well-organized, inviting outdoor environment that reflects your personal touch.
Build Your Own Outdoor Storage Bench

Transform your outdoor space into a haven for relaxation and organization by creating a DIY outdoor storage bench that doubles as a stylish seating area. This clever design ensures the security of your deliveries while maintaining a beautiful porch atmosphere. To bring this project to life, gather basic building materials like lumber and screws, as well as common woodworking tools. The end result will be a functional storage solution that complements your porch’s aesthetic appeal. By doing so, you’ll not only keep your packages safe but also create a charming outdoor space that invites relaxation and social gatherings.
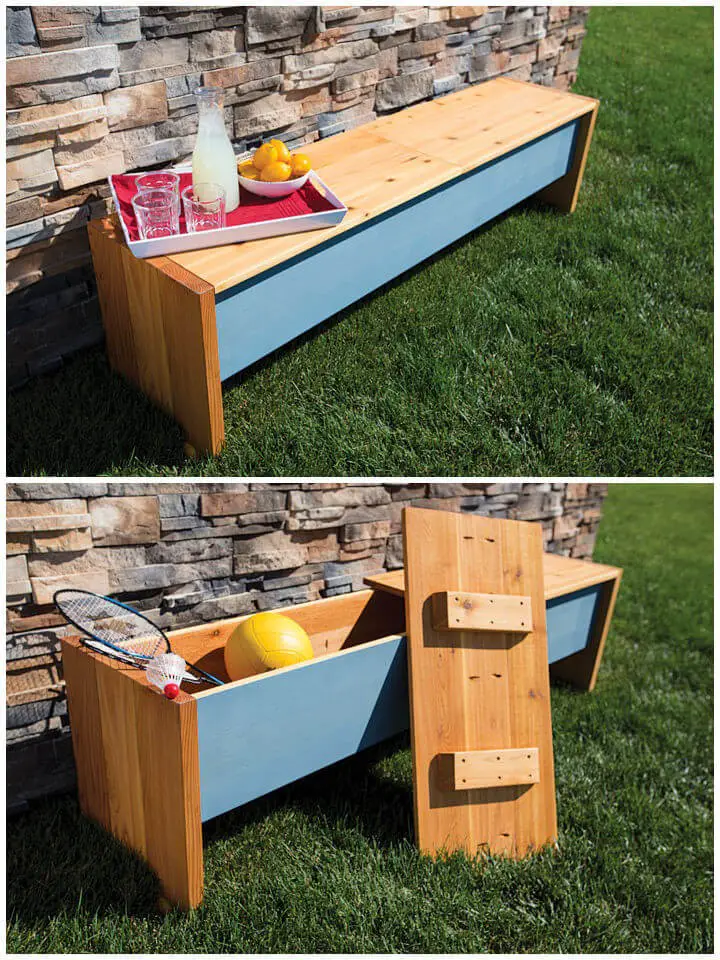
DIY Outdoor Wooden Storage Bench
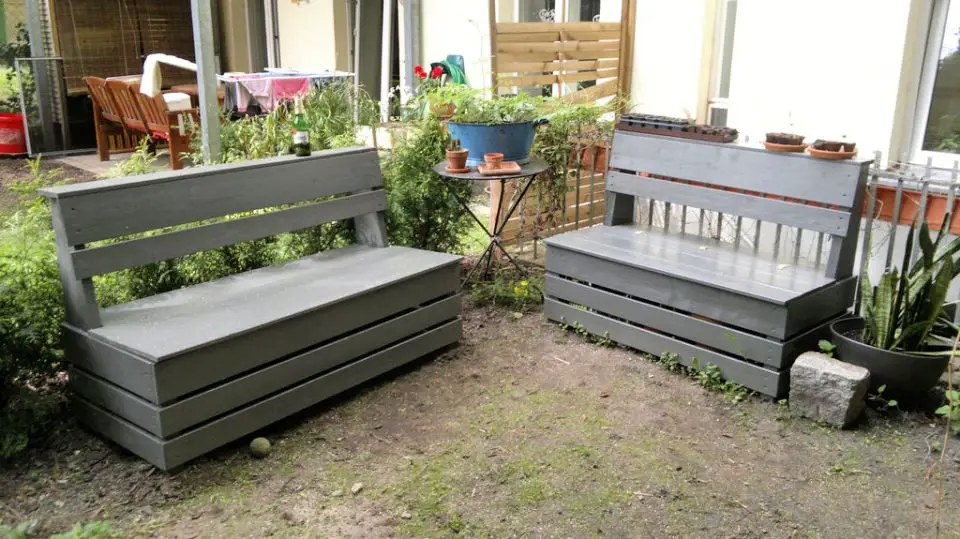
Transform your backyard oasis into a serene retreat by crafting a charming DIY garden storage bench. This ingenious piece of furniture seamlessly combines practicality with comfort, boasting a slanted back designed for optimal relaxation and a built-in shelf to cradle your favorite beverage. The best part? Its construction is remarkably straightforward, requiring only decking screws to bring it all together – a far cry from the assembly required by typical flat-pack furniture. The design itself is deceptively simple yet undeniably captivating, evoking the rustic charm of a countryside idyll. Whether you’re seeking a sunny afternoon escape or a peaceful evening under the stars, this garden bench promises to be your perfect companion. With its easy construction and thoughtful features, it’s an ideal addition to any outdoor living space – so why not get building today and elevate your alfresco experience?
Simple Outdoor Shoe Storage Bench
Transform your mudroom’s functionality without breaking the bank by creating a DIY shoe storage bench. This practical piece will keep your shoes, hats, gloves, and other accessories organized, providing ample seating for easy on-and-off access. With just four large crates from Crates & Pallets, birch plywood, and basic supplies like wood screws and glue, you can craft a stylish and functional addition to your home that adds significant storage. The finished product boasts a modern look courtesy of Benjamin Moore’s Old Navy satin enamel, while the natural wood crates provide a charming contrast. By following these simple steps, you’ll be able to declutter your mudroom and bring order to the space, creating a warm and welcoming atmosphere.
DIY Outdoor Storage Bench Tutorial
Elevate the functionality of your indoor-outdoor space with a DIY storage bench that’s both stylish and practical, requiring only a day to build. Perfect for stashing seasonal items, toys, or other knick-knacks, this versatile piece can be placed in a patio, mudroom, or child’s room. Made from durable Exterior MDF, it comes primed and finished to withstand the elements, ensuring it remains a reliable storage solution year-round.To ensure a safe and efficient building process, consider using tools like Crescent Linesman Pliers, as well as essential hearing protection. Additionally, follow our step-by-step guide for a cost-effective and customizable project that seamlessly integrates with your existing decor. With this attractive and handy storage bench, you can bid farewell to cluttered spaces and hello to a more organized living environment.
Build an Outdoor Storage Bench – Step by Step

For those seeking a practical solution for storing pool accessories or keeping their backyard tidy, building a DIY outdoor storage bench is an excellent idea. The beauty of this project lies in its simplicity, requiring only basic lumber and common power tools like a Skil circular saw, Dewalt 20v drill driver combo, and Evolution miter saw. With a bit of time and effort, you can create a sturdy and weather-resistant bench capable of holding pool noodles and other items that can withstand exposure to water. This functional piece not only serves as a storage solution but also adds a touch of charm to your outdoor space. By following this guide, you’ll be able to construct the entire project in an afternoon, leaving you with a clutter-free backyard and a sense of accomplishment.
Conclusion:
In summary, these 20 DIY outdoor storage bench plans provide a wealth of information on customization options, safety considerations, and maintenance guidance. The comprehensive guide not only covers the building process but also delves into common issues, environmental impact, and sustainability aspects. With the right tools, materials, and personal touches, you can create a functional and stylish addition to your outdoor space that perfectly complements your surroundings.
