Why Choose DIY Nightstand Projects?
Discover the joy of crafting your own nightstands! By taking on DIY projects, you can enjoy significant cost savings, unlock personalization possibilities, and tap into your creative potential.
One of the most compelling advantages of DIY nightstand projects is their affordability. Without the markup of a manufacturer or retailer, you can choose materials that fit comfortably within your budget. This approach also enables you to avoid labor costs associated with purchasing pre-made furniture.
A custom-crafted nightstand offers the ultimate in personalization. You’re free to select sizes, colors, and styles that perfectly harmonize with your bedroom’s aesthetic. This level of customization is rare in store-bought pieces, making DIY projects a truly unique opportunity.
As you work on your nightstand project, you’ll have the chance to develop new skills or refine existing ones. Whether you’re honing woodworking techniques, perfecting painting methods, or exploring design principles, you’ll gain valuable experience and confidence in your abilities.
When you DIY, you’re not just building a piece of furniture – you’re also exercising quality control. You can ensure the use of high-quality materials and apply a careful, meticulous finish to guarantee a durable and long-lasting result.
There’s something deeply satisfying about creating something with your own hands. Using a nightstand you’ve built yourself can bring a daily dose of pride and joy, reminding you that you’re capable of achieving your goals.
DIY projects offer an eco-friendly alternative to buying new furniture. By choosing sustainable materials or repurposing old pieces, you’ll reduce waste and breathe new life into discarded items – a true win-win for the environment and your wallet.
Finally, DIY nightstand projects are an invitation to have fun! They’re a chance to express your creativity, solve problems, and maybe even involve friends or family in a memorable experience. So why not give it a try?
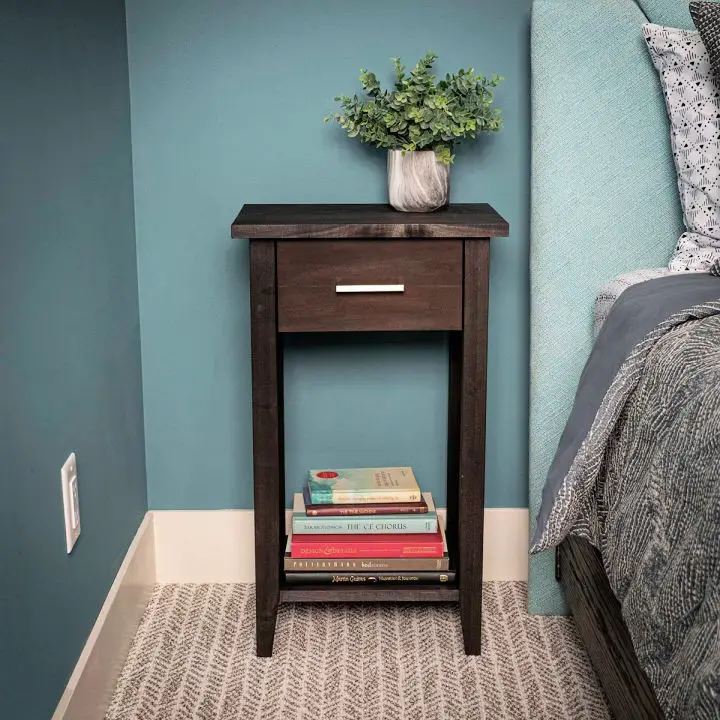
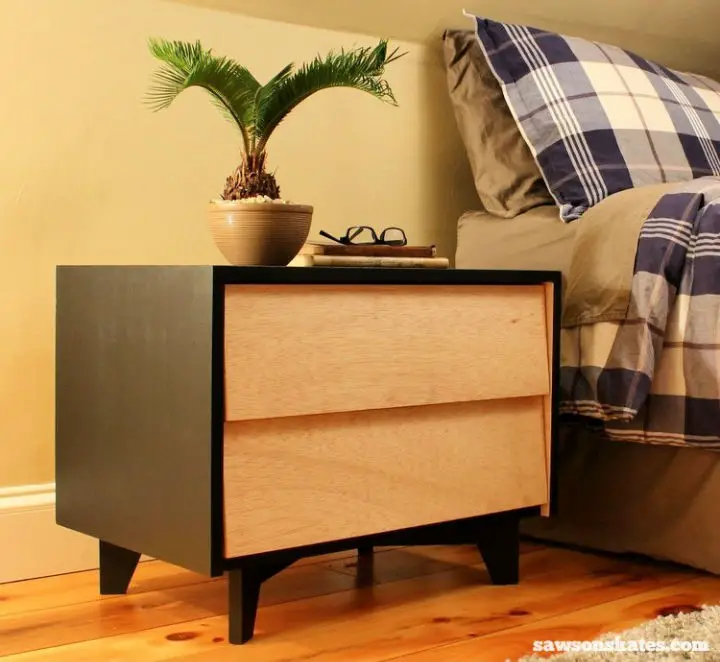
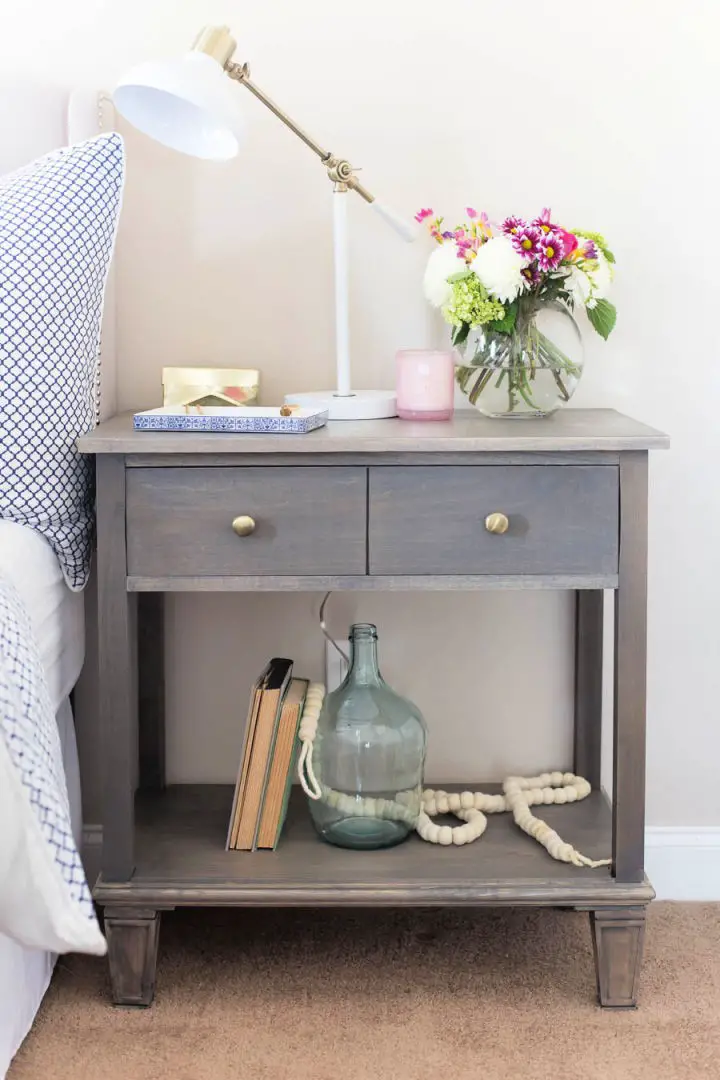
How to Build a DIY Nightstand with Drawer
Transforming your bedroom’s ambiance and functionality can be achieved by crafting a DIY nightstand that exudes unique character. By following a straightforward, step-by-step process, you can create a modern rustic nightstand featuring a drawer – ideal for serving as both an end table and bedside companion.
Materials and Tools Needed
For this woodworking project, you’ll need a range of materials and tools to bring your design to life. The lumber requirements include 2x2s, 1x6s, quarter-inch plywood, and three-quarter inch thick edge-glued panels. A Kreg Jig will be essential for making precise pocket holes. Additionally, you’ll need a drill with the corresponding screws – two-and-a-half inch Kreg screws, one-and-a-quarter inch Kreg screws, and one-inch wood screws. Wood glue is also necessary to secure joints together. Your cutting tools should include a circular saw or table saw, as well as a miter saw for making precise angled cuts. A level will ensure your workpiece remains true, while a measuring tape helps you achieve accurate measurements. To fill any gaps and create a smooth surface, use wood shims or paint stir sticks. Finally, consider adding a finishing touch with stain or paint, followed by a coat of polyurethane for added durability. For the drawer mechanism, you’ll need a drawer knob or pull, along with 12- or 14-inch drawer slides.
Steps to Build Your Nightstand
To begin building your nightstand, start by gathering all necessary materials. You can opt for premium wood or more budget-friendly options like common knotty wood. Once you have your materials in hand, set up your Kreg Jig to create pocket holes in the 2x2s that will form the sides, back, and front of the nightstand frame.Next, assemble the side frames by connecting two 2×2 leg boards with a shorter 2×2 board at the end. Use screws and a drill to secure the joints. Add a 1×6 under the 2×2, ensuring it’s a quarter inch in from the edges for a nice recess. Then, add another 2×2 underneath the 1×6 and a final 2×2 three and a half inches up from the bottom for the shelf.After completing the side frames, move on to assembling the back of the nightstand. This process is similar to building the side frames, with the addition of a top 2×2 that has pocket holes for attaching the top panel. The front of the nightstand will be assembled in a similar manner, but ensure that the 2×2 with pocket holes faces inward.Before proceeding, make sure your nightstand frame is square to avoid any issues with drawer alignment. To do this, double-check the corners and edges of the frame.The next step is to install the drawer slides. Start by adding wood strips inside the nightstand if necessary to mount the drawer slides. Follow the manufacturer’s instructions for installing the slides, ensuring they are level and properly aligned.Once the slides are in place, build and install the drawer. Measure the opening and subtract an inch from the width of the drawer bottom. Cut the quarter-inch plywood accordingly and assemble the drawer box. Attach the drawer slides and then install the drawer into the nightstand.Next, attach the front drawer face by measuring the opening for the face and cutting a 1×6 board to fit. Secure the face with wood glue and nails, ensuring a proper fit.Finally, measure and cut the panel board for the bottom shelf and top of the nightstand. Attach these using wood glue and screws. To complete the project, stain or paint the nightstand as desired, add a protective coat of polyurethane, and finish by attaching a drawer knob or pull.
Video Tutorial
Complementing the written instructions is a comprehensive video tutorial that provides a detailed visual guide to building a DIY nightstand with drawer. The combination of both formats offers an unparalleled learning experience, as it allows you to not only read about each step but also watch as it’s carried out. This synergy enables a deeper understanding and makes the process more accessible, even for those who are new to DIY projects.
Tips for Success
When tackling a DIY nightstand project, it’s essential to take a meticulous approach to ensure a flawless outcome. First and foremost, double-check your measurements before cutting any materials to avoid costly mistakes. This attention to detail will set the tone for the rest of the assembly process.Rather than rushing through each step, take your time to allow glue to dry fully between applications. Patience is key when it comes to crafting a piece that requires precision and finesse.One of the best aspects of DIY projects is the freedom to customize and make it your own. Don’t be afraid to modify the design to fit your personal style or needs. With these fundamental principles in mind, you’ll be well on your way to creating a stunning, modern rustic nightstand that reflects your unique aesthetic.
DIY Nightstand FAQs
Embarking on a DIY nightstand-building adventure? We’ve got the answers to the most frequently asked questions to get you started on creating a unique piece that reflects your personal style.
What do need to build a DIY nightTo build a DIY night, you typically need:
When embarking on a woodworking project, having the right tools and materials is essential for achieving professional-looking results. The choice of wood, whether it’s pine, oak, or plywood, is crucial. To shape this material, you’ll need to use a saw, such as a hand saw, circular saw, or miter saw. Additionally, a drill will come in handy for creating precise holes. For smoothing out the surface, consider using sandpaper or an electric sander. A screwdriver will be necessary for driving screws and other fasteners into place. Measuring tapes are vital for ensuring accurate measurements during the project. To bond different pieces of wood together, you’ll need to apply wood glue, which can then be secured with clamps. Finally, if desired, a coat of paint or stain can be applied to enhance the appearance of your finished product.
How do I choose the right design for my nightstand?
When selecting a design for your nightstand, several factors come into play. First, consider the dimensions of your bedroom and the available space beside your bed. This will help you determine an appropriate scale for your nightstand. Next, take note of the height of your bed to ensure that the nightstand is positioned at a comfortable elevation. Additionally, think about your storage needs – do you require drawers or shelves? Lastly, consider the overall aesthetic and décor of your bedroom, ensuring that your nightstand design aligns with the rest of the room’s style.
Can I build a nightstand if I have no woodworking experience?
As you embark on your DIY journey, start by tackling straightforward designs and gradually work your way up to more intricate projects as your confidence and skills grow. Fortunately, there’s no shortage of beginner-friendly resources available, including step-by-step tutorials and comprehensive plans tailored to newcomers.
What is the standard height for a nightstand?
While the conventional standard height for a nightstand stands at around 24 inches, it’s essential to consider the height of your bed when determining the ideal placement. Typically, the top of the nightstand should align with the surface of your mattress or even be slightly elevated. This ensures that the piece blends seamlessly into your bedroom decor and provides easy access to bedtime essentials.
How can I make my DIY nightstand more eco-friendly?
To boost the eco-friendliness of your DIY nightstand project, consider these environmentally conscious approaches. You can start by exploring reclaimed or recycled wood options for the main structure, which not only reduces waste but also adds a unique charm to your final product. Additionally, opt for non-toxic paints and stains that minimize harm to both humans and the environment. Another creative way to make your nightstand more eco-friendly is to repurpose old furniture pieces into a new one, reducing the demand for new materials and minimizing landfill contributions. Finally, consider using hand tools instead of power tools whenever possible, as this helps reduce energy consumption and minimizes electronic waste. By incorporating these eco-conscious strategies, you can create a sustainable and stylish DIY nightstand that reflects your commitment to environmental responsibility.
Is it cheaper to build a nightstand than to buy one?
Building a nightstand from scratch can be a cost-effective alternative to purchasing a pre-made one, particularly when using budget-friendly materials and tackling the project solo. By forgoing labor costs and tailoring the design to meet your specific requirements, you can create a unique piece that perfectly suits your needs without breaking the bank.
How do I protect my DIY nightstand?
When it comes to protecting your DIY nightstand, there are several steps you can take to ensure it remains in great condition. Firstly, once you’ve finished painting or staining the surface, be sure to apply a coat of sealant or finishing oil to provide an extra layer of protection. Additionally, using coasters is crucial for preventing water rings from forming on the surface. Furthermore, consider placing felt pads under any decorative items you place on your nightstand to prevent scratches. Finally, it’s essential to avoid placing your nightstand in direct sunlight, as this can cause the finish to fade over time.
Can I add a wireless charging spot to my DIY nightstand?
Envisioning a seamless wireless charging experience within your custom-built nightstand is now a reality. To achieve this, acquire a wireless charging kit and meticulously follow the manufacturer’s guidelines for incorporating it into the furniture. It’s essential to factor in this feature during the initial design stages, ensuring a harmonious integration that enhances the overall functionality of your DIY project.
30 Simple DIY Nightstand Plans (How to Build a Bedside Table)
Enhance the ambiance of your bedroom by crafting your own unique bedside tables with these 30 easy DIY nightstand plans. Say goodbye to ordinary furniture and hello to personalized decor, all within reach through these straightforward and accessible projects.
Custom Nightstand Using Minimal Tools
Elevate your bedroom’s ambiance with a DIY nightstand project that’s perfect for those with moderate woodworking skills. This straightforward guide requires minimal tools and can be completed within a day, making it an affordable update option between $50-75. By following each step, from cutting and drilling to finishing, you’ll create a stunning piece that seamlessly integrates into your space. Get inspired and ready to start by exploring the comprehensive guide.
DIY Night Stand With Hidden Wireless Charging
Transform your bedroom into a serene oasis with a cutting-edge nightstand that seamlessly blends form and function. This ingenious bedside table boasts a concealed wireless charging station, cleverly concealing unsightly cords beneath its sleek surface. The result is a clutter-free zone where you can effortlessly power up your devices. Adding to its modern allure are the cantilevered legs, which inject a touch of contemporary flair. Moreover, the thoughtful design provides ample storage for your daily essentials, keeping them within easy reach. If you’re eager to recreate this stylish and practical piece, head over to Instructables for a comprehensive guide on how to bring it to life.
How to Build a Nightstand With Drawers

Transform your bedroom into a serene oasis by creating a custom nightstand with drawers that effortlessly organizes your essentials and keeps them within reach. With the expert guidance of Dans le Lakehouse, you’ll navigate the process from concept to completion, learning valuable skills and techniques along the way. This comprehensive tutorial breaks down the project into manageable steps, allowing you to build a stunning piece that harmoniously blends with your existing furniture. Perfect for DIY enthusiasts seeking a unique and functional addition to their space, this guide will empower you to achieve professional-looking results infused with personal style. Are you ready to turn your bedroom into a haven? Let’s embark on this creative journey together.
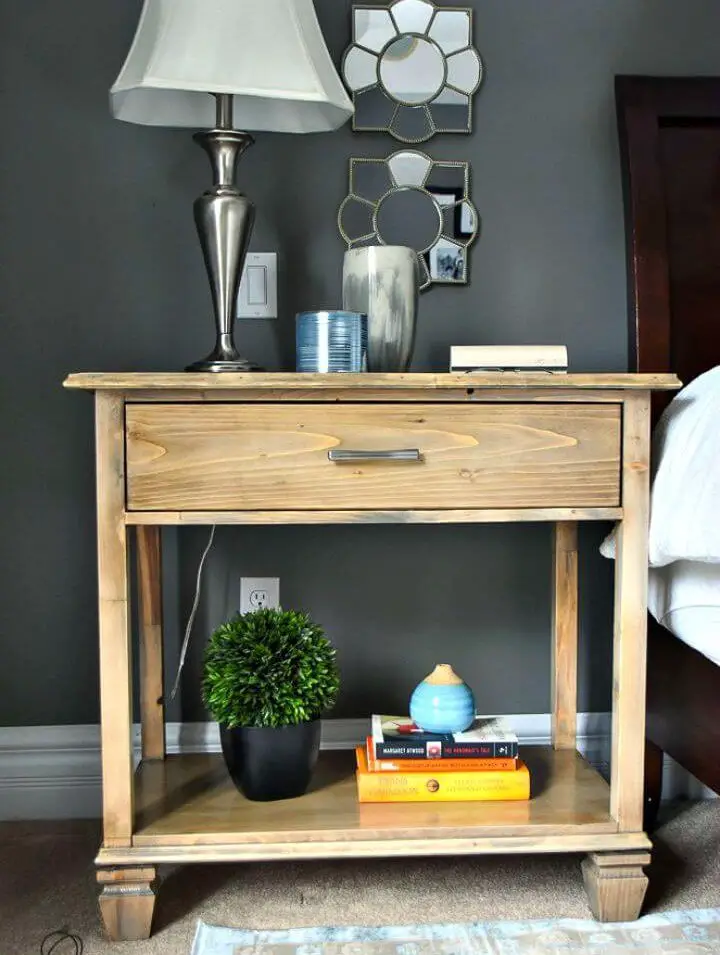
Modern DIY Nightstand Using Wood
At Young House Love, uncover a comprehensive DIY guide to creating custom nightstands that harmonize with any bedroom setting. The design relies on butcher block for a contemporary and robust finish, making it an achievable project for all skill levels. With minimal tools required and straightforward cuts involved, you can bring this modern masterpiece to life without extensive expertise.
This tutorial is ideal for individuals seeking to tailor their bedroom furniture to accommodate unique spaces or infuse personal touches into their decor. Additionally, valuable insights on cost-effective methods, material selection, and functional storage integration are provided, ensuring a rewarding DIY experience from initial planning to the final oil seal application.
Make a Planked Wood Nightstand for Bedroom

Elevate your bedroom’s ambiance by crafting your own DIY planked wood nightstands. This budget-friendly project offers a unique blend of customization and affordability, allowing you to create pieces that perfectly complement your space’s size and style. Whether you’re working with limited square footage or seeking a specific aesthetic, this step-by-step guide provides the tools you need to bring warmth and character to your bedroom with custom-made nightstands that are both functional and visually appealing.
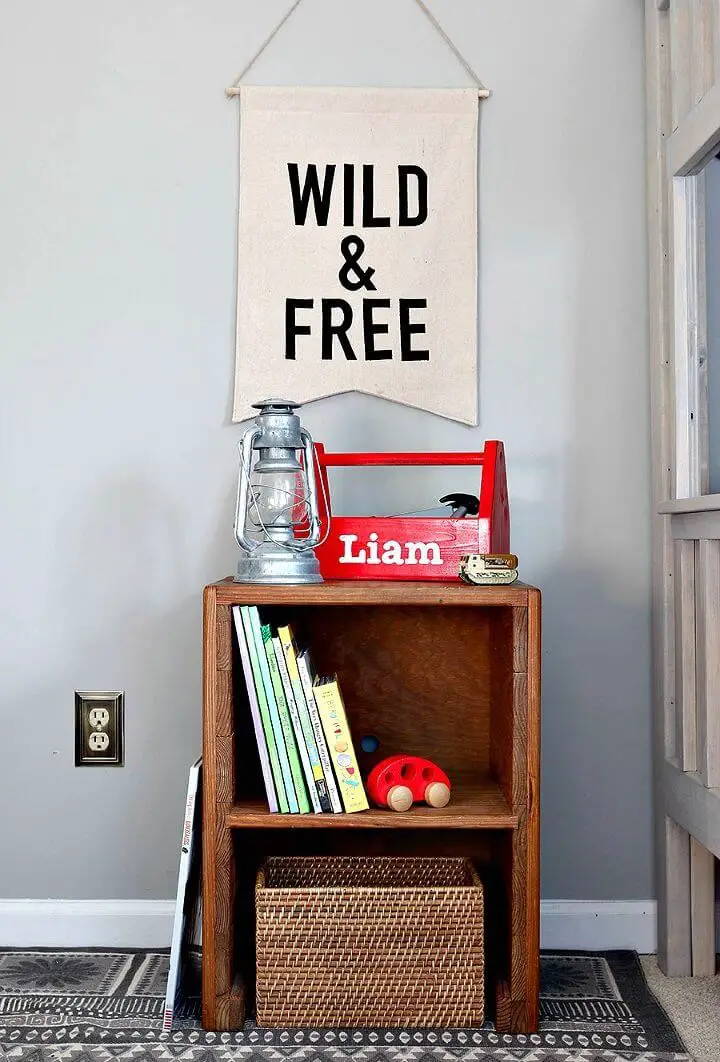
DIY Crate Nightstand – Step by Step Instructions
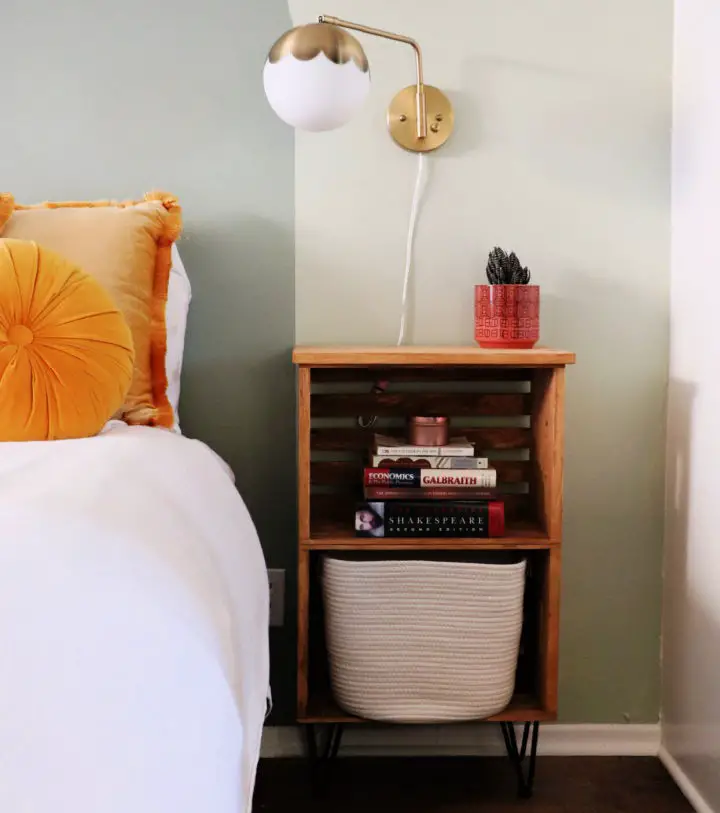
Elevate the style of your bedroom with a unique DIY project that combines bohemian flair with modern functionality. Create a one-of-a-kind Crate Nightstand with hairpin legs, transforming an ordinary crate into an extraordinary piece of furniture. By following a simple guide from DIY Darling, you’ll gain the skills to repurpose crates and craft a bespoke nightstand that reflects your personal taste. This affordable and rewarding project is perfect for those who crave customization and want to add a touch of individuality to their space.
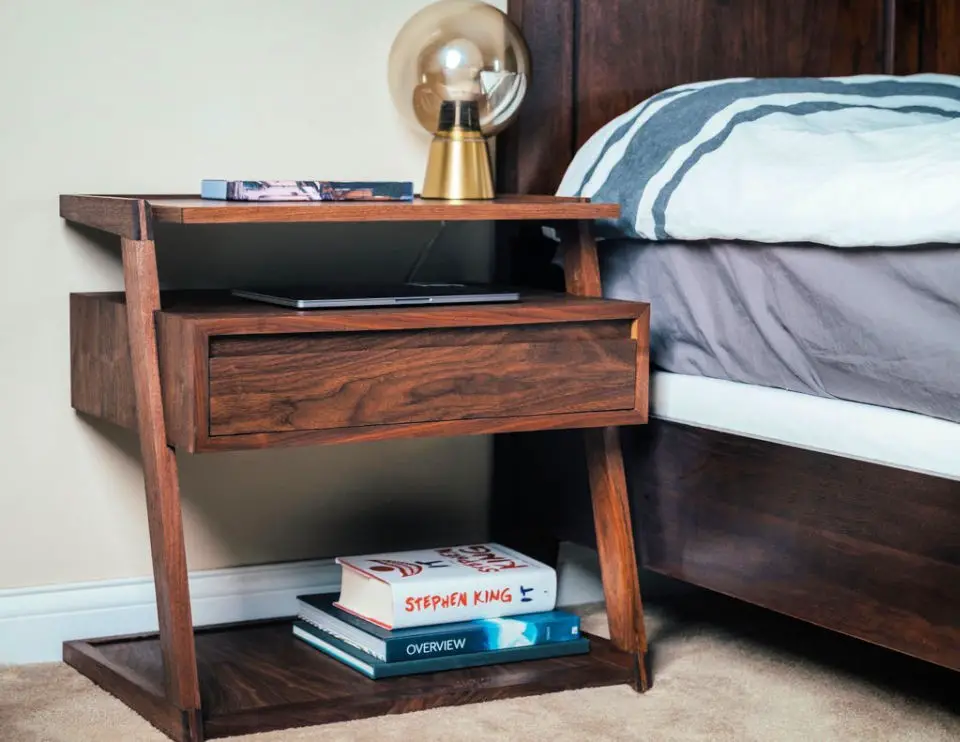
Mid Century Modern Nightstand Plan
Transform your living space into a haven of mid-century modern elegance with our DIY Nightstand tutorial, where you’ll discover how to create a sleek, angular masterpiece that defies traditional design norms. By combining clean lines, clever design, and innovative materials, this project embodies the essence of the iconic mid-century modern style. With our comprehensive plan, including a detailed supply list and step-by-step instructions, you’ll be empowered to unleash your inner craftsman and bring a touch of retro sophistication to your home. Let’s get started! Simply click here for the full guide and video walkthrough.
Easy DIY Nightstand for Beginners
Discover the simplicity of crafting a perfect bedroom accessory by following our comprehensive guide on building a basic nightstand. This detailed tutorial is designed specifically for beginner builders, providing every step necessary to create a functional and stylish piece that complements your bedroom’s aesthetic without requiring advanced skills or breaking the bank. By focusing on readily available materials and straightforward instructions, you’ll be able to complete this DIY project with confidence, resulting in a one-of-a-kind nightstand that not only serves its purpose but also adds a unique touch to your personal space.
Building a PB Teen Nightstand
Elevate your living space with a DIY project inspired by PB Teen’s Emerson Bedside Table. Not only will this endeavour add a touch of style, but it’ll also help you save money. With a comprehensive guide from Addicted 2 DIY, you can replicate the nightstand for around $60. The step-by-step tutorial is designed to walk you through the process, including tips on mimicking authentic saw marks and overcoming common woodworking challenges. To make things even easier, the guide includes free printable plans and a detailed explanation of how to achieve a distressed finish. As a result, you’ll be able to create a nightstand that’s both aesthetically pleasing and budget-friendly – perfect for adding a personal touch to your bedroom.
How to Make a Parson Nightstand
Transform your bedroom sanctuary by crafting a DIY Parsons Nightstand, an achievable project even for novices in DIY endeavors. This accessible project, inspired by A Beautiful Mess, offers a budget-friendly and customizable solution to complement any bed setup, be it traditional or contemporary. By following straightforward steps using basic materials and tools, you can create a functional and stylish nightstand that harmonizes with your bedroom’s unique aesthetics and constraints. As this sleek addition takes its rightful place beside your bed frame, it will elevate the coziness and completeness of your personal retreat.
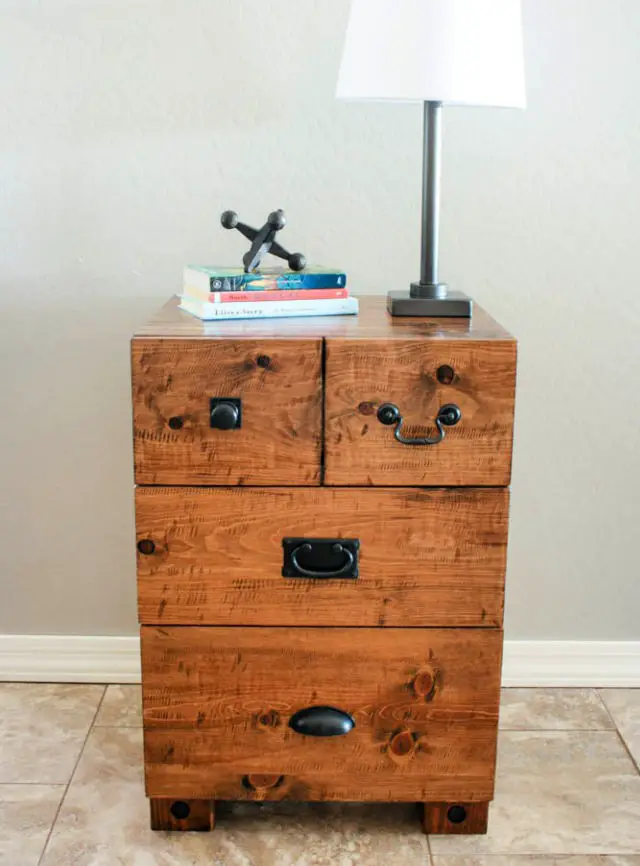
Craftsman Style 3 Drawer Nightstand

Transform your bedroom sanctuary with a DIY Craftsman 3 Drawer Nightstand, boasting ample storage for your must-haves. Designed specifically for higher beds at 28 inches, it provides a cozy companion by your side. Add a touch of sophistication with the optional square trim, reminiscent of the stylish Layne nightstand design. For those looking to tap into their creative potential, Her Tool Belt offers free plans and expert tips to help you perfect your build. From clever drawer assembly techniques to achieving a showroom-quality finish, these resources will guide you every step of the way. Join a community of makers sharing their project sketches and get inspired by the creativity unfolding before your eyes. With your tools at the ready, let your imagination take flight and bring your bedroom vision to life.
X Leg Accent Table Building Plan
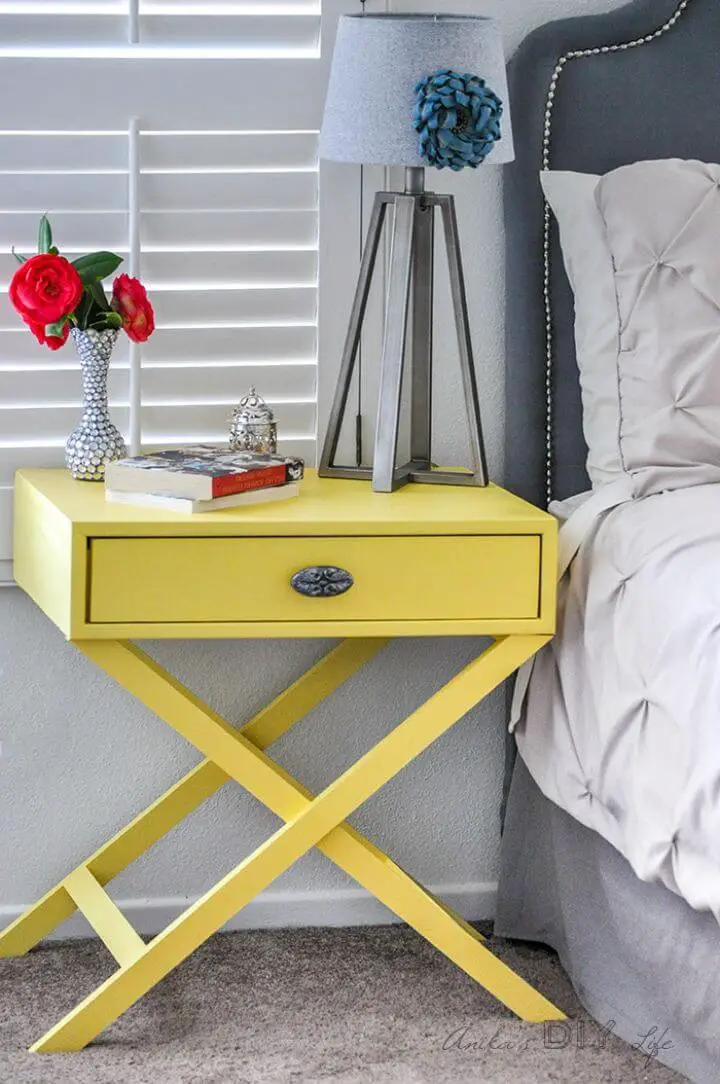
Transforming your living space has never been easier than with a DIY project that adds a touch of elegance to any room. One such project is creating an X-leg accent table, which can be achieved with ease by following Anika’s DIY Life comprehensive guide. The best part? It’s budget-friendly and rewarding, requiring no prior building experience or hefty financial investment. With free plans and step-by-step instructions, you’ll be able to turn your master bedroom or living area into a stylish oasis in no time. Simply grab the plans and get started on your creative journey today!
DIY Retro Side Table at Home
Transform your living space into a nostalgic haven by creating a charming Retro Side Table using simple tools! This DIY project is perfect for anyone looking to infuse their home with mid-century modern flair and functionality. With a focus on ease of creation, this tutorial guides you through the process of crafting a stunning piece that’s not only functional but also showcases your DIY skills.
Whether you’re looking to store remote controls or add a touch of whimsy to your decor, this beginner-friendly build is sure to impress. By following our step-by-step instructions and utilizing essential hardware, you’ll create a truly unique piece that captures the essence of retro design and adds a dash of personality to any room.
Build Your Own Emily Nightstand

If you’re looking to add a personal touch to your bedroom while saving money, these DIY nightstand plans are the perfect solution. Instead of replicating the Isabella Nightstands from Ballard Designs, why not create your own unique versions? With a combination of functionality and elegance, these nightstands feature a petite drawer and adjustable shelf that will seamlessly blend into any bedroom decor. The detailed craftsmanship is what truly sets them apart, making each piece a one-of-a-kind treasure. To get started on this project, you’ll need to click here for the comprehensive plan and list of materials required. With patience and creativity, you can achieve a bespoke look in no time.
IKEA Ivar Dresser Makeover Hack
Elevate your bedroom’s style without breaking the bank with an easy-to-follow IKEA IVAR dresser makeover guide from Club Crafted. By incorporating a bold pop of color using Sherwin-Williams paint, you can infuse your room with personality and create a unique focal point. This DIY project is perfect for those looking to add functional yet stylish storage space without sacrificing their budget. With clear, step-by-step instructions, including the addition of mid-century modern legs and chic brass handles, this tutorial guarantees that ordinary IKEA furniture can be transformed into a show-stopping statement piece. Ideal for anyone ready to embark on a rewarding home makeover adventure.
Refinished Nightstand With Chalk Paint
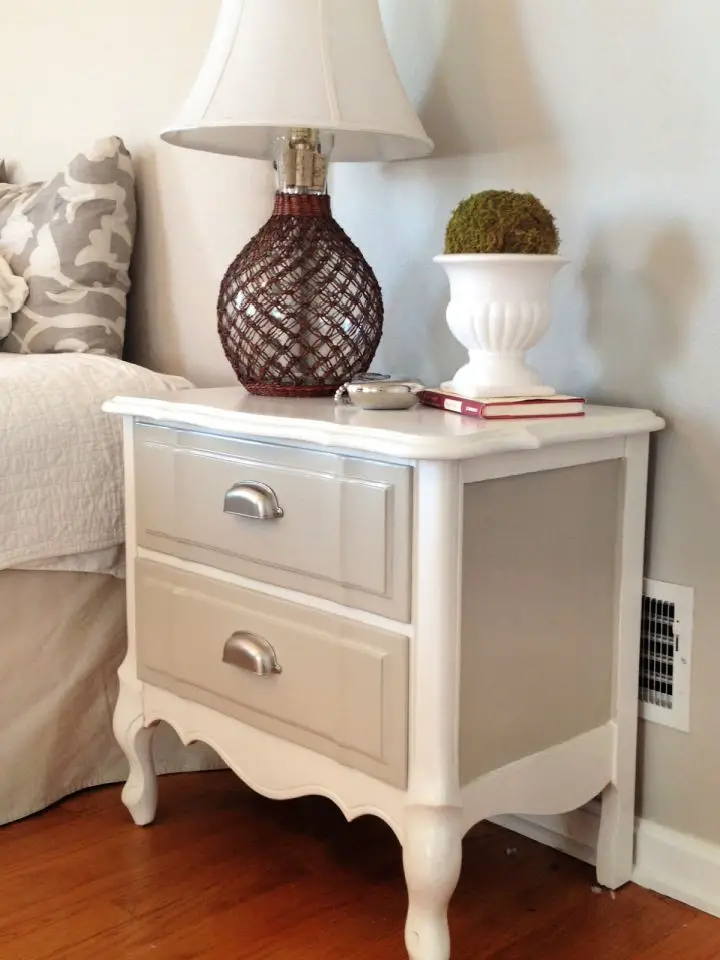
Transform your bedroom with a unique touch by giving an old nightstand a fresh lease of life. Embark on a DIY journey and learn how to create homemade chalk paint, as demonstrated through a captivating before-and-after transformation. Master the art of mixing and applying the paint for a striking two-tone finish that will elevate your decor, all while embracing the principles of reuse and improvisation. To ensure your hard work stands the test of time, discover the importance of sealing your masterpiece with a polycrylic finish to protect against daily wear and tear. Additionally, navigate the process of selecting the perfect hardware to complement your newly restored nightstand. If you’re ready to take your bedroom aesthetic to the next level, look no further than Two It Yourself for a comprehensive guide on this creative makeover.
Simple DIY Pottery Barn Nightstand
Transform your bedroom into a haven of elegance by creating your own Pottery Barn-inspired Sausalito nightstand using our easy-to-follow DIY plans. Designed for any skill level, these detailed tutorials will guide you through the process of building a stunning piece of furniture that exudes sophistication and charm at a fraction of the cost. With a collaborative approach to affordability and aesthetics, this project is perfect for those looking to elevate their bedroom makeover. For a comprehensive overview of materials, step-by-step instructions, and complete plans, click here. Start your woodworking adventure today and bring a touch of glamour to your space.
Free Simpson Nightstand PDF Plan
Transform your bedroom sanctuary with the charm of DIY Nightstand Plans from Simpson. This inviting project combines rustic style with functional design, perfect for DIY enthusiasts seeking to simplify their space. The comprehensive plan includes essential materials, precise cutting dimensions, and step-by-step instructions to guide you in crafting a warm, ash wood stained nightstand that not only serves as a practical storage solution but also showcases your woodworking skills.
DIY Sliding Barn Door Nightstand
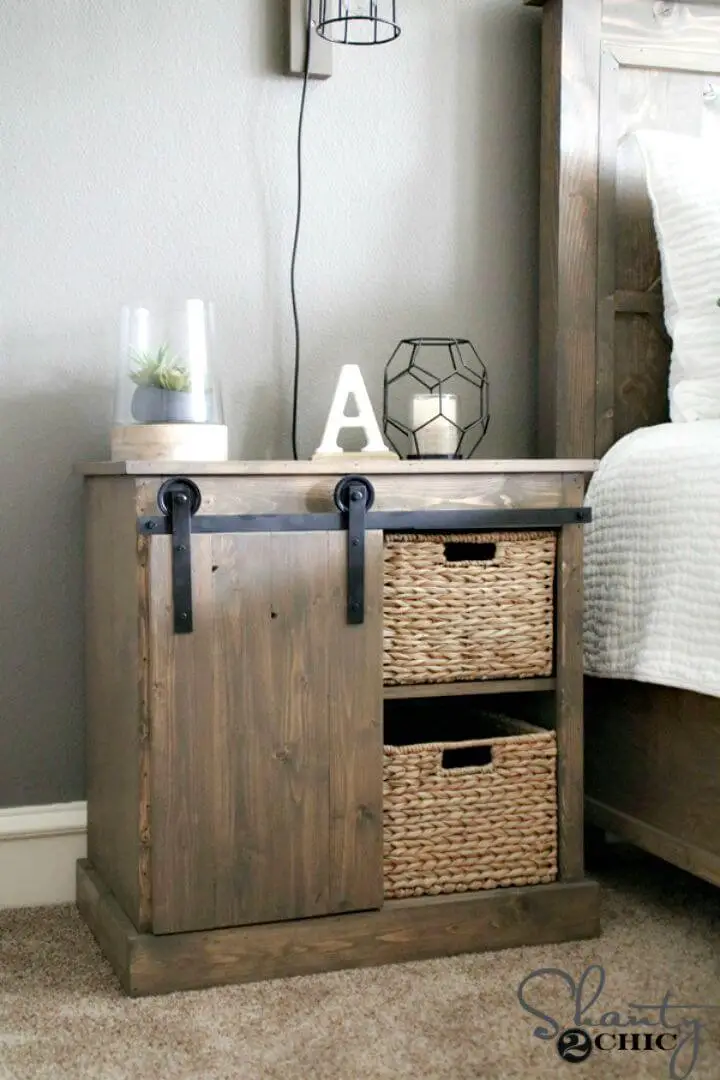
If you’re skilled in woodworking, our comprehensive guide on constructing a Sliding Barn Door Nightstand will help you elevate your craftsmanship. This DIY project is perfect for adding a touch of rustic charm and modern style to your bedroom. Not only does it provide a unique decorative element, but also offers practical storage solutions. The result is a functional piece that keeps your nighttime essentials within reach while keeping clutter at bay. For a weekend DIY adventure, follow our step-by-step tutorial, which includes free printable plans and an engaging how-to video. Start building today and bring a one-of-a-kind touch to your bedroom!
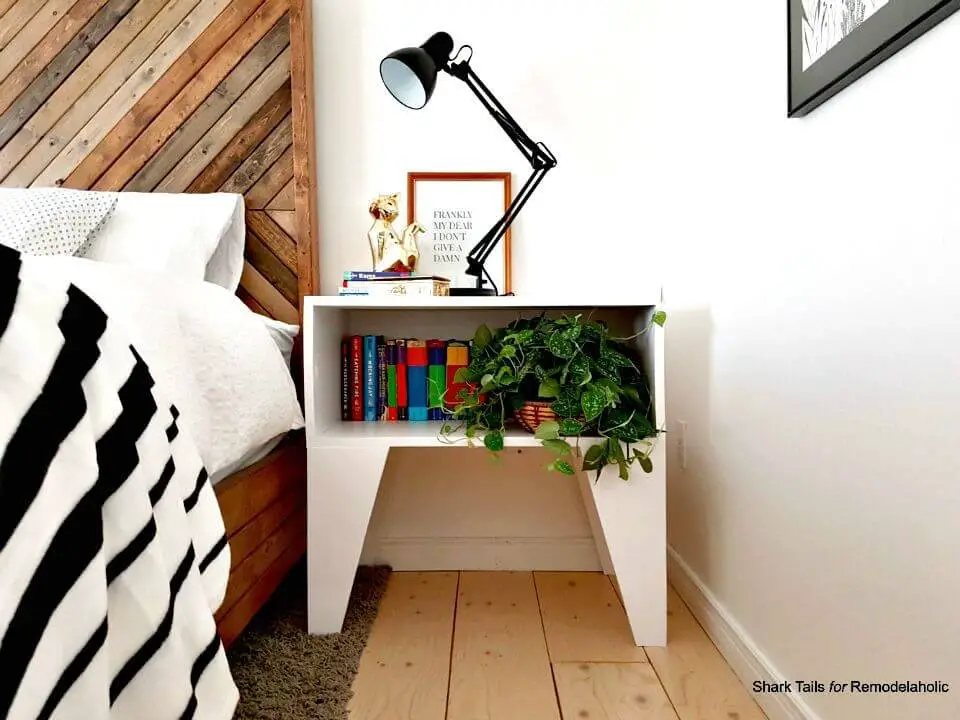
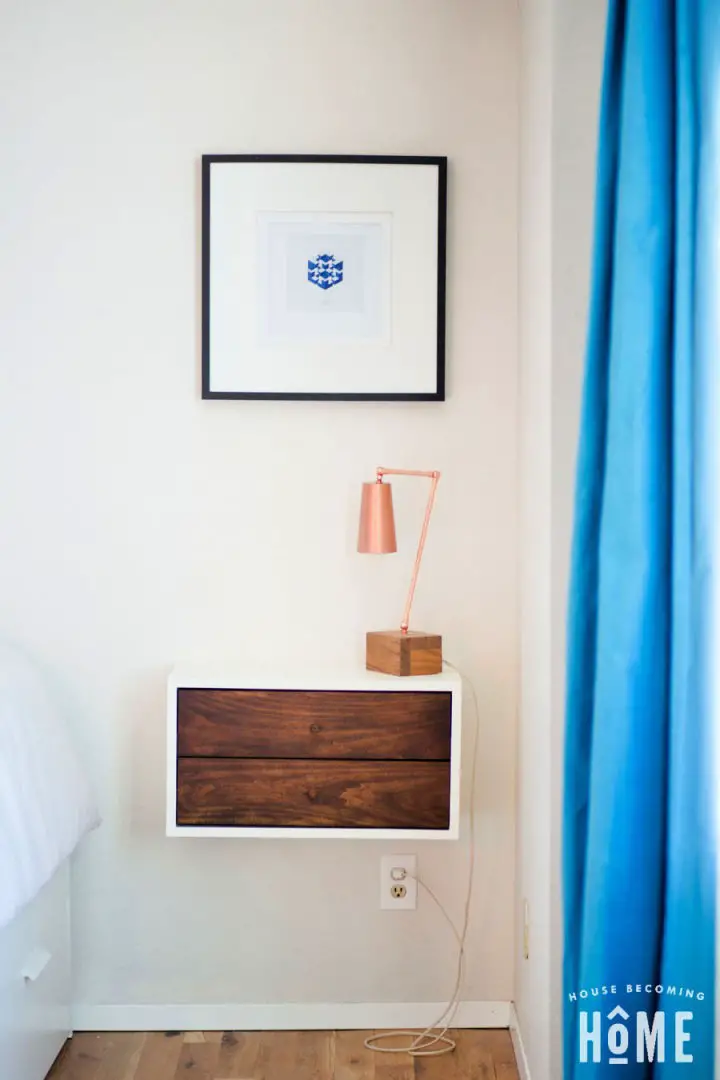
Make a Floating Storage Nightstand

Transform your bedroom’s functionality and aesthetic with a DIY floating storage nightstand that effortlessly combines flair and practicality. This comprehensive guide takes you by the hand, providing step-by-step instructions and expert tips to ensure a seamless process, even for those new to DIY projects. With the flexibility to customize and personalize your creation, create a space-saving masterpiece that not only streamlines your bedroom but also adds a touch of sophistication. As you bring this innovative project to life, savor the satisfaction of creating something both beautiful and functional.
DIY Nightstand With Bun Feet
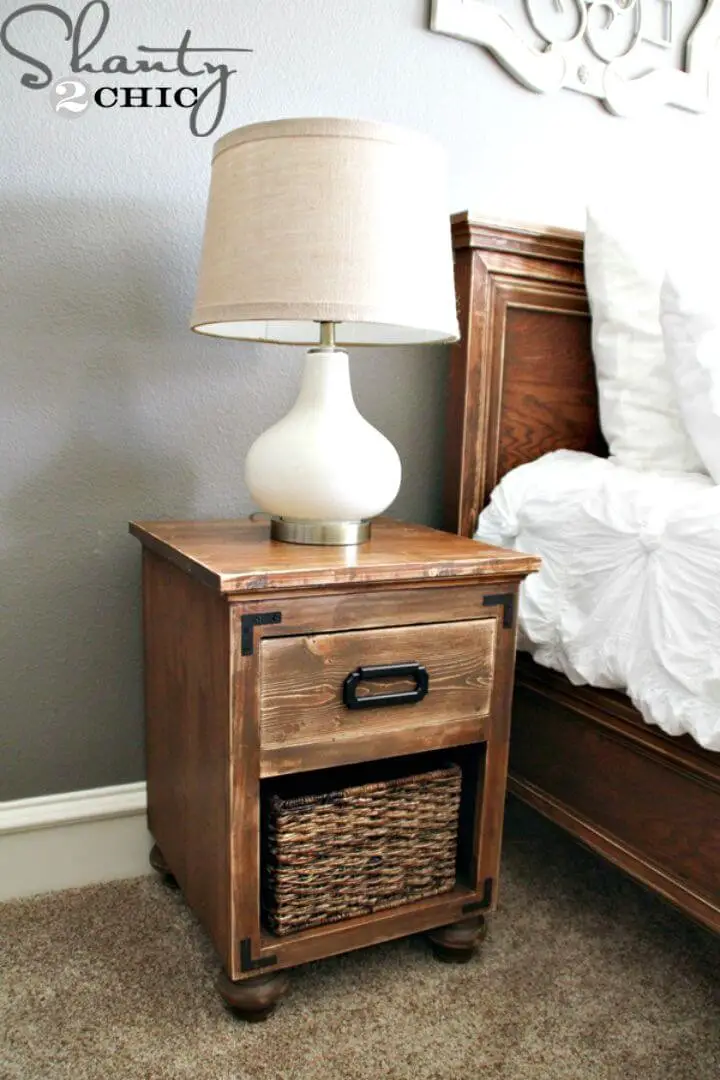
Transforming a simple bedroom with DIY nightstand ideas is an exciting project that can be achieved with elegance and budget-friendliness. By upcycling basic materials into stylish furniture, you’ll be able to infuse your personal touch into your space. The bun feet design adds a sophisticated charm to the piece, making it perfect for those who crave unique decor. This easy-to-follow guide provides step-by-step instructions for building a nightstand that seamlessly blends with your existing aesthetic. Visit Shanty-2-Chic for detailed plans and embark on this creative journey today, enjoying the transformation it brings to your bedroom.
Make Your Own X Shape Nightstand

Transform your guest bedroom with Brittany Stager’s innovative DIY project. This comprehensive guide will walk you through the process of crafting two unique pieces: X-Standard Nightstands and an eye-catching Headboard. By following these easy-to-follow steps, you’ll be able to select the perfect wood, apply beautiful stains, assemble the components, and install your creations for a truly show-stopping finish. Whether you’re a seasoned DIY enthusiast or just looking to add some personal flair to your space, this hands-on guide is sure to inspire and empower you to create something truly special.
Yardstick Pallet Wood Night Stand Ideas
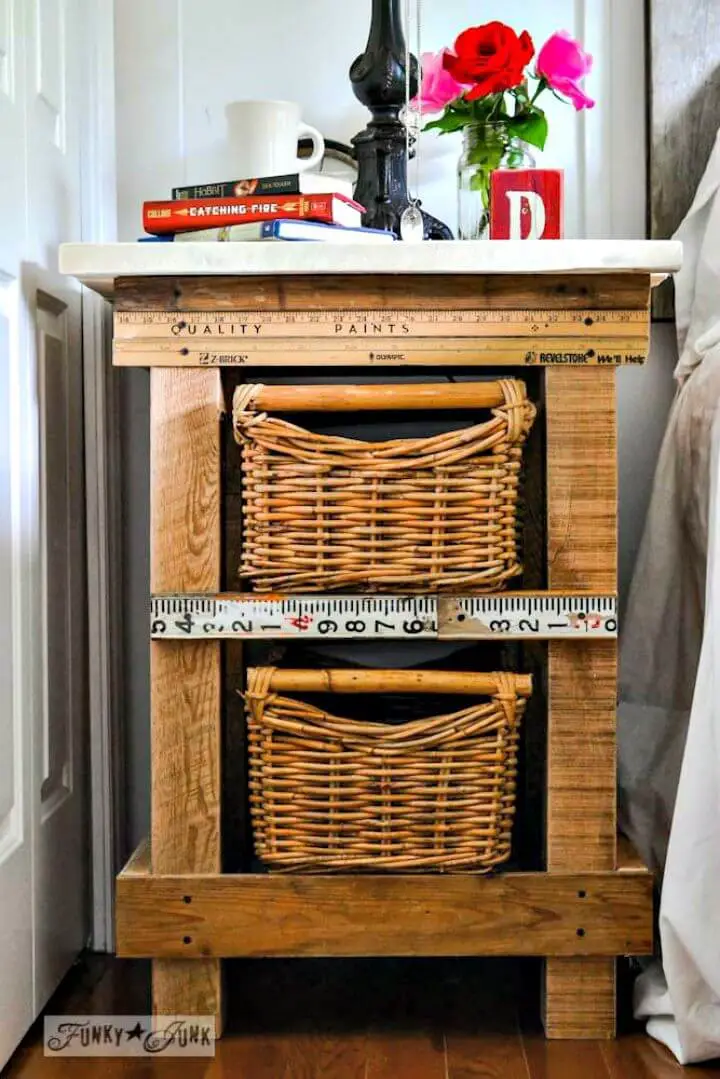
Transform your bedroom into a cozy oasis by crafting a unique nightstand from reclaimed pallet wood and yardsticks. This DIY project is perfect for beginners, offering a practical and rustic piece that adds a touch of personality to the space. By following detailed instructions on preparing the wood, constructing the frame, and adding basket drawers for storage, anyone can create a functional and stylish nightstand that’s both cost-effective and customizable. Whether it’s for your master bedroom or a versatile piece in your living room, this project is sure to be a rewarding experience.
How to Build a Nightstand
Create a stylish and functional DIY nightstand reminiscent of Pottery Barn’s Sausalito bedside tables by following simple plans. This project offers endless customization opportunities, from selecting the perfect stain finish to designing drawers that cater to your unique needs. Whether you opt for a single drawer for effortless access or a built-in power bar for added convenience, this nightstand is sure to elevate any bedroom while being remarkably budget-friendly. Perfect for both beginners and seasoned builders, this DIY endeavor will guide you through crafting a one-of-a-kind piece that reflects your personal style.
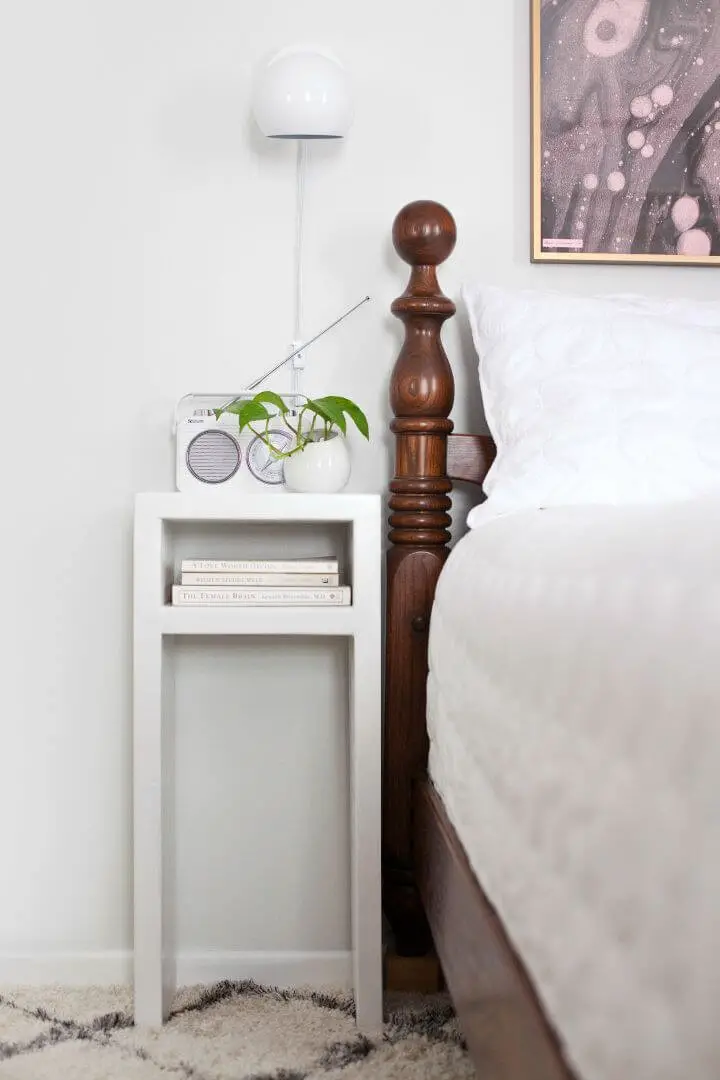
Floating Nightstand With Details Instructions
Transforming your bedroom into a serene oasis just got a whole lot easier with our step-by-step DIY floating nightstand tutorial. This space-saving solution is perfect for adding a touch of elegance next to your bed, making it an ideal weekend project for those looking to upgrade their room’s aesthetic. By following the clear and concise instructions provided by Jen Woodhouse, you’ll be able to craft a stunning piece that boasts both style and functionality. From building the nightstand shell to assembling drawers and adding the final touches, our comprehensive guide will walk you through every step of the process, ensuring that you’re well-equipped with the basic tools needed to complete this engaging project.
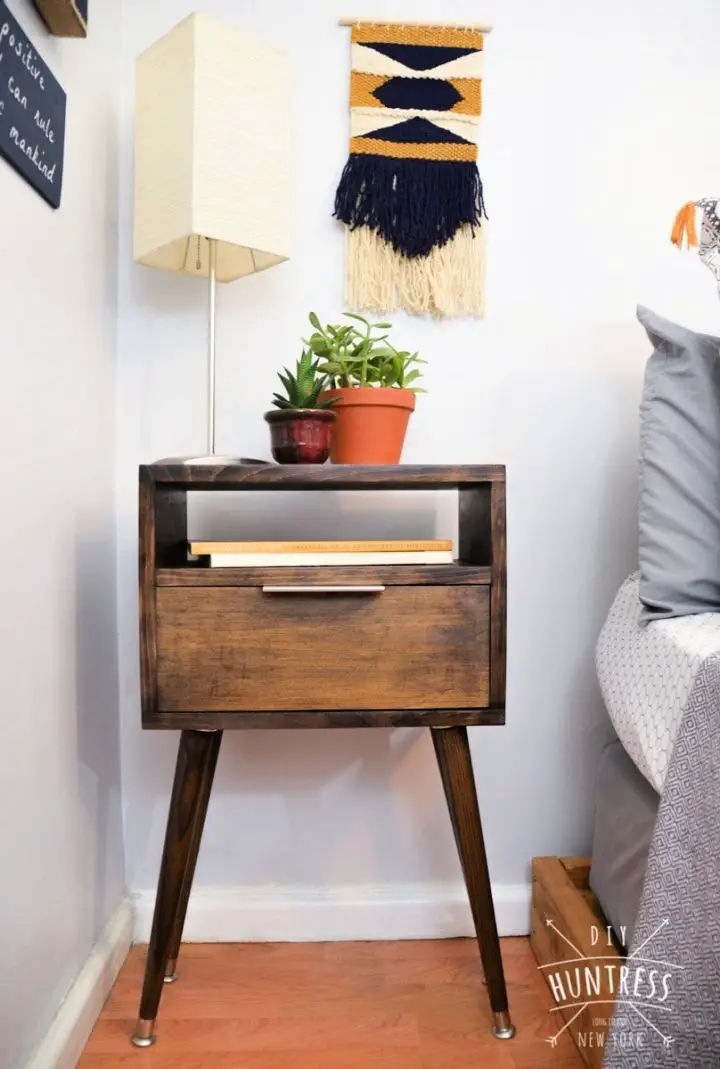
DIY Mid-Century Style Nightstand

Embark on a creative adventure by transforming ordinary materials into a stunning Mid-Century Style Nightstand through a step-by-step DIY project. This journey will guide you in selecting the ideal tools, handling power equipment with precision and care, and applying finishes like Danish Oil to achieve that iconic mid-century look. From conceptualization to assembly, this DIY endeavor presents an opportunity to confront challenges and bask in the thrill of creative accomplishment. Perfect for anyone seeking to infuse their bedroom with a unique personal touch.
How to Make a Nightstand on Wheels
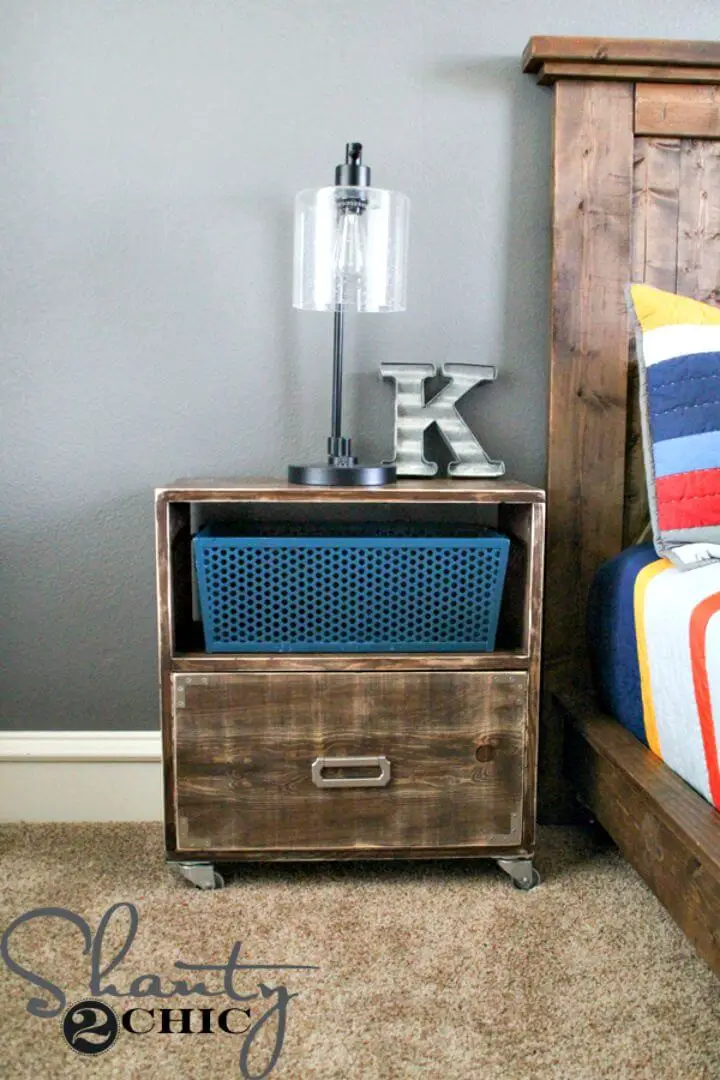
Transform your bedroom’s functionality and style by creating a DIY Nightstand on Wheels, an ideal project for adding rustic and industrial charm to your home. This unique piece requires only five 1×12 boards, amounting to approximately $90 in lumber, making it a budget-friendly option. Designed with simplicity in mind, this nightstand pairs beautifully with platform beds, offering both aesthetic appeal and practical use. Follow our step-by-step guide to construct this nightstand efficiently and complete your space with a project that seamlessly blends with any decor while serving as a convenient bedside companion.
DIY Nightstand With Hidden Charging Station

Transform the ambiance of your bedroom by crafting a bespoke DIY nightstand that harmonizes form and function. This innovative design seamlessly integrates a charging station and pullout writing tray, ideal for tech enthusiasts and anyone seeking to declutter their sleeping quarters. Not only will it elevate the aesthetic appeal of your space, but also cater to practical needs, making it an excellent addition to any bedroom. With expert guidance from Jen Woodhouse’s blog, you’ll discover how to create a clever charging solution that keeps devices powered and organized, while infusing personalized charm into your room’s design. Embark on this captivating project and revolutionize your bedside area with ease.
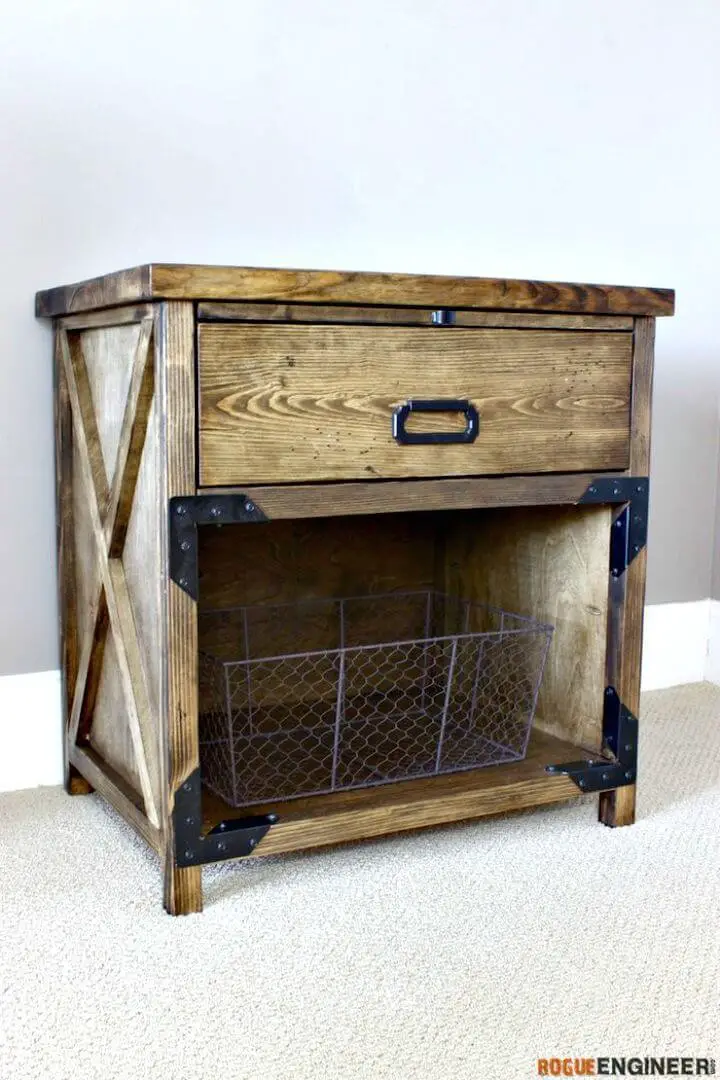
Rustic Cargo Nightstand Design
Transform your bedroom sanctuary with a rustic nightstand crafted from the comfort of your own home. This DIY project is perfect for makers of all skill levels, as it demands only basic tools and materials easily accessible at your local hardware store. By following our comprehensive guide, you’ll be able to create a unique, functional piece that adds character to your nighttime retreat without breaking the bank.
Simple Rustic Square Bedside Table

Transforming your space on a budget can be achieved through the creation of unique and affordable nightstand ideas. By embracing DIY furniture, you can unlock the joy of crafting a charming rustic bedside table for under $25 with our Simple Square Side Table plans. This project is perfect for newcomers to DIY projects, as it offers a straightforward guide that helps you create a piece that’s both practical and stylish. As you engage in this hands-on project, you’ll turn raw materials into a one-of-a-kind table that adds warmth and coziness to any room.
Conclusion:
By now, our comprehensive guide on 30 simple DIY nightstand plans has equipped you with the essential knowledge and strategies to embark on the exciting journey of crafting your very own bedside table. From selecting the ideal materials to the meticulous step-by-step instructions for assembly and finishing, we’ve meticulously covered every aspect to guarantee a successful DIY project. Furthermore, we’ve addressed some common concerns to alleviate any doubts or uncertainties you may encounter along the way. Not only does building a DIY nightstand allow you to infuse your bedroom with a personal touch, but it also yields the profound satisfaction of creating something both beautiful and functional with your own hands.
