Elevate your living space with a creative twist by crafting a one-of-a-kind DIY mason jar chandelier. This project is not just about creating a functional piece of lighting, but also about infusing your home with a unique, cozy essence that reflects your personal style. With minimal materials and a dash of imagination, you can bring warmth and ambiance to your room through a custom-designed fixture. The 15 easy DIY mason jar chandelier ideas featured in this guide offer a diverse range of designs, from rustic to modern, ensuring there’s a perfect match for every decor. As you embark on the journey of making a mason jar chandelier, you’ll discover a fusion of functionality and artistry that will leave you with a sense of pride and accomplishment. This comprehensive guide will walk you through the essential steps of choosing the right jars, painting, and assembling your masterpiece, while also providing valuable tips, tricks, and answers to frequently asked questions to help you overcome any obstacles and achieve a stunning finished project.
Why Make a DIY Mason Jar Chandelier?
Creating a DIY Mason Jar Chandelier is an engaging and fulfilling experience for several reasons. By doing it yourself, you can save money compared to purchasing one from a store, as the cost of materials can be significantly lower. You might even use items you already have at home or find affordable options at local stores or thrift shops.
Moreover, DIY projects allow you to personalize your decor to perfectly match your space and style. With a Mason Jar Chandelier, you can customize the number of jars, colors, and light bulbs to create a unique piece that reflects your personality.
Furthermore, repurposing mason jars and other materials for your chandelier promotes sustainability by reducing waste. It gives old items a new life, contributing to a more eco-friendly lifestyle.
As you work on the project, you’ll develop new DIY skills such as drilling, wiring, and creative design. Completing the chandelier will give you a sense of accomplishment, knowing that you created something with your own hands that you can admire.
The warm, inviting light emitted by Mason jar chandeliers can transform any space into a cozy atmosphere. Whether it’s hung above your dining table or in your outdoor patio, it adds a rustic charm that’s hard to replicate with store-bought items.
Most importantly, the process is meant to be enjoyable. Take your time, be creative, and have fun with it! The end result will be a beautiful piece of DIY decor that you’ll be proud to show off.
How to Make a Mason Jar Chandelier
Transforming a space with a personalized touch has never been easier than by creating your own light fixture. This DIY project offers a straightforward and rewarding experience, allowing you to bring a unique ambiance to your dining room or living area. By upcycling simple objects, you can replicate the stunning custom light fixtures featured in Hallmark Channel’s video tutorials.
What You’ll Need:
To create a unique and rustic bathroom light fixture, you’ll need the following materials. First, gather mason jars with rings to serve as the foundation of your design. For added durability, apply E6000 glue around the rim of each jar to prevent them from shifting or falling apart. Next, give the jars a distressed look by spraying them with hammered metal texture finish. Once dry, place a piece of 1×8 inch pine shelving (or reclaimed wood) above the jars to create a shelf-like effect. Secure the jars in place using screws and screw hooks. To add some greenery to your design, attach wrought iron plant hooks to the wooden surface, allowing you to hang plants or other decorative items. Finally, use a drill, hatchet, and hammer to complete the project.
Dismantling the Fixture
To begin the process, start by gently prying open the bulb covers that protect the bathroom fixture’s internal workings. Typically, these covers can be removed without the need for tools or excessive force. This initial step should provide a clear view of the underlying mechanisms.
With the covers removed, focus on detaching the front plate from the fixture. This plate usually separates smoothly once the covers are out of the way, revealing the base plate and electrical components in all their glory.
Preparing the Mason Jars
To secure the mason jar rings, start by applying a small bead of E6000 glue around the rim of each ring. Next, position the glazed rings over the holes on the fixture’s base plate, where the bulbs would typically be placed, making sure they are evenly distributed. Once in place, it’s essential to permit the glue to dry completely, allowing for a strong and durable bond between the rings and the fixture.
Painting
When selecting a spray paint, it’s essential to choose one that harmonizes with your decor. For added depth and visual interest, consider opting for a hammered metal texture finish. This unique effect can elevate the overall aesthetic of your project.
To achieve a professional-looking finish, start by applying an even coat of spray paint to both the base plate and mason jar rings. Before diving in, take some time to practice on a spare piece first. This will give you a sense of the paint’s coverage and texture, allowing you to make any necessary adjustments before moving forward.
Preparing the Wood Base
For those seeking a truly unique aesthetic, consider adding distressed details to your wooden creation. Using a combination of a hatchet and hammer, gently roughen the edges and surface of the wood to create a rustic, weathered appearance. This technique can add significant character to your finished piece. Following the distressing process, apply a rich dark ebony stain to achieve an authentic antique finish. Allow the stain to dry completely before moving forward with additional steps or final assembly.
Assembling the Wood Base and Fixture
To complete the installation, start by attaching the fixture’s electrical components to the wooden base. This typically involves drilling a hole for the wiring to pass through. Once the wiring is in place, secure the fixture to the wood using screws. Next, add any decorative elements that came with the original fixture. These may include a painted front plate or decorative caps that can be reattached to restore the fixture’s original appearance.
Adding Hooks for Hanging
To secure the light fixture to the ceiling, screw wrought iron plant hooks into each corner of the wooden base. The stability of these hooks is crucial, as they’ll be supporting the weight of the fixture itself. Make sure to fasten them securely to ensure a sturdy attachment.
Height Considerations
To achieve the perfect placement for your new light fixture, consider the ceiling height and table surface. For average 8-foot ceilings, position it between 32 to 34 inches above the tabletop. If you have higher ceilings, adjust accordingly by adding three inches for every foot of additional clearance, ensuring a harmonious balance between the lighting fixture and surrounding space.
Video Tutorial
By combining the written guide with a step-by-step video tutorial on the Hallmark Channel, you’ll gain a comprehensive understanding of how to create this DIY light fixture. The visual perspective brought by the video will help bring the instructions to life and make the process easier to follow.
This DIY project offers a simple and budget-friendly way to add character and lighting to your home, resulting in a functional piece that’s also a great conversation starter. With some creativity and basic DIY skills, you can create a unique light fixture that will illuminate your space with style.
FAQS on DIY Mason Jar Chandelier Ideas
Crafting a DIY Mason Jar Chandelier is an invigorating endeavor, and addressing common inquiries upfront can streamline the process. As you embark on this creative journey, consider the following frequently asked questions that will guide you through the initial stages.
What materials do I need to make a DIY Mason Jar Chandelier?
To begin with, you’ll need to gather the following materials: Mason jars with their accompanying rings, a suitable light fixture base – think bathroom fixtures or a rustic wooden board for a more unique appearance. You’ll also require a strong adhesive like E6000 glue, optional spray paint for personalizing your design, and the essential electrical components such as light bulbs and wiring. Furthermore, you’ll need to have a set of tools at your disposal, including a drill and screwdriver, in addition to wrought iron plant hooks or chains for hanging your finished piece.
How can I customize my Mason Jar Chandelier?
To truly make your pendant lighting system stand out, consider tailoring it to fit your personal style and aesthetic. This can be achieved through a range of creative customization options. For instance, you could give your fixtures a pop of color by spray painting the jars or base in a hue that matches your décor. Alternatively, you could experiment with different sizes or styles of mason jars to create a one-of-a-kind look. Additionally, swap out traditional light bulbs for colored ones to add an extra layer of visual interest. And finally, don’t be afraid to get creative and add decorative elements like ribbons or beads to give your pendant lighting system a uniquely personal touch.
How do I ensure my Mason Jar Chandelier is safely installed?
When it comes to installing a chandelier, safety should be your top priority. To ensure a secure and successful installation, follow these guidelines: Firstly, verify that all electrical connections are properly secured and covered to prevent any accidents or shocks. If you’re not experienced in electrical work, don’t hesitate to consult with or hire a qualified electrician to minimize the risk of injury. Additionally, before hanging your chandelier, make sure that the ceiling hook or fixture it’s attached to can support its weight without compromising stability. By taking these precautions, you’ll be able to enjoy your new lighting fixture while keeping yourself and others safe.
Can I make a Mason Jar Chandelier if I have no experience with electrical work?
When embarking on an electrical DIY project, it’s essential to proceed with caution. To ensure a smooth and safe experience, consider the following tips:
Opt for a project that necessitates minimal electrical modifications, such as utilizing a pre-wired light fixture base.
To supplement your knowledge, watch tutorial videos that provide step-by-step guidance.
If you’re not comfortable with the wiring aspect, consider enlisting the help of someone who has electrical experience or hiring a professional for this part of the project.
How do I clean my Mason Jar Chandelier?
To maintain your lighting fixtures in pristine condition, start by dusting regularly using a soft cloth or feather duster. When it comes to cleaning the glass jars that often accompany these fixtures, remove them from their fixtures and wash with warm soapy water. Ensure they are completely dry before reattaching them. Finally, use a dry cloth to wipe down both the bulbs and the fixture base, leaving everything spotless.
Can I use LED bulbs in my Mason Jar Chandelier?
One of the most significant advantages of LED bulbs is their ability to emit significantly less heat compared to traditional incandescent bulbs. This reduced heat output minimizes the risk of overheating your chandeliers and jars, ensuring a safer and more reliable lighting solution.
Additionally, LED bulbs are renowned for their energy-efficiency, which translates to substantial savings on your electricity bill. You can enjoy brighter lights without breaking the bank!
Furthermore, LED bulbs offer unparalleled flexibility when it comes to customization. With a range of colors and temperatures available, you can effortlessly tailor the ambiance of your chandelier to suit your unique style and preferences.
How do I adjust the hanging height of my chandelier?
When it comes to adjusting the height of your chandelier, simplicity is key. This can be achieved by utilizing adjustable chains or cords that allow for easy shortening or lengthening as needed. When determining the ideal hanging height, consider a general guideline of 32-34 inches above the table for standard 8-foot ceilings, with adjustments made accordingly for higher ceiling heights. As you work on creating your own Mason Jar Chandelier, remember that this DIY project not only provides a sense of accomplishment but also adds a unique, personalized touch to your home.
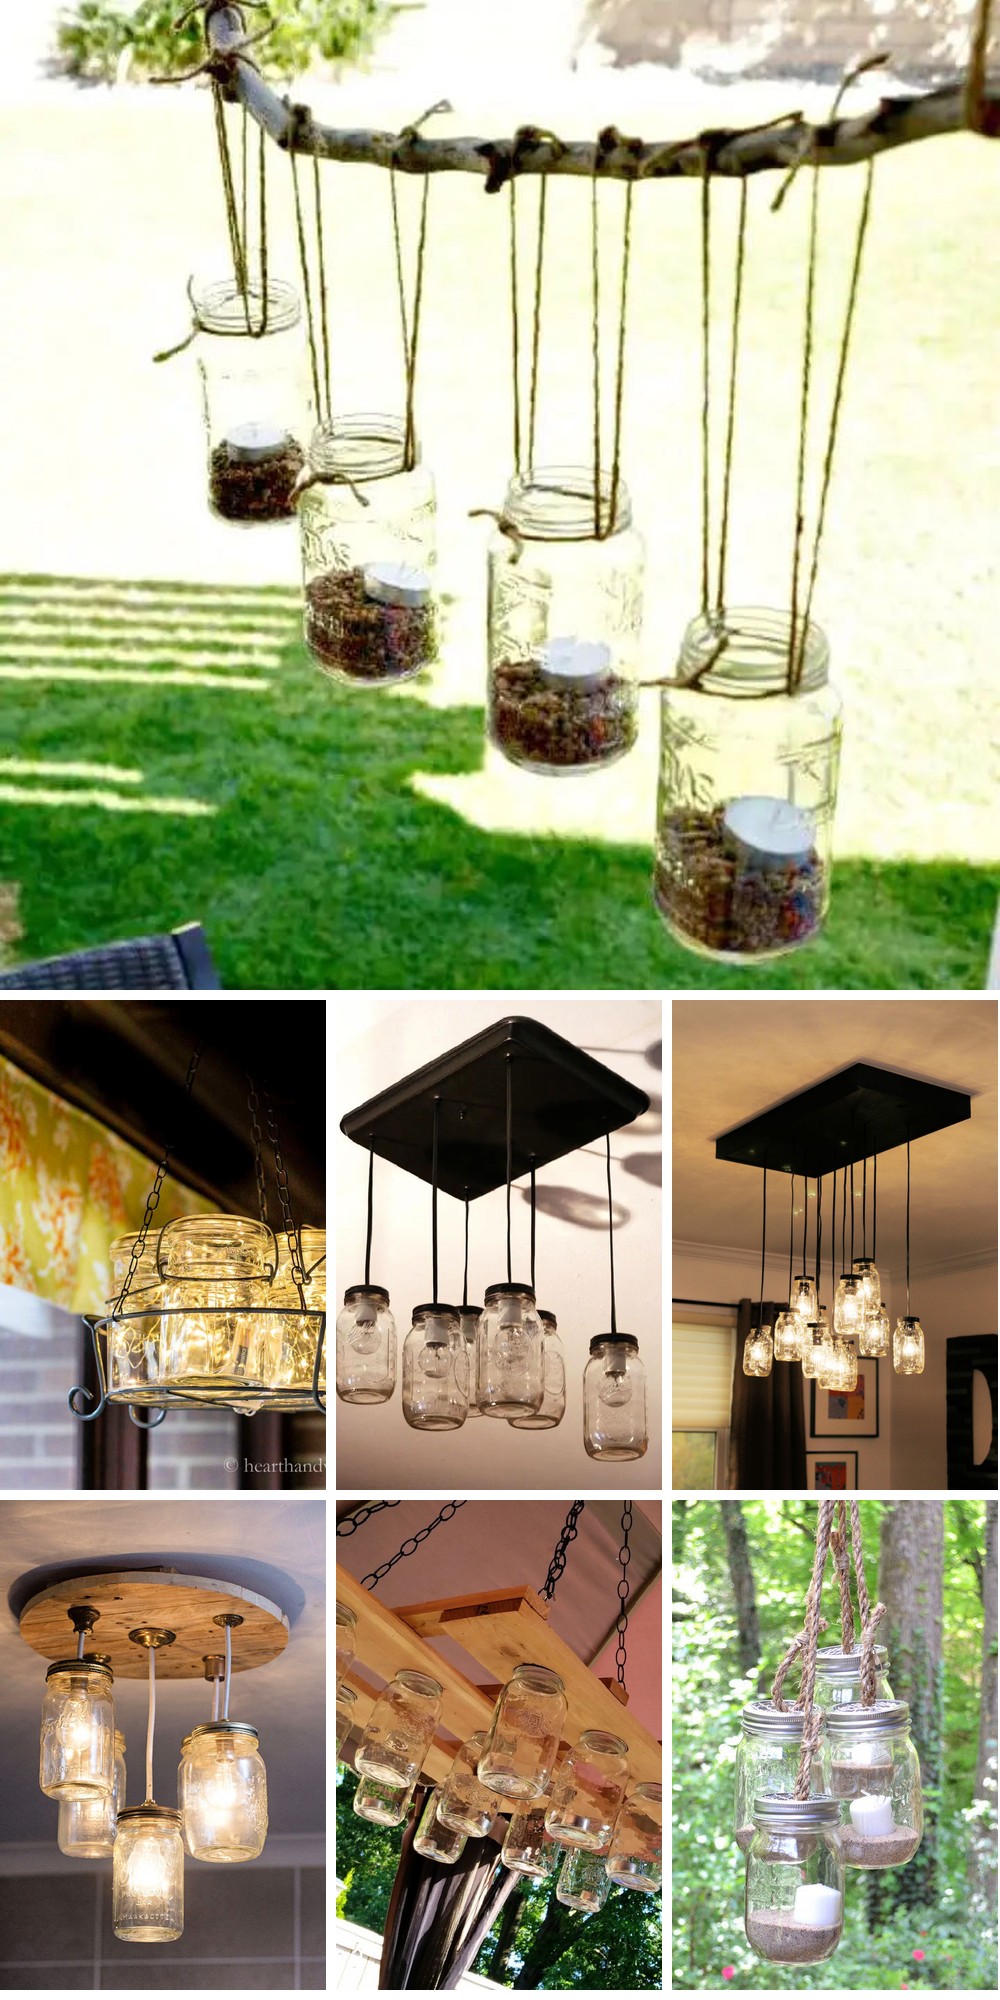
15 Easy DIY Mason Jar Chandelier Ideas
Transform your home’s ambiance by creating one-of-a-kind lighting fixtures using just 15 straightforward DIY mason jar chandelier projects. With these intuitive tutorials, you’ll be able to craft show-stopping decorations that will leave a lasting impression on your family and friends.
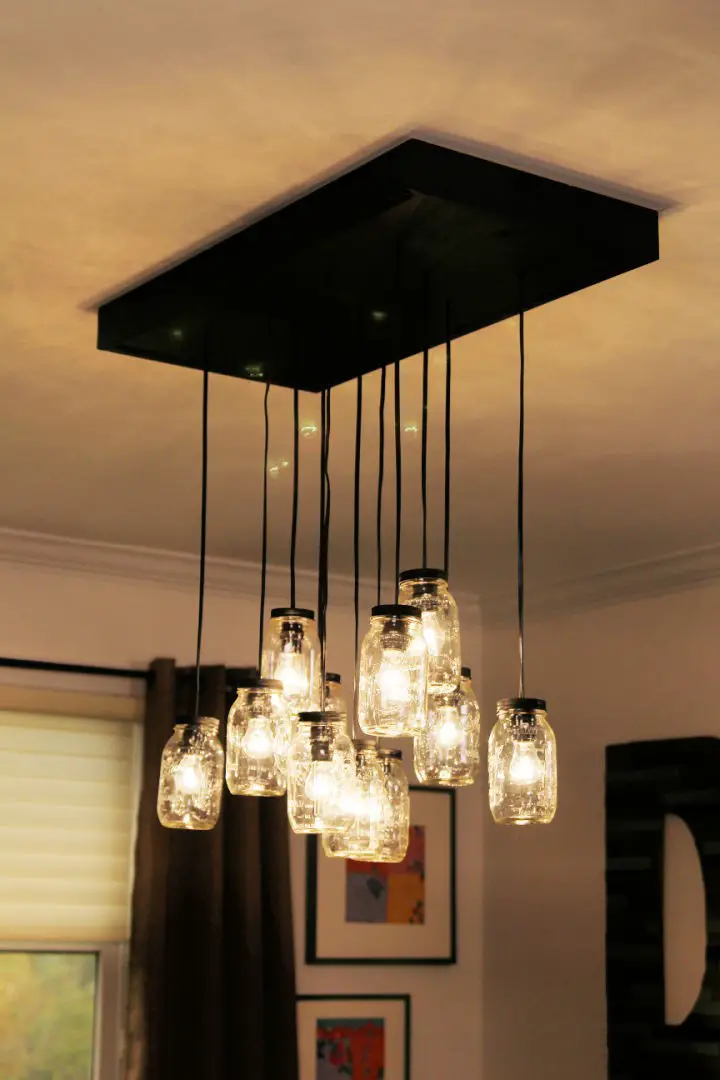
Easy DIY Mason Jar Chandelier
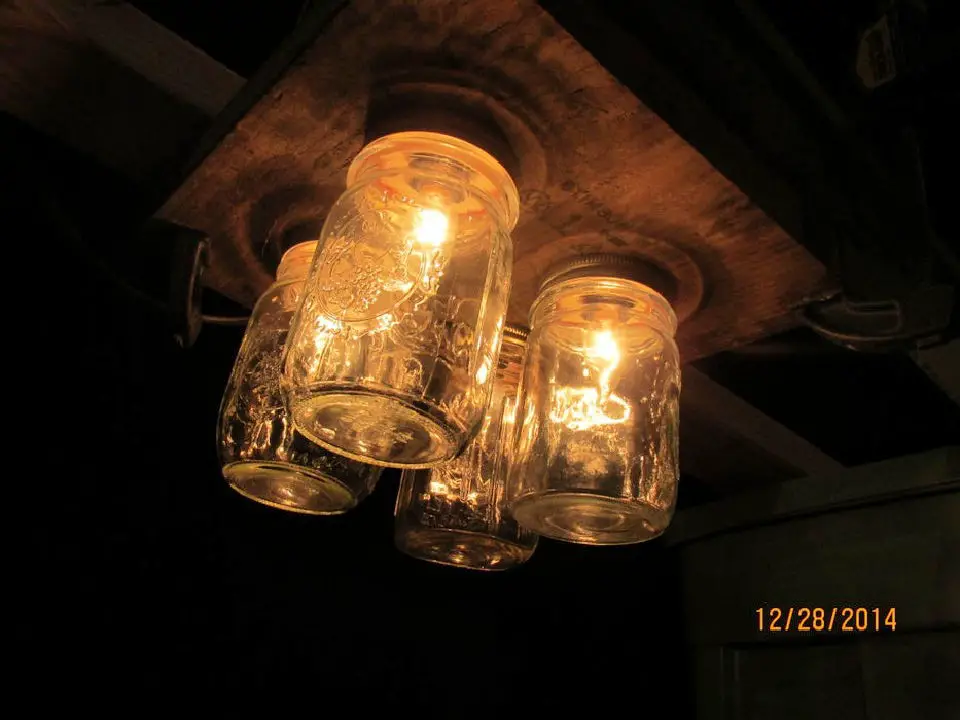
Elevate your space with rustic charm by crafting a mason jar chandelier – a budget-friendly DIY project that’s surprisingly easy to create. At Kenneth Wingard, we’ll guide you through a step-by-step process to transform an affordable bathroom light fixture into a unique and cozy lighting piece using just $50 worth of materials, significantly less than what you’d find in stores. This comprehensive guide will walk you through the transformation, from disassembling the original fixture to reassembling it with a wooden board, paint, and plant hooks. With clear instructions and a dash of creativity, you’ll be able to create a custom chandelier that adds warmth and ambiance to any room without breaking the bank.
How to Make a Mason Jar Chandelier
Transforming your home’s ambiance into a cozy retreat is just a DIY project away. Take inspiration from Carla Visser’s excerpt in ‘Vintage Remakes’ and breathe new life into your living space by crafting a one-of-a-kind Mason jar chandelier, as expertly guided by SA Garden and Home. This innovative makeover requires some essential tools: safety gloves, a drill with various bits, jars with lids, light fixtures, electrical cords, a cutter, wooden planks, a pencil, a jigsaw, nails, and screws. Start by drilling a central hole in each jar lid to accommodate the light fixture and smaller holes for heat dissipation. Secure the fittings, then cut and connect the electrical cords. Next, create a sturdy wooden base to suspend the jars from. As you assemble the chandelier, be mindful of your wire connections – if uncertain, consult a qualified electrician. Once complete, hang your handmade masterpiece and bask in the warm, personalized glow it brings to your space.
Make an Outdoor Mason Jar Chandelier for $10
Transform your garden or patio into a charmingly lit oasis with a rustic elegance DIY chandelier. For just around $10, you can create a softly glowing ambiance that’s perfect for any outdoor setting. To get started, simply gather a box of mason jars, 16-gauge wire, and a small black chain – all easily found at local stores. Begin by cutting a 13-link chain, wrapping it with wire, and securing it around the jar’s neck. The result is a versatile lantern that can be placed anywhere to add a warm, handcrafted glow to your evening gatherings under the stars.
Mason Jar Chandelier from Thrift Store Finds
Transform your home’s ambiance with a charming DIY Mason jar chandelier! By upcycling vintage wire ball Mason jars and a thrift store rack, you can create a lovely lighting piece that adds a touch of rustic charm to both indoor and outdoor spaces. This eco-friendly project is perfect for repurposing old jars and can be easily customized with a simple coat of paint and the addition of fairy lights. Imagine the warm glow of this handmade chandelier above your dining table or kitchen island, creating a cozy atmosphere that’s sure to spark conversation. Get creative and illuminate your living space with this unique and sustainable DIY endeavor!
Adorable DIY Mason Jar Chandelier
Transform your dining space with a unique and affordable mason jar chandelier that combines rustic charm with modern functionality. By following East Coast Creative’s step-by-step guide, you can create this eye-catching lighting fixture for under $100, making it an attractive alternative to pricey retail options. The project requires minimal materials, including mason jars, lamp wires, and a handmade ceiling plate, allowing you to put your personal touch on the design. With a focus on ease of use and creativity, the instructions provide valuable insights for a fun and engaging DIY experience. As a result, you’ll be able to illuminate your room with a one-of-a-kind piece that’s sure to spark conversation.
Shabby Chic Look Mason Jar Chandelier Tutorial
Transforming an outdated chandelier into a unique and charming DIY Mason Jar Chandelier is a creative way to add a touch of shabby chic to your kitchen. With minimal investment, you can reimagine spare mason jars with a dash of imagination and some chalk paint. This project will guide you through the process of securely attaching the jars, selecting the right bulbs to prevent overheating, and adding a stylish dimmer for ambiance. The total cost is approximately $30, making it an affordable way to create a stunning lighting feature that exudes warmth and inviting charm.
Making a Mason Jar Chandelier

For those who relish the thrill of DIY projects and have a passion for innovative lighting solutions, transforming Mason jars into a captivating chandelier is an alluring challenge. By following the step-by-step guide on LittleThings.com, you’ll embark on a creative journey that requires basic materials such as birch plywood, glue, nails, wiring, and a few essential tools. With clear instructions and meticulous attention to detail, you’ll learn how to assemble the chandelier, drill precise holes, wire the sockets safely, and add the finishing touches with electrical tape. As you bring this enchanting fixture to life, you’ll be amazed at how easily you can create an elegant piece that adds a touch of whimsy to any room.
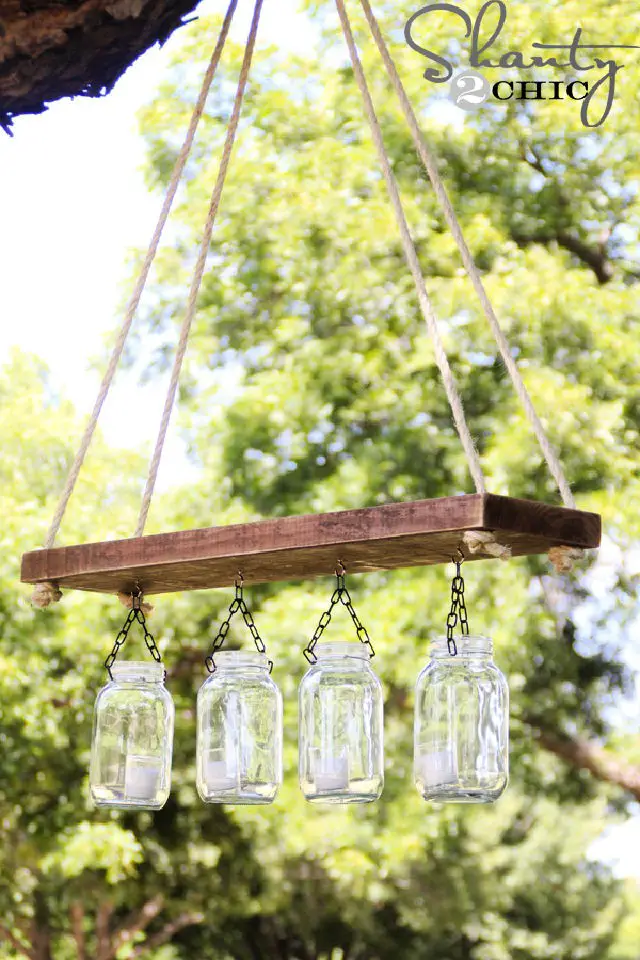
DIY Hanging Mason Jar Chandelier
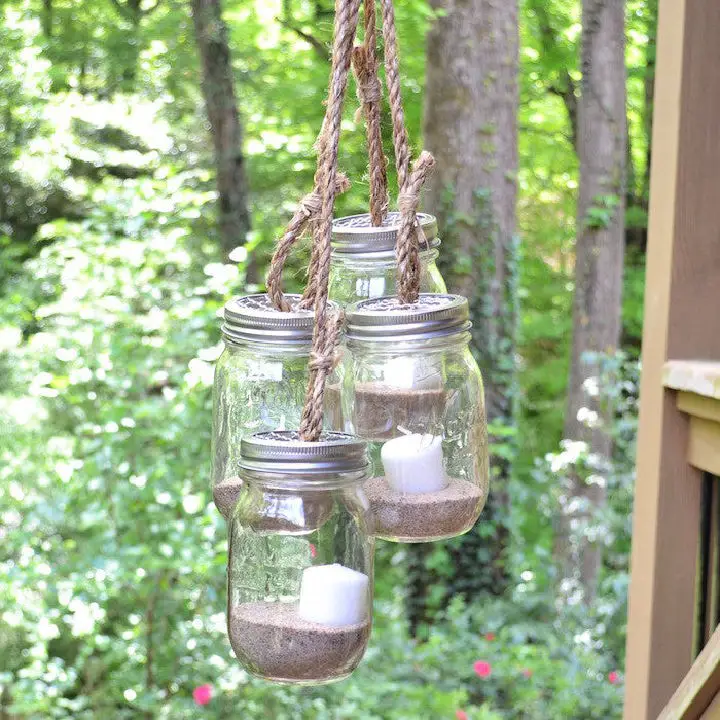
Transform your outdoor gatherings into warm and welcoming spaces with the help of Craft Box Girls’ simple DIY guide to creating a charming hanging mason jar chandelier. This rustic lighting fixture requires no electrical expertise, making it accessible to anyone looking to add a touch of coziness to their celebrations.
With just a few essential materials like mason jars, sand, tea candles, and rope, you can quickly craft a one-of-a-kind lighting fixture that sets the tone for any occasion. Simply prepare your jars, secure them with twisted rope, add a layer of sand and light up the space with candles, then hang your creation using an S-hook. In no time at all, you’ll be enjoying a warm and inviting ambiance that’s sure to delight friends and family alike.
DIY Mason Jar Chandelier at Home
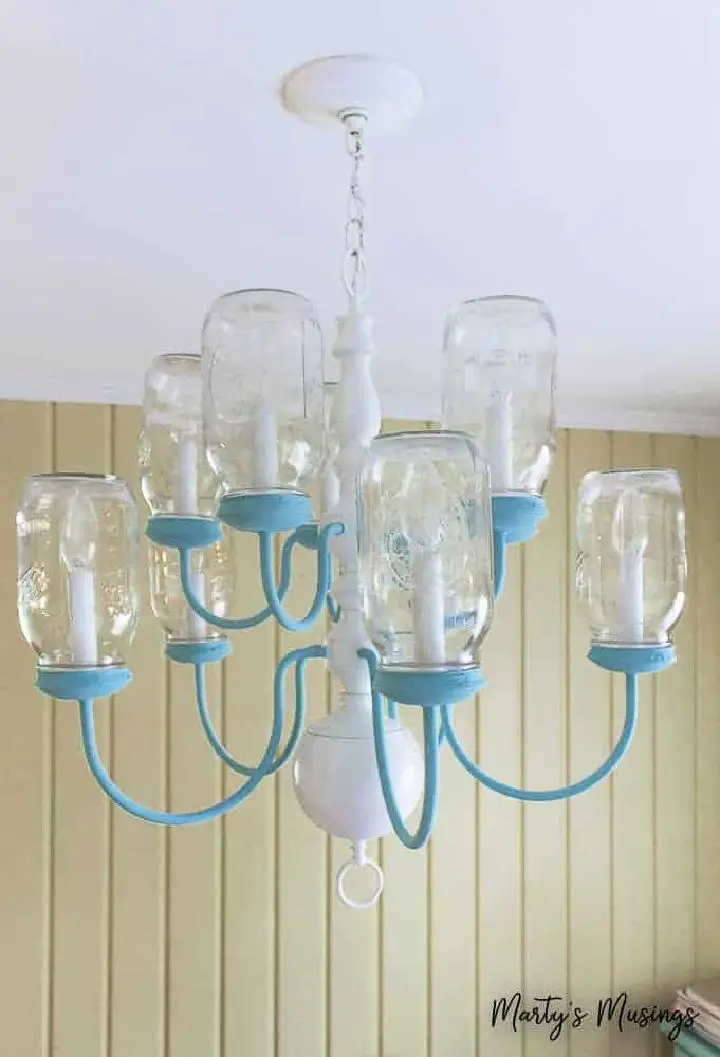
Transform your dining space with an enchanting mason jar chandelier that brings rustic charm to any room. By repurposing a basic chandelier into a captivating decor piece using blue mason jars, you can create a stunning focal point that harmonizes with your existing interior colors. This cost-effective DIY project requires minimal materials and personalizes your space for as little as $10. With its warm, inviting glow, this vintage-inspired lighting solution is sure to become the centerpiece of your room.
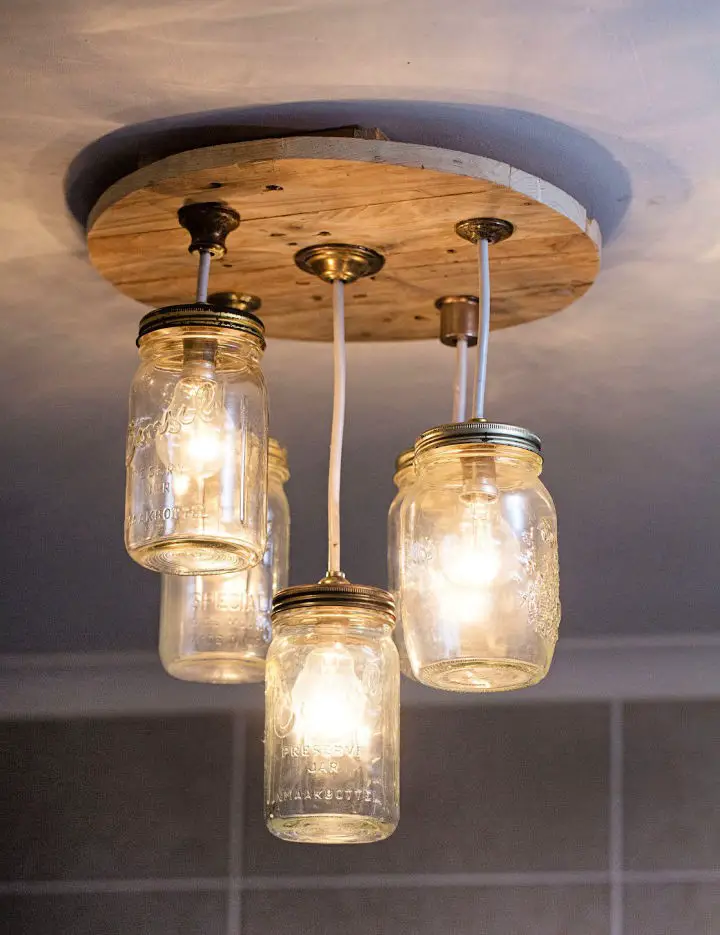
Make Your Own Mason Jar Chandelier

Transforming ordinary mason jars into unique pendant lights is a fun and budget-friendly DIY project that adds a personal touch to your home decor. With this step-by-step guide, you can create your own stylish lighting fixtures using a few simple supplies. The process may seem intimidating at first, but with clear instructions and helpful tips, you’ll be able to assemble the lights with ease. This creative project is not only functional but also serves as beautiful, handmade art that elevates any room’s ambiance.
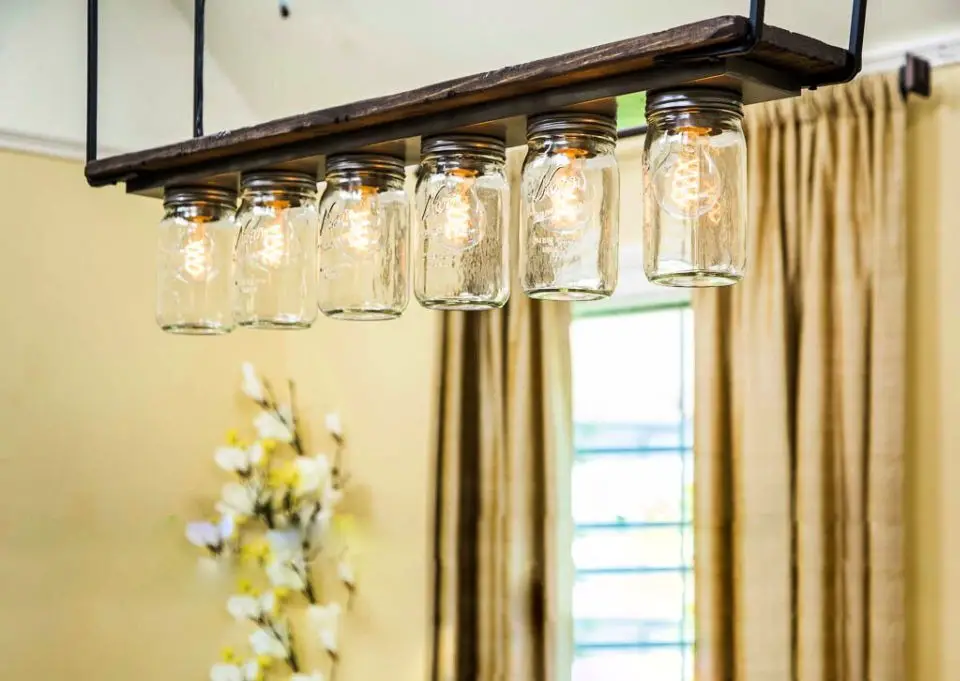
DIY Mason Jar Chandelier Made From Old Barn Wood

Transform the atmosphere of your family room into a cozy rustic retreat by crafting a one-of-a-kind DIY Mason Jar chandelier inspired by jolynnpowers’ creative endeavour on Mountain Mama Reads and Writes. This unique project upcycles repurposed barn wood and mason jars to create bespoke light fixtures, infusing any space with a charming country charm. With a step-by-step guide accompanied by insightful photographs, this DIY adventure ensures a seamless crafting experience. Perfect for adding a warm, personalized ambiance to your home, this handcrafted beauty will illuminate your space and leave you feeling cozy and content.
Homemade Mason Jar Chandelier
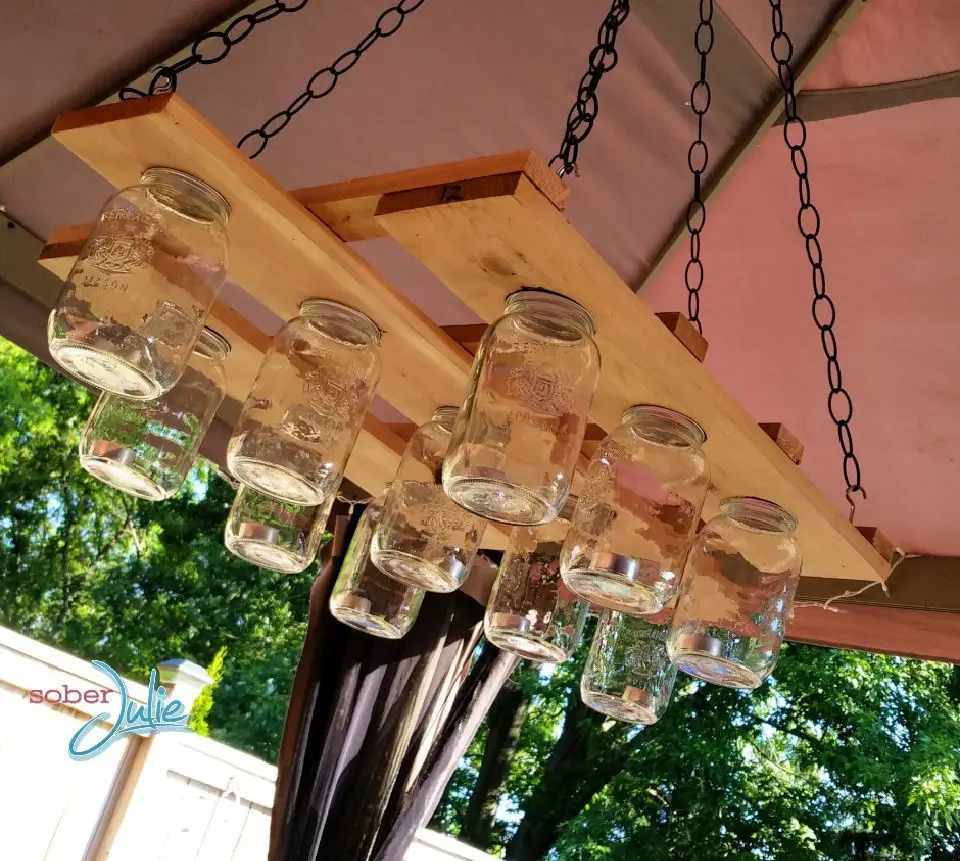
Transform your backyard patio into a warm and inviting oasis by creating a DIY mason jar chandelier with Julie Elsdon-Height’s comprehensive guide. This project is perfect for those who value the unique charm of handmade pieces, as it offers engaging and easy-to-follow instructions. The incorporation of innovative tools like RYOBI’s 18v one+™ 18ga cordless brad nailer from Home Depot simplifies the process, making it accessible to DIY newcomers. With a detailed list of materials and step-by-step directions, you can craft a stunning chandelier that provides both functional lighting and stylish flair for your outdoor space.
DIY Outdoor Mason Jar Chandelier
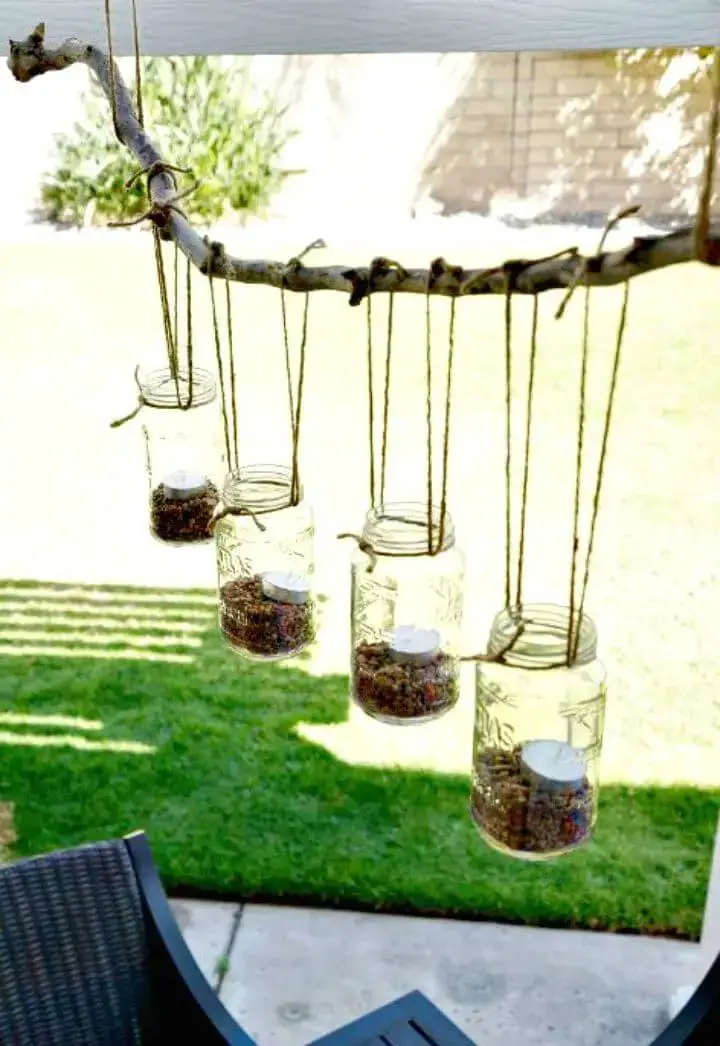
Transform your outdoor space into a charming oasis by creating a unique mason jar chandelier using this step-by-step guide from DIY inspired. Dinah Wulf’s ingenious method of repurposing sticks and old jars results in a delightful piece of garden decor that’s perfect for upcycle enthusiasts looking to add a personal touch to their patios. With readily available materials and straightforward instructions, you can create a rustic, handmade chandelier that brings both beauty and functionality to your outdoor gatherings. This creative and cost-effective DIY project is sure to illuminate your evenings with its warm glow.
Best DIY Mason Jar Chandelier
Transforming a DIY mason jar chandelier into a rustic focal point for your space can be an incredibly fulfilling project. Building on this notion, Instructables provides a comprehensive guide that simplifies the process, making it accessible to even novice DIY enthusiasts. With just a few essential materials – including mason jars, a lighting kit, and basic tools – you can allocate a day to craft this unique piece. By meticulously following step-by-step instructions, you’ll ensure the safe handling of electrical components and bring your creative vision to life. The end result is an extraordinary, handcrafted light fixture that warmly illuminates your home with its cozy, personalized charm. Feel free to keep the design understated or add a dash of flair; either way, your one-of-a-kind creation will undoubtedly spark meaningful conversations.
How to Build a Mason Jar Light Chandelier
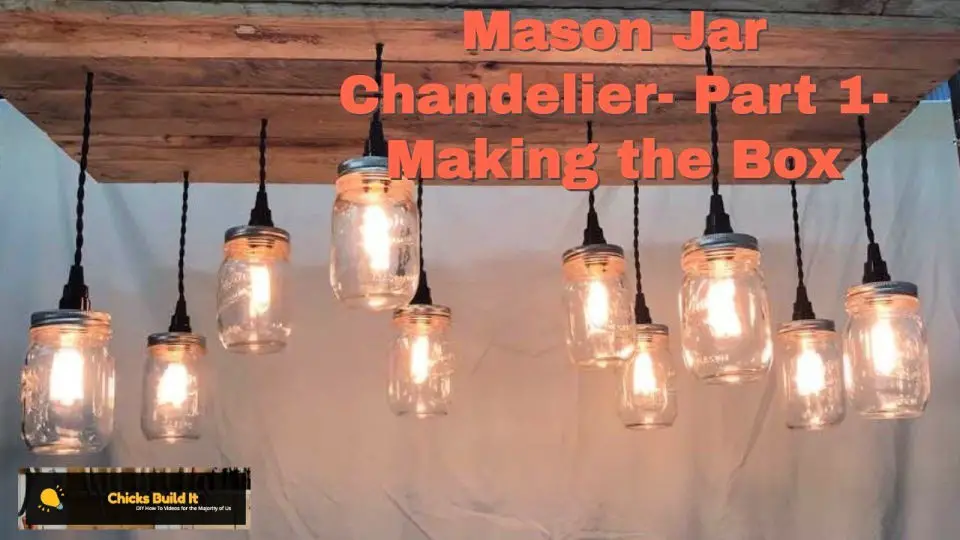
Embark on a creative journey by crafting a captivating mason jar light chandelier, guided by a comprehensive YouTube tutorial. This DIY endeavor is perfect for those seeking a rustic touch to elevate their decor. The video series will take you through the process of assembling the ceiling-mounted frame, with step-by-step instructions and practical tips to ensure a seamless execution. As you progress, you’ll gain confidence in your ability to create a one-of-a-kind lighting fixture that reflects your personal style. Tune in to YouTube’s ‘Build a Mason Jar Light Chandelier – Part 1’ and watch as your living space transforms with this handmade masterpiece.
Conclusion:
In the end, creating a DIY mason jar chandelier is not only a captivating project but also an effective way to introduce personalized lighting into your living space. The diverse array of ideas presented here empowers you to effortlessly convert ordinary mason jars into extraordinary light fixtures. To achieve success, it’s essential to plan thoroughly, collect the necessary materials, and follow each step with meticulous care. As you bask in the warmth of your handmade chandelier, you’ll not only appreciate the radiant glow it casts but also the creativity and dedication that went into crafting it. These 15 simple DIY mason jar chandelier ideas serve as a starting point for infusing your home décor with a unique and inviting ambiance. So, gather your tools and let’s embark on this creative journey together, transforming your space into a cozy oasis with the charm of mason jars!
