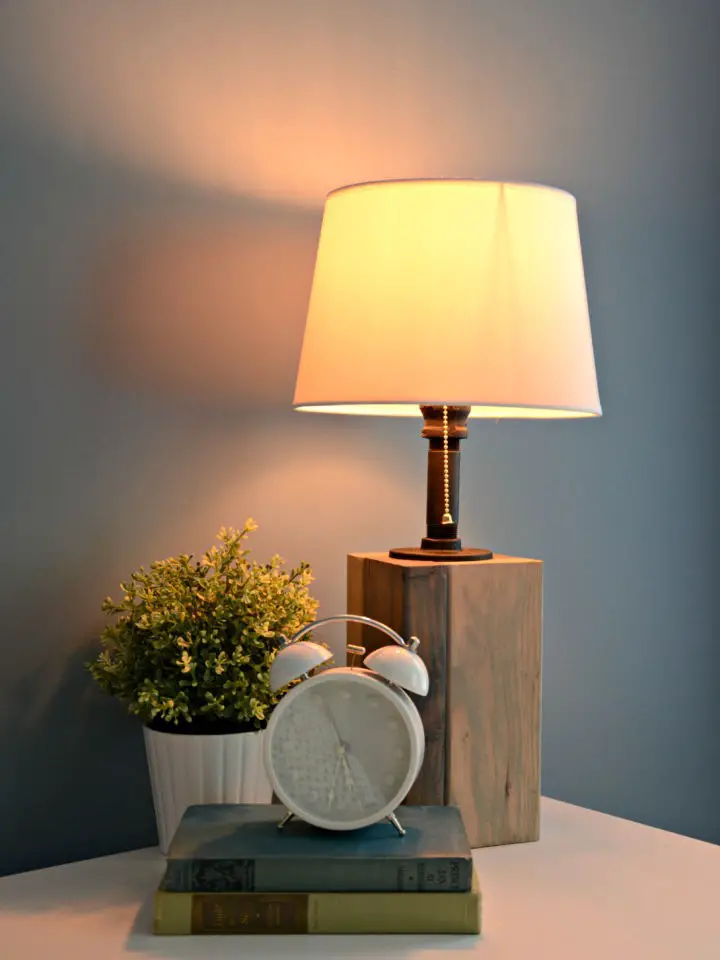
Why Make Your Own Lamp?
When it comes to DIY lamps, many people are deterred by the idea that they might not turn out as expected. However, making a lamp from scratch or upcycling materials can be incredibly rewarding. Here’s why you should consider taking on this project:
First and foremost, personalization is key. By crafting your own lamp, you have complete control over the design, ensuring it fits seamlessly into your home decor. Whether you prefer a sleek and modern aesthetic or a rustic, vintage vibe, the possibilities are endless.
Beyond just looking great, a DIY lamp can also be a conversation starter. The uniqueness of a handmade piece can’t be replicated by mass-produced products, making it a true showstopper in any room.
Not only is creating your own lamp environmentally friendly – think upcycling old materials and reducing waste – but it’s also a great way to develop new skills. From simple wiring and drilling to more complex techniques like epoxy resin work, each project presents an opportunity to learn and grow as a crafter.
And let’s not forget the sense of satisfaction that comes from completing a project with your own two hands. Turning on a lamp you’ve made yourself can bring a feeling of pride and accomplishment that simply can’t be replicated by purchasing one off the shelf.
Finally, consider the gift-giving possibilities. A homemade lamp makes for a thoughtful and personalized present, showing effort, creativity, and care – qualities that are sure to impress even the most discerning recipient.
How to Make a Lamp – Step by Step
Transforming ordinary objects into extraordinary lamps through upcycling can be an incredibly fulfilling DIY endeavor. By breaking down the process into manageable steps, this guide aims to empower anyone to turn discarded items into stunning lighting fixtures that bring unique charm and character to any space.
Step 1: Collect Materials
When starting a lamp-building project, the first step is to collect the required components. While buying a new kit from a hardware store can be an option, it may not fit within your budget. A cost-effective alternative is to scour thrift stores for second-hand lamps that you can disassemble and repurpose their parts. To ensure a successful endeavor, select a lamp that has all the necessary components in good working condition.
Step 2: Choose Your “Junk”
What makes this project so alluring is the boundless scope for creativity, as one can transform an astonishingly wide range of objects into functional lamps. Imagine turning everyday items like vintage globes, ceramic mugs, or even drumsticks into unique lighting fixtures that reflect your personality and complement their surroundings.
Step 3: Prepare Your Object
When installing your lamp, you may need to adjust the base to accommodate the electrical components. This might involve creating a passage for the wires or thoroughly cleaning the surface to ensure a secure connection. Additionally, when selecting lamps with glass components like globes, it’s crucial to choose bulbs that don’t generate excessive heat to prevent potential fire hazards.
Step 4: Assemble Lamp Parts
Start by bringing together the components you’ve collected or repurposed for your lamp’s assembly process. Typically, this involves threading the wire through the chosen base and securing the socket in place. For more intricate designs, be prepared to think outside the box and employ creative problem-solving techniques, such as utilizing epoxy or soldering to effectively bond parts together.
Step 5: Wiring Your Lamp
When tackling electrical projects like wiring a lamp, safety should always be your top priority. When utilizing components from an older lamp, it’s crucial to inspect the wire for any signs of fraying or damage. Connect the wire to the lamp socket, and if required, incorporate a switch for seamless operation. If you’re unsure about this step or feel uncertain about proceeding, consulting with a professional electrician or seeking their assistance can be a wise decision.
Step 6: Testing and Troubleshooting
Before declaring your lamp assembly a success, it’s essential to put it through its paces. Start by inserting an energy-efficient LED bulb, which will not only provide a warm glow but also minimize heat generation and energy consumption. Once the bulb is in place, plug in the lamp and give it a thorough examination to ensure everything is functioning as expected. If you encounter any issues – be they electrical or otherwise – take care of them promptly before considering your project complete.
Step 7: Enjoy Your New Lamp
With your DIY project now complete, you can bask in the glow of satisfaction, having transformed what was once considered waste into a one-of-a-kind lamp that’s not only functional but also eco-friendly. By embracing sustainable crafting and upcycling principles, you’ve not only created something beautiful, but also contributed to a more environmentally responsible approach to consumption.
Video Tutorial
The perfect accompaniment to this written guide is a step-by-step video tutorial on making lamps from upcycled materials, courtesy of Tim Sway’s ‘How to Make Lamps from “Junk”’. The visual instructions offered in this video provide a clear and accessible complement to the techniques outlined in this guide, empowering you to turn your creative ideas into reality. As you watch and follow along, you’ll discover that with just a little imagination and elbow grease, the possibilities for upcycling are truly boundless.
Choosing Your Light Source
When it comes to selecting the perfect lighting for your space, there are several factors to consider. Understanding the characteristics of various bulb types, color temperatures, and brightness levels is key to making an informed decision. This comprehensive guide will walk you through the process, providing you with the knowledge to confidently illuminate your surroundings.
Types of Bulbs
Incandescent bulbs are a traditional choice that provides a warm and inviting glow. Their familiar appearance makes them a popular option for many households. However, they have some drawbacks – they consume more energy than other options and have a relatively short lifespan.LEDs, or light-emitting diodes, offer a significant improvement over incandescent bulbs. They are highly energy-efficient and can last up to 50 times longer. Additionally, LEDs come in a range of colors and brightness levels, making them suitable for various settings. While the initial cost is higher than traditional bulbs, the long-term energy savings make them a more cost-effective option.CFLs, or compact fluorescent lamps, are another alternative to incandescent bulbs. They use less energy than traditional bulbs and have a longer lifespan. However, they do contain mercury, which requires careful disposal at the end of their life cycle. CFLs also tend to emit a cooler light that may not be preferred in all settings.
Color Temperature
The warmth of a light bulb can greatly influence the ambiance of a space. This is measured in Kelvin (K), a unit that reflects the tone and intensity of the emitted glow. The three primary categories of color temperature are Warm White, Cool White, and Daylight.
Brightness (Lumens)
Measuring lumens allows you to select the ideal level of brightness for your specific requirements. This understanding is crucial in creating a space that’s both functional and visually appealing.
To achieve this, it’s essential to consider different lighting scenarios:
Ambient and accent lighting typically require 100-500 lumens, making it perfect for setting a mood or highlighting specific areas.
Task-oriented lighting, such as reading or cooking, demands brighter lights with 500-1000 lumens. This level of illumination ensures clarity and comfort.
Lastly, overall room lighting requires an even higher output, typically exceeding 1000 lumens. This is ideal for spacious areas like living rooms where you spend a significant amount of time.
When selecting the right light source, don’t overlook the type of bulb, color temperature, and brightness. These factors collectively contribute to creating the perfect ambiance that meets your unique needs.
Advanced Techniques for DIY Lamp Projects
Elevating one’s lamp-making skills can lead to a truly personalized DIY experience. To take your creations to the next level, consider incorporating advanced techniques such as wiring multiple sockets, installing dimmer switches, or integrating smart bulbs. These innovative approaches can add functionality and sophistication to your lamps, making them truly unique and reflective of your personal style.
Wiring Multiple Sockets
When it comes to wiring multiple sockets safely, safety should always be the top priority. To start, ensure the power is turned off to prevent any electrical hazards from occurring. With that taken care of, gather your necessary materials, including the sockets, electrical wire, wire nuts, and electrical tape. Next, prepare the wire by cutting a piece long enough to connect the sockets and stripping about an inch of insulation from each end. Once you have your wire prepared, it’s time to make the connections. Twist the exposed wire around the terminal screws on each socket and tighten the screws. Make sure to follow the correct polarity, connecting the ‘live’ terminal of one socket to the ‘live’ terminal of the next, and doing the same with the ‘neutral’ terminals. To secure these connections, use wire nuts and wrap them with electrical tape for added safety. Finally, once all connections are made, restore power and test the lamp to ensure that all bulbs light up as expected.
Dimmer Switches
To effortlessly control the light level in your lamp, consider installing a dimmer switch. The process is relatively straightforward, but requires some attention to detail. Here’s how to add one: First, select a dimmer that’s compatible with the type of bulbs you’re using – it’s crucial for optimal performance. Once you’ve got the right one, make sure to turn off the power supply before proceeding. This ensures your safety throughout the process.
Next, remove the old switch by unscrewing it and carefully disconnecting the wires. Be mindful of any potential tangles or knots that could cause issues later on.
With the old switch out of the way, it’s time to connect the dimmer. Typically, you’ll find a ‘live’ wire and a ‘neutral’ wire to attach. Make sure these connections are secure before moving forward.
Finally, screw the dimmer into place, restore power to the lamp, and test the functionality of your new dimmer switch. With any luck, it should be working smoothly from this point on.
Smart Bulb Integration
Crafting a DIY lamp with integrated smart bulbs elevates convenience and modernity: When incorporating smart bulbs into your DIY lamp, it’s crucial to consider compatibility. Start by selecting bulbs that fit seamlessly into the sockets and are compatible with your home’s Wi-Fi or smart home system. Once you have the right bulbs, screw them in securely, ensuring a snug fit. Next, follow the manufacturer’s instructions to connect each bulb to your network. This might involve pairing devices via Bluetooth or establishing a seamless connection through your smartphone app.
With your bulbs connected, you can now control your lamp with voice commands or through a dedicated app. Schedule specific lighting settings, adjust brightness levels, and even change color hues if your smart bulbs offer this feature. By mastering these advanced techniques, you’ll not only create a functional lamp but also showcase your creativity and technical prowess. The process is rewarding, and the end result is a unique piece that combines form and function.
Personalizing Your Lamp
Transforming a humble lamp and lampshade into a one-of-a-kind masterpiece that reflects your personality or harmonizes with your home’s aesthetic is an incredibly fulfilling DIY endeavor. To infuse your lighting fixture with a unique flair, consider the following steps:
Decorative Finishes for Lamp Bases
When it comes to enhancing wooden lamp bases, there are several creative ways to add a personal touch without breaking the bank. One approach is to paint or stain the base itself, while another option is to decoupage glass bases with decorative paper or fabric. For those who prefer a more tactile look, adding textures with rope or yarn can also be an effective way to give your lamp a unique personality.
To begin the painting or staining process, start by lightly sanding the wooden base to create a smooth surface. This will help the paint or stain adhere better and result in a more even finish. Once you’ve achieved the desired level of smoothness, apply a coat of paint or stain using a brush that follows the grain of the wood. You may need to apply multiple coats for full coverage.
If you’re looking to add an extra layer of protection to your finished base, consider applying a clear sealant once it’s dry. This will help protect the finish from scratches and fading over time.
For those who prefer a more decoupage approach, start by trimming your decorative paper or fabric to the desired size. Smaller pieces are often easier to work with on curved surfaces, so don’t be afraid to get creative with your cuts. Next, apply a thin layer of adhesive, such as Mod Podge, to the glass base and carefully place your material on top. Smooth out any bubbles that may form and then seal everything in place by applying another layer of adhesive.
Finally, for those who prefer a more textured look, adding rope or yarn can be an effective way to give your lamp base some visual interest. Start by planning your design and deciding where you want to add the texture. Then, using a hot glue gun, attach the end of your rope or yarn to the base and start wrapping it tightly around, applying glue as you go. When you reach the end of your design, cut the rope or yarn and glue the end down securely to finish things off.
Lampshade Embellishments
When it comes to adding trim, stencils, beads, or other embellishments to a fabric project, there are several key materials needed to bring your design to life. These include fabric trim, stencils, beads, or other embellishments of your choice, as well as a reliable adhesive such as fabric glue or a hot glue gun. If you’re planning to use paint with your stencils, be sure to have that on hand as well.To get started, take some time to plan out where each embellishment will go in your design. This is an opportunity to think creatively and combine different elements to create a truly unique look. Once you have a solid plan in place, it’s time to start applying the embellishments themselves.For trim and beads, apply a thin line of glue along the edge or area where you want to add the embellishment, then press firmly until it adheres. If you’re working with stencils, tape the stencil in place and use a small brush to apply paint. Be sure to remove the stencil carefully once the paint is dry.Finally, allow everything to dry thoroughly before handling your finished project. With patience and attention to detail, you can create a truly one-of-a-kind piece that not only provides functional lighting but also showcases your personal style.
How to Get Started Making Your Own DIY Lamps
To embark on a DIY lamp-making adventure, it’s essential to prioritize simplicity, clarity, and visual guidance. Start by breaking down the process into manageable steps, using easy-to-follow language and illustrations to help you stay on track.
Selecting Your Project by Difficulty Level
Transforming everyday objects into unique lamps can be an exciting DIY project. Begin with beginner-friendly projects like transforming a classic mason jar into a charming bedside lamp or recycling an old wine bottle by converting it into an elegant lamp. These simple yet creative projects will get you started on your DIY journey.
As you gain more experience and confidence, move on to intermediate-level projects that challenge your skills while still being manageable. Construct a stylish industrial lamp using metal pipes, or give an old world globe a second life as a unique lamp. These projects require a bit more effort but offer the satisfaction of creating something truly special.
For those looking for an even greater challenge, advanced-level projects like turning tetra paks into a geometrically intriguing lamp or creating a rustic lamp from driftwood will test your creativity and skill. With these ambitious projects, you’ll not only create something beautiful but also prove to yourself that you’re capable of tackling complex DIY tasks.
Step-by-Step Instructions
To create a unique lamp, start by gathering all the essential components: your base object (such as a mason jar, bottle, or pipe), a lamp kit, a suitable light bulb, and any decorative elements you’d like to incorporate. Next, prepare the base according to the specific requirements of your project – this might involve cleaning the surface, drilling a hole for wiring, or assembling parts together. Once the base is ready, carefully assemble the lamp kit by following the instructions provided, typically involving threading the wire through the base and attaching the socket. Select a light bulb that fits the socket and meets your desired brightness and energy efficiency standards. With the technical aspects complete, it’s time to unleash your creativity – add paint, wraps, or adornments to give your lamp its personal touch. Finally, plug in your lamp and turn it on to see your creation come to life. By choosing a project that aligns with your skill level, following step-by-step guidelines, and utilizing high-quality visuals, you can craft beautiful, functional pieces that illuminate any room.
FAQs on DIY Lamp Ideas
Embarking on a DIY lamp-making adventure can be a thrilling experience, offering a sense of accomplishment as you bring your creative vision to life. To guide you through this process, we’ve compiled a list of frequently asked questions that will help alleviate any doubts and ensure a successful outcome for your crafting endeavor.
What materials do I need to make a DIY lamp?
While the materials required can differ greatly depending on the type of lamp you’re crafting, there are some fundamental components that often remain constant. These may include a lamp kit, which typically comprises a socket, cord, plug, and switch, as well as a base for your lamp – this could be anything from a repurposed bottle or block of wood to a ceramic vase. Additionally, you’ll likely need tools like a drill to make holes in your base, if necessary. Other crucial elements include a light bulb, preferably an energy-efficient LED option, and any decorative elements you wish to incorporate, such as paint or fabric.
Can I make a lamp without electrical experience?
While it’s possible to build a simple lamp without extensive electrical expertise, utilizing a pre-assembled kit can simplify the process even further. These kits are engineered for straightforward assembly, necessitating only the connection of the base to the socket and cord. Nevertheless, safety should always be your top priority; if you’re uncertain about any aspect of the process, it’s advisable to consult with a qualified professional.
How do I choose the right base for my lamp?
When it comes to selecting a base for your lamp, several factors come into play. The size of the base is crucial, as it needs to be able to support the weight of the lamp components without compromising stability. Material and aesthetics are also key considerations, as they can greatly impact the overall look and feel of the finished product. For added flair, consider upcycling unconventional materials like glass bottles, wooden scraps, or ceramic pieces – these unexpected elements can bring a unique personality to your space.
How can I ensure my DIY lamp is safe to use?
When it comes to building a DIY lamp, safety should be your top priority. To ensure your project is safe and functional, follow these guidelines: First, only use parts that are in good condition – avoid frayed wires or damaged sockets that can cause electrical shocks. Next, make sure the lamp base is stable and won’t topple over, reducing the risk of accidents. Additionally, select a bulb that matches the specifications outlined in the lamp kit to prevent overheating and potential fires. If you’re ever unsure about any aspect of your DIY project, don’t hesitate to consult with a professional electrician for guidance.
What type of light bulb should I use in my DIY lamp?
When it comes to crafting DIY lamps, LED bulbs stand out as a popular choice. Their energy-efficient nature, reduced heat emission, and extended lifespan make them an attractive option compared to traditional bulbs. However, it’s crucial to ensure the chosen bulb’s wattage aligns with the lamp kit’s specifications to prevent overheating issues.
Can I make a lampshade for my DIY lamp?
Crafting your own lampshade offers a unique opportunity to infuse your lighting fixture with personal touches. By opting for unconventional materials such as fabric, paper, or even delicate botanicals like pressed flowers, you can create a one-of-a-kind design that harmonizes perfectly with the style and proportions of your lamp base. Crucially, however, it’s essential to select materials that can withstand the heat generated by the bulb and are compatible with the overall aesthetic of your lamp.
How do I add a switch to my DIY lamp?
Many DIY lamp kits come with an integrated switch that can be easily added during assembly. However, if your kit doesn’t include a built-in switch, you can opt for an inline cord switch. This type of switch requires cutting the power cord at the desired location and attaching it according to the manufacturer’s instructions. With a few simple steps, you can install an inline cord switch and add functionality to your DIY lamp project.
Where can I find inspiration for my DIY lamp project?
When seeking inspiration for DIY lamp projects, it’s common to find sparks of creativity in a variety of places. These can include online crafting forums and websites, where enthusiasts share their latest endeavors; social media platforms like Pinterest and Instagram, where visual inspiration abounds; as well as upcycling and crafting books that offer step-by-step guides or creative prompts. Additionally, thrifting at local stores or flea markets can be a treasure trove of unique items waiting to be transformed into one-of-a-kind lamps. By considering these sources of inspiration, you’ll be well-equipped to tackle your DIY lamp project with confidence and creativity, knowing that the beauty of DIY lies in its ability to allow for personalization and making something truly yours.
25 Homemade DIY Lamp Ideas (How to Make a Lamp)
Transforming your living space into a warm and inviting haven has never been easier, thanks to the simplicity and creativity of DIY lamp projects. With the help of our comprehensive guide, you’ll be able to breathe new life into your home with 25 unique and easy-to-make homemade lamps that require minimal effort but deliver maximum impact.
Affordable DIY Terrarium Lamp
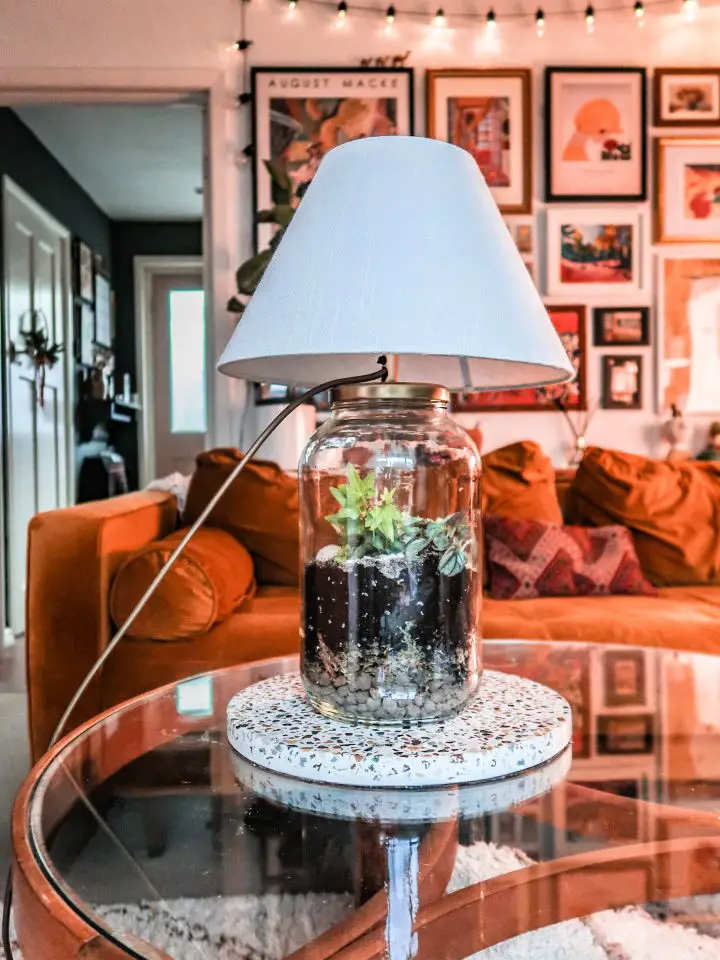
Combining the allure of nature with the functionality of home lighting, creating a DIY terrarium lamp is a captivating project that’s accessible to crafters of all levels. By following Hayley Stuart’s step-by-step tutorial, you can construct a unique piece that not only provides soft illumination but also brings a touch of greenery indoors. With careful selection of glass jar, DIY lamp kit, and terrarium contents, you’ll be able to create a personalized lamp that rivals store-bought alternatives in terms of cost, while the added satisfaction of crafting it yourself is an unbeatable bonus.
Make a Desk Lamp With Color-Changing LED Light
Combine woodworking skills with modern technology by creating a DIY desk lamp with a color-changing LED light. This unique project guides you through the process of crafting a functional and stylish lamp that can be controlled using a smartphone app. With step-by-step instructions from Brad Rodriguez of FixThisBuildThat, you’ll learn how to cut walnut boards and wire a smart LED bulb. The end result is a personalized lighting solution that adds a touch of elegance to your workspace and décor.
How to Make a Smart Lamp at Home
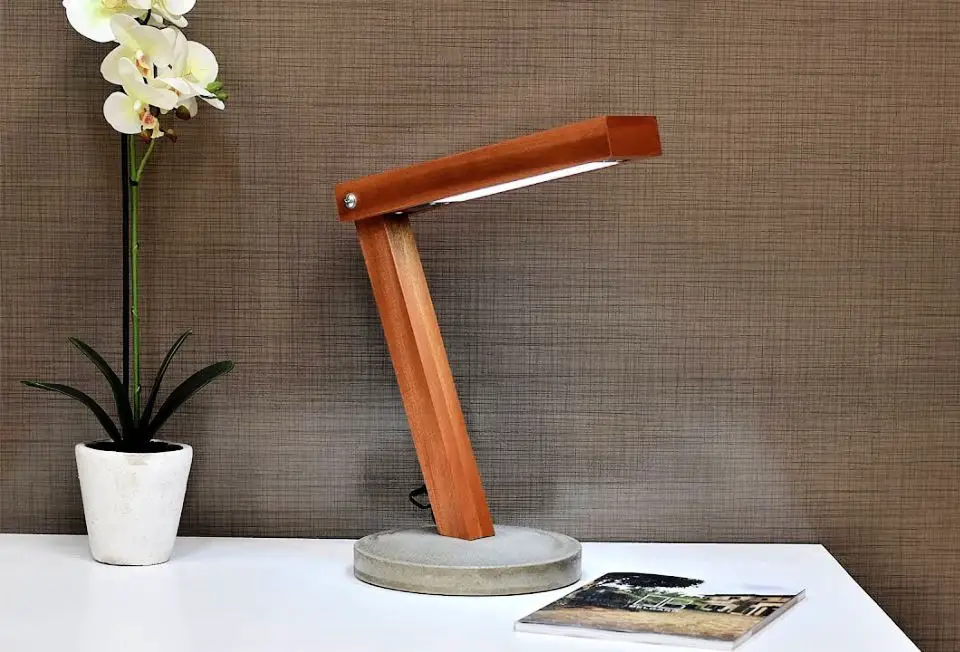
Transforming your living space with a dash of personal style is just a DIY smart lamp project away. EL Passion’s comprehensive guide takes you on a journey to create a one-of-a-kind smart lamp, skillfully merging concrete, wood, and technology in perfect harmony. With a focus on actionable steps and crystal-clear instructions, this tutorial equips you with the confidence to craft a fully functional piece of smart decor that reflects your unique personality. Whether you’re looking to elevate your home’s ambiance or embark on a rewarding DIY adventure, EL Passion’s walkthrough has got you covered.
Cool DIY Aged Pottery Lamp Makeover
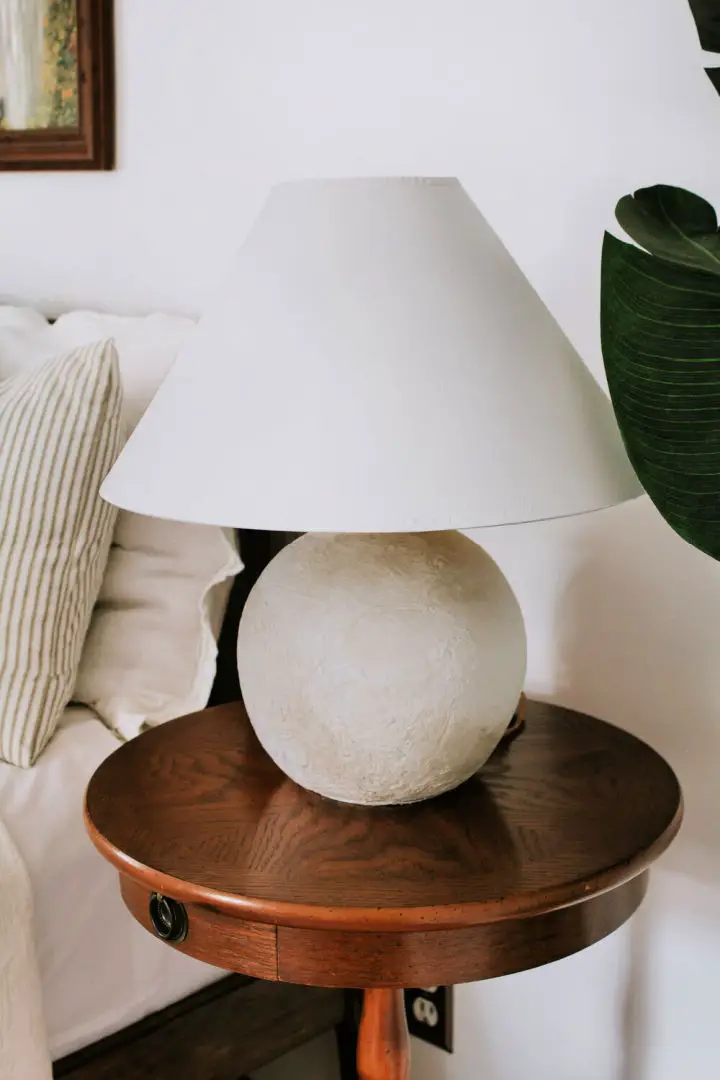
Brighten up your space with these DIY lamp ideas, perfect for crafting enthusiasts and those looking to add a personal touch to their home decor. To get started, explore Nadine Stay’s guide on transforming a thrifted lamp into an aged pottery masterpiece. This step-by-step tutorial takes you through the process of revamping an old lamp, from priming to adding texture with Plaster of Paris. Learn how to achieve a weathered look using simple paint techniques and a dash of dirt for authentic patina. With practical tips on painting the lamp shade for a cohesive finish, you’ll have all the skills needed to give any lamp a designer-worthy makeover.
Homemade Epoxy Resin Table Lamp
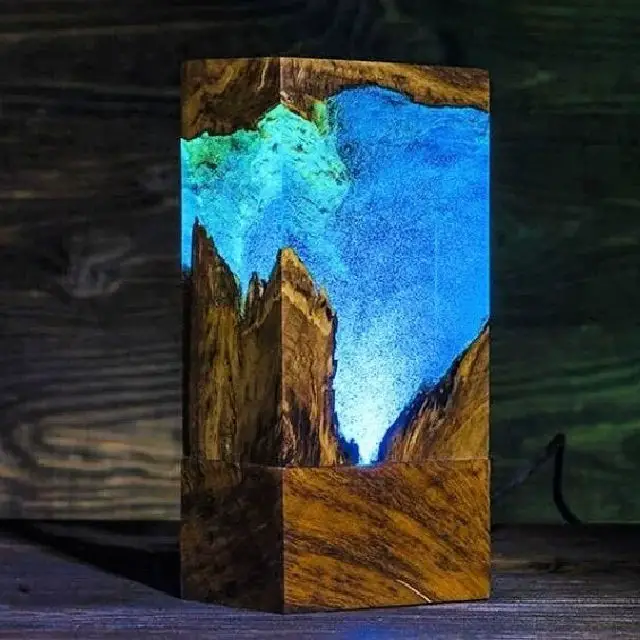
Transforming any space into a personalized haven is as easy as creating an epoxy resin lamp. Our comprehensive guide at Your Epoxy Resin and Finishing Guide empowers crafters to embark on this creative journey, from selecting the ideal materials to expertly polishing and waxing the final product. With our step-by-step instructions, helpful tips, and expert advice, beginners and seasoned crafters alike can confidently take on this project. The outcome? A lamp that not only illuminates but also serves as a captivating piece of art, adding a unique touch to any room.
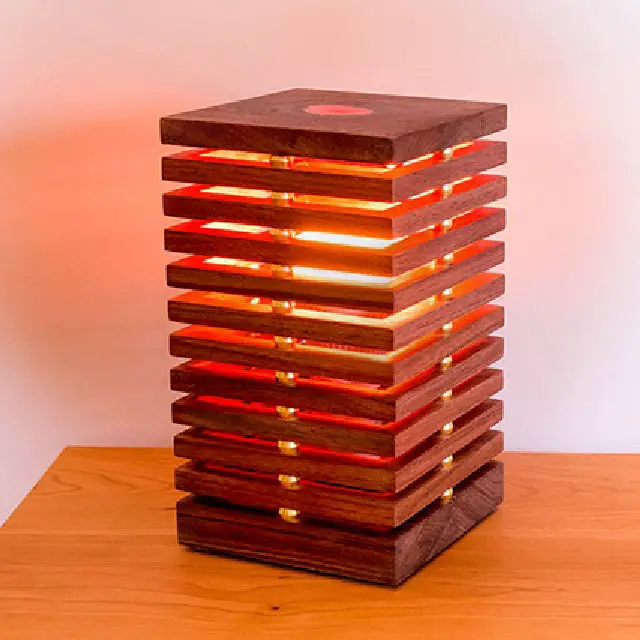
How to Build a Wood Block Lamp
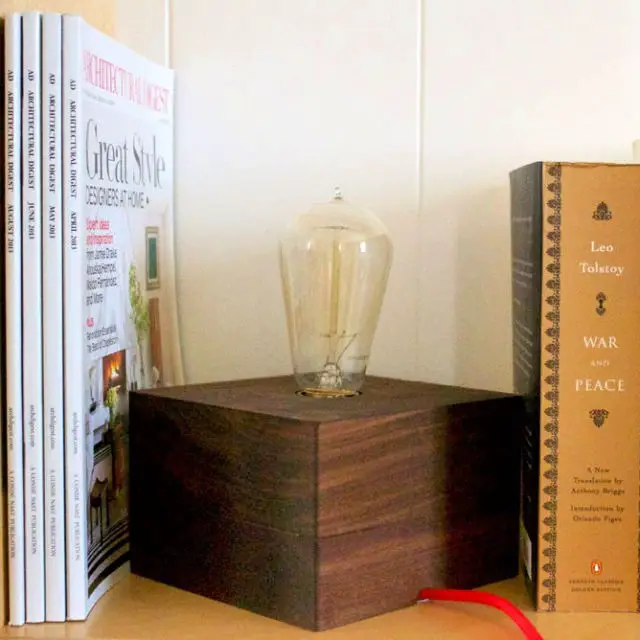
Elevate your living space’s ambiance by creating a one-of-a-kind Wood Block Lamp that exudes mid-century modern charm. By following the comprehensive guide from Instructables, you’ll embark on a DIY journey to craft a sleek and minimalist lamp using a walnut block and a straightforward lamp kit. This project is perfect for adding an air of sophistication and simplicity to your home’s decor. Throughout the process, you’ll learn how to select the right materials, meticulously measure and cut the wood, drill precise holes for the kit, and bring everything together with sanding and oiling for a polished finish. The final touches involve securing the lamp kit and bulb, ensuring your creation is both functional and visually striking. With crystal-clear instructions guiding you every step of the way, this tutorial is an excellent choice for crafty individuals seeking a practical yet engaging DIY experience.
Modern DIY Brass and Wood Table Lamp
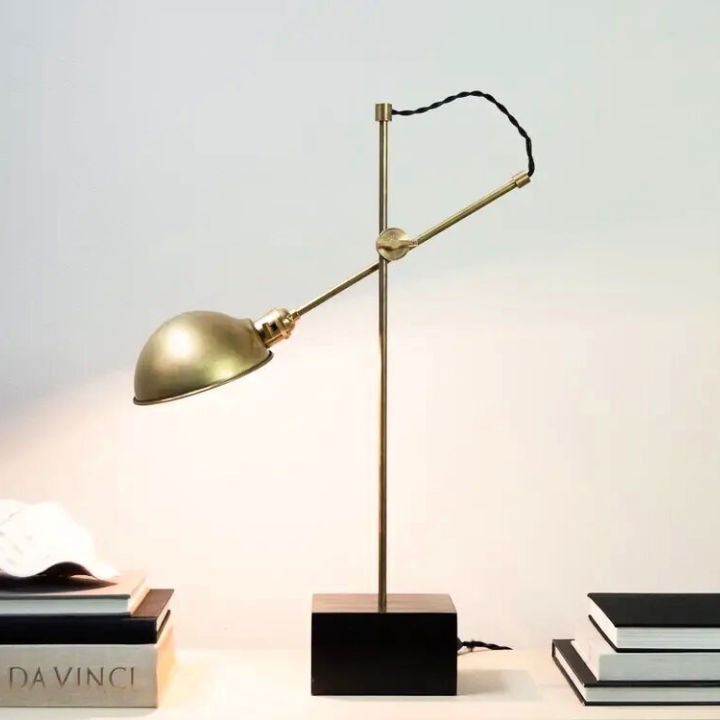
Transform any room in your home into a reflection of your personality by creating one-of-a-kind lamps. Follow the straightforward guide from The Savvy Heart to craft a stylish brass and wood table lamp that effortlessly combines modernity and simplicity. With basic tools like a drill and wire strippers, as well as materials such as a block of wood, brass pipes, and a lamp socket, you’ll be well on your way to creating a bespoke piece that perfectly complements your home decor. Take it to the next level by experimenting with different finishes and stains to make the lamp truly yours. The clear instructions and helpful guidance make this DIY project perfect for those who love getting their hands dirty and taking pride in their creations. Start building your own elegant table lamp today and watch as your space is filled with a personal touch that shines bright.
Making Junky Sawhorse Pipe Lamps With Chalkboard Shades
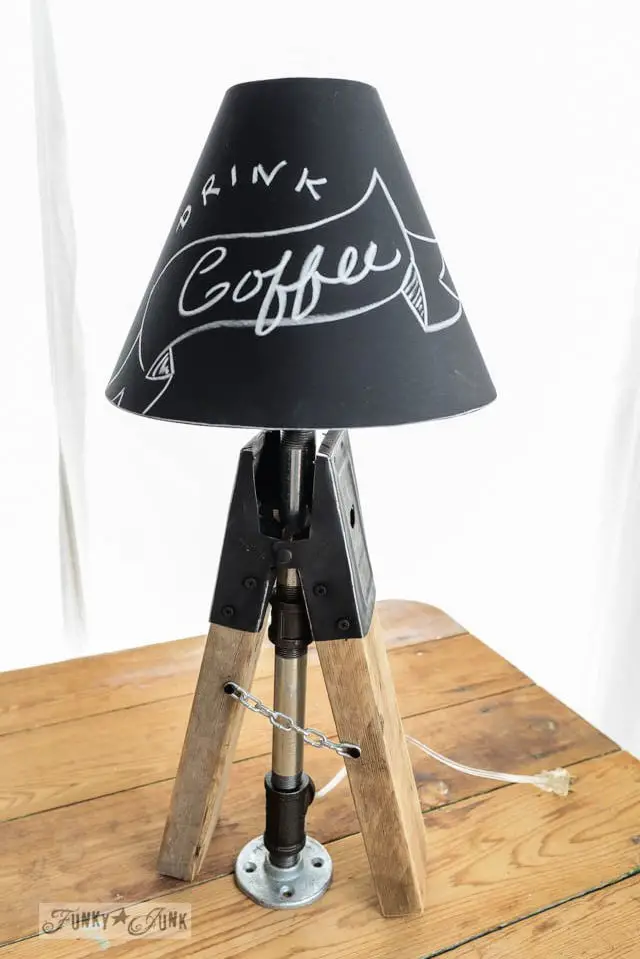
Donna’s innovative project on Funky Junk Interiors showcases the transformation of rough sawhorse brackets into distinctive pipe lamps with chalkboard shades, providing a unique DIY experience for readers. This step-by-step guide focuses on reclaimed materials and industrial charm, making it accessible to those new to DIY projects. By following the tutorial, individuals can learn how to safely wire their lamp and personalize their shades, resulting in one-of-a-kind pieces that add character and warmth to any space.
Reclaimed Wood Lamp With Geometric Himmeli Shade
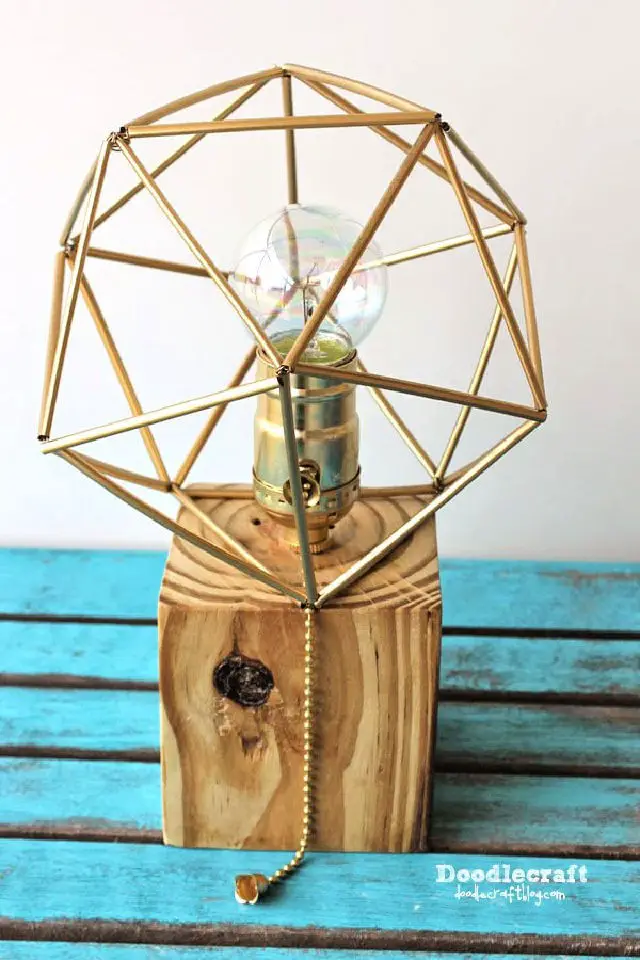
Create a stunning and functional piece of home decor by transforming an old pallet block into a chic, rustic lamp with a geometric Himmeli Shade. This DIY project from Doodlecraft requires minimal materials and skills, making it accessible to crafters of all levels. By following a straightforward tutorial, you can drill, wire, and assemble the lamp using simple supplies like coffee stirrer straws and a lighting kit. Add your personal touch by finishing the wood to your desired style and spray painting the Himmeli shade for a metallic finish. This lamp is perfect for adding warm, ambient light to any room, serving as a testament to the beauty of sustainable crafting.
Awesome DIY Wall Lamp Under $40
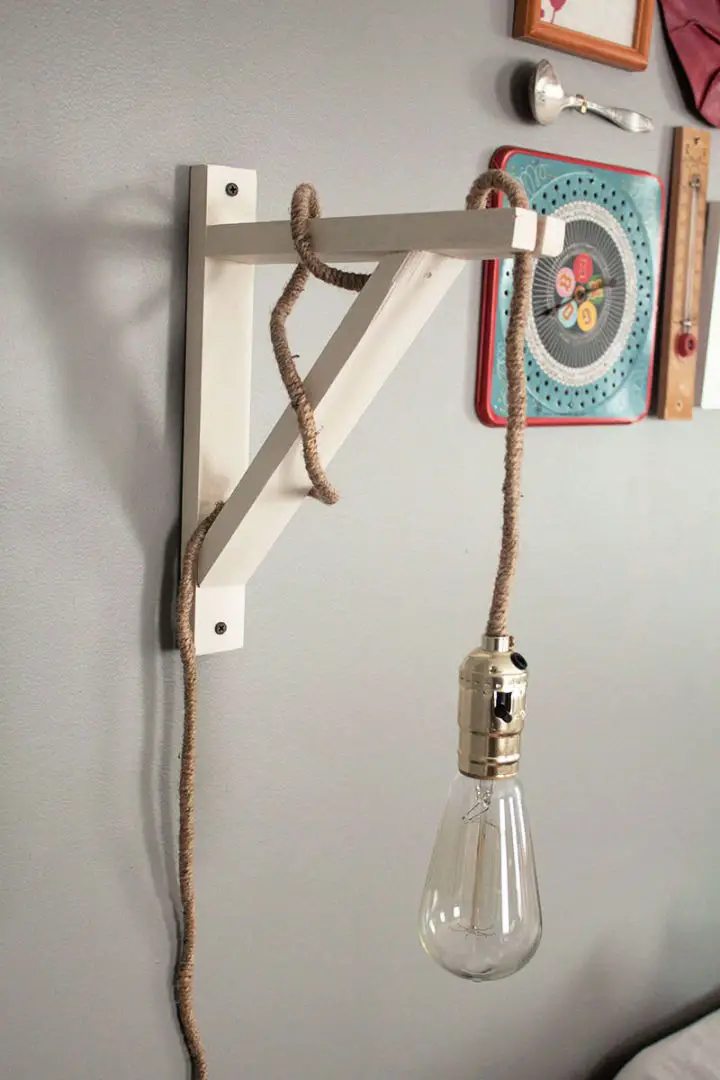
Create a stylish wall lamp at home without breaking the bank by following this easy DIY guide. For under $40, transform your bedroom into a cozy retreat with a vintage-inspired industrial lamp that’s as unique as it is affordable. With step-by-step instructions and expert tips, even the most novice DIY enthusiast can successfully complete this project. Simply gather a few basic tools, a lamp kit, and some craft jute to bring your design to life. As you work through the tutorial, you’ll be guided by clear photographs and expert advice, ensuring a smooth and enjoyable process. By the end, you’ll not only have a one-of-a-kind lamp that brightens up your space but also feel proud of your newfound DIY skills.
Building an Industrial Floor Lamp With a Surveyor Tripod
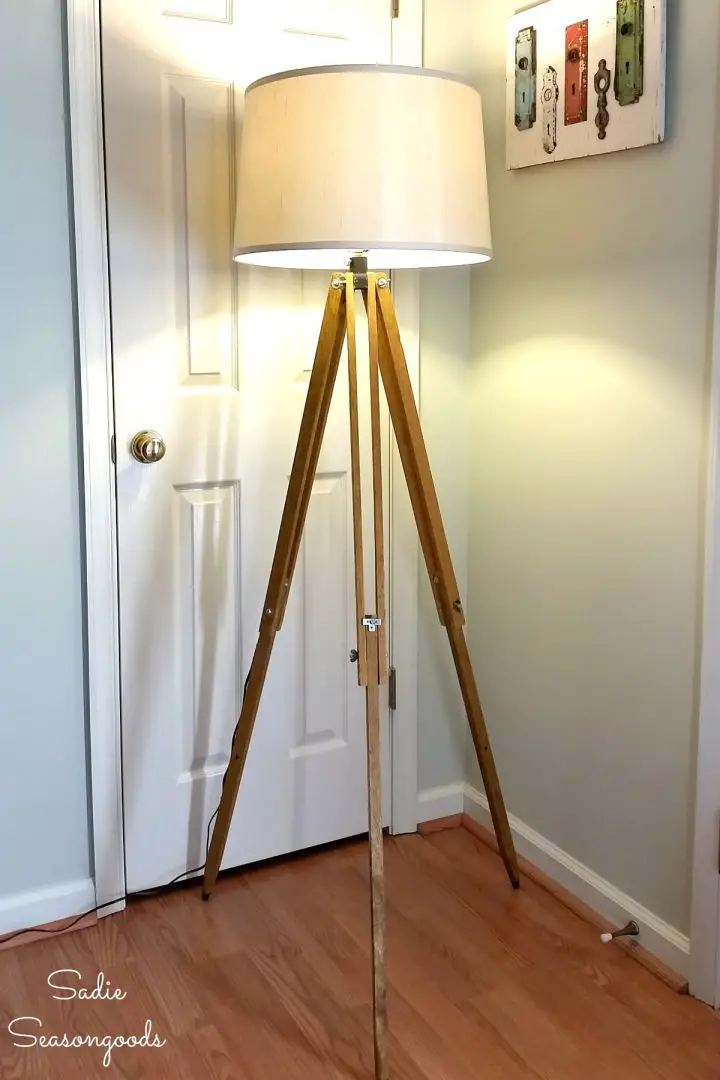
Transform a vintage surveyor’s tripod into an industrial chic floor lamp by following the creative and budget-friendly steps outlined by Sadie Seasongoods. This DIY project encourages upcycling, breathing new life into a timeless piece while saving you from costly store-bought alternatives. By equipping yourself with a lamp kit, wooden dowel, and your own ingenuity, you’ll craft a one-of-a-kind floor lamp that seamlessly combines nostalgia with modern design. To complete the look, choose a drum shade that harmonizes with your new lamp’s industrial flair. With this project, you’ll not only brighten up your space but also savor the satisfaction of turning something old into something truly unique.
How to Make an IKEA Driftwood Lamp
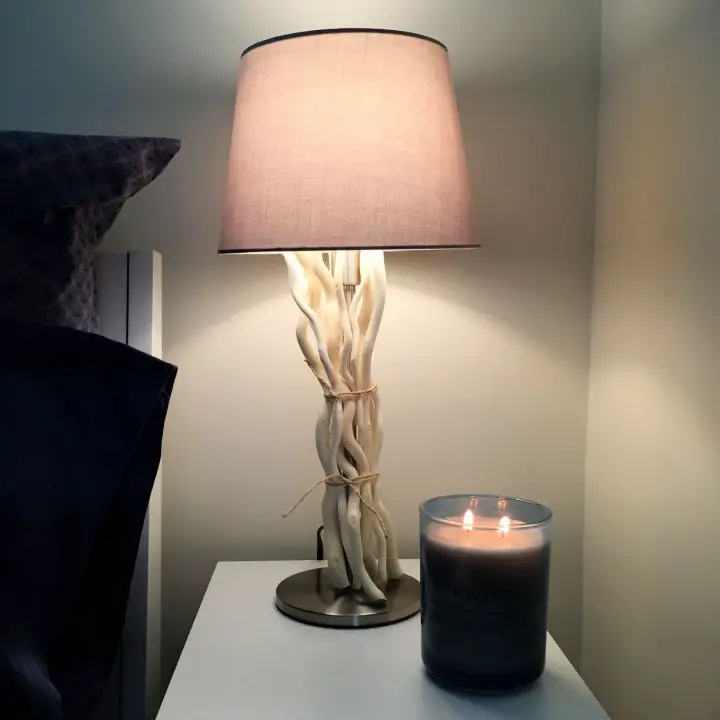
Elevate your decor with unconventional yet captivating lamp design ideas that seamlessly blend form and function. One such innovative creation is the DIY Driftwood Lamp, courtesy of Stephanie Mae Foster’s ingenious Ikea hack. This hands-on project has the power to revitalize any room, offering a timeless and gender-neutral aesthetic without denting your wallet. With a comprehensive guide, you can craft these unique lamps for just $28 each. To get started, gather essential supplies including a pencil, gardening shears, a jab or hacksaw, and a healthy dose of creativity. Follow the step-by-step instructions to carefully cut, assemble, and secure the willow branches around a lamp base. The end result is a stunning, bespoke lighting piece that effortlessly enhances your space with natural elegance. For further guidance and inspiration, visit Stephanie Mae Foster’s site and embark on this fulfilling DIY adventure.
Beginner-Friendly DIY Mushroom Lamp

Want to get in on the mushroom lamp trend without sacrificing your hard-earned cash? Look no further! With just a few thrifted glass items, some Rust-Oleum spray paint, and repurposed lighting hardware, you can create a one-of-a-kind piece of home decor that’s sure to turn heads. And the best part? This DIY project is surprisingly easy to follow, thanks to our step-by-step guide. We’ll walk you through the process, emphasizing safety above all else – we recommend using an LED bulb to prevent heat damage and ensure your new lamp lasts for years to come. With this customizable project, you can add a dash of whimsy and a pop of color to any room in your home, all while keeping things budget-friendly.
Homemade Pressed Flower Lampshade Ideas
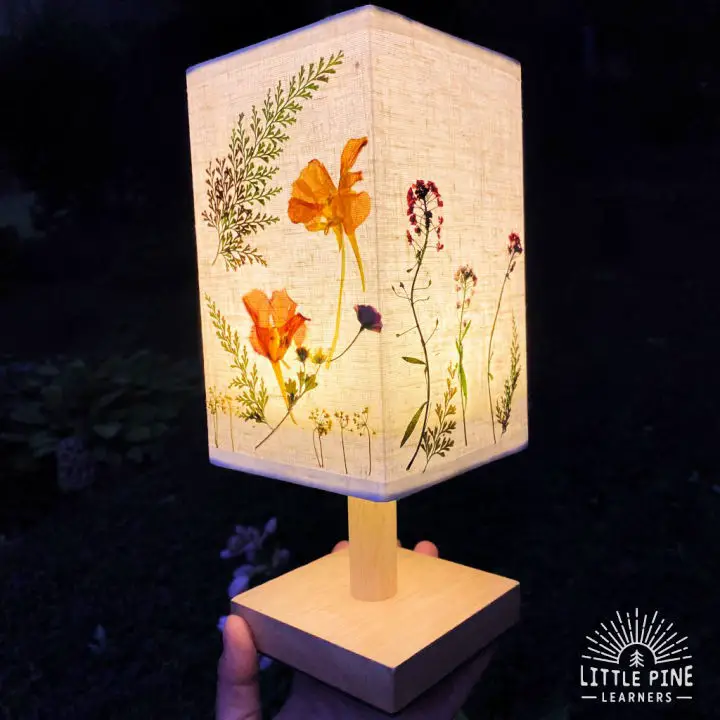
Transform any room into a haven of natural elegance by crafting your own unique pressed flower lampshade. This DIY endeavor is made easy and enjoyable through Little Pine Learners’ step-by-step guide, where a plain lampshade is transformed into a stunning piece of decor with the delicate charm of pressed flowers. To get started, gather just a few essential supplies: a suitable lamp, matte Mod Podge, and an assortment of your chosen flora – either press them yourself or take advantage of online convenience. The process involves carefully arranging your selection of flowers on the lampshade, securing them with Mod Podge, and allowing it to dry for a beautiful finish. As you bring this personalized, nature-inspired project to life, you’ll be thrilled to discover that it’s perfect for crafters of all skill levels, resulting in a one-of-a-kind decor piece that will elevate your space and inspire your creativity.
Making a Wooden Lantern Lamp
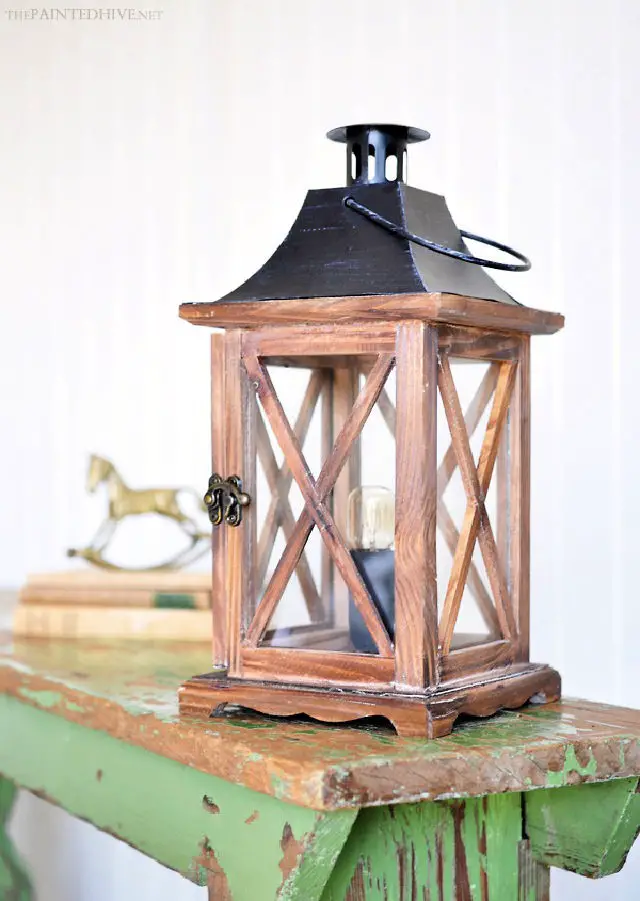
Transform your beach house guest room into a cozy retreat by crafting a one-of-a-kind DIY lantern lamp. This easy project from The Painted Hive combines a rustic lantern with a pre-wired lamp cord, streamlining the process and eliminating complex wiring issues. The result is a budget-friendly, bespoke bedside lamp that radiates a charming, nautical-inspired glow. To create this unique lighting piece, simply follow these straightforward steps: drill a hole for the socket in the lantern’s base, add a touch of polish with some paint on the socket sleeve, and assemble by inserting the bulb. With less than fifteen minutes invested, you’ll be able to elevate your space with a singularly enchanting lamp that exudes warmth and character.
Cute DIY Painted Bottle Table Lamp
Transform any desk or table with these creative DIY table lamp ideas. Take an old bottle and breathe new life into it by turning it into a charming painted bottle lamp. This eco-friendly project from One Dog Woof is perfect for Earth Day or whenever you feel crafty. The process not only adds a personalized touch but also maintains the original luster of the glass, thanks to a unique interior paint technique. With step-by-step instructions guiding you through cleaning, drilling, painting, and assembling your new lamp using simple materials, you’ll be able to achieve a professional-looking finish with helpful tips and tricks along the way. The end result is a one-of-a-kind lamp that adds a splash of color and creativity to your home decor.
Make Your Own Lamp Out of Vase
While turning a vase into a custom lamp may seem like a daunting task, Handmade Weekly’s step-by-step guide simplifies the process, making it accessible to anyone looking to add a personal touch to their decor without breaking the bank. The tutorial relies on a lamp kit and basic tools to demonstrate how to create a one-of-a-kind lighting fixture that reflects your unique style. With clear and engaging instructions, you’ll be empowered to take on this DIY project with confidence, resulting in a custom lamp that’s as distinctive as you are.
Unique Pottery Barn Knockoff Rope Knot Lamp
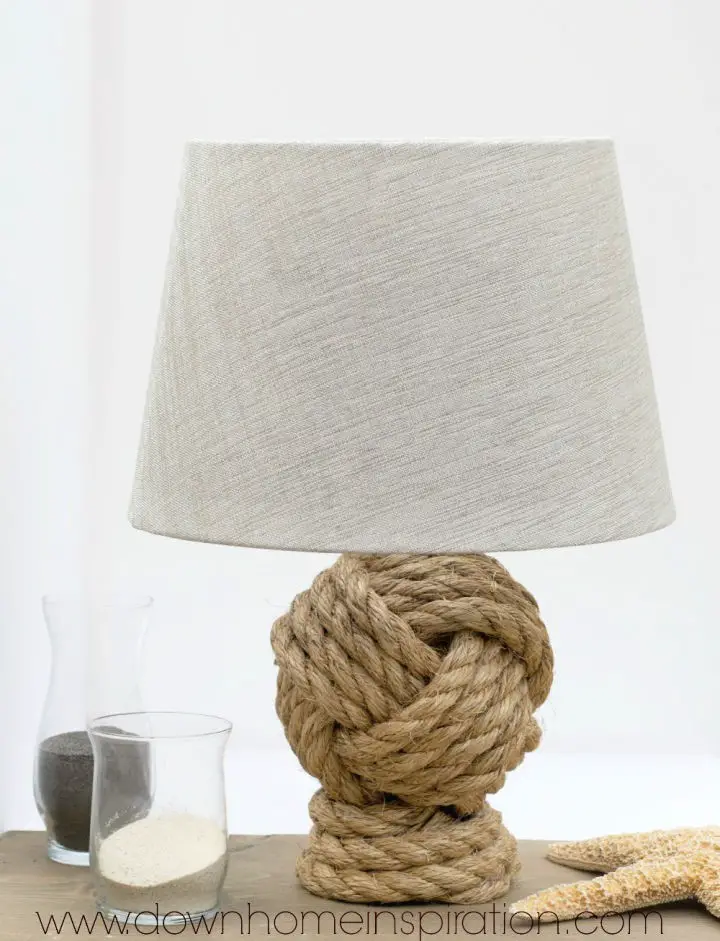
Transform your space with a one-of-a-kind statement piece using these creative DIY lamp base ideas. Revamp old lamps or create a fresh look for new ones by crafting a rope knot masterpiece, just like the experts at Pottery Barn. With a comprehensive guide and an affordable budget of $25, you can recreate a designer-inspired lamp worth $245. The tutorial takes you through each step, from mastering the monkey fist knot to assembling the lamp components, making it accessible for DIY newbies as well. Experience the thrill of creating a stunning home accessory while enjoying substantial savings. Let your imagination shine and add a personal touch to your decor today.
Budget-Friendly DIY Bedside Lamp
Immerse yourself in a creative DIY project by crafting a custom lamp with the guidance of Decor and the Dog. Their comprehensive tutorial provides a straightforward step-by-step process for constructing a unique industrial chic lamp from scratch. This hands-on activity offers a fun and engaging way to enhance your home’s ambiance, allowing you to add a personal touch to your interiors. With their helpful approach, you’ll be able to create a functional piece of decor that reflects your personality and adds a special charm to your living space.
Build Your Own Minimal Wood Lamp
Create a stylish minimalist wood lamp by following Turn It Home’s DIY guide. This unique project is ideal for adding a personal touch to your home decor. To get started, you’ll need a large wooden dowel, various drill bits, a porcelain socket, cloth-covered wire, a rubber plug end, and basic wiring tools. The process involves drilling precise holes in the dowel to accommodate the socket and wire. With a step-by-step explanation of the wiring process, you’ll feel confident in your ability to complete the project. Additionally, tips on selecting suitable wood and adding a thumb switch provide flexibility and customization options. By embracing this new DIY experience, you’ll create a one-of-a-kind lamp that’s sure to spark conversations.
How Do You Make a Pallet Wood Lamp
Transform your space with unconventional lighting solutions by illuminating creatively. Take an unorthodox approach by repurposing materials with the Scavenger Chic guide, which walks you through upcycling a pallet wood centerpiece into a stylish, handmade lamp. This innovative DIY project not only saves waste from landfills but also yields a one-of-a-kind lighting fixture that adds rustic charm to any room. Once you’ve mastered the art of pallet wood manipulation, reinforce, drill, and wire your creation with ease using this practical tutorial. The step-by-step process ensures a seamless crafting experience, resulting in a functional piece of home decor that showcases your creativity.
DIY Tapered X Base Lamp for Table
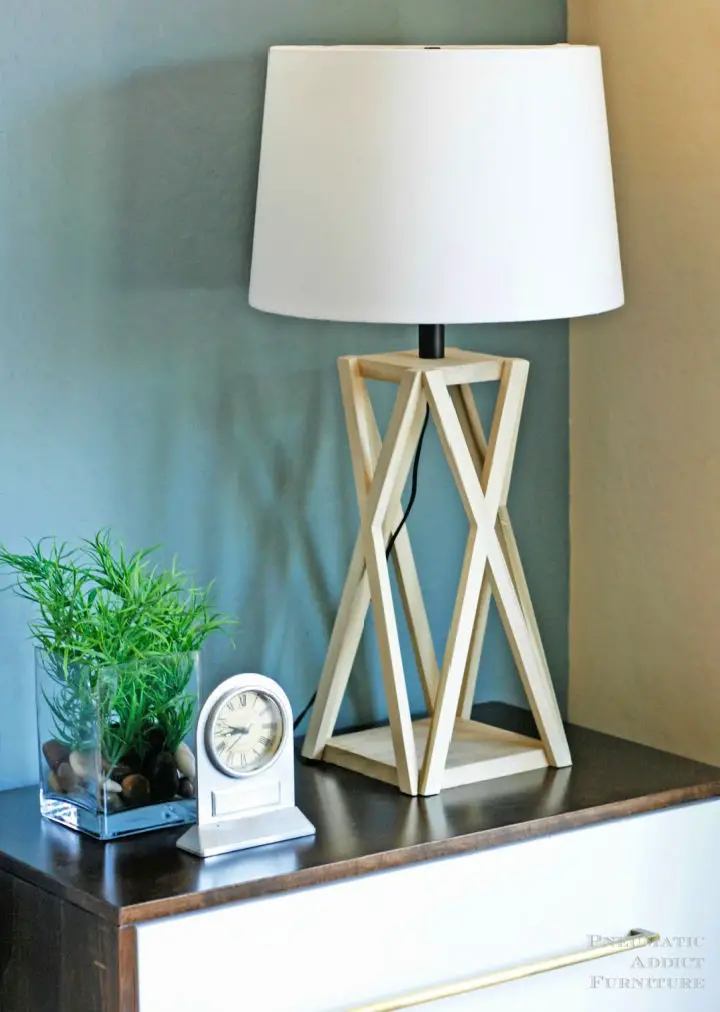
Transforming your space with a DIY tapered-x lamp is an exciting project that brings architectural flair. The Pneumatic Addict’s comprehensive guide makes it accessible for beginners and experienced DIY enthusiasts alike, by breaking down the process into manageable steps. From sourcing the right materials to making precise cuts and assembling the kit, this tutorial takes you through each stage with precision. Furthermore, the guide supplies a list of essential tools and materials, while offering valuable tips on cutting wood, strengthening joints, and achieving a flawless finish. With dedication and attention to detail, you can craft a one-of-a-kind lamp that celebrates the natural beauty of wood grain and harmonizes with your home’s aesthetic.
Homemade Industrial Style Table Lamp
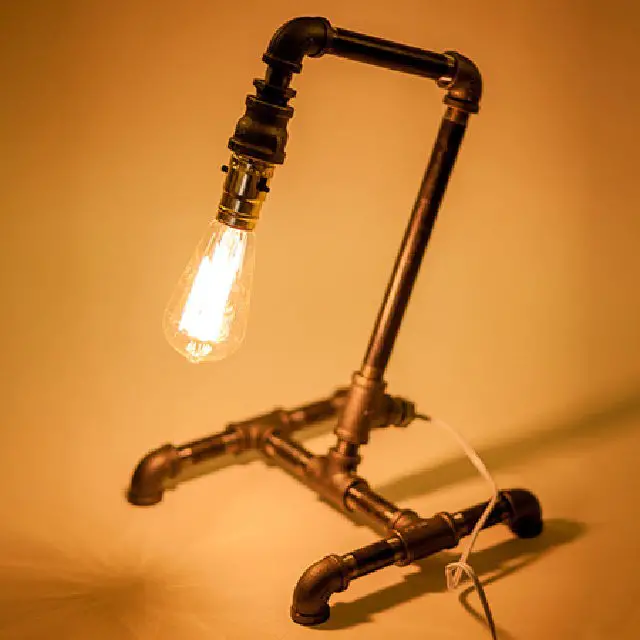
Transform a drab space into an industrial-chic haven with a one-of-a-kind table lamp crafted from galvanized pipe and fittings. Follow our step-by-step guide to bring this unique lighting feature to life, combining the raw beauty of metal with a dash of modern flair. Simply gather essential materials like pipes, fittings, lamp housing, and electrical cords at your local hardware store, then let your creativity shine as you breathe new life into your home decor with a handmade touch.
How to Make a Lamp Out of Copper Pipe
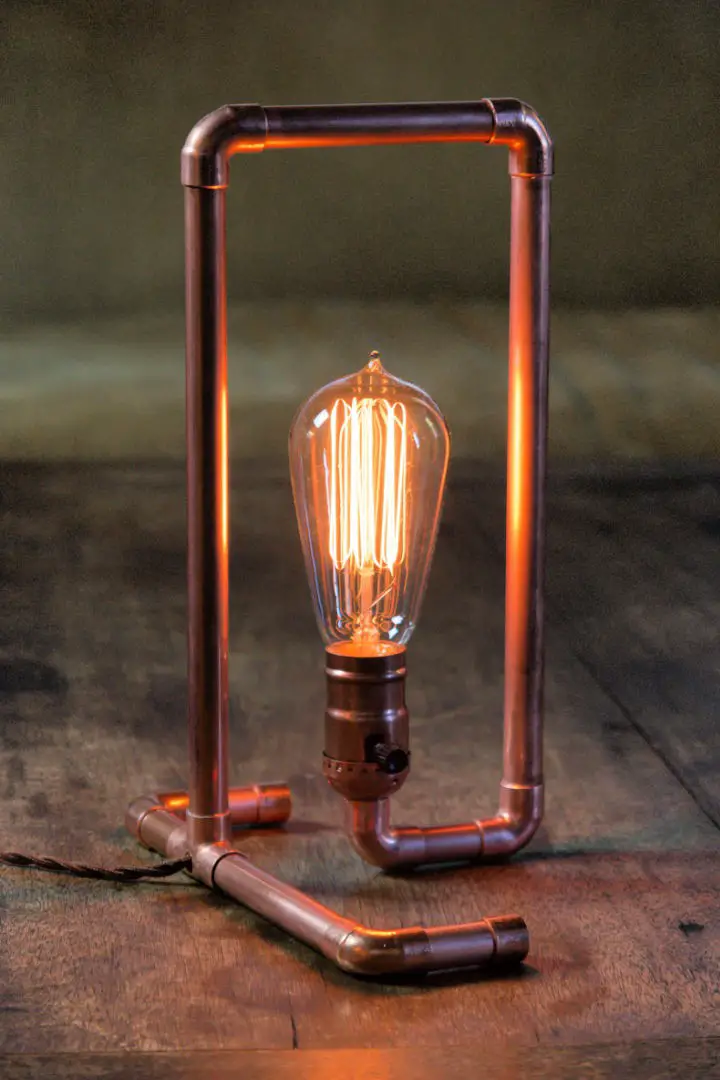
Transform an ordinary copper pipe into an extraordinary lamp with this hands-on guide from ManMadeDIY. Perfect for crafty enthusiasts who relish the thrill of working with their hands and exploring diverse materials. Asa Christiana’s latest book, ‘Handmade: A Hands-On Guide,’ showcases a wide range of creative projects, including this industrial-chic copper pipe lamp that adds a touch of elegance to any room.
With a straightforward list of essential supplies and step-by-step instructions, you can effortlessly polish the copper to a radiant shine and assemble your one-of-a-kind lighting fixture. Grab your tools and let ManMadeDIY walk you through the process of creating your custom lamp.
Easy-Peasy DIY Neon Lightbulb Lamp
Transform your space with an industrial-chic neon lightbulb lamp, effortlessly crafted using quick-dry cement and neon rope light. Our DIY guide, courtesy of Jenni from I SPY DIY, will walk you through each step of the process, ensuring a successful and satisfying outcome. With a focus on shaping wire and mixing cement, this tutorial is perfect for crafting enthusiasts seeking to add a modern twist to their home decor. The result: a one-of-a-kind conversation starter that’s sure to brighten up any room.
Conclusion:
By creating one of these 25 innovative DIY lamp designs, anyone can embark on a creative journey that adds a personal touch to their home decor. Not only does making your own lamp enable you to repurpose materials and breathe new life into old items, but it also allows for complete customization of the lighting to perfectly match your unique style. From sourcing materials to assembling and testing each component, every step in the process is an opportunity to get creative and bring your vision to life. With this comprehensive guide, you’ll have everything you need to successfully navigate the DIY lamp-making process, ensuring a safe and enjoyable experience. As you bring your own creative vision to the forefront with your handmade lamp project, let your imagination shine as brightly as the light it will produce.
