Why Build a DIY Kitchen Island?
When it comes to building a DIY kitchen island, the benefits are multifaceted and far-reaching. Not only can this project save you a significant amount of money by eliminating labor costs, but it also allows for unparalleled customization. With complete control over every aspect of your island’s design, from materials and colors to size and features, you can create a truly one-of-a-kind addition to your kitchen. The result is not only a visually appealing space but also a highly functional one that addresses any specific needs or pain points you may have had before. Whether it’s additional storage, seating, or prep space, your DIY kitchen island can be tailored to meet these demands. In taking on this project, you’ll not only gain practical skills and knowledge that can be applied to future home improvement endeavors but also experience a profound sense of personal accomplishment and pride in having created something with your own hands. As you use your new kitchen island, the memories and satisfaction will linger long after the project is complete.
How to Build a DIY Kitchen Island on a Budget
Creating a DIY kitchen island is an excellent way to enhance your kitchen’s value, functionality, and aesthetic appeal without breaking the bank. By following this straightforward, step-by-step guide, you’ll be able to craft a stunning and practical addition to your kitchen that reflects your personal style, all while staying within your budget.
Choose Your Design and Materials
When it comes to designing your kitchen island, start by envisioning the overall look and functionality you desire. Think about the size that best suits your space, as well as the storage needs you want to meet – whether that’s through shelves, drawers, or a breakfast bar. To keep costs in check, consider repurposing an old piece of furniture or using budget-friendly materials like reclaimed wood from salvage yards or stock cabinets from hardware stores. This approach can help you create a one-of-a-kind kitchen island that fits your style and budget without breaking the bank.
Plan and Measure
Before bringing your kitchen island design to life, take precise measurements of your available space to determine the ideal size for your new feature. This will ensure ample room for comfortable movement around and beneath the island. As you create your plan, don’t worry if it’s intricate – a simple sketch can effectively convey your vision, guiding your decision-making process.
Gather Tools and Materials
To embark on a DIY kitchen project, you’ll need to gather essential tools, including a saw, drill, screws, and sandpaper. In addition to the wood or cabinets of your choice, consider selecting a countertop material that fits your budget. Options like butcher block or laminate can be practical choices. For those looking for an eco-friendly and cost-effective solution, reclaimed materials may be worth exploring.
Assemble the Base
When building an island, start by following the manufacturer’s guidelines for assembling stock cabinets. Alternatively, if you’re opting for a custom build or repurposing existing furniture, measure and cut your materials to fit your design. Begin constructing the base of your island, ensuring it’s sturdy and accurately reflects your initial vision.
Install the Countertop
As you’ve prepared the foundation, it’s now time to introduce the countertop. For butcher block or reclaimed wood installations, take precise measurements and cut the material to perfectly fit the top of your base. To ensure a seamless integration, secure the countertop in place using screws from underneath, carefully concealing them from view.
Add Finishing Touches
Before completing the look of your DIY wooden island project, take care of any rough edges by sanding them down to a smooth finish. If you’re looking to add some extra flair, consider applying paint or stain to match your desired aesthetic. To enhance the functionality and style of your island, think about adding hardware such as drawer pulls or towel bars. Additionally, installing casters on the bottom can make your island mobile, which is particularly useful for smaller spaces where mobility is key.
Final Check and Enjoy
Before basking in the joy of your newly created DIY kitchen island, take a moment to review your project from top to bottom, ensuring every aspect is secure and meets your standards. As you stand back to admire your handiwork, appreciate not only the increased workspace, storage, and visual appeal this addition brings to your home, but also the sense of accomplishment that comes with creating something unique and functional on a budget.
FAQS About Building a DIY Kitchen Island
Transforming your kitchen with a DIY kitchen island is an invigorating venture that can have a profound impact on the overall aesthetic and functionality of the space. To facilitate this process, it’s essential to address the frequently asked questions that may arise during the project. By doing so, you’ll be better equipped to navigate the journey and bring your vision to life.
What materials do I need to build a kitchen island?
When it comes to crafting your wooden project, there are a few essential elements to consider. The wood itself will serve as the foundation for your frame and countertop, with your chosen design dictating the type of wood used. In addition to the wood, you’ll also need screws and brackets to bring all the parts together securely. To give your project a finished look, you may want to add some paint or stain to enhance the natural beauty of the wood. Of course, no project would be complete without the right tools at your disposal – a saw, drill, sander, and measuring tape will help you shape, assemble, and smooth out every detail. Depending on the complexity of your design, you may also need some additional materials like hinges, drawer slides, or hardware such as handles to bring everything together.
How do I choose the right size for my kitchen island?
To accommodate a kitchen island effectively, three key factors must be considered: walkway space, functionality, and proportion.
Firstly, ensure that there is sufficient clearance around the island by allocating at least 36 inches of walkway space on all sides. This will prevent any obstacles or bottlenecks in the kitchen.
Next, consider the purpose of your island. Will it be used for storage, seating, or perhaps providing additional cooking space? The size and design of the island should align with its intended function. For instance, if you plan to use the island as a workspace, you may want to opt for a smaller unit that doesn’t dominate the kitchen.
Finally, take into account the proportionality of the island in relation to your kitchen. Avoid overwhelming the space by choosing an island that is too large or imposing. Instead, aim for a harmonious balance between the island and its surroundings.
Can I make a kitchen island if I have a small kitchen?
Small kitchens often require creative solutions to maximize functionality, and one effective way to do this is by incorporating a kitchen island that doesn’t overwhelm the space. Two strategies for achieving this include opting for a mobile island with wheels, allowing you to easily move it out of the way when needed. Alternatively, consider designing a narrow island that provides additional counter space and storage without consuming too much room. By incorporating clever storage solutions into your island design, you can effectively address storage needs in a small kitchen without sacrificing precious square footage.
What are some budget-friendly countertop options for a DIY kitchen island?
When it comes to kitchen flooring, there are several options to consider. For those looking for an affordable and cozy feel, Butcher Block is a great choice. Its natural look adds warmth to the space, making it perfect for creating a welcoming atmosphere. On the other end of the spectrum, Laminate offers a cost-effective solution that still provides ample design flexibility. With its ease of maintenance and variety of styles available, it’s no wonder why this option remains a popular choice among homeowners. For those seeking a more sustainable approach, Reclaimed Wood is an excellent option. Not only does it add a touch of character to the kitchen, but it also helps reduce waste and support environmentally-friendly practices. Finally, Tile offers a budget-friendly way to achieve a high-end look without breaking the bank. With its numerous design options and durability, it’s no surprise why this material remains a favorite among homeowners seeking a stylish yet practical kitchen flooring solution.
How can I customize my DIY kitchen island?
When it comes to designing your dream kitchen, the devil’s in the details. To create a cohesive space that reflects your personal style, consider these key elements: Selecting paint or stain colours and finishes that harmonize with your decor, adding hardware that mirrors your kitchen’s aesthetic, incorporating storage solutions that cater to your unique needs, and topping it off with a one-of-a-kind countertop material like reclaimed wood or concrete. By giving attention to these often-overlooked aspects, you can elevate your kitchen from ordinary to extraordinary.
Can I build a kitchen island without carpentry skills?
To build a kitchen island without extensive carpentry expertise, consider these three approaches:
Firstly, utilize pre-made cabinets and assemble them according to the manufacturer’s instructions. This will provide a solid foundation for your project.
Secondly, opt for a straightforward design that requires basic assembly skills. Avoid complex shapes or intricate details that may challenge your DIY abilities.
Lastly, don’t be afraid to seek help from more experienced friends or consult online tutorials and guides. Having a helping hand or some expert advice can make all the difference in completing your kitchen island project successfully.
How long does it take to build a DIY kitchen island?
While the time it takes to build a DIY kitchen island can be unpredictable, factors like design complexity, skill level, and available work hours all play a role in determining the overall duration of the project. A straightforward design might require only a weekend’s worth of effort, whereas a more elaborate island could necessitate several weeks or even months of dedication.
Embarking on a DIY kitchen island project not only adds value to your home but also allows you to create a one-of-a-kind piece that caters to your unique needs and aesthetic preferences. To ensure a successful outcome, it’s essential to prioritize thorough planning and preparation from the outset.
25 DIY Kitchen Island Ideas (Build a Kitchen Island)
Elevate your kitchen’s functionality and style with these 25 innovative DIY kitchen island projects. Ranging from distressed wood to sleek glass, explore a diverse array of designs that will transform your cooking experience.
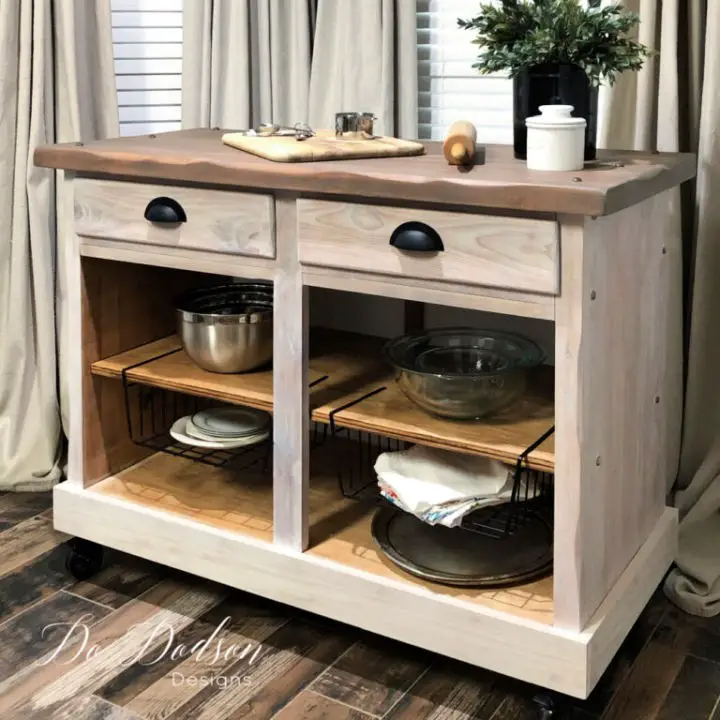
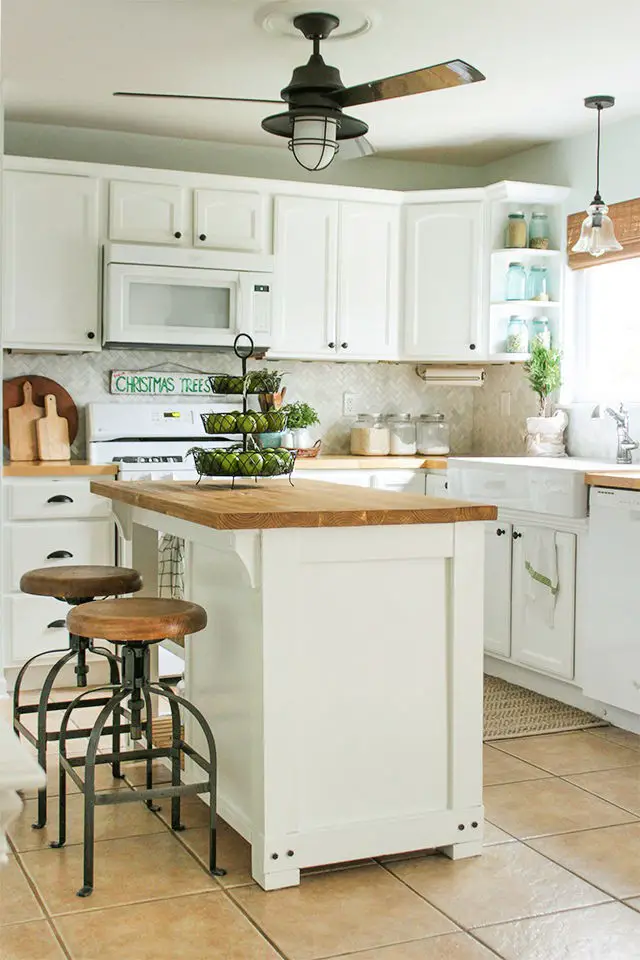
How to Build Wide Rustic X Kitchen Island
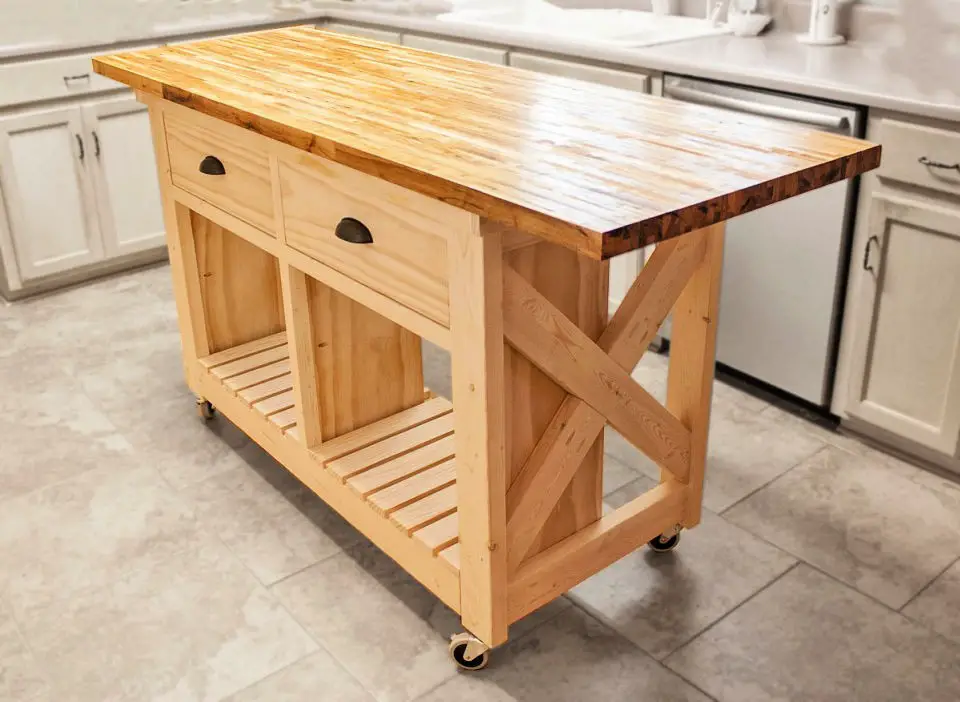
Immerse yourself in the rustic charm of the Wide Rustic X Kitchen Island, a fusion of form and function that elevates your kitchen’s workspace and organization. This captivating design boasts ample storage, comprising drawers and shelves, making it an ideal choice for those seeking to optimize their kitchen’s functionality. For a seamless DIY experience, Ana White offers detailed free plans, meticulously guiding you through each step with precision. Embark on this creative journey and infuse your home with the warmth of handmade craftsmanship.
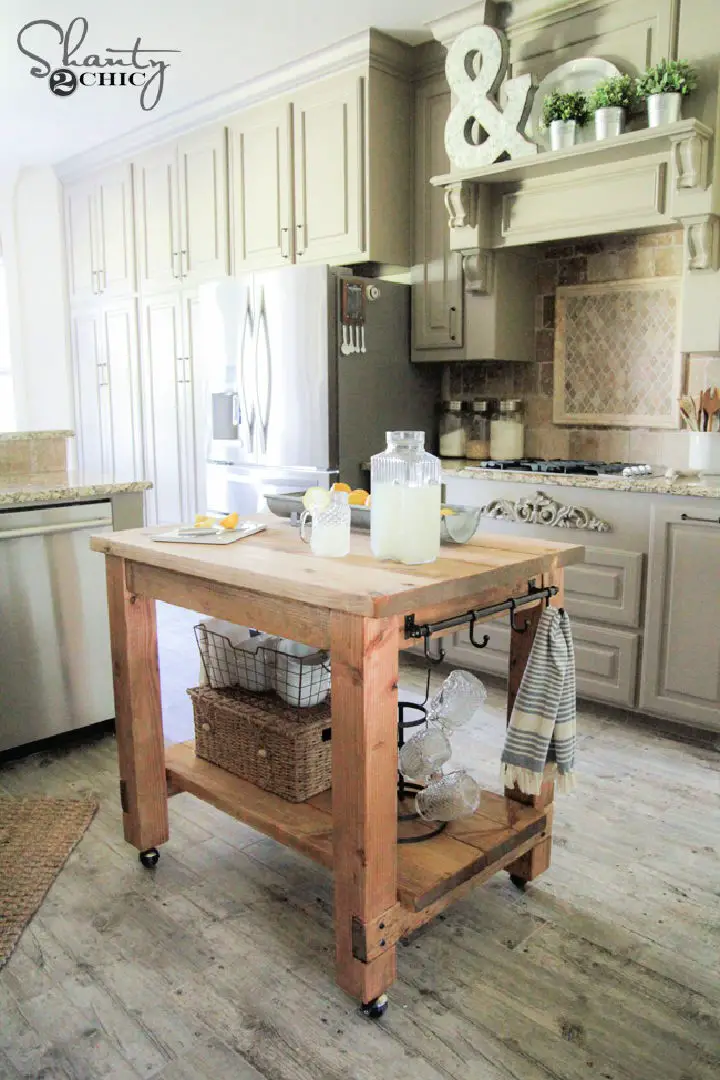
Make a Rolling Kitchen Island

Elevate your kitchen’s functionality without sacrificing style by creating a DIY Rolling Kitchen Island. This mobile masterpiece offers flexible workspace solutions, allowing you to effortlessly roll it out when needed and tuck it away when not. The island’s clever storage design features a generous lower shelf and adjustable compartments, perfect for organizing the essentials of your cooking arsenal. Not only does this kitchen companion provide additional counter space, but it also boasts a built-in power source for your appliances, making meal prep more convenient than ever. To complete the look, the island sports a stunning butcher block countertop that combines form with durability. Ready to transform your kitchen? Head to Jen Woodhouse to access the comprehensive tutorial and downloadable plans.
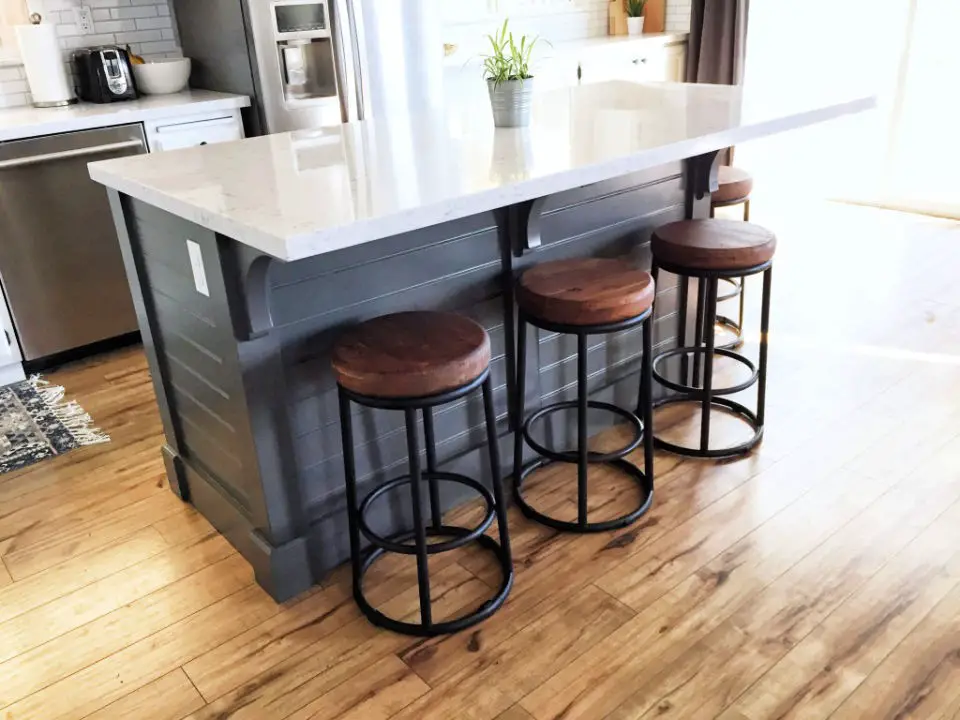
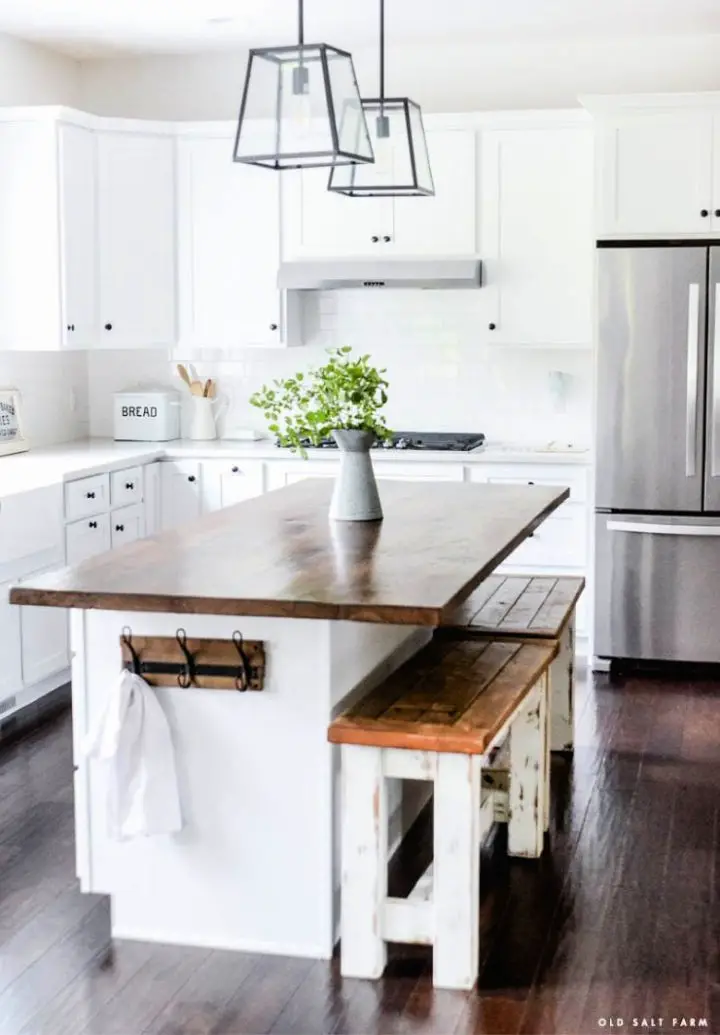
DIY Kitchen Island – Step by Step Instructions
Unlock the potential of your kitchen with a magnificent DIY island that comfortably seats five, thanks to Domestic Blonde’s meticulous step-by-step instructions. This versatile project caters to any skill level, making it an ideal solution for meal prep and social gatherings alike. To get started, you’ll learn how to thoughtfully design, assemble, and customize your very own kitchen centerpiece – from selecting the perfect cabinets to adding a dash of personal flair. With this comprehensive guide, you’ll be well on your way to creating a more functional, inviting, and uniquely yours kitchen space. So why wait? Begin crafting your dream kitchen island today!
Handmade Kitchen Island From Desk
Add rustic flair to your kitchen by upcycling an old desk into a functional kitchen island. This budget-friendly DIY project not only saves you money but also gives you a unique opportunity to think creatively about furniture repurposing. With some pallet wood, paint, and other materials at hand, you can craft a one-of-a-kind piece that boosts your kitchen’s value and convenience. Perfect for meal prep, storage, or even as an additional counter space, this project shows that great style doesn’t have to come with a hefty price tag. Get inspired and start transforming your own kitchen island from a desk.
Homemade Kitchen Island
Transforming your kitchen into a stylish haven can be achieved with ease by crafting a custom DIY island that perfectly complements your unique taste and requirements. For a hassle-free experience, Classy Clutter offers a step-by-step guide on how to create a functional and visually appealing kitchen island using basic tools and readily available materials. With an investment of under $500 and a dash of creativity, this DIY project promises to be the perfect weekend getaway that elevates your home’s heart. By taking the plunge, you’ll unlock the potential to turn your kitchen into the space you’ve always envisioned.
Easy DIY Wood Kitchen Island
Elevate your kitchen’s functionality and aesthetic appeal by building a DIY kitchen island using our comprehensive, step-by-step guide. With straightforward plans and minimal required tools, even novice DIY enthusiasts can successfully complete this project. From preparing the lumber to applying the finishing touches, our instructions will walk you through every stage of construction, ensuring a stress-free build process. Create a customized kitchen island that harmoniously combines form and function, perfectly complementing your dream kitchen.
Make a Kitchen Island Out of Base Cabinets
Improve the functionality of your kitchen with a custom-built island made from base cabinets. By modifying stock cabinets like those offered by Ikea, you can create a seamless and inviting space that complements your existing kitchen design. This involves considering factors such as size, function, and finishing touches like toe kicks and side panels to achieve an optimal balance between aesthetics and practicality. With Erin Zubot Design’s comprehensive guide, learn how to transform base cabinets into a functional island that enhances your kitchen’s efficiency and storage capacity.
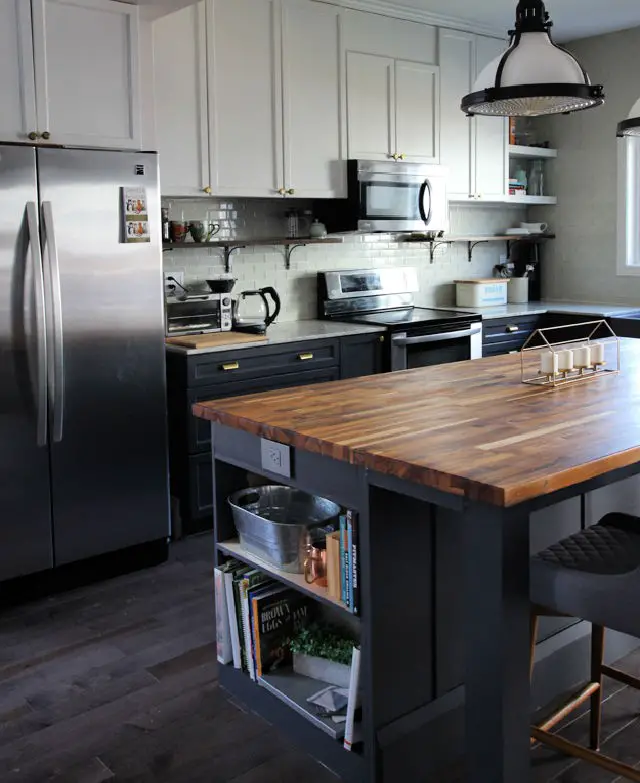
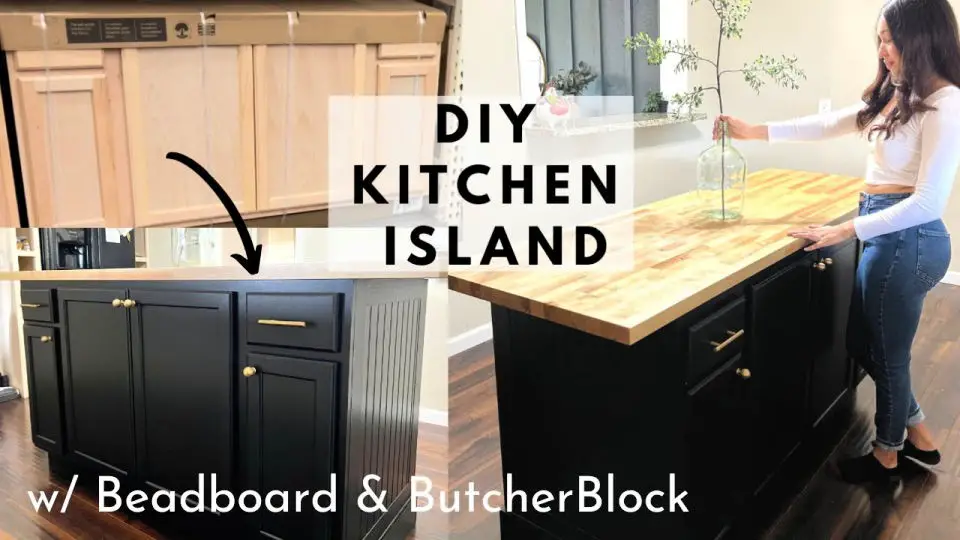
Building a Butcher Block Kitchen Island
Elevate your kitchen’s ambiance by crafting a unique butcher block kitchen island. This comprehensive guide walks you through each stage of construction, from planning materials to installing hardware, ensuring a successful and fulfilling DIY experience. By taking on this project for approximately $850, you’ll save thousands compared to purchasing a custom-made piece for around $3,000. With the detailed steps outlined in this article, you’ll be well-equipped to tackle the structural assembly, painting, and other essential aspects of building your own kitchen island. Perfect for those seeking a rewarding DIY challenge that combines functionality with style.
DIY Kitchen Island With Fittings and Pipe
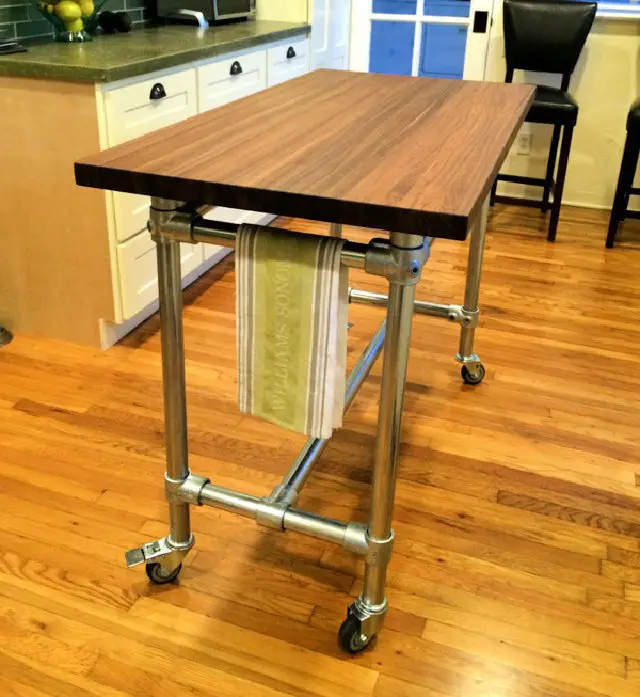
Elevate your kitchen’s functionality and style without breaking the bank by creating a custom DIY island with Simplified Building’s expert guidance. We’ll take you through the process of selecting the ideal tabletop, whether it’s reclaimed wood, butcher block, or granite, and provide step-by-step instructions for building a sturdy frame that complements your chosen surface. By following our comprehensive guide, you can create a one-of-a-kind kitchen island that perfectly suits your needs and preferences.
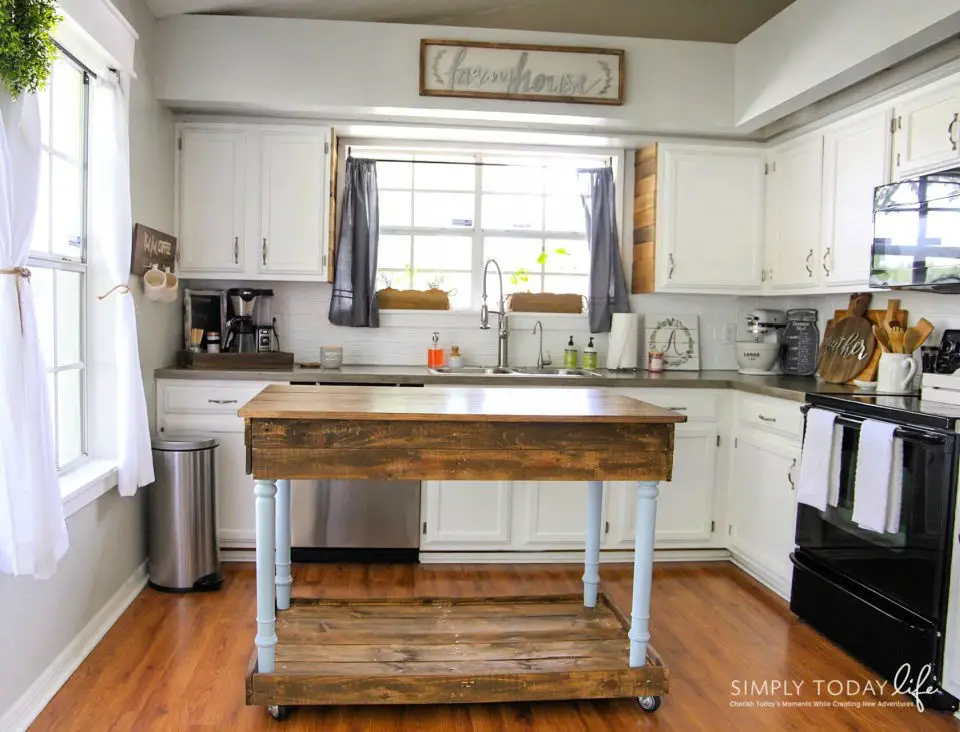
Making a Rolling Kitchen Island
Breathe new life into your kitchen with the ingenious DIY Rolling Kitchen Island project. This upcycled masterpiece transforms an ordinary cabinet into an extraordinary workspace, perfect for compact kitchens. Not only does it add warmth and character to the cooking area, but also provides ample storage and versatility. By incorporating wheels, revitalizing the wood without harsh chemicals, and customizing for personalized storage needs, this practical addition brings a cozy farmhouse charm to your home. Ideal for anyone passionate about repurposing and enhancing their living space, this guide offers a creative way to unlock your kitchen’s full potential.
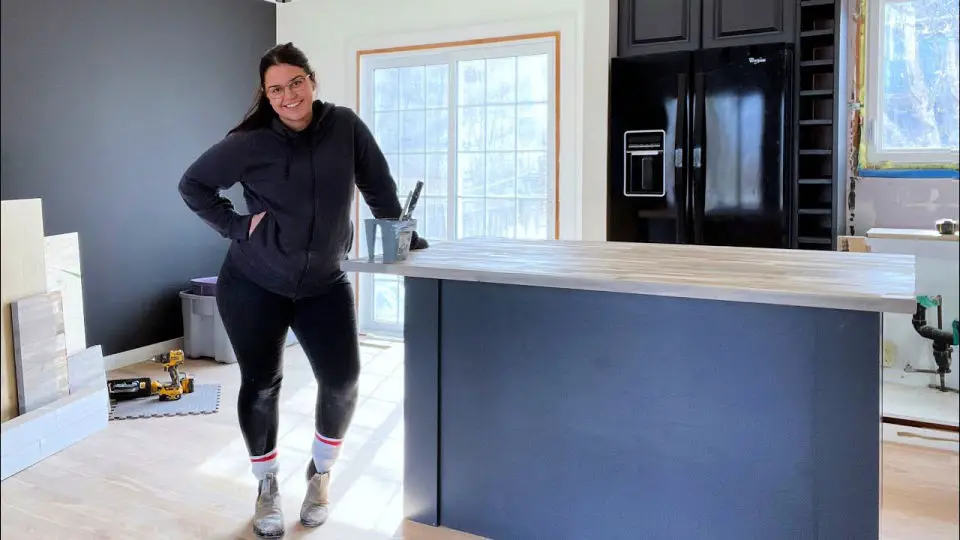
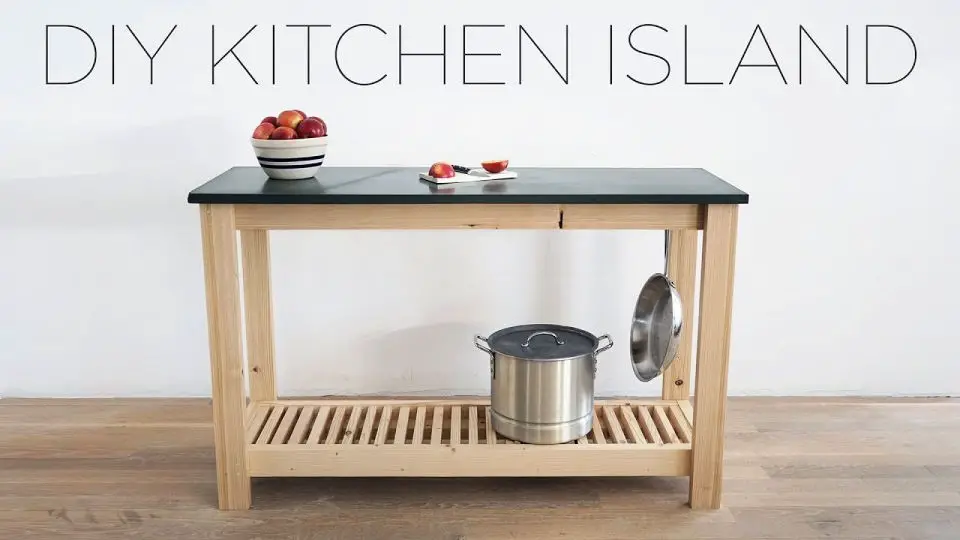
How to Make a Kitchen Island
Transforming your kitchen space into a functional and stylish hub for hosting and daily activities is made possible by embarking on a DIY kitchen island project. This endeavor allows for personalization of every detail, from layout to materials, ensuring a one-of-a-kind creation that reflects your unique style. Our journey began with careful planning, the selection of durable materials, and meticulous assembly of each component. We overcame challenges such as space constraints and design decisions through patience and creativity. Our goal is to share our progress and insights to inspire and guide others in their own DIY endeavors.
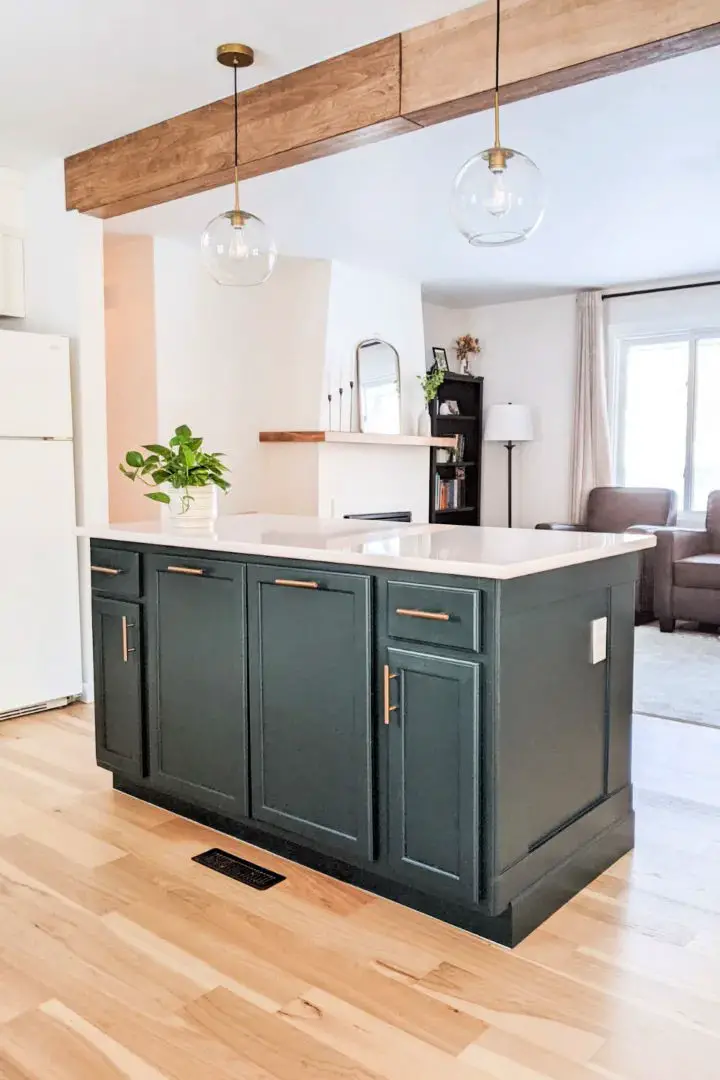
Rustic Modern DIY Kitchen Island
Transforming your kitchen into a space that reflects your unique style just got easier with the help of a custom-built Rustic Modern Kitchen Island. By embracing your creativity and putting in some elbow grease, you can create an island that seamlessly integrates into your existing kitchen layout – just like I did. This DIY project, completed for under $200, is all about adding personal touches to make it truly special. Think clever features like a built-in bottle opener or wine rack, and the perfect wood stain to tie everything together. With step-by-step guidance from OSO DIY, you can bring your kitchen island vision to life and turn your cooking space into a true reflection of your personality.
DIY Kitchen Island With Thrifted Counter Top
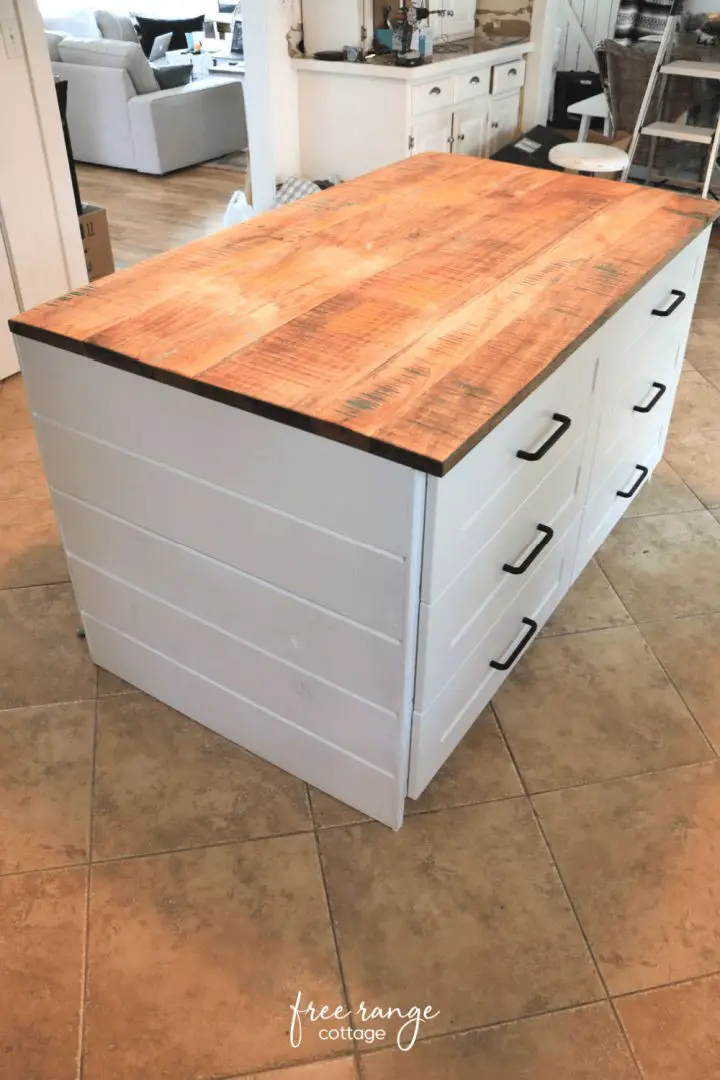
Transforming your kitchen into a haven of style and practicality doesn’t have to break the bank. At Free Range Cottage, we’re excited to share our guide on how to upcycle an IKEA kitchen island with a one-of-a-kind thrifted countertop. This DIY project seamlessly blends modern farmhouse charm with bohemian flair, providing a unique opportunity to infuse your cooking space with personalized touches. By following our straightforward approach to selecting drawers, assembling cabinets, and repurposing materials, you’ll be able to create a functional and aesthetically pleasing kitchen that’s tailored to your taste and budget.
Make Your Own Kitchen Island
Transform your kitchen into a haven of style and functionality without sacrificing your wallet’s comfort. Join Domestic Blonde on a journey to create a DIY island that perfectly blends aesthetics with practicality. Discover how she successfully turned her kitchen dreams into reality by choosing the ideal cabinets, designing for ample storage and seating, and more. With actionable steps and thrifty tips, you’ll be well-equipped to craft a space that’s uniquely yours and utterly captivating. Visit Domestic Blonde for the complete tutorial and additional wisdom.
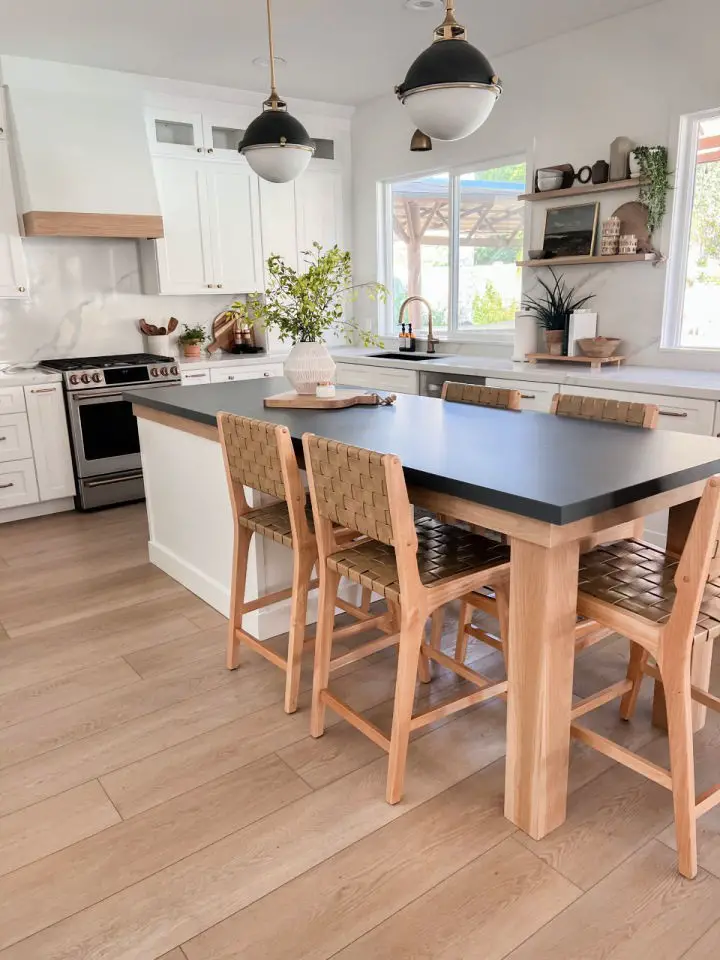
How to Make Your Own Kitchen Island
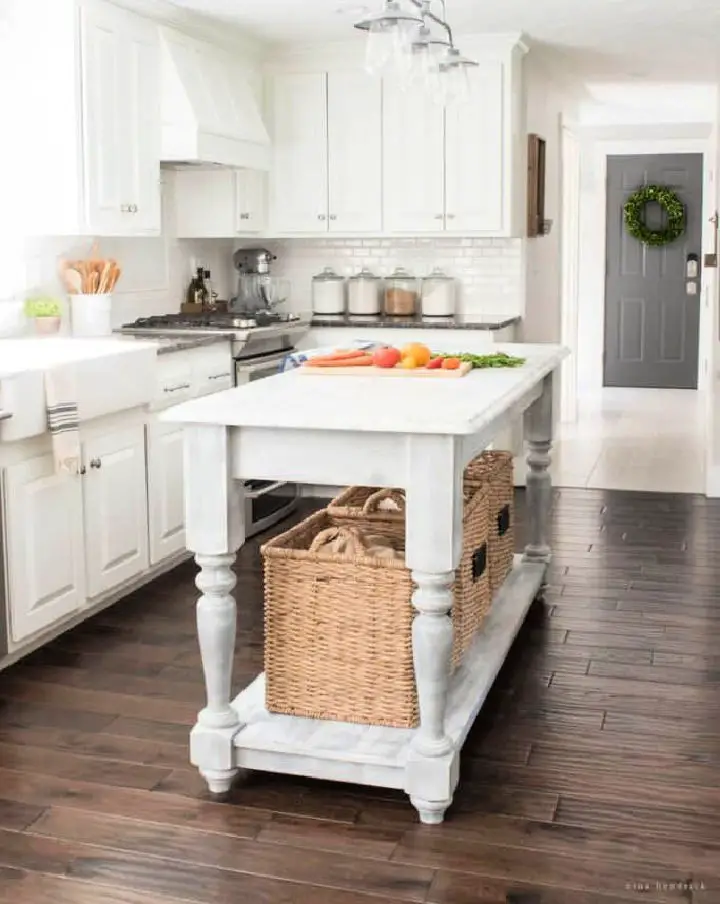
Craft a show-stopping DIY kitchen island that seamlessly blends form and function. With Nina Hendrick’s comprehensive step-by-step guide, you’ll learn how to select the perfect marble slab, source elegant legs, and bring your vision to life. Whether you’re an experienced DIY enthusiast or just starting out, this tutorial provides a clear path to building your dream kitchen island. By following these expert tips, you can transform your cooking space into a haven of elegance and utility.
DIY Kitchen Island at Home
Elevate your kitchen’s functionality and aesthetic appeal by creating a custom DIY island using prefabricated cabinets and butcher block countertops. By following our step-by-step guide, you’ll learn how to construct a sturdy base, install the cabinets, and add the perfect countertop for a unique and upscale look. Additionally, we’ll share expert tips on how to complete the project with a polished finish, ensuring your kitchen is both functional and stylish.
Turn a Bookshelf Into a Kitchen Island
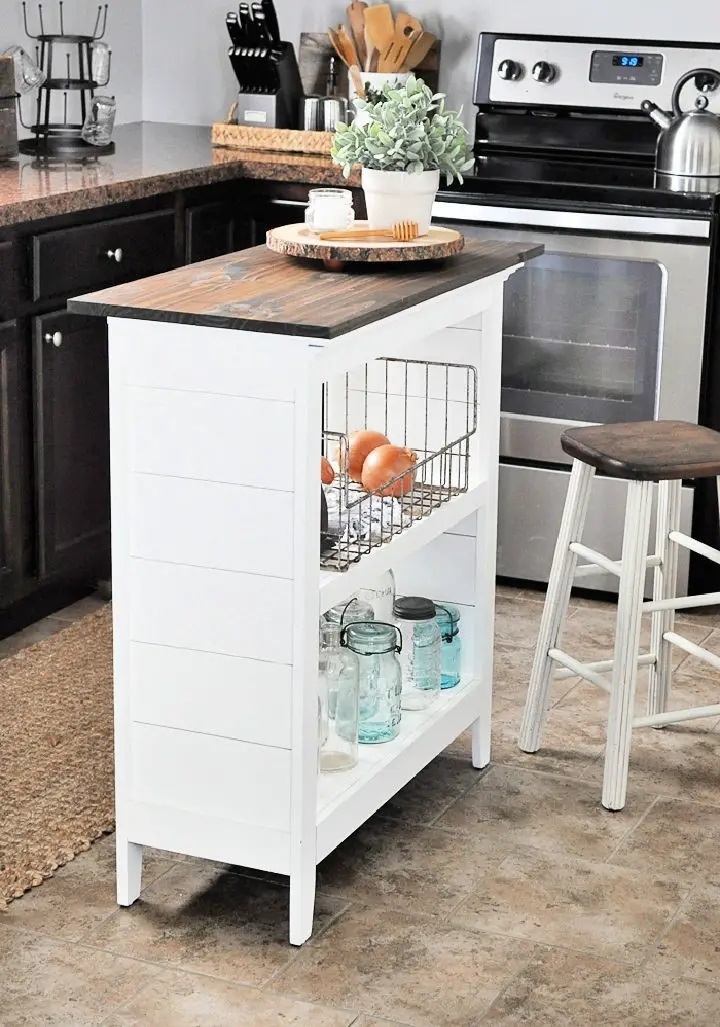
Transforming a bookshelf into a functional kitchen island is a creative way to enhance your cooking space without breaking the bank. This step-by-step guide will walk you through the process of giving new life to an unused item, adding valuable storage and workspace to your kitchen. By the end of this DIY project, you’ll have a stylish and practical upgrade that will elevate your home’s culinary hub.
Build a Kitchen Island With Trash Storage
Transform your kitchen experience with a DIY project that combines functionality and farmhouse charm, courtesy of Shades of Blue Interiors. This innovative kitchen island features a clever trash storage solution, taking the stress out of meal prep while adding a touch of rustic elegance to the space.With detailed build plans available at no cost, you can turn your kitchen into a more organized, efficient, and inviting area. The thoughtful design of this DIY kitchen island includes hidden compartments for storing baking supplies and trash, keeping your countertops clear and clutter-free. Whether you’re a home chef or simply someone who loves to cook, this project is the perfect way to maximize your kitchen’s potential.
DIY Wooden Kitchen Island Makeover
With a few simple steps, you can transform your kitchen island into a stunning focal point that brightens up the entire room. DIY enthusiast Tylynn M shares her budget-friendly approach to creating a breathtaking makeover, perfect for those looking to upgrade their space without breaking the bank. From selecting the ideal tools and materials to adding the finishing touches of paint and hardware, this project is surprisingly achievable, even for those new to DIY endeavors. For a comprehensive guide, including product recommendations such as Benjamin Moore’s Salamander paint and Riverstone Quartz countertops, check out Tylynn M’s detailed tutorial. By following her lead, you’ll be able to elevate your kitchen’s aesthetic in no time.
Build a Barn Wood Kitchen Island
Transform your kitchen with a unique DIY project that brings rustic charm to the heart of your home. By upcycling reclaimed barn wood into a one-of-a-kind kitchen island, you can create a cherished centerpiece that’s both functional and filled with personal history. This comprehensive guide takes you through every step of the process, from selecting the perfect planks to adding the finishing touches. With practical techniques and heartfelt insights, you’ll be inspired to turn a simple piece of furniture into a true work of art that tells your story.
DIY Kitchen Island Tutorial for Beginner
Start your kitchen revolution by crafting a one-of-a-kind kitchen island that reflects your personal style and enhances your cooking experience. This straightforward tutorial is perfect for beginners, guiding you through a day-long project to create a functional masterpiece that seamlessly integrates into your existing space. You’ll learn the art of layout planning, assembly, and customization, all while utilizing minimal tools and tapping into in-store resources for precision cutting. Don’t stop there – add a personal touch with paint, primer, and embellishments to make it truly yours. Join the ranks of DIY enthusiasts and bring your kitchen island vision to life today!
Creative Kitchen Island on a Budget
Revitalize your kitchen without incurring significant expenses by embarking on a DIY Kitchen Island Makeover, led by Glenda Chavez. This practical guide walks you through the process of creating a functional and stylish island while staying within budget constraints. From selecting the optimal cabinets to achieving a flawless paint finish, you’ll gain valuable insights for each stage of the transformation. Whether updating hardware or selecting the ideal stain for your butcher block countertop, this empowering video will equip you with the knowledge necessary to make informed decisions. Join Glenda on this cost-effective kitchen renovation journey and confidently revamp your space.
How to Do You Make a Kitchen Island

Transforming the hub of your home, the kitchen, into a space that perfectly blends form and function is just a few steps away. With a custom island as the centerpiece, you can create a welcoming and efficient cooking area that meets your unique needs. By following our comprehensive tutorial, you’ll learn how to build a beautifully finished kitchen island using four upper cabinets. This clever design not only adds valuable storage and workspace but also enhances the overall aesthetic of your kitchen. To ensure a seamless integration with your existing layout, we’ll walk you through essential tips on accommodating doors and walkways. Whether you’re a DIY enthusiast looking to upgrade your kitchen’s functionality or simply seeking a fresh new look, this project is sure to inspire and guide you every step of the way.
Kitchen Island With Slate Countertops
Transform your kitchen’s functionality and aesthetic with the ultimate DIY project: crafting a stylish kitchen island featuring sleek slate countertops. Our comprehensive guide takes you by the hand, walking you through each step of this engaging and helpful project. For a more in-depth visual tutorial, click on the link provided. Whether you’re looking to add a personal touch or enhance your home’s appeal, this DIY kitchen island is the perfect starting point for turning your vision into reality.
DIY Kallax Kitchen Island on a Budget

Transform your kitchen on a budget with this clever IKEA Kallax hack, perfect for 2024. By repurposing affordable pieces from the Swedish giant, you can create a stylish and functional kitchen island that’s both practical and visually appealing. This DIY guide provides clear instructions, valuable tips, and creative solutions to maximize storage and space in your kitchen without compromising on style or breaking the bank.
Conclusion:
Ultimately, constructing a DIY kitchen island is a highly rewarding experience that also provides an exceptional way to inject functionality, style, and value into your kitchen without breaking the bank. The process involves numerous opportunities for customization and creativity, from selecting the ideal design and materials to installing the countertop and adding the finishing touches. This thoughtful approach enables homeowners to tailor their DIY kitchen island to their unique needs and preferences, whether they’re seeking to boost storage capacity, create more counter space, or simply elevate the aesthetic appeal of their kitchen.
With 25 inspiring DIY kitchen island ideas to draw from, it’s clear that this project offers a wealth of possibilities for homeowners looking to make a positive impact on their kitchen. By embracing the challenge and putting in the effort required, individuals can create a stunning kitchen centerpiece that not only enhances the beauty of their space but also provides practical benefits. So why wait? Take the leap and start building your DIY kitchen island today – the end result is sure to be a true showstopper.
