Crafting your own DIY hanging planters is an excellent way to infuse your home or garden with personality. By taking on this project, you’ll not only add a touch of elegance and vibrancy to any space, but also exercise your creativity while tailoring designs to fit your distinct style. The process of making a hanging planter can be incredibly fulfilling, allowing you to showcase your favorite plants in a unique and visually appealing way. With 25 DIY hanging planter ideas at your fingertips, you’ll find the inspiration you need to create a one-of-a-kind piece that not only meets your needs but also elevates your space. Are you ready to get creative and give your plants a stylish new home? Let’s dive into the process of making hanging planters that will surely impress your neighbors.
Why Make Your Own Hanging Planters?
When it comes to decorating your indoor or outdoor space, creating homemade hanging planters is an exciting and rewarding experience. Not only can you express your unique style through personalized designs, but you can also reap a range of benefits from this simple yet impactful DIY project.One of the most significant advantages of making your own hanging planters is the opportunity to inject your personality into your home decor. Whether you prefer a minimalist aesthetic or a bold, eclectic look, you can customize each planter to reflect your taste and style. This creative freedom allows you to showcase your individuality and add a personal touch to your space.Another benefit of DIY planters is their cost-effectiveness. By repurposing materials and using basic supplies, you can create beautiful planters without breaking the bank. This eco-friendly approach not only saves you money but also helps reduce waste and promote sustainability.As you work on your hanging planter project, you may find that the therapeutic benefits of crafting by hand are just as valuable as the final product itself. The process of making something with your own hands can be meditative, reducing stress and promoting a sense of accomplishment when you see your finished creation in place.Of course, one of the most thoughtful ways to share this creative experience is by gifting handmade planters to friends or loved ones. Not only does it showcase your thoughtfulness and consideration, but it also allows you to pass on a piece of yourself and your creativity into someone else’s life.Lastly, making hanging planters can be an excellent way to learn new skills and techniques. From basic woodworking to macramé, each project presents opportunities to expand your crafting abilities and try out new approaches. As you master these new skills, you’ll find that the sense of accomplishment and personal growth are just as valuable as the finished product itself.
Sustainable Materials for DIY Hanging Planters
While embarking on a DIY hanging planter project, material selection goes beyond mere style and longevity concerns. A crucial aspect is choosing eco-friendly options that minimize the environmental footprint throughout their entire lifecycle – from resource extraction and processing to eventual disposal. By prioritizing sustainability, you’ll not only contribute to a reduced ecological impact but also foster a sense of responsibility in your creative endeavors.
Why Choose Sustainable Materials?
Harnessing the power of sustainability, eco-friendly materials offer a gentler approach to our planet’s well-being. Derived from renewable sources, these materials boast a reduced carbon footprint, and their biodegradable or recyclable nature ensures a minimized impact on waste management and resource conservation. By embracing sustainable materials for your DIY endeavors, you’re actively contributing to a waste-reduced future, where natural resources are preserved for generations to come.
Types of Sustainable Materials:
When it comes to creating eco-friendly hanging planters, there are several materials to consider. Terracotta and ceramics, for instance, are made from natural clay and require minimal processing. Not only are they durable and breathable, but they also add a touch of classic charm to your garden decor. Another option is cork, which boasts impressive properties – it’s lightweight, waterproof, biodegradable, and renewable. The best part? Harvesting cork doesn’t harm the tree, making it an excellent choice for environmentally-conscious gardeners. For a more creative approach, consider upcycling old materials like tins, plastic bottles, or even tires into unique hanging planters. This not only reduces waste but also gives new life to materials that would otherwise end up in landfills. If you prefer a natural look, opt for wood from sustainably managed forests or reclaimed wood. It’s sturdy, timeless, and can withstand outdoor conditions with the right treatment. Finally, natural fibers like jute, hemp, or rattan are renewable and biodegradable, making them an excellent choice for hanging baskets that blend seamlessly with nature.
How to Source Sustainable Materials:
When it comes to creating a unique and eco-friendly planter, sourcing materials is key. Consider exploring local craft stores for natural materials like terracotta, ceramics, and fibers that can be repurposed into planters. Additionally, recycling centers often have an assortment of recyclable materials that can be transformed into one-of-a-kind garden containers.For a more extensive selection, online marketplaces are a great resource to find sellers specializing in sustainable gardening supplies. Furthermore, community exchanges with local gardening groups can facilitate the discovery or exchange of environmentally friendly materials for your DIY project.By utilizing these sustainable resources, you’re not only contributing to a healthier planet but also adding a personal touch to your garden. Every small effort counts, and with a little creativity, you can create a beautiful and eco-conscious space that’s both functional and aesthetically pleasing.
How to Make DIY Hanging Planters
Transforming your living space into a lush oasis is just a DIY project away. By creating your own hanging planters, you can effortlessly add a touch of greenery and style to any room. From concealing unsightly plastic containers to achieving a more visually appealing display, this straightforward guide will walk you through the process step by step, ensuring a reliable and easy-to-follow experience that meets your unique needs.
Materials Needed:
To craft a stunning planter cover, you’ll need the following materials. For the basic design, start with faux leather or your preferred fabric type, a length of cord (macrame cord is highly recommended), and an Exacto knife for cutting and shaping. A drill may also be helpful if you want to add some extra details. For those looking to create a more aesthetic planter cover, gather macrame cord, wooden beads, a metal hoop (which can be sourced from an old belt or DIY store), wire, thread for tying, and clear nail polish to seal any fraying ends.
Instructions:
To create a hanging planter, start by preparing the fabric cover. Cut a large square of your chosen fabric, ensuring it’s big enough to encase the base and sides of the planter. Next, cut small slits about an inch away from each corner of the square, allowing for the cord to pass through. These slits will serve as the foundation for the hanging mechanism. Thread the cord by feeding two strands of macrame cord through the slits, crossing them diagonally inside the fabric square. This creates a supportive base that will hold your planter securely in place. For added stability, you can drill small holes in the planter corners to tie off the cord ends and prevent the plant from shifting. Once the cord is in place, you can add your chosen greenery to the center of the fabric.To hang your planter, knot the ends of the cords together at your desired height and find a suitable location to display your new hanging planter. For added visual appeal, you can also thread beads onto the cord or incorporate wooden beads into your design. If you want to add an extra layer of sophistication, you can use macrame cord to create a unique aesthetic planter. Start by cutting four strands of cord, each double the length of your desired hanging distance. Fold each strand in half to mark the midpoint.Thread wooden beads onto each set of cords, grouping them into pairs and securing with knots if necessary. Cross and pair the cord segments, threading more beads and securing as you go to create a pattern. To add extra support and cover any exposed wire, use thread or cord to wrap around the sections. If using a metal hoop, thread it through the top knots for a polished look. Finally, trim any long ends, add beads, and apply clear nail polish to prevent fraying. Your beautiful, handmade hanging planter is now ready to showcase your chosen greenery.
Video Tutorial
To further illuminate the crafting process, I recommend supplementing this guide with a step-by-step video tutorial available on YouTube. This visual approach offers an alternative perspective that can enhance understanding and provide additional clarity. As you create your DIY hanging planter, whether opting for a basic or decorative design, feel free to customize it to suit your personal style and the specific needs of your plants. By doing so, you’ll not only enjoy the crafting process but also reap the benefits of a fresh, brightened space.
Customization Ideas for DIY Hanging Planters
When it comes to DIY hanging planters, creativity knows no bounds. Not only do they provide a cozy haven for your plants, but they also serve as a canvas for self-expression and personal style. Here are some ideas to get you started:
Embellish with Elegance: Paint or stain your planters in vibrant hues that complement your decor. Alternatively, add a touch of whimsy with bold patterns, stripes, polka dots, or even a hand-painted masterpiece.
Texture Tango: Wrap your planters with fabric, rope, or burlap to introduce new textures and dimensions. A rustic vibe can be achieved with burlap, while a smooth, bright fabric adds a modern touch.
Embellish with Embellishments: Take your planters to the next level by adding beads, shells, or stones. These can be glued on or cleverly incorporated into the hanging mechanism.
Seasonal Sensations: Match your planter to a theme or season for a cohesive look. A beach-themed planter might feature sand and shells, while a winter- themed one could boast pinecones and white accents.
Mixology Masters: Don’t be afraid to combine materials and textures. Pair metal with wood, ceramic with rope, or glass with beads for a truly unique piece that reflects your personality.
By customizing your hanging planters, you’re not just creating a functional space for your plants – you’re crafting a reflection of yourself that adds character to your home.
Maintenance Tips for DIY Hanging Planters
To keep your hanging planters in prime condition, it’s essential to maintain them properly. Here are some practical tips to help you achieve this:
Soil Care: Check the soil moisture regularly and water only when the top inch is dry to avoid overwatering. Make sure outdoor planters have drainage holes to prevent waterlogging. This simple step will go a long way in keeping your plants healthy.
Lighting: Position your hanging planters in a spot that provides the right amount of sunlight for your plants. Some require full sun, while others thrive in partial shade. Ensure all sides of the plants receive equal light by rotating them occasionally.
Pruning: Regular pruning will help remove dead or yellowing leaves and encourage new growth. This not only keeps your planters looking fresh but also promotes healthy plant development.
Seasonal Adaptation: Don’t forget to adapt to changing seasons. Bring outdoor planters inside during extreme weather conditions to protect your plants from harsh elements. By following these tips, you’ll be able to enjoy the beauty and benefits of your hanging planters for a longer period.
Troubleshooting Common Issues with DIY Hanging Planters
When tackling DIY hanging planters, it’s not uncommon to encounter some obstacles along the way. To troubleshoot common issues, consider the following potential pitfalls: Overwatering, which can manifest as yellow leaves and an unpleasant musty aroma, is often caused by a lack of drainage holes in enclosed planters. Simply ensure your containers have proper drainage and allow the soil to dry out slightly between waterings. Pests like aphids, spider mites, and other common culprits can also wreak havoc. A gentle stream of water or natural pest control methods like neem oil may be all it takes to restore balance. Additionally, insufficient light can cause plants to appear leggy or pale, so consider relocating your planters to a brighter spot or employing grow lights if natural light is lacking. Finally, nutrient deficiencies can stifle growth and lead to discolored leaves. A balanced, water-soluble fertilizer applied according to package instructions can provide the necessary boost. By keeping an eye out for these potential roadblocks, you’ll be well on your way to cultivating thriving hanging planters that bring beauty to your space.
Advanced Techniques for DIY Hanging Planters
For a more sophisticated approach to DIY hanging planters, consider incorporating the following advanced techniques: Macramé is an art form that involves knotting rope into intricate patterns, creating beautiful and functional hangers for your planters. This hobby not only produces unique pieces but also provides a relaxing outlet. Additionally, self-watering systems can be incorporated into your planters to ensure consistent moisture levels, making it ideal for busy individuals or those who tend to forget to water their plants. LED grow lights offer the full spectrum of light required by plants for photosynthesis and healthy growth, perfect for serious indoor gardeners. Furthermore, automated systems allow for remote monitoring and care of your plants via smartphone app, a feature that can be especially useful for those with limited time or mobility.
FAQS on DIY Hanging Planters
To empower you with the knowledge needed to begin crafting your own DIY hanging planters, this segment addresses the most common queries and concerns that arise when undertaking such a project.
What materials do I need to make a basic DIY hanging planter?
To create a simple DIY hanging planter, gather the following essential materials: fabric or faux leather as the exterior material, macrame cord or any sturdy string to provide the structural framework, an Exacto knife or scissors for precise cutting, and a drill (if you want to create holes in the planter) to facilitate efficient construction. Don’t forget your plant and its container, which will ultimately bring life to this creative project.
Can I make a hanging planter without drilling holes in the container?
To create a hanging planter without drilling into the container, consider employing a fabric or faux leather sling that provides support for your plants. Secure this makeshift holder in place using macrame cord or string. This approach eliminates the need for any alterations to the container, preserving its original form.
What plants are best suited for hanging planters?
When it comes to selecting plants for hanging planters, several options excel in their ability to flourish in these unique environments. Pothos, spider plants, ferns, string of pearls, and philodendrons are all prime choices that can adapt to different lighting conditions, making them well-suited for indoor or outdoor use.
How do I prevent my DIY hanging planter from falling?
To prevent your DIY hanging planter from taking an unexpected tumble, it’s crucial to ensure that every component is sturdy enough to bear its weight. Start by selecting a cord or string that’s robust enough to support both the plant and its container. Next, double-check each knot to guarantee they’re secure and won’t come undone under the weight of the planter. Additionally, if you’re using a hook in the ceiling, make sure it’s properly anchored and can handle the weight of your lush greenery.
Can I use recycled materials to make a hanging planter?
By leveraging the creativity of upcycling, you can transform discarded materials into one-of-a-kind hanging planters that not only save you money but also promote sustainability. Old jars, containers, and even wooden scraps can be repurposed to create distinctive plant holders that bring a touch of eco-friendliness to your home.
How do I water plants in a hanging planter?
When tending to your hanging plants, start by carefully disentangling the pot from its suspended position if possible, to prevent any water mishaps. Next, relocate the plant over a sink, ensuring it’s securely positioned to contain any excess water as you water. Allow the soil to drain thoroughly before rehanging the planter. Alternatively, if removal isn’t feasible, consider utilizing a watering can with an extended spout that allows for targeted soil application and minimal spillage.
Is it necessary to add drainage to a hanging planter?
Proper drainage is crucial for the well-being of your plants. One effective way to ensure this is by incorporating a layer of small rocks or activated charcoal at the base of your container before adding soil. This simple hack prevents water from accumulating at the roots, thereby reducing the risk of root rot and other issues that can arise from excess moisture.
Can hanging planters be used outdoors?
When it comes to adding a touch of elegance to outdoor areas like patios, balconies, or gardens, hanging planters can be a stunning choice. To ensure they remain a beautiful feature for years to come, make sure to select materials that are not only visually appealing but also designed to withstand the elements, such as weather-resistant finishes that will preserve their integrity in the face of rain, sun, and wind.
25 DIY Hanging Planter Ideas: How to Make Hanging Planters
Transform your space with the beauty of nature by crafting one-of-a-kind hanging planters that showcase your creativity and green thumb. From whimsical to elegant, explore 25 innovative DIY projects that will have you hanging lovely planters in no time.
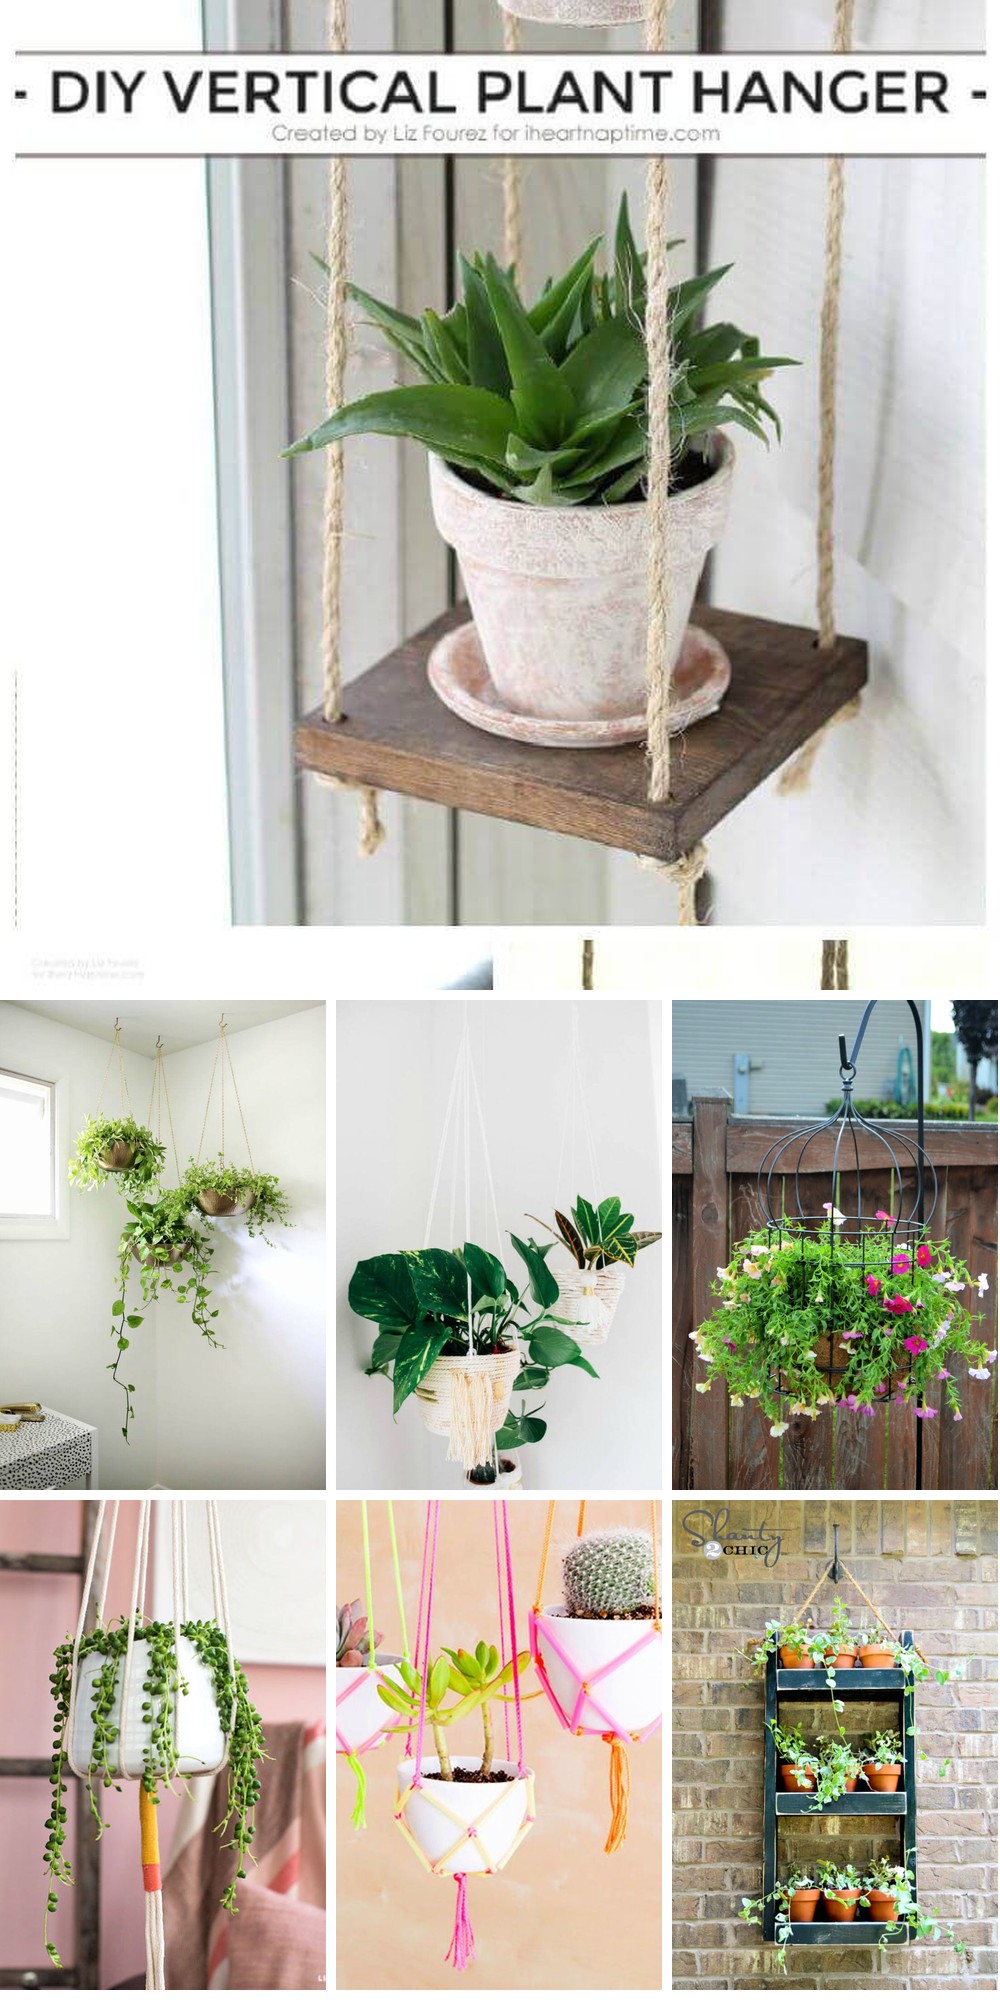
Homemade Vertical Plant Hanger
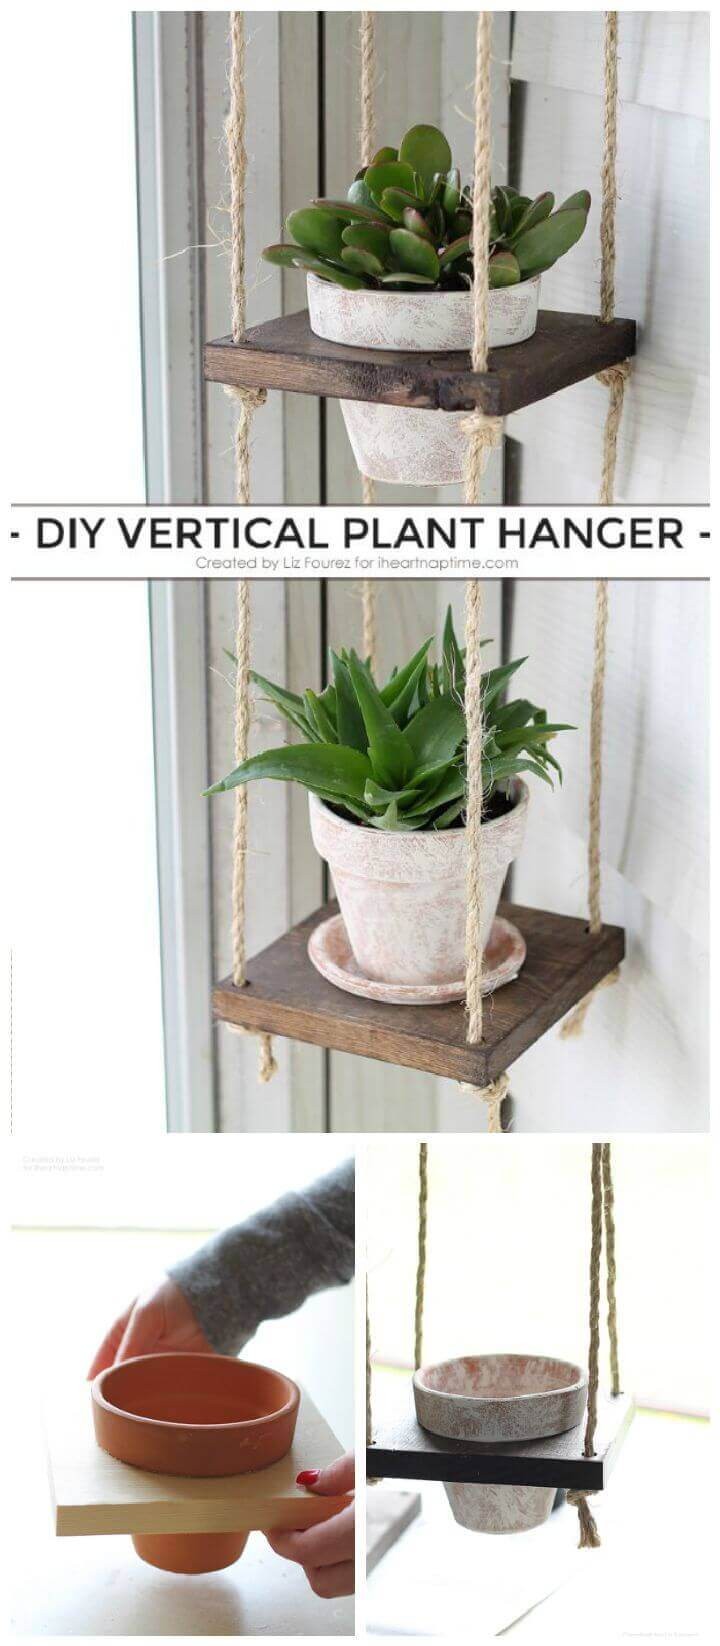
Transform your outdoor space into a lush oasis by crafting a unique DIY Vertical Plant Hanger. This easy-to-follow guide takes you through the process of creating a functional and visually appealing display, perfect for small spaces or those who want to maximize their vertical real estate. Start by gathering basic materials like reclaimed wood, terra cotta pots, twine, and some essential tools. Add a personal touch with paint or stain, then use a simple dry brushing technique on the pots to give them an organic charm. Assemble the hanger using knots and rope, securing it with a sturdy metal ring for effortless hanging. Finally, add your favorite plants, such as succulents, and enjoy the beauty of a thriving vertical garden indoors or out.
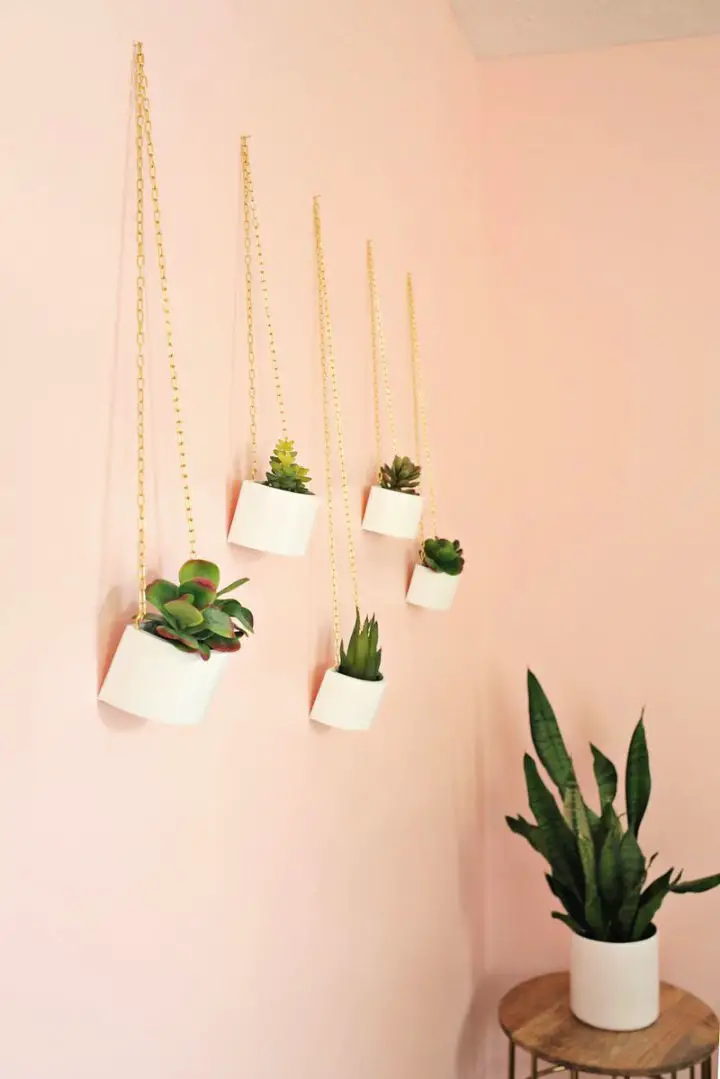
Easy DIY Hanging Planters
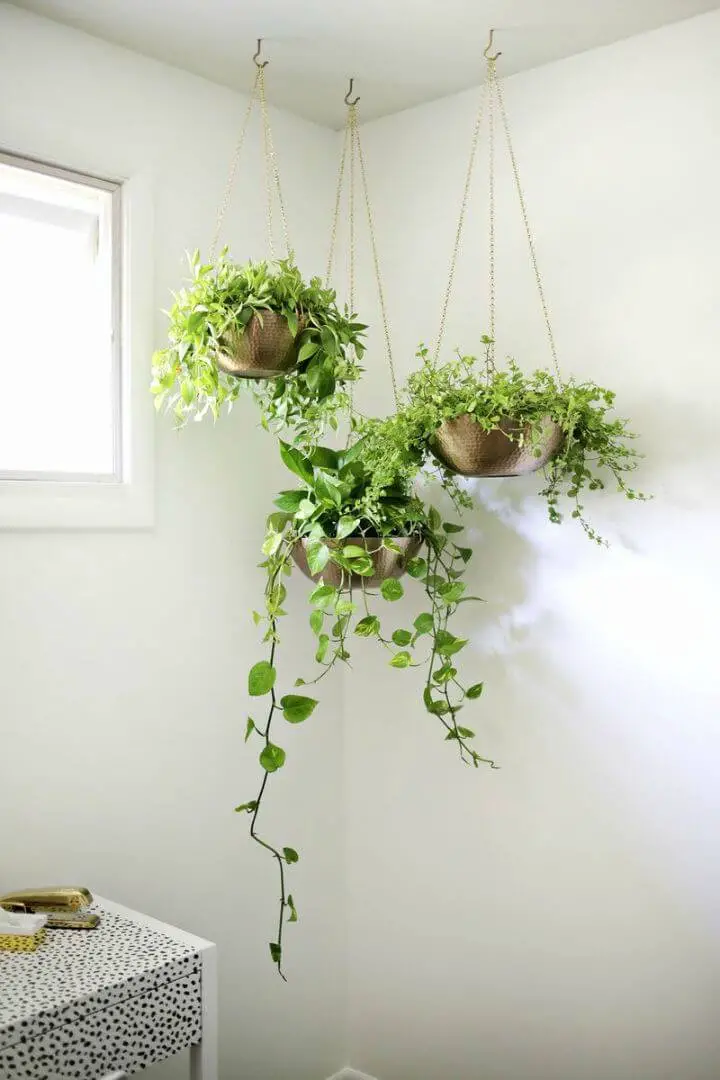
Transforming your home into a lush haven is now easier than ever with A Beautiful Mess’s Easy Hanging Planter DIY guide. By following Laura Gummerman’s straightforward steps, you can create stunning, space-conscious decor using just a few essential materials: metal bowls, drill bits, chains, and of course, an array of vibrant plants. With each step carefully outlined, you’ll master the process of drilling, painting, and assembling your own hanging planters, ultimately elevating your indoor gardening skills. Perfect for injecting a touch of natural beauty into any room, this DIY project is both enjoyable and rewarding. Give it a try and watch as your space comes alive with the sights and scents of nature.
Make Your Own Hanging Rope Planters
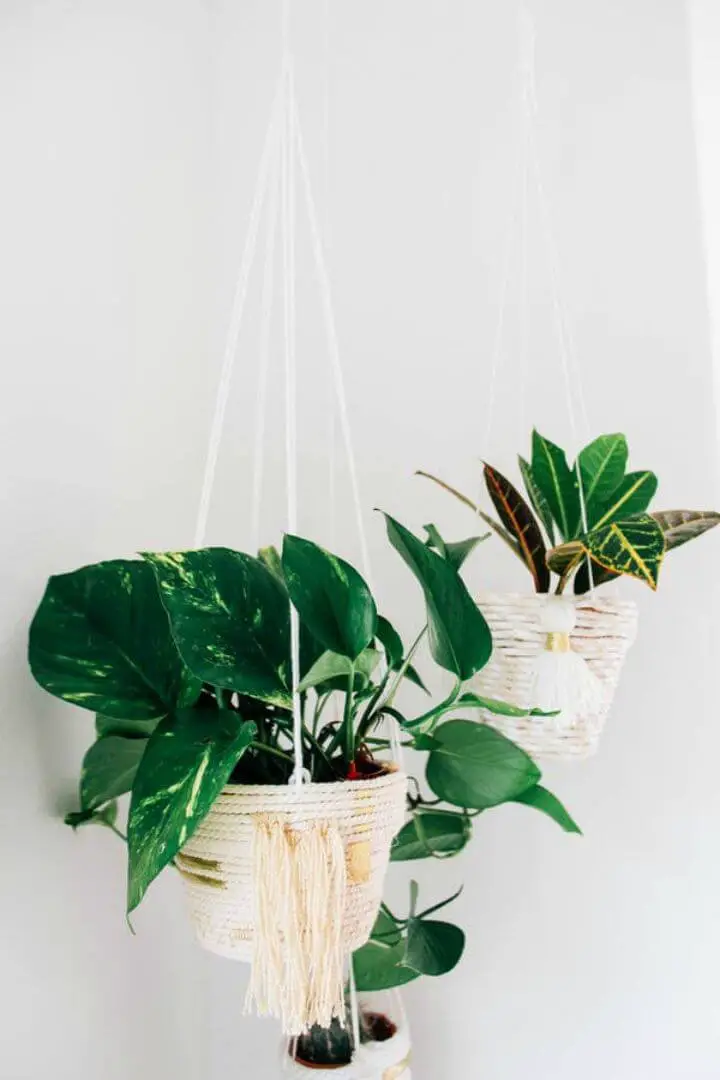
Transform ordinary pots into unique indoor planters by crafting DIY Hanging Rope Planters inspired by Alexis on Style Me Pretty. With basic supplies like cotton rope, gold ribbon, yarn, and hot glue, you can elevate a plain planter into a stylish hanging garden feature. Begin by wrapping raffia around the rope, securing it with glue to create a sturdy base. Add a bohemian flair by crafting fringe using yarn, then wrap the decorated rope around the pot, finishing it off with a yarn needle and a length of yarn to form the hanger. Once complete, add your favorite plant and proudly display it from a sturdy hook, effortlessly adding a personal touch of greenery to your home.
Make a Fishnet Hanging Planter
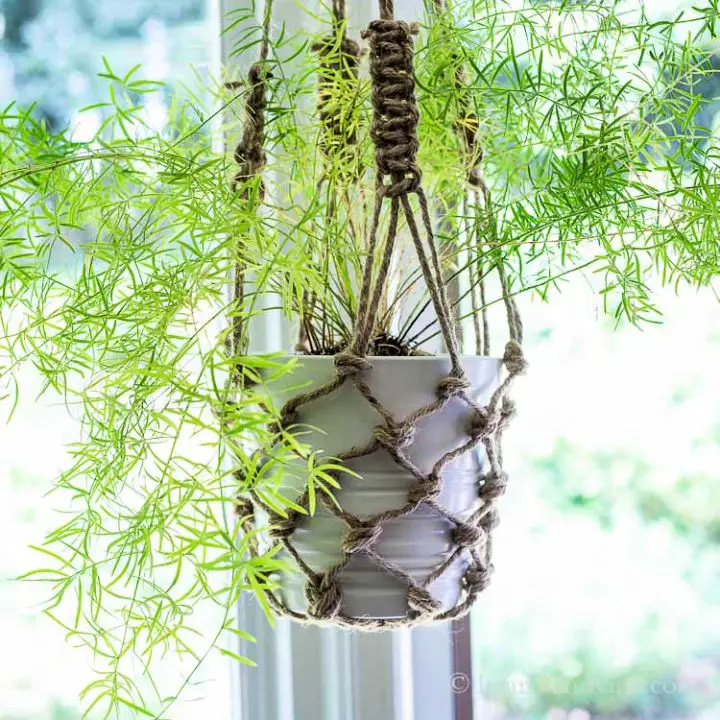
Transforming a small area into a lush oasis is easier than ever with the creation of a fishnet hanging planter. This ingenious decor piece not only adds a touch of greenery to any room but also preserves precious floor space, making it an ideal solution for plant enthusiasts. By following the simple and straightforward guide found at Hearth and Vine, you can craft this charming planter using just garden or butcher’s twine and some fundamental knot-tying skills. The result is a beautiful and functional piece that perfectly complements vining plants or any potted friend. With its budget-friendly price tag and stylish aesthetic, this DIY project is sure to delight plant lovers seeking to showcase their green thumbs. By mastering the simple instructions, you’ll be able to create an attractive fishnet hanging planter that brings life and character to your living space.
DIY Wooden Box Hanging Planter
Elevate your dining area’s ambiance by crafting charming wooden box hanging planters, inspired by Laura Gummerman’s tutorial on A Beautiful Mess. This DIY guide is ideal for those who delight in creating one-of-a-kind home decor pieces. By repurposing small wooden jewelry boxes and halving them with a jigsaw, you can add a personal touch through painting and optional waterproofing for live plants or succulents—real or faux. Hang the planters individually or in groups to suit your space’s unique character. This effortless project invites you to bring a touch of nature indoors, perfect for those seeking simple, engaging, and practical ways to enhance their home.
Hanging Planter Out of Wood and Rope
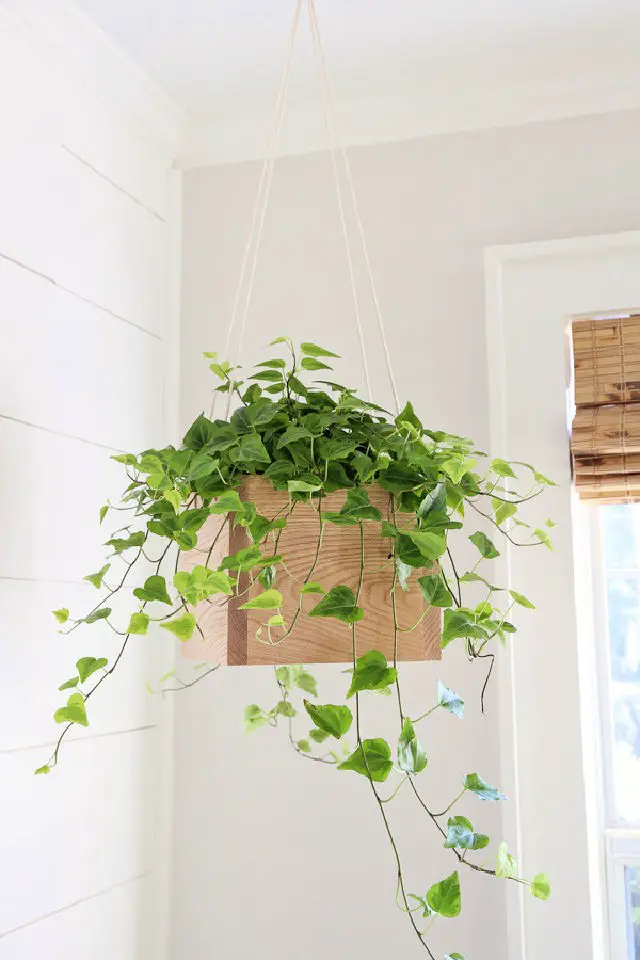
Transform your space with a charming DIY hanging planter, courtesy of Angela Marie Made’s comprehensive guide. This step-by-step tutorial empowers you to create a beautiful wood and rope plant hanger that showcases your favorite indoor plants in an effortless manner. With a straightforward materials list featuring wood, rope, and essential tools, you’ll be able to assemble a functional and stylish planter that brings a touch of greenery to any room. The process is simplified with clear instructions for cutting, drilling, assembling, and finishing the planter, ensuring a secure and attractive display for your plants. By mastering this easy and engaging woodworking project, you can elevate your home decor and create a unique focal point in your space.
DIY Cotton Rope Hanging Planter
Transform any space with the beauty of handmade craftsmanship by creating a cotton rope DIY hanging planter using Lia Griffith’s step-by-step guide. This simplified macrame project yields an eye-catching result while minimizing complexity, making it perfect for crafting enthusiasts of all levels. To get started, gather your materials – cotton rope, yarn, and a metal ring – and prepare to bring creative vision to life. With Lia Griffith’s focus on detail and creativity, this premium crafting experience turns simple elements into stunning home decor pieces, offering an enjoyable and rewarding journey for crafters.
How to Make a Wood Slice Hanging Planter
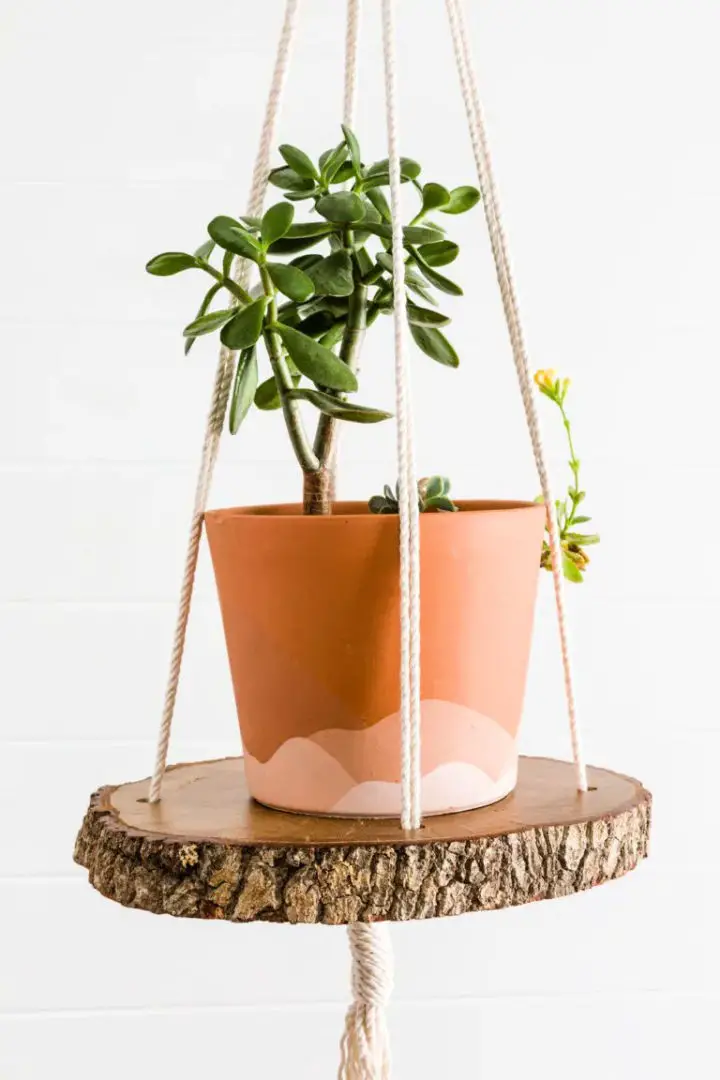
Transform fallen trees into stunning home decor pieces with a unique DIY project. Join Kippi at Home on a step-by-step journey to create a bohemian-inspired house plant hanger using a reclaimed wood slice from a tree that’s seen better days. With basic tools like a moisture meter, drill, and macrame cord within arm’s reach, you’ll be well-equipped to embark on this eco-friendly adventure. As you sand, seal, and add a personal touch with a custom macrame design, you’ll not only breathe new life into natural materials but also bring a charming, organic vibe to your indoor space. This DIY hanging planter doubles as a creative side table or decorative shelf, making it a versatile addition to any room that’s sure to delight plant enthusiasts and those who appreciate the beauty of upcycled design.
Making a Unique Hanging Planter
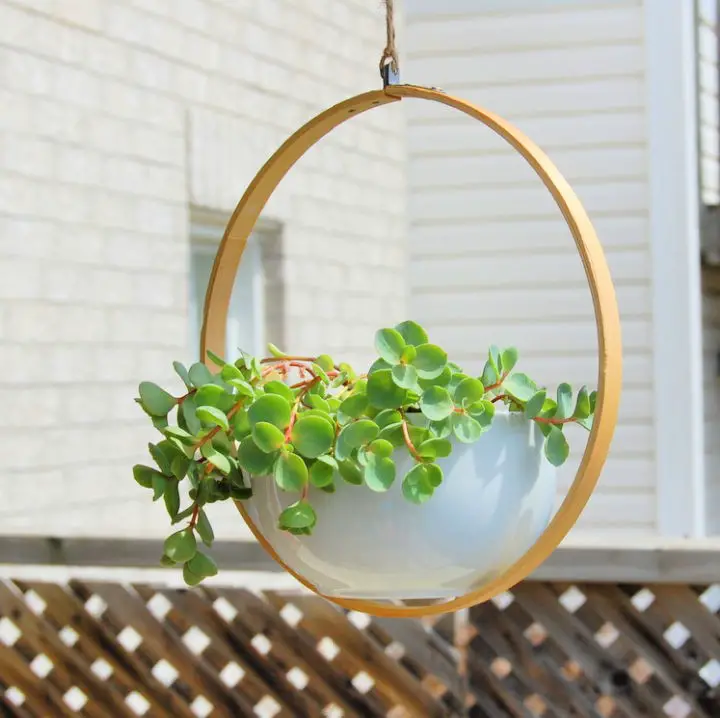
Add a touch of personality to your decor by creating a one-of-a-kind hanging planter using an embroidery hoop from Northstory + Co. This DIY project, led by Alex, is the perfect way to breathe new life into any space without breaking the bank. With a straightforward shopping list and valuable tips like choosing a sturdy hoop and considering drainage options, this tutorial is ideal for crafty beginners and seasoned makers alike. As you transform your living area or outdoor space with this stylish, functional, and eye-catching planter, you’ll discover that it’s not only a great way to add some greenery to your space but also a fun and creative outlet.
DIY Plywood Hanging Planter
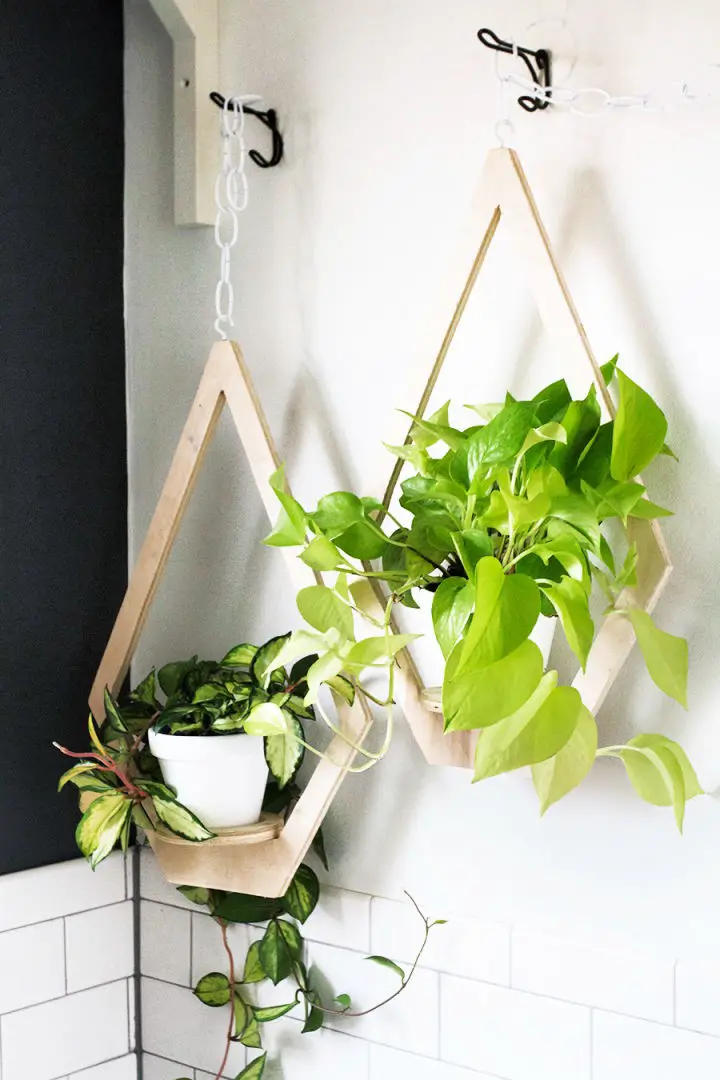
Elevate your front porch’s aesthetic appeal by upcycling plywood into geometric hanging planters inspired by Scandinavian design. By following Deuce Cities Henhouse’s step-by-step guide, you can transform a simple DIY project into a stunning centerpiece for showcasing your favorite plants. The combination of cost-effective materials and creative craftsmanship results in eye-catching, precision-cut shapes that add a personal touch to your outdoor decor. To achieve the perfect angles, rely on a carpenter square, while a compass helps ensure precise circular bases. Once you’ve sanded the edges, attached the base, and added a hook and chain, you’ll be ready to hang your handcrafted planter and enjoy the satisfaction of a unique, eco-friendly addition to your home.
Free Macramè Hanging Planter Pattern
Step into the world of DIY crafts with Reality Daydream’s comprehensive Macrame Hanging Planter tutorial, where simplicity meets creativity. This engaging guide, paired with a helpful video, demystifies the process of creating your own planter, making it accessible to crafters of all levels. As you work through the step-by-step instructions, you’ll discover how Half Square Knots can be woven together to form a visually striking spiral design that’s sure to delight. With just a few basic materials – macrame cord, brass rings, and a planter pot – you’ll be well on your way to crafting a charming home for your favorite plants. Whether you’re looking to add a personal touch to your decor or gift someone special with a unique piece, these Macrame planters are not only easy to make but also a stylish addition to any room. Join Reality Daydream on this creative journey and watch your crafting skills blossom!
Personalized Beaded Plant Hangers
Transform your living space with a unique touch of greenery by crafting your own beaded plant hangers. Jeran from Oleander and Palm shares a simple DIY project on the Crate&Kids Blog that will add a retro flair to your home decor. With minimal materials like natural twine, wooden beads, and craft paint, you can create a personalized plant holder that reflects your personal style. The process involves cutting, knotting, and beading the twine to form a sturdy and decorative holder for your plants. This project is perfect for small spaces or keeping greenery out of reach from little hands, offering a creative way to showcase your plants. Follow Jeran’s step-by-step guide and you’ll have a beautiful, handcrafted addition to your room in no time.
DIY Plant Hanger from Fabric Strips
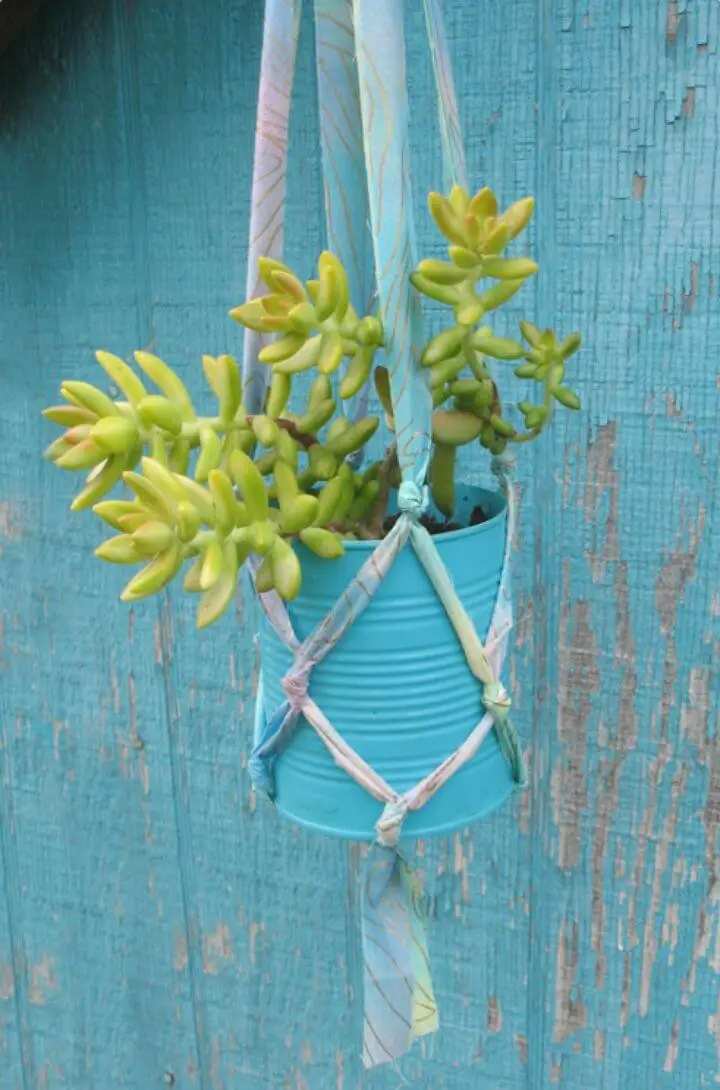
Transform your home or garden into a charming oasis with this simple DIY project. Using just four fabric strips or ribbons and a metal ring, you can create a one-of-a-kind accessory that’s not only eco-friendly but also adds a personal touch to your decor. This easy-to-follow guide takes you through each step, from securing the fabric to the ring to crafting the intricate knots that give this hanger its unique charm. Perfect for crafters who love repurposing materials, this project is a great way to get creative and add a pop of color with painted tin cans serving as plant holders. With its blend of practicality and artistry, crafting your own fabric strip plant hanger is a delightful way to beautify your space.
Making a Wall Hanging Planter
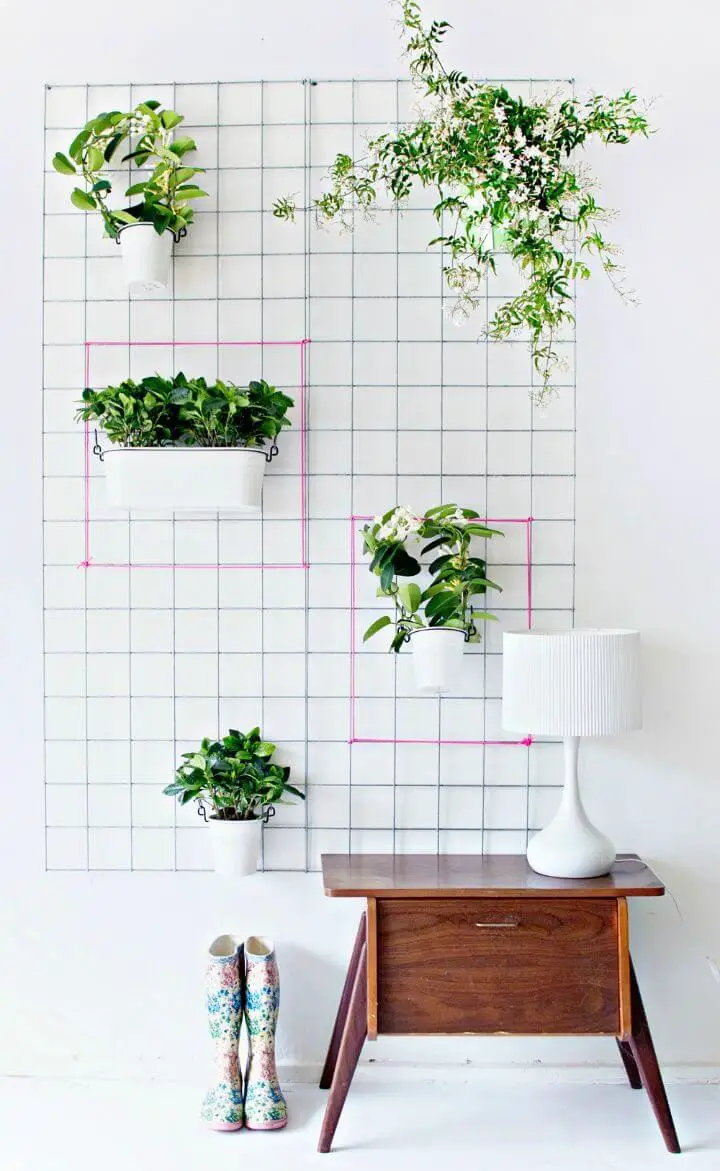
Transform any living space into a serene oasis by creating a lush green wall using the simple yet effective Wall Planter DIY guide from Lana Red Studio. This customizable vertical garden is perfect for homes of all sizes, serving as both a functional room divider and an artistic statement piece. To add a personal touch, incorporate artwork, notes, and memorabilia, making it a unique reflection of your personality. For expert care tips and further inspiration, visit Lana Red Studio to bring the beauty of nature indoors.
Easy Vertical Herb Garden Ideas
Transform your window space into a thriving vertical herb garden with ease, thanks to HomeMade Modern’s comprehensive guide on EP29 Hanging Gardens. This straightforward DIY project is ideal for anyone seeking to infuse their home with the beauty of greenery. A concise list of essential supplies, including terra cotta pots, pine boards, and rope, sets you up for success in crafting a functional and visually appealing hanging garden.
The step-by-step instructions, from drilling precise holes to carefully stringing together the wooden boards, ensure a seamless DIY experience. With clear guidance on sanding, securing, and planting, you’ll be able to confidently step back and appreciate your handiwork. By bringing this engaging project to life, you can effortlessly enhance any indoor space with a touch of nature’s charm.
DIY Wood Hanging Planter

Transform your outdoor space with a charming wood planter, crafted in under an hour for less than $20. Shanty 2 Chic’s DIY guide provides clear measurements, assembly instructions, and expert tips for achieving a polished finish. With just basic materials like pine wood, rope, clay pots, and tools such as a drill and spray paint, you’ll be able to create a unique and stylish addition to your home. By following this easy-to-follow tutorial, you’ll bring a touch of greenery to your walls and enjoy the satisfaction of a homemade project.
Modern Copper Pipe Hanging Planters
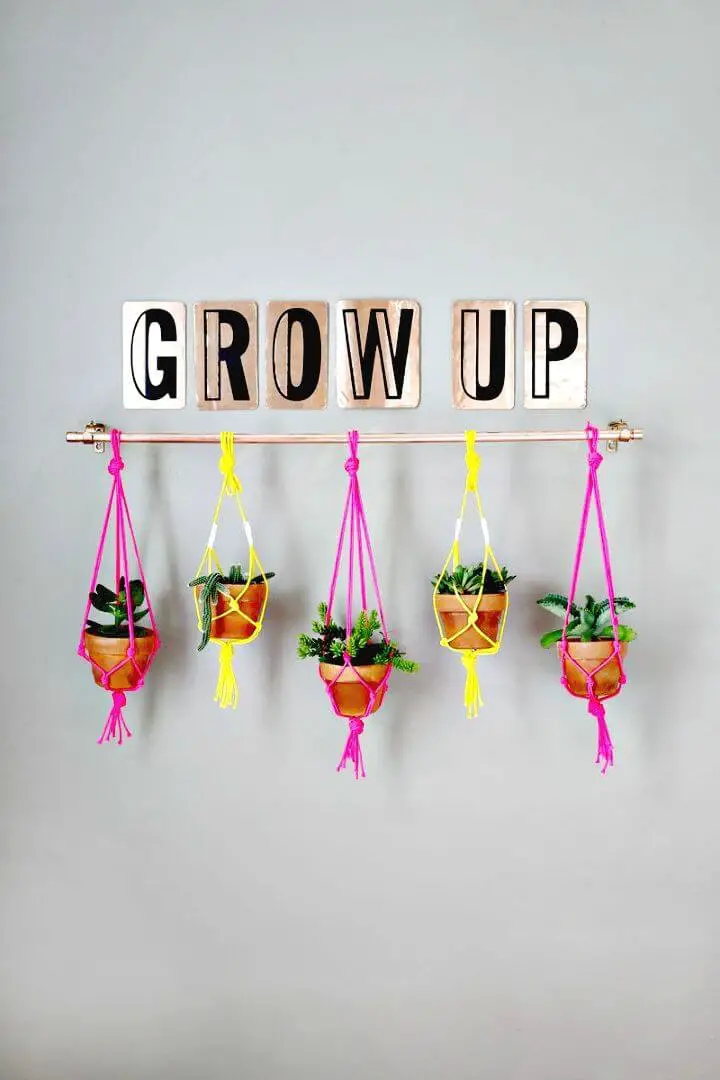
Transform your dining space into a modern oasis by creating a DIY Copper Pipe Hanging Planter, a project that’s as enjoyable to make as it is visually appealing. This endeavour is guided by Laura Gummerman, who provides a straightforward and comprehensive guide on crafting the perfect planter feature for any room, complete with lush greenery. The required supplies are minimal yet effective, comprising copper pipes, paracord, and small succulents. With clear step-by-step instructions, assembling your own hanging garden has never been more accessible. A Beautiful Mess offers additional insights, including secure installation techniques and expert advice on crafting macrame rope planters. Are you ready to elevate your space with a charming and easy addition? Start creating your hanging planter today and bask in the revitalising ambiance it brings to your home.
DIY Leather and Clay Planters
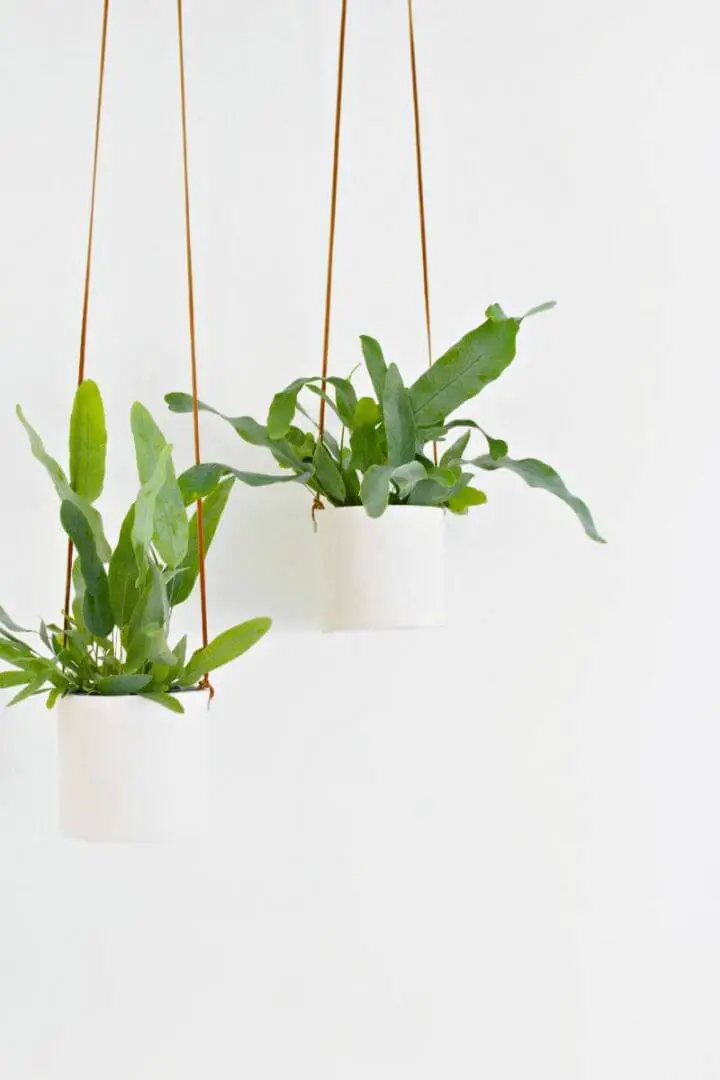
Transform your home with this simple DIY tutorial on creating one-of-a-kind hanging planters using air-dry clay and leather cord. This charming project requires just a few basic materials – including a rolling pin, craft knife, and sandpaper – which you’ll use to shape and assemble the planter before finishing it off with a sturdy leather hanging loop. Perfect for adding a touch of greenery to any space, this tutorial is ideal for enhancing alcoves or corners in need of a little life. Simply customize the size to fit your favorite ferns or small houseplants and enjoy the satisfaction of creating your own unique decor. With clear steps and practical tips, this guide ensures a successful and enjoyable crafting experience.
Make a Diamond Hanging Planters
Transform your space with ease by crafting unique diamond hanging planters using the Crafted Sparrow’s DIY guide. With minimal investment in supplies like chipboard, acrylic paint, and a Cricut Explore Air, you can create stylish vessels perfect for showcasing succulents or adding a touch of organization to your desk. Follow a straightforward process to cut, assemble, and paint your diamond shapes, then take it up a notch with leather cording for a personalized finish. This budget-friendly project offers a creative outlet to elevate your decor without sacrificing your wallet. Get inspired and infuse your space with the charm of these handmade planters.
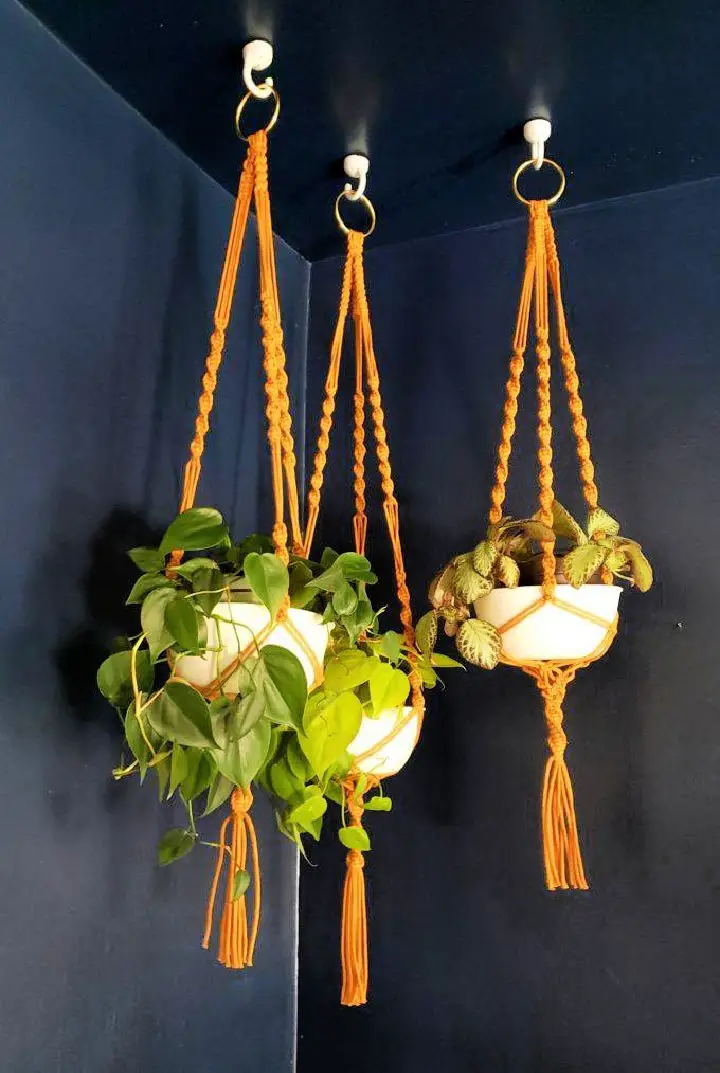
Macrame Hanging Planters for Home Decor
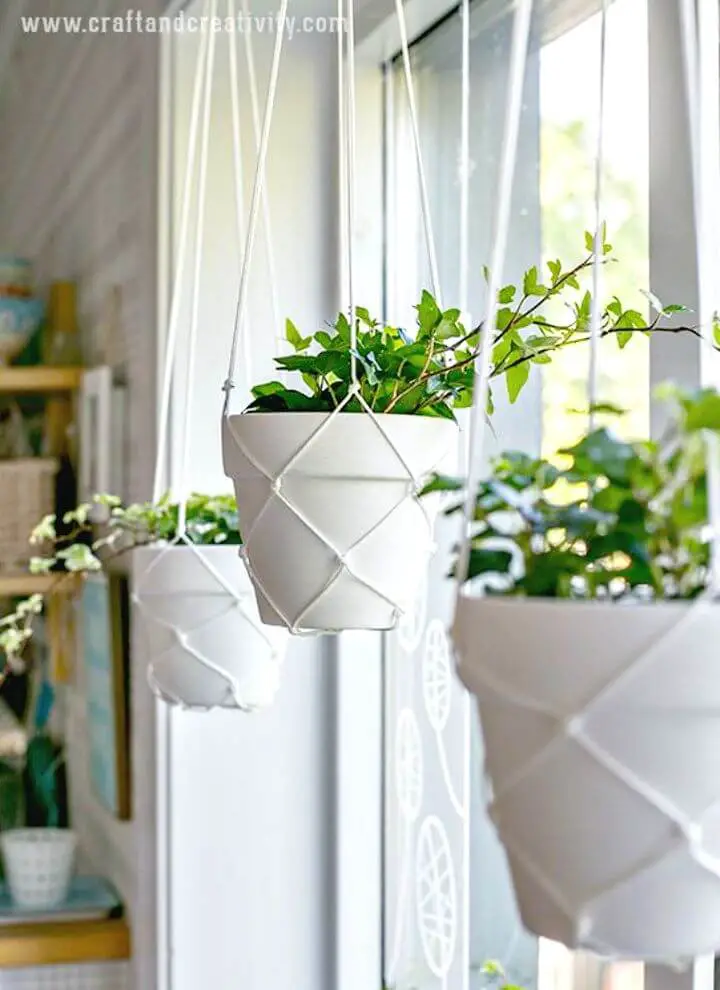
Transforming ordinary terracotta pots into unique macramé hanging planters is an innovative way to personalize your home’s décor while honing your creative skills. By following a simple, step-by-step guide on crafting these charming containers, you’ll learn the art of knotting and cutting macramé cord to create a sturdy cradle for the pot. The finishing touch comes with adding a splash of color through paint, allowing you to customize the look to suit your personal style. Not only is this project calming and meditative, but it also yields a beautiful piece that can elevate any room’s ambiance. To add an extra layer of visual interest, experiment with varying lengths for your finished planters or maintain uniformity for a cohesive display. With clear instructions, you’ll be empowered to create a stunning macramé masterpiece that showcases your passion for greenery and handcrafted decor.
Handmade Hanging Basket Garden

For those with limited outdoor space or a desire to shield their plants from inquisitive pets, creating a hanging basket garden presents a clever solution. By following Rachel Denbow’s straightforward DIY guide on A Beautiful Mess, you can craft a charming vertical herb and flower arrangement using woven baskets and braided polyester rope. This project is particularly well-suited for apartment dwellers or homeowners seeking to bring a touch of greenery into their space without the commitment of dedicated ground cultivation. By selecting plants tailored to your specific sunlight and watering conditions, you’ll be able to maintain a thriving vertical garden that not only adds visual appeal but also serves as a clever deterrent against mischievous paws and curious little hands.
DIY Hanging Birdcage Planter:
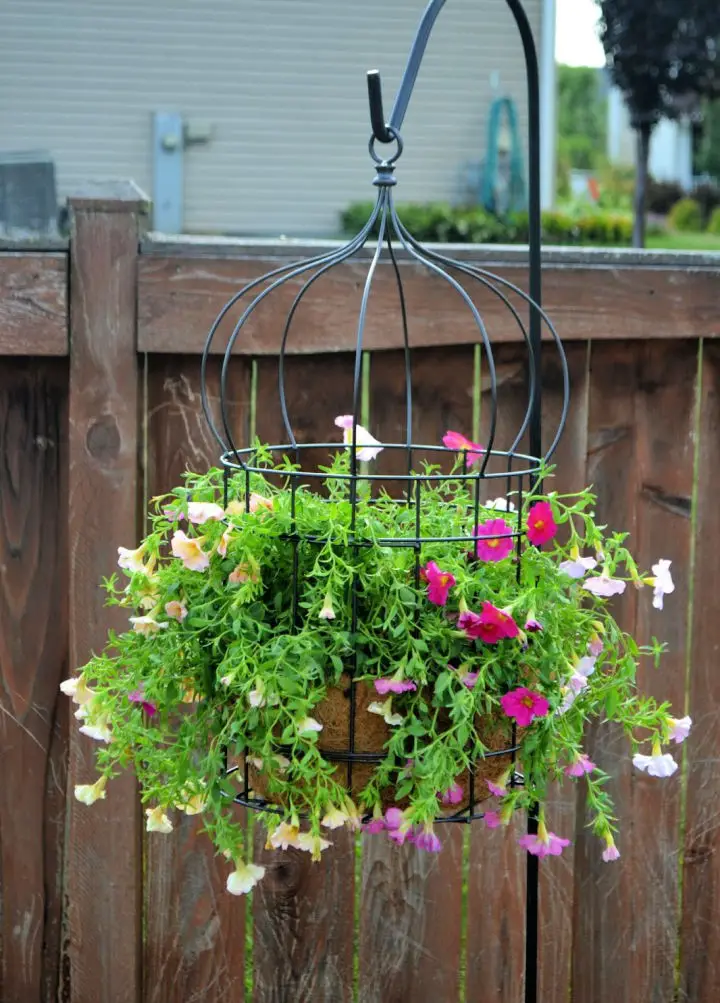
Transform an old birdcage into a stylish and easy-to-create hanging planter with just a few simple steps. Sherri’s creative endeavor requires only minor effort and time, as she expertly updates the cage with a fresh coat of paint and cleverly utilizes a coco liner and vibrant petunias. Follow her step-by-step guide to replicate this elegant garden addition, guaranteed to impress neighbors and passersby alike. Perfect for those who appreciate unique, upcycled garden projects, this DIY planter is an ideal way to add a touch of sophistication to your outdoor space.
Neon Straws and String Hanging Planter:
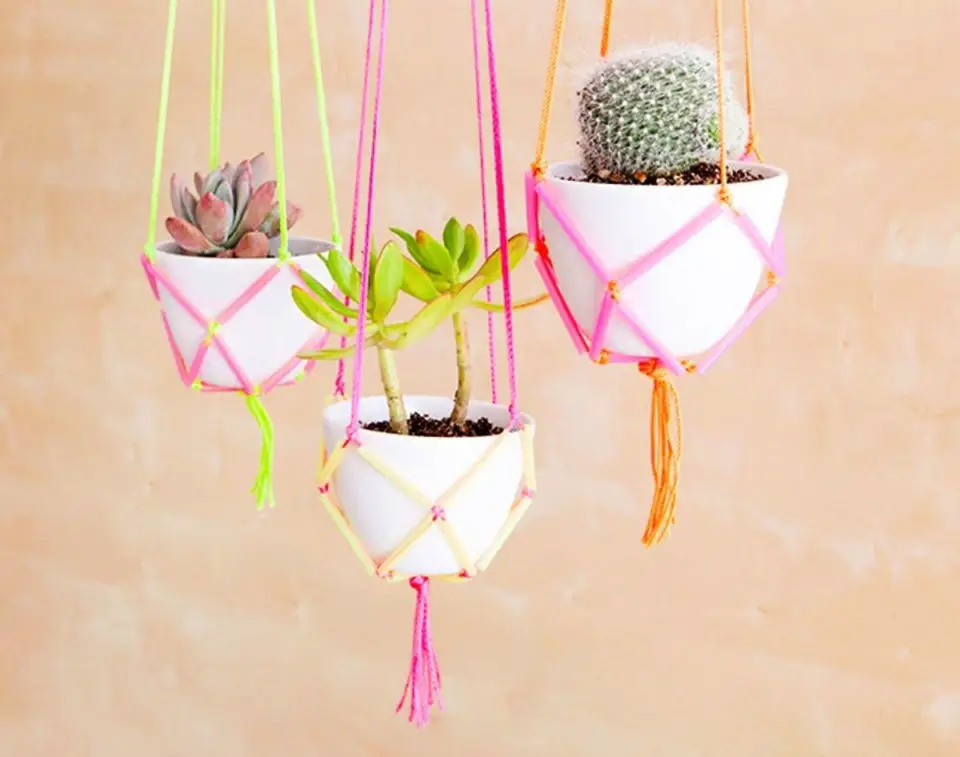
Transform your home’s aesthetic by crafting modern and vibrant DIY hanging planters using neon straws and string, as guided by Brit + Co. This 15-minute project requires just a few simple materials: neon cord, neon straws, and your preferred succulents. By following step-by-step instructions to cut, knot, and assemble the pieces, you’ll create a playful geometric design that will inject life and style into any room. Not only is this activity a fun and creative outlet, but it’s also an innovative way to display your plant collection. With these easy-to-make and strikingly unique decorations, you’re just a few minutes away from livening up your surroundings with a splash of color.
Leather and Brass Teardrop Hanging Planter:
Transform a stylish DIY Leather and Brass Teardrop Hanging Planter with this comprehensive tutorial from Vintage Revivals. For just $15, you can create a unique, geometric-inspired decor piece that doubles as oversized earrings. To get started, gather brass tubing, a mini tubing cutter, floral wire, leather lace, and a small bowl. While cutting the tubing might take some time, it’s an easy task to accomplish while multitasking. The step-by-step guide will walk you through forming pentagons with the tubing and wire, constructing a one-of-a-kind teardrop frame, and finally, assembling the planter with a leather loop for hanging. Add some succulents, and you’ll have a breathtaking new home accessory that showcases your creative flair and love for modern design.
Homemade Painted Hanging Planter
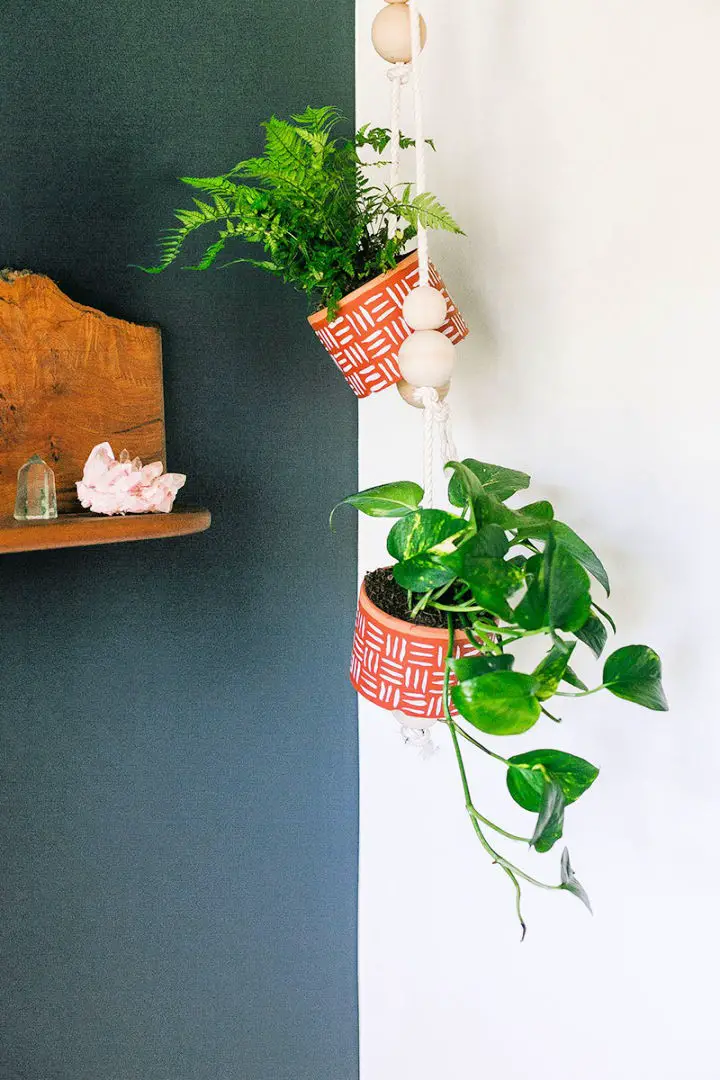
Elevate your home’s atmosphere with a touch of handmade elegance by creating a unique hanging planter using a terra cotta pot and beaded rope from Jojotastic. This straightforward guide empowers you to craft an eye-catching geometric design on the pot, suspended effortlessly by the beaded rope. To get started, gather acrylic paint, big wood beads, rope, clay pots, and brushes. Begin by applying a burnt orange base coat to the pot, followed by adding a distinctive pattern with white paint. Cut the rope to your desired length, add your preferred greenery, and thread the rope through to secure the pot. Complete the project by threading more beads onto the rope and hang your planter using an eye hook. This DIY is ideal for small spaces, bringing a charming touch to your indoor garden. For the complete tutorial and more creative ideas, visit Jojotastic.
Conclusion:
As you conclude this exploration of 25 DIY hanging planter ideas, you’ve tapped into a world of creative possibilities and personalized home or garden design. From the initial material selection to the execution of step-by-step instructions, crafting your own hanging planters can be an incredibly fulfilling experience. This comprehensive guide not only provides the foundation for creating functional and visually appealing planters but also addresses common questions that may arise during the process. With these insights in mind, pick up your tools, let inspiration strike, and embark on a journey of crafting beautiful hanging planters that elevate your space and bring lush greenery to new heights. Best of luck and happy crafting!
