Transform your outdoor space with 10 creative DIY garden hose holder ideas that combine functionality and personal style. Not only do these projects keep your garden tidy, but they also add a unique touch to your landscaping. With a wide range of materials and designs to choose from, you can create a custom hose holder that reflects your personality and complements your outdoor decor. In this guide, we’ll take you through the process of crafting your own garden hose holder, from selecting the right tools and materials to adding the perfect finishing touches. Join us on this DIY adventure as we explore the possibilities of creative gardening!
How to Make a Garden Hose Holder – Step by Step
Building a wooden hose holder is a satisfying DIY endeavor that not only keeps your garden hose organized but also adds a touch of elegance to your outdoor space. This project requires minimal materials and tools, making it accessible to woodworkers of all skill levels. We’ll utilize a 4-foot length of 5/4-inch Ipe wood as our primary material, though feel free to adapt the design to suit your preferences or available resources. It’s essential to note that when working with hardwoods like Ipe, pre-drilling screw holes is crucial to avoid damaging your screws during assembly.
Materials and Tools Needed
To embark on a woodworking project, you’ll need to gather some essential tools and materials. For this particular endeavor, start by acquiring a 4-foot piece of high-quality 5/4″ Ipe wood – or choose a wood that suits your project’s requirements. Additionally, make sure you have the following items at hand: suitable screws for the type of wood you’re working with; a reliable drill for precision and speed; a saw for cutting through even the toughest materials; a trusty measuring tape to ensure accurate measurements; sandpaper or an electric sander to smooth out any rough edges; and finally, a wood finish (if desired) to bring your creation’s aesthetic to the next level.
Step 1: Measure and Cut Your Wood
Before commencing with the cutting process, take precise measurements and mark your Ipe wood accordingly. For a straightforward hose holder, you’ll need to prepare three pieces: a backplate that will be mounted to the wall and two arms to hold the hose in place. A suitable size for the backplate is 12 inches in length, while the arms can be approximately 6 inches each. Utilizing your saw, carefully cut along the marked lines to achieve accurate results.
Step 2: Sand the Wood
To refine your wooden components, it’s essential to sand them thoroughly. This process not only eliminates any rough edges but also readies the wood for a finish application if desired. You can opt for traditional sandpaper or an electric sander to achieve a silky smooth surface. Ensure that all sides of each piece are meticulously sanded until they feel pleasant to the touch.
Step 3: Pre-drill Screw Holes
To ensure a smooth assembly process, it’s crucial to pre-drill holes in the wood before attaching the screws. This step is especially vital when working with hardwoods like Ipe, as it helps prevent splitting. Begin by placing the backplate piece on your work surface and positioning the arm pieces where you intend to attach them. Mark these spots with a pencil and then drill your holes accordingly. By taking this extra step, you’ll be able to achieve a secure and stress-free assembly process.
Step 4: Assemble the Hose Holder
To complete the assembly process, start by aligning the arm pieces with the pre-drilled holes on the backplate. Once properly aligned, securely fasten the arms in place using your chosen screw type. Double-check that the arms are firmly attached and the screws do not protrude from the surface, ensuring a sturdy and visually appealing structure.
Step 5: Mount the Hose Holder
When selecting a spot for your hose holder, consider positioning it near your primary water source for maximum convenience. Before installation, mark the area where you’ll be drilling into the backplate to secure it to the wall. Ensure that the backplate is level and firmly attached using a drill, guaranteeing a sturdy foundation for your hose holder.
Step 6: Apply Finish (Optional)
To safeguard your hose holder against the effects of weather and accentuate its visual appeal, consider applying a layer of wood finish. Once applied, ensure that the finish is fully dry before reinstalling your hose to prevent any potential damage or discoloration.
Video Tutorial
For those who learn better through visual aids, we recommend watching Longview Woodworking’s YouTube tutorial on creating a wooden hose holder, featuring Jon Peters. This comprehensive video guide perfectly complements our written instructions, providing a clear and step-by-step walkthrough of the assembly process. By following this visual approach, you’ll gain a deeper understanding of each stage involved in making your own wooden hose holder, which will ultimately help you create a functional and attractive addition to your garden. As with any woodworking project, remember that the journey is just as important as the end result – take pleasure in the process, learn new skills, and enjoy the satisfaction of creating something useful.
Design Customization for Your DIY Garden Hose Holder
Transforming a humble garden hose holder into a stunning focal point in your outdoor space is a delightful DIY endeavor. To infuse your creation with a unique personality, consider incorporating decorative elements that harmonize with the surrounding landscape. For instance, you could adorn your holder with natural materials like driftwood, seashells, or even stones, allowing it to blend seamlessly into its environment.
Choose Your Style
When designing your garden’s aesthetic, it’s essential to consider the overall style you’re aiming for. This will help guide your choice of hose holder and ensure it complements the surrounding environment. Think about whether your garden has a modern, industrial feel, a rustic charm, or perhaps a more traditional cottage-style atmosphere. Once you’ve established this foundation, you can begin to select materials and designs that align with your theme. For instance, if you’re going for a sleek, modern look, a hose holder made from metal or concrete with clean lines could be the perfect choice. Alternatively, if you’re aiming for a more rustic feel, consider repurposed wood or even a vintage wheel rim to add character and whimsy.
Selecting Colors
When it comes to choosing the color of your hose holder, there are a few factors to consider. On one hand, you could opt for a bold hue that intentionally stands out against the surrounding greenery, creating a visually striking contrast. Alternatively, if you prefer a more understated approach, selecting shades that harmonize with your garden’s natural palette can help the hose holder blend seamlessly into its surroundings.
Adding Decorative Elements
Elevate your hose holder game by adding some personal touches! Here are a few ideas to get you started:
Add a dash of whimsy with garden-themed charms that match your outdoor decor.
Make it functional and fabulous by incorporating your house number for an easy way to identify which hose is yours.
Bring in some extra greenery with a small planter on top or side of the hose holder. Not only will it add a pop of color, but it’ll also keep the surrounding area looking lush.
Material Matters
When selecting materials for your outdoor space, prioritize durability and weather-resistance. For wooden components, opt for treatments or seals that safeguard against rot. Metallic elements, on the other hand, require rust-proofing or a protective paint job to withstand the elements.
Final Touches
To give your backyard oasis a dash of personality, consider incorporating these finishing touches:
* Hooks and shelves: Think outside the box – literally – by adding hooks for hanging garden tools and a shelf for storing gloves or seed packets.
* Lighting: Illuminate your outdoor space with solar-powered lights that provide a warm glow in the evening. Imagine sipping lemonade under the stars!
* Signage: Get creative and craft a sign that welcomes visitors or shares a humorous quote about gardening. The possibilities are endless!
And don’t forget to make a statement with a one-of-a-kind garden hose holder – let your imagination run wild and create something truly unique.
Enhancing the Functionality of DIY Garden Hose Holders
Elevate the functionality of your garden hose holder to revolutionize your gardening experience. By incorporating these simple yet effective upgrades, you’ll streamline your daily routine and make the most out of your outdoor space.
Mobility and Convenience
When designing or upgrading a garden hose system, consider incorporating movable components to enhance flexibility and ease of use. For instance, equipping your hose holder with wheels allows for seamless repositioning, which is particularly advantageous in larger gardens where hoses may need to be relocated frequently. Additionally, a retractable hose reel can simplify the process of winding and unwinding the hose, reducing the physical strain associated with traditional methods.
Storage Solutions
One way to take your hose holder to the next level is by incorporating additional storage. This can be achieved through various design elements that cater to different gardening needs. For instance, built-in compartments are perfect for stashing away small items like gloves, nozzles, or hand tools. If you have larger equipment, such as watering cans, shelves above or below the reel provide ample space for them. Additionally, hooks strategically placed on the side of the hose holder allow you to hang your most frequently used gardening tools within easy reach, streamlining your entire gardening experience.
Smart Features
Elevate your gardening game by seamlessly integrating smart technology into your hose holder. This innovative approach enables you to optimize your routine and minimize waste. With the help of cutting-edge tools, you can automate tasks and receive real-time feedback on your plants’ needs.
Automate your watering schedule with timers that can remind you when it’s time to tend to your garden or activate a sprinkler system at your desired intervals. Moreover, smart sensors can monitor soil moisture levels, sending notifications when your plants require hydration.
By embracing this futuristic approach, you’ll be able to streamline your gardening process, conserve resources, and enjoy the satisfaction of nurturing a thriving green space.
Durability and Maintenance
When it comes to choosing materials for your outdoor space, prioritize those that will stand the test of time and demand little upkeep. For this reason, consider opting for metal or high-quality plastic alternatives, as they tend to be more resilient against the elements compared to untreated wood.
Safety Measures
When it comes to creating a DIY garden hose holder with kids or pets around, consider taking an extra step to ensure safety by incorporating certain features into your design. For instance, designing the reel to be lockable can prevent accidents from occurring when the hose unwinds unexpectedly. Additionally, ensuring that all edges are smooth and free of sharp protrusions will help prevent injuries. By prioritizing these safety considerations, not only will you create a functional tool for watering your garden, but you’ll also demonstrate a thoughtful approach to maintaining a safe and enjoyable outdoor space.
Sustainability Tips for Your Garden Hose Holder
Integrating sustainability into your DIY endeavors yields a trifecta of benefits – it’s good for the planet, fosters a deeper sense of connection with your garden, and ultimately enhances your overall satisfaction. To illustrate this concept, let’s take a closer look at how you can create an eco-friendly garden hose holder that not only serves its intended purpose but also minimizes its environmental footprint.
Use Recycled Materials
When it comes to creating a unique and eco-friendly hose holder, start by thinking outside the box – literally. Instead of relying on new materials, look for items that have already had a life. This could include:
Old pallets: Disassemble these wooden wonders and use the wood to create the framework of your hose holder.
Repurposed metal: Give an old barrel or bucket a second chance by transforming it into a sturdy base. Not only will you be reducing waste, but you’ll also add a touch of industrial chic to your outdoor space.
Non-Toxic Treatments
To treat your materials sustainably, consider the following eco-conscious options:
When it comes to wood finishes, choose natural wood stains made from wholesome ingredients like oils and waxes. These non-toxic alternatives not only reduce environmental impact but also promote a healthier indoor atmosphere.
For a more comprehensive approach, opt for eco-friendly paints that boast low levels of volatile organic compounds (VOCs). By doing so, you’ll minimize the release of harmful fumes into the air and contribute to a safer living space.
Water Conservation
When it comes to conserving water, even the humblest of household items – such as your hose holder – can make a difference. By incorporating some simple and clever design elements, you can turn this often-overlooked fixture into a water-saving superstar. For instance, consider attaching a funnel to direct rainwater straight into a storage container. Not only will this help collect precious precipitation, but it’ll also reduce the need for traditional watering methods that can be wasteful. Additionally, why not design your holder to seamlessly connect with a drip irrigation system? This clever hack will minimize evaporation and runoff, ensuring that every drop of water is used efficiently. By making these small changes, you can make a big impact on your water usage – all while keeping your hose holder working smarter, not harder.
Encourage Biodiversity
Transform your garden hose holder into a wildlife haven by incorporating these simple yet effective ideas. Start by adding a small birdhouse to the top of your holder, providing a cozy abode for feathered friends. Next, utilize the base of your holder as a planter for native flowers that attract pollinators and other beneficial insects. By doing so, you’ll not only add visual appeal to your outdoor space but also create a thriving ecosystem that supports local wildlife.
Longevity and Repair
When crafting your own garden hose holder, prioritize longevity by selecting durable materials like hardwoods and galvanized metals, which naturally resist decay and rust. Additionally, design the structure for easy repair or replacement of individual parts, ensuring that any necessary adjustments can be made without compromising the entire unit. By taking these thoughtful approaches, you’ll create a functional and aesthetically pleasing hose holder that not only serves your needs but also demonstrates a commitment to environmental sustainability. Every small effort towards eco-friendliness has a positive impact!
Maintenance and Care for Your DIY Garden Hose Holder
To get the most out of your garden hose holder, it’s essential to prioritize its maintenance. Regular upkeep not only extends the product’s lifespan but also ensures its continued functionality. For a DIY creation like yours, follow these simple steps to keep it in top condition.
Regular Cleaning
To maintain the cleanliness and functionality of your hose holder, regular cleaning is crucial. A simple yet effective method involves using a damp cloth to wipe away any dirt or debris that may have accumulated. For metal hose holders, it’s essential to take an extra step to prevent corrosion by using a mild soap solution when cleaning.
Weatherproofing
When it comes to safeguarding your hose holder, consider these two essential steps to ensure its longevity. Firstly, apply a waterproof sealant to the wooden structure to prevent water damage from seeping in. This simple yet effective measure will help maintain the integrity of the holder and keep it functioning optimally. Furthermore, when harsh weather conditions arise or you’re not actively using your hose, take the time to cover the holder with a protective shield. This could be anything from a simple tarpaulin to a dedicated hose holder cover, but the end result is the same – a secure, rain-free and sun-protected surface for your hose to rest upon.
Inspect and Repair
Regularly inspect your belongings to ensure their structural integrity is maintained. Start by examining loose parts, tightening any screws or bolts that have worked themselves free over time. Additionally, be mindful of the signs of wear and tear that can gradually develop, such as cracks or rust, and take prompt action to address them before they cause further damage.
Proper Storage
To ensure your hose holder remains in top condition and ready for the next gardening season, proper care is crucial during the off-season. A well-maintained hose holder will not only withstand the harsh winter conditions but also continue to serve you well when spring arrives. Start by draining all water from the hose to prevent freezing and cracking. This simple step will go a long way in prolonging the lifespan of your hose holder. If possible, consider storing the hose holder indoors to shield it from the elements and maintain its structural integrity. By taking these precautionary measures, you’ll be able to keep your hose holder in great shape for years to come, allowing you to focus on nurturing your garden into a beautiful haven.
FAQs About DIY Garden Hose Holders
As you embark on your DIY garden hose holder project, several common inquiries arise. By addressing these concerns, users can sidestep potential issues and guarantee a successful outcome. To facilitate this process, we’ve compiled a comprehensive FAQ section that tackles the most pressing questions, providing valuable insights to guide you every step of the way.
What is the best material for a garden hose holder?
When selecting a garden hose holder, durability and weather-resistance are crucial factors to consider. A few materials stand out from the rest, each offering unique benefits. For instance, treated wood is an excellent choice, as it not only withstands rot but also repels insects. Metal options, such as rust-proof or coated metals, provide a durable solution that will last for years to come. Additionally, recycled plastic offers an eco-friendly alternative that can resist moisture, making it an ideal option for gardeners looking to reduce their environmental footprint.
How can I ensure my hose holder is stable?
To guarantee the stability of your hose holder, consider implementing the following measures:
Ensure a secure attachment: Fix your hose holder to a wall or fence using sturdy anchors.
Invest in a heavy base: If your hose holder is freestanding, a substantial foundation will prevent it from tipping over.
Regular maintenance: Routinely inspect and tighten any loose parts to ensure continued stability.
Can I add a decorative touch to my hose holder?
Transform your humble hose holder into a charming focal point by incorporating personal touches that reflect your garden’s unique style. To start, consider the colors you’ve chosen to dominate your outdoor space and match them with paint swatches or hues that will complement your surrounding landscape. Next, add some whimsy with ornaments that echo the theme of your garden. This might include signs bearing clever phrases or figurines featuring botanical motifs. Finally, bring in the natural world by integrating planters or allowing climbing plants to wrap around your hose holder, creating a lush and inviting atmosphere.
How do I protect my hose holder from the weather?
To safeguard your hose holder, several measures can be taken. One effective approach is to utilize waterproof sealants on wooden holders, thereby preventing water damage and rot. Another crucial step is to employ protective covers during instances of extreme weather conditions, such as heavy rain or scorching heat. Additionally, proper storage is vital; whenever possible, store your hose holder indoors during the off-season to shield it from harsh outdoor elements.
What tools will I need to build a hose holder?
To get started with DIY projects, it’s essential to have the right tools at your disposal. The foundation of any successful project lies in having the correct equipment for cutting, drilling, and assembling components. In this regard, three fundamental tools you’ll need are a saw, drill, and screwdriver. A saw is indispensable for trimming materials to the desired size, allowing you to shape and prepare them for use. Next, a drill plays a crucial role in making precise holes and securing parts together with screws or other fasteners. Finally, a screwdriver serves as a versatile tool for assembling and tightening screws, ensuring that your project remains sturdy and secure.
How can I make my hose holder eco-friendly?
To create an eco-friendly hose holder, consider repurposing old materials like pallets or metal drums for your project. Additionally, opt for natural stains and sealants to avoid using toxic treatments. Furthermore, incorporate a rainwater collection feature into your design to reduce waste and conserve this valuable resource.
By thoughtfully planning and executing your DIY garden hose holder, you’ll be able to enjoy the fruits of your labor while also doing your part for the environment. So, get creative, have fun, and make sure to answer these key questions along the way: what materials will I use? how can I minimize waste and maximize sustainability?
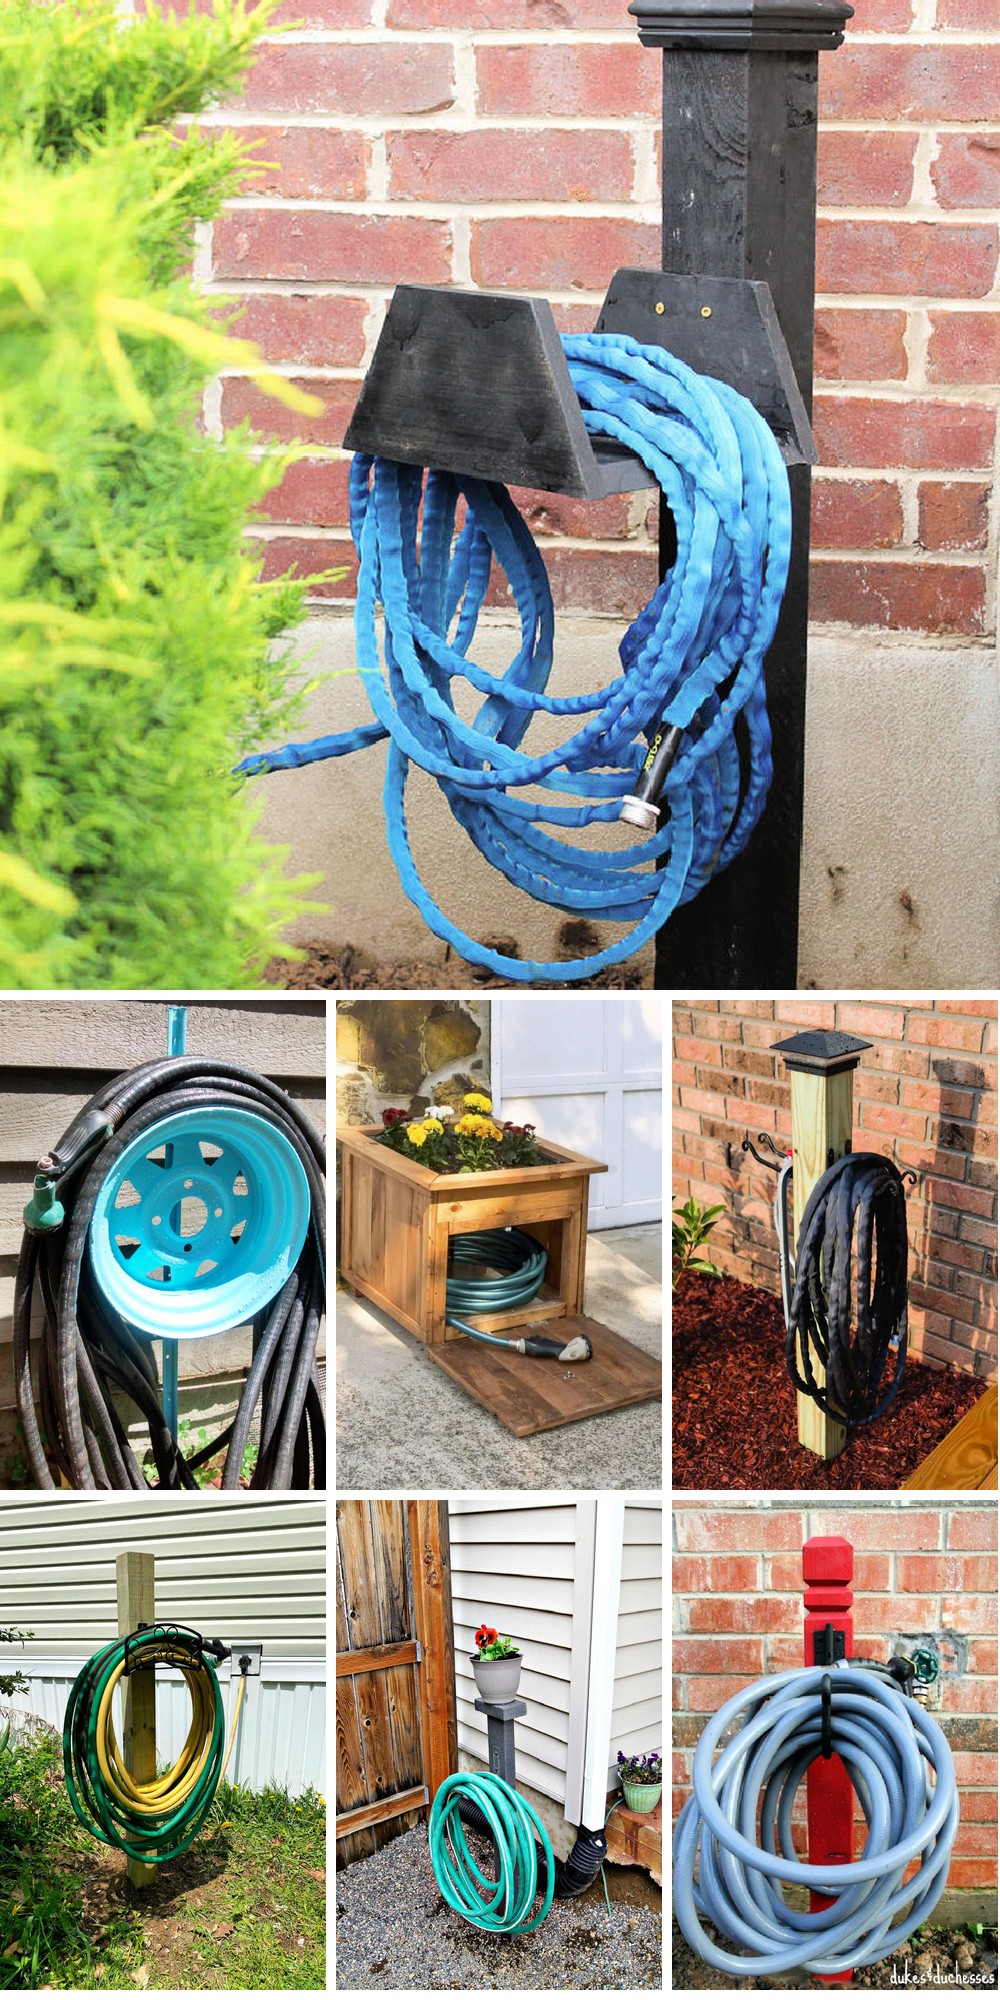
10 DIY Hose Holder Ideas for Garden
Transform the look and functionality of your outdoor space by incorporating one of these 10 innovative DIY hose holder designs. From rustic to modern, find inspiration for a more organized and visually appealing garden.
Adorable DIY Chunky Garden Hose Holder
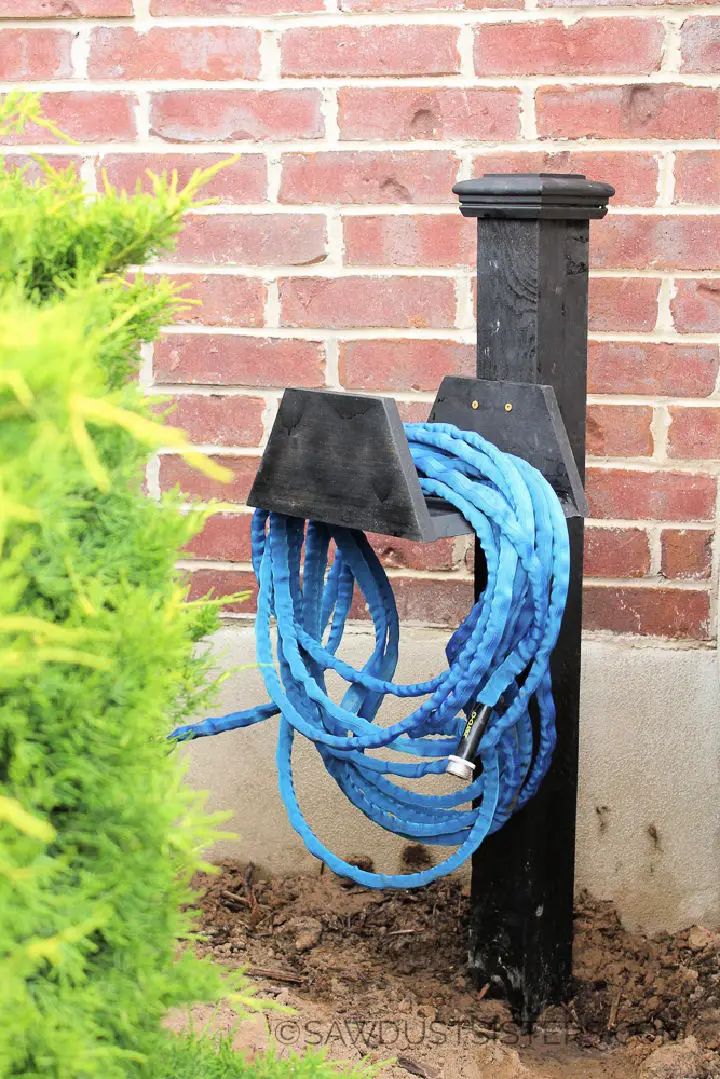
Transform your outdoor space with a functional and stylish DIY chunky garden hose holder. This effortless project eliminates the frustration of tripping over your hose, all while showcasing your creativity and resourcefulness. Crafted from durable cedar wood and assembled using basic tools, this innovative solution is perfect for beginners and seasoned DIY enthusiasts alike. By following our step-by-step guide, which includes a comprehensive list of materials and tools required, you’ll be able to create a beautiful and practical garden accessory that simplifies your gardening routine. Visit Sawdust Sisters for the complete instructions and more project inspiration.
Homemade Hose Holder for The Garden
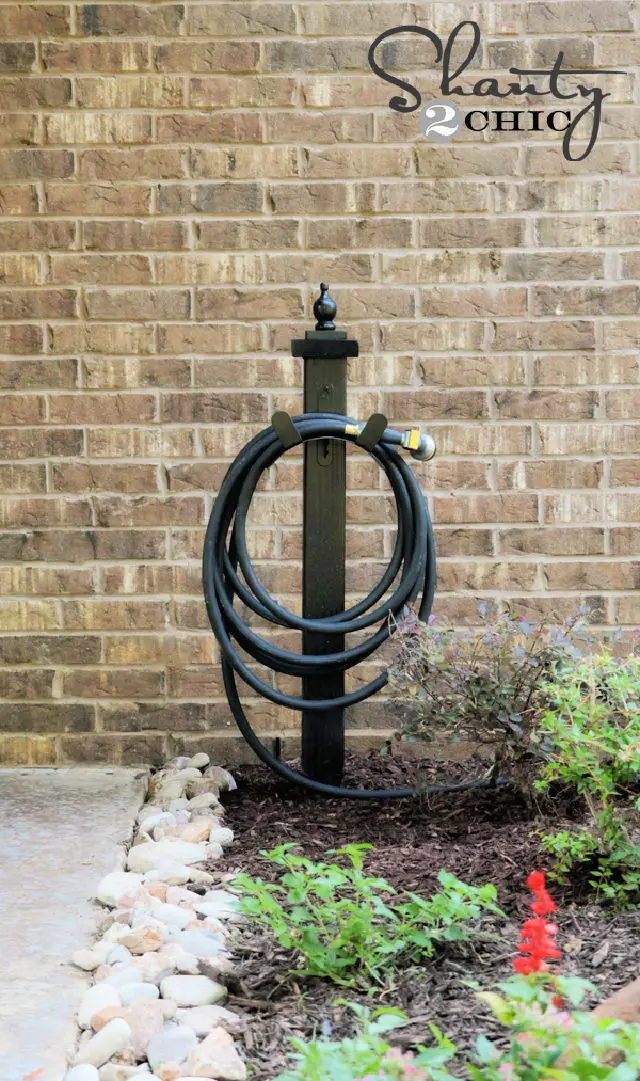
Transforming your garden with a simple yet stylish DIY hose holder is now within reach. By leveraging basic materials and following our straightforward instructions, you can create a functional and attractive addition to your outdoor space without breaking the bank or dedicating too much time. Our experts at Shanty-2-Chic have put together a practical guide that will show you how to craft a durable and charming hose holder using minimal tools and a humble pine board. This project not only addresses a common garden problem but also adds a touch of elegance to your yard, making it easier than ever to keep your garden organized.
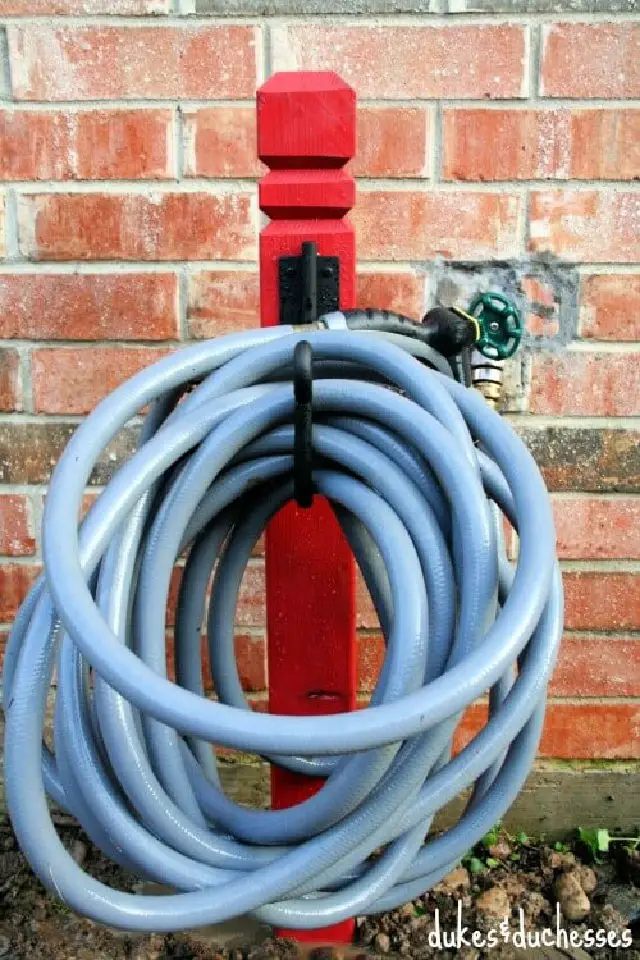
How to Make a Garden Hose Stand

Say goodbye to the chaos of tangled garden hoses with a charming DIY project from Hello Farmhouse. This straightforward guide will show you how to create a functional yet stylish hose stand that combines practicality with farmhouse charm. By following each step, from painting your post for a classic touch to securing it in concrete, you’ll ensure your hose stays neatly in place and enhances the appeal of your outdoor space while keeping it accessible and organized.
DIY Wooden Garden Hose Storage
Transform your garden hose chaos into a stylish and functional storage solution with this easy DIY project. By combining a 2×4 and some utility hooks, you can create a sturdy planter that not only keeps your hose organized but also adds a personal touch to your outdoor space. Say goodbye to tangled hoses and hello to a more organized and visually appealing garden area. This affordable and effortless guide is perfect for anyone looking to enhance their outdoor organization.
Build a Pallet Wood Garden Hose Holder with A Planter
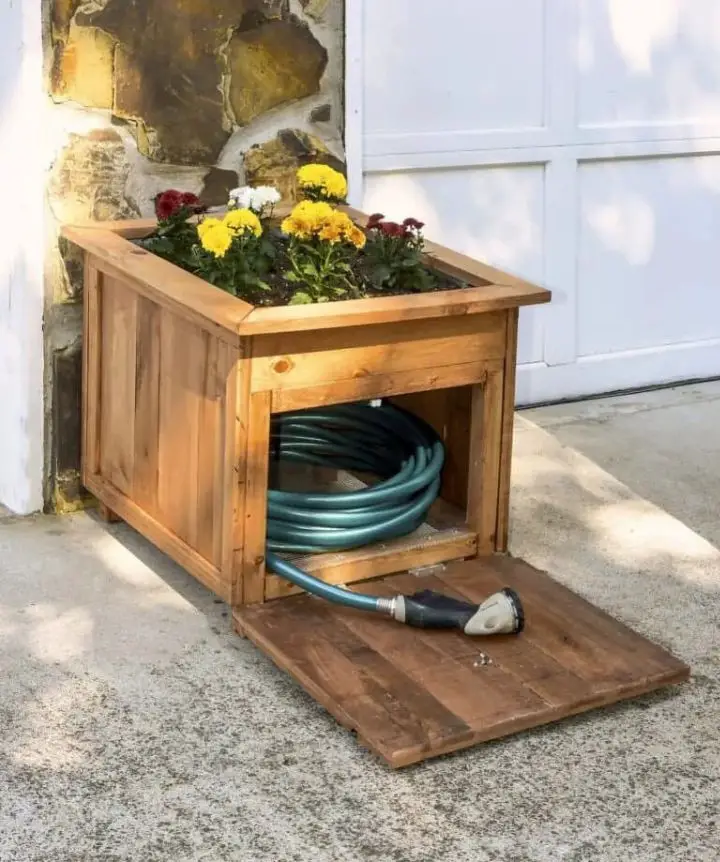
Elevate the look of your outdoor space with a functional and stylish DIY hose storage solution that also serves as a planter. By repurposing pallet wood, you can create a unique and eye-catching dual-purpose project that keeps your garden hose neatly stored while showcasing your favorite plants on top. This innovative design is a practical addition to any outdoor area, combining form and function in perfect harmony. For a step-by-step guide on building this DIY hose holder and planter, visit DIY Candy for a hassle-free and easy-to-follow process.
How to Build a Garden Hose Holder

Transform your outdoor space by creating a practical and aesthetically pleasing hose holder with a simple DIY project. By keeping your hoses organized, you’ll not only eliminate clutter but also prevent them from getting dirty and tangled. With minimal materials and a dash of creativity, you can create a cost-effective solution that’s both functional and visually appealing. Say goodbye to the hassle of messy hoses and hello to a tidy garden. Start this straightforward DIY project today and enjoy an instantly improved outdoor area.
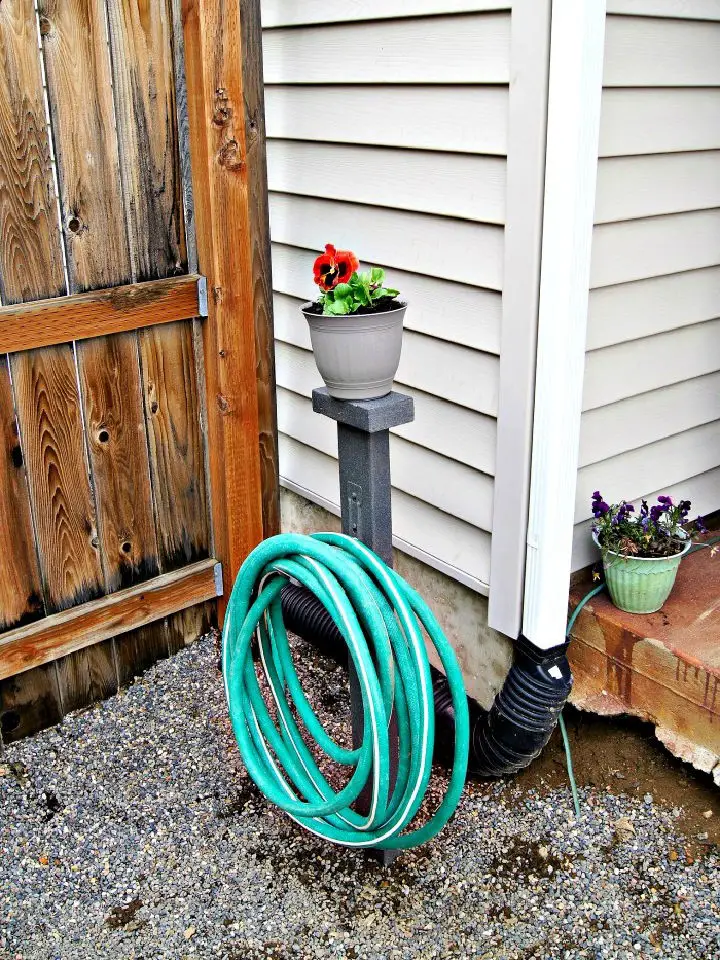
Beginner-Friendly DIY Garden Hose Holder
Transform your outdoor space into a serene oasis by creating a DIY garden hose holder that’s both practical and visually appealing. At Kippi at Home, we’re excited to share 10 innovative ideas for keeping your garden organized and your hose easily accessible. Whether you’re looking to tidy up your yard or add a decorative touch, this straightforward guide provides step-by-step instructions and all the necessary materials to help you get started. Not only will it keep your gardening essentials organized, but it’ll also enhance your home’s curb appeal with a post cap solar light that adds warmth and ambiance. This project is perfect for DIY enthusiasts of all skill levels, offering functional yet stylish storage for your garden hose.
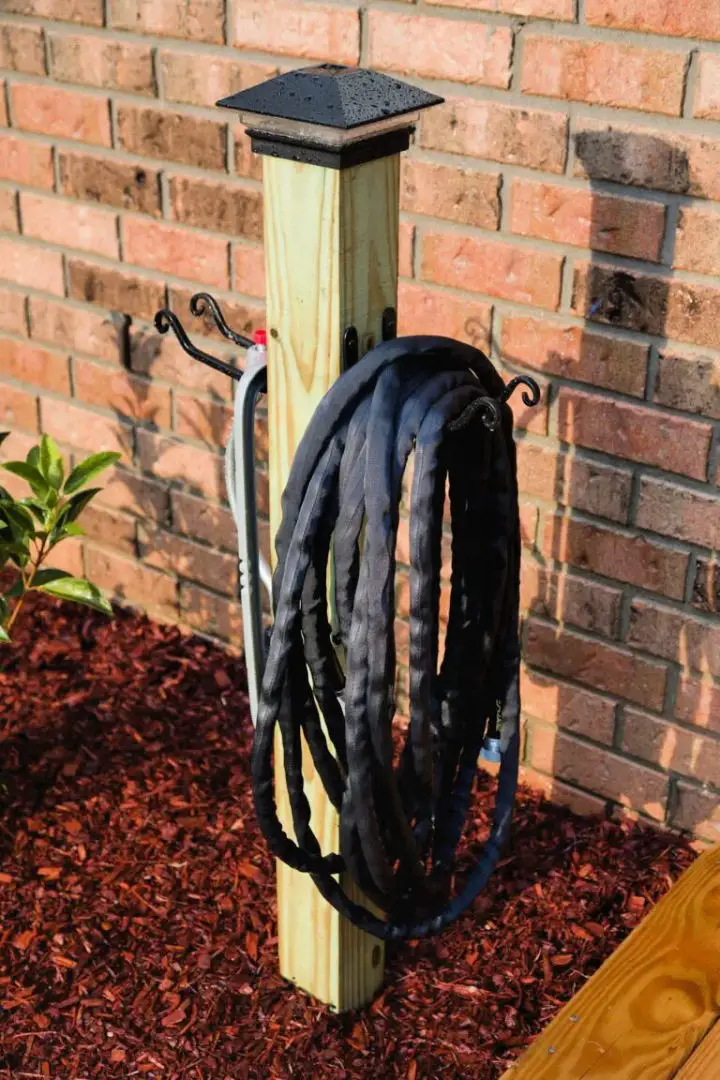
Make a Garden Hose Hanger Post
Transform your garden’s aesthetic and functionality with a DIY garden hose hanger project that’s quick, easy, and practical. By leveraging Sika PostFix instead of traditional concrete, you’ll eliminate hassle and get the job done in no time. To achieve this, you’ll need basic tools like a shovel, level, drill, as well as a treated wooden post and Sika PostFix. With just a few straightforward steps – including digging, leveling, mixing, and pouring – you’ll create a sturdy and long-lasting hanger for your hose. For a comprehensive guide to enhance your outdoor space today, head over to the Sika website.
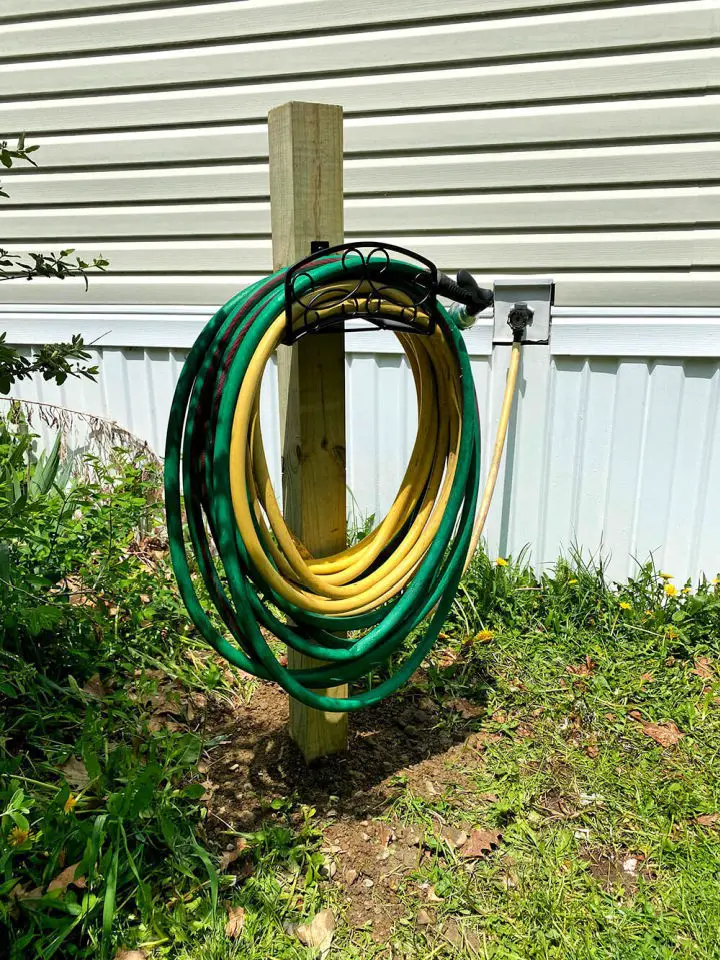
Handmade Wooden Hose Holder for The Garden
Transform your gardening experience by creating a functional and visually appealing hose holder using a deck post and some basic DIY skills. The process is surprisingly straightforward, requiring only a few minutes of drilling and setting the piece in place. This affordable solution not only keeps your garden organized but also adds a touch of personality with its splash of color. The sturdy construction ensures that it can withstand daily use without compromising on performance.
Inexpensive DIY Garden Hose Reel Idea
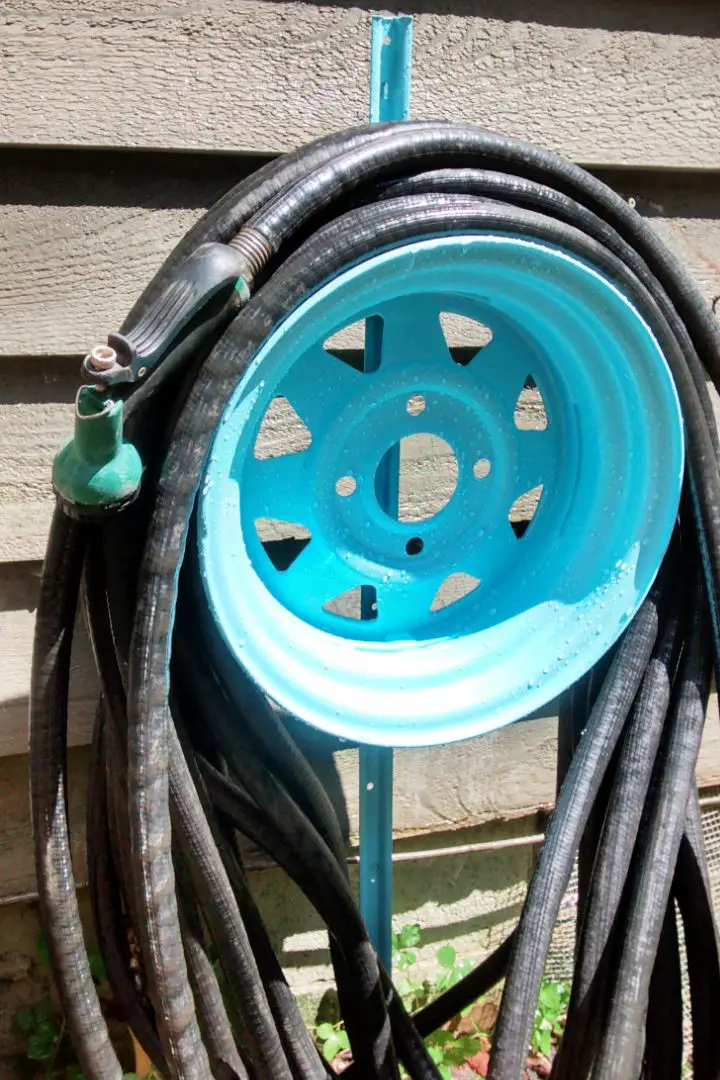
Transform your outdoor space with a DIY water hose holder that’s as functional as it is visually appealing. By upcycling an old tire rim into a sturdy hose reel, you’ll not only save money but also add a unique touch to your landscaping style. The process begins by liberating the rim from its tread and tube using a saw, making way for a sleek and modern design. Next, secure the rim to a metal T post using welding or JB weld for a strong bond. Before painting, ensure a smooth surface by sanding and cleaning the rim thoroughly. Once dry, place your new hose holder in your garden for an instant upgrade that’s both functional and aesthetically pleasing. For a step-by-step guide on this creative project, visit Homestead Heroine.
Conclusion:
As you bring your DIY garden hose holder to life, remember that it’s not just a functional solution – it’s also a reflection of your personality and commitment to sustainability. By combining creativity with eco-friendliness, you’ll create a unique piece that not only enhances your garden’s aesthetic but also demonstrates your dedication to environmentally responsible practices. Every decision you make, from choosing materials to incorporating features, has the potential to shape the final product. Whether you opt for recycled materials, non-toxic treatments, or designs centered around convenience, each choice contributes to the one-of-a-kind nature of your project. With proper maintenance, your hose holder will remain a reliable and attractive addition to your garden for years to come.
