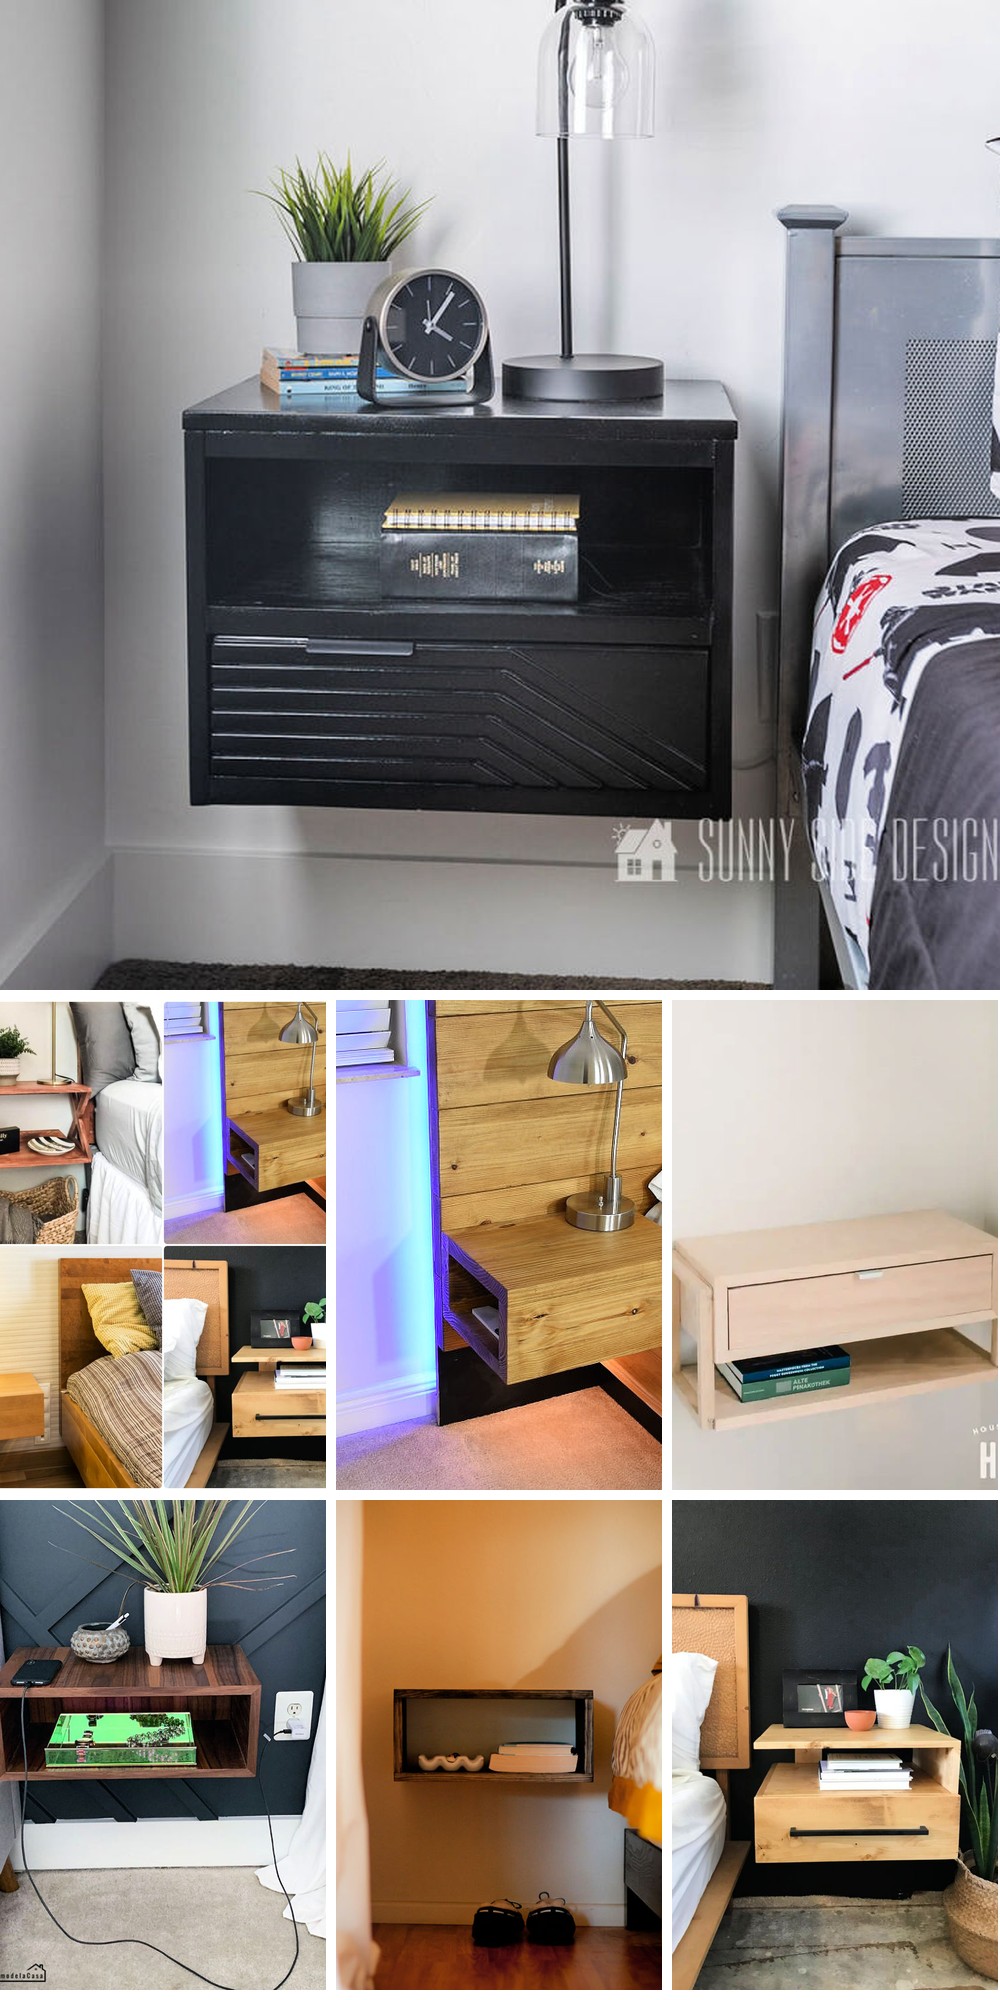
Transform your bedroom’s ambiance with modern elegance by creating your own DIY floating nightstand. Discover 25 inspiring projects that blend style and functionality, allowing you to customize your space with unique designs, colors, textures, and features. From safety precautions to budgeting and maintenance tips, we’ll guide you through the process of bringing your vision to life. Whether you’re seeking inspiration for a one-of-a-kind nightstand or practical advice on how to troubleshoot common issues, our comprehensive resource has got you covered.
How to Build a Floating Nightstand – Step by Step Guide
Discover the art of crafting a stunning floating nightstand with our comprehensive, easy-to-follow instructions. Let’s get started!
Materials Required
To create a custom drawer, you’ll need to gather the following materials: medium-density fiberboard (MDF) or your preferred material, wood glue, brad nails, and a nail gun if you have one. Additionally, you’ll require screws for assembly, drawer slides with a soft close feature to ensure smooth operation, primer and paint in your desired color scheme, and bondo to fill any nail holes that may appear. To complete the project, you’ll also need sandpaper to smooth out surfaces and drawer hardware such as knobs or handles. If you want to add a touch of elegance, consider using reclaimed wood for the drawer fronts. Finally, don’t forget wall mounting hardware if you plan to install your custom drawer in a fixed position.
Tools Required
When it comes to power tools, having the right arsenal can make all the difference in completing tasks efficiently. Among the most essential tools for any DIY enthusiast are table saws, circular saws, miter saws, drills, countersink drill bits, screwdrivers, and paintbrushes with rollers. Table saws are ideal for making precise cuts in larger materials, while circular saws offer more versatility in terms of cut size and material type. Miter saws excel at making angled cuts, a crucial feature for tasks like building picture frames or crown molding. Drills provide the necessary torque to drive screws quickly and accurately. Countersink drill bits allow for countersinking screw heads for a professional finish. Screwdrivers are a staple in any toolbox, serving as a reliable means of driving screws by hand. Finally, paintbrushes with rollers streamline the painting process, making it easier to cover large areas smoothly.
Step by Step Instructions
Step 1: Cutting the Material
To begin crafting your custom nightstand, start by meticulously cutting the MDF into the required pieces. For this specific project, you’ll need to cut the material into rectangular shapes measuring 18 inches in width, 12 inches in depth, and 6 inches in height. Although these dimensions are ideal for a standard-sized nightstand, feel free to adjust them as needed to accommodate your unique space constraints.
Step 2: Assembling the Boxes
To start building your custom furniture piece, begin by constructing the outer boxes using wood glue and brad nails. Pay close attention to ensure that all edges are precisely aligned and flush with one another. A solid foundation is crucial for a sturdy and visually appealing final product. With the outer boxes complete, move on to assembling the drawers in a similar manner, carefully checking that each edge is level and harmonious with the surrounding surfaces.
Step 3: Installing the Drawer Slides
As you approach the final stages of constructing your nightstand, make sure to prioritize installing the drawer slides before adding the top piece. Having the top removed provides a clear view of the area, making it simpler to complete this task.
Step 4: Mounting Drawer Slides
To secure the drawer slides, first attach them to the outer box, making sure they’re aligned precisely before tightening the screws. Once in place, attach the slides to each individual drawer, verifying that all components are correctly positioned before completing the assembly.
Step 5: Finalizing Structure
Mount the nightstand’s crown: After securing the sliding drawer compartments, it’s time to attach the top frame. This crucial component plays a vital role in anchoring the nightstand to the wall, thereby achieving the coveted floating appearance. To accomplish this, apply an adhesive and nail the top into place.
Step 6: Preparing for Finish
When it comes to achieving a seamless finish on your walls, one often overlooked step is filling those pesky nail holes. To do this effectively, we recommend reaching for some Bondo – a versatile filler that can be used to smooth out imperfections like small dents and cracks. Once the Bondo has dried completely, take some fine-grit sandpaper to it and gently work away any excess material that’s risen to the surface. This will leave you with a clean, hole-free finish that’s perfect for painting or finishing.
Step 7: Painting
To give your nightstand a professional finish, start by applying a thin layer of prime, allowing it to fully dry before moving on to your desired shade of paint. Allow sufficient time for each coat to dry thoroughly, ensuring a smooth and even result.
Step 8: Adding the Details
To ensure a secure and smooth operation, start by attaching the drawer hardware to your furniture piece. This involves drilling precise holes in the correct locations, as specified in the manufacturer’s guidelines for the specific knob or handle you’re using. Follow the instructions carefully to avoid any errors that might compromise the functionality of your drawers.
Step 9: Mounting to the Wall
To ensure a secure and level installation, start by determining the ideal height for your nightstand based on your personal preference. Next, identify the studs in your wall, as this will provide a solid foundation for attaching the nightstand. Use suitable screws and drywall anchors to mount the nightstand firmly to the wall, taking care to avoid any loose or shifting that might compromise its stability.
Video Tutorial
To bring your DIY project to life, a visual aid can be incredibly valuable. For creating floating nightstands, I recommend pairing this written guide with a step-by-step video tutorial that showcases the assembly and installation process in real-time. This synergistic approach makes it easier to grasp each stage of the process, ensuring a seamless transition from theory to practice.
Design Customization Ideas for Your DIY Floating Nightstand
When crafting a floating nightstand, the focus extends beyond mere practicality, allowing for a chance to infuse your bedroom with a unique personality. To spark creativity, consider these innovative design customization concepts:
Choose Your Style
When it comes to designing a space that embodies a specific aesthetic, there are several routes you can take. For those who prefer a clean and modern feel, consider embracing the minimalist approach by incorporating sleek lines, monochromatic color palettes, and high-gloss finishes. Materials like lacquered MDF or metal can help achieve this look. Alternatively, you may find yourself drawn to a more rustic charm that celebrates the natural texture of reclaimed wood and adds an industrial touch with wrought iron brackets. If Scandinavian simplicity is your style, think about incorporating light-colored woods, soft curves, and minimal ornamentation while also hiding away clutter-prone areas behind cleverly designed drawers.
Play with Colors and Textures
Elevate the style of your bedroom by incorporating bold and vibrant, as well as soft and subtle elements, into your nightstand design.
Start by making a statement with a nightstand in a bright, eye-catching color like red or turquoise. To add an extra layer of sophistication, opt for high-gloss paint to create a shiny, reflective surface that will catch the light.
Alternatively, you can choose pastel shades or neutral tones for a calming effect and a soft, subtle look. To take it up a notch, experiment with matte finishes for a sophisticated touch that adds depth and visual interest.
Finally, consider adding texture to your nightstand design by incorporating surfaces with interesting textures. Think about using wood with prominent grain patterns or applying techniques like distressing or wood-burning to create a unique look.
Add Functional Features
For a seamless and modernized sleeping experience, consider incorporating the following smart features into your nightstand design. LED strips or puck lights installed underneath can create a soft glow that not only adds ambiance but also provides subtle lighting to guide you in the dark. Meanwhile, a built-in wireless charging pad eliminates the need for cluttered cords, allowing you to power up your devices with ease and convenience. To further enhance functionality, include a pull-out tray that cleverly reveals additional surface space when needed – perfect for sipping tea or getting lost in your favorite book.
Personalize with Accessories
Transform your floating nightstand with creative flourishes that mirror your personality. Start by swapping out standard hardware for distinctive knobs or pulls that reflect your individuality. For an added artistic touch, consider applying stencil designs or decals featuring motifs that resonate with your interests. Bring the space to life with a small plant holder or vase, infusing the area with freshness and vitality.
Safety Precautions for DIY Floating Nightstands
As you embark on the thrilling adventure of crafting a floating nightstand, it’s crucial to prioritize caution above all else. To ensure a successful and accident-free experience, heed these vital safety precautions:
Personal Protective Equipment (PPE)
When engaging in activities that involve hazardous materials, it’s crucial to prioritize personal protective equipment (PPE) for optimal safety. A trio of essential elements deserves special attention: eye protection, hearing protection, and hand protection. Firstly, always don safety goggles to shield your eyes from dust, debris, or other particles that could cause irritation or long-term damage. Next, when operating power tools that emit loud noises, utilize earplugs or earmuffs to safeguard your hearing from the potential effects of prolonged exposure. Finally, wear gloves to protect your hands from splinters, sharp edges, and other hazards that could lead to cuts, abrasions, or worse.
Safe Tool Usage
Before embarking on a project, it’s essential to develop a comprehensive understanding of the tools you’ll be using. Start by thoroughly reading through the manuals that come with each tool, taking note of any specific guidelines or precautions that are necessary for proper operation. Additionally, conduct a thorough inspection of each tool to identify any signs of damage or wear and tear. This will help you avoid potential hazards and ensure that your tools are functioning optimally. Furthermore, make sure to handle each tool according to its intended purpose and follow established safe handling practices to minimize the risk of accidents or injuries.
Workspace Safety
A crucial aspect of maintaining a productive workspace is ensuring it meets specific standards for comfort and efficiency. The first step towards achieving this goal is to illuminate the area with sufficient light, thereby reducing the likelihood of accidents occurring due to poor visibility. Moreover, maintain a clutter-free zone by keeping tools and materials organized, which will prevent any potential tripping hazards. Furthermore, work in an environment that provides proper ventilation, particularly when working with adhesives or paints, as this will help eliminate any unpleasant fumes and ensure your health is not compromised.
Troubleshooting Common Issues
Despite meticulous planning, you may still encounter a few hiccups when building your floating nightstand. However, don’t worry – these obstacles are easily overcome with the right troubleshooting techniques. For instance, if you’re experiencing difficulties in ensuring the stability of your design, consider refining the weight distribution by adjusting the placement of the legs or the size and material of the platform it sits on. Alternatively, if you’re struggling to get the perfect alignment between the shelves and the frame, take a step back and re-evaluate your measurement process to ensure accuracy.
Alignment Difficulties
When it comes to assembling furniture, attention to detail is key. A crucial aspect of this is ensuring that all components fit together seamlessly. Two common issues that can arise are uneven walls and misaligned brackets. To tackle the first problem, use shims to level out any irregularities in your wall. This will ensure that your nightstand, or whatever piece you’re working on, sits comfortably and stably. Next, take a closer look at bracket alignment before drilling into place. Double-checking measurements can make all the difference in preventing costly mistakes and ensuring a sturdy final product.
Material Issues
To achieve a flawless outcome, it’s crucial to address two common issues that can arise during the wood finishing process: warped wood and finish flaws. To prevent warping, it’s essential to select straight lumber and store it properly. This will help minimize any natural bending or twisting that may occur over time.In terms of finish flaws, a key principle is to apply thin, even coats of paint or stain, allowing each layer to dry completely before moving on to the next one. Sanding between layers is also crucial for creating a smooth, consistent finish. By taking these steps, you’ll be well on your way to producing high-quality wood finishes that are free from imperfections.
Installation Setbacks
To establish a sturdy foundation for your floating nightstand, employ a stud finder to accurately locate wall studs and securely attach the piece to this anchor point. When selecting hardware, prioritize concealed fasteners to maintain a sleek aesthetic and minimize visual distractions.
Cost Analysis and Budgeting for Your DIY Floating Nightstand
By transforming a DIY floating nightstand, you can elevate the aesthetic and practicality of your bedroom without breaking the bank. To get started, consider the following crucial steps in planning your project:
Estimating Costs
When embarking on a DIY project, it’s essential to have all the necessary materials and tools at your disposal. To start, make a list of the required wood, screws, brackets, and finish you’ll need. Be sure to shop around for the best prices to ensure you’re getting the most value for your money. Additionally, don’t forget to consider any additional features you may want to include, such as lighting or charging ports. If you don’t own the necessary tools, consider borrowing from friends or renting them to avoid unnecessary expenses. By having a solid plan and preparing in advance, you’ll be well on your way to completing your project successfully.
Saving Tips
Consider creative ways to reduce expenses when it comes to building your nightstand. One approach is to repurpose leftover wood or recycled materials, which can help you save money upfront. Additionally, keep an eye out for sales at hardware stores and take advantage of online discounts to further minimize costs. In many cases, the cost-effectiveness of a DIY project like this will be evident when comparing it to purchasing a pre-built nightstand.
Maintenance Tips for Your Floating Nightstand
To preserve the integrity and aesthetic appeal of your floating nightstand, it is essential to implement a regular maintenance routine. This can be achieved by following a few simple yet effective tips.
Regular Cleaning
To maintain a clean and tidy bedroom, it’s essential to establish a routine for tackling common messes. Start by dedicating time each week to dusting, focusing on high-traffic areas like nightstands where particles can accumulate quickly. This simple task helps prevent the buildup of allergens and keeps your belongings looking their best. Additionally, make a habit of cleaning up spills immediately they occur, as ignoring these minor mishaps can lead to more significant stains or even damage over time. By prioritizing these small tasks, you’ll be able to keep your bedroom feeling fresh and organized, allowing you to relax and recharge in a peaceful environment.
Periodic Checks
To guarantee the longevity of your nightstand, start by inspecting its hardware. Check if any screws or brackets are loose and tighten them accordingly to maintain stability. Next, assess its finish, paying attention to any areas that may need reapplication of paint or varnish to preserve its original luster. By taking these proactive steps, you’ll be able to enjoy a beautifully maintained nightstand for years to come, one that remains both aesthetically pleasing and functionally sound.
FAQs About DIY Floating Nightstands
As DIY enthusiasts embark on their journey to create a floating nightstand, several doubts and uncertainties often emerge. To alleviate these concerns and provide clarity, we’ve compiled a comprehensive list of commonly asked questions, along with concise answers to help navigate the process.
What materials do I need for a floating nightstand?
To embark on this DIY project, gather the essential materials, including wood or a material of your choice for the top and sides, as well as screws, wall brackets, a drill, sandpaper, paint or stain, and a sealant. As you make your selections, consider factors such as style and durability to ensure the final product meets your expectations. With these components in hand, you’ll be well-equipped to bring your design vision to life.
How do I ensure my nightstand is level?
When it’s time to install that new nightstand, don’t overlook the importance of starting with a level surface. A spirit level can be your best friend in this situation, helping you ensure that your nightstand is properly aligned and won’t be wobbling precariously over time. But what if your wall isn’t exactly even? That’s where shims come in – these thin pieces of material can be used to fill any gaps and provide a stable foundation for your furniture. By combining the use of a spirit level with strategically placed shims, you can achieve a surface that’s as level as it is inviting.
Can I build a nightstand without power tools?
While using a manual hammer and chisel to remove old tile can be a feasible option for some, employing power tools like drills can significantly streamline the process. If you’re without these handy devices, however, there are alternative solutions to explore. Borrowing from friends or family members who may have the necessary equipment can be a viable option. Alternatively, consider renting the required power tools for a specific period to get the job done efficiently.
What’s the best wood to use for a nightstand?
When selecting hardwoods for your project, consider the balance between durability and cost. Options like oak and maple offer a robust and long-lasting solution, whereas softer woods such as pine provide an economical alternative. Ultimately, make a decision that suits both your budget and aesthetic preferences.
How do I attach the nightstand to the wall?
When it comes to securing a nightstand, don’t underestimate the importance of sturdy wall brackets. To ensure your furniture stays firmly in place, make sure to install these brackets and fix them directly into the wall studs. The result will be a solid foundation that can withstand the weight and stress of your nightstand, providing you with peace of mind knowing it’s securely anchored.
Can I add drawers to my floating nightstand?
While it’s possible to incorporate drawers into your project, doing so can elevate the complexity level. For those just starting out, it may be more practical to begin with a less intricate design and gradually add features as their skills improve.
How do I hide the brackets and screws?
To keep your nightstand looking sleek and modern, consider hiding the hardware with creative solutions. Two effective approaches include using paintable screw covers, which allow you to blend the screws seamlessly into the surrounding design. Alternatively, you can build a false back for your nightstand, effectively concealing the hardware from view.
What safety precautions should I take?
When undertaking any DIY project or working with power tools, it’s essential to prioritize safety. This involves taking simple yet crucial precautions such as donning protective gear like goggles and gloves, ensuring a well-ventilated workspace free from hazardous fumes, and meticulously following the manufacturer’s instructions for each tool.
How do I maintain my nightstand?
To maintain your furniture’s appearance and longevity, it’s essential to adopt a regular maintenance routine. This includes dusting the surface frequently to prevent dirt and debris from accumulating. Additionally, be prepared to act swiftly in case of spills, promptly wiping them up to prevent stains from setting in. Furthermore, take proactive steps to secure any loose screws or other hardware to prevent damage or loss. Finally, periodically inspect the finish for signs of wear or fading, refreshing it as needed to preserve its original appearance and ensure your furniture remains a valuable part of your home.
Can I customize the size of my nightstand?
When embarking on a DIY floating nightstand project, it’s crucial to consider the dimensions and ensure they align with your space and needs. Don’t forget to verify that the wall brackets can support the size and weight of the final product. By doing so, you’ll be well-equipped to tackle this project with confidence.
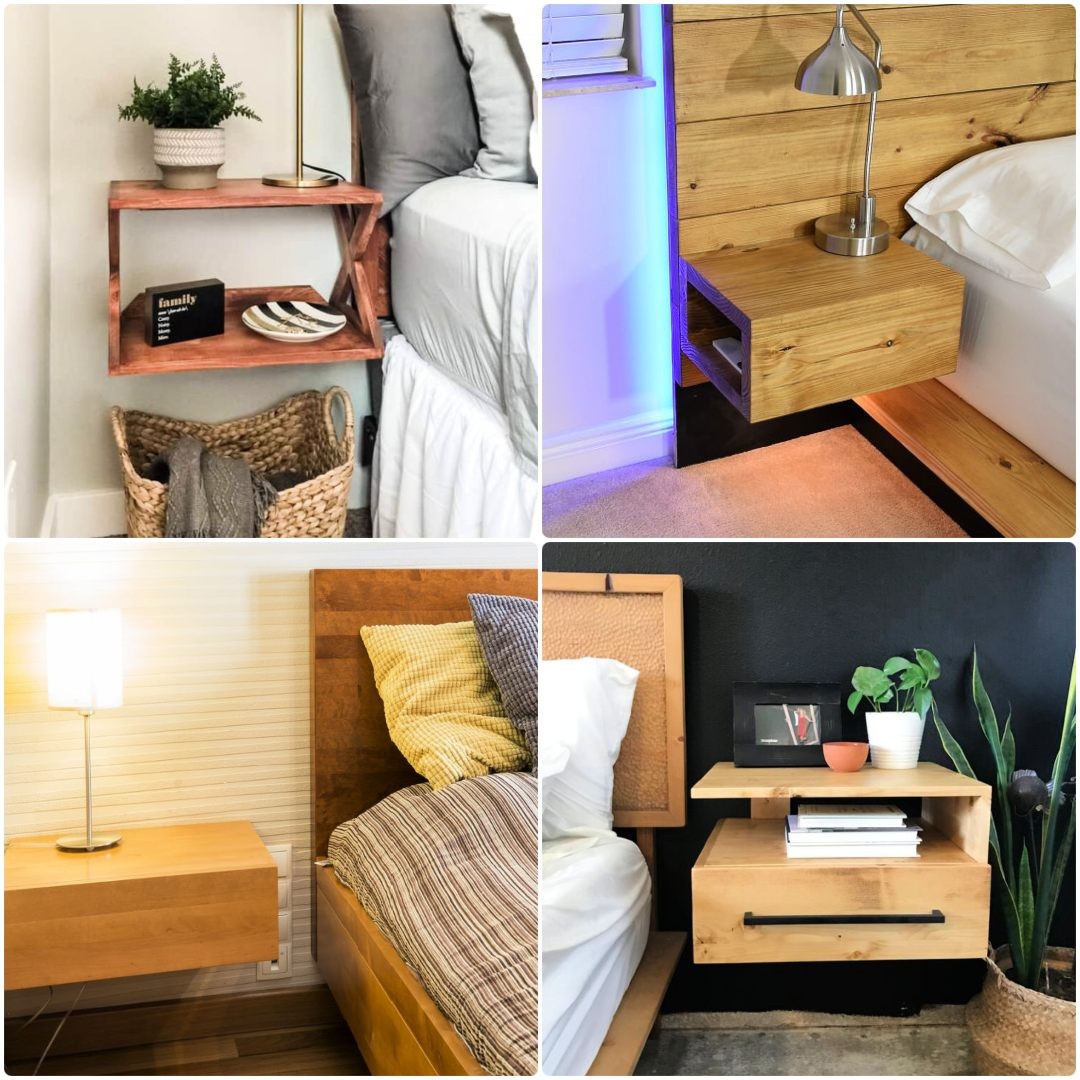
25 DIY Floating Nightstand Ideas
Transform your bedroom’s ambiance with innovative and functional DIY floating nightstand concepts. Delve into an array of 25 distinctive designs that seamlessly blend form and function, effortlessly elevating the aesthetic appeal of your sleeping sanctuary.
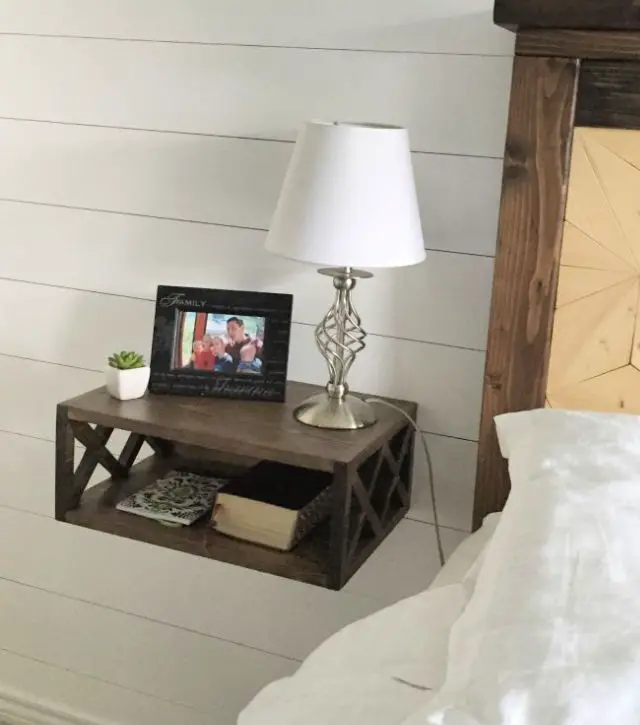
Floating Bedside Table With X-Style Sides
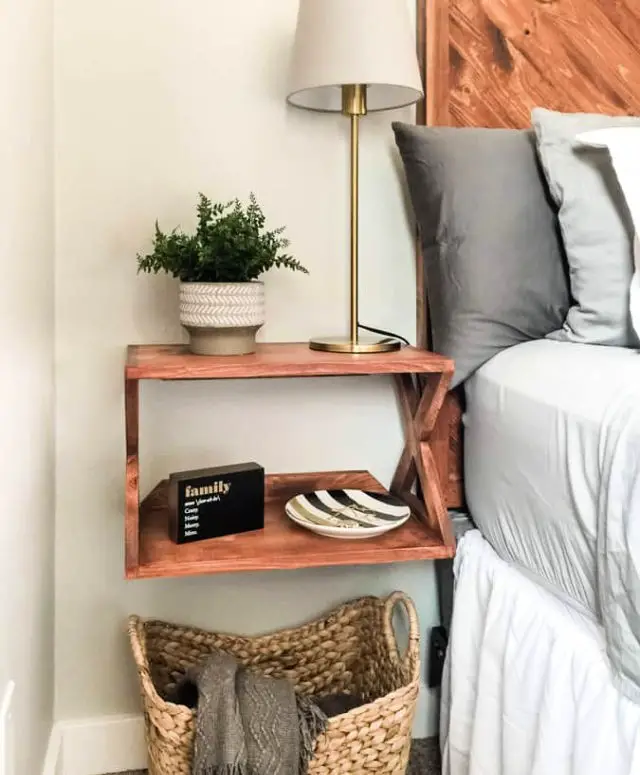
Transform your bedroom into a cozy haven by crafting a DIY floating nightstand that exudes rustic charm in just an hour. This farmhouse-inspired design cleverly creates the illusion of more floor space, making it perfect for small bedrooms or apartments. Get creative and personalize the nightstand with your preferred paint or stain color to match your unique style. The tutorial is packed with clear step-by-step instructions, covering essential tasks like cutting boards, sanding, assembly, staining, and sealing. To ensure stability, securely mount the nightstand to the wall using screws and anchors. Follow along with the printable materials and instructions to create your own sturdy and stylish floating nightstands that will elevate your bedroom’s ambiance.
Modern DIY Floating Nightstand
With Kreg’s innovative 720 Pro Pocket Hole Jig, you can effortlessly construct modern floating nightstands that exude elegance and sophistication. To guide you through this sponsored project, we’ll walk you through a step-by-step process that requires minimal materials – just $57 worth of supplies like a 20″ x 96″ x 3/4″ pine project panel, 14″ soft-close drawer slides, and 1/8″ plywood or hardboard for the drawer bottom. The end result is a stunning piece of furniture boasting an open shelf for effortless access to your belongings and a cleverly designed hidden compartment for stashing away extra items. What’s more, these floating nightstands cleverly provide ample clearance beneath them, keeping dust at bay from your bedroom floor while maintaining a sleek, modern aesthetic. So why wait? Dive into the building process now!
Homemade Floating Bedside Table

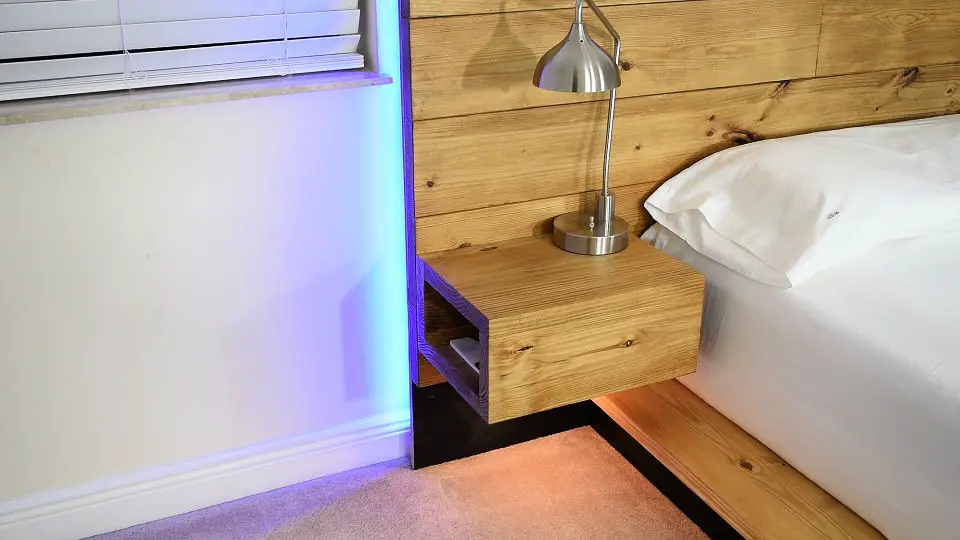
Transform your bedroom sanctuary by crafting DIY floating bedside tables that exude style and functionality. This step-by-step guide will walk you through the process of creating elegant yet straightforward tables using 1×6-inch tongue and groove pine boards. By utilizing this budget-friendly project, you’ll be able to optimize the space in your small bedroom with ease. All you need is wood glue, an MDF board for backing, and a few hours of free time. Embrace your creativity while assembling the pieces, as each project is one-of-a-kind and will ultimately reflect your personal touch.
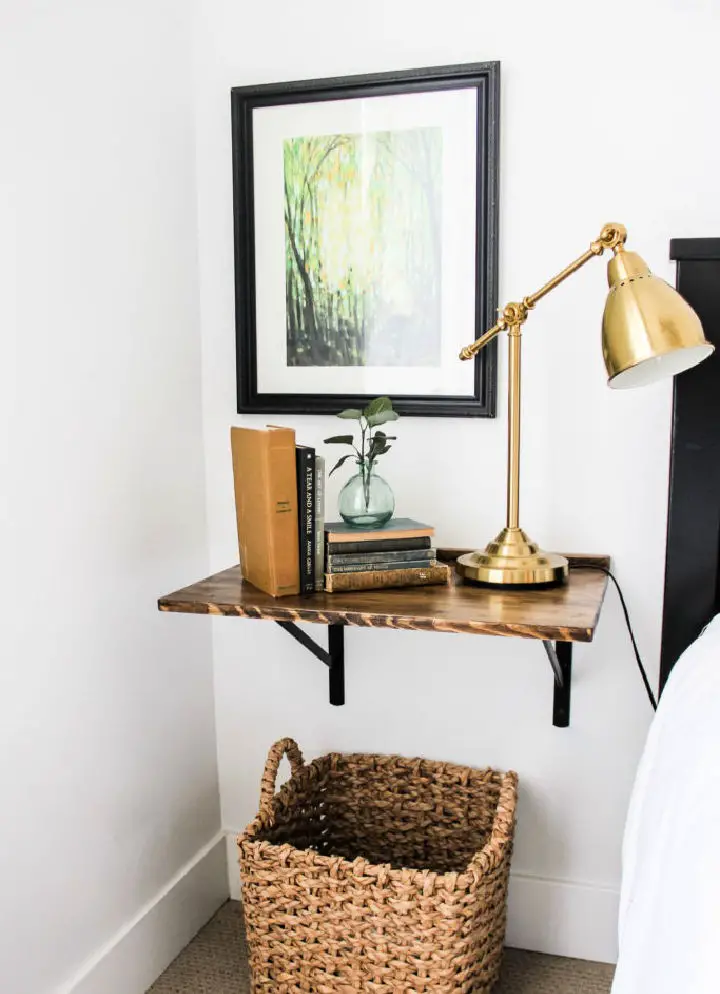
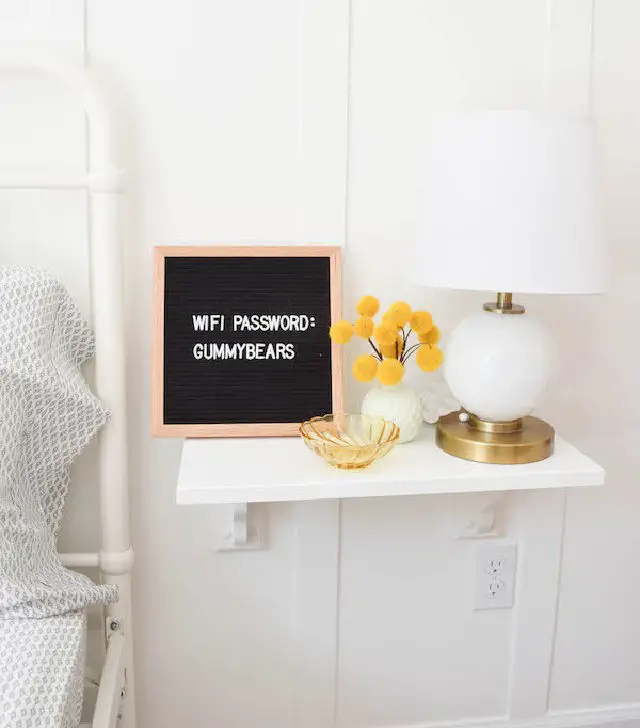
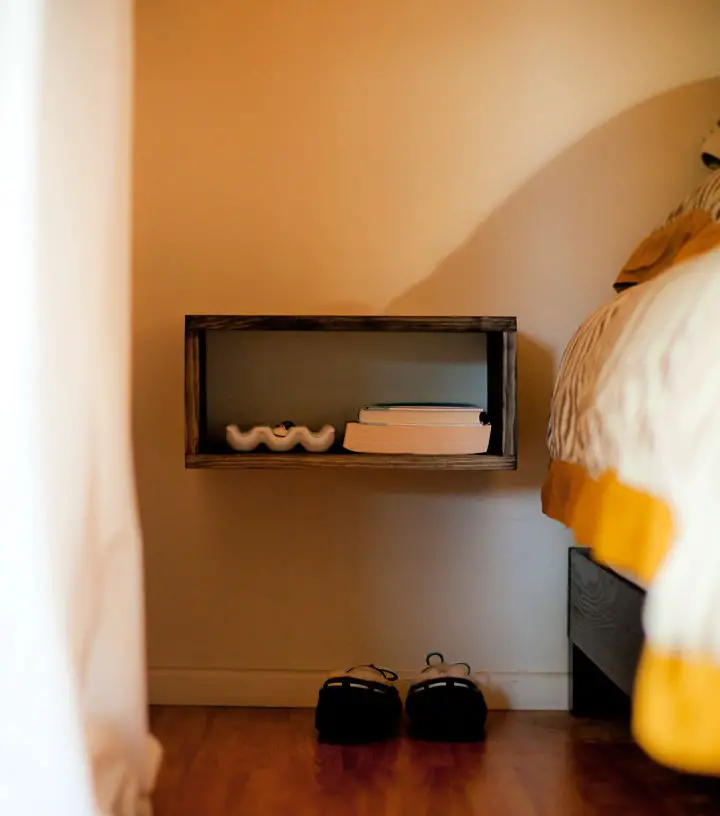
Easy DIY Bedside Wall Shelf

Transform your bedroom with this stunning DIY floating nightstand, crafted from rustic pine boards. This functional masterpiece features a convenient phone slot and minimal storage, ensuring a clutter-free zone. To give it an extra pop of personality, simply stain or paint the pine to match your unique style. With just 1×8 and 5/4×6 sized pine boards required, you’ll be able to recreate this gorgeous piece with ease – follow the simple construction instructions to bring a touch of elegance to your bedroom decor while freeing up valuable floor space.
Hw to Make a Floating Nightstand
In a concise and effortless DIY endeavor, craft an industrial farmhouse-inspired nightstand that exudes simplicity and sophistication. With only basic woodworking skills required, this project can be completed in under 60 minutes. Begin by gathering the necessary materials: a piece of lumber for the top, a 1×2 board for the back ledge, and two heavy-duty shelf brackets. Next, smooth out the wood with sandpaper, apply wood conditioner if desired to enhance staining potential, and finally finish it with your preferred stain, paint, or polyurethane. This charming nightstand is bound to become one of your most cherished DIY creations.
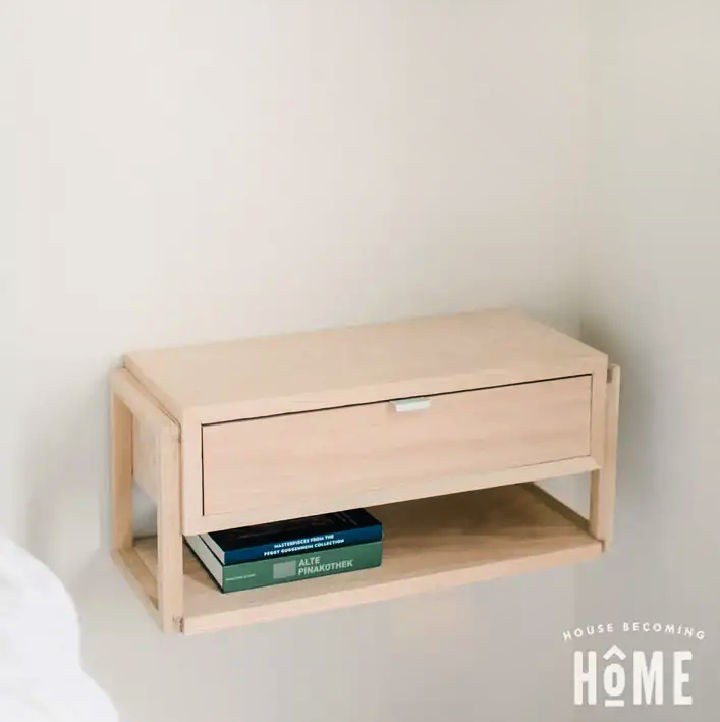
Simple DIY Floating Nightstand
Craft a stunning modern floating nightstand with ease, thanks to this step-by-step guide. You’ll need just a few essential materials – 1x12x6ft board, two 1x4x8ft boards, and plywood or MDF – as well as some poplar hobby stock. As you bring your vision to life, you’ll be delighted by the extra storage space it provides. But that’s not all – this versatile design can also be adapted for closet organization systems and bathroom vanities, making it a truly multi-purpose DIY project. Follow along for a comprehensive tutorial on creating your own beautiful floating nightstand, and discover even more woodworking inspiration within.
Easy DIY Floating Night Stands

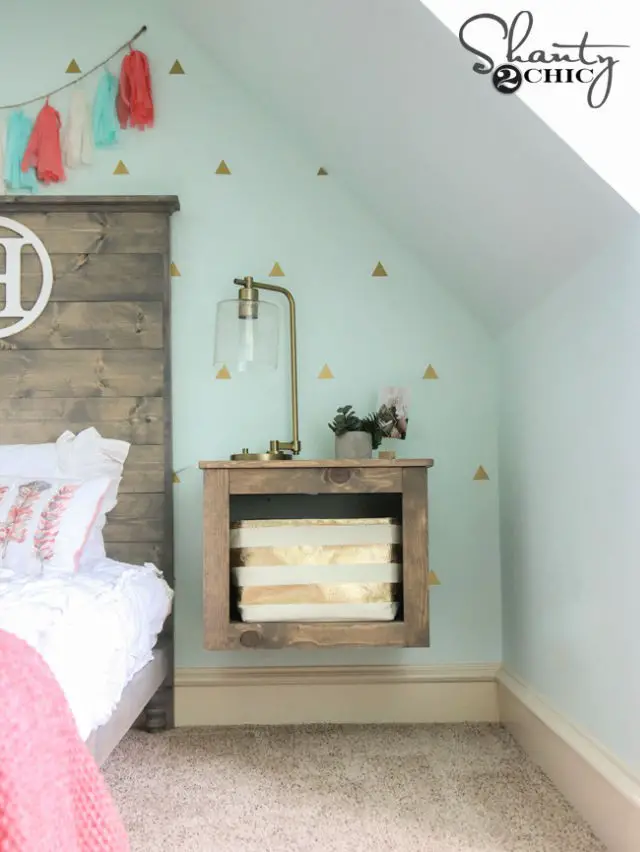
Transforming narrow bedrooms into cozy retreats just got a whole lot easier with the ingenious design of these DIY floating nightstands. Built using select pine and reinforced with a sturdy 4-inch corner brace, this space-saving solution is perfect for maximizing room functionality. With minimal materials required – including flat black spray paint, wood stain (optional), polycrylic, and a single 1×6 board – you can create your own one-of-a-kind masterpieces. Follow the easy-to-follow tutorial to get started and discover how simple yet stylish designs can elevate your bedroom’s aesthetic. By crafting your own floating nightstands, you’ll be able to make room for essentials next to your bed without sacrificing style.
DIY Wall Mounted Nightstand Under $30
Transform a space with a chic and budget-friendly wall-mounted nightstand, requiring only basic materials! This DIY endeavour leverages detailed corbels from the hardware store, allowing for seamless customization to suit your room’s unique style. Begin by sanding and painting a 20 x 10-inch piece of poplar wood to create the nightstand’s foundation. Next, attach the corbels and secure the unit to the desired height on the wall using drywall anchors. The end result is an elegant addition that harmonizes with board and batten details, awaiting your personal touches to elevate its aesthetic appeal. With no need for costly carpentry tools, this project embodies the perfect blend of style and affordability, inviting you to get creative and make it your own.
Build Floating Nightstands With Wireless Charger
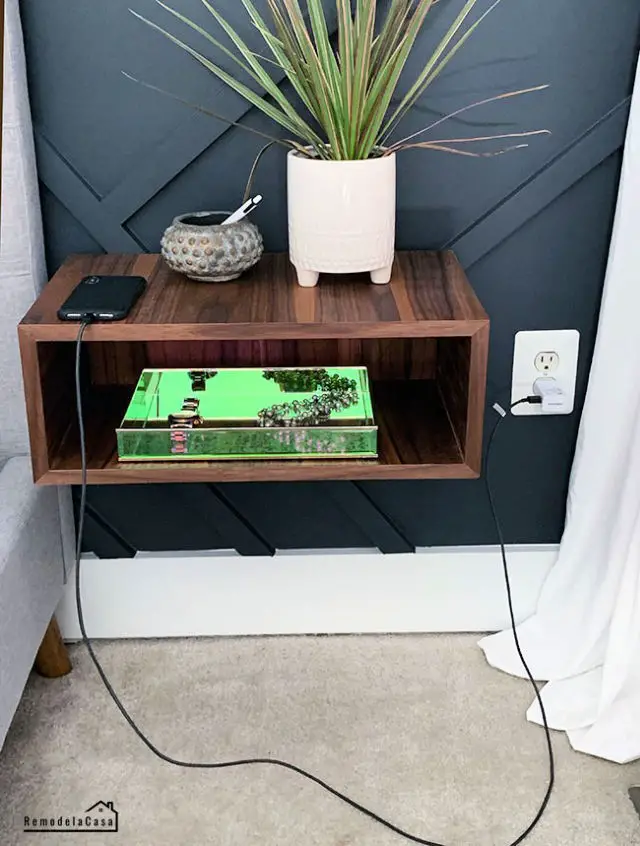
To create a stylish and functional nightstand with a built-in wireless phone charger, follow this easy DIY project! Start by gathering the necessary materials: a sheet of plywood (3/4 inch x 2 feet x 8 feet), wood glue, walnut edge banding, tung oil, and a wireless charger. First, assemble a box shape using the plywood and secure it with wood glue. Then, add walnut edge banding for a sophisticated look. Finish the timber with tung oil to achieve a beautiful natural finish. Next, attach the wireless charger to both nightstands, allowing you to easily charge your device while relaxing in bed. Enjoy your modern and practical nightstands, perfect for anyone looking to upgrade their bedroom decor.
How to Build a Floating Nightstand

Create a one-of-a-kind floating nightstand with ease, requiring just wood, L-brackets, wood glue, small finishing nails, and basic tools. Begin by crafting a simple shelf-style nightstand from lightweight woods, measuring 24 inches or less in length and 6 inches deep. Sand the surface to smooth it out, then customize the look with paint or stain for a unique finish. To ensure stability, attach L-brackets to the shelf before securing them to the wall using screws and anchors. For a two-shelf design, assemble rectangular and square wooden pieces using L-brackets, making sure they’re securely attached to wall studs. Add some creative flair by experimenting with different stains and paints – your new custom floating nightstand will be ready in no time! With this fun DIY project, you’ll have the freedom to customize every aspect of your design and enjoy the satisfaction of creating something truly unique.
Free Floating Bedside Table Plan
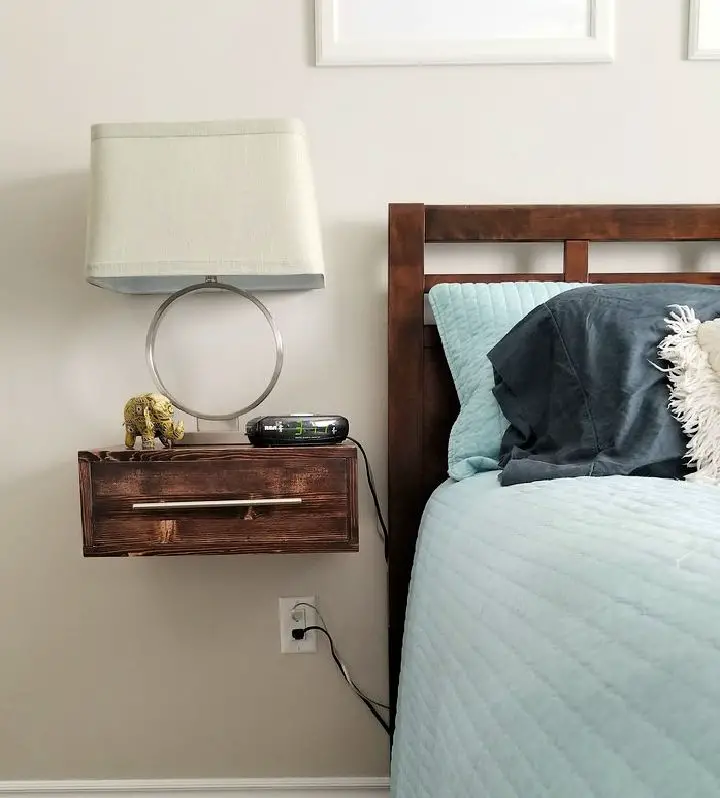
Transform your bedroom with this DIY floating bedside table project, which cleverly combines elegance and space-saving design. The frames and drawers are crafted from pine shelving boards, measuring 18″w x 14″d x 7″h. To ensure smooth drawer movement, secure the sides of the frames using countersunk screws and wooden guides. A stylish finish is achieved by coating the tables with a rich Minwax stain in Jacobean and Red Mahogany shades. For added flair, attach brushed steel handles to the mounting board, which is constructed from 2″x6″ lumber. The satisfaction of creating something new and beautiful for your bedroom is an excellent reward – enjoy the fruits of your labor!
DIY Floating Night Stands With Drawer
Transform your bedroom with the simplicity of DIY floating nightstands featuring drawers, all at an affordable price. Ditch expensive store-bought options and instead opt for two pine boards measuring 1x12x8 inches, which will seamlessly blend with your existing furniture. To complete the project, you’ll also need: ten-inch drawer slide sets (two), door pulls (two), water-based polyurethane, wood glue, corner braces (eight pieces of each – 3/4 inch and 1/2 inch flat), and wood filler to complement any chosen stain. As you successfully bring this vision to life, take pride in the impressive cost savings and the perfect fit it provides for your bedroom.
How to Do Floating Night Stands
Get ready to elevate your bedroom game with a DIY platform bed featuring floating nightstands and cutting-edge LED light strips along the headboard. This innovative project boasts hidden electrical outlets and charging ports, exuding a sleek modern design that’s both functional and stylish. To bring this vision to life, you’ll need to navigate key steps such as prepping lumber, constructing the headboard and nightstands, and integrating power and electronics. With basic tools like miter saws, clamps, and drills at your disposal, along with materials including plywood, lumber, screws, and dowels for the LED lighting component, you’ll be well-equipped to follow detailed instructions and create a chic addition to your bedroom that’s truly one-of-a-kind.
IKEA Floating Nightstands Hack
Elevate your bedroom’s style with a clever IKEA hack that turns a shelf insert into sleek floating nightstands. To get started, gather the necessary materials: the Kallax insert, 5/8-inch thick laminate shelving (15 inches wide and 72 inches long), L-mounting brackets, furniture braces, heavy-duty screws, and wall plugs. Then, follow these steps to attach the Kallax insert to the laminate shelves using the provided hardware and secure them to your walls. With minimal effort, you’ll be enjoying a unique conversation piece in no time.
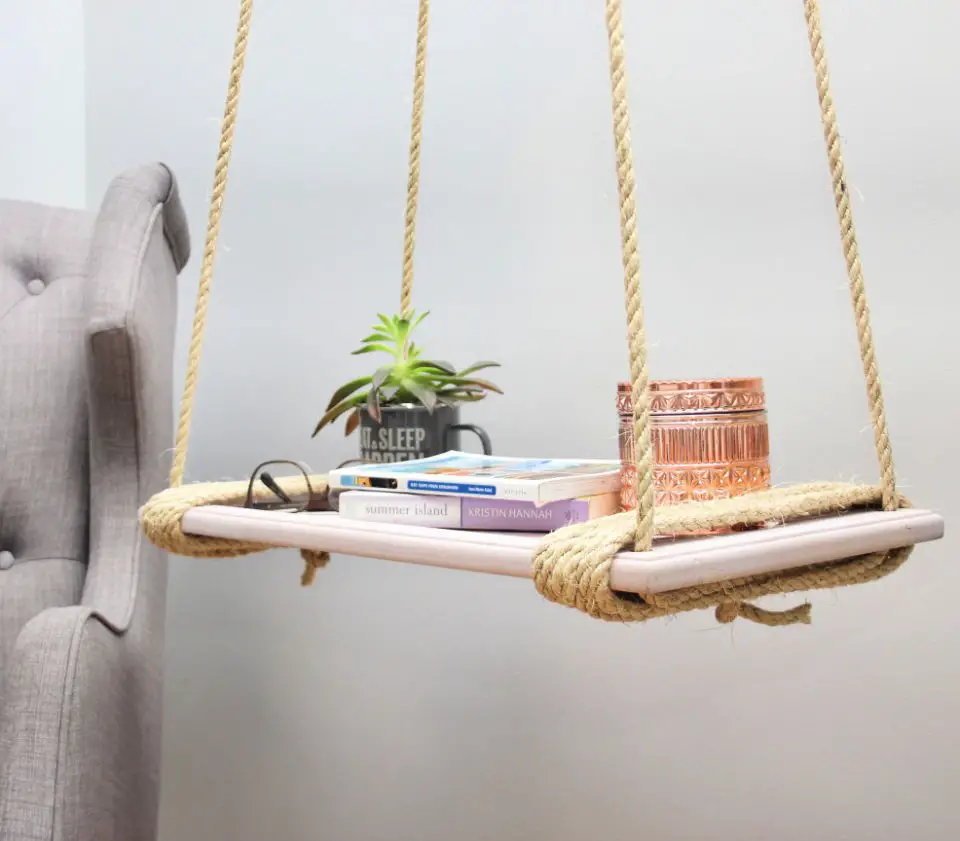
DIY Small Floating String Nightstand

Transform a wooden cutting board into an extraordinary and budget-friendly floating table with this DIY project. Start by gathering a few essential materials, including a wooden cutting board, coated steel wire, ferrules, pincers, a drill, and a hook. If you’re feeling extra creative, consider adding leather material to the mix, along with adhesive, scissors, a brush, and a belt punch.
To get started, cut the wire to size and drill holes in the cutting board. If you’ve opted for a leather surface, attach it before threading the wire through the holes. Use ferrules to secure the ends of the wire and hang the table from the ceiling hook – and just like that, you’ll have a one-of-a-kind, contemporary floating table! With its unique design and easy-to-follow instructions, this DIY project is perfect for anyone looking to add a touch of elegance to their home without breaking the bank.
Cheap DIY Hanging Bedside Table Only $20
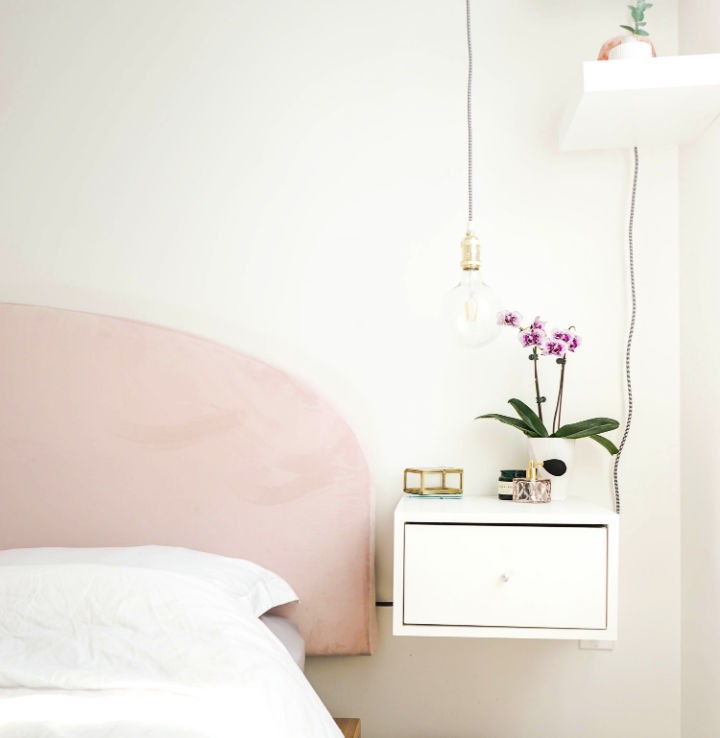
Transform your bedroom with a one-of-a-kind, affordable DIY project that combines style and functionality. By repurposing an old cupboard door, twisted sisal rope, and a few basic materials like rust-oleum chalked ultra matte paint in blush pink, rust-oleum chalked protective topcoat in matte clear, a ceiling hook, sander, and drill, you can create a charming bedside table for under $20. Begin by painting and sealing the cupboard door to give it a smooth, matte finish. Next, use your drill to make holes for the rope, which will add a natural, organic touch to your new bedside table. Finally, hang your creation from a ceiling hook and enjoy the unique décor it brings to your bedroom.
Making Your Own Floating Nightstand Shelf
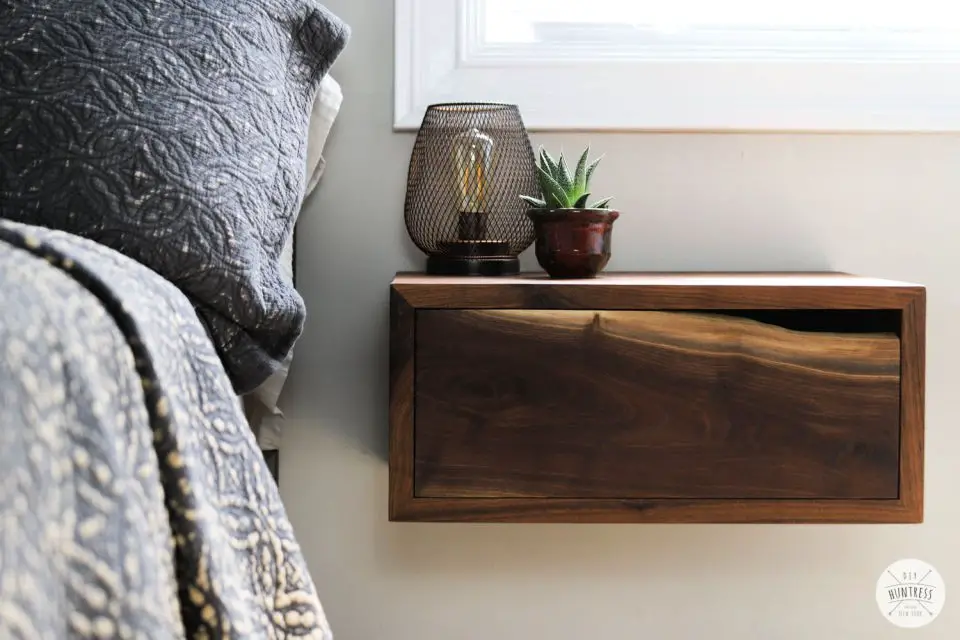
Transforming your bedroom with a one-of-a-kind touch? Discover how to create your own show-stopping floating nightstands featuring live edge drawers, a mesmerizing DIY project that demands precision and creativity. This woodworking adventure requires a range of materials, including the coveted live edge slab, walnut board, and poplar boards, among others. By following the detailed measurements provided for the top, bottom, sides, and drawer components, you’ll be guided through a step-by-step video tutorial designed to yield a truly satisfying experience. As you bring this unique design to life, get ready to elevate your home décor with an unforgettable piece that will leave a lasting impression.
Rustic DIY Floating Nightstands With Drawers
In just one weekend, you can transform your bedroom with these beautiful rustic floating nightstands, requiring only intermediate-level DIY skills. With a comprehensive supplies list featuring 2x4s, plywood sheets, project panels, drawer guides, electrical boxes, and more, you’ll be guided through the process with precise measurements for each component. The entire project comes in at an affordable cost of $250, making it an accessible addition to any home. To spark your creativity, this plan includes design inspiration and finished product pictures, ensuring a stunning result that will elevate your bedroom’s ambiance.
Making a Floating Storage Nightstand
Transform your bedroom’s ambiance with this ingenious DIY floating storage nightstand. By following these straightforward instructions, you’ll create a stunning piece that harmonizes form and function. Crafted from 3/4″ hardwood plywood, pocket hole joinery, 1×4 boards, and wood glue, the sturdy box boasts an abundance of storage space, which can be further personalized with custom baskets. This elegant addition seamlessly integrates practicality and style into any room, elevating your bedroom decor to new heights.
Building a Floating Nightstand From 1x8x8 Board
Transform your bedroom’s storage landscape with this ingenious DIY floating nightstand featuring a striking double x pattern. Built using just one straightforward board, this project showcases a clever way to optimize floor space while adding versatility to any bedroom. By following the step-by-step instructions and visual aids provided, you’ll effortlessly craft a sleek, modern nightstand that exudes sophistication. The simplicity of the build, courtesy of pocket hole joinery and ripped 1×8 board strips, makes this project accessible to DIY enthusiasts of all skill levels.
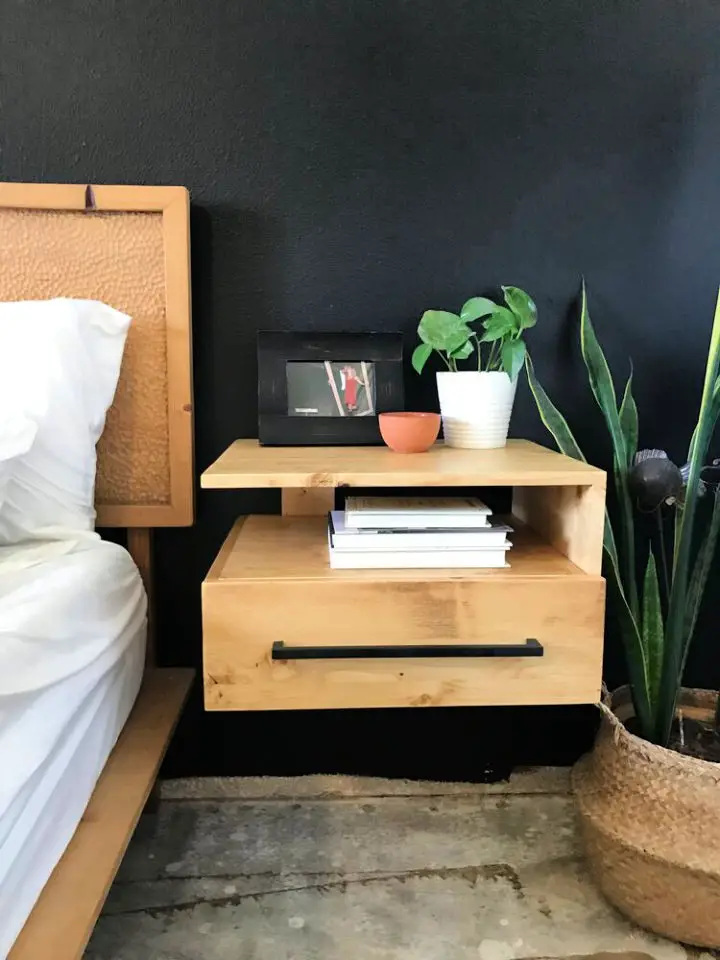
How to Make a Floating Nightstand With a Modern Vibe
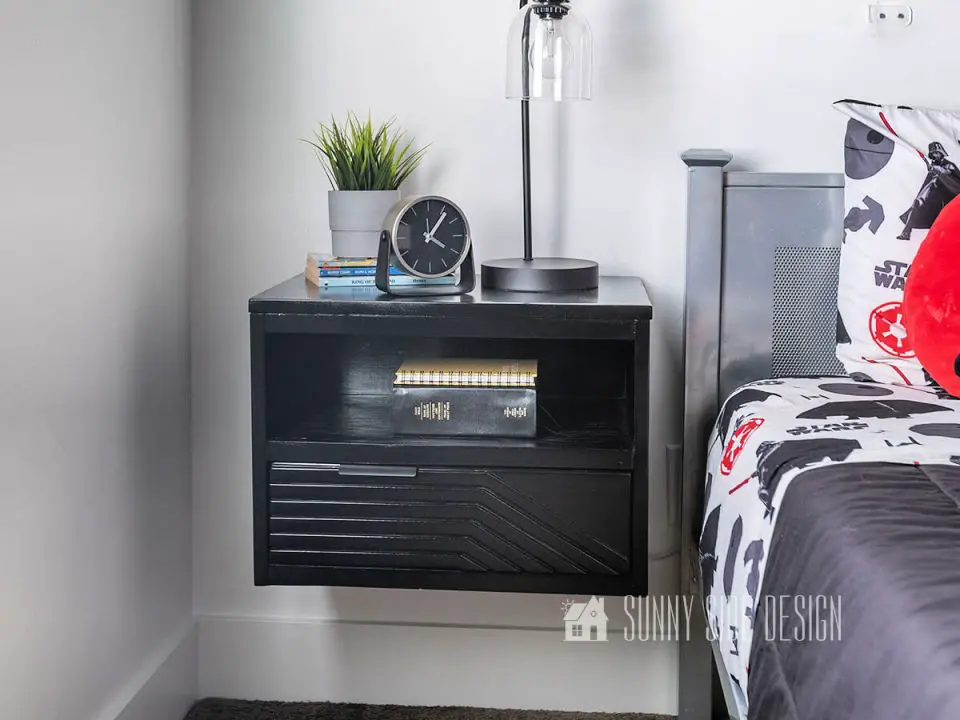
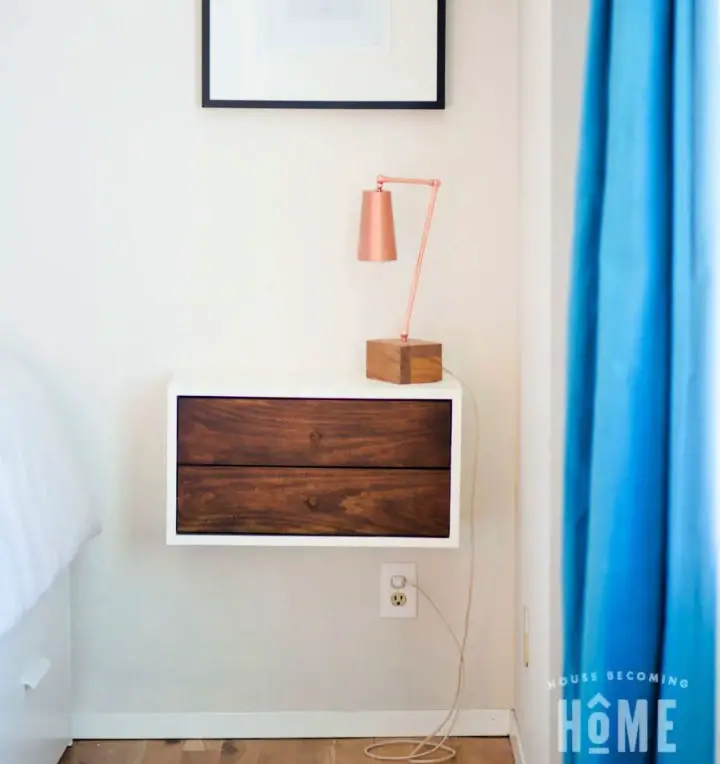
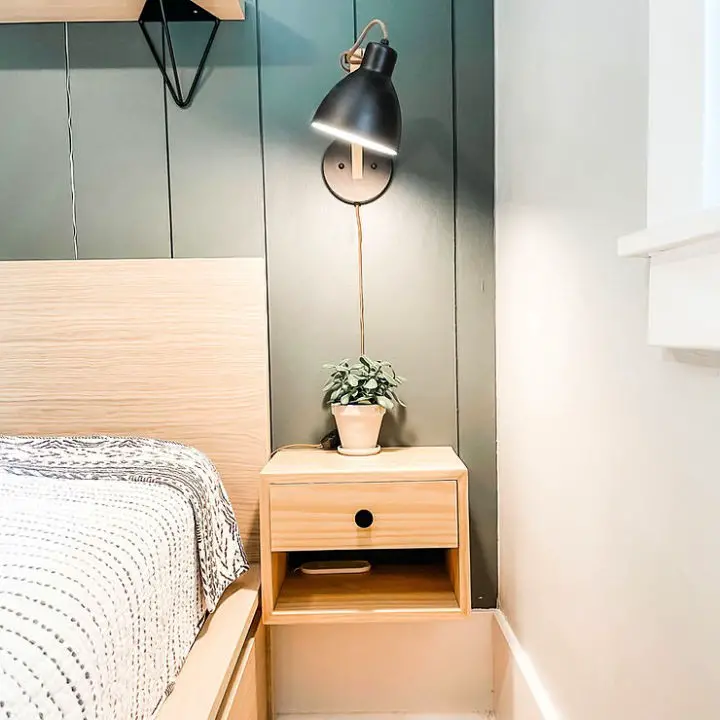
Transform your bedroom into a stylish retreat with this simple DIY project. Upcycle an ordinary nightstand into a sleek, modern floating nightstand that’s perfect for under-bed storage. To achieve the desired look, remove the molding and shorten the piece to create an open shelf and easy-access drawer section. For a flawless finish, you’ll need various tools such as table saws, drills, pocket hole jigs, bondo, and more. Complete the transformation with primer, black spray paint, and a modern drawer pull. Follow these step-by-step instructions to breathe new life into your furniture.
How to Make Your Own Floating Nightstands
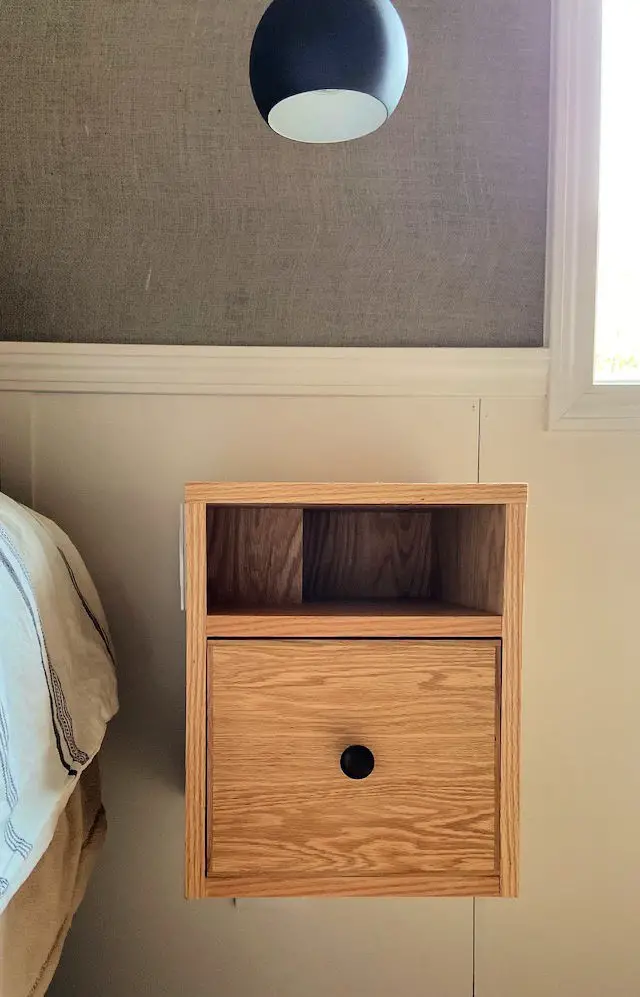
Elevate your bedroom sanctuary by crafting custom DIY floating nightstands that seamlessly integrate storage solutions with switch boxes for effortless control over lighting and fan systems. To create these functional and aesthetically pleasing pieces, start by cutting, sanding, and assembling 3/4″ oak veneer plywood, applying teak oil to the interior surfaces before assembly, and adding edge banding for a sleek finish. Once complete, secure the nightstands to the wall using cabinet screws. This innovative design not only enhances your bedroom’s décor but also keeps essential controls within easy reach, transforming your sleeping space into a cozy retreat.
Simple Floating Nightstand Building Plans
Transforming your bedroom on a budget just got a whole lot easier with this DIY floating nightstand tutorial. Frustrated by the high cost of furniture, I decided to take matters into my own hands and create not one, but two stylish floating nightstands for under $20. With Home Depot as my trusted supplier, this creative project is ideal for adding a touch of personality to your room without breaking the bank. By following my simple step-by-step guide, you can make your very own nightstand for as little as $10. Whether you’re looking to elevate your bedroom decor or simply want to add some unique touches, this budget-friendly DIY project has got you covered.
Unique DIY Floating Nightstand

Transform your bedroom into a serene oasis with these DIY modern floating nightstands. Boasting a space-saving design and sleek aesthetic, these low-profile bedside tables boast stylish arches and two shelves for effortless storage of your must-haves. With an investment of just under $20 in materials like pine boards, wood glue, pocket hole screws, and keyhole hanger brackets, you can effortlessly bring these chic nightstands to life. Simply follow the easy-to-follow step-by-step guide, which encompasses tasks such as precision cutting arches, board attachment, staining, and sealing, to craft a modern arched nightstand that exudes sophistication while providing ample functionality. A versatile addition to any design scheme, these floating nightstands are particularly well-suited for small spaces, inviting you to create a peaceful retreat that’s uniquely yours.
DIY Wooden Floating Nightstand Design
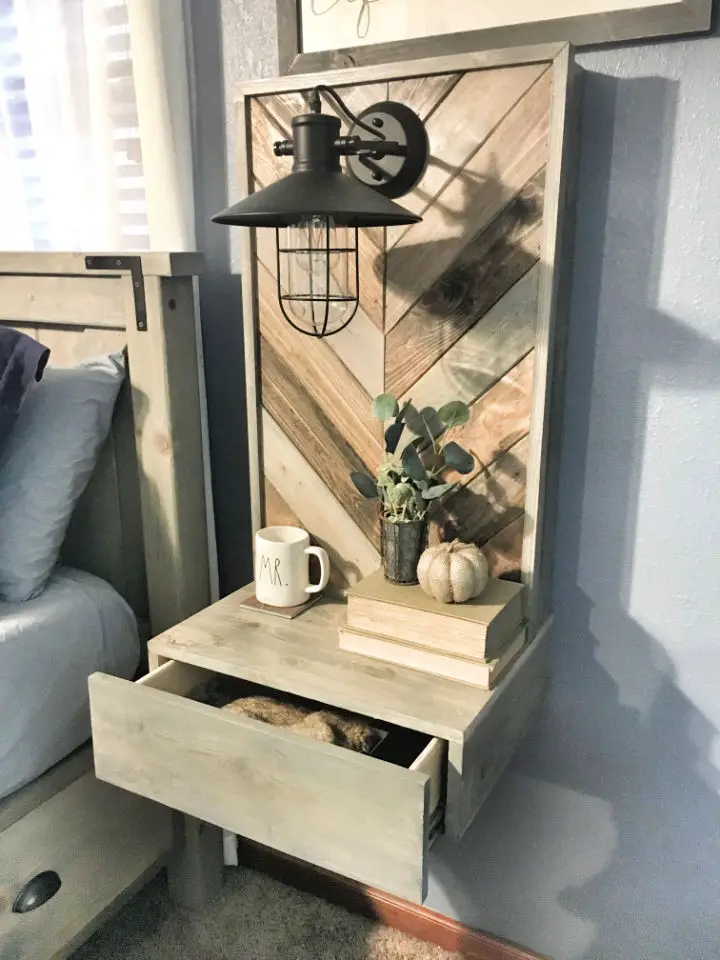
Transform your bedroom with a modern and functional floating nightstand that boasts hidden wireless charging capabilities. This comprehensive DIY guide will walk you through the process of constructing this sleek and space-saving piece of furniture, complete with a French cleat for added stability. You’ll learn how to precision-cut and join lumber, create a recessed compartment for seamless charging, perfect bevel cuts, build a sturdy drawer box, attach smooth-sliding drawers, and install a stylish drawer face. Additionally, this tutorial provides valuable tips on attaching the legs and crafting a French cleat, ensuring a professional-looking finish. With clear instructions and illuminating photographs, you’ll have the confidence to create a beautiful and practical floating nightstand that will elevate your bedroom’s ambiance.
Conclusion:
Ultimately, these 25 DIY floating nightstand designs present a vast array of opportunities for tailoring your bedroom ambiance. With the freedom to select from various styles, experiment with colors, incorporate practical features, and personalize with accessories, the possibilities are virtually boundless. By taking necessary precautions to ensure safety, resolving common problems, allocating resources wisely, and preserving your handiwork, you can achieve a harmonious blend of aesthetics and functionality in your bedroom’s décor.
